1
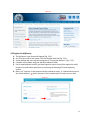
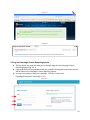
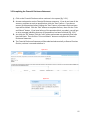
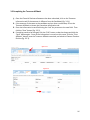
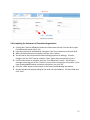
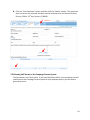
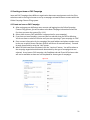
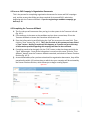
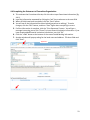
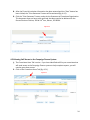
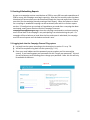
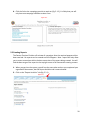
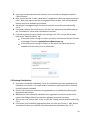
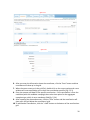
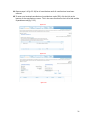
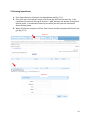
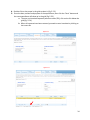
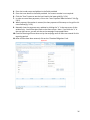
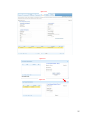
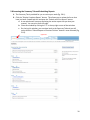
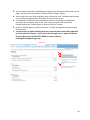
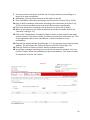
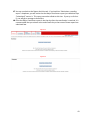
City and County of Denver Campaign Finance Reporting User’s Manual December 11, 2012 – Version 1.6 2 Table of Contents 1. The Fundamentals ............................................................................................................... 5 1.1 Campaign Finance Reporting Responsibilities .................................................................................... 5 2. The Campaign Finance Reporting System ............................................................................ 7 2.1 Launching Campaign Finance Reporting System ................................................................................ 7 2.2 Register for MyDenver ........................................................................................................................ 8 2.3 Log into Campaign Finance Reporting System .................................................................................. 10 2.4 Log Out/Timed Out ........................................................................................................................... 12 3. Creating a Candidate Campaign ......................................................................................... 13 3.1 Candidate Campaign’s Organization Documents.............................................................................. 13 3.2 Completing the Financial Disclosure Statement ............................................................................... 15 3.3 Completing the Treasurer Affidavit .................................................................................................. 16 3.4 Completing the Statement of Committee Organization ................................................................... 17 3.5 Allowing Staff Access to the Campaign Finance System ................................................................... 18 4. Creating an Issue or PAC Campaign .................................................................................... 21 4.1 Create an Issue or PAC Campaign ..................................................................................................... 21 4.2 Issue or PAC Campaign’s Organization Documents .......................................................................... 22 4.3 Completing the Treasurer Affidavit .................................................................................................. 22 4.4 Completing the Statement of Committee Organization ................................................................... 23 4.5 Allowing Staff Access to the Campaign Finance System ................................................................... 24 5. Creating & Submitting Reports .......................................................................................... 27 5.1 Logging back into the Campaign Finance Filing system .................................................................... 27 5.2 Creating Reports ............................................................................................................................... 28 5.3 Entering Contributions ...................................................................................................................... 29 5.4 Entering In‐Kind contributions .......................................................................................................... 32 5.5 Entering Expenditures ....................................................................................................................... 33 5.6 Entering Loans ................................................................................................................................... 35 5.7 Entering Overdue Obligations ........................................................................................................... 38 5.8 Accessing the Summary Tab and Submitting Reports ...................................................................... 39 6. Major Contributors Report ................................................................................................ 41 6.1 Creating a Major Contributors Report .............................................................................................. 41 7. Viewing, and Amending Reports ........................................................................................ 45 7.1 Viewing a Previously Submitted Report ............................................................................................ 45 7.2 Creating an Amended Report ........................................................................................................... 45 3 4 1. The Fundamentals Campaign finance reporting requires the use of the web‐based Campaign Finance Reporting System to create and process campaign finance reports. This system is accessed directly from the campaign finance web page on www.denvergov.org/campaignfinance. 1.1 Campaign Finance Reporting Responsibilities Every campaign that receives $500 or more or pays expenses of $500 or more is required to report all contributions, expenditures, in‐kind contributions, loans, and overdue obligations. Denver Elections Division receives Campaign Finance Reports for all Denver municipal issues, municipal candidates, and PACs seeking to influence municipal elections. Campaign Finance reports for all statewide elections (not specifically municipal) are submitted to the Colorado Secretary of State. All reports are due based on a specified schedule according to the Denver Revised Municipal Code (D.R.M.C.) Title II, Chapter 15, Article III. Every user of this system will go to www.denvergov.org/campaignfinance and then click on the link on the left side of the screen entitled Online Campaign Finance Filing. 5 6 2. The Campaign Finance Reporting System Users of the Campaign Finance Reporting System are required to file timely reports. In order to simplify this process, Denver has created a web‐based system in which all reporting information is input and submitted electronically. Most of the campaign organization documents must still be submitted manually due to the requirement for signatures and notarizations on specific forms. This manual assists the user in effectively navigating the Campaign Finance Reporting System and should answer most questions the user might encounter. 2.1 Launching Campaign Finance Reporting System 1. Log into your computer system and access the internet with a web browser. Google Chrome or Mozilla Firefox is recommended. 2. Go to the Denver Campaign Finance web page at www.denvergov.org/campaignfinance. 3. Click on the Online Campaign Finance Filing link (fig. 2.2.1). 4. Then scroll down just a bit and click on the, To begin, please log in here. link in the middle of the screen. 5. This will open the login screen for MyDenver. Figure 2.1.1 7 Figure 2.1.2 2.2 Register for MyDenver 1. 2. 3. 4. 5. The MyDenver Login Screen will appear (fig. 2.2.1). As a first time user of this system, click the Register Now link (fig. 2.2.1). A new window will come up instructing you to “Create your Account”. (fig. 2.2.2). Complete all the fields, using the tab key to advance fields. Use an email address to which you have regular access as you will be required to verify receipt of a confirmation email prior to accessing the Campaign Finance Reporting system. 6. Note: the “captcha” at the bottom must be entered correctly. It is advised that you use the refresh button ( ) within the box to find a combination of letters you can read. Figure 2.2.1 8 1. Before you click the “Create Account” button. If you type it wrong, you will have to re‐ enter your password when you are assigned a new “captcha” word combination. 2. When you are satisfied with the information you have entered, click the “Create Account” button. 3. After you are successful, you will receive a confirmation message indicating success (fig. 2.2.3). 4. Close the confirmation screen by clicking the “x” in the top right corner of the screen. 5. Log into the email address you used to register with MyDenver and follow the instructions contained within the email (fig. 2.2.4). Figure 2.2.2 9 Figure 2.2.3 Figure 2.2.4 2.3 Log into Campaign Finance Reporting System 1. The link within this email will take you to the login page for the Campaign Finance Reporting System (fig. 2.3.1). 2. Login with the email and password that you created in the register now screen and you will be taken to the Campaign Finance Reporting System. 3. You are now ready to create your campaign. Click the “Create new Campaign/Committee” button (fig. 2.3.2). Figure 2.3.1 10 1. Enter the requested information into each field, clicking the tab button to advance fields (fig. 2.3.3). 2. First select the type of campaign, by clicking one of the three radio buttons (Candidate, Issue, or PAC). Note: the type of committee you select determines the documents you must file with Denver Elections Division, Campaign Finance. 3. Next you will select the election you wish to affect (this is mandatory for candidates). 4. Then you will enter the contact information for the campaign (this can be different from the candidate contact information but the email address and phone number must be the one to which Denver Elections Division will direct all communications). Proceed through these fields by using the “tab” button). 5. When all fields have been completed, click the “continue” button. You will be taken to the campaign organization documents determined by the type of campaign that was selected. Figure 2.3.2 Figure 2.3.3 11 2.4 Log Out/Timed Out 1. If you log off, or get “timed‐out” (the system logs you out due to inactivity after 45 minutes; note the timer at the top of the screen within the system) you will see the following screen (fig. 2.4.1). 2. If you click the link to “Log Back In,” you may be taken to MyDenver (fig. 2.4.2). 3. This is the MyDenver home page, giving Denver residents several helpful services, maps and subscriptions. However, there is no link to the Campaign Finance Reporting System directly from this page. 4. Log back in according to the instructions in section 2.1 p. 7‐8 Figure 2.4.1 Figure 2.4.2 12 3. Creating a Candidate Campaign This is the process for candidate campaigns only, and the screens that follow are those required for candidate’s submission, beginning with the Candidate Affidavit. If you are registering an Issue or PAC campaign, proceed to p. 21. 3.1 Candidate Campaign’s Organization Documents 1. Log into the system according to the instructions in section 2.1, p. 7. 2. The first screen you will see is the Candidate Information Screen (fig. 3.1.1). Figure 3.1.1 3. The candidate’s first name should be entered, then tab to advance fields. Mandatory fields are marked with a “*”. 4. The phone number should be the contact number for the candidate, but this number will be a matter of public information as this form will be posted online. 5. For a candidate, an office being sought must be selected. 6. If you select a council office (besides Council‐At‐Large), the Council District dropdown will be activated. If any other office is selected, this field will remain disabled. 7. The email address provided is that by which the public can reach the campaign. 8. The residential address is that of the candidate. 9. If the residential address and the mailing address are the same, simply click the checkbox indicated and the mailing address will auto‐populate (if the mailing address is different, manually input that address). 10. If you click the “Cancel” button, all the information entered to this point is lost, and you must start the process of creating a campaign again. 11. Verify that all the information has been input correctly as this information will be locked when the “Save” button is clicked. 12. Click the “Save” button. 13 a. Note: a message comes up recommending that you verify the information provided is correct. b. This is the first time in this system you have clicked a “Save” button. Nothing is saved until this happens, so if you do not get to this step, all information provided regarding this campaign will have to be re‐entered. c. After clicking “Save”, you may notice the entries you just made are now grey and you are not able to change anything. Check all the data again to make sure it is correct as this is the information that will be posted on the internet for public viewing. 13. When you log back into the system you should notice that the campaign you created is listed here. All campaigns to which you have access will be listed here. Click on the campaign link you want to work on to continue completing the organization paperwork and/or campaign finance reports (fig. 3.1.2). 14. Once the Candidate Affidavit has been submitted, the next tab (Financial Disclosure) will now be enabled (fig. 3.1.3). Figure 3.1.2 Figure 3.1.3 14 3.2 Completing the Financial Disclosure Statement 1. Click on the Financial Disclosure tab to continue in the system (fig. 3.2.1). 2. Answer each question on the Financial Disclosure statement. If you do not have all the answers, complete as much as possible then click the “Save” button. If you do not answer all the questions before clicking the “Save” button, all answers that have been input will be locked. Click the “Edit” button to complete the form; then click the “Print and Submit” button. If you have left any of the questions blank, on submit, you will get an error message indicating that one of the questions has been left blank (fig. 3.2.2). 3. Just click the “Ok” button, click the “edit” button and answer any questions that have been left blank. Then click the “Print and Submit” button to complete the Financial Disclosure Statement. 4. The Financial Disclosure Statement will be submitted electronically to Denver Elections Division, so there is no need to deliver it. Figure 3.2.1 Figure 3.2.2 15 3.3 Completing the Treasurer Affidavit 1. Once the Financial Disclosure Statement has been submitted, click on the Treasurer Information tab (if the treasurer is different from the Candidate) (fig. 3.3.1). 2. If the treasurer is the same as the candidate and you have a committee, fill out the Treasurer Affidavit to Access the Committee Information tab. 3. Enter the information in each field using the “tab” key to move to the next field. Then click the “Save” button (fig. 3.3.2). 4. If anything needs to be changed, click the “Edit” button, make the change and click the “Save” button again. Once all the information is correct on this screen, click the “Print Affidavit” button, have the Treasurer Affidavit notarized, and submit to Denver Elections Division (fig. 3.3.3). Figure 3.3.1 Figure 3.3.2 16 Figure 3.3.3 3.4 Completing the Statement of Committee Organization 1. Printing the Treasurer Affidavit activates the Committee Info tab; click this tab to Input Committee Information (fig. 3.4.1). 2. Input the information requested by clicking the “tab” key to advance to the next field. 3. When all fields have been completed, click the “Save” button. 4. You will see all the information has been locked (grayed out to editing). To make changes, click the “Edit” button, and then “Save” again when everything is correct. 5. If all the information is complete, click the “Print Statement” button. You will get a message instructing you to click “Cancel” to input financial institution information. If you have already added financial institution information, just click “Ok”. 6. Click the “+Add” button at the bottom of the screen to add Banking information. 7. Another window will pop up asking for the bank name and address. Fill these fields and click “Save”. 17 8. Click the “Print Statement” button, and then click the “Submit” button. This document does not have to be notarized, but does need to be delivered to the Denver Elections Division, 200 W. 14th Ave, Denver, CO 80204. Figure 3.4.1 3.5 Allowing Staff Access to the Campaign Finance System The Committee Users Tab is active. If you have identified staff for your committee that will need access to the Campaign Finance system to help complete reports, you will need to grant them access. 18 1. Click on the Committee Users Tab (fig. 3.5.1). 2. Click the “Add New User” button to add a new user, this clears the fields. 3. Enter each staff person individually. Make sure the email address is correct as that will be their login id. They will set up their password when they set up a MyDenver account as you did when you entered the system for the first time. 4. After a name and email address are entered, select a role and click the Active checkbox. a. Admin users can add more users and work on reports. b. Users cannot add any other users, but can work on reports. 5. Click the “Edit” button if you need to make a change on current users. 6. In the event that a staff member leaves your campaign, you should inactivate them by highlighting them on the list and clicking the “Inactivate” button. This prevents them from viewing your reports after they have left your campaign. 7. You have now completed all the organizational documents and submitted them. Within 2 business days, your documents should be posted online at www.Denvergov.org/campaignfinance under the appropriate year and campaign. When this happens, your campaign will be activated and you will be able to create reports. Figure 3.5.1 19 20 4. Creating an Issue or PAC Campaign Issue and PAC Campaigns have different organization document requirements such that if the selection made in the original screen to set up a campaign activates different screens within the Online Campaign Finance Filing system. 4.1 Create an Issue or PAC Campaign 1. After setting up your MyDenver user account and logging into the Online Campaign Finance Filing system, you will be taken to the New Campaign Information Screen the first time you enter the system (fig. 4.1.1). 2. Select either Issue or PAC (whichever is appropriate for your campaign). 3. If you have an Issue Campaign, you must select an election that you will be affecting. You do not have to select an election until you start reporting IF your campaign is a PAC. 4. Enter contact information for the campaign (the email address and phone number must be the one to which Denver Elections Division will direct all communications). Proceed through these fields by using the “tab” button. 5. When all fields have been completed, click the “continue” button. You will be taken to the campaign organization documents determined by the type of campaign that was selected. As an Issue or PAC campaign, the Candidate tab and Financial Disclosure tabs will not be available as these are not completed for these types of campaigns. Figure 4.1.1 21 4.2 Issue or PAC Campaign’s Organization Documents This is the process for completing organization documents for Issues and PAC campaigns only, and the screens that follow are those required for Issue and PAC’s submission, beginning with the Treasurer Affidavit. If you are registering a candidate campaign, go back to p. 15. 4.3 Completing the Treasurer Affidavit 1. The first tab you will encounter after you log in to the system is the Treasurer Info tab (fig. 4.3.1). 2. If the treasurer is the same as the candidate and you have a committee, fill out the Treasurer Affidavit to Access the Committee Information tab. 3. Enter the information in each field using the “tab” key to move to the next field. Then click the “Save” button (fig. 4.3.1). This is the first time in this system you have clicked a “Save” button. Nothing is saved until this happens so if you do not get to this step, all information provided regarding this campaign will have to be re‐entered. 4. If anything needs to be changed, click the “Edit” button, make the change and click the “Save” button again. Once all the information is correct on this screen, click the “Print Affidavit” button, have the Treasurer Affidavit notarized, and submit to Denver Elections Division (fig. 4.3.2). 5. As mentioned above, after you have submitted the organization documents, they will be posted online within 1‐2 business days at which time your campaign will be activated by the Denver Elections Division, which allows you to begin creating reports. Figure 4.3.1 Figure 4.3.2 22 4.4 Completing the Statement of Committee Organization 1. This activates the Committee Info tab; click this tab to Input Committee Information (fig. 4.4.1). 2. Input the information requested by clicking the “tab” key to advance to the next field. 3. When all fields have been completed, click the “Save” button. 4. You will see all the information has been locked (grayed out to editing). To make changes, click the “Edit” button, and then “Save” again when everything is correct. 5. If all the information is complete, click the “Print Statement” button. You will get a message instructing you to click “Cancel” to input financial institution information. If you have already added financial institution information, just click “Ok”. 6. Click the “+Add” button at the bottom of the screen to add Banking information. 7. Another window will pop up asking for the bank name and address. Fill these fields and click “Save”. Figure 4.4.1 23 8. After the Financial Institution information has been entered and the “Save” button has been clicked, the “Print Statement” button will be activated (fig. 4.4.2). 9. Click the “Print Statement” button, and print the Statement of Committee Organization. This document does not have to be notarized, but does need to be delivered to the Denver Elections Division, 200 W. 14th Ave, Denver, CO 80204. Figure 4.4.2 4.5 Allowing Staff Access to the Campaign Finance System 1. The Committee Users Tab is active. If you have identified staff for your committee that will need access to the Campaign Finance system to help complete reports, you will need to grant them access. 2. Click on the Committee Users Tab (fig. 4.5.1). Figure 4.5.1 24 3. Click the “Add New User” button to add a new user, this clears the fields. 4. Enter each staff person individually. Make sure the email address is correct as that will be their login id. They will set up their password when they set up a MyDenver account as you did when you entered the system for the first time. 5. After a name and email address are entered, select a role and click the Active checkbox. a. Admin users can add more users and work on reports. b. Users cannot add any other users, but can work on reports. 6. Click the “Edit” button if you need to make a change on current users. 7. In the event a staff member leaves your campaign, you should inactivate them by highlighting their name on the list and clicking the “Inactivate” button. This prevents them from accessing your reports after they have left your campaign. 8. You have now completed all the organizational documents and submitted them. Within 2 business days, your documents should be posted online at www.Denvergov.org/campaignfinance under the appropriate year and campaign. When this happens, your campaign will be activated and you will be able to create reports. 25 26 5. Creating & Submitting Reports As soon as a campaign receives contributions of $500 or more OR has made expenditures of $500 or more, that campaign must begin reporting. After the first monthly report has been submitted, all future reports must be submitted through the Year‐end report even if there is no activity for the campaign (thereby creating a blank report). When the balance on hand for a campaign is at zero the campaign can be terminated, after which no further reports are due. If Contributions are received or Expenditures are made after a campaign has been terminated, email Denver Elections Division Campaign Finance at [email protected] to have the campaign reactivated to continue reporting on an Annual basis if the campaign is not participating in an election during the year. If a campaign still has a balance on hand after the Year‐end report is submitted, the campaign must file annual reports until the balance on hand is zero. 5.1 Logging back into the Campaign Finance Filing system 1. Log back into the system according to the instructions in section 2.1 on p. 7‐8. 2. You will be required to log back into the system (fig. 5.1.1). 3. Enter your email address and the password you set up when you first entered the system. If you have forgotten your password click the “forgot your password?” link and you will receive an email allowing you to change your password. Note: this link will only be available for 48 hours. Figure 5.1.1 27 4. Click the link to the campaign you wish to work on (fig. 5.1.2), it is likely that you will only have one campaign available to select from. Figure 5.1.2 5.2 Creating Reports The Denver Elections Division will activate all campaigns after the required paperwork has been received. No reports can be created until this happens. Note: reports will only allow you to enter transactions within the date constraints of the report being created. You will find the date range of the report in the top right corner of all transaction entering screens. 1. When you get into the system, you will see the same tabs as when you completed your organization documents, but the Report Activities tab is now activated. 2. Click on the “Report Activities” tab (fig. 5.2.1). Figure 5.2.1 28 3. If you have not already selected an election, do so now with the dropdown entitled “Select Election”. 4. Next, you will use the “Create a New Report” dropdown to select the report you wish to enter. Note: only reports that are coming due will be available. Year‐end and Annual reports may not be available until October. 5. You will get a message asking if you wish to create the report that you selected (fig. 5.2.2). 6. If the report listed is the correct report, click the “Yes” button and you will be taken to the “Contributions” tab to enter contributions received. 7. If you do not want the report listed in this message, click “No” and you will be taken back to the “Report Activities” tab. If the report you are trying to create is not listed, email Denver Elections Division at Campaign Finance at [email protected]. If the report you are trying to create is in the future, that report will not be available until the month prior to its due date. Figure 5.2.2 5.3 Entering Contributions 1. Enter each contribution individually. Note: all contributions are from organizations or individuals, not couples. If a couple made a contribution, split the amount in half and list half from each individual. 2. Select if the contribution came from an organization or an individual by selecting the appropriate radio button. 3. Whether you have selected an individual or an organization, enter part or the entire name in the field provided (if you enter an individual, enter the last name). 4. Then hit the “tab” button, then “enter” or click the “lookup” button with the mouse (fig. 5.3.1). 5. If the name of the individual (organization) does not come up, click the “+ Add” button. A window will come up to add the information about the contributor (fig. 5.3.2). 29 Figure 5.3.1 Figure 5.3.2 6. After you enter the information about the contributor, click the “Save” button and that contributor will show up in the grid. 7. When the name comes up in the grid (list), double click on the correct option and a new window will come up allowing you to enter the contribution specifics (fig. 5.3.3). 8. Enter the amount and date for the specific contribution. If this contribution is from the candidate (with this candidate campaign) then select that option for the aggregate exception type, which is not a mandatory field (fig. 5.3.4). 9. After inputting the date and amount, click the “Save” button and the contribution will show up in the grid below the contributors’ grid. 10. To add another contribution, click the “+ Add” button at the bottom of the contributions grid. 30 11. Repeat steps 1‐10 (p. 32‐34) for all contributions until all contributions have been entered. 12. To enter non‐itemized contributions (contributions under $50), click the link at the bottom of the contributions screen. This is the same function on the In‐Kind tab and the Expenditures tab (fig. 5.3.5). Figure 5.3.3 Figure 5.3.4 Figure 5.3.5 31 5.4 Entering In‐Kind contributions 1. Click on the In‐Kind contributions tab (fig. 5.4.1). 2. Follow Section 5.3 (p. 32‐34) as In‐Kind contributions are entered exactly as contributions, except on a different tab. Figure 5.4.1 32 5.5 Entering Expenditures 1. Enter Expenditures by clicking on the Expenditures tab (fig. 5.5.1). 2. Enter all or part of the payee’s name, click the tab key and then the enter key. If the name does not come up in the grid, click the “+ Add” button at the bottom of the grid to add the payee. A new window comes up into which you will input the information about the new payee. 3. When all fields are complete, click the “Save” button and the new payee will show in the grid (fig. 5.5.2). Figure 5.5.1 Figure 5.5.2 33 4. Double click on the payee in the grid to select it (fig. 5.5.3). 5. Enter the date, amount and purpose of the expenditure, then click the “Save” button and the new expenditure will show up in the grid (fig. 5.5.3). a. To enter non‐itemized expenses (amounts under $50), click on the link below the grid (fig. 5.5.4). b. When all expenses have been entered, proceed to enter loan data by clicking on the Loans tab. Figure 5.5.3 Figure 5.5.4 34 5.6 Entering Loans 1. Enter loans, if you have any, by clicking on the Loans tab (fig. 5.6.1). 2. Step 1 is to enter the guarantor (the person the bank recognizes as guaranteeing repayment of the loan) by clicking on the “+ Add” button on the bottom of the top grid. A new screen will come up to enter the guarantor information. Then click the “Save” button (fig. 5.6.2). 3. Enter the loan information in the new window that comes up (fig. 5.6.3). Figure 5.6.1 Figure 5.6.2 35 4. 5. 6. 7. Enter the Lender name and address in the fields provided Enter the Loan details in the fields provided. An account number is not required. Click the “Save” button to see the loan listed in the lower grid (fig. 5.6.4). In order to record loan payments, click on the “Loan Payments Administration” link (fig. 5.6.5). 8. When payment information is entered, the loan payment will show up on the grid in this new window (fig. 5.6.6). 9. Manually close the payment entry window by clicking the “x” in the top corner of that window only. You will be taken back to the Loans screen. Note: if you click the “x” in the top right corner, you will exit the entire campaign finance application. 10. Continue entering all loans taken out by the campaign until all loans are entered for this reporting period. 11. After all loans have been entered, click on the “Overdue Obligations” tab. Figure 5.6.3 36 Figure 5.6.4 Figure 5.6.5 Figure 5.6.6 37 5.7 Entering Overdue Obligations 1. Enter Overdue Obligations by clicking on the “Overdue Obligations” tab (fig. 5.7.1). Overdue Obligations are campaign debts that are over $500 and over 30 days past due as of the due date of this report. 2. Enter each obligation separately. When each overdue obligation has been entered, click the “Save” button and it will appear in the grid at the bottom of the screen. If your campaign has no overdue obligations, do not enter information in this tab. 3. When all overdue obligations have been entered, click the “Summary” tab to finalize your report. Figure 5.7.1 38 5.8 Accessing the Summary Tab and Submitting Reports 1. The Summary Tab is provided for you to review your work (fig. 5.8.1). 2. Click the “Display Complete Report” button. This allows you to review the forms that have just been created and also activates the “Submit and Print Report” button. a. A new window will come up displaying the entire report that you have just created. You can print from this page. b. Close this window by clicking the “x” in the top right corner of that window. c. On closing this window, you are taken back to the Summary Tab and you will notice that the “Submit Report to Elections Division” button is now activated (fig. 5.8.2). Figure 5.8.1 39 3. You can preview each form individually by clicking on the link above each section on this page. But this will not activate the “Submit and Print Report” button. 4. You can edit forms you have created by either clicking the “edit” link above each section or by clicking the appropriately named tab at the top of the screen. 5. If the balance on hand after you complete this report is zero and you would like to terminate this committee, click on the “click here to terminate this committee” checkbox below the “Submit Report to Elections Division” button. 6. Click the “Submit Report to Elections Division” if all the information has been entered for this report. 7. You will receive an email indicating that your report has been successfully submitted to Denver Elections Division. If you receive this message in error, please call Denver Elections Division at 720‐913‐VOTE (8683) or send an email to [email protected]. Figure 5.8.2 40 6. Major Contributors Report Major Contributor Reports are due the last six (6) days prior to an election and are due the day after the contribution has been received. As the name implies, these are large contributions received just before an election because they will not otherwise be reported until the Post‐Election report is due, almost a month after the election. The points below are some major contribution reporting guidelines: Major contributions are $500 or more, received in the last six (6) days before an election. All major contributions must also be entered on other reports. o The first day of major contributions are reported on the pre‐election report. o The last five (5) days of major contributions are reported on the post‐election report. 6.1 Creating a Major Contributors Report 1. 2. 3. 4. 5. 6. Log in to the system following the instructions from section 2.4, p. 12‐13. Select the campaign for which you are reporting. Select the “Report Activities” tab. From the “Create a New Report” dropdown, select “Major Contributions” (fig. 6.1.1). The system will ask if you want to create this report, click “Yes”. You will be taken to the Contributions Tab for major contributions (fig. 6.1.2). Figure 6.1.1 41 7. You may notice the tab strip is now Red; this is how you know you are working on a report for a major contribution. 8. Additionally, you may notice the name of the report on the top. 9. Enter Contributor information according to the instructions in section 5.3 (p. 32‐34). 10. Enter In‐Kind Contribution information according to the instructions in section 5.3 (p. 32‐34) as in‐kind contributions are entered just like monetary contributions. 11. Enter Loan information according to the instructions in section 5.6 (p. 38‐41). 12. When all information for the major contributors for the day is entered, click on the “Summary” tab (fig. 6.1.3). 13. Click on the “Display Major Contributions Report” button to view and print the report you just created. If the report is blank, you have not entered any information yet. Click on the appropriate tab to enter contributions, in‐kind contributions or loan contributions. 14. Close out the preview window by clicking the “x” in the top right corner of this preview window. This will activate the “Submit to Elections Division” button (fig 6.1.4). 15. Click the “Submit to Elections Division” button to submit the report. 16. You will get a message instructing you to verify that the report is complete. If it is not, click the “Cancel” button and complete the report and resubmit. If the report is ready for submission, click the “Yes” button. Figure 6.1.2 42 17. You are now back at the Report Activities tab. If you look into “Administer a pending report” dropdown, you will notice that the Major Contributor report just submitted says “(submitted)” next to it. This report cannot be edited at this time. If you try to click on it, you will get a message to that effect. 18. Since the Major Contributor report is due the day after the contribution is received, it is recommended that you submit at the end of each day so that none of these reports are submitted late. Figure 6.1.3 Figure 6.1.4 43 44 7. Viewing, and Amending Reports 7.1 Viewing a Previously Submitted Report 1. After a report has been submitted, accepted and posted online by Denver Elections Division, you can view that report from within this system. 2. Log in to the system following the instructions in section 2.4 (p. 12‐13). 3. Click on the “Report Activities” tab. 4. Go to the “View a Previously Submitted Report” dropdown. 5. If the report you wish to view is not listed there, check in the “Administer a Pending Report” dropdown to see if it still says “(submitted)”. This simply means that the report has not yet been posted and it will be posted soon. 6. After viewing the report, log out of the system or continue working on current reports. 7.2 Creating an Amended Report 1. 2. 3. 4. Log in to the system following the instructions in section 2.4 (p. 12‐13). Click on the “Report Activities” tab. Go to the “Amend a Previously Submitted Report” dropdown. If the report you wish to amend is not listed there, check in the “Administer a Pending Report” dropdown to see if it still says “(submitted)”. If so, you must wait for it to be posted or call Denver Elections Division at 720‐865‐4910 for assistance. 5. Select the report that you wish to amend. 6. Follow the instructions in section 5 (p. 29) as necessary to make adjustments to the report. (Note: Only transactions dated within the date constraints for this report will be accepted by this system.) 7. Note: the amended report must be resubmitted so make sure you follow the directions all the way through submission of the report. 45 Contact Denver Elections Division with questions or comments: Denver Elections Division Attn: Campaign Finance 200 West 14th Avenue, Suite 100 Denver, CO 80204 Phone: 720‐913‐VOTE (8683) Fax: 720‐913‐8600 Email: [email protected] 46