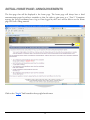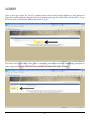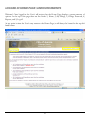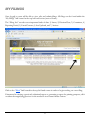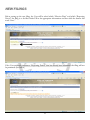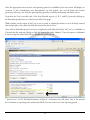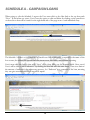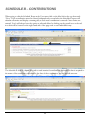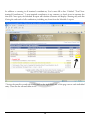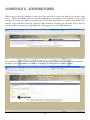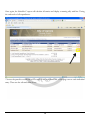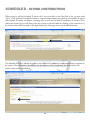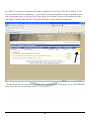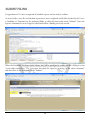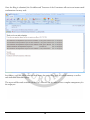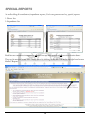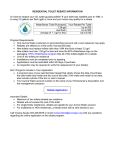
1
CITY OF AURORA
ELECTRONIC CAMPAIGN FINANCE FILING
USER MANUAL
E-Filing
CITY OF AURORA
Campaign Contributions/Expenditures
City of Aurora
Aurora Municipal Center
15151 E Alameda Pkwy
Aurora, CO 80012
Phone 303-739-7094 • Fax 303-739-7520
REVISED *DRAFT* JULY 2009
Table of Contents
Welcome ………………………………………………….……… 2
E-Filling Access Portal ……………………..…………………. 3
Initial Home Page / Announcements ........…..……………… 4
Login ………………………………………………………..……. 5
Logged In Home Page / Announcements ……..…………… 6
My Filings ………………………………………..………………. 7
New Filings ……………………………………..……………….. 8
Schedule A – Campaign Loans……………..…………….…. 10
Schedule B – Contributions ………………..………….……. 11
Schedule C – Expenditures…………..……..………….……. 13
Schedule D – In Kind Contributions ..……..………….……. 15
Submit Filing ………….…………………………..……………. 17
Special Reports ………………………………………………… 19
WELCOME TO AURORA’S e-FILING SYSTEM!
The 2009 Election cycle is introducing e-Filing for all campaign contribution and expenditure
reporting. The e-Filing system is a web based application intended to assist candidates and
committees with tracking contributions, expenditures and loans throughout the year. The first
report filed electronically through the system will be August 5, 2009.
This manual will assist and explain the basic functions of the system. Each candidate or
committee will choose a user name and be given a temporary password at the time the committee
is created. The initial log in will require the password to be changed.
2
E-FILING ACCESS PORTAL
In order to edit and submit contribution/expenditure reports, “User’s” must first visit
the Campaign Finance Reports page located under the City Clerk / Elections site at
www.auroragov.org
Click on the “E-FILING ACCESS PORTAL” link.
3
INITIAL HOME PAGE / ANNOUNCEMENTS
The first page that will be displayed is the home page. The home page will always have a brief
announcement posted as either a reminder or alert. In order to gain access to a “User’s” Committee
reports, the User/Coordinator has to log in. Once logged in, the User’s will be able to see the Home
page PLUS all e-Filing material.
Click on the “Login” link located in the top right hand corner.
4
LOGIN
Once at the login screen, the User/Coordinator must enter in their email in addition to their password.
Only those email addresses designated by the Committee through the Clerk Office will be able to log in.
Fill in the boxes and click the button that reads “Log In.”
First time user’s would have been given a temporary password and will be immediately prompted to
make a password change. Fill in the boxes and click the button that reads “Change.”
5
LOGGED IN HOME PAGE / ANNOUNCEMENTS
Welcome! Once logged in the User’s will notice that the Home Page displays a greater amount of
options. At the top of the page there are five Links: 1) Home, 2) My Filings, 3) Change Password, 4)
Reports, and 5) Logoff.
At any point in time the User’s may return to the Home Page, it will always be located in the top left
hand corner.
6
MY FILINGS
Once logged in, users will be able to view, edit, and submit filings. All filings can be found within the
“My Filings” link located at the top left hand corner (next to Home).
The “Filing List” records seven important kinds of data: 1) Status, 2) Election Date, 3) Committee, 4)
Reporting Period, 5) E-mail Contact, 6) Last Updated, and 7) Actions.
Click on the “New” link located in the top left hand corner in order to begin working on a new filing.
If interested in viewing a previously submitted report or generating a report for printing purposes, click
on either the magnifying glass icon or the notebook icon located under Actions.
7
NEW FILINGS
Before setting up the new filing, the User will be asked which “Election Date” and which “Reporting
Period” the filing is to be filed under. Fill in the appropriate information and then click the button that
reads “Save.”
If the User accidently indicates a “Reporting Period” that has already been submitted, the filing will not
be permitted. (See below)
8
Once the appropriate election date and reporting period are established, the next screen will display an
overview of the Contributions and Expenditures for that period. Any and all funds that existed
previously will carry over from the past reporting periods, essentially eliminating calculation errors.
From here the User’s can edit each of the four Schedule reports (A, B, C, and D) by merely clicking on
the Schedule specific button on the bottom half of the page.
While working on the report, if the User is not yet ready to submit but wishes to store all newly entered
data and progress, they need only click the button that reads “Save.”
Once all four Schedule reports have been completed and double checked by the User’s, a Candidate or
Treasurer has the authority/ability to click the button that reads “Submit.” Once the report is submitted
it can no longer be edited and will be officially part of the record.
* Notice Line 5 of the “Detailed Summary of Report”, it illustrates the end result. This is the amount
the Committee is reporting exists within their Bank Account at the end of the reporting period.
9
SCHEDULE A – CAMPAIGN LOANS
When trying to edit the Schedule A report the User must click on the blue link at the top that reads
“New.” If and when one exists, User’s have the option to edit and delete by clicking on the pencil icon
or the red icon that will be located on the right hand side of the page next to each individual entry.
The Schedule A form is a form designed to track loans. Information that is required is: the name of the
loan source, the address, the specific amount, interest rate, loan dates, and payment reporting.
User’s must click the button that reads “Save” when done filling out the required fields. Once saved,
User’s will be able to add “Endorser’s” by clicking the blue link with the same name. There is no limit to
the amount of endorser’s that a loan may possess. An “Endorser” is a guarantor of the loan, meaning
they can give assurance that they loan will be repaid.
10
SCHEDULE B – CONTRIBUTIONS
When trying to edit the Schedule B report the User must click on the blue link at the top that reads
“New.” Each contribution must be entered independently; nevertheless the Schedule B report will
calculate all entries and display a running tally as each new contribution is entered. Once entries are
entered, User’s will always have the option to edit and delete by clicking on the pencil icon or the red
icon that will be located on the right hand side of the page next to each individual entry.
The Schedule B form is a form designed to track itemized contributions. Information that is required is:
the name of the contributor, the address, the date of the contribution, and the specific amount.
11
In addition to entering in all itemized contributions, User’s must fill in line 2 labeled “Total Nonitemized Contributions.” A non-itemized contribution is any currency or check given in amounts less
than $20. Once again, the Schedule B report will calculate all entries and display a running tally with line
4 being the end result of all contributions, including any loans from the Schedule A report.
* Notice the pencil icon and red icon located on the right hand side of the page next to each individual
entry. These are the edit and delete icons.
12
SCHEDULE C – EXPENDITURES
When trying to edit the Schedule C report the User must click on the blue link at the top that reads
“New.” Each expenditure must be entered independently; nevertheless the Schedule C report will
calculate all entries and display a running tally as each new expenditure is entered. Once entries are
entered, User’s will always have the option to edit and delete by clicking on the pencil icon or the red
icon that will be located on the right hand side of the page next to each individual entry.
The Schedule C form is a form designed to track itemized expenditures. Information that is required is:
the name of the expenditure, the address, the purpose, the date, and the specific amount.
13
Once again, the Schedule C report will calculate all entries and display a running tally with line 3 being
the end result of all expenditures.
* Notice the pencil icon and red icon located on the right hand side of the page next to each individual
entry. These are the edit and delete icons.
14
SCHEDULE D – IN KIND CONTRIBUTIONS
When trying to edit the Schedule D report the User must click on the blue link at the top that reads
“New.” Each In-Kind Contribution must be entered independently; nevertheless the Schedule D report
will calculate all entries and display a running tally as each new In-Kind Contribution is entered. Once
entries are entered, User’s will always have the option to edit and delete by clicking on the pencil icon or
the red icon that will be located on the right hand side of the page next to each individual entry.
The Schedule D form is a form designed to track In-Kind Contributions. Information that is required is:
the name of the contributor, the address, the description of the contribution, the date, and the fair
market value of the contribution.
15
In addition to entering in all itemized In-Kind Contributions, User’s must fill in line 2 labeled “Total
Non-itemized In-Kind Contributions.” A non-itemized in kind contribution is any contribution given
with a fair market value of less than $100. Once again, the Schedule D report will calculate all entries
and display a running tally with line 3 being the end result of all In-Kind Contributions.
* Notice the pencil icon and red icon located on the right hand side of the page next to each individual
entry. These are the edit and delete icons.
16
SUBMIT FILING
Congratulations! You have completed all schedule reports and are ready to submit.
As noted earlier, once all four Schedule reports have been completed and double checked by the User’s,
a Candidate or Treasurer has the authority/ability to click the button that reads “Submit.” Once the
report is submitted it can no longer be edited and will be officially part of the record.
When the Candidate/Treasurer clicks submit, they will be prompted to certify that the e-Filing is in fact
“a true and correct filing.” The User must then click the open box agreeing “to the above statement”
and then click on the button that reads “Submit.”
17
Once the filing is submitted, the Candidate and Treasurer of the Committee will receive an instant email
confirmation that may read:
In addition, a pdf file will be attached that shows the entire filing with an overall summary as well as
each individual Schedule report.
The report will be made available on the City’s Election site in order to have complete transparency for
the taxpayers.
18
SPECIAL REPORTS
As well as filing all contribution/expenditure reports, User’s can generate two key, special, reports:
1. Donor List
2. Expenditure List
Both lists are cumulative in respects to all previous reporting periods of all previous election dates.
They can be accessed at any time on any screen by clicking on the blue link in the top right hand corner
labeled “Reports.”
19