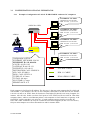
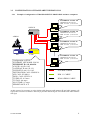
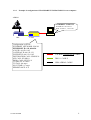
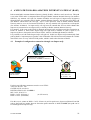
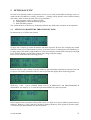
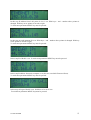
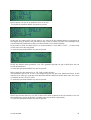
1
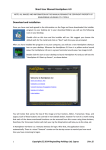
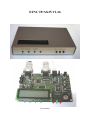
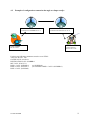
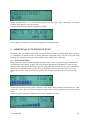
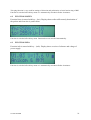
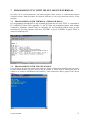
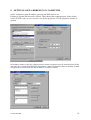
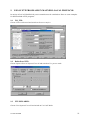
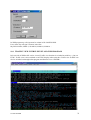
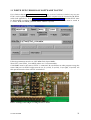
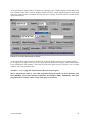
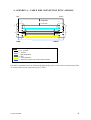
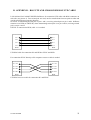
ETNC IP/AX25 V1.26
User manual
S51MO & MKM
2
1
INTRODUCTION....................................................................................................... 4
2
CONNECTION THE RADIO STATION TO THE ETNC ......................... 5
CONNECTION ETNC TO ONE PC WITHOUT LAN HUB ........................................... 5
CONNECTION ETNC TO ONE OR MORE PC COMPUTERS WITH LAN HUB .......... 5
2.1
2.2
3
CONFIGURATION OF LAN NETWORK ...................................................... 5
3.1
CONFIGURATION OF LOCAL IP PROTOCOL.................................................... 6
Example of configuration of LOCAL IP PROTOKOL and more PC computers: ............ 6
Example of configuration of LOCAL IP PROTOKOL and one computer: ..................... 7
3.2
CONFIGURATION OF TRANSPARENT IP PROTOCOL..................................... 8
3.2.1 Example of configuration of TRANSPARENT IP PROTOKOL and more computers: ..... 8
3.2.2 Example of configuration of TRANSPARENT IP PROTOKOL in one computer: ........... 9
3.1.1
3.1.2
4 AX25 PATH TO RADIO AMATEUR INTERNET GATEWAY
(RAIG)................................................................................................................................... 10
4.1
4.2
5
EXAMPLE OF CONFIGURATION CONNECTION THROUGH ONE SUPERVOZELJ: .............. 10
EXAMPLE OF CONFIGURATION CONNECTION THROUGH TWO SUPERVOZELJS:............ 11
SETINGS OF ETNC ................................................................................................ 12
5.1
6
SETINGS PARAMETERS THROUGH KEY PADS ............................................. 12
ADDITIONAL FUNCTIONS ON ETNC......................................................... 15
6.1
6.2
6.3
7
FUNCTION PING ................................................................................................... 15
FUNCTION LISTEN............................................................................................... 16
FUNCTION INFO ................................................................................................... 16
PROGRAMING ETNC WITH TELNET OR WITH TERMINAL ...... 17
7.1
7.2
PROGRAMMING WITH TERMINAL (THROUGH RS232) ............................... 17
PROGRAMMING WITH TELNET SESSION....................................................... 17
8
SETTINGS OF IP ADDRESS IN PC COMPUTER .................................... 18
9
USE OF FTP PROGRAMS IN MANNER LOACAL PROTOCOL ..... 19
9.1
9.2
9.3
9.4
10
10.1
11
WS_FTP:.................................................................................................................. 19
BULLET PROOF FTP: ................................................................................................. 19
FTP EXPLORER: .................................................................................................... 19
INTERNET EXPLORER ................................................................................................ 20
USE OF FLEXNET AND WPP PROGRAMS ........................................... 20
TRAFFIC VIEW WITH FLEXNET AND WPP PROGRAM ................................ 21
WRITE NEW VERSION OF SOFTWARE TO ETNC.......................... 22
S51MO & MKM
3
1
INTRODUCTION
Packet radio has well spread among Slovene radio amateurs. Beginning of radio amateur wireless
network has come with AX25 protocol. Radio amateurs have written a lot of software for this (AX25)
protocol (monitor programs, BBS, DXCLUSTER etc.). On other side in computer networks IP
protocol is used with his own protocols on higher levels (TCP, FTP, HTTP…). On this area is
available still many more also of cost free programs for connection between computers, which enable
transfer of files, of pictures, of talk… Main magnet, which pulls majority of users of packet radio, is
access on world web over radio amateur wireless network. In Slovenia is possible to access Internet
over few radio amateur wireless Internet gateway (S50LEA, S50SOU, S50DXX, S50FER,
S50AOP…).
There was a need to build small portable device which can be connected to LAN and deal with PSK
radio station, with power supply of 12 V. ETNC enables to work with amateurs programs as are WPP,
SP for classical connection between radio amateur computers. At the same time ETNC enables use of
a countless programs, which exploit IP connection (which are not radio amateur programs and
therefore don’t know AX25 protocol).
Only request for connection ETNC to computer is LAN network card on computer. ETNC can be
connected directly to computer with crossover cable (if just one PC is used) or to LAN HUB (if more
than one PC is used and home LAN network is made). On the other side ETNC is connected to PSK
radio station and fun can begins.
ETNC has additionally also something useful functions for tune and control all equipment.
The most useful is function PING for setting the station or aerial. This function works without PC
connected. The ping packet is sending to the Internet radio amateur getaway and on display of ETNC
is shown replay time and statistics of accepted answers.
This manual is written for users of ETNC. For building and construction will be written technical
manual.
Software, which drives ETNC, will continue develop. Right so this manual. For any new idea you can
send me E-mail on [email protected], the newest version of the program can be download from
http://lea.hamradio.si/~s51mo/download .
S51MO & MKM
4
2
CONNECTION THE RADIO STATION TO THE ETNC
ETNC is connected to radio station with DB9 nine wires cable (conection 1-1, see appendix 1). TX
and RX signal is lead through coaxial cable. If this cable is well done, length can be up to 20m, but
short cable is recommended.
2.1
CONNECTION ETNC TO ONE PC WITHOUT LAN HUB
ETNC can be connected to one PC computer with crossover UTP LAN RJ45 cable (see appendix B).
The crossover cable is built with the transmit pins on one end of the cable connected to the receive
data pins on the other end of the crossover cable, and vice versa.
2.2
CONNECTION ETNC TO ONE OR MORE PC COMPUTERS WITH LAN HUB
ETNC can be connected to LAN HUB with UTP LAN RJ45 cable. On LAN can be more computers
and each of this computers has access to Internet through ETNC. The traffic flow is separate for each
computer with port number in IP protocol.
3
CONFIGURATION OF LAN NETWORK
For correctly working of ETNC, LAN network must be carefully adjust. There are two main manners
of working:
a) LOCAL IP PROTOCOL. PC computer has set any local IP (for instance 192.168.0.1) This IP
never goes to the Internet because ETNC change this IP to radio amateur IP (for instance on
transmit 192.168.0.1 goes to 44.150.1.145, on receive vice versa) In this mode of working
more than one PC computer can be connected (each one whit his own IP, for instance: first
192.168.0.1, second 192.168.0.2, third 192.168.0.3…).
b) TRANSPARENT IP PROTOCOL. PC computer has set radio amateur IP (for instance
44.150.1.145). ETNC in this mode do not change IP. IP, which is set in PC computer, goes to
Internet directly. In this mode only one computer can be connected to ETNC.
For beginners LOCAL IP PROTOCOL mode is recommended.
S51MO & MKM
5
3.1
CONFIGURATION OF LOCAL IP PROTOCOL
3.1.1
Example of configuration of LOCAL IP PROTOKOL and more PC computers:
IP ADDRESS: 192.168.0.1
GATEWAY: 192.168.0.20
DNS: 44.150.1.1, 193.2.1.66
SWITCH or HUB
IP ADDRESS: 192.168.0.2
GATEWAY: 192.168.0.20
DNS: 44.150.1.1, 193.2.1.66
AERIAL
IP ADDRESS: 192.168.0.3
GATEWAY: 192.168.0.20
DNS: 44.150.1.1, 193.2.1.66
RIG
ETNC
IP ADDRESS: 192.168.0.4
GATEWAY: 192.168.0.20
DNS: 44.150.1.1, 193.2.1.66
Configuration on ETNC:
ETHERNET NETWORK: LOCAL
ETHERNET IP: 192.168.0.20
AX25 IP: 44.150.1.145
GATEWAY IP: 44.150.12.1
FLEXNET IP: 192.168.0.1
DESTINATION CALL: S50SOU-0
MY CALL: S51MO-0
DIGI 1 CALL: S55YLJ-4
TX DELAY: 0.5 msec
TX TAIL: 0.4 msec
SLOT TIME: 0.7 msec
PERSISTANCE: 0.75
UTP RJ45 CABLE
DB9 1-1 CABLE
H500 AERIAL CABLE
Each computer in LAN has his IP address. The best way is that our main computer has IP, which end
with number 1 (for instance 192.168.0.1) next computer connected to net has next IP (for instance
192.168.0.2) and so on. ETNC there for must have some higher IP (which is not in any computer, for
instance 192.168.0.20). In this case from LAN point of view ETNC has IP 192.168.0.20. That other
computers know, where to send Internet packets, each computer on LAN must has set gateway to IP
from ETNC (in this case this is 192.168.0.20 – in each computer gateway must be set to this IP).
ON ETNC under FLEXNET IP must be written IP from main computer (in this case 192.168.0.1).
Only on main computer we will run Flexnet driver and for instance WPP.
S51MO & MKM
6
3.1.2
Example of configuration of LOCAL IP PROTOKOL and one computer:
AERIAL
IP ADDRESS: 192.168.0.1
GATEWAY: 192.168.0.20
DNS: 44.150.1.1, 193.2.1.66
RIG
ETNC
Configuration on ETNC:
ETHERNET NETWORK: LOCAL
ETHERNET IP: 192.168.0.20
AX25 IP: 44.150.1.145
GATEWAY IP: 44.150.12.1
FLEXNET IP: 192.168.0.1
DESTINATION CALL: S50SOU-0
MY CALL: S51MO-0
DIGI 1 CALL: S55YLJ-4
TX DELAY: 0.5 msec
TX TAIL: 0.4 msec
SLOT TIME: 0.7 msec
PERSISTANCE: 0.75
S51MO & MKM
UTP RJ45 CROSSOVER CABLE
DB9 1-1 CABLE
H500 AERIAL CABLE
7
3.2
CONFIGURATION OF TRANSPARENT IP PROTOCOL
3.2.1
Example of configuration of TRANSPARENT IP PROTOKOL and more computers:
IP ADDRESS: 44.150.1.145
GATEWAY: 44.150.12.1
DNS: 44.150.1.1, 193.2.1.66
SWITCH
IP ADDRESS: 44.150.1.130
GATEWAY: 44.150.12.1
DNS: 44.150.1.1, 193.2.1.66
AERIAL
IP ADDRESS: 44.150.1.20
GATEWAY: 44.150.12.1
DNS: 44.150.1.1, 193.2.1.66
RIG
ETNC
IP ADDRESS: 44.150.1.146
GATEWAY: 44.150.12.1
DNS: 44.150.1.1, 193.2.1.66
Configuration on ETNC:
ETHERNET NETWORK: LOCAL
ETHERNET IP: 192.168.0.20
AX25 IP: 44.150.1.145
GATEWAY IP: 44.150.12.1
FLEXNET IP: 44.150.1.145
DESTINATION CALL: S50SOU-0
MY CALL: S51MO-0
DIGI 1 CALL: S55YLJ-4
TX DELAY: 0.5 msec
TX TAIL: 0.4 msec
SLOT TIME: 0.7 msec
PERSISTANCE: 0.75
UTP RJ45 CABLE
DB9 1-1 CABLE
H500 AERIAL CABLE
At this protocol is necessary to write relation table between radio amateur IP and radio amateur call
sign (in this version of software is this not jet possible and all IP goes out with the same radio amateur
call sign).
S51MO & MKM
8
3.2.2
Example of configuration of TRANSPARENT IP PROTOKOL in one computer:
AERIAL
IP ADDRESS: 44.150.1.145
GATEWAY: 44.150.12.1
DNS: 44.150.1.1, 193.2.1.66
RIG
ETNC
Configuration on ETNC:
ETHERNET NETWORK: LOCAL
ETHERNET IP: 192.168.0.20
AX25 IP: 44.150.1.145
GATEWAY IP: 44.150.12.1
FLEXNET IP: 44.150.1.145
DESTINATION CALL: S50SOU-0
MY CALL: S51MO-0
DIGI 1 CALL: S55YLJ-4
TX DELAY: 0.5 msec
TX TAIL: 0.4 msec
SLOT TIME: 0.7 msec
PERSISTANCE: 0.75
S51MO & MKM
UTP RJ45 CROSSOVER CABLE
DB9 1-1 CABLE
H500 AERIAL CABLE
9
4
AX25 PATH TO RADIO AMATEUR INTERNET GATEWAY (RAIG)
Path to main Radio Amateur Internet Gateway (shortly: RAIG), which we used, must be set. This path
is set in the ETNC and it is compound from call sign of Radio Amateur Internet Gateway (for instance
S50LEA), my amateur call sign (for instance S51MO) and call signs of Supervozeljs (digipiters)
through which we can make route to Radio Amateur Internet Gateway. All call signs must have ssid
(the number which follow the call sign – this is AX25 protocol). Ssid of Radio Amateur Internet
Gateway must be set to 0 (for instance S50LEA-0), also my amateur call sign must have ssid equal 0
(for instance S51MO-0). At Supervozeljs call sign must be entered that ssid on which channel has
Supervozelj connection to next Supervozelj or already to Radio Amateur Internet Gateway.
For instance: if the route to the RAIG is through one Supervozelj and Supervozelj has connection to
RAIG on channel 4, then beside Supervozeljs call sign must be number 4 (ssid is equal 4). So
Supervozelj knows, that packet arrived from ETNC, must be send through channel 4 to RAIG.
It is possible to set ssid beside Supervozeljs call sign to 0. In this case Supervozelj automatically finds
path to RAIG. Component part of packet is also IP number of RAIG and our radio amateur IP. All this
data ETNC stores to every AX25/TCP/IP packet, which is send to the direction of RAIG.
4.1
Example of configuration connection through one Supervozelj:
SUPERVOZELJ S55AAA
Connection to S50BBB on channel 3
RAIG S50BBB
IP: 44.150.8.1
ETNC + PC
CALL S51CCC
IP: 44.150.1.145
For this case following parameters must be set to ETNC:
AX25 IP: 44.150.1.145
GATEWAY IP: 44.150.8.1
DESTINATION CALL: S50BBB-0
MY CALL: S51CCC-0
DIGI 1 CALL: S55AAA-3
(or S55AAA-0)
DIGI 2 CALL: (left blank)
If in this case is written to DIGI 1 CALL: S5AAA-0 (ssid is equal zero), Supervozelj himself can find
path to the RAIG no mether when in Slovenian packet network is RAIG S50BBB (this path can be
even through more Supervozeljs).
S51MO & MKM
10
4.2
Example of configuration connection through two Supervozeljs:
SUPERVOZELJ S55AAA
Connection to S50BBB on ch. 3
SUPERVOZELJ S55DDD
Connection do S50AAA on ch. 8
RAIG S50BBB
IP: 44.150.8.1
ETNC + PC
CALL S51CCC
IP: 44.150.1.145
For this case following parameters must be set to ETNC:
AX25 IP: 44.150.1.145
GATEWAY IP: 44.150.8.1
DESTINATION CALL: S50BBB-0
MY CALL: S51CCC-0
DIGI 1 CALL: S55DDD-8
(or S55DDD-0)
DIGI 2 CALL: S55AAA-3
(or left blank if DIGI 1 CALL is S55DDD-0)
DIGI 3 CALL: (left blank)
S51MO & MKM
11
5
SETINGS OF ETNC
In ETNC four deferent profiles of parameters can be set. On each profile different settings can be set
(path to RAIG, IP addresses, tx delay, persistence…). During activity profiles can be switched among
each other. There are three possible ways to set parameters:
a) With assistance of keys in front of ETNC
b) Through RS232 cable and terminal program
c) With TELNET program
The variant B and C are about way of entering identical; they differ only in manner of incorporation.
5.1
SETINGS PARAMETERS THROUGH KEY PADS
In normal state is on ETNC next readout:
In upper side of display is written the number and name of profile. In lower side of display are written
functions of the keys in that moment. Left key is for menu (enter to setting menu), left middle key is
for ping (ping to the RAIG), right middle key is for listen (display current traffic on display) and right
key is for info (display version of the software and voltage of power supply).
Press on key menu shows the following picture:
Between edit (key edit), change of profile (with keys plus and minus) and back to menu (key ok) can
be chosen. For modify parameters edit key must be pressed and display shows following picture:
With keys + and – can be switched among LOCAL IP PROTOCOL and TRANSPARENT IP
PROTOKOL (see chapter 3). To reach next parameter MENU key must be pressed:
In this step the name (any name) of the profile can be set. There are 6 signs available (capital letters or
numbers). With keys + and – sign above pointer is changed. With key arrow pointer is moved to right.
To reach next parameter MENU key must be pressed:
S51MO & MKM
12
In this step IP address from LAN point of view is set. Whit keys + and – number above pointer is
changed. With key arrow pointer is moved to right.
To reach next parameter MENU key must be pressed:
In this step our radio amateur IP is set. Whit keys + and – number above pointer is changed. With key
arrow pointer is moved to right.
To reach next parameter MENU key must be pressed:
In this step IP of RAIG is set. To reach next parameter MENU key must be pressed:
In this step IP address from main computer is set (this one, on which Flexnet will run).
To reach next parameter MENU key must be pressed:
In this step call sign of RAIG is set. Ssid have to be set to zero.
To reach next parameter MENU key must be pressed:
S51MO & MKM
13
In this step my call sign is set. Ssid have to be set to zero.
To reach next parameter MENU key must be pressed:
In this step firs Supervozeljs call sign must be set. Ssid can be the channel number of connection to
next Supervozelj (or RAIG if only one Supervozelj is used) or simply set ssid to zero and Supervozelj
will automatically find RAIG (in this case all next DIGI CALLs must left blank).
By pressed key menu next DIGI CALLs are reached (DIGI 2 CALL, DIGI 3 CALL…). If these calls
are not used, leave this entry blank.
To reach next parameter MENU key must be pressed:
In this step transmit delay parameter is set. This parameter depends on type of RIG (how fast can
switch on transmitter).
To reach next parameter MENU key must be pressed:
In this step delay after transmit is set TX TAIL (picture missing).
This parameter must be set to zero if first Supervozelj has new processor (Motorola 68360). If this
Supervozelj is older type (with processor Motorola 68020 or Motorola 68010) then value of 0.6 msec
(or similar) must be set to TX TAIL.
To reach next parameter MENU key must be pressed:
In this step slot time interval is set. This is interval for check if channel is free for transmit (if it is not,
then another time period of slot time is waiting before again check is performed).
To reach next parameter MENU key must be pressed:
S51MO & MKM
14
In this step persistence is set (can be value between 0.20 and 1.00). This is probability to perform
transmit when channel is free for transmit.
To reach next parameter MENU key must be pressed:
In this step we can choose to write or divert parameters to flash memory.
6
ADDITIONAL FUNCTIONS ON ETNC
From basic state few additional functions is reached. The most useful is function ping. Moreover there
is a possibility to monitor traffic on display (function listen) and look of version of program with
function info. All this functions from this chapter works without LAN connected.
6.1 FUNCTION PING
Ping function is started with key ping from basic state. ETNC can generate ping packet himself
and transmit it to the RAIG. In upper side of the display alternate show IP address to which is ping
send and name of the profile and time to get back ping packet from RAIG. In lower side of the display
shows bar line which represent average receive ping packets (if last 16 packets is 100 % received,
there is bar 16 boxes long, if from last 16 packets received only 8 packets there is bar 8 boxes long
etc.):
Normally the interval between pings is 500 msec. This interval can be changed from 100 msec to 1500
msec with + and – key. At every receiving ping packet there is short beep heard from beeper inside
ETNC.
One more press to arrow key change the lower side of display to S-meter:
S51MO & MKM
15
This ping function is very useful at settings of direction and polarization of aerial and at sting of RIG.
Function is switched off with key menu or is automatically switched off after 30 minutes.
6.2
FUNCTION LISTEN
Function listen is started with key + (lsn). Display shows radio traffic namely destination of
the packet and from who is packet from:
Function is switched off with key menu. Function does not switch of automatically.
6.3
FUNCTION INFO
Function info is started with key – (info). Display shows version of software and voltage of
power supply:
Function is switched off with key menu or is automatically switched off after 30 minutes.
S51MO & MKM
16
7
PROGRAMING ETNC WITH TELNET OR WITH TERMINAL
In ETNC can be entered parameters with telnet program (telnet session) or with terminal program
(terminal session). Both procedures are identical, diference is only from connection and use of the
program.
7.1 PROGRAMMING WITH TERMINAL (THROUGH RS232)
For programming through RS232 any terminal program may be used. ETNC is connected to
PC with RS232 cable (look appendix C). On PC must run terminal program with settings
19200,8N1. Hardware control must be switched off and Xon/Xoff control must be also
switched off. For help response word help <ENTER> or just h <ENTER> is typed. ETNC is
answered with help text:
7.2
PROGRAMMING WITH TELNET SESSION
Every Windows program has simple telnet program. Telnet is started from Start/Run and type telnet.
In telnet Connection/Far system is chosen. Her IP number of ETNC must be entered (the same IP
number as is written on ETHERNET IP parameter). After connection if help is typed, ETNC answer
with:
S51MO & MKM
17
8
SETTINGS OF IP ADDRESS IN PC COMPUTER
On PC computer regular IP address, gateway and DNS must be set.
Desktop is opened and Network is chosen. Then choose that component part, before which
writes TCP/IP->name of your network card. Select properties. TCP/IP properties window is
opened:
In IP address address of this PC computer must be written. In gateway must be entered IP from ETNC
(the same IP is written in ETHERNET IP parameter). WINS configuration must be disabled. In DNS
configuration at least IP from one nearest DNS server must be written.
S51MO & MKM
18
9
USE OF FTP PROGRAMS IN MANNER LOACAL PROTOCOL
In activity of LOCAL PROTOCOL passive transfers must be switched on. Here are some examples
for different kind of FTP programs:
9.1
WS_FTP:
Choose Connect/Advanced and switch on Passive transfers:
9.2
Bullet Proof FTP:
Choose Options/General Options/Firewall and switch on Use passive mode:
9.3
FTP EXPLORER:
Choose View/Options/Firewall and switch on Use PASV Mode.
S51MO & MKM
19
9.4
Internet Explorer
Choose Tools/Internet Options/Advanced and switch on Use Passive FTP (for firewall and modem
compatibility):
10 USE OF FLEXNET AND WPP PROGRAMS
ETNC enables of usage of FLEXNET driver and from this also all software, which exploit
FLEXNET as a driver.
FLEXNET and WPP are together pack in http://lea.hamradio.si/~s51mo/download/wpp.zip .
All files from this URL must be transferred to C:/WPP and unzipped. After WPP.exe is started,
automatically is loaded also FLEXNET driver. Necessary is correctly configuring FLEXNET driver.
Only setting, which is necessary, is activating AXIP UDP driver. From Flexnet Control Centre choose
Tools/Parameters. With right key on mouse click on free channel, for example 0 and choose New
Driver. Choose AXIP. Write IP address from ETNC (ETHERNET IP) and click OK:
S51MO & MKM
20
In WPP program my call sign must be written in file CONFIG.WPP.
Line, where my call sign is written, looks like:
MyCall=S51MO, S5MO-1, S51MO-2,S51MO-3,S51MO-4 …
10.1 TRAFFIC VIEW WITH FLEXNET AND WPP PROGRAM
In lower side of WPP traffic can be viewed. Traffic view function is switched on with key + (lsn) on
ETNC. Traffic view is also switched on in ETNC display in the same time. Traffic view on WPP can
also be switched on through telnet program and function listen <ENTER>.
S51MO & MKM
21
11 WRITE NEW VERSION OF SOFTWARE TO ETNC
If it is find out that on http://lea.hamradio.si/~s51mo new version of software is loaded, very easy our
ETNC can be updated with this new version. ETNC and PC computer must be connected with RS232
cable (look appendix C). From http://lea.hamradio.si/~s51mo/download/ETNC all folder ETNC must
be downloaded (including folder LIB and two files inside them). All this files must be stored to
C:\ETNC. With start FWFR_100.EXE follow window is opened:
Following parameters must be set: CPU MB91F109, Speed 4MHz,
Write File c:\etnc\ETNC_Vxxx.MHX (where xxx is version number).
COM PORT must be the same as ETNC is connected. Be careful that no other program occupy the
same COM port. On ETNC bridges must be set: J1 (to left), J2 (to left), J3 (to right), J5 (to left). All
this operation must be done at ETNC switched off.
Picture 1 Settings of the bridges at writing software to ETNC
S51MO & MKM
22
At his point power supply must be switched on. All upper side of ETNC display become dark, lower
side is blank. On PC Auto is clicked. Writing software to ETNC begins. When program correctly ends
transfer it writes All OK !! If transfer does not succeed, reset key on ETNC must be pressed and try
again with Auto(A).
Picture 2 correctly ends transfer to ETNC
At this point power supply must be switched off. On ETNC bridges must be set to original position:
J1 (to right), J2 (to right), J3 (to left), J5 (to right). Switch on the power supply. ETNC himself writes
basic parameters to flash memory. After start succeed press again reset key on ETNC. Now is ETNC
ready to write your parameters in it.
Attention – at every upgrade, all parameters must be written again.
Warn: unfortunately must to worn, that mentioned program works on slower machines (less
than 700MHz) and on older Windows (Windows 98, Windows 98SE). Immediately, when new
program will be available, will be on my home page to download.
S51MO & MKM
23
A. APENDIX A – CABLE FOR CONNECTION ETNC AND RIG
RIG
ETNC
- 13.8 VDC
1
1
+13.8 VDC
6
6
9
9
5
DB9F
5
DB9M
1 – Power supply for RIG and ETNC +13.8VDC
6,7,8 - ground
2 – S meter
3 - RX modulation
4 - PTT
5 - TX modulation
9 – Data line (option, not used in this moment)
RX and TX modulation must be lead through high quality audio coaxial cable. Ground on both sides
of coaxial cables must be connected to pin 6,7 and 8.
S51MO & MKM
24
B. APENDIX B – RJ45 UTP AND CROSSOVER RJ45 UTP CABLE
LAN 10M and LAN 100M TWISTED PAIR uses for connection UTP cable with RJ45 connectors on
each side (see picture 3). Two twisted pair are used, one for transfer data from one point to other and
one for transfer data to opposite direction.
On ETNC is transmitting twisted pair on pin 1 and 2, receiving twisted pair on pin 3 and 6. Different
situation is on HUB (or SWITCH), where transmitting twisted pair is on pin 3 and 6, receiving twisted
pair is on pin 1 and 2.
If ETNC is connected to HUB, cable 1-1 is needed:
Pin 1
Pin 1
Pin 2
Pin 2
Pin 3
Pin 3
Pin 6
Pin 6
RJ 45
RJ 45
UTP RJ45 cable for connection PC and HUB or ETNC and HUB.
For connection ETNC directly to PC computer crossover cable is needed:
Pin 1 TD+
Pin 1 TD+
Pin 2 TD-
Pin 2 TD-
Pin 3 RD+
Pin 3 RD+
Pin 6 RD-
Pin 6 RD-
RJ 45
RJ 45
UTP RJ45 crossover cable for connection PC and ETNC.
S51MO & MKM
25
PIN 8
PIN 1
Picture 3, RJ45
C. APENDIX C – RS232 CABLE FOR CONNECTION ETNC AND PC
PC
ETNC
1
1
6
6
9
9
5
DB9F
S51MO & MKM
5
DB9F
26


![TR4W User Manual [English Version]](http://vs1.manualzilla.com/store/data/005728234_1-e27c4fea1c6d513d6e0fdc1451ef66f1-150x150.png)