1
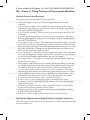
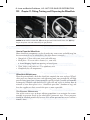
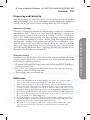
© Jones and Bartlett Publishers, LLC. NOT FOR SALE OR DISTRIBUTION C h a p t e r 1 1 Fitting, Training, and Dispensing the Wheelchair The Wheelchair Fitting Evaluate the Wheelchair • Is the order correct? • Were all items delivered? Go through the order with the supplier and check off each item ordered to determine if it was delivered. • Are postural supports installed securely? Do not place a patient into the wheelchair unless you’re sure it’s properly and safely secured. • Do all components operate (e.g., removable parts, tilt mechanism)? • Do wheel locks work? • Does the wheelchair fold if it’s supposed to? • Is the frame stable and are antitippers on the wheelchair if ordered? • Are there any exposed sharp or hard edges that may cause injuries? • Is the seat-to-back angle of the inserts acceptable and set at the correct angle based on the patient’s available hip flexion during the evaluation? 227 Fitting, Training, and Dispensing the Wheelchair Once the wheelchair is ordered and delivered by the supplier, it should be properly fitted to the patient before it is dispensed. Depending on the complexity of the order, anywhere from one to several fittings may be required before the wheelchair is acceptable and ready to go home with the patient. Evaluate (1) the wheelchair, (2) the patient’s positioning in the wheelchair, and (3) the patient/ caregiver’s knowledge of the equipment. Make sure the wheelchair is properly configured (e.g., rear wheel axle location relative to shoulders; correct seat/back angles and seat depth) and fits well to accommodate unique postural needs, so if patients self-propel, they do it with greater efficiency. In a systematic review of adaptive equipment use in older adults (55 years or older), Kraskowsky and Finlayson found that a poor fit was the chief reason for abandoning equipment.1 In the end, everyone should be happy before the patient goes home with the equipment. If the final product is not acceptable, don’t have the patient sign for the equipment until legitimate issues are resolved. © Jones and Bartlett Publishers, LLC. NOT FOR SALE OR DISTRIBUTION 228 Chapter 11: Fitting, Training, and Dispensing the Wheelchair Evaluate Patient in the Wheelchair First, position the patient properly in the wheelchair. • Are postural supports properly installed and configured based on the initial evaluation? • Is the seat depth acceptable? There should be no more than 2 inches of space between the front of the seat and the back of the knee. No pressure should exist against the back of the knee. • Is the seat width acceptable? There may be up to 1 inch of space on either side of the hips. • Is the back height acceptable based on activity level and sitting ability? The lower back must be supported. If the patient self-propels, the back should not interfere with UE movements. • Is the footplate height acceptable? The footplate height should support the weight of the LE so the thigh is approximately parallel with the seat cushion. If footplates are adjusted too high, increased hip flexion and excessive pressure under the ischia can develop. If footplates are adjusted too low, excessive pressure under the distal posterior thigh can result. • In the frontal plane, is the pelvis (anterior superior iliac spines) level, the shoulders and eyes horizontal, and nose vertical? If the patient has a fixed scoliosis, are the head and shoulders balanced over the base of support? • In the sagittal plane, is the pelvis in a neutral tilt, with the shoulder and head balanced over the pelvis? • In the transverse place (birds-eye view, looking down from above), are the pelvis, shoulders, and nose facing front and not rotated left or right relative to the midline? If the patient has a fixed scoliosis, is the head facing front? • Are rear wheels ideally positioned relative to the UEs for propulsion? Determine whether the patient propels most efficiently when the wheel axes are aligned with or slightly in front of the patient’s shoulder axes, and the elbows are in mild flexion when the patient’s hands reach to the top of the rear wheels. • Is seat belt attached at the proper angle? (typically 45 degrees) • If a chest harness is used, is adequate clearance provided for the neck? • If a pommel is used, is it positioned distally between the knees and not proximally into the groin? • If lateral trunk supports are used, is there acceptable clearance of the axillary region with no pressure into the brachial plexus? • If a lap board is used, is there sufficient space between the abdomen and the tray for clothes and respiration? • Is the frame stable from tipping when the patient is in the wheelchair? Evaluate the Equipment Knowledge of Patients, Caregiver, and Family Does the caregiver know how to (or can the patient or does the patient know how to instruct others to): © Jones and Bartlett Publishers, LLC. NOT FOR SALE OR DISTRIBUTION Training 229 • Properly position the patient in the wheelchair? • Operate all the components (i.e., antitippers, wheel locks, armrests, front rigging)? • Fold and unfold the wheelchair? • Properly and safely position straps (harness) and supports? • Engage the wheel locks during transfers? • Negotiate curbs, ramps, and maneuvering wheelchair? • Maintain the wheelchair? • Follow up? Training Using Proper Body Mechanics During Manual Patient Lifts and Transfers Mechanical lifts are generally recommended for caregiver-assisted transfers because manual lifting carries injury risks. Nevertheless, caregivers still manually transfer and lift patients. Safety guidelines during manual lifting include keeping the load close to the lifter, maintaining a straight back, using hips and legs for lifting, using an appropriate base of support, and avoiding spine twisting movements.2 Aside from two-person lifts, stand pivot and sliding board transfers are common. In a study by Hess et al., who had home health aides (n = 16) transfer mock patients using three different single assisted methods, sliding board transfers were rated over scooting and modified stand-pivot technique as being preferred, safer, more comfortable, and performed in less time and with less force.3 (Instrument measurement properties were not mentioned in their study.) Proper Positioning in the Wheelchair No wheelchair will be good if the patient is positioned poorly. In other words, first properly position the patient. 1. Engage the wheel locks on the wheelchair. This is critical during any transfer activity into or out of the wheelchair. 2. Transfer the patient safely into the wheelchair. 3. Move the patient’s pelvis back into the rear of the seat until the back of their pelvis touches the back of the insert of the wheelchair. (This is not as Fitting, Training, and Dispensing the Wheelchair The owner’s manual is the ultimate resource for model-specific device operation and maintenance and should be given to the patient/family. The patient and family should be able to operate the new wheelchair, be it manual or power, before dispensing. If additional training is anticipated during the evaluation, the patient should be placed “on program” for training before the device is dispensed to home (e.g., training to perform wheelies). Also, ensure the following skills are learned by the patient and/or caregiver. © Jones and Bartlett Publishers, LLC. NOT FOR SALE OR DISTRIBUTION 230 Chapter 11: Fitting, Training, and Dispensing the Wheelchair easy as it sounds.) Confirm that the patient’s pelvis is back in the seat by gently leaning the patient’s trunk forward (if possible) and then checking that there is no gap (space) between the back of the pelvis and the back insert of the wheelchair (Figure 11-1). (In some cases, a gap is intentionally created between the back of the seat and the bottom of the back insert during the fitting (i.e., “back gap”)4 to provide clearance for the patient’s posterior pelvic area in order to achieve a neutral pelvic position. 4. Secure the seat belt across the patient’s hips firmly (so you can fit only two fingers between the seat belt and the patient’s body). The patient’s pelvis must be maintained back in the seat while you secure the seat belt. How Wheelchair Components Operate Become familiar with how parts operate. Each company designs its components a little differently. I remember scratching my head for 10 minutes before figuring out how to remove a high-tech armrest. • • • • • Wheel locks Seat belt Armrests Front rigging Antitippers: Caregivers should be instructed not to step on antitippers to raise the casters off the ground (i.e., for curb negotiation) because the metal tubing is thin and can easily crack (Figure 11-2). Use tipping sleeves, located on the back of the chair, instead. • Removal of inserts • Proper use of straps, harnesses, and positioning devices FIGURE 11-1 Positioning in a wheelchair. Confirm that the patient’s pelvis is back in the seat. (A) Patient is not sitting back. (B) Pelvis is back. © Jones and Bartlett Publishers, LLC. NOT FOR SALE OR DISTRIBUTION Training 231 FIGURE 11-2 Avoid stepping on rear antitippers because they easily break. Patients and caregivers need to be taught how to safely ascend and descend ramps and curbs. Some information can be found in the wheelchair’s user manual. If the wheelchair must be manually lifted up or down stairs, it is critical that assisting caregivers do not lift the wheelchair from detachable or removable components, like armrests or front rigging. How the Wheelchair Folds and Unfolds I used to run into a family once a month who owned a wheelchair for years yet never knew it could fold. This often involves removing the inserts first. Folding a wheelchair can make it easier for a family to go on vacations. Improve their quality of life—teach the family to fold and unfold their wheelchair. Caution them, however, not to get their fingers caught between the rails while unfolding the frame. Unfolding: Safety Precaution When instructing to open (unfold) a wheelchair, make sure the fingers are not caught under the seat rails where they can be entrapped, and injured. Point fingers inward, toward the center of the seat upholstery, prior to exerting downward pressure on the seat rails when unfolding (opening) the chair (Figure 11-3).5 Fitting, Training, and Dispensing the Wheelchair How to Negotiate the Environment © Jones and Bartlett Publishers, LLC. NOT FOR SALE OR DISTRIBUTION 232 Chapter 11: Fitting, Training, and Dispensing the Wheelchair FIGURE 11-3 Unfold a wheelchair. (A) Point fingers toward the center of the seat. (B) Keep fingers away from side rails where they can get pinched. How to Clean the Wheelchair Most wheelchair components can be cleaned using warm water and mild soap, but because materials vary in wheelchairs, check the owner’s manual.6,7 • Naugahyde—Clean with warm water and mild soap. • Metal parts—Use wax with a cleaner (i.e., auto wax). Avoid dripping liquid into openings of metal parts. • Wood, leather, and leatherette—Use upholstery wax. • Completely dry all components. Wheelchair Maintenance Have the patient/family check the wheelchair routinely for wear and tear. Wheelchair parts may loosen over time and tightening loose nuts periodically will help prevent losing parts later. Owner manuals typically include a weekly and monthly maintenance schedule and check list. If a part falls off, and it is unclear how to reinstall it, have them place it in a “wheelchair parts box” (shoebox or bag) and have the supplier or clinic reattach the part as soon as possible. Tire Pressure Maintenance One of the easiest ways to foster efficient propulsion is to maintain the recommended air pressure levels in the wheelchair’s pneumatic tires. These pressures should be checked periodically because 50% of tire pressure loss occurs within a month’s time.8 © Jones and Bartlett Publishers, LLC. NOT FOR SALE OR DISTRIBUTION References 233 Dispensing and Follow-Up Prior to dispensing the wheelchair, make sure the patient receives all supplier contact information, clinic contact information, warranty information, equipment manuals, and any special instructions including follow-up visits in writing. Wheelchair Checkups Wheelchair Defects If problems arise with the device that can’t be resolved by the supplier and manufacturer, consult “lemon laws” in the patient’s state, which may offer protection for the first year following purchases. • Warranties and lemon laws: http://www.wheelchairnet.org/WCN_ProdServ/ Funding/warranty.html • For state by state listings, search Wheelchair Lemon Law and your state (e.g., wheelchair lemon law AND New York) • Also see http://www.usatechguide.org References 1. Kraskowsky LH, Finlayson M. Factors affecting older adults’ use of adaptive equipment: review of the literature. Am J Occup Ther. 2001;55(3):303–310. 2. Batavia M. Contraindications in Physical Rehabilitation. St. Louis, MO: Saunders; 2006. 3. Hess JA, Kincl LD, Mandeville DS. Comparison of three single-person manual patient techniques for bed-to-wheelchair transfers. Home Healthcare Nurse. 2007;25(9):577–579. 4. Gilinsky G, Smith C. New wheelchair or new solution? Rehab Manag. 2006;19(1):34–39. 5. Hazard report: foldable wheelchairs injure patients’ fingers. Health Devices. 2006;35(6):231–233. 6. Behrman AL. Clinical perspectives on wheelchair selection: factors in functional assessment. J Rehabil Res Dev. 1990;2(Supp):17–27. 7. Freney D. Pediatric seating. Home Health Care Dealer/Supplier. 1995;Sept/Oct:103–105. 8. Sawatzky B, Denison I. Wheeling efficiency: the effects of varying tyre pressure with children and adolescents. Pediatr Rehabil. 2006;9(2):122–126. 9. Hansen R, Tresse S, Gunnarsson RK. Few accidents and better maintenance with active wheelchair check-ups: a randomized controlled clinical trial. Clin Rehabil. 2004;18:631–639. Fitting, Training, and Dispensing the Wheelchair Wheelchair maintenance checkups may help to reduce accidents. In a randomized controlled trial (RCT), Hansen et al. found that while providing a 3-month occupational therapy–initiated home maintenance checkup, 73 of the 74 wheelchairs (that is, 99% of the chairs) inspected were found to require maintenance work.9 The accident rate declined in an active checkup group that received the home checkup (from 5 accidents in the previous year to 0) but was unchanged in a standard care group that did not receive any checkups during the same year. (Attrition did occur in both groups during the year.) Interestingly, users were not always aware they needed wheelchair repairs, suggesting that they may not know to call for repairs if the decision were left to them. © Jones and Bartlett Publishers, LLC. NOT FOR SALE OR DISTRIBUTION