1
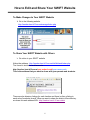
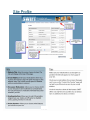
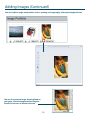
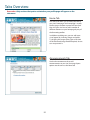
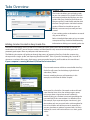
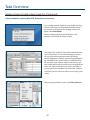
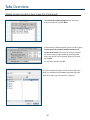
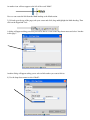
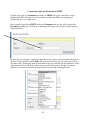
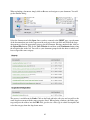
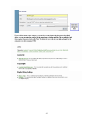
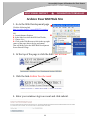
KSD User Guide and Tech Tips http:// teacher.kent.k12.wa.us/manage June 2008 TABLE of CONTENTS Swift Teacher Checklist Page KSD Web Publishing Guidelines Pages 4-5 How to Edit your KSD Swift accounts Page 6 SWIFT USER Guide from Puget Sound ESD Pages 7 - 35 Site Profile Page 7 Formatting Toolbar Overview Page 8 Adding Images Pages 9 - 10 Importing Images (special thanks to Edmonds SD) Pages 11 - 14 Inserting Microsoft Clip Art (special thanks to Pages 15 - 18 Blurring Images in Picasa 2(special thanks to Page 19 Adding Tables Page 20 Tabs Overview- Home-Announcements p21, Discussion p22, Pages 21 - 34 Using Anchors in SWIFT (special thanks to Edmonds Pages 35 - 40 Categorizing Links and Documents in Swift Pages 41 – 43 Archive Your KSD Web Site Tip Sheet Page 44 Edmonds SD) Edmonds SD) Docs-Events p23, HW-Links p24, Quiz pg25, Grades pg 26-34 SD) (special thanks to Edmonds SD) 2 3 SWIFT Web Page Teacher Checklist ;When Completed General Homepage includes: 9 Brief Introduction about purpose of web page 9 Teacher Name 9 Grade Level and/or Subjects Taught 9 District Email Address 9 District (work) Phone Number (253) 373-XXXX 9 All content relates directly to curriculum taught or school setting 9 Correct Spelling and Grammar has been used Permissions and Publishing Student Work ;When Completed 9 Student Photos and Names - Parent permission has been verified in WESPaC before posting 9 Student Names – Initials or first names only are posted after parent permission has been verified in WESPaC 9 All Forms of Student School Work – Parent permission has been verified on WESPaC before posting Copyright –Images, Music, Video, Animations and Other Sources ;When Completed 9 All resources added to web page only if permission has been asked for and granted by resource owner or if it falls under educational fair use policy. 9 All resources must be cited regardless. 9 Identifying resources produced by students posted only after parent permission has been granted and verified on WESPaC. ;When Completed Links 9 Links added have been tested and work 9 Links added are appropriate for classroom use All links are the original site (not a proxy) and contain: 9 Title of link 9 Brief description of link content 3 Kent School District Web Publishing Guidelines Please follow these guidelines to ensure that the information presented on our web site is accurate and complies with applicable laws and district policies. 1. 2. 3. 4. My web content is located on Kent SD web servers or SWIFT web servers. My pages contain content that is appropriate for the Kent School District. I credit sources for all material on my pages which I did not create. Students whose names and/or photographs appear on my pages have permission to be published. 5. Students are identified only by first names. 6. Parents have given permission for posting student work. 7. My pages are non-commercial and contain no advertisements. Print Name Signature Date Additional Information Security Practices Protecting Login Information Your web development account is for your use only. Please do not share your login name and password with anyone. 1. "Unofficial" School & Activity Sites We encourage all appropriate school-related activities to be located on the Kent School District web servers or SWIFT servers. Web pages on other servers may not meet the standards listed in these Web Publishing Guidelines, yet may appear to be endorsed by Kent School District schools if you link to them. 2. Appropriateness “Appropriate for Kent School District” implies the pages a. are consistent with the Electronic Systems Use Procedure(2022P), b. are educationally-related c. show discretion and professional judgment on the content. 3. Copyright The Kent School District makes every effort to adhere to and respect copyrighted materials. Please review Kent School District Policy 2025 on Copyrighted Materials. Any copyrighted materials used on the KSD web site must have written permission from the original author or follow fair use guidelines. Please read here for additional information: Updated 3/12/2009 • • http://www.kent.k12.wa.us/KSD/IT/wwwdev/copyright.html http://stafflink.portal.kent.k12.wa.us/sites/LibraryMedia/CopyrightPlagiari sm/Forms/AllItems.aspx 4. Web Publication Consent Web Consent Forms - You must determine which students do not have consent forms on file. Students whose names appear on the web in any form, including sports rosters, must also be clear of the "Directory Info/FERPA" listing. By default, any student's name can be published in a roster/directory form UNLESS the parents object in writing. (Your school's secretary or data processor can run a list of "FERPA exceptions" for your school.) 5. Internet Safety practices Good Internet safety practices require us to identify students only by their first name. Check your building WESPaC records for parent objections that have been submitted in writing. 6. Parent permission Student work should not be posted without parent permission. Check your building files for parent objections that have been submitted in writing. 7. Commercial Purposes "Commercial Purposes" includes (but is not limited to) • "for sale" or • "for rent" items • endorsing or • advertising for companies or products, Consistency & Accuracy Up-To-Date Content SWIFT makes keeping your content up-to-date very easy. It is important to develop a habit of updating your page on a regular schedule. Linked Pages When linking to a source outside of the Kent School District, please check your links frequently to make sure they are working as expected. We have encountered instances where a staff-created page had a link to an external website that was perfectly innocent at one time, but then the site went out of business and the same address was picked up by an inappropriate site. Updated 3/12/2009 How to Edit and Share Your SWIFT Website To Make Changes to Your SWIFT Website ¾ Go to the following website. http://teacher.kent.k12.wa.us/manage/index.php To Share Your SWIFT Website with Others ¾ Go online to your SWIFT website Notice the address: http://teacher.kent.k12.wa.us/dist/lkirkland/index.php The format is similar for a all accounts: http://teacher.kent.k12.wa.us/your school code/your name code This is the address that you want to share with your parents and students. There are also directory listings for each location and there is often a listing in each school’s website as well. When we want to share the district office directory we share this web address/URL: http://teacher.kent.k12.wa.us/dist 6 Site Profile Legend 1) Enabled tabs 2) Maximize editor window 3) View HTML code 4) Cut 5) Copy 6) Paste as plain text 7) Paste as a Word Document 8) Undo 9) Redo 10) Find a word or character on your page 11) Find and replace a word or character on your page 12) Select all of the contents of your page 13) Remove formatting from selected text 14) Insert or edit a hyperlink on selected text or image 15) Remove link from selected text or image 16) Insert or edit an html anchor 17) Insert an image or edit a selected image 18) Insert a table or edit properties of an existing table 19) Insert a horizontal line 20) Bold 21) Italic 22) Underline 23) Strike through 24) Subscript 25) Superscript 26) Left justify 27) Center justify 28) Right justify 29) Block justify 30) Create a numbered list 31) Create a bullet list 32) Decrease indent 33) Increase indent 34) Change text color 35) Change text background color 36) Insert a special character 37) Select text font 38) Select font size 39) Preformatted text 40) Preformatted styles 8 Tips If you’re unable to change the formatting of text you’ve selected (such as the color or font) first select the text you want to modify and click the “Remove Format” button (13). Then apply your new formatting. The formatting toolbar appears in numerous areas of SWIFT and functions the same in each location. More in‐depth information on placing images on your site and adding and modifying tables is included further on in this reference guide. "EEJOH*NBHFT $MJDLUIF*OTFSUJNBHFCVUUPOUPQMBDFBOJNBHFPOZPVSQBHF /PUF:PVDBOBMTPFEJUBOJNBHFBMSFBEZQMBDFEPOZPVSQBHFCZmSTUTFMFDUJOHUIFJNBHFDMJDLJOHPOJU BOEUIFO DMJDLJOHUIF*NBHF1PSUGPMJPCVUUPO :PVMMUIFOTFFUIFTFPQUJPOT 9 "EEJOH*NBHFT$POUJOVFE :PVDBOEPCBTJDJNBHFNBOJQVMBUJPOTVDIBTSPUBUJOHBOEDSPQQJOHCZDMJDLJOHUIFJNBHFFEJUJDPO :PVDBOBMTPSFTJ[FBOJNBHFBMSFBEZQMBDFEPO ZPVSQBHF$MJDLUIFJNBHFBOEUIFOESBHUIF IBOEMFTUPJODSFBTFPSEFDSFBTFUIFTJ[F 10 Addendum to SWIFT User Manual: Importing Images While SWIFT is an easy-to-use interface for web page development, inserting images requires a few extra steps which are not intuitive or obvious. Inserting images on the Home page, the Announcement page, the Homework page and the Practice Quizzes page involves the same process. If you click on the tabs for any of these pages: you will see a large text field with editing icons at the top of the field: To insert a picture, click on the “Image Portfolio” icon which will open a dialog box enabling you to insert a picture. You will see the following: Click on Browse. This will allow you to navigate to your My Pictures folder or whatever other location you use to store you photos: 11 Once you locate the photo you want to use, click on Open and you will be returned to the Image Portfolio dialog. The field next to the Browse button is now populated: Click on Add Image and a thumbnail of the photo will appear in the Image Portfolio display: Click on OK and the image will appear on the web page in question. If you wish to edit the photo, click on the pencil icon and you will enter the image edit screen: 12 The Crop, Resize, Rotate and Save icons are on the left side of the screen. Let’s crop this picture so that only the head is showing. Click on the Crop tool. The cursor will become a cross-hair. Clicking and dragging the cursor, draw a square around the part of the photo you wish to keep, in this case, the head. The part of the picture that is going to be eliminated will be grayed out: Here’s where it gets a bit complicated. Having finished the cropping maneuver: 1) Click on the green check mark above the picture: 2) Click on the Save icon. 3) Click on the green check mark AGAIN. 4) Now, you will get a prompt that the changes have been saved: 5) Click on OK. This will return you to the Image Portfolio view 6) When you are back in the Image Portfolio view, click on Add Image again and the cropped image will now be added. 13 **7) This is super-important. The Description field may or may not be empty. If it is not, go ahead and click on OK in the lower right-hand corner of the dialog box. The picture will appear on the page .If the field is empty, click on the cropped, rotated or resized image you wish to post and the field will be populated with the name of the file. Now, go ahead and click on OK in the lower right-hand corner of the dialog. You should now see the image on the web page. Verify by clicking on the View Website tab and navigate to the page you wish to see. 14 Inserting Microsoft Clip Art in SWIFT Pages for PC Computers (Windows XP) In Edmonds, we have permission from Microsoft to use their clip art on our SWIFT web pages. Follow these steps to insert clip art into your SWIFT page: 1. Log onto SWIFT: http://teacher.edmonds.wednet.edu/manage/index.php 2. You can add images to your Announcements, Home and Homework pages. Click on one of those tabs. 3. The only SWIFT pages you can add clip art onto are ones that look like mini-Word documents in editing mode and have the formatting toolbar towards the top of the editing window. 4. Click your mouse about where you want your clip art to show on your SWIFT page. You will see a flashing vertical line on the page after you have clicked your mouse. 5. Click on the Image Portfolio icon (square with mountain & sun inside). 6. Click the Browse button. 15 Inserting Microsoft Clip Art in SWIFT Pages for PC Computers (Windows XP) 7. Click the My Computer icon. 8. Double-click on the Local Disk (C:) folder. 9. Double-click on the Program Files folder. 10. Double-click on the Microsoft Office folder. 16 Inserting Microsoft Clip Art in SWIFT Pages for PC Computers (Windows XP) 11. Double-click on the CLIPART folder. 12. Double-click on the PUB60COR folder. 13. Put your mouse pointer on your View Menu icon and select Thumbnails. 14. Double-click on the piece of clip art you want. Note: You will only be able to import clip art titles that end in either .gif, .bmp or .jpg. 17 Inserting Microsoft Clip Art in SWIFT Pages for PC Computers (Windows XP) 15. Click the Add Image button. 16. In the list of images, locate the piece of clip art you just uploaded. Click once on this piece of clip art. 17. Click the OK button. 18. Your clip art will now show up on your SWIFT page! 18 Blurring an Image in Picasa 2 1. Open Picasa 2 on your computer. 2. Locate the image you want to edit in Picasa. 3. Double-click on the exact image you want to edit. 4. Click on the Effects Tab. 5. Click on Soft Focus. 6. Drag the plus sign to the area you want to appear in focus. 7. Adjust the Size slider to increase or decrease the radius of the area that appears in focus. 8. Adjust the Amount slider to increase or decrease the amount of blur applied. 9. Click the Apply button. 19 "EEJOH5BCMFT 6TFUIF*OTFSU5BCMFCVUUPOUPBEEUBCVMBSEBUBUPZPVSQBHF :PVMMUIFOTFFUIFTFPQUJPOT :PVDBOSFTJ[FBOFYJTUJOHUBCMFCZDMJDLJOH JUBOEESBHHJOHUIFIBOEMFTUPJODSFBTFPS EFDSFBTFUIFTJ[F :PVDBONPEJGZBOFYJTUJOHUBCMFBTXFMM BTBDDFTTBEWBODFEUBCMFNPEJmDBUJPOT GFBUVSFTCZTFMFDUJOHUIFUBCMFDMJDLPO JUPODF BOESJHIUDMJDLJOHZPVSNPVTF CVUUPO 20 5BCT0WFSWJFX 3FNFNCFS0OMZTFDUJPOTUIBUZPVWFBDUJWBUFEPOZPVSQSPmMFQBHFXJMMBQQFBSPOUIF UBCTNFOV )PNF5BC 5IF)PNFUBCBMMPXTZPVUPNPEJGZUIFMPPLPG ZPVSTJUFTIPNFQBHF:PVSIPNFQBHFJTVTVBMMZ UIFmSTUQBHFBTUVEFOUPSQBSFOUXJMMTFFXIFO UIFZWJTJUZPVSTJUF:PVDBOBEEBOVNCFSPG EJõFSFOUFMFNFOUTUPZPVSIPNFQBHFCZXBZPG UIFGPSNBUUJOHUPPMCBS *OBEEJUJPOUPBEEJOHUFYUZPVDBOBEENPSF WJTVBMBQQFBMCZJOTFSUJOHJNBHFTBOEUBCMFT 5SZBMJHOJOHUIFJNBHFUPUIFSJHIUPSMFGUPOF PGUIF"EWBODFE*NBHF1PSUGPMJPPQUJPO TPUFYU DBOXSBQBSPVOEJU "OOPVODFNFOUT5BC 6TFUIF"OOPVODFNFOUTUBCUPBEE BOOPVODFNFOUTUPZPVSTJUF:PVSQBHFMBZPVU PQUJPOTBSFUIFTBNFBTUIF)PNFUBC 21 Tabs Overview: Discussion Tab Add a discussion forum to your site using the Discussion tab. With each topic or “thread” you create you can choose to approve each reply or have replies automatically posted to your site. Approving each reply is strongly suggested because Internet spammers may attempt to post unwanted links as replies to your discussions in order to improve their ranking in search engines like Google. These links often contain inappropriate material for children, including pornography. In addition, approving each reply will keep you involved in the discussion, which means topics have more potential for creating learning opportunities. Approving each reply gives you the ability to view, edit, or delete each reply before it is seen by visitors to your site. You can also post your own replies to student replies to keep the dialogue going. To provide additional security, you may also want to “lock” your discussion threads. This lets you apply a password to each thread. If a visitor to your site attempts to participate in a discussion, they will be promted to enter a password—that you create—before continuing. Clicking on the “locked” or “unlocked” link will give you this screen in which to enter or modify your password for each discussion string. Note: Both the Documents tab and Tip: While working within the Discussion tab options, your web browser’s “back” button may not work. Click “Back to discussion” to step back to the previous screen or click the Discussion tab to get back to the Discussion start page. If you encounter this same problem in other areas of the SWIFT tool, click the tab for the area you are in to step back to the main edit screen of the section you are in. the Practice Quizzes tab include a Lock/ Unlock feature that functions the same as the Discussion Forum. 22 Tabs Overview: Documents Tab Use this feature to upload documents to your site you’d like to make available for download by students or parents. For example, you could upload a field trip permission form created in Word or a classroom presentation created in PowerPoint. You can assign a category to each of the documents you upload. Your documents page will display your documents in alphabetical order by category. You can lock or unlock access to each document. See page 9 for more information. Events Tab The Events tab allows you to add a calendar of events to your site. It’s easy to add either a singleday event or an event that spans multiple days. Make sure to give each event item a description. You can assign a category to each of the event you enter. Your events page will display your events in alphabetical order by category. Below is similar to what visitors to your site would see 16 23 Tabs Overview: Homework Tab Use the Homework tab to add homework assignments to your site. Your page layout options are the same as the Home tab. Links Tab Use the Links tab to add a list of links to your site. When you’re creating a link, make sure to give it a title and description in addition to the actual website address. You can assign a category to each of the links you enter. Your links page will display your link in alphabetical order by category. Below is similar to what visitors to your site would see 24 Tabs Overview: Practice Quizzes Tab The Practice Quizzes tab allows you to add interactive quizzes to your site. A visitor can take a quiz and immediately check their answers. You can create as many quizzes as you’d like. You can also add or delete questions to an existing quiz or delete a quiz all together. When creating a new quiz, make sure you give it a title and description before adding questions. You can lock or unlock visitors’ access to each quiz. See page 9 for more information. Enter a description of your new quiz here, then click the ADD button to add individual questions Below is similar to what visitors to your site would see 25 Tabs Overview: Grades Tab The Grades tab allows you to display grades on your site created in Easy Grade Pro or link to an external website that displays your class grades. With Easy Grade Pro You browse to a compressed Easy Grade Pro file and then click the Save Changes button. Individual student grades will then be viewable on your site behind a username and password you have created. If your student grades are located on an exteral site, you can link to it. Below is detailed information on how to create a compressed Easy Grade Pro file followed by information on linking to an exteral grades site. Adding Grades Created in Easy Grade Pro One of the useful features of Easy Grade Pro is its ability to export grades into a format viewable on the Web. In combination with SWIFT, you can let your students and their parents easily access their individual, passwordprotected grade reports from any computer with Internet access! The following instructions will guide you through the process of exporting from Easy Grade Pro, compressing the export into a single .zip file, and importing that file into SWIFT. If this is your first time doing this, set aside 15 minutes or so to learn all the steps. Don’t worry; once you get the hang of it, you’ll be able to do it much faster! If your computer is running Window XP, follow these instructions: First, we need to create a folder to store the files that Easy Grade Pro will create. On the desktop, right-click and select New | Folder. Name it something that you will remember. In this example, we will name our folder “Sample”. Next, open Easy Grade Pro. Since each student will need a password to access his or her online progress report, be sure you have assigned one to each student by double-clicking on a student’s name and completing the password field. If the same student is in different classes (for example, if you separate subjects into classes), give that student only one password and use it throughout for him or her. Make a note of the passwords separately so you can give them to students or parents later. Students without passwords will not be able to access their grades online. 26 Tabs Overview: Adding Grades Created in Easy Grade Pro (Continued) After assigning all the passwords, select File | Internet.... Select Multi-class Website Reports from the menu under the HTML tab and click Next. In the Multi-class Website Report Options window, select Create reports for students with Passwords in: all current-term classes. You may wish to adjust some of the default settings below, although anything under Main Page Options will be ignored. When you’re done, click Create. You will see a prompt. Click Yes. 27 Tabs Overview: Adding Grades Created in Easy Grade Pro (Continued) Find the desktop under the Save File window. Select the folder you created and click Open. You have now selected that folder to store the files you will create. Click Save to generate those files. When that’s done, you can close Easy Grade Pro. On the desktop, locate the folder you created. Right-click and select Send To | Compressed (zipped) Folder. Finally, return to the SWIFT grades module, click the Browse... button, and locate the new file you’ve created. In our example, it would be named Sample.zip and have a zipper on the folder icon. Select the file, click Open, and click Save Changes. If all went smoothly, you should see the number of student records that have been added and the date and time you last updated. If you click View Website and select Grades in the website menu, you will see a login screen with last name and password. Try one of the last name/password combinations you’ve created. You should see a progress report for that student! 28 Tabs Overview: Adding Grades Created in Easy Grade Pro (Continued) If your computer is running Mac OS X, follow these instructions: First, we need to create a folder to store the files that Easy Grade Pro will create. On the desktop, hold the Control key and click somewhere on the desktop. A menu will appear. Select New Folder Name it something that you will remember. In this example, we will name our folder “Sample”. Next, open Easy Grade Pro. Since each student will need a password to access his or her online progress report, be sure you have assigned one to each student by double-clicking on a student’s name and completing the password field. If the same student is in different classes (for example, if you separate subjects into classes), give that student only one password and use it throughout for him or her. Make a note of the passwords separately so you can give them to students or parents later. Students without passwords will not be able to access their grades online. After assigning all the passwords, select File | Internet.... 29 Tabs Overview: Adding Grades Created in Easy Grade Pro (Continued) Select Multi-class Website Reports from the menu under the HTML tab and click Next. In the Multi-class Website Report Options window, select Create reports for students with Passwords in: all current-term classes. You may wish to adjust some of the default settings below, although anything under Main Page Options will be ignored. When you’re done, click Create. You will see a prompt. Click Yes. Find the desktop under the Save File window. Select the folder you created and click Save to generate those files. When that’s done, you can close Easy Grade Pro. 30 Tabs Overview: Adding Grades Created in Easy Grade Pro (Continued) On the desktop, locate the folder you created. Hold the Control key and click its icon. A menu will appear. Select Create Archive of “Sample”, where “Sample” is the name of whatever you chose to name your folder. Finally, return to the Swift grades module, click the Browse... button, and locate the new file you’ve created. In our example, it would be named Sample.zip and has a zipper on the icon. Select the file, click Open, and click Save Changes. If all went smoothly, you should see the number of student records that have been added and the date and time you last updated. If you click View Website and select Grades in the website menu, you will see a login screen with last name and password. Try one of the last name/password combinations you’ve created. You should see a progress report for that student! When a student’s grades are viewed on your site, they will look similar to this. Linking to an Exteral Grading Website When you’re in the Profile tab you have the option to select “External link.” After you’ve selected “External link” in the Profile tab, go to the Grades tab and enter the complete url of the grades site you’d like to link to. Hyperlinking to Skyward Family Access: Ø Use this link: http://family.kent.wa-k12.net/ Tabs Overview: View Website Tab The View Website tab allows you to immediately see the modifications you’ve made to your site though SWIFT. When you click the View Website tab you are viewing the live site. RSS Feed What is RSS? RSS stands for Really Simple Syndication. Using RSS, you can easily stay up to date with changes to a website without having to check it on a regular basis. For example, this classroom website syndicates its home page, announcements, discussion threads, homework, and practice quizzes, and it will automatically refresh the feed if one of these is updated. How do I use RSS? Several modern browsers, such as Firefox and Apple’s Safari 2.0, support RSS in some way. Websites like Google and Yahoo! can also act as free RSS readers. To View The RSS Feed In Your RSS Reader: 1. Copy the URL. 2. Paste the URL into your reader. Firefox Users: Safari Users: My Yahoo! Users: Google Users: 1. Click the orange RSS icon in the address bar of your browser. 1. Click the blue RSS icon in the address bar of your browser. 1. Click on the “Add to My Yahoo!” button. 1. Click on the “Add to Google” button. 2. Add the Live Bookmark to your bookmarks list. 2. Select “Add to bookmarks” in the menu to the right. 2. Follow the instructions for adding the feed to your My Yahoo! page. 2. Follow the instructions for adding the feed either to Google Reader or your Google homepage. 32 Tabs Overview: Image Gallery Tab Use the Image Gallery tab to add interactive photo albums to your site. You can add a new photo album or edit an existing one. You can upload either individual .jpg files or a .zip file containing multiple .jpg files. Each .jpg or .zip file you upload can be no larger than 15mb. However, you can upload multiple files into each photo album you create. When creating a new photo album, make sure to give it a title and brief description. Then click “Add.” To insert images into your gallery, click the “Browse” button, then navigate to the desired image or .zip file. If you are unsure how to upload individual images or how to create a .zip file, click the Help button. The pop-up window includes detailed instructions for both Windows and Mac. As you add images, a thumbnail of each image will appear on screen. Don’t worry about each image being a specific width and height. SWIFT automatically adjusts the dimensions of each image to fit with the constraints of the image gallery. The order the images are displayed within each photo album is based on the order the images appear in the edit screen. To change the image order, simply click and drag an image thumbnail and move it up, down, right, or left. The first image in your albums will be displayed when a visitor views the image gallery page. 33 Tabs Overview: Image Gallery Tab (Continued). Click the trash can icon to delete the image from your photo album. Click the pencil icon to add a caption to your image. These numbers show the width and height of each image as it will be displayed in your photo album. Don’t worry about trying to shrink or enlarge the size of an image before uploading to SWIFT. SWIFT will automatially adjust the width and height. Also, don’t worry if there are variations in image size. SWIFT will not distort your images. Depending on the dimesions of your images, you may see black bars on the left and right of your images when viewing your photo albums. The Caption field allows you to add a description of each image. Visitors to your photo album will see your description when they roll over the image. A caption automatically appears after a few seconds if a visitor doesn’t roll over an image. This screen is similar to what a visitor will see when they go to your image gallery page. Each photo album you’ve created will be represented by the first image of the album along with the album’s name and description. A visitor simply clicks on the image or surrounding area to view the photo album. You can created as many photo albums as you’d like. If you view a photo album in full screen, you’ll need to click your browser’s back button to get out of this mode. 34 Using Anchors in SWIFT In the feedback you have submitted to me about the SWIFT interface, the one thing that many of you would like to see is content areas (Math, Social Studies, Language Arts etc,) along the navigation bar on the lefthand side of the page. This would allow parents and students to see exactly what is relevant to a given subject at a given time. Alas, that cannot be changed. However, there is a workaround that will allow you to have content area headings/links on either the Home, Announcements, or Homework pages (or all three if you wish). Clicking on any one of these links will take you to the location on the page in question where the relevant subject information can be found. We do this using Anchors. Sound confusing? No doubt. Let’s walk through it and you will see that in practice, it is quite simple. Log in to SWIFT and click on the Homework tab: Click in the text field and the Style buttons become active (Bold, Underline, Italic) : Click on Bold and make your text medium: Type in some content area headings so that the top of the page looks something like this: Take your mouse, click and drag over and highlight the first heading, in this case, Math. Click on the Background Color tool and a color palette will appear. Please not that the Background Color tool does not affect the entire background; it only affects the area adjacent to the text that you have typed in. Choose a color you find aesthetically pleasing and click on it: 35 The first heading should now look like this: Go back to the Background color tool and do the same thing for the other content area headings. When you are done, it should look something like this: We will now create the different sections on the page that these headings will link to. Go to the Background Color tool and select white: Hit the Enter key a few times so that the cursor appears three or four lines below your headings. 1) Type the first heading, in this case, Math. 2) This next step is very important. Click on the Anchor Tool then click immediately to the left of the “M” in the word “Math” which you have just typed. A dialog will appear asking you to name the Anchor. Type in the word ”Math” (no quotes) and click on OK: 36 An anchor icon will now appear to the left of the word “Math”: Now we can create the link from the Math heading to the Math section. 3) Go back up to the top of the page, take your cursor and click, drag and highlight the Math heading. Then click on the Hyperlink Tool: A dialog will appear asking you what you wish to link to. Click on the drop down menu and select “Anchor in this page”: Another dialog will appear asking you to select which anchor you want to link to. 4) Use the drop-down menu to select “Math”: 37 5) Click on OK. Your link has now been established. Place your cursor after the Math section and hit the enter key about 10-15 times and enter the name of your next section. Repeat steps 1 – 5 to create the next set of anchors and links. Make sure that the name of the Anchor is the same as the Section (Math, Social Studies, etc.). Make sure you click on “Save Changes” at the bottom of the page. In order to test your links, click on the View Website tab, click on the Homework link on the left side of the page and try out the links. The only thing that is missing now is a link to get the reader back to the top of the page. Click next to any one of the content area heading/links and click on the Anchor Tool. The dialog will appear. Call it “Top” (no quotes) and click on OK. It will look something like this: Now, scroll down to the first section of the page, in this case, Math. Next to the word “Math,”, using a smaller and less bold font, type the words “(back to top).” Include parentheses: Take your mouse, and click and drag over (back to top) so that it is highlighted. Then click on the Hyperlink Tool: The now-familiar dialog will appear asking you what you want to link to. Click on the drop-down menu and select “Anchor in this page.” Click on OK. 38 This will be followed by the next now-familiar dialog asking you which anchor you wish to link to. Use the drop-down menu, select “Top” and click on OK: Now that the link has been established for the Math section, repeat these steps for the remaining sections. Copying and pasting the links, for some reason, causes errors. So, While repeating the operation may be tedious, it is quick and easy. Again, click on the Save Changes button and click on the View Website tab to test your links. Now that you have content area headings and links to different sections on your Homework page, it is possible to post direct links to documents that you have previously uploaded to the Documents section of the website. This is a cool shortcut since it eliminates the need for the student to navigate to the Documents page and then hunt down the document that you wish to associate with the assignment. Let’s assume that for math, you want kids to read a document entitled “Using Microsoft Excel to Create Charts and Graphs” that you previously uploaded to the Documents page. First, enter the assignment on the Homework page but leave the title of the document blank: Click on Save Changes and click on the View Website tab. Navigate to the document in question: Copy the title of the document by clicking and dragging over the title, then going to Edit > Copy. **Make sure your cursor is well to the left or right of the title when you highlight it. The cursor needs to look like an arrow. If the cursor looks like a hand, then it will open the link. 39 Go back to the page you are editing and paste the title of the document by holding down the Ctrl key and typing a V. Your assignment will now look like this: Click on Save Changes. Click on the View Website tab and test your link. 40 Categorizing Links and Documents in SWIFT Up until a few days ago, Documents and Links on SWIFT web pages could only be listed alphabetically. The developers have now included a feature that allows for grouping and categorizing. It is very simple to use. Once you have logged into SWIFT, click on the Documents tab and you will be taken to the Documents upload page. Scroll down to the bottom of the page and you will see the following drop-down menu: In order to create categories, simply type the name of the category in the text field to the right of the word “Uncategorized” and hit Enter. The page will “hiccup” to the top of the page, heaven only knows why. Scroll back down to the bottom of the page, and click on the down arrow of the drop down menu. You will then see the category you have just created. Do this for as many categories as you like. Eventually the drop-down menu will look something like this: 41 When uploading a document, simply click on Browse and navigate to your document. You will get the familiar dialog: Select the document and click Open. Once you have returned to the SWIFT page, type the name of the document that you wish to appear on the web page in the text field and click on the dropdown menu to select the appropriate category for the document. Having completed that, click on the Upload File button. Click on the View Website tab and then on the Documents button along the navigation bar on the left. You will see your document grouped with the others to which you have assigned the same category: The process is no different for Links. Click on the Links tab in the edit view and you will see the same drop-down menu with the same categories listed. When placing a link on your Links page, copy and paste the address into the URL field, give the site a title, type in a brief description, and select the category from the drop-down menu. 42 43 Successfully Prepare All Students For Their Future KENT SCHOOL DISTRICT INFORMATION TECHNOLOGY Archive Your KSD Web Site 1. Go to the Web Development page A Click the following link http://wwwdev.kent.k12.wa.us/KSD/IT/wwwdev/ OR A. Launch Internet Explorer B B. In the links bar select the KSD Staff Folder, C. Choose Live, D. Click on the Web Resources link in the top right corner of the page (above the log out button) That will bring you to the KSD Web Development Server Resource Page D C 2. At the top of the page is click the link Your Account 3. Click the link Archive Your Account 4. Enter your windows log in account and click submit. 44