1
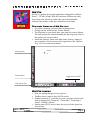
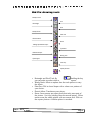
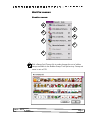
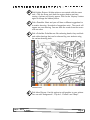
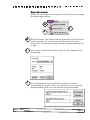
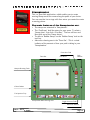
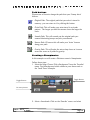
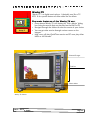
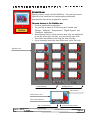
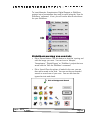
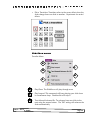
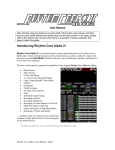
io
x Stud
i
P
d
i
K
ICT Training
Updated: July 2001
Job Aid
Contents
Kid Pix Studio
Deluxe
1
Kid Pix Studio Deluxe
Paint, Write, Create, Animate
The picker
Screen
2
This must be one of the most popular computer programs for
kids. It would be surprising to find out that your school did not
have one or two copies lying around. Kid Pix is a digital art
tool which has many interesting multimedia capabilities. The
following Job Aid will get you started using the six different
areas within Kid Pix. I encourage you to consult the complete
Kid Pix User’s Manual included on the CD-ROM for more
specific instructions.
Installation
3
Kid Pix
4
Moopies
11
Stampimator
12
Based on the premise that all children love to create pictures
and stories, Kid Pix was created to stimulate and encourage the
creative artistic side of children. Kid Pix can
produce different art projects that include
animation, clip art, stamps, movies, and sound.
It also has many hidden features and controls
that children love to explore and discover.
Wacky TV
20
SlideShow
22
FAQs
26
Lesson ideas
27
Activity
30
Trainer Notes
32
Prepared by Luc Gélinas
As an educator you will find that Kid Pix provides an
environment that is easily adaptable to the curriculum of many
school subjects. Kid Pix is quite versatile. The themes and the
interface will appeal mainly to younger children (K to grade 3).
The multimedia capabilities make Kid Pix an interesting tool to
be used in ‘Portfolio Assessment’. Children can create pictures
and write stories, reflect on their work and record their
comments using a voice recorder. They can create a digital slide
show of their work to be presented to parents at the end of a
unit or semester.
Digital puppets 17
The Picker screen
This is the first window that you see when you enter Kid Pix. The
six buttons lead you to the 6 areas of Kid Pix. Each of the six areas
provide children the opportunity to create different kinds of art
projects can be selected from the ‘Picker’.
Kid Pix Picker Screen
Kid Pix is a drawing and painting program designed for children
in mind. The tools are simple to use and by clicking and dragging
with the mouse great works of art can be created. Kid Pix is the
main application. Children can also write text and use stamps with
ready made clip art.
Moopies, short for moving pictures, takes the students into the
world of animation. In Moopies, the ‘Wacky Brushes’, ‘Rubber
Stamps’, ‘Alphabet Stamps’ and ‘Electric Mixer’ effects move!
Stampimator brings children into the area of drama. It is a
theatre stage inside your computer, where animated ‘Rubber
Stamps’ are the actors and you are the director. Select a stamp,
click and drag the mouse along a specific path and the ‘actor’ will
move along that path. This is a great starting place for story
starters. Children can then write about their projects.
CSLP — Kid Pix Studio
Page 2
Digital Puppets are little marionettes that you control with
your keyboard. You will have to explore the different keys that
make specific movements. You can add music or your own voice
and record the movements to go along with the voice.
Wacky TV is a viewer for digital movies. Kid Pix comes with
many short little movies that can then be inserted into drawings
and slide shows. You can also view work that has been saved for a
slideshow with this zany tool.
Slideshow is similar to Microsoft PowerPoint and AppleWorks
6 Presentation. It allows the student to put all of their work (from
Moopies, Stampimator, Digital Puppets and Slideshow) together to
tell a story or showcase work accumulated during the year.
Installing Kid Pix Studio
Kid Pix is supported for both Mac and PC platforms. Detailed
instructions and specifications are listed in the Installation Guide in
the package and on the CD-ROM readme files.
Installation of the software on your computer system will place the
minimum necessary files for you to run the program. In order to
run Kid Pix without the CD-ROM I recommend you also copy
these additional folders to the Kid Pix folder on your computer:
• Backgrounds
• Demo slide shows
• Movies
• Pictures
• Colour Mes
• Kids
• Sounds
• Pictures
This will enable you to use Kid Pix without the CD-ROM with the
exception of Digital Puppets (which requires the CD-ROM).
CSLP — Kid Pix Studio
Page 3
Kid Pix
Kid Pix is a graphic draw/paint application designed for children
from 3 – 12 years of age. With this software, children can easily
draw their own pictures to which they can add multimedia
elements like sounds, video clips, animations and clipart.
The main features of Kid Pix are:
• To create a drawing you must select a drawing tool.
• Colours can be selected from ‘Colour Palette’.
• Tool Options let you decide how you want the tool to behave.
The tool options are located beneath the drawing area, click on
the option you want to select.
• More tool options: Some tools offer many choices, (stamps is
one example), click the arrow at the right end of the ‘Options
Tray’ tool to reveal more choices.
Cursor
Drawing Tools
Colour Palette
Toggle for more Tools
Tool options Tray
Kid Pix Main Drawing Area
Kid Pix menus
•
•
•
•
CSLP — Kid Pix Studio
Edit: for making changes to your picture.
ToolBox menu: controls how Kid Pix works.
Goodies menu (p.7): provides you with variations for the tools
such as changing the ‘Stamp Set’, ‘ColourMes’, ‘Recording a
Sound’, ‘Picking a Movie’.
Speech menu (p.10): used to hear the text you have typed on
your picture.
Page 4
Kid Pix drawing tools
Wacky Pencil
Line
Rectangle
Oval
Wacky Brush
Paint Can
Electric Mixer
Eraser
Talking Alphabet Stamps
Typewriter
Rubber Stamps
Moving Van
Eyedropper
Undo Guy
Mystery Button
•
•
•
•
•
CSLP — Kid Pix Studio
Shift
Rectangle and Oval Tool: By
holding the key
you can make a perfect circle or
square.
Wacky Brush: Select an option from the tool options to vary
the effects.
Paint Can: Fills in closed shapes with a colour or a pattern of
your choice.
Electric Mixer: Transforms your picture.
Eraser: Some erasers are eraser pencils that only erase part of
the picture. Use it by holding down the mouse button. Other
erasers erase the whole picture with one mouse click. Click on
the mystery button. A hidden picture is revealed.
Page 5
•
•
•
•
•
•
CSLP — Kid Pix Studio
Talking Alphabet Stamps: Stamp Letters, numbers and
punctuation marks on your picture.
Typewriter: Use this tool to add text to your pictures. Some
features include:
• Edit the text without changing the picture.
• Hear the text read aloud.
• Resize text, reshape or change text location.
• Draw under text without erasing it.
To add text to your picture:
• Click the ‘Typewriter’ tool.
• Move the cursor to where you want to insert the text,
click the mouse and a text box will appear, then type
away.
• You can move the text box afterwards.
• You can paint the text into the picture using the
‘Toolbox’ menu, ‘Paint Text to Background’. You will
not be able to edit this text nor will it be read aloud
once it has been transferred to the picture.
Rubber Stamp: Choose a stamp and use the mouse button to
paste it into your picture. You can change the stamp set by
selecting ‘Edit a Stamp’ from the ‘Toolbox’ menu.
Moving Van: This tool allows you to pick up and move a
portion of your picture to another area or to copy a section of
your picture.
Eyedropper: This tool enables you to duplicate a specific colour
from your drawing to be used with another tool.
Undo Guy: This tool will undo the last action.
Page 6
Kid Pix menus
Goodies menu
A
B
C
D
E
F
G
A Pick a Stamp Set: Choose this to make changes the set of rubber
stamps available in the Rubber Stamp Tool option tray. Stamp sets
come in sets of 112.
CSLP — Kid Pix Studio
Page 7
B
Pick Hidden Pictures: Hidden pictures are created with the eraser
tool. Click the Eraser tool then the mystery button and start
erasing. A picture will slowly appear. Click on the ‘Mystery’ button
again to change the hidden picture.
C
Pick a DrawMe: Select and you will hear a different suggestion for
a creative drawing. Hundreds of suggestions exist. The words will
appear on your drawing. You can erase the words from the screen
with an eraser
D
Pick a ColorMe: ColorMes are like colouring books, they are black
and white drawings that can be coloured by your students using
the various drawing tools.
ColorMe Screen
E
CSLP — Kid Pix Studio
Pick More Pictures: Use this option to add graphics to your picture.
You can add ‘Backgrounds’, ‘Clip Art’, ‘Cutouts’ and ‘Maps’.
Page 8
F
Record a Sound: Use this feature to add sounds to your Kid Pix
picture. Students can also record their own voice.
G
Pick a Movie: You can use this command to play the movie you
have inserted in your picture. You may have to navigate to the
folder where the movies are located.
The Wacky TV will appear over your picture. Preview the movie
using the Wacky TV. Click the paste jar to paste the movie in your
picture. (For more information see the Wacky TV section).
Wacky TV Screen
CSLP — Kid Pix Studio
Page 9
Speech menu
Kid Pix can read aloud any text typed with the Typewriter tool using
the Speech menu options.
H
I
J
H
Read Text Aloud: Text written with the Typewriter tool will be read
by the computer. If you have more than one text box in your
picture, they will be read in order from top to bottom and from left
to right.
I
Pick a Voice: Use this tool to select a voice for the computer to use
for speaking.
J
How to Pronounce: You can teach the computer the proper
pronunciation for specific words. All you have to do is to type the
phonetic spelling of the way you want the word pronounced.
CSLP — Kid Pix Studio
Page 10
Moopies
Moopies stand for ‘Moving pictures’. Moopies helps you create
animated pictures as you draw.
The main features of the Moopies are:
• Moopies tools let you choose how you want to draw. Select a
Tool then look in the Tool Options tray for the various choices.
• The drawing tool are all the same as KidPix although the
resulting pictures are animated.
• To Save your Moopie picture for a SlideShow you should save
it twice. Once as a Moopie file and once again using ‘Save for
SlideShow’. The Moopie file can be edited if changes are
required.
Moopie Drawing Tools
Colour Palette
Tool options Tray
Moopies Main Drawing Area
CSLP — Kid Pix Studio
Toggle for more Tools
Page 11
Stampimator
This is a great little application, which enables you to create
moving stamps across the screen along the paths of your choice.
You can consider it as a stage with four actors you control to create
a moving picture.
The main features of the Stampimator are:
• The stamps are animated in ‘Stampimator’.
• The ‘Cast Boxes’ hold the actors for your scene. To select a
‘Stamp Actor’, first click a ‘Cast Box’. The box will turn red.
Next pick one of the ‘Stamp Actors’.
• To select a ‘Rubber Stamp’ use the ‘Rubber Stamp’ tool on the
tool bar.
• Above the drawing area is the ‘Timer Bar’. This is a visual
indicator of the amount of time your path is taking in your
‘Stampimation’.
Firecracker Tool
Timer Bar
Path
Buttons
Cast Boxes
Moopie Drawing Tools
Colour Palette
Tool options Tray
Stampimator Main Drawing Area
Toggle for more Tools
Behaviour Buttons
CSLP — Kid Pix Studio
Page 12
Stampimator tools
Firecracker Tool
Behaviour Buttons
Cast Boxes
Path Buttons
Firecracker tool: To get rid of a cast member, click the appropriate
Cast Box and then the Firecracker.
Cast Boxes: The rubber stamps placed in these boxes can be used as
actors for your Stampimation. Click a Cast Box then select a stamp
actor from the options tray.
Behaviour buttons
These buttons control the motion of your Stamp Actors during the
Stampimation.
Ping Pong: Moves your actor back and forth the path you created.
Mirror Motion : The stamp will flip at the end of the path. It will
only work if you choose Ping Pong also.
Always Move:To make your stamp actor move when no path is
created. Standing still actor will be animated.
To use the behaviour buttons:
• Click the ‘Cast Box’.
• Select the behaviour you want.
• To turn the behaviour off, click the button again.
CSLP — Kid Pix Studio
Page 13
Path buttons
Choose one of these to change the path that your ‘Stamp Actor’
follows.
•
Original Path: The original path that you select is stored in
memory, you can return to it by clicking this button.
•
Circle Path: This will make your actor travel in a circular
pattern. The longer you hold the mouse down the larger the
circle.
•
Smooth Path: This will smooth out the original path you
created eliminating bumps and jerky movements.
•
Bounce Path: Of course this will make your ‘Actor’ bounce
along your path.
•
Gravity Path: This will make the actor drop down as it moves
across the screen as if pulled by gravity.
Creating a Stampimator
In this example we will create a Christmas scene in Stampimator.
Follow these steps:
1. Select the Stage: Choose ‘Pick a Background’ from the ‘Goodies’
menu. Find a background which relates to your theme such as
the ‘Small Town’ example.
Toggle Pictures
Toggle Pictures
See more pictures
2. Select a Soundtrack: Click on the ‘Goodies’ menu, and select
CSLP — Kid Pix Studio
Page 14
‘pick a Sound’.
Toggle Sounds
Import a new sound
Record your own sound
Looping options
Preview selected sound
3. Choose your Actors: Again from the ‘Goodies’ menu , select
‘Pick a Stamp Set’. There are 112 stamps per set to choose from.
For this example, choose the ‘Celebrations’ stamp set which has
many Christmas stamps. The ‘Animation Controls’ dictate how
the stamps will move.
Stamp Animation
4. Start the Action:
• Click the ‘Cast Box’.
• Select the ‘Actor’ from the ‘Options’ tray.
• Hold down the mouse button while you drag the actor across
the screen.
• The red bar appears at the top of the screen in the ‘Timer Bar’
that indicates how much time you have. When it fills up you
are done.
• Repeat this process for each ‘Stamp Actor’.
CSLP — Kid Pix Studio
Page 15
Stampimator Christmas Scene
5. Click on the ‘Behaviour’
and ‘Path’ buttons to modify the path of your actors.
6. Save your project twice . Once as a ‘Stampimator project’, and
a second time ‘Save for SlideShow’ if you want to include it in a
SlideShow.
CSLP — Kid Pix Studio
Page 16
Digital puppets
Digital Puppets are controlled with the keys on your keyboard.
You can make the puppet move and add a voice recording. This
Kid Pix feature requires the CD-ROM to function.
The main features of the Digital Puppets are:
• This application creates an animation rather than a picture.
• You can choose from 10 different puppets.
• The buttons at the bottom of the screen enable you to ‘record’
your puppet movements, and then play your show.
• The ‘Timer Bar’ indicates the time you have left for your
recording.
Timer Bar
Puppet
Digital Puppets Display Area
CSLP — Kid Pix Studio
Control Buttons
Page 17
Create a digital puppet show
1. Select ‘Pick a Puppet’ from the ‘Goodies’ menu.
2. Experiment with your Puppet: Different keys will animate your
puppet’s arms, legs, and mouth. To get the best effects, it is a
good idea experiment with the movement controls for a few
minutes before recording.
3. Pick a background: Using the ‘Goodies’ menu.
4. Record your voice: Click on the ‘Goodies’ menu, and select
‘Pick a Sound’. Choose ‘Record a sound’. The recorder will
appear and you have 20 seconds of recording time available.
CSLP — Kid Pix Studio
Page 18
5. Start the Action.
• Click the ‘record’ button, the sound you recorded will play and
the timer bar will start to fill up.
• Press the ‘letter keys’ to make the puppet move.
• If you remember the keys associated to different movements,
you puppets will animate appropriately.
• Press ‘Stop’ when you are done, the movements you added will
be save with your recording.
• Click the ‘Play’ button to see the show.
• You have created a digital puppet show.
Digital Puppet Sample Project
7. Save your project twice . Once as a ‘Stampimator project’, and
a second time ‘Save for SlideShow’ if you want to include it in a
SlideShow.
CSLP — Kid Pix Studio
Page 19
Wacky TV
‘Wacky TV’ is a digital movie player. It basically runs like a TV
VCR. A few special features are also added for fun effects.
The main features of the Wacky TV are:
• Once selected Wacky TV will display the ‘Pick a Movie’ dialog
box listing the movies that are provided on the Kid Pix CD.
• Navigate through the folders to select the movie of your choice.
• You can get other movies through various sources on the
Internet.
• MAC users will play QuickTime movies and PC users play either
MOV or AVI formats.
Channel Changer
Tool Bar
Electric Mixer
Wacky TV Viewer
CSLP — Kid Pix Studio
Page 20
Wacky TV tools
CSLP — Kid Pix Studio
•
‘Channel Changer’: Select this to change the movies to watch.
•
‘Goodbye’: Returns you to the ‘Picker’ screen.
•
‘Stop’: Stops the movie.
•
‘Play’: Starts the movie. Movies run continuously.
•
‘Step by Step’: To advance the movie one frame at a time.
•
‘Rewind’: Brings you back to the beginning of the movie.
•
‘Volume Control’: Adjusts the sound level.
•
‘Paste Jar’: Select this tool to paste the current movie into your
picture.
•
‘Electric Mixer’: Experiment with this feature. It will make your
movie experience even wackier!!
•
‘Undo Guy’: Will remove the effects you have added.
Page 21
SlideShow
Display your art work with the SlideShow. You can insert sound
effects and use transitions to create amazing multimedia
presentations that can be projected to a group.
The main features of the SlideShow are:
• Create a multimedia presentation.
• You can link as many as 99 ‘Moving Vans’ loaded with
‘Pictures’, ‘Moopies’, ‘Stampimators’, ‘Digital Puppets’ and
‘SlideShow’ animations.
• Each Moving Van has a slide preview area, they are numbered
to see the order they will play, you can reorder your slide.
• Time slider bar indicates how long the slide will play.
• If you inserted a movie the time slider turns into a film strip.
SlideShow Bus
Control Buttons
Scrolling Arrows
Slide Number
Slide Preview Area
Pick a Picture Button
Pick a sound Button
CSLP — Kid Pix Studio
Pick a Transition Button
Page 22
To insert Moopies, Stampimators, Digital Puppets or SlideShow
projects into a presentation they must be saved using the ‘Save for
SlideShow’ command. If not, you will not be able to select them
for your SlideShow.
SlideShow moving van controls
•
Pick a Picture Button: Click this button to load the ‘moving van’
with the image you want. You can insert a ‘Moopie’,
‘Stampimator’, ‘Digital Puppet’ or ‘SlideShow’ project that was
saved with the ‘Save for SlideShow’ command.
•
Pick a Sound: Once the picture is loaded in the van, you can
then add a sound to the slide. You can use the pre-recorded
sounds or record one of your own. You can also hear the
typewriter text read aloud.
Pick a Background Sound
CSLP — Kid Pix Studio
Page 23
•
Pick a Transition: Transition refers to the screen effect when the
slides change from one slide to another. Experiment for varied
effects.
SlideShow menus
Goodies Menu
K
L
M
N
O
P
K
•
Play Once: The SlideShow will play through once.
L
•
Play Looped: This command will keep playing your slide show
in a continuous loop. Double-click will stop it.
M
•
Turn Manual Advance On: To advance from one slide to the
next using the mouse button. The ‘Off’ setting will advance the
slides automatically.
CSLP — Kid Pix Studio
Page 24
N
•
Clean Up: When editing your project, some of the ‘Moving
Vans’ may be left empty. To remove these empty vans use the
‘Clean up’ command.
O
•
Tool Sounds: As you work Kid Pix makes little noises. This
command turns them ‘On’ or ‘Off’ as you wish.
P
•
Pick a Background Colour: This will fill the background space of
your presentation with the colour of your choice.
•
Time Slider: Gives you control over the amount of time for
each slide in your presentation. Click and hold the mouse while
you slide left or right to increase or decrease the time.
Time Slider
CSLP — Kid Pix Studio
Page 25
FAQs
The following answers are for frequently asked questions about Kid
Pix.
CSLP — Kid Pix Studio
•
Can I import graphics from other sources?
Yes. Using the ‘Import a Graphic’ menu in Kid Pix and Import
Picture menu in ‘Moopies’, ‘Stampimator’ and ‘Digital Puppets’.
These functions will allow you to store and use graphics from a
variety of sources in in many formats.
•
I cannot see the animated projects my students created in the
slideshow.
You can only see pictures and movie files in slideshow. To use
the animated projects in a slideshow you must save for
slideshow to convert your project into movie format.
Remember to save the project in the original application and
then save it for slideshow. If you want to make changes to
your project, it can only be done in the original application file.
Converted files cannot be modified.
•
Can I use a Photo CD files or professionally prepared clip art
CDs?
Certainly. You can use the files in the same manner by
importing them into Kid Pix. Photo CDs are often provided
when rolls of film are processed. If you ask, you can have your
pictures stored in digital format on a CD. These files can then
be used in Kid Pix.
•
How many sounds can a Kid Pix Picture have?
With Kid Pix you can record a 30 second sound with your
picture and paste a digital movie with sound in your picture.
The recorded sound will play first, then the digital movie. An
attached sounds play when the file is used in SlideShow.
•
I cannot hear any text?
If you selected the ‘Paint Text to Background’ command under
the ‘Toolbox’ menu, the text box contents from the clear plastic
layer get painted onto the white paper layer. Now that they
are part of the picture, they cannot be edited, moved, read out
loud, etc. You can add more text boxes to your picture at any
time by using the ‘Typewriter’ tool. Only text in a text box can
be read aloud by the computer.
Page 26
Lesson ideas for all subjects
Grades 1 to 6
At a staff workshop in Geneva, Switzerland, educators came up
with the following ideas for use of Kid Pix. Some of these ideas
are being used with the English Language Special Education
Association (ELSEA) students. These are children with severe
learning disabilities who are working on some of the activities
such as the alphabet book. So far the program is going
wonderfully.
Language Arts
• Stamp pictures, write sentences to describe, use microphone
to record someone reading your sentence and put it
together into a ‘SlideShow’.
• Make an animated alphabet book with Kid Pix and the
SlideShow.
• Make and print out a dictionary.
• Have students write and record their own ‘ColorMe
Pictures’ for other students to use.
Art
• Create self portraits with recorded ‘Hello’, put into a
SlideShow for a parents' night, or use as a stand alone ‘class
who's who’ book.
• Use the shapes to create tessellations (small squares, perhaps
arranged in a mosaic).
• Make pattern pictures with the stamps.
Math
•
•
CSLP — Kid Pix Studio
Use the stamp that looks like dice to create math problems.
(One boy with learning disabilities, for example, made some
pages with the dice randomly dropped, and then found the
numbers to go with them. Finally, he stamped the + and =
signs and then stamped the answers on the page.)
Stamp numbers and then use the picture stamps to show
quantity.
Page 27
Reading
•
•
Use the ‘ColorMe pictures’ for reading comprehension.
Read a SlideShow book someone else created.
Social Studies
• Draw and paint a picture of your home.
• Draw a map of your home, room, school,
neighbourhood, etc.
• Use the ‘KidArt Maps’ software that works with Kid Pix
to create maps for projects, etc.
• Record neighbourhood sounds with a portable recorder
and then make a picture of the sound and import the
sound you recorded. Use the pictures to create a visual
and auditory picture of where you live.
• Make a ‘SlideShow’ of your school (or neighbourhood,
field trip, farm animals, city, country, a zoo, etc.).
Drama
• Make parts (face, features, hands, etc.) for paper bag
puppets.
Science
• Illustrate a science experiment and record the steps on
several Kid Pix pages and then make a ‘SlideShow’ to
demonstrate your experiment to others
• Draw a picture of the different steps for plant growth
and make a ‘quick’.
• Make a ‘SlideShow’ to animate the growth.
Music
CSLP — Kid Pix Studio
•
Make programs and posters for school musical events.
•
During the staff workshop the teachers were amazed at the
possibilities, and really enjoyed the program themselves.
Even ‘non-techies’ who get the jitters just thinking about
technology integration had fun and began to see the endless
possibilities for this program and the programs that support
it.
Page 28
Suggestions for parents
For parents who have a computer, printer, and Kid Pix at
home, all of the suggested activities may be carried out.
Submitted By:
Diane Simmons Tomczak
Sous Servaz 17, CH-1266
Duillier, Switzerland
http://henson.austin.apple.com/edres/ellesson/elemkidpixgeneva.shtml
CSLP — Kid Pix Studio
Page 29
udio
t
S
x
i
Kid P
Activities
Exploring and creating with Kid Pix &
Showcase work in a SlideShow.
This activity will have you explore and create different drawings
and animations using the Kid Pix applications. You should try to
create drawings using as many applications as you can. To
conclude the activity, you will then place all your creations in a
SlideShow presentation.
You should think of a theme and make all your creations based
on this theme.
Art projects to create:
Kid Pix: two drawings
1. Make a title page with your name and SlideShow title.
• Include stamps, graphics and colour.
2. You can create a second Kid Pix Drawing.
• This drawing should include an imported graphic or a movie.
You will need to use the ‘Wacky TV’ to preview the movies.
• Use the typewriter to add text and have the text read aloud
by the computer.
• As a challenge you can also try to include a voice recording for
this drawing. Record your comments or reflections on your
Kip Pix creation thus far.
Moopies: one animated drawing
• Use the ‘Wacky Brush’ and the animated stamps to make a
moving picture.
• Many options are available, toggle through the various choice
in the ‘Options Tray’.
• Make sure you save your project twice, once as a ‘Moopie’
which will allow you to edit it later on and a second time
‘Save for SlideShow’ to include it at the end.
Stampimator: one project
•
•
•
•
Based on your theme, select a background, some music and
some actors for your ‘Stampimator’ project.
Experiment with the tools and controls to get the desired
effects.
Refer back to the Job Aid for details on the features.
Make sure you save your project twice, once as a
‘Stampimator’ which will allow you to edit it later on and a
second time ‘Save for SlideShow’ to include it at the end.
Digital Puppets: one puppet project
• You can use the digital puppet to introduce your project or at
the end to conclude your project.
• You will need to select the puppet of your choice.
• Choose an appropriate background.
• Record your voice.
• Explore how to animate your puppet by using the key board
keys.
• Once you are ready, press record to add puppet movements
to your voice recording.
• Make sure you save your project twice, once as a ‘Digital
Puppet’ which will allow you to edit it later on and a second
time ‘Save for SlideShow’ to include it at the end.
Create a SlideShow
SlideShow: the final step using your 5 projects
• Using the various drawings and animations you have just
created prepare a show to showcase your work.
• Your ‘SlideShow’ can include animations, movies, text read
aloud, etc. Basically anything that Kid Pix enables you to use.
• Include some transitions between the slides.
• You can even add some background music to your show.
CSLP — Kid Pix Studio
Page 31
tudio
S
x
i
P
Kid
Trainer Notes
Resources
Computer Lesson Plans for Kid Pix
http://www.mississippi.net/~lamarelm/technolo.htm#pix
This site features the following:
• Venn Diagrams
• A is for Apple D
• raw More Objects
• Faces
• Two by Two
• Let's Make Shapes
• ABC's and 123's
• Big Bigger Biggest
• Match the Colour Game
• Repeat the Pattern
• Sports Balls G
• et In Shape
• Favourite Things
• Bookmark
• Shape Book
• Early Literacy Technology
Project -creating centres
•
•
•
•
•
•
•
•
•
How to Convert Kid Pix
Slideshows for the Web
Kid Pix Kid Pix-Ideas From
Geneva, Gr.1-6
Kid Pix-Learning Ideas,
Grades 2-4
KidPix Notes
Kings Park-Technology
Marcia's Kids Pix Page
Marilee's Kid Works and Kid
Pix Page
Second Grade Literature HBJ 1993 Treasury of
Literature - Index Page
Using Graphic Converter to
Convert Kid Pix Graphics to
Gif Files
Kid Pix exploration
http://www.learningspace.org/prof_growth/training/Kidpix/
Kid Pix projects
http://www.ameritech.net/users/macler/kidworks.html#othproj
Kid Pix in the classroom
http://home.wsd.wednet.edu/WSD/NewberyFolder/
kidpix_bookmarks.html
Putting Kid Pix SlideShows on the Web
http://www.inform.umd.edu/UMS+State/UMD-Projects/
MCTP/Technology/slideshow/
On-Line technology tutorials: Kid Pix
http://www.brrsd.k12.nj.us/brhs/Business/Professional%
20Development/Kid%20Pix.htm
Kid Pix on-line
http://www.kidpix.com/
CSLP — Kid Pix Studio
Page 33