1
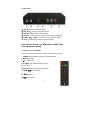
SRT 5432 User Manual 1 Warranty Information This product comes with a 12 month manufacturer’s warranty from the date of purchase. This unit has a 30 days replacement warranty for manufacturing faults. Within this period please return the faulty product with all its supplied accessories to either the place of purchase or STRONG Australia accompanied by the original purchase receipt. After this 30 days period the unit must be returned to STRONG Australia for testing, and if deemed faulty, will be repaired or replaced at the discretion of STRONG Australia Pty Ltd. The faulty product can either be sent to STRONG Australia directly or via your place of purchase for evaluation. STRONG Australia will cover any reasonable costs incurred in returning the faulty product for evaluation should the product be deemed as genuinely faulty. If the product is found to have no fault, the costs incurred in delivering product to and from STRONG Australia will be the customer. Our goods come with guarantees that cannot be excluded under Australian Consumer Law. You are entitled to a replacement or refund for major failure and for compensation for any reasonably foreseeable loss or damage. You are also entitled to have goods repaired or replaced if the goods fail to be of acceptable quality and the failure does not amount to a major failure. STRONG Australia 60 Wedgewood Rd, Hallam. VIC. 3803 Ph: +61 3 8795 7990 FAX: +61 3 8795 7991 2 Content Instruction .................................................................................................... 4 Reference .................................................................................................... 6 2. Product Overview .................................................................................. 7 2.1 Front Panel ............................................................................................ 7 2.2 Rear Panel .............................................................................................. 8 2.3 Remote Control Unit (RCU) .................................................................. 8 3. Installation .............................................................................................. 9 3.1 Manual scan ......................................................................................... 10 3.2 Auto scan ............................................................................................. 11 3.3 Antenna power setting ......................................................................... 11 3.4 Factory Default .................................................................................... 11 4. Edit Channel ........................................................................................ 11 4.1 TV/Radio Channels .............................................................................. 11 4.2 TV/Radio Favourites ............................................................................ 12 4.3 Sort Channels ....................................................................................... 12 4.4 User Channel List ................................................................................ 12 5. Settings .................................................................................................. 13 5.1 System Settings .................................................................................... 13 5.2 OSD Setup ........................................................................................... 14 5.3 Parental control .................................................................................... 14 5.4 Calendar ............................................................................................... 14 5.5 Color Settings....................................................................................... 14 6 Clock and Timer Recording ................................................................. 15 7. Expansion.............................................................................................. 16 7.1 Games .................................................................................................. 16 7.2,USB ...................................................................................................... 16 7 About STB .............................................................................................. 18 8. Basic Operation .................................................................................... 18 3 8.1 Audio ................................................................................................... 18 8.2 EPG: .................................................................................................. 18 8.5 Subtitle. ................................................................................................ 19 8.6 Record. ................................................................................................. 19 8.7 Program Information ............................................................................ 19 9. Channel List ......................................................................................... 19 9.1 OK List................................................................................................. 19 9.2 Favorite List ......................................................................................... 20 10. USB Control ....................................................................................... 20 10.1 Recording and Timeshift .................................................................... 20 10.2 PVR List............................................................................................. 20 11. Additional Information...................................................................... 21 11.1 Trouble Shooting ............................................................................... 21 12. Technical Specifications ................................................................... 20 Instruction Safety Precaution This STB has been designed and manufactured to satisfy the international safety standards. Please read the following safety precautions carefully before operating this receiver. Main Supply: Before operating, please check the units operating voltage is 100-240V AC 50/60HZ 4 Overload: Do not overload a wall outlet, extension cord or adapter, neither use damaged power cord or touch it with wet hand as this may result in electric shock. iquid: L The receiver shall not be exposed to dripping or splashing water, and that no objects filled with liquids, such as base, shall be placed on the apparatus. Ventilation: Keep the slots on top of the receiver uncover to allow sufficient airflow to the unit. Do not put the receiver on soft furnishings or carpets. Do not expose the receiver to direct light or do not place it near a heater or in humid conditions. Do not stack other electronic equipments on top of the receiver. leaning: C Plug out the receiver from the wall outlet before cleaning. Clean the receiver by a soft cloth or mild solution of washing-up liquid (no solvents). onnection: C Disconnect the receiver from the mains when you connect it to ANT or disconnect it from ANT. Failure would possibly cause damage to the ANT. Location: 5 Put the receiver indoor in order to avoid lightening, raining or sunlight. ncover: U Do not remove the cover, to reduce the risk of electric shock. Contact qualified and licensed service personnel to repair the receiver, or contact your dealer. Reference Auto Search Manual Search PAL/NTSC Conversion True full Color (32 bits) on screen display (OSD) 2 menu languages supported:English and Thai Multi-language audio supported Multi-language DVB Subtitle output 7 days Electronic Program Guide (EPG) Teletext output through VBI and OSD. USB 2.0 Interface Software update: If new software becomes available for this model, it can be dow nloaded from our website (www.strong.com.au) and then placed onto a USB. Plug in the USB into the USB port on the unit and then go to: Menu System Software Update USB Upgrade 6 Product Overview 2.1 Front Panel 1. USB2.0:One USB 2.0 Host Port. 2. Power /Signal light:Power /signal indicator. 3. Display:It displays channel information. In standby mode it displays local time. 4. Power button:Switch between operation and standby modes. 5. ▲:Change channel in viewing mode and move the cursor up in menu mode. 6. ▼;Change channel in viewing mode and move the cursor down in menu mode 7 2.2 Rear Panel 1)ANT IN:Connect the antenna cable. 2)ANT OUT:Loop out to pass signal through 3)COAXIAL:Digital Audio output (Optical). 4)DV-OUT :Connect to the TV using an HDMI cable (not supplied) 5)AUDIO(R/L)/ VIDEO:Connect to the TV using RCA cabling 6) DC-5V:Connect to the power using power adapter. Note: For best results, use HDMI cable and RG6 Quad Shielded antenna cabling 2.3 Remote Control Unit (RCU) You can control this receiver by this remote controller with full function. 1. POWER: Switch between operation and standby modes. 2. MUTE: Mute audio. : Play/Pause . 4. USB/■ : enter USB menu/stop function. 5. ●: Record. 6. INFO:Display the programme information. 7. IWW/ XXI:Previous/Next. 3. ▶|| 8. WW:Rewind 9. XX:Fast forward. 8 10. SUB:Display the subtitle language list 11. Recall:Show the previous viewed channels list or switch to previously viewed channels 12. ▲╱▼:Change channels 13. OK: Confirm the selected operation or display the channel list while watching a programme. 14. ◀╱▶:Change volume . 15. MENU: Activate main menu or exit to live channel. 16. EXIT: Exit current menu step by step. 17. VOL+/-:Change volume. 18. EPG(Electronic Program Guide): Display the programme guide. 19. Timer :Setup event timer/timer recordings 20. CH+/CH-:Change channels 21. NUMERIC KEY (0~9): Enter a TV/radio channel number, menu option number 22. ASPECT: Change the screen mode. 23. TV/R: Switch between TV and RADIO. 3. Installation You should install the receiver when powering on your product for the first time after purchase. Tip: The default password is 0000. If you have forgotten your password, please contact your local product distributor. 9 3.1 Manual scan Manual scan function would only add newly found services to STB database, without any database clearing action. User needs to know the target scan frequency and bandwidth in advance. (1) Press <OK> to enter “Manual Scan” menu. (2) Press <Up/Down> to focus on “Frequency” . (3) Press GREEN button to add Frequency and press <0 ~ 9> to input frequency value. (4) Press YELLOW button to edit Frequency. (5) Press BLUE button to delete Frequency. Press RED button to start manual scan and press <Exit> to cancel scan 10 3.2 Auto scan Auto scan function would empty all sevices in STB database at first. Then scan the frequencies one by one, which are stored in the default frequency table corresponding to current “Country Setting”. (1) Press <OK>.will appear a choice to network search yes or no. (2) Press <OK> start auto scan whether network search yer or no. 3.3 Antenna power setting This is DVB T2 5v control – for passive antennas, please set it to OFF. If active antenna, off or on does not matter. 3.4 Factory Default You can restore the product to the factory default and you can also set it up according to the wizard. 1. Menu->INSTALLTION -> Factory Default 2. Input the password (default password is 0000) 3. Highlight the option you want and press the OK button to execute it. Tip: If you select “yes”, all data and settings will be lost. 4. Edit Channel In the Channel menu, you can edit the channels that you want to play in the Normal Play mode. The functions available here include TV channel editor, Radio channel editor. 4.1 TV/Radio Channels Menu->EDIT CHANNEL->TV/Radio Channels 11 Edit Channels enables you to move, delete, rename, lock/unlock,the channels in the channel list conveniently, you can press ◀/▶button to move, delete, rename, lock/unlock ,press ▲/▼ button to select channels. Tip: Radio Channels operation similar to the TV Channels. Note: If the highlighted channel is locked, press the OK button to switch to Unlock. 4.2 TV/Radio Favorites Menu->EDIT CHANNEL-> TV/Radio Favorites You can add or remove channels from the favorite groups. 4.3 Sort Channels Menu->EDIT CHANNAL -> Sort Channels Highlight the option you want and press the OK button to sort the channel list. You can sort by LCN (logical channel number), Transponder, Default, Favourite, alphabetical and provider service ID. 4.4 User Channel List User Channel List allows you to save or load all the data and settings. 1. Menu->EDIT CHANNAL -> User Channel List->Save User Data 12 2. Menu->EDIT CHANNEL -> User Channel List->Load User Data 5. Settings 5.1 System Settings Menu->SETTINGS->System Settings Tip: You can set all the settings here by pressing VOL+/VOL- button. 1. Menu Language: Set the menu language. 2. Audio1: Set the preferred audio language. 3. Audio2: Set the sub-prime audio language. 4. Subtitle Language: Set the subtitle language (if available) 5, Subtitle control: Select ON to view subtitles or select OFF to disable them. 6. EPG Language: Set the EPG language. 7. LCN: LCN lock switch – locks channels in logical channel number 8. Digital Audio: If a channel has AC3 and PCM audio language at the same time, when you select RAW it will set AC3 audio language as default output and when you select PCM it will set PCM audio language as default output automatically when you highlight the channel. If you set OFF, in the channel list when you highlight the channel, you should press the OK button to play it. 9. Auto Channel Selection: If you set ON, in the channel list will play automatically when you highlight the channel. If you set OFF, this function is not available. 10. Auto Exit CH List: If you set ON, the channel list will disappear when you press OK on a Highlighted channel. If you set OFF, it will not. 11. Source signal type:Choice source signal type of T or T2. 12. Recall List: If you set ON, when you press Recall button of RCU you can get the recall list. If you set OFF, when you press recall button you can go back to the last program you have selected. 13. Low power standby: switch to low power standby. 13 14, Front Panel Light: Changing the value of this option allows you to adjust the brightness of the front display panel. 5.2 OSD Setup 1. Menu Transparency: Set the transparency of all menus. 2. Display Mode: Select the output resolution between 1080p, 1080i, 720p, 576i or 576p,480i or 480p. 3. TV Type: Set the TV Type on PAL/NTSC/Auto state. 4. Screen Mode: Set the display format according to the screen ratio. Select TV screen mode either 4:3 or 16:9 according to the TV type, or press the MODE button of RCU directly. 5. OSD Timeout: Set the time of the OSD to disappear after no remote control action. 5.3 Parental control Menu-> SETTINGS ->Parental Control Parental Control allows you to set limits for each program or change your previous password. You can also lock the changes you have made using Installation Lock, Edit Channel Lock and settings Lock. And you can change Age Rating. 5.4 Calendar Menu-> SETTINGS ->Calendar You can use button CH+/- and VOL+/- and 2,4,6,8 to adjust the date. Pressing the GREEN button, you can add a memo. 5.5 Color Settings Menu-> SETTINGS -> Color Settings Color Settings you can edit the Brightness, Contrast and Saturation. 14 6 Clock/Timer Settings Menu-> SETTINGS ->Times 6.1 Time Settings Menu-> SETTINGS ->Times->Time Settings Time Settings will set the time mode, time zone and summer time. 6.2 Event Timer Event Timer You can set up to 8 timer events. It will record or play the program automatically according to the timer event list that you set. 1. Menu-> SETTINGS ->TIMES-> Event Timer or press the TIMER button directly. 2. Press the RED button to setup a timer, and press the OK button to save the timer after setup. 3. You can press GREEN button to edit timer. 4. You can press YELLOW button to delete timer. 6.3 Sleep Timer SLEEP Timer can set the automatic turn off time. 1. Menu->SETTINGS ->TIMES-> Sleep Timer. 2. Press the VOL+/VOL- button to select the option or input the number at “-Min” option. 3. Press the OK button to save. 15 6.4 Standby Time If set YES, the receiver will go to standby mode after the timer, if set NO it won’t be standby. 7. Expansion 7.1 Games Menu->EXPANSION-> Games Games In this menu there is a selection of games that you can play. 7.2 USB Menu->EXPANSION-> USB or press the USB button directly Note: It supports FAT, FAT32 and NTFS format USB disk or USB HDD. 1, Tool In USB menu, you can press the RED button to select Rename/Delete/Move To/Copy To/ sort the folders the files. And also can create the new folders and format the disk. 2. Play Mode Loop:Set the Loop state on Normal, Reverse, Random, Single or Off. Slide Show Interval:Set the Slide Show Interval from 2S-10S. Photo View Mode:Set the Photo View Mode state on Full Screen, 2x2 Thumbnail or 2x3 Thumbnail. 3. PVR Setting Record Partition:Select the Partition where save your record or other 16 result of your operation. Record Mode:Set the Record Mode Channel or Transponder. Record Type:Set the Record format to TS or PS. Record Time:Set the Record Default Time off, 30, 60, 90, 120 minute or input number directly. Auto Timeshift:Set timeshift mode to auto when recording Timeshift Buffer Size(MB):Set the Timeshift Buffer Size between auto, off, 100, 200, 400, 800, 1600, 3200 or 6400MB. Timeshift Need Save:Set if the Time shift portion is to be saved to the external media as a recording Play Start Pos:When playing the PVR file, set the Play Start Position whether head/start of the file or last position (when last stopped in playback) of the file. 7.2.2 Play Files 1. PVR Same as movie 2. Movie 1) Press the VOL+/VOL- to highlight the Movie. 2) Press the CH+/CH- to change the folder or file and press the OK button to open the folder or play the movie file. It supports *.3GP, *.AVI,*.MKV, *.MP4, *.MOV, *.MPG, *.TS, *.M2TS, *.DAT, *.VOB format movie files. 3. Music 17 1) Press the VOL+/VOL- to highlight the Music. 2) Press the CH+/CH- to change the folder or file and press the OK button to open the folder or play the music file. It supports *.mp3, *.ogg, *.wav and *.flac format music files. 4. Picture 1) Press the VOL+/VOL- to highlight the Photo. 2) Press the CH+/CH- to change the folder or file and press the OK button to open the folder or play the picture. It supports *.bmp, *.jpg, and *.gif format photos. 5. Play List You can play the movie/photo/music/PVR files in the Play List. 7 About STB Menu-> SETTINGS ->ABOUT STB ABOUT STB can get the information about the STB, such as product name, software & hardware version, and serial number and so on. 8. Basic Operation 8.1 Audio:You can select the language you prefer in Audio if the current program is available in multiple audio languages. 8.2 EPG:You can view the EPG information of all channels in time and date order. 18 1. Press the EPG button. 2. Press the GREEN button to switch EPG mode between Weekly EPG and Day EPG. 8.5 Subtitle:You can select the language for the subtitle if the program provides subtitle information. 8.6 Record:You can record programs to an external USB flash drive or HDD (not supplied). Press record for instant recording or set up an event timer via EPG or ‘Timer’ button – by default, instant recording will record for 99 hours so press the record button again to change the duration using the remote. 8.7 Program Information: You can view the program information by pressing the INFO button while watching a program. 8.8. EPG Information: Press the INFO button twice to view detailed EPG information, press the VOL+/VOL- to switch current and next and press the INFO button once more to hide the detailed EPG information. 9. Channel List This chapter will help you manipulate the channel list. 9.1 OK List 1) Press the OK button to enter the channel list while watching a program. 2) press the RED button to sort the channels. 3) Press the GREEN button can select the channels by frequency . 4) Press the YELLOW button to select channels by a-z 19 5) Press the BLUE button can help you find the channel quick by the first character of name. 6)press the ◀/▶ button to change the channels list FTA,CAS/HD. 9.2 Favorite List 1) If you have set several favorite lists, press the FAV button to enter the favorite list. 2) Press the ◀/▶ button to change different favorite list and press the OK button can select to program in current favourite list. 10. USB Control 10.1 Recording and Timeshift 10.1.1 Recording You can watch another channel from the same frequency while recording. At the same time, you can record two channels in the same frequency. You can also do many operations while recording. 10.2 PVR List You can enter the PVR list directly and then play the PVR file. In the PVR list you also can delete the PVR files. 20 11. Additional Information 11.1 Trouble Shooting Before contacting your local service centre, please read the tips below carefully. If the problem persists after completing the following procedure, please contact your local product distributor or service centre for further instructions. 1. No message displayed on the front display. (The product will not switch on.) • Check the main power cable and make sure it is plugged into a suitable power outlet. • Check that the mains supply is switched on. • Connect the power cable to a different power outlet. • Check that the power switch is on at the rear of the product. (where applicable) 2. No picture • Make sure that the product is powered on and in operation mode. (Press the STANDBY button) • Make sure that the AV (RCA) or HDMI cable is firmly connected to the TV. • Make sure that the antenna cable is properly connected to the product. • Be sure to activate channel search. • Check the brightness level of the TV. • Check if the channel is currently on air. Contact the broadcaster to ensure that the channel is running. 3. Poor picture/sound quality • Make sure there is no mobile phone or microwave oven near the product. • Adjust the antenna direction to get a better picture. 21 • Set the antenna power in menu to On, if you use the active antenna to improve the reception (where applicable) 4. No or poor sound • Check that your AV/HDMI cable is connected correctly. • Check the volume levels of your TV set and the product. • Check if the product or TV is on mute. • Check audio type or soundtrack option. (where applicable) 5. Remote control does not operate. • To control the product, the top end of the remote control should point directly towards the receiving part of the product. • Remove and reinsert the batteries in the remote control. • Replace the batteries in the remote control for a new set. 12. Technical Specifications MPEG Transport Stream MPEG-2 ISO/IEC 13818Transport stream specification Profile Level MPEG1,MPEG-2 MP@ML,H.264, VC1, DV, DivX, and MPEG4 Input Rate 80 Mbps for MPEG Transport Stream and 25 Mbps for DV streams Aspect Ratio 4:3, 16:9 Video Resolution 576i, 576p, 480i, 480p, 720p50, 720p60, 1080i.1080p Audio Decoding MPEG-2 layer I and II (Music cam),MPEG4 AAC and MPEG4 AAC-HE (AAC+),Dolby Digital (AC-3) with bit rates up to 640 K bits /s, LPCM up to 48 KHz,MP3. Audio Mode Single channel/Dual channel/Joint stereo/Stereo Sampling 32, 44.1 and 48 KHz 22 Power Supply Input Voltage AC 100 ~240V, 50/60Hz Power Consumption Max. 25 W Protection Separate internal fuse. Input shall have lightening Protection Physical Specification Weight (Net) About 2.5kg Operating Temp 0℃ to + 40℃ Storage Temp -40℃ to + 65℃ 23 24 STRONG AUSTRALIA PTY LTD 60 WEDGEWOOD ROAD HALLAM, VIC. 3803 Ph: +61 3 8795 7990 FAX: +61 3 8795 7991 HELP DESK 1800 820 030 [email protected] WEBSITE www.strong.com.au 25