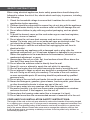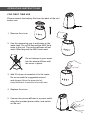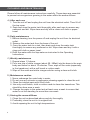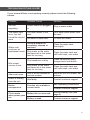
1
DEAR CUSTOMER
Thank you for purchasing the Ionmax Serene ION138 Ultrasonic Aroma
Diffuser. The Ionmax Serene reintroduces moisture into the air to help you
PDLQWDLQDFRPIRUWDEOHKXPLGLW\OHYHOLQ\RXUKRPH,WFDQKHOSWRHI¿FLHQWO\
UHOLHYHUHVSLUDWRU\DLOPHQWVVXFKDVFROGVÀXVRUKD\IHYHUFDXVHGE\GU\DLU
Please read this manual carefully to ensure proper usage and save these
instructions for future reference.
The package includes:
•
•
•
•
ION138 Ultrasonic Serene Aroma Diffuser
Measuring Cup
Power Adapter
User Manual
CONTENTS
SAFETY INSTRUCTIONS
1
PRODUCT DIAGRAM
2
SPECIFICATIONS
2
FEATURES
3
CONTROL PANEL & SETTINGS
4
OPERATING INSTRUCTIONS
5
CLEANING AND MAINTENANCE
6
TROUBLESHOOTING GUIDE
7
WARRANTY DETAILS
8
WARRANTY REGISTRATION
9
SAFETY INSTRUCTIONS
When using electrical appliances, basic safety precautions should always be
IROORZHGWRUHGXFHWKHULVNRI¿UHHOHFWULFVKRFNDQGLQMXU\WRSHUVRQVLQFOXGLQJ
the following:
1. Check the household voltage to ensure that it matches the unit’s rated
VSHFL¿FDWLRQEHIRUHRSHUDWLQJ
2. Children should be supervised to ensure they do not play with the appliance.
3. Do not add water directly to the moisture outlet as this will damage the unit.
4. Do not allow children to play with any product packaging, such as plastic
bags.
5. 7RDYRLG¿UHKD]DUGQHYHUSXWWKHFRUGXQGHUUXJVRUQHDUKHDWUHJLVWHUV
radiators, stoves or heaters.
6. Do not place the unit near heat sources such as stoves, radiators and
heaters. Do locate your unit on an inside wall near an electrical outlet. The
unit should be at least 10cm away from the wall for best results.
7. 'RQRWDWWHPSWWRUH¿OOWKHXQLWZLWKRXW¿UVWXQSOXJJLQJWKHXQLWIURPLWV
electrical outlet.
8. Do not operate any appliance with a damaged cord or plug, after the
appliance malfunctions, or if it has been dropped or damaged in any manner.
Return the appliance to the manufacturer for examination, electrical or
PHFKDQLFDODGMXVWPHQWRUUHSDLU
9. $OZD\VSODFHWKHXQLWRQD¿UPÀDWOHYHOVXUIDFHDWOHDVWFPDERYHWKH
ÀRRUDQGFPDZD\IURPWKHZDOO
10.Do not allow the moisture outlet to directly face the wall.
11. Never tilt, move or attempt to empty the unit while it is operating.
12.Shut off and unplug the unit before removing the tank or moving the unit.
13.'RQRWDWWHPSWWRUHSDLURUDGMXVWDQ\HOHFWULFDORUPHFKDQLFDOIXQFWLRQVRQ
this unit. Doing so will void your warranty. The inside of the unit contains
QRXVHUVHUYLFHDEOHSDUWV$OOVHUYLFLQJVKRXOGEHSHUIRUPHGE\TXDOL¿HG
personnel only.
14.Do not plug in the cord with wet hands: this could result in electrical shock.
15.Never use detergents, gasoline, glass cleaner, furniture polish, paint thinner
or other household solvents to clean any part of the unit.
16.Do not pour water into any openings other than the water tank.
17.Excessive humidity in a room can cause water condensation on windows
and some furniture. If this happens, turn the unit off.
18.1HYHUSODFHWKHKRXVLQJXQGHUZDWHUÀRZRULPPHUVHLWLQOLTXLG
19.Do not add more than the recommended amount of essential oil to the unit.
CORD AND PLUG INSTALLATION SAFETY INSTRUCTIONS:
7KHOHQJWKRIWKHFRUGRQWKHXQLWZDVVHOHFWHGWRUHGXFHWKHKD]DUGVRIEHFRPLQJWDQJOHG
in, or tripping over a longer cord. If a longer cord is necessary, an approved extension cord
may be used. The electrical rating of the extension cord must be equal to or greater than
that of the aroma diffuser. Please take extra care to arrange the extension cord so that
it will not drape over a countertop or tabletop or where it can be pulled on by children or
accidentally tripped over.
1
PRODUCT DIAGRAM
Cover
Water tank
Wind channel
LED time display
Control panel
Main body
LED light
SPECIFICATIONS
2
Model
Ionmax ION138
Voltage
$&9+]
Power Rating
12W
Coverage Area
15 m2
Water Tank Volume
100 ml
Weight
0.43 kg
Dimensions
116 (L) x 112 (W) x 162 (H) mm
FEATURES
7KLVGHFRUDWLYHDQGXQLTXHXOWUDVRQLFDURPDGLIIXVHUDQGKXPLGL¿HUJHQHUDWHV
a subtle, calming and relaxing scented mist to provide aromatherapy and add
moisture to the air.
1. Aromatherapy
(QMR\WKHXOWLPDWHDURPDWKHUDS\H[SHULHQFHIURPWKLVOLWWOHVOHHNGHYLFH
using your favourite fragrance without any heating elements, making this
diffuser safe to use. The advanced ultrasonic technology produces vibrations
at high frequency to turn water into mist, creating a soothing and therapeutic
atmosphere.
2. +XPLGL¿HU
Moisturises and refreshes the quality of air we breathe.
3. Ioniser
Produces negative ions like those found near beaches and waterfalls, or
after a storm.
4. RGB LED Light
The soft colour-changing LED lighting creates a wonderful tranquil ambience
WRHQMR\
5. LED Time Display
Clear LED time display above the touch control panel.
6. Alarm Clock
This can be used to set when to switch on the unit.
7. Timer
Set timer to 30, 60, 120 or 180 minutes. The unit will stop automatically
when the time runs out.
3
CONTROL PANEL & SETTINGS
“ON / OFF” BUTTON
Touch this button to switch the unit on and off. The aroma diffuser will only
function if there is water in the unit. To enable other functions, see below.
“ALARM” BUTTON
The unit can be set to an alarm. When the alarm goes off, the unit will turn on
the aroma diffuser, LED lights in auto colour changing mode, and emit an alarm
sound. After 60 seconds, the alarm sound will stop but the unit and the LED
lights will remain switched on.
While the alarm is beeping, touch
again to switch all functions off.
or
to silence the alarm. Touch
If no water is in the unit when the alarm is triggered, the unit will enter Standby
mode after 60 seconds.
to enter Settings mode. The LED time display will
To set the alarm, hold
VWDUWWRÀLFNHU7RXFK
to set the Minutes and
to set the Hours. Then,
press and hold
WRFRQ¿UPDQGFRPSOHWHWKHDODUPVHWWLQJV
To activate or deactivate the alarm, after an alarm time has been set,
to activate the alarm. The
button will light up. Touch
again to
touch
deactivate the alarm; the light will turn off.
“LIGHT” BUTTON
Touch this button to turn the light mode on or off. Continue touching to select the
desired light mode between auto changing, red, green, blue and off.
“TIMER” BUTTON
The unit can be timed to operate for intervals of 30 minutes, 60 minutes, 120
minutes and 180 minutes, stopping automatically when the selected operating
time has elapsed. For continuous operation, touch
repeatedly until the LED
time display screen shows “0000”.
LED TIME DISPLAY
to enter Settings mode. The LED time display will start to
Press and hold
ÀLFNHU
Touch
to set the Minutes and touch
to set the Hours. After you have set
the desired time, press and hold
WRFRQ¿UPDQGFRPSOHWHWKHWLPHVHWWLQJV
4
OPERATING INSTRUCTIONS
FOR FIRST TIME USE
3OHDVHUHPRYHWKHEDWWHU\¿OPIURPWKHEDFNRIWKHXQLW
before use.
1. Remove the cover.
2. Use the measuring cup to add water to the
ZDWHUWDQN'RQRW¿OOEH\RQGWKH0$;OHYHO
mark of the unit. The aroma diffuser will not
ZRUNLI¿OOHGEH\RQGWKH0$;OHYHOPDUN
Do not attempt to pour water
into the aroma diffuser with
the cover in place.
3. Add 3-5 drops of essential oil to the water.
Do not exceed the suggested amount
and always follow the essential oil
manufacturer’s instructions for safe use.
4. Replace the cover.
5. Connect the aroma diffuser to a power outlet
using the included power cable, and switch
on the unit.
5
CLEANING AND MAINTENANCE
Please follow all maintenance instructions carefully. These steps are essential
to prevent microorganisms growing in the water within the aroma diffuser.
A) After each use
1. Turn the unit off and unplug the unit from the electrical outlet. Then lift off
the top cover.
2. Drain and rinse the water tank thoroughly after each use to remove any
sediment and dirt. Wipe clean and dry with a clean soft cloth or paper
towel.
B) Daily maintenance
1. Before cleaning, turn the power off and unplug the unit from its electrical
outlet.
2. Remove the water tank from the base of the unit.
3. Carry the water tank to a sink, then drain and rinse the water tank
thoroughly to remove any sediment or dirt. Wipe clean and dry it with a
clean soft cloth or paper towel.
4. 5H¿OOWKHZDWHUZLWKFRROWDSZDWHUDVLQVWUXFWHGLQWKH2SHUDWLQJ
Instructions.
C) Weekly maintenance
1. Repeat steps 1-3 above.
2. Pour one cup of white vinegar (about 50 -100ml) into the base in the main
body and leave for about 15 minutes. Then, wipe off the scale (especially
in the transducer) with a soft brush or cotton swab.
3. Wipe off the scale and white vinegar solution using a clean soft cloth.
D) Maintenance caution
1. Never submerge the main body in water.
2. Do not use any solvents or aggressive cleaning agents to clean the unit.
3. Clean the internal parts with a soft cloth.
4. Use only a soft brush, cloth or cotton swab to clean the transducer. This
should be done once a week.
5. Change the water in the water tank at least once a week to ensure that
water is not left standing for more than one week.
E) Storing the aroma diffuser
1. Clean the unit as described above and dry thoroughly.
2. Preferably, store the unit in its original box.
3. Avoid exposing the unit to high temperatures.
6
TROUBLESHOOTING GUIDE
If your aroma diffuser is not working correctly, please check the following
causes:
Problem
Possible Cause
Solution
Unit not
operating
Power cable not plugged
in
Plug in power cable
Too much water in the
The power light
tank
is on, but the
KXPLGL¿HUGRHVQ¶W
No water in water tank
work
Pour away some water from
the tank
Fill tank with water
Previous aroma not
completely cleaned or
removed
Clean the water tank
thoroughly
Dirty water or the water
has been left in the water
tank for too long
Clean the water tank and
UH¿OOZLWKIUHVKFRROZDWHU
The transducer is dirty
Clean transducer using
vinegar and a soft brush
Dirty water or the water
has been left in the water
tank for too long
Clean the water tank and
UH¿OOZLWKIUHVKFRROZDWHU
Abnormal noise
Unit is on an unstable or
uneven surface
0RYHWKHXQLWWRDVWDEOHÀDW
surface
Water is leaking
from the unit
Unit faulty
Contact customer support
Button
unresponsive
Function not available in
current mode
See Operating Instructions
Clock resets
when power goes
out
%DWWHU\¿OPQRWUHPRYHG
5HPRYHEDWWHU\¿OPVHH
page 5)
Battery is dead
Contact customer support
Water mist
produces an
unpleasant smell.
Mist output
volume is low
Contact customer support
7
WARRANTY DETAILS
Congratulations on your purchase! It is our aim to provide you with quality products
that you can trust. Our products come with guarantees that cannot be excluded under the
Australian Consumer Law. You are entitled to a replacement or a refund for a major failure and
for compensation for any other reasonably foreseeable loss or damage.
You are also entitled to have the goods repaired or replaced if the goods fail to be of
acceptable quality and the failure does not amount to a major failure.
The Guarantee
The product is guaranteed to be free from defects in workmanship and parts for a period
of 12 months from date of purchase. Defects that occur within this warranty period, under
normal use and care, will be repaired, replaced or refunded at our discretion, solely at our
NOSHNMØVHSGØMNØBG@QFDØENQØO@QSRØ@MCØK@ANTQØ3GDØADMDÚSRØBNMEDQQDCØAXØSGHRØV@QQ@MSXØ@QDØHMØ
addition to all rights and remedies in respect of the product that the consumer has under the
Trade Practices Act and similar state laws.
Proof of Purchase
This warranty is valid for the original purchase and is not transferable. Please keep your
purchase docket or receipt as proof of purchase and as proof of date on which the purchase
was made. The purchase docket (or a copy) or receipt must be presented with the warranty
when making a claim under this warranty.
Service during the Warranty Period
To claim for warranty, contact us on 1300 800 200 or [email protected] to get an RA#
(Return Authorisation Number) or submit a support ticket on my.andatech.com.au. Ensure
that the RA# is clearly stated on the outside of the packaging and that the product is properly
packaged so that no damage occurs to the product during transit. Shipping of the product
back to us for warranty will be at your cost. A product return without the RA# or proof of
purchase will not be accepted.
Extent of Warranty
This warranty is limited to defects in workmanship or parts. All defective products or parts will
be repaired or replaced. This warranty does not cover manuals and packaging.
Normal Wear and Tear
This warranty does not cover normal wear and tear to the product or parts.
Exclusions
This warranty does not cover:
• Any defect caused by an accident, misuse, abuse, improper operation, lack of reasonable
B@QDØTM@TSGNQHRDCØLNCHÚB@SHNMØKNRRØNEØO@QSRØS@LODQHMFØNQØ@SSDLOSDCØQDO@HQØAXØ@ØODQRNMØ
not authorised by the distributor.
• Any product that has been damaged by a lightning strike either directly or indirectly or a
main power surge or liquid ingress.
• The product if it is located outside of Australia.
• Any damage caused by improper power input or improper cable connection.
Andatech Corporation Pty. Ltd.
PO Box 3038, Nunawading VIC 3131, Australia.
Phone: 1300 800 200 Fax: 1300 883 802 Email: [email protected]
WARRANTY REGISTRATION
Register your Ionmax Serene ION138 online at my.andatech.com.auRU¿OO
out this form and forward to the address below with a copy of your proof of
purchase. Contact us on 1300 800 200 or visit www.andatech.com.au for
options to extend your warranty.
Andatech Corporation Pty Ltd
PO Box 3038, Nunawading VIC 3131, Australia.
Product
: Ionmax Serene ION138
Date of Purchase
: ____________________________________
Place of Purchase : ____________________________________
Serial No.
: ____________________________________
Surname
: ____________________________________
Given Name
: ____________________________________
Address
: ____________________________________
Suburb
: ____________________________________
Postcode
: ____________________________________
State
: ____________________________________
Contact No.
: ____________________________________
Email
: ____________________________________
ionmax.com.au
1300 800 200
Version 1. Updated 11.06.2015.