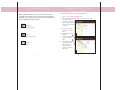
1
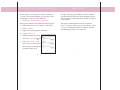
R E F E R E N C E
G U I D E
www.DigiTimeCapsule.com
Copyright 2010 Digi Time Capsule®, llc
Digi Time Capsule is a registered trademark and are patent pending.
R E F E R E N C E
G U I D E
My Pregnancy Digi Time Capsule®
Instruction Manual
Version 1.0
BACKING UP YOUR PRODUCT
We encourage you to back up your product. Should you
ever lose it or it became damaged, you can simply restore
your Pregnancy Suite onto a new USB drive.
•
“Backing Up Your Pregnancy Journal Suite”
Plug in your USB Drive and complete the following steps:
1.
Right Mouse click on your computer’s start button
2.
Choose “EXPLORE”
3.
Right click on your Pregnancy USB Drive
4.
Choose “PROPERTIES”
WELCOME
To begin, simply plug your USB drive into the computer.
The My Pregnancy Digi Time Capsule Pregnancy Journal
Suite will guide you through all of the magical moments of
your pregnancy.
This guide provides instructions to help you learn the
basics very quickly. Should you have any difficulty, please
visit us at www.DigiTimeCapsule.com and we would be
more than happy to answer your questions.
5. When the dialogue box opens,
choose the “TOOLS” Tab
6.
Select “BACK UP NOW” and
follow the on-screen directions
that will guide you through the
remainder of the process
24
1
CARING FOR YOUR PRODUCT
TROUBLE SHOOTING
www.digitimecapsule.com/product_help.htm
Before we begin, we would like to take this time to tell you
how to care for your new product.
•
“How do I delete videos that I do not want?”
1.
Choose “MEDIA”
Your product should be stored in a cool, dry place.
2.
Choose “UPLOAD MEDIA”
3.
Select the “VIDEO” ICON
4.
Any videos stored will show on the right side under “STORED FILES”
5.
Double click on the video that you want to delete and then confirm that
When cleaning your product, use a dry cloth. Never use
water, jewelry cleaner or other chemicals to clean your
product.
you want to delete the selected file
Always be sure to properly exit the software application
before removing the USB drive from your computer. Improperly removing the usb drive could damage the product.
2
23
TROUBLE SHOOTING
G E T T I N G S TA RT E D
www.digitimecapsule.com/product_help.htm
•
“I don’t see my media files when I click on the folder I
have them saved to on my computer.”
Try performing the following actions:
• You will not see individual files in your browser. Find
the file folder they are in and click “OK” on the software
screen. Your media will all appear as thumbnails in the
software.
• Some computers require you to have administrative rights
to run software that is not downloaded. If you have done
the above step and your photos are not loading, you will
have to do the following:
Close the software and complete the following steps:
1.
Right mouse click on the application
icon in the USB drive
2.
Choose “PROPERTIES”
3.
Choose “COMPATIBILITY”
4.
Go the bottom and check “RUN THIS
PROGRAM AS ADMINISTRATOR”
5.
Click “APPLY”
22
Computer Pre-requisites
If your computer does not have the latest version of Microsoft .Net 3.5 framework the Software will detect and
prompt you to download .Net 3.5. Although you do not
download Digi Time Capsule® Software, any computer
you work on will need to have the latest version of .Net 3.5
1.
Plug in your USB Drive. If it does not auto-run, complete the following steps:
2.
Right Mouse click on your computer’s start button
3.
Choose “EXPLORE”(VISTA) OR “MY COMPUTER” (XP)
4.
Right click on your USB Drive or the Drive that says
“DIGITIME CAPSULE–MY PREGNANCY”
Click Autoplay and it will launch
You will then be prompted to install .Net 3.5 on your
computer if you do not already have it
Once .Net has been installed, unplug your Time Capsule Drive then Plug it back in and follow these steps
again to launch the software if it does not auto-run
5.
6.
7.
3
THE WELCOME SCREEN
TROUBLE SHOOTING
www.digitimecapsule.com/product_help.htm
To open a menu item of all the available items, click the
selection. The selections are always on the top of every
screen
•
MEMORIES
Make sure you have the correct media icon selected. If
you are trying to upload video, select the video icon
FAMILY TREE
MEDIA
Upload, your
media files.
Create your time
capsule video
This is where the
Time Capsule
Categories are
“I don’t see my video files when I click on the folder
I have them saved to on my computer.”
Try performing the following actions:
•
“The media files are on my computer, but they don’t
all show up on the preview screen.”
Try performing the following actions:
Your media may be an incorrect file format. Try changing the format to one of the accepted formats
Images
.gif. .jpg, .png
Video
mov, .wmv, .swf
Audio
4
mp3
21
WORKING WITH THE
FA M I LY T R E E
Creating Relationships: Adding Marriages / Divorces
1.
2.
3.
4.
MOVING THROUGH
MEMORIES SCREENS
Choose the “MEMORIES” icon at the top of the software.
Choose “ADD FAMILY MEMBER” ICON.
Fill in the the members information. If the spouse has already been
added as a member you can use the drop down menu to specify if they
are married or divorced
Choose “SAVE”. You will see the connection on the grid with a “D”
signifying the members are divorced
If you selected the couple was married, you would see an “M” in the
box
20
1.
You will see selections to the left
2.
Make a selection to begin each form
3.
Each form will have selections within them at the top
of the screen
5
UPLOADING MEDIA
When adding media files to your software, below are the
acceptable file formats to use as well as the Icons and their
meaning. You will need to click on the correct media Icon in
order to upload that typle of media.
WORKING WITH THE
FA M I LY T R E E
Creating Relationships: Adding Grandparents
1.
2.
Choose “ADD FAMILY MEMBER” ICON .
Fill in the Grandparents information and choose “SAVE”. You
will see there is no relationship yet to choose
from, so the grandparent
will not yet be connected
on the grid
3.
Next go to the family
member who’s parent
this is
Double click the family
member
Assign the grandparent as the mother or
father
The grandparent now
connects on the grid
and you will see a
colored square that
signifies a “Parental”
relationship
Images
.gif. .jpg, .png
Video
4.
mov, .wmv, .swf
5.
6.
Audio
mp3
6
19
WORKING WITH THE
FA M I LY T R E E
Adding & Editing Family Members
1.
2.
3.
UPLOADING MEDIA
Choose the “MEDIA” ICON at the top of the software.
Choose the “ADD FAMILY
MEMBER” ICON on the right
side of the grid
Double click the family member box that appears and the
“MAINTAIN FAMILY TREE”
editor will appear
Here you can add member
information, photo and relationship. Each member must have a
relationship in order to properly connect on the grid
Creating Relationships: Children
1.
2.
3.
4.
Choose “ADD FAMILY
MEMBER” ICON
Fill in the child’s information
Assign the child a parent by using the drop down menu. The
parent must have been added
as a member in order to make
the assignment
Choose “SAVE” and the child
will now connect on the grid to
the parent assigned
1.
Select the “MEDIA” ICON below the browser for the type of media
you would like to upload (images, video or audio).
18
2.
Click the “BROWSE” ICON
3.
Locate the file folder that your media is saved in
4.
Choose “OK” : All of your Photos will load on the screen
7
UPLOADING MEDIA
C R E AT I N G A FA M I LY T R E E
Double click on the media thumbnails that you would like
added to your time capsule.
Choose the “FAMILY TREE” icon at the top of the software.
1.
NOTE: Once you have added your
media, you can select a different
media type to select from the same
folder without having to select
browse again
8
2.
3.
You will be prompted to fill
out the initial screen with
baby’s parents
Fill out the information and
click “SAVE”
You will then be taken to the grid screen where you can resize,
move, add photos and edit each member. Double click on the
member that you would like to edit
17
ADDING LETTERS FOR THE
FUTURE
Choose the “MEMORIES” ICON at the top of the software.
1.
2.
Choose the “MEDIA” icon at the top of the software.
Choose “LETTERS FOR THE FUTURE” to the left
1.
Select “PHOTO VIEWER” on the left
To add a new entry Click on the “ NEW ENTRY” to
2.
Double click on the image you would like to preview or enhance.
3.
After making enhancements, you can save the new version. (It will
not replace your original photo)
the right
3.
EDITING PHOTOS
To delete an entry, click on the “ DELETE ENTRY”
to the right
16
9
VIEWING STORED MEDIA
ADDING JOURNAL ENTRIES
Choose the “MEDIA” ICON at the top of the software.
Choose the “MEMORIES” ICON at the top of the software.
1.
Select “PHOTO VIEWER” on the left to view your photos
1.
Choose “PREGNANCY JOURNAL” to the left
2.
Select “THEATER” to view your videos and audio files
2.
To add a new entry Click on the “NEW ENTRY” to
3.
All of your stored images will show as thumbnails
4.
Double click on the media that you would like to preview
10
the right
3.
To delete an entry, click on the “DELETE ENTRY”
to the right
15
SHARING YOUR VIDEO
ADDING PHOTOS TO PLACE
HOLDERS
Choose the ”MEDIA” ICON at the top of the software.
1.
Select “CREATE SLIDE SHOW” on the left
2.
Create your video , add transitions and music
3.
When you are ready to save your video, Select “PREVIEW”
4.
In the Preview screen, select “FILE, SAVE AS”
5.
Select a folder on your computer to save your file
6.
You can then write it to CD or publish it
14
Your photos must first be uploaded to the software
by using the “MEDIA” ICON.
1.
Choose the “Add Photo” ICON at the bottom of the photo placeholder.
2.
All photos that have been uploaded to the software will appear. Select
a photo and choose “Select Image” to insert it into the placeholder
11
C R E AT I N G Y O U R V I D E O
WAT C H I N G Y O U R V I D E O
Choose the “MEDIA” ICON at the top of the software.
Choose the “MEDIA” ICON at the top of the software.
1.
Select “CREATE SLIDE SHOW” on the left
1. Select “THEATRE” on the left
2.
Double click on the image you would like included
3.
Choose music for your video
4.
Choose photo transitions and slide delay speed
5.
You can preview your video before you save it by choosing the
2. Double click on the video you would like to watch
3. Your video will be viewed through Internet Explorer
“PREVIEW” ICON
12
13