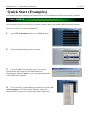
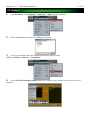
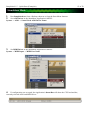
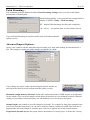
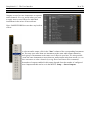
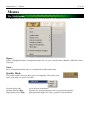
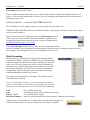
1
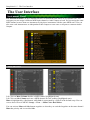
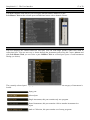
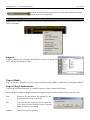
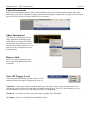
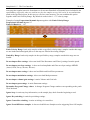
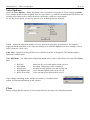
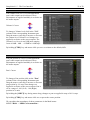
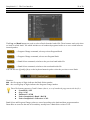
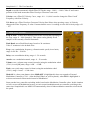
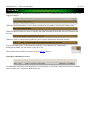
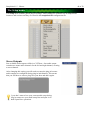
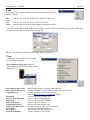
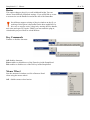
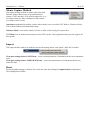
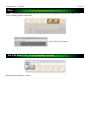
SAMPLELORD1.5
User Manual
WINDOWS IS A TRADEMARK OF MICROSOFT CORPORATION. ASIO AND VST ARE TRADEMARKS OF
STEINBERG SOFT- UND HARDWARE GMBH. OTHER COMPANY AND PRODUCT NAMES MAY BE ™ OR ®
TRADEMARKS OF THEIR RESPECTIVE OWNERS.
REVISION: 1.5.2
UPDATED: NOVEMBER 10, 2009 4:20 AM
COPYRIGHT © 2009, WŁODZIMIERZ GRABOWSKI
ALL RIGHTS RESERVED
ACKNOWLEDGEMENTS FOR LANGUAGE HELP:
KVR MEMBER: DARKSTAR
Samplelord 1.5 – Table of Contents
3 of 59
Table of Contents
Table of Contents ................................................................................................................. 3 Welcome ! ............................................................................................................................. 5 Welcome ............................................................................................................................................... 5 About the Versions ............................................................................................................................... 5 Versions Comparison............................................................................................................................ 5 Basic Software Requirements .............................................................................................................. 6 Hardware Requirements ....................................................................................................................... 6 Support & Contact ................................................................................................................................ 6 Introduction ......................................................................................................................... 7 What is Samplelord? ............................................................................................................................ 7 What is Samplelord Standalone? .......................................................................................................... 7 Installation under Windows ............................................................................................... 8 Software Installation (Samplelord, Samplelord Bundle) ...................................................................... 8 Updating Samplelord (Special versions) .............................................................................................. 9 Uninstalling Samplelord ..................................................................................................................... 10 License File ........................................................................................................................................ 11 Quick Start (Examples) ..................................................................................................... 12 Cubase Studio 4 .................................................................................................................................. 12 FL Studio 8 ......................................................................................................................................... 13 Standalone Mode ................................................................................................................................ 15 The User Interface ............................................................................................................. 16 Instrument Panel ................................................................................................................................. 16 Mute and Solo ........................................................................................................................... 16 MIDI Channel ........................................................................................................................... 17 Instrument ................................................................................................................................. 17 Instrument's Menu..................................................................................................................... 18 Volume ....................................................................................................................................... 23 Pan ............................................................................................................................................ 23 Out ............................................................................................................................................ 24 Buttons ...................................................................................................................................... 25 Edit Panel ........................................................................................................................................... 26 “General” section..................................................................................................................... 27 “Filter” section......................................................................................................................... 27 “Mod. Ctrl” section .................................................................................................................. 28 Browser Panel .................................................................................................................................... 29 Filter “F” ................................................................................................................................. 29 Directory “DIR” ....................................................................................................................... 30 Navigatione ............................................................................................................................... 30 Drag & Drop............................................................................................................................. 32 Quick Mapping ......................................................................................................................... 32 Customize .................................................................................................................................. 33 Buttons ...................................................................................................................................... 33 Tool Bar .............................................................................................................................................. 34 Keyboard ............................................................................................................................................ 35 Status Bar ........................................................................................................................................... 36 Menus .................................................................................................................................. 37 The Multi menu .................................................................................................................................. 37 The Setup menu .................................................................................................................................. 40 Hide .................................................................................................................................................... 47 Samplelord 1.5 – Table of Contents
4 of 59
The File menu (only in the Standalone version) ................................................................................ 47 The System menu (only in the Standalone version) ........................................................................... 48 The About menu (only in the Standalone version) ............................................................................. 49 Key Commands .................................................................................................................. 50 Global shortcuts.................................................................................................................................. 50 Instrument Panel shortcuts ................................................................................................................. 50 Browser Panel shortcuts ..................................................................................................................... 50 General MIDI..................................................................................................................... 51 MIDI Implementation ........................................................................................................................ 51 MIDI Automation ............................................................................................................................... 52 Automatic Bank Load ........................................................................................................................ 52 Supported File Formats .................................................................................................... 53 Native Samplelord Bank *.BANK ..................................................................................................... 53 Native Samplelord Collection *.COL ................................................................................................ 53 Sfz *.SFZ ............................................................................................................................................ 56 SoundFont *.SF2 ................................................................................................................................ 56 GigaStudio *.GIG ............................................................................................................................... 56 Kontakt *.NKI .................................................................................................................................... 56 Halion *.FXP ...................................................................................................................................... 57 EmulatorX *.EXB .............................................................................................................................. 57 Audio Files *.WAV *.AIFF ................................................................................................................ 57 Others... .............................................................................................................................................. 57 Multi & Bundle Setup ....................................................................................................... 58 Multi *.SPF ........................................................................................................................................ 58 Bundle *.SBN..................................................................................................................................... 59 Samplelord 1.5 – Welcome
5 of 59
Welcome !
Welcome
Congratulations and thank you for your decision to purchase Samplelord.
Here you will find extensive information about the features and functions of the program.
I hope you will create many great musical ideas with your new VST Instrument!
Author, Włodzimierz Grabowski
About the Versions
There are several versions of this product:
Samplelord VSTi Plug-in – this version requires a software host with VST plug-in support. This version
is a file with *.dll extension.
Samplelord Standalone – this version works as a stand alone application. It needs A MIDI input device
and an audio ASIO driver. This version is the file with *.exe extension.
Samplelord Demo – allows you to test the software before buying. The Demo Version includes a regular
periodic fade in/fade out added to the outputs and the maximum polyphony is 256 voices, other than that
it is fully functional and allows you to test all features and functions in the software.
Versions Comparison
Max.
Polyphony
MIDI
Channels
Demo Fade
In/Out
Limited
Options
Standalone
Included
Samplelord VST
2048
16
No
No
No
Samplelord Standalone
2048
16
No
No
Yes
Samplelord Demo
256
16
Yes
No
Yes
Version
Samplelord 1.5 – Welcome
Basic Software Requirements
Windows XP or Vista operating system,
VST Host application supporting VSTi plug-ins,
Acrobat Reader to view documentation.
Hardware Requirements
Intel or Athlon processor with SSE instruction support,
Hard disk with good transfer rate and fast access time for Disk Streaming use,
Min ~128MB RAM and ~20MB memory on a hard disk for the installation files,
The Standalone version needs a sound card which supports ASIO or MME drivers.
An ASIO driver is recommended to get small latencies.
Support & Contact
If you have any questions regarding to the software please contact me at [email protected] or
[email protected].
6 of 59
Samplelord 1.5 – What's new ?
7 of 59
Introduction
What is Samplelord?
Samplelord Plug-in is a virtual software instrument created for easy and extremely powerful sample
playback.
The Plug-in version requires a compatible VST host application such as Nuendo, Cubase, Sonar, Ableton
Live, Logic, FL Studio or others etc.
With multi-timbral architecture it can work using 16 MIDI channels simultaneously and it provides 16
stereo outputs at the same time. You can create different settings for each of the 16 simultaneously
playable channels of a unit to make a complete multi setup for your playback and sequencing. You can
save that multi setup for use of other projects too.
What is Samplelord Standalone?
Samplelord Standalone is a stand alone Windows application. It has the same features as the plug-in
version but it requires a sound card supporting ASIO or MME audio driver and a MIDI input device. You
do not need any additional software to run this version.
Samplelord 1.5 – Installation under Windows
Installation under Windows
Software Installation (Samplelord, Samplelord Bundle)
Login to User’s Download and enter your Registration Code:
www.samplelord.com/register.html
Download and unpack the setup and the license file into the same folder:
SAMPLELORD_SETUP.ZIP
→
SAMPLELORD_SETUP.EXE
SL_xxx_LICENSE.ZIP
→
SAMPLELORD.LIC
Run the installer from the setup file:
The Installer will ask for a main installation folder. It will install
the main files of the application and standalone version into this
folder.
By default this is folder the C:\Program Files\Samplelord
folder. On Vista systems it will install to C:\Program Files
(x86)\Samplelord.
Then installer will ask for a VSTi folder, by default this is
C:\Program Files\Steinberg\VstPlugins\Samplelord folder.
The Installer will also create some shortcuts in Start Menu
items for quick access to Samplelord’s folders:
8 of 59
Samplelord 1.5 – Installation under Windows
9 of 59
Updating Samplelord (Special versions)
To update the software run the installer SAMPLELORD_SETUP.EXE.
To update the software quickly or to install special versions described below download and run the
SAMPLELORD_UPDATE.EXE installer. This Updater will install only the runtime and theme files.
Samplelord 1.5 – Installation under Windows
10 of 59
Advanced Users:
If you want to create Samplelord’s sub-versions for special purposes, there are two options to do
that. These versions run as completely independent plug-ins and you can install them with
SAMPLELORD_UPDATE.EXE.
Create Fixed Output versions _XXstereo: when you
check this option, it will install additional Samplelord
files so-called “Fixed Output” versions, then we will
able to use different number of audio outputs in different
Samplelord instances. Updater will add 4 files in
Samplelord’s folder and you will see an additional
Samplelord’s plug-ins.
•
•
•
•
Samplelord_04stereo.dll
Samplelord_08stereo.dll
Samplelord_12stereo.dll
Samplelord_16stereo.dll
Create Independent versions #1 .. #4: when you check this option, it will install independent instances
of Samplelord. Each one has its own different VSTID, so it uses own memory resources . Updater will
add 4 files in Samplelord’s folder and you will see an additional Samplelord’s plug-ins. These versions
also can be used to work with independent settings like different number of outputs, different theme and
customize settings.
•
•
•
•
Samplelord #1.dll
Samplelord #2.dll
Samplelord #3.dll
Samplelord #4.dll
Example:
You use Samplelord to trigger drum samples on 4 audio channels with first instance and you use the
second instance of Samplelord to play the orchestral sounds on the next 4 audio channels. Thus we save
the processing power because we use only 8 audio channels (instead of 32 in case of using the ”normal”
versions). We use minimum number of audio channels needed for our project, and moreover we can set
completely different settings for each instance.
Uninstalling Samplelord
To uninstall the software use Uninstall Samplelord command from Windows' Start Menu:
Windows: Start Menu → Programs → Samplelord → Uninstall Samplelord
To uninstall software completely delete the SAMPLELORD folder.
Remember to save your files, bundles or samples which could be stored here if you may need them later.
Samplelord 1.5 – Installation under Windows
License File
The first time you run the software it will ask
you about the license. This is a
SAMPLELORD.LIC file downloaded and
unpacked before. Select the license file with an
open file dialog.
When software accepts the license you will see
the Samplelord interface. If something goes
wrong or there was an incompatibility problem
with the license's version you will see an error
message.
If you place the SAMPLELORD.LIC license file in the same folder as SETUP.EXE before
installation the installer will install and copy this file automatically.
11 of 59
Samplelord 1.5 – Quick Start (Examples)
12 of 59
Quick Start (Examples)
This chapter describes setting up the Samplelord as a VST Instrument in some host software products.
Cubase Studio 4
I assume that you have correctly set up Cubase software and your available MIDI and audio hardware.
Proceed as follows to activate Samplelord:
1.
Open VST Instruments Panel or use [F11] shortcut:
2.
Choose Samplelord plug-in from a menu:
3.
Choose Create if you want to create a new track
automatically and assign the first MIDI channel to
Samplelord or choose Cancel so you can assign Samplelord
to the MIDI track manually:
4.
If you need all 16 audio channels remember to activate All
Audio Outputs in VST Instruments Window. Otherwise
Samplelord will operate on a single main audio output only.
Samplelord 1.5 – Quick Start (Examples)
13 of 59
FL Studio 8
1. Open FL Studio, select Channels → Add One → More... menu command:
2.
Check Samplelord item on the list; [F] Icon will appear:
3.
Create a new channel and select Samplelord from the plug-ins menu:
MENU: Channels→ Add one → Samplelord
4.
Check the Enable multiple outputs option in FL Studio’s plug-in menu if you plan to use all 16
channels:
Samplelord 1.5 – Quick Start (Examples)
When the Enable multiple outputs option is enabled, each
channel is routed to corresponding inserts of FL Studio,
then we can apply insert effects and send effects to the
individual Samplelord outputs.
Checking Use fixed size buffers on the
compatibility submenu is not recommended
because it produces less accuracy of MIDI
timing.
14 of 59
Samplelord 1.5 – Quick Start (Examples)
15 of 59
Standalone Mode
1.
2.
Run Samplelord.exe from a Desktop shortcut or from the Start Menu shortcut.
Set ASIO Driver in the Standalone Application's MENU:
System → ASIO → Sound Card ASIO Driver Name:
3.
Set MIDI Driver in the Standalone Application's MENU:
System → MIDI Input → MIDI Port Name
4.
If configuration was accepted, the Application's Status Bar will show the CPU load and the,
currently selected ASIO and MIDI driver:
Samplelord 1.5 – The User Interface
16 of 59
The User Interface
Instrument Panel
The Instrument Panel (on the left-hand side) has 16 Instrument parts shown as 16 separate rows. For
each part you can assign a different MIDI input channel or Audio Output or both. You can assign the same
MIDI channel to more than one instrument to play these instruments with the same MIDI notes. You can
also route each instrument to an independent Audio Output or route some or all parts to common Audio
Outputs.
Mute and Solo
Left Click on Mute Column disables a MIDI channel (highlighted state)
Left Click on Solo Column activates a MIDI channel for solo audition (highlighted state):
Mute is highlighted by a Red button, while Solo is represented by a Yellow in the default setup. You can
reverse these colors in MENU: Setup → View → Mute Color: Red/Yellow.
You can activate Mute and Solo buttons together so when they are switched together on the same channel
Mute has priority and it overrides Solo.
Samplelord 1.5 – The User Interface
17 of 59
MIDI Channel
The MIDI Channel value allows you to assign a different MIDI Channel to a part.
Left Mouse Click on this column opens an additional menu with a channel selector.
Instrument
This area displays the sounds loaded for each part. You can load single patches, audio files, bank or
collections here. You can move up or down through the instrument parts using the Cursor Arrows and
with Left Mouse Click you can select a part. Double Click on selected part opens a Load Instrument
Dialog (see below).
The currently-selected part is highlighted and the format of the text shows what category of instrument is
loaded
Empty part
Selected part
Single instrument, this part contains only one program
Shared instrument, this part contains a link to another instrument in a
project
Bank or Collection, this part contains set of many programs
Samplelord 1.5 – The User Interface
18 of 59
Bundled instrument, this instrument was saved in the Samplelord Multi
Bundle Format to load quickly.
Instrument's Menu
Right Mouse Click on an Instrument part opens an additional menu; here we can do several operations
on the instrument.
Import...
Loads a sound file by selecting it from Windows Open File dialog. We
can Load one instrument at a time.
Export Bank...
You can use this command to export a single instrument from a Bank or Collection as a Samplelord Bank.
Export Single Instrument...
Exports the selected instrument as a single Program in Native Samplelord Format.
During Export of Bank or Single Instrument a popup message window will ask what to do with a file:
Yes
Exports a file and replaces the existing file in a
project with the newly created file.
No
If you just need to export this file for future use
or for editing in other software such as Extreme
Sample Converter for editing.
Cancel
Cancels the export operation.
Samplelord 1.5 – The User Interface
19 of 59
Unload Instrument
Removes the instrument and any links to this instrument If you have this instrument linked from other
parts those parts will be changed to empty. Also this menu displays a path to the currently used file in this
part so here you can check exactly which file is in memory.
Share Instrument
This feature is designed to use the
same instrument in multiple parts
(with different settings). The Share
Instrument's menu contains the list
of currently loaded sounds so we can
link only to the files that have been
loaded already.
Remove link
Removes a link to instrument that
was created with Share Instrument
command.
Note Off Trigger Level
This menu contains settings for the volume level of
playback when the sample is triggered by note off.
Amplitude – is the most advanced method and it gives the best results, it uses real-time audio level
monitoring. Note off sample is adjusted to the latest level played by Note On. This method gives very
smooth transition between Note On ending and Note Off beginning.
Env.Decay – uses the level from decay envelope to trigger Note Off sample.
As Sample – plays note off sample with default volume.
Samplelord 1.5 – The User Interface
20 of 59
Patch Streaming…
This command opens an additional window Patch Streaming Settings where you can set individual
preload time of loaded patch.
Global Disk Streaming - it uses preload time settings defined
globally via MENU: Setup → Disk Streaming.
OFF - disables Disk Streaming for this patch completely.
0 ms .. 60 sec. - sets preload time in selected time interval
If you set Patch Streaming an asterisk on this menu will indicate that this
option is active:
Advanced Import Options...
Opens a new window with the individual import settings to be used when loading an instrument into a
part. The settings are applied to all the samples and patches in a bank.
If you change any option in the Advanced Import Options window an
asterisk on this menu item will indicate that this option is active:
Maximum sample memory allocation: defines the maximum amount of [MB] memory to be allocated
for the samples. The rest of the samples which did not fit into this size are streamed from disk. With this
setting you can balance between memory use and hard disk access for the specified patch.
Sample length: trim samples to specified length in [seconds]. For example for long piano samples when
you do not need their long decay you can trim it. After the sample is trimmed a small 10ms Fade Out is
applied at the end of the sample to eliminate pops. Fade out is applied only to non looped samples.
Proportional dynamic layers: this option reduces the number of velocity layers. It divides the velocity
Samplelord 1.5 – The User Interface
21 of 59
zone map into regular intervals. Sometimes we do not need hundreds of dynamic layers included in the
specified key (especially when we could never play the samples at very low levels) so we can limit the
patch to the specified region. In this way we can save some memory. You can combine this option
together with Limit Velocity Range. By default it works in the 0 – 127 velocity range.
Example of using Proportional dynamic layers together with Limit Velocity Range:
Proportional dynamic layers: 10
Limit Vel Range 64 – 127
Limit Velocity Range: loads only samples within a specified velocity range, samples outside this range
are not loaded and unassigned places on the map are filled with existing samples.
Limit Key Range: loads only samples in the specified key range, samples outside this range are not
loaded.
Do not import filter settings: it does not load Filter Resonance and Filter Q settings from the patch.
Do not import envelope settings: it does not load amplitude and filter envelope settings AHDSR
(Attack, Hold, Decay, Sustain, Release).
Do not import tune settings: it does not load Pitch and ScaleTune parameters.
Do not import modulation settings: it does not load Mod parameters.
Do not import volume/gain settings: it omits Volume and Gain info.
Do not import pan settings: it omits Panorama settings.
Renumber Program Change values: it changes Program Change numbers corresponding to the patch
ID of the bank.
Ignore loop: it omits any loop information, so the sample plays back from the beginning to end.
Ignore Keyswitching: it omits keyswitching settings.
Ignore Controller switching: it omits switching via controllers.
Ignore NoteOff/Release samples: it does not load Release Samples used to triggering Note Off samples.
Samplelord 1.5 – The User Interface
22 of 59
Voice Options...
Opens the Voice Options... dialog for setting voices (polyphony of instrument). These settings overrides
voice settings inside the internal patch. Here we can create a e.g. a MONO instrument and decide how the
recently played notes will be removed before it will make a room for a new sample.
To use any of this option you need to activate it, by default options are disabled.
Voices – adjusts the maximum number of voices that can be played by an instrument. If a Sample is
triggered and the maximum voice count has already been reached Samplelord releases existing voices to
make a room for a new voice.
Fade Time – adjusts how long a killed voice will fade out before it disappears. The fadeout length is
specified in milliseconds.
Voice Kill Mode – sets what action Samplelord should take to voices which do not fit in specified Voices:
limit.
•
•
•
•
•
Kill Any
Kill Oldest
Kill Newest
Kill Highest Note
Kill Lowest Note
takes first free voice and applies a fade out on it,
the oldest, still playing voice is removed,
the most recently played voice will be fade out,
voice with the highest pitch will be cut off,
voice with the lowest pitch will be cut off.
If you change something in this window an asterisk (*) is added which
inform you about modifications in this window.
Clear
Resets settings and edit options of selected part but does not remove the loaded instrument.
Samplelord 1.5 – The User Interface
23 of 59
Volume
The volume level (CC#7) of each Instrument
part's audio output can be adjusted. These
adjustments are applied smoothly in real-time on
the audio outputs.
Volume’s Cursor:
To change a Volume level click in the "Vol"
column of the corresponding Instrument part.
Drag the mouse vertically to increase or decrease
the volume level. Volume Level changes are
applied in real-time to the stereo outputs. The
Volume Level is set in real [dB] units ranging
from -60.0dB .. 0dB .. +12.0dB in 0.1dB steps.
By holding [CTRL] key and mouse click you can set volume to the default, 0dB.
Pan
The pan position (CC#10) of each Instrument
part's audio output can be adjusted. These
adjustments are applied smoothly in real-time on
the audio outputs.
Pan’s Cursor:
To change a Pan position click on the "Pan"
column of the corresponding Instrument part.
Drag the mouse vertically to increase or decrease
pan position by 1% steps. Pan changes are
applied in real-time to the stereo outputs. Pan is
set in a range of -100 (Left) .. 100 (Right)
position in % units
By holding the [SHIFT] key during mouse-drag, changes to pan are applied in steps of 0.1% steps.
By holding [CTRL] key and mouse click we set pan to the center position.
We can adjust the smoothness of these parameters in the Multi menu:
MENU: Multi → MIDI Ctrl Automation...
Samplelord 1.5 – The User Interface
24 of 59
Out
Outputs are used to route instruments to separate
audio channels. It is very useful when you want
to apply insert or send effects for individual
instruments in the mixer of host software.
Note: SAMPLELORD does not have any built-in
effects.
To select an audio output, click in the "Out" column of the corresponding Instrument
part. You may route more than one instrument to the same audio output channel to
send a group of instruments to the same set of effects in your host. It is also possible
to route the same instrument to more than one audio output using share mode (we can
share instrument on other channels by using Share Instrument menu command).
The number of outputs enabled in this menu depends from the number of configured
Stereo Outputs and this can be set in the MENU: Setup → Stereo Outputs.
Samplelord 1.5 – The User Interface
25 of 59
Buttons
The Prog and Bank buttons are used to select a Patch from the loaded file. These buttons work only when
we load so called “bank” file which includes set of numbered programs inside so we can switch between
internal patches.
→ Program Change command, selects previous Program/Patch
→ Program Change command, selects next Program/Patch
→ Bank Select command, switches to the previous bank inside file
→ Bank Select command, switches to the next bank inside file
You can also use [-] and [+] keys on the keyboard numeric pad to select the previous or next Patch.
Notation:
000 – the first group of digits indicates the Bank Select number,
001 – the second group of digits indicates the Program Change number.
These file formats supports a "bank" feature (that is, a set of numbered programs inside the file):
SoundFont *.SF2
Giga *.GIG
EmulatorX *.EXB
Native Samplelord's Bank *.BANK
Native Samplelord's Collection *.COL
Bank Select and Program Change values are sorted according to the bank and then program number.
Drum Kits are sorted to the end of list and they usually have a Bank Select value of 128.
Samplelord 1.5 – The User Interface
26 of 59
Edit Panel
The Sound Edit Panel contains a number of sections to control different groups of parameters. When
adjusting the knobs, the default parameter values of the selected instrument are overridden (changed). (the
default parameter values are set when loading an imported instrument). Using the commands of the
"Multi" menu the Sound Edit parameters can be saved to a separate multi file (*.SPF) or to a bundled
multi (*.SBN). When using SAMPLELORD as a plug-in, the parameters will also be saved by the host in
its audio project.
To switch between the Edit Panel sections click on one of these three buttons:
Sound Edit parameters are edited by dragging the mouse vertically.
Left Mouse Click + Mouse Up or Down on a knob changes a parameter's value.
By holding the [SHIFT] key the changes are done in smaller steps.
By holding the [CTRL] key + Left Mouse Click on a knob activates or deactivates a changes. For three
dials Transp, Coarse, Tune deactivation restores a sound parameter to its default value.
Parameter is not changed and shows the default parameter value via semi-transparency.
Parameter is active and changed, thus overriding the Sound Preset's default parameter value:
Parameter is being edited:
The Transp knob has additional increment/decrement modes:
Left Mouse Click shifts down by 1
Right Mouse Click shifts up by 1
Samplelord 1.5 – The User Interface
27 of 59
“General” section
Transp: (MIDI Transpose) transposes incoming MIDI notes in semitones,
range: -60 .. 60 semitones. It also visually shifts zones in the instrument
preview (above the Virtual Keyboard).
Coarse: transposes an instrument by pitching audio, range: -12 .. + 12
semitones.
Tune: fine tunes the samples, range: -50 .. +50 cents.
No pitch: disables all default and imported instrument tunings that is
sample coarse, sample tune, instrument coarse, instrument tune, zone coarse
and zone tune.
Attack: overrides instrument's default Amplitude Envelope attack time,
range: 0 .. 50 seconds.
Hold: overrides instrument's default Amplitude EG Hold time: range: 0 .. 50
seconds.
Release: overrides instrument's default Amplitude EG Release time, range: 0 .. 50 seconds.
Decay: overrides instrument's default Amplitude EG Decay time, range: 0 .. 50 seconds.
Sustain: overrides instrument's default Amplitude EG Sustain level in real [dB] units, range: -96 dB .. +0
dB.
Vel. Curve: sets instrument's Amplitude EG Velocity Curve smoothly, in range: 0.0 .. 6.0
(0) means constant velocity, (1) means linear curve (2) means an exponential curve (default setting)
“Filter” section
Cutoff: overrides instrument's Filter Cutoff Frequency in real [Hz] units,
range: 50 Hz .. 20000 Hz. default
Q: overrides instrument's default Filter Resonance in real [dB] units, range:
+0 dB .. +20 dB.
No Filter: this switch disables the Filter, Filter Envelope Generator settings
and Filter Velocity settings.
Attack: overrides instrument's default Filter EG Attack time, range: 0 .. 50
seconds.
Hold: overrides instrument's default Filter EG Hold time, range: 0 .. 50
seconds.
Release: overrides instrument's default Filter EG Release time, range: 0 ..
50 seconds.
Samplelord 1.5 – The User Interface
28 of 59
Depth: overrides instrument's default Filter EG Depth, range: -100% .. +100%. Value '0' and center
position of this knob means that Filter Envelope Generator is not used.
Velocity: sets a Filter EG Velocity Curve, range: 0.0 .. 1.0; this is used to change the Filter Cutoff
Frequency with Note Velocity.
Vel. Start: sets a Filter Envelope Generator Velocity Start Point; when pressing a note, its Velocity
changes the Filter Frequency. A value '0' means that the curve is working over the full velocity range of 0
.. 127.
“Mod. Ctrl” section
Loop X-Fade - softens the transition between the end and the beginning of
the loop, range: 0 .. 2000 [samples]. This option works globally on all
samples of the currently selected instrument.
Pitch Bend: sets a Pitch Bend range from 0 to 24 semitones.
Value '2' semitones is the default value.
Freq.: sets a modulation frequency (vibrato/tremolo speed) in real units,
range: 0.001 Hz .. 50.0 Hz.
Delay: sets a modulation delay, range: 0 .. 50 seconds.
Attack: sets a modulation attack, range: 0 .. 50 seconds.
Volume: sets a volume range control (tremolo) using the modulation wheel
(CC#1) in real [dB] units, range: 0 dB .. +12 dB.
Pitch: sets a pitch range control (vibrato) using the modulation wheel
(CC#1), range: 0 cents .. +1200 cents.
Mod Off: is a three-state button, when MOD OFF is highlighted it does not respond to External
Modulation Controller (CC#1 - often the Mod Wheel on your keyboard), when LFO is highlighted it
activates an internal vibrato mode instead of Modulation.
Some patches have controller switching inside based on the Modulation Controller value. In this situation
we have to turn off Modulation because we can't control modulation and use controller switching at the
same time. Samplelord's sets MOD OFF automatically when it finds modulation controller switch inside
the patch.
Samplelord 1.5 – The User Interface
29 of 59
Browser Panel
The Browser is used to view, open and drag sound files
into the instrument parts. It has a tree structure based on
the file structure on your hard disk. You can browse
through one disk partition at a time, but there are
shortcuts to switch between different disk partitions on a
hard disk. Only files supported by Samplelord are shown
in this window. There are different colors used for each
file format for easy navigation through different formats.
Icons used in the Browser are:
folder
opened folder
selected folder
opened selected folder
empty folder
program inside selected bank
Filter “F”
The Filter menu can be used to customize view of files and folders in browser.
To filter some file types which you do not want to be shown in a browser click on
from menu deselect a folder or file type.
A highlighted state of the F icon means that you have made some changes here:
the icon and
Samplelord 1.5 – The User Interface
30 of 59
Directory “DIR”
By clicking on DIR icon an additional menu appears.
Here you can select a particular hard disk's partition
or folder for browsing.
Clicking on menu "Root Directory..." a new dialog window appears and here you
can select a particular folder for browsing.
Samplelord uses a temporary snapshot to store the directory tree, so that every time you select an
instrument it switches the Browser to the patch's location for easy file finding. These snapshots
work only for the program session during which you loaded the patch.
Navigatione
There are several shortcuts available in the Browser window which will help you navigate through
folders, banks and programs.
To navigate click somewhere on the Browser panel to select it and it will highlight the currently selected
folder. We can also switch to this panel from the Instrument panel by pressing the [Tab] key.
Some keys may be dependent on the host capabilities and some keys may be not available inside
Samplelord's window because the host application may use the same key (shortcut) for its own purposes.
The [Tab] key switches between the Instrument and Browser panels. If this key conflicts with a host's Tab
key you can disable it in the Setup menu: Setup → Key Commands → Tab → Off
Finally you can disable all key commands and release these keys for the host.
MENU: Setup → Key Commands → Off
Samplelord 1.5 – The User Interface
31 of 59
[Home] key sets cursor to the top item
[End] key sets cursor to the bottom item
[Left] arrow key collapses a folder or closes a bank when a bank is selected.
[Up] arrow key selects the previous item.
[Down] arrow key selects the next item.
[Right] arrow key expands a folder or opens a bank to access to its programs.
[+] key on the keyboard numeric pad selects then next entry and loads the file or program to the currently
selected instrument part in the Instrument Panel. Holding [+] key will move quickly through items. When
you release the key, it loads the file or program into the currently selected Instrument part.
[-] key on the keyboard numeric pad selects the previous item and loads the file or program to the
currently selected Instrument part. Holding [-] key will move quickly through items. When you release
this key it loads the file or program into the currently selected Instrument part.
[Page Up] scrolls view to the previous page.
[Page Down] scrolls view to the next page.
[Enter] key loads currently selected bank or patch. But when using the plug-in version this key may be
reserved for host use so using this key is dependent from the host possibilities. If this key conflicts with a
host's Enter key you can disable this key in Samplelord by checking this option in the Setup menu:
MENU: Setup → Key Commands → Enter → Off
To open a folder click on the name of folder, to close folder click on its name again:
→
If you want to view bank's content click on the name of bank, to close a bank click on its name again:
→
Samplelord 1.5 – The User Interface
32 of 59
To load a bank or patch quickly you can use Double Mouse Click on the selected bank or patch.
Drag & Drop
You can also use a Drag & Drop method to move the selected bank or patch from the Browser to the
instrument part. A Drag operation is marked with a special icon.
When you drag a file onto the first part, then it automatically creates links so the same file will be shared
by all 16 parts. Thus you can load one GM sound bank containing a set of programs and operate it as a
Multi-timbral instrument allowing playing through all 16 channels.
Quick Mapping
Samplelord provides a quick method for building a sound set from existing audio files (in *.WAV or
*.AIFF format). To do this use Drag & Drop method to drag the audio file from the browser and drop
onto selected key on the virtual keyboard.
Samplelord 1.5 – The User Interface
33 of 59
You can add more audio files to the same key and create dynamic sounds which responds to the velocity.
When you add two audio samples they will split velocity range twice. When we add three samples on a
key a three velocity splits will be created. Velocity regions are created in a regular length.
Each new velocity region is started at low point of a key and existing samples are moved into high part of
key.
A zone display above the keyboard gives information how many samples have been assigned to the same
root key.
Customize
By clicking on the arrow icon on the menu bar of the Browser you can select either of the two available
layouts of the Browser: large (next to keyboard) and small (above the keyboard).
Buttons
The Browser contains a set of buttons for easy access to some functions.
Prev
Next
Load
Root
– loads the previous patch or bank from the Browser.
– loads the next patch or bank from the Browser.
– loads the currently selected patch or bank.
– opens a directory browser to view a particular folder or partition on a hard disk.
Samplelord 1.5 – The User Interface
34 of 59
Tool Bar
The Tool Bar has buttons for accessing the menus and it shows some additional information.
Multi – opens the Multi menu
Setup – opens the Setup menu
Hide – hides/shows the graphical panel GUI.
Samplelord – is the title of the application, clicking on the title invokes detailed information about the
software, it also displays the registration status of the product.
CPU and HD panels – show information about CPU load and Disk Streaming Usage. You can hide this
panel in menu settings: MENU: Setup → View → Cpu Meter.
Voices – this counter shows information about polyphony of currently played voices (not notes as one
note can trigger many voices at once). It also depends on the patch’s construction. We can reset the
number of currently played voices at any moment using Left Mouse Click on Voices pane.
This is a so-called PANIC button.
RAM – gives information about the memory used by loaded samples. We can switch between MB
(megabytes) or (B) (bytes) units by Left Mouse Click.
The same pane is also used to display a progress of file operations
such as file import, export, open or save.
MQ – gives information about current quality of resampling. It is a three state button. Left Mouse Click
switches to next mode while Right Mouse Click switches to the previous mode. All changes are applied
in real-time so it switches Samplelord's engine internally and you don't have to close the application or
plug-in.
N – means a normal resampling quality (draft); this can causes aliasing
problems on a pitched or pitch-bended samples.
MQ – doesn't produces aliasing on pitched sounds and it is perfect for realtime use, this is the default setting.
HQ – offers a quality better than MQ but uses at least twice as much CPU
power, suitable for offline audio mixdown or audio bounce.
Samplelord 1.5 – The User Interface
35 of 59
Keyboard
The Keyboard has been provided in Samplelord for quick note audition. To hear any sound, an
instrument must be selected and not muted with “Mute” button. You can hide the keyboard in menu
settings: MENU: Setup → View → Keyboard
Left Mouse Click on a key triggers a Note ON, mouse release triggers a Note OFF. You can click at
different positions on a key to audition sound at different velocities.
Right Mouse Click triggers only Note ON in a sustained mode, to stop sustained note click on the played
key again.
Auditioned notes are marked with blue keys:
Sometimes you can see green keys on the keyboard. These keys
indicate a key switch region. Keyswitching is a technique to
create a several sound variations. By selecting a green key we
switch between the sound variations. Technically we switch a
sample mapping for each key.
Above the keyboard you will see a sample map for the selected patch:
The sample map icons are:
mono sample, plays one audio channel
stereo sample, contains two interleaved channels Left and Right
stereo linked sample, this sample is built from mono Left and Right samples
unknown sample, means there was a problem with importing of this sample
When multiple zones are located in the same region (key or velocity layering) then its root keys
may be arranged in a one column.
Samplelord 1.5 – The User Interface
36 of 59
Status Bar
Samplelord includes a status bar at the bottom of its GUI. It contains information about the multi or the
triggered sample.
When the Instrument Panel is active then it displays the file path to saved/opened Multi setup.
When the Browser Panel is active it displays the path information about the selected element in the
browser.
When we click on a keyboard to audition a note it shows information about the sample.
The bottom right corner of the status bar includes a "size handle"; by clicking and
holding that handle you can resize a plug-in's GUI.
More details about window resizing are in the Resize chapter.
Status Bar of Standalone Version
An additional Status bar in the stand-alone version shows a CPU meter, audio ASIO driver's or MME
driver's buffer size, and active MIDI Input port.
Samplelord 1.5 – Menus
37 of 59
Menus
The Multi menu
The Multi menu contains options that may used differently in every Samplelord session.
Open...
Opens a Samplelord multi or Samplelord bundle file. To open a bundle choose Bundle *.SBN file format
extension.
Save...
Saves a Samplelord multi setup or a Samplelord bundled multi setup.
Quality Mode
This menu switches between three types of resampling. This option is the
same as the MQ icon on the Tool Bar.
Normal Quality (N)
Medium Quality (MQ)
High Quality mode (HQ)
– gives the best performance
– optimal very good performance and very good sound quality
– high quality but high CPU Usage, good for audio mixdown.
Samplelord 1.5 – Menus
38 of 59
Master Level
This menu sets the global Master Volume Level. The Default
recommended setting is -6.0 dB. Samplelord does not use any
limiters on its outputs, so be careful when working with a
high master level in the standalone version of Samplelord, as
its outputs are routed directly to the sound card.
Velocity Sensitivity
Defines how Samplelord responds to velocity of notes.
Positive values +1 .. +5 cause the low-velocity notes to
play more loudly and vice versa.
Normal is the default sensitivity.
Polyphony Limiter...
Opens a window where you can set the
maximum playable voices for all instruments
in a multi. Values from 1 .. 2048 are possible.
To change the maximum number of voices by +1 or -1 click on the slider and use Left Arrow and Right
Arrow keys. You can use this option to create a "monophonic" style of play, but it will work on all
loaded instruments.
MIDI Ctrl Automation...
Used to create smooth transitions between MIDI
controller changes. It is important especially when
you use bigger ASIO latency buffers.
The Default settings are 20 ms for Volume/Pan
and 50 ms for other MIDI controllers.
Samplelord 1.5 – Menus
39 of 59
MIDI Filter...
This window opens a MIDI Filter... window where you can filter some
incoming MIDI messages. If you want to disable responding for some
MIDI controller message click on its checkbox. It is highlighted as red.
If you would like to create a default setup which will be loaded every
time you will start Samplelord click Set as Default button.
To close this window click on the icon.
Receive Program Changes
This option activates or deactivates Samplelord's response to incoming Program Change (PC) and Bank
Select (CC#0, CC#32) MIDI messages.
Reset
This option clears the project settings and unloads all instruments from memory. You can use this option
when creating a New Multi Setup.
Samplelord 1.5 – Menus
The Setup menu
The Setup menu contains global plug-in settings. These settings are common for all Samplelord's
instances and sessions and they are stored in the samplelord.ini configuration file.
Stereo Outputs
Sets available audio outputs visible in a VST host . One audio output
contains two mono audio channels for the left and right channel, creating
a stereo channel.
After changing this setting you will need to restart the plug-in because
audio outputs are configured during plug-in initialization. This means
that you will have to remove plug-in in your host and add it again.
If you don’t want to lose your current multi setup during
plug-in restart save your multi setup first and open it via
Multi Open/Save operations.
40 of 59
Samplelord 1.5 – Menus
41 of 59
Fixed outputs (Advanced Feature):
There is a hidden feature which allows you to define other number of outputs for different instances of
plug-in. To do this find Samplelord’s folder on your disk, duplicate the samplelord.dll file and rename it
according to these rules.
SAMPLELORD.DLL → SAMPLELORD_XXSTEREO.DLL
XX is a number of stereo outputs which you want to define for this plug-in file.
SAMPLELORD_08STEREO.DLL means that this instance of the plug-in will have only 8 stereo outputs
and you cannot change it.
Stereo Outputs menu item will change name to Fixed Outputs and you
will see only one value available; this means that this setting has been
configured properly. More about the special versions of Samplelord in
Updating Samplelord (Special versions)
These Fixed Output versions will use their own .ini configuration files to
store their settings. You can duplicate the samplelord.ini file and rename it (samplelord_08stereo.ini in
this example) or let Samplelord create a new configuration file for you.
Disk Streaming
Disk Streaming is a technique for playing back samples without
loading these samples entirely into RAM memory. Disk Streaming
reduces the time needed to load the sample initially, but consumes
some extra CPU processing power and as a result the number of
maximum voices played with using disk streaming is lower. Disk
Streaming performance depends a lot on software and hardware
configuration. Disk Streaming requires a hard disk with a high
transfer bandwidth with short access times.
This option sets a preload time of a sample after which it will be
streamed from a hard disk.
For a 5 second sample length: a 1 second setting means that the
software will load the first second of a sample then after it reaches
this point the rest of audio data will be streamed from a hard disk.
OFF
0 ms
100 ms .. 30 sec
Reload All Samples
– turns of Disk Streaming.
– streaming from disk will be started immediately.
– sets a preload buffer length.
– stops any played samples and reloads samples with new preload buffer.
Each time the preload buffer size is changed, the currently loaded samples are
reloaded and the amount of memory occupied by the samples is updated.
Samplelord 1.5 – Menus
Disk Streaming Buffer
This option sets the amount of audio data that disk
streaming will read directly from a hard disk. The Default
64KB option is sufficient for most configurations.
File precaching: This option enables Window’s file
caching; after which files will be streamed from a hard
disk. It takes some time but it offers stable data streaming
without dropouts.
When a file is cached you will see an additional progress
bar.
Multiprocessing
This option is reserved for systems with multiple cores or
multiple CPUs onboard. It increases Samplelord’s power, so you
get more voices for playback and less CPU load with
multiprocessing enabled.
Theme
This option changes the color theme used for the Samplelord GUI.
It is based on a single bitmap file so if you are familiar with a graphic
editor such as Paint, Photoshop or Corel you can change and design
your own shape and colors for specific elements. As an example, the
default Goldenrod theme is located in Goldenrod.bmp file in
Samplelord’s folder.
The advantages of using Theme is that the plug-in or application starts
very quickly without a noticeable delay in compared to the Colorize
function which performs various graphical operations before it builds
a GUI.
42 of 59
Samplelord 1.5 – Menus
43 of 59
Colorize
Allows you to change the general GUI color. The Colorize options
are processed for the GUI only during plug-in load or standalone
start-up and it does not affect CPU load during normal work. The
only disadvantage of this function is that it takes some noticeable
delay (about few seconds) before it will display a GUI because it
needs (re)calculate new bitmaps.
If you have an idea for some interesting color of the GUI which
could be added to the Theme for quick loading please contact me by
e-mail.
There are five predefined Color values: default, steel blue, green,
semi gray and olive. You can create your own custom color of GUI
by invoking a Custom… command from this menu.
Four parameters control different color parameters. To change the hue, color saturation, luminance or
lightness drag its slider to some position and drop at desired value.
Reset
Random
– sets the slider values to default positions.
– sets the color parameters randomly.
Store…
– allows you to save colorize option to a file and
adds it to the Colorize menu for quick access. A new dialog
window appears to save your colorize options.. This setting is
stored in the same folder as Samplelord. During the next plug-in
load or standalone start-up it scans its folder and if it finds *.color
files it will add them into Colorize menu.
OK – applies the changes.
Samplelord 1.5 – Menus
44 of 59
Font
This menu allows you to change a font used for the Instrument and
Browser panels:
Dir... – modifies the font used for Directory (Folder) in Browser
Panel.
File... – modifies the font used for File in Browser Panel.
Instr... – modifies the font used for Patch Name in Instrument Panel.
Choosing a command invokes additional font dialog window. Here you can change a font style. Note that
the font colors are defined in the theme bitmap file.
Reset – resets the font settings to the default Tahoma font style
View
Customizes view of plug-in by switching
on/off visible elements.
Show outputs as mono pair L+R sets
display output’s name in Out column and in
Out Menu.
Show hidden directories
Show system directories
Large Browser
Status Bar
Browser’s background
Keyboard
Keyboard Zones
Transparent Knobs
Mute Color Red/Yellow
Level Meter
CPU Meter
Keyboard Middle C
shows hidden folders in Samplelord’s Browser.
enables visibility of system folders in Samplelord’s Browser.
switches between two browser’s layout.
More in Browser Panel → Customize chapter.
turns on/off plug-in’s status bar.
turns on/off line’s highlighting.
turns on/off keyboard visibility.
turns on/off zone display.
turns on/off knob transparency.
switches colors for mute and solo buttons.
turns on/off audio peak monitor.
turns on/off CPU and HD monitor.
sets key numbers on keyboard.
Samplelord 1.5 – Menus
Resize
This option changes plug-in’s overall width and height. You can
choose from different predefined settings. If you would like to create
a custom size use the handle located at the end of the Status Bar.
Not all hosts support resizing of plug-in window on the fly, so
working of this option is dependent on the host capabilities. In
this case we need to resize a plug-in by moving the Size handle,
then close and open GUI again. Finally you can restart the plug-in,
reload audio project of host or reload the host.
Key Commands
Enables or disables shortcuts.
Off disables shortcuts.
Enter enables or disables use of the Enter key inside Samplelord.
Tab enables or disables use of the Tab key inside Samplelord.
Mouse Wheel
Sets the amount of window scroll in a Browser Panel
when using the mouse wheel.
Off – disables mouse wheel action.
45 of 59
Samplelord 1.5 – Menus
46 of 59
Mouse Capture Method
This option defines method of mouse wheel detection.
Because Mouse Wheel usage is an undocumented
feature of VST and there is no official support for it, so
developers must use other techniques to take control
over mouse wheel events.
Autodetect automatically enables a mouse wheel mode (selects available VST Mode or Windows Mode).
This is the default and recommended setting.
Windows Mode to use mouse wheel you have to make a click on plug-in’s panel first.
VST Mode uses an undocumented mouse wheel VST opcode.. Host application must provide support for
this opcode.
Import
This option defines what to do with the current edit settings when a new patch / audio file is loaded.
Clear part settings before PATCH load – resets current parameters of instrument before new instrument
load.
Clear part settings before AUDIO WAVE load – resets current parameters of instrument before new
audio file load.
Reset
Resets all global settings to default. You can do the same by deleting the samplelord.ini configuration
file in Samplelord’s folder.
Samplelord 1.5 – Menus
47 of 59
Hide
Hide – clicking on this button hides plug-in’s GUI so it saves its graphics resources and reduces CPU
load caused by graphics operations.
To show GUI click on panel.
The File menu (only in the Standalone version)
Exit quits the standalone version.
Samplelord 1.5 – Menus
48 of 59
The System menu (only in the Standalone version)
Stop Audio
Stops the ASIO or MME driver.
Multimedia
Selects a MME driver. The Status bar shows a CPU meter and its buffer size used for audio processing.
ASIO
Selects an ASIO driver. The Status bar shows a ASIO CPU meter and its buffer size used for audio
processing in other words a buffer latency.
ASIO Clock
This option changes a sample rate in ASIO mode and it is available when ASIO driver is selected.
ASIO Panel
This command opens a panel for the ASIO driver, where you can change a latency buffer. Some sound
cards do not offer the possibility of latency change “on the fly”. In this case you will need to close the
Samplelord.exe or stop ASIO with Stop Audio command, and open the sound card's settings
configuration file. (Please see your sound card's User Guide for details.)
This option is only available when an ASIO driver is selected.
Samplelord 1.5 – Menus
ASIO Routing...
This option opens an additional dialog when you can assign
Samplelord outputs to your sound card outputs. This option is
only available when an ASIO driver is selected. The number
of active channels depends on the number of stereo outputs set
in Stereo Outputs menu.
By default the first left/right ASIO channels are assigned as
Samplelord outputs.
To change sound card’s output click on the output’s name and
choose audio driver from the list.
Reset button sets default routing.
OK button accepts changes and closes window.
MIDI Input
This command selects a MIDI input port used to connect external
MIDI equipment with Samplelord software. After port selection its
status is shown on the Status Bar and it confirms that the MIDI input
port is active and ready. To switch off MIDI input, choose the Off
option.
The About menu (only in the Standalone version)
About... Displays about dialog. Please see the Tool Bar section
49 of 59
Samplelord 1.5 – Key Commands
50 of 59
Key Commands
Global shortcuts
[Tab]
switches between the Instrument and Browser Panels.
Instrument Panel shortcuts
[Up]
[Down]
[+]
[-]
[Del]
Shift + [Del]
Ctrl + [Del]
moves cursor up (selects previous part).
moves cursor down (selects next part).
selects next Patch a Bank or Collection.
selects next Patch in a Bank or Collection.
removes instrument from a part
removes instrument from a part and resets edit settings to default
resets only instrument edit settings to default
Browser Panel shortcuts
[Home]
[End]
[Left]
[Right]
[Up]
[Down]
[+]
[-]
[Page Up]
[Page Down]
[Enter]
sets cursor to the top item.
sets cursor to the bottom item.
collapses a folder or closes a bank when a bank is selected.
expands a folder or opens a bank to access to its programs.
selects the previous item.
selects the next item.
loads the next file or patch. Holding [+] key will move quickly through items.
When you release the key, it loads the file or program into the currently selected
Instrument part.
loads the previous file or patch. Holding [-] key will move quickly through items.
When you release the key it loads the file or program into the currently selected
Instrument part.
scrolls the view to the previous page.
scrolls the view to the next page.
loads the currently selected file or patch.
Samplelord 1.5 – General MIDI
51 of 59
General MIDI
General MIDI or GM is a standardized specification for music synthesizers that respond to MIDI
messages. It allows sending the notes and other control messages between two instruments hardware or
software instruments.
MIDI Implementation
Samplelord responds to these MIDI messages, unless you change this in the MIDI Filter... window where
you can disable responding to selected incoming MIDI messages.
Note ON
Note OFF
Control Change:
CC #0
CC #1
CC #6
CC #7
CC #10
CC #11
CC #32
CC #38
Bank Select MSB
Modulation (wheel)
Data Entry MSB
Volume
Pan
Expression
Bank Select LSB
Data Entry LSB
CC #64
CC #69
CC #71
CC #72
CC #73
CC #74
CC #120
CC #121
CC #123
Sustain Pedal
Hold 2 Pedal
Filter Resonance (Harmonic)
EG Release
EG Attack
Filter Cutoff (Brightness)
All Sound Off
All Controllers Off
All Notes Off
Program Change
Pitch Bend (by default Pitch Bend works within a range of 2 semitones; you can alter this range with
Pitch Bend dial on Mod.Ctrl edit page)
One important option is Receive Program Changes located in Multi menu.
When this Receive Program Changes option is active Samplelord selects the Patch automatically (from a
Bank or Collection) after it receives Bank Select (CC#0, CC#32) and Program Change (PC) messages.
When this option is unchecked responding to Program Change and Bank Select will be disabled.
Note: When a Bank Select message is received, the value is stored until a Program Change is received;
the stored Bank Select is then used to switch to the specified patch in the new bank. For this reason, Bank
Select must be sent before a Program Change, when you desire changing to a patch in a different bank.
(Of course, if you simply wish to change to another patch in the same bank, there is no need to send a
Bank Select first.)
Samplelord displays the Bank and Patch numbers in its own format [xxx]:[yyy]
xxx – means a bank number,
yyy – means a patch number.
Program Change (PC)
is translated by Samplelord into a Patch number .
Bank Select LSB (CC#32) is translated by Samplelord into a Bank number.
Bank Select MSB (CC#0) is translated by Samplelord as a scaling of the bank number by 128 to give
access to banks behind the 0..127 range.
Samplelord 1.5 – General MIDI
52 of 59
MIDI Automation
SAMPLELORD can be automated by using MIDI Control Change (CC) messages which make the
Samplelord respond as a typical hardware musical instrument. The list of supported MIDI messages is
described in the MIDI Implementation chapter.
Automatic Bank Load
When you load a bank into the first instrument part it is automatically linked on other channels, so it is
available on all 16 MIDI channels and ready to play in multi timbral mode
Samplelord 1.5 – Supported File Formats
53 of 59
Supported File Formats
Native Samplelord Bank *.BANK
This is an internal open/save format. It stores all data used by Samplelord to play samples.
Native format gives the best performance for patch/bank load.
This format consists of one bank file *.BANK which contain patch definitions and all parameters needed
to defines a sound playback or one or more sample files *.SMPL which hold the sample content.
Native Samplelord Collection *.COL
A Collection file is a set of file paths with Program and Bank Number assignment for each file. It is based
on the Windows text file format so you can create and edit it using Notepad.
Creating & Using Collections
Example: We have three files (piano.sf2, bass.gig, drums.nki) located in C:\Samples\ folder and we would
like to create a collection file dance.col.
1.
Run Notepad application: Start Menu → Programs →
Accessories → Notepad or type notepad in Window’s command
line Run...
2.
Add a Bank number in the range 0..999 and type [Space] as a
delimiter.
3.
4.
Add a Program number in the range 1..128 and add [Space].
And as the latest entry in a line add a path to the file, e.g.
C:\Samples\piano.sf2 and type [Enter] to create a new line for the
next entry.
Samplelord 1.5 – Supported File Formats
5.
Add entries for the 2nd file bass.gig:
6.
Add entries for the 3rd file loop.wav:
54 of 59
7.
8.
Repeat steps 2,3,4 to add more files.
Use from menu File → Save As… to save the collection,
choose All Files as the file type give the name of the file and add
.col extension to the name.
A Samplelord Collection File must have a *.COL extension in other case Samplelord will not be
able to see this file in the Browser, as *.txt extensions are not recognized. Remember to choose All
Files from Save as type listbox and add .col extension to the name of file.
9.
Open the collection in the Samplelord Browser by clicking on
the file - it lists its content. If the file didn’t show up refresh the
folder by closing and opening it. You will see a structure similar to
the one we have created. Now you can drag this file into a part and
use it or you can export it as a Native Samplelord Bank for future
use.
In our example, when Samplelord receive Program Change #1 through its MIDI Input it will select
piano.sf2. When Program Change #2 is received it will select bass.gig as the active patch etc.
Samplelord 1.5 – Supported File Formats
55 of 59
When a file in a Collection contains a list of patches inside it those patches will be incrementally
renumbered starting from the defined Bank and Patch number in a collection. So that file's own bank and
patch numbers are not used.
You can use Relative Paths instead of giving full paths which
simplify editing. Just create a collection file in the same folder
as the added files or use double dots to define a parent folder \..\
It is possible to use only file paths or filenames without Bank
and Program definitions, so Samplelord will renumber all
patches automatically. To start a new renumbering from the
certain patch please define Bank and Program Number for this patch
before its path or filename and next patches will be renumbered
incrementally.
When we are going to create a small list of patches no more
than 128 entries, we can use only Program numbers to simplify
the task and Samplelord will renumber subsequent patches from
given number.
Samplelord 1.5 – Supported File Formats
56 of 59
Sfz *.SFZ
Full support except for compressed OGG files which currently cannot be played internally by
SAMPLELORD. Compressed OGG samples can be reconverted to non-compressed format using
Extreme Sample Converter.
SoundFont *.SF2
SoundFont 2.0, 2.1 (including 16-bit samples) are fully supported.
SoundFont 2.4 (with 24-bit support) is not supported yet.
GigaStudio *.GIG
Full GIGA Support including import of accelerated samples in all bit depth resolutions. When we load
accelerated gig samples for the first time they are written to a temporary giga_cache folder on disk to
provide the best disk streaming performance.
Kontakt *.NKI
Kontakt's NKI 1.x and 2.x files are fully supported including WAVE or AIFF samples.
Compressed files, monolith files or Kompakt files are not supported.
Multi NKM files are currently not supported, they can be imported and converted using Extreme Sample
Converter.
If Samplelord cannot find the samples referenced by the Kontakt Patch, then you will see an additional
window which allows you to find these samples manually by browsing to a folder.
After you click OK Samplelord will search for the samples automatically inside that folder and its
subfolders.
You can stop this searching by pressing [ESC] key.
If some samples were still not found the best way to work around, this problem is to place the Kontakt
patch file and all the samples in the same common folder.
Samplelord 1.5 – Supported File Formats
57 of 59
Halion *.FXP
Halion's 1.x, 2.x, 3.x files are fully supported including WAVE and AIFF samples. Loading HALion 3
files requires the Steinberg Dongle.
Monolith sample banks (HSB) and others derivative Halion files are not supported.
FXB Halion bank files (multi) are currently not supported, you can use Extreme Sample Converter to
convert FXB into Samplelord’s bank format. (Comment: it would be great if ESC could convert HALion
.fxb and Kontakt .nkm files to Samplelord Collection files ☺ )
If Samplelord cannot find the samples referenced by the HALion Patch, then you will see an additional
window which allows you to find these samples manually by browsing to a folder.
After you click OK Samplelord will search for the samples automatically inside that folder and its
subfolders.
You can stop this searching by pressing [ESC] key.
If some samples were still not found the best way to work around, this problem is to place the patch file
and all the samples in the same common folder.
EmulatorX *.EXB
EmulatorX banks are fully supported except for monolith sample banks (e.g. factory sample banks).
ProteusX banks are also can be imported except for monolith factory sample banks.
Audio Files *.WAV *.AIFF
WAVE and AIFF samples are fully supported except for compressed and multi-channel audio files. Multichannel audio files are not yet supported. There are no restrictions on Disk Streaming but sample can’t
exceed 2GB file size (that is a Windows limitation).
8-bit WAVE, AIFF audio samples are loaded directly into memory due to their relatively small size.
Others...
Other files (e.g. AKAI, E-MU CDs) can be converted into a supported format using the Extreme Sample
Converter application http://www.extranslator.com which is sold separately or as a bundle offer.
Samplelord 1.5 – Multi & Bundle Setup
58 of 59
Multi & Bundle Setup
Samplelord supports 2 file formats for saving its context - Multis (.SPF files) and Bundles (.SBN files).
The Multi (*.SPF) file keeps the file path and settings for each instrument part together with some of the
main options. The Bundle (*.SBN) file has the same concept as multi file but it uses exported files in
native Samplelord Bank format, so they load quickly. You can always go back to a Multi setup before the
files were “bundled”.
Multi *.SPF
When Samplelord is working in plug-in mode in hosts such as Cubase, Sonar, FL Studio etc. multi
settings can be stored within the host's project so you do not need to save the Multi setup of Samplelord
separately, however the feature allows you to save the Multi for future use, for use in other projects, for
transferring settings from one Samplelord session to another, or finally, for archive purposes.
All commands regarding to multi operations are presented in the menu Multi.
If for some reason you would like to re-edit a Multi file (for
example to correct file paths or change other settings) you can
simply do it by loading the .SPF file into a text editor such as
Notepad or WordPad. Remember to select All Files as a file
type list box in Open Dialog Window to see all files.
The Multi file contains set of different codes arranged in
groups:
*GLOBAL parameters for the common settings
*PART01 .. *PART16 parameters for each of the 16
instrument parts.
To create a Multi, select a Save … command from menu:
MENU: Multi → Save …
Browse to the folder where you want to save the Multi, enter a name for the multi, click Save
To create a New Multi, unload all Instruments and settings, select a Reset command from menu:
MENU: Multi → Reset
Samplelord 1.5 – Multi & Bundle Setup
59 of 59
Bundle *.SBN
The advantages of using the Bundle format:
quicker loading,
transferring to another project,
archiving,
To create a bundle use these steps:
1.
Choose the command from MENU: Multi → Save... A new
dialog window will appear.
2.
Enter your filename and select Samplelord Bundle
(*.SBN) file format. Click Save.
3.
Bundling will be started and a [B]undle icon will be
shown for each part when it has been bundled.
4.
Remember to save your audio project inside your host if you would like to store the bundle setup.
For each loaded part this process creates 2 separate files one for patch info (a Samplelord .BANK
file) and the second for sample content (a Samplelord .SMPL file). When the sample content is
bigger than 1GB then it is divided into smaller 1GB files to fit more easily on DVD or USB Stick.
If you would like to go back to the multi format and reload project with
the original sound files and patches (if they still exists and they were
not deleted) save project as multi with MENU command: Multi →
Save... and choose Samplelord Multi (*.SPF) as a type of file.