1
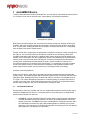
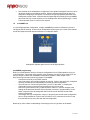
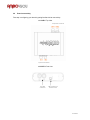
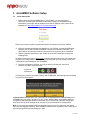
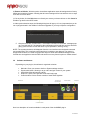
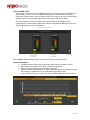
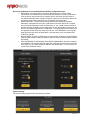
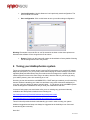
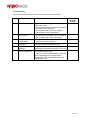
miniAMBIO 2.0
USER MANUAL
V1.0
Revision
Description
Date
V1.0
User manual – Initial version
10-10-2010
P 1 of 12
1 miniAMBIO Basics
To better understand the benefits of Ambiophonics, you first need to understand the reason behind
it. Let's take a closer look at a familiar case: a stereophonic Left & Right configuration.
Stereophonics System
Now picture yourself seating on this sofa, with sound waves coming from both the left and right
speakers. Our brain naturally interprets the atmospheric vibration from the speaker into auditory
cues. In other words, locating the audio source in space. In the present case, at a +/-30degrees
from the head of the listener. Makes sense?
Problem comes when a signal from the left speaker, intended for the left ear, "leaks" through air to
the right ear. The un-desired effects of this leak are crosstalk and comb filtering. What's that
crosstalk-comb-filtering-stuff all about? It happens when a wave is being summed together with
another version of this wave, but with a slight delay. Which delay? Basically the equivalent time it
took the wave to travel from the left to the right ear. Constructive and destructive interferences
resulting from comb filtering ultimately distort the audio. Another limitation of a stereo or 5.1
surround configuration is a narrowing of the sound image: i.e. not allowing your brain to localize
sound at the extreme sides (or all around with four speakers). With speakers located at a 60
degree angle a stereo system can only achieve up to a 60 degree wide sound stage.
And here comes Ambiophonics...
At the core of its theory is the idea of eliminating the speaker crosstalk and thus extending the
auditory image. By combining Digital Signal Processing (DSP) and a conveniently narrower 20 to
30degrees angle, Ambiophonics tricks our brain with real time correction of a standard stereo or
5.1 signal. The unique Ambiophonics experience is unlike anything you would expect from the
comfort of you living room. Ambio4YOU platforms work for any stereo, surround audio material
and will simply change the way you are accustomed to listening to audio.
1.1
Ambio4YOU Platforms
Revolutionary in their size, flexibility and low cost, Ambio4YOU's platforms are the perfect way to
experience Ambiophonics at home, in a recording studio or any public space. An Ambio4YOU
system mainly consists of 2 elements:
•
miniAMBIO, a pocket size Digital Signal Processor based on the Recursive Ambiophonic
Crosstalk Eliminator (RACE). Its purpose is to reduce the crosstalk between left & right
signals at your ears. miniAMBIO is the brain of Ambiophonics, designed to process audio
on a dedicated IC and with very high quality 24/96 algorithm to maximize your musical
experience. The end result is an accurate and distortion free listening field of 180 degrees
(two speakers) to 360 degrees (four speakers)
P 2 of 12
•
1.2
Also essential to the Ambiophonic configuration is the speaker arrangement now at a 20 to
30 degree angle from the listening position. With the speakers almost side by side, this
setup will be intriguing at first glance. It is however the required speaker placement of an
Ambiophonic system which, combined with the Digital Signal Processing from miniAMBIO,
will provide the truly unique experience of an Ambiophonics. When reproducing 5.1 media
a center speaker (front or rear) is never required
miniAMBIO 2.0
In a Left & Right speaker configuration, a single miniAMBIO processor is sufficient to provide a
180 degree field of listening. In other words, loudspeaker binaural gives you a much more realistic
sound field experience than earphone binaural or loudspeaker stereo.
Ambiophonic Speaker placement for Left & Right speakers
miniAMBIO programming
Before your Ambiophonics works, it will require configuration from a PC/Mac platform using our
custom software. A good part of the success of the miniAmbio concept lies in its simplicity of use
and you will get to realize that miniAMBIO configuration software is really simple to use.
Here are the typical steps required to program a miniAMBIO:
- Connect the board to your PC/Mac machine
- Launch the plug-in and configure settings as required. If plug-in was previously configured
correctly, the software will automatically re-load the previous configuration.
- The next step is to “Connect & Synchronize” your PC to the board, i.e. flashing the
configuration to the on-board memory and going to the On-line mode.
- Now in the synchronized mode, you will be able to make live, real time changes to the
settings of the board and hear the effect right away. No further “Synchronization” to the
board is required since all settings will now be saved to both the DSP and the Flash
memory of the board.
- Once happy with your configuration, simply un-plug the board and the audio configuration
will run as last modified in on-line mode. No need for a PC connection from now on and
the board will boot up every-time with the last configuration.
Now that you have a basic understanding of how things work, let’s get down to the details.
P 3 of 12
2 System Setup
2.1
Minimum System Requirements for software installation
MiniAMBIO controller software runs in a PC or MAC environment with the following minimum
requirements.
PC environment
• PC with 1GHz or higher processor clock speed recommended / Intel®
Pentium®/Celeron® family, or AMD K6®/AMD Athlon®/AMD Duron® family, or compatible
processor recommended.
• 256 megabytes (MB) of RAM or higher recommended
• USB 2.0 port
• Keyboard and mouse or compatible pointing device
• Microsoft• ® Windows® XP SP2/Vista/7
• Microsoft• ® .NET framework v3.5
• Flash player 10 or higher
Mac environment
• Intel Core™ Duo or faster processor
• 256 megabytes (MB) of RAM or higher recommended
• USB 2.0 port
• Keyboard and mouse or compatible pointing device
• Mac OS X v10.4, v10.5 or v10.6
• Flash player 10 or higher
Common
• Adobe AIR environment: Should be automatically installed if you have an internet
connection at the time of the plug-in install. Otherwise, go to adobe website to download
the adobe Air environment at: http://get.adobe.com/air/
Package content
Your miniAMBIO package includes:
• miniAMBIO 2.0 board for stereo configuration
• 1m long USB cable
• 1m long dual RCA audio cable
• Step by Step startup guide
Disclaimer / Warning
An incorrect miniAMBIO configuration could easily damage your audio system. Ambio4YOU can
not be responsible for any damage that may result from the improper use of this board. As with
any other product, we do recommend that you carefully read the manual and other technical notes
to insure you fully understand how to operate the board.
As a general guideline, you should first configure your miniAMBIO before connecting anything to
its outputs (loudspeakers/other output sources). Doing so will make sure that you have the
software correctly configured and won’t cause any damage to your system.
P 4 of 12
2.2
Board connectivity
First step in configuring your board is getting familiar with its connectivity.
miniAMBIO Top View
Output RCA connectors
Input RCA connectors
miniAMBIO Front view
Input RCA
connectors
USB connection for
Power & Control
P 5 of 12
2.3
Connection diagram
The following diagram is a typical connectivity diagram for a basic setup with analog inputs, analog
outputs. To prevent any damage, make sure the board is turned OFF before doing any connection
modifications. A single analog stereo source is being fed to Left and Right inputs of the miniAMBIO
box. The processed Left & Right channels at the outputs of the miniAMBIO are to be fed to your
amplifier.
Important note: The PC/Mac shown on this diagram is required for configuration only. Once
miniAMBIO configured, miniAMBIO can operate on its own from a simple USB supply (e.g phone
charger).
Stereo audio
source
RCA Audio
cable
`
MiniUSB
cable
To OUTPUTS
Active loudspeakers,
A/V receiver,
Multi-channel amplifier,
Recording devices
etc…
PC with USB
connection
2.4
Speaker Placement & Room Setup
Paramount to the success of your Ambiophonics experience is a correct placement your speakers.
Unlike the well known stereophonic triangle that places speakers at a 60 degree angle,
Ambiophonics requires speakers to be placed at about 20-30degrees apart. A novel arrangement
that improves Ambiophonics crosstalk cancellation: The process involved in making sure audio
intended for the left ear does not leak to the right ear.
One easy way to measure speaker angle is to buy a cheap, plastic protractor and a legal-size
manila folder or piece of cardboard. The folder/cardboard has two short and two long sides. Put a
dot at the very edge of one of the short sides, halfway across the edge. With the protractor and a
straight edge, draw rays radiating from the dot all the way to the far edge. The rays should be at
5-degree intervals subtending a total of 30 degrees. Sit in the listening chair, put your eye
between the speakers, hold the folder/cardboard so that the dot is just under your eye, and sight
the midrange drivers to measure the angle between them.
P 6 of 12
3 miniAMBIO Software Setup
3.1
Quick Start Guide
1. Before connecting the miniAMBIO box to your PC/MAC, you need to log-in to
ambio4you.com using the credential created when buying your miniAMBIO board.
Download of your plug-in will be enabled on the date of shipping of the product at the
following link: http://www.ambio4you.com/user-downloads
Refer to the minimum system requirements listed in the earlier section of this manual.
2. Once the software downloaded and installed on your PC/Mac, connect the USB cable
between your PC/Mac and the miniAMBIO, using the provided Mini USB cable. The
device will be recognized as a HID driver and does not require any driver installation.
3. Open the software application to gain control of the board. Please read carefully the
following lines:
By default, all plug-ins start in offline mode, meaning changes made on the user interface do
not affect your configuration. It is designed in such a way that you can visually confirm your
configuration before loading it to the miniAMBIO.
4. Once the configuration checked, you can go online by clicking the “Connect &
Synchronize” button as shown below.
Connect &
Synchronize
Providing your board is connected to the PC with a USB cable, the following important dialog
box pops up with 4 options:
a) Synchronize: With this option, the current plug-in configuration will be loaded/flashed to the
miniAMBIO and your plug-in turned to “On-line” mode. Warning that it will overwrite whatever
configuration was previously loaded on the board! If you’d like to load a different configuration,
click cancel and go to the settings tab to load one of your previously saved configurations.
Note: If you previously installed a different firmware version on your kit, this button will display:
Synchronize & Upgrade. Meaning, the miniAMBIO firmware will be upgraded to the current plug-in
firmware along with the current settings you have.
P 7 of 12
b) Restore to Default: With this option, the software application resets all settings back to factory
default and reload the firmware. Warning that all current settings will be lost and there are no ways
to be able to recover them.
c) If in any doubt, click the Help button to refresh your memory on these choices or click Cancel to
be able to go back to the offline mode.
In either synchronization steps, the following dialog box will pop-up. It’s very important that you do
not un-plug the board in the middle of a firmware upgrades or you may corrupt the configuration.
5. Once the board fully synchronized, a “Successful connection to the board” message pops
up. From this point on, all changes to the configuration will be real time and live, therefore
giving you the chance to hear the effect of your equalization, filtering, tuning…
NOTE: The synchronize button will disappear from the user interface once the board connected
and synchronized. This is perfectly normal and there is nothing to get alarmed. The reason is
simply because there is no need to synchronize anymore since all modification/changes will be
live/real time and applied to both the DSP and saved in memory from this point on. Makes sense?
3.2
Software architecture
Depending on your plug-in, the software is organized as below:
•
•
•
•
•
Main tab: Gives you access to Audio or System settings sections
Synchronize button: Allows you to go online and gain control of your system
Audio Mute: Mute all inputs & outputs
Help link: A quick link to get back to the main help page
Control toolbar: Click to access controls of each audio algorithm
Connect &
Synchronize
Main Tab
Master Mute
Help link
Control toolbar
Here is a description of controls available in each panel of the miniAMBIO plug-in.
P 8 of 12
Inputs and RMS meters
The first step in configuring your miniAMBIO consists in making sure audio is being fed to the
input correctly. To do so, click on the button labeled “inputs”. The RMS meter will quickly
indicate the average value of the input signal in dBFS (i.e. relative to the full scale of the ADC).
Individual faders control the digital gain at the input and per channel mute status.
This meter displays dB full scale (dBFS) values and will saturate at 0dBFS for about
0.9Vrms(RevA) or 2Vrms (RevB). Make sure to keep the signal below 0dBFS (red color) and
with enough headroom to prevent distortion.
Screenshot of Input window
Per channel
mute button
Per channel
Level control
Next Page
Click the Next button to switch windows OR click one of the control toolbar buttons.
Parametric Equalizers
• Left/Right channel: Select from the upper tab which channel you want to control
• EQ band selection: Select one of the 4 x Parametric equalizers
• Filter type: Select between Peak, Low Shelf, High Shelf
• Bypass: Disables the equalization but doesn’t reset the settings. A handy tool to check
the influence of equalization on your system without resetting to zero
• Copy to Right/Left channel: Click here to mirror all PEQ settings to the next channel
P 9 of 12
Recursive Ambiophonics Crosstalk Eliminator (RACE) configuration panel
• RACE delay: Controls the delay in the race algorithm from 0 to 120uS. Delay
represents the time difference in microseconds (µs) between a sound’s arrival at the
near ear and its arrival at the far ear. Another way to view Delay is that a Delay of,
say, 80µs means that when a speaker launches a signal to be cancelled at the far ear,
the speaker near that ear will launch the cancellation signal 80µs later
• RACE Attenuation: Controls the amount of attenuation in the RACE algorithm.
Attenuation represents the level loss, in dB, between the near and far ears. Another
way to interpret Attenuation is that an Attenuation of, say, 2.5 dB means that when a
speaker launches a signal to be cancelled at the far ear, the speaker near that ear will
launch a cancellation signal that is 2.5 dB softer. The signals will have the same level
but opposite polarity when they arrive at the far ear. If the attenuation is too large the
stage gets narrower and if the attenuation is too little there is over cancellation and
anything is possible.
• Bypass: Maybe the most valuable button on the interface! ☺ Allows a quick A/B test to
compare what compare what your speaker system sounds like with and without RACE
processing.
• Advanced Settings: (Low/High pass filters) RACE implementation should be limited to
90 to 6000Hz. The low pass and High pass filter define the pass band that is excluded
from RACE (e.g. 0 to 90Hz & 6000 to 20KHz in the default case). You’re welcome to
try the effect of different values.
System settings
The system settings page contains the following controls.
P 10 of 12
•
Load configuration: Use this feature to load a previously saved configuration. The
file must be as .xml format.
•
Save configuration: Click on this button to save your audio settings configuration.
Warning: Remember to save the file as .xml file extension as shown on the above printscreen.
Otherwise the software will not recognize the file at restore.
•
Restore: Clicking on this button will restore the board back to factory default. Warning
that all settings will be lost in the process.
4 Tuning your Ambiophonics system
Tuning your Ambiophonics system doesn’t require a PhD in acoustics nor a complex Hifi system.
Maybe as a surprise to you, you’ll quickly realize that modifying the 2 basic settings of the RACE
algorithm (Delay and Attenuation) bring some rather obvious changes to the system. While the
easiest might be to listen to the same song to be able to hear the effect of your tuning by using
your auditory memory, there isn’t such thing as a “rule”.
One thing is clear is that with the miniAMBIO PEQ + RACE settings combined, you will most likely
become addicted a tweaking your Audio here and there to the points it becomes satisfactory to
your ears. (until you decide you want to tweak it again… ☺) The beauty of the miniAMBIO system
is that all changes are instantaneous and you hear your modifications real time.
In terms of tuning steps, we would rather refer you to an existing very good tutorial already
available at the Ambiophonics Institute at the following link:
http://ambiophonics.org/Tutorials/UnderstandingAmbiophonics.html
http://ambiophonics.org/Tutorials/UnderstandingAmbiophonics_Part2.html
These 2 links will provide the basic understanding you need in order to setup your system.
Additional suggestions and steps can always be suggested to the Ambio4you.com forum and
shared among the community.
Have fun!
P 11 of 12
Troubleshooting
The following symptoms were found to be the most likely cause of issues.
Item#
Symptoms
Troubleshooting recommendation
1
No audio on outputs
2
No audio on RMS
input meters
4
Cannot reload
configuration
Cannot connect to
the board
Cannot install
software
Problem unsolved by
above suggestions
- Make sure that audio signal is shown on the
RMS input meters.
- Double check that input & output mute buttons
are not greyed out (mute ON)
- Confirm that master mute is not enabled
- Confirm that you are synchronized
- Check your connectivity
- Double check the strength of your input signal.
- Confirm that master mute is not enabled
- Confirm the file format of your file (.xml)
- Confirm the version of the file
- Trying to plug & Unplug the board in case your
PC didn’t recognize the board directly
- Confirm that you installed the required
frameworks (Adobe Air/ Microsoft .net / SP2 XP)
- Have a look at our forums to see if someone
else already had this issue.
- Send us an email ([email protected]) with
a clear explanation of the symptoms and
descriptions of the troubleshooting steps you
already performed
5
6
10
If not
solved go
to item
2
10
10
10
10
n/a
P 12 of 12