1
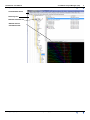
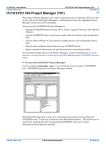
INTREPID User Manual
Library | Help | Top
INTREPID Project Manager (T02)
1
| Back |
INTREPID Project Manager (T02)
Top
The INTREPID Project Manager is the control centre of INTREPID. It enables you
to:
•
Navigate through your datasets
•
View information about each dataset, including fields, metadata, statistics,
histogram and thumbnail image
•
Manage your datasets (Copy, Move, Delete, Rename, Create KML, Edit Aliases)
•
Launch INTREPID tools in interactive mode
•
Launch other software of your choice by adding items to the configurable menu
bar
•
Execute and coordinate batch tasks for any INTREPID tools
The Project Manager window
Thr Project Manager window has
Library | Help | Top
•
A customisable menu bar
•
Three panels:
•
Directory tree for navigating directories
•
Datasets and files list for selecting files and datasets and performing some
management operations
•
Dataset and file information tabs, for viewing dataset and file information and
performing some management operations
© 2012 Intrepid Geophysics
| Back |
INTREPID User Manual
Library | Help | Top
INTREPID Project Manager (T02)
2
| Back |
Customisable menu
Directory tree
Datasets and files list
Dataset and file
information tabs
Library | Help | Top
© 2012 Intrepid Geophysics
| Back |
INTREPID User Manual
Library | Help | Top
INTREPID Project Manager (T02)
3
| Back |
Launching INTREPID tools and processes
You can launch INTREPID tools and processes from the Project Manager and by
other methods. See "How to start INTREPID—Overview" in Introduction to
INTREPID (R02) for full details.
For an introduction to the INTREPID tools and menu options to launch them, see
Tools—menu guide (R03).
Launching tools interactively
>> To launch an INTREPID tool from the Project Manager:
1
If you know which dataset you want to process, select it (see Selecting datasets
and files)
2
Choose the tool you require from the Project Manager menus (see Tools—menu
guide (R03)).
Launching batch processes
>> To launch an INTREPID batch process from the Project Manager:
1
Select the .job or .map file to be executed (see Selecting datasets and files)
2
From the short-cut menu (right click the .job or .map file) choose Launch batch
process.
Selecting datasets and files
Datasets usually consist of a number of files and a directory. The Project Manager
shows only the marker file of the dataset. For some formats, the marker file is the
dataset. Other formats have a marker or headerfile separate from the data.
For example, an INTREPID vector dataset has a ..DIR marker file. Project Manager
only shows this file in datasets and files list.
>> To select a dataset or file:
1
Locate the folder containing the dataset the dataset or file in the directory tree
panel
2
Locate and click the dataset or file in the datasets and files list. INTREPID
displays information about the dataset or file in the dataset and file information
tabs.
Dataset preview and information display
You can view the following dataset information:
Library | Help | Top
•
Basic information such as name, type, size and date last modified
•
Dataset preview, with band and component chooser for fields, tensor data etc.
•
(Vector datasets) A list of fields with information about each field. Clicking on the
column headers (eg: Fields) will change the order of display.
•
(Grids and scalar fields) A histogram
•
(Compound data type fields) A graphic representation of the compound data
•
Statistics and metadata about fields and grids
•
Line stats reporting for line datasets, in a csv file
© 2012 Intrepid Geophysics
| Back |
INTREPID User Manual
Library | Help | Top
INTREPID Project Manager (T02)
4
| Back |
Thumbnail Preview
Vector dataset fields list
Histograms
Grid datasets
Vector datasets
Library | Help | Top
© 2012 Intrepid Geophysics
| Back |
INTREPID User Manual
Library | Help | Top
INTREPID Project Manager (T02)
5
| Back |
Graphic display of compound data types
Vector data types
The Project Manager displays some compound data types graphically. See
"Representing compound data types graphically" in INTREPID database, file and
data structures (R05) for an explanation.
Tensor data types
The Project Manager displays some compound data types graphically. See
"Representing compound data types graphically" in INTREPID database, file and
data structures (R05) for an explanation.
Statistics
Grid datasets
Library | Help | Top
© 2012 Intrepid Geophysics
| Back |
INTREPID User Manual
Library | Help | Top
INTREPID Project Manager (T02)
6
| Back |
Vector datasets
Metadata
Grid datasets
Line datasets
Point datasets
Library | Help | Top
© 2012 Intrepid Geophysics
| Back |
INTREPID User Manual
Library | Help | Top
INTREPID Project Manager (T02)
7
| Back |
Dataset management operations—Overview
Project Manager performs the following dataset management operations itself:
•
Moving or copying datasets, fields and files
•
Renaming datasets, fields and files
•
Deleting datasets, fields and files
•
Managing dataset aliases
•
Nominating the datum and projection of a dataset
•
Moving or copying datasets, fields and files
•
Creating Google Earth compatible KML.
•
Connecting to relational databases—see "Setting up access to an Oracle database"
in Direct access to relational databases (R16).
Moving or copying datasets, fields and files
Moving or copying whole datasets or files
>> To move or make a copy of a whole dataset or file:
1
Select the dataset (see Selecting datasets and files).
2
From the shortcut menu (right-click the dataset) select Cut (for move) or Copy.
3
Using the directory tree, navigate to and select the directory that you are moving
or copying to.
4
From the shortcut menu (right-click the datasets and files list) select Paste. If you
are pasting into the same directory, INTREPID names the new copy ‘Copy of ...’
Moving or copying fields of vector datasets
Using the Merge Datasets utility
Use the Merge Dataset utility to copy fields between synchronised datasets. See
Merging datasets (T04).
For gravity datasets, use the specialist Gravity Merge tool (see Merging gravity
datasets (T56)).
If moving the field, delete it from the source dataset after the copy operation (see
Deleting fields of vector datasets)
If moving the field, delete it from the source dataset after the copy operation (see
Deleting fields of vector datasets)
Library | Help | Top
© 2012 Intrepid Geophysics
| Back |
INTREPID User Manual
Library | Help | Top
INTREPID Project Manager (T02)
8
| Back |
Renaming datasets, fields and files
Renaming whole datasets or files
>> To rename a whole dataset or file:
1
Select the dataset or file (see Selecting datasets and files)
2
From the shortcut menu (right-click the dataset) select Rename.
3
In the datasets and files list, edit the name of the dataset or file and press ENTER.
Renaming fields of vector datasets
>> To rename a vector dataset field:
Library | Help | Top
1
Select the dataset (see Selecting datasets and files)
2
In the Fields tab, select the field you want to rename.
3
From the shortcut menu (right-click the field name) select Rename.
4
Edit the field name and press ENTER
© 2012 Intrepid Geophysics
| Back |
INTREPID User Manual
Library | Help | Top
INTREPID Project Manager (T02)
9
| Back |
Deleting datasets, fields and files
Deleting whole datasets or files
>> To delete a whole dataset or file:
1
Select the dataset or file (see Selecting datasets and files)
2
From the shortcut menu (right-click the dataset) select Delete.
Deleting fields of vector datasets
>> To delete a vector dataset field:
Library | Help | Top
1
Select the dataset (see Selecting datasets and files)
2
In the Fields tab, select the field you want to delete.
3
From the shortcut menu (right-click the field name) select Delete.
© 2012 Intrepid Geophysics
| Back |
INTREPID User Manual
Library | Help | Top
INTREPID Project Manager (T02)
10
| Back |
Managing dataset aliases
For an introduction to aliases, see "Vector dataset field aliases" in INTREPID
database, file and data structures (R05).
You can assign any alias to any field of a vector dataset.
>> To assign an alias to a vector dataset field:
1
Select the dataset or file (see Selecting datasets and files)
2
In the Fields tab, select the field to which you want to assign the alias
3
In the Alias column for the field:
•
If you want to remove the alias, select the blank item at the top of the dropdown list
•
If the alias you require is listed, select it
•
If the alias you require is not listed, select More... . INTREPID displays the
Configure Aliases dialog box
Select the tab and then the alias that you require and then choose OK.
Note: You can also select aliases using Projection and Datum Selection dialog box
Library | Help | Top
© 2012 Intrepid Geophysics
| Back |
INTREPID User Manual
Library | Help | Top
INTREPID Project Manager (T02)
11
| Back |
Nominating the datum and projection of a dataset
You can use the Project Manager to nominate the datum and projection of a dataset.
Not datum projection conversion
This operation is not datum and projection conversion. Using this Project Manager
operation, you are simply recording the name of a datum and projection against the
dataset. The Project Manager does not work out whether this geolocation is correct
for your data. To convert your data from one datum or projection to another, use the
Projection Conversion tool (See Datum and Projection Utility (T13)).
Datum and projection for the main geolocation fields
You nominate the datum and projection of the main geolocation fields using the
Projection and Datum Selection dialog box.
>> To nominate datum and projection of the main geolocation fields:
1
Select the dataset or file (see Selecting datasets and files)
2
In the Fields tab, click the Datum or Projection columns for a main geolocation
field (a field that has the X or Y alias assigned). INTREPID displays the
Projection and Datum Selection dialog box.
3
Select the datum and projection from the drop-down list.
As part of this step you can:
4
Library | Help | Top
•
Choose More and use Type of Projection and Projection lists
•
Select different fields to be the current geologation fields (Assign different
fields to the X and Y aliases)
Choose OK.
© 2012 Intrepid Geophysics
| Back |
INTREPID User Manual
Library | Help | Top
INTREPID Project Manager (T02)
12
| Back |
Datum and projection for alternative geolocation fields
A dataset may have a set of alternative geolocation fields that you use under certain
circumstances. These fields may have a different datum or projection to the current
geolocation fields. You can nominate the datum and projection of the alternative
geolocation fields using the following steps.
>> To nominate datum and projection of alternative geolocation fields:
1
Select the dataset or file (see Selecting datasets and files)
2
In the Fields tab, use the drop-down lists in the Datum or Projection columns to
select the datum or projection you require.
•
If you want to remove the datum or projection setting, select None
•
If the datum or projection setting you require is listed, select it
•
If the datum or projection setting you require is not listed, select More... .
INTREPID displays the Projection and Datum Selection dialog box.
Select the datum and projection from the drop-down lists. Choose OK.
Note: You can also choose More and use Type of Projection and Projection
lists to help select the projection.
Library | Help | Top
© 2012 Intrepid Geophysics
| Back |
INTREPID User Manual
Library | Help | Top
INTREPID Project Manager (T02)
13
| Back |
Creating Google Earth compatible KML
Project Manager allows user to create Google Earth compatible KML for both grids
and line datasets. In order to do this use the following steps.
>> To Create Google Earth Compatible KML:
Library | Help | Top
1
Select the dataset or file (see Selecting datasets and files)
2
From the shortcut menu (right click the dataset) select Create Google Earth
Compatible KML. INTREPID will create a KML file named datasetname.kml
inside the directory where the dataset resides.
3
Drag and drop the generated KML into Google Earth to make it appear inside
Google Earth
© 2012 Intrepid Geophysics
| Back |
INTREPID User Manual
Library | Help | Top
INTREPID Project Manager (T02)
14
| Back |
Displaying the log console window
>> To display the log console window for INTREPID:
1
Basically, chase down the STDIO or ErrorIO logs in LINUX or UNIX. We write
copius amounts of background status information to a running log file.
2
For WINDOWS, this log file goes to the “temp” directory where you installed your
software by default. You can change the “temp” directory, as you may need vary
large scratch files for some of the Intrepid processes. Look for the *.log files and
simply tail them. If they are too big, remove and they will restart.
About
The build number, date and machine type are always available in the Help>About
Library | Help | Top
© 2012 Intrepid Geophysics
| Back |