1
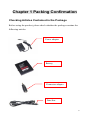
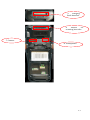
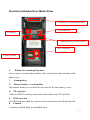
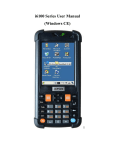
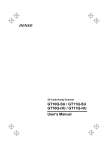
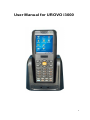
User Manual for UROVO i3000
1
Copyright Statement
Information contained in this document provides solely the description of
the current status of the product but not an intended guarantee, including
but not limited to any implied warranties of merchantability and fitness for
a particular purpose. Urovo Technology Co., Ltd. (hereinafter referred to
as the Company) reserves the right to change the features, specifications,
warranty information and document contents of related products at any
time without prior notice.
This document contains exclusive information protected by the Copyright
Law of the People’s Republic of China, with all rights reserved. Except the
part permitted by the Copyright Law of the People’s Republic of China, no
contents shall be duplicated, reproduced, modified or translated in whole
or in part without written consent of the Company.
Control programs of this product are also protected by the Copyright Law
of the People’s Republic of China, with all rights reserved.
Microsoft, Windows, Windows 2000, Windows XP, Windows 2003,
Windows Vista, Windows 2008, Windows 7, ActiveSync, Windows
Mobile Device Center, and Internet Explorer are registered trademarks of
Microsoft Corporation in the United States or other countries.
All the other brand names and product names mentioned in this document
are legal trademark names, service marks or registered trademarks of the
corresponding companies.
Before using this product, read this manual carefully.
2
Content
CONTENT......................................................................................... 3
CHAPTER 1 PACKING CONFIRMATION............................................ 5
CheckingArticlesContained inthePackage
.5
CHAPTER 2 INTRODUCTION............................................................ 6
ProductIntroduction
.6
MainFunctionsandFeatures
.7
DetailedParameters
.9
FunctionIntroduction: FrontViewandSideView
.12
MasterKeyboardIntroduction
. 14
FunctionIntroduction: BackView
.16
CHAPTER 3 USING THE DEVICE......................................................18
Insta lingtheSIMCard, MemoryCard andBattery
.18
PoweringOn/Off theDevice
.18
ChangingDateand Time
.19
UsingtheStylus
.22
EnteringText
.22
ManagingDeviceFunctions
. 25
ScanningBarcodes
.26
ConnectingtoaPC
.27
RestartingtheDevice
. 28
RestoringDefault Settings
.28
CalibratingtheScreen
.29
CheckingtheRemaining Electricity
.30
PrecautionsforUsingtheBattery
.31
3
CHAPTER 4 ADVANCED SETTINGS................................................. 32
SettingthePowerButtonFunction
.32
SettingtheGPRSNetwork
. 32
SettingtheWi-FiNetwork
. 40
SettingtheOptionsforBarcodeScanning
. 45
CHAPTER 5 AFTER-SALES SERVICE.................................................48
4
SupportandService
.48
WarrantyPeriod
.49
WarrantyScope
.50
WarrantyDeclaration
.50
Contact
.50
Chapter 1 Packing Confirmation
Checking Articles Contained in the Package
Before using the product, please check whether the package contains the
following articles:
Power adapter
Battery
Connector adapter
Data line
5
Chapter 2 Introduction
Product Introduction
The i3000 product is an industry-level handheld terminal developed,
designed, and produced based on features of different industries by Urovo
Technology Co., Ltd. (hereinafter referred to as the Company). The i3000
adopt ergonomic design and is compact and flexible, shock-proof, and
drop-proof. The i3000 can work in the standby mode for a long time. In
addition, the i3000 adopt the dual power supply mode and support the
conversation function.
1
Integrated and Portable Design
With the waterproof, dustproof, drop-proof, high-/low-temperature
resistant and electrostatic discharge (ESD) design in compliant with the
IP54 industrial standard, the i3000 can endure multiple drops to a smooth
concrete floor from a height of 1.2 m, and resist splashes and dusts in any
direction. The high capacity and long service life of the battery can fully
meet the requirements for daylong mobile operations. The dual
power supply mode can avoid any data loss. The ergonomic design
complies with the operational habits of you and can mitigate operation
fatigue. Among all handheld terminals in the market, the i3000product
has the lightest weight, because it weighs only 280g (including the
battery). With the dimensions of 189mm (length) x 68 mm (width)
x 38 mm (thickness), the product is compact, portable, and easy to carry.
2
High-Speed and High-Capacity Data Processing
The i3000 provide a 533 MHz CPU processing speed, 512/256/128
MB built-in storage, and 128 MB memory, which ensures the high-speed
running of programs with complex service logic and efficient data
6
processing. The i3000 support the Micro SD/TF card with a maximum
capacity of 32GB and can store a large amount of service data.
3
Powerful and Flexible Data Communication
The i3000 provide various functions, including voice and short
messaging on the GSM network, GPRS data communication,
communication on the 802.11b/g/n Wi-Fi WLAN, communication by
using the RS232 serial port, and Bluetooth communication. The i3000
comply with the CISCO CCX2, 3 security standards and support the
CISCO AP and security regulations. The i3000 can be used to update data
remotely.
4
Windows CE Operating System
The Windows CE operating system (OS) provides a complete feature set
and development environment, and obtains features of every customized
device such as real-time, small memory usage, multimedia, and network
connecting capability. The OS supports multiple languages, including
English, Simplified Chinese, and Traditional Chinese. The OS can be used
to develop terminal software by using Java, C++, and C# and provides a
comprehensive software development kit (SDK) free of charge. The OS
supports remote connection by using Telnet and Microsoft Internet
Explorer 6 for browsing HTML/XML files.
Main Functions and Features
1.
Compact, portable, and durable.
2.
Long working time: The product can work for more than eight hours
consecutively.
3.
Easy charging: The product uses a USB interface for charging
without a specialized data line. You can charge the device anytime
anywhere as long as there is a USB interface.
7
4.
Dual power supply mode: When the master battery is used up and
the slave battery is fully charged, the product can work in the
standby mode for six hours to prevent data loss caused by
unexpected power failure.
5.
Extensible hardware module
a
A camera with 5 million pixels
b
GPS positioning
c
High frequency/ultrahigh frequency RFID read/write
6.
Built-in one-dimension scanning module
7.
Communication mode: The product supports Wi-Fi communication,
GPRS/GSM communication, and Bluetooth communication.
8.
Open design: The product provides a software interface that can be
used to develop application functions.
9.
The product is an industry-level device that is drop-proof, dustproof
and high-/low-temperature resistant.
10.
High-speed and high-capacity data processing: The product provides
a 533 MHz CPU processing speed, 512/256/128 MB built-in storage,
and 128 MB memory and supports the Micro SD/TF card with a
maximum capacity of 32GB.
11.
The product provides a 3.2 in. color touch screen.
12.
The product supports Chinese handwriting input.
Applicable Industries
�
Apparel industry
�
Fast moving consumer goods (FMCG), retail, and supply chain
industries
�
Logistics industry (including warehousing, express delivery, and
LTL material transport)
�
8
Hospital, government, mobile office, and asset inventory.
Detailed Parameters
Model
I3000
CPU
SAMSUNG S3C2451 (533 MHz)
Operating
Microsoft Windows CE 5.0 OS
System
(Multi-lingual)
RAM
128 MB
Flash-ROM
128/256/512 MB (standard
Memory
configuration: 128 MB)
Extension
Micro SD/TF slot (a maximum of
32 GB)
Scanning engine
One-dimension laser scanner
type
Scanning speed
200 per second (bidirectional)
Scanning
60–650 mm
distance
Scanning angle
54±5 degree
Resolution
0.127–1.00 mm
Scanning
UPC-A, UPC-E, UPC-E1,
Parameters
EAN-8, EAN-13, Bookland EAN,
Code 128, UCC/EAN-128, Code
Readable
39, Trioptic Code 39, Code 39
barcodes
Full ASCII, Code 93, Code 11,
Interleaved 2 of 5, Discrete 2 of 5,
Codabar, MSI, GS1 DataBar 14,
GS1 DataBar Limited, GS1
DataBar Expanded
Screen
3.2 in. TFT-LCD QVGA
(240 x 320) color touch screen
9
Soft keyboard
Input
English, Pinyin, and Chinese
handwriting
Hard keyboard
28-key alphanumeric keyboard
Scanning start
the central key
key
The i3000 product supports
communication on the
Wi-Fi WLAN
(standard
configuration)
802.11b/g/n Wi-Fi WLAN with a
rate of
65 Mbit/s, which meets the
requirements of the CISCO
CCX2, 3 security standards and
supports CISCO AP and security
Bluetooth
regulations.
Bluetooth
V2.1+EDR
(standard
configuration)
The i3000 product provides a
Communication
Wide-area
GSM/GPRS wireless
wireless network
communication module and
(extension)
supports GSM/GPRS Class10 and
GSM0710 multiplexing.
Camera
(extension)
Camera with 3/5 million pixels and
fill light
48 channels; positioning
GPS (extension)
accuracy: less than 2.5 m; speed
accuracy: less than 0.01 m/s
10
RFID
High frequency/ultrahigh
(extension)
frequency RFID read/write
Master battery
Power
(Dual-Power
Mode)
Working hours
Charging time.
Slave battery
Ingress
10 or above (depending on the
actual environment)
3.5 hours
210 mAh, providing power for
six hours
Ergonomic
189mm (length) x 68 mm (width)
design
x 38 mm (thickness)
Weight
280 g (with batteries)
Operating
temperature
Storage
temperature
Working
lithium battery
IP54
protection
Dimensions
3.8V 3000 mAh rechargeable
–15 to +50°C
–20 to +60°C
Operating
Relative humidity: 5–95%
humidity
(no condensation)
Environment
Storage humidity
Relative humidity: 5–95%
(no condensation)
The i3000 product can endure
Endurable height
multiple drops to a smooth
for dropping
concrete floor from a height of
4 inches (1.2 m).
11
The i3000 have successfully
Certification
CCC and CE
passed the CCC compulsory
product certification, CE
certification, and obtained the
type approval certificate for radio
transmission equipment issued by
the Ministry of Industry and
Information Technology.
*The preceding parameters are for reference only. Parameters of a specific
model are subject to specific configurations.
Function Introduction: Front View and Side View
1.
Scanning&
Charging&
system
indicator
2.Touch
screen
3.
Master
Keyboard
4. Power
Button
12
5.
Charging
Dock Interface
6.
Widow
for
scanning barcodes
7. Camera
8. Loudspeaker
13
1.
Charging and system indicator
The indicator is displayed in red during charging and green when the
charging is complete and the system runs properly. The indicator blinks in
green when the power is insufficient.
2.
Scanning indicator
The indicator is displayed in red when a barcode is scanned successfully.
3.
Power button
The power button can be used to power on/off the device or switch the
device into sleep or wake-up mode.
4.
Headphone jack
The headphone jack can be inserted with a 3.5 mm headphone.
5.
Touch screen
The touch screen enables you to perform operations by using a stylus.
6.
USB and charging interface
The USB and charging interface can connect to a USB data line to
transmit and receive data or a power adapter to charge the device.
7.
Reset hole
You can use a stylus to click the reset hole to reset the device.
8.
Master keyboard
For details about the master keyboard, see “Master Keyboard
Introduction”.
14
Master Keyboard Introduction
1.
Arrow Keys
2.
8.
7.
S1 key
7. Bar code scanning key
Esc key
8. S2 key
4.
Alphanumeric
9. Enter Key
5.
3.
10. Backspace
11. Alphanumeric switching key
4. Function key
6.
12. Power Button
5.Keyboard backlight key
1.
S1 key: It represents the left softkey and is equivalent to the F11 key
on a computer keyboard.
2.
ESC key: You can press the ESC key to perform operations such as
cancel and exit.
3.
Alphanumeric keys: You can input numbers or letters based on the
current input mode.
4.
Function key: You can use a key combination by pressing
,
releasing it, and then pressing another key.
5.
Keyboard backlight key: You can press
to turn on/off the
keyboard backlight.
15
6.
7.
Arrow keys: The four arrow keys represent four directions
(left/up/right/down).
Barcode scanning key: You can scan barcodes by pressing this key.
8.
S2 key: It represents the right softkey and is equivalent to the F12
key on a computer keyboard.
9.
Enter key: You can press the Enter key for confirmation or to
switch to next line.
10.
Backspace key: You can press
character.
to delete the previous
11. Alphanumeric switching key: You can press
another input mode.
12.
Power Button: You can press it to turn on or turn off the equipment.
The key combinations are as follows: =
Fn + 0
F10
Fn + 1
F1
Fn + 2
F2
Fn + 3
F3
Fn + 4
F4
Fn + 5
F5
Fn + 6
F6
Fn + 7
F7
Fn + 8
F8
Fn + 9
F9
Fn + Tab
Reset scanner
16
to switch to
Function Introduction: Back View
1. Widow for scanning barcodes
2. Loudspeaker
6. Camera
3. Master battery cover buckles
4. TF Card Slot
5. SIM Card Slot
1.
Widow for scanning barcodes
Laser comes out from this window. Do not look into the window with
naked eyes.
2.
Loudspeaker
3.
Master battery cover buckles
The master battery cover buckles are used to fix the battery cover.
4.
TF card slot
A Micro SD/TF memory card can be inserted in the TF card slot.
5.
SIM card slot
An SIM card provided by carriers can be inserted in the SIM card slot.
6. Camera
A camera and fill light are installed here.
17
Chapter 3 Using the Device
Installing the SIM Card, Memory Card and Battery
1.
Rotate the master battery cover buckles by 90 degree to remove the
battery cover.
2.
Insert the SIM card or Micro SD/TF card into the combo deck in the
battery compartment and fasten the buckle.
3.
Install the battery properly, close the battery cover, and fasten the
buckles.
Note: Only 50% electricity remains in the battery when you use the
battery for the first time. You can charge the battery by using the power
adapter or a seat charger (purchased separately). The first charging must
be more than 12 hours.
Powering On/Off the Device
The i3000 product is powered off when you obtain it for the first time.
After you press and hold down the power button, the indicator is turned on
and the Windows CE screen is displayed. Then you can release the button
to power on the device.
When the device is not used, you can switch the device into sleep mode or
power off the device to save electricity.
1.
If you shortly press the power button when the device is in
powered-on mode, the device is switched to sleep mode.
When the device works in sleep mode, power is provided to certain
components and data in the memory is retained. You can press the power
button again to switch back to wake-up mode.
18
2.
If you press and hold down the power button for more than three
seconds when the device is powered-on, the following dialog box is
displayed:
Select Yes to power off the device.
During power-off, the power supply is cut off and data in the memory is
lost. You can press and hold down the power button again to power on the
device.
Changing Date and Time
Click Date/Time on the control panel or double-click the time zone on the
taskbar to display the Date/Time Properties dialog box.
19
Click the Time Zone
drop-down list to choose the
required time zone.
Click Apply on the lower
right corner of the dialog box
to save the configuration.
Click the number
indicating the year to
enter a year directly or
change the year by
clicking the up and
down arrows.
20
Click the characters
indicating a month to
change it in the displayed
menu or click the up and
down arrows to change the
month.
Click the mapping number
in the date area to change
the date.
After the configuration is
complete, click OK on the
upper right corner of the
dialog box to save the
configuration.
21
Using the Stylus
Clicking objects on the device screen is the basic operation and is similar
to using the mouse to click objects on a computer screen.
When the device is powered on, you can use the stylus to perform multiple
operations, such as starting an application, choosing a menu, or selecting
items in a dialog box.
You can double-click an icon on the screen to start an application.
Just like you drag the mouse to select text or move objects on a computer,
you can drag the stylus to select text or use the stylus to drag the scroll bar.
For many applications, after you press and hold down an object for about
two seconds by using the stylus, a context menu is displayed.
Note: You must use the dedicated stylus to perform operations on the
screen. Do not use a ball pen, pencil or other sharp articles.
Entering Text
You can enter text in the following ways:
�
Entering text by using the soft keyboard on the screen
�
Entering text by using the hard keyboard of the device
Entering text by using the soft keyboard
A soft keyboard is displayed in the lower area of the screen. You can use
different soft keyboards to adopt corresponding input methods to enter
letters, numbers or symbols.
22
Use the stylus to click the
keyboard icon on the taskbar.
The list of available soft
keyboards is displayed on the
screen. You can choose the
required soft keyboard from
the list.
Click Keyboard to display
the keyboard input panel.
23
Use the stylus to click
the soft keyboard to
enter letters, numbers
or symbols.
Choose Hide Input
Panel to hide the
current soft keyboard.
24
Entering text by using the hard keyboard
You can use alphanumeric keys on the master keyboard to enter text.
The current input mode is displayed on the taskbar. You can press
to switch the current input mode to other modes such as number mode,
upper case mode, and lower case mode. You can set the default input mode
of the master keyboard by choosing Control Panel > Keyboard.
Managing Device Functions
Certain functions of the i3000 product are turned off when you use it for
the first time. You can start the required functions by using the device
function manager ModuleMgr.
You can start the device function manager by double-clicking the
ModuleMgr icon on the desktop or control panel.
25
Click Enable or
Disable to enable or
disable the related
functions.
When you enable/disable a certain function, the system retains the
configuration and enables/disables the function automatically after next
power-on.
Scanning Barcodes
You can use the ModuleMgr or ScannerSetting program to start the
scanner, and then press the orange barcode scanning key on the master
keyboard to scan barcodes.
You can start the ScannerSetting program by double-clicking the
ScannerSetting icon on the desktop or control panel.
26
The bar code is
displayed in this area.
The bar code type is
displayed in this area.
Connecting to a PC
You can connect the device to a PC by using a data line if Microsoft
ActiveSync 4.5 (Window 2000/XP/2003) or Windows Mobile Device
Center 6.1 (windows Vista/2008/7) is installed on the PC.
You can download Microsoft ActiveSync 4.5 (Window 2000/XP/2003) or
Windows Mobile Device Center 6.1 (windows Vista/2008/7) from
www.Microsoft.com.
27
Restarting the Device
You may need to restart the device to recover normal running occasionally
(when more applications are running than in normal cases or when certain
software runs abnormally). The device can be restarted in the following
two modes:
1.
Warm boot
If you restart the device in warm boot mode, ongoing items are stopped
before the device restarts. Records and data in the memory are retained.
Execution method: Use the stylus to click the reset hole and release it
immediately.
2.
Cold boot
If you restart the device in cold boot mode, the power is cut off forcedly.
Ongoing items are terminated and the device restarts. Data in the memory
is deleted.
Execution method: Press and hold down
reset hole, and then release
, use the stylus to click the
and the reset hole simultaneously.
Restoring Default Settings
In some cases, you may need to delete certain settings. You can delete data
in the memory and registry by restoring the default settings.
You can
restore
the
default
settings
by
double-clicking
the
RestoreFactoryDefault icon and enter 1234. After the operation is
successful, the device automatically restarts.
28
Double-click the
RestoreFactoryDefault icon.
Calibrating the Screen
After a period, the clicking point of the stylus may shift and you must
re-calibrate the screen.
Click the stylus icon in the control panel to display the Stylus Properties
dialog box. Click the Calibrate tab in the dialog box, and then click
Re-calibrate. The calibration screen is displayed.
29
Use the stylus to click the cross
center on the screen. After each
click, the cross is displayed in
another position. After you
click the cross center correctly
for a consecutive five times, the
cross disappears. At this point,
you can press the Enter key to
save the calibration.
Checking the Remaining Electricity
You can click the power icon on the control panel to display the Power
Properties dialog box.
When the electricity is insufficient,
the system displays a warning icon
on the taskbar. You can display the
Power Properties dialog box by
clicking the warning icon.
When the electricity is to be used up,
the warning icon changes to
30
.
Precautions for Using the Battery
Certain files and information may be stored in the memory. If the battery
runs out, these files and information are lost. Therefore, providing power
to the device constantly is very important.
In general cases, the device can work for more than eight hours after it is
fully charged. When the electricity is reduced to a certain level, the system
indicator blinks and a warning indicating electricity insufficiency is
displayed. If you continue to use the device, the device switches to sleep
mode or is turned off automatically.
To extend the battery life, you must follow the following advices:
1.
Minimize the battery charge and discharge times and charge the
battery only when the system displays the electricity insufficiency
warning.
2.
Prevent over discharge in daily use and charge the battery
immediately when the system displays the electricity insufficiency
warning. Over discharge shortens the battery life.
3.
Prevent overcharging in daily use and stop charging when the
battery electricity exceeds 95%. You must calculate the charging
time correctly when a seat charger is used. Do not charge a
fully-charged battery because over charging shortens the battery life.
4.
Charge and discharge the battery completely when you use the
battery for the first time and every three months.
5.
If the battery is not used for a long time, you must remove the
battery from the device and retain 50% of electricity in the battery.
Chapter 4 Advanced Settings
31
Setting the Power Button Function
You can click PowerButton icon on the control panel to set the power
button function.
Enable: You can press and hold
down the power button to turn
off the device.
Disable: No function is
provided when you press and
hold down the power button.
Enable: You can shortly press
the power button during
power-on to switch the device
to sleep mode.
Disable: No function is
provided when you shortly
press the power button.
Setting the GPRS Network
Before using the GPRS, you must ensure that the GSM function is
enabled.
You can start the GSM function by using the device function manager
ModuleMgr.
32
You can create the GPRS connection in the following two ways:
1.
Creating the connection manually.
Double-click the Network and Dial-UP Connection icon on the control
panel to enable the network and the dial-up connection manager.
Click New Connections
connection.
33
Enter the connection
name, such as GPRS.
Select Dial-up connection
and click Next.
Choose COM2: or
COM3: and then
click Configure.
34
On the Port Settings tab
page, set Bits per second
to 115200.
On the Call Options tab page,
enter the following command to
initialize the modem:
+CGDCONT=1,"IP","cmnet"
Cmnet specifies the point to
connect to the GPRS network of
China Mobile.
Click OK to switch back to the
Modem dialog box.
35
Click Next.
In the Phone Number area,
enter the dial-up number such
as *99***1#.
You must query the mobile
carrier to obtain this number.
Click Finish.
Double-click the created GPRS connection to display the Dial-Up
Connection dialog box.
36
Click Dialing Properties
to set the dialing location.
Click Create to enter the new
location name such as GPRS.
37
Click Edit to change the
dialing mode.
Change the texts in the
three text boxes to G and
then click OK to save the
settings and exit.
38
Click OK to save
the settings and exit.
At this point, the GPRS connection is created successfully.
2.
Creating the connection automatically.
To simplify the setting of GPRS connection, the device provides the
GPRSSetting tool to set the connection quickly.
Choose My Device > Windows and click the GPRSsetting icon to enable
the GPRSsetting tool.
Enter the entry name, such as
GPRS.
Enter the required APN, such
as cmnet.
Enter the dialing number.
User name and password are
not required.
39
Setting the Wi-Fi Network
Before using the Wi-Fi, you must ensure that the Wi-Fi function is
enabled.
You can start the Wi-Fi function by using the device function manager
ModuleMgr.
You can query the network administrator for the wireless network
information, such as SSID, encryption type, authentication mode, and
cipher key.
Click the network icon on the taskbar to display the interface for setting
the Wi-Fi and set the Wi-Fi as follows:
Click the network icon to
display the interface for
setting the Wi-Fi function.
40
On the Wireless Information tab
page, available networks are
displayed. You can view the SSIDs
of APs for which the broadcast
function is enabled.
Double-click the SSID to be
connected.
If the broadcast function is not
enabled for the AP to be connected,
double-click the Add New
Network icon.
When you add an available network, the system automatically detects the
encryption type and authentication mode of the added network.
41
When you add a new network, you must specify the network information.
Enter the network name.
Select this check box to
directly connect to another
device or PC.
The encryption type varies
with the authentication mode.
Select the correct
authentication mode first.
Click Advanced to display the
interface for advanced settings.
If a static IP address is required for the network, choose Control Panel >
Network and Dial-Up Connection to set the network adapter properties.
42
This icon is displayed
only when the Wi-Fi
function is enabled.
Use the stylus to click and
hold down the icon and
choose Properties in the
displayed context menu.
Enter the IP address,
subnet mask, and default
gateway.
43
Setting the Options for Barcode Scanning
You can modify the advanced settings of the scanner by using the
ScannerSetting program.
Click Advanced Options
to display the interface for
advanced setting.
To enhance the decoding speed, the decoding function is disabled for
certain types of barcodes by default. You can enable the decoding function
manually.
In the Barcode Type list
box, choose bar code types
for which the decoding
function is enabled.
You can set the scanner to a standard input device.
44
At this point, the scanned barcodes are converted into keyboard messages.
You can scan barcodes by using programs not supporting barcode
scanning, including the Wordpad and remote desktop programs.
On the Output tab page,
you can select the
displayed options to send
messages after bar code
scanning, such as Enter
event, Beep, and vibration.
You can click Reset Scanner to restore the default settings.
45
Chapter 5 After-Sales Service
Support and Service
Website: You can connect your PC to the Internet and visit
www.urovo.com to obtain the product specifications, optional equipment,
and related information.
Customer support: If you have questions about this manual or you
cannot solve any problem through the website, please contact our
customer service staff. If your device needs repair, please contact us
before delivering the device in order to obtain service information,
delivery instructions, and maintenance costs (maintenance irrelevant to the
warranty).
Service: If you require diagnostic services or other service information,
please contact our customer service staff. Do not deliver your device
before contacting the Company. If your device meets the warranty
conditions for repair, please prepare your purchase date certificate and
warranty card.
Before contacting the Company, you must:
1.
Read this manual.
2.
Prepare the device information, including:
�
Model
�
Sequence No.
�
Purchase certificate
�
Warranty card
46
3.
Get your device ready. Our customer service staff may ask you to
operate the device.
4.
Prepare your questions. Detailed problem description can help the
customer service staff to solve your problem quickly.
Warranty Period
A customer will enjoy a warranty of 12 months for the handheld terminal
(subject to the sales contract) and a warranty of 3 months for accessories
from the date of purchase. If no purchase certificate can be presented, the
customer will enjoy a warranty of 12 months for the handheld terminal
since of the date of production. (The accessories include data line,
connector adapter, stylus, battery, power adapter, and handheld elastic
strap.)
Based on normal operating conditions, if you find any quality defect
within seven days from the purchase date, you can cancel the order or
exchange for another product of the same model.
The Company provides guarantee for the defect-free materials and
manufacturing of the hardware product for 12 months from the purchase
date on the original receipt of the first buyer.
If the Company receives a notification on the defined product defects
during the warranty period, the Company may decide to repair or replace
the proved defective product.
If the Company cannot repair or replace the product within a reasonable
period, the customer can choose a refund when returning the product.
47
Warranty Scope
The warranty does not cover defects caused by the following factors:
Misuse, unauthorized modification, dismantling the product without
permission, installing, operating, using or storing the product without strictly
following the environment specifications described in this manual, damage
caused during delivery, improper maintenance, using software, components,
media, supplies, and consumables not provided by the Company or using the
product in a non-designated project, natural wear, damaged product label,
and irresistible damages caused by natural disasters.
This warranty applies to mandatory specifications of related national laws.
Warranty Declaration
The Company provides this unique warranty statement for the product
without other written or oral warranty statements.
Any commodity route or metaphor applicable to any special purpose is
limited to the warranty period of 12 months in this written warranty
statement.
In any case, the Company is not liable for direct, indirect, special,
accidental, or ensuing damages (including lost profits) regardless of the
warranty statement, contract, negligence, or any other legal theory.
Contact
Urovo Technology Co., Ltd.
Address: Area A, 7/F, Zondy Cyber Building, Keyuan South Road,
High-tech Industrial Park, Nanshan District, Shenzhen, P.R.China
Tel: +86 755-86186300
Website: www.urovo.com
48
Fax: + 86 755-86186290