1
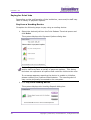
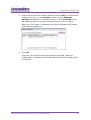
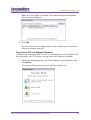
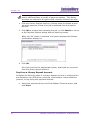
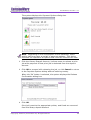
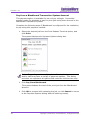
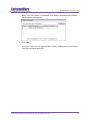
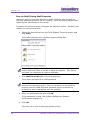
EnvisionWare® LPT:One™ User Manual Version 4.7 © 1998-2010, EnvisionWare, Inc. – All rights reserved LPT:One ™ 4.7 EnvisionWare® LPT:One™ Copyright © 1998-2010 EnvisionWare® Inc. – All rights reserved. LPT:One, Authentication and Accounting Module (AAM), and Launch Command are trademarks of EnvisionWare, Inc. EnvisionWare and PC Reservation, are registered trademarks of EnvisionWare, Inc. Mac, Mac OS, Tiger, Panther, Leopard, Snow Leopard, are trademarks of Apple Inc., registered in the U.S. and other countries. Artifex, the Artifex logo, Ghostscript, and the Ghostscript logo are registered trademarks of Artifex Software, Inc. Post Script is a trademark of Adobe Systems Incorporated. Microsoft and Windows are registered trademarks of Microsoft Corporation. Vista is a trademark of Microsoft Corporation. Pentium is a registered trademark of Intel. Novell is a registered trademark of Novell, Inc. Jet Direct is a registered trademark of Hewlett Packard. Portions Copyright © 2001 artofcode LLC. This software is based in part on the work of the Independent JPEG Group. Portions Copyright © 2001 URW++. All Rights Reserved. Other trademarks are the property of their respective owners. No part of this publication may be reproduced, stored in a retrieval system or transmitted in any form by any means electronic, mechanical, photocopy, recording or otherwise, without the prior permission of the publisher, except as permitted by U.S.A. copyright law. Ninth Publication, September 2010 Published in the United States of America Information in this document is subject to change without notice and does not represent a commitment on the part of EnvisionWare. The software described in this document is furnished under the EnvisionWare End User License Agreement (EULA). The software may be used or copied only in accordance with the terms of the Agreement. Content is based upon information available at publication time. EnvisionWare, Inc. 2810 Premiere Parkway NW Suite 350 Duluth, Georgia 30097-8917 USA EnvisionWare Pty Ltd 10 George Street Stepney, South Australia 5069 Australia 2 Copyright © 2008-2010, EnvisionWare Inc, All Rights Reserved EnvisionWare® LPT:One ™ 4.7 Foreword Thank you for purchasing LPT:One, the modular solution for staffmanaged and self service Print Cost Management. LPT:One scales to fit the needs and budget from the smallest facility to large enterprise networks with thousands of client computers. Because of its unique, Ultra-Distributed architecture, LPT:One provides the same performance regardless of the size of the network. Print jobs can be sent to a computer near printers where jobs are held until a user or staff member releases a job. Several payment methods are supported including free-print , staff-managed, vended, and on-line accounting. EnvisionWare Mission Statement "To provide our customers with quality software and exceptional service. We strive to maintain our reputation for integrity, responsiveness, and fairness, with customers, suppliers, competitors, and employees." LPT:One has been supplied to you by one of our worldwide distribution partners or directly by EnvisionWare where a partnership does not exist. In your shipment is a document that provides contact information and outlines important information about obtaining support. If you purchased from a reseller, we stand behind our resellers to provide the highest level of support. We encourage you to provide feedback concerning new features by visiting the Feature Request option on the support menu of our web site. Thanks to feedback from customers like you, EnvisionWare has become the leading Company that produces software that works the way you want it to. Thanks again for purchasing our products. --- The EnvisionWare Team Copyright © 2008-2010, EnvisionWare Inc, All Rights Reserved 3 LPT:One ™ 4.7 Table of Contents Chapter 1 – Overview ...................................................................................................... 6 Understanding LPT:One Components ................................................................................ 6 Understanding the Process .............................................................................................. 7 LPT:One Connections Diagram ..................................................................................... 7 Defining EnvisionWare LPT:One Print Client for Windows ..................................................... 8 Defining EnvisionWare LPT:One Print Client for Mac ............................................................ 8 Defining EnvisionWare LPT:One Print Release Terminal ....................................................... 9 Defining EnvisionWare LPT:One Quick Reporter................................................................ 10 Chapter 2 – EnvisionWare LPT:One Print Client for Windows and Mac ........................... 11 Understanding the LPT:One Print Client Implementation Types ........................................... 11 Using the EnvisionWare LPT:One Print Client from Facility-Owned Computers ....................... 12 Submit a Print Job from a Facility-Owned Computer ...................................................... 12 Stop the Print Client ................................................................................................. 15 Using the LPT:One Print Client on User-Owned Computers for Mobile Printing (Windows & Mac) ................................................................................................................................ 17 Downloading the Print Client via Internet Explorer (Windows) ......................................... 17 Downloading the Print Client via Firefox (Mac) .............................................................. 19 Running the Print Client for Mobile Printing (Windows & Mac) ......................................... 20 Using the LPT:One Print Client for a Facility-Owned Mac .................................................... 21 Submitting a Print Job from the Facility-Owned Mac ...................................................... 21 Selecting Duplex Printing Per Print Session (Leopard®) .................................................. 23 Selecting N-UP Printing Per Print Session (Leopard®) ..................................................... 24 Chapter 3 – EnvisionWare LPT:One Print Release Terminal............................................ 25 Understanding Print Release Terminal Run Modes ............................................................. 25 Releasing a Print Job .................................................................................................... 26 Printing Multiple Jobs ................................................................................................... 28 Reprinting a Print Job ................................................................................................... 29 Deleting a Print Job...................................................................................................... 29 Paying for Print Jobs .................................................................................................... 30 Pay from a Vending Device ........................................................................................ 30 Pay from an AAM Account.......................................................................................... 32 Pay from a TLC L.S Deposit Account............................................................................ 33 Pay from a Library Deposit Account ............................................................................ 34 Pay from a Blackboard Transaction System Account ...................................................... 36 Pay via Staff/Using Staff Override ............................................................................... 38 Pay via Staff/Using Cash Over the Counter................................................................... 39 4 Copyright © 2008-2010, EnvisionWare Inc, All Rights Reserved EnvisionWare® LPT:One ™ 4.7 Chapter 4 – EnvisionWare LPT:One Quick Reporter........................................................ 40 Generating LPT:One Reports ......................................................................................... 40 Customer Feedback ........................................................................................................ 42 Copyright © 2008-2010, EnvisionWare Inc, All Rights Reserved 5 LPT:One ™ 4.7 Chapter 1 – Overview LPT:One provides Print Cost Management of public printing and print resources for libraries and college campuses. Payment options, Print Modes, Validating Authorities, and Implementation types are versatile, promoting compatibility with many institutions, networks, platforms, and systems. This manual explains and illustrates the many capabilities of LPT:One and provides instructions for installing and configuring the system. Understanding LPT:One Components The following diagram illustrates LPT:One component connections and provides a brief description of the general functionality for each component within the system. The Job Queue Engine represented in the above diagram receives all connections with the exception of the Mac and Windows Print Clients that connect to the Print Service. The V4 Quick Reporter connects to the Job Database for reporting. The Dynamic Language Manager resides in the Job Queue Engine’s installation directory and operates independently of the Job Queue Engine. 6 Copyright © 2008-2010, EnvisionWare Inc, All Rights Reserved EnvisionWare® LPT:One ™ 4.7 Some of these components are not visible to the user or staff, however many of these components are used on a daily basis to submit, release, and report on printing activity. The following components are described in this manual from the user and staff perspective. Understanding the Process The following section illustrates the communications process. LPT:One Connections Diagram The diagram on the following page illustrates one aspect of various implementation types for LPT:One in a live environment. It graphically represents most LPT:One components available and demonstrates deployment types such as ‘User’, ‘Server’, and ‘Staff’. Other components are represented in text format. Copyright © 2008-2010, EnvisionWare Inc, All Rights Reserved 7 LPT:One ™ 4.7 Defining EnvisionWare LPT:One Print Client for Windows Printing is accomplished using the LPT:One Print Client in conjunction with the Print Service. The Print Client provides the user interface when submitting print jobs, while the Print Service processes the jobs and submits them to the Job Queue Engine pending release. As the Print Client starts, it immediately registers itself with the Print Service. The Print Service, once started, creates the local printers based on the EnvisionWare Virtual Printer located in the Windows Printers and Faxes directory of the LPT:One Adminstrator’s host computer. This printer facilitates printing while the Print Service is running. Defining EnvisionWare LPT:One Print Client for Mac Printing is accomplished using the LPT:One Print Client for Mac in conjunction with the Print Service for Windows. The Print Client for Mac provides the user interface when submitting print jobs, while the Print Service for Windows processes the jobs and submits them to the Job Queue Engine for pending release. As the Print Client for Mac starts, it immediately registers itself with the Print Service for Windows. The Print Service, once started, creates the local porinters based on the EnvisionWare Virtual Printer located in the Windows Printers and Faxes directory of the LPT:One Administrator’s host computer. This printer facilitates printing while the Print Service for Windows is running on the remote Windows server. 8 Copyright © 2008-2010, EnvisionWare Inc, All Rights Reserved EnvisionWare® LPT:One ™ 4.7 Defining EnvisionWare LPT:One Print Release Terminal The Print Release Terminal is the component that works in a Windows and Terminal Services environment to queue all print jobs submitted via the LPT:One Print Client. It allows users to pay for and release thier print jobs to the designated printer. Copyright © 2008-2010, EnvisionWare Inc, All Rights Reserved 9 LPT:One ™ 4.7 Defining EnvisionWare LPT:One Quick Reporter The Quick Reporter is a stand-alone application that queries the job database using pre-defined queries. It may be installed on any staff computer for multiple locations. Wherever installed, the host computer must be able to access the host computer hosting the Job Database. See the following screen capture for reports rendered. 10 Copyright © 2008-2010, EnvisionWare Inc, All Rights Reserved EnvisionWare® LPT:One ™ 4.7 Chapter 2 – EnvisionWare LPT:One Print Client for Windows and Mac The following chapter provides information on the LPT:One Print Client for Windows and Mac. This includes instructions on installing the Print Client on user-owned computers as well as using the application to print jobs. Understanding the LPT:One Print Client Implementation Types The LPT:One Print Client has different implementation types. Depending on the type administered, installation of the Print Client may differ. Implementation Types Facility-Owned Windows Computer User-Owned Windows & Mac Computers Description • The Print Client and Print Service are installed on each facility-owned public computer to facilitate printing from the computer. • For information on how to use this client, refer to “Using the LPT:One Print Client” later in this chapter. • The Print Service is installed on a designated Windows remote server. Users download the Print Client for Windows or the Print Client for Mac, to their user-owned portable computer to facilitate printing from the portable computer. For more information on how downloading the Print Client to a portable computer, refer to “Using the LPT:One Print Client on UserOwned Computers for Mobile Printing (Windows & Mac)” later in this chapter. • • Facility-Owned Mac Computer • The Print Client for Mac resides on each individual Mac computer. The Print Service, however, resides on a remote Windows designated server to facilitate printing on the Mac. For more information on how to submit a print job using the Macintosh Print Client, refer to “Using the LPT:One Print Client for a FacilityOwned Mac” later in this chapter. Copyright © 2008-2010, EnvisionWare Inc, All Rights Reserved 11 LPT:One ™ 4.7 Implementation Types Description • Terminal Services • The Print Client for Windows and Print Service are installed on the Terminal Services server. Users access the Print Client for Windows on the Terminal Services server via a terminal services session. For information on how to use this client, refer to “Using the LPT:One Print Client” later in this chapter. Using the EnvisionWare LPT:One Print Client from Facility-Owned Computers When using the LPT:One Print Client, the Print Client and Print Service work together to send the print job to facility printers. As the Print Service starts, it creates EnvisionWare Printer(s) based on the configuration of Printer Families at the LPT:One Administrator application. Submit a Print Job from a Facility-Owned Computer Once the Print Client is running, the user submits a print job. Complete the following steps, to submit a print job: 1. Select the option to print. The system displays the Print dialog. The available printers represent the number of Printer Families created in the LPT:One Administrator. 2. Select the appropriate printer, page range, number of copies, and click Print. 12 Copyright © 2008-2010, EnvisionWare Inc, All Rights Reserved EnvisionWare® LPT:One ™ 4.7 The system begins processing the print job and displays the first phase of the ‘Processing Job’ dialog box. At this phase, the Print Client is determining how long it will take to process the print job. If the job is large enough, the graphical image converts so that the thin bar changes to a full bar that begins to fill the text space from left to right until the print job is successfully spooled. If configured to prompt for User ID, the system displays the User Identification dialog box. Note: This dialog is configurable. Based on the configuration of the institution, this dialog may not appear and if visible may also include the User PIN for entry. 3. Enter the appropriate user information if prompted, and click OK to submit the print job, or Cancel to stop the submission. Copyright © 2008-2010, EnvisionWare Inc, All Rights Reserved 13 LPT:One ™ 4.7 The system begins processing the print job and displays the first phase of the ‘Processing Job’ dialog box. At this phase, the Print Client is determining how long it will take to submit the print job to the Job Queue Engine. If the job is large enough, the graphical image converts so that the thin bar changes to a full bar which begins to fill the text space from left to right until the print job is successfully submitted to the Job Queue Engine. The system displays the ‘Print this job?’ dialog box. This dialog displays the number pages, price per page, and total cost to print the selected print job. 4. Click OK to submit the print job, or Cancel to stop the submission. 14 Copyright © 2008-2010, EnvisionWare Inc, All Rights Reserved EnvisionWare® LPT:One ™ 4.7 If the ‘OK’ button is selected, the system displays the’ Print Complete’ dialog box. Note: This dialog is configurable. Based on the configuration of the institution, this dialog may not be displayed. 5. Click OK to acknowledge the on-screen receipt. The system transmits the job to the Print Release Terminal identified on the Print Complete dialog box. For information on the Print Release Terminal, refer to “Releasing a Print Job” in Chapter 3 of this manual. Stop the Print Client Complete the following steps to stop the Print Client: Note: Stopping the Print Client is configurable on Public Computers. Based on the configuration of the institution, this option may be disabled. 1. Double-Click the icon in the system tray to ‘Open’ the Print Client application. Copyright © 2008-2010, EnvisionWare Inc, All Rights Reserved 15 LPT:One ™ 4.7 The Print Client is displayed maximized on the computer’s desktop. 2. Click Stop Print Client. The system displays the ‘Password Required’ dialog box. 3. Do one of the following: Enter the staff password to close the application, and click OK. The system closes the Print Client. Click Cancel to keep the application open. The system does not close the Print Client and minimizes it to the System Tray. 16 Copyright © 2008-2010, EnvisionWare Inc, All Rights Reserved EnvisionWare® LPT:One ™ 4.7 Using the LPT:One Print Client on User-Owned Computers for Mobile Printing (Windows & Mac) When providing mobile printing for user-owned Windows and/or Mac, the Print Service resides on a facility-owned ‘Windows’ server. Only the Print Client for mobile printing, resides on the user-owned Windows and/or Mac computer. Printing occurs on the user-owned computer once the Print Client is downloaded and installed to the user’s system. This can be completed using either Microsoft Internet Explorer(Windows), Mozilla Firefox and Google Chrome (Mac & Windows), and Apple Safari (Mac). Note: The Print Client for mobile printing writes the User ID to memory for the initial print job. Subsequent job requests do not prompt the user to reenter his or her User ID and PIN (if configured). Once the user stops the Print Client for mobile printing, the user’s credentials are removed from computer memory. See the following sections for Print Client downloading instructions. Downloading the Print Client via Internet Explorer (Windows) Complete the following steps to download the Print Client using Internet Explorer, on a Windows user-owned computer for mobile printing: 1. Browse to the institution’s designated web page and click the link to start the Mobile Print Client. Internet Explorer (behaviour is slightly different for other browsers) displays the Security Warning dialog box. 2. Do one of the following: Click Run to install from the current location. Copyright © 2008-2010, EnvisionWare Inc, All Rights Reserved 17 LPT:One ™ 4.7 An Internet Explorer Security Warning dialog box appears. Click Run to launch the installer or Don’t Run to stop the installation. The ‘Run’ option installs the Print Client and minimizes to the Windows taskbar. a. Click Save if you choose to keep a copy of the application on the user-owned computer. The system displays the ‘Save As’ dialog box and prompts the user to save the file to a designated location. Enter a location to save the file. The system downloads the file to the designated location. The user has options to ‘Run’ directly, ‘Open a Folder’, or ‘Close’ the dialog box. Note: Users should delete the file from their portable computers when it is no longer in use. 18 Copyright © 2008-2010, EnvisionWare Inc, All Rights Reserved EnvisionWare® LPT:One ™ 4.7 Downloading the Print Client via Firefox (Mac) Complete the following steps to download the Print Client, on a Mac userowned computer, for mobile printing using Firefox: 1. Open a Firefox internet browser window from the user-owned computer. Note: Safari can also be used, simply follow the prompts to download. 2. Browse to the facility’s designated web page and click the link identified to “run the Print Client on a Mac environment”, to start the Print Client for mobile printing download. The system displays the ‘Opening’ dialog box. 3. Do one of the following: Click Save File to keep a copy of the application. The system prompts to save to a designated location. Note: Users should delete the file from their portable computers when it is no longer in use. —OR— Click Open with to extract the contents from the .zip file. Click OK to continue or Cancel to stop the download process. The system displays the ‘Download’ dialog window showing the ‘clientlauncher’ in the list. Copyright © 2008-2010, EnvisionWare Inc, All Rights Reserved 19 LPT:One ™ 4.7 Click the ‘clientlauncher’ in the list. The system extracts the contents of the .zip file and displays in the ‘Downloads’ window. Users must click this application to run and have it added to the ‘Dock’. Once the application is running and in the ‘Dock’, it creates printers in the ‘Print & Fax’ directory on the Mac. User can begin printing. Running the Print Client for Mobile Printing (Windows & Mac) Complete the following steps to launch the downloaded Print Client and run the application for mobile printing: Note: The following instructions are illustrated for a Windows userowned computer, however, the process is the same for a Mac userowned computer. 1. Double-click on the Print Client saved on the user-owned computer or at the completion of the install process select the Run option. Windows: The system installs the Print Client and minimizes it to the Windows taskbar. Mac: The system installs the Print Client and adds it to the ‘Dock’. Note: Users who have the Windows XP/Vista/or Win 7 Firewall enabled and are attempting to run the Print Client, are presented with the Windows Security Alert. This security alert appears each time users run a new instance of the Print Client for mobile printing. 20 Copyright © 2008-2010, EnvisionWare Inc, All Rights Reserved EnvisionWare® LPT:One ™ 4.7 Using the LPT:One Print Client for a Facility-Owned Mac As in the Mobile Computer Mode, when using the Mac version the Print Client manages print operations for a ‘Server-Based Page Counting’ and ‘Dedicated’ implementation where the Print Service is installed on a designated Windows server. The Macintosh Print Client for Mac is installed on all facility–owned Mac computers. Submitting a Print Job from the Facility-Owned Mac Complete the following steps to submit a print job: 1. Select the print option. The system displays the Print dialog. 2. Select the appropriate printer, page range, and number of copies, and click Print. The system begins processing the print job and displays the Print dialog box. If configured to prompt for User ID and password, the system displays the User Identification dialog box after the print job is successfully spooled. Note: This dialog is configurable. Based on the configuration of the institution, this dialog may not appear and if visible may include the User PIN for entry. 2. Enter the appropriate user information and click OK If configured. Copyright © 2008-2010, EnvisionWare Inc, All Rights Reserved 21 LPT:One ™ 4.7 If the user information is valid, the system displays the ‘Print this job?’ dialog box. This dialog displays the number pages, price per page, and total cost to print the selected print job. Note: The Accounts button is an optional setting based on the configuration of the institution. If configured, this option allows the user to view the balance of an online account for the ‘Authentication and Accounting Module’ or a ‘Library Deposit Account’. 3. Click OK to submit the print job, or Cancel to stop the submission. The system displays the Print Complete dialog box. 4. Click OK. The system transmits the job to the Print Release Terminal identified in the Print Complete dialog box. For more information on the Print Release Terminal, refer to “Releasing a Print Job” in Chapter 3 of this manual. 22 Copyright © 2008-2010, EnvisionWare Inc, All Rights Reserved EnvisionWare® LPT:One ™ 4.7 Selecting Duplex Printing Per Print Session (Leopard®) Complete the following steps to select the option for Duplex printing: 1. Select the option to print. The system displays the Print dialog defaulting to display ‘Copies & Pages’. 2. Select the appropriate printer, page range, number of copies, and click the arrows for Copies & Pages 3. Select Layout. Note: Duplex options are available when System administrators have installed output printers able to print in duplex and that the Printer Family is configured to print duplex. Dialogs and options vary depending on the printer system used. The system displays the Print dialog for printing options. 4. Select ‘1’ Page per Sheet. Layout Direction and Border are not required for duplex printing. 5. Select the binding type via the Two-Sided control and click Print. Long-edged binding refers to the vertical length of the document. Short-edged binding refers to the horizontal length of the document. The system processes the job as defined in the previous steps. The print confirmation identifies the job as a duplex job and adjusts the price as necessary for the number of sheets used. Copyright © 2008-2010, EnvisionWare Inc, All Rights Reserved 23 LPT:One ™ 4.7 Selecting N-UP Printing Per Print Session (Leopard®) Complete the following steps to select the option for Duplex printing: 1. Select the option to print. The system displays the Print dialog defaulting to display ‘Copies & Pages’. 2. Select the appropriate printer, page range, number of copies, and click the arrows for Copies & Pages. 3. Select Layout. Note: Duplex options are available when System administrators have installed output printers able to print in duplex and that the Printer Family is configured to print duplex. Dialogs and options vary depending on the printer system used. The system displays the Print dialog for printing options. 4. Select the number of pages to be printed per sheet. 5. Select the Layout Direction. This defines the order of each image printed to the sheet. 6. Choose duplex options as desired and if available. The system processes the job as defined in the previous steps. The print confirmation identifies the job and presents the costs for the print job. 24 Copyright © 2008-2010, EnvisionWare Inc, All Rights Reserved EnvisionWare® LPT:One ™ 4.7 Chapter 3 – EnvisionWare LPT:One Print Release Terminal This chapter provides instructions for using LPT:One’s Print Release Terminal in the following manner: Using the Print Release Terminal, releasing print jobs, and job payment and management. General Print Release Terminal behavior is the same for Windows and Terminal Services. Understanding Print Release Terminal Run Modes The Print Release Terminal’s functionality for each mode of operation differs slightly between modes. The following sections explain the behavior of the Print Release Terminal when configured to operate within these different modes. Operation Description Mode • • • Prompt Mode • • • Staff Mode • • • Facilitates self service access to the print queue. Runs dedicated and prohibits access to the desktop. Displays an Inactivity Timeout clock, which begins counting down at a configurable default rate of 45 seconds and closes the queue when the clock reaches 1 second. Mouse movement or keyboard activity causes the timer to reset back to 45 seconds. If there are no jobs found for the User Id and/or PIN (based on configuration options) entered, the system displays a message to the user stating that no jobs were found. Used with the Launch Command Menuing application. Facilitates staff access to print queue. Displays all jobs submitted to the PRT. Staff can minimize or close the application. Jobs identified by User ID, Station ID, Document Name, or Job Number. Copyright © 2008-2010, EnvisionWare Inc, All Rights Reserved 25 LPT:One ™ 4.7 Operation Description Mode • • Dedicated Mode • • Facilitates dedicated access. Displays all jobs submitted to the station. Application cannot be minimized. A password is required to close the application. Users identify their jobs by User ID, Station ID, Document Name, or Job Number. Releasing a Print Job Each job submitted to the PRT appears as a single line of information. Depending on the system configuration and run mode of the PRT, the information available to the user may vary. Complete the following steps to release a print job: 1. Click the desired Job Name or Job Number from the Print Release Terminal queue. The system highlights the print job in gray scale when selected. 2. Click Print to release the job to the printer. The system displays the Payment Options dialog box. Note: Depending on the institution’s configuration, users and/or staff may have a variety of payment options. For more information on the different payment options, refer to “Paying for Print Jobs” later in this chapter. 26 Copyright © 2008-2010, EnvisionWare Inc, All Rights Reserved EnvisionWare® LPT:One ™ 4.7 3. Select the appropriate payment option. Once payment is completed, the system displays the Release Confirmation dialog box. Note: This dialog is configurable. Based on the configuration of the institution, it may not appear. 4. Click OK to acknowledge the release confirmation. The print job is sent to the appropriate printer. 5. Click Done from the Print Release Terminal user interface once all print jobs are released. Note: The Done button is not available when the PRT is in ‘Dedicated Mode’. If this option is available, the system closes the application. Copyright © 2008-2010, EnvisionWare Inc, All Rights Reserved 27 LPT:One ™ 4.7 Printing Multiple Jobs Depending on the institution’s configuration, users and/or staff may have the option to print multiple jobs at the same time. Complete the following steps to release multiple print jobs: 1. Click Select All Jobs from the Print Release Terminal queue. The system changes the image and text on the button to ‘Deselect All Jobs’. 2. Select all of the jobs to be printed (this option is configurable). As the user clicks to select each row, the system highlights the row in shaded grey scale that corresponds with the selected job. Note: The above action demonstrates behavior for one of the three configurable options when selecting multiple print jobs. See the EnvisionWare LPT:One Administrator Manual for a description of each option in the “Print Release Terminal Preference Table”. 3. Proceed with printing using the same process as printing a single job. The system processes multiple jobs just as a single job, with the exception of showing multiple items in the Release Confirmation dialog box. 28 Copyright © 2008-2010, EnvisionWare Inc, All Rights Reserved EnvisionWare® LPT:One ™ 4.7 Reprinting a Print Job Depending on the configuration of the institution, users and/or staff may have the option to re-print jobs that have been previously released to a printer. Complete the following steps to re-print a job: 1. Click the Reprint Jobs button from the Print Release Terminal queue. The system changes the image and text on the button to ‘Exit Reprint Jobs’, and displays all print jobs released for the entered User ID if in prompt mode. If the PRT is in staff or dedicated mode, the system displays the print jobs for all users. 2. Select the job to be re-printed. As rows are selected, the system highlights the row that corresponds with the job selected. 3. Proceed with printing using the same process as printing a single job. The system processes re-prints just as a single job. 4. Click Exit Reprint Jobs to turn off the ability to reprint jobs. Deleting a Print Job Depending on the configuration of the institution, users and/or staff may have the option to delete jobs that have been submitted. Complete the following steps to delete a job: 1. Select the job to be re-printed from the Print Release Terminal queue. As rows are selected, the system highlights the row that corresponds with the job selected. 2. Click Delete. The system prompts for a staff password. 3. Enter the password and click OK. If the password is valid, deletes the selected job from the queue and returns to the Print Release Terminal queue. Copyright © 2008-2010, EnvisionWare Inc, All Rights Reserved 29 LPT:One ™ 4.7 Paying for Print Jobs Depending on the configuration of the institution, users and/or staff may have a variety of payment options. Pay from a Vending Device Complete the following steps to pay using a vending device: 1. Select the desired job from the Print Release Terminal queue and click Print. The system displays the Payment Options dialog box. Note: Depending on the configuration of the institution, users and/or staff may have a variety of payment options. This dialog box does not represent all options that could be visible to the user. If a message appears reporting the device is unable to initialize, please contact your Systems Administrator. The vending device may not be physically connected to the computer. 2. Click Pay From Vending Device. The system displays the Vending Deposit dialog box. 30 Copyright © 2008-2010, EnvisionWare Inc, All Rights Reserved EnvisionWare® LPT:One ™ 4.7 3. Insert money into the vending device, and click OK to proceed with releasing the job, or click Cancel to return to the Payment Options dialog without inserting money, or click Override if you are staff and wish to by-pass inserting money into the device. When the ‘OK’ button is selected, the system displays the Release Confirmation dialog box. 4. Click OK. The print job is sent to the appropriate printer and, based on configuration, the balance of funds entered into the vending device is returned. Copyright © 2008-2010, EnvisionWare Inc, All Rights Reserved 31 LPT:One ™ 4.7 Pay from an AAM Account Complete the following steps if AAM is configured for the institution, to pay using this payment method: 1. Select the desired job from the Print Release Terminal queue, and click Print. The system displays the Payment Options dialog box. Note: Depending on the configuration of the institution, users and/or staff may have a variety of payment options. This dialog box does not represent all options that could be visible to the user. 2. Click one of the appropriate AAM Accounts: Allocation Account - Allows institution to provide a specific amount of free printing per user. Deposit Account - Allows user to pay for a print job from funds already paid to the institution. Credit Account - Allows users to release a print job and pay for the print job later. 3. Click OK to proceed with releasing the job, or click Cancel to return to the Payment Options dialog without inserting money. 32 Copyright © 2008-2010, EnvisionWare Inc, All Rights Reserved EnvisionWare® LPT:One ™ 4.7 When the ‘OK’ button is clicked, the system displays the Release Confirmation dialog box. 4. Click OK. Print job is sent to the appropriate printer, and funds are removed from the selected account. Pay from a TLC L.S Deposit Account Complete the following steps if a TLC L.S deposit account is configured for the institution via a TLC server, to pay using this payment method: 1. Select the desired job from the Print Release Terminal queue, and click Print. The system displays the Payment Options dialog box. Copyright © 2008-2010, EnvisionWare Inc, All Rights Reserved 33 LPT:One ™ 4.7 Note: Depending on the configuration of the institution, users and/or staff may have a variety of payment options. This dialog box does not represent all options that could be visible to the user. 2. Click the Library Deposit Account, it allows users to release a print job while payment of that print job is deducted from the deposit account. 3. Click OK to proceed with releasing the job, or click Cancel to return to the Payment Options dialog without inserting money. When the ‘OK’ button is selected, the system displays the Release Confirmation dialog box. 4. Click OK. Print job is sent to the appropriate printer, and funds are removed from the library deposit account. Pay from a Library Deposit Account Complete the following steps if a Library Deposit Account is configured for the institution via a SIP server using the ‘envisionware’ communications protocol, to pay using this payment method: 1. Select the desired job from the Print Release Terminal queue, and click Print. 34 Copyright © 2008-2010, EnvisionWare Inc, All Rights Reserved EnvisionWare® LPT:One ™ 4.7 The system displays the Payment Options dialog box. Note: Depending on the configuration of the institution, users and/or staff may have a variety of payment options. This dialog box does not represent all options that could be visible to the user. 2. Click the Library Deposit Account, it allows users to release a print job while payment of that print job is deducted from the deposit account. 3. Click OK to proceed with releasing the job, or click Cancel to return to the Payment Options dialog without inserting money. When the ‘OK’ button is selected, the system displays the Release Confirmation dialog box. 4. Click OK. Print job is sent to the appropriate printer, and funds are removed from the library deposit account. Copyright © 2008-2010, EnvisionWare Inc, All Rights Reserved 35 LPT:One ™ 4.7 Pay from a Blackboard Transaction System Account This payment option is available for use only by colleges. It provides another option for students to pay for print jobs using their account in the Blackboard Transaction System. Complete the following steps if Blackboard is configured for the institution, to pay using this payment method: 1. Select the desired job from the Print Release Terminal queue, and click Print. The system displays the Payment Options dialog box. Note: Depending on the configuration of the institution, users and/or staff may have a variety of payment options. This dialog box does not represent all options that could be visible to the user. 2. Click Pay From Blackboard. The system deducts the cost of the print job from the Blackboard Account. 3. Click OK to proceed with releasing the job, or click Cancel to return to the Payment Options dialog without inserting money. 36 Copyright © 2008-2010, EnvisionWare Inc, All Rights Reserved EnvisionWare® LPT:One ™ 4.7 When the ‘OK’ button is selected, the system displays the Release Confirmation dialog box. 4. Click OK. Print job is sent to the appropriate printer, and funds are removed from the selected account. Copyright © 2008-2010, EnvisionWare Inc, All Rights Reserved 37 LPT:One ™ 4.7 Pay via Staff/Using Staff Override Users can pay for print jobs directly to staff members who are able to override payment options such as ‘Vending’, using the staff password and releasing the job directly to the printer. Complete the following steps to bypass the payment option, ‘Vending’ and release the job to the printer: 1. Select the desired job from the Print Release Terminal queue, and click Print. The system displays the Payment Options dialog box. Note: Depending on the configuration of the institution, users and/or staff may have a variety of payment options. This dialog box does not represent all options available. 2. Click Staff Override after collecting payment. The system prompts for a staff password. Note: There are various reasons why a staff member may want to override the payment option. One is, the device is not working properly and the Staff Override’ payment option is needed to process the user’s request as soon as possible. 3. Enter the staff password and click OK. If the password is valid, the system displays the Release Confirmation dialog box. 4. Click OK. The print job is sent to the appropriate printer. 38 Copyright © 2008-2010, EnvisionWare Inc, All Rights Reserved EnvisionWare® LPT:One ™ 4.7 Pay via Staff/Using Cash Over the Counter Users can pay for print jobs directly to staff members who are able to release the job directly to the printer without using the Staff Override option. This type of configuration submits the print job(s) directly to the printer without the interference of a payment options dialog. Complete the following steps when users may pay staff directly: 1. Select the desired job from the Print Release Terminal queue, and click Print. The system Does Not display the Payment Options dialog box. Note: This functionality is not available by default. The System administrator must turn on the ‘Use Cash Payment’ option. 2. Click OK. The print job is sent to the appropriate printer. Note: The final step may also be disabled when using the ‘Use Cash Payment Option’. See Appendix B in the LPT:One Administrator’s Manual. Copyright © 2008-2010, EnvisionWare Inc, All Rights Reserved 39 LPT:One ™ 4.7 Chapter 4 – EnvisionWare LPT:One Quick Reporter The Quick Reporter generates predefined queries to report statistical information on jobs printed or deleted along with other information about print jobs. This reporting tool is a stand-alone application and based on the configuration of the institution may be available on a staff computer. Generating LPT:One Reports Complete the following steps to view reports within the LPT:One Quick Reporter: 1. Select the Quick Reporter shortcut on the desktop, or browse to the application from the Start Menu. The system displays the Quick Reporter main menu. 2. Select the beginning and ending dates for the report, and click Generate. 40 Copyright © 2008-2010, EnvisionWare Inc, All Rights Reserved EnvisionWare® LPT:One ™ 4.7 The system generates the report in the Job Summary window. 3. Do one of the following: Click Save to generate and archive an HTML report. The system displays the ‘Save As’ dialog box. Note: By default, reports are saved to… C:\Program Files\EnvisionWare\lptone\lptreport\reports for 32-bit processors. —OR— C:\Program Files(x86)\EnvisionWare\lptone\lptreport \reports, for 64-bit processors. Browse to the correct location, provide a name for the report, and click Save. The system saves the report to the selected location and returns to the Quick Reporter main screen. Click Print to send a copy of the report to the printer. The system sends the report to the selected printer and returns to the Quick Reporter main screen. Click Exit to close the Quick Reporter. The system closes Quick Reporter. Copyright © 2008-2010, EnvisionWare Inc, All Rights Reserved 41 LPT:One ™ 4.7 Customer Feedback If you have questions or feedback concerning this publication or need assistance, please contact us at [email protected]. 42 Copyright © 2008-2010, EnvisionWare Inc, All Rights Reserved