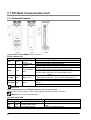
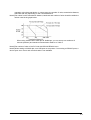
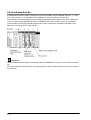
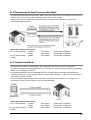
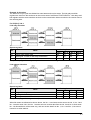
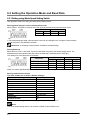
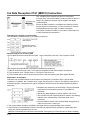
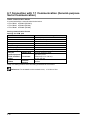
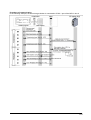
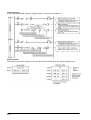
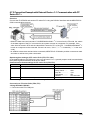
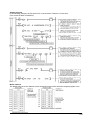
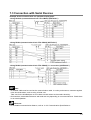
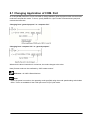
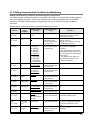
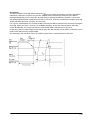
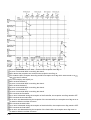
1
Safety Precautions Observe the following notices to ensure personal safety or to prevent accidents. To ensure that you use this product correctly, read this User’s Manual thoroughly before use. Make sure that you fully understand the product and information on safety. This manual uses two safety flags to indicate different levels of danger. WARNING If critical situations that could lead to user’s death or serious injury is assumed by mishandling of the product. -Always take precautions to ensure the overall safety of your system, so that the whole system remains safe in the event of failure of this product or other external factor. -Do not use this product in areas with inflammable gas. It could lead to an explosion. -Exposing this product to excessive heat or open flames could cause damage to the lithium battery or other electronic parts. CAUTION If critical situations that could lead to user’s injury or only property damage is assumed by mishandling of the product. -To prevent excessive exothermic heat or smoke generation, use this product at the values less than the maximum of the characteristics and performance that are assured in these specifications. -Do not dismantle or remodel the product. It could cause excessive exothermic heat or smoke generation. -Do not touch the terminal while turning on electricity. It could lead to an electric shock. -Use the external devices to function the emergency stop and interlock circuit. -Connect the wires or connectors securely. The loose connection could cause excessive exothermic heat or smoke generation. -Do not allow foreign matters such as liquid, flammable materials, metals to go into the inside of the product. It could cause excessive exothermic heat or smoke generation. -Do not undertake construction (such as connection and disconnection) while the power supply is on. It could lead to an electric shock. Copyright / Trademarks -This manual and its contents are copyrighted. -You may not copy this manual, in whole or part, without written consent of Panasonic Industrial Devices SUNX Co., Ltd. -Windows is a registered trademark of Microsoft Corporation in the United States and other countries. -All other company names and product names are trademarks or registered trademarks of their respective owners. PLC_ORG Table of Contents Before You Start 1. Functions and Restrictions of the Unit ................................................. 1-1 1.1 Features and Functions of the Unit ............................................................................... 1-2 1.1.1 Functions..................................................................................................................... 1-2 1.2 Unit Types ........................................................................................................................ 1-4 1.2.1 Multi Communication Unit ........................................................................................... 1-4 1.2.2 Communication Blocks ............................................................................................... 1-4 1.3 Restrictions on Units Combination ............................................................................... 1-5 1.3.1 Restrictions on Installation position and Number of Units .......................................... 1-5 2. Specifications and Functions ................................................................ 2-1 2.1 FP2 Multi Communication Unit ...................................................................................... 2-2 2.1.1 Parts and Functions .................................................................................................... 2-2 2.2 FP2 Communication Blocks ........................................................................................... 2-4 2.2.1 Types of Communication Blocks................................................................................. 2-4 2.2.2 Names and Major Applications of Port ....................................................................... 2-6 2.3 Table of Specifications ................................................................................................... 2-7 2.3.1 General Specifications ................................................................................................ 2-7 2.3.2 Communication Specifications .................................................................................... 2-8 2.4 Confirming the I/O Contacts and Slot Number ........................................................... 2-11 2.4.1 The Role of Input/Output Contacts. .......................................................................... 2-11 2.4.2 Confirming the I/O Number Allocation ...................................................................... 2-12 2.4.3 Confirming Slot Number............................................................................................ 2-13 2.4.4 Confirming Root No. ................................................................................................. 2-14 3. Installation and Wiring of Communication Blocks .............................. 3-1 3.1 Installation of Communication Blocks .......................................................................... 3-2 3.2 Wiring of Communication Blocks .................................................................................. 3-3 3.2.1 FP2-CB232(AFP2803), FP2-CB422(AFP2804) ......................................................... 3-3 3.2.2 FP2-CB485 (AFP2805) ............................................................................................... 3-4 3.2.3 Selection of Cables ..................................................................................................... 3-6 4. Communication Function....................................................................... 4-1 4.1 Communication Mode ..................................................................................................... 4-2 4.1.1 PC(PLC) Link Mode .................................................................................................... 4-2 i 4.1.2 General-purpose Serial Communciation Mode ........................................................... 4-3 4.1.3 Computer Link Mode ................................................................................................... 4-3 4.2 Remote Control using Modem........................................................................................ 4-4 4.3 Settings ............................................................................................................................. 4-5 4.3.1 Operation Mode Setting .............................................................................................. 4-5 4.3.2 Communication Condition Setting ............................................................................... 4-5 4.3.3 Unit No. Setting ........................................................................................................... 4-6 4.4 How to Set ........................................................................................................................ 4-7 4.4.1 Unit No. Setting Switch ............................................................................................... 4-7 4.4.2 Mode Speed Setting Switch ........................................................................................ 4-7 4.4.3 Memory Switch ............................................................................................................ 4-8 4.4.4 Flow Chart ................................................................................................................... 4-9 4.5 Timing for Transmission of Communication Setting Data ........................................ 4-10 5. Communication Function: PC(PLC) Link .............................................. 5-1 5.1 Overview of Funcation .................................................................................................... 5-2 5.1.1 What is PC(PLC) Link ................................................................................................. 5-2 5.1.2 Operation of PC(PLC) link........................................................................................... 5-3 5.2 Setting the Operation Mode and Baud Rate ................................................................. 5-4 5.2.1 Setting using Mode Speed Setting Switch .................................................................. 5-4 5.2.2 Setting of Unti Numbers .............................................................................................. 5-4 5.2.3 Link Relay and Link Register Allocations .................................................................... 5-6 5.3 Monitoring ...................................................................................................................... 5-12 5.4 Connection Example of PLC Link ................................................................................ 5-13 5.4.1 When using three PLCs ............................................................................................ 5-13 5.4.2 Sample program........................................................................................................ 5-15 5.5 PC(PLC) Link Response Time ...................................................................................... 5-16 5.6 Troubleshooting (PC(PLC) Link) .................................................................................. 5-18 6. Communication Function: General-purpose Serial communication .. 6-1 6.1 Overview of Funcation .................................................................................................... 6-2 6.1.1 What is General-purpose Serial Communication ........................................................ 6-2 6.2 Setting the Operation Mode and Baud Rate ................................................................. 6-4 6.2.1 Setting using Mode Speed Setting Switch .................................................................. 6-4 6.2.2 Setting using Memory Switch ...................................................................................... 6-5 6.3 I/O Allocation .................................................................................................................... 6-6 6.4 Communication with External Devices ......................................................................... 6-8 ii 6.4.1 Programming Example of General-purpose Serial Communication ........................... 6-8 6.5 Data Transmission F159 (MTRN) Instruction................................................................ 6-9 6.6 Data Reception F161 (MRCV) Instruction ................................................................... 6-12 6.6.1 Data to be Sent/Received with MCU ........................................................................ 6-14 6.6.2 Flag Operation in Serial Communication .................................................................. 6-15 6.7 Connection with 1:1 Communication (General-purpose Serial Communication) .. 6-18 6.7.1 Connection Example with External Device <1:1 Communication with MicroImagechecker> .................................................................................................................. 6-19 6.7.2 Connection Example with External Device <1:1 Communication with FP Series PLC > ........................................................................................................................................... 6-23 6.8 1:N Communication (General-purpose Serial Communication) ............................... 6-28 6.9 Troubleshooting (General-purpose Serial Communication) ..................................... 6-29 7. Communication Function: Computer link ............................................ 7-1 7.1 Overview of Function ...................................................................................................... 7-2 7.1.1 What is Computer Link ................................................................................................ 7-2 7.1.2 Unit Operation ............................................................................................................. 7-3 7.2 Setting the Operation Mode and Baud Rate ................................................................. 7-5 7.2.1 Setting using Mode Speed Setting Switch .................................................................. 7-5 7.2.2 Setting using Memory Switch...................................................................................... 7-6 7.2.3 Setting of Unit Numbers (C-NET 1:N Communication)............................................... 7-7 7.3 Connection with Serial Devices ..................................................................................... 7-9 7.3.1 Communication Conditions and Restrictions Relating to Functions ......................... 7-10 7.4 Table of MEWTOCOL Command .................................................................................. 7-12 7.4.1 MEWTOCOL-COM Commands ................................................................................ 7-12 7.4.2 Table of MEWTOCOL-COM Error code ................................................................... 7-12 7.5 Troubleshooting (Computer Link) ............................................................................... 7-13 8. Applications ............................................................................................ 8-1 8.1 Changing Application of COM. Port .............................................................................. 8-3 8.2 Setting Communication Conditions and Monitoring ................................................... 8-4 8.2.1 Example of Communication Condition Setting using F159 (MTRN) Instruction ......... 8-6 8.2.2 Example of Monitoring Communication Condition using F161 (MRCV) Instruction ... 8-7 8.3 MCU Status Monitor ........................................................................................................ 8-8 9. Specifications ......................................................................................... 9-1 iii 9.1 Table of Specifications.................................................................................................... 9-2 9.1.1 General Specifications ................................................................................................ 9-2 9.1.2 Communication Specifications .................................................................................... 9-3 9.1.3 Setting Communication Conditions and Monitoring .................................................... 9-5 9.1.4 I/O Allocation (General-purpose Serial Communication) ............................................ 9-7 9.2 Appendix........................................................................................................................... 9-9 9.2.1 Detailed Time Chart of Data Transmission and Reception......................................... 9-9 9.2.2 Time Chart of Multiplex Reception ............................................................................ 9-10 10. Dimensions and Sample Programs ................................................... 10-1 10.1 Dimensions................................................................................................................... 10-2 10.1.1 FP2 Multi Communication Unit ............................................................................... 10-2 10.1.2 Communication Blocks............................................................................................ 10-3 10.2 ASCII Codes ................................................................................................................. 10-4 iv Before You Start CPU units The CPUs as below are necessary to use this unit. FP2: Ver. 1.50 or later FP2SH: Ver. 1.50 or later Note) The unit does not work due to the CPU error when using the older version than Ver. 1.40. Programming tools The programming tools as below are necessary to use this unit. FPWIN GR: Ver. 2.40 or later FPWIN Pro: Ver. 5.02 or later FP2 communication block is necessary for FP2 Multi Communication Unit. FP2 Multi Communication Unit cannot be used alone. FP2 communication block must be installed for using FP2 Multi Communication Unit. Difference from the conventional models FP2-SDU FP2-SDU and FP2 Multi Communication Unit is not interchangeable as all uses such as settings or commands are different. FP2-CCU FP2-CCU and FP2 Multi Communication Unit is interchangeable, however, there are following differences - Unit number is available. There is no unit number on CCU, but the unit number is available in the computer link mode of MCU. (The default setting for the unit number is 1.) - Command relay function (hierarchy function) for the network unit such as MEWNET-W. It is not available for MCU. - Data transmission by SEND (F145)/RECV (F146) commands. It is not available for MCU. v vi Chapter 1 Functions and Restrictions of the Unit 1.1 Features and Functions of the Unit 1.1.1 Functions Features and functions of Multi Communication Unit Multi Communication Unit is a communication interface to be used with the programmable controller FP2/FP2SH to connect with serial communication devices. Multi Communication Unit corresponds to multiple communication modes and standards, and has features as below. Adopted the removable serial communication block Three kinds of communication standard, RS232C, RS422 and RS485 are selectable due to the removable serial communication block. Three kinds of communication mode. There are three modes, general serial, computer link and PC(PLC) link, are available. Depending on the combination with the communication block, it can be connected with many serial communication devices. 1-2 High-speed and large-capacity communication MCU corresponds to 230 kbps-high-speed communication. Also 2048 characters data per frame can be transmitted. Note) When setting to 230400 bps, use USB ports at computers. If connecting to RS232C ports, a device open error occurs and communication is not available. Stable communication by double insulation As the areas between the internal circuits and between channels are electrically insulated, it is irrefrangible, and has less effect on connecting devices. The communication is stable. Program Ladder programs for the general serial communication can be easily created by the special instruction. (Programming is not necessary for the PC (PLC link and the computer link). 1-3 1.2 Unit Types 1.2.1 Multi Communication Unit Name FP2 Multi Communication Unit Specifications Serial port 2 channels Part No. FP2-MCU Product No. AFP2465 Key Point: Multi Communication Unit is occasionally abbreviated as “MCU” in this manual. 1.2.2 Communication Blocks Name FP2 communication block (RS232C) FP2 communication block (RS422) FP2 communication block (RS485) Specifications RS232C RS422 RS485 Part No. FP2-CB232 FP2-CB422 FP2-CB485 Note: FP2 communication block is necessary for FP2 Multi Communication Unit. FP2 Multi Communication Unit cannot be used alone. Use it with FP2 communication block. 1-4 Product No. AFP2803 AFP2804 AFP2805 1.3 Restrictions on Units Combination 1.3.1 Restrictions on Installation position and Number of Units When using PC(PLC) link function 1. Up to two units, including FP2-MW (Multi-wire link unit) used in W mode, can be used. 2. When CPU is FP2SH, install two units within five units in combination with FP2-MW, FP-CCU and FP2-MCU. 3. When CPU is FP2, install two units within three units in combination with FP2-MW, FP-CCU and FP2MCU. When using General-purpose serial communication Can be installed in any position. When using Computer link function Up to eight units of FP2-MCU can be installed. Note) The restrictions are not related to the number of channels for each unit. (Either COM.1 port and COM.2 port is counted as one unit in case of the CCU setting.) 1-5 1-6 Chapter 2 Specifications and Functions 2.1 FP2 Multi Communication Unit 2.1.1 Parts and Functions Operation indicator LEDs Status indicator LED Display Send Data SD Green monitor Receive Data RD Green monitor ERR Red Communication error S. ERR Red Setting error ALARM Red Alarm Operation Flashes while data is being sent. Goes out when no data is being sent. Flashes while data is being received. Goes out when no data is being received. In PC(PLC) link mode: Lights if PC(PLC) link error occurs. In other modes: Lights if communication error occurs. In PC(PLC) link mode: Goes out if PC(PLC) link is liked up. In other modes: Goes out if no communication error occurs. Lights if setting error occurs. (The numbers at the top “1” and “2” mean COM. port No.) Goes out in normal status. Lights if unit error occurs. (Lights if watch dog timer error occurs.) Goes out if no error occurs. Key Point: The communication error LED lights when the receive error occurs. Receive error: Parity, framing, overrun, buffer capacity overflow, receive buffer FULL Reference: <8.3 MCU Status Monitor> Operation mode LED Display Operation W0 Green PC(PLC) link mode Lights in PC(PLC) link mode. Lights in General-purpose serial communication General-purpose serial GP Green communication mode mode. MC Green Computer link mode Lights in computer link mode. Note) W0 (PC(PLC) link mode) is not available for COM. 2. 2-2 Installation position for communication block The communication blocks are installed in COM.1 and COM.2. Unit No. setting switch Unit No. for the COM.1 is set when the PC(PLC) link and computer link is selected for the operation mode. Unit No. can be selected in a range of 1 to 15. Factory default setting: 0 (memory switch selection) Mode speed setting switch Used to set the operation mode and communication speed. Port COM. 1 Switch No. 1 2 3 4 5 Spare OFF OFF OFF PC(PLC) link ON OFF ON Operation General-purpose serial mode OFF ON OFF communication Computer link ON ON ON 115200 bps OFF OFF 19200 bps ON OFF Baud rate 9600 bps OFF ON Memory switch ON ON Note) If selecting the setting marked with diagonal lines, the setting error occurs. COM. 2 6 7 OFF OFF 8 ON ON OFF ON OFF ON OFF OFF ON ON Factory default setting Operation mode: Computer link Communication unit No.: 1 (Memory switch and computer link are selected.) Baud rate: 9600 (Memory switch selection) Character bit: 8 Parity: Odd Stop bit length: 1 RS/CS: Disable Note) The factory default settings for the mode speed setting switch (dip SW) are all ON. Reference: For the detail on the communication settings (unit No., memory switch setting, etc.), refer to <4.3.3 Unit No. Settings> and <4.4.3 Memory Switch> 2-3 2.2 FP2 Communication Blocks 2.2.1 Types of Communication Blocks There are three types of communication cassettes, each having a particular field of application. FP2 communication block (RS232C) FP2-CB232 (AFP2803) This communication block is a 1-channel unit with a five-wire RS232C port. It supports 1:1 computer links, general-purpose serial communication and PC(PLC) link between two units. RS/CS control is possible in general-purpose serial communication mode. Pin No. Name Abbr. Signal direction 1 (Not connected) (NC) 2 Send Data SD Unit to external devices 3 Receive Data RD External devices to Unit 4 Request to Send RS Unit to external devices 5 Clear to Send CS External devices to Unit (Connection 6 unavailable) 7 Signal Ground SG (Connection 8 unavailable) 9 Data terminal ready ER Unit to external devices Note1) RS (Request to Send) is controlled at Y contact. Note2) When setting the RS/CS control to “Able”, data cannot be sent without the pin CS (Clear to Send). When using with a three-wire port, short-circuit the pin RS and CS, or disable them. Note3) The ER signal is shorted in the RS signal and the communication block. Note4) Do not connect to the pin “connection unavailable”. Note5) The shell part and the mounting screw part of the connector is connected to the ground terminals of the power supply unit. FP2 communication block (RS422) FP2-CB422 (AFP2804) This communication block is a 1-channel unit with a four-wire RS422 port. It supports 1:1 computer link, general-purpose communication and PC(PLC) link (MEWNET-W0) between two units. Pin No. Name Abbr. Signal direction 1 (Not connected) (NC) 2 Send Data SD+ Unit to external devices 3 Receive Data RD+ External devices to Unit 4 Send Data SDUnit to external devices 5 Receive Data RDExternal devices to Unit (Connection 6 unavailable) (Connection 7 unavailable) (Connection 8 unavailable) (Connection Unit to external devices 9 unavailable) Note1) The shell part and the mounting screw part of the connector is connected to the ground terminals of the power supply unit. Note2) The terminating resistor (120 Ω) is built in between the RD+ and RD-. 2-4 FP2 communication block (RS485) FP2-CB485 (AFP2805) This communication block is a 1-channel unit with a two-wire RS485 port. It supports 1:N computer link, general-purpose serial communication and the PC(PLC) link. Pin Name Abbr. Signal direction No. 1 Terminal station setting E 2 Transmission line (-) 3 Transmission line (+) + 4 Transmission line (-) 5 Transmission line (+) + Note1) The mounting screws are connected to the ground terminals of the power supply unit. Note2) As for the setting of the terminal unit, short-circuit the terminals E and (-). The terminating resistor (120 Ω) is built in. 2-5 2.2.2 Names and Major Applications of Port Two communication ports are equipped with FP2 Multi Communication Unit (MCU). By mounting either communication blocks, RS232C, RS422 or RS485, the communication becomes available with external devices. The upper communication port is called COM. 1 port, and the lower port is called COM. 2 port. Select suitable communication block after determine the following applications. Port Communication blocks RS422 (AFP2804) RS485 (AFP2805) - Computer link (1:N) - Computer link (1:1) - General-purpose serial - Computer link (1:1) - General-purpose serial communication (1:N) COM. 1 - General-purpose serial Note2) Note2) communication (1:1) - PC(PLC) link communication (1:1) (MEWNET-W0) - Computer link (1:1) - Computer link (1:1) - Computer link (1:N) - General-purpose serial - General-purpose serial - General-purpose serial COM. 2 communication (1:1) communication (1:1) communication (1:N) Note1) MEWTOCOL-COM can be used on all ports which support computer link. With MEWTOCOLCOM, the same commands are supported on both two channels, and frames of up to 2048 bytes (header <) are supported. Note2) The PC(PLC) link with two units is available. 2-6 RS232C (AFP2803) 2.3 Table of Specifications 2.3.1 General Specifications Item Ambient temperature Storage temperature Ambient humidity Storage temperature Vibration resistance Shock resistance Noise immunity Operation condition Consumption current Weight (main unit) Weight (communication block) Description 0 to +55 °C -20 to +70 °C 30 to 85% RH (at 25 °C non-condensing) 30 to 85% RH (at 25 °C non-condensing) 10 to 55 Hz, 1 cycle/min, double amplitude of 0.75 mm 10 min on X, Y, Z axes 2 Shock of 98 m/s , 4 times on X, Y, Z axes 1000 Vp-p with pulse widths 50 ns and 1µs (by noise simulator) Free from corrosive gases and excessive dust Approx. 480 mA Approx. 130 g Approx. 35 g 2-7 2.3.2 Communication Specifications General-purpose Serial communication Item Interface Communication method Synchronous method Transmission line Transmission distance 1:1 communiNote1) cation 1:N communiNote1) cation AFP 2804 AFP2805 AFP 2803 AFP 2804 AFP2805 RS232C RS422 RS485 RS232C RS422 RS485 Full duplex transmission Two-wire, half duplex transmission (PC) PLC link AFP2803 AFP2805 RS232C RS485 Token bus (Floating master) Two-wire, half duplex transmission Half duplex transmission Start stop synchronous system Multicore shield wire 15m (3 m for Max. 115200 400 m bps or more) Twisted pair shield cable Max. 1200 m Note2) Note3) 300 to 230400 Note2) Note3) bps (19200 bps when C-NET adapter is connected) 300 to 230400 bps Transmission code ASCII, JIS7, JIS8, Binary Number of units 1:N communiNote1) cation 1:1 communiNote1) cation AFP 2803 Baud rate (to be set by memory switch) Communication format (to be set by memory switch) Computer link Multicore shield wire 15m (3 m for Max. 115200 400 m bps or more) Twisted pair shield cable Max. 1200m Note2) Note3) 1200m (RS485) 3m (RS232C) 300 to 230400 bps Note2) Note3) 300 to 230400 bps (19200 bps when C-NET adapter is connected) 115200 bps ASCII, JIS7, JIS8 Data length: 7-bit / 8-bit Parity:0/None/Even/Odd Stop bit: 1-bit / 2-bit Start code: STX/No STX End code:CR/CR+LF/Time setting/ETX Max. 99 units (32 units max. when C-NET adapter is connected.) Twisted pair shield cable Max. 99 units (32 units max. when C-NET adapter is connected.) Max. 16 units Note4) Note2) Note2) PLC link capacity Link relay: 1024 points Link register: 128 words Note1)Although it has adequate noise resistance ,It is recommendable to make the user program to execute re-transmission (in order to improve reliability of the communication in case of communication errors occurred by excessive noises or when a receiver equipment cannot receive temporarily.) Nore2)When connecting a commercially available device that has an RS485 interface, please confirm 2-8 operation using the actual device. In some cases, the number of units, transmission distance, and baud rate vary depending on the connected device. Note3)The values for the transmission distance, baud rate and number of units should be within the values noted in the graph below. When using a baud rate of 2400 bps to 38400 bps, you can set up to a maximum of 99 units (stations) and maximum transmission distance of 1200 m. Note4)The number of units of the PLC link with RS232C/RS422 is two. Note5) When setting to 230400 bps, use USB ports at computers. If connecting to RS232C ports, a device open error occurs and communication is not available. 2-9 Precaution when using RS485 port RS485 communication is a communication method to perform sending and receiving by two-wire system. Therefore, only one device enables to send data in the communication line at the same time. Multi Communication Unit (MCU) can send back responses (send data) instantaneously for the transmitted data from other devices . However, depending on other devices connected, it may need a time to open the communication line. In this case, data cannot be sent correctly as the transmitted data from MCU and the transmitted line of the other devices clash. (The above figure shows an example that the transmission “a” and “b” clash.) In this case, it is necessary to adjust the time until starting sending at MCU side, to enable the normal transmission. The time taken until starting the transmission is called “send waiting time”, and specified with the memory switch. 1. MCU setting 2. F159 (MTRN) instruction Specify the necessary waiting time for the “send waiting time” area. Example: With the RS232C/RS485 converter SI35 manufactured by Lineeye Co., Ltd., adjust the response time by this instruction if necessary. Reference: <9.2 Communication Condition settings and Monitors> <4.4.3 Memory Switch MCU settings> 2-10 2.4 Confirming the I/O Contacts and Slot Number 2.4.1 The Role of Input/Output Contacts. Multi Communication Unit (MCU) has input/output contacts which enable communication with the CPU unit. (They are mainly used in the general-purpose serial communication.) These contacts play various roles, such as alerting the CPU unit when sending and reception have been completed, alerting when an error has occurred, or resetting the port of MCU. The contacts are turned on and off from the CPU unit, which also controls the timing of serial communication being carried out by the MCU. 2-11 2.4.2 Confirming the I/O Number Allocation Like other units, the Multi Communication Unit (MCU) also allocates inputs (X) and outputs (Y). Each MCU has 16 inputs and 16 outputs, for a total of 32 contacts. The I/O numbers and slot numbers are always necessary when creating a program. These vary depending on the position at which the unit is installed in the backplane. Always check to see if the numbers match the design. Confirming the I/O Number Allocations The occupied I/O areas for all of the units mounted between the CPU unit and the MCU should be confirmed. The next number is allocated as I/O areas for the MCU. Example: The following is an example of MCU being mounted in succession following three 16-point I/O units. Note: • Regardless of the mode settings for the COM. ports, the allocations of 16SX/16SY are necessary, however, when using the PC link/computer link only, it can be changed to 0 point (0SE) using the tool software. • If there are any empty slots between the CPU and the Multi Communication Unit (MCU), check to see whether an I/O area has been allocated to the empty slot. • If I/O mount allocation and automatic allocation are being carried out, 16 points for each type of allocation will automatically be assigned to empty slots. • If the CPU unit being used is a 2-module type, also check any I/O areas occupying the units incorporated in the CPU unit. Reference: For information on how I/O allocations are made, refer to <FP2/FP2SH Hardware Manual>. 2-12 2.4.3 Confirming Slot Number When mounted on the CPU backplane Slots are numbered in sequential order, with the slot to the right of the CPU unit being No. 0. Note: If the CPU unit being used is a 2-module type, the slot number of the units incorporated in the CPU unit should be counted as “0”. If the CPU unit being used is a CPU unit with S-LINK, the slot number of the unit incorporated in the CPU unit should be counted as “0” and “1”. When mounted on an expansion backplane The slot number of the slot to the right of the power supply unit on the expansion backplane should be counted as “16”. 2-13 2.4.4 Confirming Root No. If multiple Multi Communication Units (MCU) have been installed, they are labeled “Root No. 1”, “Root No. 2” and “Root No. 3” in sequential order, starting from the unit closest to the CPU unit. Root numbers are not used directly in the handling of the Multi Communication Unit, but if a Multi-wire Link Unit (when setting MEWNET-W mode or MEWNET-W2 mode), an ET-LAN unit or a computer communication unit is being used at the same time, these numbers are sometimes specified on the Multi-wire Link Unit or the ET-LAN unit side. Key Point: When the Multi Communication Unit is being used in the MEWNET-F mode, it is not counted as a Root No. Also when the MCU is being used in the general-purpose serial communication mode, it is not counted as a Root No. 2-14 Chapter 3 Installation and Wiring of Communication Blocks 3.1 Installation of Communication Blocks 1. Insert a communication block to the COM. port of the main unit. 2. Push the communication block into the main unit until it stops and tighten mounting screws. (Tightening torque: 0.4 N・m or less) 3-2 3.2 Wiring of Communication Blocks 3.2.1 FP2-CB232(AFP2803), FP2-CB422(AFP2804) D-sub connector and connector cover set comes with MCU. Use the attached set or equivalent. Accessories Manufacturer Product No. D-sub connector J.S.T. Mfg Co.,Ltd Equivalent to JEZ-9P Cover set J.S.T. Mfg Co.,Ltd Equivalent to J-C9-2C Note1) When using any cover set other than the attached one, the cover set should be the one of which width is 35 mm or less in order to avoid the interference with the connector cover of the COM. 1 and COM. 2. Note2) When using the attached cover set, the cable diameter should be 7 mm or less. Reference: For the details of the connection examples with external devices, <Chapter 6, Chapter 7 Communication Functions> For the details of the pin names of connectors, <2.2.1 Type of Communication Blocks> 3-3 3.2.2 FP2-CB485 (AFP2805) Accessory communication connector/Suitable wire The communication block AFP2805 has a screw-type terminal block. Use the following items for wiring. Accessory communication connector If additional connectors are needed, use the communication connector manufactured by Phoenix Contact. Phoenix Contact Co. product ID Number of pins Model No. Product No. 5 pins MC1, 5/5-ST-3, 5 1840395 Reference: For the details of the connection examples with external devices, <Chapter 6, Chapter 7 Communication Functions> For the details of the pin names of connectors, <2.2.1 Type of Communication Blocks> Suitable wire (twisted wire) Number of wires Size 1 AWG#28 to 16 Use the above wires shielded. It is recommended to ground the shielded part. Cross-sectional area 2 2 0.08mm to 1.25 mm Pole terminals If you wish to use pole terminals, Phoenix Contact offers the following models. Product number Manufacturer Cross-sectional area Size With insulating Without insulating sleeve sleeve 2 0.25 mm AWG#24 AI 0, 25-6 BU A 0,25-7 2 0.34 mm AWG#22 AI 0,34-6 TQ A 0,34-7 Phoenix Contact 2 0.50 mm AWG#20 AI 0, 5-6 WH A 0,5-6 Co. 2 0.75 mm AWG#18 AI 0, 75-6 GY A 0,75-6 2 1.00 mm AWG#18 AI 1-6 RD A 1-6 Pressure welding tool for pole terminals Phoenix Contact product ID Manufacturer Model No. Product No. Phoenix Contact Co. CRIMPFOX UD6 1204436 3-4 Screwdriver for terminal block To tighten the terminals of the communication connector, use a screwdriver by Phoenix Contact Co.(product no. 1205037, blade size 0.4 x 2.5, model no. SZS 0,4 x 2,5) or Manufactured by us(part no. AFP0806). The tightening torque should be 0.22 to 0.25 Nm (2.3 kgfcm to 2.5 kgfcm). Wiring method 1. Remove 7 mm of the wire’s insulation. 2. Insert wire into terminal hole until it stops. Tighten screw clockwise to fix wire in place. (Tightening torque: 0.22 Nm to 0.25 Nm (2.3 kgfcm to 2.5 kgfcm) Notes for wiring • When removing the wire’s insulation, be careful not to scratch the core wire. • Do not twist the wires to connect them. • Do not solder the wires to connect them. The solder may break due to vibration. • After wiring, make sure stress is not applied to the wire. • In the terminal block socket construction, if the wire is fastened upon counter-clockwise rotation of the screw, the connection is faulty. Disconnect the wire, check the terminal hole, and then re-connect the wire. 3-5 3.2.3 Selection of Cables The communication blocks to be selected vary depending on communication blocks. System using AFP2803, AFP2804 Appropriate electrical cables (twisted cables) Conductor Cross-sectional ResistType view Size ance (at 20°C) Shielded multicore cable 0.3 mm2 (AWG22) or greater Max. 58.8 Ω/km System using AFP2805 Appropriate electrical cables (twisted cables) Conductor Cross-sectional ResistType view Size ance (at 20°C) Shielded twisted pair 1.25 mm2 (AWG16) or greater 0.5 mm2 (AWG20) or greater Max. 16.8 Ω/km Max. 33.4 Ω/km Insulator Material Thickness vinyl chloride Max. 0.3 mm Cable diam. Sample appropriate cable Approx. 6.6 mm Onamba Co., Ltd. ONBD6×0.3mm2 Cable diam. Sample appropriate cable Approx. 8.5 mm Belden 9860 Hitachi Cable, Ltd. KPEVS1.25 mm2 x 1P Approx. 7.8 mm Belden 9207 Hitachi Cable, Ltd. KPEVS0.5 mm2 x 1P Insulator Material Polyethylene Polyethylene Thickness Max. 0.5 mm Max. 0.5 mm Note: • Use shielded twisted pair cables. • Use only one type of transmission cable. Do not mix more than 1 type. • Twisted pair cables are recommended in noisy environments. • When using shielded cable with crossover wiring for the RS485 transmission line, grounded one end. 3-6 Chapter 4 Communication Function 4.1 Communication Mode The following three types of communication function are available with FP2 Multi Communication Unit (MCU). 4.1.1 PC(PLC) Link Mode • MCU supports the PC(PLC) link of MEWNET-W0 mode. • In a PLC link, data is shared with all PLCs connected via MEWNET using dedicated internal relays called link relays (L) and data registers called link registers (LD). • If the link relay contact for one PLC goes on, the same link relay also goes on in each of the other PLCs connected to the network. Likewise, if the contents of a link register are rewritten in one PLC, the change is made in the same link register of each of the other PLCs connected to the network. • The status of the link relays and link registers in any one PLC is fed back to all of the other PLCs connected to the network, so control of data that needs to be consistent throughout the network, such as target production values and type codes, can easily be implemented to coordinate the data, and the data of all units are updated at the same time. - Applicable communication block RS232C FP2-CB232 (Product No.: AFP2803) RS485 FP2-CB485 (Product No.: AFP2805) Note) The number of units for the PC(PLC) link with RS232C is up to 2 units. Note: • Different hardwares are used for MEWNET-W0 and MEWNET-W/MEWNET-W2. They cannot be mixed in the same network. • Used link relays (L) and link registers (LD) are shared areas with MEWNET-W. Therefore, up to 2 units of MEWNET-W0 and MEWNET-W specified in the PLC link mode can be used for one CPU system. 4-2 4.1.2 General-purpose Serial Communciation Mode • In general-purpose serial communication, data is sent and received over the COM ports to and from an external device such as an image processing device or a bar code reader. • Data is read from and written to an external device connected to the COM port by means of an FP2/FP2SH ladder program. - Applicable communication block For 1:1 communication RS232C RS422 For 1:N communication RS485 (C-NET) FP2-CB232 FP2-CB422 FP2-CB485 (Product No.: AFP2803) (Product No.: AFP2804) (Product No.: AFP2805) 4.1.3 Computer Link Mode • Computer link is used for communication with a computer connected to the PLC. Instructions (command messages) are transmitted to the PLC, and the PLC responds (sends response messages) based on the instructions received. • A proprietary MEWNET protocol called MEWTOCOL-COM is used to exchange data between the computer and the PLC. There are two different communication methods, 1:1 and 1:N communication. A 1:N network is called a C-NET. • The PLC answers automatically to the commands received from the computer, so no program is necessary on the PLC side in order to carry out communication. - Applicable communication block For 1:1 communication RS232C RS422 For 1:N communication RS485 (C-NET) FP2-CB232 FP2-CB422 FP2-CB485 (Product No.: AFP2803) (Product No.: AFP2804) (Product No.: AFP2805) 4-3 4.2 Remote Control using Modem Modem initialization When the operation mode is set to the general-purpose serial communication/computer link mode, the modem can be initialized by specifying “able” for the modem initialization setting in the communication condition settings. There are 2 methods to set communication conditions as below. Type Timing for modem initialization command issue Method by MCU setting - When the power turns on. - When the mode is changed from PROG. to RUN. Method by F159 (MTRN) instruction When F159 (MTRN) instruction is executed. There are 2 commands for modem initialization as below. Firstly command 1 is sent to the modem and then command 2. Command Description Status of modem initialization 1. ATcR Initialization command H0: Not processed H0100: Initializing now H0200: Initialization completed. 2. ATSO=1cR Respond at the sound of a beep H20FF: Initialization failed. Reference: The status can be confirmed by using F161 (MRCV) instruction. <8.3 MCU Status Monitor> Operation flow of modem initialization Note: The initialization can be executed again if the above modem initialization command is issued even if the initialization has been completed once. In case any commands other than the above 2 commands are issued, any AT command can be issued in the general-purpose serial communication mode. 4-4 4.3 Settings Specify modes, communication conditions and unit numbers. 4.3.1 Operation Mode Setting Specify the mode for each COM. port. Mode setting PC(PLC) link General-purpose serial communication Computer link Mode speed setting switch A A A Memory switch MCU setting F159 (MTRN) N/A N/A N/A A N/A A (A: Available N/A: Not available) Reference: <4.4.3 Memory Switch> 4.3.2 Communication Condition Setting Specify the communication condition for each COM. port. The memory switch setting is made by the MCU setting or F159 (MTRN) instruction. Item Allowable setting value Initial value Setting Unit No. setting 0 to 15 (can be set for COM.1 port only) Note5) switch Unit No. 1 1 to 99 Memory switch Mode speed 9600, 19200, 115200 bps setting switch Baud rate 9600 300 to 230400 bps Only available when selecting memory Memory switch switch Character bit 7 bits, 8 bits 8 Memory switch Parity Odd, Even, Parity0, None Parity Odd Memory switch Stop bit length 1 bit, 2 bits 1 Memory switch RS/CS(only with Invalid/Valid Invalid Memory switch Note1) RS232C) Send Waiting time 0 to 100 ms (0.01 ms unit) 0 Memory switch Only for Header Not exist/Exist Not exist Memory switch generalSTX purpose cR, cR+Lf, ETX Termiserial Timeout (0.01 to 100 ms) cR Memory switch nator communi- Note2) In 0.01 unit cation Initialize modem Others No/Yes No Memory switch Note3) Note1) When setting the RS/CS to be invalid, the RS signals from MCU can be always received, and the CS signals are always ignored. Note2) If the terminator is set to “Timeout=0”, the data reception will complete when the time for more than approx. 3 characters has passed from the time that last data was received. 4-5 Note3) The setting for modem initialization becomes effective whenever the power supply turns on after it was specified by the MCU setting, and ATcr and ATS0=1cr is transmitted. If it failed, it is retried for 5 times. The communication format and baud rate is set to the allowable values for modem communication. Once the modem initialization succeed or failed, it is executed using the “Timing for modem initialization command issue”. Note4) Use a USB port at computer side when it is set to 230400 bps. If a RS232C port is used, communication is not possible due to a device open error. Note5) The default setting of the memory switch is 0 in the PC(PLC) link mode. 4.3.3 Unit No. Setting Specify unit No. Mode setting PC(PLC) link General-purpose serial communication COM. port COM. 1 - Unit No. setting switch 1 to 15 Memory switch MCU setting F159 (MTRN) 1 to 16 No need to specify No need to specify COM. 1 1 to 15 COM. 2 Not available Note) COM. 2 port cannot be used in PC(PLC) link mode. Computer link 4-6 1 to 99 1 to 99 4.4 How to Set How to set is as follows. Unit No. setting switch : Rotary switch at the back of the unit Mode speed setting switch : Dip switch at the back of the unit Memory switch : Setting by the internal memory (MCU setting/F159 (MTRN) instruction) 4.4.1 Unit No. Setting Switch Rotary SW at the back of the unit No. of Unit No. No. of Unit No. Unit No. Unit No. setting switch setting switch Note1) 0 Memory switch 8 8 1 1 9 9 2 2 A 10 3 3 B 11 4 4 C 12 5 5 D 13 6 6 E 14 7 7 F 15 Note1) Sets by the MCU setting and F159 (MTRN) instruction, and sets more than 15 unit numbers. The initial value of the memory switch is 1. (For PC(PLC) link, it is 0.) Note2) Only COM. 1 port can be set. (COM. 2 port is set by the memory switch.) 4.4.2 Mode Speed Setting Switch Dip SW at the back of the unit Port COM. 1 Switch No. 1 2 3 4 Spare OFF OFF PC(PLC) link ON OFF Operation General-purpose serial mode OFF ON communication Computer link ON ON 115200 bps OFF OFF 19200 bps ON OFF Baud rate 9600 bps OFF ON Memory switch ON ON Note) If selecting the setting in any shaded column, the setting error occurs. 5 OFF ON COM. 2 6 7 OFF OFF OFF ON ON ON OFF ON OFF ON 8 OFF OFF ON ON Note: When COM2 port is not used, use the factory default setting (initial condition). 4-7 4.4.3 Memory Switch Memory switch is a MCU internal memory for communication settings. There are two methods for setting, such as MCU setting and F159 (MTRN) instruction. What is MCU setting This is a setting display by the programming tool that is exclusive for FP2 Multi Communication Unit. The detailed settings for various communication conditions and unit No. etc, are available, however, the mode setting is not available. Setting procedure using FPWIN GR (Ver 2.4 or later version is necessary.) The MCU setting is not possible online. Go offline, and download after specifying the MCU setting. Note: When using FP2 CPU unit, the system register “No. 2 Configuration capacity setting” should be set to 2k word in advance. When using FP2SH, this setting is not necessary. 1. Start up “MCU setting” on the “Option” menu. 2. “MCU select the Slot No.” dialog box is shown. 3. Specify the communication conditions correctly in the display below. Setting using F159 (MTRN) instruction The communication conditions for each COM. port can be specified or changed by using F159 (MTRN) instruction during the ladder program. Reference: <8.2 Setting Communication Conditions and Monitoring> 4-8 4.4.4 Flow Chart 4-9 4.5 Timing for Transmission of Communication Setting Data 1. The MCU communication setting data by the tool is stored in the CPU during the program download. 2. The MCU communication setting data which is stored in the CPU unit is automatically set in the MCU when the power turns on, or when changing the mode PROG >RUN. 3. When a communication parameter is specified during the execution of F159 (MTRN) instruction, it is set in the MCU. Key Point: When setting the communication parameter in the MCU, the communication channel will be reset. (It takes about 1 second to complete the COM. port setting.) However, this operation is not applied in case of the PC(PLC) link mode. In the PC(PLC) link communication, only unit No. can be changed, and if the parameter is changed by F159 (MTRN) instruction, the communication will not be reset. Reset means “Abort sending” and “Clear receiving and error”. (However, some errors cannot be cleared.) Therefore, when the MCU setting is carried out by the tool, the data which is received in the PROG. mode will be all cleared when the mode is switched to the RUN mode. 4-10 Chapter 5 Communication Function: PC(PLC) Link 5.1 Overview of Funcation 5.1.1 What is PC(PLC) Link • The PLC link is an economic way of linking the maximum of 16 PLCs which are corresponding to MEWNET-W0, using a twisted-pair cable. • Data is shared between FP2, FP2SH and FPΣ using link relays (L) and link registers (LD). • The statuses of the link relays and link registers of one PLC are automatically fed back to the other PLCs on the same network. • PC(PLC) link is not the default setting. Therefore, the mode setting switch must be set to “PLC Link” in order to use this function. PC(PLC) link is only available for the COM.1 port. • Unit numbers and l/ink areas are allocated using the unit No. setting switch or setting tool. Note: • Different hardwares are used for MEWNET-W0 and MEWNET-W/MEWNET-W2. They cannot be mixed in the same network. Reference: For the details on the PC(PLC) link of FPΣ, refer to <Chapter 7 in FPΣ User’s Manual ARCT1F333>. 5-2 5.1.2 Operation of PC(PLC) link • Turning on a link relay contact in one PLC turns on the same link relay in all other PLCs on the same network. • Likewise, if the contents of a link register in one PLC are changed, the values of the same link register are changed in all PLCs on the same network. 5-3 5.2 Setting the Operation Mode and Baud Rate 5.2.1 Setting using Mode Speed Setting Switch PC(PLC) link (MEWNET-W0) are set using the mode speed setting switch. Setting PC(PLC) link mode COM. 1 1 2 ON OFF Note) COM. 2 port cannot be used for PC (`PLC) link mode. Setting communication format The setting for PC(PLC) link is fixed as below. (The setting made using the memory switch is ignored.) Setting Setting value Baud rate 115200 bps Character bit 8 bits Parity Odd Stop bit 1 bit RS/CS (Only when using RS232C) Invalid Send waiting time 0.00 ms Header STX not exist Terminator CR Initialize modem No Note: The mode speed setting switch is at the back of Multi Communication Unit. 5.2.2 Setting of Unti Numbers For the PC(PLC) link which connects multiple PLCs to the transmission line, the unit number must be specified so that each PLC can be identified. The unit number is specified either by using the unit number setting switch or the memory switch (F159 (MTRN), MCU setting). Note1) Unit numbers should be set sequentially and consecutively, starting from 1, with no breaks between them. If there is a missing unit number in the link system, the transmission time will be longer. Note2) If fewer than 16 units are linked, the transmission time can be shortened by setting the largest unit number in system register no. 47. Note: In case of PC(PLC) link, the default setting for the memory switch is 0. Change the setting to use it. Key Point: The priority order for station number settings is as follows: 1. Unit number settings switch 2. SYS1 instruction 3. System registers 5-4 Unit numbers are the numbers to identify the different PLCs on the same network. The same number must not be used for more than one PLC on the same network. If unit number setting switch is 0, the memory switch (F159 (MTRN), MCU setting) is valid. If unit number setting switch is a number other than 0, the unit number setting switch is valid, and the unit number setting with the memory switch is ignored. Note: When using the PC(PLC) link with FP2-CB232 (AFP2803) the number of units is up to two. Setting unit numbers with the setting switch The unit number setting switch is located at the back of the unit. The rotary switch can be used to set a unit number between 1 and 15. (With FP2-CB232 (AFP2803) a maximum of 2 unit number can be set.) Table of switch settings and related unit numbers Unit No. Unit No. setting switch 0 Memory switch Unit No. setting switch 8 Unit No. 8 Note) 1 1 9 9 2 2 A 10 3 3 B 11 4 4 C 12 5 5 D 13 6 6 E 14 7 7 F 15 Note) Sets by the MCU setting and F159 (MTRN) instruction, and sets more than 15 unit numbers. The default setting of PC(PLC) link is 1, therefore, the unit No. will be 0 without the setting with the memory switch, and PC(PLC) link will be unavailable. Setting using F159 (MTRN) Setting the unit number setting switch to 0 makes F159 (MTRN) setting valid. Reference: <8.2 Communication Conditions Settings and Monitor>. Setting using MCU setting Setting the unit number setting switch to 0 makes the MCU setting in the programming tool valid. Reference: <4.4.3 Memory Switch MCU Settings.>. Reference: For the details on the PC(PLC) link of FP, refer to <FP User’s Manual ARCT1F333>. 5-5 5.2.3 Link Relay and Link Register Allocations Link relays and link registers used with the PC(PLC) link function are allocated to the link area of CPU. The link area is allocated by specifying the system register for the CPU. System registers No. Name 45 Specification of range of link relays used for communication Specification of range of link registers used for communication Starting number for link relay transmission (No. of first word) Link relay transmission size Starting number for link register transmission (first number ) Link register transmission size 46 PC(PLC) link switching flag 47 Setting of max. unit No. for MEWNET-W0 PC(PLC) link 46 PC(PLC) link switching flag 40 41 For PC (PLC) link 0 42 43 44 Default value Setting range 0 0 to 64 words 0 0 to 128 words 0 0 to 63 0 0 to 64 words 0 0 to 127 0 Standard 0 Standard 0 to 127 words st Standard: 1 unit nd Reverse: 2 unit Note) 0 to 16 nd Standard: 2 unit st Reverse: 1 unit Specification of range of link relays used for 0 0 to 64 words communication Specification of range of link registers used for 51 0 0 to 128 words communication For PC Starting number for link relay transmission (PLC) 52 64 64 to 127 (No. of first word) link 1 53 Link relay transmission size 0 0 to 64 words Starting number for link register transmission 54 128 128 to 255 (first number) 55 Link register transmission size 0 0 to 127 words Note) 57 Setting of max. unit No. for MEWNET-W0 PC(PLC) link 0 0 to 16 Note) The same number must be specified as the maximum unit No. for all the PLCs with PC(PLC) link. The maximum link register transmission size is 127 words. It is not possible to set all the 128 words. 50 Link area configuration • Link areas consist of link relays and link registers, and are divided into areas for PC(PLC) link 0 and PC(PLC) link 1 and used with those units. • The link relay which can be used in an area for either PC(PLC) link 0 or PC(PLC) link 1 is maximum 1024 points (64 words), and the link register is maximum 128 words. Note: Link areas are the shared areas for MEWNET-W0 (supported by MCU) and MEWNET-W (supported by Multi-wire Link Unit). Therefore, the PC(PLC) link modes with MEWNET-W0 and MEWNET-W are limited up to 2 systems in the combination of PC(PLC) link 0 and 1. Reference: For the details on MEWNET-W, refer to <FP2 Multi-wire Link Unit Manual ARCT1F284>. 5-6 Example of allocation The areas for PC(PLC) link are divided into send areas and receive areas. The link relays and link registers are sent from the send area to the receive area of a different FP2/FP2SH/FPΣ. Link relays and link registers with the same numbers as those on the transmission side must exist in the receive area on the receiving side. For PC(PLC) link 0 Link relay allocation System registers Setting for various units No. 1 No. 2 No. 3 No. 4 40 Range of link relays used 64 64 64 64 42 Starting No. of word for link relay transmission 0 20 40 0 43 Link relay transmission size 20 20 24 0 Note) No. 40 (range of link relays used) must be set to the same range for all the units. No. Name Link register allocation System registers Setting for various units No. 1 No. 2 No. 3 No. 4 41 Range of link registers used 128 128 128 128 44 Starting No. for link register transmission 0 40 80 0 45 Link register transmission size 40 40 48 0 Note) No. 41 (range of link registers used) must be set to the same range for all the units. No. Name When link areas are allocated as shown above, the No. 1 send area can be sent to the No. 2, No. 3 and No. 4 receive areas. Also, the No. 1 receive area can receive data from the No. 2 and No. 3 send areas. No. 4 is allocated as a receive area only, and can receive data from No. 1, No. 2 and No. 3, but cannot transmit it to other stations. 5-7 For PC(PLC) link 1 Link relay allocation System registers Setting for various units No. 1 No. 2 No. 3 No. 4 50 Range of link relays used 64 64 64 64 52 Starting No. of word for link relay 0 84 104 64 53 Link relay transmission size 20 20 24 0 Note) No. 50 (range of link relays used) must be set to the same range for all the units. No. Name Link register allocation System registers Setting for various units No. 1 No. 2 No. 3 No. 4 51 Range of link registers used 128 128 128 128 54 Starting No. for link register transmission 0 168 208 0 55 Link register transmission size 40 40 48 0 Note) No. 41 (range of link registers used) must be set to the same range for all the units. No. Name When link areas are allocated as shown above, the No. 1 send area can be sent to the No. 2, No. 3 and No. 4 receive areas. Also, the No. 1 receive area can receive data from the No. 2 and No. 3 send areas. No. 4 is allocated as a receive area only, and can receive data from No. 1, No. 2 and No. 3, but cannot transmit it to other stations. Note: There is no area for PC(PLC) link 1 with FPΣ. Even when using the PC(PLC) link1 at MCU side, the link relays and link registers No. to be used at FPΣ side are WL0 to WL63 and LD0 to LD127. FP2: WL65 ⇔ WL1 : FPΣ LD200 ⇔ LD136 5-8 Partial use of link areas In the link areas available for PC(PLC) link, link relays with a total of 1024 points (64 words) and link registers with a total of 128 words can be used. This does not mean, however, that it is necessary to reserve the entire area. Parts of the area which have not been reserved can be used as internal relays and internal registers. Link relay allocation No. No. 40 No. 42 No. 43 Name Range of link relays used for PLC link Start address of link relay send area Size of link relay send area No. 50 20 20 With the above settings, the 14 words (224 points) consisting of WL50 to WL63 can be used as internal relays. Link register allocation No. No. 41 No. 44 No. 45 Name Range of link registers used for PLC link Start address of link register send area Size of link register send area No. 100 40 40 With the above settings, the 28 words consisting of LD100 to LD127 can be used as internal registers. Note: The above example shows the case for PC(PLC) link 0. 5-9 Note: Precautions When Allocating Link Areas If a mistake is made when allocating a link area, be aware that an error will result, and communication will be disabled. Avoid overlapping send areas When sending data from a send area to the receive area of another FP2/FP2SH/FPΣ, there must be a link relay and link register with the same number in the receive area on the receiving side. In the example shown below, there is an area between No. 2 and No. 3 which is overlapped, and this will cause an error, so that communication cannot be carried out. Example of link relay allocations System registers No. No. 40 No. 42 No. 43 Name Range of link relays used Starting word no. of link relay send area Size of link relay send area Set value of various control units No. 1 No. 2 No. 3 64 64 64 0 20 30 20 20 34 Invalid allocations The allocations shown below are not possible, neither for link relays nor for link registers: - Send area is split - Send and receive areas are split into multiple segments 5-10 Setting the largest unit number for a PC(PLC) link The largest unit number can be set using system register no. 47 (using system register no. 57 for PC(PLC) link 1). [Sample setting] No. of units linked 2 4 n Setting contents 1st unit: Unit no. 1 is set 2nd unit: Unit no. 2 is set A largest unit no. of 2 is set for each. 1st unit: Unit no. 1 is set 2nd unit: Unit no. 2 is set 3rd unit: Unit no. 3 is set 4th unit: Unit no. 4 is set A largest unit no. of 4 is set for each. Nth unit: Unit no. n is set A largest unit no. of n is set for each. Note: • Unit numbers should be set sequentially and consecutively, starting from 1, with no breaks between them. If there is a missing unit number, the transmission time will be longer. • If fewer than 16 units are linked, the transmission time can be shortened by setting the largest unit number in system register no. 47 (in system register no. 57 for PC(PLC) link 1). • For all PLCs which are linked, the same value should be set for the largest unit number. • If there are fewer than 16 units linked and the largest unit number has not been set (default=16), or the largest unit number has been set but the unit number settings are not consecutive, or the unit number settings are consecutive but there is a unit for which the power supply has not been turned on, the response time for the PLC link (the link transmission cycle) will be long Reference: <5.5 PC(PLC) Link Response Time>. Setting PC(PLC) link switching flag PC(PLC) link switching flag can be set using system register no. 46. If it is set to 0 (default value), the first half of the link relay (WL0 to WL63) and register (LD0 to LD127) is used for the first PC(PLC) link unit (PC link W0 or PC link W), and the second half of the link relay (WL64 to WL127) and register (LD128 to LD255) is used for the second PC(PLC) link unit. However, if it is set to 1, the second half of the link relay and register is used for the first PC(PLC) link unit (PC link W0 or PC link W). 5-11 5.3 Monitoring When using a PC(PLC) link, the operation status of the links can be monitored using the following relays. Transmission assurance relays For PC(PLC) link 0: R9060 to R906F (correspond to unit no. 1 to 16) For PC(PLC) link 1: R9080 to R908F (correspond to unit no. 1 to 16) If the transmission data from a different unit is being used with the various PLCs, check to make sure the transmission assurance relay for the target unit is on before using the data. Operation mode relays For PC(PLC) link 0: R9070 to R907F (correspond to unit no. 1 to 16) For PC(PLC) link 1: R9090 to R909F (correspond to unit no. 1 to 16) The operation modes (RUN/PROG.) can be checked for any given PLC. PLC link transmission error relay R9050 (link 1) to R9054 (link 5) This relay goes on if a problem is detected during transmission. Key Point: Monitoring the PLC link status In FPWIN GR, the PLC link status items, such as the transmission cycle time and the number of times that errors have occurred, can be monitored by selecting the PLC link switch on the FPWIN GR Status Monitor screen. Note: Remote programming of the linked PLCs is not possible. 5-12 5.4 Connection Example of PLC Link 5.4.1 When using three PLCs The following example demonstrates how the PLC can be connected to two other FPΣ PLCs using a PLC link connection. In the example shown here, link relays are use. When X1 of control unit no. 1 turns on, Y0 of unit no. 2 turns on. When X2 of unit no. 1 turns on, Y0 of unit no. 3 turns on. System register settings When using a PC(PLC) link, the settings are fixed as below. (The settings using the memory switch are ignored.) Setting Setting value Baud rate 115200 bps Character bit 8 bits Parity Odd Stop bit 1 bit RS/CS (Only when using RS232C) Invalid Send waiting time 0.00 ms Header STX not exist Terminator CR Initialize modem No Unit no. and communication mode settings - Setting for FPΣ of unit no. 1 Name COM port 1 unit no. COM port 1 communication mode - Setting for FP2 of unit no. 2 Name COM port 1 unit no. COM port 1 communication mode - Setting for FP2SH of unit no. 3 Name COM port 1 unit no. COM port 1 communication mode Set value 1 (setting using the unit no. setting switch) PC(PLC) link (system register No. 412) Set value 2 (setting using the unit no. setting switch) PC(PLC) link (using the mode speed setting switch) Set value 3 (setting using the unit no. setting switch) PC(PLC) link (using the mode speed setting switch) Key Point: Make sure the same unit number is not used for more than one of the PLCs connected through the PC(PLC) link function. The method of some settings for FP2/FP2SH is different from the method for FPΣ. Reference: For the details on PC(PLC) link of FPΣ, refer to <FPΣ User’s Manual ARCT1F333>. 5-13 Link area allocation - Link relay allocation System registers No. No. 40 No. 42 No. 43 Name Range of link relays used Starting no. of link relay send area Size of link relay send area Set value of various control units No. 1 No. 2 No. 3 64 64 64 0 20 40 20 20 24 - Link register allocation System registers No. No. 41 No. 44 No. 45 Name Range of link registers used Starting no. of link register send area Size of link register send area Setting the largest unit number No. Name No. 47 Largest unit number setting for PC(PLC) link Set value of various control units No. 1 No. 2 No. 3 128 128 128 0 40 80 40 40 48 Set value 3 Connection diagram Reference: For the details on PC(PLC) link of FPΣ, refer to <FPΣ User’s Manual ARCT1F333>. 5-14 5.4.2 Sample program - Control unit no. 1 When X1 is input, L0 of the link relay goes on, and when X2 is input, L1 of the link relay goes on. - Control unit no. 2 When L0 of the link relay goes on, Y0 is output. - Control unit no. 3 When L1 of the link relay goes on, Y1 is output. 5-15 5.5 PC(PLC) Link Response Time The maximum value for the transmission time (T) of one cycle can be calculated using the following formula. The various items in the formula are calculated as described below. � Ts (transmission time per station) Ts = scan time + Tpc (PLC link sending time) Tpc = Ttx (sending time per byte) x Pcm (PC(PLC) link sending size) Ttx = 1/(baud rate x 1000) x 11 ms …. Approx. 0.096 ms at 115.2 kbps Pcm = 23 + (number of relay words + number of register words) x 4 � Tlt (link table sending time) Tlt = Ttx (sending time per byte) x Ltm (link table sending size) Ttx = 1/(baud rate x 1000) x 11 ms …. Approx. 0.096 ms at 115.2 kbps Ltm = 13 + 2 x n (n = number of stations being added) � Tso (master station scan time) This should be confirmed using the programming tool. � Tlk (link addition processing time) …. If no stations are being added, Tlk = 0. Tlk = Tlc (link addition command sending time) + Twt (addition waiting time) + Tls (sending time for command to stop transmission if link error occurs) + Tso (master station scan time) Tlc = 10 x Ttx (sending time per byte) Ttx = 1/(baud rate x 1000) x 11 ms …. Approx. 0.096 ms at 115.2 kbps Twt = Initial value 400 ms (can be changed using SYS1 system register instruction) Tls = 7 x Ttx (sending time per byte) Ttx = 1/(baud rate x 1000) x 11 ms …. Approx. 0.096 ms at 115. 2 kbps Tso = Master station scan time Calculation example 1 When all stations have been added to a 16-unit link, the largest station number is 16, relays and registers have been evenly allocated, and the scan time for each PLCs is 1 ms. Ttx = 0.096 Each Pcm = 23 + (4 + 8) x 4 = 71 bytes Tpc = Ttx x Pcm = 0.096 x 71 ≒ 6.82 ms Each Ts = 1 + 6.82 = 7.82 ms Tlt = 0.096 x (13 + 2 x 16) = 4.32 ms Given the above conditions, the maximum value for the transmission time (T) of one cycle will be: T max. = 7.82 x 16 + 4.32 + 1 = 130.44 ms Calculation example 2 When all stations have been added to a 16-unit link, the largest station number is 16, relays and registers have been evenly allocated, and the scan time for each PLC is 5 ms Ttx = 0.096 Each Pcm = 23 + (4 + 8) x 4 = 71 bytes Tpc = Ttx x Pcm = 0.096 x 71 ≒ 6.82 ms Each Ts = 5 + 6.82 = 11.82 ms Tlt = 0.096 x (13 + 2 x 16) = 4.32 ms Given the above conditions, the maximum value for the transmission time (T) of one cycle will be: T max. = 11.82 x 16 + 4.32 + 5 = 198.44 ms 5-16 Calculation example 3 When all but one station have been added to a 16-unit link, the largest station number is 16, relays and registers have been allocated evenly, and the scan time for each PLC is 5 ms. Ttx = 0.096 Each Ts = 5 + 6.82 = 11.82 ms Tlt = 0.096 x (13 + 2 x 15) ≒ 4.13 ms Tlk = 0.96 + 400 + 0.67 + 5 ≒407 ms Note: The default value for the addition waiting time is 400 ms. Given the above conditions, the maximum value for the transmission time (T) of one cycle will be: T max. = 11.82 x 15 + 4.13 + 5 + 407 = 593.43 ms Calculation example 4 When all stations have been added to an 8-unit link, the largest station number is 8, relays and register have been evenly allocated, and the scan time for each PLC is 5 ms. Ttx = 0.096 Each Pcm = 23 + (8 + 16) x 4 = 119 bytes Tpc = Ttx x Pcm = 0.096 x 119 ≒ 11.43 ms Each Ts = 5 + 11.43 = 16.43 ms Tlt = 0.096 x (13 + 2 x 8) ≒ 2.79 ms Given the above conditions, the maximum value for the transmission time (T) of one cycle will be: T max. = 16.43 x 8 + 2.79 + 5 = 139.23 ms Calculation example 5 When all stations have been added to a 2-unit link, the largest station number is 2, relays and registers have been evenly allocated, and the scan time for each PLC is 5 ms. Ttx = 0.096 Each Pcm = 23 + (32 + 64) x 4 = 407 bytes Tpc = Ttx x Pcm = 0.096 x 407 ≒ 39.072 ms Each Ts = 5 + 39.072 = 44.072 ms Tlt = 0.096 x (13 + 2 x 2) ≒ 1.632 ms Given the above conditions, the maximum value for the transmission time (T) of one cycle will be: T max. = 44.072 x 2 + 1.632 + 5 = 94.776 ms Calculation example 6 When all stations have been added to a 2-unit link, the largest station number is 2, 32 relays and 2 register words have been evenly allocated, and the scan time for each PLC is 1 ms. Ttx = 0.096 Each Pcm = 23 + (1 + 1) x 4 = 31 bytes Tpc = Ttx x Pcm = 0.096 x 31 ≒ 2.976 ms Each Ts = 1 + 2.976 = 3.976 ms Tlt = 0.096 x (13 + 2 x 2) ≒ 1.632 ms Given the above conditions, the maximum value for the transmission time (T) of one cycle will be: T max. = 3.976 x 2 + 1.632 + 1 = 10.584 ms Note: • In the description, “stations that have been added” refers to stations which are connected between station no. 1 and the largest station number and for which the power supply has been turned on. • Comparing examples 2 and 3, the transmission cycle time is longer if there is one station that has not been added to the link. As a result the PC(PLC) link response time is longer. 5-17 5.6 Troubleshooting (PC(PLC) Link) Status indicator LEDs Indication Function Light (on): when PC(PLC) link error occurs ERR Red Communication error Off: when PC(PLC) link is established Light (on): when setting error occurs S. ERR Red Setting error Off: Normal Note) When the ERR LED lights out and the SD/RD-LED is flashing, the PC link is operating properly. Troubleshooting Trouble Transmission error Link stops (ERR LED lights) Contents to check How to confirm Check the special relays R9050 - Is a communication block to R9054 (transmission error installed? flag). - Is the wiring correct? - Isn’t there any problem in environments such as noise? Check the special registers Unit no. overlaps - Check unit Nos. for each unit. DT90161, DT90163 and (ERR LED lights) - Is the unit no. setting correct? (Are the unit Nos. set sequentially DT90165 (error content). and consecutively from 1? Isn’t there any overlapping unit no? Isn’t any number over 16 used for unit no?) Check the special registers PC link area overlaps - Check if there are overlapping DT90170, DT90200 and (ERR LED lights) send areas of each unit. - Is the setting of the send/receive DT90230. areas of PC link correct? (Isn’t it set to send redundantly?) Check the special registers PC link error - Is a communication block DT90160 to DT90247. (ERR LED lights) installed? - Is the wiring correct? - Isn’t there any problem in environments such as noise? Check the system register. Disagreement of max. unit no. - Check if the same value is set (ERR LED lights) for system register no. 47 (or no. 57) for each unit. - Is the maximum unit no. correct? (Is the same unit no. specified for all connected MCUs? Isn’t any no. over the maximum unit no. used?) Read out setting contents using S.ERR-LED is on. - Is the operation mode setting F161 (MRCV) instruction and correct? - Isn’t it used excessively ignoring check the contents. the usage restrictions? ALARM lights Hardware error Please contact your dealer. Note) The status can be monitored using the PC(PLC) link monitor of the MCU setting in abnormal conditions. 5-18 Chapter 6 Communication Function: General-purpose Serial communication 6.1 Overview of Funcation 6.1.1 What is General-purpose Serial Communication • In general-purpose serial communication, data is sent and received over the COM ports to and from an external device such as an image processing device or a bar code reader. • Data is read from and written to an external device connected to the COM port by means of a ladder program of the CPU unit. Outline of operation To send data to and receive it from an external device using the general-purpose serial communication function, the data transmission and data reception functions described below are used. The F159 (MTRN) instruction and the F161 (MRCV) instruction are used in these operations, to transfer data between the FPΣ and an external device. Sending data Data to be transmitted is stored in the register used as the send buffer. When F159 (MTRN) is executed, the data is output from the COM port. • The start and end code specified for the memory switch in the communication setting is automatically added to the data that has been sent. • The maximum volume of data that can be sent by MCU is 2048 bytes including the start and end code. 6-2 Receiving data Data received in the COM port is stored in the receive buffer of MCU, and the “reception done” flag goes on. When the “reception done” flag goes on, the data is copied in the operation memory in the CPU using F161 (MRCV) instruction. • Data can be always received in MCU. • When detecting the completion of data reception, the “reception done” flag X0 (X2) of MCU turns on. • When the data reception completes, the data can be copied in the operation memory of the CPU using the F161 (MRCV) instruction. • No end code is included in the stored data. • The maximum volume of data that can be received in MCU is 2048 bytes. 6-3 6.2 Setting the Operation Mode and Baud Rate 6.2.1 Setting using Mode Speed Setting Switch The operation mode is set using the mode speed setting switch. Setting general-purpose serial communication mode When COM. 1 and COM. 2 are both set to the general-purpose serial communication mode: COM. 1 COM. 2 1 2 5 6 OFF ON OFF ON • The general-purpose serial communication mode can be changed to the computer communication mode using the F159 (MTRN) instruction. Reference: <8.2 Setting Communication Conditions and Monitoring> Setting baud rate Baud rates for COM. 1 and COM. 2 ports are specified using the mode speed setting switch. The allowable baud rates specified with the switch are 9600 bps, 19200 bps and 115200 bps. The settings for each baud rate are as below. COM. 1 COM. 2 Baud rate 3 4 7 8 115200 bps OFF OFF OFF OFF 19200 bps ON OFF ON OFF 9600 bps OFF ON OFF ON Memory switch ON ON ON ON Note) The values specified with this switch will be effective when the power turns on. Setting communication format The other formats are as below. (Default settings) Setting Setting value Unit No. 1 Baud rate 9600 bps Character bit 8 bits Parity Odd Stop bit 1 bit RS/CS (Only when using RS232C) Invalid Send waiting time 0.00 ms Header STX not exist Terminator CR Initialize modem No Note) The above setting values can be changed using the memory switch. Note: The mode speed setting switch is at the back of Multi Communication Unit. 6-4 6.2.2 Setting using Memory Switch There are 2 kinds of settings available for the memory switch, which are the MCU setting using the programming tool and the setting using the F159 (MTRN) instruction. The mode speed setting switch should be set as below to enable the memory switch setting. Baud rate Memory switch COM. 1 3 4 ON ON COM. 2 7 8 ON ON Setting using F159 (MTRN) instruction Baud rate and communication format can be specified with this instruction. Reference: <8.2 Setting Communication Conditions and Monitoring> Setting using MCU setting The detailed settings are specified on the exclusive screen for FP2 Multi Communication Unit using the programming tool. Reference: <4.3 Settings and 4.4 How to set> Note: The unit No. setting is not available for the general-purpose serial communication mode. 6-5 6.3 I/O Allocation The flag information between MCU and the CPU unit is transmitted using X and Y. For this unit, 16 I/O each for X and Y, totally 32 I/O are allocated. I/O numbers are determined depending on the installation location and the I/O allocations of the other units. I/O numbers (when the unit is installed in the slot 0) Input signal Name Description COM. 1 COM. 2 X0 X2 Reception When MCU completes the data reception, it done flag turns on. When waiting for data reception: 0 When completing data reception: 1 X1 X3 PLC data When MRCV is completed, it is set/reset. reception Reading completes: 1 Note1) done flag No reading data: 0 X4 X5 Transmission When transmission is available: 1 Note2) done flag During transmission: 0 When transmission is completed: 1 X6 X7 Reception When MRCV is completed, it is set/reset. error Errors exist in the data read=1 Note1) No error exists in the data read=0 X8 X9 CTS signal Status of the CTS signal sent from the monitor device communicating with. Transmission is possible from MCU=0 Transmission is not possible from MCU=1 (0: OFF, 1: ON) Effective operation mode General-purpose serial communication Effective only when setting the RS/CS to be valid and using the communication block AFP2803 (RS232C type). General-purpose serial communication (Reception) The RTS signal from MCU is controllable by Y18 and Y19. XA XC Latest Set when an error occurs during the reception reception of data by MCU error No reception error: 0 Reception error: 1 The details of the reception error can be confirmed by reading out them to the PLC using MRCV instruction. Check X6/X7 to see whether there are errors in each receive buffer or not during multiple reception. XB XD Setting error Operation mode switch setting error All operation Usage restrictions for the unit (For the modes details on the errors which the settings exceed the limited values of PC link mode/computer link mode, refer to the exhibit.) XE XF CH reset Communication channels can be reset by General-purpose done turning on Y1E or Y1F. This flag is the serial signal of its completion. communication At completion: 1 When Y1E/Y1F is off: 0 Note1) This flag is effective after the execution of the F161 (MRCV) instruction until one of the following instructions is executed. 1: END instruction (Beginning of scan) 2: F161 (MRCV) instruction 3: Partial input instruction F143 (IORF) Note2) When the transmission is completed within one scan, it may not be 0. 6-6 Output signal COM. 1 COM. 2 Y10 to Y10 to Y17 Y17 Y18 Y19 Y1A to Y1D Y1E Y1A to Y1D Y1F Name Undefined RTS signal output Undefined Request to reset CH Description Do not turn on “undefined”. (Default setting is 0.) The transmission from the devices communicating with can be controlled by turning this output on. Permit the transmission from the devices communicating=0 Prohibit the transmission from the devices communicating=1 The CTS signal sent from the devices communicating can be monitored by X8 and X9. Do not turn on “undefined”. (Default setting is 0.) Communication channels can be reset by turning on Y1E or Y1F. No request to reset=0 Request to reset=1 (0: OFF, 1: ON) Effective communication None Effective only when setting the RS/CS to be valid and using the RS232C communication cassette. None General-purpose serial communication After 1 is output and the completion of the reset is confirmed by XE/XF, return to 0. The reset is performed only once when this signal rises. Details on the channel reset operation The following operations are performed. 1: Discontinues transmission 2: Discontinues reception 3: Clears receive buffer 4: Resets communication parameters 5: Clears error information (However, only errors which can be cleared) This function can be used to delete unnecessary received data or to clear errors before starting normal reception. Note) The operation to reset channels can be automatically performed by executing the following processes as well as Y1E/Y1F. 1: When setting/changing communication parameters using MTRN instruction. 2: When changing operation modes (switching between the general-purpose communication and the computer link) using MTRN instruction. 3: When turning the PLC power supply on, or when changing the mode from PROG. to RUN in case that the MCU setting has been done using the tool. However, the reset done signal of XE/YF does not turn on in the above case. 6-7 6.4 Communication with External Devices 6.4.1 Programming Example of General-purpose Serial Communication The F159 (MTRN) and F161 (MRCV) instructions are used to send and receive data via the specified COM port. F150 (READ) nor F151 (WRT) instruction which is effective with the serial data unit (AFP2460) is not available with MCU. Transmission of data The amount of data specified by “n” is sent to the external device from among the data stored in the data table, starting with the area specified by “S”, through the COM port specified by “D”. Data can be sent with the start code and end code automatically attached. A maximum of 2048 bytes can be sent. When the program below is run, the eight bytes of data contained in DT101 to DT104 and stored in the send buffer starting from DT100 are sent from COM port 1. MCU starts the transmission within 10 µs normally (within a maximum of 500 µs approx. in the PC(PLC) link mode) right after the execution of the instruction. Reception of data The data received in the communication port of MCU in the slot No. specified by “S” is read and stored in the data table saved by the specifications from “D1” to “D2”. A maximum of 2048 bytes can be received. In the program below, when X30 (reception done flag) (including the terminator data) turns on, the received data in the COM. 1 port of the MCU located in the slot 3 is stored from DT1 specified for the receive buffer. The number of received bytes is stored in DT0. 6-8 6.5 Data Transmission F159 (MTRN) Instruction Communication with external devices is handled through the data registers located in the CPU unit. Data to be output is stored in the register used as the send buffer (DT), and when the F159 (MTRN) instruction is executed, the data is output from the COM port specified by the MCU installed in the specified slot. The MCU starts the data transmission within 10 μs right after the F159 (MTRN) instruction is executed (when PC(PLC) link is performed, within approx. 500 μs at maximum). Sample program for sending data The following program transmits the characters “ABCDEFGH (Hex)” to an external device using COM port 1 in the slot 2. Data table for transmission (send buffer) The data table is specified using F159 (MTRN) instruction. The program described above is executed in the following sequence. 1) “ABCDEFGH” is converted to an ASCII code and stored in a data register. 2) The data is sent from COM port 1 using the F159 (MTRN) instruction. Explanatory diagram 6-9 Key Point: F95 (ASC) instruction The specified character string (12 characters) is converted to an ASCII code, and stored in the area of 6 words starting from the specified address. Terminator When the terminator is not necessary, the setting should be set to “None” on the MCU setting screen. Explanation of data table The data table for transmission starts at the data register specified in S. Transmission process When the execution condition of the F159 (MTRN) instruction turns on and the “transmission done” flag X4 (X5) is on, operation is as follows: 1. The set data is transmitted in order from the lower-order byte in S+1 of the table. • During transmission, the “transmission done” flag X4 (X5) turns off. (The flag does not turn off right after the execution of the instruction. It turns on when starting 2 scans. • If the header is set to “STX Exist”, the header is automatically added to the beginning of the data. • The terminator is automatically added to the end of the data. 2. When all of the specified quantity of data has been transmitted, the “transmission done” flag X4 (X5) turns on. Note) If The transmission time is shorter than the scan time, X4 (X5) may not turn on. When you do not wish to add the terminator (end code) during transmissions: • Specify the number of bytes to be transmitted using a negative number. • If you also do not wish to add a terminator to received data, set the memory switch to “Terminator None”. Programming example: The following program transmits 8 bytes of data without adding the terminator. 6-10 Key Point: • Do not include the terminator in the transmission data. The terminator is added automatically. • When “STX exist” is specified for the header, do not add the header to the transmission data. The header is added automatically. • When using the communication block (AFP2803 RS232C type) and setting the RS/CS to be valid, transmission does not take place until CS (Clear to Send) turns on. If you are not going to connect to the other device, set the RS/CS to be invalid. • The maximum number of transmission bytes “n” is 2048. (However, the header and terminator are included.) When using the header and terminator subtract the byte numbers for them. • The contact numbers in parentheses refer to COM port 2. Reference: <9.2 Appendix (Time Chart)> Note: Followings can be set using F159 (MTRN) as well as the data transmission. 1. Switching the applications of COM port. 2. Communication conditions. Reference: <Chapter 8 Applications) > <9.6 F159 (MTRN)/F161 (MRCV) instructions> 6-11 6.6 Data Reception F161 (MRCV) Instruction The “reception done” flag X0 (X2) turns on when MCU receives data. The received data is read from MCU to the PLC using F161 (MRCV) instruction. MCU supports full duplex communication. Even if the data reception is completed, the data for 8 buffer can be received consecutively. It is not necessary to execute F159 (MTRN) instruction again to start the reception. The number of data which MCU can receive is 2048 bytes for 1 buffer (including the terminator). Data table for reception (receive buffer) The data table is specified using F161 (MRCV) instruction. Sample program for receiving data 10-byte data received in MCU through COM. 1 port of the MCU in the slot 1 are copied to DT200. The program described above is executed in the following sequence. 1) Data is received through COM. 1 port and the completion of the data reception is detected. 2) The “reception done” contact turns on. The input of X10 turns on. 3) The received data is sent from the receive buffer to the area starting with data register DT200. Explanation of data table Data sent from an external device connected to the COM port is received in MCU, and the data reception is completed, the “reception done” signal X0 (X2) turns on. When F161 (MRCV) instruction is executed using the “reception done” signal, the data is stored in the receive buffer specified by MRCV instruction. • Registers are used as the receive buffer. They are specified using the second and third operand of F161 (MRCV) instruction. • Specify the data registers in system register 416 to 419. • The number of bytes of data received is stored in the starting address of the receive buffer. The initial value is not necessary. • Received data is stored in the received data storage area in order from the lower -order byte. • The receive buffer should be specified to be larger than the supposed data to be received. • If the number of received data cannot be stored in the specified area, the data is copied within that range only and an operation error occurs. (When the received byte numbers are odd number, the higher byte of the last word is always cleared.) 6-12 Reception process When data is sent from an external device, the data is stored in the buffer in MCU as below. (1) Header and terminator is not stored. (2) When the terminator is received, the “reception done” flag X0 (X2) turns on, and subsequently the next data received are stored in the MCU internal buffer. 8 data of 2048 bytes can be received consecutively. (3) Data is copied in the area specified using the operand when F161 (MRCV) instruction is executed, and the “reception done” flag X0 (X2) turns off. However, note that the “reception done” flag X0 (X2) actually turns off at the beginning of the next scan or later when the I/O is refreshed. When multiplex reception is carried out, the reception done status (status which X0 (X1) is on) remains after the received data are copied using MRCV instruction, therefore, the received data cannot be copied by rising the “reception done” signal. For repeated reception of data, perform the following steps 1 to 3: 1. Receive data 2. Reception done X0 (X2): on 3. Execute F161 (MRCV) instruction to read the received data from MCU Prepare for reception Any special preparation is not necessary to receive data, however, if you want to clear the receive buffer when the first data is received, Y1E (Y1F) must be turned on and the communication channel must be reset. After the completion of the resetting, XE (XF) turns on. Then turn off the request to reset Y1E (Y1F). In this case, the area specified using F161 (MRCV) instruction is not cleared. Key Point: The contact numbers in parentheses refer to COM port 2. Reference: <9.2 Appendix (Time Chart)> Note: Followings can be set using F159 (MTRN) as well as the data reception. 1. Monitoring of communication conditions 2. Monitoring of MCU status Reference: <Chapter 8 Applications> <9.6 F159 (MTRN)/F161 (MRCV) instructions> 6-13 6.6.1 Data to be Sent/Received with MCU Remember the followings when accessing data in the MCU send and receive buffers: • If a header has been chosen in the communication format settings, the code STX (H02) will automatically be added at the beginning of the data begin sent. • The data without the Code STX at the reception is stored in the receive buffer, and the “reception done” flag turns on when the terminator is received. However, if the code STX is added in the middle of the data, the data is stored from the beginning of the receive buffer. • A terminator is automatically added to the end of the data being sent. • There is no terminator on the data stored in the receive buffer. Sending data: Data written to the send buffer will be sent just as it is. Example: The data “12345” is transmitted as an ASCII code to a device with RS232C port. 1. Data sent using the F95 (ASC) instruction should be converted to ASCII code data. 2. If DT100 is being used as the send buffer, data will be stored in sequential order in the data registers starting from the next register (DT101), in two-byte units consisting of the upper and the lower byte. Receiving data: Data received using F161 (MRCV) instruction will be copied as it is and stored in specified data registers. Example: The data “12345CR” is transmitted from a device with RS232C port. • If DT200 is being used as the beginning of the receive buffer, received data will be stored in the registers starting from DT201, in sequential order of first the lower byte and then the upper byte. 6-14 6.6.2 Flag Operation in Serial Communication Header: No-STX, Terminator: CR Receiving data: The “reception done” flag, the “transmission done” flag, the MTRN instruction and MRCV instruction are related as follows: • For general-purpose serial communication, full duplex transmission must be used. • Receiving data still continues after the “reception done” flag turned on. There are 8 receive buffers of 2048 bytes each internally, therefore, data for the amount of these 8 sets can be received. • Data for the specified byte numbers is transmitted to MCU and the request to send is given when executing F159 (MTRN) instruction. Transmission starts right after the execution of MTRN instruction. (within 10 µs normally, within 500 µs when using PC(PLC) link) • Duplex transmission is disabled for the same COM. port after F159 (MTRN) is being executed until transmission is completed. The “transmission done” flag X4 (X5) must be observed. The “transmission done” flag does not turn off right after the execution of MTRN instruction. It will be turned off at the beginning of the next scan or later. • When an error is detected in the received data, the error flag XA (XC) turns on. Note: Be aware that although the “reception done” flag X0 (X2) normally changes at the beginning of a scan, it changes even while a scan is in progress if an instruction to refresh partially for MCU is executed. Key Point: The contact numbers in parentheses refer to COM port 2. The input contact numbers of MCU such as the “transmission done” flag X4 (X5) or the “transmission done” flag X0 (X2) indicate 0 when the MCU is installed in the slot 0. If the MCU is installed any other slots, specify the slot number where it is installed. 6-15 Header: STX, Terminator: ETX Receiving data: The “reception done” flag, the “transmission done” flag, and the MTRN instruction are related as follows: • The data is stored in the receive buffer within MCU in sequential order. When the header is received, the receive pointer is initialized. • Receiving data still continues after the “reception done” flag turned on. There are 8 receive buffers of 2048 bytes each internally, therefore, data for the amount of these 8 sets can be received. • If there are two headers, data following the second header overwrites the data in the receive buffer. • The “reception done” flag X4 (X5) is turned off when no data is received after executing F159 (MTRN) instruction. (It does not turn off right after the execution of MTRN instruction. It will be turned off at the beginning of the next scan or later.) Key Point: There is no relevance between the operation of transmission by F159 (MTRN) instruction and the operation of reception by F161 (MRCV) instruction. MCU can always receive data. • In case of transmission, a request to send is given to MCU using F159 (MTRN) instruction. • In case of reception, received data are copied from MCU using F161 (MRCV) instruction. 6-16 Sending data: The “reception done” flag, the “transmission done” flag, and MTRN instruction are related as follows: • Header (STX) and terminator (ETX) are automatically added to the data being transmitted. The data is transmitted to an external device. • When the F159 (MTRN) instruction is executed, the “transmission done” flag X4 (X5) goes off. • F159 (MTRN) instruction is used to copy the transmitted data to MCU and request transmission. Duplex transmission is disabled for the same COM. port while MCU is sending data. The “transmission done” flag X4 (X5) must be observed. Key Point: • The contact numbers in parentheses refer to COM port 2. 6-17 6.7 Connection with 1:1 Communication (General-purpose Serial Communication) Usable communication blocks It is used with all the communication blocks below. • FP2-CB232 AFP2803 (RS232C) • FP2-CB422 AFP2804 (RS422) • FP2-CB485 AFP2805 (RS485) Setting communication format Settings for COM. port Item Allowable setting value Communication mode General-purpose serial communication Baud rate 300 to 230400 bps Character bit 7 bits, 8 bits Parity Odd, Even, Parity0, None Stop bit length 1 bit, 2 bits RS/CS(only with RS232C) Invalid/Valid Send waiting time 0 to 100 ms (0.01 ms unit) Header STX STX not exist/STX exist Only for general-purpose cR, cR+Lf, ETX serial communi- Terminator Timeout (0.01 to 100 ms) cation In 0.01 ms unit Initialize Others No/Yes modem Note) The setting must be done according to the devices connected. Reference: For the details on the method to set, <4.4 How to Set> 6-18 6.7.1 Connection Example with External Device <1:1 Communication with Micro-Imagechecker> Overview The MCU and Micro-Image checker A200/A100 are connected using an RS232C cable. The results of the scan are stored in the registers of the FP2/FP2SH2/FP2SH. • After the scan start code “%SCR” has been sent from the FP2 side, the scan result is returned from the Micro-Imagechecker as the response. Communication format settings for Micro-Image checker To set the communication mode and communication format settings for the Micro-Image checker, select “5: communication” under “5: ENVIRONMENT” on the main menu, and the set the following items. No. Name Set Value No. 51 Communication mode Normal mode 9600 bps No. 52 Serial settings Baud rate: …………. 8 bits Bit length: ………….. 1 bit Stop bit: …………….. Odd Parity : ………….…... None Flow control: ……….. No. 53 Serial output settings Output digit: ………… 5 column Invalid Digit: ………. Repl. 0 Read End: …..……… None Process End: ………. None Numerical calculation: Output Judgment: …………. Output Key Point: • If “Del” is specified for the invalid processing parameter, zero suppression processing will be carried out on the output data, and the output format will be changed. Always make sure “Repl. 0” is specified. • When outputting data to an external device, numerical calculation is required, so “Out” should be specified for the “Numerical calculation” parameter. • With the above settings, the following data will be output from the Micro-Image checker. 6-19 Connection example with Micro-Image checker A200/A100 <Using AFP2803> RS232C is connected. Connection example with other RS422 device <Using AFP2804> Reference: For the details on the connection with RS485 devices, refer to <6.8 Connection with 1:N Communication (General-purpose Serial Communication)> 6-20 Procedure of communication In the following example, the Micro-Image checker is connected to COM. 1 port of the MCU in slot 0. 6-21 Sample program In the following example, the Micro-Image checker is connected to COM port 1. Buffer statuses The following shows the statuses of the send and receive buffers when the sample program is run. 6-22 6.7.2 Connection Example with External Device <1:1 Communication with FP Series PLC > Overview Connect the FP2/FP2SH and another FP series PLC using the RS232C interface and the MEWTOCOLCOM communication protocol. • When the data area read command “%01#RDD00000 00001**CR” is sent from the FPΣ side, the values of the data register of the PLC connected to the system are sent as a response. For example, if the value K100 is stored in DT0 and the value K200 is stored in DT1 of the PLC, “%01$RD6400C8006F CR” is sent as a response to the command. If there is an error, “%01!○○** CR” is returned (○○ is the error code). • In addition to data area read and write commands, MEWTOCOL-COM also provides contact area read and write as well as many other commands. System register settings of FP series PLCs (FP1, FP1 side) In the default settings, the COM port is set not to be used. For 1:1 general-purpose serial communication, the system registers should be set as shown below. Communication format settings for FP series PLC (FP0, FP1) No. Name Set Value No. 412 COM port 1 selection of communication mode Computer link No. 413 * Communication format for COM port Character bit: …… 8 bits Parity check: ….. Odd Stop bit: ………… 1 bit Terminator: …….. CR Header: ………… STX not exist No. 414 * Baud rate for COM port 19200 bps * These settings should be the same as the settings of the connected MCU. Connection to FP series PLCs (FP0, FP1) <Using AFP2803> RS232C • - Connection with FP0 COM port 6-23 - Connection with FP1 COM port Procedure of communication In this example, an FP series PLC is connected to the COM. 1 port of MCU in the slot 3. K100 and K200 are respectively being stored in DT0 and DT1 of the PLC on the other end. 6-24 Sample program In the following example, the FP series PLC is connected to COM port 1 in the slot 3. (The contact of MCU is WX3/XY4.) Buffer statuses The tables below show the statuses of the send and receive buffers when the sample program is run. 6-25 Key Point: Contents of the response: If K100 is stored in DT0 and K200 is stored in DT1 of the FP series PLC on the other end, “%01$RD6400C8006FCR” is returned from the FP series PLC on the other end as the response when the program is executed. The received data is stored in the data registers as shown below. Extracting the data register values from the PLC on the other end In the program, the data segment of the response from the PLC on the other end is converted to hexadecimal data using the F72 (AHEX) (hexadecimal ASCII → hexadecimal data conversion) instruction and stored in DT50 and DT51, only if the character string “$1” stored in DT1 is detected as a comparison instruction If an error occurs, “%01!○○□□CR” is returned as the response (○○ is the error code and □□ is the BCC). 6-26 The values of DT50 and DT51 are written in DT0 and DT1 of the PLC connected to the COM. 2 port in the slot 0. 6-27 6.8 1:N Communication (General-purpose Serial Communication) Overview Multi Communication Unit (MCU) and the external units having unit numbers are connected using an RS485 cable. Using the protocol that matches the external units, the F159 (MTRN) and F161(MRCV) instructions are used to send and receive data. Usable communication blocks • FP2-CB485 AFP2805 (RS485) Setting communication format Settings for COM. port Item Allowable setting value Communication mode General-purpose serial communication Baud rate 2400 to 230400 bps Character bit 7 bits, 8 bits Parity Odd, Even, 0 parity, None Stop bit length 1 bit, 2 bits RS/CS(only with RS232C) Invalid/Valid Send waiting time 0 to 100 ms (0.01 ms unit) Header STX STX not exist/STX exist Only for general-purpose cR, cR+Lf, ETX serial communi- Terminator Timeout (0.01 to 100 ms) cation In 0.01 ms unit Initialize Others No/Yes modem Note1) The setting must be done according to the devices connected. Note2) Connect the “-“ terminal and the “E” terminal with a lead wire to make the termination resistance of the AFP2805 effective. Reference: For the details on the method to set, <4.4 How to Set> 6-28 6.9 Troubleshooting (General-purpose Serial Communication) Status indicator LEDs Indication Function Light (on): when reception error occurs ERR Red Communication error Off: when received data was retrieved Light (on): when setting error occurs S. ERR Red Setting error Off: Normal Note) The details can be checked by monitoring the MCU status using F161 (MRCV) instruction. Troubleshooting Trouble Communication is not possible. (ERR LED lights) S. ERR lights Transmission is not possible. Reception is not possible. ALARM lights Contents to check Is a communication block installed? Is the wiring correct? Isn’t there any problem in environments such as noise? - Is the operation mode setting correct? - Isn’t it used excessively ignoring the usage restrictions? Isn’t the request to send given redundantly during transmission? In case of RS232C communication block, isn’t transmission forbidden by CTS signal? Isn’t operation error occurring when executing MTRN instruction? Is the setting for the communication conditions the same as the one for the device communicated? Is the setting of the method for detecting “reception done” the same as the one for the device communicated? Isn’t reception error occurring? Isn’t the reception buffer FULL error occurring? If the error occurs, the operation cannot be restarted without performing CH reset. Is the operation mode generalpurpose communication? (Has the operation mode been changed using MTRN instruction?) When data is not received properly: (Isn’t it multiplex reception? Isn’t there garbage in the buffer caused by noise or something?) Hardware error How to confirm Check if the communication block is installed firmly. Check the wiring again. Check the shielding. Read out and check the status using F161 (MRCV) instruction. Review the program. Check the setting reading the status using F161 (MRCV) instruction. Check the setting reading the status using F161 (MRCV) instruction. Review the program. Check the setting reading the status using F161 (MRCV) instruction. Please contact your dealer. 6-29 6-30 Chapter 7 Communication Function: Computer link 7.1 Overview of Function 7.1.1 What is Computer Link The computer link mode is used as a communication interface that allows data to be read and written between an device such as a personal computer or display panel and a CPU unit. Can be connected to a display panel and computer. Enables a 1:1 connection to a display panel and computer. No software program is needed for communication. Economic peer-to-peer communication with a personal computer is possible. This unit can be directly connected with a personal computer through RS232C to collect and write data from it without building up a large-scale network. No communication program is needed on the PLC. The PLC automatically returns responses using the FP series’ MEWTOCOL-COM communication protocol so that there is no need to prepare a communication program at the side of the PLC. Connection with Modem It is possible to receive data over telephone lines from another PLC, by connection modem with your PLC. (Receiving only) Key Point: “C-NET link” is a communication function with 1:N communication (maximum of 99 units can be connected). When setting to 230400 bps, a USB port should be used at a computer side. When connecting with a RS232C port, the communication is not carried out due the occurrence of a device open error. 7-2 7.1.2 Unit Operation Operation overview of computer link mode (1:1 communication) The computer link mode is a function to read and write data and contact of the CPU unit by the host computer. When an command is sent from a host side, a response is returned from the PLC side. The formats of commands and responses are determined by the MEWTOCOL-COM, which is the communication protocol for the FP series of PLCs. Programs for host side devices such as computers and display panels are created in accordance with the protocol “MEWTOCOL-COM”. More than 20 types of commands are available, including commands for reading and writing the data area and contacts, etc. No program is necessary on the PLC side in order to carry out communication. Example: When the contents of the data registers are read to a host computer Operation Overview of computer link mode (C-NET 1:N communication) For a 1:N computer link, the computer is connected through a commercially available RS232C-RS485 conversion adapter, and the respective PLCs are wired using an RS485 cable. The computer and the PLC communicate via commands and responses: The computer sends a command specifying the unit number, and the PLC with that unit number sends a response back to the computer. Note) Lineeye SI-35 is recommended to be used as a conversion adapter. 7-3 Key Point: The display panel for the FP series was designed ahead of time in conformance with the MEWTOCOLCOM communication protocol, so there is no need to take the contents of commands into consideration. MEWTOCOL-COM communication protocol for FP series are generally configured as shown below. 7-4 7.2 Setting the Operation Mode and Baud Rate 7.2.1 Setting using Mode Speed Setting Switch The operation mode is set using the mode speed setting switch. Setting general-purpose serial communication mode When COM. 1 and COM. 2 are both set to the general-purpose serial communication mode: COM. 1 COM. 2 1 2 5 6 ON ON ON ON • The computer link mode can be changed to the general-purpose serial communication mode using the F159 (MTRN) instruction. Reference: <8.2 Setting Communication Conditions and Monitoring> Setting baud rate Baud rates for COM. 1 and COM. 2 ports are specified using the mode speed setting switch. The allowable baud rates specified with the switch are 9600 bps, 19200 bps and 115200 bps. The settings for each baud rate are as below. COM. 1 COM. 2 Baud rate 3 4 7 8 115200 bps OFF OFF OFF OFF 19200 bps ON OFF ON OFF 9600 bps OFF ON OFF ON Memory switch ON ON ON ON Note) The values specified with this switch will be effective when the power turns on. Setting communication format The other formats are as below. (Default settings) Setting Setting value Unit No. 1 Baud rate 9600 bps Character bit 8 bits Parity Odd Stop bit 1 bit RS/CS (Only when using RS232C) Invalid Send waiting time 0.00 ms Header STX not exist Terminator CR Initialize modem No Note) The above setting values can be changed using the memory switch. Note: The mode speed setting switch is at the back of Multi Communication Unit. 7-5 7.2.2 Setting using Memory Switch There are 2 kinds of settings available for the memory switch, which are the MCU setting using the programming tool and the setting using the F159 (MTRN) instruction. The mode speed setting switch should be set as below to enable the memory switch setting. Baud rate Memory switch COM. 1 3 4 ON ON COM. 2 7 8 ON ON Setting using F159 (MTRN) instruction Baud rate and communication format can be specified with this instruction. Reference: <8.2 Setting Communication Conditions and Monitoring> Setting using MCU setting The detailed settings are specified on the exclusive screen for FP2 Multi Communication Unit using the programming tool. Reference: <4.3 Settings> and <4.4 How to set> 7-6 7.2.3 Setting of Unit Numbers (C-NET 1:N Communication) In the C-NET link that connects multiple PLCs on the same transmission line, the unit number must be set in order to identify the different PLCs. The unit number is specified either by using the unit number setting switch or the memory switch (F159 (MTRN), MCU setting). Key Point: The priority order for unit number settings is as follows: 1. Unit number settings switch 2. F159 (MTRN) 3. MCU setting Unit numbers are the numbers to identify the different PLCs on the same network. The same number must not be used for more than one PLC on the same network. If unit number setting switch is 0, the memory switch (F159 (MTRN), MCU setting) is valid. (Default setting: 1) If unit number setting switch is a number other than 0, the unit number setting switch is valid, and the unit number setting of the MCU setting is ignored. Note: The unit number should be set to 1 in the 1:1 communication mode. Reference: For the details on the PC (PLC) link of FPΣ, refer to <FPΣ User’s Manual ARCT1F333>. 7-7 Setting unit numbers with the setting switch The unit number setting switch is located at the back of the unit. The rotary switch can be used to set a unit number between 1 and 15. Table of switch settings and related unit numbers Unit No. Unit No. setting switch 0 Memory switch Unit No. setting switch 8 Unit No. 8 Note1) 1 1 9 9 2 2 A 10 3 3 B 11 4 4 C 12 5 5 D 13 6 6 E 14 7 7 F 15 Note1) Sets by the MCU setting and F159 (MTRN) instruction, and sets more than 15 unit numbers. The default setting of the memory switch is 1. Note2) Only COM. 1 port can be specified. (COM. 2 port is specified using the memory switch.) Setting using F159 (MTRN) instruction Baud rate and communication format can be specified with this instruction. Reference: <8.2 Setting Communication Conditions and Monitoring> Setting using MCU setting The detailed settings are specified on the exclusive screen for FP2 Multi Communication Unit using the programming tool. Reference: <4.4.3 Memory Switch MCU Setting> 7-8 7.3 Connection with Serial Devices Example of the connection with our operation display panel <Using RS232C (communication block: FP2-CB232) (AIGT0030**) <Using RS422 (communication block: FP2-CB422) (AIGT0032**) <Using RS485 (communication block: FP2-CB485) (1:1 connection) (AIGT0032**) Note: • A shielded cable must be used as the communication cable. In a noisy environment, measures against noise should be taken, such as using a ferrite core. Take care for the shielded part not to be bare to avoid noises such as static electricity. • Unit numbers, transmission distance and baud rate vary depending on connected devices. Check them in an actual operation. Reference: For the details on transmission distance, refer to <2.3.2 Communication Specifications> 7-9 7.3.1 Communication Conditions and Restrictions Relating to Functions Precautions when Using the FP2 CPU Unit <1> If the processing of commands and responses sent from a host computer or display panel extends over multiple frames, a busy error (error code 53) will be returned to other ports if communication is currently being carried out on one port, and communication will be inhibited on those other ports. Combinations to which this restriction applies are shown in the diagram below. Group A ….. Group comprising the tool port of the CPU unit and the COM. 1 port of Multi Communication Unit (MCU) Group B ….. Group comprising the COM port of the CPU unit and the COM. 2 port of Multi Communication Unit (MCU) A similar restriction also applies if access is being made from another station connected with the link unit. Key Point: “Multiple frames” means that, if a command or response exceeds 118 bytes, the command or response is divided into multiple segments and transmitted or received. For example, this applies in cases such as when a program is read from a tool port, when commands, which continuously read multiple data, are transmitted from a host side. If using the FP2SH CPU unit, the above restriction does not apply. 7-10 Precautions when Using the FP2 CPU Unit <2> Of the commands sent from a host computer or display panel, if the monitor commands (the MC, MD, and MG codes) are used, they cannot be read accurately if two or more devices within the same group are connected. Group A ….. CPU unit tool port Group B ….. CPU unit COM. port Group C ….. COM. 1 port group of Multi Communication Unit (MCU) Group D ….. COM. 2 port group of Multi Communication Unit (MCU) A similar restriction also applies if access is being made from another station connected with the link unit. Note: If a monitor command is used for a port in the same group, registered data will be rewritten in sequential order starting from the most recent data, and different data will end up being monitored. Key Point: Monitoring commands are commands used to implement monitoring after the contact or data to be monitored has been registered on the PLC side. The above restriction does not apply if the FP2SH CPU unit is being used. 7-11 7.4 Table of MEWTOCOL Command The following is a table of MEWTOCOL commands that can be used with the FP2 Multi Communication Unit (MCU). 7.4.1 MEWTOCOL-COM Commands RCS WCS RCP WCP RCC WCC SC RD WD SD RS WS RK WK MC MD MG RR WR RT RM AB Read single point of contact information Write single point of contact information Read plural points of contact information Write plural points of contact information Read word unit of contact information Write word unit of contact information Preset word unit in contact area Read data area Write data area Preset of data area Read timer and counter set value area Write timer and counter set value area Read timer and counter elapsed value area Write timer and counter elapsed value area Registration and reset of monitor contact Registration and rest of monitor data Monitor execution Read system register Write system register Read PLC status Remote control (RUN/PROGRAM mode switching) Transmission abort command 7.4.2 Table of MEWTOCOL-COM Error code 40 41 42 43 BCC error Format error NOT support error Multi frame process error 53 Busy error 60 61 Parameter error Data error 62 Registration over error 63 65 PC mode error Protect error 66 67 Address error Missing program error/Missing data error 7-12 Transmission error occurred in received data. Command that does not match the format was received. An unsupported command was received. Another command was received during the processing of multiframe. Command process cannot be received due to the processing of multi-frame, or as the command during processing is busy. Specified parameter does not exist, or cannot be used. There is an error in the contact, data area, data number, size, range or format specification. Number of registration exceeded the restriction, or operation is performed without registration. Invalid command was executed in RUN mode. Write operation was performed to the program area or system register in the protect (such as password setting or dip SW) mode or ROM operation mode. There is an error in the specified address data. Program cannot be read as there is no program in program area or an error in memory contents. Or unregistered program was read. 7.5 Troubleshooting (Computer Link) Status indicator LEDs Indication Function Light (on): when reception error occurs ERR Red Communication error Off: when received data was retrieved. Light (on): when setting error occurs S. ERR Red Setting error Off: Normal Note) The details can be checked by monitoring the MCU status using F161 (MRCV) instruction. Troubleshooting Trouble Communication is not possible. (ERR LED lights) S. ERR lights Transmission is not possible when RD of MCU is flashing. ALARM lights Contents to check - Is a communication block installed? - Is the wiring correct? - Isn’t there any problem in environments such as noise? - Is the operation mode setting correct? - Isn’t it used excessively ignoring the usage restrictions? Is the setting for the transmission conditions correct? Is the setting for unit numbers correct? (Does the destination of MEWTOCOLCOM match with the unit no of MCU setting?) Is the mode set to the computer link mode? In case of % header, isn’t the command length over 118 bytes? In case of < header, isn’t the command length over 2048 bytes? Isn’t FF specified for the unit No. of the destination? Hardware error How to confirm Check if the communication block is installed firmly. Check the wiring again. Check the shielding. Read out and check the status using F161 (MRCV) instruction. Read out and check the status using F161 (MRCV) instruction. Check the setting reading the status using F161 (MRCV) instruction. Check the programs of connected devices. Please contact your dealer. 7-13 7-14 Chapter 8 Applications 8-2 8.1 Changing Application of COM. Port An F159 (MTRN) instruction can be executed to change between general-purpose serial communication mode and computer link mode. To do so, specify H8000 for n (the number of transmission bytes) and execute the instruction. Changing from “general-purpose” to “computer link” Changing from “computer link” to “general-purpose” Whenever the above instruction is carried out, the mode changes to the other. Note) Current mode can be confirmed by “MCU status monitor”. Reference: <8.3 MCU Status Monitor> Note: When the power is turned on, the operating mode specified using the mode speed setting switch takes effect. This is not available for the COM. port set to PC(PLC) link mode. 8-3 8.2 Setting Communication Conditions and Monitoring Setting communication conditions and motoring using instructions The communication conditions for Multi Communication Unit (MCU) can be changed in ladder programs using F159 (MTRN) instruction. The current communication conditions specified with F159 (MTRN) instruction or the MCU Setting using the programming tool can be monitored using F161 (MRCV) instruction. Settable items, contents and values (monitoring values) are as below. Address st 1 word Communication condition - Setting content and value Settable operation mode Received No. of bytes - Unit No. K1 to K99 rd Baud rate th Character bit K0: 300 bps K1: 600 bps K2: 1200 bps K3: 2400 bps K4: 4800 bps K5: 9600 bps K6: 19200 bps K7: 38400 bps K8: 57600 bps K9: 115200 bps K10: 230400 bps K0: 7-bit length K1: 8-bit length PC(PLC) link General-purpose serial communication Computer link General-purpose serial communication Computer link th Parity th Stop bit length K0: No parity K1: Parity 0 K2: Parity odd K3: Parity even K0: 1 bit K1: 2 bits th RS/CS Valid/Invalid K0: Invalid K1: Valid th Send waiting time K0 to K10000 (K0: Immediate) th Header STX Terminator K0: STX invalid K1: STX valid K0: cR K1: cR+LF K2: Time K3: ETX K0 to K10000 nd 2 word 3 word 4 word 5 word 6 word 7 word 8 word 9 word th 10 word th Terminator judgement Note3) time th Initialize modem 11 word 12 word 8-4 Note2) K0: Initialize K1: Not initialize Remarks Byte no. “24” is stored when monitoring (receiving). It has no meaning when setting. COM. 1: Unit no. setting switch should be set to 0. COM. 2: Can be always set using F159 (MTRN) instruction. There are following conditions to specify using F15 (MTRN) instruction. 1. The speed setting of the mode speed setting switch (at the back of the unit) must be set to the memory switch setting. 2. The setting for the COM. port which was set to PC(PLC) link mode is not available. General-purpose serial communication Computer link General-purpose serial communication Computer link General-purpose serial communication Computer link General-purpose serial communication Computer link PC(PLC) link General-purpose serial communication Computer link General-purpose serial communication General-purpose serial communication General-purpose serial communication General-purpose serial communication Computer link Effective time=knx0.01 ms(0 to 100 ms) For the time (K2), refer to “terminator judgement time”. Effective time=knx0.01 ms (However, it is effective only when the terminator setting is “Time (K2)”.) Timing for execution of modem Note4) initialization Note1) The underlined values are default settings. Note2) When the unit No. setting switch was set to 0, the default setting of the memory switch is 1 for the computer link mode, and 0 for the PC(PLC) link mode. Note3) Supplementary explanation of terminator judgement time 1. When 0 is set, the time taken from the reception of one byte until the reception of the next one byte is the time for 32 bits of the specified baud rate. Received Received data data 1 byte 1 byte If next data is not received within the time for 32 bits, the reception will be deemed to have been completed. . <Example> In case of 9600 bps, 1/9600x32=3.33 ms 2. When n(n0) is set: Received data 1 byte Received data 1 byte If next data is not received within the time for nx10 μs, the reception will be deemed to have been completed. Note4) The timing for executing modem initialization is: 1. In case of MCU setting 1) when the power turns on 2) when switching the mode from PROG to RUN. 2. When executing F159 (MTRN) instruction Reference: For the details on the modem initialization, refer to <4.2 Remote Control using Modem>. Regarding address There is a memory space for the communication condition setting and monitoring within Multi Communication Unit (MCU). n-th byte (n-th word) of the address term indicates the setting read and written using F159 (MTRN) or F161 (MRCV) instruction or the stored address of the register for monitor data. 8-5 8.2.1 Example of Communication Condition Setting using F159 (MTRN) Instruction When the following conditions are specified for the COM. 1 port in the slot 0. Unit No. : K3 :3 Baud rate : K9 : 115200 bps Character bit : K1 : 8 bits Parity : K3 : Even Stop bit length : K0 : 1 bit RS/CS : K0 : Invalid Send waiting : K100 : 1 ms Header STX : K0 : not exist Terminator : K3 : ETX Terminator setting time : K0 : Unnecessary Initialize modem : K0 : No Explanation of program operation If R0 is turned on when MCU is in the waiting status for transmission, the above communication conditions are specified for the COM. 1 port in the slot 0. Key Point: Specify “22 bytes” for the number of bytes of setting data when specifying the communication conditions. All communication conditions for registers should be specified all at once in advance in order to set the communication conditions. The head of register (DT10 in the example) specified using F159 (MTRN) instruction is used by the system. Valid data should be specified from the next address (DT11 in the example). Use the default settings for the conditions which is not needed to be set. Specify the settings for COM. 1 port and COM. 2 port separately. Some conditions cannot be changed depending on operating modes. Reference: <Column of “Settable operation mode” in 8.2 Setting Communication Conditions and Monitoring> 8-6 8.2.2 Example of Monitoring Communication Condition using F161 (MRCV) Instruction When R0 turns on, the communication condition of COM. 2 port will be stored in the next address (DT101) of the receive buffer starting with DT100 to DT111. An example of data read after the above program was executed is shown below. DT100 K22 ←Number of bytes K22 (11 words) of the received communication condition data is stored. DT101 K3 ←Unit No.: 3 DT102 K7 ←Baud rate: 38400 bps DT103 K1 ←Character bit: 8 bits DT104 K2 ←Parity: Odd DT105 K0 ←Stop bit length: 1 bit DT106 K1 ←RS/CS control: Valid DT107 K0 ←Send waiting time: Immediate DT108 K0 ←Header STX: STX not exist DT109 K0 ←Terminator: cR DT110 K0 ←Terminator judgement time: Invalid(Valid only when the end code is set to K2: Time.) DT111 K0 ←Initialize modem: No Key Point: 12 words should be assured for the receive buffer. COM. 1 port and COM. 2 port should be read separately. 8-7 8.3 MCU Status Monitor The operation mode, the error of the installed communication blocks, or operation status of Multi Communication Unit (MCU) can be checked using F161 (MRCV) instruction. The statuses that can be checked are shown below. The status for each port (COM. 1 port, COM. 2 port) can be read. Address Confirmed status st Operation mode rd Discrimination of communication blocks th Reception error code 1 word nd 2 word 3 word 4 word Note1) Setting content and value K0: Computer link mode K1: General-purpose serial communication mode K2: PC(PLC) link mode K7: In initializing modem K0: Communication block is not installed. K232: AFP2803 (RS232C) K422: AFP2804 (RS422) K485: AFP2805 (RS485) Lower byte Bit 0: Receive buffer overrun Note1-1) Bit 1: Framing error Bit 2: Parity error Note1-1) Higher byte Bit 8: Receive buffer overflow Bit 9: Receive buffer full error Note1-2) th 5 word No. of occurrences of reception error H0 to HFFFF Setting error Note3) code Lower byte Bit 0: Setting error of mode speed setting switch Description The system assures. The operation modes specified for the COM. ports can be confirmed. The installed communication blocks can be confirmed. Occurs only when an error occurs in the hardware. Becomes “1” when the character bit and the stop bit differ from the setting. Becomes “1” when the parity of the received data differs from the setting. Becomes “1” when the received message length exceeds 2048 bytes. Becomes “1” when the messages that CPU has not completed to receive exceeds 8 messages. Counts the No. of occurrences of reception errors (overrun, framing error, parity error). Note2) th 6 word Bit 1: this is the operation mode setting exceeding the usage restrictions for the unit Becomes “1” when the mode setting of the mode speed setting switch is not acceptable. 1. When setting to OFF٠OFF 2. When setting COM. 2 port to PC link mode Becomes “1” when the setting exceeds the restrictions on the installation of the unit. Note5) Higher byte Bit 8: Error in communication condition setting values Bit 9: Error in transmission ) data length 8-8 Becomes “1” when the setting value of the communication condition specified by F159 (MTRN) instruction is out of the specification. Becomes “1” when the data length of the message transmitted by F159 (MTRN) instruction exceeds 2048 bytes. Address th 7 word Confirmed status Error parameter No. Note4) th 8 word Modem initialization status Setting content and value Description K1: Unit No. setting error K2: Baud rate setting error K3: Character bit setting error K4: Parity setting error K5: Stop bit length setting error K6: RS/CS valid/invalid setting error K7: Send waiting time setting error K8: Header STX setting error K9: Terminator setting error K10: Terminator judgement time setting error K11: Initialize modem setting error Shows the status of the modem initialization process. H0: Not processed H100: During initialization H200: Initialization succeeded The bit 8 of the setting error code (communication condition setting value error) becomes “1” when the values that are out of range were specified. This area is the area to discriminate which setting value Note6) is abnormal. H2FF: Initialization failed Mode LED flashes. Modem initialization succeeded. The operation mode automatically returns to the previous mode. Modem initialization failed. The operation mode automatically returns to the previous mode. Each action of each operation mode when detecting reception Error code ER-LED XA (C) Computer link Setting Lights Invalid Lights Valid (Off to On) General-purpose Setting serial communication X6 (7) Invalid Valid (takes affect right after execution of F161 (MRCV)) PC(PLC) link Setting Note) Invalid Invalid Invalid Note) The error LED in the PC(PLC) link mode goes off when the link was established, and lights when an error occurs in the PC(PLC) link. Operation when detecting setting error Sets the setting error code. XB (D) turns on. 8-9 Note1) -: Fixed with 0. Note1-1) Errors may not be detected depending on received data organization. (Example: only when stop bit differs) Note1-2) When a buffer error occurs, MCU stops receiving data. Turn on YE (F) and reset the channel to clear the error. Note2) No. of counts is a ring counter (without code). Note3) -: Fixed with 0. Note4) It is K0 when no parameter error occurs. Note5) Reference: <1.3 Restriction on Units Combination> Note6) Reference: <8.2 Setting Communication Conditions and Monitoring> Example of monitor program When monitoring the status of the COM. 2 port in the slot 3 When R0 turns on, the status of the COM.2 port in the slot 3 is stored in DT1 to DT7 of the receive buffer starting from DT0. Note: The No. of bytes “K14” for valid received data is stored in the first address of receive buffer. Receive buffer should be assured for 8 words. 8-10 Chapter 9 Specifications 9.1 Table of Specifications 9.1.1 General Specifications Item Ambient temperature Storage temperature Ambient humidity Storage temperature Vibration resistance Shock resistance Noise immunity Operation condition Consumption current Weight (main unit) Weight (communication block) 9-2 Description 0 to +55 °C -20 to +70 °C 30 to 85% RH (at 25 °C non-condensing) 30 to 85% RH (at 25 °C non-condensing) 10 Hz to 55 Hz, 1 cycle/min, double amplitude of 0.75 mm 10 min on X, Y, Z axes 2 Shock of 98 m/s , 4 times on X, Y, Z axes 1000 Vp-p with pulse widths 50 ns and 1чs (by noise simulator) Free from corrosive gases and excessive dust Approx. 480 mA Approx. 130 g Approx. 35 g 9.1.2 Communication Specifications General-purpose Serial communication Item Interface Communication method Synchronous method Transmission line Transmission distance 1:1 communication Note1) 1:N communication Note1) AFP 2804 AFP2805 AFP 2803 AFP 2804 AFP2805 RS232C RS422 RS485 RS232C RS422 RS485 Half duplex transmission Two-wire, half duplex transmission Two-wire, half duplex transmission Half duplex transmission (PC) PLC link AFP2803 AFP2805 RS232C RS485 Token bus (Floating master) Start stop synchronous system Multicore shield wire 15m (3 m for Max. 115200 400 m bps or more) Twisted pair shield cable Max. 1200 m Note2) Note3) 300 to 230400 bps Note2) Note3) (19200 bps when C-NET adapter is connected) 300 to 230400 bps Transmission code ASCII, JIS7, JIS8, Binary Number of units 1:N communication Note1) 1:1 communication Note1) AFP 2803 Baud rate (to be set by memory switch) Communication format (to be set by memory switch) Computer link Multicore shield wire 15m (3 m for Max. 115200 400 m bps or more) Twisted pair shield cable Max. 1200m Note2) Note3) Twisted pair shield cable 1200m (RS485) 3m (RS232C) 300 to 230400 bps Note2) Note3) 300 to 230400 bps (19200 bps when C-NET adapter is connected) 115200 bps − ASCII, JIS7, JIS8 Character bit: 7-bit / 8-bit Parity:0/None/Even/Odd Stop bit: 1-bit / 2-bit Header: STX/No STX Terminator:CR/CR+LF/Time setting/ETX Max. 99 units (32 units max. when − C-NET adapter is connected.) − − − − Max. 99 units (32 units max. when C-NET adapter is connected.) Max. 16 units Note4) Note2) Note2) PLC link capacity − − − − Link relay: 1024 points Link register: 128 words 9-3 Note1)Although it has adequate noise resistance ,It is recommendable to make the user program to execute re-transmission (in order to improve reliability of the communication in case of communication errors occurred by excessive noises or when a receiver equipment cannot receive temporarily.) Nore2)When connecting a commercially available device that has an RS485 interface, please confirm operation using the actual device. In some cases, the number of units, transmission distance, and baud rate vary depending on the connected device. Note3)The values for the transmission distance, baud rate and number of units should be within the values noted in the graph below. When using a baud rate of 2400 bps to 38400 bps, you can set up to a maximum of 99 units (stations) and maximum transmission distance of 1200 m. Note4)The number of units of the PLC link with RS232C/RS422 is two. Note5)When setting to 230400 bps, use USB ports at computers. If connecting to RS232C ports, a device open error occurs and communication is not available. 9-4 9.1.3 Setting Communication Conditions and Monitoring Setting communication conditions and motoring using instructions The communication conditions for Multi Communication Unit (MCU) can be changed in ladder programs using F159 (MTRN) instruction. The current communication conditions specified with F159 (MTRN) instruction or the MCU Setting using the programming tool can be monitored using F161 (MRCV) instruction. Settable items, contents and values (monitoring values) are as below. Communication condition Address Setting content and value Settable operation mode 1st, 2nd byte (1st word) - Received No. of bytes - 3rd, 4th byte (2nd word) Unit No. K1 to K99 5th, 6th byte (3rd word) Baud rate • PC(PLC) link • General-purpose serial communication • Computer link • General-purpose serial communication • Computer link 7th, 8th byte (4th word) Character bit 9th, 10th byte (5th word) Parity 11th, 12th byte (6th word) Stop bit length K0: No parity K1: Parity 0 K2: Parity odd K3: Parity even K0: 1 bit K1: 2 bits 13th, 14th byte (7th word) RS/CS Valid/Invalid K0: Invalid K1: Valid 15th, 16th byte (8th word) Send waiting time K0 to K10000 (K0: Immediate) 17th, 18th byte (9th word) 19th, 20th byte (10th word) Header STX 21st, 22nd byte (11th word) Terminator judgement time Note3) K0: STX not exist K1: STX exist K0: cR K1: cR+LF K2: Time (24 bits) K3: ETX K0 to K10000 (K0: 32 bits) 23rd, 24th byte (12th word) Initialize modem Note2) Terminator K0: 300 bps K1: 600 bps K2: 1200 bps K3: 2400 bps K4: 4800 bps K5: 9600 bps K6: 19200 bps K7: 38400 bps K8: 57600 bps K9: 115200 bps K10: 230400 bps K0: 7-bit length K1: 8-bit length K0: Initialize K1: Not initialize Remarks Byte no. “24” is stored when monitoring (receiving). It has no meaning when setting. COM. 1: Unit no. setting switch should be set to 0. COM. 2: Can be always set using F159 (MTRN) instruction. There are following conditions to specify using F15 (MTRN) instruction. 1. The speed setting of the mode speed setting switch (at the back of the unit) must be set to the memory switch setting. 2. The setting for the COM. port which was set to PC(PLC) link mode is not available. • General-purpose serial communication • Computer link • General-purpose serial communication • Computer link • General-purpose serial communication • Computer link • General-purpose serial communication • Computer link • General-purpose serial communication • Computer link • General-purpose serial communication • General-purpose serial communication • General-purpose serial communication • General-purpose serial communication • Computer link Effective time=knx0.01 ms(0 to 100 ms) For the time (K2), refer to “terminator judgement time”. Effective time=knx0.01 ms (However, it is effective only when the terminator setting is “Time (K2)”.) Timing for execution of modem initialization Note4) 9-5 Note1) The underlined values are default settings. Note2) When the unit No. setting switch was set to 0, the default setting of the memory switch is 1 for the computer link mode, and 0 for the PC(PLC) link mode. Note3) Supplementary explanation of terminator judgement time 1. When 0 is set, the time taken from the reception of one byte until the reception of the next one byte is the time for 32 bits of the specified baud rate. Received Received data data 1 byte 1 byte If next data is not received within the time for 32 bits, the reception will be deemed to have been completed. <Example> In case of 9600 bps, 1/9600x32=3.33 ms 2. When n(n0) is set: Received data 1 byte Received data 1 byte If next data is not received within the time for nx10 μs, the reception will be deemed to have been completed. Note4) The timing for executing modem initialization is: 1. In case of MCU setting 1) when the power turns on 2) when switching the mode from PROG to RUN. 2. When executing F159 (MTRN) instruction Reference: For the details on the modem initialization, refer to <4.2 Remote Control using Modem>. Regarding address There is a memory space for the communication condition setting and monitoring within Multi Communication Unit (MCU). n-th byte (n-th word) of the address term indicates the setting read and written using F159 (MTRN) or F161 (MRCV) instruction or the stored address of the register for monitor data. 9-6 9.1.4 I/O Allocation (General-purpose Serial Communication) The flag information between MCU and the CPU unit is transmitted using X and Y. For this unit, 16 I/O each for X and Y, totally 32 I/O are allocated. I/O numbers are determined depending on the installation location and the I/O allocations of the other units. I/O numbers (when the unit is installed in the slot 0) Input signal Name Description COM. 1 COM. 2 X0 X2 Reception When MCU completes the data reception, it done flag turns on. When waiting for data reception: 0 When completing data reception: 1 X1 X3 PLC data When MRCV is completed, it is set/reset. reception Reading completes: 1 Note1) done flag No reading data: 0 X4 X5 Transmission When transmission is available: 1 Note2) done flag During transmission: 0 When transmission is completed: 1 X6 X7 Reception When MRCV is completed, it is set/reset. error Errors exist in the data read=1 Note1) No error exists in the data read=0 X8 X9 CTS signal Status of the CTS signal sent from the monitor device communicating with. Transmission is possible from MCU=0 Transmission is not possible from MCU=1 (0: OFF, 1: ON) Effective operation mode General-purpose serial communication Effective only when setting the RS/CS to be valid and using the communication block AFP2803 (RS232C type). General-purpose serial communication (Reception) The RTS signal from MCU is controllable by Y18 and Y19. XA XC Latest Set when an error occurs during the reception reception of data by MCU error No reception error: 0 Reception error: 1 The details of the reception error can be confirmed by reading out them to the PLC using MRCV instruction. Check X6/X7 to see whether there are errors in each receive buffer or not during multiple reception. XB XD Setting error Operation mode switch setting error All operation Usage restrictions for the unit (For the modes details on the errors which the settings exceed the limited values of PC link mode/computer link mode, refer to the exhibit.) XE XF CH reset Communication channels can be reset by General-purpose done turning on Y1E or Y1F. This flag is the serial signal of its completion. communication At completion: 1 When Y1E/Y1F is off: 0 Note1) This flag is effective after the execution of the F161 (MRCV) instruction until one of the following instructions is executed. 1: END instruction (Beginning of scan) 2: F161 (MRCV) instruction 3: Partial input instruction F143 (IORF) Note2) When the transmission is completed within one scan, it may not be 0. 9-7 Output signal COM. 1 COM. 2 Y10 to Y10 to Y17 Y17 Y18 Y19 Y1A to Y1D Y1E Y1A to Y1D Y1F Name Undefined RTS signal output Undefined Request to reset CH Description Do not turn on “undefined”. (Default setting is 0.) The transmission from the devices communicating with can be controlled by turning this output on. Permit the transmission from the devices communicating=0 Prohibit the transmission from the devices communicating=1 The CTS signal sent from the devices communicating can be monitored by X8 and X9. Do not turn on “undefined”. (Default setting is 0.) Communication channels can be reset by turning on Y1E or Y1F. No request to reset=0 Request to reset=1 (0: OFF, 1: ON) Effective communication None Effective only when setting the RS/CS to be valid and using the RS232C communication cassette. None General-purpose serial communication After 1 is output and the completion of the reset is confirmed by XE/XF, return to 0. The reset is performed only once when this signal rises. Details on the channel reset operation The following operations are performed. 1: Discontinues transmission 2: Discontinues reception 3: Clears receive buffer 4: Resets communication parameters 5: Clears error information (However, only errors which can be cleared) This function can be used to delete unnecessary received data or to clear errors before starting normal reception. Note) The operation to reset channels can be automatically performed by executing the following processes as well as Y1E/Y1F. 1: When setting/changing communication parameters using MTRN instruction. 2: When changing operation modes (switching between the general-purpose communication and the computer link) using MTRN instruction. 3: When turning the PLC power supply on, or when changing the mode from PROG. to RUN in case that the MCU setting has been done using the tool. However, the reset done signal of XE/YF does not turn on in the above case. 9-8 9.2 Appendix 9.2.1 Detailed Time Chart of Data Transmission and Reception Explanation of operation MCU detects the completion of data reception. The reception done flag X0(X2) is taken in the CPU by the I/O refresh operation. Makes the reception done flag X0(X2) be the execution condition, and the received data is copied in the operation memory using F161 (MRCV). Once copying data completes, the PLC data reception done flag X1(X3) turns on. After completing the execution of the MRCV instruction, the MCU reception done flag turns off. As the MCU reception done flag is taken in by the I/O refresh operation of the CPU, X0(X2) turns off. Also the PLC data reception done flag X1(X3) turns off by the I/O refresh operation. Precautions The MCU reception done flag (above-mentioned ) turns off within a maximum of 100 µs after the MRCV instruction is executed, so that it may not turn off in the next scan after the execution of the MRCV instruction depending on PLC scan time and the timing to execute the MRCV instruction. In that case, the received data has been copied from the MCU to the CPU, however, note that the reception done flag X0(X2) has been left to be on even in the next scan. It is recommended to execute the MRCV instruction as soon as the reception done flag X0(X2) turned on as mentioned below. If the moment that the reception done flag X0(X2) turns on is not used as the execution condition, the PLC data reception done flag X1(X3) after the execution of the MRCV instruction can be used to tell whether there are any received data or not. 9-9 9.2.2 Time Chart of Multiplex Reception Explanation of operation: The operation if multiplexed data are received when executing the MRCV instruction. MCU detects the completion of data reception. The reception done flag X0(X2) is taken in the CPU by the I/O refresh operation, however, new data is received with MCU by then. Makes the reception done flag X0(X2) be the execution condition, and the received data is copied in the operation memory using F161 (MRCV). Once copying data completes, the PLC data reception done flag X1(X3) turns on. After completing the execution of the MRCV instruction, the reception done flag remains to be on as the data that has been completed to be received is left in MCU. As the MCU reception done flag is taken in by the I/O refresh operation of the CPU, X0(X2) remains to be on. Also the PLC data reception done flag X1(X3) turns off by the I/O refresh operation. Makes the reception done flag X0(X2) be the execution condition, and the received data is copied in the operation memory using F161 (MRCV). Once copying data completes, the PLC data reception done flag X1(X3) turns on. After completing the execution of the MRCV instruction, the MCU reception done flag turns off as the reception done data disappears. As the MCU reception done flag is taken in by the I/O refresh operation of the CPU, X0(X2) turns off. Also the PLC data reception done flag X1(X3) turns off by the I/O refresh operation. 9-10 Precautions The MCU reception done flag (above-mentioned ) turns off within a maximum of 100 µs after MRCV instruction is executed, so that it may not turn off in the next scan after the execution of the MRCV instruction depending on PLC scan time and the timing to execute the MRCV instruction. In that case, the received data has been copied from the MCU to the CPU, however, note that the reception done flag X0(X2) has been left to be on even in the next scan. For only one received data, it is recommended to execute the MRCV instruction as soon as the reception done flag X0(X2) turned on. However, for multiplex reception, as the rise of the reception done flag cannot be detected, use F-type instruction to execute the MRCV instruction for every scan. In that case, the PLC data reception done flag X1(X3) after the execution of the MRCV instruction can be used to tell if there are any received data. The following is the time chart if the F161 (MRCV) instruction is executed twice in one scan. 9-11 MCU completes to receive the data 1, and turns the reception done flag on. An error occurs while MCU is receiving the data 2, MCU detects the reception error and turns the reception error flag on. CPU loads the MCU reception done flag and MCU reception error flag which were turned on at and by the I/O refresh, CPU turns X0(X2) and XA(XC) on. MCU receives the data 3. An error occurs while MCU is receiving the data 4. MCU receives the data 5. An error occurs while MCU is receiving the data 6. MCU receives the data 7. An error occurs while MCU is receiving the data 8. CPU receives the first buffer. As no error is detected during the reception of the first buffer, the reception error flag remains OFF. CPU receives the second buffer. As an error was detected during the reception of the second buffer, the reception error flag turns on. On state is effective until the next scan. CPU receives the third buffer. As no error is detected during the reception of the third buffer, the reception error flag remains OFF. CPU receives the forth buffer. As an error was detected during the reception of the forth buffer, the reception error flag turns on. On state is effective until the next scan. 9-12 CPU receives the fifth buffer. As no error is detected during the reception of the fifth buffer, the reception error flag remains OFF. CPU receives the sixth buffer. As an error was detected during the reception of the sixth buffer, the reception error flag turns on. On state is effective until the next scan. CPU receives the seventh buffer. As no error is detected during the reception of the seventh buffer, the reception error flag remains OFF. CPU receives the eighth buffer. As an error was detected during the reception of the eighth buffer, the reception error flag turns on. On state is effective until the next scan. As there is no received data in MCU, the reception done flag of MCU turns off. As no error exists in the received data in MCU, the reception error flag turns off. CPU reads the reception done flag of MCU, and turns the reception done flag X0(X2) off. CPU reads the reception error flag of MCU, and turns the reception error flag XA(XC) off. The reception error flag X7(X8) which was set using the MRCV instruction when the data was received turns off. 9-13 9-14 Chapter 10 Dimensions and Sample Programs 10.1 Dimensions 10.1.1 FP2 Multi Communication Unit When one AFP2803 or AFP2804 is installed. When one AFP2805 is installed. Installation space in the panel 10-2 10.1.2 Communication Blocks FP2-CB232 (AFP2803) FP2-CB422 (AFP2804) FP2-CB485 (AFP2805) 10-3 10.2 ASCII Codes 10-4 Record of changes Manual No. Date Description of changes ARCT1F396E SEP.2004 First edition ARCT1F396E-1 SEP.2004 2nd edition ARCT1F396E-2 NOV.2006 3rd edition ARCT1F396E-3 JAN.2007 4th edition ARCT1F396E-4 NOV.2008 5th edition - Change in Corporate name ARCT1F396E-5 AUG.2011 6th edition - Change in Corporate name - Fixed Errors ARCT1F396E-6 JUL.2013 7th edition - Change in Corporate name