1
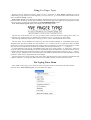
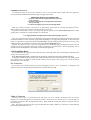
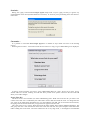
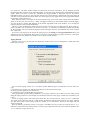
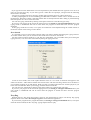
User Manual
Five Finger
Typist 2.2
the one-handed typing tutor
© Copyright SoftDawn Software 1994 - 2014
Five Finger Typist
© SoftDawn Software 1994 - 2014
Published by:
SoftDawn
Software
5 Dudley Street, North Fitzroy, 3068, Australia
EMAIL: [email protected]
WWW: www.typeonehand.com
TEL: +61 3 9489 4298
SoftDawn Licence Agreement
Please read this Licence carefully before using the Five Finger Typist application. By using the Five Finger Typist application, you
are agreeing to be bound by the terms of this Licence. If you do not agree to the terms of this Licence, promptly return the entire product
to the place you obtained it for a full refund.
1. Licence. The Five Finger Typist application (Software), and the related documentation are licenced to you by SoftDawn. You own
the media on which the Software is recorded, but SoftDawn and/or SoftDawn’s Licencee(s) retain title to the Software and related
documentation. This Licence allows you to use the Software on any computer, provided it is not used simultaneously on more than one
computer. This Licence allows you to copy the Software onto the hard disk of your computer and make copies of the Software for
backup purposes. In the event that the Software is copied onto a disk shared by multible users, each user accessing the Software must
have an authorised copy of the Software licenced from SoftDawn. You may sell, lend or give away the original copy of the Software
provided all working copies are sold, lent or given to the same person. or destroyed.
2. Limited Warranty on Media. SoftDawn warrants the disk on which the Software is recorded to be free from defects in materials and
workmanship under normal use for a period of one hundred and twenty (120) days from the date of purchase as evidenced by a copy of
the receipt. SoftDawn undertakes to replace the disk not meeting this limited warranty after its return to SoftDawn, or a SoftDawn
authorised representative, with a copy of the receipt.
3. The above is not an inclusive statement on the restrictions imposed on you under the Copyright Act. For a complete statement of the
restrictions imposed on you see the provisions of the Copyright Act of your country.
Demo Program - Any Restrictions?
There are no restrictions to copying and giving away the Five Finger Typist demo program. The demo program is intended for potential
users who wish to explore the features of Five Finger Typist before making a purchase. As such the developers of Five Finger
Typist encourage the widest possible distribution of the demo program.
A normal Copyright restriction that does apply, however, to the demonstration Five Finger Typist program is that you may not reverse
engineer, decompile, disassembly, or create derivative works from the demonstration Five Finger Typist program.
Introducing Five Finger Typist
Five Finger Typist is a typing tutor which teaches one-handed touch typing on the standard (QWERTY)
keyboard. It is a structured typing programme for learning to type effectively with only one hand. It contains a
comprehensive set of typing exercises for both the right, and the left, hand. A novice, prepared to put in the
effort, should progress to a level of proficiency where they can go on to use commercial word processing
applications.
Five Finger Typist is suitable for all age groups - child through to adult.
In the era of personal computers, people with the functional use of only one hand have in Five Finger
Typist a practical tool for learning new communication skills. For children at school it could have benefits
with their spelling, punctuation and grammar and could improve confidence and general language useage.
For adults, touch typing skills assist in communication and employment opportunities. Further, in certain
work environments there could be significant operational and productivity gains if staff were able to type with
one hand.
Five Finger Typist teaches a life-long skill which doesn’t require a specialised keyboard, or dedicated
software, which needs to be transported around with the user.
Installing Five Finger Typist
In this section we first describe how to install Five Finger Typist on Windows PCs and then on Macintosh
computers.
1 Installing on Windows PCs
Five Finger Typist 2.2 runs under all the Windows Operating Systems from Windows 95 on - Windows 7
& 8 (32 bit), Vista, Windows XP, 2000, NT4, 98 and 95. You will need 3 MB of free memory on your hard
disk.
To install Five Finger Typist:
• insert the Five Finger Typist CD in your computer’s CD-ROM drive (D drive).
• click on the Start button and then click Run...
• type d:\setupFFT and press Enter.
The installation program turns your computer screen blue. A dialog informs you that Five Finger Typist
will be installed on your computer. Click OK. You are then asked if Five Finger Typist should be installed
in the recommended location. Click OK. Five Finger Typist is installed in a new directory called SoftDawn
in the Program Files directory.
Notice to Users of 64 bit Windows 7 & 8
Five Finger Typist can run under 64 bit Windows 7 & 8 although it is a 32 bit program. However, you
will need to follow the installation instructions on the separate sheet which comes with the package and which
is also available at: www.typeonehand.com/system.html
2 Installing on Macintosh
Five Finger Typist runs under Mac OS 10.3 and later (including 10.8 Mountain Lion and on Intel and
PowerPC processors. You will need 1.4 MB of free memory on your hard disk.
Upgrading of Five Finger Typist to version 2.2 for Macintosh hasn’t been completed. The current version
of Five Finger Typist for Macintosh is version 1.71 which doesn’t include the functions under the
Customise... menu item (see below).
To install Five Finger Typist:
• insert the Five Finger Typist CD in your Mac’s CD-ROM drive. A CD icon named MACFFT will appear
on the Desktop. Double click on the icon and you will see a folder named Five Finger Typist 1.71.
• on your hard disk (usually called Macintosh HD) there is a folder named Applications. Drag the Five Finger
Typist 1.7 folder onto the Applications folder so that it is stored inside.
Starting & Closing Five Finger Typist
If you are not familiar with operating your computer you should consult the Owner’s Manual which comes
with the machine.
Starting the Five Finger Typist Application
Five Finger Typist can be started in the usual two ways - starting from the application, or starting from a
document. Starting from a document is described in Starting from your Progress Document below.
1 Windows
To start the application click on the Start button and then point to Programs. You will see the Five Finger
Typist program. Click the program and Five Finger Typist will start.
2 Macintosh
To start the application go to the Five Finger Typist 1.71 folder and double click on the application icon.
Quitting Five Finger Typist
To quit, click on Exit under the File menu.
Saving to a Progress Document
If you have commenced a new lesson you will be given the opportunity to save your progress at the end of a
session. The first time this happens save the progress document to the same directory as the Five Finger
Typist application, e.g., under Windows, in the SoftDawn directory in Program Files. Give the document an
easy-to-remember name, such as your own name, and add a ‘fft’ extension, e.g., zachary.fft.
The progress document saves the chosen typing hand, the number of the last lesson worked, the main window
size, the screen font size, any typing sound and error sound. You can start Five Finger Typist from this
progress document and the program will open at the same lesson and with previously chosen settings.
Starting from your Progress Document
1 Windows
To start from your progress document click on the Start button and then point to Documents. Look for the
name you gave your progress document, click it and Five Finger Typist will open at the last lesson worked
remembering your previously chosen settings.
If the name of your progress document doesn’t appear in the list of documents, use the Find command in the
Start menu to locate the document. After that it should appear in the Documents menu.
Click the Start button and then point to Find. Click Files and Folders. The Find All Files dialog appears.
Click the Named box and type in the name of the file you saved, e.g., zachary. Start the search by clicking Find
Now. When you see your document, double click it to start Five Finger Typist and open at the last lesson
worked.
After locating your document and starting in this way, you should find your document, next time, in the
Documents menu and be able to start from there.
2 Macintosh
To start from your progress document go to the folder where you saved it and double click on the document
icon.
Using Five Finger Typist
Starting from the application usually means you are a newcomer to Five Finger Typist and will be
commencing typing lessons from the beginning. You can, however, go to other lessons and commence from
there (see Go To Lesson... below).
Five Finger Typist opens showing the default (left) hand poised over the keyboard. If you press a key the
hand will move to that key and the key will darken. The character typed will appear in the typing frame on the
screen. It is easy to change the typing hand (see Left Hand/Right Hand below).
When Five Finger Typist opens it also displays the following banner:
The last line of the banner tells you ‘To get started select Commence from the Typing Tutor menu’. To
commence your typing lessons you should select Commence Lesson 1 in the Typing Tutor menu.
The meaning of the other menu items in the Typing Tutor menu is described in the next section.
The first three lesons introduce the home keys and the accepted technique of one-handed touch typing.
Thereafter each new lesson teaches two new characters, or is a revision lesson. In each lesson there are about
twelve lines of exercises which initially teach typing of the new characters in relation to the home keys. Overall
there are 21 lessons which teach all letters, the numbers and the punctuation keys . , - ; and enter.
As with traditional touch typing, one-handed touch typing has a ‘home position’, or ‘home keys’. These are
the group of keys from which all key strokes are made and to where the hand returns. The home position acts as
an anchor and resting place between keystrokes. With one-handed touch typing the home keys are: f, g, h and j.
When you type, the hand on the screen shows the correct hand movement. The on-screen keyboard is coloured
in bands to show the keys typed with each of the fingers.
The early lessons are a little boring as not many letters have been learnt so the exercises are mechanical and
repetitive. However, words, phrases and sentences are included as quickly as the known letters allow.
The Typing Tutor Menu
The contents of the Typing Tutor menu are shown. The menu items are discussed in an order suited to
someone new to Five Finger Typist, not in the order they appear.
Commence Lesson 1
To commence Lesson 1 click on the Commence Lesson 1 menu item. Some simple rules then appear for
moving forwards and backwards between pages of typing instructions.
THREE SIMPLE RULES OF 'FIVE FINGER TYPIST'
1. To move to the next set of typing instructions press the
down arrow key,
2. To move to the previous set of typing instructions press
the up arrow key,
3. To move the typing cursor to tne next line type 'Enter'.
They tell you that moving to the next set of instructions can be done by pressing the down-arrow key.
Moving back to the previous set can be done with the up-arrow key.
If you have chosen either of the 2 very large font options (see the section Screen Font Sizes below) these
simple rules are spread over 2 pages and there is a fourth rule:
4. To toggle between the typing frame and the keyboard graphic press F5.
The 2 very large font options have an enlarged keyboard graphic without the animated typing hand. The large
keyboard alternates on-screen with the typing frame depending on the page being displayed. As the fourth rule
states, it is possible to toggle between the keyboard graphic and the typing frame by pressing the F5 key. This
additional rule is discussed in more detail in the section Screen Font Sizes below.
The first few pages of Lesson 1 provide an introduction to one-handed typing. Subsequent lessons lead you
through the typing programme which will enable you become a proficient typist. The accompanying sets of
instructions are self explanatory and should provide adequate guidance.
Left Hand/Right Hand
It is possible to set the typing tutor for either the left, or the right, hand. The selected hand is indicated in the
Typing Tutor menu by a tick.
When Five Finger Typist is started from the application the hand selected is the (default) left hand.
To change the hand for typing simply select either the Right Hand or Left Hand menu item. The hand graphic
will change to the one chosen in a few seconds. When you look again at the Typing Tutor menu the chosen
hand will have a tick beside it.
Go To Lesson...
If you wish to go to another lesson you can by selecting the Go To Lesson... menu item. A dialog box will
appear in which you should enter the desired lesson number then click OK.
Table of Contents
You may wish to go to a particular lesson, but aren’t sure of its number. Selecting Table of Contents
displays a list of the typing lessons and the keys learnt in each lesson. To view the next, or previous page, of
the Table of Contents click the appropriate button. When finished viewing the Table of Contents click the
Finished button.
Note: the Table of Contents for the right and left hand are slightly different, so should be viewed after the
desired typing hand has been set.
Statistics
During the typing exercises Five Finger Typist keeps track of your typing accuracy (it ignores any
experimentation with new keystrokes before the exercises). To see how you’re performing select the Statistics
menu item.
Customise...
It is possible to customise Five Finger Typist in a number of ways which can assist in the learning
process.
Selecting the Customise... menu item causes the Customise Five Finger Typist tabbed dialog to be displayed.
At the top of the Customise Five Finger Typist tabbed dialog there are 3 tabs - Resize Screen Font, Typing
Sounds and Error Sounds. Clicking on a tab will show you the set of options relevant to the tab’s title and
allow you to make changes.
Screen Font Size
The Resize Screen Font window (see above tabbed dialog) asks ‘What size screen font do you want?’ The
current screen font size is indicated by the radio button with a dark dot inside the circle. To change the font
size, click on the radio button beside the size you want and then click OK. The on-screen lesson instructions,
the typing exercises and the characters you type will now appear in the new size.
The 5 font sizes are in 2 groups. With each group the main window has a slightly different appearance. The
font group with the 3 font sizes allows choice of a screen font size that suits your computer screen and which
makes reading the screen easier. The main window for the 2 very large fonts, is re-arranged to accommodate
very large text. The main window retains the tablet with the lesson instructions, but an enlarged on-screen
keyboard alternates with the typing frame depending on the page being displayed. The animated hand doesn't
appear. When new letters to learn are introduced the large keyboard is displayed with the new letters
highlighted. When you move to the page with the exercises, the keyboard is replaced with the typing frame. If
you want to see the keyboard location of the new letters again you can toggle between the typing frame and the
keyboard by pressing the F5 key.
If the chosen font size is too large, the lesson instructions may not fit in the main window and be unreadable.
If this is the case, the Font too large... dialog will appear and warn you the window needs to be made bigger.
You can do this by clicking and dragging on the bottom right-hand corner of the window, or by clicking the
maximise button in the top right-hand corner.
The PC's screen resolution also affects how much will fit on-screen; lower resolutions show things larger onscreen, but allow less information to be shown at one time. A resolution of 1280x800 or higher will display
all the program's font sizes; 1024x768 displays all but the largest font size, and 800x600 only works with the
first 3 font sizes.
If you save your progress at the end of the typing session (see Saving to a Progress Document above), the
changed font size is remembered. Then when you start the program from the progress document, it will open
with the new font size and the same window size as when you last finished.
Typing Sounds
Clicking on the Typing Sounds tab will display the window where you can configure the sounds that can be
heard when you type.
You can switch typing sounds on, or off. There are three different types of sounds that can occur when you
type:
i) a recorded voice prompts you with the next characters in the exercise line to type
ii) the key typed is spoken by a recorded voice
iii) a clacking noise is made like that of a typewriter
The typing sounds provide auditory feedback to your typing. However, the sounds occur only when you are
doing the typing exercises. It was thought it could become tiresome if the typing sounds were on whenever you
typed.
To turn on typing sounds, click in the square check box Turn sound on during typing exercises. A small tick
will appear in the check box and the 3 radio buttons beneath will become active with the first being selected.
You can choose either of the typing sounds by clicking on its radio button. When you are happy with the
selection click OK.
With the auditory prompting of keys to be typed, a recorded voice will prompt you with the next 3, to 5,
characters in the exercise line. When you have correctly typed these characters the voice will then speak the next
3, to 5, characters to type (and so on).
If you type an incorrect character the voice will repeat the key that should have been typed. It won’t move on
until you type the correct key. If you don’t type for a while the voice prompts you again with the remaining
letters in the voice buffer.
You can exit a typing exercise by moving to another page (using the up-arrow or down-arrow key).
As audio prompting has its own error handling procedure there would be a conflict if Error Sounds were on at
the same time. Therefore if either is selected, and the other is already turned on then a dialog is posted advising
that both options can’t be on at the same time.
You can turn typing sounds off by clicking in the square check box so that the tick goes away.
If you save your progress at the end of the typing session (see Saving to a Progress Document above), the
typing sound is remembered and will be active when the program is started next time from the progress
document.
If the typing sounds are too loud, or too quiet, the sound level can be adjusted using the volume control in
the Sounds control in the Settings Control Panel.
Error Sounds
It is possible to turn on an error-alert sound for when you make a mistake when doing the typing exercises.
To see the window where you can choose an alert sound click on the Error Sounds tab.
You can switch error-alert sounds on, or off. The error sound alerts you to a mistake when you are doing the
typing exercises, so an error-alert will sound only during the typing exercises.
To turn on error sounds, click in the square check box Turn on error sound. A small tick will appear in the
check box and the 7 radio buttons beneath will become active with the first being selected. You can choose a
error sound by clicking on its radio button. When you click on a radio button the error sound is played so you
know what it sounds like. When you are happy with the selection click OK.
You can turn error sounds off by clicking in the square check box so that the tick goes away.
If you save your progress at the end of the typing session (see Saving to a Progress Document above), the
error sound is remembered and will be active when the program is started next time from the progress
document.
Foxy Dog
Selecting the Foxy Dog menu item causes a replay of ‘the quick brown fox jumps over the lazy dog’ typing
sequence which occurs when Five Finger Typist is started from the application.
If you start the program from a progress document (see Saving to a Progress Document above) it will open
at the last lesson worked, but the ‘foxy dog’ typing sequence doesn’t play.
The File Menu
Save Changes...
The Save Changes... menu item appears under the File menu. The changes saved in Five Finger Typist are
any to the main window size, typing hand, last lesson worked, font size, typing sound and the error sound.
FIVE FINGER TYPIST DOES NOT SAVE TEXT THAT IS TYPED,
OR TYPING STATISTICS OF A SESSION.
Saving the typing hand, the lesson being worked and other information enables you start your next session in
the same lesson and with previously chosen settings.
Exit
You can quit a typing session by selecting Exit in the File menu, or by clicking on the close button in the
top right-hand corner of the main window.
If, during a typing session, you have made a change to the typing hand, the lesson being worked or some
other information, a dialog box will offer you the choice of saving the changes (see Saving to a Progress
Document above).
Printing Text Typed in a Session
The text you have typed in the typing frame can be printed in the usual way by choosing Print... under the
File menu. Also you can set the paper size for the printer by using Page Setup... under the File menu.
Five Finger Typist as a Word Processor
Five Finger Typist contains an elementary word processor and can teach word processing skills to that
extent.
Text that is typed appears in the typing frame. If its length extends beyond the bottom of the typing frame the
text will scroll up. The scroll bar on the right of the frame becomes active and can be used to scroll the text up
and down.
Standard text editing options - cut, copy and paste - are possible. Text copied to the clipboard from other
applications can be pasted in the typing frame. Text cut, or copied, from the typing frame can be pasted into
commercial word processors.
However, Five Finger Typist is unable to perform other standard word processing operations such as
changing of font styles, formatting, or searching for text.
Five Finger Typist also doesn’t save the text in the typing frame. As a typing tutor there is little benefit in
saving rows of typing exercises from previous sessions. If a record of achievement is required a print-out of the
text typed in a session should be sufficient.