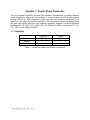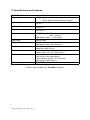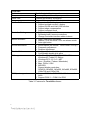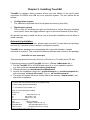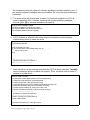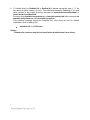
1
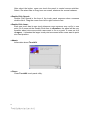
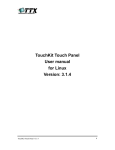
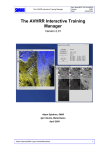
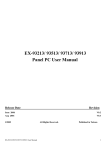
TouchKit
TouchScreen Controller
User Manual
for Linux
Version: 1.0.2
1
TouchKit Manual for Linux v1.0.2
CONTENT:
CHAPTER 1. TOUCH PANEL CONTROLLER
2
1.1
1.2
Controller
Specifications and Features
2
3
CHAPTER 2. INSTALLING TOUCHKIT
5
CHAPTER 3. CONFIGURATION UTILITY AND RIGHT BUTTON EMULATOR
12
CHAPTER 4. UNINSTALLING TOUCHKIT
17
2
TouchKit Manual for Linux v1.0.2
Chapter 1. Touch Panel Controller
This touch panel controller provides the optimistic performance of analog resistive
touch panels for 4 wire and 5 wire models. It communicates with PC system directly
through RS232 or USB connector. Users can see how superior the design is in
sensitivity, accuracy and friendly operation. The touch panel driver emulates mouse
left and right button function and supports operation systems including Microsoft
Windows 95 / 98 / ME / NT4 / 2000 / XP / XP Tablet PC Edition, Windows CE 2.12 /
3.0 / .NET, Linux, iMac and DOS.
1.1 Controller
Interface
RS232
USB
4-wire
5-wire
Capacitive
Ready
Ready
Ready
Ready
Ready
Ready
Table 1. Controllers match with different interfaces
3
TouchKit Manual for Linux v1.0.2
1.2 Specifications and Features
Specifications
Power requirements
Operating temperature
Storage Temperature
Relative Humidity
+5VDC ( Maximum 100mA, typical 70mA,
50mV peak to peak maximum ripple )
0 to 50 ℃
-40 to 80 ℃
95% at 60 ℃
Protocol
Resolution
Report rate
Response time
Pin out definition
Panel resistance
Regulatory Approvals
RS232 Model: 9600 bauds, None parity, 8 data bits
and 1 stop bit
USB Model: USB 1.1 Low speed
2048 X 2048
RS232 Model: Max. 160 points/sec
USB Model: Max. 160 points/sec
Resistive: Max. 35 ms
Capacitive: Max. 20 ms
4 wire model: X+, Y+, X-, Y5 wire model: UL, UR, COM, LR, LL
4 wire resistive model: 200 ~ 900 ohm
( pin to pin on the same layer )
5 wire resistive model: 50 ~ 200 ohm
( pin to pin on drive layer )
FCC-B, CE
Table 2. Specifications for TouchKit controller
4
TouchKit Manual for Linux v1.0.2
Features
Calibration
Compensation
Draw Test
Language
Advanced Feature
Fast full oriental 4 points position
Accuracy 25 points linearity compensation.
Position and linearity verification
Support 10 languages for Windows
1. Support monitor / display rotation
2. Support multiple monitor / display
3. Support QVGA and Half-VGA function
4. Support edge compensation
5. Support constant touch
1. Support multiple controllers
2. Dynamical add / remove controllers
3. Change Controller interface without reboot.
1. Right / Left button emulation
2. Normal / Click on touch / Click on release mode
3. Auto right button
1. Sound option (No Sound / Touch Down / Lift Up)
2. Frequency adjustment
3. Duration adjustment
1. Configurable double click speed
2. Configurable double click area
1. Windows 95 / 98 / ME / NT4 / 2000 / XP /
Windows XP Tablet PC Edition
2. Windows CE 2.12 / 3.0 / .NET
3. Linux ( RedHat / Fedora / Mandrake)
4. iMac. OS9.x / OSX
5. MS-DOS:
Support display resolution:
320x200, 640x200, 640x350, 640x480, 800x600,
1024x768 and 1280x1024
1. Support COM 1 ~ COM 256 for Windows and
Linux
2. Support COM 1 ~ COM 8 for DOS
Controller Setting
Mouse Emulator
Sound Notification
Double Click
OS support
COM port support
Table 3. Features for TouchKit software
5
TouchKit Manual for Linux v1.0.2
Chapter 2. Installing TouchKit
TouchKit is software, which contains drivers and two utilities of the touch panel
controllers for RS232 and USB on Linux operation system. The two utilities are as
follows:
·
Configuration support
The calibration and draw test of touch panel are done by this utility.
·
Right button support
This is utility for emulating the right and left button of mouse through controlling
touch panel. Users can toggle between right or left mouse buttons by this utility.
We provide two way to install the driver, one is automatic installation and the other is
install manually.
Automatic Installation
Before install TouchKit for Linux, please make sure that (1) users have root privilege
and that (2) X window system has been configured correctly.
TouchKit driver package was compressed with uuencode software, it needs
uudecode to extract it. The uuencode/uudecode software was include in the package
sharutils-x.x.x-xx.xxxx.rpm
This package should be found in the Linux CD disc or in Touchkit driver CD disc.
Follow these steps to install TouchKit for Linux. ( For ex. InMandrake 9.x )
1. Put the TouchKit CD to CD-ROM and mount it on Linux operation system.
e.g. with command: mount /dev/cdrom /mnt/cdrom
2. Change directory to /mnt/cdrom/Linux/Mandrake9
3. Launch the installation script file ( touchkit.setup.sh or touchkit.setupxxx.sh )
with command “sh [scrip file name]”. For ex. “sh touchkit.setup.sh”
4. The script will extract the driver source files to the directory “/tmp/touchkit”, and
start driver installation.
(*) Extract files from [touchkit.setup.sh] to [/tmp/touchkit]
(*) Start installer [/tmp/touchkit/setup]
=== TouchKit for Linux Installer ===
(Step 1) Check Packages Installed
[Common]
make
OK (make-3.79.1-5)
tcl
OK (tcl-8.3.1-46)
tk
OK (tk-8.3.1-46)
[Required for Full Mode]
gcc
OK (gcc-2.96-54)
glibc-devel
OK (glibc-devel-2.1.92-14)
6 XFree86-devel
OK (XFree86-devel-4.0.1-1)
kernel-source
OK (kernel-source-2.2.16-22)
TouchKit Manual for Linux v1.0.2
The installation script will checks if software packages needed installed or not. If
the needed software packages were not installed, the script file may stops driver
installation.
5. The setup script will prompt user to select [1] Compact installation or [2] Full
mode installation after it finishes checking the needed software packages.
Choose [1] or [2] to precede installation procedure.
(Step 2) Select Installation Mode
(Q) Which installation mode do you prefer?
(1) Compact Mode, (only RS232 and PS/2) or
(2) Full Mode (RS232, PS/2 and [USB])
6. If [2] Full Mode is selected, the setup script will rebuild the driver package
automatically before it install the driver.
1
(I) [Full Mode] selected
(Step 3) Rebuild TouchKit
for n in include driver utility xf86drv diag usb; do
make -C $n || exit 1;
\
done
.
.
.
: '+-----------------------------------+'
: '| Build-All Complete Successfully |'
: '+-----------------------------------+'
\
7. After rebuild the driver package successfully if [2] Full Mode selected, TouchKit
driver component will be installed into system. Then, it prompt user to restart X
window to enable driver.
(Step 4) Install TouchKit
(*) Install USB module [/lib/modules/2.2.16-22/usb/tkusb.o]
(*) Install touch panel daemon [/usr/bin/tpaneld]
(*) Install configuration utility [/usr/bin/touchcfg]
(*) Install XFree86 driver [/usr/X11R6/lib/modules/input/touchkit_drv
(*) Generate uninstall script [/usr/bin/uninstall_TouchKit]
(*) Update system starting up script [/etc/rc.d/rc.local]
(*) Update XFree86 configuration [/etc/X11/XF86Config-4]
+--------------------------------------+
| Installation Complete Successfully |
+--------------------------------------+
(I) Start TouchKit touch panel daemon
(I) Start USB module
(I) Please RESTART your X Window Server.
7
TouchKit Manual for Linux v1.0.2
8. To install driver for RedHat 8.0 or RedHat 9.0, please repeat the step 1 ~ 7 as
the same as other version of Linux. The difference between Redhat 8.0, 9.0 and
other version is the install directory changed to /mnt/cdrom/Linux/RedHat8 or
/mnt/cdrom/Linux/RedHat9.
Execute script touchkit.setupr8nm.sh or touchkit.setupr9.sh with command sh
touchkit.setupr8nm.sh or sh touchkit.setupr9.sh.
This software package should be installed first, since they are not for default
installation when installing OS.
·
sharutils-4.2.1-12.i386.rpm
Notice:
Please refer to above method to install other distributions Linux driver.
8
TouchKit Manual for Linux v1.0.2
Manual Installation
For those Linux distribution that does not support RPM, the TouchKit driver can be
installed manually. Users can extract the driver source code firstly. Unzip “touchkit.
tgz” to a temp working folder.
Then, copy the driver files to the specific directory and configure the setting for X
window.
1.
Locate the system X window configuration file in /etc/X11. The setting file name
maybe “XF86Config”( for most X 3.x ), “XF86Config-4”( for most X4.x) , or
“Xorg.conf”( for most Xorg 6.x ), etc. Please make sure which file is used for X
window configuration before adding setting configuration for TouchKit.
2.
Add setting script to the X window configuration file. Edit the configuration file
with any editor and add the script as below.
2.1) For X window 3.x:
Add a section as below in the X window configuration file
## TouchKit section begin (Please do NOT edit this section!!) ##
Section "Module"
Load "xf86TouchKit.so"
EndSection
Section "Xinput"
SubSection "touchkitpanel"
Port "/dev/tkdat0"
DeviceName "tpanel"
AlwaysCore
DebugLevel 0
EndSubSection
EndSection
## TouchKit section end ##
2.2) For X window 4.x and Xorg 6.x:
Add the below script in the Section “ServerLayout”
InputDevice “TKPANEL” “SendCoreEvents”
Then, add a new section for TouchKit
## TouchKit section begin ( Please do NOT edit this section!! ) ##
Section "InputDevice"
Identifier "TKPANEL"
Driver "touchkit"
Option "Device" "/dev/tkdat0"
9
Option "DebugLevel" "0"
TouchKit Manual for Linux v1.0.2
EndSection
## TouchKit section end ##
3.
Copy daemon to the target directory and change its mode.
cp tpaneld /usr/bin
chmod 4755 /usr/bin/tpaneld
4.
Copy X module to the target directory.
4.1) for X window 3.x:
cp xf86TouchKit.so /usr/X11R6/lib/modules/input
4.2) for X Window 4.x or Xorg 6.x:
cp touchkit_drv.o /usr/X11R6/lib/modules/input
5.
Edit the daemon configuration file “/etc/tpaneld.conf”. If this file was not exist,
create a new file with the file name “tpaneld.conf“. The configuration should
contains some parameters description as below
MouseMode = DRAWING
DblClickSpeed = 18
DblClickArea = 30
RclickTool = 0
Sound = 0
Port = /dev/ttyS0
Port = /dev/ttyS1
Port = /dev/psaux
Port = /dev/usb/tkpanel0
Port = /dev/usb/tkpanel1
The daemon tpaneld will scan the ports list in the configuration file to check if
touchscreen controller exist or not. /dev/usb/tkpanel0 and /dev/usb/tkpanel1
are used for USB model only.
6.
Copy the calibration files. The calibration files should be found in the
subdirectory of touchkit/diag after the driver packages was extracted.
/touchkit/diag/4pcal/4pcal is the 4 points calibration utility.
/touchkit/diag/25pcal/25pcal is the 25 points calibration utility.
/touchkit/diag/drawtest is the utility for draw testing.
Users can do calibration or draw test with these utility.
For ex. /touchkit/diag/4pcal/4pcal /dev/ttyS0 for 4 points calibration with the
device on /dev/ttyS0.
7.
Rebuild the kernel module for USB. This is needed for USB model. Follow below
steps to rebuild the kernel module “tkusb.o” ( for kernel before 2.4.x ) or
“tkusb.ko”( for kernel 2.6.x ).
7.1) Locate the extracted directory. And go to the subdirectory /touchkit/include
make new
7.2) change the directory to /touchkit/usb
make all
10
then the kernel module will be rebuild. ( The kernel source must be
TouchKit Manual for Linux v1.0.2
installed and well configured ).
7.3) Copy the kernel module “tkusb.o”( kernel version before 2.4.x ) or
“tkusb.ko”( kernel version 2.6.x ) to the target directory.
For example, “/usr/bin”
7.4) Copy the user daemon usbpnpd to the target directory.
For example, cp usbpnpd /usr/bin
7.5) edit USB daemon file /etc/usbpnpd.conf. If the file was not exist, create
new one. The /etc/usbpnpd.conf should contains the description as
Device = 0x0123, 0x0001, insmod tkusb vidlist=” 0123 3823 3823 0EEF 0EEF” pidlist=” 0001 0001 0002 0001 0002”; /usr/bin/tpanleld &
Device = 0x3823, 0x0001, insmod tkusb vidlist=” 0123 3823 3823 0EEF 0EEF” pidlist=” 0001 0001 0002 0001 0002”; /usr/bin/tpanleld &
Device = 0x3823, 0x0002, insmod tkusb vidlist=” 0123 3823 3823 0EEF 0EEF” pidlist=” 0001 0001 0002 0001 0002”; /usr/bin/tpanleld &
Device = 0x0EEF, 0x0001, insmod tkusb vidlist=” 0123 3823 3823 0EEF 0EEF” pidlist=” 0001 0001 0002 0001 0002”; /usr/bin/tpanleld &
Device = 0x0EEF, 0x0002, insmod tkusb vidlist=” 0123 3823 3823 0EEF 0EEF” pidlist=” 0001 0001 0002 0001 0002”; /usr/bin/tpanleld &
8.
Make device node for USB model. Make device node to represent the USB
TouchKit controller device.
mknod /dev/usb/tkpanel0 c 180 180
mknod /dev/usb/tkpanel1 c 180 181
9.
Modify rc.local to load kernel module and daemon. The “rc.local” file should be
found in “/etc/rc.d”. Append the following description in this file.
## TouchKit section begin ( Please do NOT edit this section!! ) ##
insmod /usr/bin/tkusb.o ## for USB model only. kernel before 2.4.x only
insmod /usr/bin/tkusb.ko ## for USB model only. Kernel 2.6.x only
/usr/bin/usbpnpd
/usr/bin/tpaneld
## TouchKit section end #
10. Reboot
11
TouchKit Manual for Linux v1.0.2
Chapter 3. Configuration Utility and Right Button Emulator
The touch-sensitive area of the panel and touch-sensitivity both can be modulated
through the configuration utility. Besides, the controller identification and device
activated shall be done first.
After installation TouchKit, execute touchcfg to start the configuration utility.
The Panel Candidate List, which contains by default two RS232, one PS/2 and two
USB devices, commands TouchKit driver which port to probe for controller. If a port
is occupied by other device, e.g. /dev/ttyS0(COM1) is used by a mouse, it is
recommended to Remove /dev/ttyS0 from the list, since the probe process would
interfere the operation of mouse.
If the users need other com port, for example com3, please go to /etc/tpaneld.conf
and add the sentence Port = /dev/ttyS2.
< tpaneld.conf >
MouseMode = DRAWING
DblClickSpeed = 18
DblClickArea = 30
RClickTool = 0
Sound = 0
Port = /dev/ttyS0
Port = /dev/ttyS1
Port = /dev/ttyS2 is added to use com3
Port = /dev/ttyS3 is added to use com4
Port = /dev/psaux
Port = /dev/usb/tkpanel0
Port = /dev/usb/tkpanel1
After checking that touch panel devices (included its controller) are equipped well,
users may click [Rescan] button to scan all devices listed. If there are any additional
connections excluding default connections, please press [Add] button to set specific
settings.
Select one device after import more than one device at the panel list window.
12
The one selected will activate the panel.
TouchKit Manual for Linux v1.0.2
The Sound option provides users the click feedback while the click actions are done.
There are five buttons, [Draw Test], [4-PT Cal], [Advanced], [About] and [Close],
at the lower section of the TouchCfg window.
<DRAW TEST>
Test the drawing position related to the display screen on panel.
Click on the [Draw Test] button. There will be a squared blue display showing.
Try to write or draw on it to verify the touch position.
Press <ESC> to exit.
<4-PT Cal>
Correct 4 point locations on screen with the panel. Press [4-PT Cal], screen
displays as follows.
13
Touch the blinking symbol on panel until beep or stop blinking.
TouchKit Manual for Linux v1.0.2
<Advanced>
Press [Clear] to clear the previous calibration records.
The record will become default record.
Press [Calibrate] to execute 25 points calibration.
Correct 25 point locations on screen with the panel.
Touch the blinking symbol on panel until beep or stop blinking.
There will be a message window after this correction. After the calibration, the
new record will overwrite the old one.
<Mode Button>
Check it or not to turn mouse button, which provides mode selection and right
button emulation, on or off.
Change right / left button by click the button shown on the right-bottom corner
of screen. Blue area expresses what button has been selected.
TouchKit Manual for Linux v1.0.2
14
After select the button, users can touch the panel to control mouse activities.
Select / De-select files or Drag icons on screen, whatever the mouse behaves.
<Double Click Speed>
Double Click Speed is the time of the touch panel response when someone
double click it. Drag the cursor from left to right is slow to fast.
<Double Click Area>
Each one touch has its own touch tolerance once someone may not fix in one
point. So if users set the Double Click Area to <Smaller>, the panel will be very
sensitive about micro-move while users want to fix on a point. If users set it to
<Larger>, it tolerates the larger touch point movement while users want to point
at a fixed position.
<About>
Information about TouchKit.
<Close>
Close TouchKit touch panel utility.
15
TouchKit Manual for Linux v1.0.2
Chapter 4. Uninstalling TouchKit
To uninstall TouchKit all users have to do is execute uninstall_TouchKit in text
mode.
16
TouchKit Manual for Linux v1.0.2