1
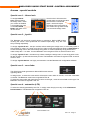
AN004 BS3X QUICK START GUIDE : CONTROL ASSIGNMENT
The Bitstream 3X standard mode is a preprogrammed mode where all controls are already assigned.
Yet you still can modify these assignments. This application note will help you to directly assign
Bitstream 3X controls in standard mode without using the configuration software.
1. Click two times on Edit Button to access the Bitstream 3X assign menu :
2. Then press OK Button. The Bitstream 3X is waiting for you to modify the position of the control to
assign.
3. Now move the control you want to assign (ie: any fader, knobs, switch button, cross-fader, joystick,
infrared axis or automation potentiometers). You automatically enter the control assign menu.
4. Use the Select Encoder to setup the following menus :
ASSIGN STD
Event type
Control change / note on
Event number
0..127
5. Click two times Cancel Button to go back to main screen and check your assignations.
For more detailed information please refer to Bitstream 3X user’s manual.
www.waveidea.com
Rev 1.0 - Page 1
AN004 BS3X QUICK START GUIDE : CONTROL ASSIGNMENT
Annexe : special controls
Special case 1 : infrared axis
To assign Infrared
Axis, before entering
the assign menu, check
your control is enabled.
A 3 seconds long push
on the ON / HOLD
Button will switch on or
off the control.
Check on the LCD screen the
control state, as well as the value
sent and the « infrared bar
graph » which will adjust
according to the movements of
your hand. Now go back to step
1 to access the assign menu.
Special case 2 : joystick
The Bitstream 3X dual axis joystick allows to generate 2 distinct MIDI events
covering the X and Y axes (horizontal and vertical respectively). They are a bit
tricky to assign separately.
To assign Joystick X axis : the tips consists, before entering the assign menu, to move the joystick Y
axis full down (Y value = 0). Keep your hand on it (don’t move!) and press two times on Edit Button to
access the assign menu. Now move slowly the joystick on X axis maintaining the joystick down in
order to keep the Y = 0 value. If so the Bitstream must recognize CTRL 06, which means X axis.
To assign Joystick Y axis : the same way, before entering the assign menu, move the joystick X axis
full left (X value = 0) and redo the same process. The Bitstream must have recognized CTRL 07 which
means Y axis.
To assign Joystick Switch : we highly recommend to use the Bitstream 3X configuration software.
Special case 3 : cross-fader
The digital cross-fader generates 2 distinct MIDI events sent as
opposing values.
In assign menu, to select the event which will reach the max value on the left, move the cross-fader
on the left. The Bitstream must have recognized CTRL 48.
To select the event which will reach the max value on the right, move the cross-fader on the right. The
Bitstream must have recognized CTRL 49.
Special case 4 : automation (LFO)
To select the events generated by the LFO : in assign menu simply move any of the 3 Dedicated
Potentiometers. The Bitstream 3X recognizes CTRL 66.
www.waveidea.com
Rev 1.0 - Page 2