1
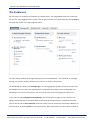
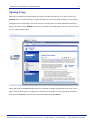
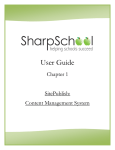
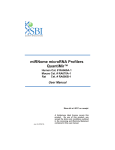
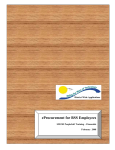
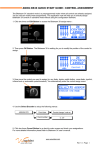
Business
User
Introduction
to
Cascade
Server
A
Getting
Started
Guide
Hannon
Hill
Corporation
950
East
Paces
Ferry
Road
Suite
2440,
Atlanta,
GA
30326
www.hannonhill.com
o:
678.904.6900
f:
678.904.6901
Table
of
Contents
Introduction.............................................................................................................................................................3
The
Dashboard ....................................................................................................................................................... 4
Opening
a
Page....................................................................................................................................................... 6
Editing
a
Page ..........................................................................................................................................................7
Using
the
Word
Processor ..................................................................................................................................... 8
Inserting
an
Image.................................................................................................................................................. 9
Inserting
a
Hyperlink ............................................................................................................................................. 12
Changing
Metadata............................................................................................................................................... 13
Saving
Content.......................................................................................................................................................14
Viewing
history ...................................................................................................................................................... 15
Creating
a
New
Page ............................................................................................................................................. 17
Starting
a
Workflow ..............................................................................................................................................19
Approving
Content
in
a
Workflow ....................................................................................................................... 21
Sending
a
Message................................................................................................................................................25
Locking
an
asset ....................................................................................................................................................27
Conclusion............................................................................................................................................................. 29
Business
User
Introduction
to
Cascade
Server
3
Introduction
Welcome
to
Cascade
Server
web
content
management
system
(CMS)!
The
next
few
pages
will
serve
as
a
guide
for
you
to
consult
as
you
see
how
easy
it
is
to
manage
your
website
right
from
within
Cascade
Server.
We’ll
show
you
how
to
create
and
update
your
content
quickly
and
easily
without
having
to
learn
an
array
of
new
skills.
Inserting
new
images,
creating
hyperlinks,
and
adding
visual
styles
to
text
are
all
easy
to
do
in
Cascade
Server.
If
you
are
comfortable
with
using
simple,
web‐based
email
such
as
Hotmail
and
Yahoo!,
you
have
all
of
the
necessary
skills
to
manage
your
content.
A
CMS
allows
specific
content
to
be
maintained
by
the
people
who
create
it
–
no
more
sending
information
off
to
be
put
online
by
a
different
person
or
department.
Cascade
Server
is
easy
to
use
and
accessible
from
any
standard
web
browser,
letting
you
focus
on
what’s
really
important
–
actually
creating
and
managing
the
content.
Please
use
the
following
credentials
for
this
introduction:
•
Username:
producer
•
Password:
producer
The
“producer”
user
is
the
manager
of
an
intranet
site
in
the
CMS.
***Please
note
that
the
following
examples
assume
you
have
a
standard
installation
of
Cascade
Server
that
has
not
yet
been
customized.
If
your
organization
has
customized
the
software,
the
following
concepts
will
be
useful
for
your
understanding
but
could
vary
from
the
steps
contained
herein.
©
2007
Hannon
Hill
Corporation,
all
rights
reserved.
950
East
Paces
Ferry
Road
∙
Suite
2440
∙
Atlanta,
GA
30326
o:
678.904.6900
f:
678.904.6901
http://www.hannonhill.com
Business
User
Introduction
to
Cascade
Server
4
The
Dashboard
Our
first
step
is
to
introduce
the
interface
for
Cascade
Server.
The
image
below
shows
the
screen
that
you
see
first,
upon
logging
into
the
system.
You
can
get
back
here
at
any
time
simply
by
clicking
Home
in
the
upper
left
corner
of
the
top
navigation
menu.
The
main
editing
window
on
the
right
displays
your
personal
dashboard
–
any
workflows
or
messages
waiting,
new
content
wizards,
locked
assets,
and
a
list
of
recently
visited
items.
The
Dashboard
also
shows
your
Starting
Page.
The
starting
page
will
typically
show
a
list
of
assets
that
are
available
for
you
to
edit.
Your
administrator
is
responsible
for
assigning
your
starting
page,
and,
depending
on
how
you
use
the
system,
you
may
not
have
the
same
starting
page
as
another
user.
In
the
section
entitled
My
New
Content
Wizards,
you
will
find
a
list
of
pages
or
assets
that
you
can
quickly
create
from
scratch.
Because
these
content
wizards
are
a
quick
way
to
manufacture
content,
they
are
also
known
as
Asset
Factories
within
the
system.
You
can
access
the
same
Content
Wizards,
or
Asset
Factories,
by
selecting
New
on
the
top
menu
bar.
We’ll
come
back
to
this
later
when
we
want
to
©
2007
Hannon
Hill
Corporation,
all
rights
reserved.
950
East
Paces
Ferry
Road
∙
Suite
2440
∙
Atlanta,
GA
30326
o:
678.904.6900
f:
678.904.6901
http://www.hannonhill.com
Business
User
Introduction
to
Cascade
Server
5
create
a
new
press
release.
On
your
Dashboard,
you’ll
also
see
sections
for
Workflows,
Messages,
Locks,
and
History.
Workflows,
Messages,
and
Locks
are
available
as
tabs
as
well.
Clicking
on
one
of
these
Dashboard
Tabs
will
enable
you
to
view
a
more
comprehensive
listing
of
each
category.
We’ll
talk
more
about
each
of
these
areas
as
we
continue
through
the
product.
Now
looking
to
the
left,
you’ll
see
the
Asset
Tree
in
the
left
side
bar.
This
is
where
your
site
is
managed.
Under
the
Base
Folder,
you
will
see
several
additional
folders
(called
top‐level
folders),
each
of
which
represents
a
different
site
that
can
be
managed
independently
of
the
others
with
different
levels
of
user
access
all
from
within
one
interface.
You
can
collapse
the
asset
tree
by
clicking
on
the
grey
tab
between
the
two
sections.
©
2007
Hannon
Hill
Corporation,
all
rights
reserved.
950
East
Paces
Ferry
Road
∙
Suite
2440
∙
Atlanta,
GA
30326
o:
678.904.6900
f:
678.904.6901
http://www.hannonhill.com
Business
User
Introduction
to
Cascade
Server
6
Opening
a
Page
We
have
an
example
site
created
within
the
system.
In
order
to
browse
the
site,
simply
click
on
the
intranet
folder
in
the
left
side
bar
to
expand
the
folder
tree.
Once
the
folder
expands,
the
sub‐folders
and
page
assets
are
displayed
in
the
same
directory
structure
that
exists
when
published.
Choosing
a
page
in
the
folder,
such
as
default,
will
bring
up
a
preview
of
the
web
page
in
the
main
system
window,
just
as
it
would
appear
online.
Notice
that
there
is
no
Edit
tab
because
we
aren’t
allowed
to
change
this
page
due
to
our
user
access
rights.
Now,
we
want
to
go
to
a
page
that
we
are
allowed
to
change.
For
one
such
page
in
the
system,
click
on
the
folder
News,
in
the
left
asset
tree,
followed
by
the
page
content.
©
2007
Hannon
Hill
Corporation,
all
rights
reserved.
950
East
Paces
Ferry
Road
∙
Suite
2440
∙
Atlanta,
GA
30326
o:
678.904.6900
f:
678.904.6901
http://www.hannonhill.com
Business
User
Introduction
to
Cascade
Server
7
Editing
a
Page
Editing
a
page
in
the
CMS
is
very
similar
to
editing
a
Microsoft
Word®
document
on
your
hard
drive.
1.
Start
by
locating
the
page
in
the
asset
tree
and
clicking
on
the
page
you
would
like
to
edit.
In
this
case,
we
are
editing
the
page
/intranet/news/content.
2. Once
the
page
has
loaded,
click
on
the
Edit
tab
located
above
the
page
next
to
the
active
View
tab.
3. From
here
you
are
able
to
edit
all
the
content
of
the
designated
region.
Make
the
desired
changes
to
the
document
just
as
you
would
when
using
a
standard
word
processor.
While
you
are
editing
an
asset,
such
as
a
page,
file,
or
folder,
the
asset
is
automatically
locked
to
prevent
other
users
from
accessing
the
same
asset
while
it
is
being
edited.
When
edits
have
been
made
and
the
asset
has
been
submitted,
the
asset
is
automatically
unlocked
so
that
other
users
can
access
it.
Please
keep
the
word
processor
open
as
we
continue
with
the
getting
started
guide.
©
2007
Hannon
Hill
Corporation,
all
rights
reserved.
950
East
Paces
Ferry
Road
∙
Suite
2440
∙
Atlanta,
GA
30326
o:
678.904.6900
f:
678.904.6901
http://www.hannonhill.com
Business
User
Introduction
to
Cascade
Server
8
Using
the
Word
Processor
The
word
processor,
also
called
the
WYSIWYG
(what
you
see
is
what
you
get)
editor,
that
is
integrated
in
the
CMS
system
has
the
same
functionality
and
features
you
are
most
likely
accustomed
to
using
in
a
standard
editor.
The
button
functions
are
as
follows:
Please
try
out
some
of
the
different
toolbar
buttons
in
the
word
processor
in
order
to
become
more
acquainted
with
how
they
work.
©
2007
Hannon
Hill
Corporation,
all
rights
reserved.
950
East
Paces
Ferry
Road
∙
Suite
2440
∙
Atlanta,
GA
30326
o:
678.904.6900
f:
678.904.6901
http://www.hannonhill.com
Business
User
Introduction
to
Cascade
Server
9
Inserting
an
Image
4. Now
we
want
to
insert
an
image.
Place
your
mouse
cursor
in
the
area
desired
for
the
image,
and
then
click
on
the
insert
image
icon
on
the
toolbar.
5. The
insert
image
window
offers
two
tabs
–
one
for
internal
images
and
one
for
external.
We
are
going
to
insert
an
image
that
is
already
in
the
system,
so
we’ll
stay
on
the
default
Internal
tab.
6. Next
to
Image,
you
will
see
two
icons
–
a
red
cancel/delete
icon
and
an
image
icon.
Click
on
the
image
icon
to
open
a
new
window
that
will
allow
you
to
select
an
image
to
insert.
7. In
the
new
image
chooser
window,
select
the
intranet
folder
in
the
left
asset
tree,
followed
by
the
files
folder
and
then
the
images
folder,
and
finally
the
image
file
logo.gif.
©
2007
Hannon
Hill
Corporation,
all
rights
reserved.
950
East
Paces
Ferry
Road
∙
Suite
2440
∙
Atlanta,
GA
30326
o:
678.904.6900
f:
678.904.6901
http://www.hannonhill.com
Business
User
Introduction
to
Cascade
Server
10
8. With
the
image
selected,
click
Confirm
to
close
the
window.
9. The
image
path
will
appear
in
the
insert
image
window.
In
the
Alternate
Text
field,
type
in
the
text
representation
of
the
image
“Company
Logo.”
©
2007
Hannon
Hill
Corporation,
all
rights
reserved.
950
East
Paces
Ferry
Road
∙
Suite
2440
∙
Atlanta,
GA
30326
o:
678.904.6900
f:
678.904.6901
http://www.hannonhill.com
Business
User
Introduction
to
Cascade
Server
11
10. Now
click
Insert
for
the
image
to
be
placed
in
the
word
processor.
©
2007
Hannon
Hill
Corporation,
all
rights
reserved.
950
East
Paces
Ferry
Road
∙
Suite
2440
∙
Atlanta,
GA
30326
o:
678.904.6900
f:
678.904.6901
http://www.hannonhill.com
Business
User
Introduction
to
Cascade
Server
12
Inserting
a
Hyperlink
11. With
our
image
inserted
we
now
want
to
put
in
a
hyperlink.
12. Highlight
the
word
or
words
you
wish
to
turn
into
a
hyperlink.
We
will
highlight
the
word
“good”
in
the
first
sentence.
13. Click
the
insert
web
link
icon
on
the
toolbar.
The
insert
link
window
will
now
open
and,
again,
you
will
see
two
tabs
–
one
for
internal
links
and
one
for
external.
We’re
inserting
a
link
to
another
page
of
our
site,
so
we’ll
stay
on
the
default
Internal
tab.
14. Next
to
Link
you
will
see
two
icons
–
a
red
cancel/delete
icon
and
a
page
icon.
Click
on
the
page
icon
to
open
a
new
window
that
will
allow
you
to
select
the
page
you
wish
to
link
to.
15. Select
intranet
on
the
asset
tree
followed
by
the
default
page.
With
the
page
selected,
click
Confirm
to
close
the
window.
16. Now,
back
in
the
insert
link
window,
click
the
Insert
button.
The
window
will
close,
and
the
hyperlink
will
be
placed
around
the
selected
word
processor
text.
©
2007
Hannon
Hill
Corporation,
all
rights
reserved.
950
East
Paces
Ferry
Road
∙
Suite
2440
∙
Atlanta,
GA
30326
o:
678.904.6900
f:
678.904.6901
http://www.hannonhill.com
Business
User
Introduction
to
Cascade
Server
13
Changing
Metadata
17. With
our
image
and
hyperlink
inserted,
we
now
need
to
update
the
metadata
about
the
page.
Metadata
is
information
that
describes
the
asset
and
includes
a
summary,
title,
keywords,
author,
and
other
items
that
are
used
for
a
variety
of
tasks
in
a
CMS.
Metadata
is
particularly
important
in
creating
dynamic
navigation
menus
such
as
site
maps
and
context
navigation.
To
edit
the
page
metadata,
please
click
on
the
Metadata
pane
directly
above
the
word
processor
toolbar.
18. For
the
Display
Name
metadata
field,
type
“My”
in
front
of
the
existing
value.
The
display
name
field,
also
known
as
the
short
name
field,
is
most
often
used
for
dynamic
navigation
menus.
19. For
the
Title
metadata
field,
type
“My”
in
front
of
the
existing
value.
The
title
field
is
a
longer
version
of
the
display
name,
and
it
is
often
used
for
the
page
heading
and
title
bar
of
the
browser.
20. With
the
two
metadata
fields
changed,
click
on
the
Content
pane
again
to
continue
editing
the
page
in
the
word
processor.
©
2007
Hannon
Hill
Corporation,
all
rights
reserved.
950
East
Paces
Ferry
Road
∙
Suite
2440
∙
Atlanta,
GA
30326
o:
678.904.6900
f:
678.904.6901
http://www.hannonhill.com
Business
User
Introduction
to
Cascade
Server
14
Saving
Content
21. With
our
example
changes
complete,
it
is
now
time
to
save
our
content.
To
save
your
changes,
click
the
Submit
button
below
the
word
processor
(or
use
the
shortcut
key
Alt+Shift+S
on
Windows
and
Ctrl+S
on
Mac).
Congratulations!
You’ve
just
edited
your
first
web
page
in
the
CMS.
You
should
see
the
changes
you’ve
made
reflected
throughout
the
page,
including
the
main
content
region
(word
processor),
left
context
navigation
menu
(metadata),
and
page
heading
(metadata).
Updating
information
and
metadata
in
CMS
provides
for
a
consistent
look‐and‐feel
throughout
your
website
makes
it
easy
for
visitors
to
navigate.
©
2007
Hannon
Hill
Corporation,
all
rights
reserved.
950
East
Paces
Ferry
Road
∙
Suite
2440
∙
Atlanta,
GA
30326
o:
678.904.6900
f:
678.904.6901
http://www.hannonhill.com
Business
User
Introduction
to
Cascade
Server
15
Viewing
History
Often,
as
you’re
working
within
the
system,
you’ll
want
an
easy
way
to
return
to
content
you
were
working
on
earlier.
Viewing
History
allows
us
to
see
a
list
of
our
most
recently
viewed
assets,
and
it
provides
for
easy
navigation.
22. To
view
history,
you
can
click
on
the
History
button,
located
in
the
top
navigation
menu.
It
can
also
be
accessed
from
the
Dashboard
under
My
Recent
History.
23. You
will
be
forwarded
to
the
History
screen
where
you
will
see
a
list
of
your
most
recently
viewed
assets.
You
can
jump
to
any
of
those
assets
by
clicking
on
its
system
name
in
the
list.
This
is
a
great
©
2007
Hannon
Hill
Corporation,
all
rights
reserved.
950
East
Paces
Ferry
Road
∙
Suite
2440
∙
Atlanta,
GA
30326
o:
678.904.6900
f:
678.904.6901
http://www.hannonhill.com
Business
User
Introduction
to
Cascade
Server
16
way
to
retrace
your
steps
when
you
need
to
navigate
quickly
to
a
previous
page.
24. Click
on
the
/intranet/news/content
asset.
This
will
bring
us
back
to
the
page
we
previously
edited.
You
can
also
use
the
Back
button
on
your
browser
any
time
you
want
to
go
back
to
a
previous
screen.
The
history
is
cleared
each
time
you
log
out
of
the
system,
so
you’ll
only
see
assets
that
you’ve
viewed
during
the
current
session.
©
2007
Hannon
Hill
Corporation,
all
rights
reserved.
950
East
Paces
Ferry
Road
∙
Suite
2440
∙
Atlanta,
GA
30326
o:
678.904.6900
f:
678.904.6901
http://www.hannonhill.com
Business
User
Introduction
to
Cascade
Server
17
Creating
a
New
Page
In
addition
to
editing
an
existing
page,
you
also
have
the
ability
to
create
new
pages
and
upload
documents
and
images
on
your
own.
To
create
a
new
page,
you
will
use
an
Asset
Factory.
As
previously
mentioned,
asset
factories
provide
an
easy
way
to
create
a
specific
type
of
asset
or
specially
configured
page.
The
asset
factory
is
made
available
by
clicking
on
“New”
in
the
top
navigation
menu.
Default
asset
factory
elements
included
in
Cascade
Server
are:
Block,
External
Link,
File,
Folder,
Page,
Stylesheet,
and
Template.
Your
user
access
rights
determine
which
asset
factory
elements
are
available
to
you,
and
your
administrator
determines
your
access
rights.
Let’s
go
through
the
process
of
creating
new
content.
25. Click
on
the
New
button,
in
the
top
navigation
menu,
to
display
the
different
types
of
assets
that
you
are
allowed
to
create.
26. Click
on
the
type
of
page
you
would
like
to
create.
For
our
page,
we
will
choose
New
‐>
Intranet
‐>
Press
Release.
©
2007
Hannon
Hill
Corporation,
all
rights
reserved.
950
East
Paces
Ferry
Road
∙
Suite
2440
∙
Atlanta,
GA
30326
o:
678.904.6900
f:
678.904.6901
http://www.hannonhill.com
Business
User
Introduction
to
Cascade
Server
18
27. You’ll
notice
that
this
type
of
page
has
a
series
of
fields
instead
of
a
large
word
processor.
Some
types
of
content
are
more
structured,
whereas
others
are
less
structured.
For
Display
Name,
type
in
“My
First
Press
Release.”
28. For
Title,
type
in
“A
New
Press
Release
in
the
CMS.”
29. For
Summary,
type
in
“The
press
release
summary
content
goes
here.”
30. Now,
scroll
down
to
the
bottom,
and
click
the
Submit
button
at
the
bottom
to
record
your
changes.
31. You
should
now
see
the
new
page
in
your
web
browser.
Notice
that
the
content
from
the
word
processor
appears
in
the
main
region
in
a
specific
layout
independent
of
the
content
you
entered.
Creating
a
new
web
page
in
the
CMS
saves
you
time
because
the
content
is
automatically
formatted
for
you,
and
related
hyperlinks
to
the
page
are
created
as
well.
©
2007
Hannon
Hill
Corporation,
all
rights
reserved.
950
East
Paces
Ferry
Road
∙
Suite
2440
∙
Atlanta,
GA
30326
o:
678.904.6900
f:
678.904.6901
http://www.hannonhill.com
Business
User
Introduction
to
Cascade
Server
19
Starting
a
Workflow
To
ensure
that
content
has
gone
through
the
necessary
approvals
before
publishing,
many
organizations
take
advantage
of
Cascade
Server’s
Workflow
options.
Starting
a
workflow
will
send
your
newly
created
or
updated
content
through
to
one
or
more
additional
users
for
approval.
Once
all
the
required
approvals
are
completed,
the
content
is
typically
published.
32. Let’s
begin
a
workflow
for
the
page
we
just
created:
/intranet/news/My‐First‐Press‐Release.
33. Click
on
the
Edit
tab
located
above
the
page
next
to
the
active
View
tab.
34. Scroll
down
the
window
until
you
reach
Advanced
Options,
and
click
on
it.
Once
you
have
opened
the
Advanced
Options,
ensure
that
the
Start
Workflow
box
is
checked
(your
administrator
may
keep
this
box
checked
as
a
default).
35. Click
Submit.
36. You
will
be
forwarded
to
the
Start
Workflow:
Create
Edit
Copy
screen,
which
lists
each
step
in
the
workflow.
In
the
field
next
to
Comments,
type
in
the
message
you
wish
the
next
user
in
the
workflow
to
receive.
In
this
case
we
will
type,
“Please
carefully
review
My
First
Press
Release.”
©
2007
Hannon
Hill
Corporation,
all
rights
reserved.
950
East
Paces
Ferry
Road
∙
Suite
2440
∙
Atlanta,
GA
30326
o:
678.904.6900
f:
678.904.6901
http://www.hannonhill.com
Business
User
Introduction
to
Cascade
Server
20
37. Select
a
due
date
by
clicking
on
the
Calendar
Icon
next
to
Due
Date.
38. If
there
are
no
preset
user
or
group
assignations
for
each
step,
or
if
you
would
like
to
change
any
assigned
users,
click
on
the
User
Icon
under
the
Assignment
section
and
select
the
user
or
group
you
want
each
step
assigned
to.
In
this
case
we
will
keep
the
user
and
group
assignations
as
they
are.
39. Click
Submit.
The
asset
is
then
locked
into
the
selected
workflow
process
and
will
be
forwarded
to
the
next
user
in
the
workflow.
©
2007
Hannon
Hill
Corporation,
all
rights
reserved.
950
East
Paces
Ferry
Road
∙
Suite
2440
∙
Atlanta,
GA
30326
o:
678.904.6900
f:
678.904.6901
http://www.hannonhill.com
Business
User
Introduction
to
Cascade
Server
21
Approving
Content
in
a
Workflow
Typically,
once
you
have
assigned
a
workflow,
your
role
is
complete.
The
next
user
will
receive
a
message
to
review
the
content,
and
the
workflow
will
continue.
You
may,
however,
find
yourself
on
the
other
end
of
the
workflow
process:
you
may
be
required
to
approve
content
in
a
workflow
started
by
another
user.
For
the
purposes
of
this
walkthrough,
we’re
going
to
act
as
two
different
users.
Since
we’ve
already
started
the
workflow
as
“producer,”
let’s
log
out
and
log
back
in
as
the
next
user
in
the
workflow
process.
40. Log
out
of
Cascade
Server
and
Log
back
in
using
the
Username:
admin
and
the
Password:
admin.
41. On
the
Dashboard,
beneath
the
My
Workflows
sub‐section,
you
will
see
the
workflow
that
you
just
created
as
“producer”
waiting
to
be
approved
by
the
user
“admin”.
Approvers
are
responsible
for
reviewing
content
in
a
workflow
and
determining
whether
it
should
be
approved
and
finished,
rejected,
or
edited.
Click
on
the
workflow
Create
Edit
Copy:
A
New
Press
Release
in
the
CMS.
42. Click
on
the
History
pane,
located
under
the
View
tab,
in
order
to
view
the
Comments.
©
2007
Hannon
Hill
Corporation,
all
rights
reserved.
950
East
Paces
Ferry
Road
∙
Suite
2440
∙
Atlanta,
GA
30326
o:
678.904.6900
f:
678.904.6901
http://www.hannonhill.com
Business
User
Introduction
to
Cascade
Server
22
43. Click
on
the
Properties
Pane.
In
order
to
review
the
content
in
the
workflow,
click
on
the
asset
“My
First
Press
Release,”
next
to
the
Review
Content
section.
44. After
reviewing
the
changes
submitted,
click
back
onto
the
Workflow
screen
by
clicking
on
Create
Edit
Copy:
A
New
Press
Release
in
the
CMS.
©
2007
Hannon
Hill
Corporation,
all
rights
reserved.
950
East
Paces
Ferry
Road
∙
Suite
2440
∙
Atlanta,
GA
30326
o:
678.904.6900
f:
678.904.6901
http://www.hannonhill.com
Business
User
Introduction
to
Cascade
Server
23
45. Select
the
appropriate
action
by
clicking
on
Assign
additional
modifications
or
Approve,
which
are
located
under
the
Actions
heading.
In
this
case,
we
will
select
Approve.
©
2007
Hannon
Hill
Corporation,
all
rights
reserved.
950
East
Paces
Ferry
Road
∙
Suite
2440
∙
Atlanta,
GA
30326
o:
678.904.6900
f:
678.904.6901
http://www.hannonhill.com
Business
User
Introduction
to
Cascade
Server
24
46. You
will
be
forwarded
to
the
Enter
Comments
screen.
Type,
“The
Press
Release
is
great,”
and
click
Submit.
This
will
forward
you
to
the
Create
Edit
Copy:
A
New
Press
Release
in
the
CMS
screen,
and
the
message
bar
will
say,
“Operation
successful”
to
indicate
that
the
workflow
is
complete.
47. In
this
case,
approving
will
complete
the
workflow
and
publish
the
page.
For
some
more
complicated
workflows,
additional
approvals
from
other
users
may
be
required.
In
such
a
case,
approving
the
workflow
will
simply
assign
the
workflow
to
the
next
appropriate
user.
Although
we
will
not
be
deleting
a
workflow
now,
in
case
you
need
to
delete
an
active
workflow
in
the
future,
simply
select
the
workflow
from
your
dashboard,
and
click
the
delete
tab
(an
active
workflow
can
only
be
deleted
by
an
administrator/manager
or
by
the
user
who
initiated
the
workflow).
©
2007
Hannon
Hill
Corporation,
all
rights
reserved.
950
East
Paces
Ferry
Road
∙
Suite
2440
∙
Atlanta,
GA
30326
o:
678.904.6900
f:
678.904.6901
http://www.hannonhill.com
Business
User
Introduction
to
Cascade
Server
25
Sending
a
Message
As
you
use
the
system,
you
may
also
find
yourself
needing
to
send
a
message
to
another
user.
Before
we
log
out
as
“admin,”
let’s
send
a
message
to
our
original
user.
48. First,
select
New‐>Message
from
the
top
navigation
menu.
49. Now
Choose
the
User
or
Group
of
users
that
you
would
like
to
receive
the
message.
We
will
choose
to
send
our
message
to
producer.
50. Now
we
will
type
in
“My
First
Message”
as
the
Subject.
In
the
Body
of
the
message,
we
will
type
in
“My
First
Message”
again.
©
2007
Hannon
Hill
Corporation,
all
rights
reserved.
950
East
Paces
Ferry
Road
∙
Suite
2440
∙
Atlanta,
GA
30326
o:
678.904.6900
f:
678.904.6901
http://www.hannonhill.com
Business
User
Introduction
to
Cascade
Server
26
51. Click
the
Submit
button
to
have
the
message
sent.
52. Log
out
of
Cascade
Server
and
log
back
in
as
producer
in
order
to
view
the
message.
53. From
your
dashboard,
you
have
two
options
for
viewing
your
messages.
You
can
select
the
Messages
tab
and
click
on
the
link
that
will
direct
you
to
the
message
“My
First
Message.”
Or
you
can
go
to
the
My
Messages
sub‐section
of
Outstanding
Items
and
select
to
view
the
message
“My
First
Message”
from
there
and
it
will
take
you
directly
to
the
message.
©
2007
Hannon
Hill
Corporation,
all
rights
reserved.
950
East
Paces
Ferry
Road
∙
Suite
2440
∙
Atlanta,
GA
30326
o:
678.904.6900
f:
678.904.6901
http://www.hannonhill.com
Business
User
Introduction
to
Cascade
Server
27
Locking
an
Asset
There
may
be
times
when
you
will
need
to
edit
an
asset,
while
preventing
other
users
from
making
changes
to
the
same
asset,
for
an
extended
period
of
time.
In
such
cases,
you
may
manually
lock
the
asset.
Unlike
the
automatic
locks
that
are
created
during
editing,
the
manual
locks
do
not
automatically
expire.
The
asset
must
be
unlocked
by
the
same
user
or
by
an
administrator.
54. Start
by
locating
and
selecting
a
page
in
the
asset
tree
that
you
want
to
lock.
In
this
case,
we
are
locking
the
page
/intranet/news/My‐First‐Press‐Release.
55. Under
the
View
tab,
select
the
Lock
pane.
56. Click
Check
out
this
asset.
57. You
will
be
forwarded
back
to
the
Layout
pane,
with
the
Working
Copy
currently
showing.
The
following
Viewing
options
are
also
revealed:
Current,
Compare
with
Current,
and
Break
Lock.
This
asset
is
now
locked,
and
no
other
users
may
edit
it
until
the
lock
is
broken.
58. To
quickly
view
your
locked
assets,
click
on
Home
in
the
top
navigation
menu.
59. Your
locks
are
displayed
on
the
dashboard,
as
they
are
for
each
user,
under
both
the
Locks
tab
and
Current
Activity
on
the
main
dashboard.
©
2007
Hannon
Hill
Corporation,
all
rights
reserved.
950
East
Paces
Ferry
Road
∙
Suite
2440
∙
Atlanta,
GA
30326
o:
678.904.6900
f:
678.904.6901
http://www.hannonhill.com
Business
User
Introduction
to
Cascade
Server
28
60. Click
on
the
asset
/intranet/news/My‐First‐Press‐Release.
In
order
to
manually
unlock
an
asset,
select
the
Lock
pane
on
the
View
tab
of
the
asset.
61. Select
Break
the
lock
and
discard
changes
in
order
to
unlock
the
asset.
Now
the
asset
is
available
for
other
users.
©
2007
Hannon
Hill
Corporation,
all
rights
reserved.
950
East
Paces
Ferry
Road
∙
Suite
2440
∙
Atlanta,
GA
30326
o:
678.904.6900
f:
678.904.6901
http://www.hannonhill.com
Business
User
Introduction
to
Cascade
Server
29
Conclusion
Now
that
you’ve
learned
the
basics,
you’re
ready
to
start
working
in
your
new
CMS.
As
you’ve
seen,
Cascade
Server
is
really
not
too
different
from
basic
web‐based
email
systems
and
standard
word
processing
software.
As
you
become
more
advanced
with
the
software,
you’ll
find
even
more
time
saving
features
and
effective
ways
to
empower
your
content.
And
if
you
ever
do
get
stuck,
the
context
sensitive
help
is
just
a
click
away.
Thank
you
for
going
through
this
introduction
guide,
and
please
let
us
know
if
we
can
help.
©
2007
Hannon
Hill
Corporation,
all
rights
reserved.
950
East
Paces
Ferry
Road
∙
Suite
2440
∙
Atlanta,
GA
30326
o:
678.904.6900
f:
678.904.6901
http://www.hannonhill.com