1
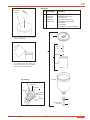
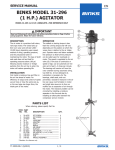
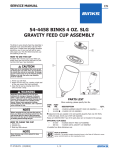
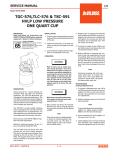
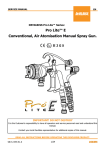
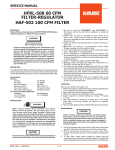
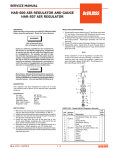
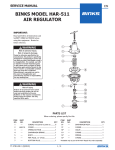
SERVICE MANUAL
EN
1 LITER ALUMINUM GRAVITY FEED CUP
WITH DISPOSABLE LID AND CUP LINER (54-4720)
Important: Before using this equipment, read all safety precautions and
instructions. Keep for future use.
Halogenated Hydrocarbon
Solvents - for example: 1, 1,
1 - trichloroethane and methylene chloride can react with the
aluminum in this cup and cause
an explosion hazard. Read the
data sheet for the material you
intend to spray. Do not use
spray materials containing
these solvents with this cup.
ASSEMBLY OF DISPOSABLE CUP LINER
Note
This paint cup can be used with
or without the cup liner. Skip to
page 2, Column 1, Filling With Paint
(without disposable cup liner) if not
using cup liner.
1.Locate piercing tool.
This gravity feed cup is designed to work
with the 95G and M1-G gravity feed spray
guns. The cup is constructed from durable
aluminum to provide trouble-free operation.
The cup insert is electroless nickel plated
brass. The disposable cup lid is recyclable
and is constructed with recycled polyethylene.
The lid has a unique drip check to prevent
paint from dripping out of the vent in the lid.
Tool
7.Open liner and insert bushing through
liner bottom.
Piercing Tool With
Bushing
Liner
\'
Open Liner
Tool
Pierce liner so it stretches around
bushing to make a leak-proof seal.
2."Break-off" tool sections from web.
8.Insert liner with bushing into cup hole.
Piercing Section
Liner with
bushing on tool.
Web
Sealing Section
3.Locate tool connection ends.
Note
After inserting liner, pull
out tool while
rotating.
Using tool,
push bushing
into cup hole.
Cup
FILLING WITH PAINT (with disposable
cup liner)
ASSEMBLY OF CUP TO GUN
(with or without disposable liner)
1.Remove one of the cup gaskets (#4
(White) Reference only for GFG and
GFHV guns) (#4A (Blue) for 95G and
M1-G guns) from the poly bag.
2. Place this cup gasket in the fluid inlet of
the gun body. See page 3, Cup Drawing.
3.Store remaining cup gasket in a safe
place for future use.
4. Place filter (3) in cup outlet at this time
if desired. See page 3, Cup Drawing.
5. Assemble cup to gun and tighten hand
tight.
Bushing
Tool
DESCRIPTION
This cup is designed to be used with
or without the DeVilbiss disposable cup
liner. The cup liner allows painting in any
position and simplifies clean up.
6.Assemble bushing on tool.
Female
Connection
Male Connection
4.Assemble tool connection together
until it "clicks" twice.
5.Locate drain bushing and piercing end
of tool.
Drain Bushing
Piercing End
1.Place gun in gun holder and carefully
open liner. Don't pull liner up or bushing may be pulled out of drain hole.
2. W
hile holding funnel/strainer, fill the
liner to within 1" (25 mm) of the cup's
top. This will allow room to fold the
liner into the paint cup.
Paint Funnel/Strainer
Hold
Funnel
Liner
Cup
SBBI-4-043-D (9/2014)
1/4
EN
3.
Starting at one end, slip the liner
sealer end of the piercing tool over
the liner's zipper. Hold the liner at the
same end and slide the tool along the
zipper. Make sure the tool overlaps
the zipper.
Piercing
Tool End
CLEANING (without disposable liner)
Note
2.While holding disposable cup liner,
point gun upwards and pull trigger to
allow paint in gun to drain into liner.
For routine cleaning, it is not necessary to remove cup from gun. Do
not remove washer (4) from gun.
If washer (4) is removed, it must
be replaced.
Line Sealer
Do not soak the lid in solvent
for extended periods of time.
Doing so could cause cup/lid
sealing problems and leakage.
Hold Liner
Here
Seal Zipper
Twice
Note
Double check the zipper by
sliding your fingers along
the zipper. Smooth out any
"Bumps". "Bumps" are an
indication the zipper is not
sealed at that area.
4. Fold top of liner down into cup before
installing lid.
FILLING WITH PAINT (without disposable liner)
Fill the cup with paint to the full mark. Do
not overfill.
INSTALLING THE LID
Place plastic lid on the top of the cup, and
push in the center of the lid to assemble
lid. Fold vent cap and push onto center portion
of lid (if vent cap is not already assembled).
PAINTING
The cup lid is designed to be disposable
but may be cleaned and reused if slightly
contaminated with overspray. If lid becomes tight, or does not fit, it is due to
extended soaking in solvent. Let lid air
dry overnight and the lid should return
to its original size and fit.
Hold liner
3.While still pointing the gun upwards,
carefully pull out liner. Keep drain
bushing up to prevent leaking. To pre vent paint from being forced out of
bushing, don't squeeze the liner
while handling it.
Remove lid and properly dispose of any excess paint. Pour in a small amount of clean
solvent. The amount will vary with different
coatings and solvents. Reinstall lid. Shake cup
to wash down the inside surfaces. Hold lid
while shaking to prevent lid from coming
off. Pull trigger to allow some solvent to be
flushed through gun. Remove lid and pour
out dirty solvent. Add a small amount of clean
solvent and repeat procedure. Wipe exterior
of lid with a clean cloth and clean solvent.
Keep bushing up
If a paint filter was used in the bottom of the
cup outlet, it should be removed and cleaned
or replaced at this time. Dispose of used cup
lid if contaminated and replace with new.
CLEANING (with disposable cup liner)
1. Disconnect the air hose and remove
the paint cup lid.
This disposable liner allows you to spray
in any position, even upside down. To spray
upside down, you must first purge the air
from the cup liner.
Note
If there is a large amount of
paint in paint liner, open zipper and
empty paint before removing liner.
4.Properly dispose of remaining paint in
paint liner. Open zipper to allow for
quicker draining of paint. Dispose of
used liner and bushing - Do Not Reuse.
To purge air from cup liner:
1. Connect to proper air supply (mini mum of 30 PSI).
2. Turn cup upside down (See Figure 6
below).
3. Trigger gun until a constant paint
flow is observed.
Note
If drain bushing remains in cup
drain, use needle nose pliers to
remove. See Step 6 for proper
cleaning.
Cup drain at highest point
CA PROP
65
2/4
PROP 65 WARNING
WARNING: This product
contains chemicals known to the
State of California to cause
cancer and birth defects or
other reproductive harm.
SBBI-4-043-D (9/2014)
EN
PARTS LIST
Ref. Replacement
No. Part Number
Description
Waste Paint
Container
1 54-4720
2 GFC-404-K2
3 KGP-5-K5
4 KGP-13-K5
5 OMX-70-K48
1 Liter Gravity Feed Cup Assembly
Disposable Lid Kit (Kit of 2)
Filter Kit (Kit of 5)
Cup Gasket (Blue) (Kit of 5)
Disposable Liner Kit (Kit of 48)
Kits include:
1 Piercing tool
Necessary Liners and Drain Bushings
2
5. Pour a small amount of clean paint
solvent into paint cup.
Piercing
Tool
1
Bushing
5
6. Clean drain hole with cleaning brush
(not supplied with cup). Drain hole
must be kept clean for proper sealing
and easy removal of drain bushing.
Liner
Full Mark
Cup Drawings
Drain Hole
Cup Fitting
Filter (3)
Cup Gasket
(4)
3
Gun Body
For 95G & M1-G
guns (Blue)
SBBI-4-043-D (9/2014)
3/4
4
EN
WARRANTY POLICY
DeVilbiss products are covered by Finishing Brands one year materials and workmanship limited warranty.
The use of any parts or accessories, from a source other than Finishing Brands, will void all warranties.
For specific warranty information please contact the closest Finishing Brands location listed below.
Finishing Brands reserves the right to modify equipment specifications without
prior notice. DeVilbiss, Ransburg, BGK, and Binks are registered trademarks of
Finishing Brands. ©2014 Finishing Brands. All rights reserved.
DeVilbiss is part of Finishing Brands, a global leader in innovative spray finishing
technologies. For technical assistance or to locate an authorized distributor,
contact one of our international sales and customer support locations below.
USA/Canada
www.devilbiss.com
[email protected]
Tel: 1-800-992-4657
Fax: 1-888-246-5732
Mexico
www.finishingbrands.com.mx
[email protected]
Tel: 011 52 55 5321 2300
Fax: 011 52 55 5310 4790
Brazil
www.devilbiss.com.br
[email protected]
Tel: +55 11 5641 2776
Fax: 55 11 5641 1256
United Kingdom
www.finishingbrands.eu
[email protected]
Tel: +44 (0)1202 571 111
Fax: +44 (0)1202 573 488
France
www.finishingbrands.eu
[email protected]
Tel: +33(0)475 75 27 00
Fax: +33(0)475 75 27 59
Germany
www.finishingbrands.eu
[email protected]
Tel: +49 (0) 6074 403 1
Fax: +49 (0) 6074 403 281
China
www.finishingbrands.com.cn
[email protected]
Tel: +8621-3373 0108
Fax: +8621-3373 0308
Japan
www.ransburg.co.jp
[email protected]
Tel: 081 45 785 6421
Fax: 081 45 785 6517
Australia
www.finishingbrands.com.au
[email protected]
Tel: +61 (0) 2 8525 7555
Fax: +61 (0) 2 8525 7500
4/4
SBBI-4-043-D (9/2014)