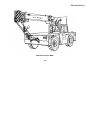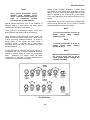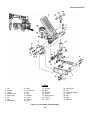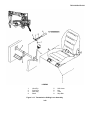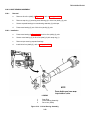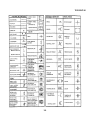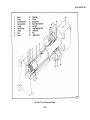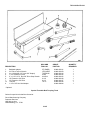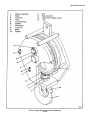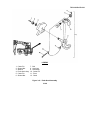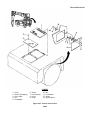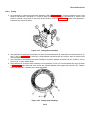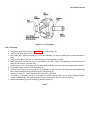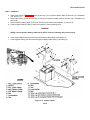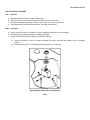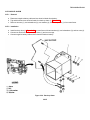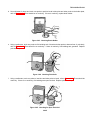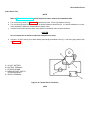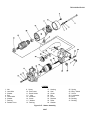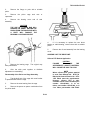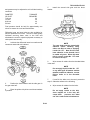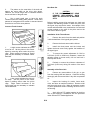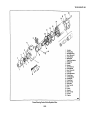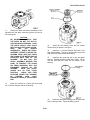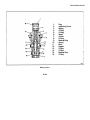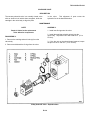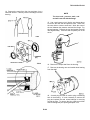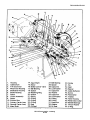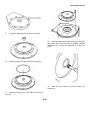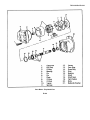
1
TM 10-3950-672-24-1
TECHNICAL MANUAL
Unit, Direct Support
and
General Support Maintenance Manual
for
WAREHOUSE CRANE
10,000 LB. CAPACITY, M469
WHEELED, DIESEL POWERED
NSN 3950-01-412-5345
(Grove Model AP 308T)
Approved for public release: Distribution is unlimited.
H E A D Q U A R T E R S ,
D E P A R T M E N T
O F
J U N E
T H E
1 9 9 7
A R M Y
TM10-3950-672-24-1
SAFETY SUMMARY
WARNING
Cleaning with compressed air can create airborne particles that may enter the eyes or penetrate
the skin. Pressure shall not exceed 30 psig. Wear goggles. Do not direct compressed air
against the skin.
WARNING
Remove all jewelry such as rings, dog tags, bracelets, etc. If jewelry contacts battery terminal, a
direct short may result in instant heating tools, damage to equipment, and injury or DEATH to
personnel.
WARNING
Extreme care should be taken when removing radiator filler cap if temperature gage reads above
180°F (82°C). Contact by steam or hot coolant may result in injury or DEATH to personnel.
WARNING
Engine must be cool to the touch prior to working on coolant system components. Failure to
comply could result in scalding or serious burns.
WARNING
Exhaust components can be hot causing burns to exposed skin. Allow exhaust components to
cool before proceeding.
WARNING
Corrosion inhibitors contain alkali. Do not get in eyes; wear goggles/safety glasses when using.
Avoid contact with skin. In case of contact, wash area with soap and water. If eyes are
contacted, flush eyes with large amounts of water for at least fifteen minutes and GET
IMMEDIATE MEDICAL ATTENTION.
SAFT-1
TM10-3950-672-24-1
SAFETY SUMMARY - Continued
WARNING
Dry cleaning solvent (P-D-680) is TOXIC and flammable. Wear protective goggles and gloves and
use only in well-ventilated areas. Avoid contact with skin, eyes, and clothes. Do not breathe
vapors. Keep away from heat and flame. Never smoke when using solvent: the flashpoint of
type I solvent is 100°F (38°C) and for type II 138°F (50°C). Failure to do so may result in injury
or DEATH to personnel.
If a person becomes dizzy while using cleaning solvent, immediately get fresh air and medical
help. If solvent contacts skin or clothes, flush with cold water. If solvent contacts eyes, flush
eyes with cold water and get immediate medical attention.
WARNING
EXHAUST GASES CAN KILL. Ensure that the area is properly ventilated. Brain damage or
DEATH can result from heavy exposure to exhaust gases. Precautions must be followed to
ensure personnel safety when operating the diesel engine.
1. Do not operate the engine in an enclosed area.
2. Do not idle the engine with the cab windows closed.
3. Be alert for exhaust gases.
4. Be alert for headaches, dizziness, sleepiness, loss of muscular control.
5. If you see another person with exhaust poisoning, remove that person from the area and
expose to open air. Then keep the person warm and do not allow physical exercise. Administer
artificial respiration if necessary and SEEK MEDICAL ATTENTION IMMEDIATELY.
6. Be aware that nuclear-biological-chemical (NBC) protection will not protect you for carbon
monoxide poisoning.
SAFT-2
TM10-3950-672-24-1
SAFETY SUMMARY - Continued
WARNING
Ensure hydraulic system is shut down and pressure is relieved. A high pressure oil stream can
pierce body and cause severe personal injury.
WARNING
Never use standard plumbing fittings for the hydraulic system. Always use high pressure
hydraulic fittings. Standard fittings could fail resulting in severe personal injury.
WARNING
Hydraulic fluid under pressure can penetrate skin or damage eyes. Fluid leaks under pressure
may not be visible. Use a piece of cardboard or wood to find leaks, but do not use bare hand.
Wear safety goggles for protection. If fluid enters skin or eye, get immediate medical attention.
WARNING
When removing boom lift cylinder, ensure cylinder is properly supported before disconnecting it
from the boom.
WARNING
When removing the boom assembly, ensure blocking and lifting devices are capable of
supporting the boom assembly.
WARNING
When removing the outrigger beam, ensure any blocking material used is capable of supporting
the weight of the outrigger beam. Do not allow it to tilt or slide. Failure to do so could result in
death or injury to personnel.
WARNING
Do not be misled by the term "low voltage". Voltages as low as 50 volts may cause death. For
artificial respiration, refer to FM 21-11.
SAFT-3
TM10-3950-672-24-1
SAFETY SUMMARY - Continued
WARNING
Ensure the battery is disconnected before performing any maintenance on an electrical circuit
which is not fused.
WARNING
Lead-acid battery gases can explode. Do not smoke, have open flames, or make sparks around
the battery. If a battery is gassing, it can explode and cause injury to personnel.
Always wear safety goggles and acid-proof gloves when handling the battery. Avoid contact
with the electrolyte. If spills occur, take immediate action to stop the burning effects. Wash skin
with cold running water. Flush eyes with cold water for at least fifteen minutes. If taken
internally, drink large amounts of water or milk, followed with milk of magnesia, beaten egg, or
vegetable oil. In each case, SEEK IMMEDIATE MEDICAL HELP. If electrolyte is spilled on
clothing, wash at once with cold water and neutralize with baking soda or household ammonia
solution.
WARNING
Always disconnect negative battery cable first to reduce chance of shorting and personal injury.
Such disconnections prevent electrical shock to personnel or equipment.
WARNING
Always connect positive battery cable first to reduce chance of shorting and personal injury.
WARNING
Always use the same fastener part number (or equivalent) when replacing fasteners. Do not risk
using a fastener of lesser quality: and do not mix metric and inch (customary) fasteners.
Mismatched or incorrect fasteners can result in damage, malfunction, or injury to personnel.
SAFT-4
TM10-3950-672-24-1
SAFETY SUMMARY - Continued
WARNING
Never crawl under the crane when performing maintenance unless the crane is securely blocked
and/or on jack 'stands. Do not work on equipment that is only supported by a jack or hoist.
Equipment may fall and cause serious injury or DEATH to personnel.
Keep clear of the crane or its components as they are being raised or lowered. Do not allow
components suspended in the air to swing. Equipment may fall or strike personnel and cause
serious injury or DEATH to personnel.
Extreme care must be taken when working on cable or chain under tension. A snapped cable or
swinging load may result in injury or DEATH to personnel.
WARNING
Starting fluid is toxic and highly flammable. NEVER heat the container and NEVER discharge
starting fluid in a confined area or near an open flame. Severe injury to personnel may result.
WARNING
When using steam cleaners, avoid contact with the steam which can cause burns, blindness, and
other serious injuries. Wear protective apron, gloves, and safety goggles when using live steam.
WARNING
The wire rope can become frayed or contain broken wires. Wear heavy leather-palmed work
gloves when handling the wire rope. Frayed or broken wires can injure the hands. Never let
moving wire rope slide through hands, even when wearing gloves as a broke wire strand could
penetrate the gloves and cut the hand.
SAFT-5/(SAFT-6 blank)
TM 10-3950-672-24-1
Technical Manual
HEADQUARTERS,
DEPARTMENT OF THE ARMY
Washington, DC, 15 June 1997
No. 10-3950-672-24-1
Unit, Direct Support Maintenance Manual
for
WAREHOUSE CRANE
10,000 LB. CAPACITY, M469
WHEELED, DIESEL POWERED
NSN 3950-01-412-5345
(Grove Model AP 308T)
REPORTING OF ERRORS
You can improve this manual. If you find any mistakes or if you know of a way to improve the procedures, please let us
know. Mail your letter, DA Form 2028 (Recommended Changes to Publications and Blank Forms) or DA Form 2028-2
located in the back of this manual direct to: Commander, US Army Tank-automotive and Armaments Command, ATTN:
AMSTA-IM-OPIT, Warren MI 48397-5000. A reply will be furnished to you. You may also provide DA Form 2028-2
information to TACOM via datafax or e.mail. TACOM's datafax number for.AMSTA-IM-OPIT is: (810) 574-6323 and
e.mail address is: [email protected]
This manual is an authentication of the manufacturer's commercial literature and does not conform with the format and
content specified in AR 25-30, Military Publications. This technical manual does, however, contain valuable information
that is essential to the operation and maintenance of the equipment.
TABLE OF CONTENTS - VOLUME 1
SAFETY SUMMARY
Page
SAFT-1
HOW TO USE THIS MANUAL .............................................................
ii
WARRANTY INFORMATION...............................................................
iii
CHAPTER 1
INTRODUCTION ................................................................................
1-1
Section 1
Section 2
General Information ............................................................................
General Maintenance ..........................................................................
1-1
1-3
CHAPTER 2
CRANE MAINTENANCE INSTRUCTIONS .........................................
2-1
Section 1
Repair Parts, Special Tool, TMDE, and ...............................................
Support Equipment
Service Upon Receipt .........................................................................
Organizational Preventive Maintenance ..............................................
Checks and Services
2-1
Section 2
Section 3
Approved for public release: Distribution is unlimited
i
2-1
2-3
TM 10-3950-672-24-1
TABLE OF CONTENTS - Continued
CHAPTER 3
MAINTENANCE ...............................................................................
3-1
Section 1
Section 2
Section 3
Section 4
Section 5
Section 6
Section 7
Section 8
Section 9
Section 10
Section 11
Section 12
Cab
.............................................................................................
Engine .............................................................................................
Drive Train .......................................................................................
Axles and Brakes .............................................................................
Steering System ...............................................................................
Hydraulic System .............................................................................
Swing System ..................................................................................
Boom .............................................................................................
Swivels ............................................................................................
Hoist .............................................................................................
Frame and Outriggers ......................................................................
Electrical System .............................................................................
3-1
3-16
3-42
3-64
3-80
3-90
3-135
3-149
3-176
3-182
3-192
3-208
APPENDIX A
REFERENCES ................................................................................
A-1
APPENDIX B
MAINTENANCE ALLOCATION CHART ...........................................
B-1
APPENDIX C
EXPENDABLE/DURABLE SUPPLIES AND MATERIALS LIST ........
C-1
APPENDIX D
TORQUE VALUE CHARTS ..............................................................
D-1
APPENDIX E
SERVICE MAINTENANCE PACKAGES ..........................................
E-1
APPENDIX F
SCHEMATICS .................................................................................
F-1
INDEX
ALPHABETICAL INDEX ...................................................................
INDEX-1
HOW TO USE THIS MANUAL
This manual is designed to help you operate and maintain the equipment. All task descriptions will take you step-by-step
through the procedure. Don't take shortcuts. Before you begin any task, you should read through the complete
procedure, make sure you know what needs to be done, then go back and follow the steps as written.
Pay particular attention to WARNINGS and CAUTIONS, as they contain information that will prevent injury to personnel
or damage to equipment.
Use the alphabetical index at the back of the manual to find a topic not listed in the table of contents.
ii
TM-10-3950-672-24-1
WARRANTY
THERE ARE NO WARRANTIES, EXPRESS OR IMPLIED, MADE BY EITHER THE DISTRIBUTOR OR THE
MANUFACTURER ON NEW GROVE EQUIPMENT, EXCEPT THE MANUFACTURER'S WARRANTY AGAINST
DEFECTS, MATERIAL AND WORKMANSHIP SET OUT BELOW:
NEW EQUIPMENT WARRANTY
"The Manufacturer warrants each new product made by the Manufacturer to be free from defects
in material and workmanship, its obligation and liability under this warranty being limited to
replacing free of charge at its factory, any part proving defective under normal use and service
for a period of fifteen (15) months CONUS or eighteen (18) months OCONUS beginning with
Government acceptance of the crane. This warranty is in lieu of all other warranties, express or
implied and the obligation and liability of the Manufacturer under this warranty shall not include
any transportation or other charges or the cost of installation or any liability for direct, indirect,
or consequential damages or delay resulting from the defect. Any operation beyond rated
capacity or the improper use or application of the product or the substitution upon it of parts not
approved by the Manufacturer shall void this warranty. This warranty covers only the products
of Grove Manufacturing Company. The products of other Manufacturers are covered only by
such warranties as are made by their Manufacturers."
THIS WARRANTY IS EXPRESSLY IN LIEU OF ANY OTHER WARRANTIES, EXPRESS OR IMPLIED, INCLUDING
ANY IMPLIED WARRANTY OF MERCHANTABILITY OR FITNESS FOR A PARTICULAR PURPOSE, AND OF ANY
OTHER OBLIGATIONS OR LIABILITY ON THE PART OF THE MANUFACTURER, AND GROVE MANUFACTURING
COMPANY NEITHER ASSUMES NOR AUTHORIZES ANY OTHER PERSON TO ASSUME FOR IT ANY OTHER
LIABILITY IN CONNECTION WITH SUCH EQUIPMENT.
NOTE
The Cummins diesel engine is covered by a separate warranty as
described in TM 10-3950-672-24-2.
There is a decal in the cab of the crane, near the main control
panel, which has the warranty expiration date.
iii
TM10-3950-672-24-1
Warehouse Crane, M469
1-0
TM10-3950-672-24-1
CHAPTER 1
INTRODUCTION
General Information
General Maintenance
Subject
.............................................................................................
.............................................................................................
Section
1
2
Page
1-1
1-3
Para.
1-1
1-2
1-2a
1-2b
1-2c
1-3
1-4
1-5
Page
1-1
1-1
1-1
1-1
1-1
1-1
1-2
1-2
Section 1. General Information
Subject
Scope
.............................................................................................
Maintenance Forms, Records, and Reports................................................................
Reports of Maintenance and Unsatisfactory Equipment .......................................
Reporting of Item and Packaging Discrepancies ..................................................
Transportation Discrepancy Report ......................................................................
Destruction of Army Materiel to Prevent Enemy Use..................................................
Administrative Storage .............................................................................................
Reporting Equipment Improvement Recommendations (EIRs)...................................
1-1. SCOPE
This manual gives procedures for maintenance of the 10K Warehouse Crane M469. The manual contains
maintenance procedures to be performed by organizational, direct support, and general support level personnel.
1-2. MAINTENANCE FORMS, RECORDS, AND REPORTS
a. Reports of Maintenance and Unsatisfactory Equipment
Department of the Army forms and procedures used for equipment maintenance will be those prescribed by
DA Pam 738-750, as contained in Maintenance Management Update.
b. Reporting of Item and Packaging Discrepancies
Fill out and forward SF 364 [Report of Discrepancy (ROD)] as prescribed in AR 735-11-2/DLAR
4140.55/SECNAVINST4355.18/AFR 400-54/MCO 4430.3J.
c. Transportation Discrepancy Report (TDR) (SF 361)
Fill out and forward SF 361 Transportation Discrepancy Report (TDR) (SF361) as prescribed in AR 5538/NAVSUPINST 4610.33C/AFR 75-1 8/MCO P4610.19D/DLAR 4500.15.
1-3. DESTRUCTION OF ARMY MATERIEL TO PREVENT ENEMY USE
Destruction of Army materiel to prevent enemy use shall be in accordance with TM 750-244-3.
1-1
TM10-3950-672-24-1
1-4. ADMINISTRATIVE STORAGE
Equipment issued to and by the Army activities will have preventive maintenance in accordance with Preventive
Maintenance Checks and Services (PMCS) performed before being placed into storage. When removing the equipment
from administrative storage, the PMCS checks should be performed to ensure operational readiness.
1-5. REPORTING EQUIPMENT IMPROVEMENT RECOMMENDATIONS (EIRs)
If your equipment needs improvement, let us know. Send us an EIR. You, the user, are the only one who can
tell us what you don't like about your equipment. Let us know why you don't like the design or performance. Put it on an
SF 368 (Product Quality Deficiency Report). Mail it to: Commander, U.S. Army Tank-automotive and Armaments
Command, Attn. AMSTA-IM-JM, Warren, MI 48397-5000. We'll send you a reply.
1-2
TM10-3950-672-24-1
Section 2. General Maintenance
Subject
Para.
Maintenance
.............................................................................................
Cleanliness
.............................................................................................
Removal and Installation .....................................................................................
Disassembly and Assembly .................................................................................
Pressing Parts
.............................................................................................
Locks
.............................................................................................
Wires and Cables .............................................................................................
Shims
.............................................................................................
Bearings
.............................................................................................
Gaskets
.............................................................................................
Batteries
.............................................................................................
Hydraulic Systems .............................................................................................
Fatigue of Welded Structures ..............................................................................
Loctite
.............................................................................................
Fasteners and Torque Values .............................................................................
1-3
Page
1-4
1-4
1-4
1-5
1-5
1-5
1-5
1-5
1-5
1-6
1-6
1-6
1-7
1-7
1-7
TM10-3950-672-24-1
GENERAL MAINTENANCE
MAINTENANCE
recommendations for cleaning and covering apply when
access covers or inspection plates are removed.
These general suggestions should be helpful in following
the instructions in this manual. In analyzing a system
malfunction, use a systematic procedure to locate and
correct the problem.
Clean and inspect all parts. Be sure all passages and
holes are open. Cover all parts to keep them clean. Be
sure parts are clean when they are installed. Leave new
parts in their containers until ready for assembly.
1. Determine the problem.
2. List possible causes.
Clean the rust preventive compound from all machined
surfaces of new parts before installing them.
3. Devise checks.
4. Conduct checks in a logical order to determine the
cause.
REMOVAL AND INSTALLATION.
When performing maintenance, do not attempt to
manually lift heavy parts when hoisting equipment
should be used. Never locate or leave heavy parts in an
unstable position. When raising a portion of a crane or
a complete crane, ensure the crane is blocked securely
and the weight is supported by blocks rather than by
lifting equipment.
5. Consider the remaining service life of components
against the cost of parts and labor necessary to replace
them.
6. Make the necessary repair.
7. Recheck to ensure that nothing has been overlooked.
When using hoisting equipment, follow the hoist
manufacturers recommendations and use lifting devices
that will allow you to achieve the proper balance of the
assemblies being lifted and to ensure safe handling.
8. Functionally test the failed part in its system.
NOTE
Unless otherwise specified, all removals requiring
hoisting equipment should be accomplished using an
adjustable lifting attachment. All supporting members
(chains and cables) should be parallel to each other and
as near perpendicular as possible to the top of the
object being lifted.
Your safety and that of others is
always
the
number
one
consideration when working around
machines.
Safety is a matter of
thoroughly understanding the job to
be done and the application of good
common sense.
It is not just a
matter of do's and don'ts. Stay clear
of all moving parts.
CAUTION
THE CAPACITY OF AN EYEBOLT
DIMINISHES
AS
THE
ANGLE
BETWEEN
THE
SUPPORTING
MEMBERS
AND
THE
OBJECT
BECOMES LESS THAN 90 DEGREES.
EYEBOLTS
AND
BRACKETS
SHOULD NEVER BE BENT AND
SHOULD ONLY HAVE STRESS IN
TENSION.
CLEANLINESS.
An important item in preserving the long life of the
machine is keeping dirt out of working parts. Enclosed
compartments, seals, and filters have been provided to
keep the supply of air, fuel, and lubricants clean. It is
important that these enclosures be maintained.
Whenever hydraulic, fuel, lubricating oil lines, or air
lines are disconnected, clean the adjacent area as well
as the point of disconnect.
As soon as the
disconnection is made, cap, plug or tape each line or
opening to prevent entry of foreign material. The same
Some removals require the use of lifting fixtures to
obtain proper balance.
The weights of some
components are given in their respective sections of the
manual.
1-4
TM10-3950-672-24-1
If a part resists removal, check to be certain all nuts and
bolts have been removed and that an adjacent part is
not interfering.
SHIMS.
When shims are removed, tie them together and identify
them as to location. Keep shims clean and flat until
they are reinstalled.
DISASSEMBLY AND ASSEMBLY.
When assembling or disassembling a component or
system, complete each step in turn. Do not partially
assemble one part and start assembling some other
part. Make all adjustments as recommended. Always
check the job after it is completed to see that nothing
has been overlooked. Recheck the various adjustments
by operating the machine before returning it to the job.
BEARINGS.
Antifriction Bearings.
When an antifriction bearing is removed, cover it to
keep out dirt and abrasives.
Wash bearings in
nonflammable cleaning solution and allow them to drain
dry. The bearing may be dried with compressed air
BUT do not spin the bearing.
PRESSING PARTS.
When pressing one part into another, use an antiseize
compound or a molybdenum disulfide base compound
to lubricate the mating surfaces.
Discard the bearings if the races and balls or rollers are
pitted, scored, or burned. If the bearing is serviceable,
coat it with oil and wrap it in clean waxed paper. Do not
unwrap new bearings until time of installation.
Assemble tapered parts dry. Before assembling parts
with tapered splines, be sure the splines are clean, dry,
and free from burrs. Position the parts together by hand
to mesh the splines before applying pressure.
The life of an antifriction bearing will be shortened if not
properly lubricated. Dirt in an antifriction bearing can
cause the bearing to lock resulting in the shaft turning in
the inner race or the outer race turning within the cage.
Parts which are fitted together with tapered splines are
always very tight. If they are not tight, inspect the
tapered splines and discard the part if the splines are
worn.
Double Row, Tapered Roller.
Double row, tapered roller bearings are precision fit
during manufacture and components are not
interchangeable. The cups, cones, and spacers are
usually etched with the same serial number and letter
designator. If no letter designators are found, wire the
components together to assure correct installation.
Reusable bearing components should be installed in
their original positions.
LOCKS.
Lockwashers, flat metal locks, or cotter pins are used to
lock nuts and bolts.
Flat metal locks must be installed properly to be
effective. Bend one end of the lock around the edge of
the part. Bend the other end against one flat surface of
the nut or bolt head.
Heating Bearings.
Bearings which require expansion for installation should
be heated in oil not to exceed 250 degrees F (121
degrees C). When more than one part is heated to aid
in assembly, they must be allowed to cool and then
pressed together again. Parts often separate as they
cool and contract.
Always use new locking devices on components which
have moving parts.
When installing lockwashers on housings made of
aluminum, use a flat washer between the lockwasher
and the housing.
Installation.
WIRES AND CABLES.
Lubricate new or used bearings before installation.
Bearings that are to be preloaded must have a film of oil
over the entire assembly to obtain accurate preloading.
When installing a bearing, spacer, or washer against a
shoulder on a shaft, be sure the chamfered side is
toward the shoulder.
Batteries should always be disconnected prior to working
on the electrical system.
When removing or disconnecting a group of wires or
cables, tag each one to ensure proper identification
during assembly.
1-5
TM10-3950-672-24-1
When pressing bearings into a retainer or bore,
uniformly apply pressure to the outer race. If the
bearing is pressed on the shaft, uniformly apply
pressure on the inner race.
HYDRAULIC SYSTEMS.
WARNING
EXERCISE
EXTREME
CARE
AROUND PRESSURIZED HYDRAULIC
SYSTEMS. DO NOT WORK ON A
HYDRAULIC SYSTEM WHILE IT IS IN
OPERATION
OR
UNTIL
ALL
PRESSURE IS RELEASED.
Preload.
Preload is an initial load placed on the bearing at the
time of assembly. Whether a tapered roller bearing
should have preload could depend on any of several
conditions: rigidity of the housings and shaft, bearing
spread, speed of operation, etc.
Cleanliness.
To determine whether a bearing requires preload or end
clearance, consult the disassembly and assembly
instructions pertaining to that bearing.
Contaminants in a hydraulic system affect operation and
will result in serious damage to the system components.
Dirty hydraulic systems are a major cause of component
failures.
Care should be exercised in applying preload.
Misapplication of preload to bearings requiring end
clearance can result in bearing failure.
Keep the System Clean.
When removing components of a hydraulic system,
cover all openings on both the component and the
crane.
Sleeve Bearings.
Do not install sleeve bearings with a hammer. Use a
press and be sure to apply the pressure directly in line
with the bore. If it is necessary to drive on a bearing,
use a bearing driver or a bar with a smooth flat end. If a
sleeve bearing has an oil hole, align it with the oil hole in
the mating part.
If evidence of foreign particles is found in the hydraulic
system, flush the system.
Disassemble and assemble hydraulic components on a
clean surface.
GASKETS.
Clean all metal parts in a nonflammable cleaning fluid.
Then lubricate all components to aid in assembly.
Be sure the holes in the gaskets correspond with the
lubricant passages in the mating parts. If it is necessary
to make gaskets, select material of the proper type and
thickness. Be sure to cut holes in the right places.
Blank gaskets can cause serious damage.
Sealing Elements.
Inspect all sealing elements (0-ring, gaskets, etc.) when
disassembling and assembling the hydraulic system
components. Installation of new elements is always
recommended.
When removed, always install new cylinder head and
manifold gaskets using recommended gasket compound
on head gaskets to allow uniform sealing.
Hydraulic Lines.
BATTERIES.
When installing metal tubes, tighten all bolts finger-tight.
Then, in order, tighten the bolts at the rigid end, the
adjustable end, and the mounting brackets. After tubes
are mounted, install the hoses. Connect both ends of
the hose with all bolts finger-tight. Position the hose so
it does not rub the machine or another hose and has a
minimum of bending and twisting.
Tighten bolts in both couplings.
Clean batteries by scrubbing them with a solution of
baking soda and water. Rinse with clear water. After
cleaning, dry thoroughly and coat terminals and
connections with an anticorrosion compound or grease.
If the machine is to be stored or not used for an
extended period of time, the batteries should be
removed. Store the batteries in a warm, dry place,
preferably on wooden shelves. Never store on concrete.
A small charge should be introduced periodically to keep
the specific gravity rating at recommended level.
Due to manufacturing methods there is a natural
curvature to a hydraulic hose. The hose should be
installed so any bend is with this curvature.
1-6
TM10-3950-672-24-1
LOCTITE.
FATIGUE OF WELDED STRUCTURES.
Experience has shown that highly stressed welded
structures when repeatedly subjected to varying stresses
caused by twisting, shock, bending, and intentional
and/or unintentional overloads, often become subject to
weld cracking which may be attributed to fatigue of the
welded joint.
This condition is not uncommon in
construction equipment.
WARNING
LOCTITE
TYPE
ADHESIVES
CONTAIN CHEMICALS THAT MAY BE
HARMFUL IF MISUSED. READ AND
FOLLOWTHE INSTRUCTIONS ON
THE CONTAINER.
Equipment should be periodically inspected for evidence
of weld fatigue. The frequency of these inspections
should be commensurate with the age of the equipment,
the severity of the application, and the experience of the
operators and maintenance personnel.
Always follow the directions on the Loctite container as
not all Loctite types are suitable for all applications.
The following are known high stress areas applicable to
Grove machines, and a visual inspection of these areas
should be made part of an owner's planned preventive
maintenance program:
The following types of Loctite brand adhesives are
available from the Parts Department of Grove
Manufacturing Company.
Various types of Loctite are specified throughout the
Service Manual.
a. Power Telescope - Boom wear pad retaining
structures, hydraulic cylinder attaching points, boom
pivot shaft retaining structures.
b. Outrigger pads, beams, boxes and attachment
structures.
suspension
9999100806
9999100805
9999100804
Refer to Appendix D for Torque
Value tables.
Use bolts of the correct length. A bolt which is too long
may bottom before the head is tight against the part it is
to hold. If a bolt is too short, there may not be enough
threads engaged to hold the part securely. Threads can
be damaged. Inspect them and replace fasteners, as
necessary.
e. Counterweight support structures.
and
277
242
592
NOTE
d. Turntable bearing connection (where bearing is
welded to the crane superstructure or chassis).
axle
Grove Part Number
FASTENERS AND TORQUE VALVES.
c. Main frames - generally in the area of doubler
plates and crossmembers; at the junction of front and
rear frame members on truck cranes.
f. Chassis
structures.
Loctite Number
mounting
g. Hydraulic cylinder end connections.
Torque values should correspond to the type bolts,
studs, and nuts being used.
The above is provided only as a guide, and your
inspection plan should not be limited to the areas listed.
A thorough visual inspection of all weldments is good
practice.
The torque tables are provided by Grove Manufacturing
Company for reference when performing maintenance.
Use of proper torque values is extremely important.
Improper torquing can seriously affect performance and
reliability.
Anyone requiring more detailed inspection instructions
and/or repair procedures may request same by
contacting: Grove Manufacturing Company; Customer
Services Department; P.O. Box 695, 1086 Wayne
Avenue; Chambersburg, Pennsylvania 17201.
Identification of fastener grade is always necessary.
When marked as a high strength bolt (grade 3, 5, etc.),
the mechanic must be aware that he is working with a
highly stressed component and the fastener should be
torqued accordingly.
1-7
TM10-3950-672-24-1
KNOW YOUR TORQUE WRENCH! Flexible beam
type wrenches, even though they might have a preset
feature, must be pulled at right angles and the force
must be applied at the exact center of the handle.
Force value readings must be made while the tool is in
motion.
NOTE
Some special applications require
variation from standard torque
values. Reference should always be
made
to
component
overhaul
procedures for recommendations.
Rigid handle type torque wrenches are available with
torque limiting devices that can be preset to required
values and which eliminate dial readings.
Special attention should be given to the existence of
lubricant, plating, or other factors that might require
variation from standard torque values.
NOTE
When maximum recommended torque values have
been exceeded, the fastener should be replaced.
To convert pounds-feet of torque to
Newton meters (N•m), multiply
quantity by 1.356.
When referring to the applicable torque charts, use
values as close as possible to the torque values shown
to allow for wrench calibration tolerance. An erratic or
jerking motion of the wrench can easily result in
excessive torque.
ALWAYS use a slow wrench
movement and STOP when the predetermined value
has been reached.
NOTE
To convert pounds-inch of torque to
Newton meters (N.m), multiply
quantity by 0.113.
Torque wrenches are precision instruments and are to
be handled with care to ensure calibrated accuracy.
Calibration checks should be made on a scheduled
basis.
Whenever the wrench might be either
overstressed or damaged, it should immediately be
removed from service until recalibrated.
NOTE
When multipliers and/or special tools
are used to reach hard to get at
spots, ensure torque readings are
precisely calculated.
1-8
TM10-3950-672-24-1
CHAPTER 2
CRANE MAINTENANCE INSTRUCTIONS
Subject
Section
Repair Parts, Special Tools, TMDE, and Support Equipment ....................................
Service Upon Receipt ...............................................................................................
Organizational Preventive Maintenance Checks and Services ..................................
1
2
3
Page
2-1
2-1
2-3
Section 1. Repair Parts, Special Tools, TMDE, and Support Equipment
Subject
Common Tools and Equipment .................................................................................
Special Tools, Repair Parts, TMDE, and Support Equipment ....................................
Para.
Page
2-1
2-2
2-1
2-1
2-1 COMMON TOOLS AND EQUIPMENT
For authorized common tools and equipment, refer to Modified Table of Organization and Equipment (MTOE)
applicable to your unit.
2-2 SPECIAL TOOLS, REPAIR PARTS, TMDE, AND SUPPORT EQUIPMENT
Reference Section III of Appendix B, Maintenance Allocation Chart, for a list of all special tools and test equipment
needed to maintain the crane. Repair parts and special tools list, TM 10-3950672-24P contains a listing of the repair
parts for this equipment.
Section 2. Service Upon Receipt
Subject
Summary
.............................................................................................
Unpacking
.............................................................................................
Checking and Unpacking Equipment .........................................................................
Deprocessing Unpacked Equipment ..........................................................................
Preliminary Servicing and Adjustment .......................................................................
Para.
Page
2-3
2-4
2-5
2-6
2-7
2-1
2-1
2-2
2-2
2-2
2-3 SUMMARY
The crane is shipped ready-for-operation and requires no maintenance or operator actions. However, it is
recommended that a visual inspection of the hydraulic, fuel, air intake, and coolant system lines be made to ensure that
lines and fittings are not loose or damaged as a result of shipment.
2-4 UNPACKING
To unpack the crane, remove the restraining strap securing the door. Then remove the fire extinguisher and place it
in the mounting bracket inside the cab.
2-1
TM10-3950-672-24-1
2-5 CHECKING AND UNPACKING EQUIPMENT
a. Inspect the crane for damage. If damaged, report damage on DD Form 6, Packaging Improvement Report.
b. Check the crane against the packing slip and ensure that shipment is complete. Report any discrepancies on DA
Form 738-700.
c. Check the crane for any unauthorized modifications.
2-6 DEPROCESSING UNPACKED EQUIPMENT
The crane should be clean and free of excess grease. However, if during inspection, any excess grease or lubricant
is found on the carrier frame or superstructure, is should be cleaned immediately.
2-7 PRELIMINARY SERVICING AND ADJUSTMENT
The crane is shipped completely serviced except for diesel fuel.
A complete walk around visual inspection of the crane should always precede operation. Special attention should
be given to structural damage, loose equipment, leaks, or other conditions that could be affect safe operation. The
following checklist should be considered the minimum requirement for such a visual inspection.
NOTE
See Section 3, PMCS for checking and servicing procedures.
a. Fuel system. Ensure fuel tank is full and cap is on tight. Open valve on fuel water separator (1/4 turn) and drain
water from bowl. Do not tighten plastic valve.
b. Check engine oil and service as required. Do not overfill.
c. Check and service engine coolant at overflow bottle. Do not overfill.
d. Ensure battery cables are tight and not corroded.
e. Check all signal and running lights for proper operation. Replace burned out bulbs as needed. Ensure backup
alarm and horn operate.
f. Check foot brake pedal and parking brake lever for proper operation.
g. Check fan belt for damage and for proper tension.
h. Check and service transmission oil level.
i. Ensure all daily lubrication has been performed.
j. Check and service hydraulic tank. Check hydraulic filter indicator.
2-2
TM10-3950-672-24-1
k. Check tires (four places) for severe cuts and for correct inflation. Check lug nuts for proper torque.
l. Inspect wire rope in accordance with PMCS table. Check boom nose sheaves, guides. hoist drum, rollers, and
other wire rope contact surfaces for sharp edges or other conditions that could damage wire rope.
m. Inspect the hook block for nicks, gouges, cracks, and other damage. Replace hook that is cracked, spread, or
twisted. Be sure safety latch operates and is aligned.
n. Inspect air restriction indicator. Check air intake tubing for damage and loose clamps.
o. Inspect muffler and exhaust tubing for corrosion, damage, and loose clamps.
p. Check charge indicator on fire extinguisher for green indication.
q. Check and service the fluid level in the windshield washer fluid bottle.
Section 3. Organizational Preventive Maintenance Checks and Services
Subject
Para.
General
.............................................................................................
Organizational Preventive Maintenance Checks and Services ..................................
Leakage Definitions for Organizational PMCS ...........................................................
Organizational Preventive Maintenance Checks and Services Chart . ......................
2-8
2-9
2-10
2-11
Page
2-3
2-3
2-6
2-7
2-8 GENERAL
To make sure that your vehicle is ready for operation at all times, inspect it systematically so you can discover any
defects and have them corrected before they result in serious damage or failure. The charts on the next few pages
contain your organizational PMCS. The item numbers indicate the sequence of minimum inspection requirements. If
you're operating the vehicle and notice something wrong which could damage the equipment if your continue operation,
stop operation immediately.
Record all deficiencies and shortcomings, along with eh corrective action taken on a DA Form 2404. The Item
Number column is the source for the numbers used on the TM Number column on DA Form 2404.
2-9 ORGANIZATIONAL PREVENTIVE MAINTENANCE CHECKS AND SERVICES
The item numbers of the table indicated the sequence of the PMCS. Perform at the intervals shown below:
a. Do your (Q) PREVENTIVE MAINTENANCE quarterly (every three months).
b. Do your (S) PREVENTIVE MAINTENANCE semi-annually (every six months).
c. Do your (A) PREVENTIVE MAINTENANCE annually (once every year).
2-3
TM10-3950-672-24-1
d. Do your (B) PREVENTIVE MAINTENANCE bi-annually (once every two years).
e. Do your (H) PREVENTIVE MAINTENANCE at the hour interval listed.
f. Do your (M) PREVENTIVE MAINTENANCE monthly (once a month).
If something doesn't work, troubleshoot it according to the instructions in this manual.
Always do your preventive maintenance in the same order so it gets to be a habit. Once you've had some
practice, you'll spot anything wrong in a hurry.
If anything looks wrong and you can't fix it, write it down on your DA Form 2404. If you find something seriously
wrong, report it to direct support as soon as possible.
WARNING
Dry cleaning solvent PD-680 is toxic and flammable. Wear protective goggles and gloves and
use only in a well ventilated area. Avoid contact with skin, eyes, and clothes and don't breather
vapors. Do not use near open flame or excessive heat. The flash point is 100°to 138°F (38°to
59°C). If you become dizzy while using solvent, get fresh air immediately and get medical aid. If
contact with eyes is made, wash your eyes with water and get medical aid immediately.
WARNING
Compressed air, used for cleaning purposes will not exceed 30 psi. Use only with effective chip
guarding and personnel protective equipment (goggles/shield/gloves, etc.).
a. Keep it clean: dirt, grease, oil, and debris only get in the way and may cover up a serious problem.
Clean as your work and as needed. Use dry cleaning solvent (PD-680) to clean metal surfaces. Use
soap and water when you clean rubber or plastic material.
b. Bolts, nuts, and screws: Check that they are not loose, missing, bent, or broken. You can't try them
all with a tool, of course, but look for chipped paint, bare metal or rust around bolt heads. Tighten any
bolt, nut, or screw that you find loose.
2-4
TM10-3950-672-24-1
c. Welds: Look for loose or chipped paint, rust or gaps where parts are welded together. If you find a
bad weld, report it to intermediate direct support.
d. Electric wires and connectors: Look for cracked or broken insulation, bare wires and loose or broken
connectors. Tighten loose connections and make sure the wires are in good condition.
e. Hoses and fluid lines: Look for wear, damage, and leaks. Make sure clamps and fittings are tight.
Wet spots show leaks, but a stain around a fitting or connector can also mean a leak. If leakage comes
from a loose fitting or connector, tighten the fitting or connector. If something is broken or worn out,
either correct it or report it to intermediate direct support (refer to the Maintenance Allocation Chart).
WARNING
The cooling system is pressurized. Personal injury may result when removing the radiator cap
after operating temperature is reached. Do not remove radiator cap when radiator is hot to
touch.
WARNING
Do not smoke or allow flame or spark in the vicinity while checking or filling the batteries. The
batteries generate - hydrogen a highly explosive gas. Wear safety goggles when adding distilled
water.
CAUTION
Turntable bearing bolts cannot be retorqued more than one time. Stretching takes place each
time they are torqued. If torque is lost, replace bolts.
CAUTION
In cold operation, charge batteries immediately after water has been added to prevent freezing
and damage to batteries; run crane engine for one hour at 1500 RPMs.
2-5
TM10-3950-672-24-1
It is necessary for your to know how fluid leaks affect the status of your equipment. The following are definitions of
the types/classes of leakage you need to know to be able to determine the status of your equipment. Learn and be
familiar with them and REMEMBER - when in doubt, notify your supervisor.
2-10 LEAKAGE DEFINITIONS FOR ORGANIZATIONAL PMCS
CLASS I Seepage of fluid ( as indicated by wetness or discoloration) not great enough to form drops.
CLASS II Leakage of fluid great enough to form drops, but not enough to cause drops to drip from the item being
checked/inspected.
CLASS III Leakage of fluid great enough to form drops that fall from the item being checked/inspected.
CAUTION
Equipment operation is allowable with minor leakage (Class I or II). Of course consideration
must be given to the fluid capacity in the item/system being checked/inspected. When operating
with Class I or II leaks, continue to check fluid levels as required on your PMCS. Class II leaks
should be reported to your supervisor.
2-6
TM10-3950-672-24-1
2-11 ORGANIZATIONAL PREVENTIVE MAINTENANCE CHECKS AND SERVICES CHART
M - MONTHLY
(200 Hours)
S - SEMI-ANNUALLY
(1000 Hours)
B - BI-ANNUALLY
Q - QUARTERLY
(500 Hours)
A - ANNUALLY
W - WEEKLY
(50 Hours)
H - HOURS
INTERVAL
ITEM
NO
M
1
•
2
•
Q
S
A
B
W
ITEM TO BE INSPECTED
PROCEDURE: CHECK, REPAIR, FILL, ADJUST
PERFORM ALL OPERATOR PMCS FIRST
H
AXLE DIFFERENTIAL
Check for proper level.
TRANSMISSION
Change oil filters.
3
•
4
•
TRANSMISSION MOUNTING BOLTS
Check torque. [lb ft (N•m)]
-Trans to Engine [50-65 lb ft (60-88 N•m)]
-Rear Engine Support to Trans [60-80 lb ft
(81-108 N•m)]
·
TURNTABLE BOLTS
CAUTION
Turntable bearing bolts cannot be
retorqued more than one time.
Stretching takes place each time
they are torqued. If torque is
lost, replace bolts.
Check torque. [lb ft (N•m)]
-Outer race [370 lb ft (502 N•m)]
-Inner race [370 lb ft (502 N•m)]
5
•
6
•
ENGINE MOUNTING BOLTS
Check torque. [lb ft (N-m)]
75 lb ft (102 N•m)
ENGINE RPM
-Governed RPM 2400.
•
7
8
•
9
•
WHEEL LUGS
Check torque. [lb ft (N•m)]
300 lb ft (407 N•m)
MUFFLER CONNECTIONS
Check for cracks or leaks
BOOM ALIGNMENT
Check for proper adjustment.
2-7
TM10-3950-672-24-1
2-11 ORGANIZATIONAL PREVENTIVE MAINTENANCE CHECKS AND SERVICES CHART(continued)
M - MONTHLY
(200 Hours)
S - SEMI-ANNUALLY
(1000 Hours)
B - BI-ANNUALLY
Q - QUARTERLY
(500 Hours)
A - ANNUALLY
W - WEEKLY
(50 Hours)
H - HOURS
INTERVAL
ITEM
NO
M
Q
10
•
11
•
12
•
13
•
14
•
15
•
S
A
B
W
ITEM TO BE INSPECTED
PROCEDURE: CHECK, REPAIR, FILL, ADJUST
PERFORM ALL OPERATOR PMCS FIRST
H
HOIST MOUNTING BOLTS
Check torque. [lb ft (N-m)]
370 lb ft (502 N•m)
GEARBOX MOUNTING BOLTS
(Planetary Gear Reducer)
Check torque. [lb ft (N•m)]
99 lb ft (134 N•m)
AXLE MOUNTING BOLTS
Check torque. [lb ft (N•m)]
-Front Drive Axle 250 lb ft (339 N•m)
DIFFERENTIAL BREATHERS
Clean or replace.
FUEL TANK FILLER SCREEN
Clean and check for broken screen.
WIRING HARNESS
Check connectors and wiring for proper insulation.
16
•
17
•
18
•
19
•
20
•
SWING GEARBOX CASE
(Planetary Gear Reducer)
Check for cracks or leaks.
TRANSMISSION CASE
Check for cracks or leaks.
BOOM WEAR PADS
Notify Direct Support Maintenance to check boom wear pads
for excessive wear. Clean or replace as necessary.
ENGINE INTAKE MANIFOLD
Check for cracks or leaks.
Check torque. [lb ft (N•m)]
18 lb ft (24 N•m)
AXLE DIFFERENTIAL
Check for cracks or leaks.
2-8
TM10-3950-672-24-1
2-11 ORGANIZATIONALPREVENTIVE MAINTENANCE CHECKS AND SERVICES CHART (continued)
M - MONTHLY
(200 Hours)
S - SEMI-ANNUALLY
(1000 Hours)
B - BI-ANNUALLY
Q - QUARTERLY
(500 Hours)
A - ANNUALLY
W - WEEKLY
(50 Hours)
H - HOURS
INTERVAL
ITEM
NO
M
Q
S
21
•
22
•
23
•
A
B
W
H
ITEM TO BE INSPECTED
PROCEDURE: CHECK, REPAIR, FILL, ADJUST
PERFORM ALL OPERATOR PMCS FIRST
FRONT & REAR AXLE PLANETARY HUB
Check for proper working order.
STEERING LINKAGE
Check for excessive wear.
ENGINE COOLANT SYSTEM
Clean and flush coolant system.
2-9/(2-10 blank)
TM10-3950-672-24-1
CHAPTER 3
MAINTENANCE
Subject
Section
Cab
....................................................................................................................... 1
Engine ....................................................................................................................... 2
Drive Train ................................................................................................................. 3
Axles and Brakes ....................................................................................................... 4
Steering System ......................................................................................................... 5
Hydraulic System ....................................................................................................... 6
Swing System ............................................................................................................ 7
Boom ......................................................................................................................... 8
Swivels ...................................................................................................................... 9
Hoist ........................................................................................................................ 10
Frame and Outriggers .............................................................................................. 11
Electrical System ..................................................................................................... 12
Page
3-1
3-16
3-42
3-64
3-80
3-90
3-135
3-149
3-176
3-182
3-192
3-208
Section 1. CAB
Subject
Para.
Seat Assembly ........................................................................................................ 3-1
Removal ........................................................................................................ 3-1.1
Installation ..................................................................................................... 3-1.2
Seat Belt Removal ......................................................................................... 3-1.3
Seat Belt Installation ...................................................................................... 3-1.4
Cab Fan Assembly .................................................................................................. 3-2
Removal ........................................................................................................ 3-2.1
Installation ..................................................................................................... 3-2.2
Windshield Wiper and Washer Assembly ................................................................ 3-3
Removal ........................................................................................................ 3-3.1
Installation ..................................................................................................... 3-3.2
Door and Latch Assembly ....................................................................................... 3-4
Removal ........................................................................................................ 3-4.1
Installation ..................................................................................................... 3-4.2
Door Glass Replacement ............................................................................... 3-4.3
Accelerator Pedal Assembly .................................................................................... 3-5
Removal ........................................................................................................ 3-5.1
Disassembly .................................................................................................. 3-5.2
Assembly ....................................................................................................... 3-5.3
Installation ..................................................................................................... 3-5.4
Cab Heater/Defroster Assembly .............................................................................. 3-6
Description ..................................................................................................... 3-6.1
Theory of Operation ....................................................................................... 3-6.2
Removal ........................................................................................................ 3-6.3
Inspection ...................................................................................................... 3-6.4
Installation ..................................................................................................... 3-6.5
3-1
Page
3-2
3-2
3-2
3-2
3-2
3-4
3-4
3-4
3-6
3-6
3-6
3-9
3-9
3-9
3-9
3-11
3-11
3-11
3-12
3-12
3-14
3-14
3-14
3-14
3-15
3-15
TM10-3950-672-24-1
3-1 SEAT ASSEMBLY
3-1.1 Removal
a. Pull release handle (1, Figure 3-1) and slide seat (2) forward off rails (3).
b. Remove seat assembly (2) from cab.
3-1.2 Installation
a. Position seat assembly (2, Figure 3-1) in cab with rear of seat slide on rail (3).
b. Slide seat assembly (2) rearward until release handle (1) locks in desired slot.
3-1.3 Seat Belt Removal
a. Remove bolt (6, Figure 3-1) securing seat belt buckle (4) to seat back.
b. Remove bolt (6) securing seat belt and retainer (5) to seat back.
3-1.4 Seat Belt Installation
a. Secure seat belt and retainer (5, Figure 3-1) to seat back with bolt (6).
b. Secure seat belt buckle (4) to seat back with bolt (6).
3-2
TM10-3950-672-24-1
Figure 3-1. Seat Assembly.
3-3
TM10-3950-672-24-1
3-2 CAB FAN ASSEMBLY
3-2.1 Removal
a. Disconnect negative battery cable and two electrical leads from battery.
b. Disconnect fan assembly (3, Figure 3-2) electrical connector from cab electrical harness.
c. Remove three mounting screws (1), three lockwashers (2), and fan assembly (3) from dash panel.
3-2.2 Installation
NOTE
Ensure fan control knob (4, Figure 3-2) faces rearward.
a. Install fan assembly (3) on dash panel with three mounting screws (1) and three lockwashers (2).
b. Connect fan assembly (3) electrical connector to crane electrical harness.
c. Connect negative battery cable and two electrical leads to battery.
3-4
TM10-3950-672-24-1
LEGEND
1.
2.
3.
4.
Screw
Lockwasher
Fan Assembly
Knob
Figure 3-2. Cab Fan Assembly
3-5
TM10-3950-672-24-1
3-3 WINDSHIELD WIPER AND WASHER ASSEMBLY
3-3.1 Removal
a. Disconnect negative battery cable and two electrical leads from battery.
b. Pry wiper arm (1, Figure 3-3) with wiper blade (2) from shaft of wiper motor (3).
c. Remove nut (4), collar (5) and felt washer (6) from shaft of wiper motor (3).
d. Remove nut (7), lockwasher (8), flat washer (9), wiper motor (3), and bushing (10) from cab frame.
e. Tag and disconnect three electrical leads from wiper motor (3).
NOTE
Nut (11 ) is factory positioned so that motor is parallel to windshield. Do not disturb setting.
f. Tag and disconnect electrical lead (23) from pump of pump/canister (14).
g. Position suitable container under pump/canister (14), disconnect hose (1 5) from pump, and drain fluid.
h. Remove four nuts (16), four lockwashers (17), four washers, ground wire (24) from lower left mounting stud
(25), and pump/canister (14) from left front wheel well.
i. Disconnect hose (15) from nozzle (21).
j. Remove nut (19), lockwasher (20), nozzle (21), and rubber seal (22) from cab frame.
3-3.2 Installation
a. Install rubber seal (22, Figure 3-3) and nozzle (21) in cab frame with lockwasher (20), and nut (19).
b. Connect hose (15) to nozzle (21).
NOTE
Ensure ground wire is positioned on lower left mounting stud.
c. Position pump/canister (14) and ground wire on mounting studs in left front wheel well. Secure pump/canister
(14) with four washers (18), four lockwashers (17) and four nuts (16).
d. Connect hose (15) to pump of pump/canister (14).
e. Connect electrical lead to pump of pump/canister (14) and remove tag.
3-6
TM10-3950-672-24-1
LEGEND
1.
2.
3.
4.
5.
6.
7.
8.
Wiper Arm
Wiper Blade
Wiper Motor
Nut
Collar
Felt Washer
Nut
Lockwasher
9.
10.
11.
12.
13.
14.
15.
16.
Washer
Bushing
Nut
Lockwasher
Washer
Pump/canister
Hose
Nut
17.
18.
19.
20.
21.
22.
23.
24.
25.
Lockwasher
Washer
Nut
Lockwasher
Nozzle
Rubber Seal
Electrical Lead
Ground Lead
Stud
Figure 3-3. Windshield Wiper and Washer Assembly
3-7
TM10-3950-672-24-1
f. Connect three electrical leads to wiper motor (3) and remove tags.
g. Install bushing (10) on shaft of wiper motor (3), and position wiper motor (3) through
hole in cab frame and onto frame stud.
h. Secure wiper motor (3) to frame stud with flat washer (9), lockwasher (8), and nut (7).
i. Install felt washer (6), collar (5), and nut (4) on shaft of wiper motor (3).
j. Press wiper arm (1) with wiper blade (2) onto shaft of wiper motor (3).
k. Connect negative battery cable and two electrical leads to battery.
3-8
TM10-3950-672-24-1
3-4 DOOR AND LATCH ASSEMBLY
3-4.1 Removal
a. Open door assembly (1, Figure 3-4) and lift door off cab hinges.
b. Remove bolt (2), with hardware and latch extension (6), from latch (7).
c. Remove lockwasher (3), four flat washers (4), bushing (5) and latch extension (6) from bolt (2).
d. Remove two nuts (8), two lockwashers (9), and two screws (10) to loosen handle (13).
e. Remove two pins (11), two washers (12), latch extension (6), and handle (13) from door assembly (1).
f. Drill out four rivets (19) and remove latch (7) from door assembly (1).
g. Remove nut (14), lockwasher (15), bolt (16), washer (17), and strap (18) from door assembly (1).
3-4.2 Installation
a. Install strap (18, Figure 3-4) on door assembly (1) with washer (17), bolt (16), lockwasher (15), and nut (14).
b. Install latch (7) on door assembly (1) with four rivets (19).
c. Install latch extension (6) and handle (13) on door assembly (1) with two washers (12), two pins (11), two
screws (10), two lockwashers (9), and two nuts (8).
d. Install latch extension (6) on latch (7) with bushing (5), four washers (4), lockwasher (3), and bolt (2).
e. Set door assembly (1) onto cab hinges and close door assembly.
3-4.3 Door Glass Replacement
WARNING
Use care when removing cracked or broken glass. Wear eye protection and gloves.
Follow silicone sealant manufacturer's instructions for applying sealant.
a. Pry locking strip open on molding around glass.
b. Remove glass and discard.
c. Remove and discard door glass molding.
3-9
TM10-3950-672-24-1
d. Cut new door glass molding to window opening size.
e. Install molding in window opening.
f. Fit glass into channel of molding. Work molding around glass until it is fully seated.
g. Seat locking strip onto molding to secure glass from outside of glass.
h. Apply silicone sealant at joint where molding end meets. Allow joint to dry and check
for leaks.
LEGEND
1.
2.
3.
4.
5.
6.
7.
Door Assembly
Bolt
Lockwasher
Washer
Bushing
Extension
Latch
8.
9.
10.
11.
12.
13.
Nut
Lockwasher
Screw
Pin
Washer
Handle
14.
15.
16.
17.
18.
19.
Figure 3-4. Door and Latch Assembly
3-10
Nut
Lockwasher
Bolt
Washer
Strap
Rivet
TM10-3950-672-24-1
3-5 ACCELERATOR PEDAL ASSEMBLY
3-5.1 Removal
a. Set outriggers, refer to Operator's Manual, TM 10-3950-672-10.
b. From under the vehicle, remove two nuts (1, Figure 3-5), two washers (2), U-bolt (3), and cable mount (4)
securing throttle cable to bracket (19).
c. Remove spring clip (5), pin (6), and throttle cable from lever (23).
d. Remove three bolts (7), three lockwashers (8), and pedal (9) with attached components from vehicle.
3-5.2 Disassembly
a. Remove spring clip (10, Figure 3-5) and pin (11) securing clevis (27) to lever (23).
b. Remove two nuts (12), two washers (13), and U-bolt (14) securing pedal (9) to bracket (15).
c. Remove bracket (15), lever (23), and bracket (19) as an assembly.
d. Remove two nuts (16), two washers (17), two bolts (18), and bracket (19) from bracket (1 5).
e. Remove circlip (20), two bearing liners (21), spring (22), and lever (23) from bracket (15).
f. Remove spring clip (24), pin (25), and rod end bearing (26) with clevis (27) from pedal (9).
NOTE
Count and note number of turns when removing clevis (27) to aid in assembly.
g. Unscrew clevis (27) from rod end bearing (26).
NOTE
Count and note number of turns when removing bolt (29) to aid in assembly.
h. Loosen nut (28) and remove bolt (29) from base of pedal (9).
i. Remove bellows (30) from base of pedal (9).
3-11
TM10-3950-672-24-1
3-5.3 Assembly
a. Install bellows (30, Figure 3-5) on base of pedal (9).
b. Screw bolt (29) with nut (28) into base of pedal (9) the same number of turns noted during disassembly.
Tighten nut (28).
c. Screw clevis (27) into rod end bearing (26) the same number of turns noted during disassembly.
d. Install rod end bearing (26) with clevis (27) on pedal (8) with pin (25) and spring clip (24).
e. Install two bearing liners (21), spring (22), and lever (23) on bracket (15). Secure lever (23) with circlip (20).
f. Install bracket (19) on bracket (15) with two bolts (18), two washers (17), and two nuts (16).
g. Position bracket (15), lever (23), and bracket (19) as an assembly under pedal (9), and attach clevis (27) to
lever (23) with pin (11 ) and spring clip (10).
h. Secure bracket (15) to pedal (9) with U-bolt (14), two washers (13), and two nuts (12).
3-5.4 Installation
a. Install pedal (9, Figure 3-5) with attached components on cab floor with three bolts (7) and three lockwashers
(8).
b. Attach throttle cable to lever (23) with pin (6) and spring clip (5).
c. Secure throttle cable to bracket (19) with cable mount (4), U-bolt (3), two washers (2), and two nuts (1).
NOTE
Ensure there is no slack in throttle cable between lever (23) and bracket (19). If necessary,
loosen nuts (1) and reposition throttle cable to take up slack.
d. Stow outriggers, refer to Operator's Manual, TM10-3950-672-10.
3-12
TM 10-3950-672-24-1
LEGEND
1.
2.
3.
4.
5.
6.
7.
8.
Nut
Washer
U-bolt
Cable Mount
Spring Clip
Pin
Bolt
Lockwasher
9. Pedal
10. Spring Clip
11. Pin
12. Nut
13. Washer
14. U-bolt
15. Bracket
16. Nut
17.
18.
19.
20.
21.
22.
23.
Washer
Bolt
Bracket
Circlip
Bearing Liner
Spring
Lever
Figure 3-5. Accelerator Pedal Assembly
3-13
24.
25.
26.
27.
28.
29.
30.
Spring Clip
Pin
Rod End Bearing
Clevis
Nut
Bolt
Bellows
TM 10-3950-672-24-1
3-6
3-6.1
CAB HEATER/DEFROSTER ASSEMBLY
Description
The cab heater/defroster is a hot water type with a variable speed fan. It is mounted under the operator's seat.
The heater system consists of a heater core, heater hoses, a fan, and an electric motor. The heater box assembly
prevents personnel from accidentally coming in contact with the fan or heater core.
3-6.2
Theory of Operation
Hot water is carried by the heater hoses from the crane's engine to the heater core. A fan is used to circulate the
heated air around the heater core out into the cab. The speed of the fan is controlled by a rotary switch located on the
left side of the cab beside the seat. The air flow is vented through the box assembly for either heat or defrost. The vent
is controlled by the push-pull knob located on the left side of the cab beside the seat.
NOTE
For more detailed information, refer to Appendix E.
WARNING
Before performing maintenance or inspection,
disconnect battery negative leads from battery
negative post.
WARNING
Engine must be cool to the touch prior to working on
coolant system components. Failure to comply could
result in scalding or serious burns.
3-6.3
Removal
a. Disconnect battery at negative battery post. Tag and disconnect the electrical leads to the motor.
NOTE
A suitable container should be used to catch draining coolant.
b. Ensure heater control knob is off. Then disconnect the heater hoses from the heater by loosening the hose
clamps.
c. Cap or plug all openings.
d. Loosen clamp and disconnect the defroster hose from the heater
e. Mark control cable to aid in installation. Remove the clamps securing the control cable to the heater
assembly and disconnect the cable from the heater.
f. Remove the three capscrews and lockwashers securing the heater to the cab. Remove the heater from
the crane.
3-14
TM 10-3950-672-24-1
3-6.4
Inspection
a.
b.
c.
d.
3-6.5
Inspect the fan for any damage.
Inspect the heater core for any signs of leakage or other damage.
Inspect the heater hoses for frays, soft spots, wear, or any other damage.
Repair or replace any damaged component as necessary.
Installation
a.
b.
c.
d.
e.
f.
Install the heater under the seat and secure with the three capscrews and lockwashers.
Install the control cable to the heater with the clamps.
Install the defroster hose to the heater. Tighten clamp.
Install the heater hoses to the heater.
Secure the electrical leads to the motor as tagged during removal.
Check the heater for proper operation and ensure there are no leaks.
Heater Defroster Installation
3-15
TM 10-3950-672-24-1
Section 2. Engine
Subject................................................................................................................................ Para.
Page
Engine ................................................................................................................................ 3-7
Description ................................................................................................................... 3-7.1
Removal ...................................................................................................................... 3-7.2
Installation ................................................................................................................... 3-7.3
Engine Oil Pressure Switch ................................................................................................ 3-8
Testing ......................................................................................................................... 3-8.1
Removal ...................................................................................................................... 3-8.2
Installation ................................................................................................................... 3-8.3
Engine Oil Pressure Sender ............................................................................................... 3-9
Testing ......................................................................................................................... 3-9.1
Removal ...................................................................................................................... 3-9.2
Installation ................................................................................................................... 3-9.3
Engine Coolant Temperature Switch .................................................................................. 3-10
Testing ......................................................................................................................... 3-10.1
Removal ...................................................................................................................... 3-10.2
Installation ................................................................................................................... 3-10.3
Engine Coolant Temperature Sender ................................................................................. 3-11
Testing ......................................................................................................................... 3-11.1
Removal ...................................................................................................................... 3-11.2
Installation ................................................................................................................... 3-11.3
Fuel System ....................................................................................................................... 3-12
Description ................................................................................................................... 3-12.1
Fuel Tank ........................................................................................................................... 3-13
Removal ...................................................................................................................... 3-13.1
Installation ................................................................................................................... 3-13.2
Fuel Filter ........................................................................................................................... 3-14
Fuel Filter Water Separator ................................................................................................ 3-15
Draining ....................................................................................................................... 3-15.1
Removal ...................................................................................................................... 3-15.2
Installation ................................................................................................................... 3-15.3
Cold Start Assembly ........................................................................................................... 3-16
Removal ...................................................................................................................... 3-16.1
Installation ................................................................................................................... 3-16.2
Air Intake and Exhaust System .......................................................................................... 3-17
Description ................................................................................................................... 3-17.1
Maintenance ................................................................................................................ 3-17.2
Muffler and Exhaust Pipes ................................................................................................. 3-18
Removal ...................................................................................................................... 3-18.1
Installation ................................................................................................................... 3-18.2
Water Cooling System ....................................................................................................... 3-19
Description
Maintenance
Radiator ............................................................................................................................. 3-20
Removal ...................................................................................................................... 3-20.1
Installation ................................................................................................................... 3-20.2
Engine Cooling Fan ............................................................................................................ 3-21
Removal ...................................................................................................................... 3-21.1
Installation ................................................................................................................... 3-21.2
3-17
3-17
3-17
3-18
3-20
3-20
3-20
3-20
3-21
3-21
3-21
3-21
3-22
3-22
3-22
3-22
3-24
3-24
3-24
3-24
3-25
3-25
3-26
3-26
3-26
3-26
3-27
3-27
3-27
3-27
3-28
3-28
3-28
3-30
3-30
3-30
3-32
3-32
3-32
3-35
3-16
3-36
3-36
3-38
3-40
3-40
3-40
TM 10-3950-672-24-1
3-7 ENGINE
3-7.1
Description
This Service Manual does not include detailed information on the engine itself. A separate manual, as prepared
in detail by the engine manufacturer, is supplied with this Service Manual. However, a short description and
maintenance of certain components of the fuel system is provided in this section. Refer to Appendix E for detailed
information on the air intake system and water cooling system.
Engine speed is controlled by a foot throttle pedal in the cab. The throttle is connected to a cable to the governor
speed control shaft through linkage on the diesel engine.
To aid in starting the diesel engine in cold weather, a starting aid injection system is provided. The system
consists of a quick start switch located on the lower right side of the front console, an atomizer, valve assembly, and
associated tubing.
3-7.2
Removal
a. Ensure the crane is on flat, level ground and set the outriggers.
b. Disconnect battery negative leads from battery negative post.
c. Disconnect the air filter tubing at the engine, refer to paragraph 3-17.
d. Disconnect the muffler exhaust piping at the engine, refer to paragraph 3-18.
e. Drain the engine coolant system, refer to paragraph 3-20.
f. Drain the engine lubrication system, refer to TM 10-3950-672-24-2.
g. Drain the transmission/torque converter oil system, refer to paragraph 3.
CAUTION
Mark the universal so it can be assembled as taken apart,
otherwise severe drive line vibration may occur.
h. Remove the capscrews, washers, nuts, bolts, and clamp drive securing the shaft to the transmission and
the capscrew, nut, washer, and clamp securing the shaft to the axle differential. Remove the drive shaft.
Refer to paragraph 3-22.
i. Tag and disconnect radiator hoses, heater hoses, lines, and tubing from the engine, transmission, and all
other components. Remove the radiator and oil cooler. Refer to paragraph 3-20.
j. Tag and disconnect all electrical leads from the engine and engine components.
k. Tag and disconnect the lines from the hydraulic pump and cap or plug all openings.
Remove the pump, refer to paragraph 3-41.
3-17
TM 10-3950-672-24-1
I.
m.
n.
o.
p.
If necessary, remove the steering pump, refer to paragraph 3-33.
Disconnect the throttle cable from the throttle linkage.
Disconnect any transmission shifting linkage from the transmission, refer to paragraph 3-23.
Attach an adequate lifting device to the engine and transmission assembly and take up any slack.
With the lifting device supporting the weight of the engine, remove the bolts, nuts, and washers securing
the engine to the mounting bracket. Remove the bolts, nuts, and washers securing the transmission to the
frame.
q. Using the lifting device, lift the engine from the crane.
r. If a new engine is to be installed, remove all components, fittings, etc., from the old engine and install
them on the new engine in the same locations. Ensure the same grade hardware, torque valves, and
loctite as were installed by the factory are used.
s. Refer to Section 3, DRIVE TRAIN and remove the transmission from the engine, if necessary.
3-7.3
Installation
a. If the transmission was removed from the engine, refer to Section 3, DRIVE TRAIN and install the engine
to the transmission.
b. With all the components and fittings installed on the new engine, lift the engine into the crane.
c. With the engine in position, secure the transmission to the frame with the bolts, nuts, and washers. Torque
the bolts to 75 lb ft (101.7 N•m). Secure the engine to the mounting bracket with the bolts, nuts, and
washers. Torque the bolts to 75 lb ft (101.7 N•m).
d. Remove the lifting device.
e. Connect the transmission shifting linkage to the transmission, refer to paragraph 3-23.
f. Connect the throttle cable to the throttle linkage.
g. If removed, install the steering pump and secure with the bolts and washers. Torque the bolts to 165 lb ft
(223.7 N•m), refer to paragraph 3-33.
h. Connect all lines and tubing to the engine, transmission and other components as tagged during removal.
i. Install the hydraulic pump and secure with the bolts and washers. Torque the bolts to 165 lb ft (223.7
N•m). Connect the lines as tagged during removal, refer to paragraph 3-41.
3-18
TM 10-3950-672-24-1
j. Connect all electrical leads to the engine and engine components as tagged during removal.
k. Install the radiator and oil cooler and connect the heater hoses, lines, and tubing as tagged during removal.
I. Grind a flat on the washers to allow clearance for bend radius on the clamp and clamp drive and to provide
proper torque of the capscrews and bolt. Secure the shaft to the axle differential with the clamp,
capscrews, nuts, and washers. Torque the nuts 27 to 29 lb ft (36.6 to 39.3 N•m). Secure the shaft to the
transmission with the clamp drive, capscrew, washers, nuts, and bolts.
m. Service the transmission, engine lubrication system, and engine cooling system.
n. Connect the muffler exhaust piping and air filter tubing to the engine, refer to paragraphs 3-17 and 3-18.
o. Bleed air from the fuel system. Refer to TM 10-3950-672-24-2 Engine Manual Index under Bleeding the
Fuel System.
p. Start the engine. Check all hoses and fittings for leaks. Shut down the engine and check all fluid levels.
3-19
TM 10-3950-672-24-1
3-8
ENGINE OIL PRESSURE SWITCH
NOTE
This switch closes when oil pressure is below 5 psi
illuminating the low oil pressure/high engine
temperature indicator.
3-8.1
Testing
a. Using multimeter, check continuity across switch connectors.
b. If continuity is not indicated, replace switch.
3-8.2
Removal
a. Disconnect negative battery cable and two electrical leads from battery.
b. Tag and disconnect two electrical connectors for engine oil pressure switch (1, Figure 3-6).
c. Remove oil pressure switch (1) from engine.
3-8.3
Installation
a. Install oil pressure switch (1, Figure 3-6) in engine.
b. Connect two electrical connectors for oil pressure switch (1) and remove tags.
c. Connect negative battery cable and two electrical leads to battery.
3-20
TM 10-3950-672-24-1
3-9
ENGINE OIL PRESSURE SENDER
3-9.1
Testing
a. Remove engine oil pressure sender.
b. Set multimeter to ohms, attach positive lead of multimeter to sender terminal, and negative lead to sender
body. Multimeter should indicate 240 ohms.
c. Using a hand operated vacuum/pressure tester, apply 50 psi and then 100 psi of pressure to sender while
observing multimeter. Multimeter should indicate 103 ohms at 49-51 psi and 33 ohms at 99-101 psi.
d. If multimeter indications are not as above, replace sender.
3-9.2
Removal
a. Disconnect negative battery cable and two electrical leads from battery.
b. Tag and disconnect electrical lead to engine oil pressure sender (2, Figure 3-6).
c. Remove oil pressure sender (2) from engine.
3-9.3
Installation
a. Install oil pressure sender (2, Figure 3-6) in engine.
b. Connect electrical lead to oil pressure sender (2) and remove tag.
c. Connect negative battery cable and two electrical leads to battery.
3-21
TM 10-3950-672-24-1
3-10
ENGINE COOLANT TEMPERATURE SWITCH
WARNING
Engine must be cool to the touch prior to working on coolant system components. Failure to
comply could result in scalding or serious burns.
NOTE
This switch closes when engine coolant temperature is above 210°F illuminating the low oil
pressure/high engine temperature indicator.
3-10.1 Testing
a. Open engine access door.
b. Set multimeter to ohms, attach positive lead of multimeter to switch terminal and negative lead to switch
body.
c. If continuity is indicated, replace switch.
d. Close and secure engine access door.
3-10.2 Removal
a.
b.
c.
d.
e.
Disconnect negative battery cable and two electrical leads from battery.
Open engine access door.
Drain engine coolant to a level below coolant temperature switch (3, Figure 3-6).
Tag and disconnect electrical lead to coolant temperature switch (3).
Remove coolant temperature switch (3) from engine.
3-10.3 Installation
a.
b.
c.
d.
e.
Install coolant temperature switch (3, Figure 3-6) in engine.
Connect electrical lead to coolant temperature switch (3) and remove tag.
Service engine coolant system.
Close and secure engine access door.
Connect negative battery cable and two electrical leads to battery.
3-22
TM 10-3950-672-24-1
Figure 3-6. Engine Senders and Switches
3-23
TM 10-3950-672-24-1
3-11
ENGINE COOLANT TEMPERATURE SENDER
WARNING
Engine must be cool to the touch prior to working on coolant system components. Failure to
comply could result in scalding or serious burns.
3-11.1 Testing
a. Open engine access door.
b. With an assistant in cab observing engine coolant temperature gauge, disconnect
electrical lead from sender, and ground lead.
c. If engine coolant temperature gauge does not move, sender is OK. If gauge peaks to
the right, replace sender.
d. Close and secure engine access door.
3-11.2 Removal
a.
b.
c.
d.
e.
Disconnect negative battery cable and two electrical leads from battery.
Open engine access door.
Drain engine coolant to a level below coolant temperature sender (4, Figure 3-6).
Tag and disconnect electrical lead to coolant temperature sender (4).
Remove coolant temperature sender (4) from engine.
3-11.3 Installation
a.
b.
c.
d.
e.
Install coolant temperature sender (4, Figure 3-6) in engine.
Connect electrical lead to coolant temperature sender (4) and remove tag.
Service engine coolant system.
Close and secure engine access door.
Connect negative battery cable and two electrical leads to battery.
3-24
TM 10-3950-672-24-1
3-12
FUEL SYSTEM
3-12.1 Description
The fuel system consists of the fuel tank, filters and/or strainer, fuel pump, and the fuel injectors.
a. Fuel Tank. The fuel tank is located on the right side of the crane. The tank has a total capacity of
approximately 35 gal. (132.4 L) and a gauge level of 30 gal. (113.5 L). The tank is equipped with a locktype filler cap and a fuel quantity sender unit which provides a signal to a quantity indicator on the
instrument panel in the cab.
b. Fuel Pump. The diesel engine has a positive displacement gear-type metering fuel pump driven by an
engine power take-off through a coupling to one of the accessories. The pump supplies fuel at low
pressure to the injectors, where the high pressure necessary for atomization of the fuel is created.
The fuel is finely atomized as it is injected into the cylinder and ignited by the heat of the compression. it
is metered also, before injection, to meet the load requirements imposed upon the engine. Surplus fuel,
returning from the injectors, is bypassed back to the fuel tank or to the inlet side of the pump. The
continuous flow of fuel through the injectors helps to cool the injectors and to bypass air from the system.
c. Fuel Filter. The gasoline engine uses a replaceable cartridge type filter in the fuel system to remove
impurities from the fuel. The filter is installed between the pump and the transfer pump outlet.
3-25
TM 10-3950-672-24-1
3-13
FUEL TANK
3-13.1 Removal
a.
b.
c.
d.
Position a suitable container under the fuel tank and drain all fuel from the tank.
Tag and disconnect the fuel line(s) from the tank.
Disconnect the electrical lead from the fuel quantity sender unit.
Support the weight of the tank and remove the bolts, nuts, and washers securing the tank to the mounting
brackets. Remove the tank.
e. If a new tank is to be installed, remove the fittings and the fuel quantity sender from the tank and install
them in the new tank.
3-13.2 Installation
a. Position the tank on the mounting brackets and secure with the washers, nuts, and bolts. Torque the bolts
to 75 lb ft (101.7 N•m).
b. Connect the electrical lead to the fuel quantity sender unit.
c. Connect the line(s) to the tank.
d. Service the tank.
3-14
FUEL FILTER
Refer to TM 10-3950-672-24-2 Engine Manual Index under Fuel Filter Replacement.
3-26
TM 10-3950-672-24-1
3-15 FUEL FILTER WATER SEPARATOR
3-15.1 Draining
The sump of the fuel filter water separator should be drained daily, 30 minutes after the engine is shut down, to
remove any water and sediment. Adhere to the following procedure.
a.
b.
c.
d.
e.
f.
g.
Remove the cap from the vent valve.
Open the petcock.
Press down the vent valve.
Drain until fuel appears.
Close the petcock.
Close the vent valve.
Replace the cap on the vent valve.
3-15.2 Removal
a.
b.
c.
d.
Clean all dirt from the filter, especially the areas around the fuel line connections.
Tag, disconnect, and cap the fuel lines to the filter.
Remove the mounting nuts and washers.
Remove the filter.
3-15.3 Installation
a.
b.
c.
d.
Position the filter assembly on the mounting bracket.
Install the washers and nuts.
Connect the fuel lines as tagged prior to removal.
Bleed air from the fuel system. Refer to TM 10-3950-672-24-2 Index under Bleeding the Fuel System.
3-27
TM 10-3950-672-24-1
3-16
COLD START ASSEMBLY
3-16.1 Removal
a. Disconnect negative battery cable and two electrical leads from negative battery post.
b. Open engine access door.
c. Tag and disconnect two electrical connectors for starting fluid valve (3, Figure 3-7) from electrical harness.
CAUTION
Cover opening to prevent dirt from falling into valve (3). Dirt could prevent starting fluid cylinder
(2) from sealing properly.
d. Open clamp (1), unscrew starting fluid cylinder (2) from starting fluid valve (3), and remove starting fluid
cylinder (2) from clamp (1).
e. Remove plastic tubing (4) between atomizer (5) and elbow (6). Cut wire ties as needed.
f. Remove atomizer (5) from engine intake manifold.
g. Remove two nuts (7), two lockwashers (8), and starting fluid valve (3) from studs on crane frame.
h. Remove elbow (6) from starting fluid valve (3).
3-16.2 Installation
a.
b.
c.
d.
e.
f.
g.
Install elbow (6, Figure 3-7) on starting fluid valve (3).
Install starting fluid valve (3) on studs on crane frame with two lockwashers (8) and two nuts (7).
Install atomizer (5) in engine intake manifold.
Install plastic tubing (4) between atomizer (5) and elbow (6). Install new wire ties as needed.
Connect two electrical connectors for starting fluid valve (3) to electrical harness and remove tags.
Insert starting fluid cylinder (2) through clamp (1) and screw cylinder tightly into starting fluid valve (3).
Connect negative battery cable and two electrical leads to negative battery post.
3-28
TM 10-3950-672-24-1
LEGEND
1.
2.
3.
4.
5.
Clamp
Cylinder
Valve
Tubing
Atomizer
6.
7.
8.
9.
Elbow
Nut
Lockwasher
Washer
Figure 3-7. Cold Start Assembly
3-29
TM 10-3950-672-24-1
3-17
AIR INTAKE AND EXHAUST SYSTEM
3-17.1 Description
The engine air intake system consists of an air cleaner and associated piping for channeling the air from the
atmosphere to the engine intake manifold. The intake pipe also provides the necessary connections for starting aid to be
injected into the air intake for quick start and a restriction indicator to indicate a dirty air cleaner, see Figure 3-8.
The air cleaner is the dry-type with a replaceable element. It is located on the deck behind the cab.
The optional cold weather starting system consists of an atomizer, valve assembly, and starting aid bottle
(customer supplies). The quick start system is normally used during cold weather operations to facilitate engine starting.
To operate the system, starter switch must be in the start position before the control is depressed. Depressing the control
actuates the valve assembly, passing starting aid from the bottle through the atomizer into the air intake manifold where
it mixes with the intake air to facilitate engine combustion.
3-17.2 Maintenance
NOTE
For more detailed information, refer to Appendix E.
3-30
TM 10-3950-672-24-1
Figure 3-8. Exhaust and Air Cleaner Installation
3-31
TM 10-3950-672-24-1
3-18
MUFFLER AND EXHAUST PIPES
3-18.1 Removal
a. Set rear outriggers, refer to Operator's Manual, TM 10-3950-672-10.
b. Turn steering wheel all the way left to position left rear wheel to gain access to muffler.
WARNING
Exhaust components can be hot causing burns to exposed skin. Allow exhaust components to
cool before proceeding.
c. Loosen three pipe clamps (1, 2, and 3, Figure 3-9).
d. Disconnect and remove tube (4) and elbow (5). Slide three pipe clamps (1, 2, and 3) off of tube and
elbow.
e. Remove four bolts (7) and four lockwashers (8) securing flange (6) to engine exhaust manifold. Remove
flange (6) and cover opening in exhaust manifold.
f. Loosen two pipe clamps (9 and 10) and remove tailpipe (11) and exhaust tube (12).
g. Remove two bolts (14) and two nuts (15) securing muffler clamp (13). Remove muffler (16) with clamp
(13). Then separate muffler (16) and clamp (13).
h. If damaged, remove muffler bracket (17). Remove two nuts (18) and two lockwashers (19) securing
muffler bracket (1 7) to vehicle frame.
3-18.2 Installation
a. If removed, install new muffler bracket (17, Figure 3-9) and secure with two nuts (18) and two lockwashers
(19).
b. Slide muffler clamp (13) over muffler (16). Then install muffler (16) and secure with two bolts (14) and two
nuts (15).
c. Slide two pipe clamps (9 and 10) over tailpipe (11) and exhaust tube (12). Then install exhaust tube (12)
on muffler (16) and tailpipe (11) on exhaust tube (12).
Adjust position of both exhaust tube (12) and tailpipe (11 ). Then tighten both pipe clamps (9 and 10).
d. Slide pipe clamp (3) over muffler (16) inlet and position two pipe clamps (1 and 2) on tube (4).
e. Install elbow (5) in muffler inlet. Then install tube (4) in elbow (5). Do not tighten three pipe clamps (1, 2,
and 3) at this time.
3-32
TM 10-3950-672-24-1
LEGEND
1.
2.
3.
4.
5.
Pipe Clamp
Pipe Clamp
Pipe Clamp
Tube
Elbow
6. Flange
7. Bolt
8. Lockwasher
9. Pipe Clamp
10. Pipe Clamp
11. Tailpipe
1 2. Exhaust Tube
13. Muffler Clamp
14. Bolt
15. Nut
Figure 3-9. Muffler and Exhaust Pipes
3-33
16.
17.
18.
19.
Muffler
Muffler Bracket
Nut
Lockwasher
TM 10-3950-672-24-1
f. Remove cover over exhaust manifold opening and connect flange (6) and tube (4).
Secure flange (6) to exhaust manifold with four bolts (7) and four lockwashers (8).
g. Reposition tube (4) and elbow (5) as required. Then tighten three pipe clamps (1, 2 and 3).
WARNING
Exhaust components can be hot causing burns to exposed skin.
h. Start diesel engine and check exhaust system for leaks. Shut down diesel engine. If necessary, allow
exhaust system components to cool and tighten pipe clamps to stop leaks.
i. Stow rear outriggers, refer to Operator's Manual, TM 10-3950-672-10.
3-34
TM 10-3950-672-24-1
3-19
WATER COOLING SYSTEM
DESCRIPTION
At all times, the coolant should be properly inhibited
The cooling system consists of the radiator, engine
against corrosion. If antifreeze is used, follow the
cooling circuit, and the connecting hoses. Its capacity
antifreeze manufacturers requirements for proper
varies according to the engine being used.
The
protection in regards to cooling system capacity, and
temperature is controlled by a 180 degree F (82 degrees
only ethylene gylcol base permanent antifreeze should
C) thermostat located between the top of the engine and
be used.
the top of the radiator. The radiator, in addition to
cooling the engine, also contains a cooler which cools
the automatic transmission oil.
MAINTENANCE
NOTE
For more detailed information refer to Appendix E.
3-35
TM 10-3950-672-24-1
3-20
RADIATOR
3-20.1 Removal
a. Disconnect negative battery cable and two electrical leads from negative battery post.
b. Remove rear access cover, refer to paragraph 3-80.
WARNING
Allow engine and radiator to cool down before opening cap. Open radiator cap slowly to allow
pressure to escape. Failure to comply could result in scalding or serious burns.
c. Remove radiator cap (1, Figure 3-10) and open radiator drain valve (2). Drain coolant (24.5 quart
capacity) into clean, adequate container.
d. Remove recovery bottle (6) cap with two hoses (4 and 5) attached and set aside. Then loosen hose clamp
(3) at radiator neck and disconnect hose (4).
e. Loosen circle clamp (7) and remove coolant recovery bottle (6).
f. Remove two hose clamps (8 and 9) securing radiator hoses (10 and 11) to radiator (12, Figure 1). Then
disconnect both radiator hoses.
g. Remove fan guard (16) as follows:
(1) Remove ten screws (13), ten lockwashers (14), ten washers (15), and fan guard (16) with supports
(17 and 18).
(2) Remove eight nuts (19), eight lockwashers (20), eight washers (21), eight screws (22), and eight
washers (23). Separate fan guard (16) and supports (17 and 18).
h. Disconnect two transmission oil cooler lines at bottom of radiator at fittings (24). Plug both transmission
cooler lines.
i. Remove two nuts (25) and two flatwashers (26) securing bottom of radiator (12) to vehicle.
WARNING
The radiator assembly weighs 72 lbs. To prevent personal injury, use a suitable lifting device to
remove radiator assembly.
NOTE
Radiator and lower shroud (29) are hoisted out of vehicle as a unit.
3-36
TM 10-3950-672-24-1
LEGEND
1. Radiator Cap
2. Drain Valve
3. Hose Clamp
4. Hose
5. Hose
6. Recovery Bottle
7. Circle Clamp
8. Hose Clamp
9. Hose Clamp
10. Hose
11. Hose
12. Radiator
13.
14.
15.
16.
17.
18.
19.
20.
21.
22.
23.
Screw
Lockwasher
Washer
Fan Guard
Support, RH
Support, LH
Nut
Lockwasher
Washer
Screw
Washer
24.
25.
26.
27.
28.
29.
30.
31.
32.
33.
34.
Fitting
Nut
Lockwasher
Nut
Lockwasher
Lower Shroud
Screw
Lockwasher
Screw
Lockwasher
Upper Shroud
Figure 3-10. Radiator and Fan Guard
3-37
35.
36.
37.
38.
39.
40.
41.
42.
43.
44.
45.
Baffle
Elbow
Nipple
Bolt
Lockwasher
Strap
Rubber Strip
Shock Mount
Nut
Lockwasher
Clamp
TM 10-3950-672-24-1
j. Support radiator (12) and remove two nuts (27) and two lockwashers (28) securing sides of radiator to
vehicle. Then lift radiator (12) with shroud (29) out of vehicle.
k. If necessary, remove ten bolts (30), ten lockwashers (31), and shroud (29) from radiator. Then remove
eight screws (32), eight lockwashers (33), upper shroud (34), and baffle (35) from shroud (29).
I. If replacing radiator (12), remove drain valve (2), elbow (36), nipple (37), and two fittings (24) from
radiator.
m. If replacing radiator (12) remove two bolts (38), two lockwashers (39), and two straps (40) from radiator.
n. If damaged, remove rubber molding (41) and two shock mounts (42).
3-20.2 Installation
a.
b.
c.
d.
e.
If removed, install nipple (37, Figure 3-10), elbow (36), drain valve (2), and two fittings (24) in radiator (12).
If removed, cut and install two new strips of rubber molding (41) on radiator (12) where shroud mounts.
Install upper shroud (34) and baffle (35) on shroud (29) with eight screws (32) and eight lockwashers (33).
Install shroud (29) on radiator (12) with ten screws (30) and ten lockwashers (31).
If removed, secure two straps (40) to radiator (12) with two bolts (38) and two lockwashers (39).
WARNING
The radiator assembly weighs 72 lbs. To prevent personal injury, use a suitable lifting device to
install radiator assembly.
f. If removed, install two new shock mounts (42) on radiator mounting studs. Then place radiator (12) with
shroud (29) in engine compartment, lining up mounting holes in vehicle frame with studs on bottom of
radiator.
g. If removed, secure two straps (40) to studs on vehicle frame with two nuts (29) and two lockwashers (28).
h. Install two nuts (25) and two washers (26) to secure bottom of radiator to vehicle frame.
i. Remove caps and connect two transmission oil cooler lines at fittings (24).
3-38
TM 10-3950-672-24-1
j. Install fan guard (16) as follows:
(1) Install supports (17 and 18) on fan guard (16) with eight screws (22), eight washers (23 and 21), eight
lockwashers (20), and eight nuts (19).
(2) Install fan guard (16) on radiator with ten screws (13), ten lockwashers (14), and ten washers (15).
k. Connect radiator hoses (10 and 11) and secure with hose clamps (8 and 9).
I. Install coolant recovery bottle (6) and secure with circle clamp (7).
m. Install recovery bottle cap with hoses (4 and 5) attached. then connect hose (4) to radiator neck and
tighten clamp (3).
n. Fill radiator with previously drained coolant.
o. Connect negative battery cable and two electrical leads to negative battery post.
p. Start engine and inspect radiator hoses and transmission oil cooler lines for leaks.
Check transmission fluid level. Shutdown engine and tighten clamps/fittings as needed.
Service transmission and coolant system if required, refer to Operator's Manual TM 10-3950-672-10.
q. Install rear access cover, refer to paragraph 3-80.
3-39
TM 10-3950-672-24-1
3-21
ENGINE COOLING FAN
3-21.1 Removal
a. Disconnect negative battery cable and two electrical leads from battery.
b. Remove fan guard, refer to paragraph 3-20.1 step g.
c. Remove four bolts (2, Figure 3-11) and four washers (3) securing engine cooling fan (1) and spacer (4) to
water pump.
CAUTION
Fan blades are plastic and can crack in cold weather if mishandled. Handle with care.
d. Remove engine cooling fan (1) and spacer (4) leaving pulley (5) and drive belt in place.
3-21.2 Installation
CAUTION
Ensure the word "FRONT" on the fan hub faces the radiator.
a. Position engine cooling fan (1, Figure 3-11) and spacer (4) on fan pulley (5). Align mounting holes in
engine cooling fan, spacer, and fan pulley to water pump holes.
b. Apply loctite to threads of four bolts (2). Install four bolts (2), and four washers (3).
Torque bolts to 18 lb ft (24 N•m).
c. Install fan guard, refer to paragraph 3-20.2 step j.
d. Connect negative battery cable and two electrical leads to battery.
3-40
TM 10-3950-672-24-1
LEGEND
1.
2.
3.
4.
5.
Engine Cooling Fan
Bolt
Washer
Spacer
Fan Pulley
Figure 3-11. Engine Cooling Fan
3-41
TM 10-3950-672-24-1
Section 3. Drive Train
Subject
Para
Drive Line ..............................................................................................................................3-22
Removal ..........................................................................................................................3-22.1
Installation .......................................................................................................................3-22.2
Lubrication .......................................................................................................................3-22.3
C-6 Automatic Transmission ..................................................................................................3-23
Description
Troubleshooting
Removal
Installation
Transmission Shift Modulator Adjustment
Park Brake .............................................................................................................................3-24
Removal ..........................................................................................................................3-24.1
Inspection ........................................................................................................................3-24.2
Installation .......................................................................................................................3-24.3
Adjustment .......................................................................................................................3-24.4
Transmission Shifting Lever Assembly ...................................................................................3-25
Adjustment .......................................................................................................................3-25.1
3-22
Page
3-42
3-42
3-42
3-43
3-44
3-59
3-59
3-59
3-59
3-60
3-62
3-62
DRIVE LINE
3-22.1 Removal
a. Scribe an alignment mark across the flanges of the drive shaft.
b. Support the shaft so it does not fall when disconnected.
c. Remove the capscrews, washers, nuts, bolts, and clamp drive securing the shaft to the transmission and
the capscrew, nut, washer, and clamp securing the shaft to the axle differential.
d. Remove the drive shaft.
3-22.2 Installation
a. Position the drive shaft aligning the alignment marks made during removal.
b. Grind a flat on the washers to allow clearance for bend radius on the clamp and clamp drive and to provide
proper torque of the capscrews and bolt. Secure the shaft to the axle differential or with the clamp,
capscrews, nuts, and washers. Torque the nuts 27 to 29 lb ft (36.6 to 39.3 N•m). Secure the shaft to the
transmission with the clamp drive, capscrew, washers, nuts, and bolts.
3-42
TM 10-3950-672-24-1
3-22.3 Lubrication
The universal joints should be lubricated with EP-MPG (refer to Operator's Manual TM 10-3950-672-10). The
interval between lubrications is generally satisfactory for normal service.
When subjected to extremely severe conditions, more frequent lubrication may be required.
Lubrication must be done with a low pressure adapter only. High pressure will rupture the cork seals.
3-43
TM 10-3950-672-24-1
3-23
C-6 AUTOMATIC TRANSMISSION
DESCRIPTION
The transmission is a three speed automatic capable of
providing automatic upshifts and downshifts through the
three forward gear ratios. The stall ratio is 1.89: 1.
Low (1st)
Gear
ratios
are
as
follows:
Int. (2nd)
Direct (3rd)
Reverse
GEAR RATIOS
2.46:1
1.46:1
1.00:1
2.175:1
MAINTENANCE
NOTE
For more detailed information refer to Appendix E.
TROUBLESHOOTING.
3-44
Before removal or operation of the transmission,
perform a visual inspection. Visually inspect all lines,
plugs, and tube connections at the transmission for oil
leakage.
Check the engine idle speed. If the idle speed is too
low, the engine will run roughly. An idle speed that is
too high will cause the crane to creep, have harsh
transmission engagements, and harsh closed throttle
downshift.
To make a thorough test of the transmission, ensure the
engine is properly tuned and the oil level in the
transmission is correct. During troubleshooting, the
engine and transmission must be regarded as a single
package.
ENGINE IDLE SPEED CHECK.
CONTROL PRESSURE TEST.
There are two methods of performing the control
pressure test. One is to perform the test using the
engine vacuum. The second method is to use a hand
operated vacuum pump.
If inspection does not reveal the cause of the trouble
and the crane is operational, further troubleshooting is
necessary. Do not remove the transmission from the
crane until the mechanical, hydraulic, and air pressure
tests are performed and the causes of trouble are
checked against the troubleshooting chart.
1. To perform the control pressure test using the
engine vacuum, perform the following.
a. Attach a tachometer to the engine and a
vacuum gauge to the transmission vacuum line at the
manifold vacuum port.
Mechanical Checks.
CAUTION
LINKAGE CHECK.
PRESSURE GAUGES AFFECT THE
SHIFT
QUALITY
OF
THE
TRANSMISSION. CARE SHOULD BE
TAKEN NOT TO ACCELERATE OR
DECELERATE RAPIDLY. POSSIBLE
TRANSMISSION FAILURE COULD
RESULT.
1. A check should be made to ensure the linkage is
free and returns to idle when released.
2. Ensure the D detent in the transmission
corresponds exactly with the stop in the console.
Leakage at the manual valve can cause delay in
engagements and/or slipping while operating if the
linkage is not correctly adjusted.
b. Firmly apply the parking brake and start
the engine.
3-44
TM 10-3950-672-24-1
When the selector lever is at 2 (second) a no drive
condition may be caused by an inoperative forward
clutch. A no drive condition at D (drive) may be caused
by an inoperative forward clutch or one-way clutch.
When there is no drive in 1 (low) the difficulty could be
caused by improper functioning of the forward clutch or
simultaneous malfunction of the low-reverse band and
the one-way clutch. Failure to drive in R (reverse) could
be caused by a malfunction of the reverse-high clutch or
low-reverse band or clutch.
c. Adjust the engine idle speed to the
specified rpm. If the engine idle speed cannot be
brought within limits, check the throttle and downshift
linkage for a binding condition. If linkage is satisfactory,
check for vacuum leaks in the transmission diaphragm
unit and its connecting tubes and hoses.
2. To perform the control pressure test using the
vacuum pump method, perform the following.
a. Disconnect and temporarily plug the
vacuum line at the vacuum diaphragm unit.
b. Attach a vacuum pump to the vacuum
diaphragm. Apply both the parking and service brakes.
Start the engine and vacuum pump.
c. Set the vacuum at 15 inches and read
and record the control pressure in all the selector
positions. Run the engine up to 1000 rpm, and reduce
the vacuum to 10 inches. Read and record the control
pressure in D, 2, and 1. Keep the engine rpm at 1000
and reduce the vacuum to 1 inch. Read and record the
control pressure in D, 1, 2, and R.
To make air pressure checks, loosen the oil pan bolts
and lower one edge to drain the transmission fluid.
Remove the oil pan and the control valve body
assembly. The inoperative clutches or bands can be
located by introducing air pressure into the various
transmission case passages.
FORWARD CLUTCH.
Apply air pressure to the transmission case forward
clutch passages. A dull thud can be heard when the
clutch piston is applied. If no noise is heard, place the
finger tips on the input shell and again apply air pressure
to the forward or front clutch passage. Movement of the
piston can be felt as the clutch is applied.
VACUUM SUPPLY TEST.
Check the vacuum supply to the vacuum diaphragm unit
and the diaphragm itself.
To check the supply,
disconnect the vacuum line at the diaphragm unit and
connect it to vacuum gauge. With the engine idling, the
gauge must have a steady acceptable vacuum reading
for the altitude at which the test is being performed. If
the vacuum reading is low, check for a vacuum leak or
poor engine vacuum. If the vacuum reading is OK,
rapidly accelerate the engine momentarily. The vacuum
reading must drop rapidly at acceleration and return
immediately upon release of the accelerator. If the
vacuum reading does not change or changes slowly, the
transmission vacuum line is plugged, restricted, or
connected to a reservoir supply.
GOVERNOR.
Apply air pressure to the control pressure to governor
passage and listen for a sharp clicking or whistling
noise. The noise indicates governor valve movement.
REVERSE-HIGH CLUTCH.
Apply air pressure to the reverse-high clutch. A dull
thud indicates that the reverse-high or rear clutch piston
has moved to the applied position. If no noise is heard,
place the finger tips on the clutch drum and again apply
air pressure to detect movement of the piston.
Air Pressure Checks.
INTERMEDIATE SERVO.
GENERAL.
Hold the air nozzle in the front servo apply tube or the
intermediate servo apply passages. Operation of the
servo is indicated by a tightening of the front or
intermediate band around the drum. Continue to apply
air pressure to the servo apply tube or passage. and
introduce air pressure into the front release tube or the
intermediate servo release passage. The front or
intermediate servo should release the band against, the
apply pressure.
A no drive condition can exist even with correct
transmission fluid pressure, because of inoperative
clutches or bands. On automatic transmissions, an
erratic shift can be caused by a stuck governor valve.
The inoperative units can be located through a series of
checks by substituting air pressure for fluid pressure to
determine the location of the malfunction.
3-45
TM 10-3950-672-24-1
3-46
TM 10-3950-672-24-1
LOW-REVERSE CLUTCH.
3. Pull the dipstick out of the tube, wipe it clean,
and push all the way back into the tube. Be sure it is
fully seated.
4. Pull the dipstick out of the tube again and check
the fluid level.
5. For correct fluid level reading on the dip-stick,
follow the appropriate instructions stated previously for
transmission hot and transmission cold check.
Apply air pressure to the low-reverse clutch apply
passage. A dull thud should be heard if the clutch is
operating properly. If the passages are clear, remove
the clutch assemblies, and clean and inspect the
malfunctioning clutch to locate the trouble.
Hydraulic Checks.
Do not overfill the transmission. Overfill can cause the
fluid to foam and spill out through the transmission vent
with resultant transmission malfunction.
FLUID LEVEL CHECK.
Check the oil level in the transmission. The fluid level
indication on the dipstick will be different at operating
temperature (transmission hot) and room temperature
(transmission cold).
Underfill can result in transmission loss of engagement
or slipping. This condition is most evident in cold
weather or when the crane is parked or being driven on
a hill.
The transmission should be checked at an operating
temperature (transmission hot) of 150 degrees to 170
degrees F (66 degrees to 77 degrees C), dipstick is hot
to touch. The dipstick reading at operating temperature
should have the fluid level on the dipstick between ADD
and DON'T ADD marks and/or between the arrows. If
the transmission is not at an operating temperature of
150 degrees to 170 degrees F (66 degrees to 77
degrees C) and it becomes necessary to check the fluid
level (such as pre-delivery) the fluid may be checked at
room temperature 70 degrees to 95 degrees F (21
degrees to 35 degrees C) giving the dipstick a cool
feeling. The dipstick reading at room temperature
should have the fluid level on the dipstick between the
middle and top holes.
6. Install the dipstick making sure it is fully seated
in the tube.
FLUID CONDITION CHECK.
After making a normal fluid check according to the
procedures under Fluid Checking Procedures, check the
condition of the transmission fluid as follows.
1. Observe the color and odor of the fluid. It
should be dark reddish not brown or black. A burnt odor
can sometimes indicate that there is an overheating
condition or clutch disc or band failure.
2. Use an absorbent white facial tissue paper to
wipe the dipstick. Examine the stain for evidence of
solids (specks of any kind) and for antifreeze signs (gum
or varnish on dipstick).
FLUID CHECKING PROCEDURE.
Check the transmission fluid using the following
procedure.
If specks are present in the oil or there is evidence of
antifreeze, the transmission oil pan must be removed for
further inspection. If fluid contamination or transmission
failure is confirmed by further evidence of coolant or
excessive solids in the oil pan, the transmission must be
disassembled and completely cleaned and repaired.
This includes cleaning the torque converter and
transmission cooling system.
1. With the transmission in Park, engine at curb
idle rpm, foot brakes applied, and crane on level
surface, move the transmission selector lever through
each range. Allow time in each range to engage the
transmission, return to Park, and apply parking brake
fully. Do not turn off the engine during the fluid level
check.
2. Clean all dirt from the transmission fluid dipstick
cap, before removing the dipstick from the filler tube.
3-47
TM 10-3950-672-24-1
by fluid around the converter housing, and may have
several sources. By careful observation, it Is possible in
many instances, to pinpoint the source of the leak
before removing the transmission.
FLUID LEVEL HIGH BEFORE STARTING ENGINE
NORMAL DURING NORMAL CHECK.
If the fluid level is high before starting the engine and
normal during normal check, check the following.
1. Fluid leaking by the front pump seal lip will tend
to move along the drive hub and onto the back of the
impeller housing. Except in the case of a total seal
failure, fluid leakage by the lip of the seal will be
deposited on the inside of the converter housing only
near the outside diameter of the housing
2. Fluid leakage by the outside diameter of the
seal and front pump body will follow the same path
which the leaks by the front pump seal follow.
3. Fluid that leaks by a front pump-to-case bolt will
be deposited on the Inside of the converter housing
only. Fluid will not be deposited on the back of the
converter.
4. Leakage by the front pump-to-case gasket may
cause fluid to be deposited inside the converter housing,
or it may seep down between the front of the case and
converter housing.
5. Fluid leakage from the converter drain plugs will
appear at the outside diameter of the converter.
1. Check for correct operation of the drainback
valve in the stator support.
2.
Check the pump bushing.
3.
Repair or replace pump, if required.
TRANSMISSION FLUID LEAKAGE CHECKS.
1. Leakage at the oil pan gasket often can be
stopped by tightening the attaching bolts to the proper
torque. If necessary, replace the gasket.
2. Check. the fluid filler tube connection at the
transmission case. If leakage is found, install a new Oring. The filler tube bracket should align properly.
3. If leakage is found at either the downshift
control lever shaft or the manual lever shaft, replace
either or both seals.
FLUID LEAKAGE IN CONVERTER AND FRONT
PUMP AREA.
Leakage at the front of the transmission, is evidenced
Troubleshooting Chart.
SYMPTOM
1. Slow initial engagement.
PROBABLE CAUSE
SOLUTION
a. Improper fluid level.
a. Perform fluid level check
b. Damaged or improperly adjusted linkage.
b Service or adjust linkage
c. Contaminated fluid
c: Perform fluid condition check.
d. Improper clutch and band application, or low main control
pressure
d. Perform control pressure test
3-48
TM 10-3950-672-24-1
SYMPTOM
2. Rough initial engagement in
either forward or reverse.
3. Harsh engagements - (warm
engine).
PROBABLE CAUSE
a. Improper fluid level.
a. Perform fluid level check.
b. High engine idle.
b. Adjust idle
c. Looseness in the driveshaft. Ujoints or engine mounts.
c. Service as required
d. Improper clutch or band application. or oil control pressure
d. Perform control pressure test
e. Sticking or dirty valve body.
body.
e. Clean. service or replace valve
a. Improper fluid level.
a. Perform fluid level check.
b. Throttle valve linkage misadjusted/long/disconnected/sticking damaged, return spring disconnected.
b. Adjust throttle valve linkage.
c. Valve body bolts loose or too
tight.
c. Tighten bolts.
d. Valve body dirty or sticking
valves.
4. No/delayed forward engagement (reverse OK).
SOLUTION
d. Determine source of contamination. Service as required.
a. Improper fluid level.
a. Perform fluid level check.
b. Manual linkage- misadjusted
damaged.
b. Check and adjust or service as
required.
c. Low main control pressure.
(Leakage.) Forward Clutch stator
support seal rings leaking (#3. #4).
c. Control pressure test. note
results.
d. Forward clutch assembly
burnt. Damaged/leaking check ball
in cylinder. Leaking piston seal
rings.
d. Perform air pressure test
e. Valve body bolts loose or too
tight.
e. Tighten bolts
f. Valve body dirty or sticking
valves.
f. Determine source of contamination Service as required.
g. Transmission filter plugged.
g. Replace filter
h. Pump damaged or leaking
h Visually Inspect pump gears.
Replace pump if necessary
3-49
TM 10-3950-672-24-1
SYMPTOM
5. No/delayed reverse engagement (forward OK).
6. No/delayed reverse engagement and/or no engine breaking in
manual low (1).
PROBABLE CAUSE
a. Improper fluid level.
a Perform fluid level check.
b Manual linkage misadjusted/
damaged.
b. Check and adjust or service as
required.
c. Low main control pressure in
reverse. Reverse clutch stator support seal rings leaking (#1, #2).
c. Control pressure test.
a. Improper fluid level.
a. Perform fluid level check.
b. Low reverse servo piston seal
leaking.
b. Check and replace piston seal.
c. Planetary low one way clutch
damaged.
7. No engine braking in manual
second gear.
8. Forward engagement slips/
shudders/chatters.
SOLUTION
c. Determine cause of condition.
Service as required.
a. Intermediate band out of adjustment.
a. Adjust intermediate band.
b. Improper band or clutch application, or oil pressure control
system.
b. Perform control pressure test.
c. Intermediate servo leaking.
c. Perform air pressure test of intermediate servo for leakage. Service as required.
d. Intermediate one way clutch
damaged.
d. Replace.
e. Polished or glazed band or
drum.
e. Service or replace as required.
a. Improper fluid level.
a. Perform fluid level check.
b. Manual linkage misadjusted/
damaged.
b. Check and adjust or service as
required.
c. Low main control pressure.
c. Control pressure test.
d. Valve body bolts loose or too
tight.
d. Tighten bolts.
e. Valve body dirty or sticking
valves.
e. Determine source of contamination. Service as required.
f. Forward clutch piston ball
check not seating, or leaking.
f. Replace forward clutch cylinder. Service transmission as required.
g. Forward clutch piston seals cut
or worn.
g. Replace seals and service
clutch as required.
h. Low one way clutch (planetary)
damaged.
h. Determine cause of condition.
Service as required.
3-50
TM 10-3950-672-24-1
SYMPTOM
9. Reverse shudder/chatters/
slips
PROBABLE CAUSE
SOLUTION
a. Improper fluid level.
a. Perform fluid level check.
b. Low main control pressure in
reverse.
b. Control pressure test.
c. Low reverse servo/leaking.
c. Air pressure test; visually inspect seal rings and piston bore.
d. Low (planetary) one-way
clutch damaged.
d. Determine cause of condition.
Service as required.
e. Reverse clutch drum bushing
damaged.
e. Determine cause of condition.
Service as required.
f. Reverse clutch stator support
seal ring grooves worn or damaged.
f. Determine cause of condition
Service as required.
g. Reverse clutch piston seals cut
or worn.
g. Determine cause of condition.
Service as required.
h. Looseness in the driveshaft. Ujoints or engine mounts.
h. Service as required.
10. No drive, slips or chatters in
first gear in D. All other gears
normal
a. Damaged or worn planetary
one-way clutch.
a Service or replace one-way
clutch.
11. No drive, slips or chatters in
second gear.
a. Intermediate band out of adjustment.
a. Adjust intermediate band.
b. Improper band or clutch application. or control pressure.
b. Perform control pressure test.
c. Damaged or worn intermediate
servo piston seals and/or internal
leaks.
c. Perform air pressure test.
d. Dirty or sticking valve body.
body.
d. Clean, service or replace valve
e. Polished. glazed intermediate
band or drum.
e. Replace or service as required.
a. Improper band and/or clutch
application, or oil pressure control
system.
a. Perform control pressure test.
b. Damaged or worn governor.
Sticking governor.
b. Perform governor check. Replace or service governor. clean
screen.
c. Valve body loose.
c. Tighten valve.
d. Dirty or sticking valve body.
d. Clean, service or replace valve
body.
e. Cross leaks between valve
body and case mating surface.
e. Service or replace valve body
and/or case as required.
12. Starts up in 2nd or 3rd.
3-51
TM 10-3950-672-24-1
SYMPTOM
13. All upshifts harsh/delayed or
no upshifts.
14. Mushy/early all upshifts/
15. No 1-2 upshift.
PROBABLE CAUSE
SOLUTION
a. Improper fluid level.
a. Perform fluid level check.
b. Manual linkage - misadjusted
or damaged.
b. Check and adjust or service as
required.
c. Governor sticking.
as required.
c. Perform governor test. Service
d. Main control pressure too high.
d. Control pressure test. Service
as required.
e. Valve body bolts loose or too
tight.
e. Tighten bolts.
f. Valve body dirty or sticking
valves.
f. Determine source of contamination. Service as required.
g. Vacuum leak to diaphragm
unit.
g. Check vacuum lines to diaphragm unit. Service as necessary.
Perform vacuum supply and diaphragm tests.
a. Low main control pressure.
pile up upshifts.
a. Control pressure test. Note results.
b. Valve body bolts loose or too
tight.
b. Tighten bolts.
c. Valve body valve or throttle
control valve sticking.
c. Determine source of contamination. Service as required.
d. Governor valve sticking.
d. Perform governor test. Repair
as required.
a. Improper fluid level.
a. Perform fluid level check.
b. Manual linkage - misadjusted/
damaged.
b. Check and adjust or service as
required.
c. Governor valve sticking. Intermediate band out of adjustment.
band.
c. Perform governor test Service
as required. Adjust intermediate
d. Vacuum diaphragm bent. sticking or leaking.
d. Check diaphragm unit. Service
as necessary.
e. Valve body bolts loose or too
tight.
e. Tighten bolts.
f. Valve body dirty/sticking
valves.
f. Determine source of contamination. Service as required.
g. Intermediate clutch. band, and/
or servo assembly burnt.
g. Perform air pressure test.
3-52
TM 10-3950-672-24-1
SYMPTOM
16.
17.
Rough/harsh/delayed 1-2
upshift.
Mushy/early/soft/slipping
1-2 upshift.
PROBABLE CAUSE
SOLUTION
a. Improper fluid level.
a. Perform fluid level check.
b. Poor engine performance.
b. Tune engine.
c. Intermediate band out of adjustment.
c. Adjust intermediate band.
d. Main control pressure too high.
d. Control pressure test. Note
results.
e. Governor valve sticking.
e. Perform governor test. Service
as required.
f.
f. Check engine vacuum lines.
Service as necessary. Check vacuum diaphragm unit. Service as
necessary. Perform vacuum supply
and diaphragm tests.
Engine vacuum leak.
g. Valve body bolts loose or too
tight.
g. Tighten bolts.
h. Valve body dirty/sticking
valves.
h. Determine source of contamination. Service as required.
a. Improper fluid level.
a. Perform fluid level check.
b. Incorrect engine performance.
b. Tune adjust engine idle as required.
c. Intermediate band out of adjustment.
c. Adjust intermediate band.
d. Low main control pressure.
d. Control pressure test. Note results.
e. Valve body bolts loose or too
tight.
e. Tighten bolts.
f.
f. Determine source of contamination. Service as required.
Valve body dirty/sticking
valves.
g. Governor valve sticking.
g. Perform governor test. Service
as required.
h. Damaged intermediate servo
or band.
h. Perform air pressure test. Service as required.
i.
i. Service or replace as required.
Polished, glazed band or drum.
3-53
TM 10-3950-672-24-1
SYMPTOM
18.
19.
No 2-3 upshift.
Harsh/delayed 2-3 upshift.
PROBABLE CAUSE
SOLUTION
a. Low fluid level.
a. Perform fluid level check.
b. Throttle valve linkage misadjusted (long)}, sticking, or damaged.
b. Adjust linkage. Service as re
quired.
c. Low main control pressure to
direct clutch.
c. Control pressure test. Note re
suits.
d. Valve body bolts loose or too
tight.
d. Tighten bolts.
e. Valve body dirty/sticking
valves.
e. Determine source of contami
nation, then service as required.
a. Incorrect engine performance.
a. Check engine tune-up.
b. Engine vacuum leak.
b. Check engine vacuum lines.
Service as necessary. Check vacc.
uum diaphragm unit. Service as
necessary. Perform vacuum supply
and diaphragm tests.
Damaged or worn intermediate
servo release and high clutch piston check ball.
d. Valve body bolts loose or too
tight.
e. Vacuum diaphragm or throttle
valve control rod bent, sticking,
or leaking.
c. Air pressure test the interme
diate servo apply and release the
high clutch piston check ball. Ser
vice as required.
d. Tighten bolts.
e. Check diaphragm and rod. Replace
as necessary.
20.
Soft/early/mushy 2-3 upshift.
a. Valve body bolts loose or too
tight.
a. Tighten bolts:
b. Valve body dirty/sticking
valves.
b. Determine source of contami
nation. Service as required.
c. Check diaphragm and rod. Re
place as necessary.
c. Vacuum diaphragm or throttle
valve control rod bent, sticking,
or leaking.
21. Erratic shifts.
a. Poor engine performance.
a. Check engine tune-up.
b. Valve body bolts loose or too
tight.
b. Tighten bolts.
c. Valve body dirty/sticking
valves.
c. Line pressure test. note resuits. Determine source of contamination. Service as required.
d. Governor valve stuck.
d. Perform governor test. Service as
required.
e. Output shaft collector body
seal rings damaged.
e. Service as required.
3-54
TM 10-3950-672-24-1
SYMPTOM
22.
Shifts 1-3 in D.
PROBABLE CAUSE
a. Intermediate band out of adjustment.
b. Damaged intermediate servo
and/or internal leaks.
c. Improper band or clutch application, or oil pressure control
system.
SOLUTION
a. Adjust band.
b. Perform air pressure test. Service front servo and/or internal
leaks.
c. Perform control pressure test.
d. Service or replace band or
drum.
d. Polished, glazed band or drum.
e. Dirty or sticking valve body,
f.
23.
24.
25.
Engine over-speeds on 2-3
shift.
No forced downshifts.
Crane will not start.
Governor valve stuck.
e. Clean, service or replace valve
body.
f. Perform governor test. Service
as required.
a. Linkage out of adjustment.
a. Service or adjust linkage.
b. Improper band or clutch application, or oil pressure control
system.
b. Perform control pressure test.
c. Intermediate servo piston seals
cut/leaking.
c. Replace seals. Check for leaks.
d. Dirty or sticking valve body.
body.
d. Clean, service or replace valve
a. Kickdown linkage out of adjustment.
a. Service or adjust linkage.
b. Damaged internal kickdown
linkage.
b. Service internal kickdown linkage.
c. Improper clutch or band application, or oil pressure control
system.
c. Perform control pressure test.
d. Dirty or sticking governor.
d. Perform governor test. Service
or replace governor, clean screen.
e. Dirty or sticking valve body.
body.
e. Clean, service, or replace valve
a. Misadjusted neutral start
switch.
a. Adjust neutral start switch
b. Misadjusted linkage.
b. Adjust linkage.
c. Defective neutral start switch.
c. Replace neutral switch.
3-55
TM 10-3950-672-24-1
REMOVAL
2. Install the converter on the transmission
ensuring the converter drive flats are fully engaged in
the pump gear.
3. Rotate the converter until the studs and drain
plug are in alignment with their holes in the flywheel.
1. Refer to Section 2 - ENGINES and remove the
engine and transmission as an assembly from the crane.
2. Block up the engine and attach an adequate
lifting device to the transmission.
3. Disconnect the neutral switch wire at the plug
connector.
4. If the transmission fluid has not yet been
drained, place the drain pan under the transmission fluid
pan. Starting at the rear of the pan and working toward
the front, loosen the attaching bolts and allow the fluid to
drain. Finally remove all of the pan attaching bolts
except two at the front, to allow the fluid to further drain.
With the fluid drained, install two bolts on the rear side
of the pan to temporarily hold it in place.
5. Remove the converter drain plug access cover
from the lower end of the converter housing.
6. Remove the converter to flywheel attaching
nuts. Place a wrench on the crankshaft pulley attaching
bolt to turn the converter to gain access to the nuts.
7. With the wrench on the crankshaft pulley
attaching bolt, turn the converter to gain access to the
converter drain plug. Place a drain pan under the
converter to catch the fluid and remove the plug. After
the fluid has been drained, reinstall the plug.
8. Disconnect the shift cable from the lever at the
transmission.
9. Disconnect the oil cooler lines from the
transmission.
10. Remove the vacuum hose from the vacuum
diaphragm unit. Remove the vacuum line from the
retaining clip.
11. Remove the remaining converter housing to
engine attaching bolts.
12. Move the transmission away from the engine.
NOTE
When moving the converter and
transmission assembly into position
with the engine, the converter must
rest squarely against the flywheel.
This indicates that the converter pilot
is not binding in the engine
crankshaft.
Do not allow the
converter drive flats to disengage
from the pump gear.
4. Move the converter and transmission assembly
into position with the engine, using care not to damage
the flywheel and the converter pilot.
5. Install the converter housing to engine attaching
bolts. Torque the bolts 50to 65 pounds-foot (67 to 88
Nm).
6. Connect the vacuum line to the vacuum
diaphragm ensuring the line is in the retaining clip.
7. Connect the oil cooler lines to the transmission.
8. Connect the shift cable to the respective lever
on the transmission.
9. Install the converter to flywheel attaching nuts.
Torque the nuts 20 to 30 lb ft (27 to 40 N•m).
10. Install the converter housing access cover and
secure with the attaching bolts.
11. Connect the neutral switch wire to the plug
connector.
12. Refer to Section 2 - ENGINES and install the
engine and transmission as an assembly into the crane.
13. Ensure the drain pan is securely attached, and
fill the transmission to the correct level with the
specified fluid.
INSTALLATION.
1. Torque the converter drain plug 18 to 28 lb ft
(24 to 30 N•m).
3-56
TM 10-3950-672-24-1
TRANSMISSION SHIFT MODULATOR ADJUSTMENT
PROCEDURE.
1. Position the fuel control lever to wide open
throttle. Pull the threaded cable rod end until resistance
is felt against its internal stop. Adjust the cable slip link
to provide free pin to pin condition for full lever. Refer
to figure titled, Wide Open Throttle.
2. Inspect linkage for ease of movement and
return to idle position.
3. If preliminary adjustment performed in step 1
fails to provide smooth up shifts at full throttle, perform
the following adjustment procedure. With engine fuel
control lever at wide open throttle and the modulator
control cable threaded rod end in idle (retracted)
position, set the slip link to 1.38 inches (35.0 mm).
Refer to figure titled Wide Open Throttle (Modulator
Control Lever In Idle). Install the slip link on the fuel
control lever and operate the crane to check for smooth
up-shifts in the transmission drive (D) mode. If improper
shifting is still apparent, turn the slip link in or out on the
threaded end of the modulator cable until smooth upshift occurs.
CAUTION
THE MODULATOR UNIT IS FACTORY
ADJUSTED AND DISASSEMBLY OF
THE MODULATOR LID SHOULD NOT
BE REQUIRED.
DISASSEMBLY
COULD RESULT IN UNEQUAL
TORQUING OF SCREWS CAUSING
GASKET LEAKAGE AND/OR LOSS
OF INTERNAL PARTS.
NOTE
The modulator is designed with
positive stop at both ends of its 1.50
inch (3.81 mm) travel. The cable slip
link must allow the lever to return to
idle regardless of cable position.
Wide Open Throttle
3-57
TM 10-3950-672-24-1
Wide Open Throttle (Modulator Control Lever in Idle)
3-58
TM 10-3950-672-24-1
3-24 PARK BRAKE
The park brake consists of a brake and shoe assembly bolted to the transmission. The park brake is cableactuated and controlled from the cab. The brake shoes are applied by pulling the cab-mounted lever. The lever pulls a
cable attached to the brake cam. The cam is rocked as the cable is pulled thus applying the brake shoes. (Refer to
Figure 3-12.)
The intended usage is for holding the vehicle when standing in a parked condition. The brake, when applied,
holds the drive shaft from turning.
3-24.1
Removal
a.
Refer to DRIVE LINE, in this section and remove the drive shaft.
b.
Disconnect the parking brake actuating lever from the linkage.
c.
Remove the transmission spline flange and drum.
d.
e.
3-24.2
3-24.3
Remove the bolts holding the carrier plate to the transmission housing. Slide the
plate with the brake shoes and retaining springs off the transmission.
Remove the actuating lever, shoe retaining springs, and remove the shoes.
Inspection
a.
Inspect the drum braking surface for roughness and scoring.
b.
Replace the drum if worn or physically damaged.
c.
Inspect the brake lining and replace if the distance between the braking surface
of the lining and the top of the rivet head is less than 0.031 in. (0.794 mm).
Installation
a.
Install the brake shoe lower retaining spring on the shoes. Position the shoes
and lower retaining spring on the back of the carrier plate and install the shoe
upper retaining springs and the actuating lever.
b.
Install the assembly on the transmission with the lever properly positioned at ball
socket and shoe ends. Install the brake mounting bolts and lockwashers.
c.
Install the transmission drum and spline flange, nut, and cotter pin.
NOTE
If the drum mounting bolts are pressed into the
companion flange, the drum can be mounted later as
in step d, otherwise, the drum and flange should be
assembled together and installed as a unit.
3-59
TM 10-3950-672-24-1
3-24.4
d.
Install the brake drum. Refer to DRIVE LINE, in this section and install the drive shaft.
e.
Connect the actuating lever to the parking brake linkage. Check the brake operation
and adjust, if necessary.
Adjustment
a.
Chock the wheels. Release the parking brake lever in the cab.
b.
From under the crane, remove the cotter pin from the parking brake linkage adjusting
clevis pin in the parking brake lever. Remove the clevis pin.
c.
Lengthen the parking brake adjusting link by turning the clevis. Continue to lengthen
the adjusting link until the shoes seat against the drum when the clevis pin is installed.
d.
Remove the clevis pin and shorten the linkage adjustment until there is a slight
clearance between the shoes and the drum (approximately 0.01 0 in. [0.254 mm] per
shoe).
e.
Install a new cotter pin in the clevis retaining pin and check brake operation.
LEGEND (Figure 3-1 2)
1.
2.
3.
4.
5.
6.
7.
8.
9.
10.
11.
12.
13.
14.
15.
16.
17.
18.
19.
20.
21.
22.
23.
24.
25.
Nut
Lockwasher
Drum
Brake Shoe Assembly
Bolt
Spring
Bolt
Mount
Nut
Lockwasher
Spring
Lever
Drum
Brake Assembly
Shield
Bellcrank
Bolt
Lockwasher
Nut
Drum
Cam and Lever Assembly
Clevis Pin
Cotter Pin
Bolt
Washer
26.
27.
28.
29.
30.
31.
32.
33.
34.
35.
36.
37.
38.
39.
40.
41.
42.
43.
44.
45.
46.
47.
48.
49.
50.
3-60
Brake Assembly
Washer
Bolt
Bar
Nut
Bolt
Washer
Washer
Bolt
Cable Support Bracket
Nut
Lockclip
Bolt
Nut
Nut
Clevis
Nut
Cotter Pin
Stud
Spacer
Clevis Pin
Clevis
Cotter Pin
Clevis
Clevis Pin
TM 10-3950-672-24-1
Figure 3-12. Park Brake (Automatic Transmission) (Sheet 1 of 2)
3-61
TM 10-3950-672-24-1
3-25 TRANSMISSION SHIFTING LEVER ASSEMBLY
3-25.1
Adjustment
a.
Set outriggers, refer to Operator's Manual, TM 10-3950-672-10.
b.
Remove hitch pin (1, Figure 3-13), clevis pin (2), and disconnect rod assembly (3) from
shaft (4).
c.
Pull rod assembly (3) forward (toward front of vehicle) through detents until movement
stops. Then move rod assembly (3) rearward one detent (reverse position).
d.
Move shift lever (5) rearward until shaft (4) contacts stop bolt (8).
e.
Loosen jam nut (6) and turn yoke (7) until holes in yoke (7) align with holes in shaft (4).
f.
Attach yoke (7) to shaft (4) with clevis pin (2), secure with hitch pin (1), and tighten
jam nut (6) against yoke (7).
g.
Stow outriggers, refer to Operator's Manual, TM10-3950-672-10.
3-62
TM 10-3950-672-24-1
LEGEND
1.
2.
3.
4.
Hitch Pin
Clevis Pin
Rod Assy
Shaft
5.
6.
7.
8.
Shift Lever
Nut
Yoke
Stop Bolt
Figure 3-13. Transmission Shifting Lever Assembly
3-63
TM 10-3950-672-24-1
Section 4. Axles and Brakes
Subject
Para.
Front Drive Axle ...................................... .............................................................. 3-26
Removal .......................................... ................................................................. 3-26.1
Cleaning .......................................... ................................................................. 3-26.2
Installation ........................................ ................................................................ 3-26.3
Rear Steer Axle ..................................................................................................... 3-27
Description
Steering Linkage
Hub and Spindle Assembly
Hub, Brake and Spindle Assembly
U-Joint Bearing Assembly ............................... ...................................................... 3-28
Removal .......................................... ................................................................. 3-28.1
Installation ........................................ ................................................................ 3-28.2
Hydraulic Brakes ..................................... .............................................................. 3-29
Description
Removal
General
Installation
Bleeding the Brake System
Brake Shoe Adjustment
Brake Master Cylinder ........................................................................................... 3-30
Description
Troubleshooting
Removal
Installation
Relief Valve Adjustment
Wheels and Tires ................................... ............................................................... 3-31
Description
Mounting Wheel Assemblies
Page
3-64
3-65
3-65
3-66
3-67
3-72
3-72
3-72
3-73
3-76
3-79
3-26 FRONT DRIVE AXLE
The front drive axle is a single reduction, solid-mounted axle with floating axle shafts and a high traction differential, and
is manufactured by Rockwell.
NOTE
For more detailed information, refer to Appendix E.
NOTE
The axle does not have to be removed from the
crane to disassemble and perform maintenance on
the drive unit.
3-64
TM 10-3950-672-24-1
3-26.1 Removal
CAUTION
Use care in handling the U-joint cross bearing assembly. When
removed from the yoke, the inside needle bearings tend to fall out
if any bearing caps slide off. Refer to U-Joint Bearing Assembly in
this Section.
a.
Loosen the wheel lug nuts one quarter turn while the wheels are still on the ground.
b.
Using the outriggers, lift the frame until the wheels are at least two inches off the ground. Install
cribbing or blocking which is capable of handling the weight of the crane under the crane for support.
CAUTION
Mark the universal so it can be assembled as taken apart,
otherwise severe drive line vibration may occur.
c.
Scribe a timing mark across the mating flanges of the drive shaft yoke to front axle and on the drive
shaft U-joint to ensure original reassembly position.
d.
If installed, remove the nuts, washers, capscrews, and clamps securing the drive shaft to the axle
differential or gearbox and disconnect the drive shaft.
e.
Tag, disconnect, and cap the hydraulic brake line at each wheel.
NOTE
The tire and wheel assembly weighs approximately 114 lbs
(51.7 kg), depending on tire size.
f.
Remove the wheel lug nuts and slide the tire and wheel assembly from both sides of the axle.
NOTE
The axle weighs approximately 526 lbs (238.5 kg). If the two-gear
gearbox is installed, the axle weighs approximately 609.25 lbs
(276.3 kg).
g.
Position jacks which are capable of handling the weight of the axle, under the axle for support.
3-26.2 Cleaning
Completely assembled axles may be steam cleaned on the outside only, to facilitate initial removal and
disassembly, providing all openings are closed. Breathers, vented shift units, and all other openings should be tightly
covered or closed to prevent the possibility of water entering the assembly.
3-65
TM 10-3950-672-24-1
3-26.3 Installation
a.
Position the axle under the crane on jacks which are capable of handling the weight of the axle.
b.
Raise the axle into place and secure to the frame with the eight bolts, nuts, and washers. Torque the
bolts to 250 lb ft (339 N•m).
c.
Install the wheels onto the axle. Refer to WHEELS AND TIRES in this section.
d.
Connect the hydraulic brake line at each wheel as tagged during removal.
NOTE
To provide proper torque of the capscrews at installation, grind a
flat on the washers as required to allow clearance for bend radius
on the clamps and clamp drives.
e.
Connect the drive line to the axle differential or gearbox, if installed, and secure with the clamps,
capscrews, washers, and nuts. torque the capscrews 27 to 29 lb ft (37 to 39 N•m).
f.
Bleed the hydraulic brake system. Refer to HYDRAULIC BRAKES in this section.
g.
Remove the blocking and retract the outriggers to lower the wheels to the ground.
3-66
TM 10-3950-672-24-1
3-27 REAR STEER AXLE
DESCRIPTION
attached to the spindle assemblies.
The cylinder
The rear steer axle incorporates a steer cylinder
provides the hydraulic power to turn the rear wheels
assembly and a left and right hand hub and spindle
when steering is required. The spindle welds are
assembly or a left and right hand hub, brake, and
attached to the frame by means of a pin arrangement.
spindle assembly.
The wheel hub contains the bearings, seals, washers,
and nuts necessary to mount and adjust the hub.
A single 3-inch (7.62 cm) hydraulic cylinder is attached
by a rod eye assembly to the link plates that are
MAINTENANCE
2.
If removed, install the link plates to the spindle
assembly and secure with the capscrew, flatwasher,
washer, and nut. Torque the capscrew to 250 lb ft (339
N•m).
STEERING LINKAGE.
Removal.
1.
Fully lower and retract the boom.
2.
Chock the front and rear wheels.
NOTE
If installing a new steer cylinder
ensure the threads between the jam
nut and rod eye assembly are free of
dirt and oil and apply Locquic Primer
T to the threads. Allow to dry and
apply Loctite 242 adhesive/sealant,
or equivalent, to the threads before
tightening the jam nut. The rod eye
assemblies must be adjusted equally
on both sides of the cylinder rod .
3.
Using an adequate lifting device or the
outriggers, lift the frame until the wheels are at least two
inches off the ground. Install cribbing or blocking which
is capable of handling the weight of the crane under the
frame for support.
4.
Tag, disconnect, and cap the hydraulic lines to
the steer cylinder.
5.
Remove the bolts, locknuts, and washers
securing the rod eye assemblies of the steer cylinder to
the spindle link plates.
3.
Install the rod eye assemblies of the steer
cylinder to the spindle link plates and secure with the
capscrews, locknuts, and washers.
Torque the
capscrews to 583 lb ft (790 N•m).
6.
If necessary, remove the capscrew, flatwasher,
washer, and locknut securing the link plates to the
spindle assembly.
4.
Connect the hydraulic lines to the steer cylinder
as tagged during removal.
7.
Remove the bolts and washers securing the
steer cylinder to the frame and remove the steer
cylinder.
HUB AND SPINDLE ASSEMBLY.
Removal.
Installation.
1.
Install the steer cylinder to the frame and secure
with the bolts and washers. Torque the bolts to 75 lb ft
(102 N•m).
3-67
1.
Fully lower and retract the boom.
2.
Chock the front wheels.
TM 10-3950-672-24-1
Rear Axle Assembly
3-68
TM 10-3950-672-24-1
1.
2.
3.
4.
5.
6.
7.
8.
9.
10.
Brake
Seal
Washer
Pin
Nut
Cover
Capscrew
Lockwasher
Roller Bearing Cone
Hub and Drum Assy
11.
12.
13.
14.
15.
16.
17.
18.
19.
20.
Roller Bearing Cone
Spindle Weld
Capscrew
Lockwasher
Locknut
Washer
Rod Eye Assembly
Capscrew
Capscrew
Link Plate
21.
22.
23.
24.
25.
26.
27.
28.
29.
30.
Flatwasher
Washer
Locknut
Grease Fitting
Bolt
Washer
Pin Weldment
Jam Nut
Steer Cylinder
Frame Weldment
Legend for Rear Axle Assembly
3.
Loosen the wheel lug nuts one quarter turn while
the wheels are still on the ground.
2.
Remove the washer, pin, and nuts from the end
of the spindle.
4.
Using an adequate lifting device, or the
outriggers, lift the frame until the wheels are at least two
inches off the ground. Install cribbing or blocking which
is capable of handling the weight of the crane under the
frame for support.
3.
Support the spindle and pull the hub from the
spindle.
NOTE
The bearings may not release
themselves when pulling the hub. It
is not necessary to remove them if
inspection reveals no damage.
NOTE
The tire and wheel assembly weighs
approximately 114 pounds (51.7 kg).
5.
Remove the wheel lug nuts and remove the tire
and wheel assembly.
6.
Support the hub and spindle assembly with a
suitable lifting device.
4.
If necessary, remove the bearings.
5.
Remove the seal from the hub.
Assembly.
1.
7.
Remove the bolts, washers, and pin weld
securing the hub and spindle assembly to the frame.
Install the seal in the hub.
2.
If removed, clean, repack, and install the
bearings.
8.
Remove the pin weld and bronze bushing from
the hub and spindle assembly.
3.
9.
Remove the hub and spindle assembly from the
frame.
Install the hub onto the spindle.
4.
Install the adjust nut on the spindle. Tighten the
adjusting nut to 50 lb ft (69 N•m) while rotating the
wheel in both directions to ensure all bearing surfaces
are In contact. Backoff the adjusting nut 1/16 to 1/4
turn.
Disassembly.
1.
Remove the bolts and washers securing the
cover to the hub. Remove the cover.
NOTE
CAUTION
Ensure the pin is installed between
the washer and jam nut.
ENSURE THE ROLLER BEARINGS
AND OTHER COMPONENTS ARE
KEPT FREE OF DIRT.
3-69
TM 10-3950-672-24-1
7.
Remove the bolts, washers. and pin weld
securing the hub, brake, and spindle assembly to the
frame.
5.
Install the washer, pin, and jam nut onto the end
of the spindle. Torque the jam nut to 250 lb ft (339
N•m). End play must be within 0.001 to 0.010 inches
(0.025 to 0.254 mm).
8.
Remove the pin weld and bronze bushing from
the hub and spindle assembly.
6.
Install the cover on the hub and secure with the
bolts and washers.
9.
Remove the hub, brake, and spindle assembly
from the frame.
Installation.
Disassembly.
1.
Using an adequate lifting device. position the
hub and spindle assembly to the frame.
2.
Remove the bolts and washers securing the cover to the
hub. Remove the cover.
Install the bronze bushing and pin weld.
3.
Secure the pin weld to the hub and spindle
assembly with the bolts and washers. Torque the bolts
to 75 lb ft (102 N•m).
CAUTION
ENSURE THE ROLLER BEARINGS
AND OTHER COMPONENTS ARE
KEPT FREE OF DIRT.
4.
Install the tire and wheel assembly on the hub
and secure with the nuts. Torque the nuts to 300 lb ft
(407 N•m).
2.
Remove the washer, pin, and nuts from the end
of the spindle.
5.
Remove the cribbing and blocking and lower the
wheels to the ground.
3.
Support the spindle and pull the hub and drum
straight off the spindle, being careful that the outer
bearing cone does not drop off the spindle.
HUB, BRAKE. AND SPINDLE ASSEMBLY.
Removal.
NOTE
1.
Fully lower and retract the boom.
2.
Chock the front wheels.
The inner and outer bearing cups will
remain seated inside the hub cavity.
If the inner bearing cone slides off
the spindle, the hub oil seal will
remain inside the hub .
3.
Loosen the wheel lug nuts one quarter turn while
the wheels are still on the ground.
NOTE
4.
Using an adequate lifting device, or the
outriggers, lift the frame until the wheels are at least two
inches off the ground. Install cribbing or blocking which
is capable of handling the weight of the crane under the
frame for support.
It is not necessary to remove the
bearing if inspection reveals no
damage.
4.
If necessary, remove the bearings from the hub
using a press and sleeve or a suitable puller.
NOTE
The tire and wheel assembly weighs
approximately 114 pounds (51.7 kg).
5.
Using a long screwdriver or other pointed tool,
pry the seal loose and discard.
5.
Remove the wheel lug nuts and remove the tire
and wheel assembly.
NOTE
6.
Support the hub and spindle assembly with a
suitable lifting device.
For removal of the brake drum and
brake assembly, refer to the Front
Axle in Appendix E.
3-70
TM 10-3950-672-24-1
5.
Install the washer, pin, and jam nut onto the end
of the spindle. Torque the jam nut to 250 lb ft (339
N•m). End play must be within 0.001 to 0.010 inches
(0.025 to 0.254 mm).
Assembly.
NOTE
For installation of the brake
assembly and brake drum, refer to
the Front Axle In Appendix E.
1.
6.
Install the cover on the hub and secure with the
bolts and washers.
Install the seal in the hub.
Installation.
2.
If removed, clean, repack, and install the
bearings.
3.
1.
Using an adequate lifting device, position the
hub, brake and spindle assembly to the frame.
Install the hub and drum onto the spindle.
2.
4.
Install the adjusting nut on the spindle. Tighten
the adjusting nut to 50 lb ft (69 N-m) while rotating the
wheel In both directions to ensure all bearing surfaces
are In contact. Backoff the adjusting nut 1/16 to 1/4
turn.
Install the bronze busing and pin weld.
3.
Secure the pin weld to the hub, brake, and
spindle assembly with the bolts and washers. Torque
the bolts to 75 lb ft (102 N•m).
4.
Install the tire and wheel assembly on the hub
and secure with the nuts. Torque the nuts to 300 lb ft
(407 N•m).
NOTE
Ensure the pin is installed between
the washer and jam nut.
5.
Remove the cribbing and blocking and lower the
wheels to the ground.
3-71
TM 10-3950-672-24-1
3-28 U-JOINT BEARING ASSEMBLY
3-28.1
Removal
a.
Remove drive line (shaft) (3, Figure 3-14), refer to paragraph 3-22.1.
b.
Remove snap ring (1) securing cross bearing (2) in drive line (shaft) (3) yoke.
c.
Secure exposed bearings to cross bearing assembly (2) with tape.
d.
Press cross bearing (2) out of drive line (shaft) (3) yoke.
3-28.2 Installation
a.
Press cross bearing (2, Figure 3-14) into drive line (shaft) (3) yoke.
b.
Secure cross bearing (2) in drive line (shaft) (3) with snap ring (1).
c.
Remove tape securing exposed bearings.
d.
Install drive line (shaft) (3), refer to paragraph 3-22.2.
LEGEND
1.
2.
3.
Snap Ring
Cross Bearing Assembly
Drive Line (Shaft)
Figure 3-14. U-Joint Bearing Assembly
3-72
TM 10-3950-672-24-1
3-29 HYDRAULIC BRAKES
DESCRIPTION
adjusters, and return springs. Actuation permits the
shoes to center themselves in the drum with equal
effectiveness in either direction.
The brake is hydraulic actuated, installed on the front
wheels, has a floating shoe design, requires manual
shoe clearance adjustments, and is not power assisted.
The brake assembly consists of a backing plate, two
wheel cylinders, two brake shoe assemblies, two brake
MAINTENANCE
NOTE
For more detailed information refer to the applicable
SM package.
NOTE
All brake maintenance, with the exception of
replacement of the complete brake assembly, can
be performed without removing the brake assembly.
Brakes should be cleaned, inspected, lubricated, and
adjusted each time the hubs are removed.
REMOVAL.
1.
Remove the wheels. Refer to FRONT DRIVE
AXLE in this section.
During a major overhaul, the following parts should be
carefully checked and replaced with genuine
replacement parts as required.
2.
Remove the wheel hub and drum assembly.
Refer to the axle SM package.
1.
Check the backing
looseness, and sheared rivets.
3.
Disconnect the brake lines from the brake
assembly.
plate
for
distortion,
2.
Check the brake shoes for wear at the anchor
pin holes.
4.
Remove the brake assembly. Refer to the axle
SM package.
3.
Shoe return springs should be replaced at the
time of overhaul.
GENERAL.
4.
Check the brake linings for grease saturation,
wear, and loose rivets or bolts.
A schedule for the periodic adjustment, cleaning,
inspection, and lubrication of brake equipment should be
established by the operator on the basis of past
experience and severity of operation.
5.
Check the drums for cracks, scoring, or other
damage.
Linings and drums are parts particularly subject to wear
depreciation. To compensate for this wear, brakes
should be adjusted as frequently as required to maintain
satisfactory
operation
and
maximum
safety.
Adjustments should provide uniform lining clearance,
correct travel of levers and proper equalization.
INSTALLATION.
1.
Install the brake assembly. Refer to the axle
SM package.
3-73
TM 10-3950-672-24-1
2.
Connect the brake lines to the brake assembly.
5.
Connect a 35 psi (241 kPa/2.41 bar) air source
to the bleeder tank.
3.
Install the wheel hub and drum assembly. Refer
to the axle SM package.
4.
Install the wheels.
AXLE in this section.
6.
Open the bleeder tank valve and bleed all air
out of the hose to be connected to the master cylinder
adapter.
Refer to FRONT DRIVE
7.
Connect the bleeder hose to the master cylinder
adapter.
5.
Adjust the brakes. Refer to BRAKE SHOE
ADJUSTMENT in this section.
NOTE
6.
Bleed the brake system. Refer to BLEEDING
THE BRAKE SYSTEM in this section.
Always bleed the wheel units
beginning with the wheel having the
longest brake line.
BLEEDING THE BRAKE SYSTEM.
The brake system should be bled whenever air becomes
entrapped
within
the
brake
system
(usually
characterized by a spongy feeling during brake pedal
application), whenever any brake system line has been
opened, or whenever any brake component has been
replaced.
8.
Connect one end of a bleeder hose to the
bleeder valve on the wheel cylinder. Submerge the
other end in a glass jar partially filled with clean brake
fluid.
9.
Open the bleeder valve and allow fluid to flow
into the jar until it is a solid stream, free of air bubbles.
Close the bleeder valve.
Pressure Bleeding the Brake System.
NOTE
NOTE
Before bleeding the brake system,
ensure the master cylinder is filled to
the proper level. Refer to Section 13
LUBRICATION for the proper brake
fluid.
1.
fluid.
Repeat steps 8 and 9
remaining wheel cylinders.
for
the
10.
Bleed the valve at each of the wheel cylinders.
11.
Remove the air supply from the bleeder tank.
Fill the master cylinder reservoir with brake
12.
Close the bleeder tank valve and disconnect the
hose from the bleeder adapter on the master cylinder.
2.
Install the bleeding adapter on the master
cylinder.
13.
3.
Fill the bleed tank at least one half full with
brake fluid.
14.
Remove the bleeder adapter from the master
cylinder.
CAUTION
15.
Install and secure the master cylinder reservoir
cover.
DO NOT LIFT, MOVE, OR SHAKE
THE BLEED TANK AFTER THE AIR
PRESSURE IS APPLIED. THIS MAY
CAUSE ANY SEDIMENT IN THE
TANK TO GO INTO SUSPENSION IN
THE BRAKE FLUID.
Remove the bleeder tank and hose.
16.
Start the engine and pump the brake pedal
several times until approximately full pedal is obtained.
17.
Release the brake pedal.
18.
Remove the master cylinder reservoir plugs and
check the fluid level. Add brake fluid as necessary.
4.
Position the tank so it will not have to be moved
again until the bleeding is finished.
3-74
TM 10-3950-672-24-1
19.
Install and secure the master cylinder reservoir
cover.
BRAKE SHOE ADJUSTMENT.
1.
Two eccentric cams ride against the inside
surface of each brake shoe. The cams can be adjusted
by adjusting the bolts on the back of the backing plate
with a 15/16-inch open end wrench.
Manually Bleeding the Brake System.
NOTE
2.
Upon assembly, first actuate the brake to center
the shoes in the drum.
Before bleeding the brake system,
ensure the master cylinder is filled to
the proper level. Refer to Section 13
LUBRICATION for the proper brake
fluid.
NOTE
Always bleed the wheel units
beginning with the wheel having the
longest brake line.
1.
Connect the end of the bleeder hose to the
bleed valve on the wheel cylinder. Submerge the other
end in a jar partially filled with clean brake fluid.
2.
Open the bleed valve on the wheel cylinder and
allow fluid to flow into the jar while pumping the brake
pedal until a solid stream free of air bubbles is acquired.
Depress the brake pedal and close the bleeder valve,
then release the brake pedal.
Brake Shoe Adjustment
3.
Repeat steps 1 and 2 for the remaining wheel
cylinders.
3.
Adjust the liners out until a slight drag can be
felt while the drum is in rotation, then back off the
adjusting bolt until the drum can rotate freely.
Subsequent adjustments to compensate for lining wear
may be made by moving the shoe in or out by turning
the eccentric cam in the desired direction.
4.
Remove the master cylinder reservoir plugs and
check the fluid level. Add brake fluid as required.
3-75
TM 10-3950-672-24-1
3-30 BRAKE MASTER CYLINDER
DESCRIPTION
Transfer from low pressure (large piston) to high
The brake master cylinder is located under the deck to
pressure (small piston) is accomplished by means of a
the front of the cab. The master cylinder which has its
metered pressure relief valve.
own oil reservoir, is actuated directly by linkage to the
brake pedal. The master cylinder incorporates two
The low pressure bore has a diameter of 1.75 inch (4.4
integrally designed pistons; the large piston for large
cm) and the high pressure bore has a diameter of 1-inch
volume and the small piston for high pressure.
(2.5 cm). The stroke of the cylinder is 1.50 inches (3.8
cm).
MAINTENANCE
NOTE
For more detailed information refer to Appendix E.
TROUBLESHOOTING.
SYMPTOM
1.
2.
Slow pedal return sticking
piston.
Brake drag or pressure build
up.
PROBABLE CAUSE
SOLUTION
a. Fluid return ports of the relief
valve may have become plugged
through entrance of foreign matter.
a. Remove relief valve and wash
in alcohol. Clean the return ports by
hand using a 0.0625 inch (1.58
mm) drill.
b. Poor quality or incorrect brake
fluid.
b. Disassemble cylinder and wash
all parts in alcohol then
lubricate/service cylinder.
c. Runout in O.D. and I.D. of low
pressure pistons.
c. Replace defective component.
d. Binding pedal linkage or heavy
pedal.
d. Free up linkage pivots.
a. No push rod end clearance.
a. Adjust the push rod to maintain
the 0.0312 inch i0.792 mm) maximum clearance to the secondary
piston contact when pedal is fully
retracted.
b. Disassembly cylinder and rebuild replacing all gaskets.
b. Incorrect fluid or oil in the
fluid causing cups to swell and
stick.
3-76
TM 10-3950-672-24-1
SYMPTOM
3.
4.
Pedal loss. (pedal too low before braking action starts.)
Spongy pedal
PROBABLE CAUSE
SOLUTION
a. Too much clearance between
push rod and piston. (pedal loss at
the start of the stroke means loss at
the end of the stroke where it is
most important.
a. Adjust push rod to maintain a
0.0312 inch (0.792 mm) maximum
clearance to secondary piston contact when pedal is fully retracted.
b. Brake lining badly worn requiring shoe adjustment.
b. Refer to HYDRAULIC BRAKES
in this section and adjust the shoes.
c. Faulty check valve.
c. If fluid drains from the end of
the cylinder when the end plug is
removed, the check valve is faulty
and should be replaced. Refer to
Appendix E for assembly
procedures.
a. High pressure leaks.
a. Check all fittings and joints for
leakage while the system is under
pressure. If the cylinder end plug
leaks remove the line connections
and tighten by turning clockwise.
REMOVAL.
RELIEF VALVE ADJUSTMENT.
1.
Disconnect the brake lines from the master
cylinder. Cap or plug all openings.
If Set Too High.
If the adjustment screw is set unnecessarily high, the
brake pedal will be very heavy during the first of the
pedal stroke and then a very noticeable pop will be felt
with a resulting pedal drive. To correct this condition,
perform the following steps.
2.
Disconnect the brake linkage from the master
cylinder.
3.
Remove the capscrews and washers securing
the master cylinder to the mounting bracket and remove
the master cylinder.
1.
Remove the filler plug to gain access to the
adjustment screw in the top of the relief valve assembly.
INSTALLATION.
2.
Using a screw driver. release the adjustment by
turning counter-clockwise on full turn at a time.
1.
Position the master cylinder to the mounting
bracket and secure with the capscrews and washers.
After each adjustment try the brake pedal for proper
feel. Depress the brake pedal both rapidly and slowly.
No pedal travel should be lost.
2.
Connect the brake linkage to the master
cylinder.
3.
If adjustment by release of the relief valve adjustment
screw will not correct pedal action, remove the entire
relief valve assembly. Disassemble the relief valve and
wash all parts in alcohol to eliminate piston sticking
within the body of the valve.
Connect the brake lines to the master cylinder.
4.
If necessary, bleed the brake system. Refer to
BLEEDING THE BRAKE SYSTEM in this section.
3-77
TM 10-3950-672-24-1
piston before full shoe extension has been attained. To
correct this condition, perform the following steps.
If the corrections above do not correct pedal action, the
relief valve may be mechanically defective. If so
replace with a new valve.
If Set Too Low.
1.
Remove the filler plug to gain access to the
adjustment screw in the top of the relief valve assembly.
If the setting of the relief valve is too low, loss of pedal,
low pedal, or inconsistent pedal action may occur. This
is caused by the relief valve releasing the low pressure
2.
Using a screw driver, turn the relief valve
adjusting screw clockwise. Continue to adjust in this
direction until pedal travel becomes constant.
3-78
TM 10-3950-672-24-1
3-31 WHEELS AND TIRES
DESCRIPTION
The tires are size 10.00 x 1 5H (16 PR). The tires and
rims are available from different manufacturers.
NOTE
The tire diameters, widths, and
weights may vary slightly depending
on the tire manufacturer.
CAUTION
DO NOT MIX TIRES AND RIMS OF
DIFFERENT MANUFACUTRERS.
Off-highway tires are designed to operate with a certain
sidewall deflection or bulge.
Correct air pressure
ensures prior deflection which, in turn, ensures proper
traction, flotation, support of load, and prevents
excessive flexing of the tire. Over inflation increases
rim stresses, which results in lowered rim life.
Each wheel assembly (tire and rim) weighs
approximately 114 pounds (51.7 kg), and is mounted on
the hub with (6) 3/4-16 UNF bolts.
Refer to and adhere to the inflation pressures on the
Tire Inflation decal on the crane.
MAINTENANCE
until they are just snug, rotating the wheel so the nut
being tightened is in the top position.
2.
Ensure the wheel assembly is positioned
properly on the hub.
3.
Torque the lug nuts to 300 lb ft (407 N•m) in the
sequence shown in the Lug Nut Torquing Sequence
figure.
WARNING
DO NOT ATTEMPT TO DEMOUNT OR
MOUNT TIRES WITHOUT PROPER
TRAINING. THE HIGH PRESSURES
INVOLVED CAN CAUSE TIRE AND
RIM PARTS AND TOOLS TO FLY
WITH
EXPLOSIVE
FORCE,
IF
PROPER PROCEDURES ARE NOT
USED, CAUSING SEVERE INJURY
OR DEATH TO PERSONNEL AND
DAMAGE TO THE CRANE AND
SURROUNDING AREA.
MOUNTING WHEEL ASSEMBUES.
NOTE
Do not lubricate the wheel studs or
lug nuts.
Lug Nut Tightening Sequence
1.
Position the wheel assembly on the mounting
studs. Install the lug nuts and washer and tighten them
3-79
TM 10-3950-672-24-1
Section 5. Steering System
Subject
Para.
Steering System .................................................................................................... 3-32
Description
Troubleshooting
Functional Check
Power Steering Pump ........................................................................................... 3-33
Description
Troubleshooting
Removal ........................................................................................................... 3-33.1
Installation ........................................................................................................ 3-33.2
Test .................................................................................................................. 3-33.3
Steering Control Valve .......................................................................................... 3-34
Description
Theory of Operation
Removal
Installation
Steer Cylinder ....................................................................................................... 3-35
Description
Removal
Installation
3-80
Page
3-81
3-83
3-84
3-84
3-84
3-85
3-89
TM 10-3950-672-24-1
3-32 STEERING SYSTEM
DESCRIPTION
is turned, the steering control valve will route the
hydraulic flow t: the applicable end of the steer cylinder.
The rod of the steer cylinder will act against the
applicable spindle to move the rear wheels in the
desired direction.
The steering system consists of a power steering pump,
a steering control valve, and a steer cylinder. The
steering pump is driven by the engine and supplies
hydraulic oil from the reservoir to the steering control
valve. Depending upon the direction the steering wheel
MAINTENANCE
TROUBLESHOOTING.
SYMPTOM
1.
2.
3.
Hard to steer left and right.
Hard to steer either left or
right.
Steering is erratic left and
right.
PROBABLE CAUSE
SOLUTION
a. Hydraulic oil low.
a. Refill hydraulic reservoir.
b. Clogged or loose hydraulic lines
or fittings.
b. Clean or tighten lines or fittings.
c. Insufficient lubricant on steer
cylinder.
c. Lubricate steer cylinder.
d. Defective pressure relief valve.
d. Repair or replace valve.
e. Defective steering control valve.
e. Repair or replace valve.
f.
f. Repair or replace pump.
Defective steering pump.
a. Clogged or loose hydraulic lines
or fittings.
a. Clean or tighten lines or fittings.
b. Insufficient lubricant on steer
cylinder.
b. Lubricate cylinder.
c. Defective steer cylinder.
c. Repair or replace cylinder.
a. Hydraulic oil low.
a. Refill hydraulic reservoir.
b. Clogged or loose hydraulic lines
or fittings.
b. Clean or tighten lines or fittings.
c. Defective pressure relief valve.
c. Repair or replace valve.
d. Defective steering control valve.
d. Repair or replace valve.
e. Defective steering pump.
e. Repair or replace pump.
3-81
TM 10-3950-672-24-1
SYMPTOM
4.
Noisy steering pump caused
by cavitation.
PROBABLE CAUSE
SOLUTION
a. Hydraulic oil low.
a. Refill hydraulic reservoir.
b. Suction line plugged or too
b. Clean line and check for size.
a. Worn shaft seal.
a. Replace shaft seal.
small.
5.
Steering pump shaft seal leakage.
NOTE
If replacing the shaft seal does not
stop leakage, the pump should be
disassembled and checked for the
following.
b. Broken diaphragm seal or backup gasket.
b. Replace seal or gasket.
c. Bearing out of position.
c. Replace bearing.
d. Excessive internal wear.
d. Replace pump.
is an indication of hard steering, this can be caused by
either a reduced oil flow to the control valve or a
reduced system relief pressure. Adequate oil flow under
all conditions can best be checked by timing the full
travel of the cylinder with the steered axle unloaded and
loaded. If there is a great difference at low engine
speed and slight difference at high engine speeds this
may indicate a defective pump drive. Adequate oil
pressure can only be determined by connecting a
pressure gauge (2500 psi [17,237.5 kPa/172.4 bar]full
scale recommended) at the pump outlet port or at the IN
port of the steering control valve. With the engine
running at a medium speed, turn the steering wheel to
one end of the travel and hold the cylinders at the travel
limit briefly, just long enough to read the pressure
gauge. Never hold the system at relief pressure for
more than a few seconds at a time. The pressure gauge
should indicate 1500 psi (10,342.5 kPa/1 03.4 bar). If
not, adjust the pressure relief valve to 1500 psi
(10,342.5 kPa/103.4 bar).
Functional Check.
A normal periodic functional check of the entire power
steering system will generally be adequate to ensure
satisfactory service.
1.
Check all fittings for leakage. An accumulation
of moist, black dirt is a good indication of leakage.
2.
With the engine running at idle and at full
throttle, and with the machine standing still and moving,
turn the steering wheel through the full range of travel.
Note any speed irregularities and sticky sensation. This
may indicate dirt in the fluid. If the steering wheel
continues to rotate when started and released a
condition known as Motoring exists. This may also
indicate dirty fluid in the system.
3.
Ensure the system has adequate power. If there
3-82
TM 10-3950-672-24-1
3-33 POWER STEERING PUMP
DESCRIPTION
(22.7 Ipm) and contains a relief valve with a relief
setting of 1500 psi (10,342.5 kPa/103.4 bar).
The power steering pump is mounted on and driven by
the engine. The pump is a gear type pump that supplies
hydraulic oil from the hydraulic system reservoir to the
steering system. The pump has an output of 6 gpm
MAINTENANCE
NOTE
For more detailed information refer to Appendix E.
TROUBLESHOOTING.
SYMPTOM
1.
2.
3.
4
Noisy pump.
Foaming oil.
Pump or oil overheating.
Low flow.
PROBABLE CAUSE
SOLUTION
a. Low oil supply.
a. Fill reservoir.
b. Oil too heavy.
b. Change to proper viscosity.
c. Air leak in inlet line.
c. Check plumbing.
d. Partly blocked inlet line.
d. Check for foreign object and/or
clean lines.
a. Pump cavitation.
a. Refer to Symptom 1.
b. Water in the oil.
b. Check reservoir.
a. Oil supply too thin.
a. Drain and fill with proper viscosity oil.
b. Oil supply contaminated.
b. Drain, clean filter, and fill
with clean oil.
c. Pump cavitating.
c. Refer to Symptom 1.
d. System relief valve bypassing.
d. Check relief valve setting. Refer to Solution 4c.
a. Pump cavitating.
a. Refer to Symptom 1.
b. Foaming oil.
b. Refer to Symptom 2.
3-83
TM 10-3950-672-24-1
SYMPTOM
4
5.
Low flow.
Failure to build pressure.
3-33.1
3-33.2
3-33.3
PROBABLE CAUSE
SOLUTION
c. Relief valve leaks, or set too
low
c. Check relief valve for foreign
particles.
d. Speed too low.
d. Increase engine speed.
e. Oil too hot.
e. Check temperature. Refer to
Symptom 3. Solutions a through d.
a. Defective relief valve.
a. Check and reset or replace.
b. Low oil supply.
b. Fill reservoir.
Removal
a.
Tag and disconnect the hydraulic lines at the power steering pump. Cap the lines and
openings.
b.
Remove the bolts and washers securing the pump to the engine. Remove the pump.
Installation
a.
Install the pump and secure with the bolts and washers. Torque the bolts to 165 lb ft
(224 N•m).
b.
Connect the hydraulic lines as tagged during removal.
Test
After the pump has been installed, run it for two to three minutes before pressurizing, ensuring the gears are
constantly running in oil. Apply pressure gradually for an additional five minutes and monitor the pressure with a
pressure gauge installed in a plugged outlet line. Ensure a sufficient quantity of oil is available on the suction side of the
pump.
3-84
TM 10-3950-672-24-1
3-34 STEERING CONTROL VALVE
DESCRIPTION
precise full hydraulic steering which is accomplished by
a metering system within the valve that is directly
connected to the steering column and wheel.
The orbitrol steering control valve is located under the
front console and is actuated by an orbitrol steering
column and a steering wheel which are integral parts of
the steering control valve. The steering valve provides
THEORY OF OPERATION
permits incremental steering left or right. If hydraulic oil
flow to the IN port is lost due to failure of the engine,
torque converter or steering pump, rear wheel steering
can still be accomplished with the steer control valve.
When pressure is lost, a poppet valve closes and the
gerotor set becomes a hydraulic pump. Turning the
steering wheel mechanically actuates the gerotor set,
pumping hydraulic oil from one side of the steer cylinder
to the other. This means of steering is very difficult and
requires a great amount of force to be applied to the
steering wheel.
Turning the steering wheel to the left or right causes a
spool, enclosed in a precision sleeve, to rotate. As the
spool is rotated, a set of lateral springs tend to move the
sleeve in the same direction. Due to the springs, there
is a time lag between the movement of the spool and
sleeve. During this time lag, hydraulic oil from the IN
port of the valve is permitted to flow to the gerotor set
which meters hydraulic oil to the steer cylinder through
the appropriate L or R port of the valve. When the
sleeve rotates to the same position as the spool, the
metered flow of hydraulic oil stops and oil flows from the
IN port to the OUT port and back to the return manifold.
It is the action between the spool and sleeve that
MAINTENANCE
NOTE
For more detailed information refer to Appendix E.
REMOVAL.
Control Valve.
3. Tag and disconnect the hydraulic hoses from
the steering control valve. Cap or plug each hose and
the ports of the valve.
1. To gain access to the steering control valve,
remove the screws securing the cover to the front of the
cab. Pull the cover off far enough to disconnect any
wiring necessary to remove the cover. Remove the
cover.
4. Remove the bolts and washers securing the
valve to the steering column. Remove the control
valve.
2. Thoroughly clean the steering control valve and
surrounding area of all dirt and contamination before
disconnecting the hydraulic hoses from the valve.
3-85
TM 10-3950-672-24-1
5.
Using a thin bladed screwdriver, pry the retaining ring from the bore of the control column.
Integral Column.
6
Remove the control shaft and bearing assembly
from the column. If the control shaft and bearing
assembly is hard to remove, tap lightly with a plastic
or rubber hammer on the splined end of the control
shaft until the shaft breaks loose from the column.
1.
Remove the four capscrews from the column.
2.
Remove the column and spring.
3.
Remove the bearing locator.
NOTE
The retaining ring fit is very tight. Be
careful not to distort it when
removing it from the shaft.
4.
Remove the quad ring seal and 1-15/16 inch
diameter seal from the column.
NOTE
Remove the retaining ring only if it is
necessary to remove the bearing
assembly from the shaft.
7.
If removing the bearing assembly from the
shaft, remove the retaining ring from the shaft using a
thin bladed screwdriver.
8.
If necessary, remove the bearing assembly from
the threaded end of the shaft.
3-86
TM 10-3950-672-24-1
INSTALLATION.
Integral Column.
2.
Install the quad ring seal (dry). Lubricate the 1
15/1 6 inch diameter seal and install the seal in the
column.
3.
Install the column on the housing.
4.
Align the bolt holes and install the four
capscrews (dry). Using a criss-cross pattern. torque the
capscrews to 200 lb in. (23 N•m).
1.
Install the bearing locator over the two bearing
races and the needle thrust bearing. Using a soft plastic
or rubber hammer, lightly tap the bearing locator in the
housing.
5.
Press the bearing assembly on the control shaft
with the seal (red) side of the bearing assembly facing
3-87
TM 10-3950-672-24-1
toward the threaded end of the shaft. Ensure the
bearing assembly seats against the shoulder of the
shafts.
7.
Apply clean grease to the splines and spring
hole located in the face of the control shaft. Install the
spring in the hole. The grease should hold the spring in
place until the control shaft is installed in the column.
6.
Install the retaining ring on the control shaft.
Ensure the ring seats properly in the ring slot above the
bearing assembly.
8.
Insert the splined end of the control shaft in the
column first, and install the control shaft and bearing
assembly in the column. Turn the shaft to engage it
with the spool. Push the bearing assembly in far
enough to allow for installation of the retaining ring in
the bore of the column.
9.
Install the retaining ring in the bore of the
column. Ensure that the retaining ring is fully seated in
the ring groove.
Control Valve.
1.
Position the control valve to the steering column
and secure with the bolts and washers.
2.
Connect the hydraulic hoses to the control valve
as tagged during removal.
3.
Prior to securing the cover to the front of the
crane cab, start the engine and check for proper
operation and any leaks.
4.
Connect any wiring disconnected during
removal. Install and secure the cover to the front of the
cab.
3-88
TM 10-3950-672-24-1
3-35 STEER CYLINDER
DESCRIPTION
hydraulic oil from either the R port or L port of the
steering control valve is directed to the appropriate side
of the steer cylinder. Flow to the cylinder causes the
cylinder to extend or retract thus turning the wheels.
A single 3-inch (7.62 cm) hydraulic steer cylinder is
installed on the rear axle.
The cylinder is attached by a rod end assembly to link
plates that are attached to the spindle assemblies.
Depending on the direction the steering wheel is turned,
MAINTENANCE
INSTALLATION.
NOTE
1.
Position the steer cylinder to the frame and
secure with the bolts and washers. Torque the bolts
to 75 lb ft (102 N•m).
Refer to CYLINDERS in Section 6 for
Disassembly
and
Assembly
procedures.
2.
Align the rod end assemblies to the spindle link
plates ensuring the rod end is equally adjusted on both
sides of the cylinder rod. Install the bolts, locknuts,
and washers and secure the cylinder. Torque the
bolts to 583 lb ft (791 N•m).
REMOVAL.
1.
Tag and disconnect the hydraulic hoses from
the steer cylinder ports. Cap or plug all openings.
2.
Remove the bolts, locknuts, and washers securing the rod end assembly on both sides of the cylinder
to the spindle link plates.
3.
Connect the hydraulic lines to the cylinder as
tagged during REMOVAL
4.
Operate the steering system and check for
proper operation and any leakage.
3.
Remove the bolts and washers securing the
steer cylinder to the frame and remove the steer
cylinder from the crane.
3-89
TM 10-3950-672-24-1
Section 6. Hydraulic System
Subject
Para.
Hydraulic System .................................................................................................. 3-36
Description
Hydraulic Oil Recommendations
Draining and Flushing
Removing Air From the Hydraulic System
Control Valves
Hydraulic Hoses, Lines, and Fittings (Typical) ....................................................... 3-37
Removal ........................................................................................................... 3-37.1
Installation ........................................................................................................ 3-37.2
Hydraulic Tank ...................................................................................................... 3-38
Removal ........................................................................................................... 3-38.1
Installation ........................................................................................................ 3-38.2
Supply Pressure and Return Circuit ....................................................................... 3-39
Description
Hydraulic Filter ...................................................................................................... 3-40
Removal and Disassembly
Assembly and Installation
Hydraulic Pump ..................................................................................................... 3-41
Description
Troubleshooting
Removal
Installation
Valves ................................................................................................................... 3-42
General
Valve Usage Table
Relief Valves ......................................................................................................... 3-43
Description
General
Preparation
Main Relief Valve Adjustment
Circuit Relief Valve Adjustment
Directional Control Valve ....................................................................................... 3-44
Description
Removal
Installation
Functional Check
Holding Valves ...................................................................................................... 3-45
Description
Removal
Installation
Pilot Operated Check Valve .................................................................................. 3-46
Description
Theory of Operation
Removal
Installation
3-90
Page
3-92
3-97
3-97
3-97
3-98
3-98
3-98
3-101
3-104
3-105
3-106
3-108
3-111
3-113
3-114
Para.
Outrigger Selector Valve ....................................................................................... 3-47
Description
Removal
Installation
Functional Check
Solenoid Valve ...................................................................................................... 3-48
Description
Removal
Installation
Hoist Motor Control Valve ..................................................................................... 3-49
Description
Removal
Installation
Crossover Relief Valve .......................................................................................... 3-50
Description
Removal
Installation
Cylinders ............................................................................................................... 3-51
General
Maintenance
Lift Cylinder ........................................................................................................... 3-52
Description
Disassembly
Cleaning and Inspection
Assembly
Telescope Cylinder ................................................................................................ 3-53
Disassembly
Cleaning and Inspection
Assembly
Steer Cylinder ....................................................................................................... 3-54
Description
Disassembly
Cleaning and Inspection
Assembly
Stabilizer (Outrigger) Cylinder ............................................................................... 3-55
Description
Disassembly
Cleaning and Inspection
Assembly
3-91
TM 10-3950-672-24-1
Page
3-115
3-116
3-117
3-118
3-119
3-120
3-124
3-128
3-131
TM 10-3950-672-24-1
3-36 HYDRAULIC SYSTEM
DESCRIPTION
Graphical Symbols chart is provided in this Section.
This Section describes the supply, pressure, and return
hydraulic circuit, hydraulic pumps, all hydraulic
cylinders, and all hydraulic valves. Description and
operation of individual hydraulic circuits are discussed in
their individual Sections.
A hydraulic test panel for checking relief valve settings
is located at the front right side of the engine
compartment. The test panel contains three fittings
sealed with pipe plugs. By removing the pipe plugs and
connecting a pressure gauge to the fittings, the pressure
setting of the relief valves can be checked.
A complete hydraulic system schematic showing all
options is at the back of this Manual and an A.N.S.I.
Hydraulic Test Panel Decal
MAINTENANCE
1.
Remove the reservoir drain plug.
Allow
approximately three minutes, after oil stops flowing from
the drain port, for the side walls to drain.
HYDRAULIC OIL RECOMMENDATIONS.
For the hydraulic oil specifications, refer to Section 13
LUBRICATION.
2.
Clean and install the reservoir plug and fill the
reservoir with a 50-50 mixture of fuel oil and clean
hydraulic oil.
DRAINING AND FLUSHING.
If a component has been changed because of a failure
that might allow metal or abrasive particles to enter the
system, all systems must be thoroughly checked,
drained, and flushed.
3.
Cycle the crane through all functions several
times; then return the crane to its stowed position and
turn the front and rear wheels to the extreme left. Shut
down the engine.
3-92
TM 10-3950-672-24-1
12. Disconnect the return lines from the steer cylinder
and turn the wheels to the extreme right.
13. Connect the return lines and turn the wheels to the
extreme left and then back to center. Replenish the
reservoir oil level as necessary.
4. Remove the reservoir drain plug and drain the
reservoir. Clean and install the drain plug and fill the
reservoir with clean oil.
CAUTION
CAUTION
OIL SUPPLY LINES MUST BE
CONNECTED TO THE CYLINDERS
WHEN FLUSHING THE SYSTEM.
WHEN OILS ARE CHANGED OR
ADDED, ENSURE THAT OILS OF
DIFFERENT MANUFACTURERS ARE
OF THE SAME SPECIFICATIONS.
HOWEVER,
DISCOLORATION
(MILKINESS) MAY OCCUR.
NOTE
Draining the various components will
be facilitated by connecting a drain
line in place of the disconnect return
line.
When hydraulic oils are changed, recheck the reservoir
oil level after brief system operation and add oil as
required.
5. Disconnect the return line from the lift cylinder and
raise the boom to maximum elevation.
Reservoir gauge level capacity is 30.0 gallons (113.5
liters) and total capacity is 35.0 gallons (132.4 liters).
6. Connect the cylinder return line and lower the boom
to its stowed position. Replenish the reservoir oil level
as required.
Ensure the crane is in the travel mode of operation
when the oil system is being filled. The system must be
filled with all cylinders retracted and the boom at rest.
Fill the reservoir to the full mark on the reservoir sight
gauge. After the reservoir is filled, operate all circuits
and recheck the reservoir sight gauge. Add oil as
required.
CAUTION
WHEN DRAINING THE STABILIZER
CYLINDERS.
ALWAYS OPERATE
EITHER BOTH FRONT OR BOTH
REAR CYLINDERS TOGETHER TO
PREVENT TWISTING THE CRANE.
REMOVING AIR FROM THE HYDRAULIC SYSTEM.
7. Disconnect the return lines from a pair of outrigger
stabilizer cylinders and activate the cylinders to their
maximum down position.
Due to the manner in which the hydraulic system is
designed, air entering the hydraulic oil will normally be
removed automatically by passage of the oil over the
baffles in the hydraulic reservoir.
However, if a
component has been replaced, the reservoir level is too
low, or a leak develops in the suction lines to the pumps,
air can enter the system. If air becomes entrapped in
the hydraulic oil, it may be detectable in pumps and
motor operated components such as the swing
mechanism and hoist(s), because it can cause these
units to become noisy during operation. Should noisy
operation occur, first check the level of the hydraulic
reservoir and replenish as necessary. Then inspect for
leaks in the suction lines leading to the pumps.
8. Connect the return lines and raise the stabilizer
cylinders to the stowed position. Replenish the oil level
as necessary.
9. Repeat steps 7 and 8 for the remaining two outrigger
stabilizer cylinders.
10. Disconnect the return line from the telescope
cylinder and fully extend the boom.
11. Connect the return line and retract the boom.
Minute leaks may be difficult to locate. Should you
encounter a leak that is not readily detectable, the
following method may be used when checking for
Replenish the reservoir oil level as necessary.
3-93
TM 10-3950-672-24-1
3-94
TM 10-3950-672-24-1
entrapped air from the hydraulic cylinder, ensure the
boom is first telescoped IN (not OUT) in the morning.
Telescoping OUT may cause air to be forced back into a
cylinder.
such leaks. Seal all normal openings in the hydraulic
system and the reservoir. Using a positive means to
control the pressure (i.e. a regulator), pressurize the
hydraulic system to 2 to 4 psi (13.79 to 27.6 kPa/0.
1379 to 0.276 bar) and inspect all joints and fittings for
evidence of leaks. A soap solution applied to the fittings
and joints may also prove helpful in detecting minute
leaks while the system is pressurized. Remove the
pressure, repair any leaks found, and reopen any
openings (vents, etc.) closed for inspection. Refill the
reservoir after completing any repairs or service.
Operate all hydraulic circuits several times in both
directions. This action should return any entrapped air
to the reservoir where it can be removed from the oil by
the baffle system provided.
WARNING
EXTREME CARE MUST BE USED
WHEN REMOVING ANY PLUGS OR
RESTRICTIONS FROM A HYDRAULIC
SYSTEM SUSPECTED TO HAVE
ENTRAPPED AIR THAT MAY BE
PRESSURIZED.
Entrapped air may be removed from cylinders having
wet rods by cycling. On certain cylinders, a plugged
port is provided on the rod end to bleed-off entrapped
air.
NOTE
On cranes with booms that can not
be lowered to below horizontal, the
outriggers may be used to raise the
machine in order to lower the boom
nose below horizontal.
WARNING
DO NOT ATTEMPT TO LOOSEN
FITTINGS IN PRESSURIZED LINES
OR WHILE THE HYDRAULIC PUMP IS
IN OPERATION.
CAUTION
LOCATE THE CRANE ON A FIRM
SUPPORTING
SURFACE
AND
POSITION THE BOOM IN THE MOST
STABLE
POSITION
WHEN
EXTENDING THE BOOM AT LOW
ANGLES.
In the event that air entrapment should persist, bleeding
of air by loosening various clamp and screw type fittings
may become necessary.
CONTROL VALVES.
The control valves that control the crane functions are
installed under the dash in the cab. Access to the
control valves is gained by removing the cover in front
of the cab. Mechanical linkage extends from the base
of the control levers, under the cab, to the respective
control valves.
On cranes with boom telescope cylinders attached so
the rod (ram) moves while the cylinder barrel remains
stationary, cycling may not remove the air. Lowering
the boom to below horizontal and fully telescoping the
boom in and out several times should remove entrapped
air from the cylinders.
Inspection.
However, if the air is not readily removed, lower the
boom to below horizontal, extend the telescope cylinder
as far as practicable, and allow the boom to remain in
this position overnight. This should allow entrapped air
to find its way to the holding valve where telescoping the
boom IN the next morning should force the air back to
the reservoir.
Inspect the control valves for visible damage, binding
spools, and evidence of leakage. If excessive internal
leakage is suspected during operation with a spool in its
center position, it is possible that the area between the
spool and working section bore of the valve body is
worn beyond serviceable limits. If this condition exists,
the spool and body must be replaced as an assembly.
While allowing the boom to remain in an extended and
lowered position overnight is helpful in removing
3-95
TM 10-3950-672-24-1
Check valves in the control valves are designed to
permit a flow of oil in one direction only. If a piece of
dirt or rust has worked its way into the check valve and
lodges between the poppet and seat, it will keep the
valve open and allow a return flow of oil. The remedy is
to clean the valve, but it is also a good idea to follow
through and ensure the hydraulic system filters are still
serviceable.
Valve Leakage.
Dripping oil indicates some type of external leakage.
The machine should be removed from service for
immediate repairs. External leaks sometimes develop
at fittings and seals. Spool seals are susceptible since
they are subject to wear. Seals may be damaged by
temperatures that are too high, or by dirt or paint
accumulation on the spool. Damaged seals must be
replaced.
Binding Spools.
A component functioning at reduced efficiency may
indicate that the control valve for that component is
leaking internally.
Assuming preliminary check-out
reveals that adequate volume is being supplied to the
affected valve bank, relief valves are properly adjusted,
and the component is not at fault, check the valve for
scored or worn parts. Scoring is a sign of the number
one problem in hydraulics contamination: external
contamination by dust or internal contamination by
debris from deteriorating components or oxidized oil.
Scored or severely worn valve components must be
replaced.
Some of the most common causes for stiff spool
movement or jammed spool action are; system
overheating, excessive pressure, contaminated or
deteriorated oil, or warped mountings. When scorched
or deteriorated oil or contamination is the cause,
flushing the system and replenishing with clean oil may
solve the problem. If the spool bores are badly scored
or galled, the valve must be removed for servicing.
Warped mounting surfaces can distort the assembly and
cause leakage and binding.
To check for valve
distortion, loosen the mounting bolts slightly. If the
leakage stops when the bolts have been backed off
slightly, distortion was the problem. To correct this
condition, shim the valve assembly to level and
retighten the mounting bolts.
Also, check the valve for rust. Rust or dirt collecting on
the linkages can prevent free movement of the spool,
and keep it from the true center position. Excessive
system pressure can create both internal and external
leaks in valves that are otherwise sound. Therefore, it is
extremely important that relief valves be adjusted only
by qualified personnel using the proper equipment.
Warping occurs when mounting plates are not level or
they become distorted from machine damage. As
mentioned previously, the valve can be shimmed level.
3-96
TM 10-3950-672-24-1
3-37 HYDRAULIC HOSES, LINES, AND FITTINGS (TYPICAL)
3-37.1 Removal
WARNING
Fluid leaks under pressure may not be visible. A high pressure oil stream can pierce body and
cause severe personal injury. Always wear safety goggles to protect eyes and heavy gloves to
protect hands. Prior to servicing any component, reduce hydraulic pressure in system to zero
and then disconnect power source.
a. Relieve hydraulic pressure by moving control levers through full range with engine shut down.
b. Remove hose or line (1, Figure 3-15), as applicable, from fitting (2).
c. Remove fitting (2) from component.
3-37.2 Installation
WARNING
Never use standard plumbing fittings for the hydraulic system. Always use high pressure
hydraulic fittings. Standard fittings could fail resulting in severe personal injury.
a. Install fitting (2, Figure 3-15) in component.
b. Install hose or line (1), as applicable, on fitting (2).
WARNING
Hydraulic fluid under pressure can penetrate skin or damage eyes. Fluid leaks under pressure
may not be visible. Use a piece of cardboard or wood to find leaks, but do not use bare hand.
Wear safety goggles for protection. If fluid enters skin or eye, get immediate medical attention.
c. Start up hydraulic system and check for leaks.
LEGEND
1. Hose/Line
2. Fitting
Figure 3-15. Hydraulic Hoses, Lines, and Fittings (Typical)
3-97
TM 10-3950-672-24-1
3-38 HYDRAULIC TANK
3-38.1 Removal
a. Disconnect negative battery cable and two electrical leads from negative battery post.
b. Remove drain plug (2, Figure 3-16) from hydraulic tank (1) and drain hydraulic oil into suitable container (tank
capacity 35 gal.). Dispose of oil according to local regulations.
c. Remove two bolts (3) and two lockwashers (4) securing hydraulic line (5) to return filter assembly (19).
d. Remove two locknuts (6), two washers (7), and two bolts (8) securing bottom of hydraulic tank to crane frame.
e. Tag and disconnect two electrical leads from temperature switch (26).
f. Remove two bolts (9), two lockwashers (10), and disconnect suction hose (11), steering pump hose (12), and
return tube (13) from back of reservoir.
g. Remove locknut (14), washer (15), hold-down (15), and hydraulic tank (1) from crane frame.
h. Remove six bolts (17), six lockwashers (18), return filter assembly (19), and gasket (20) from hydraulic tank (1).
Discard gasket (20).
i. Remove clamp (21), cover (22), and o-ring (23) from hydraulic tank (1). Discard o-ring (23).
j. Remove breather cap (24), oil level gauge (25), and temperature switch (26) from hydraulic tank (1).
3-38.2 Installation
a. Install temperature switch (26, Figure 3-1 6), oil level gauge (25), and breather cap (24) in hydraulic tank (1).
b. Install new gasket (20) and return filter assembly (19) in hydraulic tank (1) with six lockwashers (18) and six bolts
(17).
c. Install hydraulic tank (1) on crane frame with hold-down (16), washer (15), nut (14), two bolts (8), two washers
(7), and two nuts (6). Torque nuts (6 and 14) to 75 lb ft (102 N•m).
d. Connect return tube (13), steering pump hose (12), and suction hose (11) with two washers (10) and two bolts (9)
to back of reservoir.
e. Connect two electrical leads to temperature switch (26) and remove tags.
3-98
TM 10-3950-672-24-1
LEGEND
1.
2.
3.
4.
5.
6.
7.
8.
9.
Hydraulic Tank
Drain Plug
Bolt
Lockwasher
Return Line
Nut
Washer
Bolt
Bolt
10.
11.
12.
13.
14.
15.
16.
17.
18.
Washer
Suction Hose
Steering Pump Hose
Return Tube
Nut
Washer
Hold-Down
Bolt
Lockwasher
Figure 3-16. Hydraulic Tank
3-99
19.
20.
21.
22.
23.
24.
25.
26.
Return Filter
Gasket
Clamp
Cover
O-ring
Breather Cap
Sight Glass
Temp. Switch
TM 10-3950-672-24-1
f. Connect hydraulic line (5) to return filter assembly (19) with two lockwashers (4) and two bolts (3).
g. Install drain plug (2) in hydraulic tank (1) and service reservoir with new hydraulic oil. Refer to Operator's
Manual, TM10-3950-672-10, for proper hydraulic oil.
h. Install new o-ring (23), cover (22), and clamp (21) on hydraulic tank (1).
WARNING
Hydraulic fluid under pressure can penetrate skin or damage eyes. Fluid leaks under pressure
may not be visible. Use a piece of cardboard or wood to find leaks, but do not use bare hand.
Wear safety goggles for protection. If fluid enters skin or eye, get immediate medical attention.
i. Start up hydraulic system and check for leaks.
j. Connect negative battery cable and two electrical leads to negative battery post.
3-100
TM 10-3950-672-24-1
3-39 SUPPLY PRESSURE AND RETURN CIRCUIT
DESCRIPTION
The supply pressure end return circuit routes hydraulic
oil from the pump to the directional control valves for
the individual operating circuits. The supply pressure
and return circuit consists of the reservoir, pump, oil
filter, hydraulic swivel, and oil cooler. The operating
circuit's description and components begin with the
circuit's directional control valves.
Refer to
HYDRAULIC PUMP in this section for Description and
Maintenance of the hydraulic pump. Refer to Section 9,
SWIVELS for Description and Maintenance of the
hydraulic swivel.
This opening may also be used to fill the reservoir after
it has been completely drained.
HYDRAULIC RESERVOIR AND FILTER.
OIL COOLER.
The reservoir, attached to the right side of the crane
chassis, has a total capacity of approximately 35.0
gallons (132.4 liters) and a gauge level capacity of
approximately 30.0 gallons (113.5 liters). The all-steel
reservoir has an internally mounted full-flow filter and
integral baffles that help cool the oil and prevent oil
foaming.
The air cooled hydraulic oil cooler is mounted to the
front of the crane under a bolt-on cover. The oil cooler
consists of a fan, an electric motor, and a temperature
switch. The fan draws cool air through the cooling fins
on the cooler. The oil cooler cools the oil utilized in the
swing and telescope circuits. Return oil flows from the
oil cooler directly to the return filter in the reservoir.
Oil flows through individual tubing from the back of the
reservoir to the hydraulic pump. The return flow is also
to the back of the reservoir, but on the opposite side of a
baffle plate which acts to separate return and supply oil.
Two return lines are connected to the back of the
reservoir. One goes directly into the reservoir. The
other return line goes directly into the filter case inside
the reservoir.
A temperature switch installed in the back of the
reservoir controls the operation of the fan motor.
The oil filter is located in the reservoir. The filter
housing contains a replaceable 3 micron filter element.
An indicator on the filter tells what condition the filter is
in, i.e. dirty or clean, whether the filter is functioning or
by-passing, or if an element was not installed. The filter
bypass valve is either positively closed when normal
filtration is in progress, or is positively open when the
filter has reached its bypass setting.
When the temperature switch senses a temperature of
160 degrees F (71 degrees C), the motor is energized
and continues running until the oil temperature is
reduced to 148 degrees F (65 degrees C).
PUMP DISTRIBUTION.
A sight gauge is located on the front of the reservoir to
indicate oil level. A breather used as a filter is located
on the top of the reservoir to allow air to enter or
exhaust from the reservoir. It is most important that the
breather be kept clean to prevent damage to the
reservoir. Change interval would be dependent upon
environmental conditions.
Under severely dusty
conditions, the change interval should be once every 3
to 4 months, moderate condition change interval should
be 6 to 8 months, and mild condition interval should be
once yearly. A large round access cover on the top
center of the reservoir provides access for cleaning.
Section One.
Section one of the hydraulic pump supplies the 3-valve
bank housing the outrigger/tow winch, lift, and main
hoist directional control valve.
Section Two.
Section two of the hydraulic pump supplies the 2-valve
bank housing the swing and telescope directional control
valve.
3-101
TM 10-3950-672-24-1
Hydraulic Reservoir and Filter
3-102
TM 10-3950-672-24-1
MAINTENANCE
TROUBLESHOOTING.
SYMPTOM
1. No oil flows in systems.
b.
2. Excessive pressure buildup.
3. Pump noise. Accompanied by
oil foaming in reservoir.
PROBABLE CAUSE
SOLUTION
a. Low oil level.
a. Fill reservoir.
Pump coupling or shaft sheared
or disengaged.
b. Properly engage the pump
drive. If drive or coupling is damaged or
sheared. remove and repair or replace
as necessary.
c. Reservoir-to-pump supply line
broken or restricted. Air entering at
suction lines. Pump not priming.
c. Clean, repair, or replace line
as necessary. Check all lines for security, suction lines for cracks, and
proper attachment. Tighten, repair.
or replace components as necessary.
d. Internal contamination.
d. Repair or replace pump. Drain,
flush, and refill system with recommended oil.
a. System relief valve set too
high.
a. Use adequate pressure gauge
and adjust system relief valve as
necessary.
b. Restricted pump-to-control valve
supply line.
b. Clean, repair, or replace line
as necessary.
a. Air entering at suction lines.
Low oil level.
a. Check all lines for security
and proper attachment. Tighten,
repair, or replace components as
necessary. Ensure that oil level in
reservoir is adequate. Fill to HIGH
mark on sight gauge.
b. Excessive engine rpm.
b. Regulate engine speed.
3-103
TM 10-3950-672-24-1
7. If necessary, remove the screws and lockwashers
securing the indicator to the head. Inspect the indicator,
O-ring seals, and gasket sponges for damage. Replace,
if necessary.
3-40 HYDRAULIC FILTER
Removal and Disassembly.
WARNING
8. Ensure the new filter element(s) is correct by
comparing the part number with that of the used filter
element(s).
ENSURE ALL HYDRAULIC SYSTEMS
ARE SHUT DOWN AND THE
PRESSURE IS RELIEVED.
9. Discard the used filter element(s).
1. Shut down all hydraulic systems.
Assembly and Installation.
2. Wipe any dirt from the filter housing and filter head.
1. If removed, install the indicator to the head and
secure with the lockwashers and screws.
3. Remove the screws from the filter cover and remove
the cover. Inspect the cover O-ring and replace it if
there is any evidence of damage.
2. Install the filter elements(s) into the filter bowl.
4. Remove the screws securing the head to filter bowl.
Remove the head. Inspect the bowl O-ring and replace
It If there is any evidence of damage.
3. Install the diverter and poppet valve assembly into
the head and secure with the diverter handle and hitch
clip pin.
5. Remove the hitch clip pin from the diverter handle
and remove the diverter and poppet valve assembly.
Inspect the diverter O-ring and replace it if there is any
evidence of damage.
4. Install the head to the filter bowl and secure with the
screws.
6. Remove the elements.
6. Start up the hydraulic system and check for leaks.
5. Install the filter cover and secure with the screws.
3-104
TM 10-3950-672-24-1
3-41 HYDRAULIC PUMP
DESCRIPTION
The hydraulic pump is mounted on and is driven by the diesel engine through an adapter and coupling
on the crankshaft. The pump is a gear-type unit and consists of two section. The first section has
an output of 27.4 gpm (103.7 Ipm) and the second section has an output of 18.9 gpm (71.5 Ipm) @
2400 rpm.
MAINTENANCE
NOTE
For more detailed information refer to Appendix E.
TROUBLESHOOTING.
SYMPTOM
1. Noisy pump caused by cavitation.
PROBABLE CAUSE
SOLUTION
a. Oil supply low.
a. Fill the hydraulic reservoir.
b. Air leaking into the suction line.
b. Tighten all fittings.
c. Incorrect oil in reservoir.
c. Drain and fill reservoir with
non-foaming oil.
a. Oil supply is low.
a. Fill the reservoir.
b. Contaminated oil.
b. Drain the reservoir and refill
with clean oil.
c. Oil in system too light.
c. Drain the reservoir and refill
with proper viscosity oil.
3.Shaft seal leakage.
a. Worn shaft seal.
a. Replace the seal.
4.Foaming Oil.
a. Low oil level.
a. Fill the reservoir.
b. Air leaking into the suction line.
b. Tighten the fittings.
c. Wrong kind of oil.
c. Drain and fill reservoir with
non-foaming oil.
2. Oil heating.
3-105
TM 10-3950-672-24-1
REMOVAL.
INSTALLATION.
1. Tag and disconnect the hydraulic lines from the
pump. Cap or plug all openings.
1. Slide the pump shaft into the drive adapter. Install
the bolts and washers and secure the pump. If a
Cummins engine is installed, torque the bolts to 58 lb ft
(79 N•m).
2. Remove the bolts and washers securing the pump
and slide the pump shaft from the drive adapter.
2. Connect the hydraulic lines to the pump as tagged
during removal.
3-42 VALVES
GENERAL
itself. For information on how the valve functions in the
individual circuits, refer to the Description and Operation
of that circuit.
This subsection provides descriptive information for all
the hydraulic valves used on this crane. For a listing of
all valves, the circuit they are used in, and their physical
location, refer to the Valve Usage Table.
The
description of the valves given here is for the valve
VALVE USAGE TABLE
Valve Name
Circuit Used In
Physical Location
Directional Control Valves:
Open Spool
Hoist
Swing
Under the front console
Under the front console
Closed Spool
Boom Lift
Outrigger
Telescope
Under the front console
Under the front console
Under the front console
Double Selector Valve
Outrigger
In the battery box
Holding Valves
Telescope
Boom Lift
Port block of each cylinder
Port block of each cylinder
Pilot Operated Check Valve
Outrigger
Port block of each cylinder
Outrigger Selector Valve
Outrigger
In the cab
Hydraulic Lockout Solenoid Valves
Boom Lift
Hoist
Telescope
the cab floor
Between the frame rails under
Hoist Motor Control Valve
HO-12 Hoist
On the hoist motor
Crossover Relief Valve
assembly
Thermal Relief Valve
Swing
On the swing drive
Lift
In Line
3-106
TM 10-3950-672-24-1
Valve Locations
3-107
TM 10-3950-672-24-1
3-43 RELIEF VALVES
DESCRIPTION
Relief valves are used to protect a component, a circuit,
or a system from overpressurization. Most of the relief
valves are located in the directional control valves, but
some are located in the line between components (e.g.,
double crossover relief valve), while others are part of a
component.
MAINTENANCE
The following test and Tables list Main and Circuit Relief
Valve Settings. If the pressure setting of any relief
valve is not + 100 psi (+689.5 kPa/6.8 bar) of that listed
in the tables, adjustment is necessary.
GENERAL.
Relief valves are checked and adjusted by causing a
given circuit to reach its prescribed pressure limit (stall).
At this point the relief valve opens, returning oil to the
reservoir. Hydraulic motor circuits may be stalled by
preventing rotation of the motor shaft prior to actuating
the control valve. Cylinder circuits may be stalled by
extending or retracting a cylinder to its limit of travel.
CAUTION
DO NOT OVERTIGHTEN THE SCREW
OR LOCKNUT.
By placing a pressure gauge in the proper line or port, a
pressure reading will indicate the point at which the
relief valve opens. The needle on the meter face will
climb until it reaches the relief valve setting. At that
point the needle will stop climbing and fluctuate,
indicating the relief valve is open and returning oil to the
reservoir.
DO NOT HOLD THE RELIEF VALVE
OPEN FOR MORE THAN ONE
MINUTE AT A TIME.
Correct relief valve adjustment is mandatory if any
hydraulic circuit is to function properly. Settings must
be within tolerances. Therefore, adjustment should be
performed only by qualified technicians using the correct
equipment, after the need for adjustment has been
established.
To adjust a relief valve, turn the
adjustment screw (in to increase or
out to decrease) until the proper
setting is reached.
CAUTION
NOTE
MAIN RELIEF SETTINGS
Each valve bank has one main relief valve limiting
maximum operating pressure of the component(s) in
that circuit. In addition, circuit relief valves further limit
operating pressures as required by circuit design.
Valve Bank
Setting psi (kPa/bar)
Two Section ..............................2500 (17,237/172.3)
Three Section............................3000 (20,685/206.8)
CIRCUIT RELIEF SETTINGS
Valve Bank
Circuit Relief - psi (kPa/bar)
Main Relief - psi (kPa/bar)
Hoist ................................................................................................................................................
Lift (down) ....................................................... 350 (2413/24.1).....................................................
Telescope (2 Section Boom) (Retract)............. 1000 (6,895/68.9)..................................................
Swing.............................................................. 1780 (12,273/122.7) ..............................................
Outrigger..........................................................................................................................................
3-108
3000 (20,685/206.8)
3000 (20.685/206.8)
2500 (17,237/172.3)
3000 (20,685/206.8)
3000 (20,685/206.8)
TM 10-3950-672-24-1
pressure reading at each position. If the readings are
not + 100 psi (689.5 kPa/6.89 bar) of that listed in the
CIRCUIT REUEF SETTING table, adjust the pressure
setting as necessary.
Swing.
1. Install the pressure gauge in the test port on the
control valve.
5. If the valve cannot be adjusted to within the 100 psi
(689.5 kPa/6.89. bar) tolerance, shut down the crane
and replace the relief valve.
2. Set the throttle to 1000 rpm.
3. Disconnect the hydraulic line to the swing brake
release port and cap the line. Plug the open port on the
brake.
6.
After the required pressure setting has been
obtained, shut down the engine. Connect the swing
brake release line to the swing brake, remove the
pressure gauge and install the pipe plug.
4. Swing first one direction then the other, holding
momentarily in each position. Note the maximum
3-109
TM 10-3950-672-24-1
4. If the pressure readings are not + 100 psi (689.5
kPa/6.89 bar) of 3000 psi (20,685 kPa/206.8 bar) set the
relief valve.
NOTE
Release the control lever after taking
each reading and while making
adjustments.
5.
After the required pressure setting has been
obtained, shut down the crane and remove the pressure
gauge.
When the proper pressure setting has been attained,
tighten the adjustment screw locknut and recheck the
pressure. It is possible that the setting may change
while tightening the locknut.
CIRCUIT RELIEF VALVE ADJUSTMENT.
Lift Retract.
NOTE
NOTE
Lift extend uses the valve bank main
relief valve.
An accurate 0 to 6000 psi (0 to 34,475
kPa/344.75 bar) pressure gauge
should be used when adjusting relief
valves.
Pressure test ports are
located on the hydraulic test panel.
These test ports are connected to the
inlet line of each valve bank.
1. Remove the pipe plug from the pressure test port
and install the pressure gauge.
2. Set the throttle to 1000 rpm.
3. Move the BOOM control lever to DOWN and hold
momentarily.
Note the maximum reading on the
pressure gauge. If the reading is not ± 100 psi (689.5
kPa/6.89 bar) of that listed in the CIRCUIT RELIEF
SETTING table, adjust the pressure setting as
necessary.
PREPARATION.
1. Start and warm up the engine until the hydraulic oil
temperature reaches a minimum of 70 degrees F (21.1
degrees C).
WARNING
4. Shut down the engine. Remove the pressure gauge
and install the pipe plug.
DO NOT ATTEMPT TO LOOSEN THE
FITTINGS IN PRESSURIZED LINES
OR WHILE THE HYDRAULIC PUMP IS
IN OPERATION.
Telescope Retract.
NOTE
2. Shut down the engine.
Telescope extend uses the valve
bank main relief valve.
MAIN RELIEF VALVE ADJUSTMENT.
1. Install the pressure gauge in the test port on the
applicable control valve.
WARNING
NEVER USE STANDARD PLUMBING
FITTINGS FOR THE HYDRAULIC
SYSTEM,
ALWAYS
USE
HIGH
PRESSURE HYDRAULIC FITTINGS.
2. Set the throttle to 1000 rpm.
3. Move the TELESCOPE control lever to IN and hold
momentarily.
Note the maximum reading on the
pressure gauge. If the reading is not + 100 psi (689.5
kPa/6.89 bar) of that listed in the CIRCUIT RELIEF
SETTING table, adjust the pressure setting as
necessary.
1. Plumb the pressure gauge into the pressure test port
on the control valve bank.
2. Set the throttle to 2400 rpm.
4. Shut down the engine. Remove the pressure gauge
and install the pipe plug.
3. Position the LIFT control lever to LOWER and hold
momentarily.
3-110
TM 10-3950-672-24-1
3-44 DIRECTIONAL CONTROL VALVE
DESCRIPTION
This flow pattern is applicable in either direction the
valve may be positioned. If it is necessary to open more
than one directional control valve in the same valve
bank, it may be required to partially close or feather the
valves that are located in the bank first, in regards to
flow from the pump, in order to provide sufficient flow to
the valves located last in the bank.
The directional control valves are four-way, threeposition valves with either an open or closed spool.
Whether a valve has an open or closed spool is
determined by whether, with the spool in the neutral
position, the work ports are open to the reservoir return
passage. If the work ports are open to the reservoir
return passage the valve is classified as an open spool
type: if they are not, the valve is a closed spool type.
(Refer to the Valve Usage Table for circuit applicability
by valve type). Additionally, the valve spool is spring
loaded to the neutral position.
The closed spool directional control valve functions
basically the same way as the open spool directional
control valve in that the through passage of the valve
must be blocked off by the valves' spool to divert flow to
the dead end parallel passage. With flow diverted to the
parallel passage, pressure then must unseat the load
check valve to allow the flow to reach the open work
port. The load check valve is provided to prevent back
sliding of components which support heavy loads as is
evidenced by the circuits this valve is used in. Return
flow from the component is through the return work port
to the reservoir return passage.
The open spool directional control valve is constructed
with a through passage to allow flow to pass to the next
valve(s) in the bank and on to the reservoir, when the
valve spool is in the neutral position. By positioning the
valve spool to a work position, the through passage is
blocked and flow is diverted to the dead end parallel
passage. This causes flow to be directed to the
component's open supply work port. Return flow is
routed from the return work port to the reservoir return
passage by the opposite end of the valve spool.
MAINTENANCE
NOTE
For more detailed information refer to Appendix E.
REMOVAL.
5. Remove the capscrews and washers securing the
valve bank to the mounting plate and remove the valve
bank.
1. Gain access to the control valves by removing the
capscrews, nuts, washers, and clamps securing the
console assembly to the frame.
Lift the console
assembly off the control valves.
INSTALLATION.
2. Tag and disconnect the hydraulic lines from the
valve bank. Cap and plug all openings.
1 Position the valve bank on the mounting plate and
secure with the capscrews and washers.
3. Tag and disconnect any electrical leads from the
valve bank.
2. Connect the control levers to the valve(s) and secure
with the cotter pins and clevis pins.
4. Remove the cotter pins and clevis pins attaching the
control levers to the valve(s). Replace the hardware in
the linkage to prevent loss.
3. Connect any electrical leads to the valve bank as
tagged during removal.
3-111
TM 10-3950-672-24-1
4. Connect the hydraulic lines to the valve bank as
tagged during removal.
FUNCTIONAL CHECK.
1. Start the engine and check the operation at high and
low idle speed with no load applied.
5. Install the console assembly to the frame. Secure
the top of the console assembly with the clamps,
washers, and nuts. Secure the sides of the console with
the capscrews and washers. Torque the capscrews to
31 lb ft (42 N•m).
2. Set the engine speed to the recommended operating
rpm.
3. Operate the control lever(s) of the affected circuit(s).
Check for smooth operation of cylinders and motors.
Check the valve bank(s) and lines for leakage.
3-112
TM 10-3950-672-24-1
3-45 HOLDING VALVES
DESCRIPTION
Two different holding valves are utilized on the crane,
one in the lift cylinder and one in the telescope cylinder.
Both valves are installed in the port block of their
respective cylinder.
MAINTENANCE
NOTE
For more detailed information refer to Appendix E.
CAUTION
REMOVAL.
1. To remove the holding valve, unscrew it from the
port block.
DO NOT DAMAGE THE O-RINGS
DURING INSTALLATION OF THE
HOLDING VALVE. IF THE HOLDING
VALVE TURNS FREELY THEN GETS
HARD TO TURN, THEN EASY TO
TURN; REMOVE THE HOLDING
VALVE AND CHECK THE O-RINGS.
THEY HAVE PROBABLY BEEN
DAMAGED BY A SHARP EDGE OF A
PORT.
INSTALLATION.
1. Check the inside of the port block for any sharp
edges or burrs and remove as necessary with emery
cloth.
2. Install new O-rings onto the holding valve.
3. Lubricate the holding valve and O-rings with clean
hydraulic oil.
NOTE
The holding valve should turn by
hand until compression of the Orings begins.
4. Carefully install the holding valve into the port block
until fully seated.
3-113
TM 10-3950-672-24-1
3-46 PILOT OPERATED CHECK VALVE
DESCRIPTION
NOTE
The pilot operated check valve is located in the
outrigger stabilizer, port block.
The check valve
provides two functions; the first function is a holding
valve, the second function provides a thermal relief of
the stabilizer.
For more detailed information refer
to Appendix E.
THEORY OF OPERATION
through port B in the poppet. Fluid then flows around
the check valve seat and out the piston stem hole to
port A. If the piston is moved far enough the piston will
unseat the poppet and increase flow.
When this
happens there is little or no flow through port B around
the check valve seat.
Pressure is applied through port A of the valve. The
pressure lifts the poppet off its seats and fluid flows
through port C to the component. The return flow from
the component is held in check by the check valve until
sufficient pressure builds against the base of the piston
to cause the stem to unseat the check valve. When the
check valve is unseated, oil flows through port C and
MAINTENANCE
CAUTION
REMOVAL.
1. To remove the check valve, unscrew the check valve
from the stabilizer port block.
DO NOT DAMAGE THE O-RINGS
DURING INSTALLATION OF THE
CHECK VALVE.
IF THE CHECK
VALVE TURNS FREELY THEN GETS
HARD TO TURN, THEN EASY TO
TURN, REMOVE THE CHECK VALVE
AND CHECK THE O-RINGS. THEY
HAVE PROBABLY BEEN DAMAGED
BY A SHARP EDGE OF A PORT.
INSTALLATION.
1. Check the inside of the port block for any sharp
edges or burrs and remove as necessary with emery
cloth.
2. Install new O-rings onto the check valve.
NOTE
3. Lubricate the check valve and O-rings with clean
hydraulic oil.
The check valve should turn by hand
until compression of the O-rings
begins.
4. Carefully install the check valve into the port block
until fully seated.
3-114
TM 10-3950-672-24-1
3-47 OUTRIGGER SELECTOR VALVE
DESCRIPTION
one outrigger only, position the selector valve lever to
one of four positions; FRONT RIGHT. FRONT LEFT,
REAR RIGHT, or REAR LEFT.
To operate two
outriggers at one time, position the selector valve lever
to either FRONT, RIGHT, LEFT, or REAR.
The OUTRIGGER SELECTOR valve is located in the
cab to the left of the seat. It is an eight position
hydraulic selector valve marked FRONT, RIGHT, LEFT,
and REAR, RIGHT, LEFT. The selector valve directs
the flow of hydraulic oil from the outrigger directional
control valve to the appropriate outrigger(s). To operate
MAINTENANCE
NOTE
For more detailed information refer to Appendix E.
REMOVAL.
FUNCTIONAL CHECK.
1. Remove the hoses and fittings from the selector
valve. Cap or plug all openings.
1. Activate the hydraulic system.
2. Using the outrigger control lever and outrigger
selector, extend and retract the outriggers.
2. Remove the eleven bolts and washers securing the
selector valve to the mounting bracket.
INSTALLATION.
3.
Observe the outrigger for adequate speed of
extension and retraction and smooth operation.
1. Position the outrigger selector valve on the mounting
bracket and secure with the eleven bolts and washers.
4. Check the hydraulic connections for evidence of
leakage.
2. Connect the hoses and fittings to the selector valve
as tagged prior to removal.
3-115
TM 10-3950-672-24-1
3-48 SOLENOID VALVE
DESCRIPTION
the cartridge in the valve body to align the ports in the
valve. This alignment of ports routes the hydraulic flow
in the desired direction.
Three two-way solenoid valves are used in the hydraulic
override installation and are installed between the frame
rails under the cab floor. The valve is a normally closed
valve with an electrical coil which when energized shifts
MAINTENANCE
NOTE
For more detailed information refer to Appendix E.
REMOVAL.
INSTALLATION.
1. Remove the bolts, washers, and nuts securing the
solenoid valve(s) to the mounting plate. Remove the
valve.
1. Install the valve to the mounting plate and secure
with the bolts, washers, and nuts.
3-116
TM 10-3950-672-24-1
3-49 HOIST MOTOR CONTROL VALVE
DESCRIPTION
The hoist motor control valve is designed to provide an
even flow of oil to the hoist motor in both directions.
This allows flow to the return reservoir through the
directional control valve.
To drive the hoist motor in the raise direction, hydraulic
oil flows through the in port and pushes the free flow
poppet off its seat. The oil then flows to the out port and
on to the hoist drive motor.
An orifice plug is installed in the pilot pressure port to
restrict back flow when the directional control valve is
closed. The restriction prevents the pilot operated
poppet from chattering on its seat.
When driving the hoist motor in the lower direction, oil
from the directional control valve enters the out port.
The pilot operated poppet is held shut by the adjustment
spring until pilot pressure of sufficient force is sensed at
the pilot pressure port to move the pilot operated poppet
off its seat.
A vent is provided that vents the area between the pilot
piston seal and the free flow poppet and pilot operated
poppet seals to prevent a hydraulic lock should weepage
around the seals occur.
MAINTENANCE
NOTE
For more detailed information refer to Appendix E.
REMOVAL.
INSTALLATION.
1. Tag and disconnect the hydraulic lines to the motor
control valve. Cap or plug all lines and openings.
1. Install the valve on the hoist motor and secure with
the capscrews and lockwashers.
2. Remove the capscrews and lockwashers securing
the valve to the hoist motor. Remove the valve.
2. Connect the hydraulic lines to the motor control
valve as tagged during removal.
3-117
TM 10-3950-672-24-1
3-50 CROSSOVER RELIEF VALVE
DESCRIPTION
drilled and ported block with two relief valves and two
check valves with orifice plugs installed in the block.
The relief valves relieve pressure from one line to the
other and therefore there is no connection to the
reservoir.
The crossover relief valve with shuttle valve is designed
to protect the system from excessive pressure buildup
and to maintain a given pressure in the system. The
crossover relief valve relieves surge pressure in the
swing circuit that could occur if the motor is suddenly
stopped. It also provides for smoothly starting and
stopping of the swing motor. The valve consists of a
MAINTENANCE
NOTE
For more detailed information refer to Appendix E.
REMOVAL.
INSTALLATION.
1. Tag and disconnect the hydraulic lines to the valve.
Cap or plug all openings.
1. Install the valve and secure with the capscrews and
washers.
2. Remove the capscrews and washers securing the
valve. Remove the valve.
2. Connect the hydraulic lines to the valve as tagged
during removal.
3-118
TM 10-3950-672-24-1
3-51 CYLINDERS
GENERAL
For information on how the cylinder functions in the
individual circuits, refer to the Description and Operation
of that circuit.
This sub-section provides descriptive information for all
the hydraulic cylinders used on this crane.
The
description of the cylinder given here is for the cylinder
itself.
MAINTENANCE
GENERAL.
There must be a gap between the ends of each wear
ring when it is installed onto the piston or head. In
addition, each wear ring gap is to be located as follows.
Divide 360 degrees by the number of wear rings on the
component. The resulting value is the number of
degrees each wear ring gap is to be located with respect
to each other.
The approximate wear ring gaps are as follows.
PISTON WEAR RING GAP
Piston Size
Inch
1 to 4.75
5.50 to 10.0
greater than 10.0
Wear Ring Gap
mm
25.4 to 120.66
139.70 to 254.00
greater than 254.0
Inch
0.125
0.187
0.250
mm
3.175
4.750
6.350
HEAD WEAR RING GAP
Head Size
Inch
1 to 4.75
5 to 10.0
greater than 10.0
mm
25.40 to 120.65
127.00 to 254.00
greater than 254.00
Wear Ring Gap
Inch
0.125
0.187
0.250
3-119
mm
3.175
4.750
6.350
TM 10-3950-672-24-1
3-52 LIFT CYLINDER
DESCRIPTION
the extended length of the cylinder is 59.06 inches
(150.0 cm). Foreign matter is prevented from entering
the cylinder by a wiper seal. O-rings are used within the
cylinders to prevent internal and external damage.
The lift cylinder is the double acting type with a cylinder
bore of 7.0 inches (17.7 cm). The retracted length of
the cylinder from the center of the rod bushing to the
center of the barrel bushing is 37 inches (93.9 cm) and
MAINTENANCE
DISASSEMBLY.
4. Secure the cylinder rod to prevent it from moving.
Remove the setscrew from the piston and rod.
NOTE
5. Unscrew the piston from the rod.
Any
maintenance
requiring
disassembly of the cylinders should
include replacement of all seals and
rings.
6. Remove the head from the rod.
CAUTION
1. Drain all hydraulic oil from the cylinder.
2. Remove the socket setscrew from the barrel on the
rod end of the cylinder.
WHEN REMOVING THE SEALS AND
RINGS, AVOID SCRATCHING THE
GROOVED AND GLAND SURFACES.
WARNING
NOTE
DO NOT USE AIR PRESSURE TO
REMOVE THE CYLINDER ROD
ASSEMBLY. USE ONLY A SOURCE
OF CONTROLLED HYDRAULIC OIL
PRESSURE IF THE ROD ASSEMBLY
IS HARD TO MOVE.
Aligning discarded seals and rings in
the order of disassembly will
facilitate installation of new seals
and rings.
7. Remove the seal assemblies from the outside of the
piston and the backup rings and O-ring from the inside
of the piston.
CAUTION
EXERCISE EXTREME CARE WHEN
HANDLING OR SETTING DOWN THE
CYLINDER ROD. DAMAGE TO THE
ROD
SURFACE
MAY
CAUSE
UNNECESSARY MAINTENANCE AND
EXPENSE.
NOTE
Note the sequence of each seal
making up the rod seal and its
location on the rod to ensure proper
assembly.
3. Withdraw the cylinder rod assembly from the barrel,
and move it to a clean work area.
8. Remove the O-ring and backup ring from the outside
of the head and the wear ring, buffer seal assembly, rod
seal, and wiper ring from the inside of the head.
NOTE
9. If necessary, remove the holding valve from the port
block.
It is advisable to cover the cylinder
barrel
opening
to
avoid
contamination.
10. If necessary, remove the grease fittings.
3-120
TM 10-3950-672-24-1
Lift Cylinder
3-121
TM 10-3950-672-24-1
CLEANING AND INSPECTION.
NOTE
1. Clean all parts with solvent and dry with compressed
air. Inspect all parts for serviceability.
The holding valve should turn by
hand until compression of the Orings begins.
CAUTION
5. Carefully install the holding valve into the port block
until fully seated.
BEFORE INSTALLING NEW SEALS
AND RINGS, CLEAN ALL SURFACES
AND CAREFULLY REMOVE BURRS
AND NICKS. PARTS DISPLAYING
EXCESSIVE WEAR OR DAMAGE
SHOULD BE REPLACED.
NOTE
Coat all seals and rings with clean
hydraulic oil.
2. Stone out minor blemishes and polish with a fine
crocus cloth.
CAUTION
3. Clean with solvent and dry with compressed air any
parts that have been stoned and polished.
AVOID STRETCHING THE SEALS
AND RINGS. ENSURE THE SEALS
AND RINGS ARE INSTALLED IN THE
PROPER ORDER.
4. Inspect the barrel carefully for scoring.
6. Install the O-ring and backup ring onto the outside of
the head.
ASSEMBLY.
1. If removed, install the grease fittings.
NOTE
NOTE
Ensure the rod seal is installed in the
sequence
as
noted
during
disassembly.
Steps 1, 2, 3, and 4 are used only if
the holding valve has been removed.
7. Install the wiper ring, rod seal, buffer seal, and the
wear ring into the inside of the head.
2. Check the inside of the port block for any sharp
edges or burrs and remove as necessary with emery
cloth.
8. Install the seal assemblies onto the outside of the
piston.
3. Install new O-rings onto the holding valve.
9. Install the O-ring and backup rings into the inside of
the piston. Ensure the O-ring is between the backup
rings.
4. Lubricate the holding valve and O-rings with clean
hydraulic oil.
CAUTION
10. Lubricate the rod with clean hydraulic oil.
DO NOT DAMAGE THE O-RINGS
DURING INSTALLATION OF THE
HOLDING VALVE. IFTHE HOLDING
VALVE TURNS FREELY THEN GETS
HARD TO TURN, THEN EASY TO
TURN; REMOVE THE HOLDING
VALVE AND CHECK THE 0RINGS.
THEY HAVE PROBABLY BEEN
DAMAGED BY A SHARP EDGE OF A
PORT.
11. Install the head onto the rod. Remove the cover
from the cylinder barrel.
12. Clean all oil from the threads of the cylinder rod and
barrel and apply NEVER-SEEZ (paste type) compound.
13. Install the piston on the rod and tighten with a
spanner wrench. Apply Locquic Primer T to the threads
of the setscrew. Allow to dry and apply Loctite 271
adhesive/sealant to the threads of the setscrew. Install
the setscrew and secure the piston on the rod.
3-122
TM 10-3950-672-24-1
CAUTION
AVOID SCRATCHING OR DAMAGING
THE
GROOVED
AND
GLAND
SURFACES, OR THE RINGS AND
SEALS.
15. Apply Locquic Primer T to the threads of the
setscrew.
Allow to dry and apply Loctite 271
adhesive/sealant to the threads of the setscrew. Install
the setscrew into the barrel on the rod end of the
cylinder.
CAUTION
WARNING
EXERCISE EXTREME CARE WHEN
HANDLING OR SETTING DOWN THE
CYLINDER ROD. DAMAGE TO THE
ROD
SURFACE
MAY
CAUSE
UNNECESSARY MAINTENANCE AND
EXPENSE.
DO NOT USE AIR PRESSURE TO
CYCLE
OR
PRESSURIZE
THE
CYLINDER.
16. Pressurize and cycle the cylinder. Check for proper
operation and any leakage.
14. Lubricate the piston and head with clean hydraulic
oil and install the rod assembly into the barrel with a
twisting motion.
3-123
TM 10-3950-672-24-1
3-53 TELESCOPE CYLINDER
centerline of the port block is 263.75 in. (669.9 cm).
Foreign matter is prevented from entering the cylinder
by a wiper seal during rod retraction. The cylinder rod is
secured to the boom base and the cylinder barrel is
attached to the fly section.
The boom telescope cylinder is of the double acting
type. The cylinder has a bore of 4.5 in. (11.4 cm). The
retracted length from the end of the barrel to the
centerline of the holding block is 142.0 in. (360.6 cm).
The extended length from the end of the barrel to the
Disassembly.
NOTE
NOTE
It is advisable to cover the cylinder
barrel
opening
to
prevent
contamination.
Any maintenance requiring disassembly of the cylinder
should include replacement of all cylinder seals.
1. Drain all hydraulic oil from the cylinder.
4. Secure the cylinder rod to prevent it from moving.
Remove the setscrew from the piston and rod.
2. Remove the four bolts from the head retaining plate
on the rod end of the cylinder.
5. Unscrew the piston from the rod.
6. Remove the spacer and head from the rod.
WARNING
7. Remove the head retaining plate from the rod.
DO NOT USE AIR PRESSURE TO
REMOVE THE CYLINDER ROD
ASSEMBLY. USE ONLY A SOURCE
OF CONTROLLED HYDRAULIC OIL
PRESSURE IF THE ROD ASSEMBLY
IS HARD TO MOVE.
WHEN REMOVING SEALS AND
RINGS,
AVOID
SCRATCHING
GROOVED AND GLAND SURFACES.
CAUTION
NOTE
EXERCISE EXTREME CARE WHEN
HANDLING OR SETTING DOWN THE
CYLINDER ROD.
Aligning discarded seals and rings in
the order of disassembly will
facilitate installation of new items.
3. Withdraw the cylinder rod assembly from the barrel
and move it to a clean work area.
8. Remove the seal assemblies from the outside of the
piston and the O-ring and backup rings from the inside
of the piston.
CAUTION
3-124
TM 10-3950-672-24-1
4.50 Inch (11.4 cm) Telescope Cylinder
3-125
TM 10-3950-672-24-1
NOTE
Note the sequence of each seal
making up the buffer seal and its
location on the rod to ensure proper
assembly.
NOTE
Steps 1, 2, 3, and 4 are used only if
the holding valve has been removed.
1. Check the inside of the port block for any sharp
edges or burrs and remove as necessary with emery
cloth.
9. Remove the O-ring and backup ring from the outside
of the head and the wear rings, buffer seal assembly,
and rod seal from the inside of the head.
2. Install new O-rings onto the holding valve.
10. Remove the wiper ring from the head retaining
plate.
3. Lubricate the holding valve and O-rings with clean
hydraulic oil.
11. If necessary, remove the holding valve from the
port block.
CAUTION
Cleaning and Inspection.
DO NOT DAMAGE THE O-RINGS
DURING INSTALLATION OF THE
HOLDING VALVE. IFTHE HOLDING
VALVETURNS FREELY THEN GETS
HARD TO TURN, THEN EASY TO
TURN: REMOVE THE HOLDING
VALVE AND CHECK THE O-RINGS.
THEY HAVE PROBABLY BEEN
DAMAGED BY A SHARP EDGE OF A
PORT.
1. Clean all parts with solvent and dry with compressed
air. Inspect all parts for serviceability.
CAUTION
BEFORE INSTALLING NEW SEALS
AND RINGS, CLEAN ALL SURFACES
AND CAREFULLY REMOVE BURRS
AND NICKS. PARTS DISPLAYING
EXCESSIVE WEAR OR DAMAGE
SHOULD BE REPLACED.
NOTE
The holding valve should turn by
hand until compression of the Orings begins.
2. Stone out minor blemishes and polish with a fine
crocus cloth.
4. Install the wiper ring into the head retaining plate.
3. Clean with solvent and dry with compressed air any
parts that have been stoned and polished.
5. Install the O-ring and backup ring onto the outside of
the head.
4. Inspect the barrel carefully for scoring.
NOTE
Assembly.
Ensure the buffer seal is installed in
the sequence as noted during
disassembly.
NOTE
Coat all seals and rings with clean
hydraulic oil.
6. Install the rod seal, buffer seal assembly, and wear
rings into the inside of the head.
CAUTION
7. Install the seal assemblies onto the outside of the
piston.
AVOID STRETCHING THE SEALS
AND RINGS. ENSURE THE SEALS
AND RINGS ARE INSTALLED IN THE
PROPER ORDER.
8. Install the O-ring and both backup rings into the
inside of the piston. Ensure the O-ring is between the
backup rings.
3-126
TM 10-3950-672-24-1
9. Lubricate the rod with clean hydraulic oil.
CAUTION
10. Install the head retaining plate on the rod.
EXERCISE EXTREME CARE WHEN
HANDLING OR SETTING DOWN THE
CYLINDER ROD. DAMAGE TO THE
ROD
SURFACE
MAY
CAUSE
UNNECESSARY MAINTENANCE AND
EXPENSE.
11. Install the head onto the rod. Remove the cover
from the cylinder barrel.
12. Clean all oil from the threads of the cylinder rod and
barrel and apply NEVER-SEEZ (paste type) compound.
14. Lubricate the piston and head with clean hydraulic
oil and install the rod assembly into the barrel with a
twisting motion.
13. Install the spacer and piston on the rod. Tighten the
piston with a spanner wrench. Apply Locquic Primer T
to the threads of the setscrew. Allow to dry and apply
Loctite 271 adhesive/sealant to the threads of the
setscrew. Install the setscrew and secure the piston on
the rod.
15. Bolt the head retaining plate to the cylinder barrel.
Torque to 250 lb ft (339 N•m).
WARNING
CAUTION
DO NOT USE AIR PRESSURE TO
CYCLE
OR
PRESSURIZE
THE
CYLINDER.
AVOID SCRATCHING OR DAMAGING
THE
GROOVE
AND
GLAND
SURFACES. OR THE RINGS AND
SEALS.
16. Pressurize and cycle the cylinder. Check for proper
operation and any leakage.
3-127
TM 10-3950-672-24-1
3-54 STEER CYLINDER
DESCRIPTION
The steer cylinder has a 3-inch (7.62 cm) diameter bore
and is the double acting type. The cylinder is mounted
on the rear axle. O-rings are used within the cylinder to
prevent internal and external leakage. A wiper ring is
mounted on each end of the cylinder barrel to wipe dirt
from the rod as it is retracted.
MAINTENANCE
4. Secure the cylinder rod to prevent it from moving.
DISASSEMBLY.
5. Remove the piston from the rod.
NOTE
6. Remove the spacers and heads from each end of the
head.
Any
maintenance
requiring
disassembly of the cylinder-should
include replacement of all cylinder
seals.
CAUTION
WHEN REMOVING THE SEALS AND
RINGS, AVOID SCRATCHING THE
GROOVED AND GLAND SURFACES.
1. Drain all hydraulic oil from the cylinder.
2. Remove the bolts from the head plates on each end
of the cylinder.
NOTE
WARNING
Aligning discarded seals and rings in
the order of disassembly will
facilitate installation of new seals
and rings.
DO NOT USE AIR PRESSURE TO
REMOVE THE CYLINDER ROD
ASSEMBLY. USE ONLY A SOURCE
OF CONTROLLED HYDRAULIC OIL
PRESSURE IF THE ROD ASSEMBLY
IS HARD TO MOVE.
7. Remove the crown seal and wear rings from the
outside of the piston.
EXERCISE EXTREME CARE WHEN
HANDLING OR SETTING DOWN THE
CYLINDER ROD.
NOTE
Note the sequence of each seal
making up the rod seal and its
location on the rod to ensure proper
assembly.
3. Withdraw the cylinder rod assembly from the barrel,
and move it to a clean work area. Cap or plug the ends
of the rod to protect the threads.
8. Remove the O-ring and backup ring from the outside
of the heads and the rod seal, buffer seal assembly, and
wear ring from the inside of the heads.
CAUTION
9. Remove the wiper ring from each head plate.
NOTE
CLEANING AND INSPECTION.
It is advisable to cover the cylinder
barrel
opening
to
avoid
contamination.
1. Clean all parts with solvent and dry with compressed
air. Inspect all parts for serviceability.
3-128
TM 10-3950-672-24-1
Steer Cylinder
3-129
TM 10-3950-672-24-1
4. Install the crown seal and wear rings onto the outside
of the piston.
CAUTION
BEFORE INSTALLING NEW SEALS
AND RINGS, CLEAN ALL SURFACES
AND CAREFULLY REMOVE BURRS
AND NICKS. PARTS DISPLAYING
EXCESSIVE WEAR OR DAMAGE
SHOULD BE REPLACED.
5. Lubricate the rod with clean hydraulic oil.
6. Install the heads and spacers onto the rod. Remove
the cover from the cylinder barrel.
7. Install the piston onto the rod.
2. Stone out minor blemishes and polish with a fine
crocus cloth.
CAUTION
AVOID SCRATCHING OR DAMAGING
THE
GROOVED
OR
GLAND
SURFACES OR THE RINGS AND
SEALS.
3. Clean with solvent and dry with compressed air any
parts that have been stoned and polished.
4. Inspect the barrel carefully for scoring.
ASSEMBLY.
CAUTION
NOTE
EXERCISE EXTREME CARE WHEN
HANDLING OR SETTING DOWN THE
CYLINDER ROD. DAMAGE TO THE
ROD
SURFACE
MAY
CAUSE
UNNECESSARY MAINTENANCE AND
EXPENSE.
Coat all seals and rings with clean
hydraulic oil.
CAUTION
AVOID STRETCHING THE SEALS
AND RINGS. ENSURE THE SEALS
AND RINGS ARE INSTALLED IN THE
PROPER ORDER.
8. Remove the caps or plugs from the rod ends.
Lubricate the piston and heads with clean hydraulic oil
and install the rod assembly into the barrel with a slight
twisting motion.
1. Install the wiper ring in each head plate.
2. Install the O-ring and backup ring onto the outside of
the heads.
9. Install the head plates on each end of the cylinder
and secure with the bolts. torque the bolts to 75 lb ft
(101 N•m).
NOTE
WARNING
Ensure the rod seal is installed in the
sequence
as
noted
during
disassembly.
DO NOT USE AIR PRESSURE TO
CYCLE
OR
PRESSURIZE
THE
CYLINDER.
3. Install the rod seal, buffer seal assembly. and wear
ring into the inside of the heads.
10. Pressurize and cycle the cylinder. Check for proper
operation and any leakage.
3-130
TM 10-3950-672-24-1
3-55 STABILIZER (OUTRIGGER) CYLINDER
DESCRIPTION
the cylinder is 69.19 inches (175.7 cm). A port block is
welded to the cylinder barrel and a pilot operated check
valve is threaded into the port block. O-rings are used
within the cylinder to prevent internal and external
damage. A wiper ring is mounted in the cylinder head to
wipe the rod as it is retracted into the barrel.
The four stabilizer cylinders have 3-inch (7.6 cm)
diameter bores and are the double acting type. The
barrel end of the cylinders are attached to the frame and
the rod end of the cylinders are attached to the outrigger
beam. The retracted length of the cylinder from the
center of the barrel to the center of the rod attach point
is 40.19 inches (102.0 cm) and the extended length of
MAINTENANCE
DISASSEMBLY.
NOTE
NOTE
It is advisable to cover the cylinder
barrel
opening
to
avoid
contamination.
Any
maintenance
requiring
disassembly of the cylinder should
include replacement of all cylinder
seals.
4. Secure the cylinder rod to prevent it from moving.
CAUTION
1. Drain all hydraulic oil from the cylinder.
WHEN REMOVING THE SEALS AND
RINGS, AVOID SCRATCHING THE
GROOVED AND GLAND SURFACES.
2. Remove the setscrews securing the barrel to the
head.
WARNING
NOTE
Aligning discarded seals and rings in
the order of disassembly will
facilitate installation of new items.
DO NOT USE AIR PRESSURE TO
REMOVE THE CYLINDER ROD
ASSEMBLY. USE ONLY A SOURCE
OF CONTROLLED HYDRAULIC OIL
PRESSURE IF THE ROD ASSEMBLY
IS HARD TO MOVE.
5. Remove the seal assembly from the outside of the
piston.
6. Remove the head from the rod.
CAUTION
NOTE
Note the sequence of each seal
making up the rod seal and its
location on the rod to ensure proper
assembly.
EXERCISE EXTREME CARE WHEN
HANDLING OR SETTING DOWN THE
CYLINDER ROD. DAMAGE TO THE
ROD
SURFACE
MAY
CAUSE
UNNECESSARY MAINTENANCE AND
EXPENSE.
7. Remove the wear ring, buffer seal assembly, rod
seal, and wiper ring from the inside of the head.
Remove the O-ring and backup ring from the outside of
the head.
3. Remove the cylinder rod assembly from the cylinder
barrel and move it to a clean work area.
3-131
TM 10-3950-672-24-1
Stabilizer (Outrigger) Cylinder
3-132
TM 10-3950-672-24-1
8. If necessary, remove the pilot operated
check valve from the port block.
NOTE
The holding valve should turn by
hand until compression of the Orings begins.
CLEANING AND INSPECTION.
1. Clean all parts with solvent and dry with
compressed air. Inspect all parts for serviceability.
4. Carefully install the check valve into the
port block until fully seated.
CAUTION
CAUTION
BEFORE INSTALLING NEW SEALS
AND RINGS, CLEAN ALL SURFACES
AND CAREFULLY REMOVE BURRS
AND NICKS. PARTS DISPLAYING
EXCESSIVE WEAR OR DAMAGE
SHOULD BE REPLACED.
WHEN INSTALLING NEW SEALS
AND RINGS, AVOID STRETCHING
THE SEALS OR SCRATCHING THE
GROOVED AND GLAND SURFACES.
NOTE
2. Stone out minor blemishes and polish with
a fine crocus cloth.
3. Clean with solvent and dry with
compressed air any parts that have been stoned and
polished.
4. Inspect the barrel carefully for scoring.
Lubricate new seals and rings with
clean hydraulic oil.
5. Install the O-ring and backup ring onto the
outside of the head.
ASSEMBLY.
NOTE
NOTE
Ensure the rod seal is installed in the
sequence
as
noted
during
disassembly.
Steps 1, 2, 3, and 4 are used only if
the check valve has been removed.
6. Install wiper ring, rod seal, buffer seal
assembly, and wear ring into the inside of the head.
7. Lubricate the rod with clean hydraulic oil.
8. Install the head onto the rod. Remove the
cover from the cylinder barrel.
9. Install the seal assembly onto the outside
of the piston.
1. Check the inside of the port block for any
sharp edges or burrs and remove as necessary with
emery cloth.
2. Install new O-rings onto the check valve.
3. Lubricate the check valve and O-rings
with clean hydraulic oil.
CAUTION
CAUTION
DO NOT DAMAGE THE O-RINGS
DURING INSTALLATION OF THE
CHECK VALVE.
IF THE CHECK
VALVE TURNS FREELY THEN GETS
HARD TO TURN, THEN EASY TO
TURN; REMOVE THE CHECK VALVE
AND CHECK THE O-RINGS. THEY
HAVE PROBABLY BEEN DAMAGED
BY A SHARP EDGE OF A PORT.
AVOID SCRATCHING OR DAMAGING
THE
GROOVED
AND
GLAND
SURFACES, OR THE RINGS AND
SEALS.
CAUTION
EXERCISE EXTREME CARE WHEN
HANDLING OR SETTING DOWN THE
CYLINDER ROD. DAMAGE TO THE
ROD
SURFACE
MAY
CAUSE
UNNECESSARY MAINTENANCE AND
EXPENSE.
3-133
TM 10-3950-672-24-1
10. Lubricate the piston and head with clean hydraulic oil and install the rod assembly into the barrel with a
twisting motion.
11. Apply Locquic Primer T to the threads of the setscrew. Allow to dry and apply Loctite 271 adhesive/sealant
to the threads of the setscrew. Install the setscrew into the barrel securing it to the head.
WARNING
DO NOT USE AIR PRESSURE TO CYCLE OR PRESSURIZE THE CYLINDER.
12. Pressurize and cycle the cylinder. Check for proper operation and any leakage.
3-134
TM 10-3950-672-24-1
Section 7. Swing System
Para.
Page
Swing System ....................................................................................................... 3-56
Description
Theory of Operation
Troubleshooting
Swing Motor .......................................................................................................... 3-57
Description
Removal
Installation
Test
Planetary Gear Reducer ........................................................................................ 3-58
Description
Removal
Installation
Test
Swing Bearing ....................................................................................................... 3-59
Description
General
Torquing Turntable Bolts
Removal
Inspection
Installation
Testing
3-136
Subject
3-135
3-141
3-142
3-143
TM 10-3950-672-24-1
3-56 SWING SYSTEM
DESCRIPTION
a crossover relief valve containing a shuttle valve, relief
The superstructure swing system provides 360 degrees
valves, and check valves.
continuous rotation. Swinging in either direction is
controlled by the swing control lever in the cab.
A multi-disc type brake is an integral part of the gear
reducer and is mounted between the motor and the gear
The swing circuit consists of the directional control
reducer. The crossover relief valve is mounted to the
valve, drive motor, gear reducer with integral brake, and
swing motor.
THEORY OF OPERATION
causing the gear reducer to rotate the superstructure to
The system is supplied by the 22.0 gpm (83.2 Ipm)
the right. Pulling the directional control lever back
pump. The oil flows to the swing directional control
(LEFT) causes the gear reducer to rotate the
valve bank. A 3000 psi (20,685 kPa/206.8 bar) main
superstructure to the left. A shuttle valve in the
relief valve is located in the valve bank. When the
crossover relief valve, installed between the swing left
directional control lever is pushed forward (RIGHT), the
and swing right lines, provides pressurized oil to the
flow is directed through the crossover relief valve (set at
swing brake assembly to release the swing brake.
1780 psi [12,273.1 kPa/122.7 bar]) to the swing motor
MAINTENANCE
TROUBLESHOOTING.
SYMPTOM
1.
Boom swing operation erratic
In either direction.
PROBABLE CAUSE
SOLUTION
a. Damaged relief valve.
a. Replace relief valve.
b. Swing brake dragging (not releasing properly).
b. Readjust and/or replace necessary parts.
3-136
TM 10-3950-672-24-1
Swing System Components
3-137
TM 10-3950-672-24-1
SYMPTOM
1. Boom swing operation erratic
in either direction. (continued)
2. Boom swing operation erratic
in one direction only.
PROBABLE CAUSE
SOLUTION
c. Low engine rpm.
c. Increase engine rpm to obtain
smooth swing operation.
d. Low hydraulic oil.
d. Replenish hydraulic oil to proper level.
e. Improper movement of control
lever to neutral.
e. Feather controls to neutral to
maintain smooth stopping action.
f. Insufficient lubricant on swing
bearing.
f. Lubricate bearing properly
g. Crane not level.
g. Level crane using outriggers.
(If equipped)
h. Damaged swing motor.
h. Repair or replace swing motor.
i.
i.
Excessive overload.
Reduce load.
j. Restricted or partly clogged hydraulic hose or fitting.
j. Replace hose or fittings.
k. Pump cavitation in swing section.
k. Retighten suction hose or replace any damaged fitting.
I. Improperly torqued turntable
bolts.
I. torque turntable bolts evenly.
m. Excessive preload on upper
and lower pinion shaft bearing.
m. Adjust as necessary.
n. Improperly torqued swing motor attachment bolts.
n. Torque swing motor attachment bolts.
o. Malfunction of the swing box.
o. Remove swing box and make
necessary repairs.
p. Worn or damaged pump section.
p. Repair or replace damaged section.
a. Relief valve inoperative.
a. Clean. readjust. and/or replace
relief valve.
b. Crane not level.
b. Level crane using outriggers.
(If equipped)
c. Turntable bearing binding due
to continuous limited swing. (Example: concrete pourer.)
c. Rotate machine 360 degrees in
both directions several times and
lubricate turntable bearing.
d. Restricted hose or fitting.
d. Replace hose or fitting.
3-138
TM10-3950-672-24-1
SYMPTOM
PROBABLE CAUSE
2. Boom swing operation erratic
in one direction only. (continued)
e. Crossover relief valve malfunctioning.
e. Replace crossover relief valve.
f.
f. Replace pinion.
3. Boom will not swing in either
direction.
Damaged swing pinion.
SOLUTION
a. Damaged relief valve.
a. Remove. clean. and repair or
replace relief valve.
b. Damaged swing motor.
b. Repair or replace swing motor.
c. Swing brake not releasing properly.
c. Repair as necessary.
d. Completely inoperative crossover relief valve.
d. Replace crossover relief valve.
e. Internal damage to swing box.
e. Remove swing box and repair.
4. Swing operation slow in either
direction.
f. Worn or damaged hydraulic
pump section.
f. Replace pump section.
a. Damaged relief valve.
a. Adjust, repair or replace valve.
b. Improperly adjusted swing
brake.
b. Readjust.
c. Improperly adjusted crossover
relief valve.
c. Adjust valve. (Refer to VALVES
in Section 6.)
d. Improperly lubricated swingbearing.
d. Lubricate bearing per recommendations.
e. Improper size hose and/or fittings installed.
e. Replace with correct
hose/fitting.
f. Clogged or restricted hydraulic
hoses or fittings.
f. Clean or replace damaged
parts.
g. Worn or damaged output shaft
bearings.
g. Replace bearings.
h. Worn or damaged swing motor.
h. Repair or replace motor.
i. Worn or damaged hydraulic
pump section.
i. Repair or replace pump section.
3-139
TM 10-3950-672-24-1
SYMPTOM
5.
Swing operation slow in one
direction only.
PROBABLE CAUSE
SOLUTION
a. Crane not level.
(If equipped)
a.
b. Damaged relief valve.
b. Repair or replace relief valve.
c. Improperly adjusted crossover
relief valve.
c. Adjust valve. (Refer to VALVES
in Section 6.)
d.
Clogged or restricted hose.
d.
e. Improperly torqued turntable
bearing.
6.
Boom swings slowly.
a.
Level crane using outriggers.
Insufficient hydraulic volume.
Replace hose or fitting.
e. Torque turntable bearing.
a. Check delivery of hydraulic
pump. Ensure sufficient fluid is
available to pump. Check pump
drive speed.
b. Damaged relief valve.
b. Adjust, repair or replace valve.
c. Damaged swing motor.
c. Repair or replace motor.
7.
Swing motor continues to operate when swing control is in neutral position.
a. Control valve spool sticking or
valve otherwise damaged.
a. Repair or replace valve.
8.
Swing motor turning in wrong
direction.
a.
Improper port connections.
a.
a.
Air in system.
a. Refer to Section 6 - HYDRAULICS for removal of air from the
system.
b.
Motor binding.
b.
9.
Swing motor noisy.
3-140
Reverse port connections.
Repair or replace motor.
TM 10-3950-672-24-1
3-57 SWING MOTOR
Description
characteristics. It has only three moving parts; the
commutator valve, the drive, and the gerotor star. The
motor has two ports for connection to the hydraulic
system.
The swing motor is mounted on the
brake housing and drives the gear reducer through the
brake assembly.
The swing motor is a hydraulic
gerotor-type with low speed and high torque
MAINTENANCE
NOTE
For more detailed information, refer to Appendix E.
REMOVAL
NOTE
NOTE
Indents in the swing motor housing
are for clearance and for accessibility
to the turntable bolts with the swing
motor installed. Before removing the
swing motor, note the orientation of
the housing indents and ensure that
the motor is installed in the same
manner.
Apply Never Seez compound to
splines and pilot areas prior to
assembly.
1. Apply RTV silicone to the surface of the brake.
Position the swing motor on the brake, engaging the
shaft with the brake input shaft.
2. Install the cross over relief valve to the motor and
secure with the capscrews and washers.
1. Clean the port area around the motor. Tag and
disconnect the hydraulic lines from the motor assembly.
Cap or plug all openings.
2. Remove the capscrews and washers securing the
cross over relief valve to the motor and remove the
relief valve.
3. Apply thread sealant to the capscrews. Install the
capscrews and secure the motor to the brake housing.
Torque the capscrews to 109 lb ft (148 Nom).
4. After motor has been installed, remove four of the
3/8-inch bolts from the motor end of the brake
assembly. Clamp the stops firmly against the motor
flanges and torque the bolts to 35 lb ft (47 Nom).
5. Connect the hydraulic lines to the swing motor as
tagged during removal.
CAUTION
Pull straight up on the motor
assembly to avoid damaging the
splined shaft.
3. Remove the capscrews and washers securing the
motor to the gear reducer and lift the swing motor free.
TEST
1. Test the swing of the superstructure in each
direction. Stop and start swing several times.
2. Inspect for hydraulic leaks and repair as necessary.
INSTALLATION
CAUTION
Use care when engaging the swing
motor drive gear, do not force the
shaft to engage.
3-141
TM 10-3950-672-24-1
DESCRIPTION
motor drives the gear reducer through the brake
assembly. The gear reducer has a ratio of 27.98:1 and
has an air vent to allow air to escape when the reducer
is being filled with oil.
The planetary gear reducer is bolted to the turntable
frame. The gear reducer pinion meshes with the
turntable bearing to rotate the turntable. The gear
reducer has an integral brake mounted to it, and the
swing motor is mounted on the brake. The crossover
relief valve is mounted on the swing motor. The swing
MAINTENANCE
2. Carefully raise the gear reduction assembly into
place. While holding in place with the lifting device,
apply Loctite 271 to the threads of the mounting bolts,
1. Extend and set the outriggers.
and install the bolts and washers securing the gear
2. Tag, disconnect, and cap all hydraulic lines from the
reduction assembly to the frame weld. Torque the bolts
swing motor and reducer.
to 99 lb ft (134 Nom).
3. Remove the nuts, spring washers, and flatwashers
3. Remove the lifting device and eye bolt. Apply neversecuring the pinion guard and remove the guard.
seeze compound to the splines of the pinion shaft.
4. Remove the slotted flat screws securing the pinion
Install the pinion and pinion end cap. Apply Loctite 271
end cap and remove the end cap and pinion.
to the screws. Install the slotted flat screws and secure
5. The gear reducer must be supported before the
the end cap.
mounting bolts are removed. It can be supported from
4. Install the pinion guard and secure with the nuts,
the top by installing an eye bolt in the hole where the
spring washers, and flat washers.
pinion cap is normally installed. Use an adequate lifting
5. Connect the hydraulic lines to the swing motor and
device to lower the gear reducer to the ground after the
gear reducer as tagged during removal.
mounting bolts and washers have been removed. The
6. Service the assembly as indicated in Section 13 gear reducer can be supported from the underside using
LUBRICATION.
an automatic transmission jack (or equivalent). Lower
the gear reducer after removing the bolts and washers,
TEST.
and move to a clean work area.
REMOVAL.
INSTALLATION.
1. Test the swing of the superstructure in each
direction. Start and stop swing several times.
2. Inspect for hydraulic leaks and repair as necessary.
1. Install an eye bolt in the hole where the pinion cap is
normally installed, and attach an adequate lifting device.
3-142
TM 10-3950-672-24-1
3-59 SWING BEARING
DESCRIPTION
The swing bearing mates the superstructure to the
carrier.
The bearing outer race is bolted to the
superstructure and the inner race is bolted to the carrier.
The inner race contains one grease fitting for lubrication
of the bearing. The outer race incorporates 94 gear
teeth that mesh with the pinion gear of the gear reducer
to provide rotation.
MAINTENANCE
GENERAL
Proper identification of bolt grade is important. When
marked as a high strength bolt (grade 8), the
serviceman must be aware of bolt classifications and
that he is installing a high strength heat-treated
tempered component and the bolt must be installed
according to specifications. Special attention should be
given to the existence of lubricant and plating that will
cause variation from dry torque values. When a high
strength bolt is removed, or untorqued, the bolt must be
replaced with a new bolt of the same classification,
along with a new grade 8 nut.
The swing bearing is the most critical maintenance point
of the crane. It is here, at the centerline of rotation, that
stresses of loads are concentrated. In addition, the
bearing provides the only attachment between the
superstructure and carrier. Therefore, proper care of the
bearing and periodic maintenance of the turntable-tobearing attach bolts IS A MUST -to ensure safe and
efficient operation.
TORQUING TURNTABLE BOLTS.
WARNING
General.
IT IS MANDATORY THAT BEARING
ATTACHING BOLTS BE INSPECTED
FOR
LACK
OFTORQUE
AND
RETORQUED AS REQUIRED, AFTER
THE FIRST 300 HOURS OF CRANE
OPERATION. THE BOLTS MAY
LOOSEN IN SERVICE DUE TO
VIBRATION, SHOCK-LOADS, AND
TEMPERATURE
CHANGES.
THEREFORE,
PERIODIC
INSPECTION
SHOULD
BE
ACCOMPLISHED EVERY 500 HOURS
THEREAFTER,
ENSURING
THE
BOLTS ARE PROPERLY TORQUED.
WARNING
FAILURE TO MAINTAIN PROPER
TORQUE OF THE TURNTABLE
BEARING ATTACHING BOLTS WILL
RESULT IN DAMAGE TO THE CRANE
AND
POSSIBLE
INJURY
TO
PERSONNEL.
Maintaining proper torque values for bolts is extremely
important for structural strength, performance, and
reliability of the crane. Variations in torque can cause
distortion, binding, or complete separation of the
superstructure from the carrier.
KNOW YOUR TORQUE WRENCH! Flexible beam type
wrenches, even though they might have a preset
feature, must be pulled at right angles and the force
must be applied at the center of the handle. Force
value readings must be made while the tool is in motion.
Rigid handle type, with torque limiting devices that can
be preset to required values, eliminate dial readings and
provide more reliable, less variable readings.
CAUTION
REPEATED
RETORQUING
MAY
CAUSE BOLTS TO STRETCH. IF
BOLTS KEEP WORKING LOOSE,
THEY MUST BE REPLACED WITH
NEW BOLTS AND NUTS OF THE
PROPER GRADE AND SIZE.
3-143
TM10-3950-672-24-1
the bearing is secured to the superstructure by 20 0.75
inch hex socket head capscrews.
NOTE
If multipliers and/or special tools are
used to reach hard to get at areas,
ensure torque readings are accurate.
Torque Values.
Torque the outer race hex socket head capscrews to
395 lb ft (536 N•m).
Torque wrenches are precision instruments and must be
handled with care. To ensure accuracy, calibrations
must be made on a scheduled basis. Whenever there is
a possibility that a torque wrench may have been
overstressed or damaged, it should immediately be
removed from service until recalibrated. When using a
torque wrench, any erratic or jerking motion can result in
the application of excessive or improper torque.
ALWAYS use a slow, even movement and STOP when
the predetermined value has been reached.
Torque the inner race bolts to 370 lb ft (502 N•m).
Using the 4 to 1 multiplier and no step wrench, set the
torque wrench for 106 lb ft (144 N•m).
Using the 4 to I multiplier and six Inch step wrench, set
the torque wrench for 78 lb ft (106 N•m).
Tools Required.
If it is reported by the crane operator or suspected that
the crane has been overloaded beyond the capacities
specified above the bold line on the crane's capacity
chart, then all turntable bolts must be inspected for
looseness and retorqued to specifications.
The figure titled Special Turntable Bolt Torquing Tools
illustrates and lists the complete set of special tools
required to torque the turntable bolts.
Outer Race Torquing.
Turntable bolts should be torqued diametrically
opposed, working in sequence from one side of the
circle to the opposite side rather than tightening
adjacent bolts successively. Torque first to 50% then to
the final torque value.
1. Extend and set the outriggers, if equipped. Fully
elevate the boom.
2. Torque the corner bolts 3, 8, 13, and 18 using the
hex nut adapter and step wrench.
3. Torque all other bolts in a diametrically opposed
sequence using the hex nut adapter, 4 to 1 multiplier,
and step wrench.
4. First torque all bolts to 185 lb ft (251 N•m) and then
to a final torque of 370 lb ft (502 N•m).
When using step wrenches, calculated wrench settings
are valid only when the following conditions are met.
1. Torque wrenches must be those specified and forces
must be applied at the handle grip. The use of handle
extensions will change applied torque to the bolt.
2. All handles must be parallel to the step wrench
during final tightening. Multiplier reaction bars may be
misaligned no more than 30 degrees without causing
serious error in torque.
3. Multiplier reaction bar handles must be propped or
supported within the outer 1/4 of the handle length, or
serious under or over tightening will occur.
Inner Race Torquing.
1. Extend and set the outriggers.
2. An access hole is available on the turntable top plate
for inner race bolt torquing. First torque all bolts to 185
lb ft (251 N•m) and then to a final torque of 370 lb ft
(502 N•m).
3. Torque the bolts in a clockwise motion using a
socket, extension, 4 to 1 multiplier, and torque wrench.
4. Swing the turntable until the next series of bolts are
exposed within the access area.
The inner race of the bearing is secured to the carrier
frame by 23 0.75 inch grade 8 bolts. The outer race of
3-144
TM 10-3950-672-24-1
WILLIAMS
TOOL NO.
DESCRIPTION
1.
2.
3.
4.
5.
6.
7.
*8.
9.
Backlash Adapter
3/4" Drive Torque Wrench
4 to 1 Multiplier (1/2" Input 3/4" Output)
1 1/8" Socket 3/4" Drive
6" x 1 1/8" 12 Pt. Box 3/4" Drive Step Wrench
10" Extension 3/4" Drive
13" Extension 3/4" Drive
Tool Box
1 1/8”x 5/8" Hex Nut Adapter
ST-50ABR
HTW-4RCF
TM75OLW
6-636
M-10811
6-110
6-113
TB-11
GROVE
PART NO.
9-999-100141
9-999-100159
9-999-100134
9-999-100142
9-999-100122
9-999-100138
9-999-100137
9-999-100146
9-999-100844
* Optional
Special Turntable Bolt Torquing Tools
Orders for special tools shall be referred to:
Grove Manufacturing Company
Customer Services
1086 Wayne Ave.
Chambersburg, Pa. 17201
3-145
QUANTITY
REQUIRED
1
1
1
1
1
1
2
1
1
TM 10-3950-672-24-1
Inner and Outer Race Bolt Pattern
3-146
TM 10-3950-672-24-1
REMOVAL.
WARNING
ENSURE THE SUPERSTRUCTURE IS
FULLY
SUPPORTED
BEFORE
PROCEEDING.
1. Fully extend and set the outriggers.
2. Ensure the boom is in the travel position.
3. Elevate the boom slightly and shut down the engine.
4. Remove the boom and lift cylinder following the
procedures outlined in Section 8, BOOM.
5. Tag and disconnect the battery cables from the
battery.
6. Remove the swivel following the procedure outlined
in Section 9, SWIVELS.
7. If necessary, disconnect the electrical connectors
from the terminal block.
8. Remove the nuts, spring washers, and flatwashers
securing the pinion guard and remove the guard.
Remove the slotted flat screws securing the pinion end
cap and remove the end cap and pinion.
NOTE
If the same bearing is to be used
again, mark the pinion and bearing
where the teeth mesh (point of
maximum eccentricity).
This will
facilitate installation and checking
the gear backlash.
11. Remove the bolts and washers attaching the
turntable bearing to the superstructure.
WARNING
WARNING
ENSURETHATANY
BLOCKING
MATERIAL USED IS CAPABLE OF
FULLY SUPPORTING THE WEIGHT
OFTHE SUPERSTRUCTURE AND
WILL NOT ALLOW IT TO TILT OR
SHIFT.
ENSURE THE LIFTING DEVICE IS
CAPABLE OF FULLY SUPPORTING
THE
WEIGHT
OF
THE
SUPERSTRUCTURE.ENSURETHE
SUPERSTRUCTURE WILL NOT TILT
OR SLIDE DURING LIFTING AND
MOVING.
12. Carefully lift the superstructure, guiding it over the
swivel, and set it on blocking that will not allow the
superstructure to tilt or shift. Leave the lifting device
attached.
CAUTION
USE SPARE PIVOT SHAFTS OR
OTHER MATERIAL CAPABLE OF
SUPPORTING THE WEIGHT OF THE
SUPERSTRUCTURE.
DO NOT
DAMAGE
THE
PIVOT
SHAFT
BUSHINGS.
NOTE
If the same bearing is to be used
again, mark the position of the
bearing on the carrier so it can be
installed in the exact position it was
before removal.
NOTE
If a lifting device capable of lifting
the entire superstructure is not
available, superstructure weight may
be reduced by removing the hoist.
13. Remove the bolts and washers attaching the
turntable bearing to the carrier.
NOTE
9. Install spare pivot shafts or other suitable material
through the lower lift cylinder pivot bushings and through
the boom pivot bushings.
10. Attach a suitable lifting device to the spare pivot
shafts and take in cable or chain to remove slack. Do
not pull up on the superstructure.
Depending upon the manufacturer,
the bearing weighs between 134 and
139 pounds (60.7 and 63.0 kg).
Ensure the bearing lifting device is
capable of supporting the weight.
3-147
TM 10-3950-672-24-1
proper
backlash,
contact
representative
or
Grove
Chambersburg, Pennsylvania.
14. Using the lifting device, remove the turntable
bearing from the carrier.
your
local
service
Customer
Services,
INSPECTION.
Check the bearing teeth for chipping or cracking. If any
evidence of these is found, replace the bearing. Ensure
the bolt holes are free of dirt, oil, or foreign material.
INSTALLATION.
CAUTION
ANYTIME A GRADE 8 TURNTABLE
BOLT HAS BEEN REMOVED, IT
MUST BE REPLACED WITH A NEW
GRADE 8 BOLT.
NOTE
Installation is in the travel position.
Backlash Adjusting Shim
6. Install the swivel following the procedure outlined in
Section 9, SWIVELS.
7. If disconnected, connect the electrical connectors to
the terminal block.
8. Install the pinion and cap and secure with the slotted
flat screws. Install the pinion cover and secure with the
nuts, spring washers, and flatwashers.
9. Install the boom and lift cylinders following the
procedures outlined in Section 8, BOOM.
10. Connect battery cables to the battery.
1. Using an appropriate lifting device, set the turntable
bearing in position on the carrier. If the same bearing is
being used, position it as marked prior to removal.
2. Install new bolts, nuts, and washers securing the
bearing to the carrier. Refer to Inner Race Torquing in
this subsection.
NOTE
Installation is in the travel position.
3. Using an appropriate lifting device, align the
superstructure over the bearing on the carrier. Lower
the superstructure into position on the bearing.
4. Install the bolts and washers. Refer to Outer Race
Torquing in this subsection.
NOTE
TESTING.
Activate the crane and check for proper function.
NOTE
If the superstructure does not turn
freely after bearing and pinion
replacement, contact your local
service representative or Grove
Customer Services, Chambersburg,
Pennsylvania.
If a new bearing is being installed, a
new pinion gear must also be used.
5. Install the gearbox pinion aligning the high point
(maximum eccentricity) on the turntable bearing. Using
a 0.005 inch (0.127 mm) thick shim, check the backlash
(see figure). If the pinion must be moved to achieve
3-148
TM 10-3950-672-24-1
Section 8. Boom
Subject
Para.
Boom .................................................................................................................... 3-60
Removal ........................................................................................................... 3-60.1
Installation ........................................................................................................ 3-60.2
Disassembly ..................................................................................................... 3-60.3
Assembly .......................................................................................................... 3-60.4
Functional Check .............................................................................................. 3-60.5
Alignment and Inspection .................................................................................. 3-60.6
Telescope Circuit .................................................................................................. 3-61
Troubleshooting
Removal and Installation
Disassembly and Assembly
Lift Circuit .............................................................................................................. 3-62
Description
Troubleshooting
Removal
Disassembly and Assembly
Installation
Hook Block ............................................................................................................ 3-63
Description
Disassembly
Inspection
Assembly
Periodic Maintenance
Wire Rope ............................................................................................................. 3-64
General
Environmental Conditions
Dynamic Shock Loads
Lubrication
Precautions and Recommendations During Inspection or Replacement
Wire Rope Inspection (Running Ropes and Pendant Cables)
Wire Rope Replacement (All Wire Rope)
Boom Nose Sheave Assembly .............................................................................. 3-65
Removal ........................................................................................................... 3-65.1
Installation ........................................................................................................ 3-65.2
Antitwo-Block System Switch ................................................................................ 3-66
Removal ........................................................................................................... 3-66.1
Installation ........................................................................................................ 3-66.2
Antitwo-Block System Cable Reel ......................................................................... 3-67
Removal ........................................................................................................... 3-67.1
Installation ........................................................................................................ 3-67.2
Antitwo-Block System Console .............................................................................. 3-68
Removal ........................................................................................................... 3-68.1
Installation ........................................................................................................ 3-68.2
3-149
Page
3-150
3-150
3-151
3-152
3-152
3-154
3-154
3-155
3-158
3-162
3-164
3-168
3-168
3-168
3-170
3-170
3-170
3-172
3-172
3-172
3-174
3-174
3-174
TM 10-3950-672-24-1
3-60 BOOM
The boom is a 14 to 24 ft (4.2 to 7.3 m) two-section full power boom and is trapezoidal in design. It consists of a
telescope cylinder, a base section, and a telescope. The telescope cylinder is used to extend and retract the telescope
section.
Boom assembly lift is provided by a 7 in. (1 7.8 cm) diameter bore lift cylinder. Boom elevation is from 0°to 70°
from horizontal.
3-60.1 Removal
a. Extend and set the outriggers and fully retract the boom.
b. Remove the hook block and wind all the wire rope onto the hoist drum.
c. Elevate the boom slightly to allow for withdraw of the lift cylinder rod end from the lift cylinder attach fitting.
WARNING
Ensure the blocking and lifting devices are capable of supporting the boom assembly.
d. Attach a suitable lifting device to the boom to provide equal weight distribution. Place a safety block in
position under the boom and rest the boom on the safety block.
e. Disconnect electrical wiring from the boom.
f. Tag and disconnect the hydraulic lines to the telescope cylinder. Cap the lines and openings.
WARNING
Ensure the boom lift cylinder is properly supported before disconnecting it from the boom.
g. Block the lift cylinder.
h. Remove the bolts, washers, nuts, and plates securing the rod end pivot shaft to the lift cylinder attach
fitting.
i. Remove the rod end pivot shaft.
j. Activate the hydraulic system and withdraw the lift cylinder rod enough to clear the attach fitting.
WARNING
Shut down the crane before proceeding.
3-150
TM 10-3950-672-24-1
k. Take up the clack on the boom lifting device.
I. Remove the retainer plates, bolts, and washers securing the boom pivot shaft to the boom and turntable
assemblies. Remove the boom pivot shaft.
m. Raise the boom clear of the crane and lower it to ground level for service.
3-60.2 Installation
WARNING
Ensure blocking and lifting devices are capable of supporting the boom assembly.
a. Attach the boom lifting device to provide equal weight distribution.
b. Suspend the boom over the crane.
c. Lower the boom into position and align the boom pivot shaft mounting holes for installation of the pivot
shaft.
d. Lubricate and install the boom pivot shaft. Shim as necessary and secure it with the washers, bolts, and
retainer plates. Torque the capscrews to 75 lb ft (102 N•m).
CAUTION
Extend the cylinder rod ends only enough to align them with the holes in the lift cylinder attach
fitting.
CAUTION
Before installing the lift cylinder rod end pivot shaft, ensure the lift cylinder rod ends are aligned
with the lift cylinder attach fitting.
e. Lubricate and install the rod end pivot shaft.
f. Install the plates, washers, nuts, and bolts securing the rod end pivot shaft to the lift cylinder attach fittings.
Torque the bolts to 75 lb ft (102 N•m).
g. Connect the hydraulic lines to the telescope cylinder as tagged prior to removal.
h. Connect the electrical wires to the boom as tagged prior to removal.
i. Remove the lifting device from the boom.
j. Activate the hydraulic system and raise the boom slightly to remove the boom and lift cylinder support
blocking.
k. Check for proper operation of the boom.
3-151
TM 10-3950-672-24-1
3-60.3 Disassembly
NOTE
The boom may be disassembled with the base section remaining on the crane if repair of the
base section is not required. If the base section is not being removed from the crane for
disassembly, start with step b.
a. Remove the boom in accordance with removal procedures (paragraph 3-60.1).
b. Place the boom in a horizontal position.
c. Remove the bolts, washers, and plates securing the pins which connect the telescope cylinder to the base
section. Remove the pins.
d. Back off the setscrews of the base section adjustable wear pads to provide additional clearance.
e. Remove the upper front base section plate.
f. Remove the capscrews, washers, and plates securing the lower base section wear pads. Remove the
wear pads.
g. Remove the upper rear wear pads.
h. Remove the telescope section from the base section and place in a horizontal position.
i. Remove the capscrews, washers, and stop blocks securing the telescope cylinder assembly to the fly
section. Remove the cylinder assembly.
j. If necessary, remove the wear pads from the cylinder.
3-60.4 Assembly
NOTE
The following thread locking adhesive/sealant procedure should be used for all bolts and
fasteners. Apply a light coat of Locquic Primer T to the threads and allow to dry. Apply several
stringer beads of Loctite 242 perpendicular to the threads and several beads parallel to the
threads. Allow to cure before installation.
a. If removed, install the wear pads to the cylinder.
b. Install the telescope cylinder into the telescope section and secure with the stop blocks, washers, and
capscrews. Torque the capscrews to 203 lb ft (275 N•m).
3-152
TM 10-3950-672-24-1
Two-Section Boom
3-153
TM 10-3950-672-24-1
c. Install the telescope section into the base section.
d. Install the lower base section wear pads and secure with the plates, washers, and capscrews. Torque the
capscrews to 1 5 lb ft (20 N•m).
e. Install the upper front base section plate and secure with the screws.
f. Install the screws in the base section adjustable wear pads.
g. Secure the telescope cylinder to the base section with the pins, plates, washers, and bolts. Torque the
bolts 10 to 1 2 lb ft (14 to 16 N•m).
h. Refer to paragraph 3-60.2 for installation procedures.
3-60.5 Functional Check
a. Activate the hydraulic system.
b. Elevate the boom and hold it in the extended position. The boom should stay in position until retracted by
the operator.
c. Extend and retract the boom several times at various elevations. Check for smooth operation of the
telescope cylinder.
d. Check operation of all electrical/electronic components affected by boom removal.
3-60.6 Alignment and Inspection
Visually inspect the telescoping sections for adequate lubrication of bottom plates. Observe extended sections
for evidence of cracks, warping, or other damage. Periodically check security of boom wear pads. Check boom nose
sheaves for security and freedom of movement.
3-154
TM 10-3950-672-24-1
3-61 TELESCOPE CIRCUIT
The boom telescope circuit consists of the telescope cylinder, telescope control valve, telescope relief valve,
holding valve, boom assembly, swivel, and lockout solenoid valve. The holding valve is located on and threaded into the
cylinder. The telescope control valve is located in the valve compartment behind the front console in the cab.
Movement of the telescope control valve lever forward (OUT) or rearward (IN) from center (neutral) shifts a spool
within the telescope control valve which aligns appropriate passages in the control valve to route oil to the holding valve.
The holding valve, with its internal makeup of valves and springs, passes oil to and from the telescope cylinder.
The telescope control valve is the closed spool-type and is described under VALVES in Section 6.
The boom telescope cylinder has a 4.5 in. (1 1.4 cm) bore. The cylinder is internally ported (rod ported). Oil
from the telescope control valve is routed to the cylinder by external lines. Foreign material is prevented from entering
the cylinder by a wiper seal during rod retraction. O-ring seals prevent internal and external leakage. The cylinder rod is
secured to the boom base and the cylinder barrel is attached to the fly section.
The holding valve is threaded into the rod end of the telescope cylinder. The holding valve functions during the
retraction, extension, or holding operation. During extension, oil unseats the poppet (check) valve in the holding valve
when pressure is 6 ± 4 psi (41.37 ± 27.58 kPa/0.414 ± 0.276 bar). This oil is routed to the piston side of the cylinder
which forces the rod out of the cylinder, causing the boom section to extend.
During retraction, oil enters the retract port and flows to the rod side of the cylinder. when pilot pressure reaches
a pre-determined value, the main poppet unseats, and oil flows from the piston side of the cylinder to the reservoir,
causing the boom section to retract.
When holding the boom section at a given length, oil is trapped in the cylinder by the holding valve. Refer to
Appendix E for a complete description of the holding valve operation.
MAINTENANCE
TROUBLESHOOTING.
SYMPTOM
1. Erratic operation of extending
telescoping cylinder.
PROBABLE CAUSE
SOLUTION
a
Low hydraulic oil level.
a. Replenish hydraulic oil to
proper level.
b.
Damaged relief valve
b. Repair or replace relief valve.
c. Air in telescope cylinder.
c. Bleed by lowering telescope cylinder below horizontal.
d. Low engine rpm.
d. Increase engine rpm to recommended setting.
e. Lack of lubrication on boom
sections.
e. Properly lubricate all boom sections.
f. Extremely tight boom nose
sheaves.
f. Inspect and properly lubricate
boom nose sheaves.
3-155
TM10-3950-672-24-1
SYMPTOM
1. Erratic operation of extending
telescoping cylinder.
(continued)
2. Erratic operation of retracting
telescoping cylinder.
PROBABLE CAUSE
SOLUTION
g. Improper boom alignment
caused from side loading.
g. Reduce and properly hoist load.
h. Worn boom wear pads.
h. Replace wear pads and properly lubricate.
i. Distorted boom section.
i. Replace distorted section.
j.
j. Repair or replace cylinder.
Damaged telescope cylinder.
k. Clogged, broken, or loose
hydraulic lines or fittings.
k. Clean, tighten, or replace lines
or fittings.
I. Damaged control valve.
I. Repair or replace control valve.
a. Low hydraulic oil level.
a. Replenish hydraulic oil to
proper level.
b. Damaged relief valve.
b. Repair or replace relief valve.
c. Air in cylinder.
c. Bleed by lowering telescoping
cylinders below horizontal and cycle telescope cylinder,
d. Low engine rpm.
d. Increase engine rpm to recommended setting.
e. Lack of lubrication.
e. Properly lubricate all boom sections.
f.
f. Repair or replace check valve.
Check valve malfunctioning.,
g. Improper boom alignment
caused from side loading.
g. Reduce and properly hoist load.
h. Extremely tight boom nose
sheaves.
h. Inspect and properly lubricate.
i. Distorted boom section.
i. Replace distorted section.
j. Worn boom wear pads.
j. Replace wear pads and properly
lubricate.
k. Bent cylinder rod.
k. Replace cylinder rod and all cylinder seals.
I. Scored cylinder barrel.
I. Repair or replace cylinder
barrel.
m. Damaged piston seals.
m. Replace all cylinder seals.
n. Loose or damaged piston.
n. Replace all seals and retorque
or replace piston.
3-156
TM 10-3950-672-24-1
SYMPTOM
3. Telescope cylinder will not
extend.
4. Telescope cylinder will not
retract.
PROBABLE CAUSE
SOLUTION
a. Low hydraulic oil level.
a. Replenish oil to proper level.
b. Relief valve malfunctioning.
b. Repair or replace relief valve.
c. Excessive load.
c. Reduce load.
d. Clogged hose and fittings.
d. Replace hose or fittings. (Refer
to manufacturer's specifications).
e. Broken valve linkage.
e. Repair or replace linkage.
f.
f. Replace valve.
Broken valve spool.
g. Damaged piston seals.
g. Replace all cylinder seals.
h. Damaged piston.
h. Replace piston and all cylinder
seals.
i. Bent boom section.
i. Replace damaged boom section.
j. Broken hydraulic pump coupling.
j. Replace broken hydraulic pump
coupling.
k. Worn or damaged hydraulic
pump section.
k. Repair or replace pump section.
a. Low hydraulic oil level.
a. Replenish oil to proper level.
b. Relief valve damaged.
b. Repair or replace relief valve.
c. Excessive load.
c. Reduce load. (Refer to load
chart).
d. Inoperative check valve.
d. Replace check valve.
e. Clogged hose and fittings.
e. Replace hose or fittings. (Refer
to manufacturer's specifications).
f.
f. Replace or repair linkage.
Broken valve linkage.
g. Broken valve spool.
g. Replace valve section.
h. Broken piston.
h. Replace piston and all cylinder
seals.
i.
Damaged piston seals.
i. Replace all cylinder seals.
j.
Bent boom section.
j. Replace damaged boom section.
k. Broken hydraulic pump coupling.
k. Replace broken hydraulic
pump coupling.
I. Worn or damaged hydraulic
pump.
I. Repair or replace pump.
m. Broken hydraulic pump shaft.
m. Replace pump shaft.
3-157
TM 10-3950-672-24-1
REMOVAL AND INSTALLATION.
DISASSEMBLY AND ASSEMBLY.
Removal and installation of the telescope cylinder from
the boom is described under disassembly and assembly
of the boom. Refer to BOOM MAINTENANCE in this
Section.
Disassembly and assembly procedures of the telescope
cylinder and control valve are provided in Section 6
under CYLINDERS and VALVES respectively.
3-62 LIFT CIRCUIT
DESCRIPTION
When booming up, oil unseats the poppet (check) valve
in the holding valve, letting oil flow to the piston side of
the cylinder. Pressure is applied to the piston, forcing
the rod to extend, raising the boom.
The boom lift circuit consists of the lift cylinder, holding
valve, lift control valve, thermal relief valve, swivel, and
lockout solenoid valve if the hydraulic lockout option is
provided. The holding valve is located in the port block
which is welded to the outside of the cylinder barrel.
The lift control valve is located in the valve
compartment behind the front console in the cab.
When booming down, oil enters the retract port of the
port block and flows to the cylinder rod side. When pilot
pressure reaches a pre-determined value, the main
poppet unseats and oil flows from the piston side of the
cylinder to the reservoir.
Movement of the control lever forward (DOWN) or
rearward (UP) from center (neutral) shifts a spool within
the lift control valve. Appropriate passages in the
control valve route oil to the holding valve. The holding
valve passes oil to and from the cylinder as required.
When holding the boom, oil is trapped in the cylinders
by the holding valve. Refer to the applicable SM
package for a complete description of holding valve
operation.
Boom elevation is 0 degrees to 70 degrees from
horizontal. The lift control valve is the closed spool
type, and is described under VALVES in Section 6.
The lift cylinder is the double acting type with a cylinder
bore of 7 inches (17.8 cm). For a detailed description of
the lift cylinder, refer to Lift Cylinder in Section 6
HYDRAULIC SYSTEM.
The holding valve is threaded into the cylinder port
block. The holding valve functions when booming up
(cylinder rod extended), booming down (cylinder rod
retracted), or holding (cylinder rod stationary).
MAINTENANCE
TROUBLESHOOTING.
SYMPTOM
1
Boom raises erratically.
PROBABLE CAUSE
SOLUTION
a. Low hydraulic oil.
a. Replenish hydraulic oil to proper level.
b. Low engine rpm.
b. Increase engine rpm to recommended setting.
c. Main relief valve damaged.
c. Replace relief valve.
d. Air in cylinder rods.
d Bleed cylinder rods.
e. Bent boom pivot shaft.
e. Replace pivot shaft.
3-158
TM 10-3950-672-24-1
SYMPTOM
2.
3.
4.
Boom lowers erratically.
Boom raise: slowly.
Boom lowers slowly.
PROBABLE CAUSE
SOLUTION
a. Low hydraulic oil.
a. Replenish hydraulic oil to proper oil level.
b. Low engine rpm.
b. Increase engine rpm to recommended level.
c. Circuit and/or relief valve inoperative.
c. Repair or replace relief valve.
d. Air in hydraulic cylinders.
d. Bleed air from cylinders.
e. Control valve linkage out of adjustment.
e. Adjust linkage to obtain full
spool travel.
f. Damaged hydraulic pump section.
f. Repair or replace pump section.
a. Low hydraulic oil level.
a. Replenish hydraulic oil to proper level.
b. Low engine rpm.
b. Increase and maintain engine
rpm.
c. Damaged relief valve.
c. Repair or replace relief valve.
d. Extremely cold hydraulic oil.
d. Operate unit to bring oil to operating temperature.
e. Improper hose or fitings, installed.
e. Replace hose or fittings. (Refer
to Parts Manual).
f. Control valve linkage out of adjustment.
f. Adjust linkage to obtain full
spool travel.
g. Operating two functions within
the same control valve bank assembly.
g. Feather controls to obtain desired speed of both functions.
h. Restriction in return hose.
h. Replace return hose.
i. Cylinder piston seals leaking.
i. Replace all cylinder seals.
j. Scored cylinder barrels.
j. Hone or replace barrel.
k. Worn hydraulic pump section.
k. Repair or replace pump section.
a. Low hydraulic oil level.
a. Replenish hydraulic oil to proper level.
b. Low engine rpm.
b. Increase rpm to recommended
level.
3-159
TM 10-3950-672-24-1
SYMPTOM
4. Boom lowers slowly.
(continued)
5. Boom will not raise.
per level.
6.
Boom will not lower.
PROBABLE CAUSE
SOLUTION
c. Damaged relief valve.
c. Repair or replace relief valve.
d. Operating two functions within
the same control valve bank assembly.
d. Feather controls to obtain desired speed of both functions.
e. Extremely cold hydraulic oil.
e. Operate unit to bring oil to operating temperature.
f. Improper hose or fittings installed.
f. Replace hose or fittings. (Refer
to Parts Manual).
g. Control valve linkage out of
adjustment.
g. Adjust linkage to obtain full
spool travel.
h. Restriction in return hose.
h. Replace return hose.
i. Cylinder piston seals worn.
i. Replace all cylinder seals.
j.
j. Hone or replace barrel.
Scored cylinder barrels.
k. Worn hydraulic pump section.
k. Repair or replace pump section.
I. Piston rod broken (loose from
piston).
I. Replace piston rod and all cylinder seals.
a. Low hydraulic oil.
a. Replenish hydraulic oil to pro-
b. Main relief valve or circuit
relief valve damaged.
b. Repair or replace relief valve.
c. Excessive load.
c. Reduce load as required.
d. Improperly adjusted control
valve linkage.
d. Adjust linkage to obtain full
spool travel.
e. Worn or damaged hydraulic
pump section.
e. Repair or replace pump section.
f.
f. Replace pump shaft and seals.
Broken pump shaft.
g. Broken pump drive coupling.
g. Replace drive coupling.
h. Broken control valve spool.
h. Replace control.
a. Low hydraulic oil.
a. Replenish hydraulic oil to proper level.
b. Main relief valve or circuit
relief valve damaged.
b. Repair or replace relief valve.
3-160
TM 10-3950-672-24-1
SYMPTOM
6. Boom will not lower.
(continued)
PROBABLE CAUSE
SOLUTION
c. Improperly adjusted control
valve linkage.
c. Adjust linkage to obtain full
spool travel.
d. Worn or damaged hydraulic
pump section.
d. Repair or replace pump section.
e. Broken pump shaft.
e. Replace pump shaft and seals.
f.
f. Replace drive coupling.
Broken pump drive coupling.
g. Broken control valve spool
NOTE
Refer to Section 6 for lift cylinder
Disassembly
and
Assembly
procedures.
Maintenance
not
requiring removal of the cylinder
barrels, such as packing, may be
performed without removing the
cylinders
from
the
turntable.
However,
all
disassembly
and
assembly should be conducted in a
clean dust-free area.
g. Replace control valve.
5. Remove the nuts, washers, bolts and plates securing
the lift cylinder shaft.
6. Block the cylinder in place and pry out the pivot
shaft.
7. Retract the cylinder rod.
8. Tag and disconnect the hydraulic hoses from the lift
cylinder. Cap or plug all openings.
9. Remove the bolts, washers, and plates securing the
boom pivot shaft to the turntable.
10. Take up any slack in the lifting device. Tap out the
boom pivot shaft and remove the lift cylinder.
REMOVAL.
1. Extend and set the outriggers.
2. Elevate the boom so that the lift cylinder is extended
approximately one foot (0.3 m).
DISASSEMBLY AND ASSEMBLY.
Disassembly and assembly procedures of the lift
cylinder holding valve, and control valve are provided in
Section 6 under CYLINDERS and VALVES respectively.
WARNING
ENSURE
ANY
BLOCKING
OR
CRIBBING USED IS CAPABLE OF
SUPPORTING THE BOOM.
INSTALLATION.
1. Attach an adequate lifting device to the lift cylinder
and lower the cylinder into place on the turntable.
2. Install the boom pivot shaft and secure with the
plates, washer, and bolts. Torque the bolts to 75 lb ft
(102 N•m).
3. Align the lift cylinder rod end with the attach point on
the boom. Install the lift cylinder shaft through the
cylinder and boom attach points. Shut down the engine.
4. Secure the lift cylinder shaft with the plate, washers,
and bolts. Torque the bolts to 75 lb ft (102 N•m).
5. Connect the hydraulic lines to the lift cylinder as
tagged during removal.
6. Remove the lifting and supporting devices from the
boom and lift cylinder. Activate the hydraulic system
and check the lift cylinder for proper operation and any
leaks.
3. Ensure the boom is fully supported by placing
blocking or cribbing under the boom. Rest the boom on
the blocking or cribbing.
WARNING
ENSURE THE LIFTING/SUPPORTING
DEVICE
IS
CAPABLE
OF
SUPPORTING THE LIFT CYLINDER.
4. Attach an adequate lifting/supporting device to the lift
cylinder.
3-161
TM10-3950-672-24-1
3-63 HOOK BLOCK
Hook block for this crane is a 8.5 ton, one sheave assembly weighing 152 lb (68.9 kg). The hook block uses a one piece
pivot block and the hook is provided with a heavy duty safety latch. A grease fitting is provided to ensure lubrication of
all moving parts.
MAINTENANCE
DISASSEMBLY.
4. Install the hook in position in the hook block
weldment.
5. Install the washer and slotted nut on the hook.
1. Remove the cotter pin, slotted nut, washer, and
bearing from the block weldment.
2. Remove the hook from the block weldment.
3. Remove the bolt, washer, and bushing from the rivet
eye bolt in the sheave shaft.
4. Remove the eye bolt, sheave shaft, bushings, and
sheave(s) assembly from the hook block weld.
NOTE
Position the nut and cotter pin to
provide free rotation of hook with
minimum clearance.
6. Install the cotter pin in the nut.
INSPECTION.
PERIODIC MAINTENANCE.
1. Examine all components for cracks and damage.
2. Ensure the safety latch functions properly.
3. Check for spreading of the hook.
It is recommended that the hook block be inspected
every 50 hours. A complete disassembly inspection
should be conducted every quarter or 500 hours in the
area of the hook, hex nut, and threaded areas for
corrosion and proper fit. After assembly of the hook a
liberal coating of multipurpose grease should be applied
to the nut and threaded areas by brush or hand to
prevent corrosion.
Grease containing molybdenum
disulfide should not be used.
ASSEMBLY.
1. Install the sheave(s) assembly bushings, and sheave
shaft in the order and position removed.
2. Install the rivet eye bolt through the sheave shaft.
Secure with the bushing, washer, and bolt. Torque the
bolt to 250 lb ft (339 N•m).
3. Grease the bearing and install the bearing into the
block weldment.
For hook blocks and other load handling devices not
manufactured by Grove Manufacturing Company; follow
the
Manufacturer's
inspection
and
testing
recommendations to assure an adequate preventative
maintenance program is established.
3-162
TM 10-3950-672-24-1
8.5 Ton, Single Sheave Hook Block Assembly
3-163
TM 10-3950-672-24-1
recommended for preventing premature wear and to
insure long--term satisfactory performance.
3-64 WIRE ROPE
GENERAL.
DYNAMIC SHOCK LOADS.
The following information is a compendium of
information from various wire rope manufacturers and
includes inspection, replacement, and maintenance
guidelines for wire rope as established by ANSI/ASME
B30.5, federal regulations, and Grove. The inspection
interval shall be determined by a qualified person and
shall be based on such factors as expected rope life as
determined by experience on the particular installation
or similar installations, severity of environment,
percentage of capacity lifts, frequency rates of
operation, and exposure to shock loads. Periodic
Inspections need not be at equal calendar intervals and
should be performed at shorter time intervals as the wire
rope approaches the end of its useful life. A periodic
inspection shall be performed at least once a year. The
following provides inspection and maintenance
procedures for wire ropes used on Grove products, (e.g.
wire rope used as load lines [hoisting cables], boom
extension and retraction cables, pendant cables, tow
winch cables, and hook block 'tie down' cables).
Subjecting wire rope to abnormal loads beyond the
endurance limit will shorten the wire ropes, life
expectancy.
Examples of this type of loading are listed below.
1. High velocity movement e.g.; hoisting or swinging of
a load followed by abrupt stops.
2. Suspending loads while traveling over irregular
surfaces such as railroad tracks, potholes, and rough
terrain.
3. Moving a load that is beyond the rated capacity of
the lifting mechanism, i.e.; overloading.
LUBRICATION.
A wire rope cannot be lubricated sufficiently during
manufacture to last it's entire life. Therefore, new
lubricant must be added throughout the life of a rope to
replace factory lubricant which is used or lost. It is
important that lubricant applied as part of a maintenance
program shall be compatible with the original lubricant,
and to this end, the rope manufacturer should be
consulted. Lubricant applied shall be of the type which
does not hinder visual inspection. Those sections of
rope which are located over sheaves or otherwise
hidden during inspection and maintenance procedures
require special attention when lubricating rope. The
object of rope lubrication is to reduce internal friction
and to prevent corrosion.
ENVIRONMENTAL CONDITIONS.
The life expectancy of wire rope may vary due to the
degree of environmental hostility and other conditions to
which these mechanical devices are subjected.
Variation in temperature, continuous excessive moisture
levels, exposure to corrosive chemicals or vapors or
subjecting the wire rope to abrasive material may
shorten normal wire rope life.
Frequent/periodic
inspections and maintenance of your wire rope is
Wire Rope Lubrication
3-164
TM 10-3950-672-24-1
During fabrication, ropes receive lubrication; the kind
and amount depends on the rope's size, type, and
anticipated use. This in-process treatment will provide
the finished rope with ample protection for a reasonable
time if it is stored under proper conditions. But, when
the rope is put into service, the initial lubrication may be
less than needed for the full useful life of the rope.
Because of this possibility, periodic applications of a
suitable rope lubricant are necessary.
2. Always use safety glasses for eye protection.
3. Wear protective clothing, gloves, and safety shoes
as appropriate.
4. Use supports and clamps to prevent uncontrolled
movement of wire rope, parts, and equipment.
5. When replacing fixed length cable assemblies (e.g.
pendants) having permanently attached end fittings use
only pre-assembled lengths of wire rope as supplied
from Grove Product Support. Do not build lengths from
individual components.
6. Replace an entire wire rope assembly. Do not
attempt to rework damaged wire rope or wire rope ends.
7. Never electroplate wire rope assemblies.
8. Do not weld any wire rope assembly or component
unless welding is recommended by the wire rope
manufacturer. Welding spatter shall never be allowed
to come in contact with the wire rope or wire rope ends.
In addition, be sure that the wire rope is not an electrical
path during other welding operations.
9. Wire ropes are manufactured from special steels. If
heating a wire rope assembly is absolutely necessary for
removal, the entire wire rope assembly shall be
discarded.
10. On systems equipped with two or more wire rope
assemblies operating as a matched set, they shall be
replaced as an entire set.
11. Do not paint or coat wire ropes with any substance
except approved lubricants.
The following are important characteristics of a good
wire rope lubricant:
1. It should be tree from acids and alkalis.
2. It should have sufficient adhesive strength to remain
on the ropes.
3. It should be of a viscosity capable of penetrating the
interstices between wires and strands.
4. It should not be soluble in the medium surrounding it
under the actual operating conditions (i.e. water).
5. It should have a high film strength.
6. It should resist oxidation.
Before applying lubrication, accumulations of dirt or
other abrasive material should be removed from the
rope. Cleaning can be accomplished by using a stiff
wire brush and solvent, compressed air, or live steam.
Immediately after the wire rope is cleaned, it should be
lubricated.
Many techniques may be used; these
include bath, dripping, pouring, swabbing, painting or
pressure spray methods.
Whenever possible, the
lubricant should be applied at the top of a bend in the
rope, because at that point the strands are spread by
bending and are more easily penetrated. There should
be no load on the rope while it is being lubricated. It
should be noted, the service life of wire rope will be
directly proportional to the effectiveness of the method
used and amount of lubricant reaching the working parts
of the rope.
WIRE ROPE INSPECTION (RUNNING ROPES AND
PENDANT CABLES).
Wire rope should be inspected frequently/dally and
periodically/yearly in accordance with the following
information excerpted from a National Consensus
Standard as referenced by Federal Government
Agencies. Recommended inspection intervals may vary
from machine to machine and may vary based on
environmental conditions, frequency of lifts, and
exposure to shock loads. The inspection time intervals
may also be predetermined by state and local regulatory
agencies.
PRECAUTIONS AND RECOMMENDATIONS DURING
INSPECTION OR REPLACEMENT.
1. Always lock out equipment power when removing or
installing wire rope assemblies.
Any deterioration observed in the wire rope should be
noted in the equipment inspection log and an
3-165
TM 10-3950-672-24-1
surface of the wire rope need be inspected, and no
attempt should be made to open the rope. Periodic
inspection should include all items listed under frequent
inspection plus the following:
assessment concerning wire rope replacement should
be made by a qualified person.
Frequent Inspection.
A frequent daily visual inspection is recommended for
all running ropes in service. This inspection should be
made on all wire rope which can be expected to be in
use during the day's operation. This inspection should
be used to monitor progressive degradation and to
discover severe damages necessitating wire rope
replacement such as:
a. Inspect for reduction of rope diameter
below nominal diameter.
b. Inspect for severely corroded or broken
wires at end connections.
c. Inspect for severely corroded, cracked,
bent, worn, or improperly applied end connections.
d. Inspect wire rope in areas subjected to
rapid deterioration such as:
a. Distortion, Kinking, Crushing, Un-stranding, Bird
caging, Reduction of diameter, etc.
b. General corrosion
c. Broken or cut strands
d. Number, distribution and type of broken wires
e. Evidence of core failure
f. End fitting wear/abrasion
Periodic Inspection.
1. Sections in contact with saddles, equalizer
sheaves, or other sheaves where wire rope
travel is limited
2. Sections of wire rope at or near terminal ends
where corroded or broken wires may protrude.
e. Inspect boom nose sheaves, hook block sheaves,
boom extension/jib sheaves, auxiliary boom nose
sheaves, and hoist drums for wear. Damaged sheaves
or hoist drums can accelerate wear and cause rapid
deterioration of the wire rope.
Wire rope should be inspected periodically/annually or
at a shorter time interval if necessitated by
environmental or other adverse conditions, and shall
cover the entire length of the wire rope. Only the outer
3-166
TM 10-3950-672-24-1
WIRE ROPE REPLACEMENT (ALL WIRE ROPE).
c. Evidence of any heat damage from any cause.
d. Reductions from nominal diameter of more than
1/64 inch for diameters up to and
including 5/16 inch
1/32 inch for diameters 318 and 1/2 inch
inclusive
3/64 inch for diameters 9/16 to 3/4 inch
inclusive
1/16 inch for diameters 7/8 to 1 1/8 inches
inclusive
3/32 inch for diameters 1/14 to 1 1/2
inches inclusive
e. In standing ropes, more than two broken wires in
one lay in sections beyond end connections or more
than one broken wire at an end connection.
f. Grove recommends that for cable extended
booms, a single damaged wire rope assembly shall
require replacement of the entire set of extension
cables.
g. Grove recommends for cable extended booms,
that boom extension cables be replaced every seven (7)
years.
No precise rules can be given for determination of the
exact time for replacement of wire rope since many
variable factors are involved. Determination regarding
continued use or replacement of wire rope depends
largely upon the good judgment of an appointed and
qualified person who evaluates the remaining strength in
a used rope after allowance for any deterioration
disclosed by inspection.
Wire rope replacement should be determined by the
following information excerpted from a National
Consensus Standard as referenced by Federal
Government Agencies and as recommended by Grove.
All wire rope will eventually deteriorate to a point where
it is no longer usable. Wire rope shall be taken out of
service when any of the following conditions exist:
a. In running ropes, six randomly distributed
broken wires in one lay or three broken wires in one
strand in one lay.
b. Wear of one-third the original diameter of
outside individual wires. Kinking, crushing, bird caging,
or any other damage resulting in distortion of the rope
structure.
3-167
TM 10-3950-672-24-1
3-65 BOOM NOSE SHEAVE ASSEMBLY
3-65.1 Removal
a. Remove hook block and wind all wire rope onto hoist drum.
b. Remove two detent pins (1, Figure 3-17) and retainer (2) from boom nose.
c. Remove bolt (3), lockwasher (4), pin bolt (5), shaft (6), three bushings (7, 9, and 10), and sheave (8) from boom
nose.
d. Remove bolt (1 1 ), lockwasher (12), pin bolt (13), shaft (14), four bushings (15, 16, 19, and 20), and two sheaves
(17 and 18) from boom nose.
3-65.2 Installation
a. Install two sheaves (17 and 18, Figure 3-17) in boom nose with four bushings (15, 16, 19, and 20), shaft (14), pin
bolt (13), lockwasher (12), and bolt (11 ).
b. Install sheave (8) in boom nose with three bushings (7, 9, and 10), shaft (6), pin bolt (5), lockwasher (4), and bolt
(3).
c. Reeve wire rope through three sheaves (8, 1 7, and 1 8), antitwo-block weight, and hook block. Refer to
Operator's Manual, TM10-3950-672-10, for cable reeving.
d. Install retainer (2) on boom nose with two detent pins (1).
3-168
TM 10-3950-672-24-1
LEGEND
1.
2.
3.
4.
5.
6.
7.
Detent Pin
Retainer
Bolt
Washer
Pin Bolt
Shaft
Bushing
8. Sheave
9. Bushing
10. Bushing
11. Bolt
12. Washer
13. Pin Bolt
14. Shaft
15.
16.
17.
18.
19.
20.
Bushing
Bushing
Sheave
Sheave
Bushing
Bushing
Figure 3-17. Boom Nose Sheave Assembly
3-169
TM 10-3950-672-24-1
3-66 ANTITWO-BLOCK SYSTEM SWITCH
3-66.1 Removal
a.
b.
c.
d.
Disconnect negative battery cable and two electrical leads from negative battery post.
Unscrew link (1, Figure 3-18) and disconnect weight assembly (2) and link (1) from antitwo-block switch (3).
Disconnect cable connector (4) from junction box (5).
Remove two screws (6), two lockwashers (7), and antitwo-block switch (3) from boom nose.
3-66.2 Installation
a.
b.
c.
d.
Install antitwo-block switch (3, Figure 3-1 8) on boom nose with two lockwashers (7) and two screws (6).
Connect cable connector (4) to junction box (5).
Connect negative battery cable and two electrical leads to negative battery post.
Start crane and position hook block to a minimum dimension of 4 ft 10 in. from bottom of boom nose. Shut
down crane.
e. Lay weight assembly (2) on hook block and attach weight assembly (2) chain to antitwo-block switch (3) cable
with link (1) so that no slack exists in chain.
3-170
TM 10-3950-672-24-1
Figure 3-18. Antitwo-Block System Switch
3-171
TM 10-3950-672-24-1
3-67 ANTITWO-BLOCK SYSTEM CABLE REEL
3-67.1 Removal
a. Disconnect negative battery cable and two electrical leads from negative battery post.
b. Disconnect cable connector (1, Figure 3-19) from junction box (2).
NOTE
Count and record number of turns cable is wrapped on boom nose shaft.
c. Remove strap (3), unwrap cable from shaft on boom nose, and allow cable to rewind onto cable reel assembly
(7).
d. Disconnect electrical connector from box on outside of cable reel assembly (7).
e. Remove four screws (4), four lockwashers (5), four washers (6), and cable reel assembly (7) from boom
mounting plate.
3-67.2 Installation
a. Install cable reel assembly (7, Figure 3-19) on boom mounting plate with four washers (6), four lockwashers (5),
and four screws (4).
b. Connect electrical connector to box on cable reel assembly (7).
c. Route cable through roller guide assembly (under roller), wrap cable around end of boom nose shaft (same
number of turns as recorded during removal), and connect cable connector (1) to junction box (2).
d. Secure cable wraps around boom nose shaft together with strap (3).
e. Connect negative battery cable and two electrical leads to negative battery post.
3-172
TM 10-3950-672-24-1
Figure 3-19. Antitwo-Block System Cable Reel
3-173
TM 10-3950-672-24-1
3-68 ANTITWO-BLOCK SYSTEM CONSOLE
3-68.1 Removal
a. Disconnect negative battery cable and two electrical leads from battery.
b. Tag and disconnect two electrical connectors from console (3, Figure 3-20).
c. Unscrew knob (1), remove washer (2), move console (3) away from mounting bracket (5), and remove serrated
washer (4).
d. Remove console (3) from vehicle.
3-68.2 Installation
a. Position console (3, Figure 3-20) in vehicle.
b. Install serrated washer (4) on stud of console (3) and install console (3) on mounting bracket (5) with washer (2)
and knob (1).
c. Connect two electrical connectors to console (3) and remove tags.
d. Connect negative battery cable and two electrical leads to battery.
3-174
TM 10-3950-672-24-1
LEGEND
1. Knob
2. Washer
3. Console
4. Serrated washer
5. Mounting Bracket
Figure 3-20. Antitwo-Block System Console
3-175
TM 10-3950-672-24-1
Section 9. Swivels
Subject
Swivels ..................................................................................................................
Description
6 Port Hydraulic Swivel ..........................................................................................
Description
Theory of Operation
Removal
Installation
Electrical Swivel .....................................................................................................
Description
Removal
Installation
Preventive Maintenance
Para.
Page
3-68
3-176
3-69
3-178
3-70
3-180
3-68 SWIVELS
DESCRIPTION
of the swivel to rotate around the stationary spool as the
The swivel installation consists of a hydraulic swivel and
superstructure rotates.
an optional electrical swivel. Solid connections cannot
be used to transfer oil or electricity between the carrier
The electrical swivel center or collector ring assembly is
and superstructure due to the continuous 360 degree
secured by setscrews to a center post, which is bolted to
swing. The use of swivels efficiently accomplishes this
the spool of the hydraulic swivel. This allows the
function.
collector ring assembly to remain stationary with the
carrier. The outer portion or brush assembly is spring
The spool portion of the hydraulic swivel is mounted on
mounted on two pins which are located on a mounting
a spool mounting plate bolted to the carrier bearing
plate attached to the swivel barrel. This allows the
plate. The barrel portion of the hydraulic swivel has a
brush assemblies to rotate with the superstructure. The
lug welded to the barrel case that fits in a slot on the
springs on the mounting plate pins allow the swivel to
turntable bearing plate. This permits the barrel portion
float and not bind when the superstructure rotates.
3-176
TM 10-3950-672-24-1
Hydraulic and Electrical Swivel Installation
3-177
TM 10-3950-672-24-1
3-69. 6 PORT HYDRAULIC SWIVEL
DESCRIPTION
Each of the ports on the spool and barrel of the swivel is
The function of each port is described below.
stamped
with
the
port
number.
Port Number
Function
Test Pressure
1
Lift Down
3000 PSI (20685 kPa/206.8 bar)
2
Lift Up
3000 PSI (20685 kPa/206.8 bar)
3
Hoist Down
3000 PSI (20685 kPa/206.8 bar)
4
Hoist Up
3000 PSI (20685 kPa/206.8 bar)
5
Telescope - Extend
3000 PSI (20685 kPa/206.8 bar)
6
Telescope - Retract
3000 PSI (20685 kPa/206.8 bar)
W
Hoist Motor Weep Line 500 PSI (3447.5 kPa/34.4 bar)
THEORY OF OPERATION
The hydraulic swivel allows oil to flow from the control
valve to various crane functions on the superstructure.
All oil is routed into the spool portions of the swivel where,
through a series of internally drilled passages, oil is
transferred to a channel on the spool exterior. This
channel corresponds with a mating port on the barrel of
the swivel. Each channel is separated by a series of
teflon and O-ring seals that prevent transfer of oil
between the channels.
MAINTENANCE
NOTE
For more detailed information refer to Appendix E.
REMOVAL.
1. Ensure the boom is over the front.
2. Extend the outriggers and set them just enough to
make contact with the ground. Do not lift the crane on the
outriggers.
3. Elevate the boom enough from horizontal to
install blocking between the boom base and the lift
cylinder. Shut down the engine.
4. Remove the electrical swivel.
(Refer to
ELECTRICAL SWIVEL Removal in this Section.)
5. Remove the capscrews and lockwashers securing
the swivel mounting plate to the carrier bearing plate.
6. Lift the swivel up enough to tag and disconnect
the hydraulic lines from the spool of the swivel. Cap or
plug all openings.
7. Tag and disconnect the hydraulic lines from the
barrel of the swivel. Cap or plug all openings.
8. Using a suitable lifting device, insert two eyebolts
on the swivel top plate and lift straight up on the swivel.
3-178
TM 10-3950-672-24-1
9. Remove the swivel from the crane and move it to a
clean work area.
INSTALLATION.
1. Install the eyebolts to be used for lifting
swivel.
2. Carefully position the swivel into place on
crane.
3. Before lowering the swivel completely into
carrier bearing plate, connect the hydraulic lines to
spool of the swivel as tagged during removal.
4. Connect the hydraulic lines to the barrel
tagged during removal.
the
the
the
the
as
5. Secure the swivel mounting plate to the carrier
bearing plate with the capscrews and lockwasher.
Torque the capscrews to 31 lb ft (42 N-m).
6. Unhook the lifting device from the eyebolts and
remove the eyebolts and lifting device.
7. Install the electrical swivel.
(Refer to
ELECTRICAL SWIVEL Installation in this Section).
8. Remove the blocking material from the lift
cylinder.
9. Activate all systems. cycle all functions and
observe for proper operation and any leakage.
3-179
TM 10-3950-672-24-1
3-70 ELECTRICAL SWIVEL
DESCRIPTION
The swivel consists of ten sets of brushes and collector rings, and a cover.
Each brush set incorporates two brushes, leads, and clips which are attached to a brush holder assembly. The collector
ring leads are formed into one harness routed downward through the center of the hydraulic swivel.
The swivel cover is secured with capscrews and washers that attach it to the mounting plate of the electric swivel. The
mounting plate is attached to the barrel of the hydraulic swivel.
MAINTENANCE
NOTE
For more detailed information refer to Appendix E.
INSTALLATION.
1. If removed, route the collector ring harness
through the center of the hydraulic swivel.
1. Perform steps 1 through 3 of HYDRAULIC
SWIVEL Removal in this section.
2. If removed, install the springs onto the mounting
posts.
2. Remove the bolts, lockwashers, and nuts
securing the swivel cover. Remove the cover.
3. Guide the collector ring assembly over the center
post and onto the two springs and pins on the mounting
NOTE
plate.
On swivels equipped with crimp - type
4. Exert a downward pressure on the collector core
connectors on the collector core
and brush assembly. Compress the springs to a height of
wires, do not disconnect the collector
1.625 inches (4.1 cm). Secure the collector and brush
core wires at the top of the swivel
assembly to the center post by tightening the setscrews in
the collector core.
assembly.
3. Tag and disconnect the wires on the top of the
5. Connect the wires on the top of the swivel
swivel collector.
collector. Ensure the numbers on the collector ring
harness wires match the numbers on the collector ring
4. Secure the wires in the center harness and if the
wires.
hydraulic swivel is to be removed, route the harness down
through the center of the hydraulic swivel.
6. Install the swivel cover and seal. Secure with the
capscrews,
lockwashers, and nuts.
5. Loosen the setscrews securing the electrical
swivel collector to the center post. Remove the swivel.
7. Remove the blocking material from the lift
cylinder.
6. If necessary, remove the springs from the
mounting plates.
8. Activate all systems, cycle all functions and
observe for proper operation and any leakage.
REMOVAL.
3-180
TM 10-3950-672-24-1
PREVENTIVE MAINTENANCE.
It is recommended that a normal inspection of the
electrical swivel collector ring and brush assembly be
established.
An example of this could be at
approximately 100 to 150 engine operating hours. When
this time limit is reached, perform the following.
2. If the swivel has a grease fitting instead of a nylon
bushing, grease it. Use no more than about 1 ounce
(0.028 kg) of a good quality bearing grease.
3. Check the collector ring setscrews and ensure
they are tight.
4. Check the brush and arm assembly springs.
Ensure they are holding the brushes firmly against the
collector rings.
1. Check the collector ring and brush assembly for
any corrosion, pitting, arcing, and wear.
3-181
TM 10-3950-672-24-1
Section 10. Hoist
Subject
Hoist ......................................................................................................................
Description
Theory of Operation
Removal
Hoist Installation and Alignment
Functional Check
Servicing
Adjustment of Motor Control Valve
Cable Follower .......................................................................................................
Description
Removal
Disassembly
Cleaning and Inspection
Assembly
Installation
Vane Type Motor ....................................................................................................
Description
Removal
Installation
Hoist to Boom Alignment ........................................................................................
3-182
Para.
Page
3-71
3-183
3-73
3-186
3-72
3-189
3-74
3-190
TM 10-3950-672-24-1
3-71 HOIST
DESCRIPTION
Cable Capacity
One hoist is available, the Grove HO-12. The hoist is a
single speed assembly consisting of a hoist control valve,
a vane type motor, the brake, cable drum, clutch
assembly, and the motor and brake end housings.
Permissible Line Pull
The hoist is installed at the rear of the turntable. Hoist
usage is controlled by a hoist control lever. If the optional
cable follower assembly is provided, it is installed on the
rear side of the hoist.
The following is a list of specifications for the model HO12 hoist.
Drum Dimensions
Cable capacity for the 9.0
inch (22.8 cm) drum with
9/16 inch cable is 135
feet (41.1 m).
Refer to the Line Pulls and
Reeving Info Chart in the
cab.
NOTE
For more detailed
information refer to
Appendix E.
Drum dimensions are
9.625 inches (24.4 cm) diameter with 9.0 inches
(22.8 cm) length.
THEORY OF OPERATION
The control valve is actuated by the main hoist control
The first section of the hydraulic pump supplies oil to the
lever. Hydraulic oil from the hoist returns to the reservoir
hoist directional control valve. The control valve supplies
through hydraulic swivel port 3.
oil through swivel port 4 to the hoist motor control valve.
MAINTENANCE
REMOVAL
HOIST INSTALLATION AND ALIGNMENT.
1. Remove the cable and cable follower. (Refer to
CABLE FOLLOWER - REMOVAL in this Section.)
2. Attach a suitable lifting sling to the hoist.
3. Tag and disconnect the hydraulic supply lines to
the hoist; cap or plug all lines and openings.
4. Remove the capscrews, nuts, washers, and plates
securing the hoist and remove the hoist from the back of
the turntable.
1. Ensure the hoist mount is clean and free from
debris and the hoist has not been damaged during
handling.
2. With the hoist supported in a suitable lifting sling,
position the hoist on the mount.
3. Check the hoist to boom alignment according to
the HOIST TO BOOM ALIGNMENT procedure in this
section.
4. Place a level between the boom pivot shaft
bushings.
3-183
TM 10-3950-672-24-1
5. Place a level across the top of the hoist drum and
determine if the hoist is sitting in the same plane in
relation to the level positioned between the boom pivot
shaft bushings.
6. Install the plates, washers, nuts, and capscrews
and secure the hoist. Torque the capscrews to 370 lb ft
(501 N•m).
7. Connect the hydraulic lines and hoses as tagged
prior to removal.
8. Remove the lifting sling from the hoist.
9. Install the cable follower.
Refer to CABLE
FOLLOWER INSTALLATION in this section.
10. Service the hoist. Refer to SERVICING in this
section.
11. Install the cable, following procedures outlined
under INSTALLING CABLE ON THE HOIST, in the
Operator's Manual TM 10-3950-672-10.
FUNCTIONAL CHECK.
1. Attach a test weight to the hook and raise and
lower the load several times.
2. Check the hoist for smooth operation of the hoist
motor and brake system.
3. Ensure the hydraulic connections are secure and
free from leaks.
SERVICING.
1. Remove the cable from the hoist (if applicable).
2. Rotate the hoist drum until one drain plug is at the
highest point.
3. Remove the drain plugs.
NOTE
Drum
lubricant
capacity
approximately 2 quarts (1.8 liters).
is
4. Fill the drum with EPGL-80W/140 lubricant.
5. Install the pipe plugs.
3-184
ADJUSTMENT OF THE MOTOR CONTROL VALVE.
The following adjustment procedures are to be used when
unacceptable hoist operating characteristics have been
traced to the motor control valve.
Optimum hoist
performance is obtained when hydraulic oil temperature is
at 170 to 180 degrees F (77 to 82 degrees C) or at 165
degrees (74 degrees C) on units with a thermostat
controlled oil cooler if environmentally possible.
NOTE
For the following procedures, refer to
the figure titled Hoist Motor Control
Valve Adjustment.
Remove the cap and spring and add shims (in 0.005 inch
[0.0127 mm] increments) as needed to correct the rough
lowering condition. Install the spring and end cap. Too
many shims may create a loss of or poor control. If this
happens, remove shims until control is obtained.
3. Hoist has loss of or poor control when lowering a
load.
1. Hoist will not raise the maximum load.
If the hoist will not raise the maximum load, check the
system pressure. If the system pressure is low, adjust to
the proper system pressure.
2. Hoist is lowering rough.
NOTE
Some very rough conditions may
require as much as 0.060 inch (0.152
mm) additional shim to correct the
rough lowering condition.
Remove the cap and spring and remove the shim(s) in
the valve. Install an amount of shims smaller in thickness
than the original shim(s) to correct the problem. Install
the spring and cap.
4. Hoist brake is chattering during the lowering of a
load.
Remove the cap and spring and add the needed thickness
of shims (in 0.005 inch [0.0127 mm] increments) to
correct the chattering condition. Install the cap and
spring.
Hoist Motor Control Valve Adjustment
3-185
TM 10-3950-672-24-1
3-72 CABLE FOLLOWER
DESCRIPTION
The cable follower is installed on the rear side of the hoist. It applies a downward spring pressure against the cable onto
the hoist drum. The pressure ensures the cable will be uniformly wound onto the hoist drum, and also prevents cable
jumping under abnormal line conditions.
MAINTENANCE
REMOVAL.
3. Check the spring tension. If the springs will not
provide sufficient tension when adjusted, replace them.
1. Loosen the adjusting nuts and remove the extension
springs.
ASSEMBLY.
2. Remove the bolts, washers, and nuts securing the
lever welds to the side plate weld.
3. Remove the capscrews securing one of the side
plates, ensuring the roller assembly is not dropped when
the side plate is removed.
4. Remove the capscrews securing the side plates to the
hoist, and lift the follower assembly from the crane.
DISASSEMBLY
NOTE
The cable follower should be
disassembled in a clean work area.
1. Remove the capscrews and washers securing the
angle to the cable follower shaft.
2. Remove the angle and shim washer from the end
of the cable follower shaft and slide the roller assembly
off the shaft.
3. Remove the shaft bearings and the other shim
washer from the roller assembly.
CLEANING AND INSPECTION.
1. Install the inner shaft bearings into the roller
assembly.
2. Install on e shim washer on the inner shaft.
NOTE
Locate the roller assembly as parallel
as possible, 0.625 inches (15.8 mm)
from the hoist drum and 0.125 inches
(3.1 mm) from the left flange.
3. Install the roller assembly on the inner shaft and
install a shim washer on the end.
4. Ensure the roller assembly and bearings are fully
seated and install the angle on the cable follower shaft.
5. Apply
medium
strength
threadlocking
adhesive/sealant and primer to the capscrews. Install the
capscrews and washers and secure the angle to the roller
assembly.
INSTALLATION.
1. Using a suitable lifting device, install the follower
assembly on the hoist.
2. Install the side plates to the hoist and secure with
the capscrews. Torque the capscrews to 31 lb ft (42
N•m). Fill the side plate assemblies with grease through
the grease fittings on each side plate weld.
1. Clean all grease from the shaft and bearings.
2. Check the inner shaft, the roller, and the shaft
bearings, for cracks, scoring, or grooving. Replace if
necessary.
3-186
TM 10-3950-672-24-1
Cable Follower Assembly
3-187
3. Install the lever welds to the side plate welds and
secure with bolts. washers, and nuts. Torque the bolts 10
to 12 lb ft (14 to 16 N•m).
4. Install the extension springs. Adjust the spring
adjusting rod to extend the extension spring
TM 10-3950-672-24-1
approximately 1 -inch (25.4 mm). Tighten the adjusting
nuts.
5. Refer to operators manual, TM 10-3950-672-10
and lubricate the cable follower as specified.
3-188
TM 10-3950-672-24-1
3-73 VANE TYPE MOTOR
DESCRIPTION
The vane type motor is a fixed displacement, rotary
balanced motor that converts hydraulic oil flow into rotary
mechanical motion. The motor consists of four basic subassemblies; a body or housing and shaft with a
permanently lubricated bearing, a front port plate
assembly consisting of the port plate with a built-in check
valve, a cam ring assembly containing the rotor, vanes.
vane springs and cam ring, and the end cap assembly
consisting of the end cap and needle bearing.
MAINTENANCE
NOTE
For more detailed information refer to Appendix E.
REMOVAL.
INSTALLATION.
1. Apply
high
strength
thread
locking
adhesive/sealant and primer to the bolts. Position the
1. Tag and disconnect the hydraulic lines from the
motor In place on the end housing and secure with the
motor and hoist motor control valve. Cap or plug all lines
bolts and washers. Torque the bolts to 68 lb ft (92 N-m).
and openings.
2. Connect the hydraulic lines to the motor and hoist
2. Remove the bolts and washers securing the
motor control valve as tagged during removal.
motor to the end housing. Remove the motor.
3-189
TM 10-3950-672-24-1
3-74 HOIST TO BOOM ALIGNMENT
b. Draw a line between the hoist drum flanges,
passing through both points as located above and
determine the midpoint.
PROCEDURE.
1. Lower the boom to the level position.
2. Find a line on top of the hoist drum which is
parallel to the drum axis as follows.
a. Use a Miracle Point Gauge and find a zero
degree dial point next to each flange on top of the drum.
NOTE
If this special equipment is not
available, sufficient accuracy in
locating a centerline may be obtained
by using a steel square against the
machined inner surfaces of both
flanges. It is advisable to avoid using
any cast surfaces in this procedure
unless a check from both flanges
indicates that the resultant line is
straight.
3. Find the midpoint of the lines drawn across the
top of the base boom section, perpendicular to its length,
at both ends of the boom section. (Figure points A and
B.)
4. Check as follows to see if the hoist is aligned
perpendicularly to the boom.
a. String a chalk line from point A, (outer
boom centerline) across the base section centerline and
the hoist drum midpoint.
b. Pull the line taut. aligning it directly over
the top of point B.
c. With a protractor, measure the angle
between the chalk line and the cross line drawn on the
hoist. If the measurement of the angle exceeds 90
degrees ± 1 /2 degree, realignment will be necessary.
Hoist to Boom Alignment
3-190
CAUTION
DO NOT ALTER HOLES OR STOP
BLOCKS ON THE CRANE MOUNTING
PLATE.
AS
VERY
SMALL
ADJUSTMENTS RESULT IN LARGE
ANGULAR CHANGES.
EXTREME
CARE SHOULD BE TAKEN TO AVOID
OVERCORRECTION.
TM 10-3950-672-24-1
5. If realignment is necessary, remove the hoist
mounting bolts and shift the hoist as necessary to achieve
the minimum angular tolerance. Trial and error location
may be necessary for proper line-up of the bolt holes and
stop blocks. If all bolts cannot be inserted or the stop
blocks interfere with line-up, a slight elongation of the
hoist bolt holes and/or shimming of the mounting lugs
might be necessary.
3-191
Section 11. Frame and Outriggers
Subject
Para.
Outriggers ..............................................................................................................
Description ........................................................................................................
Theory of Operation ..........................................................................................
Removal ............................................................................................................
Inspection ..........................................................................................................
Installation .........................................................................................................
Outrigger Stabilizer Cylinder ..................................................................................
Description
Removal
Installation
Functional Check
Outrigger Selector Valve ........................................................................................
Description
Pintle Hook ............................................................................................................
Removal ............................................................................................................
Repair ...............................................................................................................
Installation .........................................................................................................
Front Access Covers ..............................................................................................
Removal ............................................................................................................
Installation .........................................................................................................
Rear Access Covers ...............................................................................................
Removal ............................................................................................................
Installation .........................................................................................................
Mirror Assembly (Right Side) ..................................................................................
Removal ............................................................................................................
Installation .........................................................................................................
Mirror Assembly (Left Side) ....................................................................................
Removal ............................................................................................................
Installation .........................................................................................................
Page
3-75
3-75.1
3-75.2
3-75.3
3-75.4
3-75.5
3-76
3-192
3-192
3-193
3-193
3-195
3-195
3-196
3-77
3-197
3-78
3-78-1
3-78.2
3-78-2
3-79
3-79-1
3-79-2
3-80
3-80-1
3-80-2
3-81
3-81-1
3-81-2
3-82
3-82-1
3-82-2
3-199
3-199
3-199
3-199
3-201
3-201
3-201
3-203
3-203
3-203
3-205
3-205
3-205
3-207
3-207
3-207
3-75 OUTRIGGERS
3-75.1 Description
The outriggers are the oblique telescoping type and consist of a removable outrigger beam and a cylinder
assembly. The outriggers are controlled by a toggle switch, an outrigger selector valve, and a double selector valve.
The outrigger selector valve is located in the cab to the left of the seat. The double selector valve, if installed, is located
in the battery box. Each stabilizer cylinder has a port block mounted on its side. A pilot operated check valve is
threaded into the port block.
A level is mounted on the right side of the cab. The level provides the operator with a visual indication of crane
levelness.
3-192
TM 10-3950-672-24-1
3-75.2 Theory of Operation
Flow from the 32 gpm (121.1 Ipm) pump section supplies the outrigger circuit. Positioning the OUTRIGGER
control switch to DOWN/OUT positions the spool in the control valve to permit oil to flow to the OUTRIGGER
SELECTOR valve. Positioning the selector valve switches to one of the eight positions (FRONT, REAR, LEFT, RIGHT,
FRONT RIGHT, REAR RIGHT, FRONT LEFT, or REAR LEFT) allows the hydraulic oil to flow to the appropriate
cylinder(s). The oil first unseats the check valve and the pressure on the piston, then extends the outrigger. Oil from the
rod side of the cylinder flows back through the control valve, then to the tank. Positioning the OUTRIGGER control
switch to UP/IN positions the spool in the control valve to permit oil to flow to the rod side of the cylinder(s). The pilot
pressure from the pressurized retract line unseats the check valve allowing oil to flow from the piston side of the
cylinder(s) to the SELECTOR valve. The oil flows from the SELECTOR valve, through the control valve, and back to the
tank.
3-75.3 Removal
a. Extend the outrigger slightly to facilitate attaching a lifting device to the outrigger beam.
b. Using an adequate lifting device, lift the frame enough to enable removal of the outrigger beam. Install
cribbing or blocking which is capable of handling the weight of the crane under the frame for support.
c. Shut down the engine.
d. Tag and disconnect the hydraulic lines to the cylinder. Cap or plug all openings.
CAUTION
Use an adequate support to fully support the cylinder.
e. Place a soft wood support between the outrigger beam and the cylinder.
CAUTION
When blocking up the cylinder, place the support under the port block.
f. Remove the capscrew, washer, flatwasher, cotter pin, and pin securing the cylinder barrel to the frame.
g. Attach a suitable lifting device to the outrigger beam.
h. Pull the outrigger beam out of the outrigger box readjusting the lifting attachment to prevent the cylinder
from sliding or tilting when the outrigger beam clears the outrigger box.
3-193
TM 10-3950-672-24-1
Outrigger Installation
3-194
TM 10-3950-672-24-1
WARNING
Ensure any blocking material used is capable of supporting the weight of the outrigger beam.
Do not allow it to tilt or slide. Failure to do so could result in death or injury to personnel.
i. Position the outrigger beam on blocking material.
j. Remove the cylinder support.
NOTE
For Removal and Installation of the cylinder, refer to OUTRIGGER STABILIZER CYLINDER in this
Section.
NOTE
For Removal and Installation of the double selector valve used when the optional tow winch is
installed, refer to Section 6 VALVES.
3-75.4 Inspection
Inspect the outrigger beams for bends, evidence of cracks, or other damage. Check the outrigger beam
internally for hydraulic fluid, which may indicate a leaking cylinder, loose connection, or damaged hydraulic line.
3-75.5 Installation
a. Place a soft wood support between the outrigger beam and the port block of the cylinder.
b. Attach a suitable lifting device to the outrigger beam.
c. Slide the beam into the outrigger housing being careful not to let the cylinder slide or tilt. Align the cylinder
barrel with the frame mount.
d. Install the cylinder barrel to the frame mount. Apply anti-seize to the pin and secure the cylinder barrel to
the frame mount with the pin, cotter pin, flatwasher, washers, and capscrew.
e. Connect the hydraulic lines to the cylinder as tagged prior to removal.
f. Remove any blocking material in the outrigger assembly.
g. Activate the system and check for proper operation and any leaks.
3-195
TM 10-3950-672-24-1
3-76 OUTRIGGER STABILIZER CYLINDER
DESCRIPTION
flatwasher, and cotter pin. The rod end of the cylinder is
The 3-inch (7.62 cm) stabilizer cylinder is 40.19 inches
attached by means of a plate, pin, bolt, and washer, to the
(102.0 cm) long from the center of the barrel to the center
outrigger beam. There are four stabilizer cylinders on the
of the rod bushing and has a stroke of 29.0 inches (73.6
crane and each cylinder weighs 80 pounds (36.2 kg) dry
cm). The barrel end of the cylinder is attached to the
and 82.5 pounds (37.4 kg) wet.
frame by means of a pin, capscrew, lockwasher,
MAINTENANCE
NOTE
2. Apply anti-seize compound to the pin, and install
Refer to CYLINDERS in Section 6 for
the plate, pin, washer, and bolt securing the rod end of the
cylinder to the outrigger beam.
Disassembly and Assembly of the
cylinder.
3. Install the outrigger beam.
(Refer to
OUTRIGGERS, Installation in this Section).
REMOVAL.
FUNCTIONAL CHECK.
1. Remove the outrigger beam. (Refer to OUTRIGGERS, Removal in this Section).
2. Remove the plate, pin, bolt, and washer securing
the rod end of the cylinder to the outrigger beam.
3. Remove the cylinder.
1. Activate the hydraulic system; using the outrigger
control lever and outrigger selector. Extend and retract
the outrigger.
2. Observe the operation of the outrigger beam.
3. Check the hydraulic connections for any evidence
of leakage.
INSTALLATION.
1. Install the cylinder into the outrigger beam.
3-196
TM 10-3950-672-24-1
3-77 OUTRIGGER SELECTOR VALVE
DESCRIPTION
The OUTRIGGER SELECTOR valve is located in the cab
to the left of the seat. It is an eight position hydraulic
valve that directs the flow of hydraulic oil from the
outrigger directional control valve to the appropriate
outrigger(s).
3-197
NOTE
For a more detailed DESCRIPTION and
MAINTENANCE of the outrigger
selector valve, refer to VALVES in
Section 6 -HYDRAULIC SYSTEM.
TM 10-3950-672-24-1
LEGEND
1.
2.
3.
4.
5.
6.
Cotter Pin
Slotted Nut
Washer
Pintle Hook Assy
Cotter Pin
Slotted Nut
7. Bolt
8. Hook Jaw
9. Hook Body
10. Cotter Pin
11. Rivet
12. Chain
Figure 3-21. Pintle Hook Assembly
3-198
TM 10-3950-672-24-1
3-78 PINTLE HOOK
3-78.1 Removal
a. Remove radiator, refer to paragraph 3-20.1.
b. Remove cotter pin (1, Figure 3-21), slotted nut (2), washer (3), and pintle hook assembly (4) from crane frame.
3-78.2 Repair
a.
b.
c.
d.
e.
Remove cotter pin (5, Figure 3-21), slotted nut (6), bolt (7), and hook jaw (8) from hook body (9).
Remove cotter pin (10), rivet (11 ), and chain (12) from hook body (9).
Inspect parts for damage and replace as necessary.
Install chain (12) on hook body (9) with rivet (11) and insert cotter pin (10) in chain.
Apply anti-seize compound to threads of bolt (7) and install hook jaw (8) on hook body (9) with bolt (7), slotted
nut (6). Tighten slotted nut (6) and back off nut until hook jaw (8) will pivot and hole in shaft of bolt (7) aligns with
slots in nut (2). Secure slotted nut (2) with new cotter pin (5).
3-78.3 Installation
a. Insert pintle hook assembly (4, Figure 3-21) through crane frame and secure with washer (3) and slotted nut (2).
Tighten slotted nut (2), back off nut until pintle hook assembly (4) will rotate, and hole in shaft of hook body (9)
aligns with slotted nut (2).
b. Secure slotted nut (2) with new cotter pin (1).
c. Install radiator, refer to paragraph 3-20.2.
3-199
TM 10-3950-672-24-1
Figure 3-22. Access Covers, Front
3-200
TM 10-3950-672-24-1
3-79 FRONT ACCESS COVERS
3-79.1 Removal
a.
b.
c.
d.
e.
Open cover (1, Figure 3-22) and slide cover off crane deck hinges.
Remove four screws (2), four lockwashers (3), four washers (4), and cover (5) from crane deck.
Remove two hinges (6) from cover (5).
Remove four screws (7) and cover (8) from crane deck.
Remove four self-tapping screws (9) and cover plate (10) from crane frame.
3-79.2 Installation
a.
b.
c.
d.
e.
Install cover plate (10, Figure 3-22) on crane frame with four self-tapping screws (9).
Install cover (8) on crane deck with four screws (7).
Slide two hinges (6) onto pins of cover (5).
Install cover (5) on crane deck with four screws (2), four lockwashers (3), and four washers (4).
Slide cover (1) into crane deck hinges and close cover.
3-201
TM 10-3950-672-24-1
LEGEND
1.
2.
3.
4.
5.
Cover
Screw, Self-tapping
Cover Plate
Nut
Lockwasher
6.
7.
8.
9.
Screw
Lower Spring
Cover
Hinge
10.
11.
12.
13.
Nut
Lockwasher
Screw
Upper Spring
Figure 3-23. Access Covers, Rear
3-202
TM 10-3950-672-24-1
3-80 REAR ACCESS COVERS
3-80.1 Removal
a.
b.
c.
d.
3-80.2
Open cover (1, Figure 3-23) and slide cover off crane deck hinges.
Remove two self-tapping screws (2) and cover plate (3) from crane deck.
Remove two nuts (4), two lockwashers (5), two screws (6), lower spring (7), and cover (8) from hinge (9).
Remove two nuts (10), two lockwashers (11), two screws (12), upper spring (13), and hinge (9) from crane frame.
Installation
a. Install hinge (9, Figure 3-23) and upper spring (13) on crane frame with two screws (12), two lockwashers (11),
and two nuts (10).
b. Install cover (8) and lower spring (7) on hinge (9) with two screws (6), two lockwashers (5), and two nuts (4).
c. Install cover plate (3) on crane deck with two self-tapping screws (2).
d. Slide cover (1) into crane deck hinges and close cover.
3-203
TM 10-3950-672-24-1
LEGEND
1.
2.
3.
4.
5.
Locknut
Screw
Cushion Washer
Nut
Lockwasher
6. Washer
7. Screw
8. Locking Plate
9. Star Washer
10. Mirror Assy
11.
12.
13.
14.
15.
Bracket
Nut
Lockwasher
Carriage Bolt
Bracket
Figure 3-24. Mirror Assembly, Right Side
3-204
16.
17.
18.
19.
20.
Nut
Lockwasher
Mirror
Jam Nut
Screw
TM 10-3950-672-24-1
3-81 MIRROR ASSEMBLY (RIGHT SIDE)
3-81.1 Removal
a. Remove locknut (1, Figure 3-24), bolt (2), cushion washer (3), nut (4), lockwasher (5), washer (6), screw (7),
locking plate (8), star washer (9), and mirror assembly (10) from bracket (11).
b. Remove hex nut (12), lockwasher (13), carriage bolt (14), and bracket (15) with mirror (18) from bracket (11).
c. Remove nut (16), lockwasher (17), and mirror (18) from bracket (15).
d. Loosen jam nut (19) and screw (20), and remove bracket (11) from socket in crane frame.
3-81.2 Installation
a.
b.
c.
d.
Install bracket (11, Figure 3-24) in socket in crane frame and tighten screw (20) and jam nut (19).
Install mirror (18) on bracket (15) with lockwasher (17) and nut (16).
Install bracket (15) with mirror (18) on bracket (11) with carriage bolt (14), lockwasher (13), and nut (12).
Install mirror assembly (10) on bracket (11) with locking plate (8), star washer (9), screw (7), washer (6),
lockwasher (5), nut (4), cushion washer (3), bolt (2), and locknut (1).
3-205
TM 10-3950-672-24-1
LEGEND
1.
2.
3.
4.
5.
6.
7.
Locknut
Screw
Cushion washer
Nut
Lockwasher
Washer
Screw
8. Locking Plate
9. Star Washer
10. Mirror Assy
11. Bracket
12. Jam Nut
13. Screw
Figure 3-25. Mirror Assembly, Left Side
3-206
TM 10-3950-672-24-1
3-82 MIRROR ASSEMBLY (LEFT SIDE)
3-82.1 Removal
a. Remove locknut (1, Figure 3-25), screw (2), cushion washer (3), nut (4), lockwasher (5), washer (6), screw (7),
locking plate (8), star washer (9), and mirror assembly (10) from bracket (11).
b. Loosen jam nut (12) and screw (13), and remove bracket (11 ) from socket in crane frame.
3-82.2 Installation
a. Install bracket (11, Figure 3-25) in socket in crane frame and tighten screw (13) and jam nut (12).
b. Install mirror assembly (10) on bracket (11) with locking plate (8), star washer (9), screw (7), washer (6),
lockwasher (5), nut (4), cushion washer (3), screw (2), and locknut (1).
3-207
TM 10-3950-672-24-1
Section 12. Electrical System
Subject
Para.
Electrical System ...................................................................................................
Description ..........................................................................................................
General Maintenance ..........................................................................................
Troubleshooting ..................................................................................................
Alternator ...............................................................................................................
Removal .............................................................................................................
Disassembly .......................................................................................................
Inspection ...........................................................................................................
Testing ................................................................................................................
Assembly ............................................................................................................
Installation ..........................................................................................................
Battery ...................................................................................................................
Removal .............................................................................................................
Installation ..........................................................................................................
Battery Cables .......................................................................................................
Removal .............................................................................................................
Installation ..........................................................................................................
Fuse and Relay Panel ............................................................................................
Removal .............................................................................................................
Installation ..........................................................................................................
Instruments .........................................................................................................
Removal ................................................................................................................
Inspection ...........................................................................................................
Installation ..........................................................................................................
Functional Check ................................................................................................
Electrical Switches .................................................................................................
Removal .............................................................................................................
Inspection ...........................................................................................................
Installation ..........................................................................................................
Functional Check ...................................................................................................
Clearance Light ...................................................................................................
Removal .............................................................................................................
Installation ..........................................................................................................
Spotlight .................................................................................................................
Removal .............................................................................................................
Installation ..........................................................................................................
Dome Light ............................................................................................................
Removal .............................................................................................................
Installation ..........................................................................................................
Turn Signal Light (Front) ........................................................................................
Removal .............................................................................................................
Installation ..........................................................................................................
Boom Light .............................................................................................................
Removal .............................................................................................................
Installation ..........................................................................................................
3-208
3-83
3-83.1
3-83.2
3-83.3
3-84
3-84.1
3-84.2
3-84.3
3-84.4
3-84.5
3-84.6
3-85
3-85.1
3-85.2
3-86
3-86.1
3-86.2
3-87
3-87.1
3-87.2
3-88
3-88.1
3-88.2
3-88.3
3-88.4
3-89
3-89.1
3-89.2
3-89.3
3-89.4
3-90
3-90.1
3-90.2
3-91
3-91.1
3-91.2
3-92
3-92.1
3-92.2
3-93
3-93.1
3-93.2
3-94
3-94.1
3-94.2
Page
3-209
3-209
3-209
3-210
3-212
3-212
3-212
3-214
3-215
3-216
3-217
3-217
3-217
3-217
3-218
3-218
3-219
3-220
3-220
3-220
3-222
3-222
3-222
3-222
3-222
3-223
3-223
3-223
3-224
3-224
3-225
3-225
3-225
3-227
3-227
3-227
3-228
3-228
3-228
3-229
3-229
3-229
3-231
3-231
3-231
TM 10-3950-672-24-1
Headlight/Backup Light ..........................................................................................
Removal .............................................................................................................
Installation ..........................................................................................................
Tail, Brake, and Turn Signal Light ..........................................................................
Removal .............................................................................................................
Installation ..........................................................................................................
Backup Alarm ........................................................................................................
Removal .............................................................................................................
Installation ..........................................................................................................
Chassis Wiring Harness .........................................................................................
Removal .............................................................................................................
Installation ..........................................................................................................
Starter ....................................................................................................................
Test ....................................................................................................................
Bench Test .............................................................................................................
Disassembly .......................................................................................................
Inspect, Measure, and Repair ..............................................................................
Assembly ............................................................................................................
3-95
3-95.1
3-95.2
3-96
3-96.1
3-96.2
3-97
3-97.1
3-97.2
3-98
3-98.1
3-98.2
3-99
3-99.1
3-99.2
3-99.3
3-99.4
3-99.5
3-233
3-233
3-233
3-234
3-234
3-234
3-235
3-235
3-235
3-236
3-236
3-240
3-243
3-243
3-246
3-248
3-249
3-250
3-83 ELECTRICAL SYSTEM
3-83.1 Description
The electrical system is 12-volt operation with 12-volt starting and consists of an alternator and one lead-acid
battery. The system is the single-wire ground return-type, utilizing the machine's structure as ground.
Electrical power is transferred to and from the carrier and superstructure through the electrical swivel. The
swivel has ten slip rings. For more detailed information on the electrical
swivel, refer to Section 9 - SWIVELS.
The fuse and relay panel is located on the cab wall under the front console.
Electrical schematics and wiring diagrams are located in Appendix F.
The 65-ampere alternator is mounted on the engine and is belt driven. When the engine is running, the
alternator supplies the crane electrical leads and the voltage to recharge the batteries and maintain them at a full state of
charge.
The 12-volt battery is located in a box to the right front of the cab under the deck cover. The battery is the
maintenance-free-type and is completely sealed, except for a small vent hole in the side of the battery. The vent hole
allows what small amount of gasses that are produced in the battery to escape.
3-83.2 General Maintenance
Electrical system maintenance includes replacement of damaged components. Standard wiring practices should
be observed when replacement is necessary.
3-209
TM 10-3950-672-24-1
WARNING
If it should become necessary to perform electrical maintenance on live or hot circuits, remove
all rings, watches, and other jewelry before performing maintenance as serious burns may result
from accidental grounding or shorting circuits.
WARNING
Ensure the battery is disconnected before performing any maintenance on an electrical circuit
which is not fused. Multimeter resistance and continuity checks should be made with either the
wire or component to be checked out of the circuit or the battery cables disconnected from the
negative post.
CAUTION
Never replace original wiring with wiring of a smaller diameter.
3-83.3 Troubleshooting
Most troubles associates with the electrical system can be traced to the electrical swivel. Troubles common to the swivel
are:
a. Improper mounting.
b. Foreign material between the brushes and slip rings.
c. Incorrect wiring from the swivel to the components.
d. Incorrect wire size.
e. Worn brushes.
f. Improper spring tension on the brush assembly.
g. Loose setscrews on the collector ring assembly.
To isolate electrical troubles, a multimeter should be used. The multimeter, when used properly, can provide readings
necessary for service personnel to determine the following:
a. Opens in the electrical system.
b. Resistance in the electrical system.
The following is a list of tools necessary for connector maintenance.
3-210
TM 10-3950-672-24-1
Extraction (Amp)
FOR BLACK CIRCUIT CONNECTORS (AMP)
14 gauge wire - P/N 305183
12 to 8 gauge wire - P/N 91019-3
FOR IN-LINE CONNECTORS (AMP)
4 to 9 circuit - P/N 453300-1
15 circuit- PIN 458944-1
Extraction (Deutsche)
12 gauge wire - P/N 114010
16 gauge wire - P/N 0411-204-1605
8 to 10 gauge wire - P/N 114008
4 to 6 gauge wire - P/N 114009
Crimping (Amp)
14 to 12 gauge wire
10 to 8 gauge wire
4 to 9 circuit in-line connectors
15 circuit in-line connectors
Tool
Die
P/N 69710-1 P/N 90145-1
P/N 69710-1 P/N 90140-1
P/N 69710-1 P/N 90306-1
P/N 90299-1
Crimping (Deutsche)
12 gauge wire P/N HDT 12-00
16 gauge wire P/N HDT 16-00
8 to 10 gauge wire P/N HDT 08-00
4 to 6 gauge wire P/N HDT 04-00
Because the pins are crimped to the wires, it is not possible to remove the pin. Using the proper extraction tool,
remove the pin(s) from the plug or receptacle. Cut the wire as close to the pin as possible. After cutting the pin off, the
wire will most likely be too short. Using a wire that is too short will allow pressure to be applied to the pin and wire where
they are crimped when the pin is inserted in the plug or receptacle. Add a short length of the same size wire to the short
wire by crimp splice or solder. Use heat shrinkable tubing or other suitable material to insulate the splice.
3-211
TM 10-3950-672-24-1
3-84 ALTERNATOR
3-84.1 Removal
a.
b.
c.
d.
e.
f.
g.
h.
i.
Open the engine compartment.
Disconnect battery negative leads from battery negative post.
Remove the drive belt. See "Drive Belt Removal", in Index of this TM.
Disconnect 3-wire plug from 3-wire socket at rear of alternator (Blue-Yellow-Black
leads).
Remove terminal nut (1, Figure 3-26) and washer (2) from terminal B +. Tag and remove Blue (No. 196) and
(No. 5) wire, and blue condenser wire (196) from terminal B +.
Tag and disconnect Black (No. 174) and Blue (196) from B- terminal. Leave condenser in place on B- terminal.
Remove two capscrews (26) from alternator brace. Remove alternator brace (27) from alternator.
Remove one pivot hex flange screw (23) from alternator support bracket (24). Leave bracket (24) attached to
engine block.
Remove alternator from engine.
3-84.2 Disassembly
a. Remove two terminal nuts (1 and 21, Figure 3-26), two washers (2 and 22), and two screws (3). Move voltage
regulator (4) away from rear housing (8), disconnect electrical connector from brush assembly (6), and remove
voltage regulator (4).
b. Remove two screws (5) and brush assembly (6) from rear housing (8).
CAUTION
Do not insert screwdriver blades deeper than 1/16 inch (1.587 mm) to avoid damaging stator
winding.
c. Match mark front and rear housings, and remove four screws (7). Insert two flat tip screwdrivers in opposite
openings between stator (10) and rear housing (8), refer to Figure 3-27.
NOTE
Mark stator (10) location prior to prying apart and removing from front housing (15).
d. Pry units apart and remove rear housing (8, Figure 3-26) and stator (10) from front housing (15).
3-212
TM 10-3950-672-24-1
LEGEND
1.
2.
3.
4.
5.
6.
7.
Nut
Washer
Screw
Voltage Reg.
Screw
Brush Assy
Screw
8. Rear Housing
9. Retainer
10. Stator
11. Bearing
12. Rotor Assy
13. Retainer
14. Bearing
15.
16.
17.
18.
19.
20.
21.
Frt. Housing
Spacer
Fan
Nut
Lockwasher
Pulley
Nut
Figure 3-26. Alternator Assembly
3-213
22.
23.
24.
25.
26.
27.
Washer
Pivot Hex Flange Screw
Support Bracket
Screw
Screw, Cap
Alternator Brace
TM 10-3950-672-24-1
NOTE
To remove nut (18), place rotor assembly (12) in a soft-jawed vise.
e. Remove nut (18), lockwasher (19), pulley (20), fan (17), and spacer (16) from rotor assembly (12) shaft.
f. Using arbor press, remove rotor assembly (12) from front housing (15).
g. Remove bearing retainer (1 3) and press bearing (14) from front housing (15).
3-84.3 Inspection
a. Inspect brushes for cracks, grooves on sides, being oil soaked, and that they are at least 0.1875 inch (4.7625
mm) long.
b. Inspect rear housing for cracked or broken casting, stripped threads, and severe wear of rear bearing bore.
c. Inspect fan for cracked or broken fins and for worn mounting hole.
d. Inspect front housing for cracked or broken casting, stripped threads, and bore of mounting foot for elongation.
e. Inspect other components for damage such as broken terminals or insulation, discoloration, stripped threads, and
other obvious damage.
f. Replace damaged components as necessary.
Figure 3-27. Stator and Rear Housing Separation
3-214
TM 10-3950-672-24-1
3-84.4 Testing
a. Set multimeter for ohms and check brush assembly (refer to Figure 3-28) for continuity between mount A and
brush B, and terminal C and brush D. Check for open circuits between mount A and terminal C, mount A and
brush D, terminal C and brush B, and brush B and brush D, refer to Figure 3-28. Replace brush assembly if
indications are other than stated.
Figure 3-28. Testing Brush Assembly
b. Set multimeter for ohms and check stator for open circuits between point D (lamination) and each terminal A, B,
and C, refer to Figure 3-29. If continuity is noted between lamination and any terminal, stator is defective and
must be replaced.
c. Set multimeter for ohms and check stator windings for continuity between terminals A-B, A-C, and B-C, refer to
Figure 3-29. If open, replace stator.
d. Set multimeter for ohms and check resistance of rotor assembly for 3.0 to 3.6 ohms between slip rings, as shown
on Figure 3-30. Also check that open circuits are indicated between pole fingers and each slip ring. Replace
entire rotor assembly if indications are other than stated.
Figure 3-29. Testing Stator Windings
3-215
TM 10-3950-672-24-1
Figure 3-30. Testing Rotor
3-84.5 Assembly
a. Using press, install front bearing (16, Figure 3-26) in front housing (15).
b. Install front bearing retainer (13).
c. Using arbor press, press front housing (15) over rotor assembly (12) until inner bearing race contacts shoulder on
shaft.
d. Position pulley spacer (16), fan (17), and pulley (20) on rotor assembly (12) shaft.
e. Install lockwasher (19) and nut (18) on rotor assembly (12) shaft. Place rotor assembly in soft jawed vise and
torque nut 40 to 50 lb ft (54 to 68 N-m).
f. Position stator (10) in front housing (15) with stator leads at top and notches in lamination aligned with bolt holes.
g. If damaged, replace retainer (9) in rear housing (8).
h. Position rear housing (8) over slip rings of rotor assembly (12) with front and rear housing bolt holes aligned and
stator leads extending through openings at top of rear housing (8).
i. Install four screws (7). Torque screws to 50 to 60 lb ft (67 to 81 Nom).
j. If necessary, remove four screws (7) and rotate rear housing (8) and stator (10) to align housings as match
marked on disassembly. Reinstall screws and torque screws to 50 to 60 lb ft (5.65 to 6.78 Nom).
k. Install brush assembly (6) in rear housing (8) with two screws (5).
3-216
TM 10-3950-672-24-1
I. Connect voltage regulator (4) electrical connector to brush assembly (6) and install voltage regulator (4) on rear
housing (8) with two screws (3).
m. Connect voltage regulator lead to terminal (D +) with terminal washer (2) and terminal nut (1), refer to Figure 326, Detail A for terminal location.
n. Connect jumper wire from voltage regulator harness connector to rear housing terminal (Stator AC) with terminal
washer (22) and terminal nut (21), refer to Figure 3-26, Detail A for terminal location.
3-84.6 Installation
a. Position the alternator on the alternator support bracket (24, Figure 3-26) and install the pivot hex flange screw
(23). Do not torque the capscrew at this time.
b. Install the alternator link capscrews (26). Torque the screws to 18 lb ft (24 N•m).
c. Torque the pivot hex flange screw (23) to 32 lb ft (44 N•m).
d. Position the belt around the alternator pulley. If necessary, refer to TM 10-3950672-24-2. Maximum deflection
should be 0.375 to 0.50 in. (9.5 to 12.7 mm). Gauge pressure should be 80 to 110 lb ft (108 to 149 N•m). If
gauge reading is not acceptable, replace automatic belt tensioner, refer to TM 10-3950-672-24-2.
e. Connect the electrical leads to the terminals as tagged during removal.
3-85 BATTERY
3-85.1 Removal
a. Lift the hinged deck cover.
b. Tag and disconnect wire lugs (4, 15, and 16, Figure 3-31) from the negative terminal (1). Then tag and
disconnect wire lugs (5 and 14) at positive terminal (3).
c. Remove the bolt, nut, and lockwasher from the angle bracket holddown rod and remove the angle holddown
bracket.
d. Remove the battery.
3-85.2 Installation
a.
b.
c.
d.
Install the battery.
Install the angle holddown bracket and rod, and secure the rod to the angle with the bolt, nut, and lockwasher.
Connect all leads to the battery's terminals starting with the positive wire lugs (5 and 14, Figure 3-31).
Close the deck cover.
3-217
TM 10-3950-672-24-1
3-86 BATTERY CABLES
3-86.1 Removal
WARNING
Always disconnect negative battery cable first to reduce chance of shorting and personal injury.
a.
b.
c.
d.
Disconnect negative battery cable clamp (1, Figure 3-31) from battery (2).
Disconnect positive battery cable clamp (3) from battery (2).
Disconnect negative battery cable (4) from crane chassis ground. Remove negative battery cable from crane.
Remove nut (6), lockwasher (7), and positive battery cable (5) from starter. Remove positive battery cable (5)
from crane.
e. Remove nut (8), lockwasher (9), bolt (10), two wire lugs (15 and 16), and cable clamp (1) from negative battery
cable (4).
f. Remove nut (11), lockwasher (12), bolt (13), one wire lug (14), and cable clamp (3) from positive battery cable
(5).
3-218
TM 10-3950-672-24-1
3-86.2 Installation
a. Install cable clamp (3, Figure 3-31) and one wire lug (14) on positive battery cable (5) with bolt (13), lockwasher
(12), and nut (11).
b. Install cable clamp (1) and two wire lugs (15 and 16) on negative battery cable (4) with bolt (10), lockwasher (9),
and nut (8).
c. Position positive battery cable (5) in crane and connect to starter with lockwasher (7) and nut (6).
d. Position negative battery cable in crane and connect to crane chassis ground.
WARNING
Always connect positive battery cable first to reduce chance of shorting and personal injury.
e. Clean positive battery post and connect positive battery cable clamp (3) at battery (2).
f. Clean negative battery post and connect negative battery cable clamp (1) at battery (2).
Figure 3-31. Battery Cables
3-219
TM 10-3950-672-24-1
3-87 FUSE AND RELAY PANEL
3-87.1 Removal
a.
b.
c.
d.
e.
Disconnect negative leads from negative battery post.
Tag and disconnect all leads to both fuse blocks.
Tag and disconnect all leads to the terminal blocks.
Remove the nuts and lockwashers securing the panel to the cab wall and remove the panel.
If necessary, remove the screws, lockwashers, and nuts securing the terminal blocks and fuse blocks.
3-87.2 Installation
a. If removed, install the two fuse blocks and secure with the screws, lockwashers, and nuts.
NOTE
Ensure the fuses are of the proper amperage before placing in the fuse blocks.
b.
c.
d.
e.
f.
g.
If removed, install the fuses in the fuse blocks.
If removed, install the terminal blocks and secure with the screws, lockwashers, and nuts.
Install the panel to the cab wall and secure with the nuts and lockwashers.
Connect the leads to the terminal blocks as tagged during removal.
Connect the leads to the fuse blocks as tagged during removal.
Connect negative leads to battery negative post.
FUSE DATA
Fuse No.
FU1
FU2
FU3
FU4
FU5
FU6
FU7
FU8
FU9
FU10
FU11
Amps
6
6
10
4
4
10
10
10
15
15
10
Circuits
Left Headlights; Work Lights
Right Headlights; Work Lights
Stop Lights, Turnsignals; Taillights
Gauge Lights
Boom Floor Lights
Horn; Backup Lights
Dome Light; Gauge Lights; A2B; Engine Distress
A2B
Oil Fan; Gearshift
Cab Fan; Heater Fan; Spotlight
Windshield Wiper
3-220
TM 10-3950-672-24-1
Fuse and Relay Panel (Sheet 1 of 2)
3-221
TM 10-3950-672-24-1
3-88 INSTRUMENTS
3-88.1 Removal
a. Disconnect negative leads from negative battery post.
b. Remove the nuts, washers, and screws securing the cover to the front of the console. Remove the cover and
disconnect the worklight connector and lay the cover aside.
c. Remove the hardware securing the gauge to the instrument panel; then remove the gauge.
d. Tag and disconnect the electrical leads to the gauge, then tape the lead ends.
3-88.2 Inspection
a. Examine gauges for cracked and broken lenses. Check gauge terminals and mounting studs for damage.
b. Check wiring for damaged insulation or damaged terminals.
3-88.3 Installation
a.
b.
c.
d.
Connect the electrical leads as marked prior to removal.
Place the gauge into position on the panel and secure it with the attaching hardware.
Position the cab front cover plate and secure with the screws, washers, and nuts.
Connect negative leads to battery negative post.
3-88.4 Functional Check
Start the engine and observe for proper functioning of the repaired indicator. Refer to operators manual, TM 10-3950672-10. Troubleshoot further as necessary, any system malfunction not corrected by repair or replacement of the
indicator or associated wiring.
3-222
TM 10-3950-672-24-1
3-89 ELECTRICAL SWITCHES
3-89.1 Removal
a.
b.
c.
d.
Disconnect negative leads to negative battery post.
Gain access to the front console as described under Instrument Removal.
Remove the hardware securing the switch to the console; then remove the switch.
Tag and disconnect the leads from the switch; then tape the lead ends.
3-89.2 Inspection
a. Visually check the switch for evidence of cracks, damaged connections, or other damage.
b. Check wiring for damaged insulation or damaged terminals.
c. Perform the following check to determine switch serviceability.
(1) Using an ohmmeter, check for continuity between the switch terminals with switch in ON or activated
position.
(2) Position switch to OFF. Ohmmeter should register zero (no continuity).
3-223
TM 10-3950-672-24-1
3-89.3 Installation
a.
b.
c.
d.
Connect the electrical leads as marked prior to removal.
Position the switch on the panel and secure it with the attaching hardware.
Install the cab front console cover.
Connect negative leads to battery negative post.
3-89.4 Functional Check
Operate the switch as described in the operators manual, TM 10-3950-672-10. Observe it for proper functioning
in the applicable circuit. Continue troubleshooting as necessary any system or circuit malfunction not corrected by repair
or replacement of the switch or associated wiring.
3-224
TM 10-3950-672-24-1
3-90 CLEARANCE LIGHT
3-90.1 Removal
a. Disconnect negative battery cable and two electrical leads from battery.
b. Disconnect light assembly (1, Figure 3-32) electrical connector from crane electrical harness.
c. Unsnap lens (2) and remove two nuts (3), two lockwashers (4), two screws (5), and light assembly (1) from crane
frame.
d. Remove two bulbs (6) from light assembly (1).
3-90.2 Installation
a.
b.
c.
d.
Install two bulbs (6, Figure 3-32) in light assembly (1).
Install light assembly (1) in crane frame with two screws (5), two lockwashers (4), and two nuts (3).
Snap lens (2) on light assembly (1) and connect electrical connector to crane electrical harness.
Connect negative battery cable and two electrical leads to battery.
Figure 3-32. Clearance Light
3-225
TM 10-3950-672-24-1
LEGEND
1.
2.
3.
4.
5.
Bolt
Cylindrical nut
Handle
Screw
Shaft and Light Assy
6.
7.
8.
9.
Screw
Retaining Ring
Retainer
Sealed Beam
Figure 3-33. Spotlight
3-226
TM 10-3950-672-24-1
3-91 SPOTLIGHT
3-91.1 Removal
a.
b.
c.
d.
e.
Disconnect negative leads from negative battery post.
Disconnect spotlight assembly electrical connector from crane electrical harness.
Remove bolt (1, Figure 3-33) and cylindrical nut (2), and separate handle (3) from shaft and light assembly (5).
Remove two screws (4) and pull shaft and light assembly (5) from cab frame.
Remove screw (5), retaining ring (6), four retainers (clips) (8), two electrical leads, and sealed beam (7) from
shaft and light assembly.
f. Remove four retainers (8) and separate retaining ring (7) and sealed beam (9).
3-91.2 Installation
a. Install sealed beam (9, Figure 3-33) in retaining ring (7) and secure with four retainers (8).
b. Position sealed beam (9) with retaining ring (7) to shaft and light assembly (5), connect two electrical leads, and
secure assembly with screw (6).
c. Push shaft and light assembly (5) through cab frame and secure with two screws (4).
d. Install handle (3) on shaft and light assembly (5) with bolt (1) and cylindrical nut (2).
e. Connect spotlight assembly electrical connector to crane electrical harness.
f. Connect negative leads to battery negative post.
3-227
TM 10-3950-672-24-1
3-92 DOME LIGHT
NOTE
The dome light switch which is integral to the base (1, Figure 3-34) is not replaceable.
damaged, replace the entire dome light assembly.
If
3-92.1 Removal
a.
b.
c.
d.
Disconnect negative battery cable and two electrical leads from battery.
Disconnect electrical connector from crane electrical harness.
Remove three screws (2, Figure 3-34), lens (3), and bulb (4) from dome light base (1).
Remove three nuts (5), three lockwashers (6), three screws (7), and dome light base (1) from cab frame.
3-92.2 Installation
a. Install dome light base (1, Figure 3-34) on cab frame with three screws (7), three lockwashers (6), and three nuts
(5).
b. Install bulb (4) and lens (3) in dome light base (1) with three screws (2).
c. Connect electrical connector to crane electrical harness.
d. Connect negative battery cable and two electrical leads to battery.
Figure 3-34. Dome Light
3-228
TM 10-3950-672-24-1
3-93 TURN SIGNAL LIGHT (FRONT)
3-93.1 Removal
a. Disconnect negative battery cable and two electrical leads from battery.
b. Disconnect light assembly (1, Figure 3-35) electrical connector from crane electrical harness.
c. Remove three nuts (2), three lockwashers (3), three washers (4), three bolts (5), and light assembly (1) from
crane frame.
d. Remove retaining ring (6), lens (7), gasket (8), and bulb (9) from light assembly (1).
3-93.2 Installation
a. Install bulb (9, Figure 3-35), gasket (8), lens (7), and retaining ring (6) in light assembly (1).
b. Install light assembly (1) in crane frame with three bolts (5), three washers (4), three lockwashers (3), and three
nuts (2).
c. Connect light assembly (1) electrical connector to crane electrical harness.
d. Connect negative battery cable and two electrical leads to battery.
LEGEND
1.
2.
3.
4.
5.
Light Assy
Nut
Lockwasher
Washer
Bolt
6.
7.
8.
9.
Retaining Ring
Lens
Gasket
Bulb
Figure 3-35. Turn Signal Light
3-229
TM 10-3950-672-24-1
LEGEND
1.
2.
3.
4.
5.
6.
7.
Boom Light Assy
Nut
Lockwasher
Screw
Retaining Ring
Sealed Beam
Retainer
8. Ground Lead
9. Power Lead
10. Power Connector
11. Harness Ground Wire
12. Harness Receptacle
Figure 3-36. Boom Light
3-230
TM 10-3950-672-24-1
3-94 BOOM LIGHT
3-94.1 Removal
a. Disconnect negative leads from negative battery post.
b. Disconnect boom light assembly (1, Figure 3-36) electrical connector (10) from crane electrical harness
receptacle (12).
c. Remove nut (2), lockwasher (3), harness ground wire (11), and boom light assembly (1) from mounting bracket.
d. Remove screw (4), disconnect two electrical leads (8 and 9), and remove sealed beam (6) with retaining ring (5)
from boom light assembly (1).
e. Remove retainer (7) and separate retaining ring (5) from sealed beam (6).
3-94.2 Installation
NOTE
Align tabs on retaining ring (5, Figure 3-36) with boss on sealed beam (6).
a. Install retaining ring (5) on sealed beam (6) and secure with retainer (7).
b. Position sealed beam (6) with retaining ring (5) to boom light assembly (1), connect two electrical leads (8 and 9),
and secure with screw (4).
c. Install boom light assembly (1) on mounting bracket, position harness ground wire (11) on mounting stud, and
secure assembly with lockwasher (3) and nut (2).
d. Connect boom light assembly (1) electrical connector (10) to crane electrical harness receptacle (12).
e. Connect negative leads to battery negative post.
3-231
TM 10-3950-672-24-1
LEGEND
1.
2.
3.
4.
5.
Light Assy
Nut
Lockwasher
Washer
Bolt
6. Screw
7. Star Washer
8. Sealed Beam
9. Retaining Ring
10. Retainer
Figure 3-37. Headlight/Back-up Light
3-232
TM 10-3950-672-24-1
3-95 HEADLIGHT/BACK-UP LIGHT
3-95.1 Removal
a. Disconnect negative battery cable and two electrical leads from battery.
b. Disconnect light assembly (1, Figure 3-37) electrical connector from crane electrical harness.
c. Remove four nuts (2), four lockwashers (3), four washers (4), four bolts (5), and light assembly (1) from crane
frame.
d. Remove screw (6) and star washer (7), disconnect two electrical leads, and remove sealed beam (8) with
retaining ring (9) from light assembly (1).
e. Remove four retainers (10) and separate retaining ring (9) from sealed beam (8).
3-95.2 Installation
NOTE
Align tabs on retaining ring (9, Figure 3-37) with boss on sealed beam (8).
a. Install retaining ring (9) on sealed beam (8) and secure with four retainers (10).
b. Position sealed beam (8) with retaining ring (9) to light assembly (1), connect two electrical leads, and secure
with screw (6) and star washer (7).
c. Install light assembly (1) in crane frame with four bolts (5), four washers (4), four lockwashers (3), and four nuts
(2).
d. Connect light assembly (1) electrical connector to crane electrical harness.
e. Connect negative battery cable and two electrical leads to battery.
3-233
TM 10-3950-672-24-1
3-96 TAIL, BRAKE, AND TURN SIGNAL LIGHT
3-96.1
Removal
a. Disconnect negative leads from negative battery post.
b. Disconnect two electrical connectors for light assembly (1, Figure 3-38) from crane electrical harness.
c. Remove three nuts (2), three lockwashers (3), three washers (4), three bolts (5), and light assembly (1) from
crane frame.
d. Remove retaining ring (6), lens (7), gasket (8), and bulb (9) from light assembly (1).
3-96.2 Installation
a. Install bulb (9, Figure 3-38), gasket (8), lens (7), and retaining ring (6) in light assembly (1).
b. Install light assembly (1) in crane frame with three bolts (5), three washers (4), three lockwashers (3), and three
nuts (2).
c. Connect two electrical connectors for light assembly (1) to crane electrical harness.
d. Connect negative leads to battery negative post.
LEGEND
1.
2.
3.
4.
5.
Light Assy
Nut
Lockwasher
Washer
Bolt
6.
7.
8.
9.
Retaining Ring
Lens
Gasket
Bulb
Figure 3-38. Tail, Brake, and Turn Signal Light
3-234
TM 10-3950-672-24-1
3-97 BACK-UP ALARM
3-97.1 Removal
a. Disconnect negative battery cable and two electrical leads from battery.
b. Tag and disconnect two electrical leads from back-up alarm (1, Figure 3-39).
c. Remove two nuts (2), two lockwashers (3), two washers (4), and back-up alarm (1) from crane frame.
3-97.2 Installation
a. Install back-up alarm (1, Figure 3-39) on crane frame with two washers (4), two lockwashers (3), and two nuts (2).
b. Connect two electrical leads to back-up alarm (1) and remove tags.
c. Connect negative battery cable and two electrical leads to battery.
Figure 3-39. Back-up Alarm
3-235
TM 10-3950-672-24-1
3-98 CHASSIS WIRING HARNESS
3-98.1 Removal
NOTE
To aid removal, refer to electrical schematic in Appendix F.
a.
b.
c.
d.
e.
f.
g.
h.
Disconnect negative battery cable 150 and wires 70 and 51 J from negative battery post.
Tag and disconnect wire 13A from right headlight.
Tag and disconnect wire 13B from right front side marker light.
Tag and disconnect wire 14 from right front turn signal light.
Tag and disconnect wire 12A from left headlight.
Tag and disconnect wire 12B from left front side marker light.
Tag and disconnect wire 15 from left front turn signal light.
Tag and disconnect wire 99 from horn.
NOTE
All wires numbered 51 (various suffixes) are common ground.
i.
j.
k.
I.
m.
n.
o.
p.
q.
Tag and disconnect wires 137 and 51 H from oil cooler fan motor.
Tag and disconnect wire 715 from alternator discharging light.
Tag and disconnect wires 38 and 41 from brake switch.
Tag and disconnect wires 73, 70, 67, 52A, 41, 5, 38A, 32, 25A, 18, 17, 16, 15, 14, 13D, 12D, 10, 9, 7A, 372A, 1,
3, 4, 99, 371, 169A, and 136 from crane relay panel.
Tag and disconnect wires 51 L, 73A, 51 M, 73B, 51N, and 73C from two-block override solenoid.
Tag and disconnect wires 156, 157, and 2A from starter relay.
Tag and disconnect wire 1 96A from battery connector.
Tag and disconnect wires 137 and 136 from oil cooler temperature switch.
Tag and disconnect connector from gearshift solenoid.
3-236
TM 10-3950-672-24-1
Chassis Wiring Harness (Sheet 1 of 2)
3-237
TM 10-3950-672-24-1
Chassis Wiring Harness (Sheet 2 of 2)
3-238
TM 10-3950-672-24-1
r. Tag and disconnect wires 372A, 372B, and 371 from gearshift switch.
s. Tag and disconnect wires 82, 84, and 38D from left outrigger selector switch.
t. Tag and disconnect wires 81, 83, 38C, and 38D from right outrigger selector switch.
u. Tag and disconnect wires 81, 51AA, and 51AB from right front outrigger solenoid.
v. Tag and disconnect wires 84, 51 AC, and 51AD from left rear outrigger solenoid.
w. Tag and disconnect wires 82 and 51 AD from left front outrigger solenoid.
x. Tag and disconnect wires 83, 51AB, and 51AC from right rear outrigger solenoid.
y. Tag and disconnect wires 7C, 8D, 7B, and 8B from backup switch.
z. Tag and disconnect wire 25B from transmission oil temperature switch.
aa. Tag and disconnect connector and wires 2C and 52C from neutral safety switch.
bb. Tag and disconnect wires 1 0 and 51V from tachometer sender.
cc. Tag and disconnect wires 4 and 1 69B from engine oil pressure sender.
dd. Tag and disconnect wire 51X from engine oil pressure switch.
ee. Tag and disconnect wire 1 from fuel solenoid.
ff. Tag and disconnect wires 157 and 156 from starter.
gg. Tag and disconnect connector and wires 1 96B, 5, and 1 96A from alternator.
hh. Tag and disconnect wires 3 and 1 69C from engine water temperature sensor.
ii. Tag and disconnect wire 32 from fuel level switch.
jj. Tag and disconnect wires 18 and 51Y from quick start solenoid.
kk. Tag and disconnect wire 25C from transmission oil temperature switch.
II. Tag and disconnect wires 1 3F and 16 from right tail/stoplight.
mm. Tag and disconnect wire 1 3G from right rear side marker light.
nn. Tag and disconnect wires 8A and 51Z from backup alarm.
oo. Tag and disconnect wires 17 and 1 2G from left tail/stoplight.
pp. Tag and disconnect wire 8C from backup light.
3-239
TM 10-3950-672-24-1
qq. Tag and disconnect wire 1 2F from left rear side marker light.
rr. Remove wire ties and/or clamps securing harness to crane and remove chassis harness.
3-98.2 Installation
NOTE
To aid installation, refer to electrical schematic in Appendix F.
a.
b.
c.
d.
e.
f.
g.
h.
i.
j.
k.
I.
m.
n.
o.
p.
q.
r.
s.
Position chassis harness in crane.
Connect wire 1 2F to left rear side marker light and remove tag.
Connect wire 8C to backup light and remove tag.
Connect wires 17 and 12G to left tail/stoplight and remove tag.
Connect wires 8A and 51Z to backup alarm and remove tag.
Connect wire 1 3G to right rear side marker light and remove tag.
Connect wires 1 3F and 16 to right tail/stoplight and remove tag.
Connect wire 25C to transmission oil temperature switch and remove tag.
Connect wires 18 and 51Y to quick start solenoid and remove tag.
Connect wire 32 to fuel level switch and remove tag.
Connect wires 3 and 1 69C to engine water temperature sensor and remove tag.
Connect wires 1 96B, 5, and 1 96A to alternator terminal B + and connect multi-pin connector to alternator and
remove tag.
Connect wires 157 and 156 to starter and remove tag.
Connect wire 1 to fuel solenoid and remove tag.
Connect wire 51X to engine oil pressure switch and remove tag.
Connect wires 4 and 169B to engine oil pressure sender and remove tag.
Connect wires 10 and 51V to tachometer sender and remove tag.
Connect wires 2C and 52C and connector to neutral safety switch and remove tag.
Connect wire 25B to transmission oil temperature switch and remove tag.
3-240
TM 10-3950-672-24-1
t.
u.
v.
w.
x.
y.
z.
aa.
bb.
cc.
dd.
ee.
ff.
gg.
Connect wires 7C, 8D, 7B, and 8B to backup switch and remove tag.
Connect wires 83, 51 AB, and 51 AC to right rear outrigger solenoid and remove tag.
Connect wires 82 and 51AD to left front outrigger solenoid and remove tag.
Connect wires 84, 51 AC, and 51AD to left rear outrigger solenoid and remove tag.
Connect wires 81, 51 AA, and 51 AB to right front outrigger solenoid and remove tag.
Connect wires 81, 83, 38C, and 38D to right outrigger selector switch and remove tag.
Connect wires 82, 84, and 38D to left outrigger selector switch and remove tag.
Connect wires 372A, 372B, and 371 to gearshift switch and remove tag.
Connect connector to gearshift solenoid and remove tag.
Connect wires 1 37 and 1 36 to oil cooler temperature switch and remove tag.
Connect wire 1 96A to battery connector and remove tag.
Connect wires 156, 157, and 2A to starter relay and remove tag.
Connect wires 51L, 73A, 51 M, 73B, 51N, and 73C to two-block override solenoid and remove tag.
Connect wires 73, 70, 67, 52A, 41, 5, 38A, 32, 25A, 18, 17, 16, 15, 14, 13D, 12D, 10, 9, 7A, 372A, 1, 3, 4, 99,
371, 1 69A, and 1 36 to crane relay panel and remove tag.
hh. Connect wires 38 and 41 to brake switch and remove tag.
ii. Connect wire 715 to alternator discharging light and remove tag.
jj. Connect wires 137 and 51 H to oil cooler fan motor and remove tag.
kk. Connect wire 99 to horn and remove tag.
ll. Connect wire 15 to left front turn signal light and remove tag.
mm. Connect wire 12B to left front side marker light and remove tag.
nn. Connect wire 12A to left headlight and remove tag.
oo. Connect wire 14 to right front turn signal light and remove tag.
pp. Connect wire 1 3B to right front side marker light and remove tag.
3-241
TM 10-3950-672-24-1
qq. Connect wire 1 3A to right headlight and remove tag.
rr. Secure harness to chassis with wire ties as necessary to prevent chafing and interference with other components.
Install any clamps that were removed.
ss. Connect negative battery cable 150 and wires 70 and 51J to negative battery post.
3-242
TM 10-3950-672-24-1
3-99 STARTER
3-99.1 Test
Testing Starter Motor (Installed)
a. Make sure battery is fully charged and that all battery and starter cables are serviceable and properly installed.
b. Connect a multimeter as shown in Figure 3-40. Momentarily connect a jumper as shown in Figure 3-40.
Multimeter should indicate battery voltage and starter should crank engine. If multimeter does not read battery
voltage, the starter relay is defective. If multimeter indicates battery voltage, but starter does not operate, starter
is defective.
Figure 3-40. Starter Relay Test Circuit
3-243
TM 10-3950-672-24-1
Testing Starter Components
a. Using a growler tester, place armature on it and hold a-hack saw blade against armature core while slowly
rotating armature. A short circuited armature causes blade to vibrate and be attracted to core. An armature
which is short circuited must be replaced.
b. Set multimeter for ohms and touch one probe to a commutator segment and other probe to armature core, refer
to Figure 3-41. There should be no continuity. If there is continuity, armature is grounded. Replace armature if
grounded.
Figure 3-41. Testing for Grounded Windings
c. Set multimeter for ohms and touch probes to two segments, refer to Figure 3-42. There should be continuity at
any point. If there is no continuity, winding is open circuited. Replace armature if open circuited.
Figure 3-42. Checking for Open Circuit Windings
3-244
TM 10-3950-672-24-1
d. Set multimeter for ohms and touch one probe to positive brush holder plate and other probe to the holder plate,
refer to Figure 3-43. There should be no continuity. If there is continuity, replace brush holder.
Figure 3-43. Checking Brush Holder
e. Using a multimeter, touch one probe to field winding end of brush and other probe to bare surface of yoke body,
refer to Figure 3-44. There should be no continuity. If there is continuity, field windings are grounded. Replace
yoke assembly.
Figure 3-44. Checking Field Coils
f. Using a multimeter, touch one probe to lead wire and other probe to brush, refer to Figure 3-45. There should be
continuity. If there is no continuity, field windings are open circuited. Replace yoke assembly
Figure 3-45. Checking for Open Field Coil
3-245
TM 10-3950-672-24-1
3-99.2 Bench Test
NOTE
Refer to TM 10-3950-672-24-2 Electrical Section for starter removal and installation data.
a. Turn overrunning clutch (19, Figure 3-47) clockwise by hand. Pinion (19) should turn freely.
b. Turn overrunning clutch counterclockwise. A definite resistance should be felt. If a definite resistance is not felt,
clutch assembly is defective, disassemble the starter clutch.
c. If armature turns freely and the clutch is not defective, test starter under no-load conditions.
CAUTION
Do not conduct the no-load test unless the armature turns freely.
d. Connect a 12 VDC source (A) to starter battery terminal (B) and starter frame (C). Use heavy duty cables, refer
to Figure 3-46.
A - 12-VOLT BATTERY
B - BATTERY TERMINAL
C - STARTER FRAME
D - REMOTE START SWITCH
(STARTING RELAY)
E - SWITCH TERMINAL
Figure 3-46. Starter Bench Test Setup
3-246
TM 10-3950-672-24-1
LEGEND
1.
2.
3.
4.
5.
6.
7.
8.
Nut
Lead Wire
Washer
Bolt
Lockwasher
Washer
Packing
Rubber Cover
9. Screw
10. End Frame
11. Brush Holder
1 2. Yoke
13. Armature
14. Screw
1 5. Washer
16. Packing
17.
18.
19.
20.
21.
22.
23.
24.
Housing
Seal
Clutch
Ball
Pinion
Retainer
Roller
Washer
Figure 3-47. Starter Assembly
3-247
25.
26.
27.
28.
29.
30.
31.
Spring
Mag. Switch
Screw
Lockwasher
Boot
Bearing
Bearing
TM 10-3950-672-24-1
e. Connect a remote start switch (D) between switch terminal (E) and battery terminal (B).
f. When switch is activated, starter should engage and run.
g. If magnetic switch plunger only chatters, hold-in winding is open-circuited. If nothing happens, either the pull-in
winding is open-circuited or mechanical parts are sticking. To check for sticking, remove magnetic switch end
cover and push plunger by hand.
NOTE
The magnetic switch cannot be repaired.
h. If plunger engages properly, but starter does not run, check for defective bearings, brushes, reduction gears,
armature, and field windings.
3-99.3 Disassembly
a. Remove nut (1, Figure 3-47), yoke assembly lead wire (2), and washer (3) from magnetic switch assembly (26).
b. Remove two bolts (4), two lockwashers (5), two washers (6), two packings (7), and yoke (12) from magnetic
switch assembly (26). Discard lockwashers (5) and packings (7).
c. Remove two screws (9) and yoke assembly end frame (10).
d. Lift brush springs and remove brushes from brush holder (11), refer to Figure 3-48.
e. Remove brush holder (11, Figure 3-47) from yoke (12).
f. Remove armature (13) from magnetic switch assembly (26).
g. Remove three screws (14), washers (15), and packings (16) from housing (17).
Remove housing (17) from magnetic switch assembly (26). Remove and discard seal (18).
h. Remove overrunning clutch (19) from magnetic switch assembly (26).
i. Remove steel ball (20) from overrunning clutch (19).
j. Remove starter pinion (21), retainer (22), and five rollers (23) from housing (17).
k. Remove washer (224 and spring (25) from magnetic switch assembly (26).
I. If necessary, remove screw (27) and lockwasher (28) from magnetic switch assembly (26).
3-248
TM 10-3950-672-24-1
Figure 3-48. Removing Brushes
3-99.4 Inspect, Measure, and Repair
a. Check armature commutator run-out as follows:
(1) Place armature bearings on V-blocks.
(2) Zero dial indicator on commutator.
(3) Rotate armature and record run-out. Standard is 0.0008 in. (0.02 mm), with a limit of 0.00197 in. (0.5
mm).
(4) If run-out exceeds limit, replace armature.
b. Using a micrometer, measure OD of commutator. If measurement is less than 1.38 in. (35 mm), replace
armature.
c. Measure commutator segment mica depth as shown in Figure 3-49. 'If depth is less than 0.0079 (0.2 mm),
undercut the mica.
d. Check commutator surface for burn spots. This usually indicates an open circuit.
Remove these spots using #400 abrasive paper.
e. Inspect bearings (30 and 31, Figure 3-47) for wear and damage. If damaged or worn, replace bearings using a
press.
f. Check field windings of yoke (12) for wear or damage. Check all connections for clean and tight solder joints.
g. Measure brush length. If less than 0.51 in. (13 mm), replace brush holder and/or yoke assembly.
h. Check brush springs for damage or corrosion. If damaged or corroded, replace brush holder.
i. Check that overrunning clutch rotates freely in direction of starter rotation and that it will be locked when trying to
rotate in opposite direction.
3-249
TM 10-3950-672-24-1
Figure 3-49. Measuring Segment Mica Depth
3-99.5 Assembly
a. If removed, install screw (27, Figure 3-47) with lockwasher (28).
b. Apply general purpose grease to retainer (22), rollers (23), overrunning clutch (19), steel ball (20), spring (25),
and bearings (30 and 31).
c. Install washer (24) and spring (25) in magnetic switch assembly (26).
d. Install five rollers (23), retainer (22), and starter pinion (21) in housing (17).
e. Place steel ball (20) in overrunning clutch (19) and install both in housing (17).
f. Position assembled housing (17) with new seal (18) on magnetic switch assembly (26) and secure with three
screws (14), washers (15), and new packings (16).
Torque screws 5.1 to 8.7 ft lbs (6.9 to 11.8 Nom).
g. Install armature (1 3) in magnetic switch assembly (26).
h. Position brush holder (11) to yoke (1 2). Lift springs and install brushes, refer to Figure 3-48. Ensure negative
brushes (connected to brush holder) are installed in negative holes (not insulated) and positive brushes
(connected to yoke) are installed in positive holes (separated from plate with insulator). Ensure positive brush
leads are not grounded.
i. Position yoke assembly end frame (10, Figure 3-47) on yoke (12) engaging tab on end frame with lead wire
grommet. Secure with two screws (9). Torque screws 1.95 to 3.40 ft lbs (2.6 to 4.6 N•m).
j. Position yoke (12) on magnetic switch assembly (26) engaging tab on yoke assembly with notch in magnetic
switch assembly. Secure with two bolts (4), two new lockwashers (5), two washers (6), and two new preformed
packings (7). Torque bolts 5.1 to 8.7 ft lbs (6.9 to 11.8 N•m).
k. Connect yoke assembly lead wire (2) to terminal on magnetic switch assembly (26) with washer (3) and nut (1).
Torque nut 18.1 to 26 ft lbs (24.5 to 35.3 N•m). Ensure rubber cover (8) for lead wire is installed securely.
3-250
TM 10-3950-672-24-1
APPENDIX A
REFERENCES
A-1 SCOPE
This appendix lists all forms and publications that are referenced in this manual.
A-2 PAMPHLETS
DA Pam 25-30
DA Pam 738-750
Consolidated Index of Army Publications and Blank Forms
The Army Maintenance Management System (TAMMS)
A-3 FORMS
DA Form 2404
DA Form 2028
DA Form 2028-2
SF 361
SF 364
SF 368
Equipment Inspection and Maintenance Worksheet
Recommended Changes to Publications and Blank Forms
Recommended Changes to Equipment Technical Publications
Transportation Discrepancy Report
Report of Discrepancy (ROD)
Product Quality Deficiency Report
A-4 SUPPLY BULLETINS
SB 11-573
Painting and Preservation Supplies Available for Field Use for
Electronics Command Equipment
A-5 TECHNICAL BULLETINS
None
A-6 TECHNICAL MANUALS
TM 43-0139
TM 10-3950-672-10
TM 1 0-3950-672-24P
Painting Instructions for Field Use
Operators Manual, Warehouse Crane, M469
Repair Parts and Special Tools List, Warehouse Crane, M469
A-7 FIELD MANUALS
FM 21-11
First Aid for Soldiers
A-8 MISCELLANEOUS PUBLICATIONS
CTA 50-970
Expendable Items (Except: Medical, Class V, Repair Parts and
Heraldic Items)
A-1
TM10-3950-672-24-1
APPENDIX B
MAINTENANCE ALLOCATION CHART
Section I. INTRODUCTION
B-1 THE ARMY MAINTENANCE SYSTEM
a. This introduction (section I) provides a general explanation of all maintenance and repair functions authorized at
various maintenance levels under the standard Army Maintenance System concept.
b. The Maintenance Allocation Chart (MAC) in section II designates overall authority and responsibility for the
performance of maintenance functions on the identified end item or component. The application of maintenance
functions to the end item or component will be consistent with the capacities and capabilities of the designated
maintenance levels, which are shown on the MAC in column (4) as:
Unit includes two subcolumns, C (operator/crew) and 0 (organizational) maintenance.
Direct Support includes an F subcolumn.
General Support includes an H subcolumn.
Depot includes a D subcolumn.
c. Section III lists the tools and test equipment (both special tools and common tool sets) required for each
maintenance function as referenced from section II.
d. Section IV contains supplemental instructions and explanatory notes for a particular maintenance function.
B-2 MAINTENANCE FUNCTIONS
Maintenance functions will be limited to and defined as follows:
a. Inspect. To determine the serviceability of an item by comparing its physical, mechanical and/or electrical
characteristics with established standards through examination (e.g., by sight, sound, or feel).
b. Test. To verify serviceability and to detect incipient failure by measuring the mechanical or electrical
characteristics of an item and comparing those characteristics with prescribed standards.
c. Service. Operations required periodically to keep an item in proper operating condition, i.e., to clean
(decontaminate), to preserve, to drain, to paint, or to replenish fuel, lubricants, chemical, or gases.
B-1
TM10-3950-672-24-1
B-2 MAINTENANCE FUNCTIONS - Continued
d. Adjust. To maintain, within prescribed limits, by bringing into proper or exact position, or by setting the
operating characteristics to specified parameters.
e. Align. To adjust specified variable elements of an item to bring about optimum or desired performance.
f. Calibrate. To determine and cause corrections to be made or to be adjusted on instruments or test, measuring
and diagnostic equipments used in precision measurement. Consists of comparisons of two instruments, one of which is
a certified standard of known accuracy, to detect and adjust any discrepancy in the accuracy of the instrument being
compared.
g. Remove/Install. To remove and install the same item when required to perform service or other maintenance
functions. Install may be the act of emplacing, seating, or fixing into position a spare, repair part, or module (component
or assembly) in a manner to allow the proper functioning of an equipment or system.
h. Replace. To remove an unserviceable item and install a serviceable counterpart in its place.
i. Repair. The application of maintenance services (inspect, test, service, adjust, align, calibrate, replace) or other
maintenance actions (welding, grinding, riveting, straightening, facing, remachining, or resurfacing) to restore
serviceability to an item by correcting specific damage, fault, malfunction, or failure in a part, subassembly, module
(component or assembly) end item, or system.
j. Overhaul.
That maintenance effort (service/action) necessary to restore an item to a completely
serviceable/operational condition as prescribed by maintenance standards (i.e., DMWR) in appropriate technical
publications. Overhaul is normally the highest degree of maintenance performed by the Army. Overhaul does not
normally return an item to like new condition.
k. Rebuild. Consists of those services/actions necessary for the restoration of unserviceable equipment to a like
new condition in accordance with the original manufacturing standards. Rebuild is the highest degree of material
maintenance applied to Army equipment. The rebuild operation includes the act of returning to zero those age
measurements (hours, miles, etc.) considered in classifying Army equipment/components.
B-3 EXPLANATION OF COLUMNS IN THE MAC, SECTION II
a. Column (1) - Group Number. Column 1 lists functional group code numbers, the purpose of which is to identify
components, assemblies, subassemblies, and modules within the next higher assembly.
b. Column (2) - Component/Assembly.
Column 2 contains the names of components, assemblies,
subassemblies, and modules for which maintenance is authorized.
c. Column (3) - Maintenance Function . Column 3 lists the functions to be performed on the item listed in column
2.
B-2
TM10-3950-672-24-1
B-3 EXPLANATION OF COLUMNS IN THE MAC, SECTION II Continued
d. Column (4) Maintenance Level. Column 4 specifies, by the listing of a work time figure in the appropriate
subcolumn(s), the lowest level of maintenance authorized to perform the function listed in column 3. This figure
represents the active time required to perform that maintenance function at the indicated level of maintenance. If the
number or complexity of tasks within the listed maintenance function vary at different maintenance levels, appropriate
work time figures will be shown for each level. The work time figure represents the average time required to restore an
item (assembly, subassembly, component, module, end item, or system) to a serviceable condition and typical field
operating conditions.
This time includes preparation time, (including necessary disassembly/assembly time),
troubleshooting/fault location time, and quality assurance/quality control time in addition to the time required to perform
the specific tasks identified for the maintenance function authorized in the maintenance allocation chart. The symbol
designations for the various maintenance levels are as follows:
C - Operator/Crew (Unit Level Maintenance)
O - Organizational (Unit Level Maintenance
F - Direct Support
H - General Support
D - Depot
e. Column (5) - Tools and Equipment. Column 5 specifies by code, those common tool sets, (not individual
tools) and special tools, TMDE, and support equipment required to perform the designated function.
f. Column (6) Remarks. Column 6 identifies remarks defined in Section IV of the MAC.
B-4 EXPLANATION OF COLUMNS IN TOOL AND TEST EQUIPMENT REQUIREMENTS, SECTION III
a. Column (1) - Reference Code. The tool and test equipment reference code correlates with a code used in the
MAC, Section II, column 5.
b. Column (2) - Nomenclature. This column lists the name and nomenclature of the tools and test equipment
required to perform the maintenance function.
c. Column (3) - Maintenance Level.
equipment.
The lowest level of maintenance authorized to use the tool or test
d. Column (4) - National/NATO Stock Number . This column lists the National/NATO stock number of the
specific tool or test equipment.
e. Column (5) - Tool Number . This column lists the manufacturer's part number of the tool followed by the
Federal Supply Code For Manufacturers code (five digit) in parenthesis.
B-3
TM10-3950-672-24-1
B-5 EXPLANATION OF COLUMNS IN REMARKS, SECTION IV
a. Column (1) - Reference Code. This code refers to the appropriate item in Section II, Column
6 of the MAC.
b. Column (2) - Remarks. This column provides the required explanatory information
necessary to clarify items appearing in Section II of the MAC.
B-4
TM10-3950-672-24-1
Section II. MAINTENANCE ALLOCATION CHART
FOR CRANE, WAREHOUSE M469
(1)
(2)
Group
Number
01
Component/
Assembly
Unit
C
O
Direct General
Support Support
F
H
(5)
Depot
D
Tools and
Equipment
Ref Code
Inspect
Test
Service
Replace
Repair
0.1
0.5
1.5
16.0
32.0
1, 2, 6, 12,
13, 14, 16,
18, 19, 20,
22, 24, 37,
38, 39, 40
Crankcase, Block
Cylinder Head:
Cylinder Head
Block
0102
Maint.
Function
(4)
MAINTENANCE LEVEL
ENGINE
Engine Assembly:
0101
(3)
Inspect
Replace
Repair
0.5
10.0
8.0
Inspect
Replace
Repair
1.0
20.0
8.0
Inspect
Replace
0.3
4.0
6, 8, 9, 10,
11, 12, 13,
24, 37, 38,
39, 40
Crankshaft:
Crankshaft
B-5
6, 8, 9, 12,
13, 24
(6)
Remarks
Code
TM10-3950-672-24-1
Section II. MAINTENANCE ALLOCATION CHART - Continued
FOR CRANE, WAREHOUSE M469
(1)
Group
Number
0103
(2)
Component/
Assembly
Flywheel Housing
0105
Maint.
Function
(4)
MAINTENANCE LEVEL
Unit
C
O
Direct General
Support Support
F
H
(5)
Depot
D
Tools and
Equipment
Ref Code
Flywheel Assembly:
Flywheel
0104
(3)
Inspect
Replace
Repair
0.3
2.0
Inspect
Replace
0.1
18.0
10, 11,15,
16, 24
1.0
Pistons, Connect Rods:
Pistons
Inspect
Replace
Repair
0.8
8.0
6.0
Connect Rods
Inspect
Replace
0.8
2.5
6, 8, 9, 12,
13, 24
Valves, Camshaft, &
Timing System:
Rocker Arm Assembly
Valves, Camshaft
Inspect
Adjust
Replace
0.8
1.5
9, 12, 22,
24
4.0
Inspect
Replace
Repair
1.2
2.3
2.0
B-6
(6)
Remarks
Code
TM10-3950-672-24-1
Section II. MAINTENANCE ALLOCATION CHART - Continued
FOR CRANE, WAREHOUSE M469
(1)
Group
Number
0106
(2)
Component/
Assembly
(3)
Maint.
Function
(4)
MAINTENANCE LEVEL
Unit
C
O
Direct General
Support Support
F
H
(5)
Depot
D
Tools and
Equipment
Ref Code
Engine Lubricate
System:
Oil Cooler
Inspect
Replace
Oil Pan
Inspect
Replace
4.0
4.0
Oil Pump
Inspect
Replace
Test
0.5
4.0
03
FUEL SYSTEM
0301
Fuel Injector:
0302
Fuel Pumps:
Fuel Injection
Lift Pump
Replace
0.2
4.0
10,11,15,
16, 24
0.3
Replace
1.0
Inspect
Replace
Repair
0.5
2.0
Inspect
0.5
5.0
21, 23, 24,
20
15.0
B-7
(6)
Remarks
Code
TM10-3950-672-24-1
Section II. MAINTENANCE ALLOCATION CHART - Continued
FOR CRANE, WAREHOUSE M469
(1)
Group
Number
0304
(2)
Component/
Assembly
0309
Unit
C
O
Direct General
Support Support
F
H
(5)
Depot
D
Tools and
Equipment
Ref Code
Inspect
Service
Replace
Repair
0.1
24
0.5
0.2
1.0
Tanks, Lines, Fittings,
Headers:
Tank, Fuel Assembly
Inspect
Service
Replace
0.5
1.0
2.0
Lines, Fittings
Inspect
Replace
0.5
2.0
24, 12, 16
Fuel Filters:
Fuel Water
Separator/Filter
0311
Maint.
Function
(4)
MAINTENANCE LEVEL
Air Cleaner:
Air Cleaner Assembly
0306
(3)
Inspect
Service
Replace
0.2
0.4
21, 23, 24,
20
1.0
Engine Starting Aid:
Cold Start Assembly
Inspect
Service
Replace
0.2
0.5
1.0
B-8
21, 23, 24
(6)
Remarks
Code
TM10-3950-672-24-1
Section II. MAINTENANCE ALLOCATION CHART - Continued
FOR CRANE, WAREHOUSE M469
(1)
Group
Number
0312
(2)
Component/
Assembly
Maint.
Function
(4)
MAINTENANCE LEVEL
Unit
C
O
Direct General
Support Support
F
H
(5)
Depot
D
Tools and
Equipment
Ref Code
Accelerator,
Throttle/Choke
Control:
Accelerator Control
04
(3)
Inspect
Replace
Repair
0.2
2.5
1.5
24
EXHAUST SYSTEM
Muffler & Pipes:
05
COOLING SYSTEM
0501
Radiator:
0503
Thermostat & Housing
Gasket, Hoses &
Clamps:
Inspect
Replace
0.1
24
2.0
Inspect
Test
Service
Replace
0.5
2.0
1.5
3.5
11, 30, 32
Thermostat & Housing
Gasket
Test
Replace
1.5
1.0
24
Hoses & Clamps
Inspect
Replace
0.5
2.0
B-9
(6)
Remarks
Code
TM10-3950-672-24-1
Section II. MAINTENANCE ALLOCATION CHART - Continued
FOR CRANE, WAREHOUSE M469
(1)
(2)
Group
Number
0504
0505
Component/
Assembly
Water Pump:
Maint.
Function
(4)
MAINTENANCE LEVEL
Unit
C
Inspect
Replace
O
Direct General
Support Support
F
H
(5)
Depot
D
Tools and
Equipment
Ref Code
0.5
3.0
Fan Assembly:
Fan
Belt, Drive
06
ELECTRICAL
SYSTEM
0601
Alternator:
0603
(3)
Inspect
Replace
0.1
Inspect
Replace
0.1
24
0.5
0.5
Test
Replace
Repair
0.2
0.5
Test
Replace
1.0
0.5
1, 4, 5, 16,
19, 20,
3.0
Starting Motor:
Starter/Solenoid
Assembly
Repair
1, 4, 5, 16,
19, 20
3.0
0607
Instrument or Engine
Control Panel:
Switches/Circuit
Breakers &
Instruments
Inspect
Replace
0.5
3.0
B-10
4, 16
(6)
Remarks
Code
TM10-3950-672-24-1
Section 11. MAINTENANCE ALLOCATION CHART - Continued
FOR CRANE, WAREHOUSE M469
(1)
(2)
Group
Number
0608
0609
Component/
Assembly
0611
Maint.
Function
(4)
MAINTENANCE LEVEL
Unit
C
O
Direct General
Support Support
F
H
(5)
Depot
D
Tools and
Equipment
Ref Code
Miscellaneous Items:
Light Switches
Inspect
Replace
0.5
1.0
Fuse and Relay Panel
Inspect
Replace
0.5
0.5
21, 23, 24,
Lights:
Vehicle Head, Tail,
Stop, Back-up, Spot,
Flood & Clearance
Lights
0610
(3)
Inspect
Replace
0.3
0.5
21, 23, 24
Gages, Sending Units
& Warning Switches:
Oil Temperature, Oil
Pressure, Coolant
Temperature, &
Transmission
Temperature Gage;
Fuel Quantity Sending
Unit; Low Oil
Pressure, High Engine
Temperature Switches
Inspect
Replace
Test
0.1
Horn & Back-up
Alarm:
Inspect
Replace
01
21. 23
0.5
0.2
21, 23
1.0
B-11
(6)
Remarks
Code
TM10-3950-672-24-1
Section II. MAINTENANCE ALLOCATION CHART - Continued
FOR CRANE, WAREHOUSE M469
(1)
Group
Number
0612
0613
(2)
Component/
Assembly
(3)
Maint.
Function
(4)
MAINTENANCE LEVEL
Unit
C
O
Batteries, Storage:
Inspect
Replace
0.5
1.5
Battery Tie Down
Replace
Inspect
0.5
2.0
Battery Cables
Inspect
Replace
Repair
0.5
0.5
Test
Replace
Repair
1.0
0.5
1.0
Direct General
Support Support
F
H
(5)
Depot
D
Tools and
Equipment
Ref Code
3, 4, 5
1.0
Hull or Chassis Wiring
Harness:
Wiring Harnesses
07
TRANSMISSION
0705
Gear Shift, Shift
Modulator:
Adjust
Replace
0708
Torque Converter:
Replace
0710
Transmission
Assembly:
Service
Inspect
Test
Replace
Repair
21, 23, 5
13.0
2.0
20.0
14, 15, 24
12.0
2, 4, 6, 8,
9, 10, 12,
13, 14, 15,
24
2.0
0.2
0.5
24.0
B-12
(6)
Remarks
Code
TM10-3950-672-24-1
Section II. MAINTENANCE ALLOCATION CHART - Continued
FOR CRANE, WAREHOUSE M469
(1)
Group
Number
0721
(2)
Component/
Assembly
Unit
C
O
Direct General
Support Support
F
H
(5)
Depot
D
Tools and
Equipment
Ref Code
Inspect
Replace
Repair
1.0
2.0
21, 23, 24,
2
Inspect
Service
Replace
Repair
0.5
0.5
1.5
2.5
24, 21
Service
Inspect
Replace
Repair
1.0
0.5
2, 4, 12,
13, 17, 24,
6
Inspect
Service
Replace
Repair
0.5
0.5
3.0
PROPELLER &
PROPELLER
SHAFTS
Drive Line Assembly:
10
FRONT AXLE
1000
Front Axle Assembly:
1002
Maint.
Function
(4)
MAINTENANCE LEVEL
Coolers, Pumps,
Motors Trans:
Front Pump
09
(3)
Differential, Front
Spin or No-Spin:
16.0
8.0
13, 14, 2
12.0
8.0
B-13
(6)
Remarks
Code
TM10-3950-672-24-1
Section II. MAINTENANCE ALLOCATION CHART - Continued
FOR CRANE, WAREHOUSE M469
(1)
Group
Number
1003
(2)
Component/
Assembly
Planetary Drive:
11
REAR AXLE
1100
Rear Axle Assembly:
1104
(3)
Maint.
Function
(4)
MAINTENANCE LEVEL
Unit
C
O
Inspect
Service
Replace
Repair
0.5
1.0
Service
Replace
Repair
1.0
Inspect
Service
Replace
Repair
0.2
0.5
Inspect
Adjust
Replace
1.0
1.5
8.0
Direct General
Support Support
F
H
(5)
Depot
D
Tools and
Equipment
Ref Code
2, 13, 14,
24
8.0
8.0
2, 4, 6, 12,
13, 17, 24
16.0
8.0
Steering Mechanism:
Steering Cylinder &
Linkage
12
BRAKES
1202
Service Brakes:
Brakeshoes and
Related Parts
4, 6, 10,
21, 23, 24
5.0
4.0
B-14
24, 29
(6)
Remarks
Code
TM10-3950-672-24-1
Section II. MAINTENANCE ALLOCATION CHART - Continued
FOR CRANE, WAREHOUSE M469
(1)
(2)
Group
Number
1204
Component/
Assembly
(3)
Maint.
Function
Unit
C
O
Direct General
Support Support
F
H
(5)
Depot
D
Tools and
Equipment
Ref Code
Hydraulic Brake
System:
Master Cylinder
13
WHEELS & TRACKS
1313
Tires:
Service
Inspect
Replace
Adjust
Inspect
Service
Replace
14
STEERING:
1401
Steering Control Valve
Assembly with
Steering Wheel:
Replace
Inspect
Repair
1411
Hoses, Lines &
Fittings:
Inspect
Replace
Hydraulic Pump
(Steering):
Inspect
Replace
Repair
1412
(4)
MAINTENANCE LEVEL
0.2
0.2
4, 6, 10,
21, 23, 24
1.5
0.5
0.1
0.2
21, 23, 24
3.0
8.0
0.5
4.0
0.1
2, 12, 13,
22, 23, 24
1.0
2, 15, 24,
27
0.2
1.5
2, 15, 24,
27
4.0
B-15
(6)
Remarks
Code
TM 10-3950-672-24-1
Section II. MAINTENANCE ALLOCATION CHART - Continued
FOR CRANE, WAREHOUSE M469
(1)
Group
Number
15
1503
1507
(2)
Component/
Assembly
FRAME, TOWING
ATTACHMENTS &
DRAWBARS
Pintle Hook:
(3)
Maint.
Function
(4)
MAINTENANCE LEVEL
Unit
C
Service
Replace
Repair
O
Direct General
Support Support
F
H
0.1
0.5
0.2
(5)
Depot
D
Tools and
Equipment
Ref Code
24
Landing Gear,
Leveling Jack:
Outrigger Assembly
Inspect
Replace
0.1
21, 23, 24
2.0
Cylinder, Stabilizer
Inspect
Replace
Repair
0.2
1.0
3.8
Selector Valve
Inspect
Replace
Test
0.2
1.0
0.5
18
BODY, CAB, HOOD
& HULL
1801
Door Assembly with
Latch/Handle:
Inspect
Replace
01
Access Covers, Engine
Battery & Tool Box
Inspect
Replace
0.1
15, 21, 23,
24
21, 23, 24
1.5
2.0
B-16
(6)
Remarks
Code
TM10-3950-672-24-1
Section II. MAINTENANCE ALLOCATION CHART - Continued
FOR CRANE, WAREHOUSE M469
(1)
Group
Number
1806
(2)
Component/
Assembly
2207
Maint.
Function
(4)
MAINTENANCE LEVEL
Unit
C
Inspect
Replace
0.1
Depot
D
Tools and
Equipment
Ref Code
Mirrors, Windshield
Wiper & Cab Fan:
Inspect
Replace
0.1
Cab Heater &
Defroster Assembly
Inspect
Replace
0.1
21, 23, 24
2.0
BODY, CHASSIS, OR
HULL &
ACCESSORY ITEMS
12, 13, 24,
20
4.0
HYDRAULIC &
FLUID SYSTEM
2401
Hydraulic Pump:
Inspect
Replace
Repair
2402
Hydraulic Control
Valve:
Inspect
Replace
Repair
0.2
Inspect
Replace
0.1
Strainers, Filters, Lines
and Fittings:
24
1.0
24
2406
O
Direct General
Support Support
F
H
(5)
Upholstery Seat:
Seat Assembly
22
(3)
0.5
2.0
6.0
12, 13, 15
2, 12, 13,
15, 24
2.0
6.0
1.5
B-17
2, 21, 23,
24
(6)
Remarks
Code
TM10-3950-672-24-1
Section II. MAINTENANCE ALLOCATION CHART - Continued
FOR CRANE, WAREHOUSE M469
(1)
Group
Number
2407
2408
(2)
Component/
Assembly
(3)
Maint.
Function
(4)
MAINTENANCE LEVEL
Unit
C
O
Direct General
Support Support
F
H
(5)
Depot
D
Tools and
Equipment
Ref Code
Hydraulic Cylinders:
Lift Cylinder
Replace
Repair
Inspect
0.5
2.0
5.0
12, 13, 15,
24
Tele Cylinder
Inspect
Replace
Repair
0.5
2.0
12.0
12, 13, 15,
24
Hydraulic Reservoir:
Inspect
Service
Replace
0.1
Inspect
Replace
0.1
68
WARNING,
SCANNING AND
SIGNALING
DEVICES AND
NAVIGATIONAL
INSTRUMENTS
6801
Anti Two-Block
Warning System:
2, 12, 13,
24, 21, 23
0.2
2.0
12.0
B-18
5, 12, 13,
24
(6)
Remarks
Code
TM10-3950-672-24-1
Section II. MAINTENANCE ALLOCATION CHART - Continued
FOR CRANE, WAREHOUSE M469
(1)
Group
Number
(2)
Component/
Assembly
74
CRANES, SHOVELS
AND EARTH
MOVING
EQUIPMENT AND
COMPONENTS
7411
Crane Attachments:
Boom Assembly
Sheave Assembly,
Boom Nose
Cable, Wire Rope
Hook Block
(3)
Maint.
Function
Inspect
Service
Replace
Repair
(4)
MAINTENANCE LEVEL
Unit
C
O
Direct General
Support Support
F
H
0.1
0.2
10.0
10.0
Inspect
Service
Replace
Repair
0.1
Inspect
Service
Replace
0.2
Inspect
Service
Replace
Repair
0.1
(5)
Depot
D
Tools and
Equipment
Ref Code
4, 6, 8, 9,
10, 11,12,
13, 24, 25,
26, 32, 33,
20, 31
29, 31
0.1
1.5
2.0
29, 31
2.0
2.0
29, 31
0.2
1.0
4.0
B-19
(6)
Remarks
Code
(A)
TM10-3950-672-24-1
Section II. MAINTENANCE ALLOCATION CHART - Continued
FOR CRANE, WAREHOUSE M469
(1)
Group
Number
7417
(2)
Component/
Assembly
Maint.
Function
(4)
MAINTENANCE LEVEL
Unit
C
O
Direct General
Support Support
F
H
(5)
Depot
D
Tools and
Equipment
Ref Code
Hoists:
Hoist Assembly
7419
(3)
Inspect
Service
Replace
Repair
0.2
0.3
Hydraulic Motor,
Hoist
Inspect
Replace
Repair
0.5
Cable Follower
Inspect
Replace
Repair
0.2
1.0
Inspect
Replace
Test
0.5
Planetary Gear
Reducer
Inspect
Replace
Repair
Test
0.3
Swing Motor
Inspect
Replace
Repair
Test
0.5
3.0
2.0
0.5
8.0
8.0
2, 4, 5, 10,
12, 13, 15,
22, 24
3.0
2.0
2.5
Turntable:
Swing Bearing
7.0
3.0
4.0
4.0
1.0
B-20
24, 12, 13,
15
(6)
Remarks
Code
TM10-3950-672-24-1
Section II. MAINTENANCE ALLOCATION CHART - Continued
FOR CRANE, WAREHOUSE M469
(1)
Group
Number
(2)
Component/
Assembly
Hydraulic Swivel
Electrical Swivel
(3)
Maint.
Function
(4)
MAINTENANCE LEVEL
Unit
C
O
Inspect
Replace
Repair
Test
0.5
Inspect
Replace
Repair
0.5
Direct General
Support Support
F
H
6.0
2.0
0.5
3.0
2.0
B-21
(5)
Depot
D
Tools and
Equipment
Ref Code
(6)
Remarks
Code
TM10-3950-672-24-1
Section III. TOOL AND TEST EQUIPMENT REQUIREMENTS
FOR CRANE, WAREHOUSE M469
Tool or Test
Equipment
Ref Code
Maintenance
Level
National/NATO
Stock Number
Nomenclature
Tool
Number
1
O,F,H
Analyzer, Set
Engine; STE/ICE
4910-00-124-25
2389409
2
F
Lubrication Service
Unit, Trailer Mtd
4930-00-017-9167
901765-1
3
F,H
Shop Equipment Battery
Servicing Shelter Mtd
4940-00-209-6234
SC4940-95CL-A58
4
F
Shop Equipment Contact
Maintenance Truck Mtd
SC4940-95-CL-B05
4930-00-294-9518
SECM-1975
5
F,H
Shop Equip Electrical
Rep Semitrailer Mtd
SC4940-95-CL-B05
4940-01-150-3113
85236
6
H
Shop Equip Gen Purpose
Rep, Semitrailer Mtd
SC4940-95-CL-B02
4930-01-006-3229
13221E9020
7
F
Shop Equipment
Organizational Repair
Light Truck Mtd
SC4940-95-CL-B03
4940-01-028-2672
SEORLT-S12-050-118
8
H
Shop Equipment
Machine Shop; FM
Heavy Less Power
3470-00-754-0738
SC3470-95
CLA15
9
H
Shop Equipment
Machine Shop; FM Heavy
Suppl No.1
3470-00-754-0739
SC3470-95CL-A16
10
F
Shop Equipment
Machine Shop; FM Basic
3470-00-754-0708
SC3470-95CL-A02
4940-00-37-7268
SC3470-95CL-A08
11
F
Shop Equipment
Welding, Field
Maintenance
B-22
TM10-3950-672-24-1
Section III. TOOL AND TEST EQUIPMENT REQUIREMENTS - Continued
FOR CRANE, WAREHOUSE M469
Tool or Test
Equipment
Ref Code
Maintenance
Level
National/NATO
Stock Number
Nomenclature
Tool
Number
12
F,H
Shop Equipment
Auto-Maintenance
and Repair, FM Basic
4910-00-754-0705
SC4910-95CL-A31
13
F,H
Shop Equipment
Auto-Maintenance
and Repair, FM Suppl
No.1
4910-00-754-0706
SC4910-95CL-A62
14
H
Shop Equipment
Auto-Maintenance and
Repair, FM Suppl No.2
4910-00-754-0707
SC4910-95CL-A63
15
F,H
Tool Outfit Hydraulic
Sys; Test and Repair,
3/4 Ton Trailer Mtd
SC4940-95-CL-B07
4940-01-036-5784
13221E6850
16
F,H
Shop Equipment
Fuel and Electric
System Engine FM Basic
4940-00-754-0714
SC4910-95CL-A01
17
H
Stand Maintenance
Auto-Axle
Wheel Mtd. Front and
Rear Axle Unit
4910-00-241-3329
150-AX
18
H
Test Set Diesel
Injector
4910-00-317-8265
5910359
19
F
Test Stand AutoGenerator and Starter,
Floor Mtd. 500 AMP
4910-00-767-0218
MIL-T4544
20
F,H
Tool Kit AutoFuel and Electric
System Repair
5180-00-754-0655
SC5180-95CL-B08
21
O,F,H
Shop Equipment AutoMaintenance and Repair
Common No.1
4910-00-754-0654
SC4910-95CL-A74
B-23
TM10-3950-672-24-1
Section III. TOOL AND TEST EQUIPMENT REQUIREMENTS - Continued
FOR CRANE, WAREHOUSE M469
Tool or Test
Equipment
Ref Code
Maintenance
Level
National/NATO
Stock Number
Nomenclature
Tool
Number
22
F
Shop Equipment
Auto-Maintenance and
Repair; Common No.2
4910-00-754-0650
SC4910-95CL-A72
23
O,F,H
Shop Equipment
Auto-Maintenance
and Repair; Org Suppl
No.1
4910-00-754-0653
SC4910-95CL-A73
24
O,F,H
Tool Kit, General
Mechanic-Auto
5180-00-177-7033
SC5180-90CL-N26
25
H
Tool Kit Body
and Fender Repair
5180-00-357-7731
SC5180-90CL-N62
26
F,H
Tool Kit;
Metal Workers
5180-00-754-0643
SC5180-90CL-N34
27
F
Tool Kit, Hyd
Repair; Army Aircraft
5180-00-323-4891
SC5180-99CL-A03
28
F,H
Tool Kit;
Machinist,
Post-Camp-Station
5280-00-511-1950
SC5280-95CL-A02
29
O
Tool Kit, General
Mechanic; Equip
Maintenance and
Repair
5180-00-699-5273
SC5180-90CL-N05
30
O,F
Welding Shop
Trailer Mtd,
Oxy-Acet/Elec Arc
3431-01-090-1231
11022000
31
F
Tool Kit Rigging
Wire Rope
5180-00-596-1513
SC5180-90CL-N17
32
F,H
Tool Kit Welders
5180-00-754-0661
SC5180-90CL-N39
B-24
TM10-3950-672-24-1
Section III. TOOL AND TEST EQUIPMENT REQUIREMENTS - Continued
FOR CRANE, WAREHOUSE M469
Tool or Test
Equipment
Ref Code
Maintenance
Level
National/NATO
Stock Number
Nomenclature
Tool
Number
33
F,H
Torch Arc Weld
Gas Shield,
400 AMP
3431-00-165-4112
MIL W80105
34
F,H
Welding Machine
Arc; Transformer
300 AMP AC/DC
3431-00-620-5999
425ACDCG
35
H
Welding Set Arc
Inert Gas Shield
Water Cool
General Purpose
Aluminum
SC3431-95-CL-A02
3431-00-731-4163
EDTS004-61
36
H
Shop Equipment
Canvas and Glass
Shop, Shelter Mtd
4940-00-209-6239
SC4940-95CL-A63
37
H
Liner Puller
5120-01-143-2032
3376015
38
H
Liner Driver
ST-1229
39
F
Intake Valve Seat
Extractor
337796
40
F
Exhaust Valve Seat
Extractor
ST-1276-1
B-25
TM10-3950-672-24-1
Section IV. REMARKS
Reference
Code
Remarks
(A)
No heating, welding, cutting or drilling unless authorized
by the manufacturer.
(B)
Reference TC9-510, Metal body repair and related
operations.
B-26
TM10-3950-672-24-1
APPENDIX C
EXPENDABLE/DURABLE SUPPLIES AND MATERIALS LIST
Section I. INTRODUCTION
C-1 SCOPE
This appendix lists the expendable supplies and materials you will need to operate and maintain the Crane,
Warehouse M469. These items are authorized to you by CTA 50-970, Expendable Items (except Medical, Class V,
Repair Parts and Heraldic Items).
C-2 FORMS
a. Column (1) Item Number
This number is assigned to the entry in the listing and is referenced in the narrative instructions to identify the
material (e.g., "use cleaning compound, item 1, app E).
b. Column (2) Level
This column identifies the lowest level of maintenance that requires the listed item. One of the following codes
appears in column (2).
C - Operator/Crew (Unit)
O - Organizational (Unit)
c. Column (3) National Stock Number
This is the national stock number assigned to the item. Use it to request or requisition the item.
d. Column (4) Description
Indicates Federal item name and, if required, a description to identify the item. The last line for each item
indicates the Contractor and Government Entity (CAGE) code in parentheses followed by the part number.
e. Column (5) Unit of Measure (U/M)
Indicates the measure used in performing the actual maintenance function. This measure is expressed by a
two-character alphabetical abbreviation (e.g., EA, IN, PR). If the unit of measure differs from the unit of issue,
requisition the lowest unit of issue that will satisfy your requirements.
C-1
TM10-3950-672-24-1
Section II. EXPENDABLE/DURABLE SUPPLIES AND MATERIALS LIST
(1)
(2)
(3)
(4)
ITEM
NUMBER
NATIONAL STOCK
NUMBER
DESCRIPTION
LEVEL
1
(5)
U/M
O
EA
(LATER)
2
O
TU
3
O
GL
4
O
EA
5
O
CN
C-2
TM10-3950-672-24-1
APPENDIX D
TORQUE VALUE CHARTS
D-1
TM10-3950-672-24-1
Torque values as shown are for nut-bolt combinations that have not been plated and have not had special lubrications
applied to them and/or for those using flat or split ring types of washers. (Discount the residual lubricant present that was
applied at the time of manufacture.)
Figure D-1. Torque Values (Sheet 1 of 3)
D-2
TM10-3950-672-24-1
Torque values as shown are for nut-bolt combinations that have been plated or have had lubrication applied.
Figure D-1. Torque Values (Sheet 2 of 3)
D-3
TM10-3950-672-24-1
Torque values as shown are for nut-bolt combinations that have not been plated and have not had special lubrications
applied to them and/or for those using flat or split ring types of washers. (discount the residual lubricant present that was
applied at the time of manufacture.)
Metric Torque Values
Figure D-1. Torque Values (Sheet 3 of 3)
D-4
TM10-3950-672-24-1
APPENDIX E
SERVICE MAINTENANCE PACKAGES
TABLE OF CONTENTS
Subject
Page
Air Intake System ......................................................................................................................................................E-7
Description .............................................................................................................................................................E-7
Maintenance ..........................................................................................................................................................E-7
Troubleshooting .....................................................................................................................................................E-7
Filter Element Replacement ...................................................................................................................................E-8
Element Cleaning ..................................................................................................................................................E-8
Inspection ............................................................................................................................................................E-10
Water Cooling System ............................................................................................................................................E-12
Description ...........................................................................................................................................................E-12
Maintenance ........................................................................................................................................................E-12
Troubleshooting ...................................................................................................................................................E-12
General ................................................................................................................................................................E-14
Effects of Cooling System Neglect .......................................................................................................................E-14
Rust Prevention ...................................................................................................................................................E-15
Seasonal Care .....................................................................................................................................................E-15
Cleaning ..............................................................................................................................................................E-15
Pressure Flushing ................................................................................................................................................E-16
Component Inspection .........................................................................................................................................E-16
Test Equipment ....................................................................................................................................................E-17
Antifreeze ............................................................................................................................................................E-18
Coolant Recommendations ..................................................................................................................................E-18
Coolant Filter .......................................................................................................................................................E-18
Transmission ...........................................................................................................................................................E-20
Description ...........................................................................................................................................................E-20
Maintenance ........................................................................................................................................................E-20
Troubleshooting ...................................................................................................................................................E-20
General Overhaul Information ..............................................................................................................................E-40
Cleaning and Inspection .......................................................................................................................................E-41
Assembly Procedures ..........................................................................................................................................E-43
Transmission Disassembly (Major Component Removal) .....................................................................................E-43
Transmission Disassembly and Assembly (Subassemblies) .................................................................................E-45
Transmission Assembly .......................................................................................................................................E-54
Lubrication ...........................................................................................................................................................E-56
Front Drive Axle ......................................................................................................................................................E-57
Description ...........................................................................................................................................................E-57
Maintenance ........................................................................................................................................................E-57
Disassembly of the Wheel Ends ...........................................................................................................................E-57
Assembly of the Wheel Ends ...............................................................................................................................E-57
E-1
TM10-3950-672-24-1
TABLE OF CONTENTS - continued
Subject
Page
Front Drive Axle - continued
Disassembly of the Drive Unit ..............................................................................................................................E-60
Assembly of the Drive Unit ...................................................................................................................................E-64
Cleaning, Inspection and Repair ...........................................................................................................................E-73
Lubrication ...........................................................................................................................................................E-75
Front Steering Control Valve ...................................................................................................................................E-79
Description ...........................................................................................................................................................E-79
Theory of Operation .............................................................................................................................................E-79
Maintenance ........................................................................................................................................................E-79
Prior to Disassembly ............................................................................................................................................E-79
Disassembly ........................................................................................................................................................E-81
Assembly .............................................................................................................................................................E-83
Steer Pump .............................................................................................................................................................E-88
Description ...........................................................................................................................................................E-88
Maintenance ........................................................................................................................................................E-88
Troubleshooting ...................................................................................................................................................E-88
Disassembly ........................................................................................................................................................E-89
Inspection ............................................................................................................................................................E-90
General ................................................................................................................................................................E-90
Assembly .............................................................................................................................................................E-90
Brake Master Cylinder .............................................................................................................................................E-92
Description ...........................................................................................................................................................E-92
Theory of Operation .............................................................................................................................................E-92
Maintenance ........................................................................................................................................................E-94
Troubleshooting ...................................................................................................................................................E-94
Rockwell FSH Hydraulic Brakes ..............................................................................................................................E-96
Description ...........................................................................................................................................................E-96
Maintenance ........................................................................................................................................................E-96
Disassembly ........................................................................................................................................................E-96
Cleaning and Inspection .......................................................................................................................................E-96
Wheel Cylinder Maintenance ...............................................................................................................................E-98
Hoist Motor Control Valve (Grove 1 5B Hoist) ....................................................................................................... E-100
Description ......................................................................................................................................................... E-100
Maintenance ...................................................................................................................................................... E-102
Disassembly ...................................................................................................................................................... E-102
Cleaning and Inspection ..................................................................................................................................... E-102
Assembly ........................................................................................................................................................... E-102
Pilot Operated Check Valve .................................................................................................................................. E-103
Description ......................................................................................................................................................... E-103
Maintenance ...................................................................................................................................................... E-103
Disassembly ...................................................................................................................................................... E-103
E-2
TM10-3950-672-24-1
TABLE OF CONTENTS - continued
Subject
Page
Pilot Operated Check Valve - Continued
Cleaning and Inspection ..................................................................................................................................... E-103
Assembly ........................................................................................................................................................... E-103
Holding Valve ........................................................................................................................................................ E-105
Description ......................................................................................................................................................... E-105
Maintenance ...................................................................................................................................................... E-105
Disassembly ...................................................................................................................................................... E-105
Cleaning and Inspection ..................................................................................................................................... E-105
Assembly ........................................................................................................................................................... E-105
Holding Valve ........................................................................................................................................................ E-107
Description ......................................................................................................................................................... E-107
Maintenance ...................................................................................................................................................... E-107
Disassembly ...................................................................................................................................................... E-107
Assembly ........................................................................................................................................................... E-107
Hydraulic Pump ..................................................................................................................................................... E-109
Description ......................................................................................................................................................... E-109
Maintenance ...................................................................................................................................................... E-109
Disassembly ...................................................................................................................................................... E-109
Inspection .......................................................................................................................................................... E-109
Assembly ........................................................................................................................................................... E-109
Crossover Relief Valve ......................................................................................................................................... E-112
Description ......................................................................................................................................................... E-112
Maintenance ...................................................................................................................................................... E-112
Disassembly ...................................................................................................................................................... E-112
Cleaning and Inspection ..................................................................................................................................... E-112
Assembly ........................................................................................................................................................... E-112
Solenoid Valve ...................................................................................................................................................... E-114
Description ......................................................................................................................................................... E-114
Maintenance ...................................................................................................................................................... E-114
Disassembly ...................................................................................................................................................... E-114
Assembly ........................................................................................................................................................... E-114
Directional Control Valve ....................................................................................................................................... E-115
Description ......................................................................................................................................................... E-115
Maintenance ...................................................................................................................................................... E-115
Troubleshooting ................................................................................................................................................. E-115
Disassembly ...................................................................................................................................................... E-116
Assembly ........................................................................................................................................................... E-118
E-3
TM10-3950-672-24-1
TABLE OF CONTENTS - continued
Subject
Page
Swing Motor .......................................................................................................................................................... E-119
Description ......................................................................................................................................................... E-119
Maintenance ...................................................................................................................................................... E-119
Disassembly ...................................................................................................................................................... E-119
Cleaning and Inspection . .................................................................................................................................. E-123
Assembly ........................................................................................................................................................... E-123
Planetary Gear Reducer ........................................................................................................................................ E-128
Description ......................................................................................................................................................... E-128
Maintenance ...................................................................................................................................................... E-128
Disassembly ...................................................................................................................................................... E-128
Cleaning and Inspection ..................................................................................................................................... E-128
Assembly ........................................................................................................................................................... E-130
Grove Model HO-12 Hoist ..................................................................................................................................... E-132
Description ......................................................................................................................................................... E-132
Theory of Operation ........................................................................................................................................... E-132
Maintenance ...................................................................................................................................................... E-133
Troubleshooting . ............................................................................................................................................. .E-133
Disassembly ...................................................................................................................................................... E-137
Cleaning and Inspection ..................................................................................................................................... E-141
Assembly ........................................................................................................................................................... E-141
Vane Type Motor . ................................................................................................................................................ E-147
Description ......................................................................................................................................................... E-147
Theory of Operation ........................................................................................................................................... E-147
Maintenance ...................................................................................................................................................... E-147
Troubleshooting ................................................................................................................................................. E-147
Disassembly ...................................................................................................................................................... E-148
Cleaning and Inspection . .................................................................................................................................. E-150
Assembly ........................................................................................................................................................... E-152
Hydraulic Swivel ................................................................................................................................................... E-155
Description ......................................................................................................................................................... E-155
Theory of Operation ........................................................................................................................................... E-155
Maintenance ...................................................................................................................................................... E-155
Disassembly ...................................................................................................................................................... E-155
Cleaning and Inspection . .................................................................................................................................. E-155
Assembly ........................................................................................................................................................... E-155
Test ................................................................................................................................................................... E-158
E-4
TM10-3950-672-24-1
TABLE OF CONTENTS - continued
Subject
Page
Electric Swivel ...................................................................................................................................................... E-159
Description ......................................................................................................................................................... E-159
Theory of Operation ........................................................................................................................................ . E-159
Maintenance ...................................................................................................................................................... E-159
Disassembly ...................................................................................................................................................... E-159
Cleaning and Inspection ..................................................................................................................................... E-159
Assembly ........................................................................................................................................................... E-160
Cab Heater/Defroster (Hot Water) ......................................................................................................................... E-162
Description ......................................................................................................................................................... E-162
Theory of Operation ........................................................................................................................................... E-162
Maintenance ...................................................................................................................................................... E-162
Disassembly ...................................................................................................................................................... E-162
Inspection .......................................................................................................................................................... E-162
Assembly ........................................................................................................................................................... E-162
E-5/(E-6 blank)
TM10-3950-672-24-1
AIR INTAKE SYSTEM
DESCRIPTION
The engine air intake system consists of an air cleaner
and associated piping for channeling the air from the
atmosphere to the engine intake manifold. The intake
pipe also provides the necessary connections for a
restriction indicator to indicate a dirty air cleaner. The
air cleaner is the dry-type with a replaceable element.
MAINTENANCE
TROUBLESHOOTING .
Check For Filter Restriction.
Dust passing the air cleaner, even through small holes,
can cause rapid engine wear. Ensure all connections
between the air cleaner and the engine are tight and
sealed. If these connections are all well sealed, and
there is still evidence of dust leakage, check the
following places for possible trouble.
As a dry cleaner element becomes loaded with dust, the
vacuum on the engine side of the air cleaner (at the air
cleaner outlet) increases. The vacuum is generally
measured as restriction in inches of water.
The engine manufacturer places a recommended limit
on the amount of restriction the engine will withstand
without loss of performance before the air filter element
is cleaned or replaced. For the Cummins diesel engine,
the maximum allowable air restriction is 20 inches (50.8
cm) of water maximum with a dirty air filter at maximum
governed speed.
NOTE
Dust that gets by the air cleaner
system can often be detected by
looking for dust streaks on the air
transfer tubing or just inside the
intake manifold inlet.
Mechanical gauges, warning devices, indicators, and
water manometers can be used to determine when the
air
intake
restriction
reaches
the
maximum
recommended limit.
1. Inspect the air cleaner outlet tube for damage.
2. Ensure the element gasket washer is not damaged
and the washer's rubber face seals against the element.
The AP308T features an air restriction indicator
mounted in the air intake piping just after the air cleaner
assembly. The indicator consists of a spring in a clear
tube with graduated scale lines scribed on the outside of
the tube to indicate vacuum pressure. A red line on the
graduated scale indicates when the air filter should be
cleaned or replaced.
3. Inspect the element gasket for damage.
4. Check for structural failures.
must be replaced.
Any damaged parts
5. Inspect the restriction indicator tap for leaks.
E-7
TM10-3950-672-24-1
6. Ensure the O-ring around the air cleaner body is in
place and not damaged.
With a new air filter installed, the engine draws air
through the filter virtually unrestricted. As dirt and other
foreign matter become trapped by the air filter, vacuum
pressure in the air intake piping gradually increases as
the engine pulls air through the restricted filter. The
gradual increase in vacuum pressure results in a
gradual compression of the spring in the air restriction
Indicator. As the spring compresses, it indicates the
current level of air restriction.
7. Install the baffle on the air cleaner body with the two
arrows pointing up. Secure with the clamp band and
tighten the hex head bolt.
ELEMENT CLEANING.
Washing in a water-detergent solution or blowing out
with compressed air are two accepted methods for
cleaning the element of the air cleaners. If the elements
contain substantial amounts of soot or oil fumes,
washing in water works better than compressed air. If
the contaminant is found to be mostly loose dust, either
method works equally well.
FILTER ELEMENT REPLACEMENT .
CAUTION
NEVER SERVICE THE AIR CLEANER
WHILE THE ENGINE IS RUNNING .
If cleaned with compressed air, elements can be put
back into service immediately; however, if cleaned by
washing, elements must be dried before returning them
to service.
1. Loosen the hex head bolt on the clamp band and
remove the clamp band and baffle.
2. Remove the thumbscrew and washer; then withdraw
the element.
NOTE
3.
Clean the element as outlined in ELEMENT
CLEANING. Replace the element after six cleanings or
annually, whichever comes first.
Some elements are partially covered
by a plastic sleeve with fins. The
covered portion can be cleaned with
water or air without removing the
sleeve. Use a stiff fiber (not wire)
brush to remove oil and grease
deposits from the sleeve and fins.
Never remove the sleeve and fins
from the element.
4. Inspect all parts of the intake system and air cleaner.
5. Install the cleaned or new element into the air
cleaner body, securing it with the washer and
thumbscrew.
E-8
TM 10-3950-672-24-1
Cleaning With Compressed Air.
When the loose dust and soot have been removed, the
element is ready to be washed.
CAUTION
NEVER
USE
GASOLINE
SOLVENTS
TO
CLEAN
ELEMENTS.
OR
THE
2. Dissolve the detergent in a small amount of cool
water.
3. Add warm water (approximately 100 degrees F
[38 degrees C]) to get the proper proportions of
detergent and water (about one cup of detergent to five
gallons of water).
4. Soak the element in the solution for at least 15
minutes.
CAUTION
PRESSURE ATTHE AIR NOZZLE
MUST NOT EXCEED 100 PSI (689
KPA/6.89 BAR).
1. Direct a jet of clean, dry air from the inside of
the filter element, perpendicular to the pleats.
2. Move the air jet up and down along the pleats,
slowly rotating the element, until no more dust is being
removed. Do not rupture the element with the nozzle or
the air jet.
5. Agitate the element for about two minutes to
loosen the dirt.
Cleaning With Water.
1. The elements can be cleaned by washing with
water and a good non-sudsing detergent. Direct a jet of
clean, dry air from the inside of the filter element.
E-9
TM 10-3950-672-24-1
INSPECTION.
Element.
CAUTION
CAUTION
WATER PRESSURE FROM A HOSE
OR TAP SHOULD NOT EXCEED 40
PSI (276 KPA/2.76 BAR).
DO NOT TOUCH THE INSIDE OF THE
FILTER WITH A BARE LIGHT BULB.
6. Rinse the element with clean water until the
water coming through the element is clean. Air-dry the
element thoroughly before using.
After cleaning the filter element, inspect the element for
damage. Look for dust on the clean air side. the
slightest rupture, or damaged gaskets. A good method
to use to detect ruptures in the element is to place a
light inside the element and look toward the light from
the outside. Any hole in the element, even the smallest.
will pass dust to the engine and cause unnecessary
engine wear. Element replacement is recommended if
such holes are evident.
CAUTION
HEATED
AIR
(MAXIMUM
TEMPERATURE 160 DEGREES F [71
DEGREES
C])
MUST
HAVE
CIRCULATION. DO NOT USE LIGHT
BULBS FOR DRYING ELEMENTS.
Air Cleaner Body.
Before installing the filter element, remove any foreign
material (leaves, lint or other foreign matter)that may
have collected inside the air cleaner body. Inspect the
inside of the body for dents or other damage that would
interfere with air flow or with the fins on the element or
inside the body. Repair any body dents, being careful
not to damage the sealing surfaces.
7. Mechanized drying methods can be used.
E-10
TM 10-3950-672-24-1
Check the condition of the valve and lips frequently and
keep them clean. The valve lips should be open only
when the engine is shut down, or running at low idle
speed. If the valve is turned inside out, check for a
clogged air cleaner inlet. Malfunction of this valve does
not reduce the air cleaner effectiveness, but does allow
the element to get dirty faster and reduces serviceable
life. If a valve is lost or damaged. replace it with a new
valve of the same part number.
Vacuator Valve.
Vacuator valves are designed to expel loose dust and
dirt accumulations from the air cleaner body
automatically, thus lengthening the element service-life.
The valve lips must point straight down to operate
effectively, and must be kept free from debris. Mud and
chaff can lodge in these lips periodically and hold them
open during engine operation.
Duct Work.
1. Check the intake pipe cap and screen for
accumulation of leaves, trash, and other debris that
could restrict air flow. Repair the screen or replace the
cap if any large holes are found in the screen.
2. Check all mounting hardware for security to
eliminate possible vibration of intake piping. Such
vibration leads to early failure of hoses, clamps, and
mounting parts, and can cause hoses to slip off the
connecting pipes, allowing unfiltered air into the engine
air intake.
3. Check hoses for cracks, chafing, or
deterioration, and replace at the first sign of probable
failure.
E-11
TM 10-3950-672-24-1
WATER COOLING SYSTEM
DESCRIPTION
antifreeze is used, follow the antifreeze manufacturers
The cooling system consists of the radiator, engine
requirements for proper protection in regards to cooling
cooling circuit, and the connecting hoses. Its capacity
system capacity, and only ethylene glycol base
varies according to the engine being used.
The
permanent antifreeze should be used.
Engines
temperature is controlled by a 180 degree F (82 degrees
equipped with cooling system filters should not use
C) thermostat located between the top of the engine and
antifreeze with antileak additives because the additives
the top of the radiator. The radiator, in addition to
will clog the filter.
cooling the engine, also contains a cooler which cools
the automatic transmission oil. At all times, the coolant
should be properly inhibited against corrosion.
If
MAINTENANCE
TROUBLESHOOTING
SYMPTOM
1. Engine overheating.
PROBABLE CAUSE
SOLUTION
Coolant Loss.
a. Leaks at any of the following: gaskets, hose connections, water pump, radiator, heater, core plugs, drain cock or
plugs, cracked head or block.
a. Chock, locate, and repair
leaks. Replace hoses, clamps, and
other parts as required.
NOTE
Internal leakage is Indicated by the
presence of coolant in the engine
crankcase, or oil in the radiator.
Check for cracked cylinder head or
block, or a blown head gasket.
Boiling.
a. Radiator or other parts of cooling
system clogged with rust or scale.
a. Drain and flush cooling system.
b. Grille or bug screen clogged.
c. Radiator core fins damaged.
b. Clear obstructions.
c. Straighten fins.
d. Thermostat damaged - stuck
closed.
d. Replace thermostat.
e. Water pump leaking air into system.
e. Repair or replace water pump.
f. Radiator hose collapsed or rotting inwardly.
f. Replace radiator hoses.
E-12
TM 10-3950-672-24-1
SYMPTOM
1. Engine overheating (continued).
PROBABLE CAUSE
g. Radiator pressure cap damaged.
h. Cylinder head loose, causing exhaust gas leakage into cooling system.
i. Water pump impeller corroded or
loose on shaft.
j. Antifreeze protection inadequate,
causing partial freeze-up.
SOLUTION
g. Replace cap.
h. Check and tighten.
i. Repair or replace water pump.
j. Check and add antifreeze as required.
After Boil.
a. Improper installation of thermostat.
a. Check and correct.
b. Damaged thermostat.
b. Replace thermostat.
c. High temperature thermostat used
with alcohol-type antifreeze.
antifreeze.
d. Excessive sediment in cooling system.
c. Use thermostat of proper operating range; use ethylene-glycol type
a. Excessive sediment in cooling system.
a. Drain and flush cooling system.
b. Air or exhaust leak into cooling system.
Check, locate, and repair.
d. Drain and flush cooling system.
Foaming.
Radiator Air Flow Obstructed.
a. Leaves, dirt and foreign material.
a. Clean away obstruction.
b. Bent fan blades.
c. Improper valve timing or sticking
valves.
b. Straighten blades or replace fan.
c. Check and repair or re-time engine.
d. Clogged muffler or pipe.
e. Dragging brakes.
d. Check and correct.
e. Check brakes and repair as required.
f. Check and add oil as required.
f. Low engine oil level.
E-13
TM 10-3950-672-24-1
SYMPTOM
1. Engine overheating (continued).
2. Overcooling.
PROBABLE CAUSE
SOLUTION
g. Engine overloaded.
g. Operate engine in proper load
range.
h. Stiff rebuilt engine.
h. Break-in engine properly.
a
a. Install thermostat.
Thermostat not installed.
b. Damaged thermostat stuck open.
b. Replace thermostat.
c. Short runs and intermittent driving.
c. Warm up engine properly.
traced to overheating; however, an engine that is
running too cold can be just as troublesome.
GENERAL.
The cooling system includes the radiator, thermostat,
the fan, and fan and water pump drive belts. Radiator
hoses are also included in this group.
Overheating.
An engine that is overheating may lead to troubles such
as the following.
Because the effects or damage that result from an
improperly maintained cooling system usually occur
gradually, this system is often times neglected.
However, the cooling system must be treated with the
same attention to maintenance as is given such other
systems as fuel, air, and brakes. A review of the cooling
system's function will show this more clearly.
1. Burned valves.
2. Pinging or knocking.
3. Excessive fuel consumption.
In general, the circulation of water through the cooling
system relies entirely upon the water pump. The water
pump draws water from the radiator and forces it
through the water jackets and cylinder head. There it
accumulates heat. Then the water flows to the upper
radiator tank and down through the radiator core, being
cooled by air from the fan. This process of removing
heat from water as it circulates holds the engine to its
efficient operating temperature.
4. Poor lubrication - increased engine wear.
The following paragraphs point out several facts about
cooling system components, the effects of cooling
system neglect, and procedures to be followed for
cooling system maintenance.
Overcooling.
EFFECTS OF COOLING SYSTEM NEGLECT.
1. Excessive fuel consumption.
Whenever an engine does not perform at top efficiency,
neglected cooling system may be at fault even though
the engine part directly responsible is not even a part of
the cooling system. Most of these problems will be
2. Sludge formation in crankcase.
5. Sticking valves.
6. Short injector life.
7. Engine hot spots.
8. Need for higher grade fuel.
The following engine troubles result when an engine is
overcooled.
3. Corrosive acids formed in crankcase.
4. Excessive fuel deposits in the exhaust system
E-14
TM 10-3950-672-24-1
CLEANING
RUST PREVENTION.
WARNING
THE
COOLING
SYSTEM
IS
PRESSURIZED.
PERSONNEL
INJURY FROM SCALDING MAY
RESULT WHEN REMOVING THE
RADIATOR
CAP
AFTER
THE
COOLANT
HAS
REACHED
OPERATING
TEMPERATURE.
ALLOW THE ENGINE TO COOL
BEFORE
BEGINNING
THE
CLEANING OPERATION.
1. Turn on coolant flow to the heater to allow
complete circulation during the draining, cleaning, and
flushing operation.
2. Slowly open radiator cap to allow any pressure
in the system to escape. Then open the radiator drain
cock and drain the engine coolant into a suitable
container. Open the drain cock on the engine block and
drain the coolant from the engine. Close both drain
cocks.
3. Following
the
cleaning
compound
manufacturer's instructions, pour cleaning compound
into radiator. Then fill coolant system with clean, fresh
water. Install the radiator cap.
4. Place a clean, suitable drain pan under the
radiator to catch any overflow from the overflow bottle.
Do not allow cleaning solution to spill onto painted
surfaces of the vehicle.
5. Start the diesel engine and allow the engine
coolant temperature to reach its operating temperature
of 1800 F (82o C) or above. If necessary, cover the
radiator to achieve the necessary operating
temperature, but do not allow the coolant to boil over.
Allow the engine to idle for at least two hours (or as
specified by the cleaning compound manufacturer) with
the coolant temperature at 180o F (82o C). Do not drive
the crane and If necessary, add water to the overflow
bottle to maintain the cleaning solution at the "HOT"
level. Stop the diesel engine as needed if the cleaning
solution begins to boil.
6. Stop the diesel engine and observe the coolant
temperature gauge. When there is no change in the
temperature gauge reading (indicating the coolant
temperature has dropped), slowly remove the radiator
cap and open the radiator drain cock and drain the
cleaning compound into a suitable container. Then
open the engine block drain cock and drain the engine
block into a suitable container. Close both drain cocks.
To keep engines operating at newness efficiency, all
forms of rust formation must be prevented.
The
formation of rust in the cooling system is a result of the
interaction of water, iron, and oxygen, and can only be
prevented by maintaining full strength corrosion
protection at all times.
For rust protection during the winter months an
antifreeze having a corrosion preventive should be
installed in the fall. When spring arrives, drain the old
antifreeze solution from the cooling system as all
corrosion inhibitors are weakened and may be entirely
exhausted by this time depending on how the engine
has been taken care of and how many operating hours
have been put on it. To rustproof the cooling system for
summer driving, add a good rust inhibitor with the first
fill of clean water, if water is to be used, in the spring.
This solution should then be drained in the fall and a
fresh filling of chemically treated anti-freeze installed. A
good quick test to determine if the cooling system needs
cleaning or flushing due to rust, scale, or grease is to
wipe the inside of the filler neck and header tank with
the finger. If any sludge or excessive rust and scale are
present and evidence by this test, the system needs a
thorough cleaning.
SEASONAL CARE.
The cooling system of any vehicle should be drained
and flushed out at least once a year. Unless the coolant
has a corrosion preventive in it, rust and scale will
eventually clog up the cooling system. Any effective
commercially available flushing agent should be used at
least once a year, and preferably twice a year, to ensure
against a buildup of rust and scale.
NOTE
Remove the radiator cap when
draining the system to ensure proper
draining.
E-15
TM 10-3950-672-24-1
10. After completing the flushing operation, clean
out the radiator overflow pipe; inspect the water pump;
clean the thermostat and the radiator cap control valves.
Check the thermostat for proper operation before
installation.
11. Blow insects and dirt from the radiator core air
passages, using water, if necessary, to soften
obstructions.
7. If the radiator core clogging is relieved but not
fully corrected, after allowing the engine to cool,
pressure flush the cooling system and repeat the
cleaning operation.
8. If pressure flushing the system does not correct
coolant system problems then the radiator must be
replaced.
PRESSURE FLUSHING.
COMPONENT INSPECTION.
1. Disconnect the upper radiator hose which
connects the radiator core to the engine water outlet,
and remove the thermostat from the engine water outlet.
2. Clamp a convenient length of hose to the
radiator core outlet opening, and attach another suitable
length of hose to the radiator inlet opening to carry away
the flushing stream.
3. Connect the flushing gun to compressed air and
water pressure, and clamp the gun nozzle to the hose
attached to the radiator outlet opening.
4. With the radiator cap on tight, fill the core with
water. Turn on air pressure in short blasts to prevent
core damage.
5. Continue filling the radiator with water and
applying air pressure as above until the water comes out
clear.
6. Clamp the flushing gun nozzle firmly to a hose
attached securely to the engine water outlet opening.
Fill the engine block with water, partly covering the
water inlet opening to permit complete filing.
7. Turn on compressed air to blow out water and
loose sediment. Continue filling with water and blowing
out with air until flushing stream comes out clear.
8. For badly clogged water jackets that do not
respond to regular pressure flushing, remove the engine
cylinder head and core hole plugs, and with a suitable
length of small copper tubing attached to the flushing
gun nozzle, flush the water jackets through the
openings.
9. When the vehicle is equipped with a water
heater connected to the cooling system, flush the
heater, following the same procedure as for the radiator
core.
Radiator.
1. Top and Bottom Tank.
Look for leaks,
particularly where the tank is soldered to the core.
Vibration and pulsation from pressure can fatigue
soldered seams.
2. Filler Neck. The sealing seat must be smooth
and clean. Cams on filler neck must not be bent or worn
so as to allow a loose fitting cap. Ensure the overflow
tube is not plugged.
3. Radiator Cap. This is the pressure-setting type.
Its purpose is to hold the cooling system under a slight
pressure, increasing the boiling point of the cooling
solution and preventing loss of solution due to
evaporation and overflow.
The cap has a spring-loaded valve, the seat of which is
below the overflow pipe in the filler neck. This prevents
the escape of air or liquid while the cap is in position.
When the cooling system pressure reaches a
predetermined point, the cap valve opens and will again
close when the pressure falls below the predetermined
point.
When removing the pressure type cap from the radiator,
perform the operation in two steps. Loosening the cap
to its first notch raises the valve from the gasket and
releases the pressure through the overflow pipe. In the
first stage position of the cap, it should be possible to
depress the cap approximately 0.125-inch (3.175 mm).
The prongs on the cap can be bent to adjust this
condition. Care must be taken that the cap is not too
loose as this would prevent proper sealing.
E-16
TM 10-3950-672-24-1
Water Pump.
WARNING
The pump should be checked carefully for leaks and
proper lubrication, and if leaking, cracked, or worn, it
should be rebuilt or replaced promptly.
WHEN
REMOVING
THE
CAP,
LOOSEN IT SLOWLY AND THEN
PAUSE A MOMENT.
THIS WILL
AVOID POSSIBLE BURNING BY HOT
WATER OR STEAM.CONTINUE TO
TURN THE CAP TO THE LEFT UNTIL
IT CAN BE REMOVED.
Fans and Belts.
The fan should be checked for loose or bent blades. A
loose blade might work free during operation and cause
damage.
4. Tubes. Because these are very small they can
be come easily clogged, or partially so, by rust and
scale The general condition of the cooling system and
operating temperature are indications as to whether or
no1 tubes are clean. Another good test is to feel the
core for cold spots.
5. Fins. These thin metal sheets dissipate heat
picked up by the tubes. They should be kept free of
bugs, leaves, straw etc., so as to allow the free passage
of air. Bent fins should be straightened.
A bent blade could cause an imbalance and cause the
water pump to fail prematurely, and it will reduce the
fan's efficiency.
Refer to the engine manual for your particular engine for
fan and other belt adjustment specifications.
When one belt of dual drives is damaged or worn, they
must both be changed as a matched pair.
Engine Water Jacket.
Thermostat.
The water jacket permits coolant to be circulated around
the cylinder walls, combustion chamber, and valve
assemblies. Some of these coolant passages are small
and can easily become clogged, if the cooling system
does not receive the proper maintenance.
Thermostats used in these carriers are of the nonadjustable type and are incorporated in the cooling
system for the purpose of retarding or restricting the
circulation of coolant during engine warm up. Engine
overheating and loss of coolant is sometimes due to an
inoperative thermostat. To check for this condition,
remove the thermostat and test by submerging it in hot
water and noting the temperature at which the
thermostat opens and closes. Use an accurate high
temperature thermometer for making this test.
1. Core Plugs. These are sometimes mistakenly
called freeze plugs. They do not provide protection
against freezing expansion, but are only present
because of engine block casting methods. Remove and
replace core plugs that show signs of leaking or rusting
through.
Use an installation tool for core plug
replacement.
2. Drain Plugs. The water jacket of each engine
has one or more drain plugs. These should receive
seasonal care and kept free of rust and scale.
3. Gaskets. Gaskets must be in good condition to
prevent both internal and external leaks. If there are
external leaks around gaskets, there may also be
internal leaks into the engine. Proper tightening of the
head bolts with a torque wrench is essential for
preventing leaks around the head gasket.
Hose and Clamps.
Hoses and their connections must be checked regularly
because they are often the source of hidden trouble.
Hoses may often times appear in good condition on the
outside while the inside will be partially deteriorated. If
there are any doubts about a hose doing its job,
replacement should be made. The clamps should be
inspected to make sure they are strong enough to hold a
tight connection.
TEST EQUIPMENT.
The hydrometer is a primary aid in maintaining the
cooling system at top efficiency. Hydrometers, which
are used to test the freezing protection of an anti-freeze
solution, work on the principle of specific gravity or
E-17
TM 10-3950-672-24-1
Inhibitor depletion will occur in ethylene glycol base
antifreeze through normal service. The inhibitors should
be replenished at approximately 500 hour intervals with
a non-chromate inhibitor.
Commercially available
inhibitors may be used to re-inhibit antifreeze solutions.
weight of the antifreeze solution. They are simple to
use provided they are used in the proper manner.
When using the temperature sensitive hydrometer, the
solution must be warm (at least 110 degrees F [43
degrees C]), the temperature and level must be noted
correctly, and the float must be able to move freely.
Read only the hydrometer scale corresponding to the
type antifreeze solution in the radiator.
COOLANT RECOMMENDATIONS.
1. Always use a proper inhibited coolant.
2. If freeze protection is required, always use
ethylene glycol antifreeze.
3. Re-inhibit antifreeze with a non-chromate
inhibitor.
4. Always
follow
the
manufacturer's
recommendations on inhibitor usage and handling.
5. Do not use soluble oil.
6. Chromate inhibitors should NEVER be used with
permanent antifreeze.
7. Sealer type antifreeze should NOT be used.
8. Maintain the prescribed inhibitor strength.
Keep the hydrometer clean inside and out, and treat it
with the same care as given any other precision
instrument.
NOTE
Hydrometers
do
not
correctly
register the freezing protection of a
mixture of methanol and glycol base
antifreeze. Therefore, always flush
the cooling system with the
thermostat removed before adding
antifreeze for the winter.
COOLANT FILTER.
ANTIFREEZE.
The Cummins engines have a coolant filter of the
canister or spin-on type that requires periodic servicing.
It is suggested that this be done when the coolant is
changed.
When freeze protection is required, an ethylene glycol
base permanent antifreeze should be used. An inhibitor
is included in this type of antifreeze and no additional
inhibitors are required on initial fill if a minimum
antifreeze concentration of 30 percent by volume is
used. Solutions of less than 30 percent concentration
do not provide sufficient corrosion protection.
Concentration over 67 percent adversely affect freeze
protection and heat transfer rates.
Close the shut-off valves in the inlet and drain lines
before disassembling the filter. Some engines may
have a push button valve on the rear of the water pump
housing that must be closed (pushed in) when changing
the water filter.
E-18
TM 10-3950-672-24-1
Anti-Freeze Concentration Chart
E-19
TM 10-3950-672-24-1
TRANSMISSION
DESCRIPTION
The transmission is a three speed automatic
transmission manufactured by Ford Motor Company.
The transmission is capable of providing automatic upshifts and downshifts through the three forward gear
ratios. The stall ratio is 1.89:1. Gear ratios are as
follows:
GEAR RATIOS
LOW (1st)
INT. (2nd)
DIRECT (3rd)
REVERSE
2.46: 1
1.46: 1
1.00: 1
2.175: 1
MAINTENANCE
too high will cause the crane to creep, have harsh
transmission engagements, and harsh closed throttle
downshift.
TROUBLESHOOTING.
Before removal or operation of the transmission,
perform a visual inspection. Visually inspect all lines.
plugs, and tube connections at the transmission for oil
leakage.
CONTROL PRESSURE TEST.
There are two methods of performing the control
pressure test. One is to perform the test using the
engine vacuum. The second method is to use a hand
operated vacuum pump.
To make a thorough test of the transmission. ensure the
engine is properly tuned and the oil level in the
transmission is correct. During troubleshooting, the
engine and transmission must be regarded as a single
package.
1. To perform the control pressure test using the
engine vacuum, perform the following.
If inspection does not reveal the cause of the trouble
and the crane is operational, further troubleshooting is
necessary. Do not remove the transmission from the
crane until the mechanical, hydraulic, and air pressure
tests are performed and the causes of trouble are
checked against the troubleshooting chart.
a. Attach a tachometer to the engine and a
vacuum gauge to the transmission vacuum line at the
manifold vacuum port.
CAUTION
Mechanical Checks.
PRESSURE GAUGES AFFECT THE
SHIFT
QUALITY
OF
THE
TRANSMISSION. CARE SHOULD BE
TAKEN NOT TO ACCELERATE OR
DECELERATE RAPIDLY. POSSIBLE
TRANSMISSION FAILURE COULD
RESULT.
LINKAGE CHECK.
1. A check should be made to ensure the linkage is
free and returns to idle when released.
2. Ensure the D detent in the transmission
corresponds exactly with the stop in the console.
Leakage at the manual valve can cause delay in
engagements and/or slipping while operating if the
linkage is not correctly adjusted.
b. Firmly apply the parking brake and start
the engine.
c. Adjust the engine idle speed to the
specified rpm. If the engine idle speed cannot be
brought within limits, check the throttle and downshift
linkage for a binding condition. If linkage is satisfactory,
check for vacuum leaks in the transmission diaphragm
unit and its connecting tubes and hoses.
ENGINE IDLE SPEED CHECK.
Check the engine idle speed. If the idle speed is too
low, the engine will run roughly. An idle speed that is
E-20
TM 10-3950-672-24-1
When there is no drive in 1 (low) the difficulty could be
caused by improper functioning of the forward clutch or
simultaneous malfunction of the low-reverse band and
the one-way clutch. Failure to drive in R (reverse) could
be caused by a malfunction of the reverse-high clutch or
low-reverse band or clutch.
2. To perform the control pressure test using the
vacuum pump method, perform the following.
a. Disconnect and temporarily plug the
vacuum line at the vacuum diaphragm unit.
b. Attach a vacuum pump to the vacuum
diaphragm. Apply both the parking and service brakes.
Start the engine and vacuum pump.
c. Set the vacuum at 15 inches and read
and record the control pressure in all the selector
positions. Run the engine up to 1000 rpm, and reduce
the vacuum to 10 inches. Read and record the control
pressure in D, 2. and 1. Keep the engine rpm at 1 000
and reduce the vacuum to 1 inch. Read and record the
control pressure in D. 1, 2. and R.
To make air pressure checks. loosen the oil pan bolts
and lower one edge to drain the transmission fluid.
Remove the oil pan and the control valve body
assembly. The inoperative clutches or bands can be
located by introducing air pressure into the various
transmission case passages.
FORWARD CLUTCH.
Apply air pressure to the transmission case forward
clutch passages. A dull thud can be heard when the
clutch piston is applied. If no noise is heard. place the
finger tips on the input shell and again apply air pressure
to the forward or front clutch passage. Movement of the
piston can be felt as the clutch is applied.
VACUUM SUPPLY TEST.
Check the vacuum supply to the vacuum diaphragm unit
and the diaphragm itself.
To check the supply,
disconnect the vacuum line at the diaphragm unit and
connect it to vacuum gauge. With the engine idling, the
gauge must have a steady acceptable vacuum reading
for the altitude at which the test is being performed. If
the vacuum reading is low, check for a vacuum leak or
poor engine vacuum. If the vacuum reading is OK.
rapidly accelerate the engine momentarily. The vacuum
reading must drop rapidly at acceleration and return
immediately upon release of the accelerator. If the
vacuum reading does not change or changes slowly, the
transmission vacuum line is plugged, restricted. or
connected to a reservoir supply.
GOVERNOR.
Apply air pressure to the control pressure to governor
passage and listen for a sharp clicking or whistling
noise. The noise indicates governor valve movement.
REVERSE-HIGH CLUTCH.
Apply air pressure to the reverse-high clutch. A dull
thud indicates that the reverse-high or rear clutch piston
has moved to the applied position. If no noise is heard,
place the finger tips on the clutch drum and again apply
air pressure to detect movement of the piston.
Air Pressure Checks.
GENERAL.
INTERMEDIATE SERVO.
A no drive condition can exist even with correct
transmission fluid pressure, because of inoperative
clutches or bands. On automatic transmissions, an
erratic shift can be caused by a stuck governor valve.
The inoperative units can be located through a series of
checks by substituting air pressure for fluid pressure to
determine the location of the malfunction.
Hold the air nozzle in the front servo apply tube or the
intermediate servo apply passages. Operation of the
servo is indicated by a tightening of the front or
intermediate band around the drum. Continue to apply
air pressure to the servo apply tube or passage. and
introduce air pressure into the front release tube or the
intermediate servo release passage. The front or
intermediate servo should release the band against the
apply pressure.
When the selector lever is at 2 (second) a no drive
condition may be caused by an inoperative forward
clutch. A no drive condition at D (drive) may be caused
by an inoperative forward clutch or one-way clutch.
E-21
TM 10-3950-672-24-1
Hydraulic Control System
E-22
TM 10-3950-672-24-1
Transmission Assembly Exploded View (Sheet 1 of 6)
E-23
TM 10-3950-672-24-1
Transmission Assembly Exploded View (Sheet 2 of 6)
E-24
TM 10-3950-672-24-1
Transmission Assembly Exploded View (Sheet 3 of 6)
E-25
TM 10-3950-672-24-1
Transmission Assembly Exploded View (Sheet 4 of 6)
E-26
TM 10-3950-672-24-1
Transmission Assembly Exploded View (Sheet 5 of 6)
E-27
TM 10-3950-672-24-1
Transmission Assembly Exploded View (Sheet 6 of 6)
E-28
TM1 0-3950-672-24-1
1
2.
3.
4.
5.
6.
7.
8.
9.
10.
11.
12.
13.
14.
15.
16.
17.
18.
19.
20.
21.
22.
23.
24.
25.
26.
27.
28.
29.
30.
31.
32.
33.
34.
35.
36.
37.
38.
39.
40.
41.
42.
43.
44.
45.
46.
47.
48.
49.
50.
51.
TRANSMISSION, AUTO
HOUSING
SEAL, OUTPUT SHAFT
BUSHING
BOLT
CLIP
BOLT
GASKET
SHAFT, OUTPUT
PILOT
SCREW
BODY ASSEMBLY
COLLECTOR, OIL
SEAL, GOVERNOR HOUSING
RING, RETAINING
SLEEVE, OIL DISTRIBUTION
BOLT
TUBE, OUTLET
TUBE, INLET
SCREW
CLIP
CLIP
DIAPHRAGM
ROD
VALVE
GASKET
BOLT
PAN, OIL
PLUG
CONVERTER ASSEMBLY
CASE ASSEMBLY
PLUG
RETAINER
SHAFT
VENT
SHAFT, INPUT
SEAL, SMALL
BOLT
PUMP ASSEMBLY
BUSHING
STATOR
BOLT
SEAL, PISTON, OUTER
SEAL, PISTON, INNER
DRUM, BRAKE
ANCHOR
BAND
STRUT
GASKET
SEAL, INTERMEDIATE
SEAL, LARGE
52.
52.
52.
52.
52.
53.
53.
53.
53.
53.
54.
55.
56.
57.
58.
59.
60.
61.
62.
63.
64.
65.
66.
67.
68.
69.
70.
71.
72.
73.
73.
74.
75.
76.
77.
78.
79.
80.
81.
82.
83.
84.
85.
86.
87.
88.
89.
90.
91.
92.
93.
E-29
WASHER, .114
WASHER, .119
WASHER,.057
WASHER,.078
WASHER,.094
RING, RETAINING
RING, RETAINING
RING, RETAINING
RING, RETAINING
RING, RETAINING
WASHER
PLATE, PRESSURE
PLATE, CLUTCH, EXTERNAL
PLATE, CLUTCH, INTERNAL
RING, RETAINING
RETAINER
SPRING
PISTON
SEAL
CYLINDER ASSEMBLY
DISC, SPRING
SEAL, PISTON, OUTER
SEAL
RING, RETAINING
PISTON
PLATE, PRESSURE
SPRING, PRESSURE
PLATE, CLUTCH, INTERNAL
PLATE, PRESSURE
RING, RETAINING
RING, RETAINING
WASHER, HUB THRUST
RING, RETAINING
HUB, OUTPUT SHAFT
GEAR, RING, OUTPUT
RING, RETAINING
WASHER, PLANET CARRIER
GEAR
RING, RETAINING
RING, RETAINING
WASHER
SHELL, INPUT
GEAR
RACE, BEARING, REAR
BEARING, SUN GEAR
RACE, BEARING, FRONT
PLANET, GEAR, FORWARD
GEAR, RING, FORWARD
HUB, FORWARD CLUTCH
WASHER, FORWARD CLUTCH
CLUTCH, REVERSE
TM 10-3950-672-24-1
94.
95.
96.
97.
98.
99.
100.
101.
102.
103.
104.
105.
106.
107.
108.
109.
110.
111.
112.
113.
114.
115.
116.
117.
118.
119.
120.
121.
122.
123.
124.
125.
RING, RETAINING
CLUTCH, OVERRUNNING
RING, RETAINING
PLATE, CLUTCH, EXTERNAL
PLATE, CLUTCH, INTERNAL
SPRING, CLUTCH
SEAL, PISTON, OUTER
SEAL, PISTON, INNER
RACE, OVERRUNNING CLUTCH
RETAINER, SPRING
PISTON ASSEMBLY
BOLT
GEAR ASSEMBLY
WASHER, OUTPUT SHAFT
BOLT
TAG
COVER
SEAL
GASKET
PISTON
SPRING
SCREW
NUT AND WASHER
LEVER
SHAFT, PARKING PAWL
PAWL, PARKING
SPRING, PARKING PAWL
SCREW
BRACKET
SEAL, OIL
LEVER
SEAL, CONTROL LEVER
126.
127.
128.
129.
130.
131.
132.
133.
134.
135.
136.
137.
138.
139.
140.
141.
142.
143.
144.
145.
146.
147.
148.
149.
150.
151.
152.
153.
154.
155.
156.
E-30
SWITCH, NEUTRAL/REVERSE
SCREW
WASHER, LOCK
NUT
LEVER ASSEMBLY, DOWN
SPRING
PLATE ASSEMBLY
SHAFT, PARKING PLATE
PLUG, PARKING PLATE
SCREW
LEVER ASSEMBLY
LEVER
ROD ASSEMBLY, PARKING
LEVER, DOWNSHIFT
NUT
PLATE, SHIFT VALVE
BOLT
PLATE, THROTTLE
RETAINER
VALVE, MANUAL
PLATE
PLATE
TUBE
PLATE
CONTROL UNIT ASSY
BODY, VALVE
GASKET
GASKET
FILTERING DISK, FLUID
TUBE
BOLT
TM 10-3950-672-24-1
LOW-REVERSE CLUTCH.
3. Pull the dipstick out of the tube, wipe it clean,
and push all the way back into the tube. Be sure it is
fully seated.
4. Pull the dipstick out of the tube again and check
the fluid level.
5. For correct fluid level reading on the dipstick,
follow the appropriate instructions started previously for
transmission hot and transmission cold check.
Apply air pressure to the low-reverse clutch apply
passage. A dull thud should be heard if the clutch is
operating properly. If the passages are clear, remove
the clutch assemblies, and clean and inspect the
malfunctioning clutch to locate the trouble.
Hydraulic Checks.
Do not overfill the transmission. Overfill can cause the
fluid to foam and spill out through the transmission vent
with resultant transmission malfunction.
FLUID LEVEL CHECK.
Check the oil level in the transmission. The fluid level
indication on the dipstick will be different at operating
temperature (transmission hot) and room temperature
(transmission cold).
Underfill can result in transmission loss of engagement
or slipping. This condition is most evident in cold
weather or when the crane is parked or being driven on
a hill.
The transmission should be checked at an operating
temperature (transmission hot) of 150 degrees to 170
degrees F (66 degrees to 77 degrees C), dipstick is hot
to touch. The dipstick reading at operating temperature
should have the fluid level on the dipstick between ADD
and DON'T ADD marks and/or between the arrows. If
the transmission is not at an operating temperature of
150 degrees to 170 degrees F (66 degrees to 77
degrees C) and it becomes necessary to check the fluid
level (such as pre-delivery)the fluid may be checked at
room temperature 70 degrees to 95 degrees F (21
degrees to 35 degrees C) giving the dipstick a cool
feeling. The dipstick reading at room temperature
should have the fluid level on the dipstick between the
middle and top holes.
6. Install the dipstick making sure it is fully seated
in the tube.
FLUID CONDITION CHECK.
After making a normal fluid check according to the
procedures under Fluid Checking Procedures, check the
condition of the transmission fluid as follows.
1. Observe the color and odor of the fluid. It
should be dark reddish not brown or black. A burnt odor
can sometimes indicate that there is an overheating
condition or clutch disc or band failure.
2. Use an absorbent white facial tissue paper to
wipe the dipstick. Examine the stain for evidence of
solids (specks of any kind) and for antifreeze signs (gum
or varnish on dipstick).
FLUID CHECKING PROCEDURE.
Check the transmission fluid using the following
procedure.
If specks are present in the oil or there is evidence of
antifreeze, the transmission oil pan must be removed for
further inspection. If fluid contamination or transmission
failure is confirmed by further evidence of coolant or
excessive solids in the oil pan, the transmission must be
disassembled and completely cleaned and repaired.
This includes cleaning the torque converter and
transmission cooling system.
1. With the transmission in Park, engine at curb
idle rpm, foot brakes applied, and crane on level
surface, move the transmission selector lever through
each range. Allow time in each range to engage the
transmission, return to Park, and apply parking brake
fully. Do not turn off the engine during the fluid level
check.
2. Clean all dirt from the transmission fluid dipstick
cap, before removing the dipstick from the filler tube.
E-31
TM 10-3950-672-24-1
by fluid around the converter housing, and may have
several sources. By careful observation. it is possible
in many instances, to pinpoint the source of the leak
before removing the transmission
FLUID LEVEL HIGH BEFORE STARTING ENGINE
NORMAL DURING NORMAL CHECK.
If the fluid level is high before starting the engine and
normal during normal check, check the following.
1. Fluid leaking by the front pump seal lip will tend
to move along the drive hub and onto the back of the
impeller housing. Except in the case of a total seal
failure, fluid leakage by the lip of the seal will be
deposited on the inside of the converter housing only,
near the outside diameter of the housing.
2. Fluid leakage by the outside diameter of the
seal and front pump body will follow the same path
which the leaks by the front pump seal follow.
3. Fluid that leaks by a front pump-to-case bolt will
be deposited on the inside of the converter housing
only. Fluid will not be deposited on the back of the
converter.
4. Leakage by the front pump-to-case gasket may
cause fluid to be deposited inside the converter housing,
or it may seep down between the front of the case and
converter housing.
5. Fluid leakage from the converter drain plugs will
appear at the outside diameter of the converter
1. Check for correct operation of the drainback
valve in the stator support.
2. Check the pump bushing.
3. Repair or replace pump. if required.
TRANSMISSION FLUID LEAKAGE CHECKS.
1. Leakage at the oil pan gasket often can be
stopped by tightening the attaching bolts to the proper
torque. If necessary, replace the gasket.
2. Check the fluid filler tube connection at the
transmission case. If leakage is found. install a new Oring. The filler tube bracket should align properly.
3. If leakage is found at either the downshift
control lever shaft or the manual lever shaft. replace
either or both seals.
FLUID LEAKAGE IN CONVERTER AND FRONT
PUMP AREA.
Leakage at the front of the transmission. is evidenced
Troubleshooting Chart.
SYMPTOM
1. Slow initial engagement.
PROBABLE CAUSE
SOLUTION
a. Improper fluid level.
a Perform fluid level check.
b. Damaged or improperly adjusted linkage.
b. Service or adjust linkage.
c. Contaminated fluid.
c. Perform fluid condition check.
d. Improper clutch and band application, or low main control
pressure.
d. Perform control pressure test.
E-32
TM 10-3950-672-24-1
SYMPTOM
2. Rough initial engagement in
either forward or reverse.
3. Harsh engagements - (warm
engine).
PROBABLE CAUSE
a. Improper fluid level.
a. Perform fluid level check.
b. High engine idle.
b. Adjust idle.
c. Looseness in the driveshaft, Ujoints or engine mounts.
c. Service as required.
d. Improper clutch or band application. or oil control pressure.
d. Perform control pressure test.
e. Sticking or dirty valve boy.
body.
e. Clean. service or replace valve
a. Improper fluid level.
a. Perform fluid level check.
b. Throttle valve linkage misadjusted/long/disconnected/sticking/damaged/return spring disconnected.
b. Adjust throttle valve linkage.
c. Valve body bolts loose or too
tight.
c. Tighten bolts.
d. Valve body dirty or sticking
valves.
4. No/ delayed forward engagement {reverse OK).
SOLUTION
d. Determine source of contamination. Service as required.
a. Improper fluid level.
a. Perform fluid level check.
b. Manual linkage - misadjusted/
damaged.
b. Check and adjust or service as
required.
c. Low main control pressure.
(Leakage.) Forward clutch stator
support seal rings leaking (#3, #4).
c. Control pressure test, note
results.
d. Forward clutch assembly
burnt. Damaged/leaking check ball
in cylinder. Leaking piston seal
rings.
d. Perform air pressure test.
e. Valve body bolts loose or too
tight.
e. Tighten bolts.
f Valve body dirty or sticking
valves.
f. Determine source of contamination. Service as required.
g. Transmission filter plugged.
g. Replace filter.
h. Pump damaged or leaking.
h. Visually inspect pump gears.
Replace pump if necessary.
E-33
TM 10-3950-672-24-1
SYMPTOM
5. No/delayed reverse engagement forward OK)
6. No/delayed reverse engagement and/or no engine breaking In
manual low {1).
PROBABLE CAUSE
a. Improper fluid level'
a Perform fluid level check(
b. Manual linkage misadjusted
damaged
b Check and adjust or service 5s
required
c. Low main control pressure In
reverse. Reverse clutch stator support seal rings leaking (#1, #2)
c. Control pressure res:
a. Improper fluid level.
a. Perform fluid level check
b. Low reverse servo piston seal
leaking.
b. Check and replace piston seal
c. Planetary low one way clutch
damaged.
7. No engine braking in manual
second gear
8. Forward engagement slips,'
shudders/chatters.
SOLUTION
c. Determine cause of condition
Service as required
a. Intermediate band out of adjustment
a. Adjust Intermediate band
b. Improper band or clutch application. or oil pressure control
system.
b. Perform control pressure :es.
c. Intermediate servo leaking
c. Perform air pressure test of Intermediate servo for leakage Service as required
d. Intermediate one way clutch
damaged.
d Replace
e. Polished or glazed band or
drum.
e. Service or replace as required
a. Improper fluid level.
a. Perform fluid level check
b. Manual linkage misadjusted.,
damaged.
b. Check and adjust or service as
required
c. Low main control pressure.
c Control pressure test.
d. Valve body bolts loose or too
tight.
d Tighten bolts
e. Valve body dirty or sticking
valves.
e. Determine source of contamination Service as required
f. Forward clutch piston ball
check not seating or !leaking
f. Replace forward clutch cvlinder Service transmission as re
quired
g. Forward clutch piston seals cut
or worn
g Replace seals and service.:
clutch as required
h. Low one way clutch (planetary)
damaged
Determine cause of condition
Service as required
E-34
TM 10-3950-672-24-1
SYMPTOM
9. Reverse shudder/chatters/
slips.
PROBABLE CAUSE
SOLUTION
a. Improper fluid level.
a. Perform fluid level check.
b. Low main control pressure in
reverse.
b Control pressure test
c. Low reverse servo/leaking.
c Air pressure test: visually Inspect seal rings and piston bore
d. Low (planetary) one-way
clutch damaged.
d. Determine cause of condition
Service as required.
e. Reverse clutch drum bushing
damaged.
e. Determine cause of condition
Service as required.
f. Reverse clutch stator support
seal ring grooves worn or damaged.
f. Determine cause of condition.
Service as required.
g. Reverse clutch piston seals cut
or worn.
g. Determine cause of condition
Service as required.
h. Looseness in the driveshaft, Ujoints or engine mounts.
h. Service as required.
10. No drive, slips or chatters in
first gear in D. All other gears
normal.
a. Damaged or worn planetary
one-way clutch.
a. Service or replace one-way
clutch.
11. No drive, slips or chatters in
second gear.
a. Intermediate band out of adjustment.
a. Adjust intermediate band.
b. Improper band or clutch application. or control pressure.
b. Perform control pressure test
c. Damaged or worn intermediate
servo piston seals and/or internal
leaks.
c. Perform air pressure test.
d. Dirty or sticking valve body.
body.
d. Clean. service or replace valve
e. Polished. glazed intermediate
band or drum.
e. Replace or service as required.
a. Improper band and/or clutch
application, or oil pressure control
system.
a. Perform control pressure test.
b. Damaged or worn governor.
Sticking governor
b. Perform governor check Replace or service governor. clean
screen.
c. Valve body loose.
c. Tighten valve.
d. Dirty or sticking valve body.
body
d. Clean. service or replace valve
e. Cross leaks between valve
body and case mating surface.
e. Service or replace valve body
and/or case as required.
12. Starts up in 2nd or 3rd.
E-35
TM 10-3950-672-24-1
SYMPTOM
13. All upshifts harsh/delayed or
no upshifts.
14 Mushy/early all upshifts/
pile up upshifts.
15. No 1-2 upshift.
PROBABLE CAUSE
SOLUTION
a. Improper fluid level.
a. Perform fluid level check
b. Manual linkage - misadjusted
or damaged
b. Check and adjust: or service as
required
c. Governor sticking.
as required.
c. Perform governor test Service
d. Main control pressure too high.
as required.
d. Control pressure test. Service
e. Valve body bolts loose or too
tight.
e. Tighten bolts.
f. Valve body dirty or sticking
valves.
f. Determine source of contamination. Service as -required
g. Vacuum leak to diaphragm
unit.
g. Check vacuum lines to diaphragm unit. Service as necessary
Perform vacuum supply and diahragm tests.
a. Low main control pressure.
suits.
a. Control pressure test. Note re-
b. Valve body bolts loose or too
tight.
b. Tighten bolts.
c. Valve body valve or throttle
control valve sticking.
c. Determine source of contami,nation. Service as required.
d. Governor valve sticking.
as required.
d. Perform governor test. Repair
a. Improper fluid level.
a. Perform fluid level check
b. Manual linkage- misadjusted/
damaged.
b. Check and adjust or service as
required.
c. Governor valve sticking. Intermediate band out of adjustment.
band.
c. Perform governor test. Service
as required. Adjust intermediate
d. Vacuum diaphragm bent. sticking or leaking.
d. Check diaphragm unit. Service
as necessary.
e. Valve body bolts loose or too
tight.
e. Tighten bolts.
f. Valve body dirty/sticking
valves.
f. Determine source of contamination. Service as required.
g. Intermediate clutch, band, and/
or servo assembly burnt.
g. Perform air pressure test.
E-36
TM 10-3950-672-24-1
SYMPTOM
16 Rough/harsh/delayed 1-2
upshift.
17. Mushy/early/soft, slipping
1-2 upshift.
PROBABLE CAUSE
SOLUTION
a. Improper fluid level.
a. Perform fluid level check.
b. Poor engine performance.
b Tune engine
c. Intermediate band out of adjustment.
c. Adjust intermediate band.
d. Main control pressure too high.
results.
d. Control pressure test. Note
e. Governor valve sticking.
as required.
e. Perform governor test. Service
f. Engine vacuum leak.
f. Check engine vacuum lines.
Service as necessary. Check vacuum diaphragm unit. Service as
necessary. Perform vacuum supply
and diaphragm tests.
g. Valve body bolts loose or too
tight.
g. Tighten bolts.
h Valve body dirty/sticking
valves.
h. Determine source of contamination. Service as required.
a. Improper fluid level.
a. Perform fluid level check.
b. Incorrect engine performance.
quired.
b. Tune adjust engine idle as re-
c. Intermediate band out of adjustment.
c. Adjust intermediate band.
d. Low main control pressure.
d. Control pressure test. Note results.
e. Valve body bolts loose or too
tight.
e. Tighten bolts.
f. Valve body dirty/sticking
valves.
f. Determine source of contamination. Service as required.
g. Governor valve sticking.
as required.
g. Perform governor test. Service
h. Damaged intermediate servo
or band.
h. Perform air pressure test Service as required.
i. Polished. glazed band or drum.
i. Service or replace as required
E-37
TM 10-3950-672-24-1
SYMPTOM
18. No 2-3 upshift.
19. Harsh/delayed 2-3 upshift.
PROBABLE CAUSE
SOLUTION
a. Low fluid level.
a. Perform fluid level check
b. Throttle valve linkage misadjusted (long), sticking, or damaged.
b Adjust linkage Service as required
c. Low main control pressure to
direct clutch.
c. Control pressure test Note resuIts.
d. Valve body bolts loose or too
tight.
d. Tighten bolts
e. Valve body dirty/sticking
valves.
e Determine source of contami.
nation, then service as required
a. Incorrect engine performance.
a. Check engine tune-up
b. Engine vacuum leak.
b. Check engine vacuum lines
Service as necessary. Check vacuum diaphragm unit. Service as
necessary. Perform vacuum Supply
and diaphragm tests.
c. Damaged or worn intermediate
servo release and high clutch piston check ball.
d. Valve body bolts loose or too
tight.
e. Vacuum diaphragm or throttle
valve control rod bent. sticking. or
leaking.
c. Air pressure test the intermediate servo apply and release the
high clutch piston check ball Service as required.
d. Tighten bolts
e. Check diaphragm and rod Replace as necessary.
20. Soft/early/mushy 2-3 upshift. tight.
a. Valve body bolts loose or too
b. Valve body dirty/sticking
valves.
c. Vacuum diaphragm or throttle
valve control rod bent, sticking.
or leaking.
21. Erratic shifts.
a. Tighten bolts.
b. Determine source of contamination. Service as required
c. Check diaphragm and rod Replace as necessary
a. Poor engine performance.
a. Check engine tune-up
b. Valve body bolts loose or too
tight.
b. Tighten bolts
c. Valve body dirty/sticking
valves.
c. Line pressure test. note resuits. Determine source of contamination. Service as required
d. Governor valve stuck.
d. Perform governor test Service
as required.
e. Output shaft collector body
seal rings damaged
e Service as required.
E-38
TM 10-3950-672-24-1
SYMPTOM
22. Shifts 1-3 in D.
PROBABLE CAUSE
a. Intermediate band out of adjustment.
b. Damaged Intermediate servo
and/or internal leaks,
c. Improper band or clutch application, or oil pressure control
system.
SOLUTION
a. Adjust band.
b. Perform air pressure test: Service front servo and or Internal
leaks.
c. Perform control pressure test.
d. Service or replace band or
drum.
d. Polished, glazed band or drum.
e. Dirty or sticking valve body.
f.
23. Engine over-speeds on 2-3
Shift.
24. No forced downshifts.
25. Vehicle will not start.
Governor valve stuck.
e. Clean. service or replace valve
body.
f. Perform governor test. Service
as required.
a. Linkage out of adjustment.
a. Service or adjust linkage
b. Improper band or clutch application. or oil pressure control
system.
b. Perform control pressure test.
c. Intermediate servo piston seals
cut/leaking.
c. Replace seals. Check for leaks.
d. Dirty or sticking valve body.
d. Clean. service or replace valve
body.
a. Kickdown linkage out of adjustment.
a. Service or adjust linkage.
b. Damaged internal kickdown
linkage.
b. Service Internal kickdown linkage.
c. Improper clutch or band application, or oil pressure control
system.
c. Perform control pressure test.
d. Dirty or sticking governor.
d. Perform governor test. Service
or replace governor, clean screen.
e. Dirty or sticking valve body.
e. Clean, service. or replace valve
body.
a. Misadjusted neutral start
switch.
a. Adjust neutral start switch
b. Misadjusted linkage.
b. Adjust linkage
c. Defective neutral start switch.
c. Replace neutral switch.
E-39
TM 10-3950-672-24-1
GENERAL OVERHAUL INFORMATION.
lowing special tools and equipment will be beneficial in
servicing the transmission, and are available from Ford
Motor Company, Dearborn, Michigan,
Special Tools and Equipment.
In addition to common tools ordinarily used. the fol-
SPECIAL SERVICE TOOLS
Number
Description
T50T-100-A
T59L-100-B
T58L-101-A
T57L-500-B
Tool-1175-AC
Tool-4201-C
Tool-7000-DD
Tool-7000-DE
T66L-7003-CZ
T67P-7341-A
T84P-7341-A
T84P-7341-B
T61L-7657-B
T77L-7697-C
T77L-7697-D
T76L-7902-C
T80L-7902-A
T77L-7902-A
T73P-77060-A
Tool-77288
T71P-77370-A
T65L-77515-A
T77L-77548-A
T63L-77837-A
T83T-7B200-AH
T69L-7D044-A
T74P-77247-A
T82L-7006-A
T82P-7006-C
T83L-7902-A1
T83L-7902-A2
T80L-77030-B
T83L-7902-A3
Impact Slide Hammer
Impact Slide Hammer
Puller Attachment
Bench Mounted Holding Fixture
Seal Remover
Dial Indicator with Bracketry
Rubber Tip for Air Nozzle
Air Nozzle Assembly
Front Pump Bushing Replacer
Shift Linkage Insulator Tool
Shift Linkage Grommet Remover
Shift Linkage Grommet Remover
Extension Housing Seal Replacer
Extension Housing Bushing Replacer
Extension Housing Bushing Remover
Converter Clutch Torquing Tool
End Play Checking Tool
Converter Clutch Holding Tool
Output Shaft Retainer Pliers
Shift Lever Seal Replacer
Band Adjustment Torque Wrench Set
Clutch Spring Compressor
Lip Seal Protector
Front Pump Seal Replacer
VRV Gage Block
Clutch Housing Bushing Tool
Neutral Start Switch Socket Tool
Air Pressure Check Plate
Capscrews for Air Pressure Check Plate
Torque Adapter Turning Tool
Pilot Guide
Servo Piston Remover
Holding Fixture
ROTUNDA EQUIPMENT
014-00028
072-00004
019-00027
Torque Converter Cleaner
Torque Converter Leak Tester
Automatic Transmission Tester
E-40
TM 10-3950-672-24-1
CLEANING AND INSPECTION.
4. Inspect the separator plate screen for
obstructions. The screen must be clean and free of
foreign material. If contaminated, remove it from the
separator plate, clean in a suitable solvent.
and
thoroughly blow clean with compressed air.
5. Roll the manual valve on a flat surface to check
for bent condition.
Transmission.
It is important to completely clean all transmission
components, including converter, main control valve
body, governor, all clutches, and all check balls after
any
transmission
servicing
that
generates
contamination. These contaminants are a major cause
for recurring transmission troubles and must be
removed from the system before the transmission is put
back into service. The cleaning of debris from the direct
Clutch check ball is often omitted. This omission can
lead to a repeat servicing of the transmission.
Intermediate Servo.
1. Inspect the servo bore for cracks and the servo
piston for damage, and the piston bore and the servo
piston stem for scores. Check fluid passages for
obstructions. Replace damaged seals.
2. Check the servo spring and servo band strut(s)
for distortion.
3. Inspect the cover seal and gasket cover sealing
surface for damage.
Clean all parts with suitable solvent and use moisture
free air to dry off all parts and clean out fluid passages.
The composition clutch plates, bands. and synthetic
seals should not be cleaned in a vapor degreaser or with
any type of detergent solution. To clean these parts,
wipe them off with a lint free cloth. New clutch plates or
bands should be soaked in transmission fluid specified
for that transmission type for fifteen minutes before
being assembled.
Extension Housing.
1. Inspect the housing for cracks. Inspect the
gasket surface for burrs or warpage.
2. Inspect the bushing for scores or wear.
Replace. if required.
3. Inspect the rear seal for hardness, cracks, or
wear. If the seal shows wear or deterioration. replace
the seal.
4. Inspect the seal counterbore and remove all
burrs and scores with crocus cloth.
Do not reuse the control valve body to filter gasket or try
to clean in solvent. Replace the valve body to filter
gasket upon assembly of the transmission.
Control Valve Body.
1. Clean all parts thoroughly in clean solvent, and
blow dry with moisture free compressed air. If the valve
body-to-screen gasket is removed, the gasket should not
be cleaned in a degreaser, solvent, or any type of
detergent solution. To clean the gasket, wipe it off with
a lint-free cloth.
2. Inspect all valve and plug bores for scores.
Check all fluid passages for obstructions. Inspect the
check valve for free movement. Inspect all mating
surfaces for burrs or scores. Use crocus cloth to polish
valves and plugs. Avoid rounding the sharp edges of
the valves and plugs with the cloth.
3. Inspect all springs for distortion. Check all
valves and plugs for free movement in their respective
bores. Valves and plugs, when dry, must fall from their
own weight in their respective bores.
Governor.
1. Inspect the governor valves and bores for
scores. Minor scores may be removed from the valves
with crocus cloth. Replace the governor if the valves or
body is deeply scored.
2. Check for free movement of the valves in the
bores. The valves should slide freely of their own
weight in the bores when dry. Inspect fluid passages in
the valve body and counterweight for obstructions. All
fluid passages must be clean.
3. Inspect the mating surfaces of the governor
body and governor distributor for burrs and distortion.
Mating surfaces must be smooth and flat.
E-41
TM 10-3950-672-24-1
Front Pump.
Forward Clutch.
1. Inspect the mating surfaces of the pump body
and case for burrs.
2. Inspect the drive and driven gear bearing
surface for scores and check gear teeth for burrs.
3. Inspect the front pump seal for cuts or nicks.,
and the pump bushing for scoring.
4. Check the fluid passages for obstructions.
5. If any parts are found damaged or worn, replace
the pump as a unit. Minor burrs and scores may be
removed with crocus cloth.
6. Check the large seal ring groove of the pump
body for damage. Check the gasket mating surface of
the pump body for damage.
1. Inspect the clutch cylinder thrust surfaces. pis
ton bore. and clutch plate serrations for scores or burrs.
Minor scores or burrs may be removed with crocus
cloth. Replace the clutch cylinder if it is badly scored or
damaged.
2. Check the fluid passage in the clutch cylinder
for obstructions. Clean out all fluid passages. Inspect
the clutch piston for scores and replace. if necessary
Inspect the piston check ball for freedom of movement
and proper seating.
3. Check the clutch release spring for distortion
and cracks. Replace the spring if distorted or cracked.
4. Inspect the composition clutch plates, steel
clutch plates. and clutch pressure plate for worn or
scored bearing surfaces. Replace all parts that are
deeply scored.
5. Check the clutch hub thrust surfaces for scores
and the clutch hub splines for wear 6. Check the splines
on the stator support for wear. Inspect the bushing in
the stator support for scores. Check the input shaft for
damaged or worn splines. Replace the shaft if the
splines are excessively worn.
Reverse-High Clutch.
1. Inspect the drum band surface, the bushing, and
thrust surfaces for scores.
Minor scores may be
removed with crocus cloth. Badly scored parts must be
replaced.
2. Inspect the clutch piston bore and the piston
inner and outer bearing surfaces for scores. Check the
air bleed ball valve in the clutch piston for free
movement. Check the orifice to ensure it is not
plugged.
3. Check the fluid passages for obstructions. All
fluid passages must be clean and free of obstructions.
Direct Clutch Piston.
Inspect the piston check ball for freedom of movement.
Improper seating of check ball will cause leakage.
Leakage can be detected by turning the piston upside
down (flat side of piston facing you) allowing the check
ball to seat in the piston. Pour a small quantity of
solvent over the check ball. If solvent drips past the
check ball, replace the piston.
4. Inspect the clutch plates for wear, scoring, and
fit on the clutch hub serrations. Replace all plates that
are badly scored, worn, or do not fit freely in the hub
serrations.
5. Inspect the Clutch pressure plate for scores on
the clutch plate bearing surface. Check the clutch
release spring(s) for distortion.
6. Inspect the clutch piston check ball for freedom
of movement and proper seating.
Low-Reverse Clutch.
1. Inspect the clutch cylinder piston born, and
clutch plate serrations for scores or burrs. Minor scores
or burrs may be removed with crocus cloth. Replace the
case if it is badly scored or damaged
2. Check the fluid passage in the case for
obstructions. Clean out all fluid passages. Inspect the
clutch piston for scores and replace, if necessary.
E-42
TM 10-3950-672-24-1
2. If any parts require replacement. the correct
clutch clearances will be given in the affected assembly
procedure.
3. Check the piston return springs for distortion.
Check the piston return spring retainer for flatness.
4. Inspect the composition clutch piates, steel
clutch plates and clutch pressure plate for worn or
scored bearing surfaces. Replace all parts that are
deeply scored.
5. Check the clutch hub splines.
Torque Specifications.
Toque specifications for various items are provided in
chart form. These same torque values are included In
the assembly procedures.
Planetary One-Way Clutch.
TRANSMISSION
DISASSEMBLY
COMPONENT REMOVAL).
1. Inspect the intermediate outer and inner races
for scores or damaged surface areas where rollers
contact the races.
2. Inspect the rollers and springs for excessive
wear or damage.
3. Inspect the spring and roller cage for bent or
damaged spring retainers.
(MAJOR
Control Valve Body.
1. If not already done, remove the transmission
pan attaching bolts and remove the pan and gasket.
Remove and discard the nylon shipping plug
from the pan. This plug is used to retain transmission
fluid within the transmission during shipment and should
be discarded when the oil pan is removed.
2. Remove the valve body attaching bolts and
remove the valve body from the case.
Converter and Fluid Cooler.
When internal wear or damage has occurred in the
transmission, metal particles, clutch plate material, or
band material may have been carried into the converter
and oil cooler. These contaminants are a major cause
of recurring transmission troubles and must be removed
from the system before the transmission is put back into
service.
Intermediate Servo.
1. Remove the bolts that attach the servo to the
transmission case.
2. Remove the cover, piston, spring, and gasket
from the case, screwing the band adjusting screw inward
as the piston is removed. This places enough tension
on the band to keep the struts properly engaged in the
band end notches while the piston is removed.
3. Apply air pressure to the port in the servo cover
to remove the piston and rod. If the piston or piston
sealing lips are damaged, the complete piston and rod
assembly should be replaced at assembly.
4. Remove the seal from the cover.
Whenever a transmission has been disassembled to
replace worn or damaged parts or because the valve
body sticks from foreign material, the converter and oil
cooler must be cleaned by using the Rotunda Torque
Converter Cleaner (model 014-00028), or equivalent.
Under no circumstances should an attempt be made to
clean converters by hand agitation with solvent.
ASSEMBLY PROCEDURES.
Selective Parts.
Extension Housing Bushing and Rear Seal.
1. Certain parts are provided in graduated
thicknesses to provide correct clutch clearances.
Because the initial selection has already been made for
the particular transmission, it should not be necessary to
re-select components if components affecting the
original selection are not replaced.
1. If only the rear seal needs replaced, carefully
remove it with a tapered chisel or special tools.
T50T100-A and 1175-AC.
NOTE
If using special tool T77L-7697D,
bushing remover, to remove the
bushing, ensure the spline seal is
not damaged.
NOTE
To maintain relationship of involved
components, it may be desirable to
identify the related parts during
disassembly.
2. Remove the bushing
T77L7697-D, or equivalent.
E-43
using
special
tool
TM 10-3950-672-24-1
TORQUE SPECIFICATIONS
Item
Converter to Flywheel
Front Pump to Transmission Case
Overrunning Clutch Race to Case
Oil Pan to Case
Stator Support to Pump
Converter Cover to Converter Housing
Guide Plate to Case
Intermediate Servo Cover to Case
Diaphragm Assembly to Case
Distributor Sleeve to Case
Extension Assembly to Transmission Case
Plug Case Front Pump or Line Pressure
Pressure Gauge Tap
Band Adjusting Screw Locknut to Case
Converter Drain Plug
Manual Valve Inner Lever to Shaft
Downshift Lever to Shaft
Transmission to Engine
Rear Engine Support to Transmission
Plug Case - Throttle Pressure
5/16" Fitting - Cooler Line Connector to
Case - Front and Rear (Case Fitting)
5/16" Tube Nut - Cooler Line to Transmission
Case Fitting
End Plates to Body
End Plates to Body
Inner Downshift Lever Stop
Reinforcement Plate to Body
Screen and Lower to Upper Valve Body
Shift Valve Plate to Upper Body
Upper to Lower Body
Reinforcing Right Side Plate to Lower Body
Control Assembly to Case
Governor Body to Collector Body
Detent Spring to Case
Rear Engine Support to Frame
Neutral Switch to Case
E-44
(lb ft)
20-34
16-30
18-25
8-12
12-16
12-16
12-16
14-20
12-16
12-16
25-35
6-12
6-12
35-40
8-28
30-40
12-16
50-65
60-80
6-12
18-23
N•m
27-46
22-41
24-34
11-16
16-22
16-22
16-22
19-27
16-22
16-22
34-48
8-16
8-16
48-54
11-38
41-54
16-22
68-88
81-109
8-16
24-31
12-18
16-24
(lb in.)
20-45
20-45
20-45
20-45
40-55
20-45
40-55
20-45
95-125
90-120
80-120
40-60
55-75
N•m
2-5
2-5
2-5
2-5
5-6
2-5
5-6
2-5
11-14
10-14
9-14
5-7
6-9
TM 10-3950-672-24-1
Extension Housing.
3. If not already done, remove the valve body
attaching bolts.
Lift the valve body from the
transmission case.
1 Remove the extension housing attaching bolts. Slide
the extension housing off the output shaft. Remove the
gasket.
4. Attach a-dial indicator, special tool 4201-C. or
equivalent, to the front pump. Center the output shaft
using seal replacer tool T61L-7657-B. or equivalent.
5. Pry the gear train to the rear of the case and at
the same time, press the input shaft inward until it
bottoms. Set the dial indicator to read zero.
6. Pry the gear train forward, and note the amount
of gear train end play on the dial indicator. Record the
end play to facilitate assembly of the transmission.
Remove the dial indicator from the pump and
the tool from the output shaft.
7. Remove the vacuum diaphragm. valve rod,
and the throttle valve from the bore in the rear of the
case. Remove the input shaft out of the front pump.
8. Remove the front pump attaching bolts. Pry the
gear train forward to remove the pump.
9. Loosen the band adjustment screw and remove
the two struts.
10. Rotate the band 90 degrees counterclockwise to
align the ends with the slot in the case. Slide the band
off the reverse-high clutch drum.
11. Remove the forward part of the gear train as an
assembly.
12. If not already done, remove the bolts that attach
the servo cover to the transmission case.
13. If not already done, remove the cover, piston,
spring and gasket from the case.
14. Remove the large snap ring that secures the
reverse planet carrier in the low-reverse clutch hub.
Lift the thrust washers and planet carrier from
the drum.
15. Remove the snap ring that secures the reverse
ring gear and hub on the output shaft. Slide the ring
gear and hub off the shaft. Remove the thrust washer.
16. Rotate the low-reverse clutch hub in a clockwise
direction and at the same time. withdraw it from the
case.
Governor.
1. Remove the four governor body to oil collector
attaching bolts.
2. Remove the governor from the collector body
flange.
TRANSMISSION DISASSEMBLY AND ASSEMBLY
(SUBASSEMBLIES).
General.
Before removing any of the subassemblies, thoroughly
clean the outside of the transmission to prevent dirt from
entering the mechanical parts.
Handle all transmission parts carefully to avoid nicking
or burring the bearing or mating surfaces. Lubricate all
internal parts of the transmission with clean automatic
transmission fluid before assembly.
Do not use any other lubricants except on gaskets and
thrust washers. These may be coated with petroleum
jelly to facilitate assembly. Always use new gaskets and
seals when assembling the transmission.
Tighten all bolts and screws to the recommended torque
as outlined in the Torque Specifications chart.
Transmission Disassembly.
1. Remove the converter. Mount the transmission
in holding fixture Rotunda model 014-00106, or
equivalent.
2. If not already done, remove the fluid pan
attaching bolts. Remove the pan and gasket.
E-45
TM 10-3950-672-24-1
NOTE
When removing the separator plate
and gasket, be careful not to lose the
check valves and springs.
17. Remove the reverse clutch snap ring from the
case, then remove the clutch discs, plates, and pressure
plate from the case.
18. If not already done, remove the extension
housing attaching bolts from the case. Remove the
extension housing and gasket.
19. Slide the output shaft assembly from the
transmission case.
20. Remove the distributor sleeve attaching bolts
and remove the sleeve, parking pawl gear, and the
thrust washer. If the thrust washer is staked in place,
use a sharp chisel and cut off the metal from behind the
thrust washer. Be sure to clean the rear of the case with
air pressure or a suitable solvent to remove any metal
particles.
21. Compress the reverse clutch piston release
spring with clutch spring compressor tool T65L77515-A.
or equivalent. Remove the snap ring. Remove the tool
and the springs and retainer assembly.
22. Remove the one-way clutch inner race attaching
bolts from the rear of the case. Remove the inner race
from inside of the case.
23. Remove the low-reverse clutch piston from the
case using air nozzle tool 7000-DE, or equivalent.
3. Separate the bodies and remove the separator
plate and gasket. Remove and clean the separator
plate screen, if necessary.
4. Remove the manual valve retaining pin from
the upper valve body.
5. Slide the manual valve out of the valve body
6. Cover the downshift bore with a finger, then
working from the underside of the body remove the
downshift valve retainer. Remove the spring and
downshift valve.
7. Apply hand pressure on the pressure boost
valve sleeve end and remove the sleeve retaining clip
from the under side of the body. Slowly release hand
pressure and remove the sleeve and the pressure boost
valve. Remove the two springs, the spring retainer and
the main regulator valve from the bore
8. Apply pressure on the throttle boost valve
retaining plate and remove the two attaching screws.
Slowly release the pressure and remove the plate,
throttle pressure boost valve and spring, and the manual
low 2-1 scheduling valve and spring from the body.
9. Apply pressure on the remaining valve retaining
plate and remove the eight attaching screws.
10. Hold the valve body so that the plate is facing
upward. Slowly release the pressure and remove the
plate.
11. Remove the spring and the intermediate servo
modulator valve from the valve body.
12. Remove the intermediate servo accumulator
valve and springs.
13. Remove the 2-3 back-out valve and spring.
14. Remove the 2-3 shift valve. spring. and the
throttle modulator valve
Disassembly of the Control Valve Body.
NOTE
The valve body-to-screen gasket
should not be cleaned in a degreaser
solvent or any type of detergent
solution when disassembling the
main control. To clean the gasket.
wipe it off with a lint free cloth.
1. Remove the nine screws that attach the screen
to the lower valve body and remove the screen and
gasket.
2. Remove the five upper to lower valve body and
hold down plate attaching screws. Remove the seven
attaching screws from the underside of the lower valve
body.
E-46
TM 10-3950-672-24-1
9. Install the cutback control valve and the line
pressure coasting regulator valve in the valve body.
10. Install the one spring, DR-2 shift valve. and the 1-2
shift valve in the body.
11. Install the throttle modulator valve and spring
and the 2-3 shift valve in the valve body.
12. Install the spring and the 2-3 backout valve in
the valve body.
13. Install the two springs and the intermediate
servo accumulator valve in the valve body.
14. Install the intermediate servo modulator valve
and spring in the body.
15. Carefully install the valve retaining plate on the
body and secure with the eight attaching screws.
Torque the two hex washer head screws 20 to 45 lb in.
(2 to 5 Nom). Torque the remaining six screws 20 to 40
lb in. (2 to 5 N•m).
16. Install the throttle pressure boost valve and
spring in the valve body. Install the manual low 2-1
scheduling valve and spring In the valve body and
install the retaining plate. Torque the attaching screws
20 to 45 lb in. (2 to 5 N•m).
17. Install the spring retainer on the stem of the
main regulator valve so that the retainer flange is next
to the valve shoulder. Install the main regulator valve,
spring retainer, two springs, pressure boost valve, and
sleeve in the bore. Apply hand pressure on the end of
the pressure boost valve sleeve and install the spring
clip retainer in the groove on the under side of the body
so that the clip is inserted into the end groove in the
sleeve. Ensure the pressure boost valve sleeve is free
in its bore.
18. Install the manual valve in the valve body and
install the retaining pin in the body.
15. Remove the 1-2 shift valve, DR-2 shift valve,
and the spring from the valve body.
16. Remove the line pressure coasting regulator
valve from the body.
17. Remove the cutback control valve to complete
the disassembly of the control valve.
Assembly of the Control Valve Body.
1. Install the downshift valve and spring in the
valve body. Compress the spring and install the retainer
from the underside of the body.
2. Install the valve body on a clean surface with
the passage side facing up. Install the converter relief
valve spring in its bore. Coat the converter pressure
relief valve with petroleum jelly and place it on top of
the spring. Install the 2-3 shift valve check ball in its
cavity. Install the throttle pressure relief valve spring in
its bore. Coat the throttle pressure relief valve check
ball with petroleum jelly and place it on top of the spring.
3. If previously removed, install the separator
screen in the separator plate ensuring that the screen
tabs are flush with the separator plate surface. Carefully
position the separator plate and new gasket on the lower
valve body. Install the two hold down plates on the
separator plate and install the attaching screws finger
tight.
4. Install the lower body and plate assembly on the
upper valve body and install the attaching screws finger
tight.
5. Install the oil screen screws loosely, without the
screen, to properly align the upper and lower valve
bodies, gasket, and separator plate.
6. Torque the two bolts that are covered by the
screen 40 to 55 lb in. (5 to 6 N•m).
7. Remove the oil screen attaching screws and
install the gasket and oil screen in position on the lower
valve body. install the screen attaching screws.
8. Torque all the valve body and screen attaching
screws 40 to 55 lb in. (5 to 6 N•m).
Disassembly of the Intermediate Servo.
1. If not previously removed, apply air pressure to
the port in the servo cover to remove the piston and rod.
If the piston or piston sealing lips are damaged replace
the complete piston and rod assembly.
E-47
TM 10-3950-672-24-1
5. Remove the nut securing the inner manual lever to
the shaft. Remove the inner lever from the shaft. Slide
the outer lever and shaft from the case.
2. Remove the seal and gasket from the cover.
Assembly of the Intermediate Servo.
6. Remove the seal from the case with tools T59L1 00B and T58L101 -A hammer and puller, or equiva lent.
1. Dip the new seals in transmission fluid. Install a
new seal and gasket on the cover.
2. Dip the piston in transmission fluid and install it
in the cover.
Assembly of the Downshift and Manual Linkage.
1. Dip the new seal in transmission fluid and install it in
the case using seal replacer tool 77288, or equivalent.
Disassembly of the Governor.
2. Slide the outer manual lever and shaft In the
transmission case. Install the Inner lever on the shaft,
ensuring the leaf spring roller is positioned In the Inner
manual lever detent. Install the attaching nut and torque
30 to 40 lb ft (41 to 54 Nom).
1. If not previously removed. remove the governor
body attaching bolt and remove the governor.
2. Remove the snap ring that secures the governor
oil collector body on the output shaft and slide it off the
front of the shaft.
3. Remove the seal rings from the oil collector
body.
3. ' Install the parking pawl actuating rod and secure it
to the inner manual lever with the C-ring.
Assembly of the Governor.
4. Slide the neutral start switch on the outer lever shaft
and install the bolts in the case.
1. Carefully install new seal rings on the oil
collector body.
2. Working from the front end of the output shaft.
slide the governor oil collector body into place on the
shaft and secure with the snap ring. Ensure the snap
ring is seated in the groove.
3. Install the governor assembly on the oil collector
body and secure with the attaching screws. Torque the
screws 90 to 120 lb in. (10 to 14 N•m).
5. With the transmission manual lever in neutral, rotate
the switch and install the gauge pin (No. 43 drill shank
end) into the gauge pin holes of the switch.
The gauge pin must be installed a full 0.4844 inches
(12.303 mm) into the three holes of the switch.
6. Torque the attaching bolts 55 to 75 pounds-inch
(63.3 to 86.4 kgcm). Remove the gauge pin from the
switch.
Disassembly of the Downshift and Manual Linkage.
7. Install a new downshift lever seal in the recess of the
outer lever shaft. Slide the downshift lever and shaft
into Position.
1. Remove the nut and lockwasher that secures
the outer downshift lever to the transmission and
remove the lever.
2. Slide the inner downshift lever assembly out
from the inside of the case.
3. Remove the two bolts securing the neutral start
switch.
4. Remove the C-ring securing the parking pawl
actuating rod to the manual lever. Remove the rod from
the case.
8. Install the outer downshift lever on the shaft and
secure with the lockwasher and nut. Torque the nut 12
to 16 lb ft (16 to 22 Nom).
Disassembly of the Parking Pawl Linkage.
1. Remove the bolts securing the parking pawl guide
plate to the case. Remove the plate.
E-48
TM 10-3950-672-24-1
2.
Remove the spring, parking pawl, and shaft
from the case.
3.
Working from the pan mounting surface, drill a
0. 1 25 inch (3.1 mm) diameter hole through the center
of the cupped plug. Pull the plug from the case with a
wire hook.
4.
Unhook the end of the spring from the park
plate Slot to relieve the tension.
5.
Thread a 1/4-20 inch or 8-32 x 1-1/4 inch screw
into the park plate shaft. Pt ' the shaft from the case
with the screw. Remove tl.3 spring and park plate.
Assembly of the Parking Pawl Linkage.
1.
Install the spring and park plate in the case and
install the shaft. Install the end of the spring into the
Slot of the park plate.
2.
Servo AppIy Lever installation
2.
Coat the cup plug with threadlock and sealer.
Using the fabricated tool shown in the illustration titled,
Servo Apply Lever Installation, drive the cup plug into
position in the case. Ensure the plug is flush with the
shoulder of the counterbore.
Install a new cupped plug to retain the shaft.
3.
Install the parking pawl shaft in the case. Install
the parking pawl and spring into place on the shaft.
4.
Install the guide plate on the case, ensuring the
actuating rod is seated in the slot of the plate. Secure
the plate with the two bolts and lockwashers. Torque
the bolts 12 to 16 lb ft (16 to 22 N•m).
Disassembly of the Front Pump.
1.
Remove the two seal rings and the selective
thrust washer.
Disassembly of the Servo Apply Lever.
2.
Remove the large square seal from the outside
diameter of the pump housing.
1.
Working from the inside of the transmission
case, carefully drive on the servo apply lever shaft to
remove the cup plug. The shaft can be withdrawn from
the case by hand.
3.
Remove the five bolts that secure the stator
support to the pump housing. Lift the support from the
housing.
Assembly of the Servo Apply Lever.
4.
Remove the drive and the driven gear from the
housing.
1.
Hold the servo apply lever in position and install
the new shaft.
5.
If the pump housing bushing is worn or
damaged, it must be replaced. Install the new bushing
in position ensuring the half moon slot in the bushing is
on top and in line with the oil lube hole near the seal
bore. Press the bushing in 0.060 to 0.080 inches (1.522.03 mm) below the front face of the bushing bore. Use
bushing replacer tool T66L-7003-C2. or equivalent, and
a handle to seat the bushing properly. Ensure the half
moon slot is in past the lube hole to provide proper
lubrication.
E-49
TM 10-3950-672-24-1
IDENTIFICATION
COLOR
Blue
Natural (White)
Red
FRONT PUMP SUPPORT THRUST WASHER SELECTION
THICKNESS
INCH
0.056-0.060
0.073-0.077
0.088-0.092
MM
1.42-1.52
1.85-1.95
2.23-2.33
Stator to Impeller Interference Check.
Assembly of the Front Pump.
NOTE
Each drive and driven gear has either
an identification mark or chamfered
teeth or one face. The identification
mark on the chamfered surface on
each gear must be installed toward
the front of the pump housing.
1.
Install the front pump assembly on a bench with
the spline end of the stator shaft pointing up.
1.
Install the drive and driven gears in the pump
housing.
3.
Hold the pump stationary and try to rotate the
converter counterclockwise.
The converter should
rotate freely without any signs of interference or
scraping within the converter assembly.
2.
Mount a converter on the pump with the splines
on the one-way clutch inner race engaging the mating
splines of the stator support. The converter hub will
then engage the pump drive gear.
2.
Install the stator support in the pump housing
and secure with the five attaching bolts. Torque the
bolts 12 to 16 lb ft (16 to 22 N•m).
4.
If there is an indication of scraping, the trailing
edges of the stator blades may be interfering with the
leading edges of the impeller blades and the converter
should be replaced.
3.
Install two new seal rings on the stator support.
Ensure the ends of the rings are engaged to lock them
in place.
Stator to Turbine Interference Check.
4.
Install a new square seal on the outside
diameter of the pump housing.
1.
Install the converter on the bench front side
down.
5.
Install the selective thrust washer. Refer to the
Front Pump Support Thrust Washer Selection chart to
ensure the thickness of the washer is correct.
2.
Install the front pump assembly to engage the
mating splines of the stator support and stator, and
pump drive gear lugs.
NOTE
Before installing the pump on the
converter, perform the Stator to
Impeller Interference Check.
the
Stator to Turbine Interference Check.
the Converter End Play Check, and
the One Way Clutch Check.
3.
Install the input shaft, engaging the splines with
the turbine hub.
4.
Hold the pump stationary and attempt to rotate
the turbine with the input shaft. The turbine should
rotate freely in both directions without any signs of
interference or scraping noise.
6.
Install the pump on the converter, ensuring the
drive gear engages the converter hub. Rotate the pump
to ensure the gears rotate freely.
5.
If interference exists, the stator front thrust
washer may be worn, allowing the stator to hit the
turbine. If this condition exists. the converter should be
replaced.
E-50
TM 10-3950-672-24-1
Transmission
Model
C6
TORQUE - CONVERTER END - PLAY
Converter End- Play
New or Rebuilt Converter
Inch
0.021 Max.
mm
0.533 Max.
Used Converter
inch
0.040 Max.
mm
1.01 Max
Converter End Play Check.
4.
If the clutch fails to lock up and hold at 10
pounds-foot (1.38 kgm) torque. replace the converter
unit.
1.
Install the end play checking tool T80L-7902-A,
or equivalent, into the converter pump drive hub until it
bottoms.
Disassembly of the Reverse High Clutch.
2.
Expand the sleeve in the turbine spline by
tightening the threaded inner post until the tool is
securely locked into the spline.
1.
Separate the drive train. Remove the pressure
plate snap ring.
2.
Remove the pressure plate and the drive and
driven (internal and external spline) clutch plates.
3.
Attach a dial indicator, tool 4201-C, or
equivalent, to the tool. Position the indicator button on
the converter pump drive hub, and set the dial face at
zero.
3.
Install the clutch spring compressor tool
T65L77515-A, or equivalent, on the reverse-high clutch
drum. Ensure the legs clear the snap ring enough to
remove it. Remove both snap rings and remove the
tool.
4.
Lift the tool upward as far as it will go and note
the indicator reading. The indicator reading is the total
end play which the turbine and stator share. Replace
the converter unit if the total end play exceeds the
limits.
4.
Remove the spring retainer and the piston
return springs.
5.
Loosen the threaded inner post to free the tool,
and then remove the tool from the converter.
5.
Apply air pressure to the piston apply hole in the
clutch hub using air nozzle tool 7000-DE. or equivalent,
and remove the piston.
Converter One-Way Clutch Check.
6.
Remove the piston outer seal from the piston
and the inner seal from the clutch drum.
1.
Insert the one-way clutch holding tool
T77L7902-A. or equivalent, in one of the grooves in the
stator thrust washer.
7.
Remove the front and rear bushings from the
clutch drum If they are worn or damaged. To remove
the front bushing. use a cape chisel and cut along the
bushing seam until the chisel breaks through the
bushing wall Pry the loose ends of the bushing up with
an awl and remove the bushing. To remove the rear
bushing, use tool T69L-7D044-A or equivalent.
2.
Insert the one-way clutch torquing tool
T77L7902-D, or equivalent. In the converter pump drive
hub so as to engage the one-way clutch inner race.
3.
Attach a torque wrench to the one-way clutch
torquing tool. With the one-way clutch holding tool held
stationary, turn the torque wrench counterclockwise.
The converter one-way clutch should lockup and hold a
10 lb ft (14 N•m) force. The converter one-way clutch
should rotate freely in a clockwise direction. Try the
clutch for lockup and hold in at least five different
locations around the converter.
and press the bushing from the drum.
Assembly of the Reverse-High Clutch.
1.
If the clutch drum bushings were removed.
Install the drum in a press and press new bushings into
the drum with bushing tool T69L-7DO44-A, or
equivalent.
E-51
TM 10-3950-672-24-1
TRANSMISSION CLUTCH PLATE USAGE
Transmission
Model
Forward Clutch
PGD, PJD
High Clutch
PGD. PJD
Reverse Clutch
PJD
PGD
Clearance
Steel
Friction
Inch
mm
41
4
0.021-0.046
0.533-1 168
3
3
0.022-0.036
0.558-0 914
52
42
5
4
2.
Dip the new seals in transmission fluid and
install one on the drum and one on the piston.
3.
CLUTCH PLATE SELECTIVE SNAP RINGS
Snap Ring Thickness
Install the piston in the clutch drum.
Inch
0.056-0.060
0.064-0.069
0.074-0.078
0.083-0.087
0.092-0.096
0.110-0.114
0.218-0.132
4.
Install the piston return springs in the piston
sockets. Install the spring retainer on the springs.
NOTE
Before releasing the pressure on the
clutch spring compressor tool,
ensure the snap ring is positioned
inside of the four snap ring guides
on the spring retainer.
mm
1 42-1.52
1.62-1 75
1 87-1 98
2.10-2.20
2.33-2.43
2.79-2.89
3.25-3.35
7.
After all clutch plates have been installed.,
install the pressure plate in the clutch drum. Install the
pressure plate selective snap ring.
5.
Install the clutch spring compressor tool
T65L7751 5-A, or equivalent, and compress the springs.
Ensure the spring retainer is centered while
compressing the springs. Install the snap ring.
8.
With a feeler gauge. check the clearance
between the pressure plate and snap ring while the
pressure plate is held downward. The clearance should
be 0.022 to 0.036 inches (0.558 to 0.914 mm). If the
clearance is not within specifications, refer to the Clutch
Plate Selective Snap Rings chart for the correct size
snap ring. Install the correct size snap ring and re-check
the clearance.
6.
Refer to the Transmission Clutch Plate Usage
chart for the number of plates to be used. Dip the clutch
plates in clean transmission fluid. Install the clutch
plates alternately starting with a steel drive (internal)
plate. If using new clutch plates, soak the plates in
automatic transmission fluid for 15 minutes before they
are assembled.
Disassembly of the Forward Clutch.
1.
Remove the clutch pressure plate snap ring.
2.
Remove the rear pressure plate, the drive and
driven plates, wave plate, and the forward pressure
plate from the clutch hub.
3.
Remove the snap ring that secures the disc
spring in the clutch cylinder. Using tool T65L-77515A,
or equivalent, remove the disc spring.
E-52
TM 10-3950-672-24-1
4.
Using an air nozzle tool 7000-DE, or equivalent,
apply air pressure to the clutch cylinder to remove the
piston.
Disassembly of the Input Shell and Sun Gear.
5.
Remove the seal from the piston and the seal
from the clutch hub.
2.
Remove the thrust washer wear plate from the
input shell and sun gear.
Assembly of the Forward Clutch.
3.
Working from inside the input shell remove the
sun gear. Remove the snap ring from the gear.
1.
Remove the rear snap ring from the sun gear.
1.
Dip the two new seals in transmission fluid.
Install the smaller seal on the clutch hub and the lip seal
on the clutch piston.
Assembly of the Input Shell and Sun Gear.
2.
Using the lip seal protector tool T77L-77548-A,
or equivalent, install the clutch piston and lip seal.
1.
Install the forward snap ring on the forward end
(short end) of the sun gear. Working from inside the
input shell, slide the sun gear and snap ring into place
ensuring the longer end is at the rear.
3.
Install the installation tool into the forward clutch
cylinder so that the bore of the tool is aligned with the
piston bore in the cylinder. Press the piston into the
cylinder until it bottoms in the bore. Remove the
installation tool.
2.
Install the thrust washer wear plate on the sun
gear and install the rear snap ring.
Disassembly of the Output Shaft Hub and Ring
Gear.
NOTE
Position the disc spring in the
cylinder with the dished face
downward.
1.
Remove the hub snap ring from the ring gear.
2.
Lift the hub from the ring gear.
Assembly of the Output Shaft Hub and Ring Gear.
4.
Ensure the steel pressure ring is in the groove
on the piston. Install the spring so that the pressure ring
and spring are in contact. Secure the disc with the
retaining snap ring.
1.
Position the hub in the ring gear.
2.
Secure the hub with the snap ring. Ensure the
snap ring is fully engaged with the groove.
5.
Install the forward pressure plate with the flat
side up and the beveled side down. Dip the clutch
plates in clean transmission fluid. Install the wave plate,
a steel plate. and a composition driven plate. Install the
remaining plates in the previous sequence. Refer to the
Transmission Clutch Plate Usage chart for the number
of plates required. The last plate installed will be the
rear pressure plate. Install the snap ring and ensure it
seats fully in the groove.
Disassembly of the One-Way Clutch.
1.
Remove the snap ring and bushing from the
rear of the low-reverse clutch hub.
2.
Remove the rollers from the spring assembly
and lift the spring assembly from the hub.
3.
6.
With a feeler gauge, check the clearance
between the snap ring and the pressure plate while
exerting downward pressure on the plate.
The
clearance should be 0.021 to 0.046 inches (0.533-1.168
mm). If the clearance is not within specifications, refer
to the Clutch Plate Selective Snap Rings chart for the
correct size snap ring. Install the correct size snap ring
and re-check the clearance.
Remove the remaining snap ring from the hub.
Assembly of the One-Way Clutch.
1.
Install a snap ring in the forward snap ring
groove of the low-reverse clutch hub.
E-53
TM 10-3950-672-24-1
8.
Place the transmission case on the bench with
the front end facing down.
2.
Install the low-reverse clutch hub on the bench
with the forward end down.
3.
Install the one-way clutch spring assembly on
top of the snap ring.
NOTE
Do not re-stake the thrust washer.
4.
Install a roller into teach of the spring assembly
compartments.
9.
Install the parking gear thrust washer and the
gear on the case.
5.
Install the bushing on top of the spring
assembly.
10.
Install the collector and tubes in place on the
rear of the case and secure with the attaching bolts.
Torque the bolts 12 to 16 lb ft (16 to 22 N•m).
6.
Install the remaining snap ring at the rear of the
low-reverse clutch hub to secure the assembly.
11.
Install the output shaft and governor as an
assembly.
Disassembly of the Low-Reverse Clutch Piston.
Assembly of the Low-Reverse Clutch Piston.
12.
Clean the mounting surface on the transmission
case and extension housing. Install a new gasket on the
transmission case. Install the extension housing on the
case and secure with the attaching bolts. Torque the
bolts 25 to 35 lb ft (34 to 48 N•m).
1.
fluid.
Dip the two new seals in clean transmission
13.
Mount the transmission case in the holding
fixture.
2.
Install the seals on the piston.
14.
Coat a new gasket with petroleum jelly and
install on the servo cover.
1.
Remove the inner and the outer seal from the
low-reverse clutch piston.
TRANSMISSION ASSEMBLY.
15.
1.
Install the servo spring on the piston rod.
Mount the transmission in a holding fixture.
16.
Install the servo piston rod in the case. Install
the servo cover and secure with the attaching bolts,
taking care to back off the band adjusting screw as the
cover bolts are tightened. Torque the bolts 14 to 20 lb ft
(19 to 27 N•m).
2.
Tap the low-reverse piston into place in the case
with a clean rubber hammer.
3.
Hold the one-way clutch inner race in position
and secure with the attaching bolts. Torque the bolts 18
to 25 lb ft (24 to 34 N•m).
17.
Align the low-reverse clutch hub and one-way
clutch with the inner race at the rear of the case. Rotate
the low-reverse clutch hub clockwise while applying
pressure to seat it on the inner race.
4.
Install the low-reverse clutch return spring and
retainer assembly in the clutch piston.
18.
Install the low-reverse clutch plates, starting with
the wave plate next to the piston and following
alternately with steel and friction plates. Retain them
with petroleum jelly. If new composition plates are
being used, soak them in clean transmission fluid for
fifteen minutes before installation. Install the pressure
plate and the snap ring. Test the operation of the lowreverse clutch by applying air pressure at the clutch
pressure apply hole in the case.
5.
Install the retainer snap ring in place on the oneway clutch inner race.
6.
Install the compressing tool T65L-7751 5-A, or
equivalent, and compress the springs just enough to
install the low-reverse clutch piston snap ring.
7.
Install the
compressing tool.
snap
ring,
then
remove
the
E-54
TM 10-3950-672-24-1
IDENTIFICATION
COLOR
Blue
Natural (White)
Red
SELECTIVE THRUST WASHER THICKNESS
THICKNESS
INCH
0.056-0.060
1.42-1.52
0.073-0.077
1.85-1.95
0.088-0.092
2.23-2.33
19.
Install the reverse planet ring gear thrust washer
and the ring gear and hub assembly. Install the snap
ring in the groove on the output shaft.
MM
27.
Using two 5/16-inch bolts three Inches long,
make two alignment studs. Cut the heads from the bolts
and grind a taper on the cut end. Temporarily install the
two studs opposite each other in the mounting holes of
the case. Slide a new gasket onto the studs. Install the
pump on the case, ensuring no damage is done to the
large seal on the outside diameter of the pump housing.
Remove the aligning studs. Install six of the seven
mounting bolts. Torque the bolts 16 to 30 lb ft (22 to 41
N•m).
20.
Install the front and rear thrust washers onto the
reverse planet assembly and retain them with petroleum
jelly. Install the assembly into the ring gear and install
the snap ring.
21.
Set the reverse-high clutch assembly on a
bench with the front end facing down. Install the thrust
washer on the rear end of the reverse-high clutch
assembly. Retain the thrust washer with petroleum jelly
and install the splined end of the forward clutch into the
open end of the reverse-high clutch with splines
engaging the direct clutch friction plates.
28.
Clean all dirt from the band adjusting screw, and
remove and discard the locknut. Adjust the intermediate
band by Installing a new locknut and tightening the
adjusting screw to 10 lb ft (14 N•m). Back off the
adjusting screw exactly 1 1/2 turns. Hold the adjusting
screw from turning and torque the locknut 35 to 40 lb ft
(48 to 54 N•m). After adjustment is made, Install the
input shaft with the long splined end installed into the
forward clutch assembly.
22.
Install the thrust washers and retain them with
petroleum jelly on the front end of the forward planet
ring gear and hub. Install the ring gear into the forward
clutch.
29.
Install tool 4201-C dial indicator. or equivalent,
at the seventh pump mounting bolt and check the
transmission end play following steps 2, 3, and 4 of
Disassembly. End play should be 0.008 to 0.044 inch
(0.203 to 1.117 mm).
If end play is not within
specification. install a selective thrust washer. Refer to
the Selective Thrust Washer Thickness chart. Remove
the dial indicator.
23.
Install the thrust washer on the front end of the
forward planet assembly.
Retain the washer with
petroleum jelly and install the assembly into the ring
gear. Install the input shell and sun gear assembly.
24.
Install the reverse-high clutch assembly, forward
clutch assembly, forward planet assembly and drive
input shell, and sun gear as an assembly into the
transmission case.
30.
Install the seventh pump mounting bolt. Torque
the bolt 16 to 30 lb ft (22 to 41 N•m).
25.
Install the intermediate band into the case
around the reverse-high clutch drum. Install the struts
and tighten the band adjusting screw sufficiently to
retain the band.
31.
Install the main control valve body on the case
ensuring the selector and downshift levers engage the
valves properly, and secure with the attaching bolts.
Torque the bolts 95 to 125 lb In. (11 to 14 N•m).
26.
Install a selective thickness bronze thrust
washer on the rear shoulder of the stator support and
retain it with petroleum jelly. If the end play was not
within specification when checked prior to disassembly,
replace the washer with one of proper thickness. Refer
to the Selective Thrust Washer Thickness chart.
E-55
TM 10-3950-672-24-1
32.
Install the primary throttle valve, rod, and the
vacuum diaphragm in the case. Torque the diaphragm
attaching bolt 12 to 16 lb ft (16 to 22 N•m).
1.
Dip the new seal in transmission fluid.
2.
Install a new seal on the cover.
33.
Clean the transmission pan and gasket surfaces
thoroughly. Install a new pan gasket and the pan.
Secure the pan to the transmission case with the
attaching bolts. Torque the bolts 8 to 12 lb ft (11 to 16
N•m).
3.
Coat a new gasket with petroleum jelly, and
install on the servo cover 4.
Dip the piston in
transmission fluid and install it in the cover.
34.
6.
Install the servo piston and cover in the case
and secure the cover to the case with the attaching
bolts, taking care to back off the band adjusting screw
as the cover bolts are tightened. Torque the bolts 14 to
20 lb ft (19 to 27 N•m).
5.
Install the converter assembly.
Installation of the Governor.
1.
Install the governor to the oil collector flange
and secure with the attaching bolts. Torque the bolts 90
to 120 lb In. (10 to 14 N•m).
Install the servo spring on the piston rod.
Installation of the Control Valve Body.
Installation of the Extension Housing.
NOTE
Perform steps 1 and 2 if not done
during Transmission Assembly.
NOTE
Perform steps 1 and 2 if not done
during Transmission Assembly.
1.
Install the valve body on the case ensuring the
selector and downshift levers engage the valves
properly, and secure with the attaching bolts. Torque
the bolts 95 to 125 lb in. (11 to 14 N•m).
1.
Clean the mounting surface on the transmission
case and extension housing. Install a new gasket on the
transmission case.
2.
Hold the extension housing in place and secure
with the attaching bolts. Torque the bolts 25 to 35 lb ft
(34 to 48 N•m).
2.
Clean the transmission pan and gasket surfaces
thoroughly. Install a new pan gasket and the pan.
Secure the pan to the transmission case with the
attaching bolts. Torque the bolts 8 to 12 lb ft (11 to 16
N•m).
Installation of the Extension Housing Bushing and
Rear Seal.
LUBRICATION.
The fluid level indicator should be used to determine
actual fluid requirements. Check the oil level at normal
operating temperature. Refer to TROUBLESHOOTING
Hydraulic Checks.
1.
Install a new bushing using bushing replacer tool
T77L-7697-C. or equivalent.
2.
Before installing the seal, inspect the
counterbore of the housing for burrs. Remove any burrs
with crocus cloth. Install the seal into the housing with
seal replacer tool T61L-7657-B, or equivalent. The seal
should be firmly seated in the bore. Coat the inside
diameter of the end of the seal with Multi-Purpose LongLife Lubricant.
If it is necessary to add or replace fluid. use DEXRON
II, or equivalent. If a partial drain was done, add 5
quarts (4.7 liters) shallow pan or 6 quarts (5.6 liters)
deep pan of fluid to the transmission through the filler
tube. Check the fluid level. If a complete drain was
done the approximate refill capacity is 11.75 quarts
(11.2 liters). The approximate dry capacity includes
cooler and lines.
Installation of the Intermediate Servo.
NOTE
Perform steps 1 through 6 if not
done
during
Transmission
Assembly.
E-56
TM 10-3950-672-24-1
FRONT DRIVE AXLE
DESCRIPTION
The straddle mounted pinion has two tapered roller
bearings in front of the pinion teeth which take the
forward and reverse thrust and a third bearing behind
the pinion teeth to carry the radial load.
The front drive axle is a F-146-FSHX axle manufactured
by Rockwell. The axle incorporates a single reduction
carrier with a heavy duty hypoid drive pinion and ring
gear. The differential and gear assembly is mounted on
tapered roller bearings.
MAINTENANCE
1.
Remove the wheel studs from the brake drum
and hub by placing the hub and drum assembly in a
press. Position the open end of the drum downward and
press out the studs.
DISASSEMBLY OF THE WHEEL ENDS.
Removal of the Wheel Hub and Drum Assembly.
1.
Remove the axle shaft to hub nuts, washers,
dowels, and studs. Remove the axle drive shaft and
drive shaft gasket.
Disassembly of the Bearing Cups and Seal from the
hub.
2.
Remove the outer wheel bearing lock nut and
washer and inner wheel bearing adjusting nut from the
spindle.
1.
If the seal is still seated in the hub, remove it by
using a long screwdriver or other pointed tool to pry
loose. Discard the seal.
3.
Pull the hub and drum straight off the spindle,
being careful that the outer bearing cone does not drop
off the spindle.
2.
Remove the inner and outer bearing cups from
the hub using a press and sleeve or a suitable puller.
Removal of the Oil Slinger and Brake.
NOTE
The inner and outer bearing cups will
remain seated inside the hub cavity.
If the inner bearing cone slides off
the spindle, the hub oil seal will
remain inside the hub.
1.
Remove the oil slinger from the hub.
2.
Remove the bolts, lockwashers, and nuts and
remove the brake from the backing plate. Remove the
brake assembly to a clean work area. If maintenance is
required on the brake assembly, refer to the BRAKES
SM package.
Removal of the Brake Drum.
ASSEMBLY OF THE WHEEL ENDS.
CAUTION
DO NOT STRIKE WHEEL STUDS
WITH A STEEL HAMMER OR TWIST
TO REMOVE THEM.
Silicone RTV Gasket Application.
NOTE
Where silicone RTV gasket material
is used, Dow Siliastic No. RTV-732
Black and General Electric No.
RTV1473
Black
meet
the
requirements.
However., silicone
RTV is also available in bulk under
Rockwell part number 1199-Q-2981;
in 10 oz. tubes, part number 1250-X388, or in 3 oz. tubes, part number
1199-T3842.
NOTE
If a press is not available, a brass
hammer or a drift may be used to
drive out the studs.
E-57
TM 10-3950-672-24-1
Wheel End Assembly- Exploded View
E-58
TM 10-3950-672-24-1
Removal of all gaskets including silicone RTV is
accomplished by peeling or scraping the used gasket off
the hub mating surface of the drive flange.
CAUTION
DO
NOT
USE
EXCESSIVE
PRESSURE TO INSTALL THE SEAL
OR TAP THE SEAL AFTER IT HAS
BUTTOMED, AS IT WILLCRUSHTHE
SEAL RETAINER AND CAUSE SEAL
DAMAGE.
WARNING
MINOR
CONCENTRATIONS
OF
ACETIC ACID VAPOR MAY BE
PRODUCED DURING APPLICATION.
ADEQUATE VENTILATION SHOULD
BE PROVIDED WHEN SILICONE RTV
IS APPLIED IN CONFINED AREAS.
2.
Place the inner bearing cone into position inside
the hub against its cup, and install a new hub oil seal.
Tap the seal into position until it bottoms in the bore.
Installation of the Brake Drum.
WARNING
EYE
CONTACT
WITH
THESE
SILICONE RTV MATERIALS MAY
CAUSE IRRITATION.
IF EYE
CONTACT TAKES PLACE, FLUSH
THE EYES WITH WATER FOR 15
MINUTES AND HAVE THE EYES
EXAMINED BY A DOCTOR.
1.
Place the hub in a press with the inner end
pointing upward.
CAUTION
DO NOT STRIKE THE STUDS WITH A
STEEL HAMMER.
NOTE
Before pressing the wheel studs into
position, ensure that the stud
serrations in the corresponding
holes of the hub and drum and
serrations of the wheel studs align
correctly, otherwise as studs are
being pressed through, a larger hole
will develop causing loose wheel
studs.
Application of silicone RTV gasket material is as follows:
1.
Remove dirt, grease, or moisture from the hub
mating surface of the drive shaft.
2.
Dry the surface.
3.
Apply a thin bead, maximum 0.125 inch (3.175
mm) diameter, completely around one mating surface to
ensure complete sealing and prevent leakage.
4.
Assemble the components immediately to
permit silicone RTV gasket material to spread evenly.
NOTE
If a press is not available, a brass
hammer or drift may be used to seat
the wheel studs.
Installation of the Oil Slinger and Brake.
1.
Install the brake assembly to the backing plate
and secure with the bolts, lockwashers, and nuts.
2.
Installation of the Wheel Hub and Drum Assembly.
1.
Install the hub and drum assembly onto the
spindle being careful not to damage the oil seal in the
hub. Press the hub until the inner bearing is seated
flush on the spindle.
Install the oil slinger on the hub.
Assembly of the Bearing Cups and Seal to the Hub.
1.
If the wheel bearings were removed from the
hub, install the inner and outer bearing cups into the hub
using a press and suitable sleeve.
2.
Place the outer bearing cone into position on the
spindle and against its cup in the hub.
E-59
TM 10-3950-672-24-1
NOTE
Step 3 is for axles with a two gear
gear box only.
NOTE
After completing steps 3 and 4,
adjust the bearing following the
procedure under Wheel Bearing
Adjustment in this package.
3.
Remove the gearbox.
Gearbox in the Service Manual.
3.
Install the inner wheel bearing adjusting nut onto
the spindle against the outer bearing.
WARNING
DO NOT HIT THE CIRCULAR
DRIVING LUGS ON THE SHAFT
HEAD AS THIS MAY CAUSE THE
LUGS TO SHATTER OR SPLINTER.
DO NOT USE CHISELS OR WEDGES
TO LOOSEN THE SHAFT OR
DOWELS AS THIS WILL DAMAGE
THE HUB, SHAFT, AND OIL SEAL.
4.
Install the outer wheel bearing lock washer and
lock nut onto the spindle and against the adjusting nut.
5.
Coat the inside hub mating surface of the drive
shaft with silicone RTV gasket material, following the
procedure under Silicone RTV Gasket Application in this
package.
6.
Apply a small amount of wheel bearing grease
to the internal splines of the drive shaft.
NOTE
To loosen the dowels, hold a 1.5inch (3.81 cm) diameter brass drift
against the center of the axle shaft
head, inside the circular driving lugs.
Strike the drift a sharp blow with a 5
to 6 pound (2.3 to 2.8 kg) hammer or
sledge. A 1.5-inch (3.81 cm) diameter
brass hammer is an excellent and
safe drift.
7.
Install the axle drive shaft and secure with the
axle shaft to hub nuts, washers, dowels, and studs.
Wheel Bearing Adjustment.
1.
Tighten the bearing adjusting nut to 50 lb ft (68
N•m) while rotating the hub in both directions to seat the
bearings.
2.
Back off the adjusting nut 1/16 to 1/4 turn.
3.
Torque the jam nut to 250 lb ft (339 N•m).
4.
Remove the axle shaft stud nuts, lockwashers,
and tapered dowels.
5.
Remove the axle shaft from the drive unit and
housing.
4.
The end play must be within the limits of 0.001
to 0.010 inch (0.025 to 0.254 mm) loose.
6.
Remove the carrier to housing stud nuts and
lockwashers. Loosen the two top nuts but leave them
on the studs to prevent the carrier from falling.
DISASSEMBLY OF THE DRIVE UNIT.
Removal of the Drive Unit from the Housing.
7.
Break the carrier loose from the housing with a
rawhide mallet.
1.
Remove the plug from the bottom of the axle
housing and drain the lubricant.
2.
Refer to Two Gear
8.
To remove the carrier from the housing, place a
roller jack under the carrier. Remove the top nuts and
lockwashers and work the carrier free. A small pinch
bar may be used to straighten the carrier in the housing
bore. However, the end must be rounded to prevent
indenting the carrier flange.
Disconnect the propeller shaft.
E-60
TM 10-3950-672-24-1
9.
Place the carrier in a suitable holding fixture.
Removal of
Assembly.
the
Differential
Case
and
Gear
NOTE
If the initial inspection indicates the
drive gear is not going to be
replaced, the established backlash
should be measured and noted for
reference and used at assembly.
1.
Loosen the jam nut and back off the thrust block
adjusting screw.
6.
Lift out the differential and gear assembly.
Disassembly of the Differential Case and Gear
Assembly.
NOTE
Refer to NoSPIN DIFFERENTIAL in
this Section for disassembly of the
NoSPIN differential.
2.
Center punch one differential carrier leg and
bearing cap to identify in assembly.
3.
Cut the lockwire, if used, and remove the leg
capscrews and cotter key.
4.
Remove the bearing adjusting ring and the
carrier cap.
5.
Repeat Steps 3 and 4 for removal of the carrier
cap on the opposite side.
E-61
TM 10-3950-672-24-1
Drive Unit - Exploded View
E-62
TM 10-3950-672-24-1
1.
If the original identification marks are not clear,
mark the differential case halves with a punch or chisel
for correct alignment on assembly.
Removal of the Pinion and Cage Assembly.
2.
Remove the-lockwire, if used, and capscrews
and separate the case halves.
3.
Remove the spider, spider pinions, side gears
and thrust washers.
4.
If the gear is to be replaced for any reason,
remove the rivets and separate the gear from the case.
1.
Hold the flange or yoke with a suitable tool and
remove the pinion shaft nut and washer.
CAUTION
DRIVING THE FLANGE OFF WILL
CAUSE EXCESSIVE RUNOUT.
CAUTION
DO NOT CHISEL OUT THE RIVETS.
a. Carefully center-punch the rivets in the center of
the head.
b. Use a drill 0.03125-inch (0.79375 mm) smaller
than the body of the rivet to drill through the head from
the gear side.
c. Press out the rivets.
5.
If it is necessary to replace the differential
bearings, remove them with a suitable puller.
E-63
TM 10-3950-672-24-1
2.
Remove the flange or yoke with a suitable
puller.
3.
Remove
capscrews.
the
pinion
cage
stud
4.
Remove
assembly.
the
bearing
cover
and
nuts
oil
or
seal
CAUTION
THE USE OF A PINCH BAR WILL
DAMAGE THE SHIMS. DRIVING THE
PINION FROM THE INNER END WITH
A DRIFT WILL DAMAGE THE
BEARING LOCK RING GROOVE.
4.
If it is necessary to replace the rear thrust
bearing or radial bearing, remove them with a suitable
puller.
5.
Remove the oil seal assembly from the bearing
cover.
ASSEMBLY OF THE DRIVE UNIT.
Silicone RTV Gasket Application.
5.
Remove the bearing cage.
have pulled holes.
CAUTION
FAILURE
TO
USE
THE
APPROPRIATE GASKET MATERIAL
WILL CAUSE THE AXLE TO LEAK.
The original may
6.
Wire the shim pack together to facilitate
adjustment on assembling.
NOTE
Where silicone RTV gasket material
is used, Dow Siliastic No. RTV-732
Black and General Electric No. RTV1473 Black meet the requirements.
However, silicone RTV is also
available in bulk under Rockwell part
number 1199-Q-2981; in 10 oz.
tubes, part number 1250-X-388, or in
3 oz. tubes, part number 1199-T3842.
Disassembly of the Pinion and Cage Assembly.
1.
Tap the shaft out of the cage with a soft mallet
or press the shaft from the cage.
2.
Remove the outer bearing from the cage.
3.
Remove the spacer or spacer combination from
the pinion shaft.
E-64
TM 10-3950-672-24-1
Removal of all gaskets including silicone RTV is
accomplished by peeling or scraping the used gasket off
the carrier to housing surfaces.
WARNING
MINOR
CONCENTRATIONS
OF
ACETIC ACID VAPOR MAY BE
PRODUCED DURING APPLICATION.
ADEQUATE VENTILATION SHOULD
BE PROVIDED WHEN SILICONE RTV
IS APPLIED IN CONFINED AREAS.
WARNING
EYE
CONTACT
WITH
THESE
SILICONE RTV MATERIALS MAY
CAUSE IRRITATION.
IF EYE
CONTACT TAKES PLACE, FLUSH
THE EYES WITH WATER FOR 15
MINUTES AND HAVE THE EYES
EXAMINED BY A DOCTOR.
Application of silicone RTV gasket material is as follows.
1.
Remove dirt, grease, or moisture from the
surface of the carrier and housing.
2.
3.
Press the rear thrust and radial bearing firmly
against the pinion shoulders with a suitable sleeve that
will bear only on the bearing inner race.
Dry the surface.
4.
Install the radial bearing lock ring and squeeze
the ring into the pinion shaft groove with pliers.
3.
Apply a thin bead, maximum 0.125 inch (3.175
mm) diameter, completely around one mating surface
and all fastener holes to ensure complete sealing and
prevent leakage.
5.
Insert the pinion and bearing assembly in the
pinion cage and position the spacer or spacer
combination over the pinion shaft.
4.
Assemble the components immediately to
permit silicone RTV gasket material to spread evenly.
6.
Press the front bearing firmly against the
spacer.
Assembly of the Pinion and Cage Assembly.
7.
Rotate the cage several revolutions to assure
normal bearing contact.
1.
If new cups are to be installed, press firmly
against the pinion bearing cage shoulders.
8.
While in the press under pressure, check the
bearing preload torque. Wrap soft wire around the cage
and pull on a horizontal line with a pound (kilogram)
scale. If a press is not available, the pinion nut may be
tightened to the correct torque and the preload checked.
2.
Lubricate the bearings and cups with light
machine oil.
E-65
TM 10-3950-672-24-1
PINION SHAFT
THREAD SIZE
7/8"-20
1"-20
1 1/4 "-12
1 1/4 "-18
1 1/2"-12
1 1/2"-18
1 3/4"-12
PINION NUT TORQUE
(required to obtain correct pinion
bearing preload)
lb ft
N•m
200-275
271 - 373
300- 400
407 - 542
700- 900
949 - 1,220
700- 900
949- 1,220
800- 1,100
1,085- 1,492
800-1,100
1,085- 1,492
900- 1,200
1,220- 1,627
PRESS LOAD
(required to obtain correct pinion
bearing preload)
lb ft
N•m
22,000
13,560
30,000
40,680
54,000
73,224
54,000
73,224
54,000
73,224
54,000
73,224
50,000
67,800
Pinion Bearing Preload
NOTE
Use rotating torque, not starting
torque. If the rotating torque is not
within 5 to 25 lb in. (1 to 3 N•m) for
new bearings or 5 to 15 lb in. (1 to 2
N•m) for reused bearings, use a
thinner spacer to increase or a
thicker spacer to decrease preload.
EXAMPLE:
Assuming the pinion
cage diameter to be 6 in. (15.24 cm),
the radius would be 3 in. (7.62 cm)
and with 5 lb (2.268 kg) pull would
equal 15 lb in. (2 N•m) preload
torque.
10.
Place the pinion and cage assembly over the
carrier studs. Hold the flange and tighten the pinion
shaft nut to the correct torque. The flange must be held
with a suitable tool or fixture to tighten the nut.
11.
Recheck the pinion bearing preload torque. If
the rotating torque is not within 5 to 25 lb in. (1 to 3
N•m) for new bearings or 5 to 15 lb in. (1 to 2 N•m) for
reused bearings, repeat the foregoing procedure.
12.
Hold the flange and remove the pinion shaft nut
and flange.
9.
Press the flange or yoke against the forward
bearing and install the washer and the pinion shaft nut.
E-66
TM 10-3950-672-24-1
16.
Tighten to the correct torque. If a drilled or
castellated fastener is employed, install a cotter key.
Refer to Torque Values in this Sub-Section.
Installation of the Pinion and Cage Assembly.
1.
Install the correct shim pack. Locate thin shims
on both sides for maximum sealing ability.
2.
Position the pinion and cage assembly over the
studs and tap it into position with a soft mallet.
3.
Install the lockwashers and the stud nuts or
capscrews. Tighten to the correct torque.
Assembly of
Assembly.
13.
Lubricate the pinion shaft oil seal and cover the
outer edge of the seal body with a non-hardening
sealing compound. Press the seal against the cover
shoulder with a seal driver.
14.
the
Differential
and
Ring
Gear
NOTE
Refer to NoSPIN DIFFERENTIAL in
this Section for assembly of the
NoSPIN differential.
Install a new gasket and the bearing cover.
Proper service replacement of the differential ring gear
onto the differential case half is necessary for correct
gear adjustment and longer drive unit service life. For
correct installation, it is recommended the ring gear be
heated in water to approximately 160 to 180 degrees F
(71 to 82 degrees C) for about ten minutes before
assembly. This will allow an easier fit of the gear over
the differential case pilot, without the use of a press, and
without damaging the case and the ring gear mating
surfaces.
The gear should not be pressed or driven on the case,
as this would cause excessive metal particles to lodge
between the gear and case, thus resulting in gear
runout. Proper installation should, therefore, incorporate
preheating the gear as described above to ensure
correct interference fit and to eliminate metal pickup.
1.
Rivet the hypoid gear to the case half with new
rivets. Rivets should not be heated, but always upset
cold. When the correct rivet is used, the head being
formed will be at least 0.1 25-inch (3.18 mm) larger in
diameter then the rivet hole. The heat will then be
approximately the same height as the preformed head.
Excessive pressure will cause distortion of the case
holes and result in gear eccentricity.
15.
Press the flange against the forward gearing
and install the washer and the pinion shaft nut.
CAUTION
DO NOT BACK OFF TO ALIGN
COTTER KEY HOLES.
Tonnage required for squeezing cold rivets: These
pressures are approximately for annealed steel rivets
E-67
TM 10-3950-672-24-1
5.
Install the second side gear and the thrust
washer.
and pressure may be adjusted to suit individual working
conditions.
DIAMETER
OF RIVET
7/16 inch
1/2 inch
9/16 inch
5/8 inch
TONNAGE
REQUIRED
22
30
36
45
Final pressure should be held for approximately one
minute to ensure the rivet has filled the hole.
Differential case and gear bolts are also available for
service replacement of rivets. The use of bolts greatly
facilitates servicing these units in the field and
eliminates the need for special equipment necessary to
cold upset rivets correctly.
2.
Lubricate the differential case inner walls and all
component parts with axle lubricant.
NOTE
The case bolts must be treated with
adhesive before installing using
either new Dri-Loc bolts or applying
Loctite No. 277. New Dri-Loc bolts
have adhesive on the threads, but it
is usable only once. When the same
bolt is reused, Loctite No. 277 must
be used as in step 7.
6.
Wipe excess oil residue from the threaded holes
in the case.
NOTE
Do not apply liquid Loctite No. 277
or any other type of fastener retainer
material, sealant or adhesive, on new
Dri-Loc bolts or in the threaded
holes.
7.
If new Dri-Loc bolts are to be used, proceed to
step 8. Otherwise adhere to the following.
3.
Position the thrust washer and the side gear in
the gear case half.
a. Wipe excess oil residue from the bolts.
NOTE
Do not apply Loctite to the bolt,
since trapped air in the hole will
create back
pressure and "blow
out" the Loctite as the bolt advances.
4.
Place the spider with pinions and thrust washers
in position.
E-68
TM 10-3950-672-24-1
b. Apply liquid Loctite No. 277 to the threaded
holes only, by letting four or five drops run down the
side of each hole. Visually check to ensure the Loctite
has contacted the threads.
8.
Align mating marks, position the mating case
half, and draw the assembly together with three equally
spaced bolts.
NOTE
The checking tool can be made by
cutting an axle shaft to an
appropriate length and welding a nut
on the end to accept a wrench
socket.
9.
Install the remaining bolts and tighten to the
correct torque. Refer to Torque Values in this SubSection.
10.
If the bearings are to be replaced, press
squarely and firmly on the differential case halves with a
suitable sleeve.
11.
Check the rolling resistance of the differential
nest as follows.
NOTE
Use soft metal covers over the vice
jaws to protect the ring gear.
a. Place the differential and ring gear assembly in
a vise.
c. Using a suitable socket and torque wrench,
rotate the differential nest while observing the scale on
the torque wrench. The correct rolling resistance of the
differential assembly is 50 pounds-foot (6.91 kgm)
torque maximum applied to one sidegear.
Installation of the Differential and Gear Assembly.
1.
Temporarily install the bearing cups, threaded
adjusting ring (where employed), and bearing caps.
Tighten the capscrews to the proper torque.
b. Insert a checking tool into the differential nest.
Allow the splines of the tool to engage with the spline of
one sidegear only.
E-69
TM 10-3950-672-24-1
2.
The bearing cups must be a hand push fit in the
bores. If they are not, the bores must be reworked with
a scraper or some emery cloth until a hand push fit is
obtained. Use a blued bearing cup as a gauge and
check the fits as work progresses. Once the cup fits
properly, remove the bearing caps.
7.
Install the carrier leg capscrews and tighten to
the required torque. Install the adjusting nut lock (cotter
keys or lock plate). If the carrier leg capscrews are
drilled or castellated, lock wire after final adjustments
are made. Refer to Torque Values in this Sub-Section.
Adjustment of Differential Bearing Preload.
3.
Lubricate the differential bearing cones and
cups with the recommended axle lubricant.
4.
Place the cups over the bearings and position
the assembly in the carrier housing.
5.
Insert the bearing adjusting nuts and turn
handtight against the bearing cups.
1.
Using a dial indicator at the backface of the
gear, loosen the bearing adjusting nut on the side
opposite the gear only sufficient to notice end play on
the indicator.
2.
Tighten the same adjusting nut only enough to
obtain 0.000 end play.
3.
Check the gear for runout. If runout exceeds
0.008-inch (0.203 mm), remove the differential and
check for cause.
CAUTION
IF THE BEARING CAPS DO NOT
POSITION
PROPERLY,
THE
ADJUSTING NUTS MIGHT BE CROSS
THREADED.
REMOVETHE CAPS
AND REPOSITION THE ADJUSTING
NUTS. FORCING THE CAPS INTO
POSITION
WILL
RESULT
IN
IRREPARABLE DAMAGE TO THE
CARRIER HOUSING OR BEARING
CAPS.
4.
Tighten the adjusting nuts one notch each from
0.000 end play to preload the differential bearings.
6.
Install the bearing caps in the correct location as
marked and tap lightly into position.
E-70
TM 10-3950-672-24-1
2.
Sharper impressions may be obtained by
applying a small amount of resistance to the gear with a
flat steel bar and using a wrench to rotate the pinion.
When making adjustments, check the drive side of the
gear teeth. Coast side should be automatically correct
when drive side is correct. As a rule, coating about
twelve teeth is sufficient for checking purposes.
Checking Hypoid Gear Backlash.
CORRECT TOOTH CONTACT.
It the driver gear is not going to be replaced, we suggest
the established backlash recorded before disassembly
be used. For new gears the new backlash should be
initially set at 0.010-inch (0.254 mm). Adjust backlash
by moving the gear only. This is done by backing off
one adjusting ring and advancing the opposite ring the
same amount. After satisfactory contacts have been
established, the backlash can be altered within the limits
of 0.005 to 0.015 inch (0.127 to 0.381 mm) to obtain a
better contact position.
Gears Unloaded
1.
With adjustments properly made (pinion at
correct depth and backlash set at 0.010-inch (0.254
mm]) the contacts shown above will be procured. The
area of contact favors the toe and is centered between
the top and bottom of the tooth.
Check Tooth Contact.
2.
The hand rolled pattern shown (gears unloaded)
will result in a pattern centered in the length of the tooth
when the gears are under load. The loaded pattern will
be almost full length and the top of the pattern will
approach the top of the gear.
1.
Apply oiled red lead lightly to the hypoid gear
teeth. When the pinion is rotated, the red lead is
squeezed away by the contact of the teeth, leaving bare
areas the exact size, shape, and location of the
contacts.
Gears Loaded
E-71
TM 10-3950-672-24-1
New Gear Set.
3.
The pattern on the coast side of the teeth will
appear the same width as the drive side shown.
However, the overall length will be centered between
the toe and heel of the gear tooth.
CAUTION
IF THE PINION OR DRIVE GEAR
REQUIRE REPLACEMENT, BOTH
MUST BE REPLACED IN MATCHED
SETS.
4.
Set a used hypoid gear to have the tooth
contacts match the existing wear patterns. Hand rolled
patterns of used gears will be smaller in area and should
be at the toe end of the wear patterns.
Before installing a new pinion and gear set, check and
compare the Matching number of both the pinion and
drive gear, they must be the same. An example of this
number would be M29 or any combination of a letter and
number marked on the nose of the pinion and on the
front face of the drive gears.
Incorrect Tooth Contact.
Installation of the Thrust Screw.
1.
Remove the carrier from the stand and position
it with the backface of the hypoid gear upward.
2.
Remove the thrust screw and the locknut.
3.
Install the thrust screw and the locknut and
tighten the thrust screw firmly against the backface of
the hypoid gear.
1.
A high contact indicates the pinion
is too far out. Set the pinion to the correct
depth by removing shims under the pinion
cage. Slight outward movement of hypoid
gear may be necessary to maintain correct
backlash.
4.
To secure the correct adjustment of 0.010 to
0.020-inch (0.254 to 0.508 mm) clearance, loosen the
adjusting screw (or thrust screw) 1/4 turn and lock it
securely with the nut.
5.
Recheck to ensure the minimum clearance of
0.010-inch (0.254 mm) during full rotation of the bevel
gear.
Assembly of the Drive Unit.
1.
Remove any accumulation of dirt, grit, or gum
from the housing bowl and sleeves. Clean the housing
thoroughly with solvent and blow it dry with compressed
air.
2.
A low contact indicates the pinion is
too deep. Set the pinion to the correct
depth by adding shims under the pinion
cage.
Slight inward movement of the
hypoid gear may be necessary to maintain
correct backlash.
2.
Inspect the housing for cracks, loose studs,
nicks, and burrs at machined surfaces. Remove nicks
and burrs with stone or file. Make all necessary repairs
or parts replacement before installing the drive unit in
the housing.
3.
Apply silicone RTV gasket material to the drive
unit or the housing in accordance with the procedure
under Silicone RTV Gasket Application.
E-72
TM 10-3950-672-24-1
Steam cleaning is not recommended for assembled
drive units after they have been removed from the
housing. When this method of cleaning is used, water is
trapped in the cored passage of the castings and in the
close clearances between parts as well as on the parts.
This can lead to corrosion (rust) of critical parts of the
assembly and the possibility of circulating rust particles
in the lubricant. Premature failure of bearings, gears,
and other parts can be caused by this practice.
Assembled drive units cannot be properly cleaned by
steam cleaning, dipping, or slushing. Complete drive
unit disassembly is necessary for a thorough cleaning.
CAUTION
DRIVING THE CARRIER INTO THE
HOUSING WITH A STEEL HAMMER
WILL DAMAGE THE CARRIER
FLANGE.
4.
Roll the carrier into position on a roller jack.
Start the carrier into the housing with four flatwashers
and nuts equally spaced and tighten alternately to draw
the carrier squarely into the axle housing.
5.
Remove the nuts and flatwashers and install the
lockwashers and stud nuts or capscrews. Tighten to the
correct torque. Refer to Torque Values in this package.
6.
ROUGH PARTS.
WARNING
EXERCISE CARE TO AVOID SKIN
RASHES AND INHALATION OF
VAPORS WHEN USING ALKALI
CLEANERS.
Install the axle shafts in the housing.
7.
Install the tapered dowels, the lockwashers, and
the stud nuts. Tighten the nuts 60 to 75 pounds-foot
(8.2 to 10.3 kgm).
Rough parts such as differential carrier castings, cast
brackets, and some brake parts may be cleaned in hot
solution tanks with mild alkali solutions providing these
parts are not ground or polished. The parts should
remain in the tank long enough to be thoroughly cleaned
and heated through. This will aid the evaporation of the
rinse water. The parts should be thoroughly rinsed after
cleaning to remove all traces of alkali.
NOTE
Step 8 is for axles with a two gear
gearbox only.
8.
Install the gearbox. Refer to Two Gear Gearbox
in the Service Manual.
9.
Connect the propeller shaft.
COMPLETE ASSEMBLIES.
10.
Fill the axle housing until the oil starts to run out
the check hole, CLEANING, INSPECTION, AND
REPAIR.
Completely assembled axles may be steam cleaned on
the outside only, to facilitate initial removal and
disassembly, providing all openings are closed.
Breathers, vented shift units, and all other openings
should be tightly covered or closed to prevent the
possibility of water entering the assembly.
Cleaning.
Parts having ground and polished surfaces such as
gears, shafts, and bearings, should be cleaned in a
suitable solvent such as kerosene or diesel fuel oil.
DRYING.
CAUTION
AVOID THE USE OF GASOLINE. DO
NOT CLEAN THESE PARTS IN A HOT
SOLUTION TANK OR WITH WATER
AND ALKALINE SOLUTIONS SUCH
AS
SODIUM
HYDROXIDE,
ORTHOSILICATES,
OR
PHOSPHATES.
Parts should be thoroughly dried immediately after
cleaning. Use soft, clean, lintless, absorbent, paper
towels or wiping rags free of abrasive material, such as
lapping compound, metal filings, or contaminated oil.
Bearings should never be dried by spinning with
compressed air.
E-73
TM 10-3950-672-24-1
4.
Inspect the axle shafts for signs of torsional
fractures or other indication of impending failure.
CORROSION PREVENTION.
5.
When servicing drive units assembled with DriLoc or Loctite No. 277 in threaded case holes where the
bolts do not require removal, check each bolt for
tightness by applying the minimum amount of torque
specified for that fastener. If the bolt does not rotate, it
is satisfactory. If the bolt rotates to any degree, it must
be removed from the case halves and Loctite No. 277
must be applied to the threaded hole.
Parts that have been cleaned, dried, inspected, and are
to be immediately assembled, should be coated with
light oil to prevent corrosion. If these parts are to be
stored for any length of time, they should be treated with
a good RUST PREVENTIVE and wrapped in special
paper or other material designed to prevent corrosion.
Inspection.
It is impossible to overstress the importance of careful
and thorough inspection of drive unit components prior
to assembly. Thorough visual inspection for indications
of wear or stress, and the replacement of such parts as
are necessary, will eliminate costly and avoidable
difficulties.
INSPECTION OF DRIVE UNIT HOUSING.
INSPECTION OF THE DRIVE UNITS.
2.
Inspect housing for cracks, loose studs, nicks,
and burrs at machined surfaces. Remove nicks and
burrs with stone or file. Make all necessary repairs or
parts replacement before installing drive unit in housing.
1.
Remove any accumulation of dirt, grit, or gum
from housing bowl and sleeves.
Clean housing
thoroughly with solvent and blow dry with compressed
air.
1.
Inspect all bearings, cups, and cones, including
those not removed from parts of the drive unit, and
replace if rollers or cups are worn, pitted, or damaged in
any way.
Repair.
Remove parts needing replacement with a suitable
puller or in a press with sleeves. Avoid the use of drifts
and hammers. They may easily mutilate or distort
component parts.
1.
Replace all worn or damaged parts. Replace
'trunnion sockets if scratched. Replace all hex nuts with
rounded corners, washers, distorted snap rings, oil
seals, gaskets, and socket felts at a time of overhaul.
2.
Inspect the hypoid gears for wear or damage.
Gears which are worn, ridged, pitted, or scored, should
be replaced. When necessary to replace either the
pinion or gear of hypoid set, the entire gear set should
be replaced.
2.
Use only genuine Rockwell-Standard parts for
satisfactory service. For example, using gaskets of
improper material generally leads to mechanical trouble
due to variations in thickness and the inability of certain
materials to withstand compression, oil, etc.
3.
Inspect
following.
3.
Remove nicks, mars, and burrs from machined
or ground surfaces. Threads must be clean and free to
obtain accurate adjustment and correct torque. A fine
mill file or India stone is suitable for this purpose. Studs
must be tight prior to assembling the parts.
the
differential
assembly
for
the
a. Pitted, scored, or worn thrust surfaces of the
differential case, halves, thrust washers, spider
trunnions, and differential gears. Thrust washers must
be replaced in sets. The use of a combination of old
and new washers will result in premature failure.
b. Wear or damage to the differential pinion and
side gear teeth. Always replace differential pinions and
side gears in sets.
4.
The burrs caused by lockwashers at the spot
face of stud holes of knuckle flanges, spider flange, or
hub cover should be removed to assure easy assembly
of these parts.
E-74
TM 10-3950-672-24-1
With new axles.-the original drive axle lubricant should
be drained at 1000 miles (1600 km) but no later than
300 miles (4800 km). Drain the lubricant initially used in
the assembly while the assembly is still warm. Axles
should not be flushed with any solvent such as
kerosene.
5.
When assembling component parts use a press
where possible.
LUBRICATION.
General.
For reconditioned axles, follow the same procedures as
above after overhaul.
The efficiency and life of mechanical equipment is as
dependent on proper lubrication as on proper
engineering design.
The importance of proper
lubrication is increased because of greater gear tooth
and bearing pressures and higher speeds in present day
vehicles. For this reason, the best possible lubricants
should be used.
Fill the axle housings to the bottom of the level hole (in
the carrier or housing) with specified lubricant with the
vehicle on level ground.
Magnetic Drain Plugs.
The grease recommendations are based on commercial
products that have given satisfactory results in normal
operation. However, there are many proprietary grease
products on the market which will perform satisfactorily,
and may be preferable because of supply problems,
common usage for other truck components, etc. Where
such products are recommended by reputable grease
suppliers for the specific lubrication of Rockwell
components, Rockwell has no objections, provided that
these substitute products are equal to or better than the
Rockwell recommendations in lubrication properties,
water resistance, corrosion protection, high and low
temperature characteristics, oxidation stability, shear
stability, etc.
Any drive axle, while it is working, generates wear
particles at a fairly steady rate. These wear particles
are very fine, but hard. If these hard wear particles are
allowed to circulate in the lubricant, the anti-friction
bearings will wear at a faster rate than they would if the
hard wear particles were removed as they are
generated.
Magnetic drain plugs perform the vital function of
trapping these small metallic particles that circulate in
the lubricant, through the gears and bearings, causing
rapid wear and premature failure. The magnet must be
strong enough to firmly hold the particles under service
conditions. Plugs with elements having a minimum
pickup capacity of 2 pounds (0/.907 kg) of low carbon
steel in plate or bar forms are recommended.
It is advisable to consider the reputation of the refiner or
vendor when selecting a lubricant. He is responsible for
the quality and correct application of his product. A high
quality lubricant incorrectly applied may greatly reduce
the maximum service built into our product. Past
experience has proven that a large portion of service
problems can be traced to an improper lubricant
application.
Magnets will rapidly lose effectiveness as collected
material bridges the gap between the two poles.
Change plugs before this occurs. It may be necessary
to change plugs one or more times between complete
lubrication changes.
The removed plugs can be
cleaned and reused.
The purpose in compiling these specifications is to
provide a guide to aid in the selection of a lubricant
which will render the most satisfactory service.
NOTE
For maximum protection against
wear particles, it is desirable that
magnetic plugs be employed at any
drain, fill, or level hole location of the
drive unit.
New and Reconditioned Axle Service.
All new axles should be checked for correct oil level
before being placed into service.
E-75
TM 10-3950-672-24-1
160 degrees to 220 degrees F (71 degrees to 104
degrees C). The chemicals and additives that give _
these lubricants increased load carrying capacity oxidize
faster at temperatures above 220 degrees F (104
degrees C), contributing to more rapid lubricant
deterioration. For this reason, lubricants of this type that
operate continuously at high temperatures must ' be
changed more frequently to realize the inherent
advantages they offer.
Lubricant Change Schedule.
There are very practical reasons for recommending
lubricant changes. Fluid lubricants serve more than one
purpose.
They not only lubricate but they transport chemically
reactive additives, they wash away minute wear
particles, serve as a corrosion inhibitor, and also act as
a heat transfer medium. Draining and refilling with a
fresh supply assists in eliminating both magnetic and
nonmagnetic wear particles which may not have been
trapped by a magnetic plug. Exposure to heat and use
may also alter the desirable performance properties
which are reassured through a lubricant change.
Oil Viscosities.
For service purposes and the convenience of
description, the term Standard indicates a lubricant of
proper viscosity for average temperature conditions
during the spring, summer, and fall in the continental
United States (except for Alaska), and a part of the
continental United States during the winter.
A regular schedule for changing the lubricant in a
particular vehicle and operation can be accurately
determined by analysis of samples taken from the
assembly at specified intervals or mileages.
The
lubricant supplier frequently makes available his
laboratory facilities for determining the useful life of his
product under actual service conditions. The finally
recommended schedule may be correlated, for
economic reasons, with lubricant changes governed by
climatic conditions and magnetic drain plug
maintenance. Lubricant changes should be made as
climatic temperatures demand, regardless of vehicle
mileage, accumulated hours of operation, or established
change schedule.
Optional viscosity lubricants should be used whenever
vehicles are parked at outside temperatures lower than
the minimum given for the Standard lubricant.
The proper viscosity of oil for the specific component
shall be selected from the table of ambient
temperatures. Where more than one lubricant can be
selected from this table, the high viscosity oil should be
used.
However, experience has shown that the use of an
S.A.E.
140 viscosity grade lubricant (Rockwell
specifications 0-76, 0-76-A, and 0-76-B) will result in
longer gear life.
DRIVE UNITS.
If it is desirable to select an arbitrary lubricant change
schedule, we recommend changing the lubricant at
25,000 to 30,000 mile (40,234 to 48.280 kilometers)
intervals or at 2000 hours of operation when the yearly
usage is in excess of 60,000 miles (96,561 kilometers)
or 4000 hours.
When yearly usage is less than 60,000 miles (96,561
kilometers) or 4000 hours, the lubricant should be
changed twice yearly (spring and fall) irrespective of
mileage or hours of operation.
Unusual temperature or operating conditions may
require
other
or
more
specific
lubricant
recommendations.
Rockwell will review these
circumstances, upon request, and make optional gear oil
or grease recommendations. It is essential that all
details of vehicle operation, loads, area temperatures,
etc., are clearly and completely stated when applying to
Rockwell Engineering department for an optional
lubricant recommendation.
Multigrade and synthetic lubricants may be used
provided the complete specifications (including viscosity
stability in service) of each viscosity grade listed are
met.
HIGH TEMPERATURE OPERATION.
The normal operating temperature of compounded
lubricants during the summer season is approximately
E-76
TM 10-3950-672-24-1
WHEEL BEARINGS.
CAUTION
THE SYNTHETIC LUBRICANT MUST
BE
COMPATIBLE
WITH
THE
STANDARD COMMERCIAL SEALS
USED IN THE AXLE (PINION AND
WHEEL END), OTHERWISE SPECIAL
SEALS MUST BE INSTALLED.
FURTHER, THE SEALS USED MUST
PASS ROCKWELL SPECIFICATION
J-11 WHEN TESTED IN THE
SYNTHETIC LUBRICANT.
LUBRICANT.
Oil filled hubs standard 0-76-C or 0-76-D optional 0-76-F
or 0-76-J
Synthetic lubricants may be used in drive axles provided
they meet all of the requirements of Rockwell-Standard
specifications 0-76, 0-76-A, 0-76-B, 0-76-C, 0-76-D, 076-F, or 0-76-J.
Preparation for Storage.
In the event the carrier is a spare and may not be
immediately installed, all gears and bearings should be
thoroughly oiled and the carrier placed in a dust-proof
container.
CHANGE INTERVAL.
Specifications of Recommended Lubricants (Oil and
Grease).
Check every 1000 miles (1609 km) and change
whenever the seals are replaced or when the brakes are
relined, or at least once a year.
DRIVE UNITS.
Lubricant Capacities.
The design of hypoid gear teeth, which mesh with a
sliding action, enables them to withstand higher unit
pressures.
Lubricant capacities are given as a guide only. All
measurements are taken still filled, with the pinion shaft
on the horizontal centerline, to the bottom of the tapped
level hole. Refer to Section 13, LUBRICATION for the
capacity.
Therefore, the lubricant should have extreme pressure
properties. Only lubricants with the S.A.E. designation
API-GL-5 meet these requirements and are
recommended for hypoid gears.
LUBRICANT:
The lubricant capacities of two similar axles in the same
series may vary considerably due to design changes
and the vehicle manufacturer's installation. The actual
service capacity may be accurately determined by
carefully measuring the amount of specified lubricant
necessary to fill the assembly to the correct level and
measuring the lubricant again as it is drained from the
unit. The vehicles should be on a level surface when
this inspection is made.
Standard: 0-76, 0-76-A or 0-76-B
(Refer to OIL VISCOSITIES)
Optional: 0-76-C, 0-76-D, 0-76-F, or
0-76-J (Refer to OIL VISCOSITIES)
CHANGE INTERVAL: Check every 1000 miles (1600
km). Drain and refill to the top of the filler neck or the
bottom of the tapped hole every 25.000 to 30,000 miles
(40,000 to 48,000 km) when yearly mileage is in excess
of 60,000 miles (96,000 km). If yearly mileage is less
than 60,000 (96,000 km) change twice a year (spring
and fall).
E-77
TM 10-3950-672-24-1
Drive Unit Torque Values
E-78
TM 10-3950-672-24-1
FRONT STEERING CONTROL VALVE
DESCRIPTION
The steering control valve is located under the dash and
is actuated by a conventional steering column and
wheel providing precise full hydraulic steering.
This is accomplished by a metering system within the
valve that is directly connected to the steering column
and wheel.
THEORY OF OPERATION
the spool and sleeve that permits incremental steering
left or right. If hydraulic oil flow to the IN port is lost due
to failure of the engine, torque converter or steering
pump, front wheel steering can still be accomplished
with the steer control valve. When pressure is lost; a
poppet valve closes and the gerotor set becomes a
hydraulic pump.
Turning the steering wheel
mechanically actuates the gerotor set.
pumping
hydraulic oil from one side of the steer cylinders to the
other. This means of steering is very difficult and
requires a great amount of force to be applied to the
steering wheel.
Turning the steering wheel to the left or right causes a
spool, enclosed in a precision sleeve, to rotate. As the
spool is rotated, a set of lateral springs tend to move the
sleeve in the same direction. Due to the springs, there
is a time lag between the movement of the spool and
sleeve. During this time lag, hydraulic oil from the IN
port of the valve is permitted to flow to the gerotor set
which meters hydraulic oil to the steering cylinders
through the appropriate L or R port of the valve. When
the sleeve rotates to the same position as the spool, the
metered flow of hydraulic oil stops and oil flows from the
IN port to the OUT port and back to the return manifold.
It is the action between
MAINTENANCE
PRIOR TO DISASSEMBLY.
1.
Observe the shaft area of the unit immediately
upon removal. If it shows an appreciably oil wetted
appearance, this indicates the shaft seal may have been
leaking.
parts as they are being assembled. To clean the unit
adequately, first plug all four ports, then wire brush
around the meter area, ringing and blowing away all
surface contamination before any disassembly is begun.
2.
If there is a functional problem or leakage at the
control end of the unit, the disassembly of the control
end of the unit only will be required and it is generally
advisable to leave the gerotor end assembled.
4.
For any disassembly, an extremely clean bench
area is necessary. Do not use shop cloths or cotton
waste to wipe or clean the parts. The lint deposited by
these cloths can disrupt the function or cause leaks.
The clean inside surface of a corrugated container is
frequently a very adequate assembly surface.
Assembly is generally easier and more satisfactory with
clean dry parts. After parts are rinsed clean in solvent,
they may be blown dry with an air hose or placed on
clean paper towels to drain and dry.
3.
If a complete teardown and assembly of the unit
is planned, clean all paint and surface contamination
from the unit at points of separation. This is extremely
important at the meter end of the unit so no paint flakes
or particles will enter these closely fitted
E-79
TM 10-3950-672-24-1
Power Steering Control Valve-Exploded View
E-80
TM 10-3950-672-24-1
DISASSEMBLY.
Meter (Gerotor) End.
5.
star.
Remove the meter. Be careful not to drop the
6.
Remove the seal from the meter.
7.
Remove the drive spacer(s).
8.
Remove the drive.
9.
Remove the spacer plate:
10.
Remove the seal from the housing.
1.
Clamp the unit in a vise, meter end up. Clamp
lightly on the edges of the mounting area.
Use
protective material on the vise jaws. Do not overtighten
the jaws.
2.
Remove the 5/16-inch capscrews.
3.
Remove the end cap.
4.
Remove the seal from the end cap.
E-81
TM 10-3950-672-24-1
14.
Use a thin bladed screwdriver to pry the dust
seal from the seal gland bushing. Do not damage the
bushing.
Control End.
15.
Remove the two bearing races and the needle
thrust bearing from the spool and sleeve assembly.
11.
Remove the housing from the vise. Place the
housing on a clean soft cloth to protect the surface
finish. Use a thin bladed screwdriver to pry the retaining
ring from the housing.
12.
Rotate the spool and sleeve until the pin is
horizontal. Push the spool and sleeve assembly forward
with the thumbs just far enough to free the seal gland
bushing from the housing. Remove the bushing.
16.
Remove the spool and sleeve assembly from
the fourteen hole end of the housing.
CAUTION
DO NOT BIND THE SPOOL AND
SLEEVE IN THE HOUSING. ROTATE
THE
SPOOL
AND
SLEEVE
ASSEMBLY
SLOWLY
WHEN
REMOVING IT FROM THE HOUSING.
17.
Push the centering pin from the spool and
sleeve assembly.
13.
Remove the quad ring seal from the seal gland
bushing.
E-82
TM 10-3950-672-24-1
23.
seat.
Remove the two seals from the check valve
24.
Tip the housing to remove the check ball and
the check ball retainer.
ASSEMBLY.
Check all mating surfaces. Replace any parts that have
scratches or burrs that could cause leakage. Clean all
metal parts in clean solvent. Blow dry with air. Do not
wipe dry with a cloth or paper towel because lint or other
matter can get into the hydraulic system and cause
damage. Do not use a coarse grit or try to file or grind
these parts.
NOTE
Lubricate all seals (with the
exception of the quad ring seal) with
a petroleum jelly, such as Vaseline.
Do not use excessive lubricant on
the seals for the gerotor section'.
18.
Push the spool partially from the control end of
the sleeve, then carefully remove the six centering
springs from the spool by hand.
19.
Push the spool back through and out of the
sleeve. Rotate the spool slowly when removing it from
the sleeve.
20.
21.
Refer to the parts listings covering your steering control
unit when ordering replacement parts. Replace all old
seals with new seals during assembly.
Remove the seal from the housing.
Control End.
1.
Use needle nose pliers to lower the check ball
retainer into the check valve hole of the housing.
Ensure the retainer lays flat in the housing and Is not
tilted on edge.
Remove the setscrew from the housing.
22.
Screw a 1/8" 24 machine screw into the end of
the check ball seat. Then by pulling on the screw, with
pliers, lift the seat out of the housing.
2.
Install the check ball into the housing.
3.
Lubricate both seals and install the 5/8 inch
diameter seal on the large diameter end of the check
E-83
TM 10-3950-672-24-1
ball seat. Install the 7/16 inch diameter seal on the
small diameter end of the check ball seat.
CAUTION
WHEN INSTALLING THE SEAL. DO
NOT TWIST OR DAMAGE THE
SEALS.
4.
Lubricate and install the check ball seat in
housing; insert open end of seat first. Do not damage
seals when installing check ball seat. Push the check
ball seat to the bottom of the hole.
5.
Install the setscrew. Use a 0.3124-in. Allen
wrench to torque the setscrew to 100 lb in. (11 N•m).
To prevent interference, the top of the setscrew must be
slightly below the housing mounting surface.
7.
Bring the spring slots of both parts in line and
stand the parts on the end of the bench. insert the
spring installation tool through the spring slots of both
parts. A tool is available as Char-Lynn Part No. 600057.
Position three pairs of centering springs (two sets of
three each) on the bench so the extended edge is down
and the arched center section is together. In this
position, enter one end of the entire spring set into the
spring installation tool.
8.
Compress the extended end of the centering
spring set and push it into the spool sleeve assembly,
withdrawing the installation tool at the same time.
9.
Center the spring set in the parts so they push
down evenly and are flush with the upper surface of the
spool and sleeve.
6.
Assemble the spool and sleeve carefully so the
spring slots line up at the same end. Rotate the spool
while sliding the parts together. Test for free rotation.
The spool should rotate smoothly in the sleeve with
fingertip force applied at the splined end.
NOTE
Some spool and sleeve sets have
identification marks, align these
marks as shown.
10.
Install the pin through the spool and the sleeve
assembly until the pin becomes flush at both sides of
the sleeve.
E-84
TM 10-3950-672-24-1
11.
Position the spool and sleeve assembly so the
splined end of the spool enters the fourteen hole end of
the housing first.
CAUTION
BE EXTREMELY CAREFUL THAT
THE PARTS DO NOT TILT OUT OF
POSITION WHILE ENTERING. PUSH
THE PARTS GENTLY INTO PLACE
WITH A SLIGHT ROTATING ACTION.
KEEP
THE
PIN
NEARLY
HORIZONTAL. BRING THE SPOOL
ASSEMBLY ENTIRELY WITHIN THE
HOUSING BORE UNTILTHE PARTS
ARE FLUSH ATTHE METER END OR
FOURTEEN HOLE END OF THE
HOUSING.
DO NOT PULL THE
SPOOL ASSEMBLY BEYOND THIS
POINT TO PREVENT THE CROSS
PIN FROM DROPPING INTO THE
DISCHARGE GROOVE OF THE
HOUSING.
WITH THE SPOOL
ASSEM BLY IN THIS FLUSH
POSITION.
CHECK FOR FREE
ROTATION WITHIN THE HOUSING
BY
TURNING
WITH
LIGHT
FINGERTIP FORCE AT THE SPLINED
END.
13.
Install the two bearing races and the needle
thrust bearing as shown in the figure.
14.
Install the 1 1/4-inch diameter dust seal in the
seal gland bushing. The flat or smooth side of the dust
seal must face down towards the bushing.
15.
Install the dry quad ring seal in the seal gland
bushing. Smooth the seal in place with a finger. Do not
use any seal that falls freely into the pocket of the
bushing.
12.
Place the housing on a clean cloth and install
the 2 1/8-inch diameter seal in the housing.
16.
Install the seal gland bushing over the spool end
with a twisting motion. Tap the bushing in place
E-85
TM 10-3950-672-24-1
with a rubber hammer.
against the bearing race.
Ensure the bushing is flush
19.
Install the 3 inch diameter seal in the housing.
20.
Install the spacer plate. Align the bolt holes in
the spacer plate with the tapped holes in the housing.
17.
Install the retaining ring in the housing. After
installing the ring, tap on the ring end or pry with a
screwdriver around the entire circumference of the ring
to properly seat the ring in the groove.
18.
Clamp the housing in the vise. Clamp lightly on
the edges of the mounting area. Do not over-tighten the
jaws.
21.
Rotate the spool and sleeve assembly until the
pin is parallel with the port face. Install the drive and
ensure the drive is engaged with the pin. To ensure
proper alignment, mark the drive as shown in the figure,
(ref. 8). Note the relationship between the slotted end
of the drive to the splined end of the drive when
marking.
NOTE
Check to ensure the spool and
sleeve are flush or Slightly below the
fourteen hole surface of the housing.
Clean the upper surface of the
housing by wiping with the palm of
the clean hand. Clean each of the
flat surfaces of the meter section
parts in a similar way when ready for
assembly. Do not use cloth or paper
to clean the surfaces.
E-86
TM 10-3950-672-24-1
22.
Install 3 inch diameter seal in the gerotor.
24.
Install the drive spacer(s) when used, in the
meter.
25.
Install the 3 inch diameter seal in the end cap.
26.
Install the end cap on the gerotor and align the
holes.
23.
With the seal side of the meter toward the
spacer plate, align the star valleys (ref. A) on the drive
(ref. B). Note the parallel relationship of reference lines
A, B, C, and D. Align the bolt holes without disengaging
the meter from the drive.
27.
Install seven dry capscrews in the end cap.
Pretighten the screws to 150 lb in. (17 N•m), then
torque the screws to 275 lb in. (31 N•m) in the
sequence shown in the figure.
E-87
TM 10-3950-672-24-1
STEER PUMP
DESCRIPTION
The power steering pump is a gear type pump.
Mounted in the end cover of the pump are a pressure
relief valve and a flow control valve. The pump is spline
driven.
MAINTENANCE
TROUBLESHOOTING.
SYMPTOM
1.
2.
3.
4.
Noisy pump.
Foaming oil.
Pump or oil overheating.
Low flow.
PROBABLE CAUSE
SOLUTION
a. Low oil supply.
a. Fill reservoir.
b. Oil too heavy.
b. Change to proper viscosity.
c. Air leak in inlet line.
c. Check plumbing.
d. Partly blocked inlet line.
d. Check for foreign object and/or
clean lines.
a. Pump cavitation.
a. Refer to Symptom 1.
b. Water in the oil.
b. Check reservoir.
a. Oil supply too thin.
a. Drain and fill with proper viscosity oil.
b. Oil supply contaminated.
b. Drain, clean filter. and fill with
clean oil.
c. Pump cavitating.
c. Refer to Symptom 1.
d. Pump drive shaft excessively
misaligned with pump driven shaft.
d. Check alignment.
e. Pump drive shaft axially loaded
by driving shaft.
e. Check for clearance at ends of
shafts, for shaft misalignment or
worn driving splines.
f.
f. Check relief valve setting. Refer
to Solution 4c.
System relief valve bypassing.
a. Pump cavitating.
a. Refer to Symptom 1.
b. Foaming oil.
b. Refer to Symptom 2.
E-88
TM 10-3950-672-24-1
SYMPTOM
4. Low flow.
(continued)
5.
Failure to build pressure.
PROBABLE CAUSE
SOLUTION
c. Relief valve leaks or set too low.
c. Check relief valve for foreign
particles.
d. Speed too low.
d. Increase engine speed.
e. Oil too hot
e. Check temperature. Refer to
Symptom 3. Solution a through e.
a. Defective relief valve.
a. Check and reset or replace.
b. Low oil supply.
b. Fill reservoir.
DISASSEMBLY.
1. Clean the unit thoroughly with solvent, kerosene, or other non-corrosive cleaning fluid. which will not affect rubber
components.
2. Scribe a line across the three sections of the pump to act as a guide in assembly.
3. Remove the six hex screws (3) and two capscrews (2).
4. Remove the front cover (5) by lightly tapping the flange with a soft metal hammer.
5. The center section (12) will remain attached to either the front cover (5) or back cover (17). Place the drive gear (13)
into the unseparated section, and while holding the center section (12), tap lightly to separate. Be careful to avoid
cocking on the dowel pins (7).
6. Remove the wear plate (10) and thrust plate (18).
Steer Pump - Exploded View
E-89
TM 10-3950-672-24-1
7. Mark the front cover island next to the pressure vent
hole in the heat shield (9), gasket (8), and V-seal (6) to
act as a guide in assembly. The location of this vent
hole determines pump rotation.
Front Cover and Back Cover Assemblies.
1. If any bearing bore diameter exceeds 0.7518 inches
(19.096 mm), the cover should be discarded. The
bearings are not supplied separately.
8. Use a small diameter wire (a paper clip will do) to
remove the phenolic heat shield (9), the paper
compound gasket (8) and the rubber V-seal (6). Discard
these parts and replace when the pump is assembled.
2. Replace the shaft seal (1) only if it shows excessive
wear or cracking.
3. Check all internal threads for damage.
9. Remove both O-rings (11 ) and discard.
4. The bearings must be below the cover faces and
show no signs of contact with the snap rings on the gear
shafts.
10. Do not remove the shaft seal (1) in the front cover
(5) unless it is damaged or leaking. If the seal is to bereplaced, use great care not to damage the seal recess
or bearing. Heating the cover in an oven to 250 degrees
F (121 degrees C) will reduce the press fit.
5. If the bearings are scored, rough, or show signs of
heat discoloration, the cover assembles should be replaced.
11. If the flow control is defective, replace it as a
cartridge.
Center Section.
12. If the relief valve is defective, replace it as a
complete relief valve unit.
1. Inspect the wall of the gear bore diameters for
excessive wear or score marks. The center section gear
bores will show signs of wear on the inlet side of the
pump. A wear ridge will develop at the end of the gear
bore where the thrust plate is located. This wear ridge
should not exceed 0.03125 inch (0.79375 mm).
INSPECTION.
Drive and Driven Gear Assemblies.
2. Lightly lap the faces to remove any nicks or burrs.
Do not break the inside edges.
1. Inspect the shafts for roughness in the bearing and
sealing areas. Measure for wear. The minimum
acceptable diameter is 0.7492 inch (19.03 mm).
GENERAL.
2. Inspect the splines for damage or excessive wear.
The following parts should be replaced at every major
overhaul: wear plate(10), thrust plate(18), fiber heat
shield (9), paper gasket (8), V-seal (6), and O-rings (11).
The shaft seal (1) should be replaced only when
necessary.
3. Inspect the gear end faces, outside diameter, and
teeth for roughness and score marks. Minimum gear
width is 1.3840 inches (35.154 mm).
4. Ensure the snap rings are secure; break any sharp
edges on the sides of the gears.
ASSEMBLY.
5. Gears and shafts are available only as assemblies.
One gear assembly may be replaced separately if the
other is in good condition.
1. All parts must be thoroughly cleaned prior to
assembly by dipping in solvent and brushing to remove
all traces of contamination. The pump should be
assembled in a dirt free area.
2. Install the shaft seal (1), if it was removed, in the
front cover with the spring loaded lip facing inward.
E-90
TM 10-3950-672-24-1
9. Install the drive gear (13) and driven gear (14)
assemblies into the front cover. Apply oil to the shaft at
the drive end to prevent damage to the shaft seal
caused by sharp edges on the drive shaft passing
through the shaft seal. An oil coated shaft, rotated
slowly, will usually cause no damage to the seal. Check
to see the shaft seal lip and spring is not pushed out by
the shaft.
Force the seal into place, using a flat steel rod slightly
smaller in diameter than the OD of the seal. This will
permit the tool to enter the seal recess and bottom the
rotary seal on the stop. (The front cover [5] must be
backed up on a smooth, clean surface to prevent
damaging its face).
NOTE
10. Check the wear plate to ensure it is still seated into
its oval cavity and install the center section (12) over the
gears until it engages the wear plate. The center
section must be positioned so the previously scribed
lines on the housing exteriors are in line with those
scribed on the front cover. The small slot located midway between the bores should align with the small vent
hole in the wear plate. The face containing the slot
must be in contact with the wear plate.
The load to force the seal into place
should be applied exactly in line with
the housing seal bore to prevent
bending the steel seal retainer.
and/or scoring the seal housing
bore.
3. Install the V-seal (6), the gasket (8), and heat shield
(9) into the front cover cavity as follows. Ensure the
small vent hole through the parts is in line and
positioned next to the scribe mark on the island. This
position locates the vent holes on the outlet side of the
pump.
11. Install the dowel pins (7) and add a generous
amount of clean hydraulic oil into the gear cavities.
12. Rotate the gears to distribute the oil.
4. Face the lips on the U-seal toward the cavity and
insert it into the groove with the aid of a dull tool to
prevent damage to the rubber surface.
A small
screwdriver can be used.
13. Position the thrust plate (18) on top of the gears in
the center section, with the bronze face toward the
gears. The open side should be toward the inlet.
5. Firmly press the gasket toward the bottom of the
cavity with the thumbs to ensure all of its perimeters are
completely within the groove to avoid interference with
subsequent assembly.
14. Install the O-ring (11) into its back cover face
groove.
Oil the O-ring, the cover face, and the
bearings. Install the back cover so the scribe marks are
in line with the marks on the center section and front
cover.
6. Firmly press the heat shield toward the bottom of the
cavity with the thumbs to provide sufficient space for the
wear plate.
15. Install the housing retaining screws and tighten
alternately to 190 to 210 lb in. 122 to 24 N•m).
16. Add a generous amount of clean hydraulic oil into
both ports to ensure the pump is adequately lubricated.
Rotate the drive shaft to distribute the oil and check for
freedom of shaft rotation. The shaft should be free to
rotate with the help of a short wrench [100 lb in. (11
N•m) maximum).
7. Install the O-ring (11 ) into the groove provided in the
front cover face. Oil the O-ring and stretch it slightly, if
necessary, so it will remain in its groove.
8. Install the wear plate (10) with the bronze surface
against the gears and the small vent hole in line with the
hole in the heat shield. Press the wear plate. The wear
plate shall be sufficiently within the oval cavity so it is
axially retained.
E-91
TM 10-3950-672-24-1
BRAKE MASTER CYLINDER
DESCRIPTION
Transfer from low pressure (large piston) to high
pressure (small piston) is accomplished by means of a
metered pressure relief valve. The low pressure bore
has a diameter of 1.75 inch (4.4 cm) and the high
pressure bore has a diameter of 1 -inch (2.5 cm). The
stroke of the cylinder is 1.50 inches (3.8 cm)
The brake master cylinder is located under the deck to
the front of the cab. The master cylinder which has its
own oil reservoir, is actuated directly by linkage to the
brake pedal. The master cylinder incorporates two
integrally designed pistons; the large piston for large
volume and the small piston for high pressure.
THEORY OF OPERATION
(5). Cylinder displacement to the brake line is made up
of the displacement of cup (7) in the low pressure
chamber, and cup (3) in the high pressure chamber.
BRAKES COMPLETELY RELEASED.
With the brakes completely released, fluid is at reservoir
pressure. Relief valve (1) is closed and reservoir ports
(2) and (5) are open allowing fluid to pass freely.
Fluid displaced by cup (7)travels through by-pass port
(6) over cup (3) and into the brake lines. Relief valve
(1) remains closed during this portion of the cylinder
cycle.
Initial brake pedal movement carries the low pressure
piston (4) forward closing reservoir ports (2) and
Brakes Completely Released
E-92
TM 10-3950-672-24-1
from cup (7) to flow directly into the reservoir. Cup (8)
flares due to the pressure drop across it. and the
cylinder displacement to the brake line is made up only
of the displacement of cup (8). Line pressure is
developed in relation to the diameter of cup (8), input
force, and the pedal ratio used.
BRAKES FULLY APPLIED.
Displacement continues until the braking surfaces are in
contact and a line pressure buildup occurs. When the
line pressure reaches the pre-determined pressure
setting of the relief valve (factory set). the relief valve
opens allowing further displacement
Brakes Fully Applied
E-93
TM 10-3950-672-24-1
MAINTENANCE
TROUBLESHOOTING.
SYMPTOM
1. Slow pedal return-sticking
piston.
2.
up.
Brake drag or pressure build
3. Pedal loss. (pedal too low before braking action starts.)
PROBABLE CAUSE
SOLUTION
a. Fluid return ports of the relief
valve may have become plugged
through entrance of foreign matter.
a. Remove relief valve and wash
in alcohol. Clean the return ports by
hand using a 0.0625 inch (1,58
mm) drill.
b. Runout in O.D. and l.D. of low
pressure pistons.
b. Replace defective component.
a. No push rod end clearance.
a. Adjust the push rod to maintain
a 0.0312 inch (0.792 mm) maximum clearance to the secondary
piston contact when pedal is fully
retracted.
b. Incorrect fluid or oil in the fluid
causing cups to swell and stick.
b. Disassemble cylinder and rebuild replacing all gaskets.
a. Too much clearance between
push rod and piston. (pedal loss at
the start of the stroke means loss at
the end of the stroke where it is
most important.)
a. Adjust push rod to main tain a
0.0312 inch (0.792 mm) maximum
clearance to secondary piston contact when pedal is fully retracted.
b. Faulty check valve.
b. If fluid drains from the end of
the cylinder when the end plug is
removed, the check valve is faulty
and the cylinder should be
replaced.
c. Relief valve setting too low.
c. Refer to Appendix E, Relief
Valve Adjustment, and adjust the
relief valve.
d. Relief valve setting too low.
d. Refer to Appendix E, Relief
Valve Adjustment, and adjust the
relief valve.
E-94
TM 10-3950-672-24-1
TROUBLESHOOTING.
SYMPTOM
4.
Spongy pedal.
PROBABLE CAUSE
SOLUTION
a. Air trapped in system.
a. Refer to HYDRAULIC BRAKES
in Section 3 and bleed the brake
system.
b. High pressure leaks.
b. Check all fittings and joints for
leakage while the system is under
pressure. If the cylinder end plug
leaks remove the line connections
and tighten by turning clockwise.
c. Loose wheel bearings.
c. Refer to Appendix E, FRONT
DRIVE AXLE, and adjust the wheel
bearings.
NOTE
If wheel bearings are loose. the
relief valve will release the low
pressure piston with its large volume displacement capacity before the wheel cylinders have
centralized the drums. When this
occurs, the high pressure piston
falls short of the volume displacement capacity required.
d. Incorrect anchor adjustment. If
this condition exists, the relief
valve will release and cause the
same results as loose wheel bearings.
d. Refer to Appendix E, FRONT
DRIVE AXLE, and adjust the anchor
settings.
e. Worn or cracked brake drums.
a. Replace drums. (lathe turning
the drums will not correct drum
stretching.)
E-95
TM 10-3950-672-24-1
ROCKWELL FSH HYDRAULIC BRAKES
DESCRIPTION
Actuation permits the shoes to center themselves in the
drum with equal effectiveness in either direction.
The brake is a floating shoe, hydraulic actuated brake,
consisting of a backing plate assembly, wheel cylinder
assembly, two brake shoe assemblies, two brake
adjustment bolts, and shoe hold down spring
assemblies.
MAINTENANCE
DISASSEMBLY.
1. Refer to Chapter 3, Section 4 - FRONT DRIVE AXLE
and remove the wheels.
CAUTION
DO NOT USE CLEANING SOLVENTS
ON
THE
HYDRAULIC
SEALS,
BOOTS, OR PISTONS. CLEANING
SOLVENTS CAN DAMAGE THESE
COMPONENTS.
PROTECT THE
BRAKE LINING FROM SOLVENTS,
LUBRICANTS, RUST INHIBITORS,
OR OTHER CONTAMINANTS THAT
CHANGE
THE
FRICTION
PROPERTIES OF THE LINING.
CONTAMINATED LININGS MUST BE
REPLACED.
CAUTION
DO NOT APPLY MORE THAN 20 LB
FT (27 N•m) TORQUE TO THE
HEADS OF THE ADJUSTMENT
BOLTS. DO NOT USE A POWER
WRENCH ON THE ADJUSTMENT
BOLTS.
2. Remove the brake drums. If necessary, manually
retract the brake shoes by rotating the adjustment bolts
so that the brake drums will clear the linings. To retract
each brake shoe, rotate the adjustment bolt heads 1/8
turn.
1. Using a cleaning solvent, clean ground or polished
parts and surfaces. Kerosene or diesel fuel can be
used for this purpose. do not use gasoline. Do not
clean ground or polished parts in a hot solution tank or
with water, steam, or alkaline solutions. These solutions
will cause corrosion of the parts.
3. Release and remove the shoe return spring.
4. Push down on the shoe retainers so that the retainer
nails can be reached with pliers. Hold the retainers so
that they do not twist while rotating the nails 1/4 turn.
Remove the retainers, springs, and retainer nails.
WARNING
USE CARE WHEN USING CLEANING
SOLVENTS.
FOLLOW
THE
INSTRUCTIONS SUPPLIED BY THE
SOLVENTMANUFACTURERTO
PREVENT INJURY.
5. Remove the brake shoes.
6. If complete disassembly is necessary, disconnect the
hydraulic line, remove the wheel cylinder attaching
capscrews and wheel cylinder.
WARNING
CLEANING AND INSPECTION.
USE CARE WHEN USING HOT
SOLUTION TANKS AND ALKALINE
SOLUTIONS.
FOLLOW
THE
INSTRUCTIONS SUPPLIED BY THE
ALKALINE MANUFACTURER TO
PREVENT INJURY.
Cleaning.
E-96
TM 10-3950-672-24-1
BRAKE ASSEMBLY
E-97
TM 10-3950-672-24-1
6. Check the brake drums for cracks, severe heat
checking, heat spotting, scoring, pitting, and distortion.
Replace damaged brake drums.
2. Rough parts can be cleaned with the ground or
polished parts, or in hot solution tanks with a weak
alkaline solution. Parts must remain in the hot solution
tanks until they are completely cleaned and heated.
7. Inspect the wheel cylinders for leaks and smooth
action. Refer to WHEEL CYLINDER MAINTENANCE.
3. Parts must be dried immediately after they are
cleaned with clean paper or rags, or compressed air.
WHEEL CYLINDER MAINTENANCE.
NOTE
When the brake shoes are replaced or a cylinder is
leaking, check to see if the wheel cylinders need
overhauling or replacing.
Wheel cylinders and cup seals must
only be lubricated with the fluid used
in the brake system. Cylinder boots
must be kept dry.
There are two types of wheel cylinder failures; leaks and
poor cylinder action.
4. To prevent corrosion and rust on cleaned parts, apply
axle lubricant to the cleaned and dried metal parts that
are not damaged and are to be immediately assembled.
If parts are to be stored, apply a special material that
prevents rust and corrosion to all surfaces.
CAUTION
LEAKS WHICH COAT THE OUTSIDE
OF THE BOOT AND CYLINDER WITH
FLUID, CAUSE A DECREASE FLUID
LEVEL IN THE RESERVOIR OR
DAMPEN AND STAIN THE BRAKE
LININGS ARE DANGEROUS. THESE
LEAKS CAN CAUSE THE BRAKES
TO GRAB OR FAIL AND MUST BE
IMMEDIATELY
CORRECTED.
CONTAMINATED LININGS MUST BE
REPLACED.
Also, put a cover over the parts of a special paper or
other material that prevents corrosion and rust.
Inspection.
It is important that all parts be carefully inspected before
assembly. Check all parts for wear or damage and
repair or replace them as required. Replacement of
these parts now can prevent failure of the assembly
later.
Cylinder leaks can be caused by:
1. Check all castings and backing plates for cracks,
loose rivets, and correct alignment.
Replace all
damaged parts.
a. Wrong type of brake fluid causing the seals to
leak.
CAUTION
2. Check all adjusting bolts, guide pins, and pawl pins
for corrosion and wear. Replace or repair damaged
parts.
ENSURE THE CORRECT BRAKE
FLUID AND SEALS ARE USED. THE
USE OF THE WRONG BRAKE FLUID
CAN DAMAGE THE CUP SEALS OF
THE WHEEL CYLINDER. DIFFERENT
TYPES OF BRAKE FLUID MUST NOT
BE MIXED.
REFER TO THE
OPERATORS MANUAL, TM 10-3950672-10
FOR
CORRECT
LUBRICATION.
3. Check brake shoes for rust, expanded rivet holes,
broken welds and correct alignment. Replace damaged
shoes.
4. Check anchors, anchor pins, and shoe bushings for
wear or damage. Replace as necessary.
5. Replace all shoe return springs at time of brake
overhaul.
b. Corrosion or damage on the surface of the
cylinder bore.
c. Worn or oversize cylinder bore.
E-98
TM 10-3950-672-24-1
NOTE
d. Damaged seal cups.
The wheel cylinder is a consumable
part. No seal kit or other repair parts
are available.
To find leaks that are not immediately visible, pull back
the cylinder boot. A small amount of fluid on the inside
of the boot is normal. Unless other conditions causing
poor brake performance are known, the wheel cylinder
must be checked.
ASSEMBLY.
NOTE
Do not permit grease to come in
contact with the brake drum or
linings. Grease on the linings can
cause poor brake performance.
Contaminated linings must be
replaced.
1. Before assembly, apply a thin layer of brake
lubricant, NLGI Grade No.2, Rockwell specification 0616 to the following parts:
a. The push rod ends of the shoes and cylinder.
b. Surfaces of the adjusting cams and the
matching surfaces of the brake shoes.
c. Surfaces of the shoe support pads on the
backing plate assembly and the ends of the shoe webs
that slide against the anchor bracket.
2. Install the wheel cylinder to the backing plate.
Tighten the wheel cylinder attaching screw and
capscrew 25 to 35 lb ft (34 to 48 N•m).
3. Connect the hydraulic line.
4. Install the brake shoes in position so that the push
rod ends of the shoes are engaged with the wheel
cylinder or push rods.
Poor cylinder action can be caused by:
a. Corrosion or deposits in the cylinder bore.
5. Assemble the retainer nails, springs, and retainers.
Lock the nails in position by pushing down on the
retainers while twisting the nails 1/4 turn with pliers.
b. Swollen cups caused by contaminated or wrong
type of brake fluid.
6. To assemble the shoe return spring, put one hook in
position in a brake shoe. Pull the spring open to install
the opposite hook in the other shoe.
c. Cups wedged into excessive clearance between
the piston and the cylinder bore.
7. Assemble the retainer spring clip into the brake
shoes.
d. Wrong type of pistons for push rods or brake
shoe ends.
8. Bleed the hydraulic system after all the brakes are
assembled and perform a brake adjustment. Refer to
Section 3.
Light corrosion or rough areas can be removed with
crocus cloth or a cylinder hone. Use brake fluid as a
lubricant when cleaning the cylinder. If the bore cannot
be easily cleaned, the cylinder must be replaced.
E-99
TM 10-3950-672-24-1
HOIST MOTOR CONTROL VALVE (GROVE 15B HOIST)
DESCRIPTION
pilot operated poppet off its seat.
The hoist motor control valve is designed to provide an
even flow of oil to the hoist motor in both directions.
This allows flow to the return reservoir through the
directional control valve.
To drive the hoist motor in the raise direction, hydraulic
oil flows through the in port and pushes the free flow
poppet off its seat. The oil then flows to the out port and
on to the hoist drive motor.
An orifice plug is installed in the pilot pressure port to
restrict back flow when the directional control valve is
closed. The restriction prevents the pilot operated
poppet from chattering on its seat.
When driving the hoist motor in the lower direction. oil
from the directional control valve enters the out port.
The pilot operated poppet is held shut by the adjustment
spring until pilot pressure of sufficient force is sensed at
the pilot pressure port to move the
A vent is provided that vents the area between the pilot
piston seal and the free flow poppet and pilot operated
poppet seals to prevent a hydraulic lock should weepage
around the seals occur.
E-100
TM 10-3950-672-24-1
E-101
TM 10-3950-672-24-1
MAINTENANCE
ASSEMBLY.
DISASSEMBLY.
NOTE
1. Remove O-ring (3) from the valve body (1).
It is recommended
replaced with new
assembly.
2. Remove the plug (17) and O-ring (2), spring (4), and
poppet (5) from the valve body.
O-rings
O-rings
be
at
3. Remove nut (10),. spring (8), O-ring (7), and washer
(5) from the valve body.
1. Prior to assembly coat all parts with clean hydraulic
oil.
4. Remove the spool (12) from the valve body.
Remove the O-ring (13) from the spool. Remove plug
(15) from the spool.
2. Install O-ring and plug (16) into the valve body.
5. Remove plug (11) and orifice (14).
4. Install plug (15) and O-ring (13) into the spool (12).
Install spool (12) into the valve body.
3. Install plug (11) and orifice (14).
6. Remove plug (16) and O-ring. Remove all of the
remaining plugs from the valve body.
5. Install washer (6) onto the spool. Install the O-ring
onto plug (9).
CLEANING AND INSPECTION.
1. Clean all parts in a suitable solvent and dry with air.
6. Install spring (8) and secure to the spool with plug
(9).
2. Inspect the spool and poppet for nicks and scratches.
Minor nicks and scratches may be removed with crocus
cloth.
7. Install poppet (5), spring (4), O-ring (2), and plug (17)
into the valve body.
8. Install the remaining plugs into the valve body.
E-102
TM 10-3950-672-24-1
PILOT OPERATED CHECK VALVE
DESCRIPTION
The pilot operated check valve is usually located in
the port block on the outrigger stabilizer cylinder. The
valve is normally closed and is opened by pilot
pressure.
MAINTENANCE
ASSEMBLY.
DISASSEMBLY.
1. Remove the backup rings (13 and 15) and 0rings (2,
4, and 11) from the body (1).
NOTE
Coat all parts with clean hydraulic oil
prior
to
assembly.
It
is
recommended O-rings and backup
rings be replaced at assembly.
2. Remove the bottom plug from the body (1), remove
the O-ring (16), orifice (18), O-ring (17),-piston (14),
spring (3), piston (19), and stem (20).
NOTE
1. Install the stem (20), piston (14), spring (3), piston
(19), O-ring (17), orifice (18) into the bottom of the
valve.
Some valves will not have a seal ring
(24) or a retaining ring (25).
2. Install O-ring (16) onto the bottom plug. Install the
plug into the valve.
3. Remove the plug (8), O-ring (7), springs (6 and 10),
spring end (9), ball (5), poppet (12), seal ring (24), and
retaining ring (25).
3. Install the poppet (12), ball (5), spring end (9), and
springs (6 and 10) into the top of the valve.
CLEANING AND INSPECTION.
4. Install the O-ring (7) and plug (8) into the body (1).
1. Clean all parts with solvent and dry with compressed
air. Check all parts for serviceability.
5. Install the O-ring (11) onto the body (1).
6. Install the O-rings (2 and 4) and backup rings (13 and
15) onto the body (1).
E-103
TM 10-3950-672-24-1
Pilot Operated Check Valve
E-104
TM 10-3950-672-24-1
HOLDING VALVE
DESCRIPTION
hydraulic circuit. As the directional control valve is
opened to the lower position, pressure is applied to the
pilot piston. The pilot piston moves against the pilot
release poppet until it unseats the pilot release poppet
valve which port oil to the return side of the directional
control valve.
The holding valve is ported to allow hydraulic flow in two
directions. To raise a load, the oil must unseat the free
flow poppet valve. In this case, oil pressure must
overcome the main poppet spring. To do this, the oil
flows through the oil ports of the pilot release poppet
valve which applies pressure to the inside face of the
free flow poppet. When the main poppet unseats, the
oil flows past the main poppet seat to the component to
be worked.
The free flow check valve is provided for venting the
pressure side of the pilot piston.
A vent is provided for venting the area between the pilot
piston O-rings should weepage occur. A second vent is
provided at the adjustment end of the pilot release
poppet valve should weepage occur past the O-ring seal
into the spring area.
When a load is to be lowered, as in retracting the boom,
better control is necessary because of the weight of the
load. For this reason a pilot pressure is used for
positioning the main poppet valve which is being held
against its seat by heavy springs. The pilot pressure is
sensed from the lowering side of the
MAINTENANCE
ASSEMBLY.
DISASSEMBLY.
NOTE
NOTE
Do not remove the allen head plug on the top end of the
holding valve.
It is recommended that all O-rings
and backup rings be replaced at
assembly with new parts.
1. Remove the adjusting stem assembly from the
valve by turning the nut counterclockwise.
1. Install all O-rings and backup rings onto the valve
and lubricate with clean hydraulic oil prior to assembly.
2. Remove the stem, spring, and spool from the
valve.
2. Install the plug in the base of the valve.
3. Remove the plug from the base of the valve.
3. Install the spool, spring, and stem into the valve
body.
4. Remove all O-rings and backup rings from the
valve assembly.
4. Install the O-ring onto the adjusting stem assembly.
Coat the O-ring with clean hydraulic oil and install the
adjusting stem assembly into the valve body.
CLEANING AND INSPECTION.
1. Clean all parts in solvent and dry with air.
E-105
TM 10-3950-672-24-1
Holding Valve
E-106
TM 10-3950-672-24-1
HOLDING VALVE
DESCRIPTION
The holding valve is ported to allow hydraulic flow in two
directions. To raise a load, the oil must unseat the free
flow poppet valve. In this case, oil pressure must
overcome the main poppet spring. To do this, the oil
flows through the oil ports of the pilot release poppet
valve which applies pressure to the inside face of the
free flow poppet. When the main poppet unseats, the
oil flows past the main poppet seat to the component to
be worked.
hydraulic circuit. As the directional control valve is
opened to the lower position, pressure is applied to the
pilot piston. The pilot piston moves against the pilot
release poppet until it unseats the pilot release poppet
valve which port oil to the return side of the directional
control valve.
When a load is to be lowered, as in retracting the boom,
better control is necessary because of the weight of the
load. For this reason a pilot pressure is used for
positioning the main poppet valve which is being held
against its seat by heavy springs. The pilot pressure is
sensed from the lowering side of the
A vent is provided for venting the area between the pilot
piston O-rings should weepage occur. A second vent is
provided at the adjustment end of the pilot release
poppet valve should weepage occur past the O-ring seal
into the spring area.
The free flow check valve is provided for venting the
pressure side of the pilot piston.
MAINTENANCE
ASSEMBLY.
DISASSEMBLY.
NOTE
NOTE
Do not remove the adjustment stem
or locknut during disassembly.
It is recommended that all O-rings
and backup rings be replaced with
new parts at assembly.
1. Remove the adjustment end of the valve by turning
the large nut counterclockwise. Do not remove the
adjusting stem.
1. Install all backup rings and O-rings onto the valve.
2. Install the ball and spring into the sleeve and secure
with the plug.
2. Remove the O-ring from the nut
3. Remove the valve spring and seats.
3. Coat the sleeve with clean hydraulic oil and install
the sleeve into the valve.
4. Remove the inner sleeve from the valve.
4. Install the valve seats and spring into the valve body.
5. Remove the plug from the inner sleeve. Remove
the spring and ball.
5. Install the O-ring onto the adjustment end nut and
install the adjusting stem into the valve.
6. Remove the O-rings and backup rings from the
valve.
E-107
TM 10-3950-672-24-1
E-108
TM 10-3950-672-24-1
HYDRAULIC PUMP
DESCRIPTION
The hydraulic pump is a two section gear type pump
mounted on and driven by the engine through an
adapter and/or coupler on the crankshaft.
MAINTENANCE
13. Remove the drive gear (8) and driven gear (9) and
keep them together as a set.
DISASSEMBLY.
NOTE
14. Remove the shaft seal (3).
Any
maintenance
requiring
disassembly of the pump should
include replacement of seals and
plates.
15. Remove the wear plate (7), spacer (6), and seal (5).
INSPECTION.
1. Inspect the components for sharp edges, roughness,
nicks, and burrs. If any areas are not smooth, polish
with a fine crocus cloth. If components show unusual
wear, replace the entire pump.
1. Clean the outside of the pump thoroughly and
disassemble in a clean work area.
2. Scribe a line the entire length of the outside of the
pump to aid in assembly.
2. Replace all seals and plates.
3. Clamp the pump in a vise with the shaft down.
ASSEMBLY.
4. Remove the bolts (18) and washers (17) from the
cover (16). Remove the cover (16).
NOTE
5. Remove the gasket (11) and dowel pins (12) from the
cover (16).
Lubricate all internal components
and the lips of the shaft seal before
assembly.
6. Remove the thrust plate (10).
1. Install the shaft seal (3) into the front housing (4) to a
depth of 1/4-inch from the pilot face.
7. Remove the drive gear (14) and driven gear (1 5)
and keep them together as a set.
NOTE
8. Remove the wear plate (7), spacer (6), and seal (5).
Do not push the pressure seal (5) to
the bottom of the groove. The seal
must be in the wear plate groove and
stick above the plate surface 0.005
inch (0.127 mm) minimum.
9. Remove the bolts (1) and washers (2) from the front
housing (4).
10. Remove the rear housing (13).
11. Remove the dowel pins (12) and gasket (11) from
the housing (13).
2. Invert the housing (4) with the bores facing up and
install the wear plate (7), spacer (6), and pressure seal
(5), into the bottom of the gear pocket in the
12. Remove the thrust plate (10).
E-109
TM 10-3950-672-24-1
E-110
TM 10-3950-672-24-1
wear plate (7), spacer (6), and pressure seal (5).
housing. Ensure the pressure seal (5) is installed with
the flat face down and the legs of the seal toward the
inlet of the pump.
9. Install the drive gear (14) and driven gear (15) with
the short journal up on the driven gear.
3. Install the drive gear (8) through the shaft seal (3)
being careful not to cut the shaft seal.
10. Install the second thrust plate (10).
11. Install two dowel pins (12) and the second gasket
(11) into the cover (16).
4. Install the driven gear (9), with the short journal up.
5. Install the thrust plate (10) toward the gears.
12. Install the cover (16) and secure with the bolts (18)
and washers (17).
6. Install two dowel pins (12) and the gasket (11) in the
housing (4) groove.
13. Invert the assembly and install the bolts (1) and
washers (2) in the front housing (4). Torque the bolts 28
to 35 lb ft (38 to 47 Nom).
7. Install the rear housing (13) over the dowel pins (12)
in the front housing (4).
14. Rotate the pump shaft by hand or with pliers. The
pump will have a small amount of drag, but should turn
freely after a short period of use.
8. Follow the procedure in the note preceding step 2
and the procedure in step 2 and install the second
E-111
TM 10-3950-672-24-1
CROSSOVER RELIEF VALVE
DESCRIPTION
ing and stopping of the swing motor. The valve consists
of a drilled and ported block with two relief valves and
two check valves with orifice plugs installed in the block.
The relief valves relieve pressure from one line to the
other and therefore there is no connection to the
reservoir.
The crossover relief valve with shuttle valve is designed
to protect the system from excessive pressure buildup
and to maintain a given pressure in the system. The
crossover relief valve relieves surge pressure in the
swing circuit that could occur if the motor is suddenly
stopped. It also provides for smooth start-
MAINTENANCE
NOTE
CLEANING AND INSPECTION.
Repair is limited to the replacement of the defective
components.
1. Clean all parts with solvent and dry with compressed
air. Check all parts for serviceability.
DISASSEMBLY.
ASSEMBLY.
1. Remove the relief valve cartridges from the valve
body.
1. Install new O-rings onto the check valves.
2. Install the check valves into the valve body.
2. Remove and discard the O-rings and backup rings
from the relief valves.
3. Install new O-rings and backup rings onto the relief
valve cartridges.
3. Remove the check valves from the valve body.
4. Install the relief valve cartridges into the valve body.
4. Remove and discard the O-rings from the check
valves.
E-112
TM 10-3950-672-24-1
Crossover Relief Valve
E-113
TM 10-3950-672-24-1
SOLENOID VALVE
DESCRIPTION
The two-way solenoid valve is a normally closed valve
with an electrical coil which when energized, shifts the
cartridge in the valve body to align the ports
in the valve. This alignment of ports routes the
hydraulic flow in the desired direction.
MAINTENANCE
NOTE
ASSEMBLY.
1. Install new O-rings onto the valve.
Repair is limited to the replacement
of the defective components.
2. Install the cartridge solenoid valve(s) into the
valve body. Torque the valve 450 to 500 lb in. (51 to
57 N•m).
DISASSEMBLY.
1. Remove the cartridge solenoid valve(s) from the
valve body.
3. If the jam nut on the solenoid was loosened, torque
the jam nut 120 to 140 lb in. (14 to 16 N•m).
2. Remove and discard the O-rings from the valve.
2-Way Solenoid Valve - Exploded View
E-114
TM 10-3950-672-24-1
DIRECTIONAL CONTROL VALVE
DESCRIPTION
direction the valve may be positioned. If it is necessary
to open more than one directional control valve in the
same valve bank, it may be required to partially close or
feather the valves that are located in the bank first, in
regards to flow from the pump, in order to provide
sufficient flow to the valves located last in the bank.
The directional control valves are four-way, three
position valves with either an open or closed spool.
Whether a valve has an open or closed spool is
determined by whether, with the spool in the neutral
position, the work ports are open to the reservoir return
passage. If the work ports are open to the reservoir
return passage the valve is classified as an open spool
type: if they are not, the valve is a closed spool type.
Additionally, the valve spool is spring loaded to the
neutral position.
The closed spool directional control valve functions
basically the same way as the open spool directional
control valve in that the through passage of the valve
must be blocked off by the valves' spool to divert flow to
the dead end parallel passage. With flow diverted to the
parallel passage, pressure then must unseat the load
check valve to allow the flow to reach the open work
port. The load check valve is provided to prevent back
sliding of components which support heavy loads as is
evidenced by the circuits this valve is used in. Return
flow from the component is through the return work port
to the reservoir return passage.
The open spool directional control valve is constructed
with a through passage to allow flow to pass to the next
valve(s) in the bank and on to the reservoir, when the
valve spool is in the neutral position. By positioning the
valve spool to a work position, the through passage is
blocked and flow is diverted to the dead end parallel
passage. This causes flow to be directed to the
component's open supply work port. Return flow is
routed from the return work port to the reservoir return
passage by the opposite end of the valve spool This
flow pattern is applicable in either
MAINTENANCE
TROUBLESHOOTING.
SYMPTOM
1.
Sticking spool.
PROBABLE CAUSE
SOLUTION
a. Excessively high oil temperature.
a. Eliminate any restriction in pipe
line or filtering system.
b. Dirt in oil.
b. Change oil and flush system.
c. Pipe fittings too tight.
c. Check torque. Retorque as necessary.
d. Valve warped from mounting.
d. Loosen valve and check.
e. Excessively high pressure in
valve. (Relief valve not working
properly).
e. Check pressure at inlet and at
working ports.
f.
f. Free linkage.
Handle or linkage binding.
g. Return spring damaged or
broken.
9. Replace faulty parts.
h. Spring or valve cap binding.
h. Loosen cap and retighten.
E-115
TM 10-3950-672-24-1
SYMPTOM
2.
3.
out.
PROBABLE CAUSE
Leaking seals.
Unable to move spool in or
4. Poor hydraulic system performance or failure.
SOLUTION
a. Paint or dirt on or under seal.
a. Remove and clean, as necessary.
b. Excessive back pressure.
b. Open or enlarge line to reservoir.
c. Scored spool.
c. Replace valve.
d. Cut or scored seal.
d. Replace faulty parts.
a. Dirt in valve.
a. Clean and flush out valve assembly.
b. Spool cap full of oil.
b. Replace seals.
c. Bind in linkage.
c. Free linkage.
a. Damaged pump.
a. Repair or replace pump.
b. Dirt in relief valve.
b. Disassemble and clean relief
valve.
c. Relief valve damaged.
c. Replace relief valve.
d. Worn cylinder(s) or motor(s).
d. Repair or replace damaged
components.
e. Load too heavy.
e. Reduce load. (Refer to load
chart for rated capacities).
f.
f. Replace valve.
Internal valve crack.
g. Spool not at full stroke.
g. Check movement and linkage.
h. Oil low in reservoir.
h. Add oil. Fill to FULL mark on
sight gauge.
i.
System filter clogged.
i. Clean or replace filter element.
j.
Line restricted.
j. Check lines. Clean or repair as
necessary.
1. Remove the nuts and relief cap and remove the
relief valve from the valve bank. Discard the O-rings.
DISASSEMBLY.
CAUTION
2. Remove the screws securing the end caps. Remove
the end caps and centering springs.
USE CARE WHEN HANDLING THE
VALVE
HOUSING
TO
AVOID
DAMAGING THE FACES OR O-RING
GROOVES.
3. Remove the holding check valve from the housing.
Discard the O-ring.
E-116
TM 10-3950-672-24-1
Directional Control valve
E-117
TM 10-3950-672-24-1
4. Remove the plugs from the unused ports.
1. Remove any burrs from the face of the housing and
ensure all mating surfaces are clean.
ASSEMBLY.
2. Install the plugs in the unused ports.
CAUTION
3. Install a new O-ring and the holding check valve into
the valve housing.
INSTALL NEW O-RINGS AND SEALS
ON OR IN ALL COMPONENT PARTS.
COAT O-RINGS AND SEALS WITH
CLEAN HYDRAULIC FLUID PRIOR
TO ASSEMBLY.
4. Install the centering springs and end caps and secure
with the screws.
5. Install new O-rings and the relief valve into the valve
body. Install the relief cap and nuts.
E-118
TM 10-3950-672-24-1
SWING MOTOR
DESCRIPTION
The swing motor is a hydraulic gerotor type with low
speed and high torque characteristics. It has only
three moving parts, the commutator valve, the drive,
and the gerotor star. The motor has two ports for
connection to the hydraulic system.
MAINTENANCE
NOTE
The swing motor shown is typical of
all swing motors, however a splined
output shaft is used instead of a
keyed output shaft.
NOTE
The swing motor shown is typical of all swing motors.
however, a drive spacer may or may not be installed.
DISASSEMBLY.
NOTE
2. Remove the capscrews and sealwashers.
It is recommended that the motor be
kept in a vise during disassembly.
3. Remove the end cap.
4. Remove the seal from the end cap.
1. Place the motor in a vise and clamp across the edge
of the flange with the output shaft down. When
clamping use a protective device on the vise, such as
special soft jaws or pieces of hard rubber or board.
5. Remove the gerotor.
6. Remove the seal from the gerotor.
E-119
TM 10-3950-672-24-1
Swing Motor - Exploded View
E-120
TM 10-3950-672-24-1
7. Remove the drive spacer.
12. Remove the 4 capscrews from the mounting flange.
These motors are assembled using Loctite on the
screws to hold them in place. The screws will require
approximately 300 to 400 lb in. (34 to 45 Nom) of
torque to break loose and approximately 100 lb In. (11
N•m) torque to remove after they are broken loose. Do
not use an impact wrench on screws held with Loctite,
this may result In rounded heads or broken sockets. If It
requires more than 400 lb In. (45 N•m) to remove the
capscrews, proceed to step 13, otherwise, proceed to
step 14.
8. Remove the splined drive.
9. Remove the wear plate.
10. Remove the seal from the housing.
CAUTION
BE CAR EFUL NOTTO OVERHEAT
AND DAMAGE THE MOTOR.
13. Use a small flame propane torch to heat a small
area of the housing where the screw enters (see the
figure above). Apply torque to the capscrew with a
socket wrench gradually as heat is applied for 8 to 10
seconds. As soon as the screw breaks loose, remove
the heat from the housing, and continue turning the
screw until it is completely removed.
11. Reposition the motor in the vise, clamping across
the ports as shown above, not on the housing.
Excessive clamping pressure on the housing causes
distortion.
E-121
TM 10-3950-672-24-1
14. Remove the motor from the vise and place it on a
clean flat surface. Carefully remove the flange from the
housing.
NOTE
The dust seal, pressure seals, and
seal will come off with the flange.
15. Use a seal remover tool, like the one shown above
to remove the dust seal and pressure seal. Work from
the outer side to remove each seal. Work the nose of
the tool between the pressure seal and the flange. Pry
the seal partway. Remove the tool and repeat at a point
180 degrees away. Push the seal completely out of the
cavity.
16. Remove the output shaft from the housing.
17. Remove the bearing race and needle thrust bearing
from the shaft.
18. A metal plug and seal is used to plug a machining
hole in the housing. It is not necessary to remove the
plug and replace the seal unless leakage is occurring
around the plug. To remove the plug, insert an so Allen
wrench through the port opening and push it out.
E-122
TM 10-3950-672-24-1
ASSEMBLY.
CLEANING AND INSPECTION.
1. Check all mating surfaces, and replace any parts
having scratches or burrs that could cause leakage or
damage.
NOTE
Use all new seals when assembling
the motor. Lubricate the seals with
petroleum jelly before assembly. Do
not stretch the seals before
installing.
2. Clean all metal parts in clean solvent. Blow dry with
air. Do not wipe them with a cloth or paper towel
because lint or other matter can get into the hydraulic
system and cause damage.
3. Check around the chamfered area of the shaft for
burrs, nicks, or sharp edges that can damage the seals
when assembling the flange. Nicks or burrs may be
removed with a hard, smooth stone (such as an
Arkansas stone). Do not try to file or grind this part.
4. Wash the housing with non-petroleum base solvent
to remove oil, grease, and debris. Petroleum base
solvents may leave residue detrimental to the
successful use of Loctite. Pay particular attention to the
four tapped holes on the flange end.
NOTE
1. If the plug and seal were removed, lubricate the seal
and install it on the plug. Push the plug into the housing
so the plug and housing are flush. Be careful not to
damage the seal.
Fully cured Loctite resists most
solvents, oils, gasoline, kerosene.
and is not effected by cleaning
operations.
5. Blow dry the motor with compressed air. Clean and
dry the tapped holes.
NOTE
It is not necessary to remove the
cured Loctite that is securely bonded
in the tapped holes; however, any
loose particles of cured Loctite
should be removed.
6. Wire brush the screw threads to remove any cured
Loctite and other debris. Discard any screws that have
damaged threads or a corroded, damaged, or rounded
head.
NOTE
7. Wash the screws with non-petroleum base solvent.
Blow dry with compressed air.
Do not allow oil to get into the
tapped holes.
2. Lubricate the output shaft with hydraulic oil. Install
the shaft in the housing.
E-123
TM 10-3950-672-24-1
3. Install the needle thrust bearing then the bearing race
on the shaft. Pull the shaft partially out of the housing,
them push all three parts in the housing together. The
bearing race must rotate freely when in position.
Seal Installation
NOTE
The pressure seals are marked
"Pressure Seal 9057-1". Check the
seals before installing to ensure they
are installed in the correct places.
The dust seal is smaller in diameter
than the pressure seal. If installed in
the wrong place, leakage around the
shaft will occur.
4. Clean the mounting flange and output shaft to
remove all loose metallic chips, particles, dirt or other
contamination, including oil. During cleaning, visually
inspect the seal seat in the mounting flange for
scratches or other marks that might damage the seal.
Check for cracks in the flange, that might cause
leakage.
5. Install the dust seal in the flange as shown in the
Seal Installation figure. Press the seal into place
carefully, using a tool which will provide proper guiding
and positioning to eliminate damage to the rubber
portion or distortion of the metal container.
6. Lubricate the outside diameter of the pressure seal
with petroleum jelly. Place the seal in the flange and
press into place as shown in the Seal Installation figure.
E-124
TM 10-3950-672-24-1
This seal has a metal case with rubber molded around it.
Install it carefully to prevent damage to the seal,
especially distortion to the metal case. The preferred
method of installation is to use a press and a seal
installation tool. If a press is not available, use the
following method. After lubrication, insert the seal into
the flange with the lip up as shown in the Seal
Installation figure.
PLACE TIP OF APPLICATOR OF TOP OF
THREADED PORTION
APPLY 3 OR 4 DROPS IN EACH HOLE
9. Apply three or four drops of Loctite adhesive (Loctite
number 601 sealant) at the top of the threads in each of
the 4 holes in the housing, as shown above. Also apply
one drop of Loctite to one side of the threads of each
capscrew. Do not allow parts with Loctite applied to the
surface to contact any metal parts other than their
proper assembly. Wipe off any excess Loctite from the
housing face, using a nonpetroleum base solvent. Do
not apply Loctite to the threads more than fifteen
minutes before installation of the capscrews. If the
housing stands for more than 15 minutes, repeat the
application.
No additional cleaning or removal of
previous Loctite is necessary.
Use a 1.25 inch socket, or equivalent tool that has the
same outside diameter as that of the seal. Carefully tap
the socket until the seal is completely seated. It is
extremely important that the seal is installed straight.
Liberally fill the space between the dust seal and
pressure seal as well as the lips of both seals with
petroleum jelly, as shown in the Seal Installation figure.
7. Install the 1.9375 inch (4.92 cm) diameter seal in the
flange.
10. Before installing the flange and seal assembly over
the shaft, place a protective sleeve or bullet over the
shaft. Install the flange. Rotate the flange slowly while
pushing down over the shaft. Be careful not to invert or
damage the seals.
8. Apply a light coat of Loctite Primer NF on the bolts
and in the tapped holes of the housing. Allow primer to
air dry for at least one minute. Do not force dry with air
jet, as the primer will blow away. Use of the primer is
optional. With the primer, curing time with Loctite is
approximately 15 minutes. Without the primer, curing
time is approximately 6 hours.
11. Clamp the motor in a vise as shown in step 11 of
DISASSEMBLY.
Install the capscrews and torque
immediately 225 to 250 lb in. (25 to 28 N•m). If you
use primer, allow the Loctite to cure for 10 to 15
minutes, without primer allow 6 hours before subjecting
the motor to high torque reversals. On all other
applications, you can run the motor immediately. If you
use new bolts, ensure they are the
E-125
TM 10-3950-672-24-1
correct length, (0.875 inch [22.23 mm] under head
length). Longer screws will not permit proper seal
between the flange and housing.
12. Clamp the housing in a vise, gerotor end up. Refer
to step 1 of DISASSEMBLY or the correct clamping
procedure.
CAUTION
DO NOT STRETCH THE SEALS
BEFORE INSTALLING THEM IN THE
GROOVE.
NOTE
To aid in the installation of the seals,
apply a light coating of clean
petroleum jelly to the seal before
installing.
13. Pour approximately 35 cc of hydraulic oil in output
shaft.
14. Install the 2.875 inch (7.3 cm) diameter seal in the
housing seal groove and install the wear plate on the
housing.
Motor Timing
NOTE
The timing marks are machined on
the shaft and drive.
15. Install the drive with the timing mark on the drive
tooth aligned with the timing mark on the shaft. Refer to
the Motor Timing figure.
E-126
TM 10-3950-672-24-1
ing figure, the output shaft will rotate as shown with
the ports pressurized as shown.
16. Install the 2.875 inch (7.3 cm) diameter seal in the
gerotor seal groove.
21. Install the 2.875 inch (7.3 cm) diameter seal in the
end cap, then carefully place the end cap on the gerotor.
17. Carefully place the gerotor on the wear plate, seal
side toward the wear plate. Install the gerotor with any
tooth aligned with the timing mark on the drive.
18. Turn the gerotor to line up the holes for the
capscrews, be careful not to disengage the star from the
drive.
19. Install the drive spacer.
Torquing Sequence
22. Install the capscrews and sealwashers In the end
cap. Pretighten all screws 15 to 40 lb in. (2 to 5 N•m).
Check to ensure the seals are seated properly in the
grooves. Tighten the capscrews to a final torque of 175
to 200 lb in. (20 to 23 N•m) following the Torquing
Sequence figure.
20. With the orientation shown in the Motor Tim-
E-127
TM 10-3950-672-24-1
PLANETARY GEAR REDUCER
DESCRIPTION
relief valve is mounted on the swing motor. The swing
motor drives the gear reducer through the brake
assembly. The gear reducer has a ratio of 27.98: 1.
The planetary gear reducer is bolted to the turntable
frame weld. The gear reducer pinion meshes with the
turntable bearing to rotate the turntable. The gear
reducer has an integral brake mounted to it, and the
swing motor is mounted on the brake. The crossover
MAINTENANCE
11. Remove the primary planetary assembly (20) and
set aside for later disassembly.
DISASSEMBLY.
1. Remove the drain plug and drain all oil from the gear
reducer.
12. Remove the thrust races (21) and bearing (22).
13. Remove the secondary sun gear (37).
2. Remove the capscrews and washers securing the
relief valve to the motor and remove the relief valve.
14. Remove the secondary planetary assembly (23)
and set aside for later disassembly.
NOTE
15. Remove the O-ring (24) from the internal gear (12).
The motor bolts were installed with
thread sealant.
16. Bend down the tabs of the lockwasher (25), and
remove the locknut (26) and lockwasher (25).
3. Remove the socket head capscrews and lockwashers
securing the motor to the brake housing and remove the
motor.
17. Press the output shaft (27) from the hub (28).
18. Remove the bearing (29) and oil seal (30) from the
shaft (27).
4. Remove the bolts (1) and washers (2) securing the
brake housing (3) to the end cover (4). Remove the
brake housing (3) and springs (16).
19. Remove the bearing (29) from the hub.
5. Remove the piston (5) and cylinder head (6).
20. Press the roll pins (31) into the planet shafts (32) of
the primary planetary assembly (20).
6. Remove the O-rings (7) and backup rings (8) from
the head (6) and piston (5).
7. Remove the brake discs (9) and stators (10).
21. Press out the planet shafts (32) and remove the
gears (33), bearings (34), and thrust races (35).
8. Remove the bolts ( 1) securing the end cover (4) to
the internal gear (12).
22. Remove the spacer (36) from the planet carrier
housing.
9. Remove the O-ring (13), bearing (14), and bearing
races (15) from the end cover (4).
23. Repeat steps 20 through 22 for the secondary
planetary assembly (23).
10. Press the primary sun gear (17) from the end cover
(4). Remove the spacer (18), and oil seal (19).
CLEANING AND INSPECTION.
1. Clean all parts with a suitable cleaning solvent and
dry with compressed air or a lint free, clean cloth.
E-128
TM 10-3950-672-24-1
Gear Reduction Assembly - Exploded View
E-129
TM 10-3950-672-24-1
8.
Install the oil seal (30) into the hub (28) ensuring
that it is flush with the hub (28) and not damaged on the
splines of the output shaft.
2.
Inspect all bearings for damage to the rolls, cages,
or quills.
3.
Inspect all gear teeth for cracks, pitting, or other
damage.
9.
Turn the assembly over with the output shaft (27)
down.
4.
Inspect all bearing surfaces for scoring, scratches,
or other damage.
10.
Install the lockwasher (25) with the tabs up.
11. Install the locknut (26) with the bevel side down.
Tighten the nut until the output shaft (27) turns with the
locknut (26). Continue to tighten until the next tab on
the lockwasher (25) lines up. Bend the tabs until the
locknut (26) is secure.
ASSEMBLY.
NOTE
Prior to assembly, all bearings must be packed with
a high quality extreme pressure grease.
12. Install the secondary planetary assembly (23) with
the splined side down and engaged with the output shaft
(27).
1.
Install the bearings (34) into the inside of all three
primary planet assembly gears (33).
2.
Install two of the gears (33) with bearings (34) into
the primary planet assembly (20) with the planet shafts
(32). When pressing in the planet shafts (32) ensure the
roll pin (31) hole is aligned with the hole in the primary
planet assembly (20) housing.
13.
Install the secondary sun gear (37).
14. Install the thicker bearing race (21), then the
bearing (22), then the thinner bearing race (21).
3.
Secure the two planet shafts (32) into position with
the roll pins (31).
15. Install the O-ring (24) onto the internal gear (1 2)
and install the internal gear (12) onto the hub (28).
4.
Install the spacer (36) into the splined end of the
primary planet assembly (20) and under the two
previously installed gears (33).
16. Install the spacer (18) onto the primary planetary
assembly (20).
17. Install two thin bearing races (15) and the bearing
(14) onto the primary planet assembly (20).
5.
Install the other gear (33) with bearing (34) into
the primary planet assembly (20) with the planet shaft
(32). When pressing in the planet shaft (32), ensure the
roll pin (31) hole is aligned with the hole in the primary
planet assembly (20) housing.
18. Temporarily install the end cover (4) onto the
internal gear (12) and check for a small amount of
clearance between the end cover (4) and the primary
planetary assembly (20).
6.
Repeat steps 1 through 5 for the secondary
planetary assembly (23).
19.
7.
Press the upper bearing (29) onto the output shaft
(27) and press the output shaft into the hub (28).
20. Install the oil seal (19) into the end cover (4) and
the O-ring (13) onto the internal gear (12).
CAUTION
USE EXTREME CARE WHEN INSTALLING THE OIL
SEAL (30) INTO THE HUB (28). ENSURE IT IS
FLUSH WITH THE HUB (28) AND NOT DAMAGED ON
THE OUTPUT SHAFT (27) SPLINES.
21. Lubricate the primary sun gear (17) shaft with
grease and install the shaft. Install the spacer (18) over
the shaft and onto the primary planetary assembly (20).
Remove the end cover (4) and spacer (18).
CAUTION
DO NOT DAMAGE THE OIL SEAL
WHEN INSTALLING THE END COVER
(4) ONTO THE INTERNAL GEAR.
E-130
TM 10-3950-672-24-1
28. Remove dirt grease, or moisture from the end
cover surface. Dry the surface or allow to dry naturally.
Apply never-seez compound and RTV silicon to the
surface of the end cover.
22. Carefully install the end cover (4) over the primary
sun gear (17)with a slight rotating motion. Do not
damage the oil seal (19) on the splines of the sun gear.
23. Apply thread sealant to the bolts (11) and install
the bolts (11) securing the end cover (4) to the Internal
gear (12). Torque the bolts to 35 lb ft (48 N•Om).
29. Install the brake housing assembly (3) with the
brake release port lined up with the alignment hole used
earlier.
24. Install the brake discs (9) and the stators (10),
another brake disc (9) and then a thin stator (10).
30. Apply thread sealant to the bolt (1) threads and
Install the bolts (1) and washers (2) securing the brake
housing (3) to the end cover (4). Torque the bolts to 35
lb ft (48 N•m).
25. Install the O-rings (7) and backup rings (8) on both
the inside and outside of the cylinder head (6) with the
o-rings (8) up as the head would be installed in the
brake housing (3).
31. Install the motor to the brake housing. Apply
thread sealant to the socket head capscrews. Install the
capscrews and secure the motor to the brake housing.
Torque the capscrews to 109 lb ft (148 Nom).
26. Install the O-ring (7) and backup ring (8) into the
piston (5) so the O-ring (7) faces the O-ring (7) in the
head (6).
32. Install the relief valve to the motor with the
capscrews and washers.
27. Install the springs (16) into the piston and install
the head (6) and piston (5) into the brake housing (3).
E-131
TM 10-3950-672-24-1
GROVE MODEL HO-12 HOIST
DESCRIPTION
Cable Capacity
The Grove Model HO-12 hoist is a single speed hoist
consisting of a hoist control valve, a vane type motor,
the brake, cable drum, clutch assembly, and the motor
and brake end housings.
Permissible Line Pull Refer to the Line Pulls and
Reeving Info Chart in the cab.
The following is a list of specifications for the model HO12 hoist.
Drum Dimensions
Cable capacity for the 9.0
inch (22.8cm)drum with 9/16
inch cable is 135 feet (41.1
m).
Drum dimensions are 9.625
inches (24.4 cm) diameter
with 9.0 inches (22.8 cm)
length.
THEORY OF OPERATION
port of the motor, which drives the hoist to wind cable
onto the drum.
The first section of the hydraulic pump supplies oil to the
hoist directional control valve. The control valve
supplies oil through swivel port 4 to the hoist motor
control valve. The control valve is actuated by the main
hoist control lever. Hydraulic oil from the hoist returns
to the reservoir through hydraulic swivel port 3.
When hoisting down, oil flows to the down port of the
hoist motor, the hoist brake, and the pilot line of the
hoist control valve. The pilot operated poppet of the
hoist control valve and the hoist brake are controlled by
the pressure in the down line. Because the poppet in
the hoist control valve is closed and oil cannot flow from
the raise port of the motor, pressure rises in the down
line. As the pressure rises, the hoist brake will release
and as pressure continues to rise, the pilot pressure in
the hoist control valve will open the poppet allowing the
hoist to run in a down direction and oil flow to the
reservoir. If the load-drop speed increases, the pressure
in the down line will decrease. This decrease in
pressure will cause the poppet in the hoist control valve
to close and causes the spring actuated brake to slow or
stop the hoist. The hoist control valve prevents the load
from driving the hoist motor during hoist down operation.
The hoist drum rotates on anti-friction bearings located
in the drum ends. A shaft splined to the drive motor
transmits the drive motor rotation to the primary carrier
assembly. A second shaft transmits this rotation from
the secondary carrier assembly to the clutch assembly.
Brake discs and plates mounted on the clutch restrict or
stop drum rotation as determined by the action of the
hydraulic operated brake.
Oil from the hoist directional control valve flows to the
hoist control valve mounted on the hoist drive motor.
When hoisting up, oil enters the IN Port of the hoist
control valve and unseats the free flow poppet. Oil then
flows from the OUT port of the valve to the up
E-132
TM 10-3950-672-24-1
SYMPTOM
1.
Hoist will not raise load
PROBABLE CAUSE
SOLUTION
a. Too much cable on drum.
a. Each layer of cable on the drum
reduces the line pull. By reducing
the amount of cable on the drum,
the pull will increase.
b. Improper reeving.
b. Multiply the line pull times the
number of lines used, adjusting for
the amount of cable on the drum;
compare with load. Add parts of
line if load exceeds results.
c. Load capacity exceeded.
c. Reduces load. (Refer to applicable Load Chart).
d. Hydraulic oil low.
d. Replenish system.
e. Broken hydraulic lines of fittings.
e. Replace lines or fittings.
f.
f. Repair or replace valve.
Damaged relief valve
g. Damaged hoist control valve.
g. Repair or replace valve.
h. Damaged primary drive assembly.
h. Repair or replace primary drive
assembly.
i. Sheared shaft on pump or damaged pump.
i. Install a 0 to 5000 psi (0 to
34.475 kPa/344.8 bar) guage in
the inlet line of the hoist valve bank.
Activate the system. No pressure or
excessively low pressure indicates
a damaged pump or drive shaft. Repair or replace.
j. Motor control valve out of
adjustment.
j. Refer to Adjustment of the
Motor Control Valve in this Section
and adjust the valve.
E-133
TM 10-3950-672-24-1
SYMPTOM
2.
3.
4.
Hoist will not lower.
Slow operation down.
Slow operation up.
PROBABLE CAUSE
SOLUTION
a. Broken lines or fittings.
a. Replace lines or fittings.
b. Damaged relief valve.
b. Repair or replace valve
c. Damaged hoist control valve.
c. Repair or replace valve.
d. Damaged primary drive assembly.
d. Repair or replace primary drive
assembly.
e. Motor control valve out of
adjustment.
e. Refer to Adjustment of the
Motor Control Valve in this Section
and adjust the valve.
a. Low engine rpm.
a. Increase speed.
b. Damaged circuit relief valve.
b. Refer to Chapter 3, Section 6 VALVES (HYDRAULIC SYSTEM).
c. Damaged hydraulic pump.
c. Install flow meter in exhaust line
of the pump. Under moderate load,
check for proper output. Refer to
Chapter 3, Section 6 - HYDRAULIC
PUMPS (HYDRAULIC SYSTEM).
Damaged pumps normally build
heat. By hand, carefully check the
temperature of the pump in relation
to the other hydraulic pump.
a. Low engine rpm.
a. Increase engine rpm to recommended setting.
b. Damaged main relief valve.
b. Refer to Chapter 3, Section 6 HYDRAULIC SYSTEM.
c. Damaged hydraulic pump.
E-134
c. Install flow meter in exhaust line
of the pump. Under moderate load,
check for proper output. Refer to
Chapter 3, Section 6 - HYDRAULIC
PUMPS (HYDRAULIC SYSTEM).
Damaged. pumps normally build
heat. By hand, carefully check the
temperature of the pump in relation
to the other hydraulic pump.
TM 10-3950-672-24-1
SYMPTOM
4.
5.
Slow operation up. continued)
Erratic operation up.
b.Damaged motor.
5000 psi [0 to 34,475 kPa/344.8
bar]) in the inlet and exhaust line of
the motor. Hoist upwards in low
speed Observe meter readings. If
the motor has excessively more or
less pressure than normal, it is
damaged - repair or replace damaged motor.
6.
Erratic operation down
7. Sticking spool in the control
valve
PROBABLE CAUSE
SOLUTION
d. Damaged O-rings in brake
piston.
d. Install a pressure gauge (0 to
5000 psi [0 to 34.475 kPa/344.8
bar]) in the pipe plug hole in the line
going into the center of the brake
housing. The inability to build or
hold pressure at 500 psi (3447.5
kPa/34.48 bar) in this line indicates defective O-rings - replace if
damaged.
e. Warped brake piston.
e. Replace piston.
f. Motor control valve out of
adjustment.
f. Refer to Adjustment of the
Motor Control Valve in this Section
and adjust the valve.
a. Low engine rpm.
a. Increase speed.
b. Install pressure gauge (0 to
a. Air in brake release line.
a. Bleed pilot pressure line going
into brake housing.
b. Low engine rpm.
b. Increase speed.
c. Damaged circuit relief valve.
c. Refer to Chapter 3, Section 6 VALVES (HYDRAULIC SYSTEM).
d. Motor control valve out of
adjustment.
d. Refer to Adjustment of the
Hoist Motor Control Valve.
a. Excessively high oil temperature.
a. Eliminate any restriction in
pipe line or filtering system.
b. Dirt in oil.
b. Change oil and flush system.
c. Valve warped from mounting.
c Loosen valve and check.
d Excessively high pressure In
valve (Relief valves not working
properly)
d Check pressure at inlet and at
working ports.
e. Handle or linkage binding
e. Free linkage
E-135
TM 10-3950-672-24-1
SYMPTOM
7. Sticking spool in the control
valve. (continued)
8
9.
out.
Leaking seals.
Unable to move spool in or
10. Load drops when spool moved
from neutral.
11. Poor hydraulic system performance or failure.
PROBABLE CAUSE
f.
Spacer bent.
SOLUTION
f. Replace valve.
g. Return spring damaged.
g. Replace faulty parts.
h. Spring or valve cap binding.
h. Loosen cap, recenter and retighten.
i. Oil not thoroughly warmed
up.
i. Allow time for system warm
up.
a. Paint on or under seal.
a. Remove and clean. as necessary.
b. Dirt under seal.
b. Remove and clean, as necessary.
c. Scored spool.
c. Replace valve.
d. Loose seal plates.
d. Clean and tighten plates.
e. Cut or scored seal.
e. Replace faulty parts.
a. Dirt in valve.
a. Clean and flush out valve
assembly.
b. Spool cap full of oil.
b. Replace seals.
c. Bind in linkage.
c. Free linkage.
a. Dirt in check valve.
a. Disassemble and clean check
valve.
b. Scored check valve poppet or
seat.
b. Replace poppet or lap poppet
to seat.
c. Motor control valve out of
adjustment.
c. Refer to Adjustment of the
Motor Control Valve in this Section
and adjust the valve.
a. Damaged pump.
a. Check pressure and repair or
replace pump.
b. Dirt in relief valve.
b. Disassemble and clean relief
valve.
c. Relief valve damaged.
c. Replace relief valve.
d. Worn hoist motor.
d. Repair or replace damaged
components.
E-136
TM 10-3950-672-24-1
DISASSEMBLY.
NOTE
Any maintenance involving
disassembly of the hoist should
include replacement of all gaskets
and O-rings.
Brake Assembly.
1.
Disconnect the hydraulic lines to the brake
housing (6); cap or plug all lines and openings.
8.
Tap the shaft (13), spacer (20), and bearings (1 7)
from the clutch (8).
2.
Remove the capscrews (29) and washers (30)
securing the brake assembly to the brake end housing.
Remove the brake assembly.
3.
9.
(7).
Remove the springs (21) from the piston (7).
Remove the O-rings (22 and 23) from the piston
Hydraulic Motor.
1.
Tag and disconnect the hydraulic lines from the
motor (1 5) and the hoist motor control valve (1 6). Cap
or plug all lines and openings.
4.
Using a suitable puller, remove the piston and
clutch assembly.
5.
Remove the stators (9), discs (10), and spacer
(20).
6.
Remove the snap ring (19) from the shaft (13).
7.
Using a soft faced hammer, remove the piston (7)
from the clutch assembly (8).
2.
Remove the bolts and washers securing the motor
to the motor end cover (4). Remove the motor. For
maintenance of the vane type motor, refer to the
applicable SM package.
E-137
TM 10-3950-672-24-1
HO-12 Grove moist - cutaway
E-138
TM 10-3950-672-24-1
Hoist.
1.
Remove the screws (45), flatwashers (46). and
washers (47), securing the cable deflector (44) and the
hoist housing collars (48). Remove the deflector (44)
and collars (48).
2.
Remove the capscrews (37) and washers (38)
from the motor end housing (4). Remove the housing.
3.
Remove the capscrews (31) and washers (32)
from the brake end housing (5) and remove the housing.
Remove the seals (26) from the housing.
NOTE
Photos of the right hand drum end
(3) show eight bolt holes. Quantity
of bolts has been increased to
sixteen.
6.
Remove the right hand drum end (3) from the
housing.
4.
Remove the capscrews (33) and washers (34)
from the right hand drum end (3).
7.
Remove the spacer (28) from the right hand drum
end (3).
5.
Pull the drum (2) from the housing (1).
8.
(2).
E-139
Remove the secondary carrier (12) from the drum
TM 10-3950-672-24-1
2.
Use a brass drift to drive the pin (41) out of the
carrier and planet gear.
9.
(2).
Remove the primary carrier (11 ) from the drum
NOTE
Be careful not to lose any of the
needle bearings.
3.
Remove the planet gear (49), thrust washers (51),
O-ring (52), and needle bearings (50).
10.
Remove the seal (39) from the cable drum (2).
Primary and Secondary Carrier.
1.
Remove the circlip (40) from the pin (41) securing
the gears (49) in the carrier.
E-140
TM 10-3950-672-24-1
Primary and Secondary Carrier.
1.
Install the spacer (43) in the secondary carrier.
NOTE
The primary carrier has one row of
needle bearings and the secondary
carrier has two rows of needle
bearings.
2.
Place a small amount of EP-MPG grease around
the inner diameter of the planet gear (49). Position one
of the thrust washers (51) on a flat surface and place the
planet gear (49) in position on top of it. Install the
needle bearings (50) in place using grease to hold them
upright. A socket just smaller than the diameter of the
pin can be used to stabilize the rollers until they are all
in place. If assembling the primary carrier, position the
other thrust washer in place.
If assembling the
secondary carrier, install the second row of needle
bearings before installing the thrust washer.
4.
Remove the spacer (43) from the secondary
carrier (12).
5.
Repeat steps 1, 2, 3, and 4 for the other planet
gears.
CLEANING AND INSPECTION.
3.
Carefully install the planet gear (49) in the carrier
and carefully install the pin (41). Ensure all the rollers
are in position.
1.
Clean all parts with a suitable solvent and dry with
compressed air.
CAUTION
DO NOT ALLOW COMPRESSED AIR
TO SPIN THE BEARINGS.
4.
5.
Repeat steps 2, 3, and 4 for the other planet
gears.
2.
Clean all tapped holes and threads using taps and
dies.
Hoist.
3.
Check all parts for cracks, nicks, or other damage.
Polish out any minor blemishes on the brake piston or
cylinder mating surfaces with a fine crocus cloth.
4.
Examine the bearings
freedom of movement.
for
smoothness
Secure the pin (41) with the circlip (40).
1.
Wipe the surface of the cable drum end clean.
Apply a light coat of Locquic Primer T to the area
between the seal and drum end. Allow 30 to 60 minutes
to dry, and apply Loctite 290 adhesive. Install the seal
(39) in the cable drum (2).
and
5.
Prelubricate all seals, O-rings, and bearings with
90weight EPGL gear lubricant unless otherwise
specified.
ASSEMBLY.
NOTE
Any maintenance involving
disassembly of the hoist should
include replacement of all gaskets
and O-rings.
E-141
TM 10-3950-672-24-1
6.
Apply a thin even film of silicone adhesive sealant
(RTV silicon rubber) to the cable drum (2) and right
hand drum end (3) surfaces. Install the right hand drum
end into the housing (2).
2.
Install the primary carrier ( 11) into the drum (2).
7.
3.
Install the cable drum (2) into the housing (1).
Install the secondary carrier (12) into the drum (2).
4.
Clean the surface of the right hand drum end (3).
Apply a thin even film of silicone adhesive sealant (RTV
silicone rubber) to the surface and install the O-ring (35).
8.
Ensure the thread surface of the capscrews (33)
are free of dirt and oil. Apply high strength thread
locking adhesive/sealant and primer to the threads of
the capscrews (33). Install the capscrews (33) and
washers (34) and secure the right hand drum end (3) to
the cable drum (2).
5.
Wipe the surface of the cable drum (2) and right
hand drum end (3) clean. Apply a light coat of Locquic
Primer T to the area between the seal and drum end.
Allow 30 to 60 minutes to dry and apply Loctite 290
adhesive. Install the spacer (28) in the right hand drum
end (3).
E-142
TM 10-3950-672-24-1
9.
Torque the capscrews (33) to 41 lb ft (56 Nom).
12. Install the brake end housing cover (5) to the right
hand drum end (3) securing with the washers (32) and
capscrews (31). Torque the capscrews to 31 lb ft (42
Nom).
10.
Install the seals (26) in the brake end housing (5).
13. Install the input shaft (14) into the motor end
housing (4).
11. Install the O-ring (24) on the brake end housing
cover (5).
E-143
TM 10-3950-672-24-1
Deflector and Collar Location
14. Install the motor end housing cover (4) to the
drum with the washers (38) and capscrews (37). Torque
the capscrews to 31 lb ft (42 N•m).
15. Install the hoist housing collars (48) and deflector
(44).
Refer to figure titled, Deflector and Collar
Location, for proper location. Install the washers (47),
flatwashers (46), and screws (45) and secure the collars
and deflector. Torque the screws 12 to 14 lb ft (16 to 19
N•m).
E-144
TM 10-3950-672-24-1
Brake Assembly.
1.
Install the shaft (13) into the clutch (8) with the two
bolt holes in the clutch up.
2.
Install the bearing (17) and spacer (18) on the
shaft (13).
3.
Install the O-rings (22 and 23) on the piston (7).
5.
Install the clutch assembly (8) into the brake
housing (6).
6.
4.
Install the spacer (20) into the brake housing (6).
E-145
Install the snap ring (19) onto the shaft.
TM 10-3950-672-24-1
7.
Install a brake stator (9) followed by a brake disc
(10) alternating until all discs and stators are installed.
NOTE
The 0.030 diameter vent hole in the
piston should be located toward the
top of the brake housing.
8.
10. Position the brake assembly in place on the brake
end housing cover (5). Secure with the capscrews (29)
and lockwashers (30). Torque the bolts to 31 lb ft (42
N•m).
Install the piston (7) into the brake housing (6).
Hydraulic Motor.
1.
Position the motor in place on the motor end
housing cover (4). Secure with the washers and bolts.
Torque the capscrews to 75 lb ft (101 N•m).
9.
Install the springs (21) into the piston (7).
E-146
TM 10-3950-672-24-1
VANE TYPE MOTOR
DESCRIPTION
plate assembly consisting of the port plate with a built-in
check valve, a cam ring assembly containing the rotor,
vanes, vane springs and cam ring, and the end cap
assembly consisting of the end cap and needle bearing.
The vane type motor is a fixed displacement, rotary
balanced motor that converts hydraulic oil flow into
rotary mechanical motion. The motor consists of four
basic subassemblies; a body or housing and shaft with a
permanently lubricated bearing, a front port
THEORY OF OPERATION
During operation, hydraulic oil flows through either one
of the two ports in the end cap and is directed to both
sides of the cam ring assembly through the cast ports in
the end cap and port plate assembly. The
pressure applied against the vanes forces the rotor to
turn and at the same time rotates the motor shaft. As
the rotor turns, the oil moves to the discharge ports in
the port plate and end cap.
MAINTENANCE
TROUBLESHOOTING.
SYMPTOM
1
2.
3.
4.
External leakage.
Leakage at fittings.
Loss in speed under load.
Poor speed control.
PROBABLE CAUSE
SOLUTION
a. Seal failure.
a. Replace seal.
b. Defective casting.
b. Replace casting.
a. Cracked casting.
a. Replace.
b. Defective threads.
b. Replace.
c. Damaged O-ring
c. Replace.
d. Burr.
d. Stone or file flat.
a. Low inlet pressure.
a. Check pressure.
b. Excessive back-pressure at outlet.
b. Check pressure. Check the line
for restrictions.
c. Scored port plate or end cap.
c. Relap flat to clean up.
d. High oil temperature.
d. Use heavier oil; adjust relief
valve setting.
a. Worn rotating group.
a. Replace.
E-147
TM 10-3950-672-24-1
SYMPTOM
5.
6.
7.
Motor fails to start turning.
Shaft play.
Excessive noise.
PROBABLE CAUSE
a. Insufficient torque.
a. Increase relief valve pressure
setting.
b. Excessive motor leakage.
b. Check flow from motor outlet if
excessive, check shuttle valve in
front port plate. Pressure not loading plate causing plate to move
away from cam ring.
c. Worn port plates.
c. Replace.
d. Worn rotating group.
d. Replace.
e. Defective O-ring on OD of front
port plate.
e. Replace O-ring if damaged.
f.
f. Pump worn.
Insufficient pump delivery.
g. Motor too small.
g. Use larger size cam ring.
a. Worn bearings.
a. Replace.
b. Hammering coupling on shaft.
b. Coupling bore should be slip fit
on shaft.
a. Worn or damaged internal
parts.
a. Disassemble to remove rotor,
vane, cam ring assembly. Inspect
for exessive wear. Check condition
of faces of port plate and end cap.
Rework (lap) or replace if scuffed.
b. Air in system.
b. Bleed air off- check fittings for,
tightness.
5.
Remove the dowel pin (5) from the cam ring
assembly (6).
DISASSEMBLY.
Drain all fluid from the motor and thoroughly clean all
exterior surfaces. Prepare a clean, lint-free surface on
which to lay the internal parts of the motor.
6.
Thread two No. 10-24 screws in the two tapped
holes provided as puller holes in the cam ring (7) and
remove the cam ring assembly (6) as a unit (7, 8, 9, and
10).
1.
Secure the motor in a vise or other suitable
holding fixture with the shaft (21) extended down.
NOTE
If resistance is encountered when
lifting the cam ring assembly, lightly
tap the outside of the body while
lifting the assembly. This will help in
removing the cam ring, rotor, vanes,
and springs as a unit.
2.
Remove the screws (1) and remove the end cap
(2) from the body.
3.
(2).
SOLUTION
Remove the rubber seal ring (3) from the end cap
4.
Check the needle bearing (4) in the end cap. If it
is worn or damaged, remove it. It must be replaced.
E-148
TM 10-3950-672-24-1
Vane Motor - Exploded View
E-149
TM 10-3950-672-24-1
16. Examine the bearing (20) for wear before
removing it from the shaft. Apply a little pressure to the
outer race and rotate the bearing to check the steel balls
and race for wear or cracks. Check for looseness.
Remove the bearing from the shaft if a replacement is
needed. Inspect the outside diameter of the shaft at the
point of contact with the bearing and also the sealing
surface area for the shaft seal.
WARNING
THE VANES ARE HELD AGAINST
THE CAM RING BY TENSION FROM
THE SPRINGS IN THE ROTOR. IF
THE ROTOR IS PULLED FROM THE
CAM RING WITH NO PROTECTION,
TENSION FROM THE SPRINGS WILL
THROW THE VANES OUT IN ALL
DIRECTIONS. THE FOLLOWING
PROCEDURE MUST BE FOLLOWED
WHEN DISASSEMBLING THE ROTOR
AND VANES FROM THE CAM RING.
CAUTION
THE TWO SNAP RINGS (19) MUST
BE REMOVED BY PASSING OVER
THE INTERNAL END OF THE SHAFT
AND NOT THE SHAFT SEAL
SURFACE. DAMAGED SEAL
SURFACE WILL CAUSE THE SEAL
TO LEAK.
7.
Place the cam ring assembly on a clean, flat
surface. Push the rotor and vanes from the cam ring far
enough to secure a piston ring compressor over the
vanes (8) and around the rotor (10).
8.
After the compressor is in place, push the rotor
and vanes the remainder of the way out of the cam ring.
9.
Release the tension on the compressor and
remove the vanes (8) and vane springs (9) from the
rotor (10).
10. Remove the dowel pin (11) from the port plate
assembly (1 2).
11. Thread two No. 10-24 screws into the puller holes
in the port plate assembly (12) and remove it from the
body (24).
12. Remove the setscrews (13) in the side. Remove
the adapter valve (14) and balls (26) from the drilled
passage. The drilled holes in the port plate must be
clean and free from burrs.
Motor Shaft
13. Remove the rubber seals (15 and 16) and the
belleville washer (25).
14.
17. Remove one of the snap rings (19) and press the
bearing (20) from the shaft. Remove the other snap ring
(19).
Remove the snap ring (17) from the housing (24).
15. Press on the external end of the shaft (21) and
remove the shaft and bearing assembly (18) from the
housing.
18. Remove the felt wiper (23) and shaft seal (22)
from the body.
CLEANING AND INSPECTION.
1.
Wash all metal parts in cleaning solvent (Stoddard
Solvent or equal) and dry thoroughly.
E-150
TM 10-3950-672-24-1
Vane Motor Special Tools
2.
Inspect the seals for wear, breaks, cuts, and
brittleness. Check closely the shaft seal for scratches
and cracks. Discard and replace all defective seals.
8.
Inspect the wear surfaces of the port plate and
end cap for deep scratches. Replace if defective.
9.
Inspect the housing and end cap for cracks or
other casting damage. Replace all damaged castings.
3.
Inspect all springs for wear on the OD, for cracks
or permanent set. Replace all defective springs.
10. Inspect the shaft for excessive wear (internal,
spline, bearing surface. and drive end). Replace if
defective.
4.
Inspect the bearings for wear or flat spots. If the
bearings are rough or loose they must be replaced.
5.
Inspect the cam ring for excessive wear (ripples or
washboard marks on the contour). Replace a badly
worn or defective cam ring.
CAUTION
DIRT IS A MAJOR CAUSE OF WEAR
AND MOTOR FAILURE. COVER ALL
PARTS AFTER CLEANING TO
PREVENT DUST AND DIRT FROM
SETTLING ON THEM. ALL
SURFACES SHOULD BE COATED
WITH A FILM OF HYDRAULIC
LUBRICATING OIL AFTER THEY
HAVE BEEN CLEANED.
6.
Inspect the rotor for scored, marred, or scratched
(faces and vane slots) surfaces. Replace a defective
rotor.
7.
Inspect the vanes for excessive wear marks
(burrs, nicks, and scoring). Replace any defective
vanes.
E-151
TM 10-3950-672-24-1
NOTE
ASSEMBLY.
Immerse the seals and bearings in clean hydraulic fluid
to make the assembly easier and to provide initial
lubrication.
Ensure no sealing compounds get
on the seal element or the shaft.
Keep all foreign matter from the
sealing lips of the seal to prevent
cuts and abrasions.
NOTE
Do not install the retaining ring over
the external drive end of the shaft as
damage may be done to the seal
surface next to the groove.
6.
Position the thimble (special tool) over the
coupling end of the shaft assembly (18) and press the
assembly into the housing (24).
7.
Press on the outer race of the bearing until the
bearing is seated against the bottom of the bearing bore.
Remove the thimble from the shaft.
1.
Install one retaining ring (19) in the groove
nearest the external drive end of the shaft (21).
NOTE
There is an intentional interference
fit between the ball bearing inner
race and the shaft OD.
8.
Install the snap ring (17) in the housing (24).
Ensure the snap ring is fully seated in the groove.
NOTE
Inspect the check valve drilling in the
port plate to ensure all the passages
are clean.
2.
Press on the ball bearing inner race only and
press the ball bearing (20) on the shaft (21) and against
the retaining ring (19). Install the other retaining ring
(19) into the groove provided.
9.
Position the port plate (12) so the check valve
drilling is vertical. Install one 0.187 diameter ball (26).
NOTE
Two special tools must be fabricated
to accomplish the following steps.
See the figure for specifications on
making these special tools.
10. Install the adaptor valve (14) with the chamfered
end first.
3.
Saturate the felt wiper (23) in oil and remove all
excess oil. Position the housing (24) on a clean flat
surface with the center line vertical and the large bore
up. Install the felt wiper (23) into the bore in the housing
(24).
11. Install the setscrew (13) until it bottoms against
the adaptor valve (14).
Firmly hand tighten the
setscrew. This should jam the chamfered end of the
adaptor valve (14) into the chamfered seat between the
no. 4drill and "Q" drill in the port plate (12) to create a
metal to metal seal.
4.
Position the shaft seal (22) on the shaft seal driver
(special tool) with the open face of the seal against the
driver.
12. Lubricate the seals (15 and 16). Install seal (15)
in the bottom of the bore of the housing (24) and seal
(16) around the small diameter of the port plate (12).
5.
Apply lubricating fluid to the OD of the seal and
install the seal in the 1 1/2-inch bore of the housing (24).
13. Position the housing (24) centerline vertical and
the large bore up, and install the belleville washer (25)
in the bottom of the housing bore. The outside diameter
of the belleville washer should contact the housing (24)
and should also be centered inside seal (15). Refer to
Location of Belleville Washer illustration.
E-152
TM 10-3950-672-24-1
Location of Belleville Washer
into the cam ring. The backup plate will prevent the
14. Install the port plate (12) into the housing (24) until
vanes from sliding end wise in the rotor slots and
it bottoms on the belleville washer (25).
damaging the slots and springs.
15. Line up the dowell pin hole with the threaded hole
for the end cap, at the lower right corner of the housing
WARNING
(24). Install the dowel pin (11 ) in the dowel pin hole in
ENSURE THE ROTOR AND VANE
the port plate (12).
ASSEMBLY IS INSERTED FAR
ENOUGH IN THE CAM RING TO
16. Place the cam ring (7), rotor (10), vanes (8), and
PREVENT THE VANES FROM
vane springs (9) on a clean flat surface. Arrange the
FLYING OUT OF POSITION WHEN
vanes side by side with the three spring holes up. Insert
THE RING COMPRESSOR IS
the vane springs in the vanes. Install the vanes with the
REMOVED.
springs in slots in the rotor.
CAUTION
ENSURE THE SPRINGS ARE
STARTED IN THE HOLES IN EACH
ROTOR SLOT.
18. Lubricate the running face of the port plate.
Thread two No. 10-24 screws into the tapped holes on
the side of the cam ring (7) that indicates the cam size.
Insert the dowel pin (5) in the cam ring (7) and position
the complete assembly in the body over the other dowel
pin (11). See the exploded drawing for the correct
position.
17. Place a ring compressor around the vanes and
tighten the compressor gradually until the springs and
vanes are in the position they will occupy while in the
cam ring. Place a backup plate, slightly smaller than
the outside diameter of the rotor in the ring compressor
and push the rotor, springs and vanes
19. Press the needle bearing (4) into the end cap (2).
The bearing should be flush with the counterbore
approximately 1/32 deep from the wear face.
E-153
TM 10-3950-672-24-1
20. Lubricate the rubber seal (3) and install around the
diameter of the cap (2).
22. Install the cap (2) into the housing (24) and secure
with the capscrews (1). Torque the capscrews 70 to 80
lb ft (95 to 108 N•m).
21. Lubricate the pumping cartridge and running face
of the end cap (2). Line up the dowel pin hole in the end
cap (2) with the dowel pin (11) in the cam.
E-154
TM 10-3950-672-24-1
HYDRAULIC SWIVEL
The hydraulic swivel is used to provide hydraulic oil
from the carrier to the superstructure or from the
superstructure to the carrier. The hydraulic swivel is
DESCRIPTION
located at the centerline of rotation of the
superstructure. The hydraulic swivel consists of a case,
a spool, a mounting plate, and seals.
THEORY OF OPERATION
by a series of teflon and O-ring seals that prevents
All oil is routed into the spool portion of the swivel
transfer of oil and pressure. Return oil flow from the
where, through a series of internally drilled passages, oil
crane functions is accomplished In the same manner
is transferred to a circumferential channel on the spool
through another set of ports.
exterior. This channel corresponds with a mating port
on the barrel of the swivel. Each channel is separated
MAINTENANCE
DISASSEMBLY.
dust-free area and block the spool to prevent movement
during disassembly.
NOTE
There are two major differences in
hydraulic swivels. they may vary in
the amount of ports and the method
in which the spool is retained in the
case. The spool may be held within
the case by either a snap ring or by
capscrews with retaining clips.
CAUTION
WHEN REMOVING THE SEALS AND
RINGS, AVOID SCRATCHING THE
GROOVED AND GLAND SURFACES.
4.
Remove the seals and rings from the spool NOTE
Aligning the discarded seals and rings in the order of
disassembly will assist with installation of new seals and
rings.
NOTE
Any maintenance requiring
disassembly of the hydraulic swivel
should include replacement of all
seals and rings.
CLEANING AND INSPECTION.
1.
Remove the capscrews and retaining clips or the
snap ring that secures the spool in the swivel case.
1.
Clean the spool and barrel with a suitable solvent
and dry with compressed air.
2.
2.
Check the spool and the inside of the barrel for
scratches, grooves, scoring, etc. If any grooves have
developed with a depth exceeding 0.005-inch (0.1270
mm), the unit should be replaced.
Withdraw the spool from the barrel.
NOTE
During routine maintenance it is not
necessary to remove the mounting
plate. Use the mounting plate for
blocking.
3.
ASSEMBLY.
1.
Lubricate the spool, seals, and rings with hydraulic
oil or STP.
Plate the spool on a clean work surface in a
E-155
TM 10-3950-672-24-1
Typical Hydraulic Swivel with Snap Ring - Exploded View
E-156
TM 10-3950-672-24-1
Typical Hydraulic Swivel with Capscrews and Retaining clips - Exploded View
E-157
TM 10-3950-672-24-1
NOTE
Use only 10W hydraulic oil during
pressure testing.
CAUTION
WHEN INSTALLING NEW SEALS
AND RINGS, AVOID STRETCHING
THE SEALS OR SCRATCHING THE
GROOVED OR GLAND SURFACES.
1.
Install a pressure gauge into a port on the swivel
case.
2.
Install a pressure line in the corresponding port in
the swivel spool.
2.
Install new seals and rings on the spool using a
walking method.
3.
Allow the ports, on each side of the port to be
tested, to vent in order to detect leakage.
CAUTION
PROPER ALIGNMENT WHEN
INSERTING THE SPOOL IS
REQUIRED. DO NOT FORCE THE
SPOOL INTO THE BARREL.
4.
Pressurize the port to be tested while rotating
either the spool or case 360 degrees.
5.
If leakage is detected disassemble the swivel and
determine the cause.
3.
Insert the spool-into the berrrel. Secure the spool
to the barrel with the capscrews and retaining clips or
the snap ring.
6.
Pressure check each port individually until all
ports have been tested.
TEST.
NOTE
For individual port test pressures
refer to the HYDRAULIC SWIVEL in
the Service Manual.
E-158
TM 10-3950-672-24-1
ELECTRIC SWIVEL
DESCRIPTION
The electrical swivel consists of brushes, collector rings,
and a cover assembly. It is mounted on top of the
air/hydraulic swivel. The electrical swivel is used to
conduct power between the carrier and the
superstructure.
THEORY OF OPERATION
collector ring assembly on the swivel. The brush
assembly then picks up the electricity and through wiring
harnesses transmits the electricity to the superstructure
components.
The electrical swivel is located on top of the air/
transmission swivel and transfers electricity between the
carrier and superstructure. Wiring harnesses transmit
the electricity from the carrier components to the
MAINTENANCE
NOTE
Although the amount of slip rings
will vary, disassembly and assembly
procedures are the same.
CAUTION
ENSURE THE BRUSH AND ARM
ASSEMBLIES ARE PROPERLY
TAGGED WITH THE
CORRESPONDING CIRCUIT
NUMBERS.
DISASSEMBLY.
NOTE
Do not disconnect the collector core
wires at the top of the swivel
assembly.
NOTE
When removing the brush and arm
assemblies. it will help if they are
kept in order.
1.
Move the swivel to a clean work area and block it
from moving. (Block against the center post.)
7.
Remove the brush and arm assemblies.
8.
Loosen the setscrews securing the collector core
to the mounting bracket and remove the collector core.
2.
Perform Prior to Disassembly located in the
CLEANING AND INSPECTION part of this Package.
9.
Remove the nylon bearing from the mounting
bracket.
3.
Tag and disconnect the knife disconnects on the
brush and arm assemblies.
10. Perform After Disassembly located in the
CLEANING AND INSPECTION part of this Package.
4.
Remove the nuts and washers on the brush
holding studs.
CLEANING AND INSPECTION.
5.
Remove the nylon outboard bearing.
Prior to Disassembly.
6.
If there are any spacers (on the brush holding
studs) located under the nylon outboard bearing,
remove and save them.
1.
Check all brushes for proper contact with the
collector ring conductors. Note any brush sets which
E-159
TM 10-3950-672-24-1
2.
Install the collector core in the mounting bracket
and tighten one setscrew to secure the core to the
center post. (This setscrew will be loosened later).
are oil-soaked or worn to one-half of their original
length. These must be replaced.
2.
Check the spring tension of each brush. Any that
are damaged or weak must be replaced. Spring tension
should be sufficient to firmly hold the brushes against
the collector ring.
CAUTION
ENSURE THE BRUSH AND ARM
ASSEMBLIES ARE INSTALLED IN
THE PROPER ORDER.
3.
Inspect the collector ring conductors for arcing,
pitting, and corrosion. Under some conditions, the ring
will have a tendency to collect fine silt and in a salt
atmosphere, corrosion will occur. If this happens, rotate
the collector core several times. This should clean the
ring. If it does not, it might be necessary to clean the
core after disassembly.
CAUTION
ENSURE THAT ANY BRUSH AND
ARM ASSEMBLIES THAT HAVE
BEEN REPLACED ARE OF THE
PROPER ELECTRICAL CAPACITY.
NOTE
When installing the brush and arm
assemblies, do not unhook the
springs. Use your fingers to spread
the brush arms while sliding the
brush and arm assemblies onto the
holding studs.
4.
Check the continuity between each of the collector
core rings surfaces and the electrical leads. If any
conductors are defective they must be replaced.
After Disassembly.
1.
If the collector rings are corroded, it may be
necessary to use a standard non-residue solvent to
clean them. Then lightly sand the brushes with doubleought (2/0) nonabrasive material. Blow out any dust
with compressed air.
3.
Install the brush and arm assemblies.
4.
Install any spacers that were taken off.
2.
Any brush sets that are oil soaked cannot be
cleaned. They must be replaced.
5.
Install the nylon outboard bearing and the nuts
and washers.
3.
6.
Connect the knife disconnects on the brush and
arm assemblies. Slide the plastic sleeves over the knife
disconnects.
If the nylon bearing is worn, replace it.
ASSEMBLY.
1.
Install the nylon bearing in the mounting bracket.
E-160
TM 10-3950-672-24-1
E-161
TM 10-3950-672-24-1
CAB HEATER/DEFROSTER (HOT WATER)
The heater system consists of a heater core, heater
hoses, a fan, and an electric motor. The heater box
DESCRIPTION
assembly prevents personnel from accidentally coming
in contact with the fan or heater core.
THEORY OF OPERATION
Hot water is carried by the heater hoses from the engine
to the heater core. A fan is used to circulate the heated
air around the heater core out into the cab. The air flow
is vented through the box assembly for either heat or
defrost. The vent is controlled by the push-pull knob.
MAINTENANCE
3.
Inspect the heater hoses for frays, soft spots,
wear, or any other damage.
DISASSEMBLY.
1.
Remove the four screws securing the motor to the
heater box. Remove the motor.
4.
Repair or replace any damaged component as
necessary.
2.
Remove the setscrew securing the fan to the
motor shaft. Remove the fan.
ASSEMBLY.
1.
3.
Remove the chrome strip from the clips on the
front upper cover.
4.
2.
Install the front upper cover to the heater box with
the two screws.
Remove the front lower cover.
3.
5.
Remove the two screws securing the front upper
cover to the heater box and remove the cover.
6.
Install the front lower cover to the heater box.
4.
Install the chrome strip to the clips on the front
upper cover.
Slide the heater core from the box assembly.
5.
Install the fan to the motor shaft using the
setscrew to secure it.
INSPECTION.
1.
Install the heater core into the box assembly.
Inspect the fan for any damage.
6.
Install the motor to the heater box with the four
screws.
2.
Inspect the heater core for any signs of leakage or
other damage.
E-162
TM 10-3950-672-24-1
Cab Heater/Defroster
E-163/(E-164blank)
TM 10-3950-672-24-1
ALPHABETICAL INDEX
Subject
Page
A
Accelerator Pedal Assembly ...................................................................................................................................... .3-11
Accelerator Pedal Disassembly .................................................................................................................................. 3-11
Accelerator Pedal Installation ..................................................................................................................................... 3-12
Accelerator Pedal Removal ........................................................................................................................................ 3-11
Adjustment of Motor Control Valve ........................................................................................................................... 3-185
Administrative Storage ................................................................................................................................................. 1-2
Air Flow Restriction Results in Excess Smoke and Low Power Troubleshooting ...................................................... .5-111
Air in the Fuel System Troubleshooting ..................................................................................................................... .5-70
Air Intake and Exhaust System Description ............................................................................................................... .3-30
Air Intake and Exhaust System Maintenance ............................................................................................................. .3-30
Air Intake System Description ......................................................................................................................................E-7
Air Intake System Element Cleaning ............................................................................................................................E-8
Air Intake System Filter Element Replacement ............................................................................................................E-8
Air Intake System Inspection ..................................................................................................................................... E-1 0
Air Intake System Maintenance ....................................................................................................................................E-7
Air Intake System Troubleshooting ...............................................................................................................................E-7
Air Restriction Indicator Replacement ...................................................................................................................... 5-115
Air System Flow, Description of ................................................................................................................................ 5-111
Air System Replacement Procedures ....................................................................................................................... 5-112
Alternator Not Charging Or Insufficient Charging Troubleshooting ............................................................................. .5-48
Alternator Removal, Repair, Installation .................................................................................................................. .3-212
Alternator Troubleshooting ....................................................................................................................................... 5-150
Antitwo-Block System Cable Reel Installation .......................................................................................................... 3-172
Antitwo-Block System Cable Reel Removal ............................................................................................................. 3-172
Antitwo-Block System Console Installation ............................................................................................................... 3-174
Antitwo-Block System Console Removal .................................................................................................................. 3-174
Antitwo-Block System Switch Installation ................................................................................................................. 3-170
Antitwo-Block System Switch Removal .................................................................................................................... 3-170
Automatic Transmission (C-6) Description, Replacement, and Repair ....................................................................... .3-44
Axles and Brakes Maintenance .................................................................................................................................. 3-64
B
Back Leakage Valve Replacement/lnspection (injection Pump) ................................................................................ 5-265
Back-up Alarm Installation ....................................................................................................................................... .3-235
Back-up Alarm Removal ......................................................................................................................................... .3-235
Base Engine Components, Operation and Description ............................................................................................ .5-161
Base Engine Components Replacement Procedures ................................................................................................ 5-190
Base Engine Components Specifications ................................................................................................................. 5-185
Battery Cables Installation ........................................................................................................................................ 3-219
Battery Cables Removal .......................................................................................................................................... 3-219
Battery Installation ................................................................................................................................................... 3-217
Battery Removal ...................................................................................................................................................... 3-217
Index-1
TM 10-3950-672-24-1
ALPHABETICAL INDEX
Subject
Page
B - continued
Batteries, General Maintenance of ............................................................................................................................... 1-6
Bearings, General Maintenance of ............................................................................................................................... 1-5
Belt Tensioner Replacement ...................................................................................................................................... 5-59
Bleeding the Brake System ........................................................................................................................................ 3-74
Bleeding the Fuel System .......................................................................................................................................... 5-83
Blowby Limits ........................................................................................................................................................... 5-313
Boom Alignment and Inspection ............................................................................................................................... 3-154
Boom Assembly ....................................................................................................................................................... 3-152
Boom Disassembly .................................................................................................................................................. 3-152
Boom Functional Check ........................................................................................................................................... 3-154
Boom Installation ..................................................................................................................................................... 3-151
Boom Maintenance .................................................................................................................................................. 3-150
Boom Nose Sheave Installation ............................................................................................................................... 3-168
Boom Nose Sheave Removal .................................................................................................................................. 3-168
Boom Removal ....................................................................................................................................................... .3-150
Brake Master Cylinder Description ............................................................................................................................. E-92
Brake Master Cylinder Description, Replacement, and Repair .................................................................................... 3-76
Brake Master Cylinder Maintenance ........................................................................................................................... E-94
Brake Master Cylinder Theory of Operation ................................................................................................................ E-92
Brake Master Cylinder Troubleshooting ...................................................................................................................... E-94
Brake Shoe Adjustment .............................................................................................................................................. 3-75
C
C-6 Automatic Transmission Description, Replacement, and Repair .......................................................................... 3-44
Cab Fan Installation ..................................................................................................................................................... 3-4
Cab Fan Removal ........................................................................................................................................................ 3-4
Cab Heater/Defroster Assembly Description and Replacement .................................................................................. 3-14
Cab Heater/Defroster (Hot Water) Assembly ............................................................................................................ E-162
Cab Heater/Defroster (Hot Water) Description .......................................................................................................... E-162
Cab Heater/Defroster (Hot Water) Disassembly ....................................................................................................... E-162
Cab Heater/Defroster (Hot Water) Inspection ........................................................................................................... E-162
Cab Heater/Defroster (Hot Water) Maintenance ....................................................................................................... E-162
Cab Heater/Defroster (Hot Water) Theory of Operation ............................................................................................ E-162
Cable Follower Description, Replacement, and Repair ............................................................................................. 3-186
Camshaft and Gear Inspection ................................................................................................................................. 5-297
Camshaft and Tappet Replacement Procedures ...................................................................................................... 5-199
Camshaft Bushing Installation .................................................................................................................................. 5-291
Camshaft Cleaning ................................................................................................................................................... 5-297
Camshaft Expansion Plug Installation ...................................................................................................................... 5-290
Camshaft Gear Replacement ................................................................................................................................... 5-302
Camshaft Specifications ........................................................................................................................................... 5-186
Camshaft, Tappets, and Push Rods, Operation and Description ............................................................................... 5-163
Capscrew Markings and Torque Values - Metric ....................................................................................................... 5-364
Index-2
TM 10-3950-672-24-1
ALPHABETICAL INDEX
Subject
Page
C - continued
Chassis Wiring Harness Installation ......................................................................................................................... 3-240
Chassis Wiring Harness Removal ............................................................................................................................ 3-236
Checking and Unpacking Equipment ............................................................................................................................ 2-2
Cleanliness, General .................................................................................................................................................... 1-4
Clearance Light Installation ...................................................................................................................................... 3-225
Clearance Light Removal ......................................................................................................................................... 3-225
Cold Start Installation ................................................................................................................................................. 3-28
Cold Start Removal .................................................................................................................................................... 3-28
Common Tools and Equipment .................................................................................................................................... 2-1
Compression Knocks Troubleshooting ....................................................................................................................... 5-42
Connecting Rod Specifications ................................................................................................................................. 5-188
Contaminated Coolant ................................................................................................................................................ 5-39
Contaminated Lube Oil Troubleshooting ..................................................................................................................... 5-40
Control Lever Replacement (Injection Pump) ........................................................................................................... 5-270
Coolant Draining ........................................................................................................................................................ 5-60
Coolant Loss (Troubleshooting) .................................................................................................................................. 5-32
Coolant System Components and Flow, Description of .............................................................................................. 5-50
Coolant System Malfunctions ..................................................................................................................................... 5-51
Coolant System Replacement Procedures ................................................................................................................. 5-59
Coolant System Troubleshooting ................................................................................................................................ 5-51
Coolant Temperature Above Normal Troubleshooting ................................................................................................ 5-28
Coolant Temperature Below Normal Troubleshooting ................................................................................................. 5-31
Crankshaft and Main Bearings, Operation and Description of ................................................................................... 5-167
Crankshaft and Main Bearings Troubleshooting ........................................................................................................ 5-179
Crankshaft Cleaning ................................................................................................................................................. 5-293
Crankshaft Gear Replacement ................................................................................................................................. 5-295
Crankshaft Inspection ............................................................................................................................................... 5-294
Crankshaft Specifications ......................................................................................................................................... 5-189
Crossover Relief Valve Assembly ............................................................................................................................ E-112
Crossover Relief Valve Cleaning and Inspection ...................................................................................................... E-112
Crossover Relief Valve Description .......................................................................................................................... E-112
Crossover Relief Valve Description and Replacement .............................................................................................. 3-118
Crossover Relief Valve Disassembly ........................................................................................................................ E-112
Crossover Relief Valve Maintenance ........................................................................................................................ E-112
Cup Plug Replacement ............................................................................................................................................ 5-257
Cup Plugs Replacement (Coolant System) ................................................................................................................. 5-65
Cup Plugs Replacement (Lubricating System) .......................................................................................................... 5-141
Cylinder Block Assembly .......................................................................................................................................... 5-288
Cylinder Block Cleaning ........................................................................................................................................... 5-281
Cylinder Block Disassembly ..................................................................................................................................... 5-279
Cylinder Block Inspection ......................................................................................................................................... 5-287
Cylinder Block, Operation and Description of ........................................................................................................... 5-167
Cylinder Block Specifications ................................................................................................................................... 5-188
Cylinder Block Storing .............................................................................................................................................. 5-293
Index-3
TM 10-3950-672-24-1
ALPHABETICAL INDEX
Subject
Page
C - continued
Cylinder Block Troubleshooting ................................................................................................................................ 5-180
Cylinder Bore Specifications .................................................................................................................................... 5-189
Cylinder Bores De-Glaze (In-Chassis Overhaul) ....................................................................................................... 5-223
Cylinder Head and Gasket Installation (In-Chassis Overhaul) ................................................................................... 5-242
Cylinder Head and Valve Train, Operation and Description of .................................................................................. 5-162
Cylinder Head Assembly .......................................................................................................................................... 5-255
Cylinder Head Clean and Inspect ............................................................................................................................. 5-247
Cylinder Head Deck Flatness Specifications ............................................................................................................. 5-359
Cylinder Head Disassembly ...................................................................................................................................... 5-246
Cylinder Head Removal (In-Chassis Overhaul) ........................................................................................................ 5-220
Cylinder Head Valve Inspection Specifications ......................................................................................................... 5-358
Cylinders, General Maintenance .............................................................................................................................. 3-119
D
Damage from Non-Filtered Air Troubleshooting ....................................................................................................... 5-112
Dataplate, Engine ......................................................................................................................................................... 5-2
Dataplate (Nameplate), Fuel Pump .............................................................................................................................. 5-3
Definition of Terms ....................................................................................................................................................... 4-2
Delivery Valves (Back Leakage Valves on Lucas CAV Pumps) Troubleshooting ........................................................ 5-76
Deprocessing Unpacked Equipment ............................................................................................................................. 2-2
Destruction of Army Materiel to Prevent Enemy Use .................................................................................................... 1-1
Diagnosing Air System Malfunctions ........................................................................................................................ 5-111
Diagnosing Base Engine Component Malfunctions ................................................................................................... 5-169
Diagnosing Electrical Malfunctions ........................................................................................................................... 5-147
Diagnosing Lubricating System Malfunctions ............................................................................................................ 5-121
Dipstick Tube Replacement ...................................................................................................................................... 5-292
Directional Control Valve Assembly ......................................................................................................................... E-118
Directional Control Valve Description ..................................................................................................................... E-1 1 5
Directional Control Valve Description, Replacement, and Repair .............................................................................. 3-111
Directional Control Valve Disassembly ..................................................................................................................... E-116
Directional Control Valve Maintenance ..................................................................................................................... E-115
Directional Control Valve Troubleshooting ............................................................................................................... E-1 15
Disassembly and Assembly, General ........................................................................................................................... 1-5
Dome Light Installation ............................................................................................................................................. 3-228
Dome Light Removal ............................................................................................................................................... 3-228
Door and Latch Assembly Installation ........................................................................................................................... 3-9
Door and Latch Assembly Removal ............................................................................................................................. 3-9
Drive Belt Replacement ............................................................................................................................................. 5-59
Drive Line Installation ................................................................................................................................................. 3-42
Drive Line Lubrication ................................................................................................................................................ 3-43
Drive Line Removal ................................................................................................................................................... 3-42
Drive Train Maintenance ............................................................................................................................................ 3-42
Index-4
TM 10-3950-672-24-1
ALPHABETICAL INDEX
Subject
Page
E
Effects of Cooling System Neglect .............................................................................................................................. E-14
Electric Fuel Shut Off Valve (Electrical System) Replacement .................................................................................. 5-157
Electric Fuel Shut Off Valve Replacement .................................................................................................................. 5-97
Electric Swivel Assembly .......................................................................................................................................... E-160
Electric Swivel Cleaning and Inspection .................................................................................................................... E-159
Electric Swivel Description ........................................................................................................................................ E-159
Electric Swivel Disassembly...................................................................................................................................... E-159
Electric Swivel Maintenance...................................................................................................................................... E-159
Electric Swivel Theory of Operation .......................................................................................................................... E-159
Electrical Schematic....................................................................................................................................................FP-1
Electrical Switches Functional Check ........................................................................................................................ 3-224
Electrical Switches Inspection ................................................................................................................................... 3-223
Electrical Switches Installation .................................................................................................................................. 3-224
Electrical Switches Removal ..................................................................................................................................... 3-223
Electrical Swivel Description, Replacement, and Repair............................................................................................ 3-180
Electrical System, Description/Operation of............................................................................................................... 5-143
Electrical System Maintenance ................................................................................................................................. 3-208
Engine Assembly Specifications................................................................................................................................ 5-350
Engine Component Torque Values............................................................................................................................ 5-366
Engine Coolant Temperature Sender Description and Replacement............................................................................ 3-24
Engine Coolant Temperature Switch Description and Replacement ............................................................................ 3-22
Engine Cooling Fan Installation................................................................................................................................... 3-40
Engine Cooling Fan Removal...................................................................................................................................... 3-40
Engine Cranks But Will Not Start (No Smoke From Exhaust) Troubleshooting ............................................................ 5-11
Engine Dataplate........................................................................................................................................................... 5-2
Engine Description and Replacement.......................................................................................................................... 3-17
Engine Diagrams........................................................................................................................................................... 5-8
Engine Disassembly.................................................................................................................................................. 5-349
Engine DynamometerTest, Engine Installation .......................................................................................................... 5-321
Engine Dynamometer Test, for Engine Run-In .......................................................................................................... 5-327
Engine Dynamometer Test, Performance Check of................................................................................................... 5-332
Engine Electrical System Replacement Procedures .................................................................................................. 5-155
Engine Hard To Start Or Will Not Start (Smoke From Exhaust) Troubleshooting......................................................... 5-13
Engine Installation..................................................................................................................................................... 5-310
Engine Maintenance.................................................................................................................................................... 3-16
Engine Oil Pressure Sender Description and Replacement ......................................................................................... 3-21
Engine Oil Pressure Switch Description and Replacement .......................................................................................... 3-20
Engine Painting......................................................................................................................................................... 5-337
Engine Replacement................................................................................................................................................. 5-308
Engine RPM Will Not Reach Rated Speed Troubleshooting ........................................................................................ 5-21
Engine Run-In and Test in the Chassis...................................................................................................................... 5-314
Engine Run-In Procedure "In Chassis" (Off-Highway Vehicles).................................................................................. 5-336
Engine Runs Rough Or Misfiring Troubleshooting ....................................................................................................... 5-19
Engine Side Views .................................................................................................................................................... 5-318
Index-5
TM 10-3950-672-24-1
ALPHABETICAL INDEX
Subject
Page
E - continued
Engine Specifications.................................................................................................................................................... 5-6
Engine Starts But Will Not Keep Running Troubleshooting.......................................................................................... 5-15
Engine Storage, Long Term ...................................................................................................................................... 5-341
Engine Storage, Short Term...................................................................................................................................... 5-338
Engine Test Procedures, Chassis Dynamometer....................................................................................................... 5-334
Engine Testing .......................................................................................................................................................... 5-312
Engine Testing, General Information of ..................................................................................................................... 5-320
Engine Testing Service Tools.................................................................................................................................... 5-316
Engine Will Not Crank Or Cranks Slowly Troubleshooting ........................................................................................... 5-10
Engine Will Not Shut Off Troubleshooting ................................................................................................................... 5-44
Excessive Engine Noises Troubleshooting .................................................................................................................. 5-47
Excessive Exhaust Smoke Troubleshooting ................................................................................................................ 5-27
Excessive Fuel Consumption Troubleshooting ............................................................................................................ 5-43
Excessive Vibration Troubleshooting........................................................................................................................... 5-45
Exhaust Manifold Inspection...................................................................................................................................... 5-114
Exhaust Manifold Replacement................................................................................................................................. 5-114
Expansion and Pipe Plug Installation......................................................................................................................... 5-288
Expendable/Durable Supplies and Material List.............................................................................................................C-1
External Engine Components, Location of..................................................................................................................... 5-4
External Pump Leaks, Repair of................................................................................................................................ 5-101
F
Fan Hub Replacement ................................................................................................................................................ 5-60
Fan Pulley Replacement ............................................................................................................................................. 5-59
Fasteners and Torque Values........................................................................................................................................ 1-7
Fatigue of Welded Structures........................................................................................................................................ 1-7
Flywheel Housing and Flywheel, Operation and Description of.................................................................................. 5-164
Flywheel Housing and Flywheel Troubleshooting ...................................................................................................... 5-180
Flywheel Housing Assembly...................................................................................................................................... 5-306
Flywheel Housing Inspection ..................................................................................................................................... 5-305
Flywheel Ring Gear and Rear Seal Replacement...................................................................................................... 5-215
Frame and Outriggers Maintenance .......................................................................................................................... 3-192
Front Access Cover Installation................................................................................................................................. 3-201
Front Access Cover Removal.................................................................................................................................... 3-201
Front Crankshaft Seal, Operation and Description of................................................................................................. 5-163
Front Drive Axle Assembly of the Drive Unit ............................................................................................................... E-64
Front Drive Axle Cleaning ........................................................................................................................................... 3-65
Front Drive Axle Cleaning, Inspection, and Repair ...................................................................................................... E-73
Front Drive Axle Description ....................................................................................................................................... E-57
Front Drive Axle Disassembly of the Drive Unit........................................................................................................... E-58
Front Drive Axle Installation ........................................................................................................................................ 3-66
Front Drive Axle Lubrication........................................................................................................................................ E-75
Front Drive Axle Maintenance ..................................................................................................................................... E-57
Index-6
TM 10-3950-672-24-1
ALPHABETICAL INDEX
Subject
Page
F - continued
Front Drive Axle Removal........................................................................................................................................... 3-65
Front Drive Axle Wheel End Assembly........................................................................................................................ E-57
Front Drive Axle Wheel Ends Disassembly ................................................................................................................. E-57
Front Gear Housing and Gear Train, Operation and Description of............................................................................ 5-163
Front Gear Housing and Gear Train Troubleshooting ................................................................................................ 5-175
Front Steering Control Valve Assembly....................................................................................................................... E-83
Front Steering Control Valve Description..................................................................................................................... E-79
Front Steering Control Valve Disassembly .................................................................................................................. E-81
Front Steering Control Valve Maintenance .................................................................................................................. E-79
Front Steering Control Valve, Prior to Disassembly of ................................................................................................. E-79
Front Steering Control Valve Theory of Operation....................................................................................................... E-79
Front Support, Cleaning and Inspection of................................................................................................................. 5-307
Fuel Drain Manifold Replacement ............................................................................................................................... 5-92
Fuel Drain Manifold Troubleshooting........................................................................................................................... 5-82
Fuel Filter Replacement .............................................................................................................................................. 5-85
Fuel Filter Water Separator......................................................................................................................................... 3-27
Fuel Filter Water Separator, Draining of...................................................................................................................... 3-27
Fuel Filter Water Separator Installation ....................................................................................................................... 3-27
Fuel Filter Water Separator Removal.......................................................................................................................... 3-27
Fuel Injector Replacement .......................................................................................................................................... 5-95
Fuel Inlet Fitting/Sealing Washer Replacement (Injection Pump) .............................................................................. 5-269
Fuel Lift Pump Replacement....................................................................................................................................... 5-88
Fuel Or Oil Leaking From Exhaust Manifold Troubleshooting...................................................................................... 5-41
Fuel Pump Dataplate .................................................................................................................................................... 5-3
Fuel Pump Replacement........................................................................................................................................... 5-101
Fuel Pump Stud Replacement................................................................................................................................... 5-304
Fuel Shutoff Valve Troubleshooting ....................................................................................................................... . 5-153
Fuel System Bleeding ................................................................................................................................................. 5-83
Fuel System Components and Flow, Description of..................................................................................................... 5-67
Fuel System, Description of ........................................................................................................................................ 3-25
Fuel System Replacement Procedures..................................................................................................................... . 5-83
Fuel System Specification........................................................................................................................................... 5-68
Fuel System Troubleshooting...................................................................................................................................... 5-69
Fuel Tank, Installation ................................................................................................................................................. 3-26
Fuel Tank, Removal.................................................................................................................................................... 3-26
Fuel Water Separator/Filter Unit Troubleshooting........................................................................................................ 5-71
Fuse and Relay Panel Installation ............................................................................................................................. 3-220
Fuse and Relay Panel Removal ................................................................................................................................ 3-220
G
Gaskets, General Maintenance of ................................................................................................................................. 1-6
Gauges, Overfueling, and Loading (Coolant System) Troubleshooting ........................................................................ 5-58
Gear Cover Installation ............................................................................................................................................ 5-1 38
Index-7
TM 10-3950-672-24-1
ALPHABETICAL INDEX
Subject
Page
G - continued
Gear Housing and Timing Pin Assembly Inspection .................................................................................................. 5-304
Gear Housing Disassembly ....................................................................................................................................... 5-304
Gear Housing or Gasket Replacement ...................................................................................................................... 5-210
Gear Train Specifications.......................................................................................................................................... 5-186
General Information ...................................................................................................................................................... 1-1
General Maintenance .................................................................................................................................................... 1-4
General Safety Instructions ........................................................................................................................................... 4-4
Generic Symbols........................................................................................................................................................... 4-1
Grove Model HO-12 Hoist Assembly......................................................................................................................... E-141
Grove Model HO-12 Hoist Cleaning and Inspection................................................................................................... E-141
Grove Model HO- 1 2 Hoist Description..................................................................................................................... E-132
Grove Model HO-12 Hoist Disassembly .................................................................................................................... E-137
Grove Model HO-1 2 Hoist Maintenance ................................................................................................................... E-133
Grove Model HO-12 Hoist Theory of Operation......................................................................................................... E-132
Grove Model HO-1 2 Hoist Troubleshooting .............................................................................................................. E-133
H
High Oil Pressure Troubleshooting ............................................................................................................................ 5-121
High Pressure Fuel Lines Troubleshooting ................................................................................................................. .5-79
High Pressure Lines Replacement............................................................................................................................... 5-89
Hoist Description, Replacement, and Repair ............................................................................................................. 3-183
Hoist Maintenance .................................................................................................................................................... 3-183
Hoist Motor Control Valve Assembly ......................................................................................................................... E-102
Hoist Motor Control Valve Cleaning and Inspection ................................................................................................... E-102
Hoist Motor Control Valve Description....................................................................................................................... E-100
Hoist Motor Control Valve Description and Replacement........................................................................................... 3-117
Hoist Motor Control Valve Disassembly..................................................................................................................... E-102
Hoist Motor Control Valve Maintenance .................................................................................................................... E-102
Hoist to Boom Alignment........................................................................................................................................... 3-190
Holding Valve Assembly ........................................................................................................................................... E-105
Holding Valve Assembly ........................................................................................................................................... E-107
Holding Valve Cleaning and Inspection ..................................................................................................................... E-105
Holding Valve Description ......................................................................................................................................... E-105
Holding Valve Description ......................................................................................................................................... E-107
Holding Valve Disassembly....................................................................................................................................... E-105
Holding Valve Disassembly....................................................................................................................................... E-107
Holding Valve Maintenance....................................................................................................................................... E-107
Holding Valve Maintenance....................................................................................................................................... E-105
Holding Valves Description and Replacement ........................................................................................................... 3-113
Hook Block Description, Replacement, and Repair.................................................................................................... 3-162
Hub, Brake and Spindle Assembly .............................................................................................................................. 3-67
Hydraulic Brakes Cleaning and Inspection................................................................................................................... E-96
Hydraulic Brakes Description....................................................................................................................................... E-96
Index-8
TM 10-3950-672-24-1
ALPHABETICAL INDEX
Subject
Page
H - continued
Hydraulic Brakes Description and Replacement .......................................................................................................... 3-73
Hydraulic Brakes Disassembly .................................................................................................................................... E-96
Hydraulic Brakes Maintenance .................................................................................................................................... E-96
Hydraulic Brakes Wheel Cylinder Maintenance ........................................................................................................... E-98
Hydraulic Filter Maintenance..................................................................................................................................... 3-104
Hydraulic Hoses, Lines, and Fittings Installation .......................................................................................................... 3-97
Hydraulic Hoses, Lines, and Fittings Removal............................................................................................................. 3-97
Hydraulic Oil Draining and Flushing ............................................................................................................................ 3-92
Hydraulic Oil Recommendations ................................................................................................................................. 3-92
Hydraulic Pump Assembly ........................................................................................................................................ E-109
Hydraulic Pump Description ...................................................................................................................................... E-109
Hydraulic Pump Description and Replacement.......................................................................................................... 3-105
Hydraulic Pump Disassembly.................................................................................................................................... E-109
Hydraulic Pump Inspection....................................................................................................................................... E-1 09
Hydraulic Pump Maintenance.................................................................................................................................... E-109
Hydraulic Schematic ...................................................................................................................................................FP-7
Hydraulic Swivel (6 port) Description and Replacement ............................................................................................ 3-178
Hydraulic Swivel Assembly ....................................................................................................................................... E-155
Hydraulic Swivel Cleaning and Inspection ................................................................................................................. E-155
Hydraulic Swivel Description ..................................................................................................................................... E-155
Hydraulic Swivel Disassembly................................................................................................................................... E-155
Hydraulic Swivel Maintenance................................................................................................................................... E-155
Hydraulic Swivel Test................................................................................................................................................ E-158
Hydraulic Swivel Theory of Operation ....................................................................................................................... E-155
Hydraulic System Description...................................................................................................................................... 3-92
Hydraulic System Maintenance ................................................................................................................................... 3-92
Hydraulic Systems, General Maintenance of ................................................................................................................. 1-6
Hydraulic Tank Installation .......................................................................................................................................... 3-98
Hydraulic Tank Removal ............................................................................................................................................. 3-98
I, J, K
In-Chassis Overhaul.................................................................................................................................................. 5-219
Injection Pump Fuel Shut Off Valve, Description/Operation of .................................................................................. 5-145
Injection Pump Re-Rating ......................................................................................................................................... 5-110
Injection Pump Repairs - Lucas CAV DPA ................................................................................................................ 5-264
Injection Pump Service Tools.................................................................................................................................... 5-264
Injection Pump Supply Line Replacement ................................................................................................................... 5-93
Injection Pump Timing Troubleshooting ...................................................................................................................... 5-77
Injection Pump Troubleshooting .................................................................................................................................. 5-72
Injector Replacement .................................................................................................................................................. 5-95
Injectors, Troubleshooting of ....................................................................................................................................... 5-80
Instruments (Main Control Panel) Functional Check .................................................................................................. 3-222
Instruments (Main Control Panel) Inspection ............................................................................................................. 3-222
Index-9
TM 10-3950-672-24-1
ALPHABETICAL INDEX
Subject
Page
I, J, K - continued
Instruments (Main Control Panel) Installation ............................................................................................................ 3-222
Instruments (Main Control Panel) Removal ............................................................................................................... 3-222
Intake Air Restriction Replacement ........................................................................................................................... 5-115
Intake Manifold Cover and Gasket Replacement....................................................................................................... 5-112
L
Lift Circuit Description, Replacement, and Repair ..................................................................................................... 3-158
Lift Cylinder Description, Replacement, and Repair................................................................................................... 3-120
Lift Pump Replacement, and Repair............................................................................................................................ 5-88
Lift Pump Troubleshooting .......................................................................................................................................... 5-69
List of Troubleshooting Symptoms ................................................................................................................................ 5-9
Locking Screw/O-Ring Replacement (Injection Pump) .............................................................................................. 5-264
Locks, General Maintenance of ..................................................................................................................................... 1-5
Loctite, General Maintenance Using.............................................................................................................................. 1-7
Long Term Storage, Engine ...................................................................................................................................... 5-341
Low Oil Pressure Troubleshooting ............................................................................................................................. 5-121
Low Power Troubleshooting ........................................................................................................................................ 5-23
Low Pressure Fuel Line Replacement ......................................................................................................................... 5-87
Lube Oil Loss Troubleshooting .................................................................................................................................... 5-37
Lube Oil Pump Replacement .................................................................................................................................... 5-133
Lubricants ................................................................................................................................................................. 5-369
Lubricating for the Power Components...................................................................................................................... 5-117
Lubricating Oil Pressure Low Troubleshooting............................................................................................................. 5-34
Lubricating Oil Pressure Too High Troubleshooting ..................................................................................................... 5-36
Lubricating Oil Pump................................................................................................................................................. 5-117
Lubricating System Flow ........................................................................................................................................... 5-117
Lubricating System Replacement Procedures ........................................................................................................... 5-128
Lucas CAV DPA Back Leakage Valve and Sealing Washer Replacement................................................................... 5-99
M, N
Main Bearing Preliminary Inspection (In-Chassis Overhaul) ...................................................................................... 5-221
Main Bearing Replacement (In-Chassis Overhaul) .................................................................................................... 5-227
Maintenance Allocation Chart........................................................................................................................................B-1
Maintenance Forms, Records, and Reports................................................................................................................... 1-1
Maintenance, General ................................................................................................................................................... 1-3
Mirror Assembly (Left Side) Installation ..................................................................................................................... 3-207
Mirror Assembly (Left Side) Removal........................................................................................................................ 3-207
Mirror Assembly (Right Side) Installation................................................................................................................... 3-205
Mirror Assembly (Right Side) Removal...................................................................................................................... 3-205
Mounting Wheel Assemblies ....................................................................................................................................... 3-79
Muffler and Exhaust Pipe Installation ......................................................................................................................... .3-32
Muffler and Exhaust Pipe Removal ............................................................................................................................. 3-32
Index-10
TM 10-3950-672-24-1
ALPHABETICAL INDEX
Subject
Page
O
Oil Cooler Element and/or Gasket Replacement ....................................................................................................... 5-129
Oil Coolers ................................................................................................................................................................ 5-118
Oil Dilution Troubleshooting ...................................................................................................................................... 5-123
Oil Filter Bypass Valve.............................................................................................................................................. 5-118
Oil Filters .................................................................................................................................................................. 5-118
Oil Leaks Troubleshooting......................................................................................................................................... 5-127
Oil Pan, Operation and Description of ....................................................................................................................... 5-169
Oil Pan, Suction Tube, and/or Gaskets Replacement ................................................................................................ 5-131
Oil Pressure Regulating Valve Troubleshooting......................................................................................................... 5-121
Oil Pressure Regulator Valve and/or Spring Replacement......................................................................................... 5-128
Oil Pressure Switch and Temperature Sensor Troubleshooting ................................................................................. 5-153
Oil Pressure Switch and Temperature Sensors, Description/Operation of.................................................................. 5-145
Oil Pressure Switch Replacement ............................................................................................................................. 5-157
Oil Pump System Replacement ................................................................................................................................ 5-133
Outrigger Selector Valve Description, Replacement, and Repair ............................................................................... 3-115
Outrigger Stabilizer Cylinder Description and Replacement....................................................................................... 3-196
Outriggers Description............................................................................................................................................... 3-192
Outriggers Inspection ................................................................................................................................................ 3-195
Outriggers Installation ............................................................................................................................................... 3-195
Outriggers Removal .................................................................................................................................................. 3-193
Outriggers Theory of Operation................................................................................................................................. 3-193
P, Q
Park Brake Adjustment................................................................................................................................................ 3-60
Park Brake Inspection ................................................................................................................................................. 3-59
Park Brake Installation ................................................................................................................................................ 3-59
Park Brake Removal ................................................................................................................................................... 3-59
Pilot Operated Check Valve Assembly ...................................................................................................................... E-103
Pilot Operated Check Valve Cleaning and Inspection................................................................................................ E-103
Pilot Operated Check Valve Description.................................................................................................................... E-103
Pilot Operated Check Valve Description and Replacement ....................................................................................... 3-114
Pilot Operated Check Valve Disassembly ................................................................................................................. E-103
Pilot Operated Check Valve Maintenance ................................................................................................................. E-103
Pintle Hook Installation.............................................................................................................................................. 3-199
Pintle Hook Removal ................................................................................................................................................ 3-199
Pintle Hook Repair .................................................................................................................................................... 3-199
Piston and Rod Assemblies, Operation and Description of ........................................................................................ 5-165
Piston and Rod Assembly Installation (In-Chassis Overhaul)..................................................................................... 5-239
Piston and Rod Assembly Troubleshooting................................................................................................................ 5-177
Piston and Rod Disassembly (In-Chassis Overhaul) .................................................................................................. 5-231
Piston and Rod Removal (In-Chassis Overhaul)........................................................................................................ 5-222
Piston Pin Specifications........................................................................................................................................... 5-357
Piston Ring Gap Check ............................................................................................................................................. 5-357
Index-11
TM 10-3950-672-24-1
ALPHABETICAL INDEX
Subject
Page
P, Q - continued
Piston Rings Installation ............................................................................................................................................ 5-358
Piston Specifications ................................................................................................................................................. 5-356
Piston to Connecting Rod Installation ........................................................................................................................ 5-235
Planetary Gear Reducer Assembly............................................................................................................................ E-130
Planetary Gear Reducer Cleaning and Inspection ..................................................................................................... E-128
Planetary Gear Reducer Description ......................................................................................................................... E-128
Planetary Gear Reducer Description and Replacement ............................................................................................. 3-142
Planetary Gear Reducer Disassembly ....................................................................................................................... E-128
Planetary Gear Reducer Maintenance....................................................................................................................... E-128
Power Steering Pump Description/Troubleshooting ..................................................................................................... 3-83
Power Steering Pump Installation................................................................................................................................ 3-84
Power Steering Pump Removal .................................................................................................................................. 3-84
Power Steering Pump Testing ..................................................................................................................................... 3-84
Preliminary Servicing and Adjustment........................................................................................................................... 2-2
Pressing Parts General Maintenance ............................................................................................................................ 1-5
Pressure Regulator Valve Replacement .................................................................................................................... 5-129
Preventive Maintenance Checks and Services, Organizational ..................................................................................... 2-3
R
Radiator, Fans, and Shutters Troubleshooting............................................................................................................. 5-55
Radiator Installation .................................................................................................................................................... 3-38
Radiator Removal ....................................................................................................................................................... 3-36
Rear Access Cover Installation.................................................................................................................................. 3-203
Rear Access Cover Removal .................................................................................................................................... 3-203
Rear Crankshaft Seal, Operation and Description of ................................................................................................. 5-169
Rear Steer Axle Description ........................................................................................................................................ 3-67
References....................................................................................................................................................................A-1
Relief Valve Adjustment.............................................................................................................................................. 3-77
Relief Valves Description, Preparation, and Adjustment ............................................................................................ 3-108
Removal and Installation, General ................................................................................................................................ 1-4
Repair Parts, Special Tools, TMDE, and Support Equipment ........................................................................................ 2-1
Reporting Equipment Improvement Recommendations (EIRs)...................................................................................... 1-2
Reporting of Item and Packaging Discrepancies............................................................................................................ 1-1
Reports of Maintenance and Unsatisfactory Equipment................................................................................................. 1-1
Rocker Lever, Valve Stem, Push Rod, Tappet, and Camshaft Troubleshooting......................................................... 5-176
Rocker Levers and Pedestals Specifications ............................................................................................................. 5-361
Rocker Levers and Push Rods Replacement............................................................................................................. 5-190
Rough Idle (Irregularly Firing Or Engine Shaking) Troubleshooting ............................................................................. 5-17
S
Safety Instructions, General .......................................................................................................................................... 4-4
Schematics ................................................................................................................................................................... F-1
Index-12
TM 10-3950-672-24-1
ALPHABETICAL INDEX
Subject
Page
S - continued
Scope ........................................................................................................................................................................... 1-1
Sealants.................................................................................................................................................................... 5-369
Seat Assembly Installation ............................................................................................................................................ 3-2
Seat Assembly Removal ............................................................................................................................................... 3-2
Service Maintenance Packages ....................................................................................................................................E-1
Service Tools, Engine Testing................................................................................................................................... 5-316
Service Upon Receipt ................................................................................................................................................... 2-1
Shims, General Maintenance of .................................................................................................................................... 1-4
Short Term Storage, Engine...................................................................................................................................... 5-338
Shutdown Lever/Spring Replacement (Injection Pump)............................................................................................. 5-271
Shutdown Solenoid Replacement (Injection Pump) ................................................................................................... 5-266
Solenoid Valve Assembly.......................................................................................................................................... E-114
Solenoid Valve Description ....................................................................................................................................... E-114
Solenoid Valve Description and Replacement ........................................................................................................... 3-116
Solenoid Valve Disassembly ..................................................................................................................................... E-114
Solenoid Valve Maintenance..................................................................................................................................... E-114
Special Tools, Repair Parts, TMDE, and Support Equipment ........................................................................................ 2-1
Spotlight Installation.................................................................................................................................................. 3-227
Spotlight Removal..................................................................................................................................................... 3-227
Stabilizer (Outrigger) Cylinder Description, Replacement, and Repair ....................................................................... 3-131
Starting Motor Bench Test......................................................................................................................................... 3-246
Starting Motor Replacement...................................................................................................................................... 5-155
Starting Motor Test(ing)............................................................................................................................................. 3-243
Starting Motor Troubleshooting ................................................................................................................................. 5-147
Steer Cylinder Description and Replacement .............................................................................................................. 3-89
Steer Cylinder Description, Replacement, and Repair ............................................................................................... 3-128
Steer Pump Assembly................................................................................................................................................. E-90
Steer Pump Description .............................................................................................................................................. E-88
Steer Pump Disassembly ............................................................................................................................................ E-89
Steer Pump General ................................................................................................................................................... E-90
Steer Pump Inspection ................................................................................................................................................ E-90
Steer Pump Maintenance............................................................................................................................................ E-88
Steer Pump Troubleshooting....................................................................................................................................... E-88
Steering Control Valve Description and Replacement ................................................................................................. 3-85
Steering System Description and Repair ..................................................................................................................... 3-81
Steering System Maintenance..................................................................................................................................... 3-80
Supply Pressure and Return Circuit........................................................................................................................... 3-101
Surging (Engine Speed Change) Troubleshooting ....................................................................................................... 5-16
Swing Bearing Description, Replacement, and Repair............................................................................................... 3-143
Swing Motor Assembly.............................................................................................................................................. E-123
Swing Motor Cleaning and Inspection........................................................................................................................ E-123
Swing Motor Description............................................................................................................................................ E-119
Swing Motor Description and Replacement ............................................................................................................... 3-141
Swing Motor Disassembly ......................................................................................................................................... E-119
Index-13
TM 10-3950-672-24-1
ALPHABETICAL INDEX
Subject
Page
S - continued
Swing Motor Maintenance ......................................................................................................................................... E-119
Swing System Description and Troubleshooting ........................................................................................................ 3-136
Swing System Maintenance ...................................................................................................................................... 3-136
Swivels Maintenance ................................................................................................................................................ 3-176
T
Tappets Specifications .............................................................................................................................................. 5-186
Telescope Circuit Replacement and Troubleshooting ................................................................................................ 3-159
Telescope Cylinder Description, Replacement, and Repair ....................................................................................... 3-124
Temperature Sensor Replacement........................................................................................................................... .5-158
Thermostat Inspection................................................................................................................................................. 5-63
Thermostat Replacement ............................................................................................................................................ 5-62
Thermostat Troubleshooting........................................................................................................................................ 5-56
Timing Advance Assembly (Injection Pump) ............................................................................................................ .5-274
Timing Pin Assembly or Gasket Replacement........................................................................................................... 5-209
Timing Pin Installation............................................................................................................................................... 5-211
Tools Required to Repair the B Series Engine.......................................................................................................... .5-348
Torque Specification ................................................................................................................................................. 5-364
Torque Value Charts .....................................................................................................................................................D-1
Torquing Turntable Bolts ........................................................................................................................................... 3-143
Transmission Assembly............................................................................................................................................... E-54
Transmission Assembly Procedures............................................................................................................................ E-43
Transmission (Automatic C-6) Description, Replacement, and Repair ......................................................................... 3-44
Transmission Cleaning and Inspection ........................................................................................................................ E-41
Transmission Description ............................................................................................................................................ E-20
Transmission Disassembly and Assembly (Subassemblies) ........................................................................................ E-45
Transmission Disassembly (Major Component Removal)............................................................................................ E-43
Transmission General Overhaul Information ............................................................................................................... E-40
Transmission Lubrication............................................................................................................................................. E-56
Transmission Maintenance.......................................................................................................................................... E-20
Transmission Shift Modulator Adjustment ................................................................................................................... 3-57
Transmission Shifting Lever Adjustment ..................................................................................................................... 3-62
Transmission Shifting Lever Assembly........................................................................................................................ 3-62
Transmission Troubleshooting..................................................................................................................................... E-20
Transportation Discrepancy Report ............................................................................................................................... 1-1
Troubleshooting, Symptoms of...................................................................................................................................... 5-9
Turnsignal Light (Front) Installation ........................................................................................................................... 3-229
Turnsignal Light (Front) Removal .............................................................................................................................. 3-229
Typical External Circuit, Description/Operation of ..................................................................................................... 5-144
Index-14
TM 10-3950-672-24-1
ALPHABETICAL INDEX
Subject
Page
U
U-Joint Bearing Removal ............................................................................................................................................ 3-72
U-Joint Installation ...................................................................................................................................................... 3-72
Unpacking of Equipment ............................................................................................................................................... 2-1
V
Valve Grinding Specifications ................................................................................................................................... 5-360
Valve Guide Specifications ....................................................................................................................................... 5-358
Valve Seat Grinding Specifications ........................................................................................................................... 5-360
Valve Seats, Grinding of ........................................................................................................................................... 5-251
Valve Seats Specifications........................................................................................................................................ 5-359
Valve Springs Inspection........................................................................................................................................... 5-255
Valve Springs Specifications ..................................................................................................................................... 5-359
Valve Train and Head Assembly Troubleshooting ..................................................................................................... 5-169
Valve Train Specifications......................................................................................................................................... 5-185
Valve Usage Table.................................................................................................................................................... 3-106
Valves (General) ....................................................................................................................................................... 3-106
Valves, Grinding ....................................................................................................................................................... 5-250
Vane Type Motor Assembly ...................................................................................................................................... E-150
Vane Type Motor Cleaning and Inspection ................................................................................................................ E-148
Vane Type Motor Description .................................................................................................................................... E-145
Vane Type Motor Description and Replacement........................................................................................................ 3-189
Vane Type Motor Disassembly.................................................................................................................................. E-146
Vane Type Motor Maintenance.................................................................................................................................. E-145
Vane Type Motor Theory of Operation ...................................................................................................................... E-145
Vane Type Motor Troubleshooting............................................................................................................................. E-145
Vent Fitting/Sealing Washer Inspection/Replacement(lnjection Pump)...................................................................... 5-268
Vibration Damper, Cleaning and Inspection............................................................................................................... 5-303
Vibration Damper Specifications ............................................................................................................................... 5-356
W, X, Y, Z
Water (Coolant) Pump Troubleshooting ...................................................................................................................... 5-54
Water Cooling System Antifreeze ............................................................................................................................... E-18
Water Cooling System Cleaning.................................................................................................................................. E-15
Water Cooling System Component Inspection ............................................................................................................ E-16
Water Cooling System Coolant Filter .......................................................................................................................... E-18
Water Cooling System Coolant Recommendations ..................................................................................................... E-18
Water Cooling System Description.............................................................................................................................. E-12
Water Cooling System Description and Maintenance .................................................................................................. 3-35
Water Cooling System (General)................................................................................................................................. E-14
Water Cooling System Maintenance ........................................................................................................................... E-12
Water Cooling System Pressure Flushing ................................................................................................................... E-16
Water Cooling System Rust Prevention ...................................................................................................................... E-15
Index-15
TM 10-3950-672-24-1
ALPHABETICAL INDEX
Subject
Page
W, X, Y, Z - continued
Water Cooling System Seasonal Care ........................................................................................................................ E-15
Water Cooling System Test Equipment....................................................................................................................... E-17
Water Cooling System Troubleshooting ...................................................................................................................... E-12
Water Pump Replacement .......................................................................................................................................... 5-61
Wheels and Tires Description...................................................................................................................................... 3-79
Windshield Wiper and Washer Installation ·.................................................................................................................. 3-6
Windshield Wiper and Washer Removal....................................................................................................................... 3-6
Wire Rope Inspection................................................................................................................................................ 3-165
Wire Rope Lubrication............................................................................................................................................... 3-164
Wire Rope Replacement ........................................................................................................................................... 3-167
Wires and Cables, General Maintenance of .................................................................................................................. 1-5
Index-16
TM 10-3950-672-24-1
Figure FO-1. Electrical Schematic (Sheet 1 of 3).
FP-1/(FP-2 blank)
TM 10-3950-672-24-1
Figure FO-1. Electrical Schematic (Sheet 2 of 3).
FP-3/(FP-4 blank)
TM 10-3950-672-24-1
Figure FO-1. Electrical Schematic (Sheet 3 of 3).
FP-5/(FP-6 blank)
TM 10-3950-672-24-1
Figure FO-2. Hydraulic Schematic.
FP-7/(FP-8 blank)
The Metric System and Equivalents
Linear Measure
Liquid Measure
1 centiliter = 10 milliters = .34 fl. ounce
1 deciliter = 10 centiliters = 3.38 fl. ounces
1 liter = 10 deciliters = 33.81 fl. ounces
1 dekaliter = 10 liters = 2.64 gallons
1 hectoliter = 10 dekaliters = 26.42 gallons
1 kiloliter = 10 hectoliters = 264.18 gallons
1 centimeter = 10 millimeters = .39 inch
1 decimeter = 10 centimeters = 3.94 inches
1 meter = 10 decimeters = 39.37 inches
1 dekameter = 10 meters = 32.8 feet
1 hectometer = 10 dekameters = 328.08 feet
1 kilometer = 10 hectometers = 3,280.8 feet
Square Measure
Weights
1 sq. centimeter = 100 sq. millimeters = .155 sq. inch
1 sq. decimeter = 100 sq. centimeters = 15.5 sq. inches
1 sq. meter (centare) = 100 sq. decimeters = 10.76 sq. feet
1 sq. dekameter (are) = 100 sq. meters = 1,076.4 sq. feet
1 sq. hectometer (hectare) = 100 sq. dekameters = 2.47 acres
1 sq. kilometer = 100 sq. hectometers = .386 sq. mile
1 centigram = 10 milligrams = .15 grain
1 decigram = 10 centigrams = 1.54 grains
1 gram = 10 decigram = .035 ounce
1 decagram = 10 grams = .35 ounce
1 hectogram = 10 decagrams = 3.52 ounces
1 kilogram = 10 hectograms = 2.2 pounds
1 quintal = 100 kilograms = 220.46 pounds
1 metric ton = 10 quintals = 1.1 short tons
Cubic Measure
1 cu. centimeter = 1000 cu. millimeters = .06 cu. inch
1 cu. decimeter = 1000 cu. centimeters = 61.02 cu. inches
1 cu. meter = 1000 cu. decimeters = 35.31 cu. feet
Approximate Conversion Factors
To change
To
inches
feet
yards
miles
square inches
square feet
square yards
square miles
acres
cubic feet
cubic yards
fluid ounces
pints
quarts
gallons
ounces
pounds
short tons
pound-feet
pound-inches
Multiply by
centimeters
meters
meters
kilometers
square centimeters
square meters
square meters
square kilometers
square hectometers
cubic meters
cubic meters
milliliters
liters
liters
liters
grams
kilograms
metric tons
Newton-meters
Newton-meters
2.540
.305
.914
1.609
6.451
.093
.836
2.590
.405
.028
.765
29,573
.473
.946
3.785
28.349
.454
.907
1.356
.11296
To change
ounce-inches
centimeters
meters
meters
kilometers
square centimeters
square meters
square meters
square kilometers
square hectometers
cubic meters
cubic meters
milliliters
liters
liters
liters
grams
kilograms
metric tons
To
Newton-meters
inches
feet
yards
miles
square inches
square feet
square yards
square miles
acres
cubic feet
cubic yards
fluid ounces
pints
quarts
gallons
ounces
pounds
short tons
Temperature (Exact)
°F
Fahrenheit
temperature
5/9 (after
subtracting 32)
Celsius
temperature
°C
Multiply by
.007062
.394
3.280
1.094
.621
.155
10.764
1.196
.386
2.471
35.315
1.308
.034
2.113
1.057
.264
.035
2.205
1.102
PIN: 075558-000
This fine document...
Was brought to you by me:
Liberated Manuals -- free army and government manuals
Why do I do it? I am tired of sleazy CD-ROM sellers, who take publicly
available information, slap “watermarks” and other junk on it, and sell it.
Those masters of search engine manipulation make sure that their sites that
sell free information, come up first in search engines. They did not create it...
They did not even scan it... Why should they get your money? Why are not
letting you give those free manuals to your friends?
I am setting this document FREE. This document was made by the US
Government and is NOT protected by Copyright. Feel free to share,
republish, sell and so on.
I am not asking you for donations, fees or handouts. If you can, please
provide a link to liberatedmanuals.com, so that free manuals come up first in
search engines:
<A HREF=http://www.liberatedmanuals.com/>Free Military and Government Manuals</A>
– Sincerely
Igor Chudov
http://igor.chudov.com/