1
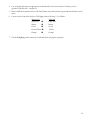
CALIFORNIA SIDECAR
TRIKE CONVERSION KIT
INSTALLATION INSTRUCTIONS
VALKYRIE
FOR INSTALLATION ASSISTANCE, CALL PARTS & TECHNICAL SUPPORT@
(434) 263 - 8866
TABLE OF CONTENTS
SECTION
PAGE
Table of Contents
2
Introduction
3
Parts List
4
Accessory Parts List
6
Step 1. Preparing the Motorcycle
7
Step 2. Removing the Rear Wheel and Swing Arm
7
Step 3. Installing the New Swing Arm
7
Step 4. Installing the Rear End
8
Step 5. Installing the Air Shock Mounting Bracket
8
Step 6. Installing the Body Frame
8
Step 7. Installing the Progressive Shocks to the Motorcycle Frame
9
Step 8. Installing the Shocks to the Swing Arm
9
Step 9. Modifying the Exhaust System
9
Step 10. Installing the Air Shock Hose Tubing
9
Step 11. Installing the Body
10
Step 12. Installing Corbin seat
10
Step 12-A. Installing O.E.M. seat
10
Step 13. Installing the Wheels
10
Step 14. Installing the Passenger Foot Rests
10
Step 15. Installing the Wiring
11
2
INTRODUCTION
DISCLAIMER - These instructions assume a level of understanding of motorcycle repair and
maintenance beyond that of a “beginner” or “novice”, and California Sidecar cannot be liable for an
installer’s failure to understand or follow these instructions as written. Likewise, California Sidecar
cannot be responsible if any of the steps are omitted or shortcuts are taken, or parts other than those
supplied by CSC, are used in installing this trike conversion kit.
“WARNINGS” are printed in bold type. PLEASE USE EXTREME CARE so as not to damage the
part, the motorcycle, or yourself!!
ALWAYS wear safety glasses when working with hand and power tools, and when working with or
around any harmful or hazardous materials! Additionally, when working in and around the fuel
system, ALWAYS work in a well ventilated area free from sparks and open flames!
DIRECTIONAL REFERENCES
- All references to “right” and “left” side are as if one is seated on the motorcycle.
- All references to “forward” mean toward the front of the motorcycle while “back” means toward the
rear of the motorcycle unless otherwise stated.
SAVING AND DISCARDING PARTS - During installation, if parts are intended to be “saved” for
later use, they are marked “SAVE” in italics. If removed parts are not marked “SAVE”, they may be
discarded.
LIST OF TOOLS AND EQUIPMENT - This list contains only those items that might be construed
as out of the ordinary for someone repairing a motorcycle. A COPY OF THE O.E.M SERVICE
MANUAL IS ESSENTIAL TO THIS INSTALLATION.
Trike Installation
5/16” drill bit
Flat Black Spray Paint
Floor Jack
Ring Pliers
Silicone Sealer
Super Glue
Teflon Sealing Tape
Trailer Hitch Installation
1/8 X 8” or 3/16 X 8” drill bit
IMPORTANT NOTE TO INSTALLING DEALER:
Please forward the Owner Info Pack on to the purchaser of this product. It contains valuable
information for the end-user of this product.
3
CALIFORNIA SIDECAR
VALKYRIE TRIKE CONVERSION KIT
PARTS LIST
1.)
BODY FRAME
4 - 5/16-18 X 3 HHCS
8 - 5/16 USS Flat Washer
6 - 5/16-18 Nyloc Nut
2 - 5/16-18 x 1 HHCS
2 - 5/16 Fender Washer
2 - Air Shock Front Mounting Bracket
2 - 3/8-16 x 1-1/4 HHCS
4 - 3/8 SAE Flat Washer
2 - 3/8-16 Nyloc Nut
2 - Air Shock Rear Mount Bracket
2 - 3/8 x 18 x 1-1/4 HHCS
4 - 3/8 SAE Flat Washer
2 - 3/8-16 Nyloc Nut
4 - M10 x 1.25 x 35 SHCS
4 - M10 Flat Washer
2.)
AIR SHOCK MOUNT
1 - Valkyrie air shock mount
1 - Honda O.E.M. air shock
1 - Air shock filler line kit (see 2-A)
1 - 5/8-18 x 2-1/2 HHCS
1 - 5/8-18 Nyloc Nut
1 - M14 x 1.50 x 55 HHCS
1 - M14 x 1.50 Nyloc Nut
2 - M10 x 1.25 x 80 HHCS
4 - M10 x 1.25 Nyloc Nut
2 - M10 x 1.25 x 100 HHCS
16 - M10 Flat Washer
3.)
SPRING SHOCKS
1 - Spanner wrench
2 - Progressive shock
2 - 5/8-18 x 2-1/4 HHCS
2 - 5/8-18 Nyloc Nut
4.)
SWING ARM ASSEMBLY
2-A.) AIR SHOCK FILLER LINE KIT
1 - Black air tubing (3’ X 1/8”)
1 - Adapter shock to air tube with O ring
1 - Bag consisting of:
1 - Ferrel Nut
1 - Ferrel
2 - O-ring
1 - Air filler assembly
1 - Needle valve S/S with cap
2 - 5/16 Flat Washer S/S
1 - Needle valve jam nut
1 - Brass adapter needle valve to air tube
1 - Brass compression sleeve
1 - Brass compression nut
2 - Swing arm pivot bolts (left + right)
5.)
FINAL DRIVE UNIT
8 - ½-20 Nyloc Nut for Ford rear drive unit
1 - Drive shaft, fitted with:
1 - Yoke
1 - U-joint
1 - O.E.M front U-joint and yoke (modified)
1 - Box of Neapco #1-0189, 2 U-bolts, 4 Nuts and 4 Lock Washers
6.)
EXHAUST SYSTEM - STANDARD
EXHAUST SYSTEM - OPTIONAL
4
2 - Hanger mounts, chrome fitted with:
2 - 5/16-18 X 1-3/4 HHCS
4 - 5/16 SAE Flat Washer S/S
2 - 5/16-18 Nyloc Nut
2 - 3/8-24 x 1 HHCS
2 - 3/8-24 Nyloc Nut
See Accessory List
7.)
BRAKE LINE SYSTEM
1 - 2-piece Braided steel brake line
1 - M10 X 1.25 single banjo bolt
1 - 2 lb. residual valve
8.)
WHEELS & TIRES
8 - ½-20 tapered lug nut
9.)
PASSENGER FOOT REST
2 - foot rest mount plate
4 - 3/8-16 x 1-1/2 Button socket head bolts S/S
4 - 3/8-16 nyloc nut
2 - M10 x 1.25 x 40 hex head cap screw
2 - M10 Lock washer
10.)
MISCELLANEOUS
INSTRUCTIONS
CORE PARTS LIST
5
ACCESSORY PARTS LIST
1.)
TRAILER HITCH
1 - Receiver hitch plate
6 - 5/16-18 x 1 HHCS
6 - 5/16-18 Nyloc Nut
12 - 5/16 SAE Flat Washer S/S
1 - Receiver tongue, chrome
1 - Receiver pin
1 - Receiver pin clip
1 - 1-7/8 Chrome ball with lock washer and nut
2.)
CHROME EXHAUST PIPE EXTENSIONS
2 - Turn down extensions, chrome
2 - ¼-20 x 1 HHCS
2 - ¼-20 Nyloc Nuts
2 - 3/8-24 x 1 HHCS
2 - 3/8-24 Nyloc Nut
6
CALIFORNIA SIDECAR
VALKYRIE TRIKE CONVERSION KIT
INSTALLATION INSTRUCTIONS
STEP 1: PREPARING THE MOTORCYCLE
Remove all of the following items (refer to service manual):
Rider and passenger seat and back rest. Side stand, exhaust system, drivers foot rests and passenger
foot rests and support brackets, and both side covers.
STEP 2: REMOVING REAR WHEEL / SWING ARM (refer to service manual)
1.
2.
3.
4.
5.
6.
7.
8.
9.
10.
Drain brake fluid
Remove back half of rear fender
Leaving wires as long as possible cut off and save electrical plug from rear section of fender.
Remove rear wheel, final drive unit, caliper and brake line to master cylinder
Remove both shocks
Remove both swing arm pivot bolts and save lock nut
Remove U-joint boot from engine case and save
Remove swing arm
Remove C-clip, spring and cup washer from drive shaft and save
Save front U-joint and yoke to be returned to California Sidecar as core parts
STEP 3: INSTALLATION OF SWING ARM
1.
2.
3.
4.
5.
6.
7.
Install C-clip, spring and cup washer to new drive shaft. Lightly grease spring and spines of the new
drive shaft.
Place drive shaft through swing arm and install new front U-joint and yoke. Be certain that the
alignment marks do line up properly.
Lightly compress and tie both U-joints together with wire through frame
Install U-joint dust cover to swing arm.
Install swing arm onto bike frame using new swing arm pivot bolts.
Torque to Honda specs listed below:
Do not loosen or cut wire (Step 3.3 above) holding drive shaft.
STEP 4: INSTALLATION OF REAR END
NOTE REAR END IS SHIPPED DRY REFER TO STEP 7
1. Move rear end into position with the swing arm.
2. Install eight ½-20 nyloc nuts and torque to 55 lbs.
7
3. Cut and remove wire. (Make certain that the bearing offsets in the yoke and the U-joint are properly
aligned). Install U-bolts to rear drive yoke and torque to 20 lbs.
4. Route braided brake line forward from T-fitting around to right side of frame and attach to master
cylinder using OEM banjo bolt.
5. Using 12” wire ties, tie brake line to swing arm in at least 4 places and make sure it is clear of all
obstructions and or areas where it could be damaged or pinched.
6. Using DOT 4 brake fluid bleed all air from brake lines.
7. Add 3 pints or 1 ½ quarts of 80-90 wt. gear oil to final drive unit.
8. Grease rear U-joint.
9. Push front U-joint dust boot back over output shaft and on to engine case.
STEP 5: INSTALLATION OF AIR SHOCK MOUNT
1. Using a 25/64 drill bit, drill completely through the frame on both sides at the front and rear hole
where the passenger backrest was mounted.
2. Install air shock to mount with filler pipe pointing forward to front of bike. Be certain the clevis on
the air shock mount points to front of bike.
3. Install air line adapter with air tube to air shock.
4. Place air shock and mount into position, make certain the air line opening on shock is facing the
front of bike.
5. Install FRONT air shock mount bolts in the following sequence:
M10 x 1.25 x 80 bolt, (1) M10 washer, body hanger, (3) M10 washers, then position bolt through
motorcycle frame and air shock mount and fasten with M10 x 1.25 nyloc nut.
a. Repeat step 5 for the other side of bike.
b. Install REAR air shock mount bolts in the following sequence:
M10 x 1.25 x 100 bolt, (1) M10 washer inserted through the chrome fender rail, then through the
fender, through the hanger bracket, and finally through the air shock mount. Add (3) M10 washers
and fasten with M10 x 1.25 nyloc nut
c. Repeat step 5-b. for the other side of bike.l
8
STEP 6: INSTALLING THE BODY FRAME
1. Place body frame into position.
2. Install four chrome M10 x 1.25 x 35 socket head bolts with four M10 washers, through holes (2 on
each side) where passenger footrest brackets were mounted. Torque to 55 lbs.
3. Install all eight 3/8 -24 x 1¼ Gr.8 bolts, each with two 3/8 SAE flat washers and one 3/8-24 nyloc nut,
connecting the body hanger brackets front and rear to body frame. Torque to 40 lbs.
STEP 7: INSTALLING THE PROGRESSIVE SHOCKS TO THE MOTORCYCLE FRAME
Before installing the Progressive shocks it necessary to set the “preload”. These shocks come from
the factory set at their lowest rebound setting and can be adjusted higher from the lowest setting to
the highest. This is performed by placing the bottom of the shock in a vise and, using the spanner
wrench provided with the kit, rotating the adjusting can on the bottom of the shock. Rotating
clockwise increases the preload, and rotating counter-clockwise decreases the preload. These may
need to be adjusted several times to suit rider preferences.
STEP 8: INSTALLING SHOCKS TO SWING ARM
1. Place a jack under final drive unit and raise so bottom of shocks align with the holes in the clevis
brackets of swing arm.
2. Place the two 5/8-18 x 2¼ Gr.8 bolts through clevis and shock. Fasten with two 5/8-18 nyloc nuts
and torque to 55 lbs.
3. Fasten air shock to swing arm with M14 x 1.50 x 55 bolt and M14 x 1.50 nyloc nut and torque to 55
lbs.
STEP 9: MODIFYING THE EXHAUST SYSTEM
1. Remove chrome covers from each side of the exhaust pipes, to expose the individual exhaust tubes
where they fit into the muffler.
2. Place a jack under final drive unit and raise so exhaust system can be reinstalled and tighten all
exhaust bolts at cylinder head and torque to 16 lbs.
3. Using an oxy / acetylene torch with a rose bud tip, carefully heat all three pipes equally until they are
red hot. When they are sufficiently hot insert a long metal pipe into the muffler to bend mufflers
down 2” on both right and left sides. Be careful not to burn a hole through the exhaust pipe.
4. On right side re-heat same three exhaust tubes and again using metal pipe bend muffler out away
from center of bike about 2”. Again, be careful not to burn a hole in the exhaust pipe. It will be
necessary to tie the motorcycle down and elevate the final drive unit enough for the mufflers to fit
into their proper position.
5. If exhaust extensions are not being used, install muffler hanger brackets now.
9
a) Slide hanger mounts on from back and join to trike body frame mount with two 3/8-24 x 1” bolts
and two 3/8-24 nyloc nuts. Do not tighten YET.
a. Tighten all clamps and rear hanger brackets.
6. If exhaust extensions are to be used remove left and right tail pieces and install extensions to
mufflers.
7. If mufflers do not clear final drive unit or do not align to body frame muffler tabs, repeat steps 9.3
and 9.4.
STEP 10: INSTALLING AIR SHOCK AIR HOSE TUBING
1. Route air shock inlet tube to left side of front panel where the seat key release is and drill 5/16 hole
and insert air shock inlet valve and tighten with nut supplied.
STEP 11: INSTALLATION OF BODY
1.
2.
3.
4.
Be sure all previous steps are complete.
Place body on frame in a downward motion from above bike.
Align body on bike.
Drill six 5/16 holes through body using holes in body frame as guide. Be certain to pull inside trunk
carpet out of the way of the holes to be drilled.
5. Fasten body using the following bolts:
Rear – four 5/16-18 x 2 ¾ with eight 5/16 USS flat washers + four 5/16-18 nyloc nuts.
Front – two 5/16-18 x 1 with two 5/16 x 1 ½ fender washers + two 5/16-18 nyloc nuts.
10
STEP 12: INSTALLATION OF CORBIN SEAT
(Note: The CSC Valkyrie Trike Conversion Kit is designed to use a Corbin seat with no
modifications necessary. If you are using the O.E.M. seat, refer to step 12-A.)
1. Follow installation instructions provided with the Corbin seat.
STEP 12-A: INSTALLATION OF O.E.M. SEAT
1. After completing step 11, place O.E.M. seat into position. Mark with marker on both the left and
right side where it contacts the body.
2. Turn seat upside down and remove the staples between the two marks on each side from previous
step. Then, fold seat material back to expose inner plastic shell.
3. Connect two marks in an upward crescent moon shape with marker, removing about 3/8” of the
plastic and foam material. Fold material over and test with a trial fit. If seat does not fit, repeat step 3
and remove more material until seat front snaps into lock.
4. Fold seat material back around shell tightly and re-staple.
5. Re-install seat to motorcycle.
STEP 13: INSTALLATION OF WHEELS
1. Install wheels with lug nuts provided and torque to 70 lbs. Re-check after 25 miles.
2. Install center caps with CSC logo.
3. Inflate tires to 20-25 lbs. of air pressure.
STEP 14: INSTALLATION OF PASSENGER FOOT RESTS
NOTE: The footrest can be placed in either of two positions depending on which is more comfortable for
the passenger.
1. Position footrest plates on body frame just in front of fender with top of plate flush with top of body
frame.
2. Mark the two holes and drill out with 3/8 drill bit.
3. Install two 3/8-16 x 1 ½ button socket head bolts through foot rest plate and body frame. Next
install 3/8-16 nyloc nuts and torque to 20 lbs.
4. Repeat the above procedure for the opposite side.
5. Fasten foot rest to plate with M10 x 1.25 x 40 and M10 lock washer and tighten.
STEP 15: WIRING
1. Drill 3/4” hole next to or beside OEM hole where factory wiring goes though fender.
2. Install rubber grommet (provided) into hole drilled in previous step.
3. Route red and black 10 gauge wire through grommet to the battery.
11
4. Cut to length and crimp an appropriate terminal end to wire and connect to battery, red to +
(positive) and black to - (negative).
5. Route small black antenna wire to the body frame (anywhere) and wrap around metal frame several
times.
6. Connect wires from trike body to OEM plug removed in Step 2-3 as follows:
Motorcycle
Trike Kit
Light Blue Light Blue
Brown
Brown
Green
Green
Green/Yellow Yellow
Orange
Orange
7. Check all lighting on the motorcycle and trike body for proper operation.
12