1
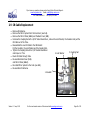
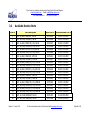
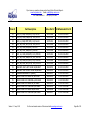
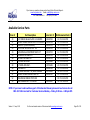
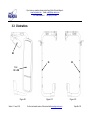
If you have any questions, please contact Lang-Mekra Technical Support. www.lang-mekra.com Email: [email protected] Tel: 1-888-MEKRA-4-U Fax: (803) 337 5265 Volvo 2005 Aero Mirror System Service Manual Version 3 June, 2012 For the most recent version of this manual visit www.lang-mekra.com. Page 1 of 32 If you have any questions, please contact Lang-Mekra Technical Support. www.lang-mekra.com Email: [email protected] Tel: 1-888-MEKRA-4-U Fax: (803) 337 5265 Page Table of Contents Product Features, Customer Support 3 Chapter 1 Disassembly Instructions 1.1 Removal of Mirror System 1.2 Removal of Third Arm Assembly 1.3 Removal of Look-Down Mirror Assembly 1.4 Mirror Glass Plate Exchange 1.4.1 Removing Mirror Glass Plate 1.4.2 Installing Mirror Glass Plate 1.5 Removing or Installing the Back Cover 1.6 Removing, Installing or Adjusting the Mirror Housing 1.6.1 To Remove Mirror Housing 1.6.2 To Install Mirror Housing 1.6.3 To Adjust Mirror Head 1.7 General Maintenance and Cleaning Tips 4 5 5 6 7 8, 9 10 11 12 12 Chapter 2 Trouble Shooting 2.1 2.2 2.3 Fold-Away Feature Electrical Mirror Movement Analysis Mirror Movement Analysis Flowchart For Electrical Adjustment Version 3 June, 2012 Page 2.4 Actuator or Main Manual Base Assembly Replacement (Infield Repair) 2.5 Convex Manual Adjustment Kit Replacement 2.6 2.7 2.8 2.9 2.10 2.11 Bracket Assembly Replacement Wiring Diagram & Electrical Facts Control Cable Replacement CB Cable Replacement Mirror Heat Analysis Flowchart Mirror Heat Analysis 16 17 18 19 20 21 22 23 Chapter 3 Warranty/ Other Information 3.1 3.2 3.3 3.4 3.5 Warranty Coverage Available Service Parts Illustrations Actuator Identification Optimal driving position 24 25-27 28-30 31 32 13 14 15 For the most recent version of this manual visit www.lang-mekra.com. Page 2 of 32 If you have any questions, please contact Lang-Mekra Technical Support. www.lang-mekra.com Email: [email protected] Tel: 1-888-MEKRA-4-U Fax: (803) 337 5265 Product Features \ Customer Support Replaceable Components Minimal Diagnosis & Repair Time Spring-Loaded Fold Away Bracket Feature Remote Control Main Mirror Self-Regulating Heaters Look-Down Mirror on Passenger Side Toll-Free Support Hotline: 1-888-635-7248 Web-Accessible Service Manuals & Product Updates www.lang-mekra.com E-Mail: [email protected] Fax: (803) 337-5265 Lang Mekra Mirror Test Box Part # 90 472 0100-PDC Diagnostic Tool for: - - Mirror Actuators Mirror Heaters These Products may be the subject of Pending U.S. Patent Applications or may be covered by, but not limited to, one or more of the following U.S. Patents: 4,991,950; 5,110,196; 5,196,965; 5,621,577; 5,615,054; 5,583,703; 5,687,035; 5,880,895; 5,938,166; 6,007,446; 6,092,778; 6,283,863; D460,393; 6,793,357; 6,814,336 Version 3 June, 2012 For the most recent version of this manual visit www.lang-mekra.com. Page 3 of 32 If you have any questions, please contact Lang-Mekra Technical Support. www.lang-mekra.com Email: [email protected] Tel: 1-888-MEKRA-4-U Fax: (803) 337 5265 1.1 Removal of Mirror System Remove Antenna from Antenna Base Disengage Third Arm from Bracket Receiver ( see 1.2 page 5). Loosen (do not remove) 2 Bolts from Upper Holder using a T-40 driver. Be sure to hold the Mirror steady to prevent damage or personal injury. Important: DO NOT use the Third Arm as a handle to hold or carry the Mirror! Remove the 3 Bolts from the Lower Holder from inside the door hinge, using a T-40 driver. Gently pull the Lower Holder away from the door to expose the Control Harness & CB Cable, disconnect both Supporting the weight of the Mirror System carefully, remove the 2 loosened Bolts from the Upper Holder. The Mirror System is now free. Third Arm CB Antenna Third Arm Look-Down Mirror Lower Holder Figure # 2 Receiver Mount Figure #1 Version 3 June, 2012 Upper Holder Note: To re-install the complete Mirror System, follow the instruction above in the reverse order. For the most recent version of this manual visit www.lang-mekra.com. Page 4 of 32 If you have any questions, please contact Lang-Mekra Technical Support. www.lang-mekra.com Email: [email protected] Tel: 1-888-MEKRA-4-U Fax: (803) 337 5265 1.2 Removal of Third Arm Assembly To disengage the Third Arm from the Mirror System, move the whole Mirror System forward until the Third Arm slides out of the Receiver. To Remove the Third Arm Assembly from the truck, remove the two Bolts with a T-40 driver. Be sure to hold the Third Arm steady to prevent damage or personal injury. Third Arm Assembly Figure #3 Look Down Mirror Figure #4 Important! DO NOT use the Third Arm as a handle to hold or carry the Mirror! 1.3 Removal of Look-Down Mirror Assembly To remove the Look-Down Mirror Assembly, follow the same step as the Third Arm Assembly (1.2). Note: No tools are required to adjust the LookDown Mirror. When attached to the truck, you can adjust the Mirror Head manually (up/down and rotational). Note: To re-install the Third Arm or Look-Down Mirror, follow the instruction above in the reverse order. Version 3 June, 2012 For the most recent version of this manual visit www.lang-mekra.com. Page 5 of 32 If you have any questions, please contact Lang-Mekra Technical Support. www.lang-mekra.com Email: [email protected] Tel: 1-888-MEKRA-4-U Fax: (803) 337 5265 1.4 Mirror Glass Plate Exchange 1.4.1 Removing Mirror Glass Plate Your Lang-Mekra Mirror System is equipped with a durable Mirror Glass Plate. The Mirror Glass Plate is reinforced with anti-shatter material to minimize splintering in the event of breakage. We strongly recommend the prompt replacement of damaged Mirror Glass. To remove the Mirror Glass Plates follow the instructions to the right. Note: It will be easier to begin with the Main Mirror Plate and then remove the Convex Mirror Plate. Figure #5 1. Actuate mirror down electrically or manually. 2. While applying firm steady pressure on mirror plate with your hand, slide it up. Reminders: Be careful not to damage the electrical Wiring or the Heater Connections when changing the Mirror Glass Plate, especially when disconnecting Heater Wires from the Mirror Glass Plate. Make sure you pull or push on the Wire Terminal, rather than the Wire itself. 3. When disengaged, carefully lift mirror plate to expose heater wires. Disconnect wires by pulling on wire terminal cover. Way of Movement Note: The procedure is the same for both Main and Convex Mirror Plates. Version 3 June, 2012 For the most recent version of this manual visit www.lang-mekra.com. Page 6 of 32 If you have any questions, please contact Lang-Mekra Technical Support. www.lang-mekra.com Email: [email protected] Tel: 1-888-MEKRA-4-U Fax: (803) 337 5265 1.4.2 Installing Mirror Glass Plate To install the Mirror Plates follow the instructions to the right (it is opposite of Mirror Plate removal). Note: Always begin by installing the Convex Convex Mirror Plate and then attach the Main Mirror Plate. Reminders: When attaching the Mirror Plate, be sure to match the Locking Teeth on the Socket Plate with the locking tabs on the mirror plate. When attaching the Heater Wires, be sure to push on the Wire Terminals. Do not push or pull on the Wires. Keep Wires free of Socket Plate; do not pinch them between Socket Plate and Mirror Plate Note: The procedure is the same for both Main and Convex Mirror Plates. Figure #6 1. For Heated Mirror System, attach Wire Terminal to back of new Mirror Glass Plate. Actuate Socket Plate down, install Mirror Plate (Align Teeth). 2. While applying hand pressure on Mirror Plate, slide it down to engage locking teeth Heater Wire Terminals 3. Re-Position Mirror to driving position Locking Tabs on Mirror Plate Locking Teeth on Socket Plate Version 3 June, 2012 For the most recent version of this manual visit www.lang-mekra.com. Page 7 of 32 If you have any questions, please contact Lang-Mekra Technical Support. www.lang-mekra.com Email: [email protected] Tel: 1-888-MEKRA-4-U Fax: (803) 337 5265 1.5 Removing or Installing the Back Cover Removing the Back Cover Remove both Mirror Plates according to 1.4.1. Disengage the 3 outboard and 3 inboard Retaining Clips (see picture below) by starting at one end and push each clip towards the edge of the mirror housing and down to create separation between the Back Cover and the Mirror Housing. Each Clip must be disengaged and enough separation created to not allow it to pop back into place. Separation between the Back Cover and the Mirror Housing along the outboard edge must be sufficient to allow grasping both parts along their edges with the fingertips of each hand. Pull both parts firmly away from each other until a loud “pop” is heard when the inboard Clips separate. The Back Cover may then need to be shifted away from the CB Coupling Nut if present to allow complete removal. a.) b.) c.) Version 3 June, 2012 For the most recent version of this manual visit www.lang-mekra.com. Page 8 of 32 If you have any questions, please contact Lang-Mekra Technical Support. www.lang-mekra.com Email: [email protected] Tel: 1-888-MEKRA-4-U Fax: (803) 337 5265 Installing the Back Cover Insert the CB Coupling Nut into the Back Cover hole if present.(see picture) Align the Back Cover with the Mirror Housing and begin pressing the Back Cover into place along the inboard or tube side edge engaging each of the 3 inboard Clips. Push the flange at each outboard corner of the Back Cover inward and tuck inside the outside edge of the Mirror Housing. After both corners are tucked in, squeeze both parts together along the outboard edge to engage the remaining 3 outboard Clips. Reinstall both Mirror Plates according to 1.4.2. Version 3 June, 2012 For the most recent version of this manual visit www.lang-mekra.com. Page 9 of 32 If you have any questions, please contact Lang-Mekra Technical Support. www.lang-mekra.com Email: [email protected] Tel: 1-888-MEKRA-4-U Fax: (803) 337 5265 1.6 Removing, Installing or Adjusting the Mirror Housing 1.6.1 To Remove Mirror Housing Remove the Mirror System from the truck according to 1.1. Remove Mirror Glass Plates according to 1.4.1. Remove Back Cover according to 1.5. At first pull the ends of the CB Cable back through the Lower Tube section and out of the tube. Take in the same manner the Control Harness off. Using a 6 mm Allen Wrench, remove the 4 main Bolts (a) that go through the Tube section. From the backside of the Housing, using a T-25 driver, first remove the 4 Lower Clamp Screws (d) then hold the Actuator (f) in one hand and remove the 4 Upper Clamps Screws (b). The Actuator is now free. Unclip the Cables and remove the Actuator. Unclip the two Clamps (e & c), turn the tube slightly until you are able to fully disengage the Clamps from Housing and Tube. Remove both Clamps. Remove Mirror Housing from Tube To reuse the Actuator, manually unscrew it from the Housing (don’t use an automatic screwdriver or drill new holes). This will strip the hole in the Actuator. Version 3 June, 2012 For the most recent version of this manual visit www.lang-mekra.com. Page 10 of 32 If you have any questions, please contact Lang-Mekra Technical Support. www.lang-mekra.com Email: [email protected] Tel: 1-888-MEKRA-4-U Fax: (803) 337 5265 1.6.2 To Install Mirror Housing Place the Bracket Assembly in the Mirror Housing and turn the tube slightly in order to install the Bottom Clamp (e, Fig.#7). Hand tighten the Clamp with the 4 Screws (d, Fig.#7) using a T-25 driver. Position the Actuator into Housing: First pull the Cables through the Housing hole and line up the flat side on the back of the Actuator with the flat boss on the Housing. Install the Top Clamp (c, Fig.#7) and hand tighten the 4 Screws (b, Fig.#7) using a T-25 driver while holding the Actuator. Route first Control Cable and then CB Cable through Lower Tube Section. Re-install Convex and Main Mirror Plates according to 1.4.2. Re-install the Mirror System to the truck according to 1.1. Adjust Mirror Head to optimal driving position (see 3.5). Tighten the 8 Clamp Screws (b+d, Fig.#7) at the back of the Housing to a torque of 3-5 Nm. Remove the Mirror Glass Plates and tighten the 4 Tube Bolts (a, Fig.#7) using a 6mm Allen Wrench to a torque of 1822 Nm. Re-assemble the Back-cover and the Mirror Glass Plates according to 1.5 and 1.4.1. NOTE: Re-adjustment for best view To reuse the Actuator, manually unscrew it from the Housing (don’t use an automatic screwdriver or drill new holes). This risks stripping threads in Actuator. Version 3 June, 2012 For the most recent version of this manual visit www.lang-mekra.com. Page 11 of 32 If you have any questions, please contact Lang-Mekra Technical Support. www.lang-mekra.com Email: [email protected] Tel: 1-888-MEKRA-4-U Fax: (803) 337 5265 1.6.3 To Adjust Mirror Head Lang Mekra North America provides the possibility to adjust the Mirror Head plus or minus 10 degrees from its nominal position. Remove the Mirror Glass Plates according to 1.4.1.1.21.2. Remove Back Cover according to 1.5. Remove 4 Tube Bolts at the front of the Housing with 6mm Allen Wrench (a, Fig #7). Loosen 8 Clamp Screws at the back with a T-25 driver (d+e, Fig #7). Remove the self-drilling Metal Screw from CB Bracket with a 5/16” Socket Head driver and loosen the big CB Bracket Bolt with a 6mm Allen Wrench. Re-install the Mirror Glass Plates according to 1.4.2. Turn Mirror Head to optimal driving position. Re-install the self-drilling Metal Screw and torque it with a 5/16” Socket Head driver to 7 Nm. Fasten CB Bracket Bolt (Torque= 9 Nm) with a 6mm Allen Wrench and the 8 Clamp Screws (Torque= 5 Nm) with a T25 driver. Remove the Mirror Glass Plates and re-install the 4 Tube Bolts with a 6mm Allen Wrench (Torque= 20 Nm). Re-install Back Cover according to 1.5 and the Mirror Glass Plates according to 1.4.2. 1.7 General Maintenance and Cleaning Tips When cleaning the surface Mirror Glass, abrasive cleaners or brushes should be avoided. Excessive abrasion may damage the reflective surface. A standard glass cleaner and a soft, clean cloth should be used to clean the Mirror surface. Version 3 June, 2012 For the most recent version of this manual visit www.lang-mekra.com. Page 12 of 32 If you have any questions, please contact Lang-Mekra Technical Support. www.lang-mekra.com Email: [email protected] Tel: 1-888-MEKRA-4-U Fax: (803) 337 5265 2.1 Fold-Away Bracket Feature The Mirror Brackets are equipped with a Fold-Away Feature, sometimes referred to as a Break-Away System. The Mirror System will fold forward or backward manually, or upon impact. This feature minimizes damage to the Mirror System and the vehicle door Bracket does not fold back / is too difficult to fold back If the Break-Away force is too high (difficult to fold back), you may loosen the Nut in the Lower Holder with a 9/16” Socket Head driver (The Torque should be between 15 Nm and 20 Nm). When the Mirror System is in the driving position, the Detent Spring should be almost fully compressed. You may want to check the Upper Fastener Kit. The torque should be 5 Nm. If the Upper Fastener Kit is too tight, loosen the Nut with a 6mm Allen Wrench to reach the specified torque. Bracket folds back too easily If the Bracket folds back too easily, check the following: Upper Fastener Kit should be torqued to 5 Nm. If the Upper Fastener Kit is too loose, tighten it to the specified torque with a 6mm Allen Wrench. Ensure the Lower Pivot is not too loose. You may tighten it to the specified torque of 15 Nm – 20 Nm using a 9/16” socket head driver. Additionally, insure that the Flip Out Arm is properly engaged into the Receiver (see picture in 1.1) Version 3 June, 2012 Detent spring should be almost fully compressed For the most recent version of this manual visit www.lang-mekra.com. Page 13 of 32 If you have any questions, please contact Lang-Mekra Technical Support. www.lang-mekra.com Email: [email protected] Tel: 1-888-MEKRA-4-U Fax: (803) 337 5265 2.2 Electrical Mirror Movement Analysis You have a four-way adjustable Mirror, integrated with the design of your truck. The flat, top Mirror is adjustable via Remote Control or manually; the convex, bottom Mirror is always manually adjustable. If you are having trouble moving the mirror via Remote Control or manually, check the following points: 1.) Mirror System and Cab at the truck door (under Lower Holder). (see 1.1.) Make sure all Cables and Connections are Tight. Check electrical connection between. 2.) Remove the Mirror Glass Plate according to 1.4.1. Check to ensure the Mirror is electrically operated (is an Actuator present) (see 2.8). If there is no Actuator, the Mirror System is manual. Then replace the Main Manual Base Assembly (Item# 41) (see 2.4). The Convex Mirror (small Mirror at the bottom) is always manual. If you have a problem with the Convex Mirror, just replace the Convex Manual Adjustment Kit (Item# 48) (see 2.5). 3.) If your Mirror has an Actuator, is your Actuator and Wire Harness in good visual condition and function? Check with the Lang Mekra Mirror Test Box (see page 3), if Actuator and Control Cable are OK. If the Actuator still does not function, replace with Actuator Kit (Item# 40) (see 2.4) If the Mirror System functions properly with test box, then the problem is truck internal, probably a Wire Harness or defective Mirror Switch. Follow the flowchart in 2.3 to promptly diagnose Mirror Movement problems. Note: If you have trouble with any part of the above procedure, please call our Service Line at 803-337-5264, and ask for Customer Service. Monday-Friday, 9:00 am – 4:00 p.m. EST Version 3 June, 2012 For the most recent version of this manual visit www.lang-mekra.com. Page 14 of 32 If you have any questions, please contact Lang-Mekra Technical Support. www.lang-mekra.com Email: [email protected] Tel: 1-888-MEKRA-4-U Fax: (803) 337 5265 2.3 Mirror Movement Analysis Flowchart For Electrical Adjustment Version 3 June, 2012 For the most recent version of this manual visit www.lang-mekra.com. Page 15 of 32 If you have any questions, please contact Lang-Mekra Technical Support. www.lang-mekra.com Email: [email protected] Tel: 1-888-MEKRA-4-U Fax: (803) 337 5265 2.4 Actuator or Main Manual Base Assembly Replacement (Infield Repair) Remove both Mirror Plates and disconnect Heater Wires from Mirror Plate (1.4.1). Take the Back Cover off (1.5) Remove the 4 Screws from the back of the Clamp with a T-25 driver, remove Actuator or Main Manual Base from Housing and discard. Only for Actuator (Remote System): Identify the actuator (see 3.4) If it is actuator Ref 08 5751 112: remove the actuator and the control cable (see routing in 2.8) If it is actuator Ref 08 4803 997: unplug the control cable connector and remove only the actuator Plug the control cable connector in the back of the new Actuator Position the new Actuator (Item# 40) or Main Manual Base (Item #41) in Mirror Housing. Use 4 new Screws and secure part with a T-25 driver. (Torque: 2-3 Nm) Assemble the Back Cover (1.5) and the Mirror Plates (1.4.2) again. Version 3 June, 2012 For the most recent version of this manual visit www.lang-mekra.com. Page 16 of 32 If you have any questions, please contact Lang-Mekra Technical Support. www.lang-mekra.com Email: [email protected] Tel: 1-888-MEKRA-4-U Fax: (803) 337 5265 2.5 Convex Manual Adjustment Kit Replacement The Pivot Assembly provides manual adjustment for the Convex Glass. The Pivot Assembly should be clean, and free of dirt or debris that may inhibit proper movement. To Replace Convex Pivot Assembly: Remove Convex Glass Mirror Plate (1.4.1). Use a 5/16” Allen wrench to compress the Locking Pin and Spring, make a quarter of a turn counterclockwise and remove assembly. Warning: Assembly is spring loaded and may be Hazardous. Take appropriate safety measures! (e.g. Safety glasses) Using Replacement Kit (Item #48), assemble the parts in order according to the drawing. Compress the Spring and the Locking Pin and lock the Pin by twisting it a quarter of a turn clockwise using a 5/16” Allen wrench. Reassemble the Mirror Plate (1.4.2). Version 3 June, 2012 For the most recent version of this manual visit www.lang-mekra.com. Page 17 of 32 If you have any questions, please contact Lang-Mekra Technical Support. www.lang-mekra.com Email: [email protected] Tel: 1-888-MEKRA-4-U Fax: (803) 337 5265 2.6 Bracket Assembly Replacement Disassemble Mirror System from truck according to 1.1. Remove Mirror Plates according to 1.4.1. Remove Back Cover according to 1.5. Remove 4 Tube Bolts at the front. Remove 8 Clamp Screws at the back, detach Actuator from Housing and remove the 2 Aluminum Clamps. Remove CB and Control Cables from Tube. Remove old Bracket Assembly from Mirror Housing. Remove CB Cable and Hardware from old Bracket and discard old Bracket. Take new Bracket Assembly and re-install CB Cable Hardware (see 2.10) and Mirror Housing to Tube following step 1.6.2 and 1.6.3. To reuse the Actuator, manually unscrew it from the Housing (don’t use an automatic screwdriver or drill new holes). This risks stripping threads in Actuator. Version 3 June, 2012 For the most recent version of this manual visit www.lang-mekra.com. Page 18 of 32 If you have any questions, please contact Lang-Mekra Technical Support. www.lang-mekra.com Email: [email protected] Tel: 1-888-MEKRA-4-U Fax: (803) 337 5265 2.7 Wiring Diagram & Electrical Facts Direction of Motion Table: TYPICAL AMPERE-TEMPERATURE-CHART Convex Heater Foil Connector Wiring: Main Heater Foil Test Voltage: Version 3 June, 2012 For the most recent version of this manual visit www.lang-mekra.com. Page 19 of 32 If you have any questions, please contact Lang-Mekra Technical Support. www.lang-mekra.com Email: [email protected] Tel: 1-888-MEKRA-4-U Fax: (803) 337 5265 2.8 Control Cable Replacement For Remote System (a): If there are problems with the Control Cable, identify which actuator is built-in (see 3.4) If it is the actuator Ref 08 5751 112, replace the actuator (see 2.4) and control cable (see routing below). If it is the actuator Ref 08 4803 997, change the control cable only (see routing below). For Manual Heated System (b): The Heater Cable must be changed: Use Cable Set Kit #39. First remove the Mirror Plates according to 1.4.1 and disconnect the Wire Connectors from the Mirror Plates. Remove the Heater Cable from the Bracket and from the Socket Plate hole. Re-install the new Heater Cable to the Mirror System: Route the new Heater Cable from the Housing to the Lower Holder (1+2). Route the 2 green Wires (short ones) as shown below through the Socket Plate hole (3) and position the long Wires as shown in picture (4). Re-connect the short Wires to the Convex Mirror Plate, the long ones to the Main Mirror Plate. Re-assemble the Mirror Plates according to 1.4.2. Version 3 June, 2012 For the most recent version of this manual visit www.lang-mekra.com. Page 20 of 32 If you have any questions, please contact Lang-Mekra Technical Support. www.lang-mekra.com Email: [email protected] Tel: 1-888-MEKRA-4-U Fax: (803) 337 5265 2.9 CB Cable Replacement Remove CB Antenna. Remove the Mirror System from the truck door (see 1.1). Remove the Mirror Plates (1.4.1) and the Back Cover (1.5). Unscrew the Coupling Nut with a 9/16” Socket Head driver, remove the Lock Washer, the Insulator and pull the CB Cable out of the Tube. Reassemble the new CB Cable to the CB Bracket: Put the Insulator, the Lock Washer and the Coupling Nut. Tighten the Coupling Nut with a 9/16” Socket Head driver 3. Coupling Nut 2. Lock Washer and torque to 7 Nm. Route CB Cable through Tube. Re-assemble Back Cover (1.5). and Mirror Plates (1.4.2). Re-install Mirror System to the truck (see 1.1). Re-assemble CB Antenna. 1. Insulator Version 3 June, 2012 For the most recent version of this manual visit www.lang-mekra.com. Page 21 of 32 If you have any questions, please contact Lang-Mekra Technical Support. www.lang-mekra.com Email: [email protected] Tel: 1-888-MEKRA-4-U Fax: (803) 337 5265 2.10 Mirror Heat Analysis Flowchart LMNA uses PTC (Positive Temperature Coefficient) heater foils for defrosting mirrors. These devices have the advantage of having lower resistance at lower temperatures. Lower resistance means increased wattage, which, in turn, means that more heat is available at lower temperatures to perform the defrosting function. When applying voltage to a heater foil, power supply current draw will decrease as the foil temperature rises. As the outside temperature increases, the heater foil temperature decreases. Version 3 June, 2012 For the most recent version of this manual visit www.lang-mekra.com. Page 22 of 32 If you have any questions, please contact Lang-Mekra Technical Support. www.lang-mekra.com Email: [email protected] Tel: 1-888-MEKRA-4-U Fax: (803) 337 5265 2.11 Mirror Heat Analysis Follow the flowchart in 2.10 to diagnose mirror heat problems. 1. Remove the Mirror Glass according to 1.4.1. Check to ensure the Mirror is heated. (Heater terminals are present.) 2. Make sure all Cables and Connections are tight (see 2.7). 3. Check to see if the Heater Terminals are securely attached. If not, replace the Glass Plate Assembly. 4. Using the Lang Mekra Mirror Test Box, or 12 V power source, test the Heat function of the Mirror System Control Cable at the truck door. If the Mirror Heat functions properly, the fault is cab-internal. 5. If the Mirror doesn’t function properly, replace the Heater Wire Harness (see 2.8) for Manual System or the Actuator Kit (see 2.4) for Remote System. Version 3 June, 2012 For the most recent version of this manual visit www.lang-mekra.com. Page 23 of 32 If you have any questions, please contact Lang-Mekra Technical Support. www.lang-mekra.com Email: [email protected] Tel: 1-888-MEKRA-4-U Fax: (803) 337 5265 3.1 Warranty Coverage Lang-Mekra provides a warranty for production and service parts per Volvo Supplier Warranty Agreement. The warranty will cover: The warranty will not cover: Functional Quality of Components Lang-Mekra Workmanship Confirmed Field Failures Labor Costs for Replacement Approved Administrative Costs Glass Breakage and Other Impact, Abuse, Mistreatment Minor Reassembly Unnecessary Service Unauthorized Product Alterations and/or Additions Unreasonable Costs Please Do Not Submit Warranty Claims for Items That Have Suffered Impact! Parts Returned Exhibiting Impact Damage Will Be Denied Coverage, and May Be Returned Freight-Collect Lang-Mekra reserves the right to inspect submitted warranty claims. Upon satisfactory performance and history, dealers, fleets and other end users may be granted warranty coverage based on submitted description alone. Evaluation points will include: Complete and Accurate Claim Descriptions Use of appropriate Replacement Parts Absence of Rejected Claims Version 3 June, 2012 For the most recent version of this manual visit www.lang-mekra.com. Page 24 of 32 If you have any questions, please contact Lang-Mekra Technical Support. www.lang-mekra.com Email: [email protected] Tel: 1-888-MEKRA-4-U Fax: (803) 337 5265 3.2 Available Service Parts Item # 1 2 3 4 5 6 7 8 9 10 11 12 13 14 15 16 17 18 19 20 Part Description SYS, SYS, SYS, SYS, SYS, SYS, SYS, SYS, SYS, SYS, SYS, SYS, SYS, SYS, SYS, SYS, SYS, SYS, SYS, SYS, LH, BLK, MAN/UHT, No CB RH, BLK, MAN/UHT, No CB LH, BLK, MAN/HTD, 12V, No CB RH, BLK, MAN/HTD, 12V, No CB LH, BLK, RMT/HTD, 12V, No CB RH, BLK, RMT/HTD, 12V, No CB LH, BLK, MAN/UHT, STD CB RH, BLK, MAN/UHT, STD CB LH, BLK, MAN/HTD, 12V, STD CB RH, BLK, MAN/HTD, 12V, STD CB LH, BLK, RMT/HTD, 12V, STD CB RH, BLK, RMT/HTD, 12V, STD CB LH, BLK, MAN/UHT, PRM CB RH, BLK, MAN/UHT, PRM CB LH, BLK, MAN/HTD, 12V, PRM CB RH, BLK, MAN/HTD, 12V, PRM CB LH, BLK, RMT/HTD, 12V, PRM CB RH, BLK, RMT/HTD, 12V, PRM CB LH, CHR, MAN/UHT, No CB RH, CHR, MAN/UHT, No CB Version 3 June, 2012 Volvo Part # LM Aftermarket Part # 20701655 20701656 20701657 20701658 20701659 20701660 20701661 20701671 20701673 20701674 20701676 20701679 20701680 20701681 20701682 20701683 20701684 20701685 20701397 20701398 59 472 1032-PDC 59 472 1042-PDC 59 472 1132-PDC 59 472 1142-PDC 59 472 1332-PDC 59 472 1342-PDC 59 472 1034-PDC 59 472 1044-PDC 59 472 1134-PDC 59 472 1144-PDC 59 472 1334-PDC 59 472 1344-PDC 59 472 1036-PDC 59 472 1046-PDC 59 472 1136-PDC 59 472 1146-PDC 59 472 1336-PDC 59 472 1346-PDC 59 472 2032-PDC 59 472 2042-PDC For the most recent version of this manual visit www.lang-mekra.com. Page 25 of 32 If you have any questions, please contact Lang-Mekra Technical Support. www.lang-mekra.com Email: [email protected] Tel: 1-888-MEKRA-4-U Fax: (803) 337 5265 Item # 21 22 23 24 25 26 27 28 29 30 31 32 33 34 35 36 37 38 39 Part Description SYS, LH, CHR, MAN/HTD, 12V, No CB SYS, RH, CHR, MAN/HTD, 12V, No CB SYS, LH, CHR, RMT/HTD, 12V, No CB SYS, RH, CHR, RMT/HTD, 12V, No CB SYS, LH, CHR, MAN/UHT, PRM CB SYS, RH, CHR, MAN/UHT, PRM CB SYS, LH, CHR, MAN/HTD, 12V, PRM CB SYS, RH, CHR, MAN/HTD, 12V, PRM CB SYS, LH, CHR, RMT/HTD, 12V, PRM CB SYS, RH, CHR, RMT/HTD, 12V, PRM CB BRACKET ASSY LEFT HAND W/CB BRKT BRACKET ASSY RIGHT HAND W/CB BRKT MIRROR HOUSING KIT (BEZEL) BACK COVER 472 BLACK w/ NO HOLE BACK COVER 472 CHROME w/ NO HOLE BACK COVER 472 BLACK w/ LH HOLE BACK COVER 472 CHROME w/LH HOLE BACK COVER 472 BLACK w/RH HOLE BACK COVER 472 CHROME w/RH HOLE Version 3 June, 2012 Volvo Part # LM Aftermarket Part # 20701399 20701400 20701401 20701402 20701403 20701409 20701410 20701412 20701416 20701418 85108719 85108720 85108721 85108722 85108723 85108724 85108725 85108726 85108727 59 472 2132-PDC 59 472 2142-PDC 59 472 2332-PDC 59 472 2342-PDC 59 472 2036-PDC 59 472 2046-PDC 59 472 2136-PDC 59 472 2146-PDC 59 472 2336-PDC 59 472 2346-PDC 58 472 1034-PDC 58 472 1044-PDC 14 472 0001-PDC 13 472 0001-PDC 13 472 0003-PDC 13 472 0011-PDC 13 472 0013-PDC 13 472 0021-PDC 13 472 0023-PDC For the most recent version of this manual visit www.lang-mekra.com. Page 26 of 32 If you have any questions, please contact Lang-Mekra Technical Support. www.lang-mekra.com Email: [email protected] Tel: 1-888-MEKRA-4-U Fax: (803) 337 5265 Available Service Parts Item # Part Description 40 41 42 43 44 45 46 47 48 49 50 51 52 53 FLAT MIRROR GLASS PLATE 12V HEATED CONVEX MIRROR GLASS PLATE 12V HEATED CABLE SET (WIRE HARNESS) ELECTRICAL ACTUATOR KIT 12V MAIN MANUAL ADJUSTMENT ASSY KIT STANDARD CB CABLE KIT PREMIUM CB CABLE KIT LH THIRD ARM ASSY. RH THIRD ARM ASSY. RECEIVER KIT RH THIRD ARM ASSY. W/ ROOF MIRROR CONVEX MANUAL ADJUSTMENT KIT LANG MEKRA MIRROR TEST BOX WIRE HARNESS KIT 473 VOLVO Volvo Part # LM Aftermarket Part # 85108728 85108729 85108731 85108732 85108733 85108734 85108735 20701688 20701689 85108738 20701698 85108730 85109540 15 15 09 61 61 61 61 20 20 20 59 61 90 09 472 0102-PDC 472 0202-PDC 472 0001-PDC 473 0023-PDC 472 0002-PDC 472 0004-PDC 472 0005-PDC 472 0311-PDC 472 0312-PDC 472 0305-PDC 412 1171-PDC 472 0003-PDC 472 0100-PDC 4730 009-PDC NOTE: If you have trouble with any part of this Service Manual, please call our Service line at 803-337-5264 and ask for Customer Service Monday – Friday, 9:00 am – 4:00 pm EST. Version 3 June, 2012 For the most recent version of this manual visit www.lang-mekra.com. Page 27 of 32 If you have any questions, please contact Lang-Mekra Technical Support. www.lang-mekra.com Email: [email protected] Tel: 1-888-MEKRA-4-U Fax: (803) 337 5265 3.3 Illustrations 50 31 32 From 11 to 30 Figure #11 Version 3 June, 2012 Figure #12 For the most recent version of this manual visit www.lang-mekra.com. Figure #13 Page 28 of 32 If you have any questions, please contact Lang-Mekra Technical Support. www.lang-mekra.com Email: [email protected] Tel: 1-888-MEKRA-4-U Fax: (803) 337 5265 Illustrations Version 3 June, 2012 For the most recent version of this manual visit www.lang-mekra.com. Page 29 of 32 If you have any questions, please contact Lang-Mekra Technical Support. www.lang-mekra.com Email: [email protected] Tel: 1-888-MEKRA-4-U Fax: (803) 337 5265 Illustrations Version 3 June, 2012 For the most recent version of this manual visit www.lang-mekra.com. Page 30 of 32 If you have any questions, please contact Lang-Mekra Technical Support. www.lang-mekra.com Email: [email protected] Tel: 1-888-MEKRA-4-U Fax: (803) 337 5265 3.4 Actuator Identification Actuator Ref 08 5751 112 Actuator Ref 08 4803 997 Version 3 June, 2012 For the most recent version of this manual visit www.lang-mekra.com. Page 31 of 32 If you have any questions, please contact Lang-Mekra Technical Support. www.lang-mekra.com Email: [email protected] Tel: 1-888-MEKRA-4-U Fax: (803) 337 5265 3.5 Optimal driving position LH Version 3 June, 2012 RH For the most recent version of this manual visit www.lang-mekra.com. Page 32 of 32