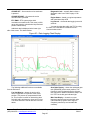
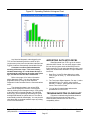
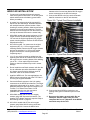
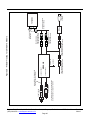
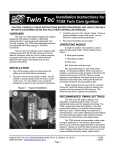
1
Twin Tec TCFI Gen 6 Fuel Injection System Installation & Tuning Manual CAUTION: CAREFULLY READ INSTRUCTIONS BEFORE PROCEEDING. NOT LEGAL FOR SALE OR USE IN CALIFORNIA OR ON ANY POLLUTION CONTROLLED VEHICLES. OVERVIEW The Twin Tec TCFI Gen 6 fuel injection controller replaces the original equipment (OE) engine control module (ECM) on 2008-2013 Harley-Davidson® touring models with electronic throttle control (ETC). The term TCFI is used throughout this document as a generic term and refers to the new TCFI Gen 6 controller unless otherwise noted. The TCFI Gen 6 kit includes the WEGO IIID dual channel wide-band exhaust gas oxygen sensor interface that allows simultaneous front and rear cylinder auto-tuning during actual riding conditions. CAUTION: Tuning the TCFI requires competency in PC operation, using Microsoft Windows based programs, and basic engine tuning and fuel injection mapping concepts. The TCFI installer is assumed to be familiar with the Harley-Davidson fuel injection system and to have access to basic test equipment and factory service manuals. QUICK START SYSTEM INSTALLATION AND SETUP 1. Check the exhaust system. If you can insert a broomstick through the mufflers, you have the equivalent of open drag pipes and auto-tuning will fail. If applicable, read the section about exhaust considerations starting on page 10. 2. Check for updates. This tuning manual is for TCFI Gen 6 units. Before proceeding, check our website at www.daytona-twintec.com for available updates for the TCFI firmware, accompanying PC based software, and documentation. 3. Tech support. If you have questions or encounter problems at any point during the installation process, please contact our tech support at 386304-0700. 4. USB interface. Read the USB interface instructions starting on page 15, install the USB drivers and configure the COM port. 5. PC Link software used for setup and engine tuning. Read the PC Link TCFI instructions starting on page 17 and install the software. 6. Data logging software. Read the TCFI Log instructions starting on page 31 and install the software. WARNING: You must use revision 2.08 or higher TCFI Gen 6 firmware and version 17.0 or higher PC Link TCFI software for setup and tuning. Note that earlier version TCFI setup files may be used for the TCFI Gen 6 with minor modifications. To access all logged data, you must use version 18.0 or higher TCFI Log software. 7. TCFI Controller. Read the TCFI installation instructions starting on page 38 and install the TCFI unit. 8. WEGO wide-band exhaust gas oxygen sensor interface. Read the WEGO installation instructions starting on page 38, install the WEGO unit and perform the free air calibration described on page 43. 9. Connect the USB interface cable between the TCFI unit and your PC. 10. Start the PC Link TCFI software, use the Open File command, and open the appropriate setup file. Setup data files are provided in the program folder for typical engine applications. Refer to Table 3 on page 14 for details. Additional setup guidelines for larger displacement engines are given on page 8. 11. Use the Edit Basic Parameters command. Make any required changes such as estimated rear wheel horsepower, injector flow rating (refer to Table 1 on page 8), and RPM limit. You must set Daytona Twin Tec LLC, 933 Beville Road, Suite 101-H, S. Daytona, FL 32119 (386) 304-0700 www.daytona-twintec.com Page 1 TCFI Gen 6 Manual Rev 2.1 5/2015 the vehicle speed sensor (VSS) frequency for your model. This affects speedometer/odometer scaling, idle RPM control, and turn signal cancellation. Refer to pages 24-26. Do not change any other parameters or options unless there is a specific reason to do so. Click OK when done. 12. Use the Save File command to save your initial setup file with an easily identifiable name (refer to suggestions in the editing and file operations section on page 3). 13. Turn the ignition key and run/stop switch on. Upload the setup data to the TCFI unit. The firmware ID and revision will be displayed before the upload. Verify that you have the current firmware revision. 14. Optional VIN entry. Some accessories may require the ECM to report the VIN number. Use the Edit TCFI VIN command to program the VIN. Refer to page 27 for more details. 15. Turn the run/stop switch off. 16. Follow the steps for testing throttle position sensor (TPS) and twist grip sensor (TGS) levels as explained in Appendix A starting on page 42. 17. Start the TCFI Log software. Turn the run/stop switch on but do not start the engine. Use the ETC Test Mode and ETC Manual Test command on the Communications menu. Enter “1” to enable ETC manual test mode. Then select View Real Time Data on the View menu. Verify that throttle position sensor (TPS) data tracks twist grip sensor (TGS) data. TPS should go down to under 1% when the twist grip is released. If not, please contact our tech support before proceeding. Exit real time display and turn the run/stop switch off when complete. realistically simulate actual warm up conditions. If the engine does not start or stalls, refer to the diagnostic tips in the idle tuning section starting on page 5. 20. Monitor front and rear cylinder AFR and block learn multiplier (BLM), ET, and IAC values. Keep notes on your observations of these values. After 30 seconds, the system should be operating in closed loop and maintaining the desired idle AFR (nominal value of 13.5). The BLM values should remain within the range of 80-120%. The IAC value should slowly go down as the engine reaches operating temperature and requires less idle air. BLM values below 100% indicate that the TCFI is removing fuel in closed loop to correct a rich condition. BLM values above 100% indicate that the TCFI is adding fuel in closed loop to correct a lean condition. Refer to the TCFI operation section starting on page 3 for details. If the BLM values go below 80% or above 120% anytime during the warm up period, the system is running out of adjustment range. Refer to the suggestions in the idle tuning section starting on page 5. 21. Once the engine reaches 110° C (230° F) ET, do not shut the engine off, disconnect the USB cable, and ride the motorcycle for at least 15 minutes. Repeatedly accelerate through the useable RPM range in every gear at different throttle positions. Also operate the motorcycle at various fixed speeds likely to be encountered during normal riding. For safety reasons, wide open throttle runs should be done on a closed course. If lean surging or spark knock is noted, refer to the suggestions in the auto-tuning section starting on page 7. 18. Cold start test and initial auto-tuning. Position the motorcycle so that you can perform a cold start test while monitoring engine data with TCFI Log software and then be able to disconnect the USB interface and ride the bike for initial auto-tuning. To allow viewing and logging air/fuel (AFR) data immediately after engine start, turn the ignition switch on but leave the run/stop switch in the stop position. Wait at least 15 seconds for the WEGO sensors to warm up and then start the engine. Monitor real time engine data and status with TCFI Log software. 22. Hot restart test. After the initial ride, shut the engine off and allow it to hot soak for 10 minutes. To allow viewing and logging AFR data immediately after engine restart, turn the ignition switch on but leave the run/stop switch in the stop position. Wait at least 15 seconds for the WEGO sensors to warm up and then restart the engine and let it idle. Monitor real time engine data and status with TCFI Log software. Verify that the AFR values do not exceed 15.0 before closed loop operation. Allow the engine to idle until it reaches 110° C (230° F) ET again. Verify that the IAC value is in the range of 15-40. If not, refer to the suggestions in the idle tuning section starting on page 5. 19. Allow the engine to idle until it reaches 110° C (230° F) engine temperature (ET). This will typically take about 10 minutes. A fan should be used to direct cooling air on the engine to more 23. Auto-tuning. The closed loop auto-tuning process consists of operating the motorcycle through a wide range of loads and speeds while periodically monitoring progress using the PC Link TCFI Daytona Twin Tec LLC, 933 Beville Road, Suite 101-H, S. Daytona, FL 32119 (386) 304-0700 www.daytona-twintec.com Page 2 TCFI Gen 6 Manual Rev 2.1 5/2015 software. Long rides at constant speed and load are of no value. After 1-2 hours of engine operation, download the current setup with PC Link TCFI software and use the Edit 3D Table – BLM Tables – Edit Front and Edit Rear BLM Table commands to examine the BLM tables. Cells that are shaded red indicate that the system has run out of correction range. Then use the Apply Front and Apply Rear BLM Table commands to automatically correct the Alpha-N fuel table and front cylinder trim table. This also resets all the BLM values back to 100% and allows auto-tuning to continue. Save the edited setup file to disk and upload it to the TCFI. Continue this auto-tuning process until most of the BLM cells remain in the 90-110% range. Refer to the auto-tuning section starting on page 7 for more details. 24. Final checks. Verify absence of spark knock during throttle roll on and wide open throttle acceleration. Verify that the speedometer reading is accurate and that the turn signals cancel properly. Verify proper operation of 6th gear indicator light. If required, operate the motorcycle at a steady speed around 50 MPH in 6th gear and then download data with TCFI Log. Use the gear ratio display function to determine the actual 6th gear ratio. Use PC Link TCFI software to download the current setup data, enter the new 6th gear ratio into Module Parameters, save the edited setup file to disk, and upload it to the TCFI. EDITING AND FILE OPERATIONS After initial setup, the TCFI tuning process requires multiple edits of the engine tables and parameters using PC Link TCFI software. Unless otherwise noted, editing involves downloading the current setup data in the TCFI, performing the required edits, saving table edits to buffer memory, saving the revised setup file to disk, and then uploading it to the TCFI. You should always print out any affected tables and parameters and save each revised file with a unique filename. Use a filename that incorporates the customer name and a date code, such as Chris_20120410a.dat. We suggest that you create a separate folder for all tuning files. Keep detailed written notes on the changes you make and the associated filenames. Make frequent backup copies onto removable media such as a USB Flash drive. New customers with limited PC experience often become confused and have problems with simple Windows file management functions including the use of the Windows Explorer. We regret that we cannot provide tech support for Windows related issues. We suggest that you spend some time practicing with the PC Link TCFI and TCFI Log software, including the Copy, Paste, and Modify commands on the right mouse button popup menu. OVERVIEW OF TCFI OPERATION The TCFI controls air/fuel ratio (AFR) and idle RPM using individual control loops. Each control loop can operate open loop (without feedback correction) or closed loop (with feedback correction) depending on conditions. If you are not familiar with control systems concepts such as open and closed loop operation, we suggest that you order Understanding Automotive Electronics (Sixth Edition) by William B. Ribbens from www.amazon.com. Chapter 2 includes an excellent introduction to control system theory. The output of the AFR control loop is injector pulse width. A higher pulse width causes more fuel to be injected and decreases the AFR towards a rich condition. An initial estimate of horsepower and injector size (flow rate) is used to calculate a base injector pulse width. Base injector pulse width corresponds to the amount of fuel required to generate a stoichiometric mixture (14.7 AFR) at wide open throttle (WOT), 6,000 RPM and standard atmospheric conditions. Base injector pulse width is then corrected for intake air temperature (IAT) and barometric pressure. Daytona Twin Tec LLC, 933 Beville Road, Suite 101-H, S. Daytona, FL 32119 (386) 304-0700 www.daytona-twintec.com Page 3 TCFI Gen 6 Manual Rev 2.1 5/2015 TCFI CLOSED LOOP FUEL CONTROL BASE INJECTOR PULSE WIDTH RPM TPS COLD START ALPHA-N MAIN FUEL TABLE FRONT CYLINDER TRIM TABLE AFR TABLE +- FRONT BLM TABLE FRONT FUEL INJECTOR ENGINE REAR FUEL INJECTOR ENGINE FRONT WIDE-BAND OXYGEN SENSOR +- REAR BLM TABLE REAR WIDE-BAND OXYGEN SENSOR At any given RPM and throttle position (TPS), the corrected base injector pulse width is multiplied by the values in the Alpha-N table (main fuel table), AFR table (the AFR command), front cylinder trim table (only for the front cylinder), and block learn multiplier (BLM) tables. The BLM tables store closed loop correction factors based on feedback from the WEGO system. Independent BLM tables are used for front and rear cylinders. The BLM tables are continually updated whenever the system is operating in closed loop (generally 30 seconds after engine start). The BLM tables are updated based on the AFR error (difference between AFR command and actual AFR read by the WEGO system). During auto-tuning, BLM values are only saved if the engine reaches 95° C (200° F) and runs for at least 5 minutes. This is set by warm engine temperature and engine warm-up time parameters (refer to page 26). In cold climate areas, you may have to use a lower value for warm engine temperature. Additional cold start enrichment fuel is applied based on engine temperature and elapsed time since engine start. Priming fuel is injected when the run/stop switch is cycled on. A fixed pulse width injection is also used during cranking (RPM < 400). Two tables set the priming and cranking pulse widths based on engine temperature. TCFI CLOSED LOOP IDLE SPEED CONTROL ENGINE TEMP TIME IAC TABLES CONDITIONS FOR CLOSED LOOP CONTROL: 1. TGS < 1% 2. ZERO VEHICLE SPEED +- ETC SYSTEM RPM AIR ENGINE The output of the idle RPM control loop is an idle air control (IAC) value ranging from 0-127. The IAC value is the minimum throttle position during idle in 0.1% units (i.e. an IAC value of 50 corresponds to 5% throttle). A higher IAC value allows more air flow and increases engine RPM. A table sets the idle RPM command as a function of engine temperature. This allows a higher idle RPM while the engine is cold. Closed loop idle RPM control is only enabled when vehicle speed is zero and twist grip position is less than the idle TGS value (usually 1%). Under open loop conditions (such as the motorcycle being driven while the engine is warming up), the IAC value is continually adjusted based on engine temperature and elapsed time since engine start. When the engine is fully warmed up, the system assumes that the IAC value will be close to a nominal value (usually 20). Under cold start conditions, when the IAC value is high, the system may be using the 2.5% or 5% TPS rows in the fuel tables even when the twist grip is closed. The nominal idle IAC value (IAC value once the engine is fully warmed up and at stable idle condition) is automatically sampled and updated. This occurs after 8 seconds of stable idle whenever vehicle speed returns to zero while the motorcycle is operated. The updated value is saved after engine shut down. This feature eliminates the requirement to set the nominal idle IAC value as part of the tuning process and allows the system to automatically accommodate manufacturing variations in throttle bodies. For more detailed explanations of the AFR and idle RPM control loops and various tables, please download the TCFI Idle Tuning Tech Note. Daytona Twin Tec LLC, 933 Beville Road, Suite 101-H, S. Daytona, FL 32119 (386) 304-0700 www.daytona-twintec.com Page 4 TCFI Gen 6 Manual Rev 2.1 5/2015 TCFI ELECTRONIC THROTTLE CONTROL (ETC) TWIST GRIP TGS TPS MAIN PROCESSOR FUEL AND SPARK AUXILIARY PROCESSOR TCA MOTOR DRIVER TCA M ETC AND J1850 TCA DISABLE ELECTRONIC THROTTLE CONTROL The figure above shows the architecture of the TCFI Gen 6 ETC system. The system has two fast reduced instruction set (RISC) processors that communicate on an internal data bus. The main processor primarily controls fuel and spark. The auxiliary processor controls the ETC function and also handles J1850 data bus communications. The twist grip and throttle control actuator (TCA) both have dual position sensors and send signals to the auxiliary processor that then sends a pulse width modulated (PWM) signal to the TCA motor driver to control the throttle motor. ETC related diagnostics run on both processors and in the event of a serious error condition, the main processor can independently disable the TCA motor driver to force limp back mode. In the unlikely event of a stuck throttle plate, the main processor will initiate shutdown mode by disabling spark. On initial power up, the ETC system runs an auto-calibration routine that tests operation of the TCA and establishes the zero (closed throttle) position. The ETC system includes a brake override safety function. If either the front or rear brake is applied while the transmission is in gear, the clutch is engaged, and vehicle speed exceeds 5 KPH (3 MPH), the throttle is forced to a low value. For drag racing applications requiring a burn-out while the front brake is held, the brake override function can be disabled. Refer to page 25 for details. ETC CHECK Proper operation of the TCFI system depends on an accurate, repeatable, and in-range TGS and TPS signals and TCA response. You can use TCFI Log software to check the ETC system while the engine is not running. Read the ETC Test Mode section on page 33 before proceeding. Connect the USB interface cable and start TCFI Log. Turn the run/stop switch on but do not start the engine. Use the ETC Test Mode and ETC Manual Test command on the Communications menu. Enter “1” to enable ETC manual test mode. Then select View Real Time Data on the View menu. Verify that TPS data tracks TGS data. If desired, you can remove the air filter and observe the throttle plate movement. TPS should go down to under 1% when the twist grip is released. If not, please contact our tech support before proceeding. Exit real time display and turn the run/stop switch off when complete. ENGINE STARTING PROCEDURE With alpha-N fuel control, the proper engine starting procedure must be followed. When the run/stop switch is turned on, the ETC system runs an auto-calibration routine that establishes the zero (closed throttle) position. During this time, the check engine light is on and the fuel pump is energized for several seconds, making an audible buzz. Do not press the starter button until the check engine light goes out and the fuel pump stops buzzing. We recommend that you let the engine idle for about 20-30 seconds before operating the motorcycle. This allows the closed loop idle air control system to stabilize idle RPM. IDLE TUNING Please note that during the initial period after engine start, fuel control is open loop (no feedback from the WEGO sensors) and relies entirely on correct values in the Alpha-N table. The TCFI will enter closed loop AFR control mode after the WEGO warm up time (nominal value of 30 seconds) has elapsed. To allow viewing and logging AFR data immediately after engine start, turn the ignition switch on but leave the run/stop switch in the stop position. Wait at least 15 seconds for the WEGO sensors to Daytona Twin Tec LLC, 933 Beville Road, Suite 101-H, S. Daytona, FL 32119 (386) 304-0700 www.daytona-twintec.com Page 5 TCFI Gen 6 Manual Rev 2.1 5/2015 warm up and then start the engine. Monitor engine data and status with TCFI Log software. Allow the engine to idle until it reaches normal operating temperature of 110° C or 230° F. A fan should be used to direct cooling air on the engine to more realistically simulate actual warm up conditions and prevent the engine from overheating. If the engine does not start or stalls, please refer to the diagnostic tips at the end of this section. Monitor front and rear cylinder AFR and BLM, engine temperature, and IAC values. Keep notes on your observations of these values. After 30 seconds, the system should be operating in closed loop and maintaining the desired idle AFR (nominal value of 13.5). The BLM values should remain within the range of 80-120%. The IAC value should slowly go down as the engine reaches operating temperature and requires less idle air. BLM values below 100% indicate that the TCFI is removing fuel in closed loop to correct a rich condition. BLM values above 100% indicate that the TCFI is adding fuel in closed loop to correct a lean condition. If the BLM values go below 80% or above 120% anytime during the warm up period, the system is running out of adjustment range and the idle cells in the Alpha-N fuel table should be edited before proceeding with further tuning. Download the current setup with PC Link TCFI software and use the Edit 3D Table – Alpha-N Table command to edit the idle cells in the Alpha-N fuel table. Depending on engine temperature, IAC value and idle RPM, the TCFI will be using the cells in the 750, 1,000, 1,250, and 1,500 RPM columns and the 0%, 2.5% (IAC between 15-40), and 5% TPS (IAC above 40) rows. You can select all these cells, right click the mouse, and then use the Modify command on the pop-up menu. Add a percentage corresponding to the BLM error. For example, if the worst case BLM value noted was 120%, add 20% fuel by entering +20% (not +20). Likewise, if the worst case BLM value was 80%, subtract 20% fuel by entering -20%. Remember to use the Save Table Edits to Buffer command after editing the table. Then use the Edit 3D Table – BLM Tables – Reset BLM Tables command to reset all BLM values to 100%. Save the edited setup file to disk and upload it to the TCFI. As mentioned above, the IAC value should slowly go down as the engine reaches operating temperature. The IAC value should drop to near the nominal value (15-30 as set under basic module parameters). If the IAC value stays above 40 or drops below 15, there may be an electromechanical problem with the TCA or a manifold vacuum leak (very low IAC). After making any required edits repeat the start test and allow the engine to reach normal operating temperature. Make sure the engine runs for at least 5 minutes and the status display shows warm closed loop operation – otherwise BLM values will not be saved. The idle tuning step is complete when BLM values stay within the range of 85-115% during the warm up phase and the IAC value is within the range of 15-30 once the engine reaches normal operating temperature. If these criteria cannot be met, please contact our tech support before proceeding. For additional idle tuning information, please download the TCFI Idle Tuning Tech Note. Diagnostic tips if the engine does not start: 1. Verify that the TCFI is properly installed and set up, that the battery is fully charged, and that the engine is not flooded from excessive priming caused by repeatedly cycling the run/stop switch during setup. Disconnect the fuel pump relay and crank the engine to clear flooding. 2. Try the following starting procedure: set the run/stop switch to run, wait until the fuel pump stops running, slightly open the throttle, and then press the starter switch. If the engine starts, the problem may be insufficient air caused by an incorrect IAC value. Please contact our tech support before proceeding. 3. Ether starting spray can be used as a diagnostic aid. Try starting the engine after an application of ether spray. If the engine starts and runs at a normal idle RPM, the problem is insufficient fuel. Try increasing the priming and cranking fuel values by 10-20%. Download the current setup with PC Link TCFI software and use the Edit 2D Table – ET Based Priming Fuel Table and ET Based Cranking Fuel Table commands. Select all cells, right click the mouse, use the Modify command on the popup menu, and enter +10% (not +10). Remember to use the Save Table Edits to Buffer command after editing each table. Save the edited setup file to disk and upload it to the TCFI. Retest and repeat if additional fuel seems to be required. 4. If larger fuel injectors were installed, cranking and priming fuel values may need to be decreased. Try decreasing the priming and cranking fuel values by 20%. Download the current setup with PC Link TCFI software and use the Edit 2D Table – ET Daytona Twin Tec LLC, 933 Beville Road, Suite 101-H, S. Daytona, FL 32119 (386) 304-0700 www.daytona-twintec.com Page 6 TCFI Gen 6 Manual Rev 2.1 5/2015 Based Priming Fuel Table and ET Based Cranking Fuel Table commands. Select all cells, right click the mouse, use the Modify command on the popup menu, and enter -20% (not -20). Remember to use the Save Table Edits to Buffer command after editing each table. Save the edited setup file to disk and upload it to the TCFI. 5. Try re-installing the stock ECM. If the engine does not start with the stock ECM, there may be an underlying problem that requires correction. If the engine starts with the stock ECM but not the TCFI, please contact our tech support for assistance. Diagnostic tips if the engine stalls: 1. If the engine momentarily starts, runs for several revolutions (less than 2 seconds), and then stalls, priming and cranking fuel values may be insufficient to build up the required fuel film in the intake manifold. Try using ether starting spray or cycling the run/stop switch several times to add additional priming fuel before starting the engine. If the engine starts normally, you have confirmed that more fuel is required. Try adding 10-20% more priming and cranking fuel as explained in Paragraph 2 in the preceding section. 2. If the engine stalls after running for several seconds, observe AFR values. To do this you must allow the WEGO sensors to warm up for at least 15 seconds before starting the engine. You can observe data in real time or download data logged using TCFI Log. For best results, select the 10 samples/sec download option. In most cases, the problem is caused by excessively lean AFR. Based on observed AFR values, make appropriate corrections to the idle cells in Alpha-N table. If the AFR is lean, try adding 10-20% fuel (use the procedure explained on page 6). If this does not solve the problem, please contact our tech support for assistance. 3. In some cases, changes to the cold start enrichment tables may be required. There are independent ET (engine temperature) based front and rear cylinder cold start enrichment tables. To allow viewing and logging AFR data immediately after engine start, turn the ignition switch on but leave the run/stop switch in the stop position. Wait at least 15 seconds for the WEGO sensors to warm up and then start the engine. Monitor engine data and status with TCFI Log. Download the logged data. Compare the front and rear AFR values after engine start to determine if adjustments are required. Refer to the TCFI Idle Tuning Tech Note for more details. AUTO-TUNING The closed loop auto-tuning process consists of operating the motorcycle through a wide range of loads and speeds while periodically monitoring progress using the PC Link TCFI software. Long rides at constant speed and load are of no value. The best technique is to very slowly accelerate through the useable RPM range in every gear, allowing several seconds of operation in each RPM and throttle position based cell. Also operate the motorcycle at various fixed speeds likely to be encountered during normal riding. For safety reasons, wide open throttle runs should be done on a closed course. We recommend auto-tuning under actual riding conditions. If this is not possible, you can auto-tune on a load control dyno and use TCFI Log to monitor AFR and other engine parameters. If AFR values appear very lean (above 14.5), we suggest that you edit the Alpha-N table to add 15-20% fuel to all cells except idle cells before proceeding. Auto-tuning works best if you start with a slightly rich Alpha-N table. Download the current setup with PC Link TCFI software and use the Edit 3D Table – AlphaN Table command. You can select groups of cells, right click the mouse, use the Modify command on the pop-up menu, and enter +15% (not 15). Remember to use the Save Table Edits to Buffer command after editing each table. Save the edited setup file to disk and upload it to the TCFI After 1-2 hours of engine operation, download the current setup with PC Link TCFI software and use the Edit 3D Table – BLM Tables – Edit Front and Edit Rear BLM Table commands to examine the BLM tables. Cells that are shaded red indicate that the system has run out of correction range. Then use the Apply Front and Apply Rear BLM Table commands to automatically correct the Alpha-N fuel table and front cylinder trim table. This also resets all the BLM values back to 100% and allows auto-tuning to continue. Save the edited setup file to disk and upload it to the TCFI. Auto-tuning is a statistical process. The longer the operating time, the greater the probability that more cells will be covered. However, even a varied operating cycle can miss some cells. After you use the Apply BLM Table commands, take some time to examine the modified Alpha-N and front cylinder trim tables. Unless your engine has some unusual camshaft and exhaust interactions, the tables should appear smooth (with gently rising slopes). If you spot sharp spikes or dips, these cells have probably been missed during autotuning and will require some manual edits to smooth them into the surrounding terrain. Daytona Twin Tec LLC, 933 Beville Road, Suite 101-H, S. Daytona, FL 32119 (386) 304-0700 www.daytona-twintec.com Page 7 TCFI Gen 6 Manual Rev 2.1 5/2015 The Alpha-N table represents percent injector pulse width (fuel flow) before correction for BLM, front cylinder trim, barometric pressure, intake temperature, and cold start enrichment. You can use the following guidelines to smooth the Alpha-N table: at high MAP (manifold absolute pressure) values. Large displacement engines are prone to spark knock at relatively low MAP values during throttle roll-on. You may need to reduce the ignition advance throughout the entire MAP range. 1. At part throttle (low TPS%), Alpha-N values in each row will tend to decrease as RPM increases (because the throttle is choking air flow). FUEL INJECTOR SIZING 2. At wide open throttle, Alpha-N values in each row will tend to follow the engine torque curve. 3. In any given RPM column, Alpha-N values must always increase with TPS. The front cylinder trim table may appear more complex and irregular, with peaks and valleys corresponding to gas flow interactions within the intake and exhaust system. However, very sharp spikes and dips may require some smoothing. If you edit the Alpha-N or front cylinder trim table to smooth out values, remember to use the Save Table Edits to Buffer command after editing each table. Save the edited setup file to disk and upload it to the TCFI. Continue to operate the motorcycle under varying conditions for another 1-2 hours. Then repeat the process of downloading setup data, examining the BLM tables, using the Apply BLM Table commands, smoothing the Alpha-N and front cylinder trim tables, saving, and uploading back to the TCFI as previously described. Continue this auto-tuning process until most of the BLM cells remain in the 90-110% range. CAUTION: During auto-tuning, BLM values are only saved if the engine reaches 95° C (200° F) and runs for at least 5 minutes. This is set by warm engine temperature and engine warmup time parameters (refer to page 28). In cold climate areas, you may have to use a lower value for warm engine temperature. If spark knock is noted under wide open throttle or throttle roll-on, use PC Link TCFI software to edit the ignition advance table and reduce the ignition advance 3-5 degrees under the conditions that cause spark knock. Using the TCFI Log software to examine engine data may be very helpful for determining exactly what manifold pressure and RPM values were encountered. A common error is to assume spark knock only occurs Accepted engineering practice is to use the smallest possible injectors (in terms of flow) for best control at idle and part throttle. The original equipment throttle body and similar aftermarket units with siamesed runners are subject to fuel imbalance problems between the front and rear cylinders. When the fuel injector duty cycle exceeds 50%, fuel will start being inducted into the wrong cylinder (i.e. front injector spraying fuel while rear intake valve is still open). The TCFI system cannot correct this problem. Table 1 lists conservative horsepower limits based on injector size. You can use TCFI Log software to check the injector duty cycle at wide open throttle. Table 1 – Recommended Horsepower Limits Injector Size Horsepower Limit 4.34 gm/sec (stock) 100 HP 4.89 gm/sec (Screamin Eagle® P/N 27654-06) 110 HP WARNING: If you significantly exceed these horsepower limits, the result may be a lean cylinder and possible engine damage at high RPM wide open throttle. LARGE DISPLACEMENT ENGINES For large displacement engines and/or higher flow injectors, you can modify one of the existing setup files by editing the module parameters and entering appropriate values for the estimated horsepower and injector flow rate. Engines displacing over 103 CID may require additional tuning procedures. Please contact our tech support for details. The stock starting system is inadequate for high displacement, high compression engines. For these applications, you must install compression releases and upgrade the starter, ring gear/pinion, and battery. Based on customer feedback, the best available Daytona Twin Tec LLC, 933 Beville Road, Suite 101-H, S. Daytona, FL 32119 (386) 304-0700 www.daytona-twintec.com Page 8 TCFI Gen 6 Manual Rev 2.1 5/2015 starting system is the combination of a Tech Cycle 2.0 KW Tornado starter, Rivera Engineering 84 tooth ring gear/pinion set, and Yuasa YuMicron CX battery. IDLE TUNING CONSIDERATIONS Some large displacement engines with high overlap/long duration camshafts may not idle properly at the nominal 1,000 RPM and 13.5 AFR settings used in the standard setup files. You may have to increase the idle RPM to a higher value such as 1,100 RPM and enrich the idle to 12.5-12.8 AFR. Download the current setup with PC Link TCFI software and use the Edit 2D Table – ET Based Idle RPM command to increase the idle RPM. Do not decrease values at the left of the table (corresponding to a cold start condition) that are already higher than your desired idle RPM. If you significantly increase idle RPM, you may also have to make corresponding edits to the ET Based IAC Position table. Please contact our tech support for details. Then use the Edit 3D Table – AFR Table command and change the applicable idle cells (750 1,500 RPM at 0-5% TPS) to the desired AFR value. Remember to use the Save Table Edits to Buffer command after editing each table. Save the edited setup file to disk and upload it to the TCFI. For additional idle tuning information, please download the TCFI Idle Tuning Tech Note. DYNO TUNING CONSIDERATIONS Auto-tuning using the procedures listed on page 7 will get you within a few horsepower of the maximum that the engine can deliver. If you decide to do dyno tuning for maximum power, you can experiment with wide open throttle (WOT) ignition timing and AFR. Please pay careful attention to the following dyno tuning considerations: 1. Only edit the ignition advance and AFR tables. Don’t edit any other tables (never make any changes to the BLM or Alpha-N tables once autotuning is completed). The usual range for WOT ignition timing at 4,000-6,000 RPM is about 28-34 degrees BTDC. The usual range for WOT AFR is about 12.5-12.8. Some engines may require a richer mixture, possibly down to 11.5, to avoid detonation problems. 2. The TCFI should be operated in closed loop. Make sure that the engine is warmed up (oil temperature is in the 150-180° F range) before doing a run and that engine status in TCFI Log shows closed loop operation. If you have made any table edits, allow one run for auto-tuning before capturing data. 3. Inadequate air flow for engine cooling is a major problem with many dyno systems. Always let the engine cool off between dyno runs. The use of a separate heavy duty industrial grade fan capable of generating at least 50+ MPH air velocity at the front of the engine is recommended. You can measure the air velocity with a handheld anemometer such as Extech P/N 45118 available from Grainger. 4. Use the TCFI data logging capability. Always download data with TCFI Log software at the end of every run and study the results (use the 10 samples/sec download option). Check engine and air temperatures, throttle position, manifold pressure, and AFR. TCFI Log is a very powerful tool that can help you identify potential problems that may be affecting engine performance. Inconsistent dyno test results are often the result of thermal problems (engine temperature variations or hot soak effects). 5. Dyno exhaust sniffer limitations. Some of the older sniffers monitored CO and CO2. These systems are so slow and inaccurate that they should be totally disregarded. Modern sniffers from Dynojet and Horiba use a wideband sensor similar to the WEGO sensor. These sniffers are still subject to erroneous lean readings caused by reversion of atmospheric oxygen if the probe cannot be inserted past the baffles in the exhaust. Sensor degradation caused by leaded racing gas is a common occurrence. Another problem is sampling delay due to the long hose between the sniffer tip and actual sensor. The bottom line is to trust your WEGO sensors and disregard any errant readings from an exhaust sniffer. ENGINE TUNING GUIDELINES Higher AFR values correspond to a leaner (less fuel) condition. The practical operating range for most engines using gasoline fuel is from approximately 11.5 to 14.7 AFR. Combustion of a stoichiometric mixture (exactly enough air to burn all the fuel) results in 14.7 AFR indication. Automotive engines with catalytic converters operate near 14.7 AFR during cruise and idle. Air-cooled motorcycle race engines usually require a richer mixture to limit cylinder head temperature and prevent detonation. Table 2 lists recommended AFR values for race engines without emission controls. Daytona Twin Tec LLC, 933 Beville Road, Suite 101-H, S. Daytona, FL 32119 (386) 304-0700 www.daytona-twintec.com Page 9 TCFI Gen 6 Manual Rev 2.1 5/2015 Table 2 – Recommended AFR Values Operating Mode Recommended AFR Cold Start (first 30 sec) 11.5-12.5 Idle 12.8-13.5 Part Throttle Cruise 13.0-14.0 Wide Open Throttle 12.5-12.8 (values down to 11.5 may be used to reduce detonation) EXHAUST CONSIDERATIONS The use of a WEGO system for closed loop fuel control places constraints on the choice of exhaust system. The WEGO system may give inaccurate results in certain situations: Exhaust reversion. Reversion is the term for a negative pressure wave that can suck ambient air back into the exhaust and cause an erroneous lean AFR indication. Reversion effects will be most noticeable at idle, part throttle low RPM cruise, and decel. Open drag pipes suffer from reversion effects. Please note that if you use drag pipes or other open pipes, autotuning may not be possible at idle or part throttle due to reversion effects. In this case, you have three options: 1. Modify the exhaust to allow auto-tuning at idle and part throttle by adding a restriction such as the washers shown in Figure 1 or some other type of baffling. For race applications, you can remove the restriction after auto-tuning the idle and part throttle cells and then lock out closed loop operation by using the special value 0 in the BLM tables for these cells. 2. Use a rubber hose to extend the exhaust length during auto-tuning at idle and part throttle. For more information, please contact our tech support. 3. Manually tune the fuel tables for idle and part throttle cells. This involves trial and error and is not recommended. Closed loop operation in idle and part throttle cells must be locked out by using the special value 0 in the BLM tables for the affected cells. You can reduce reversion effects in open drag pipes and mufflers without restrictive baffles with the modification shown in Figure 1. Use washers with an OD that is 2/3 to 3/4 the ID of the pipe (for example, 11/2” OD washers are suitable for pipes with an ID of 2” to 2.25”). Weld ¼-20 socket head cap screws to the washers as shown. Drill holes at the bottom of the pipes about 2” from the end and use decorative acorn nuts to secure the washer assemblies. We suggest that you use stainless steel hardware. The washers will reflect positive pressure waves that will cancel out the negative pressure waves reflecting from the end of the pipes. You can turn the washers just like throttle blades to provide more or less restriction. Dyno tests will show a significant increase in midrange torque and a small drop in top end horsepower as the restriction is increased. WARNING: If you can insert a broomstick through the mufflers, you have the equivalent of open drag pipes and the WEGO sensors will not read accurate AFR values, except at wide open throttle. Figure 1 – Exhaust Mod to Reduce Reversion Excessive scavenging. Tuned exhausts in combination with a high overlap camshaft profile can pull unburned air and fuel mixture through the cylinder into the exhaust and cause an erroneous rich AFR indication. Some aftermarket 2-into-1 systems, such as the Thunderheader appear to suffer from this problem, whereas others such as the Supertrapp seem less affected. Misfiring. If the AFR is so rich that the engine misfires, high levels of oxygen will remain in the exhaust gas and result in an erroneous lean indication. CAUTION: Insistence on using an inappropriate exhaust and consequent failure of auto-tuning is a major cause of installation problems requiring tech support. Daytona Twin Tec LLC, 933 Beville Road, Suite 101-H, S. Daytona, FL 32119 (386) 304-0700 www.daytona-twintec.com Page 10 TCFI Gen 6 Manual Rev 2.1 5/2015 HOT STARTING PROBLEMS ACR SYSTEM Some engines are prone to hot starting problems. When cranked after a short hot soak, the engine may “kick back.” Over time, this will cause damage to the ring gear and starter pinion. Engines on some models are equipped with an automatic compression release (ACR) system. The TCFI Gen 6 supports the ACR system. No modifications or other special considerations are required. The ACR output on pin 19 of the ECM connector is active during the cranking revolutions set under Module Parameters (refer to page 26) if this parameter is set to a non-zero value. The TCFI module uses an improved starting algorithm that includes a programmable cranking delay. The TCFI module is shipped with a zero cranking delay: it fires on the first recognized compression stroke. This works best on stock and mildly modified engines. High compression engines will generally require compression releases. When compression releases are installed, best starting results will be obtained by programming the TCFI module for a 1-2 revolution cranking delay. This can be done by means of the PC Link TCFI software. SPARK KNOCK PROBLEMS WITH HIGH COMPRESSION ENGINES Spark knock problems may be encountered with high compression engines. If engine parts were “mixed and matched” from different suppliers, the actual compression ratio may differ substantially from the expected value. You cannot estimate compression ratio with cranking compression tests, as camshaft timing usually causes an erroneous low reading. To accurately calculate compression ratio, you must measure the combustion chamber volume and use the formula: Compression = (Head cc + Deck cc + Cylinder Volume) Ratio (Head cc + Deck cc) The practical limit for compression ratio is about 10.5:1 to 11:1 when running 93 octane pump gas. Any higher compression ratio will require retarding the ignition timing to the point where more power is lost from the retarded timing than is gained from the higher compression. If spark knock is encountered during operation, you can use the TCFI Log software to download data and examine the operating conditions (RPM and manifold pressure) where spark knock occurred. You can then make appropriate reductions to the ignition advance table. Large displacement, high compression engines are prone to spark knock at relatively low MAP values during throttle roll-on. You may need to reduce the ignition advance throughout the entire MAP range. USER FUNCTIONS The TCFI user input on pin 56 of the ECM connector can be connected for a stage RPM limit function as shown in Figure 2. The stage limit switch must be normally open. You can use a microswitch attached to the clutch lever. When the clutch lever is pulled in, the switch contacts should close to activate the stage RPM limit. Refer to the User Functions section on page 28 for details on programming the stage RPM limit. Figure 2 – Stage Limit Switch Wiring Diagram STAGE LIMIT SWITCH OPERATION: SWITCH OPEN - MAXIMUM RPM LIMIT SWITCH CLOSED - STAGE RPM LIMIT TCFI GEN 6 PIN 56 (USER INPUT) TO GROUND The TCFI user output on pin 20 of the ECM connector can drive a standard automotive relay connected as shown in Figure 3. When the user output is active, +12V power is applied to the load. Refer to the User Functions section on page 28 for details on programming the user output. Figure 3 – User Output Relay Wiring Diagram TO +12V TCFI GEN 6 87 PIN 20 (USER OUTPUT) Daytona Twin Tec LLC, 933 Beville Road, Suite 101-H, S. Daytona, FL 32119 (386) 304-0700 www.daytona-twintec.com Page 11 86 30 85 12V STANDARD AUTOMOTIVE RELAY TO LOAD TCFI Gen 6 Manual Rev 2.1 5/2015 CUSTOM BIKE AND AFTERMARKET ACCESSORY CONSIDERATIONS The TCFI can be used for custom bike applications. The TCFI does not require the presence of a turn signal/security module (TSM/TSSM). However, it does require all the engine sensors and actuators used with a standard H-D® application, including a vehicle speed sensor (VSS). Prior to installation on a custom bike, we suggest that you contact our tech support. Improper wiring connections, with missing or incorrect signals, are the most common problem encountered with custom bike applications. The original equipment ECM has no connector terminal assignment for a tach signal. Engine RPM data is only available on the J1850 data bus. Any aftermarket accessories that require engine RPM data will require an appropriate J1850 data bus interface. TECH SUPPORT If you require tech support for tuning issues, we will ask you to email us both the current setup file (downloaded by means of PC Link TCFI) and a data logging file (downloaded by means of TCFI Log) that shows the problem. The data logging files are large and tend to be corrupted when attached to an email. You suggest that you use an archiving program such as PKZIP or WinZip to compress the files prior to attaching them to an email. You can send email to [email protected]. Please make sure that you include your full name, phone number, complete information about the engine setup, and a detailed description of the problem. We suggest that you call us first to discuss the situation. UPGRADES AND KNOWN ISSUES The TCFI controller can be upgraded in the field by the user. Operating firmware is stored in FLASH memory and new firmware can easily be uploaded by means of the USB interface cable. We suggest you periodically check our website at www.daytona-twintec.com for upgrades to the TCFI firmware and accompanying PC based software. As of the shipment date, there are no known issues other than those listed below. Possible firmware corruption during dyno test. We suggest that you do not connect the USB interface to any PC running Dynojet WinPEP software. Use a separate PC, such as a laptop with isolated ground. There appears to be a serial port conflict or noise issue from the Dynojet ignition pickup. ENGINE DIAGNOSTICS The TCFI Gen 6 version has extensive diagnostics. When the ignition switch is first turned on, the check engine LED illuminates. The LED goes out when the system initialization is complete. If a diagnostic fault is detected while the engine is running, the LED will illuminate. Diagnostic codes can be read and cleared by means of the speedometer (same as with the OE ECM) or TCFI Log software. Most of the diagnostic codes are the same as those used by H-D and the H-D Electrical Diagnostic Manual for your model should be employed as a primary troubleshooting reference. Certain diagnostic codes that are unique to the TCFI or require special consideration are listed below: P0373 CKP Signal Lost. This code will appear if the engine stalls. Customers are often confused about the meaning of the term “trips” associated with codes, especially P0373. This is an industry standard terminology. If code P0373 shows 40 trips, it means that the code was set 40 engine start cycles ago, not that the code has been set 40 times and that the crankshaft position sensor is defective. P0132 Rear Oxygen Sensor High, P0134 Rear Oxygen Sensor Low/Open, P0152 Front Oxygen Sensor High, or P0154 Front Oxygen Sensor Low/Open. These codes indicate a problem with the WEGO IIID unit. P0134 and/or P0154 will be set if the WEGO signal connection (white and blue wires) or WEGO power is lost. These codes may also be set if a Bosch sensor fails or becomes contaminated by leaded gasoline. REINSTALLING THE ORIGINAL EQUIPMENT ECM Removal of the WEGO system is not required for simple operational tests such as verifying that the engine will start and run. TROUBLESHOOTING FLOWCHART Follow the troubleshooting flowchart shown on the next page. Please note that the troubleshooting flowchart does not relate to incorrect setup or tuning issues with new installations. Experience has shown that most units returned for warranty are OK and another problem, such as user error including improper setup or tuning, an intermittent wire harness connection, or defective coil, fuel injector, or sensor is later identified. Daytona Twin Tec LLC, 933 Beville Road, Suite 101-H, S. Daytona, FL 32119 (386) 304-0700 www.daytona-twintec.com Page 12 TCFI Gen 6 Manual Rev 2.1 5/2015 TCFI Gen 6 System Troubleshooting Flowchart STARTING POINT REPLACE TCFI WITH OE MODULE OR ANOTHER KNOWN GOOD MODULE. IS PROBLEM FIXED? YES NO REPAIR UNDERLYING PROBLEM BEFORE INSTALLING TCFI. REFER TO MOTORCYCLE SERVICE MANUAL REINSTALL TCFI TURN IGNITION ON. SET ENGINE SWITCH TO RUN. IS CHECK ENGINE LED ILLUMINATED? NO YES DOES ENGINE START? REPLACE TCFI NO YES DOES CHECK ENGINE LED REMAIN ILLUMINATED OR ILLUMINATE AFTER A SHORT TIME? REPLACE TCFI NO YES REFER TO ENGINE DIAGNOSTICS SECTION. FIX APPLICABLE PROBLEM. DOES ENGINE STOP OR DROP CYLINDER AFTER SEVERAL MINUTES OF RUNNING? NO YES REPLACE COIL. IS PROBLEM FIXED? YES DOES ENGINE MISFIRE UNDER LOAD? NO NO REPLACE TCFI DONE YES REPLACE SPARK PLUGS, SPARK PLUG WIRES, AND COIL IS PROBLEM FIXED? YES DONE NO REPLACE TCFI DOES ENGINE MISFIRE AT PART THROTTLE OR WHILE COLD? NO FOR MISC PROBLEMS, CALL TECH SUPPPORT. YES CHECK FOR INCORRECT COLD START SETTINGS OR INTAKE LEAK. IS PROBLEM FIXED? YES DONE Daytona Twin Tec LLC, 933 Beville Road, Suite 101-H, S. Daytona, FL 32119 (386) 304-0700 www.daytona-twintec.com Page 13 NO REPLACE TCFI TCFI Gen 6 Manual Rev 2.1 5/2015 Table 3 – Setup File Listing Filename Description TCFI_Setup_2012_103CID_G6.dat 2012 and later 103 CID engines with stage 2 or higher modifications. Normal 1,000 RPM idle. TCFI_Setup_2012_103CID_G6_Low_Idle.dat 2012 and later 103 CID engines with stage 2 or higher modifications. 700 RPM idle. Files with “G6” in the filename are specifically intended for TCFI Gen 6 applications. Note that any existing TCFI Gen 3-5 setup files can be used with minor modifications for the TCFI Gen 6. Contact out tech support for assistance. For additional tuning files, please refer to the Quick Links page on our website at http://www.daytona-twintec.com/quicklinks.html Daytona Twin Tec LLC, 933 Beville Road, Suite 101-H, S. Daytona, FL 32119 (386) 304-0700 www.daytona-twintec.com Page 14 TCFI Gen 6 Manual Rev 2.1 5/2015 USB INTERFACE OVERVIEW The Twin Tec USB Interface P/N 102004 shown in Figure 4 is supplied as part of the TCFI system to provide PC connectivity. The USB interface is compatible with Windows XP/Vista/7/8. The USB Interface has a switch that selects the operating mode. The “TC88A And All Others” switch position is used for communications with the TCFI system. The unit comes with a connector that mates with the four terminal Deutsch data link connector located near the ECM. Figure 4 – USB Interface NOTE: You must set the switch to the correct position. Use the “TC88A And All Others” setting for use with the TCFI system. USB INTERFACE INSTALLATION The Twin Tec USB interface is based on the FTDI FT232R chip and drivers that allow the unit to emulate a standard Windows RS-232 COM port. Updated Windows drivers, installation instructions and troubleshooting tips are available on the FTDI website at www.ftdichip.com. Additional information and troubleshooting tips can be found on the PC Link Tech FAQ on our website at www.daytona-twintec.com. A new USB driver that simplifies the installation process is available. This installs as an executable file, similar to other Windows programs. The Windows Found New Hardware Wizard will then detect the USB device when it is first connected and automatically install the correct driver without the user having to browse out to the CDROM. Before proceeding with installation, shutdown any other applications that may be running. For Windows Vista, you must disable the User Account Control (UAC) during installation. If you are not familiar with the UAC, please refer to the Vista UAC Tech Note on our website's PC Link Tech FAQ for details. 1. Make sure your USB interface is not connected to your PC. 2. Insert the Twin Tec CDROM. When the Twin Tec autorun menu appears, click on Software. Scroll down and click on the USB Driver link. When the File Download dialog box appears, click on "Run this program from its current location." Ignore any security warnings and click on Yes to continue. 3. After installation of the driver is complete, connect the USB interface to the PC with the supplied USB cable. The Windows Found New Hardware Wizard will appear and complete installation of the USB interface. COM PORT CONFIGURATION After completing the installation steps outlined above, you must configure the new COM port using Device Manager. 1. Windows XP: click Start, Settings, Control Panel, System, Hardware, and then Device Manager. Windows Vista: click Start, Control Panel, System and Maintenance, and then Device Manager. Windows 7/8: Click Start, Control Panel, System and Security, and then Device Manager. For more information, visit www.pcsupport.about.com. 2. Scroll down to Ports (COM and LPT). The new USB interface will appear as a USB Serial Port. Click on this new port. Click on the Port Settings tab. Daytona Twin Tec LLC, 933 Beville Road, Suite 101-H, S. Daytona, FL 32119 (386) 304-0700 www.daytona-twintec.com Page 15 TCFI Gen 6 Manual Rev 2.1 5/2015 3. Click on Advanced. In most cases the wizard will have installed your new USB interface as COM5. Note the COM port number assigned for your system. For optimum performance, you should also change the BM Options Latency Timer to 2 msec as shown in the Figure 5. 4. Once you have configured a COM port number for your new unit, make sure that you use this same COM port selection in the Twin Tec software by using the Port Setup command from the Communications menu. Figure 5 – COM Port Configuration CAUTION: If communications are interrupted during PC Link upload or you accidently turn on the run/stop switch while the USB interface switch is in the wrong position, the TCFI may become non-responsive. To completely reset the TCFI, momentarily unplug the ECM connector. Daytona Twin Tec LLC, 933 Beville Road, Suite 101-H, S. Daytona, FL 32119 (386) 304-0700 www.daytona-twintec.com Page 16 TCFI Gen 6 Manual Rev 2.1 5/2015 PC LINK TCFI OVERVIEW SOFTWARE INSTALLATION PC Link TCFI software runs under Microsoft Windows XP/Vista/7/8. Version 16 of the PC Link TCFI software supports all current TCFI Gen 3-6 fuel injection controllers. The software allows the user to program the units with custom ignition and fuel tables and other engine parameters. The term TCFI is used throughout this document as a generic term and refers to the new TCFI Gen 6 version unless otherwise noted. The software is supplied on CDROM media or in the form of a compressed file downloaded from our website. The installation process uses InstallShield. This industry standard installer is based the new Microsoft Windows Installer service that greatly reduces potential problems such as version conflicts and allows for application self-repair. After PC Link TCFI is launched, the main screen appears blank. You have two options for obtaining data for editing. You can open a previously saved data file by using the Open File command on the File menu or you can download data from an attached TCFI unit by using the Download Data From TCFI command on the Communications menu. Note that TCFI data files use a .dat extension. You should create a separate folder to store these files. Once you have TCFI data, you can edit various 2D and 3D tables and engine parameters. All 3D tables are accompanied by chart displays that help visualize the data. You can also rotate the 3D chart display for a better view of a particular region. You can print the data associated with an active table or engine parameters by using the appropriate Print command from the File menu. When you open a file or download data from a TCFI module, the data is stored in a buffer memory. After editing a table, you can save the edits to this buffer memory. Once you have completed all your edits, you can save the data in buffer memory to a file or upload it back to the TCFI module by using the appropriate command from the File or Communications menu. PC REQUIREMENTS We recommend a laptop with Pentium processor and super VGA display (SVGA with 1024 x 768 pixel resolution) running Windows XP/Vista/7/8. Data chart display is graphics intensive and a high speed Pentium processor is recommended. Processors slower than 300 MHz will exhibit sluggish program loading and response. The PC must have a CDROM drive for program loading and an available USB port. PC Link TCFI includes print commands that print table graphics and other engine parameters. The program has been tested with Hewlett-Packard laser and inkjet printers and Epson inkjet printers. We recommend using a color inkjet printer. Before proceeding with installation, shutdown any other applications that may be running. For Windows Vista, you must disable the User Account Control (UAC) during installation. If you are not familiar with the UAC, please refer to the Vista UAC Tech Note on our website's Tech FAQ for details. Use the Windows Explorer or the Run command from the Windows Start Menu to launch setup.exe in the PC_Link_TCFI folder on the CDROM or the setup.exe file downloaded from our website. InstallShield will install the software in an appropriate folder under Program Files. Once InstallShield has completed the installation, PC Link TCFI will appear on the Windows Start Menu. You can then launch it just as you would any other Windows program. PC Link TCFI requires the Monospace 821 BT fixed pitch printer font in order to properly align columns when printing advance tables. The Monospace 821 BT font is included in the distribution media and automatically copied to your Windows Fonts folder during installation. A backup copy is also placed in the program folder. If you accidentally delete this font, use the Install New Font command from the Fonts folder File menu. The filename associated with Monospace 821 BT is monos.ttf. DOWNLOADING DATA The USB interface, P/N 102004, is used for communication with the TCFI module. No additional hardware is required. The USB interface connects to the four terminal Deutsch data link connector that is part of the WEGO harness (refer to Figure 26 for details). The USB Interface has a switch that selects the operating mode. For communication with the TCFI, you must use the TC88A And All Others switch position. Turn the ignition key and engine run/stop switches on to provide power to the TCFI unit. Do not start the engine. The PC Link TCFI program has auto-connect capability and a COM port scan function to aid in initial Daytona Twin Tec LLC, 933 Beville Road, Suite 101-H, S. Daytona, FL 32119 (386) 304-0700 www.daytona-twintec.com Page 17 TCFI Gen 6 Manual Rev 2.1 5/2015 setup of the communications link. You can use the Port Setup command from the Communications menu to display the dialog box shown below and select the correct COM port. Figure 7 - Creating a New Advance Table If you are not sure what COM port the USB interface has been assigned to, you can click on the Scan button to automatically detect and select the correct port. Before you do so, make sure that the USB interface has been connected to your PC and the TCFI module. Both the ignition key and engine run/stop switches must be turned on. Once the correct COM port has been selected, the program will remember this setting. If you enable the Auto Connect check box, the program will try to connect to the TCFI every time the program is started. Please note that you must have the correct COM port selected and the USB interface connected to your PC and the TCFI module. Both the ignition key and engine run/stop switches must be turned on in order for auto-connect to work properly. Figure 6 – Data Port Setup Editing Table Data You can edit table data using standard Windows copy and paste operations by selecting cells and then clicking the right mouse button to pop-up the edit menu. You can select cells by dragging the mouse with left button down. Figure 8 – Modify Command Download data by using the Download Data From TCFI command on the Communications menu. The program will display the module's firmware ID. CREATING A NEW IGNITION ADVANCE TABLE Use the New Advance Table command on the Edit, Edit 3D Table, Advance Table menu. A dialog box appears and allows you to enter initial timing and advance slope settings. Settings close to 5 result in an advance table suitable for stock engines. Use lower values for high compression engines. Each time you click on Update, the corresponding advance table is displayed. You will find the New Advance Table command useful for generating an advance table that will serve as a starting point for further edits. When you are ready to proceed with editing, click on OK. After you have edited the table, you must use the Save Table Edits To Buffer command from the Edit menu to save your edits to buffer memory. If you use the Close Table command from the Edit menu, all your edits are lost. You can also use the Modify command on the pop-up menu. When you enter a value, the presence of optional sign (+ or -) or percent (%) characters affects the outcome of the Modify command. Chart Operations You can rotate the 3D chart display for a better view of a particular region by dragging the mouse while holding both mouse buttons down. PC Link TCFI is intended to be an open system and uses the Component One Chart 7.0 3D charting control. The adventurous user can experiment with the chart property pages by right clicking on the chart. Almost any chart property can be changed. Click on the Help button for more information. If you corrupt the chart, exit and restart PC Link TCFI. Daytona Twin Tec LLC, 933 Beville Road, Suite 101-H, S. Daytona, FL 32119 (386) 304-0700 www.daytona-twintec.com Page 18 TCFI Gen 6 Manual Rev 2.1 5/2015 Data Export and Import by Means of Drag and Drop You might want to export or import 3D table data to or from another application such as Microsoft Excel. Arrange the program windows so that both the source and destination are visible (one on the left side of the screen and the other on the right side seems to work best). You must be able to see the information you want to drag as well as the location where you want to drop it. To export from PC Link TCFI to Excel, use the left mouse button to select a range of data on the spreadsheet grid. Then move the mouse cursor to an edge around the selection. Hold the left mouse button down and drag the selection into Excel. Release the left mouse button on the top left cell in Excel. When importing into PC Link TCFI from Excel, use the same procedure, except that Excel requires dragging and dropping with the right mouse button. EDITING IGNITION ADVANCE TABLE DATA Once you have advance table data (by opening an existing data file, downloading data from a TCFI unit or creating a new table as explained in the previous section), you can edit the data by clicking on and dragging individual points on the 3D chart display or you can directly edit numeric data on the spreadsheet grid. The table consists of 20 columns from zero to 7,500 RPM and 11 manifold pressure (MAP) rows from 10 to 30 In-Hg. The 7,500 RPM advance value is used at all higher RPM levels and the 10 In-Hg MAP advance value is used at all lower MAP levels. Note that 10 In-Hg corresponds to a high vacuum deceleration or idle condition and that 30 In-Hg corresponds to wide open throttle (WOT). Advance values must be between zero and 45 degrees. You can shift the entire advance table up or down by holding the Shift key down while dragging any point. The chart label box shows the shift in degrees. When you release the mouse button, the chart and spreadsheet grid values will be updated. Response of the chart label box may be sluggish on slower systems due to the amount of data being updated. After you have edited the table, you must use the Save Table Edits To Buffer command from the Edit menu to save your edits to buffer memory. If you use the Close Table command from the Edit menu, all your edits are lost. Editing Table Data You can edit table data using standard Windows copy and paste operations by selecting cells and then clicking the right mouse button to pop-up the edit menu. You can select cells by dragging the mouse with left button down. You can also use the Modify command on the pop-up menu. When you enter a value, the presence of optional sign (+ or -) or percent (%) characters affects the outcome of the Modify command as shown in Figure 8. Chart Operations You can rotate the 3D chart display for a better view of a particular region by dragging the mouse while holding both mouse buttons down. Daytona Twin Tec LLC, 933 Beville Road, Suite 101-H, S. Daytona, FL 32119 (386) 304-0700 www.daytona-twintec.com Page 19 TCFI Gen 6 Manual Rev 2.1 5/2015 Figure 9 – Editing Advance Table Data PC Link TCFI is intended to be an open system and uses the Component One Chart 7.0 3D charting control. The adventurous user can experiment with the chart property pages by right clicking on the chart. Almost any chart property can be changed. Click on the Help button for more information. If you corrupt the chart, exit and restart PC Link TCFI. Data Export and Import by Means of Drag and Drop You might want to export or import 3D table data to or from another application such as Microsoft Excel. Arrange the program windows so that both the source and destination are visible (one on the left side of the screen and the other on the right side seems to work best). You must be able to see the information you want to drag as well as the location where you want to drop it. To export from PC Link TCFI to Excel, use the left mouse button to select a range of data on the spreadsheet grid. Then move the mouse cursor to an edge around the selection. Hold the left mouse button down and drag the selection into Excel. Release the left mouse button on the top left cell in Excel. When importing into PC Link TCFI from Excel, use the same procedure, except that Excel requires dragging and dropping with the right mouse button. EDITING 3D TABLE DATA In addition to the ignition advance table, there are five other 3D tables that you can edit: AFR (air/fuel ratio), Alpha-N (throttle position and RPM based fuel table), front cylinder trim (percent fuel trim for front cylinder), and front and rear BLM (block learn multiplier). Before you can edit one of these tables you must either open a data file or download data from a TCFI unit. Due to the somewhat irregular shape of these tables, editing data by clicking on and dragging points on the chart is not feasible. You must edit the numeric data on the spreadsheet grid. Each table consists of 20 columns from zero to 7,500 RPM and 11 throttle position rows from 0% to 100%. The 7,500 RPM value is used at all higher RPM levels. Daytona Twin Tec LLC, 933 Beville Road, Suite 101-H, S. Daytona, FL 32119 (386) 304-0700 www.daytona-twintec.com Page 20 TCFI Gen 6 Manual Rev 2.1 5/2015 Figure 10 – BLM Table Showing Special Cells After you have edited a table, you must use the Save Table Edits To Buffer command from the Edit menu to save your edits to buffer memory. If you use the Close Table command from the Edit menu, all your edits are lost. Alpha-N Table The Alpha-N table is the main fuel table (AlphaN is the technical term for throttle position and RPM). The Alpha-N table values are in percent units. The calculated base injector pulse width (determined by horsepower and injector size settings on the module parameters screen) is multiplied by the Alpha-N table value to determine the theoretical injector pulse width for a 14.7 air fuel ratio. This value is then corrected for the desired air/fuel ratio (as set on the AFR table) and BLM (block learn multiplier) to arrive at the actual rear injector pulse width. From a practical standpoint, the Alpha-N table must be within about 20% of the required values for the TCFI system to successfully correct the injector pulse width based on closed loop feedback from an exhaust gas oxygen sensor. AFR Table The AFR (air/fuel ratio) table sets the desired air/fuel ratio under various operating conditions. The air/fuel ratio value is used in the rear injector pulse width calculation as explained above. Typical air/fuel ratios are 13.0 for idle, 13.8 for cruise, and 12.8 for wide open throttle. To prevent engine overheating, avoid lean air/fuel ratios exceeding 14.5 under cruise conditions. Front Cylinder Trim Table The front cylinder trim table values are in percent units. The calculated injector pulse width is multiplied by the front cylinder trim value to arrive at the front injector pulse width. Required front cylinder trim values are dependent on engine gas flow dynamics. The front cylinder trim table is automatically corrected when the Apply Front BLM Table command is executed. If you exceed the horsepower limits Daytona Twin Tec LLC, 933 Beville Road, Suite 101-H, S. Daytona, FL 32119 (386) 304-0700 www.daytona-twintec.com Page 21 TCFI Gen 6 Manual Rev 2.1 5/2015 listed in Table 1 on page 8, front cylinder trim may fail. BLM Table The rear BLM (block learn multiplier) table is shown in the graphic above. BLM values are in percent units and represent a correction factor required to obtain the air/fuel ratio set on the AFR table. BLM values are updated based on closed loop feedback from the exhaust gas oxygen sensor. Some special considerations apply to the BLM tables. BLM values are limited in range from 75% to 125%. The range limits are set on the module parameters screen. When a BLM cell nears the range limit, the cell color changes to red to alert the user that the system has just about run out of correction range and that the corresponding cell in the Alpha-N fuel table must be changed. BLM cell values 0 and 1 command special functions and these cells are highlighted in blue. Closed loop feedback is disabled in any BLM cells with value 0. This is useful in operating areas where exhaust reversion effects may cause incorrect sensor readings. Note that most BLM tables will have the value 0 in cells corresponding to decel (RPM above idle and closed throttle) where reversion effects are most pronounced. BLM update, but not closed loop feedback, is disabled in any BLM cells with value 1. Some BLM tables may have the value 1 in cells corresponding to idle (1,000-1,250 RPM and closed throttle). Please refer to the TCFI Idle Tuning Tech Note for more information on this subject. After several hours of engine operation, examine the BLM (block learn multiplier) tables. If you see red cells on a BLM table, you can use the corresponding Apply BLM Table command (on the BLM Table submenu) to automatically correct the Alpha-N fuel table and front cylinder trim table. After running the Apply BLM Table command, the BLM table cells will return to 100%. Please remember to upload the data back to the TCFI unit in order for the changes to take effect. The Reset BLM Table command on the BLM Table submenu resets all BLM cells to 100%. Editing Table Data You can edit table data using standard Windows copy and paste operations by selecting cells and then clicking the right mouse button to pop-up the edit menu. You can select cells by dragging the mouse with left button down. You can also use the Modify command on the pop-up menu. When you enter a value, the presence of optional sign (+ or -) or percent (%) characters affects the outcome of the Modify command as shown in Figure 8. Chart Operations You can rotate the 3D chart display for a better view of a particular region by dragging the mouse while holding both mouse buttons down. PC Link TCFI is intended to be an open system and uses the Component One Chart 7.0 3D charting control. The adventurous user can experiment with the chart property pages by right clicking on the chart. Almost any chart property can be changed. Click on the Help button for more information. If you corrupt the chart, exit and restart PC Link TCFI. Data Export and Import by Means of Drag and Drop You might want to export or import 3D table data to or from another application such as Microsoft Excel. Arrange the program windows so that both the source and destination are visible (one on the left side of the screen and the other on the right side seems to work best). You must be able to see the information you want to drag as well as the location where you want to drop it. To export from PC Link TCFI to Excel, use the left mouse button to select a range of data on the spreadsheet grid. Then move the mouse cursor to an edge around the selection. Hold the left mouse button down and drag the selection into Excel. Release the left mouse button on the top left cell in Excel. When importing into PC Link TCFI from Excel, use the same procedure, except that Excel requires dragging and dropping with the right mouse button. EDITING 2D TABLE DATA There are eleven 2D tables that you can edit. Before you can edit one of these tables you must either open a data file or download data from a TCFI unit. Each table consists of 17 columns with the upper row corresponding to the independent variable (throttle position, engine temperature, elapsed time, or IAC (idle air control) position. You can edit the numeric data corresponding to the dependent variable on the lower row of the spreadsheet grid. A typical 2D table is shown below. Some of the engine temperature cells are highlighted in red. These red cells correspond to invalid sensor readings. Daytona Twin Tec LLC, 933 Beville Road, Suite 101-H, S. Daytona, FL 32119 (386) 304-0700 www.daytona-twintec.com Page 22 TCFI Gen 6 Manual Rev 2.1 5/2015 After you have edited the table, you must use the Save Table Edits To Buffer command from the Edit menu to save your edits to buffer memory. If you use the Close Table command from the Edit menu, all your edits are lost. Delta TPS Fuel Multiplier Table throttle position means change in throttle position. Fuel multipliers greater than 100% for positive delta throttle position correspond to an acceleration enrichment (similar effect to an accelerator pump on a carburetor). Fuel multipliers less than 100% for a negative delta throttle position correspond to a deceleration enleanment (useful for reducing exhaust back fire). This table consists of a fuel multiplier (percent units) that is a function of delta throttle position. Delta Figure 11 – Typical 2D Table ET Based Priming Fuel Table This table consists of an injector pulse width that is a function of engine temperature. The priming pulse occurs once on the initial ignition switch on event. Some of the engine temperature cells are highlighted in red. These red cells correspond to invalid sensor readings. ET Based Cranking Fuel Table This table consists of an injector pulse width that is a function of engine temperature. The cranking pulse width is used during engine start. Some of the engine temperature cells are highlighted in red. These red cells correspond to invalid sensor readings. Time Based AFR Cold Start Enrichment Table This table consists of an AFR cold start multiplier (percent units) that is a function of elapsed time since engine start. This AFR cold start enrichment is applied to the values in the 3D AFR table. The AFR values are multiplied by the time based AFR cold start enrichment and by the ET based AFR cold start enrichment. For example, assume that the AFR value in a given cell is 14.0 and that the time and ET based AFR cold start enrichment values are 50% and 15% respectively. The actual AFR value for that cell then becomes 13.0 (14/(1 + 0.5 x 0.15)). The time based AFR cold start enrichment should always taper off from 100% at zero elapsed time and must reach 0% at the maximum value of elapsed time (251 seconds). In general, the values in this table will be correct for most applications and should not be changed without consulting tech support. ET Based AFR Cold Start Enrichment Table This table consists of an AFR cold start multiplier (percent units) that is a function of engine temperature. This table does double duty for hot soak enrichment. Some of the engine temperature cells are highlighted in red. These red cells correspond to invalid sensor readings. In general, the values in this table will be correct for most applications and should not be changed without consulting tech support. Time Based Fuel Cold Start Enrichment Table This table consists of a fuel cold start multiplier (percent units) that is a function of elapsed time since engine start. The overall fuel cold start enrichment is determined as follows: calculated injector pulse width for each cylinder is multiplied by the time based fuel cold start enrichment and by the appropriate ET based front or rear cylinder cold start enrichment. The overall fuel cold start enrichment is then added to the injector pulse width. For example, assume that the calculated injector pulse width is 4 msec and that the time and ET based fuel cold start enrichment values are 50% and 25% respectively. The total injector pulse width is then 4.5 msec (0.5 x 0.25 x 4.0 + 4.0). The time based fuel cold start enrichment should always taper off from 100% at zero elapsed time and must reach 0% at the maximum value of elapsed time (251 seconds). ET Based Front and Rear Cylinder Cold Start Enrichment Table These tables consist of a fuel cold start fuel multiplier (percent units) that is a function of engine temperature. Individual tables are used because most Daytona Twin Tec LLC, 933 Beville Road, Suite 101-H, S. Daytona, FL 32119 (386) 304-0700 www.daytona-twintec.com Page 23 TCFI Gen 6 Manual Rev 2.1 5/2015 engines exhibit significant differences in the characteristics of the front and rear cylinders. These tables also do double duty for hot soak enrichment. Note that a significant enrichment is required at high temperatures due to reduced injector flow. Some of the engine temperature cells are highlighted in red. These red cells correspond to invalid sensor readings. You may need to edit these two tables for optimum cold start and restart after hot soak. Please refer to the TCFI Idle Tuning Tech Note. for more information on this subject. ET Based Idle RPM Table This table consists of desired idle RPM as a function of engine temperature. The ET based IAC position (see table description below) is adjusted to maintain the desired idle RPM. Some of the engine temperature cells are highlighted in red. These red cells correspond to invalid sensor readings. ET Based IAC Table This table consists of IAC (idle air control) value as a function of engine temperature. The IAC value is the minimum throttle position during idle in 0.1% units (i.e. an IAC value of 50 corresponds to 5% throttle). Greater IAC values result in more idle air and higher idle speed. IAC is continuously reduced as the engine warms up, even if the engine is not idling. Some of the engine temperature cells are highlighted in red. These red cells correspond to invalid sensor readings. ET Based IAC Start Adder Table This table consists of IAC (idle air control) value as a function of engine temperature. The values represent additional air flow through the idle system during engine starting. Generally, more air is required for a hot start, especially after a hot soak. Some of the engine temperature cells are highlighted in red. These red cells correspond to invalid sensor readings. Time Based IAC Start Adder Table This table consists of a multiplier factor (percent units) that is a function of elapsed time since engine start. The multiplier factor is applied to the IAC start adder in order to compensate for time dependent characteristics of the throttle body after engine start, especially after a hot soak. The table values should always taper off from some initial value at zero elapsed time and must reach 0% at the maximum value of elapsed time (268 seconds). If the engine runs above the desired idle RPM for several seconds when first returning to idle after the motorcycle has been driven some distance, a higher initial multiplier value is required. Editing Table Data You can edit table data using standard Windows copy and paste operations by selecting cells and then clicking the right mouse button to pop-up the edit menu. You can select cells by dragging the mouse with left button down. You can also use the Modify command on the pop-up menu. When you enter a value, the presence of optional sign (+ or -) or percent (%) characters affects the outcome of the Modify command as shown in Figure 8. Data Export and Import by Means of Drag and Drop You might want to export or import 2D table data to or from another application such as Microsoft Excel. Arrange the program windows so that both the source and destination are visible (one on the left side of the screen and the other on the right side seems to work best). You must be able to see the information you want to drag as well as the location where you want to drop it. To export from PC Link TCFI to Excel, use the left mouse button to select a range of data on the spreadsheet grid. Then move the mouse cursor to an edge around the selection. Hold the left mouse button down and drag the selection into Excel. Release the left mouse button on the top left cell in Excel. When importing into PC Link TCFI from Excel, use the same procedure, except that Excel requires dragging and dropping with the right mouse button. MODULE PARAMETERS Module parameters are divided into two categories: basic parameters and advanced parameters. Module parameters control the overall operation of the TCFI unit. Setup and calibration of the TCFI unit will generally involve editing some of the basic parameters. Users should not modify any of the advanced parameters without first consulting tech support. Basic module parameters are displayed in a dialog box by using the Edit Basic Module Parameters command on the Edit menu. Basic parameters include: Closed Loop AFR Control Mode – allows BLM (block learn multiplier) table updates based on feedback from an exhaust gas oxygen sensor. Only select this checkbox if the WEGO (wide-band exhaust gas oxygen) unit is connected to the TCFI. Daytona Twin Tec LLC, 933 Beville Road, Suite 101-H, S. Daytona, FL 32119 (386) 304-0700 www.daytona-twintec.com Page 24 TCFI Gen 6 Manual Rev 2.1 5/2015 Dual Independent Runner Intake – not applicable and grayed out for TCFI Gen 6 units. Brake Override – enables brake override safety function. Refer to page 5 for details. Continuous Barometric Pressure Update Mode – recommended for operation in mountainous terrain with elevation changes of more than 3000 feet. Barometric pressure is continually estimated from manifold pressure sampled at specific crank angle and TPS conditions. Estimated Wheel HP at 6000 RPM – enter a reasonable estimate in order for the TCFI to calculate the base injector pulse width. Well tuned engines will develop about one horsepower per CID. If the horsepower peak is below 6,000 RPM, use the peak value. If the estimated value is too low, the engine will initially run lean and this may interfere with auto-tuning. Enable Low Fuel Warning – not applicable and grayed out for TCFI Gen 6 units. Automatic Nominal Idle IAC Update Mode – recommended for most applications. The nominal idle IAC value (once engine is fully warmed up and at stable idle condition) is automatically sampled and updated. Manual setting of the nominal idle IAC value may be required for some applications. For more information on this subject, please refer to the TCFI Idle Tuning Tech Note. Anti-Stall IAC Mode – not applicable and grayed out for TCFI Gen 6 units. Injector Size – flow rate in gm/sec units. Refer to Table 4. You must enter the correct injector size value in order for the TCFI to calculate the base injector pulse width. Table 4 – Injector Size Model Injector Size (gm/sec) Stock Twin Cam 3.91 Screamin Eagle P/N 27654-06 4.89 Figure 12 – Basic Module Parameters Dialog Box Daytona Twin Tec LLC, 933 Beville Road, Suite 101-H, S. Daytona, FL 32119 (386) 304-0700 www.daytona-twintec.com Page 25 TCFI Gen 6 Manual Rev 2.1 5/2015 Base Injector Pulse Width – in millisecond units. Please note the base injector pulse width is a calculated value that you cannot directly edit. RPM Limit – you can enter any value from 3,000 to 9,900 RPM. Values are automatically rounded to the nearest 100 RPM. Cranking Revs - sets the number of engine revolutions before the ignitions fires the first spark. Please note that a hot engine may exhibit preignition and appear to start on the first revolution even if the Cranking Revs parameter is set to a non-zero value. The automatic compression release (ACR) system is activated during cranking if the Cranking Revs parameter is set to a non-zero value. Rear Cylinder Timing Offset – you can set the value over a -5 to +5 degree range. Leave the value at zero if you do not require a rear cylinder timing offset. VSS Frequency – this parameter sets the correct speedometer and odometer scaling. An incorrect value will also affect idle RPM control and turn signal cancellation. Please refer to the following section for more details. 6th Gear Ratio – this parameter sets the RPM/KPH ratio used to detect the transmission gear and illuminate the 6th gear light. You can use the gear ratio display function in TCFI Log software data logging chart display to determine the required value for a particular application. For most models, you can use the default value of 23. WEGO Warmup Time – in seconds. This parameter determines the minimum engine run time before closed loop AFR control. Idle TGS – in percent units. This parameter determines the maximum TGS (twist grip sensor) value for closed loop idle speed control. The default value is 1.0%. For more information on this subject, please refer to the TCFI Idle Tuning Tech Note. Nominal Idle IAC – this parameter determines the nominal IAC (idle air control) value learned by the system when the engine is completely warmed up and at a stable idle condition. IAC value is in 0.1% throttle position units (higher number means more idle air).For more information on this subject, please refer to the TCFI Idle Tuning Tech Note. You can click on Restore Defaults to restore default values for a stock engine. Advanced module parameters are displayed in a dialog box by using the Edit Advanced Module Parameters command on the Edit menu. Advanced parameters include: Warm Engine Temperature – in degree C units. This parameter determines the minimum engine (cylinder head) temperature before closed loop corrections are saved to the BLM tables. The default value is 95 degree C. Engine status changes from cold to warm once the warm engine temperature is reached and the engine warmup time has elapsed. Engine Warmup Time – in seconds. This parameter determines the minimum engine run time before closed loop corrections are saved to the BLM tables. The default value is 260 seconds. Engine status changes from cold to warm once the warm engine temperature is reached and the engine warmup time has elapsed. Hot Soak Temperature – in degree C units. This parameter determines the minimum engine (cylinder head) temperature before special hot soak considerations apply when the engine is turned off. The default value is 60 degree C. Hot Soak Timeout – in seconds. This parameter determines the minimum engine off time (prior to a hot restart) before special hot soak considerations apply. The default value is 60 seconds. Delta TPS Gain – this parameter determines the scaling of TPS values in the delta TPS based fuel multiplier table. Do not change this parameter from the default value of 5. Enlean Decay Rate – this parameter determines the time constant of recovery from enleanment (negative delta TPS values) in the delta TPS based fuel multiplier table. Do not change this parameter from the default value of 25. Enrich Decay Rate – this parameter determines the time constant of recovery from enrichment (positive delta TPS values) in the delta TPS based fuel multiplier table. Do not change this parameter from the default value of 20. User Data – you can enter up to 32 characters of user data that will be saved in EEPROM memory. User data can contain comments or serial numbers. Minimum Injector Pulse Width – in millisecond units. This parameter affects linearity of the fuel tables at low values. Do not change this parameter from the default value of 0.1. Once you have entered the appropriate module parameters, click on OK to save your edits to buffer memory. If you click on Cancel, all your edits are lost. Idle Integrator Gain – this parameter determines the response time of closed loop idle speed Daytona Twin Tec LLC, 933 Beville Road, Suite 101-H, S. Daytona, FL 32119 (386) 304-0700 www.daytona-twintec.com Page 26 TCFI Gen 6 Manual Rev 2.1 5/2015 control. A higher value will result in a faster response but may cause instability (oscillation). The default value is 10. Min AFR BLM – in percent. This parameter limits the minimum BLM value when the system is correcting a rich condition. The default value is 75%. AFR Integrator Gain – this parameter determines the response time of closed loop AFR control. A higher value will result in a faster response but may cause instability (oscillation). The default value is 30. Max AFR BLM – in percent. This parameter limits the maximum BLM value when the system is correcting a lean condition. The default value is 125%. AFR Deadband – in AFR units. This parameter determines the deadband (minimum error before system response) for closed loop AFR control. A small deadband value improves closed loop stability and reduces hunting. The default value is 0.3. Asynchronous Fuel Gain – this parameter determines the amount of fuel that is immediately (asynchronously) injected when the throttle is rapidly opened. Higher values result in more fuel. A zero value disables asynchronous injection. Figure 13 – Advanced Module Parameters Dialog Box VIN ENTRY Use the Edit TCFI VIN command to program the VIN. If the TCFI firmware is updated using Mega Boot Programmer software, the VIN must be reentered. Note that the VIN is not stored as part of a TCFI setup file and is not changed if a different setup file is uploaded. SPEEDOMETER CALIBRATION The VSS frequency parameter sets the correct speedometer and odometer scaling. Preliminary values for 2012 and later models are given in Table 5. For models not listed, you can use TCFI Log software to examine data logged while the motorcycle was operated at a known speed in 6th gear. Use the speedometer recalibration procedure as explained below to recalculate the VSS frequency. Use the gear ratio display function and average several readings to determine the 6th gear ratio. Daytona Twin Tec LLC, 933 Beville Road, Suite 101-H, S. Daytona, FL 32119 (386) 304-0700 www.daytona-twintec.com Page 27 TCFI Gen 6 Manual Rev 2.1 5/2015 Table 5 – VSS Frequency and 6th Gear Ratio for 2012 and Later Models Model VSS Frequency at 100 KPH 6th Gear Ratio (RPM/KPH) Touring 1575 Hz 23 Speedometer Recalibration. You can easily recalibrate the speedometer (and odometer) to accommodate tire and gear changes. Run the motorcycle on a chassis dyno at a constant speed. Note the speedometer reading and the correct speed indicated on the dyno. Use the following formula to calculate the new VSS frequency parameter: New VSS Freq = Original VSS Freq x Speedo Reading Indicated Dyno Speed standard automotive relay returned to +12V. When the user output is active, the pin is grounded. User input functions include: Data Log Only – default mode. For data logging connected switches. Ignition Retard – applies user retard value (0 to 10 degrees) whenever the user input is grounded. To avoid potential conflicts, do not select ignition retard mode if the user output is in NOS trigger mode. Ignition Kill – disables spark firing whenever the user input is grounded. Can be used with an air shifter to reduce stress during shifts. Stage RPM Limit – activates stage RPM limit (2000 to 9900 RPM) whenever the user input is grounded. User output functions include: For example, if the original VSS frequency parameter was 1403 Hz, the speedometer reading is 60 MPH and the indicated dyno speed is 57 MPH, then the new VSS frequency parameter should be: 1476 Hz = 1403 Hz x 60 MPH 57 MPH The speed units cancel out, so you can use either MPH or KPH units in the calculation as long as you use the same units for both the speedometer reading and dyno speed. For best accuracy, use a test speed near highway cruising speed. USER FUNCTIONS User functions are displayed in a dialog box by using the Edit User Functions command on the Edit menu. User functions control the operation of the user input and user output of the TCFI unit. The user input is a 0 to +5V input that is internally "pulled high" to +5V. The input pin is sampled and the data is always logged as part of the TCFI data logging function. The user input can also be used for other functions such as selecting a stage RPM limit. In this case the user input is “active low” with a threshold of about 2.5V. You can connect a switch between the user input and ground. When the switch is closed and the user input pin is grounded, the stage RPM limit (our other selected function) will be activated. The user output can drive a small load up to one amp and is protected against short circuits. The user output is “active low.” It can be used to drive a Off – default mode. RPM And TPS Based Switch – general purpose switch function based on RPM and TPS. The user output is set on (pulled to ground) when RPM >= RPM On AND TPS >= TPS On. The user output then remains on until it is reset off when RPM > RPM Off OR TPS < TPS Off. This feature allows you to implement an RPM and TPS based window switch. In the sample data above, the use output would be active between 3000 and 5000 RPM if the throttle was opened above 90%. NOS Trigger – specifically designed to trigger an NOS system. The user output is set on (pulled to ground) when RPM >= RPM On AND TPS >= TPS On AND VSS >= Minimum VSS. The user output then remains on until it is reset off when RPM > RPM Off OR TPS < TPS Off OR VSS < Minimum VSS. As an additional safety feature to prevent engine damage, the user output is immediately tripped off if the RPM limit is exceeded and cannot be set back on again until the TPS drops below the TPS Off level. In NOS trigger mode, the user retard value (0 to 10 degrees) is applied whenever the user output is on. Individual parameters are enabled or disabled (grayed out) based on the user functions you selected. Once you have entered the appropriate user function parameters, click on OK to save your edits to buffer memory. If you click on Cancel, all your edits are lost. You can click on Restore Defaults to restore default values. Daytona Twin Tec LLC, 933 Beville Road, Suite 101-H, S. Daytona, FL 32119 (386) 304-0700 www.daytona-twintec.com Page 28 TCFI Gen 6 Manual Rev 2.1 5/2015 Figure 14 – User Functions Dialog Box UNITS SELECTION UPLOADING DATA You can select the temperature, pressure, and air/fuel ratio units used for table data display. Use the Units Selection command on the Edit menu. A dialog box will appear as below. You can select Fahrenheit (F) or Celsius (C) temperature units, inches of mercury (In-Hg) or kilopascals (kPa) manifold pressure units, and air/fuel ratio in gasoline AFR or Lambda units. The program remembers the selections you have made. Refer to the Downloading Data section on page 17 for details about USB interface hookup and COM port setup. Before uploading, make sure the module parameters are correct. Figure 15 – Units Selection Dialog Box Upload data by using the Upload Data To TCFI command on the Communications menu. A status message is displayed when the upload process has been successfully completed. If you attempt to upload data to anything other than a TCFI unit with correct firmware, an error message will appear and the upload will be aborted. TROUBLESHOOTING FLOWCHART Follow the troubleshooting flowchart shown on the following page. Experience has shown that most communication problems are user error or PC compatibility issues. Daytona Twin Tec LLC, 933 Beville Road, Suite 101-H, S. Daytona, FL 32119 (386) 304-0700 www.daytona-twintec.com Page 29 TCFI Gen 6 Manual Rev 2.1 5/2015 Software Communications Troubleshooting Flowchart STARTING POINT IS RS-232 TIMEOUT ERROR MESSAGE DISPLAYED WHEN ATTEMPTING DOWNLOAD OR UPLOAD? YES NO FOR MISC PROBLEMS, CALL TECH SUPPORT. CYCLE ENGINE RUN/STOP SWITCH. VERIFY CHECK ENGINE LIGHT ILLUMINATED. IS PROBLEM FIXED? YES NO DONE USE WINDOWS DEVICE MANAGER TO VERIFY THAT CORRECT COM PORT IS SELECTED. IS PROBLEM FIXED? YES DONE NO CALL TECH SUPPORT Daytona Twin Tec LLC, 933 Beville Road, Suite 101-H, S. Daytona, FL 32119 (386) 304-0700 www.daytona-twintec.com Page 30 TCFI Gen 6 Manual Rev 2.1 5/2015 TCFI LOG SOFTWARE OVERVIEW TCFI Log software runs under Microsoft Windows XP/Vista/7/8. Version 18 of the TCFI Log software supports all current TCFI Gen 3-6 fuel injection controllers. The software allows users to view real time engine data during dyno tuning, download and display data logged by the unit including operating statistics, and to control certain engine functions. The term TCFI is used throughout this document as a generic term and refers to the new TCFI Gen 6 version unless otherwise noted. After TCFI Log is launched, the main screen appears blank. You have multiple display options. You can display real time engine data on an instrument panel type screen by using the View Real Time Data command on the View menu. You can display and print data logged by the TCFI unit on a chart recorder type screen. Data logged by the TCFI unit must be downloaded before it can be displayed, by using the Download Logged Data From TCFI command on the Communications menu. Once data has been downloaded, it is automatically displayed on a chart recorder type screen. You can save this data by using the Save File command from the File menu. You can display a previously saved data file by first using the Open File command on the File menu and then using the View Chart command on the View menu. You can also download, view, and print engine operating statistics and historical diagnostic codes by using the Download Statistics and Diagnostic Codes command from the Communications menu. Please note that this data is not saved. TCFI Log Version 18 is only compatible with TCFI Gen 3-6 units and cannot be used to download data or open files from earlier TCFI units. A sample data file (Sample.log) is included in the program folder. SOFTWARE INSTALLATION The software is supplied on CDROM media or in the form of a compressed file downloaded from our website. The installation process uses InstallShield. This industry standard installer is based the new Microsoft Windows Installer service that greatly reduces potential problems such as version conflicts and allows for application self-repair. Before proceeding with installation, shutdown any other applications that may be running. For Windows Vista, you must disable the User Account Control (UAC) during installation. If you are not familiar with the UAC, please refer to the Vista UAC Tech Note on our website's Tech FAQ for details. Use the Windows Explorer or the Run command from the Windows Start Menu to launch setup.exe in the TCFI_Log folder on the CDROM or the setup.exe file downloaded from our website. InstallShield will install the software in an appropriate folder under Program Files. Once InstallShield has completed the installation, TCFI Log will appear on the Windows Start Menu. You can then launch it just as you would any other Windows program. TCFI Log requires the Monospace 821 BT fixed pitch printer font in order to properly align columns when printing. The Monospace 821 BT font is included in the distribution media and automatically copied to your Windows Fonts folder during installation. A backup copy is also placed in the program folder. If you accidentally delete this font, use the Install New Font command from the Fonts folder File menu. The filename associated with Monospace 821 BT is monos.ttf. TCFI CONNECTION The USB interface, P/N 102004, is used for communication with the TCFI module. No additional hardware is required. The USB interface connects to the four terminal Deutsch data link connector that is part of the WEGO harness (refer to Figure 26 for details). The USB Interface has a switch that selects the operating mode. For communication with the TCFI, you must use the TC88A And All Others switch position Turn the ignition key and engine run/stop switches on to provide power to the TCFI unit. Do not start the engine. The TCFI Log program has auto-connect capability and a COM port scan function to aid in initial setup of the communications link. You can use the Port Setup command from the Communications menu to display the dialog box shown below and select the correct COM port. If you are not sure what COM port the USB interface has been assigned to, you can click on the Scan button to automatically detect and select the correct port. Before you do so, make sure that the USB interface has been connected to your PC and the TCFI module. Both the ignition key and engine run/stop switches must be turned on. Once the correct COM port has been selected, the program will remember this setting. If you enable the Auto Connect check box, the program will try to connect to the TCFI every time the Daytona Twin Tec LLC, 933 Beville Road, Suite 101-H, S. Daytona, FL 32119 (386) 304-0700 www.daytona-twintec.com Page 31 TCFI Gen 6 Manual Rev 2.1 5/2015 program is started. Please note that you must have the correct COM port selected and the USB interface connected to your PC and the TCFI module. Both the ignition key and engine run/stop switches must be turned on in order for auto-connect to work properly. BAT – battery voltage IAC – idle air control value in 0.1% throttle position units (higher number means more idle air) Figure 16 – Data Port Setup AFR – the air/fuel ratio bar graph has dual pointers. The yellow pointer on the left side is the air/fuel ratio command (from AFR table). The white pointer on the right side is the actual air/fuel ratio based on the exhaust gas oxygen sensor reading. Note that the value will remain near 10 until the sensor has warmed up. Front and rear cylinder AFR values are displayed for all TCFI Gen 6 units when the WEGO IIID is installed. REAL TIME ENGINE DATA DISPLAY BLM – block learn multiplier (main fuel table correction factor based on exhaust gas oxygen sensor feedback, shown as percent value from 75-125%). Separate front and rear cylinder BLM values are displayed. When the engine is running, you can display real time engine data on an instrument panel type screen by using the View Real Time Data command on the View menu. Please note that real time engine data cannot be directly saved by means of the TCFI Log program. However, this data is constantly being logged by the TCFI unit and can be downloaded (for example at the end of series of dyno runs). Real time engine data is displayed on an instrument panel type layout with round tach and speedometer gauges and bar graph type gauges for most other parameters. Barometric pressure, any diagnostic codes, status of the user input and output, and status messages are displayed in additional windows. If the engine is not running most values will appear as zero. Displayed parameters include: RPM – engine crankshaft RPM (numeric value displayed beneath gauge) VSS – vehicle speed in MPH or KPH (numeric value displayed beneath gauge) TPS – throttle position (0 to 100%) FRONT INJ, REAR INJ – injector pulse width in milliseconds or duty cycle in percent FRONT ADV, REAR ADV – ignition advance in degrees BTDC You can also select the vehicle speed, temperature, pressure, and injector data units used for real time engine data display and data logging chart display. Use the Units Selection command on the Edit menu. A dialog box will appear as shown below. You can select miles per hour (MPH) or kilometers per hour (KPH) vehicle speed units, Fahrenheit (F) or Celsius (C) temperature units, inches of mercury (In-Hg) or kilopascals (kPa) manifold pressure units, pulse width in milliseconds or duty cycle in percent for injector data, and air/fuel ratio in gasoline AFR or Lambda units. The program remembers the selections you have made. Figure 17 – Units Selection TGS – twist grip position (0 to 100%) MAP – manifold pressure in In-Hg (29.92 In-Hg or 101.3 kPa corresponds to atmospheric pressure) ET – engine cylinder head temperature IAT – intake air temperature Daytona Twin Tec LLC, 933 Beville Road, Suite 101-H, S. Daytona, FL 32119 (386) 304-0700 www.daytona-twintec.com Page 32 TCFI Gen 6 Manual Rev 2.1 5/2015 Figure 18 – Real Time Engine Data Display ETC TEST MODE The ETC Test Mode command on the Communications menu has two options that allow you to test the electronic throttle control system without the engine running: Manual test. Throttle control actuator (TCA) throttle position follows twist grip sensor (TGS) command. This option is useful for a quick check of TCA operation. Enter “1” to enable ETC manual test mode or “0” to disable. Then select View Real Time Data on the View menu to view TGS and TPS data. Characteristic curve. The system plots out the characteristic curve of TCA throttle position versus TCA motor pulse-width modulated (PWM) drive. This option allows detection of defects such as excessive friction, incorrect or noisy TPS signals, and broken gear teeth. Refer to Appendix A for more details. USER OUTPUT MANUAL OVERRIDE The User Output Manual Override command on the Communications menu allows you to manually override the user output on TCFI units. This command can be used as a diagnostic aid to test accessory systems connected to the user output. DATA LOGGING CHART DISPLAY You can also display data logged by the TCFI unit on a chart recorder type screen. The data logging memory within the TCFI stores the last 36000 data points at 10 samples/second. This corresponds to 60 minutes of data. When you use the Download Logged Data From TCFI command on the Communications menu, the popup menu shown in Figure 19 will appear. You can select the length of the data set that will be downloaded. Once data has been downloaded, it is automatically displayed. The last data logged will appear at the right end of the chart. You can save the data by using the Save File command from the File menu after closing the chart display (data is not lost by closing the chart display). You can display a previously saved data file by first using the Open File command on the File menu and then using the View Chart command on the View menu. Daytona Twin Tec LLC, 933 Beville Road, Suite 101-H, S. Daytona, FL 32119 (386) 304-0700 www.daytona-twintec.com Page 33 TCFI Gen 6 Manual Rev 2.1 5/2015 Figure 19 – Download Options TPS – throttle position (0 to 100%) TGS – twist grip position (0 to 100%) AFR CMD – air/fuel ratio command (10:1 to 20:1). This is the AFR value the TCFI is attempting to maintain. FRONT AFR, REAR AFR – air/fuel ratio based on the exhaust gas oxygen sensor reading (10:1 to 20:1).Front and rear cylinder AFR values are displayed for all TCFI Gen 6 units when the WEGO IIID is installed. Please note that real time engine data cannot be directly saved by means of the TCFI Log program. However, this data is constantly being logged by TCFI unit and can be downloaded (for example at the end of series of dyno runs). Note that TCFI data files use a .log extension. You should create a separate folder to store these files. You can select two parameters for display. Trace 1 is displayed in red with its Y axis legends on the left side of the chart. Trace 2 is displayed in green with its Y axis legends on the right side of the chart. The X axis is always elapsed time. You can zoom in, zoom out, or zoom all (displays entire data file). At the maximum zoom in level, approximately 100 data samples will be displayed on the chart. You can use the scroll bar to move the chart display window in terms of elapsed time. If you hold the left mouse button down within the chart area, a cursor line appears. The exact values of the parameters displayed on trace 1 and trace 2 and the elapsed time appear in windows above the chart. When you zoom in or zoom out, the displayed data will always be centered about the cursor line. This allows you to quickly select and closely examine an area of interest. If you want to analyze the elapsed time between two events (for example the time required to accelerate from 0 to 60 MPH), you can move the cursor to the first event and then click on the Reset Time Display button. You can print the displayed chart to any Windows printer by clicking on the Print button (a color inkjet printer is recommended for best results). Data parameters include: FRONT BLM, REAR BLM – block learn multiplier (main fuel table correction factor based on exhaust gas oxygen sensor feedback, shown as percent value from 75-125%). Separate front and rear cylinder BLM values are displayed. IAC – idle air control value in 0.1% throttle position units (higher number means more idle air) IAT – intake air temperature ET – engine cylinder head temperature FRONT INJ, REAR INJ – injector pulse width in milliseconds or duty cycle in percent FRONT ADV, REAR ADV – ignition advance in degrees BTDC BAT – battery voltage USER IN – user input displayed as digital (on/off) signal. On means that the input is active (grounded). USER OUT – user output displayed as digital (on/off) signal. On means that the output is grounded. CLUTCH – On means that the clutch is pulled in BRAKE – On means that a brake has been applied NEUTRAL – On means that neutral light is illuminated (transmission in neutral) TGS ROLLOFF – On means the twist grip is in the roll-off position RPM – engine crankshaft RPM VSS – vehicle speed in MPH or KPH CRUISE ENABLE – On mean the cruise switch is on. MAP – manifold pressure in In-Hg (29.92 In-Hg or 101.3 kPa corresponds to atmospheric pressure) CRUISE ENGAGED – On means the cruise control system is controlling vehicle speed Daytona Twin Tec LLC, 933 Beville Road, Suite 101-H, S. Daytona, FL 32119 (386) 304-0700 www.daytona-twintec.com Page 34 TCFI Gen 6 Manual Rev 2.1 5/2015 CRUISE SET – On means the cruise set button is pressed CRUISE RESUME – On means the cruise resume button is pressed ETC PWM – ETC system pulse width modulation command to the TCA motor (±100% range with negative values below limp back and positive values above) Additional data is displayed at the lower right side of the screen. This data includes: Diagnostic Code – normally blank unless a diagnostic code is set. Refer to page 12 for details. Engine Status – based on engine temperature and open/closed loop AFR Log Interval – the actual data logging interval in seconds You can clear the data within the TCFI by using the Clear TCFI Data Buffer command from the Communications menu. Figure 20 – Data Logging Chart Display The following additional functions are available from the Edit menu: Fuel Cell Display – shows the active cell in terms of RPM and TPS percent at the cursor position. TPS percent is compensated for idle air. This function is useful for determining what fuel table cell is active at any given point in time. The same RPM and TPS cell is active in all fuel tables. Gear Ratio Display – shows the calculated gear ratio (RPM/KPH) at the cursor position. This function is useful for determining the 6th gear ratio required for Module Parameter setup in PC Link TCFI for the 6th gear indicator light. Misc Data Display – shows the current barometric pressure and nominal IAC value (value learned by system when engine is completely warmed up and at stable idle condition). Daytona Twin Tec LLC, 933 Beville Road, Suite 101-H, S. Daytona, FL 32119 (386) 304-0700 www.daytona-twintec.com Page 35 TCFI Gen 6 Manual Rev 2.1 5/2015 OPERATING STATISTICS You can also display engine operating statistics logged by the TCFI unit. Data logged by the TCFI unit must be downloaded before it can be displayed, by using the Download Statistics and Diagnostic Codes command on the Communications menu. Once data has been downloaded, it will automatically be displayed. If you exit from the display, you can view the same data again by using the View Statistics command from the View menu. Please note that this data is not saved. The data is fairly self-explanatory. Total hours represents the total time that the engine was running. ID represents the firmware identification. This field typically includes the manufacturer (Twin Tec), model number, program revision and author's initials, and date. Note that the date is not a manufacturing date code, just the date for the particular firmware release. Elapsed time is displayed for 13 RPM bands from idle to 6999 RPM. Note that elapsed time data is rounded off during each engine run, so the sum of the elapsed time figures may not precisely match the total hours. The program also displays the maximum engine RPM, time at the RPM limit (in seconds for better resolution) and the number of engine starts. Clicking on the Print Statistics button prints a report. When you click on this button, a small data entry screen pops up and allows you to add a serial number or comment that will appear on the printout. You can also use the Print command from the File menu. Figure 21 - Operating Statistics Display Daytona Twin Tec LLC, 933 Beville Road, Suite 101-H, S. Daytona, FL 32119 (386) 304-0700 www.daytona-twintec.com Page 36 TCFI Gen 6 Manual Rev 2.1 5/2015 Figure 22 - Operating Statistics Histogram Chart Any historical diagnostic codes logged by the TCFI unit are listed along with the number of trips (engine start cycles) since the individual code was last logged. Codes are automatically cleared after 50 trips. Customers are often confused about the meaning of the term “trips.” This is an industry standard terminology. If a code shows 40 trips, it means that the code was set 40 engine start cycles ago, not that the code has been set 40 times. Refer to the page 12 for further information about diagnostic codes. You can clear historical diagnostic codes by using the Clear Historical Diagnostic Codes command from the Communications menu. The elapsed time data in the various RPM bands can be displayed in the form of a histogram chart by clicking on the Histogram button. Color coding of the bars helps to interpret the data. The idle RPM band is blue, normal operating RPM bands are green and high RPM bands are yellow and red. The chart is automatically scaled for best display. You can print the chart along with a complete statistics report by clicking on the Print Chart button. IMPORTING DATA INTO EXCEL Data files saved from TCFI Log are in comma delimited ASCII format. You can easily import a data file into other programs such as Microsoft Excel for further analysis. You can also view data files with a text editor such as Windows WordPad. To import a data file into Excel: 1. Start Excel. In the File Open dialog box, select Files of type: All Files (*.*). Then browse for the data file. 2. The Text Import Wizard appears. For step 1, select delimited file type. For step 2, select comma delimiter. For step 3, select general column data format. Then click on Finish. 3. You can then format the data and save the spreadsheet as an Excel file. TROUBLESHOOTING FLOWCHART Follow the troubleshooting flowchart shown on page 30. Experience has shown that most communication problems are user error or PC compatibility issues. Daytona Twin Tec LLC, 933 Beville Road, Suite 101-H, S. Daytona, FL 32119 (386) 304-0700 www.daytona-twintec.com Page 37 TCFI Gen 6 Manual Rev 2.1 5/2015 TCFI GEN 6 PRE-INSTALLATION CHECKS Make sure that the original equipment (OE) engine control module (ECM) is functioning correctly (other than tuning issues) before attempting TCFI installation. If the OE ECM is setting diagnostic codes, find and correct any underlying problems first. TCFI GEN 6 INSTALLATION 1. If motorcycle is equipped with security system, make sure system is disarmed. Turn off the ignition switch and disconnect the battery ground cable before proceeding. 2. Find and remove the OE ECM. The OE module is usually located under the seat or under a side cover. 3. Install the TCFI module. Figure 23 shows a typical installation. Figure 23 - Typical Installation with WEGO Mounted on Top of TCFI Unit GENERAL RECOMMENDATIONS The TCFI is designed to be used with the H-D OE coil. Fuel injected engines require a special coil with low primary resistance and an additional terminal for ion-sensing. Do not attempt to use any aftermarket coil not specifically intended for fuel injection applications with ion-sensing ignition. Due to the short lengths involved on motorcycle applications, energy losses in spark plug wires are insignificant. OE carbon core suppression cables will deteriorate after several years. For a more durable replacement, we suggest spiral core type spark plug cables. CAUTION: Do not use solid copper spark plug cables or non-resistor type spark plugs. The TCFI unit may misfire. Aftermarket spark plugs with excessive internal resistance may cause the ionsensing feature to malfunction. WEGO IIID INSTALLATION OVERVIEW The dual channel WEGO IIID allows simultaneous front and rear cylinder fuel auto-tuning during actual riding conditions. The terms TCFI and WEGO are used throughout this document as generic terms and refer to the various TCFI Gen 6 and WEGO IIID units unless otherwise noted. The WEGO system uses low cost Bosch LSU 4.2 5-wire wide-band oxygen sensors. By utilizing miniature surface mount electronics technology, digital signal processing techniques, and a switching power supply for the sensor heater, the WEGO provides the same level of accuracy as lab systems costing thousands of dollars. 4. Do not reconnect the battery ground cable until you have completed installation of the WEGO IIID. Do not attempt to start the engine until you have completed the initial setup. The WEGO unit has dual 0-5 volt analog air/fuel ratio (AFR) outputs that are connected to the TCFI for closed loop AFR control. The WEGO IIID version included in the TCFI Gen 6 kit has a special wire harness that also provides proper connections for the four terminal data link connector used for communications between the TCFI module and our USB interface. Daytona Twin Tec LLC, 933 Beville Road, Suite 101-H, S. Daytona, FL 32119 (386) 304-0700 www.daytona-twintec.com Page 38 TCFI Gen 6 Manual Rev 2.1 5/2015 WEGO IIID INSTALLATION 1. If motorcycle is equipped with security system, make sure system is disarmed. Turn off the ignition switch and disconnect the battery ground cable before proceeding. harness to the front and rear Molex MX150 oxygen sensor connectors on the OE wire harness. 11. Connect the WEGO to the four terminal Deutsch data link connector on the OE wire harness. Figure 24 – Typical Front Sensor Installation 2. In general, the sensors should be mounted 2-8 inches from the head flange. Available clearance will usually dictate the optimum location. When choosing a mounting location, allow several inches clearance for the sensor wire harness. The wire harness must exit straight out from the sensor. Do not loop the harness back onto the sensor body. 3. 2008-2009 models with original equipment 18 mm oxygen sensors (all others skip ahead to step 4). You can use the original equipment (OE) oxygen sensor mounting bosses. Remove the OE sensors. Skip ahead to step 6. 4. 2010-2013 models. You cannot use the original equipment (OE) 12 x 1.25 mm oxygen sensor mounting bosses. Remove the OE oxygen sensors and use the supplied 12 x 1.25 mm hex socket plugs to block off their mounting bosses after completing step 5. 5. 18 x 1.5 mm weld nuts must be welded onto the exhaust pipes and can be located near the smaller OE oxygen sensor mounting bosses. After welding, run an 18 x 1.5 mm tap through the threads. Failure to clean the threads may result in sensor damage. Figure 25 – Typical Rear Sensor Installation 6. Do not install the new Bosch sensors until after the free air calibration procedure described on page 43. Always use an anti-seize lubricant such as Permatex 133A on the sensor threads. 7. Install the WEGO unit. For most applications, the WEGO can be mounted on top of the TCFI Gen 6 unit using the supplied hardware. 8. Connect the Bosch sensors to the 6 pin mating connectors on the WEGO wire harness. The longer cable (with yellow band) is for sensor 1 (front). For additional protection and improved cosmetics, use Techflex 1-1/4” Black Flexo Clean Cut FR expandable sleeving over the connectors (available from www.wirecare.com). 9. 2008-2009 models with OE two wire oxygen sensors using AMP Superseal connectors. The supplied TCFI adapter harness is required. Skip to the following section on page 42. 10. 2010-2013 models with OE four wire oxygen sensors using Molex MX150 series connectors. Refer to Figure 26. Connect the WEGO wire 12. Connect the black WEGO ground wire to an existing frame ground connection point near the ECM. 13. Reconnect the battery ground cable. Do not attempt to start the engine until you have completed the free air calibration of the WEGO and initial setup of the TCFI. Daytona Twin Tec LLC, 933 Beville Road, Suite 101-H, S. Daytona, FL 32119 (386) 304-0700 www.daytona-twintec.com Page 39 TCFI Gen 6 Manual Rev 2.1 5/2015 Daytona Twin Tec LLC, 933 Beville Road, Suite 101-H, S. Daytona, FL 32119 (386) 304-0700 www.daytona-twintec.com Page 40 TCFI Gen 6 Manual Rev 2.1 5/2015 REAR SENSOR BOSCH LSU 4.2 SIX TERMINAL DEUTSCH CONNECTORS ON OXYGEN SENSOR CABLES NOT SHOWN BOSCH LSU 4.2 FRONT SENSOR GROUND BLACK WIRE FOUR TERMINAL DATA LINK CONNECTOR ON MOTORCYCLE SENSOR 2 INPUT WEGO IIID SENSOR 1 INPUT LONG CABLE WITH YELLOW BAND USED FOR SENSOR 1 (FRONT) FOUR TERMINAL DATA LINK CONNECTORS ON WEGO HARNESS FOUR TERMINAL BLACK REAR OXYGEN SENSOR CONNECTORS FOUR TERMINAL GRAY FRONT OXYGEN SENSOR CONNECTORS TCFI GEN 6 TO LAPTOP PC USB PORT ORIGINAL EQUIPMENT WIRING HARNESS USB INTERFACE 73 TERMINAL ECM CONNECTOR Figure 26 - WEGO Hookup for 2010-2013 Models Daytona Twin Tec LLC, 933 Beville Road, Suite 101-H, S. Daytona, FL 32119 (386) 304-0700 www.daytona-twintec.com Page 41 TCFI Gen 6 Manual Rev 2.1 5/2015 REAR SENSOR BOSCH LSU 4.2 GROUND BLACK WIRE FOUR TERMINAL DATA LINK CONNECTOR ON MOTORCYCLE SENSOR 2 INPUT FOUR TERMINAL DATA LINK CONNECTORS ON WEGO HARNESS 72 52 USB INTERFACE TWO TERMINAL CONNECTOR ON TCFI ADAPTER HARNESS FOUR TERMINAL BLACK CONNECTORS TCFI GEN 6 TERMINALS 1-16 BLOCKED 16 32 REAR (WIRE ENTRY SIDE) TERMINAL NUMBERING ECM CONNECTOR DETAIL TO LAPTOP PC USB PORT 17 1 53 33 ORIGINAL EQUIPMENT WIRING HARNESS 73 TERMINAL ECM CONNECTOR TWO TERMINAL REAR OXYGEN SENSOR CONNECTOR ON OE HARNESS 73 GREEN WIRE FROM TCFI ADAPTER TO ECM TERMINAL 48 FOUR TERMINAL GRAY CONNECTORS LONG WHITE WIRE ON TCFI ADAPTER HARNESS WEGO IIID SENSOR 1 INPUT LONG CABLE WITH YELLOW BAND USED FOR SENSOR 1 (FRONT) TWO TERMINAL FRONT OXYGEN SENSOR CONNECTOR ON OE HARNESS SIX TERMINAL DEUTSCH CONNECTORS ON OXYGEN SENSOR CABLES NOT SHOWN BOSCH LSU 4.2 FRONT SENSOR TWO TERMINAL CONNECTOR ON TCFI ADAPTER HARNESS Figure 27 - WEGO Hookup for 2008-2009 Models (Using TCFI Adapter Harness WEGO IIID INSTALLATION ON 20082009 MODELS Figure 28 - ECM Connector Retainer Removal 1. The supplied TCFI adapter harness is required. Refer to Figure 27. 2. Connect the four terminal black and gray Molex MX 150 connectors from the WEGO to the mating connectors on the TCFI adapter harness. 3. Route the long white wire on the TCFI adapter harness to the front of the motorcycle where the front oxygen sensor connector is located. Connect the two terminal AMP Superseal connector to the mating front oxygen sensor connector on the OE wire harness. 4. Route the short blue wire on the TCFI adapter harness to the location near the ECM where the rear oxygen sensor connector is located. Connect the two terminal AMP Superseal connector to the mating rear oxygen sensor connector on the OE wire harness. Figure 29 - ECM Connector Terminal Removal 5. The green wire on the TCFI adapter is routed to terminal 48 on the ECM connector. Use a small flat screwdriver to depress the tabs on the side of the connector and remove the cable cover. Use the screwdriver to gently slide out the green terminal retainer as shown in Figure 28 6. 2009 models have an existing wire at terminal 28 that must be removed and taped up. Use the supplied plastic push pin as a terminal removal tool. Insert the push pin into the round hole between terminal cavities as shown in Figure 29. This will release the two adjacent terminals. Remove the existing terminal 48. Make sure that the adjacent terminal is not dislodged. 7. Insert the terminal on the green wire into position 48, and re-assemble connector. 8. Connect the WEGO to the four terminal Deutsch data link connector on the OE wire harness. 9. Connect the black WEGO ground wire to an existing frame ground connection point near the ECM. 10. Reconnect the battery ground cable. Do not attempt to start the engine until you have completed the free air calibration of the WEGO and initial setup of the TCFI. REPLACEMENT SENSORS AND ACCESSORIES The WEGO uses standard Bosch LSU 4.2 sensors used on a VW production application (Bosch P/N 0 258 007 057/058 or VW P/N 021 906 262B). The proprietary VW connector is replaced with a smaller Deutsch DT-04-6P. We offer replacement sensors with the Deutsch connector installed. Daytona Twin Tec LLC, 933 Beville Road, Suite 101-H, S. Daytona, FL 32119 (386) 304-0700 www.daytona-twintec.com Page 42 TCFI Gen 6 Manual Rev 2.1 5/2015 WEGO IIID OPERATION Figure 30 - WEGO Unit For more information about wide-band oxygen sensors including the Bosch LSU 4.2, we suggest that you visit the Tech FAQ on our website at www.daytona-sensors.com. The WEGO has red status LEDs for each channel. When power is turned on, the LEDs blink at a slow rate until the corresponding sensor has reached normal operating temperature. After installation, the WEGO system requires free air calibration. This should be done with the sensors dangling in free air. The environment must be free of hydrocarbon vapors. We suggest that you perform the free air calibration outdoors. Turn the free air calibration trimpots on the WEGO full counterclockwise. Turn on power and wait for 60 seconds so the system can fully stabilize. Then slowly turn each free air calibration trimpot clockwise until the corresponding LED starts flashing at a rapid rate. Try to set each trimpot at the point where its LED just starts to flash. The free air calibration procedure should be performed at reasonable intervals (every 250-500 hours) or whenever a sensor is replaced. If you cannot get an LED to rapidly flash when its trimpot is turned full clockwise, you either have a damaged sensor or very high hydrocarbon levels in your environment. If both LEDs keep blinking at the slow rate, you may have a low battery voltage condition. Try connecting a battery charger. The WEGO includes internal diagnostics for abnormal battery voltage (less than 11 volts or greater than 16.5 volts), sensor open circuit, and sensor short circuit conditions. A fault condition causes the status LEDs to blink at the slow rate. Daytona Twin Tec LLC, 933 Beville Road, Suite 101-H, S. Daytona, FL 32119 (386) 304-0700 www.daytona-twintec.com Page 43 TCFI Gen 6 Manual Rev 2.1 5/2015 TROUBLESHOOTING FLOWCHART CAUTION: Racing gasoline containing lead will quickly degrade the sensors. Under these conditions, expected sensor life is less than 10 hours. There is no warranty on sensors. Follow the troubleshooting flowchart shown below. Experience has shown that most units returned for warranty are OK and another problem, such as user error, a degraded sensor, or bad power connections is later identified. WEGO IIID Troubleshooting Flowchart STARTING POINT NOTE: ALL TESTS PERFORMED WITH SENSORS IN FREE AIR DO STATUS LEDS SLOWLY BLINK WHEN POWER IS FIRST TURNED ON? NO YES VERIFY +12V POWER ON RED WIRE. VERIFY BLACK WIRES CONNECTED TO GROUND. IS PROBLEM FIXED? NO DO STATUS LEDS CONTINUE SLOWLY BLINKING 60 SECONDS AFTER POWER UP? YES REPLACE WEGO YES DONE NO PERFORM FREE AIR CALIBRATION. IS CALIBRATION SUCCESSFUL? NO REPLACE SENSOR(S). IS PROBLEM FIXED? MEASURE VOLTAGE LEVEL ON RED WIRE WITH DVM. IS IT GREATER THAN 11 VOLTS? YES REPLACE SENSOR(S). IS PROBLEM FIXED? NO REPLACE WEGO YES NO NO WEGO REQUIRES MINIMUM 11 VOLTS. FIX UNDERLYING PROBLEM WITH VEHICLE ELECTRIC SYSTEM. YES REPLACE WEGO DONE YES DONE IS PROBLEM FIXED? NO CALL TECH SUPPORT Daytona Twin Tec LLC, 933 Beville Road, Suite 101-H, S. Daytona, FL 32119 (386) 304-0700 www.daytona-twintec.com Page 44 YES DONE TCFI Gen 6 Manual Rev 2.1 5/2015 APPENDIX A – TPS AND TGS PARAMETERS The throttle position sensor (TPS) and twist grip sensor (TGS) both have dual position sensor elements with zero to +5V signal levels. The primary sensor element has a rising signal and the secondary sensor element has a falling signal. The primary sensor element is used for all TCFI engine control functions. The secondary sensor element is used for diagnostic purposes. Sensors signals go to 10-bit analog-to-digital converters and are converted in data values ranging from zero at 0V to 1023 at +5V. The raw data is then scaled to a zero to 100% range for program calculations. While the electrical range is zero to 1023, the actual mechanical limits of the sensors are less. TPS and TGS manufacturing tolerances require that as part of the installation actual sensor limits must be measured and verified to be within expected values. PC Link TCFI version 17 and TCFI Log version 18 have provision for special commands to read sensor values and if required, modify some parameters. levels are all within reasonable margins. The TCFI Log software includes a special test function that exercises the ETC system and reports the various parameters. The ETC test function will also help identify potential problems with the TCA including broken gear teeth. Figure 1 – TPS Sensor Levels 1023 TPS WIDE-OPEN FULL SCALE On initial power up, the ETC system runs an auto-calibration routine that tests operation of the TCA and establishes the zero (closed throttle) position. The zero and limp back values must be within the ranges shown on the figure. If either the zero or limp back position is outside the allowed range, code P2176 ETC Auto-Calibrate Error is set. If the zero position is within the allowed limits, it is used to calculate a TPS offset parameter that the TCFI engine control program then uses as the zero percent TPS level. The TCFI engine control program uses a TPS full scale parameter as the 100% TPS level. To avoid the TCA motor forcing the throttle plate against a hard mechanical limit, the full scale parameter is slightly less than the actual wide open mechanical limit. While the ETC auto-calibration routine handles the more critical TPS offset parameter, we recommend you verify that the actual TPS sensor 957 DEFAULT PC LINK TCFI PARAMETER 940 15-20 STEP MARGIN AUTO-CAL LIMP BACK RANGE 170 FIXED TPS LIMP BACK 149 PROGRAM VALUES AUTO-CAL ZERO RANGE TPS ZERO 96 140 115 85 0 TPS SENSOR LEVELS Refer to the TPS sensor levels diagram in Figure 1. The TPS sensor has three important levels, zero (fully closed), limp back (position when ETC system is not active), and wide open position. The red, green, and blue shaded areas indicate the range of manufacturing tolerances. The figure is not to scale and the ranges are expanded for clarity. OBSERVED VALUES TGS SENSOR LEVELS Refer to the TGS sensor levels diagram in Figure 2. The TGS sensor also has three important levels, roll-off (twisted fully clockwise), released, and wide open (twisted fully counterclockwise) position. The red, green, and blue shaded areas indicate the range of manufacturing tolerances. The figure is not to scale and the ranges are expanded for clarity. Roll-off position is used to disengage the cruise control. The roll off detection parameter is not critical as long as it is towards the lower end of the range between the released position and the full clockwise mechanical limit. The TCFI engine control program uses TGS offset and full scale parameters as the zero and 100% TGS levels. To account for manufacturing variations and to avoid throttle application when the rider’s hand is resting on the twist grip, some deadband is provided between the TGS released value and the TGS offset. Likewise, some margin is provided between the TGS full scale parameter and TGS wide-open value. Daytona Twin Tec LLC, 933 Beville Road, Suite 101-H, S. Daytona, FL 32119 (386) 304-0700 www.daytona-twintec.com Page 45 TCFI Gen 6 Manual Rev 2.1 5/2015 We recommend you verify that the actual TGS released and wide open levels allow for reasonable deadband and margin. Figure 2 – TGS Sensor Levels 1023 TGS WIDE-OPEN FULL SCALE OBSERVED VALUES 953 940 10-15 STEP MARGIN 5-10 STEP DEADBAND DEFAULT PC LINK TCFI PARAMETERS 245 OFFSET TGS RELEASED 237 ROLL-OFF DETECT TGS ROLL-OFF 96 50 FIXED PROGRAM VALUE 0 TPS SENSOR LEVEL TEST PROCEDURE 1. Use the blank worksheet in Figure 4. 2. Turn the ignition key and run/stop switch on. Do not start the engine. 3. Start the TCFI Log software. Use the ETC Test Mode and ETC Characteristic Curve command from the Communications menu. Click on the Start button to begin the test. 4. The TCFI system will exercise the TCA for approximately 1 minute and then display a characteristic curve of TCA throttle position versus TCA motor pulse-width modulated (PWM) drive. This allows detection of defects such as excessive friction, incorrect or noisy TPS signals, and broken gear teeth. A typical characteristic curve for a properly functioning throttle body is shown in Figure 3. The red trace shows the primary rising sensor (TPS1) voltage level versus TCA motor PWM drive. The green trace shows the sum of the rising and falling sensors (TPS1 and TPS2) versus TCA motor PWM drive. Test parameters including TPS (sensor 1) levels corresponding to zero, limp back and wide open position are reported. You can click on the Print button to print the characteristic curve and other test results. Refer to page 50 for more details on interpreting characteristic curve data. 5. Record the test results for TPS zero, limp back and wide open on the worksheet in Figure 4. 6. The observed TPS zero and limp back values should be within the allowed auto-calibration zero and limp back ranges (gray shaded fixed program values in Figure 4). If any recorded TPS value is outside the allowed range, please contact tech support for assistance. 7. The recorded TPS wide-open value should be 1520 steps higher than the default TPS full scale parameter in Figure 1. If not, calculate the required TPS full scale parameter (15-20 steps less than the observed value) and write it in the revised parameter box on the worksheet in Figure 4 for later use. TGS SENSOR LEVEL TEST PROCEDURE 1. Use the blank worksheet in Figure 5. 2. Turn the ignition key and run/stop switch on. Do not start the engine. 3. Start the TCFI Log software. You will be repeatedly using the Read TPS/TGS command from the Communications menu to read values. 4. Very firmly rotate the twist grip fully clockwise to the roll-off position. Read and record the TGS rolloff value on the worksheet. It should be well below the roll-off detection value (gray shaded program value in Figure 2). If not, please contact tech support for assistance. 5. Rotate the twist grip to the wide-open position and then gently and smoothly return it to the released position. Do not let go of the twist grip and allow it to snap back to the released position. Read and record the TGS released value on the worksheet. It should be 5-10 steps less than the default TGS offset parameter in Figure 2. If not, calculate the required TGS offset parameter (5-10 steps higher than the observed value) and write it in the revised parameter box on the worksheet in Figure 5 for later use. 6. Very firmly rotate the twist grip counterclockwise to the wide-open position. Read and record the TGS wide-open value on the worksheet. It should be 1015 steps higher than the default TGS full scale parameter in Figure 2. If not, calculate the required TGS full scale parameter (10-15 steps less than the observed value) and write it in the revised parameter box on the worksheet in Figure 5 for later use. Daytona Twin Tec LLC, 933 Beville Road, Suite 101-H, S. Daytona, FL 32119 (386) 304-0700 www.daytona-twintec.com Page 46 TCFI Gen 6 Manual Rev 2.1 5/2015 Figure 3 – TCA Characteristic Curve Daytona Twin Tec LLC, 933 Beville Road, Suite 101-H, S. Daytona, FL 32119 (386) 304-0700 www.daytona-twintec.com Page 47 TCFI Gen 6 Manual Rev 2.1 5/2015 Figure 4 – TPS Sensor Levels Worksheet 1023 OBSERVED VALUES TPS WIDE-OPEN FULL SCALE REVISED PC LINK TCFI PARAMETER 15-20 STEP MARGIN AUTO-CAL LIMP BACK RANGE 170 FIXED TPS LIMP BACK PROGRAM VALUES AUTO-CAL ZERO RANGE 140 115 TPS ZERO 85 0 Figure 5 – TGS Sensor Levels Worksheet 1023 OBSERVED VALUES TGS WIDE-OPEN FULL SCALE 10-15 STEP MARGIN REVISED PC LINK TCFI PARAMETERS 5-10 STEP DEADBAND OFFSET TGS RELEASED ROLL-OFF DETECT TGS ROLL-OFF 96 FIXED PROGRAM VALUE 0 Customer: _______________________ Date: ________ Daytona Twin Tec LLC, 933 Beville Road, Suite 101-H, S. Daytona, FL 32119 (386) 304-0700 www.daytona-twintec.com Page 48 TCFI Gen 6 Manual Rev 2.1 5/2015 UPDATING TPS AND TGS PARAMETERS If any TPS or TGS parameters required revision during the test steps in the previous sections, start the PC Link TCFI software and use the Edit ETC Parameters command from the Edit menu. Enter the required parameters in the text boxes circled in red in Figure 6 and click on Upload. Please note: These parameters are separately programmed into the TCFI unit. Loading a new setup file does not affect these parameters. However, if the TCFI firmware is updated, the parameters revert back to initial defaults and will have to be reprogrammed. Make sure you save the worksheets in Figures 4-5 for future reference. 3. If the throttle body or twist grip are replaced, the corresponding sensor level test procedure must be completed again and some parameters may require update. 1. Do not modify any other ETC or cruise control parameters unless advised by tech support. 2. Parameters shown on the Edit ETC Parameters dialog box are not stored as part of a setup file. Figure 6 – Edit ETC Parameters Dialog Box Daytona Twin Tec LLC, 933 Beville Road, Suite 101-H, S. Daytona, FL 32119 (386) 304-0700 www.daytona-twintec.com Page 49 TCFI Gen 6 Manual Rev 2.1 5/2015 INTERPRETING CHARACTERISTIC CURVE DATA The red trace in Figure 7 shows the hysteresis loops caused by friction and spring tension in two regions, above and below limp back position. Each test cycle starts at zero PWM with the TCA at limp back position (approximately 0.75V). TCA PWM is stepped to 40%. At approximately 15% PWM, motor torque is sufficient to overcome spring tension and friction and the throttle starts to open. TPS1 rises to approximately 4.75V (wide open throttle) at approximately 30% PWM. Next, PWM is stepped back down to zero. As PWM drops down below approximately 12%, friction effects are overcome and spring tension closes the throttle back to limp back position. TCA PWM is then stepped in the negative direction to -40%. At approximately - 20% PWM, motor torque is sufficient to overcome spring tension and friction and the throttle starts to close. TPS1 falls to approximately 0.5V (closed throttle) at approximately -23% PWM. At the end of each test cycle, TCA PWM is stepped back to zero and the throttle returns to limp back position. The traces for multiple test cycles should overlap closely. The green trace showing the sum of TPS1 and TPS2 should always be very close to 5.0V. The resistive TPS elements can wear out and become noisy, like a scratchy volume control on an old radio. This noise will appear as wiggles or jumps in the green trace. A broken gear tooth near limp back position is a common failure mode. Figure 8 shows the effect. Figure 7 – Characteristic Curve Hysteresis Loops Figure 8 – TCA Characteristic Curve with Broken Gear Tooth Daytona Twin Tec LLC, 933 Beville Road, Suite 101-H, S. Daytona, FL 32119 (386) 304-0700 www.daytona-twintec.com Page 50 TCFI Gen 6 Manual Rev 2.1 5/2015