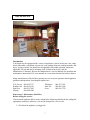
1
WELCOME TO OUR FAMILY OF PROUD HOMEOWNERS We are pleased you recognized the quality and value in our homes and purchased a Regent Home. Our goal is to deliver a home to you that, at the time of closing, will meet all of your expectations. We take great pride in the home we built for you, and in the service we provide even after the closing. Contained in this manual will be the Regent Homes Limited Warranty, Builder's Structural Warranty, and instructions on any necessary procedures you will need to follow. Individual Manufacturer’s Warranties can be found in the kitchen of your new home. If you should have any questions or need assistance, please call any of the individuals listed below. We will be happy to assist you. Again, congratulations on becoming a new Regent Homeowner. Sincerely, Regent Homes Staff LIMITED WARRANTY Regent Homes warrants to the original buyer that the original construction of the homes will be free from defects in material and workmanship for a period of one (1) year after the closing date. The warranty does not cover maintenance items or damage. This warranty is not a maintenance contract and is not transferable. Regent Homes warrants that the original installation of the roof, plumbing, electric, windows, heating, and air conditioning system will be free from defects in workmanship which appear at any time within one (1) year after the closing date. Regent Homes warrants that the original construction of the roof, foundation, floors and walls of the home will be free from structural defects which significantly affect the load-bearing functions of the defective component which defects appear at any time within one (1) year after the date of closing. Appliances, fixtures, equipment and other components included in the home, will be covered by separate, written warranties of the manufacturers or suppliers of those items (manufacturer's warranty). Regent Homes hereby assigns all of those obligations of the manufacturer's warranties. After closing date, any defects in such items become the obligation of the manufacturers or suppliers of those components. Examples include (but not limited to): refrigerator, range, dishwasher, washer, dryer, garbage disposal, water heater, heat pump, air conditioner, furnace, smoke detector, garage door opener, etc. EXCLUSIONS FROM REGENT HOMES WARRANTY COVERAGE As covered in your Regent Home Acceptance Walk, the following are warranty exclusions. Warranty does not cover conditions or damage caused by an act of God or Mother Nature. 1. Deficiencies or defects resulting from: riot, civil commotion, an act of God including but not limited to, rot, insect damage, fire, explosion, smoke, water escape, windstorm, mudslide, hail, lightening, falling trees, aircraft, vehicles, flood, earthquake, volcanic eruption, hurricane, tornado, or change in the level of underground water table. 2. All landscaping including but not limited to, sod, seeding, shrubs, trees and planting. 3. Deficiencies or defects caused by soil movement. 4. Any contamination caused or created by material or manmade chemicals, compounds, or substances. The warranty does not cover conditions or damage caused by lack of maintenance or additions, changes or alterations after the warranty enrollment date. 1. Any loss or damage that arises while the home is not being used for residential purposes. 2. Changes, alterations or additions made to the home by anyone other than Regent Homes. 3. Changes of grading of the site by anyone other than Regent Homes. 4. Adding a storm door will void both Regent Homes and the manufacturer’s warranty for exterior doors. 5. The warranty does not cover deficiencies or defects caused by neglect. 6. Deficiencies or defects caused or made worse by the owner, occupants or guests. 7. Normal wear and tear. 8. Any improvements installed after the warranty date any part of the property not included in the purchase price. Regent Homes’ warranty does not cover manufacturers' and other implied warranties, although these manufacturers and suppliers have written warranties of their own which are enclosed. 1. Appliances, fixtures and equipment including but not limited to, refrigerator, range, dishwasher, washer, dryer, garbage disposal, water heater, heat pump, air conditioner, furnace, smoke detector, security system, garage door opener, etc. Regent Homes’ warranty does not cover claims that were caused by the homeowner: 1. Dampness or condensation due to failure of the homeowner to maintain adequate ventilation. 2. Negligence in proper maintenance. 3. Any abuse of the home. 4. Any failure of the purchaser to give notice to Regent Homes of the deficiencies or defects within a reasonable time. 5. Any of the above conditions resulting from the home being occupied for any length of time. 6. Any of the above conditions resulting from the home being rented or leased to another party. ALL OTHER WARRANTIES, EXPRESS OR IMPLIED, INCLUDING BUT NOT LIMITED TO, THE WARRANTY OR MERCHANT ABILITY (HABITABILITY) AND SUITABILITY FOR A PARTICULAR PURPOSE IS HERBY DISCLAIMED. REGENT HOMES A D.R. Horton Company 8001 Arrowridge Blvd Charlotte, NC 28273 (704) 377-2006 30-Day Warranty List DATE: 11-Month Warranty List Warranty Item See your Acceptance Walk List Review the list of items that Are Not covered under warranty DATE OF CLOSING: LOT NO.: COMMUNITY: NAME OF HOMEOWNER: ADDRESS: HOME PHONE: BEST TIME TO CALL: WORK PHONE: THE HOMEOWNER NEEDS TO BE PRESENT IN ORDER FOR WORK TO BE PERFORMED List below the items that need attention. Be specific and provide as much information as possible. 1. Done 2. Done 3. Done 4. Done 5. Done ALL ITEMS HAVE BEEN COMPLETED IN A SATISFACTORY MANNER: HOMEOWNER’S SIGNATURE REGENT HOMES INC., REPRESENTATIVE DATE DATE REGENT HOMES A D.R. Horton Company 8001 Arrowridge Blvd Charlotte, NC 28273 (704) 377-2006 30-Day Warranty List DATE: 11-Month Warranty List Warranty Item See your Acceptance Walk List Review the list of items that Are Not covered under warranty DATE OF CLOSING: LOT NO.: COMMUNITY: NAME OF HOMEOWNER: ADDRESS: HOME PHONE: BEST TIME TO CALL: WORK PHONE: THE HOMEOWNER NEEDS TO BE PRESENT IN ORDER FOR WORK TO BE PERFORMED List below the items that need attention. Be specific and provide as much information as possible. 1. Done 2. Done 3. Done 4. Done 5. Done ALL ITEMS HAVE BEEN COMPLETED IN A SATISFACTORY MANNER: HOMEOWNER’S SIGNATURE REGENT HOMES INC., REPRESENTATIVE DATE DATE AIR CONDITIONING & HEATING A. Air Conditioner & Heating Equipment The air conditioning and heating equipment was installed by the HVAC (Heating, Ventilating, and Air Conditioning) Contractor. The air conditioning and heating system(s) provide(s) year-round climate control and consists of a thermostat to control temperature, and air handler unit to heat or cool the air, a filter to remove particles from the air, plus a fan unit to distribute and circulate air throughout the home via ducts and registers. Air conditioners have an outdoor condensing unit or compressor, which must be kept sufficiently free of obstructions (such as shrubbery) to allow air to flow freely. NOTE: Window coverings should be installed to maintain consistent room temperatures. Direct sunlight entering the house will increase the temperature in the affected area and will also fade furnishings and carpet. If you come home at 5:30 p.m. on a day when the temperature has reached 90 degrees, and set your thermostat to 75 degrees, the air conditioning unit will being cooling, but will take a long time to reach the desired temperature. At 5:30 p.m., the air conditioning unit will start cooling the air, but the walls, carpet, and furniture release heat and nullify this cooling. It may take hours before the air conditioning unit has cooled the walls, carpet, and furniture. Homeowner’s Maintenance Guidelines Service Contract: When there is heavy demand on your HVAC system, we encourage homeowners to take advantage of the extended annual service contract that is available from your air conditioner supplier. This contract typically provides seasonal check-ups of the heating and cooling components, plus periodic cleaning; the advantage being that scheduled service may reduce system failure by preventing problems before they occur. Before calling for Service: 1. Check to see that the thermostat is properly set. 2. Check the circuit breaker in the panel box. If tripped, reset by switching the breaker to full “OFF”, the fully back to the “ON” position. If the circuit breaker will not reset, contact the HVAC Contractor. (See Circuit Breakers in the Electrical System Section). 3. Check the electrical disconnect switch, located on or near the air handler and reset. 4. Check the exterior disconnect switch located outside the home, near the compressor and reset. 1 B. Air Filter The air filter, located adjacent to the air handler unit or in the return air grille, helps reduce the flow of dust into the air. As the filter collects dust, it reduces the system’s efficiency and must be either cleaned or replaced. Your Builder has installed one air filter in each filter location and will, at the walk-through, demonstrate proper filter installation, cleaning, and replacement procedures. After that, the regular cleaning, replacement, and maintenance of air filters is the homeowner’s responsibility. Homeowner’s Maintenance Guidelines Monthly filter cleaning or replacement will provide cleaner air, improve airflow, and help reduce utilities costs. To remove, clean, or replace filters, turn the air conditioner/furnace and fan off using the thermostat control, then carefully remove the old filter and clean, or insert a new one. Replacement filters are available through hardware and home supply stores. Make sure to buy the correct size for replacement. C. Thermostat The thermostat controls the entire heating and cooling system. The thermostat provides a fan switch to circulate the air when neither heating nor cooling is needed. To maximize energy efficiency and minimize utility bills, set the thermostat to a comfortable level normally between 68° F to 71° F for heating, and between 76° F to 78° F for cooling, and leave it there. Then set the fan switch to either the “ON” or “AUTO” position. The less you change the thermostat setting, the more comfortable you will be, the lower your utility bills will be, and less wear and tear on the system’s compressor will incur. Changing settings frequently will cause the supplemental heater to run more often, and turning the system on or off expends extra energy to bring the temperature back to a comfortable level. Setting air conditioning controls too low does not cool the home faster and the same principle applies to heating. D. Air Distribution System Duct Work: Ducts carry and distribute heated or cooled air to each room. 2 Registers: Two kinds of registers are used: air supply registers, located on the wall or ceiling, that deliver warm or cooled air into the room; and air return registers (located on walls or ceilings, or under the air handler access door) that return air from the room back into the air handler fan to be re-heated or re-cooled. To regulate temperatures on different floors or rooms during different seasons, adjust the air supply registers by partially opening or closing them, thus restricting or moving additional air into each room. Vacuum supply and return registers to ensure they remain dust free. Check that draperies, furniture, or other obstructions that restrict normal airflow do not block registers. Interior doors in each room are undercut to allow return air to circulate throughout each room where the doors are closed. Do not close doors to regulate room temperatures. A Note of Caution: Burning candles for prolonged periods of time may, in some instances, create a phenomenon known as “Ghosting”. “Ghosting” occurs when soot from a burning candle is released into the air, carried throughout the house through the air conditioner, and expelled through the vents. The soot adheres to all surfaces including ceilings, fabrics, and countertops. It is especially visible on the carpet at the base of bedroom doors. Cleaning is very difficult and it a homeowner’s responsibility. To avoid “ghosting” in your home, follow these few simple steps: 1. Buy candles made with hard wax and with thin braided wicks that curl over when burned. 2. Buy candles with low aromatic properties and with wicks that burn with a low flame. 3 3. Buy candles with cotton or paper wicks and refrain from buying candles with metal-core wicks. 4. Do not allow candles to smoke and keep them out of drafts. 5. Keep matches and wick debris out of the candle. 6. Extinguish candles after one hour of continuous burning. Allow the candle to cool before relighting. 7. Large numbers of candles should be burned in the fireplace with the damper open to allow the smoke and emission to escape. 8. Stop using candles that leave a visible soot ring on their containers. E. Exterior Compressor/Condensing Unit Homeowner’s Maintenance Guidelines Keep the condensing unit (compressor) level and keep the area surrounding the unit clear to allow unimpaired airflow. Do not plan bushes too close to the unit and be careful that dirt, leaves, and grass clippings are cleared away. For a thorough cleaning, contact an HVAC Contractor. Do no build a deck around or over the compressor unless there is an 18” clearance on the sides and a 6’ foot minimum clearance on top. F. Condensate Control Dehumidification is part of the function of your air conditioning system. The moisture removed from the air is condensed into water and is then referred to as “condensate”. The condensate forms and it collected on the evaporator coil, which is located in the airhandling unit (except on one-piece package units). The condensate drain removes the water. Regular maintenance by the A/C contractor of the drain pan and line should be performed to control algae build-up and eliminate water leaks. Homeowner’s Maintenance Guidelines Install algae tablets in the condensate drain pan regularly. Flush condensate drain pan regularly. Flush condensate drain lines regularly. Drains should be flushed from the inside of the house towards the outside. Never open the air handling unit without first disconnecting the power. Algae tablets are available through your air-conditioning contractor or home improvement center. Helpful Hints: a. Check and replace or clean filters every month. Clogged filter mean higher operating costs. b. Don’t try to maintain different temperatures in different rooms by totally closing duct outlets, you will unbalance the system and reduce its efficiency. c. Use bath and kitchen exhaust fans sparingly when air conditioning is operating. d. To reduce the time your air conditioner must be on, do heat-producing chores such as baking and dish washing, during the cooler hours in the morning or evening. 4 e. f. g. h. Check weather stripping and caulking around doors and windows for leaks. Shade your home with trees wherever possible. Keep all windows and exterior doors shut when air conditioner is on. Do not short cycle your compressor by moving the thermostat up and down too rapidly. Set your temperature slowly and leave it for at least 5 minutes before resetting. i. In case of outside temperatures exceeding 95° F, a differential of 15° F is acceptable. SOLUTIONS TO COMMON HEATING & AIR CONDITIONING PROBLEMS Problem Air temperature in different rooms or floors is uneven. Likely Cause Air distribution unbalanced. Registers are obstructed. Reduced airflow or excessive dust on vents and registers. Indicator light on thermostat stays on continuously. Heat pump, fan, or air conditioner not operating. Air conditioner or heat pump not operating properly. Inside air handler is leaking water. Dirty air filter. Condensate drain clogged or inside coil is frozen. Call HVAC Contractor. Check manufacturer’s warranty. Inside or outside coil is frozen. Low refrigerant or dirty air filter. Excess water on windowpanes. Excess humidity in home. Burning smell when winter or auxiliary heat first turned on. Blue/green light on thermostat stays on continuously. Accumulated dust on electrical coils. Call HVAC Contractor. Clean or replace filter. Raise thermostat to 90° to thaw. Adjust thermostat setting. Use exhaust fans while cooking or bathing. Normal. Happens once each year. Disconnect breaker at panel box tripped. Circuit breaker or fuse tripped. Outside unit obstructed by debris; bushes, leaves, etc. Disconnect breaker tripped at heat pump. 5 Solution Adjust air registers. Clear obstructions away from registers. Clean or replace air filters as necessary. Check disconnect breaker. Reset or replace as necessary. Reset circuit breaker at panel box or unit. Clear obstructions from top and sides of unit. Check disconnect breaker. Reset or replace as necessary. Tip to Homeowner: If your air conditioner does not operate properly even after you have followed the above guidelines and the manufacturer’s warranty booklet, call the subcontractor. Remember, you will be responsible for paying the service call unless the problem is warranted. 6 APPLIANCES Introduction Your home may be equipped with a variety of appliances, such as an electric oven, range hood, dishwasher, refrigerator, microwave oven, garbage disposal, washing machine, and dryer. At move-in time you should test all appliances for proper operation, and where applicable, fill out and mail in warranty cards. Failure to do so may void the Manufacturer’s Warranty. Review the Manufacturer’s Service Manuals for operation and maintenance instructions. File your manuals in a convenient location for future reference. Many manufacturers offer toll-free customer service to answer questions about appliance problems and operation. Some helpful numbers are: G.E. Service Kitchen Aid Sub-Zero Maytag 800-432-2737 800-422-1230 800-222-7820 800-688-9900 Whirlpool Jenn-Air Sears 800-253-1301 800-688-1100 800-366-7278 Homeowner’s Maintenance Guidelines Before calling for service: If an electrical applicant fails to work, complete the following checklist before calling the appropriate contractor, otherwise, you may be charged for a service call. 1. Check that the appliance is plugged in. 7 2. If the appliance is plugged into a wall-switched electrical outlet, make sure the switch is “ON”. If the appliance is plugged into the GFCI circuit, check and reset the button if necessary. 3. The circuit breaker in the panel box controlling the appliance should be in the “ON” position. 4. Some appliances come with their own separate fuses or circuit breakers. Review the Manufacturer’s Service Manual for the exact location, the check for proper setting. 5. Annually check the dryer vent for obstructions. Accumulated lint should be removed by disconnecting and then vacuuming the dryer vent. Helpful Hints: Refrigerators/Freezer: Check and clean the gaskets regularly to ensure a tight seal. Refrigerator and freezer temperatures should be set at the temperatures recommended by the manufacturer. DO NOT PLUG a refrigerator or freezer into a “ground/fault” (GFCI) receptacle, because the circuit may trip and not be discovered for some time, allowing the contents of the refrigerator or freezer to spoil. Dishwasher: Use only when you have a full load. Use the shortest wash cycle. Cook Tops/Stoves/Ovens: Do no allow dirt to accumulate. Clean with a recommended over-the-counter-cleaner. Do not use harsh abrasives unless specified. Clean all filters regularly. Garbage Disposal: Always use cold water when disposal is working. Corncobs and husks, bones, celery, or any other food that shreds should not be put into the disposal. If the machine becomes jammed, use the wrench to free the mechanism and try again. The disposal will rust if not used regularly. If you are going to be away for an extended period of time, a teaspoon of oil will help prevent the mechanism from freezing. Range Hood Fan or Microwaves: The range hood fan filters collect grease and should be cleaned regularly. Soaking the filters or lightly brushing them in hot soapy water is the best cleaning method. Be sure the filters are dry before reinstalling them. Microwaves Oven: Be sure that vent louvers are not blocked. 8 TYPICAL ANSWERS TO APPLIANCE ISSUES Issue Electric appliance not working. Probable Cause Check circuit breaker. Garbage disposal not working. Garbage disposal odor. Clogged. Range hood not filtering properly. Dishwasher not cleaning properly. Water spots on dishes or glasses in dishwasher. Dirty filter. Normal. Obstructed water flow. Not using a rinse agent. Refrigerator not making ice. Icemaker not turned on or water is not turned on. Condensation around Temperature control is refrigerator door. incorrectly set. Clothes dryer not drying Lint build-up. properly. Clothes washer leaking on Washer drain line not floor. installed correctly. 9 Answer Reset breaker or call Appliance Service Department. Refer to Manufacturer’s Manual Run ice cubes through the unit. Clean or replace the filter. Check for proper loading of dishwasher. Use rinse agent recommended by the manufacturer. Turn on. Reset the temperature control. Check dryer filter. Make sure the dryer vent is clear. Install drain line correctly. ATTIC Introduction The attic space below the roof is part of the truss system. When inspecting the attic, walk on the wood members only. The drywall ceiling of the room below is not designed to support any weight. Homeowner’s Maintenance Guidelines The attic truss system is not engineered to support additional weight and should not be used for any storage purpose. Materials stored can also be a fire hazard. Do not cover any vents with insulation or any other material. Insulation on the attic floor is for the thermal protection of the rooms below. If the insulation is moved, it will leave gaps between the insulation panels and may obstruct the attic vents. Always replace moved insulation back to its original position. Building codes require attic and crawl space vents to minimize accumulation of moisture. Attic ventilation occurs through vents in the soffit (the underside of the overhangs) or on gable ends. Driving rain or snow sometimes enters the attic through these vents. Do not cover them to prevent this. Instead, cover the insulation in front of the vent. When you do this, precipitation that blows in safely evaporates and ventilation can still occur. 10 BATHROOM MAINTENANCE Homeowner’s Maintenance Guidelines Mildew: Moisture and mildew problems will occur in any room where water vapor is present. To reduce mildew, turn on the exhaust fan or slightly open a window when bathing. Wipe off wet tiles when done, and then hang up towels and washcloths to dry. To clean mildewed surfaces and reduce mildew odors, apply a liquid mildew agent in a well-ventilated room, followed by a disinfectant and thorough rinsing with clear water. Moisture and mildew removal is a homeowner’s responsibility. Soap Scum: In some geographic areas, water that is high in mineral content can contribute to soap scum buildup. To clean and remove this residue, wash the affected surfaces with a mild vinegar and water solution or use mildew removers found in most stores. Rust Stains: The contact of wet metal on sink surfaces, for example, the bottom of a shaving cream can, may produce rust stains. To remove them, apply a powered rust remover, carefully following the manufacturer’s instructions. TYPICAL ANSWERS TO BATHROOM ISSUES Issue Probable Cause Grout cracks between tiles Settlement Grout stains Moisture and soap build-up Mirror discoloration around edges Moisture build-up around windows Standing water on bottom of mirror or moisture Normal 11 Answer Re-caulk cracks with flexible caulk Wipe down wet tile after bathing. Use exhaust fan. Keep edges clean and dry Wipe down after use CABINETS Introduction Kitchen, laundry room, and bathroom vanity cabinets are all selected for their attractive appearance, durability, and ease of care. With proper maintenance, the cabinets will remain serviceable and attractive for many years. Homeowner’s Maintenance Guidelines Wood Cabinets: Wood cabinet tone, grain, and color variations are normal and reflect the natural characteristics of real wood. Clean wood cabinets with the same gentle care you would give any fine wood furniture. A light coat of wax or lemon oil applied once or twice a year will protect the finish and enhance the appearance. Cabinet mounted coffee makers are not recommended since the rising steam will damage solid wood and wood veneer, causing fading or delamination. For the same reason, position regular coffee makers out from underneath the upper cabinets and near the front of the counter. Laminate Cabinets: Clean laminate cabinets with a soapy cloth or sponge, using a nonabrasive liquid household cleanser for more stubborn stains. There are one-step cleaning products available for laminates that clean, reduce streaking, and leave surfaces polished. As with all cleaning products, carefully follow the manufacturer’s instructions. 12 Shelves: Shelves are not designed to hold weight that exceeds 20 pounds per square foot. Keep canned goods, flour, sugar, and heavier products on the bottom shelf of the base cabinets. If desired, apply contact paper to shelves to protect against scratches and stains. Drawer and Hinge Care: Check the hinges at least once a year for proper alignment and tightness, using a screwdriver to make necessary adjustments. Check drawers for easy movement and apply a silicone spray to the drawer guides should sticking occur. Repairing Nicks and Scratches: Hardware stores offer color-matching putty, stains, and polymer fillers to cover and repair cabinet nicks and scratches. The homeowner is responsible for fading damage or delamination caused by heat, steam, or water intrusion. 13 TYPICAL ANSWERS TO CABINET ISSUES Issue Cabinet door does not close properly Cabinet door bangs when closing Adjustable shelves not at desired height Probable Cause Door hinge is out of adjustment Missing cabinet bumper pads Shelf clips are in the wrong position Cabinet drawer sticks Scratch or dent in cabinet Drawer glides are out of alignment or debris is in the track Normal use Cabinet finish is dull Cabinet is dirty Cabinet swelling from moisture Water leak or putting wet dishes in cabinet 14 Answer Adjust the hinges Install new bumper pads Remove shelf one side at a time. Move clips to desired position. Replace shelf one side at a time Realign track and check for debris. Spray with silicone Fill crack or dent with colored putty Clean with soap and water. Use mild furniture polish. Do not use lemon oil. Check for water leaks. Dry dishes thoroughly CONCRETE Foundation and Floor Slabs: In monolithic construction, the floor slab, garage slab, foundations, and footings are all poured in concrete at the same time. Most builders use heavily reinforced concrete monolithic slab construction. In some states, in order to prepare the soil for the foundation, a termite spray is applied to the ground prior to pouring the concrete slab. After the first year, it is the homeowner’s responsibility to maintain a termite contract. One thing to understand about concrete is that it will crack! It is important to understand that concrete is a porous material that will expand, contract, and crack as a result of temperature changes, shrinkage, stress, and settlement. Hairline cracks that may appear on foundation walls and be visible on garage floors are common and are usually cosmetic, as opposed to structural. Shrinking occurs from the normal curing process of concrete that varies with the time of year and the moisture conditions that exist when the concrete is poured. Soil conditions and loads such as the weight of the walls cause slab stress and settlement. These forces can create a variety of stresses which, in combination with seasonal temperature variations, can cause concrete and masonry foundations to develop non-structural cracks. Home Slab and Garage Slabs: Due to the large size of concrete home and garage slabs, hairline cracks less than ¼ inch in width are common, and are usually the result of expansion and contraction. These cracks are normal and it is best to leave them alone, since attempts to fill the cracks will not stop the expansion and contraction. Long “hairline” cracks in the slabs, patios, garage floors, sidewalks, and driveways are common and require no additional attention. They are cosmetic in nature and do not affect the integrity of the concrete. Any attempt to repair chips or cracks in concrete will result in product and color variation. Color variations in concrete are a common occurrence and are beyond the control of the builder or sub-contractor. Homeowner’s Maintenance Guidelines Clean concrete with a solution of five tablespoons of baking soda to a gallon of water. Before using the cleaning solution, wet the floor with clear water and loosen dirt with a steel brush or scraping blade. A concrete sealer may be applied to the floor, following the manufacturer’s directions, approximately six months after you move in. This will make it easier to clean and will reduce concrete dusting. Note: Use of concrete sealer may make the floor slippery when wet. 15 Driveway, Sidewalks, Patios, Porches, Steps and Stoops In most cases, exterior concrete cracks are due to expansion and contraction because of temperature variations, soil movement, and slight home settlement. Driveways are not designed to handle the extreme weight of dual axle and dual wheel vehicles. Homeowner’s Maintenance Guidelines Lawn fertilizer left on the driveway, sidewalk, and patios will stain the concrete and cause rust spots. This can be prevented by immediately hosing off the driveway, sidewalk, or patio after applying fertilizer. Water used to irrigate lawns may also cause driveway, sidewalk, and patio staining and mildew, therefore continuous contact should be avoided. Keep excessive weight, such as sand, lumber, and moving vans off driveway to prevent cracking. Rust and grease stains are a homeowner’s responsibility. 16 CONDENSATION/MILDEW Introduction Condensation, or the appearance of moisture that occurs when warm moist air comes into contact with a colder surface, is most prevalent in new homes, especially during the first year. This is caused by the large quantities of water used to build the new home, from the concrete foundations to the paint on the walls. As this water evaporates, and the drying out process occurs, the moisture takes the form of condensation on interior windows. Another source of indoor humidity is everyday water usage. For example, a family of four doing laundry, bathing, and using the dishwasher puts approximately 2 to 5 gallons of moisture into the air everyday. Window condensation is produced by conditions beyond your builder’s control. Mildew fungus that spreads through the air in microscopic spores. They love moisture and feed on surfaces or dirt. On siding, they look like a layer of dirt. Cleaning mildew from your home is your responsibility. Solutions that remove mildew are available from local paint or home improvement stores. Wear protective eyewear and rubber gloves for this task; the chemicals that remove mildew may be unfriendly to humans. Homeowner’s Maintenance Guidelines Ventilation: Proper ventilation is the safe and steady way to reduce indoor humidity, condensation, and mildew. 1. Ensure that the clothes dryer is properly vented to the outside and that the vent is clear of obstructions and lint. Do not push the dryer too far back or the vent hose may become kinked and therefore obstructed. 2. Kitchen, bath, and utility exhaust fans can be used to carry moist air outside. Use the fans for short periods of time since they exhaust cooler air-conditioned air outside the home. 3. Adjust the registers to maintain even temperatures throughout the home. Do not try to speed up the evaporation process by creating extremely high temperatures in the wintertime. This will cause the house to dry out unevenly, creating cracks and other problems. 17 COUNTERTOPS & VANITY TOPS Introduction Kitchen and bathroom counter tops are covered with laminate material or cultured marble. Homeowner’s Maintenance Guidelines Laminate Counter Tops: Clean laminate counter tops with a soapy cloth or sponge, or use a non-abrasive liquid household cleanser for more stubborn stains. There are one-step cleaning products available for laminates that clean, reduce streaking, and leave surfaces polished. As with all cleaning products, carefully follow the manufacturer’s instructions. Caution: Keep standing water away from the backsplash, side splashes, seams, and seal around the sink. These areas are prone to water damage, since excessive moisture will eventually break down the seal and cause swelling or delamination of the counter top. Check seams periodically and re-caulk as necessary. If counter tops or back splashes swell or buckle, it may be due to not maintaining the caulking. This is an important part of your routine maintenance. Cultured Marble Vanity Tops Clean cultured marble with a damp cloth and a non-abrasive detergent. When recaulking, use a flexible caulk. Use of a gel-gloss or aerosol spray may be used for polishing. 18 Counter Top Precautions: 1. Keep counter top dry at all times. 2. Excessive heat can cause charring, burning, lifting, or blistering. Do not place hot pans, coffee pots, baking dishes, hot irons, or burning cigarettes directly on counter top surfaces. Use protective hot pads or trivets under counter top electrical appliances. 3. Always use a cutting board since knives will cut the surface of the counter top. 4. Steam from an open dishwasher may cause swelling and delamination. Allow time for the dishwasher to cool before opening the door. To further reduce moisture damage, apply a silicone spray to the underside of counter tops, directly over the dishwasher and two feet left and right of the dishwasher. 5. Do not use clean silicone caulk, as it yellows with age and stains easily. 19 DOORS Introduction Your home comes with a variety of doors, which may include interior doors, French doors, louver doors, bi-fold doors, sliding glass doors, exterior doors, and garage doors. A. Interior Doors Interior doors expand and contract in reaction to temperature and moisture changes, and will be wider in humid summer periods and narrower during dryer winter months. Homeowner Maintenance Guidelines Sticking Doors: Home settlement or damp weather may cause swelling that puts the doors out of alignment. In some cases, this may only be temporary due to seasonal variations, and the sticking will tend to correct itself without any adjustment. Door Precautions: Interior doors are usually hollow core and are not designed to support attachments and hanging accessories. Hanging heavy items on doorknobs, or at the top of a door, can damage hardware and hinges. These doors are also undercut to allow air movement. Slamming: Slamming doors can damage both doors and jambs, and can even cause cracking in walls. Teach children not to hang on the doorknob and swing back and forth; this will loosen the hardware and cause the door to sag. Shrinkage: Use putty, filler, or latex caulk to fill any minor separations that develop at mitered joints in door trim. Follow with painting. Panels of wood doors shrink and expand in response to changes in temperature and humidity. Touching up the paint or stain on unfinished exposed areas is your home maintenance responsibility. B. Bi-Fold and Bi-Pass Doors Keep the door tracks free of paint and dirt, and apply a small amount of silicone spray to the guide edges of the tracks. C. Sliding Glass Doors and French Doors Keep sprinklers away from sliding glass doors and French doors when watering the lawn. Sliding glass doors have been sealed against water, but occasionally, high winds and driving rains can create a vibration that causes some leakage. Neither this, nor the water that accumulates in the tracks can be prevented. This is also true for French doors. Clean glass with a spray glass cleaner and wipe frames with sudsy water and a soft cloth. Periodically clean the bottom of the door track, and check to ensure that drain holes are clear of obstructions. To keep the doors moving freely, apply a silicone spray to the tracks. Do not use oil, which may cause premature deterioration of the rollers. 20 In some cases, the glass is tinted to help block the rays of the sun. If you feel you need solar protection film on your glass, it is important to note that ALL SOLAR FILM MUST BE APPLIED TO THE INSIDE PANE OF GLASS. Otherwise, heat build-up between the layers of glass will cause the glass to crack. D. Exterior Doors An exterior door that is properly aligned, fitted, weather-stripped, and maintained will help control energy costs. Exterior doors are often steel clad or fiberglass to prevent warpage and to maximize insulation. An exterior door will warp to some degree, due to temperature differences between the inside and the outside surfaces. Warpage shall not exceed ¼” measured diagonally from corner to corner. Wood exterior doors should be checked every six months for signs of weathering and repainted as necessary. Painting: Steel clad or fiberglass doors are maintenance-free and require little attention except for painting and upkeep from dents and scratches. Weather Stripping: Weather stripping on exterior doors helps maintain the home’s energy efficiency, preventing the loss of conditioned air and reducing the infiltration of outside air. Weather stripping must remain in place to operate effectively. 1. Replace weather stripping that becomes loose or damaged 2. Prolong the life of vinyl and rubber weather stripping by applying a silicone spray. 3. The sweep weather stripping at the bottom of the door may require replacement from time to time. To replace, remove the sweep and match with a replacement available at any hardware store. 4. To raise or lower the threshold, adjust the screws on the wood or metal portion of the threshold. Keep threshold caulked at all times. 5. Keep sprinklers away from doors. 21 TYPICAL ANSWERS TO DOOR ISSUES ISSUES Interior door does not stay closed Door sticks or binds PROBABLE CAUSE ANSWER Keeper out of adjustment Adjust keeper Settlement or swelling from moisture Loose screw Metal rubbing Bi-fold doors do not close flush Bi-fold door leaves the track Door keepers unadjusted Sliding glass door sticking or hard to operate Sliding glass door will not lock Entry door does not latch Bottom rollers out of adjustment Latch out of adjustment Adjust hinges, keeper, or jambs Tighten screws Apply silicone spray to hinges Adjust keepers on backside of the door Reinstall door, inserting wheels at top of the door track Adjust and spray with silicone Adjust the locking latch Tight weather-strip or slight door movement Threshold out of adjustment Adjust weather-stripping or keeper Adjust threshold Threshold not snug at bottom of door Out of adjustment Adjust threshold Loose weather-strip or sweep Weak or dead batteries. Check circuit breaker Debris in track blocking weep holes Adjust weather-strip or sweep to ensure tighter fit Replace batteries. Reset circuit breaker Clean out the track of any debris Doorknob loose or rattles Hinges on the door squeak Hot or cold air coming in around exterior door Water infiltration at door Garage door not operating properly Can see light around entry door or garage service door Remote garage door opener not operating Water in sliding glass door track Unusual handling of door 22 Call authorized repairman DOOR HARDWARE/LOCKS/HINGES/KEYS Homeowner’s Maintenance Guidelines The brass door locks, door handles, hinges, and stoppers used throughout the home are exposed to both inside and outside elements, pollution, extreme elements, and common everyday use. This may cause them to discolor or become pitted. The manufacturer does not guarantee the finish of any product. Clean these with a damp cloth and do not use abrasive cleansers or solvents. Periodic polishing, following the manufacturer’s recommendations, will help maintain the original luster and appearance. Do not use brass polish on lacquered brass parts or fixtures. Locks: Lubricate door locks with graphite or other waterproof lubricant. Avoid oil, as it will gum up. Failure to Latch: If a door will not latch because of minor settling, you can correct this by making a new opening in the jamb for the latch plate (remortising) and raising or lowering the place accordingly. Hinges: You can remedy a squeaky door hinge by removing the hinge pin and applying a silicone lubricant to it. Avoid using oil, as it can gum up or attract dirt. Graphite works well as a lubricant but can create a gray smudge on the door or floor covering beneath the hinge if too much is applied. Keys: Keep a duplicate privacy lock key where children cannot reach it in the event a youngster locks him/herself in a room. The top edge of the door casing is often used as a place to keep the key. A small screwdriver or similarly shaped device can open some types of privacy locks. Your interior door locksets can work loose over time. If you notice excessive play in the lockset, we recommend tightening the screws located in the cover plate. If the doorknob has become inoperative, it could mean that the interior mechanism has slipped out of place. Remove the knob, realign the interior mechanism, reset the knob, and then tighten the exterior screws. Should a lock be hard to operate, apply graphite lubricant to the keyhole and lock mechanism. This will usually help the lock to operate more smoothly. 23 CABLE T.V. SYSTEM Introduction Homeowner’s Responsibility: The homeowner is responsible for contacting the local cable company for the initial hook-up. Roof antennas and/or satellite signal receiving dishes are not allowed in some communities and you should check with your Homeowner’s Association (if applicable) before proceeding with any installation. 24 ELECTRICAL SYSTEM Introduction The electrical system in your home is designed for safe, trouble-free service and meets both local and national electrical code requirements. Any additional alteration or modification to the original electrical system installation will void all applicable warranties. Homeowner’s Maintenance Guidelines Electrical Safety Cautions: Do-it-yourself electrical wiring is dangerous. Improper electrical wiring is dangerous. Improper electrical repairs can endanger the lives of your family and jeopardize your homeowner’s insurance in the event of a fire or electrical injury. Always use a licensed electrician to make electrical repairs, adjustments, and additions. Electrical Storm Caution: It is recommended that you unplug television sets, computers, and telephones during electrical storms. Power Failure: If the electrical power goes out, check first to determine if neighbors are also without power, and if so, contact the utility company. Before attempting to reset the circuit breakers, check that power has been restored to the area. If neighbors have power, check the main circuit breaker in the panel box. See Homeowner’s Maintenance Guidelines under Circuit Breakers, this section. Be aware that not every electrical power problem is due to problems within the home’s electrical system. Utility companies experience a variety of situations that effect power 25 supplies, including power surges and interruptions, peak overload periods, and even total shutdowns. Circuit Breakers: Electrical wiring and appliances are protected by circuit breakers to stop circuit overloading. The main circuit breaker is located in the electrical panel box, and if tripped for any reason, entirely cuts off all electricity to the house. The smaller circuit breakers within the panel box control appliances, wall switches, lighting, and the HVAC system, and each switch should be clearly marked as to what it controls. Do not tamper with the electrical service entrance cable that provides power to the service panel. Circuit Tripping Causes and Remedies: Thunderstorms, lightening, and power failures can cause circuit breakers to trip. If only your home is affected, try to reset by switching the breaker to full “OFF” then back to full “ON” position. If this does not reset the breaker, or if the breaker continues to trip, do not continue resetting the breaker as this can damage the panel box, wiring, or the appliance that is controls. Call a licensed electrical contractor for a service inspection. Overloaded circuits can also cause tripping. This occurs when too many appliances are used on one circuit. To reduce the load, remove plugs of appliances that may cause the overloading, then reset the breaker as described above. If you install a microwave oven or other appliances that require large electrical loads, you may need a licensed Electrical Contractor to add additional wiring to accommodate the load. Outlets and Wall Switches: If an electrical outlet does not work, check first to make sure that the outlet is not controlled by a wall switch. If the outlet still does not operate contact an electrical contractor. Note: Do not plug a refrigerator or freezer into a GFCI controlled outlet. There is a good chance that if the GFCI trips, your food will be ruined before you notice the problem. Ground Fault Circuit Interrupters: GFCI electric outlets help to prevent electrical shock, and are installed in kitchens, bathrooms, garages, and exterior areas where water may be present. GFCI receptacles are sensitive to power surges and interrupt power under certain conditions to prevent injury. Do not plug refrigerators or freezers into GFCI outlets. GFCI outlets are often wired in a series. For example, the garage GFCI outlet controls the bathroom, and may possibly control other outlets throughout the home. Taking this example further, if the electrical outlet in the bathroom is not functioning, check the GFCI in the garage. Also be aware that some homes have multiple GFCI’s, so be certain to inspect and reset the affected outlet. 26 If a GFCI’s receptacle is not functioning, press the “RESET” button on the wall plate to restore proper operation. If that does not work, check and reset the circuit breaker in the panel box first, then press the GFCI Reset button. If the outlet still fails, it may indicate a short in the appliance. If other appliances will not operate, an electrician should be contacted and the GFCI replaced. To test GFCI’s, press the “TEST” button on the receptacle. The outlet should not perform. To reset, press the “RESET” button. Pre-wired for Telephones: Most homes are pre-wired for telephones. If you experience problems with the telephone system you should contact your local phone company. If the telephone company states that there is trouble in the house wiring and your house is less than one year old, please call your builder. 27 GAS SHUT OFFS There is a shut off on the gas line at or near its connection to each item that operates on gas. If you suspect a gas leak, leave the home and call the gas company immediately for emergency service. 28 LIGHT FIXTURES Homeowner’s Maintenance Guidelines Interior and exterior lighting fixtures require periodic homeowner maintenance to preserve the finish. Carefully review and follow the instructions if provided for these fixtures. Interior and exterior fixtures will tarnish and the manufacturer does not warrant the finish. Always turn the power off at a wall switch or circuit breaker before cleaning any electrical device. The danger of a severe shock will still exist if the device is turned off with a built-in switch. Do not use indoor bulbs in outdoor lighting fixtures if the bulb is to be exposed to the weather. Do not use light bulbs with a higher wattage than the maximum wattage stated on the light fixture. 29 SMOKE DETECTORS The smoke detectors in your home are pre-wired, per electrical code requirements, into the main electrical system. In case of electric failure, the smoke detector is back up with a 9-volt battery. Homeowner’s Maintenance Guidelines Test the detectors and clean and vacuum the openings of the smoke detector once a month. Visually inspect the clear button on the test switch to see that the indicator light is glowing. To test the alarm, press the TEST button for about ten seconds, or until the horn sounds lightly. Do not use an open flame to test the detector. The unit will emit a low-frequency beeping noise if a malfunction or power failure occurs or if the battery is low. Change the 9-volt battery every 6 months to ensure proper operation. STAIRS Homeowner’s Maintenance Guidelines No known method of installation prevents all vibration or squeaks in a staircase. A shrinkage crack may develop where the stairs meet the wall. If this occurs, apply a thin bead of latex caulk and, when dry, touch up with paint. 30 EXTERIOR WALL FINISHES Introduction Exterior finishes are applied once the exterior framing and/or concrete block is complete. The exterior of your home may be finished with stucco, brick, siding, and stone. A. Brick Brick is used extensively throughout the United States. It is probably the lowest maintenance finish of all home exterior finishes. The mortar between the bricks may require some tuck-pointing (filling in) as your home ages. The weep holes in the brick are there to allow moisture out. Do not fill these holes or allow landscaping material to cover them. Efflorescence is a white powdery substance that may appear on the exterior walls. It is normal and is composed of water-soluble salts, originally present in masonry materials that are brought to and deposited on the surface when water evaporates. Most efflorescence can be removed with a stiff scrub brush, water, and vinegar. 31 B. Stone Veneer Slight variations in size, color, and placement create the textural interest that contributes to the look of a stone exterior. Minor stone chipping, cracking, and cement shrinkage are normal. C. Siding Siding expands and contracts in response changes in humidity and temperature. Slight waves are visible in siding under certain weather conditions; this cannot be entirely eliminated. 32 SOLUTIONS TO COMMON EXTERIOR FINISH PROBLEMS PROBLEM LIKELY CAUSE SOLUTION Dents in soffit or fascia Abusive treatment Replace panel Siding blows off Strong winds under 54 miles per hour Strong winds over 54 miles per hour Call during first year for inspection Act of God. Review homeowner’s insurance policy Caulk and repaint as soon as possible Periodic hosing. See manufacturer’s recommendations Apply commercial mildew cleaner following manufacturer’s directions Clean and sand surface, then prime and repaint Re-caulk or fill Siding blows off Nicks or deep depressions in wood siding Dirty siding Abuse or accidents Siding has dirty, streaked appearance Mildew and fungus growth Cracking/peeling of painted surfaces Gaps at joints in wood trim Normal aging and weathering Normal caulk and filler shrinkage Wood drying out Sap on exterior trim Efflorescence on masonry finishes Cracks or stair-step cracks in masonry finishes Adverse weather conditions and soiling Crystallized soluble salts Normal home settlement 33 Sand, prime, and paint Scrub with water and stiff brush Seal cracks with a flexible masonry caulk EXPANSION & CONTRACTION Most building materials will expand and contract subject to changes in temperature and humidity. All materials do not expand and contract at the same rate and the result may be small cracks in drywall and paint and small separations between materials. This is very normal in a new home, even in the highest quality of construction. Shrinkage of the wood and sheetrock in your home is inevitable, and this will be most noticeable during the first year following completion of the construction. However, generally all that is needed is a small cosmetic repair, sometimes involving only minor caulking. Keep in mind that caulk will eventually require replacement by the homeowner. 34 GAS FIREPLACES If you have a gas fireplace, supplying the source for the gas is usually the homeowner’s responsibility. If you have this type of fireplace, it is demonstrated as soon as the gas is provided. Read and follow all manufacturers’ directions. A slight delay between turning the switch “on” and the flame ignition is normal. The flames should ignite gently and silently. If you notice any deviation from this and any gas smell, immediately shut off the switch and report it to the gas company. Excessive winds can cause a downdraft, which can blow out the pilot, requiring you to relight it before using the fireplace. The exterior vent cover for a direct-vent gas fireplace becomes extremely hot when the fireplace is operating. 35 FLOORING Introduction Your home may be finished with a variety of flooring materials, including carpet, vinyl, hardwood floors, and ceramic tiles. A. Carpeting The carpet in durable and requires minimal care. Color variations and shading may be noticeable, and depend upon the surface texture and pile fiber of the carpet. Homeowner’s Maintenance Guidelines Frequent vacuuming and immediate stain removal are primary carpet care steps. When using carpet cleaners, carefully follow manufacturer’s instructions. While normal vacuuming will only remove loose fibers from carpet yarns, an occasional tuft may be lifted about the surface. Do not pull out the tuft: just snip if off to the length of the other tufts using scissors. Color fading and spots caused by sunlight are normal and can be minimized by using the draperies during the day, or by using sheer draperies to reduce incoming sunlight. Some colors may fade faster than others. Change filters in your heating and air conditioning systems on a regular basis or when dirty. Dust, pollen, and smoke will settle on your carpets and increase staining and soiling. When a spill occurs, immediately blot it firmly with dry, white paper towels or rags. Do not rub the spot as it will damage your carpet’s tufts and may permanently alter your carpets appearance. If stain remains, spray with cold water and blot again. Repeat if necessary. Cleaning: You can add years to the life of your carpet with regular care. Carpet wears out because of foot traffic and dirt particles that get trampled deep into the pile beyond the suction of the vacuum. The dirt particles wear down the fibers like sandpaper and dull the carpet. The most important thing you can do to protect your carpet is vacuum it frequently. Vacuum twice each week lightly and once a week thoroughly. Heavy traffic areas may require more frequent cleaning. A light vacuuming is three passes; a thorough job may need seven passes. A vacuum cleaner with a beater-bar agitates the pile and is more effective in bringing dirt to the surface for easy removal. Vacuuming high-traffic areas daily helps keep them clean and maintains the upright position of the nap. Wipe spills and clean stains immediately. For best results, blot or dab any spill or stain; avoid rubbing. Test stain removers on an out-of-the-way area of the 36 carpet, such as in a closet, to check for any undesirable effects. Have your carpet professionally cleaned regularly, usually once a year. Some problem conditions that may occur with your new carpet and our suggested remedies are presented below: Stains: No carpet is stain proof. Although your carpet manufacturer designates your carpet as stain-resistant, some substances may still cause permanent staining. Cleaning Stains: First, scoop-up or blot as much of the spill as possible from the carpet. With a white cloth rag, blot from the edges toward the center of the stain until dry. For asphalt, butter, chocolate, cooking oil, furniture polish, grease, food, lipstick, mascara, oil, shoe polish, tar, apply a small amount of dry cleaning fluid (non-oil type commonly used for spot removal from garments) to a dry white cloth towel and blot. Repeat and blot with paper towels until the spot is dry. For ice cream, latex paint, excrement, mayonnaise, milk, vomit, and white wine, apply a small amount of detergent or a recommended cleaner or solvent to a dry white cloth towel and blot. Repeat and blot with paper towels until the spot is dry. For fruit drinks, berries, blood, coffee, fruit juice, ketchup, mustard, soft drinks, tea, and red wine, mix ½ cup household hydrogen peroxide with 1 tsp. Clear ammonia and dampen the spot with a small amount of the mixture. Let stand for 2 or 3 hours under a weighted sheet of plastic wrap. Apply with damp towel. Blot with paper towels until dry. Apply a little undiluted white vinegar only after stain is removed. NEVER APPLY DETERGENTS OR STAIN REMOVER DIRECTLY TO CARPET! This could cause permanent discoloration. For recommended cleaners and solvents, call the fiber producer. When a stain reappears after cleaning, it means all the stain and cleaners were not removed completely. Re-cleaning is necessary. Always rinse your carpet thoroughly to remove any detergent residue. Burns: Take care of any kind of burn immediately. First, snip off the darkened fibers. Then use a soapless cleaner and sponge with water. If the burn is extensive, talk with a professional about replacing the damaged area. Crushing: Furniture and traffic may crush a carpet’s pile fibers. Frequent vacuuming in high-traffic areas and glides or cups under heavy pieces of furniture can help prevent this. Rotating your furniture to change the traffic pattern in a room promotes more even wear. Some carpets resist matting and crushing because of their level of fiber, but this does not imply or guarantee that no matting or crushing will occur. Heavy traffic areas such as 37 halls and stairways are more susceptible to wear and crushing. This is considered normal wear. Fading: Science has yet to develop a color that will not fade with time. All carpets will slowly lose some color due to natural and artificial forces in the environment. You can delay this process by frequently removing soil with vacuuming, regularly changing air filters in heating and air conditioning systems, keeping humidity and room temperature from getting too high, and reducing sunlight exposure with window coverings. Filtration: If interior doors are kept closed while the air conditioning is operating, air circulation from the closed room flows through the small space at the bottom of the door. This forces the air over the carpet fibers, which in turn act as a filter, catching particulate pollution. Over time, a noticeable stain develops at the threshold. Rippling: With wall-to-wall carpeting, high humidity may cause rippling. If the carpet remains rippled after the humidity has left, have a professional re-stretch the carpeting using a power stretcher, not a knee-kicker. Seams: Carper usually comes in 12-foot widths, making seams necessary in most rooms. Visible seams are not a defect unless they have been improperly made or unless the material has a defect, making the seam appear more pronounced than normal. The more dense and uniform the carpet texture, the more visible the seams will be. Carpet styles with low, tight naps result in the most visible seams. Seams are never more visible than when the carpet is first installed. Usually with time, use and vacuuming will help the seams become less visible. You can see examples of how carpet seams diminish after they have been vacuumed and have experienced traffic in the model homes. Shading: Shading is an inherent quality of fine-cut pile carpets. Household traffic causes pile fibers to assume different angles; as a result, the carpet appears darker and lighter in these areas. A good vacuuming, which makes the pile all go in the same direction, provides a temporary remedy. Shedding: New carpeting, especially pile, sheds bits of fiber for a period of time. Eventually these loose fibers are removed by vacuuming. Shedding will usually occur more with wool carpeting than with nylon or other synthetics. B. Hardwood Floors Most hardwood floors are pre-finished at the factory with a baked on wax coating or a urethane coating. Wood floor tone, grain, and color variations are normal, and reflect the natural characteristics of real hardwood. Some squeaking or separating of hardwood floors is normal and is caused by seasonal weather and humidity changes. It is normal to expect surface nailing to occur around the perimeter area of pre-finished hardwood floors, and around any repair areas, as well. 38 Cupping or crowning are normal and occur from gaining or losing moisture on one side faster than the other. Neither the builder nor the manufacturer can stop this from happening. It is also due to natural growth rings in the tree and the part of the tree that has been used. In some instances, the cupping and crowning action may loosen nails or adhesive. The only way to control this occurrence is to try to keep your home at an even temperature and moisture level. Homeowner’s Maintenance Guidelines Prior to cleaning your hardwood floors, carefully read and follow the manufacturer’s instructions and recommendations. Use entrance rugs or mats to protect wood flooring from dirt and water spots. Do not use rubber-backed mats, as they will remove the finish. Mop up water spills immediately. Do not set potted plants directly on a hardwood floor as moisture can leak through and cause permanent staining and warpage. Attach furniture protectors to the bottom of furniture legs to protect the hardwood flooring from scuffing and surface damage. High heel shoes and constant moving of chairs can damage hardwood floors. Extra care is required to keep hardwood floors dry and to promptly mitigate any unusual water intrusion that could occur. C. Resilient Floor Coverings Resilient floor coverings come in 6-foot or 12-foot wide rolls and are usually installed in kitchens, bathrooms, and laundry areas. Before cleaning a resilient floor, read and follow the manufacturer’s cleaning and care recommendations. Do not wax a “no-wax” floor. 39 Homeowner’s Maintenance Guidelines Mop up bathroom water spills from showers and baths immediately. Water seeping into the mastic through the seams and under the baseboard trim can cause mildew, seam separation, and lifting. A flexible caulk, available at hardware stores, is recommended for use at tub and floor joints to minimize this problem. Attach furniture protectors to the bottom of furniture legs to protect the resilient flooring from scuffing and surface damage. High heel shoes and constant moving of chairs may show and may damage resilient floor coverings. 40 TYPICAL ANSWERS TO FLOORING AND FINISH ISSUES ISSUE Carpet seams are noticeable Carpet fades near window and doors Carpet looks matted on stairs and high traffic areas Carpet fuzzing PROBABLE CAUSE Fibers separate from vacuuming and normal traffic Excessive sunlight ANSWER Vacuum carpet in same direction as seams Dirty carpet or insufficient vacuuming Normal for new carpet Close window coverings to reduce excessive sun Follow manufacturer’s guidelines Vacuum Resilient or vinyl floor looks dull Cuts or burns on resilient floors Nail or staple pops up under vinyl or resilient floors Yellow or purple areas in resilient floors Normal No repair required Accidents Contact Flooring Contractor for repairs Gently re-set nail or staple Caulk cracks around vinyl floors Dents in vinyl, resilient, or hardwood floors Fine scratches, white splotches, or stains on hardwood floors Grout cracks along baseboards Grout staining Caulk shrinkage and settlement Objects dropped, heavy furniture, or high heel shoes Normal wear, furniture scratches, and spills Settlement Moisture problem or rubber backed floor mats Normal expansion and contraction Liquid spills and grease from food 41 Investigate moisture problem. Do not use rubber backed mats Re-caulk gaps with flexible caulking Follow manufacturer’s guidelines Follow manufacturer’s guidelines Re-grout cracks Follow manufacturer’s guidelines FRAMING & CARPENTRY Wall Framing: Wood and/or metal studs are set vertically on 16 or 24-inch centers. Steel studs are primarily used in non-load bearing walls. Roof Framing: Roof framing uses a pre-engineered truss system that supports the weight of the roof and can be used in combination with conventional ceiling and roof framing. The trusses are delivered to the building site by truck, and then placed and secured into position on the home using a crane. Roof Sheathing: Roof sheathing covers and serves as base for the roofing materials. As the wood in your home dries, normal shrinkage will occur that causes settlement. While every home has certain degrees of settlement, not all settlement is severe enough to require repair. Natural shrinkage and swelling will cause small cracks, chips, and splits. These are acceptable under industry standards. Insulation: Insulation is placed wherever there is likely to be a difference between interior and exterior temperature or humidity in the floors, ceilings, exterior walls, and the attic. Flexible insulation, in the form of fiberglass blankets, is commonly used in walls, floors, ceilings, and around air ducts. Blown insulation of loose fiberglass can be used in ceiling areas. Plastic foam may be used for spot insulation around windows and doors, pipe openings, and other leakage points. 42 R-Value: This is the insulation measurement. The higher a material’s “R-value” number, the more effective it is as an insulator. Different parts of the home have different insulation standards. 43 GARAGE DOORS Caution: The installation of a garage door opener, unless installed as an available option, may void your garage door warranty. Garage doors are warranted for proper mechanical operation as installed. The installation of a garage door opener (by others) alters the operation of the door and the builder cannot be responsible for altered mechanical operation. Homeowner’s Maintenance Guidelines Garage doors with remote openers can be operated manually by pulling the release cord at the top of the garage door, near the track, and then lifting the garage door open. If minor garage door adjustments are required, contact an authorized repairman. On a yearly basis, light gauge oil should be applied to track, roller, hinges, pulleys, and springs. Also check to see if nuts and bolts are tight. Please Note: Photocells are not designed to be waterproof, and care must be taken when pressure cleaning or hosing out the garage. If the photocells get wet they may not allow the door to close. We will not warrant photo cells if this is deemed the cause of failure. Garage overheard doors cannot be airtight. Some light will be visible around all the edges. Severe weather conditions may result in some precipitation entering around the door. 44 INTERIOR WALLS & CEILINGS Introduction Your home has two types of walls; load bearing and non-load bearing. 1. Any alteration of load bearing walls may reduce the strength of the structure by altering its unit load capacity, its load bearing, or its support. 2. Interior wall construction begins with the placement of studs set vertically at specified intervals. Then the drywall is screwed and/or nailed to the studs. Drywall: Drywall is screwed to the studs of the ceiling and wall surfaces. The seams where sheets of drywall come together are taped, spackled with a joint compound, allowed to dry, and then sanded to prepare them for finishing. The generally acceptable building standards are that slight “imperfections” such as nail pops, seam lines, and cracks not exceeding 1/8” are common in gypsum wallboard installations. However, obvious defects or poor workmanship resulting in excess compound in joints, trowel marks, and cracked corner beads are not acceptable and must be noted prior to closing. Both nail pops and small drywall cracks are simple to repair. Drywall Nail Pops and Crack Repair Instructions: 1. Reset the protruding nail slightly into the gypsum board surface or remove it entirely. Place another drywall nail two inches above or below the popped nail, and gently hammer it slightly below the paper surface. Cover the area with spackling compound, allow to dry, sand smooth, and then refinish the surface. 2. For drywall joint cracks, press a small “V” shaped indentation using the back of a putty knife along the length of the crack about 1/8 of an inch deep and 1/8 of an inch wide. Spackle, sand, and refinish as with nail pops. 3. To prevent cracks wider than ¼” from re-opening, first apply the spackling compound over the crack with a strip of drywall tape, add another top layer of spackling, feathering the edges well, sand to a smooth finish, then refinish. 4. Deep scrapes and indentations on drywall surfaces can be filled with two or three applications of spackling compound. Allow it to dry thoroughly, and sand between each application. Touch-up painting of repaired areas will not blend perfectly with the original wall paint. Interior Trim and Moldings: Homes are built with various moldings including but not limited to, floor moldings, door casings, and other wood trims. Some separation of wood trims and moldings is normal and is caused by home settlement, plus shrinkage, or expansion due to extremes of dryness or humidity. 45 Homeowner’s Maintenance Guidelines Should the baseboard trim come loose, simply re-nail the baseboard back into the proper position. For moldings, it is better to wait for several months to see if settlement will bring the pieces back together naturally. If not, a separation at corners or seams can be patched with a wood filler and then refinished to match the existing molding. Shrinkage of wood trim occurs during the first two years or longer, depending on temperature and humidity. All lumber is more vulnerable to shrinkage during the heating season. Maintaining a moderate and stable temperature helps to minimize the effects of shrinkage. Wood will shrink less lengthwise than across the grain. Wood shrinkage can result in separation at joints of trim pieces. You can usually correct this with caulking and touch-up painting. When re-nailing baseboards, drive in another nail close to, but not exactly in, the existing nail hole. Fill the old nail hole with putty and touch up with paint as needed. If the base shoe (small trim between base molding and the floor) appears to be lifting from the floor, this is probably due to slight shrinkage of the floor joists below. Again, you can correct this condition by removing the old nails and re-nailing. You may prefer to wait until after the first heating season to make any needed repairs. 46 LANDSCAPING, GRADING, LAWN, & SHRUBS Introduction Landscaping plans are generally designed by a landscape architect, and approved by local officials. The home may be part of the entire communities’ landscape master plan and therefore cannot be individually modified. Check with your builder before doing any extensive landscaping changes. A. Grading The drainage plan for your community was designed by engineers and approved by the various authorities having jurisdiction. Storm water management is a critical part of the community design. The yard is carefully graded to direct storm water away from the house into areas where it can soak away or eventually flow into the community storm water drainage system. After heavy rain, it is normal to see significant areas of standing water. This is a deliberate part of the approved drainage design; it allows water to enter the drainage system slowly and also helps to limit the entry of nutrients, fertilizers, etc. into the interconnected fresh water system. After normal heavy rain, water should not be standing on paved areas after 48 hours. Swales and drainage areas may be permanently wet, particularly in times of heavy rain or melting snow. Homeowner’s Maintenance Guidelines Over time, the grade around the house can settle. If this occurs, spread additional soil or sand in the depressions to raise and re-establish the grade. 47 To prevent erosion and ponding of water: 1. Do not alter the soil grade. 2. Keep water ditches or swales open and free of leaves and debris. Do not build sheds, hot tubs, decks, fences, pools, or gardens in the swales otherwise water may not flow properly through the swale. 3. Direct water run-off away from the home to prevent washouts. Reposition splash blocks if they are moved. 4. Do not allow sprinklers to wet the house or form puddles near or against the foundation. B. Lawn In new homes, the yard is graded and the landscape contractor removes debris and rakes the ground surface prior to installing sod or grass seed. Homeowner’s Maintenance Guidelines The future beauty of your yard depends on the care and attention you provide. The builder cannot be responsible for homeowner neglect or improper landscape maintenance. The following suggestions should make the job easier: Fertilizing: Fertilizer should be applied a minimum of three times a year for turf. In the winter months, two applications are necessary and one should be a weed and feed. In the summer months, one application should be applied. Spray insecticide every other month. Do not spray immature grass with chemicals to kill weeds. The best approach is to use pre-emergent weed control when grass is stronger and more mature. Be aware that sod, when initially laid, will occasionally go into shock and turn brown. The sod is not dead and you should continue to water it. Watering: From germination to establishment – once seeds are in the ground, their ability to germinate and eventually form a full lawn depends on a variety of conditions. Watering needs to be done several times a day for newly seeded lawns to keep the soil moist (but not so much that the soil washes away). Traffic such as children, pets, and equipment should be kept off the planted area to avoid crushing the emerging blades. This delicate nurturing period extends from the time the seed is sown to the point at which the grass becomes established. Germination can take anywhere from 4 to 30 days, with an average of 14 to 21 days, followed by a 6 to 10 week establishment period prior to use. After installation, proper watering is the single most important step in the establishment of sod lawn. After the sod is in place, it may be necessary to water every day for up to two weeks until the roots have sufficiently knitted with the underlying soil. A lawn that is properly watered and fertilized has fewer problems with weeds and disease. Telling you how much water to apply and how often would be simple if there were set rules for every situation. But too many variables are possible. The water requirements of your lawn depend on a number of things: the type of soil you have, seasonal temperatures, wind velocity, humidity, the frequency of rain, the type of grass, 48 and maintenance practices. By combining these guidelines with your own watering experience and knowledge of the climate in your area, you can develop a good watering program for your lawn. How often to water: The answer to this question is simply – when it needs it. However, water shrubs once per week in summertime. Water your lawn when the soil begins to dry out before the grass wilts. When a lawn wilts, grass blades either roll or fold, exposing the bottoms of the blades. At this stage, the lawn color appears to change from a bright green to a dull blue-green or smoky color. You are actually seeing the bottoms of the wilted blades, which are grayer than the tops. This first occurs in the most drought-prone spots, especially beneath trees. Another signal of the need for water is the loss of resilience – the ability of a lawn to bounce back into shape. Take a walk across your lawn. Do the impressions of your footprints remain visible for more than a few seconds? If the answer is yes, especially in the morning, your lawn needs water. Mowing: Mow newly sodded areas as soon as the grass is 2 ½ to 3 inches high. Clip is frequently enough to prevent removal of more than one third of the growth at one mowing. A lawn that is mowed to the right height at the right time resists weeds, insects, and disease. It appears to be lush and healthy. Infrequent mowing often results in the removal of too much grass at one time, and eventually produces a lawn that looks thin, spotty, or burned. How often your lawn needs mowing depends on three things: how often and much you water and fertilize, what time of year it is, and the type of grass in your lawn. Grasses tend to spread either horizontally or vertically. Newly seeded lawns are more delicate than established ones, which is why you have to be more careful when mowing them. The soil is soft and the grass plants usually are not deeply rooted by the first mowing. One the other hand, mowing young lawns, especially those planted vegitatively, helps the plants to spread, thus promoting a thicker lawn. Use common sense and apply the same principles for properly mowing any lawn. Miscellaneous: Grass seed, like all seed, are living organisms requiring the environmental conditions that will allow each seed to be awakened or germinate and start life as a plant. This means applying proper amounts of fertilizer, lime, and water regularly. However, do not cut wet grass. The clippings are messy and they mat, blocking light from grass. Alternate mowing patterns. Mowing the same direction each time tends to compact the soil and cause wear patterns. C. New Shrub and Tree Care A professional landscape designer has planned the landscaping around your home. All trees and shrubs are nursery grown, and a landscape contractor handled the initial planting. The homeowner is responsible for maintaining the new plantings. The type of tree or shrub will dictate the specific care needed, check with your local gardening center. Caution: Do not remove or transplant trees or shrubs from their original locations. 49 Homeowner’s Maintenance Guidelines Watering: It is extremely important that new plants and trees be watered once a day for the first month, for one to three minutes on shrubs, and fifteen to twenty minutes on trees. Fertilizing: Plants should be fertilized on a regular basis. Contact a lawn care specialist for proper maintenance guidelines. Trimming: Hedges and plants should be trimmed on a monthly basis to encourage growth and conformity to the intended design. TYPICAL ANSWERS TO LANDSCAPING ISSUES ISSUES PROBABLE CAUSE ANSWER Tips of grass blades are frayed or turning tan Gaps or holes in grass Dull mower blades Sharpen or replace blades Insufficient watering Grass turning yellow Lack of fertilizer Brown patches in grass Fungus or insect disease Fill gaps with seed and soil. Water properly Fertilize following manufacturer’s directions Contact lawn specialist Grass does not maintain a lush green appearance Trees/shrubs turning yellow Lack of fertilizer Trees/shrubs wilting Too much or too little water Newly planted tree/shrub drops all leaves Shock resulting from transplanting Lack of fertilizer 50 Fertilize following manufacturer’s directions Fertilize following manufacturer’s directions Check soil around base of plant and water accordingly Normal. Continue to water as necessary MIRRORS & SHOWER ENCLOSURES A. Mirrors Homeowner’s Maintenance Guidelines Clean bathroom mirrors and shower enclosures with an ammonia-free spray glass cleaner and a soft cloth, wiping several times to remove all glass cleaner residue. Most mirror failures are at the edges where “spillover” solutions attack the backing. By applying cleaner to the cloth rather than the mirror, this can be prevented. Do not use abrasive cleaners, which will permanently scratch and mar mirror or glass surfaces. Do not expose mirror products to salt air for extended periods of time. Humidity, heat, and dampness can cause permanent damage, therefore, provide adequate ventilation in rooms with mirrors. Some mirrors will have some minor imperfections. This is perfectly normal. All scratches and other defects in mirrors and glass tub/shower enclosures must be reported to your builder at time of the orientation/walk-through and not after closing. The following is a list of common acceptable defects: • Slight hairline face and back scratches • Slight pinhead bubbles or seeds • Slight rubs • Slight discoloration • Slight dins or bruises B. Shower Enclosures Homeowner’s Maintenance Guidelines Shower enclosures create extreme amounts of moisture; therefore frequent checking of joint areas is recommended. Check caulking periodically to ensure against leaking. The homeowner is responsible for re-caulking as needed. The use of clear silicone is not recommended as it yellows with age. 51 PAINTING & CAULKING Introduction The interior walls of new homes are generally painted with a latex paint. We strongly recommend that touch-up paint be used instead of washing the walls. Paint touch-up after your final walkthrough is the homeowner’s responsibility. A. Interior Paint Painting Note: The builder cannot guarantee that painting repairs requiring new material will match the color of the existing material. Paint repairs may show slight variations in color as a result of weathering, aging, or pigment variations in different paint manufacturing runs. Color variations are normal. Fading is also normal and the degree is dependent on climate conditions. Touch-Up: Paint touch-up is visible under certain lighting conditions. When doing paint touch-ups, use a small brush, applying paint only to the damaged spot. Touch-up may not match the surrounding area exactly, even if the same paint mix is used. When it is time to re-paint a room, prepare the wall surfaces first by cleaning with a mild soap and water mixture or a reliable cleaning product. Cleaning Flat-Latex Painted Surfaces: In many homes, an off-white, lead-free latex paint is applied to the interior walls of the home. This is not a washable paint and will smudge if cleaned. We do not recommend washing these surfaces, but instead suggest using touch-up paint to cover paint scuffs and marks. Cleaning Semi-Gloss Painted Surfaces: An off-white, lead-free semi-gloss paint is applied to interior wood trim and doors. These surfaces may be cleaned with a sponge and lukewarm water. The less moisture on the sponge, the better. Wipe quickly with a gentle washing pressure from top to bottom without allowing the solution to run down the door or trim. If the water does not work, try the same procedure using a small amount of mild detergent mixed with water. Once complete, lightly rinse the washed area with plain water and allow to dry. B. Caulking Caulking is a building joint sealant used to where two dissimilar materials are joined. In time, caulking hardens and cracks and should be renewed prior to any re-painting. Homeowner’s Note: Caulking is a homeowner’s responsibility. Caulking around windows and doors should be checked and re-caulked at least once a year. 52 Exterior caulk will eventually shrink, separate, and deteriorate. This will cause the caulking to pull away from surfaces and create areas for water and air to infiltrate. This should be monitored constantly because moisture can work its way behind wood trim or siding and cause rotting. Pay particular attention to the caulking at doors and windows. If separation of the caulking occurs, it can result in leaks. When re-caulking on the exterior, use a product that paint will adhere to. Homeowner’s Maintenance Guidelines Changes in temperature and humidity cause all building materials to expand and contract. Dissimilar materials expand or contract at different rates. This movement results in separation between materials, particularly dissimilar ones. You will see the effects in small cracks in drywall and in paint; especially where moldings meet drywall, at mitered corners and where tile grout meets tub or sink. While this can alarm an uninformed homeowner, it is normal. Shrinkage of the wood members of your home is inevitable and occurs in every new home. Although this is most notable during the first year, it may continue beyond that time. In most cases caulk and paint are all that you need to conceal this minor evidence of a natural phenomenon. Even though properly installed, caulking shrinks and cracks. Maintenance of caulking is your responsibility. Acrylic Latex with Silicone Caulk: An all-purpose caulk that is mildew resistant, flexible, and paintable. Latex Caulk: Latex caulking is appropriate for an area that requires painting, such as along the stair stringer or where wood trim meets the wall. Silicone Caulk: Caulking that contains silicone will not accept paint; it works best where water is present, for example, where tub meets tile or a sink meets a countertop. If you are unsure of what type of caulk to use for a specific job, you may want to consult a sales professional at your local hardware store or home improvement center. 53 TYPICAL ANSWERS TO PAINTING AND CAULKING ISSUES ISSUE Wrinkling, runs, or drips in paint Interior or exterior caulking cracks or shrinks Mildew on painted surfaces PROBABLE CAUSE ANSWER Paint applied too thick Sand smooth and re-paint Normal drying, settlement, expansion, and contraction Fungus from moisture and little sunlight Remove old caulking, recaulk open gaps Carefully wash with water diluted chlorine bleach 54 PLUMBING SYSTEM Introduction A licensed plumbing contractor installed all plumbing pipes and systems in your new home. These have been tested and inspected. In most cases, minimum homeowner maintenance is all that the plumbing system requires. Attending to small problems as they occur keeps them from becoming larger, more costly problems later on. A. Water Lines Your home is served by a well or a city water supply. The pipes that carry water into the home are designed to resist rust and corrosion. Homeowner’s Maintenance Guidelines Noisy Pipes: Noisy water pipes should be corrected immediately since the resulting vibrations can damage plumbing line fittings and cause them to leak. There is one exception: Exterior hose faucets often produce a high-pitched noise caused by an attached vacuum breaker or back-flow preventer. This noise is normal and not a cause for concern. Noisy pipe problems can be identified and corrected as follows: 1. The water heater temperature may be set too high, producing steam in the pipes. To resolve, gradually reduce the water heater temperature setting until the steam is reduced. 2. Abruptly turning off a faucet in areas with high water pressure can produce a pounding or knocking sound. To resolve, slightly close the main shut-off valve. 3. Air can get into the pipes. To resolve, open all interior and exterior faucets and run for a few minutes, allowing air to pass through the system. Freezing Pipes: Provided the home is heated at normal level, pipes should not freeze. Set heat at 65° F if you are away during winter months. Keep garage doors closed to protect plumbing lines that run through this area. If temperatures are below normal, you should open cupboards to allow heat to the pipes and let faucets drip to keep pipes from freezing. Outside faucets must be shut off during freezing weather and the hose removed. B. Main Shut-off Valve This is the center of the plumbing system, the point at which the main water line comes into the home. If a major plumbing problem occurs, turn off the main shut-off valve to prevent flooding. It is a good idea to show every family member where the shut-off valve is, explain how to close it in case of an emergency, and to mark it with an easy-to-locate identification tag. 55 If your water supply stops completely, first check the water shut-off at the front of the house or garage. Next, check the water meter shut-off to confirm the service has not been shut down in your area. If this is not the problem, please call our office. Please Note: Having to shut off the water to an isolated item in the home (such as one toilet) is not an emergency. If it is a warrantable problem, submit it to our office in accordance with normal procedures. C. Water Intake Valves Most plumbing fixtures in the home have a water intake valve to individually shut off the water to that fixture for minor repairs and emergencies. Show family members how to operate them and where to locate them and where they are located on sinks, toilets, water heater, washing machine, and laundry tub. Toilet valves are behind the toilet and sink valves are under the sink. D. Drain Traps Every plumbing fixture in the home is equipped with a drain trap, an S-shaped pipe that holds water and acts as a barrier to keep airborne bacteria and sewer gas odors from coming back into the home. If a sink or bathtub fixture is not used frequently, turn it on periodically to replace evaporating water and to keep the water trap barrier intact. Homeowner’s Maintenance Guidelines Drain traps can be cleaned by putting 3 tablespoons of ordinary washing soap (not baking soda) into the drain. Add a little hot water, let stand for 15 minutes, and then flush with hot water. Use a rubber plunger to unclog a blocked toilet. Caution: Do not pour grease into drains or toilets, or use caustic cleansers to open plugged drains. Do not use a plunger with any drain-cleaning chemical. When using a chemical drain cleaner, carefully follow the manufacturer’s safety precautions and product directions. E. Sewer Stoppage All of your sewer and drain lines should operate freely. If a sewer or drain line becomes clogged, repair is required. Should an emergency problem develop with your sewer or drain lines and you have determined that the clogging is not a result of a blockage caused by improper disposal or other homeowner maintenance problem, you should contact us immediately. Preventive maintenance is the best safeguard against clogged drains or sewer lines. Clogs are generally caused by the improper disposal of waster materials. The use of a plunger can facilitate the clearing of minor clogs, and if you use a chemical agent, be sure to follow the manufacturer’s instructions carefully to avoid personal injury. If service is required and it is determined that the problem is not warranted, you will be responsible for the plumber’s charges. 56 SOLUTIONS TO COMMON PLUMBING SYSTEM PROBLEMS PROBLEM No hot water from electric water heater Hot water recovery is slow Toilet runs constantly Toilet makes loud noise when flushed Toilet makes dripping or gurgling noise Toilet backing up or overflowing Hose sprayer in kitchen sink drips Slow draining sink or bathtub Water flow from faucet is reduced Water leaking from under sink Water splatters out of faucet LIKELY CAUSE SOLUTION Tripped circuit breaker or temperature setting is too low Burned out heating element Check and reset circuit breaker, or adjust temperature setting Replace heating element. Check circuit breaker Adjust float arm stem in toilet water tank downward Replace ball cock in toilet water tank Replace flapper valve Water level in tank is too high Ball cock in water tank is not working properly Warped or worn out flapper valve Obstruction in line Dirty of defective Blockage such as hair at drain Aerator at tip of faucet is clogged Loose plumbing Air in water supply line Water dripping from shutoff valves Garbage disposal clogged Loose packing nut Garbage disposal will not operate Tripped reset button Obstruction in line 57 Turn toilet intake valve off and plunge toilet Clean or replace Remove hair blockage Unscrew aerator screen and rinse Hand tighten couplings on drain pipes Open all faucets in home for 5 minutes Open valve all the way, then gently tighten nut Use disposal wrench on bottom of disposal Check reset button on bottom of disposal PLUMBING FIXTURES Introduction The plumbing fixtures in most homes include the water heater, bathtubs, showers, toilets, and sinks. Note: As equipment technology changes frequently, the Manufacturer’s Service Manuals will supersede all recommendations and procedures contained in this manual. A. Water Heater The electric water heater is equipped with an automatic temperature and pressure relief valve, a safety feature that opens and releases excessive pressure or heat build-up. Should this occur, water will flow from the tank until both temperature and pressure are reduced to safe levels. Homeowner’s Maintenance Guidelines Hot Water Temperature: the Manufacturer sets Water temperature at 120° F. While low temperature settings reduce utility costs, bear in mind that dishwashers do not operate properly with settings below 120° F. Do not store combustible items, oily rags, clothing, brooms, or dust mops near the water heater, since this presents a potential fire hazard. Do not use the top of the water heater as a storage shelf. Scale: Small amounts of scale deposits will collect and settle to the bottom of the water tank. Remove this residue annually by draining the tank. Shut off the power first, using the appropriate circuit breaker in the electrical panel box. Attach a garden hose to the valve and run it outside. Then open the valve at the bottom of the water heater, allowing the residue to drain out or until the water runs clear. If you live in a hard water region, a water softener will reduce the need for more frequent draining. Do not completely drain an electric water tank without first shutting off the water heater circuit breaker. Do not turn circuit breaker on until the tank is full of water. Element Cleaning or Replacement: The heating elements in the water heater will require periodic cleaning. The frequency is determined in part by the quality of the water in your area. Again, refer to the manufacturer’s literature for step-by-step instructions and drawings, or contact an authorized service company. 58 No Hot Water: If you discover you have no hot water, check the breaker, the temperature setting, and the water supply valve before calling for service. Refer to the manufacturer’s literature for locations of these items and other troubleshooting information. Pressure Relief Valve: At least once each year, manually operate the pressure relief valve. Stay clear of the discharge line to avoid injury. See manufacturer’s literature for diagrams and detailed instructions. B. Fixtures Kitchen and bathroom sinks, toilets, and bathtubs are made with cultured marble, plastic, stainless steel, or finished with porcelain. Homeowner’s Maintenance Guidelines To clean, use a non-abrasive spray cleanser and sponge. Dropping heavy objects onto porcelain can chip or crack the surface and may produce permanent staining. Do not leave steel wool pads on sink surfaces, as they will rust and stain the surface. Be aware that continuous action toilet bowl cleansers, placed in the toilet water tank, will prematurely wear out the rubber tank flapper and may discolor the bowl. Follow the manufacturer’s recommendations for cleaning and maintenance. C. Kitchen Sinks/Stainless Steel and Cast Iron Homeowner’s Maintenance Guidelines For routine cleaning, use a non-abrasive household cleanser with warm water and a sponge. Do not scrape the surface with utensils, pots, or pans. Do not leave leftovers in sink or strainer, particularly tea bags and coffee grounds, which contain harmful acids. Regular washing soap, not baking soda, should be added to the drain to keep it grease and soap free. 59 Do not clean stainless steel sinks with steel wool or metal brushes, and do not leave rubber mats in the sink since they trap water and produce surface discoloration. To restore luster to stainless steel, apply a small amount of mineral oil with a soft cloth then wipe dry. D. Garbage Disposal Homeowner’s Maintenance Guidelines Always use cold water when disposal is working. Corncobs and husks, bones, celery, or any other food that shreds should not be put in the disposal. If the machine becomes jammed, use the wrench to free the mechanism and try again. The disposal will rust if not used regularly. If you are going to be away for an extended period of time, a teaspoon of oil will help prevent the mechanism from freezing. E. Bathroom Sinks Homeowner’s Maintenance Guidelines Sink surfaces can be easily chipped and stained, so treat them accordingly. Prevent hair accumulation clogs by periodically removing the stopper for cleaning or purchase a rubber hair collector. Avoid setting lit cigarettes on the edge of the sink, as they will burn and permanently damage the surface. F. Toilets A water-saving regulation went into effect in 1993. It prohibits the manufacture of toilets that use more than 1.6 gallons of water per flush. In the search for a balance among comfort, convenience and sensible use of natural resources, the government conducted several studies. The 1.6-gallon toilet turned out to be the size that consistently saves water. 60 As a result of implementing the standard, flushing twice is occasionally necessary to completely empty the toilet bowl. Even thought you flush twice on occasion, rest assured that overall you are saving water and you have complied with the law. Running Toilets: To stop running water in the toilet, check the shut-off float in the tank. You will most likely find it has lifted too high in the tank, preventing the valve from shutting off completely. In this case, gently bend the float rod down until it stops the water at the correct level. The float should be free and not rub the side of the tank or any other parts. Also check the chain on the flush handle. If it is too tight, it will prevent the rubber stopper at the bottom of the tank from sealing, resulting in running water. G. Bathtubs, Showers, & Tub-Shower Combinations Homeowner’s Maintenance Guidelines Cleaning: Clean porcelain-on-steel bathtubs, cultured marble tubs and sinks, fiberglass showers and tub-shower combinations, and shower stall floors with warm water and a non-abrasive cleanser. Clean glass shower doors with a commercial glass cleaner. Check bathtub stoppers and shower floor drain grates for hair accumulation. Do not use ammonia-based cleaners. Gel-Gloss is recommended for polishing cultured marble. Do not step into a bathtub or tub-shower with shoes one. Gritty particles adhere to your shoe soles and will scratch the finish. Re-Caulking of the Tubs and Showers: Over time, cracks and separations between tub or shower stall and wall surfaces or bathroom floors will appear. Maintaining these areas is critical since excessive moisture can severely damage underlying materials. It will be necessary to re-apply a tub and tile caulk when the previous caulking has dried out or eroded. To re-caulk the area, use a tub and tile caulk available in local hardware stores. Do not use a clear silicone caulk, as it yellows with age. Begin by removing the old caulk and cleaning the area. Once the area is dry, apply fresh caulking to fill the vacant space, then smooth out the finish with a wet finger. H. Interior Faucets Interior faucets are either single-lever faucets or washer faucets. Homeowner’s Maintenance Guidelines Single-Lever Faucets: The single-lever kitchen and bath faucet are low maintenance, washerless faucets. Should the cartridge ever need to be replaced, turn off the water supply under the sink, remove the handle assembly, and pull the cartridge out. Take the cartridge to a local plumbing supplier and match accordingly, being sure to follow installation instructions. Chrome Faucets: Chrome faucets should be cleaned with a soft damp cloth and a commercially accepted cleaner. Dry the faucet with a soft cloth. Never use an abrasive or ammonia based cleaner. 61 Washer Faucets: A washer faucet has a shut-off feature that requires light closing pressure to stop the flow of water. Do not apply too much pressure since washers can be damaged. Faucet Aerators: Screened aerators screw into the spout of a faucet to add air to the flowing water, which reduces splashing. Aerators are easy to remove for periodic cleaning. This should be done every 3-4 months. Washer Replacement: Dripping faucets can dramatically increase water bills and represent the loss of a valuable natural resource. Over time, all washers will wear out and must be replaced. Neglecting to change washers may cause damage to the valve seat or to the entire faucet. Many homeowners prefer to do this simple replacement procedure themselves. 1. Turn off the water supply intake valve located under the sink. 2. Using a wide-jaw wrench, remove the hexagonal cap from the top of the faucet assembly. This may take a turn or two.’ 3. Remove the inside part, turn it upside down, and you will see a fiber washer held by a screw through it’s center. This is the source of the leak. The screw is easily removed, but the washer itself may take a little prying to remove. 4. Match the new washer to the worn-out washer and replace it. Re-use the same screw if it is in good condition. Then re-assemble the faucet. I. Exterior Hose bibs Exterior faucets are called hose bibs. To replace washers on standard exterior faucets, follow the same procedure for washer replacement, as stated above. Check for leaks and replace washers as required since a leaking exterior faucet can cause water damage. See washer replacement under Interior Faucets, this section. Water back-flow prevention: Most new homes have a vacuum breaker installed on the exterior hose faucet. This device prevents backflow, and stops potentially contaminated water from flowing back into the home water supply system via the garden hose. These devices are a plumbing code requirement and may not be removed. With a vacuum breaker installed, it is normal to hear a humming or vibrating noise throughout the home when the exterior faucet is in use. This is caused by the washers built into the back-flow preventer, and is not reason for concern. 62 ROOFING, GUTTERS, & DOWNSPOUTS Introduction The roof of most homes is constructed with a two-ply roof system, which consists of roofing felt, and plywood or sheathing. Tile or shingles are installed following manufacturer’s guidelines and product specifications. For more information on roof sheathing and insulations, see section “Framing and Carpentry”. A. Shingle Roofs Shingle roofs come in many different colors and styles. Shingle roofs provide water protection to the roof underlayment. B. Flashing Roof flashings are sheet metal trims used around roof openings, on vent stacks, roof vents and valleys. Their purpose is to channel water away from the house. C. Gutters and Downspouts (if installed) Gutters channel water run-off from the roof to downspouts that guide the water to ground level drainage areas. Homeowner’s Maintenance Guidelines Gutters and downspouts should be inspected and cleaned regularly. Clear the gutter of accumulated debris such as leaves, twigs, branches, balls, and other objects. Gutters need to slope slightly downward to channel water to the downspout. Splash blocks can be properly positioned at the bottom of the downspout to direct water away 63 from the foundation. Finally, the soil grade must slope away from the home. The best advice is to keep the gutters free of debris. Gutters and downspouts should not leak but may overflow during heavy rain. After severe storms, a visual inspection of the roof damage is called for; notify your homeowner’s insurance is there is storm damage noted. D. Vents Vents should remain unobstructed year round. If your home has soffit vents and/or ridge vents, they should be cleared of debris. Ridge bents should be checked periodically to ensure they are secure and have not come loose in high winds. Also, check that these vents have not been stepped on and deformed. Blocked air vents usually cause excessive heat buildup in the attic. This condition can be resolved by clearing all obstructions away from the vents to allow proper heat release. There are a variety of attic vents that could be used on your home. The different types can be soffit vents (located in the eaves of your roof), ridge vents (found at the peak of your roof), and attic vents (sometimes known as whirly birds, turtlebacks, and mushrooms). Familiarize yourself with all the different vents on your home. TYPICAL ANSWERS TO ROOFING ISSUES ISSUE Roof leakage Roof leakage PROBABLE CAUSE ANSWER Loose flashing. Loose pipe collars Loose or missing shingles and/or vents Secure and re-seal flashing and pipe collars Secure and/or replace loose or missing shingles/roof vents Normal during severe storms Re-seal shingle Roof leakage Rain blowing into vents Shingle not laying flat Fastener loose 64 SECURITY SYSTEM & INTERCOM Some homes are equipped with security systems and/or intercoms, and their operating instructions and warranty information are contained in their respective manuals and product literature. SHELVING Introduction Unless wood shelves are installed, shelves are fabricated of heavy gauge welded steel rod covered with a protective plastic coating. The shelving will support a static load of 75 pounds per 3 linear feet, evenly distributed. 65 WINDOWS/SCREENS Introduction Typically the windows in your new home are double pane glass and are framed in vinyl. The manufacturer has sealed all the glass to the frame and the frame has been attached to your home and caulked. Note: It is the homeowner’s responsibility to check and re-caulk all exterior frames. All window scratches or imperfections must be reported to your builder at time of orientation/walk-through, not after closing. Homeowner’s Maintenance Guidelines Cleaning Window Glass: Clean windows with a commercial glass cleaner or a cup of vinegar mixed with a gallon of warm water. Apply with a sponge or lint-free cloth, then dry and polish with paper towels. A rubber squeegee passes over glass surfaces will speed the drying and eliminate streaking. Window Condensation: The appearance of moisture that occurs when warm moist air comes in contact with a colder surface is called condensation. While moisture may appear on windows, this does not indicate a window problem. The most common cause is humid air outside the home hitting the cold surface of the window glass. Wipe up condensation as quickly as possible in order to avoid staining the drywall, windowsill, or caulking. Weep Holes: In heavy rains, water may collect in the bottom channel of window frames. Weep holes are provided to allow excess water to escape to the outside. Keep the bottom window channels and weep holes free of dirt and debris for proper operation. Window Screens: Window screens are provided with every new home, and their sole purpose is to help prevent insects from coming inside when the windows are open. Window screens may be washed and rinsed using a mild household detergent. Storing Screens: Many homeowners remove and store screens for the winter to allow more light into the home. To make re-installation more convenient, label each screen as you remove it. Use caution; screens perforate easily and the frames bend if they are not handled with care. CAUTION: Window screens will not prevent children from falling through open windows to the ground below. The screen is not a barrier, and the fastening system for the screen will not support any weight beyond the screen itself. Never allow children near an opened screened window, or place any weight on or push against a window screen. Do not place furniture near windows so that children have easy access. 66 TYPICAL ANSWERS TO WINDOW ISSUES ISSUE PROBABLE CAUSE ANSWER Window binds or is difficult to open Window binds or is difficult to open Window binds or is difficult to open Window will not slide up or down Window will not lock properly Broken window balance Replace balancer Paint or dirt on jambs Condensation on inside surface of window High humidity inside the home Clean jamb and spray with silicone Replace balancer or adjust tension rod Call the window company for an inspection Clean track or check alignment at middle when closing Reduce humidity with a dehumidifier, heat or A/C Weak window balancer Tension rod jammed Debris in track or window not aligned properly 67 Glossary of Construction Terms 68 Home Buyers Glossary of Construction Terms Aerator – A small, removable extension at the tip of a sink faucet that mixes streaming water with air to reduce splashing and conserve water. Air Hammer – A banging noise in plumbing pipes caused by air infiltration. Airway – The space between roof insulation and roof boards, which allows for movement of air. Alkali – A soluble mineral salt of mixture of salts capable of neutralizing acids. Anchor Bolts – Bolts that secure a wooden sill plate to a concrete or masonry floor or wall. Asphalt – A residue from evaporated petroleum, insoluble in water but soluble in gasoline. Melts when heated. Attic Ventilators – Screened openings provided to ventilate an attic space. Ball Cock – A device in a flush toilet consisting of a valve connected by a lever to a floating ball. The valve closes when the ball is raised and opens when it is lowered. Baseboard – A decorative and protective wood molding positioned where the wall meets the floor. Base Molding – Molding used to trim the upper edge of interior baseboards. Beam – A structural member transversely supporting a load. Bearing Wall – A wall that supports any vertical load in addition to its own weight. Brace – An inclined piece of framing lumber applied to wall or floor to stiffen the structure. Often used on walls as temporary bracing until framing has been completed. Brick Veneer – A facing of brick laid against and fastened to sheathing of a frame or tile wall. Casing – Molding of various widths and thicknesses used to trim floor and window openings at the jambs. 69 Caulk – Caulk is a building joint sealant used where two dissimilar materials are joined. In time, caulk hardens and cracks and should be renewed prior to any painting. Circuit Breaker – A switching device, located in the main electrical panel, that opens and closes electrical circuits and automatically shuts off electricity to a circuit should it become overloaded. Once the electrical load is reduced, the breaker switch can be turned back on to resume normal service. Concrete Dusting – A fine dust that accumulates on finished concrete surfaces. Condenser – An exterior unit that is part of the air-conditioning system, which expels heat into the outside air. Conduit, Electrical – A pipe, usually metal, in which insulated electrical wire is installed. Corner Bead – An angled metal edging used to protect and form an edge where drywall panels meet at outside edges. Damper – A device in a fireplace that controls the air draft allowed into the fire. Delamination – The separation of the top piles or laminate from the base to which they are attached. In vanity and kitchen countertops, the warping or detachment of laminate material from the wood substrate. Dethatching – The loosening and/or removal of matted grass and leaves from existing lawns, which allows the grass to breathe and therefore promotes healthy growth. Downspout – A pipe, usually of metal, for carrying water from roof gutters. Drywall – Also known as gypsum board or sheetrock, these large sheets are attached to the wall studs and ceiling framing to construct the walls and ceiling of the home. Eaves – The margin or lower part of a roof projection over a wall. Efflorescence – A white powdery substance that can form on new block, brick, or stucco finishes. It is composed of water-soluble salts that are present in masonry materials and that rise to the surface via water evaporation. Face Frame – The front of kitchen and bathroom cabinets, to which the hinged doors attach. Face Nailing – Nailing through a finished exposed surface so that the flat top of the nail head is still visible after nailing. 70 Facia or Fascia – The exterior horizontal trim around rafters. Also positioned directly behind gutters and over gable trim boards. Filler Board – Cabinet grade wood used to fill gaps that occur between cabinets and wall openings. Fillers – A wood putty used in preparation for painting to fill holes or cracks in wood. Flashing – Sheet metal or other material used in roof and wall construction to protect a building from rainwater penetrating the house structure. Flue – A vertical duct, constructed of sheet metal or clay that channels smoke from a fireplace out of the home. Footing – A masonry section, usually concrete, in a rectangular form wider than the bottom of the foundation wall or pier it supports. Foundation – The supporting portion of a structure below the first-floor construction, or below grade, including the footings. Frame Construction – A type of construction in which the structural parts are wood or depend upon a wood frame for support. Gable – The portion of the roof above the eave line of a double-sloped roof. Gabled Louvers – A vent with louvers located at the peak of gable ends. Graphite Lubricant – A finely powdered graphite used as a lubricant. Ground Fault Circuit Interrupter (GFCI) – A specialized electrical device that will interrupt electrical power where a weak electrical loss of ground occurs. Normally installed in areas where water may be present. Grout – A white or colored plaster-like mortar compound used to fill spaces between ceramic tiles. Header – A heavy timber and/or concrete beam that spans open spaces in walls, over doors and windows, and provides support to structural members above it. Hip Roof – A roof that rises by inclined planes from all four sides of a building. Honeycomb – In concrete, an open cell like surface texture that occurs while pouring the concrete. Hose Bib – An exterior faucet connection for lawn and garden hoses. 71 Insulation – Any material high in resistance to heat transmission that, when placed in the walls, ceilings, or floors of a structure, will reduce the rate of heat flow. Jamb – The side and headlining of a doorway, window, or other opening. Joint Compound – A plaster-like compound, used with drywall tape, to join sheets of drywall into a smooth, continuous panel. Joists – The horizontal support members used in constructing a floor. Keeper Plate – The metal plate that keeps a door lock latch firmly in place. Lockset – A door lock. Louver – An opening with a series of horizontal slats so arranged as to permit ventilation but to exclude rain, sunlight, or vision. Masonry – Stone, brick, concrete, hollow-tile, concrete block, gypsum block, or other similar building units or materials or a combination of the same, bonded together with mortar to form a wall, pier, buttress, or similar mass. Mastic – A construction adhesive that is thick and waterproof. Used on roofs. Moldings – Shaped strips of ornamental wood used around doors and windows. Also used for base molding, tile molding, as chair rails and for exterior area molding. Moldings finish the junction of different materials or shapes. Nail Pops – Nails that come loose from a stud and push joint compound up. Caused by normal wood shrinkage and home settlement. Pointing – The filling and finishing of broken mortar and stone cement masonry joints. Ponding – The collection of water on driveways, walkways, or lawns. Ponding for excessive periods of time is indicative of grading problems. Rafter – One of a series of structural members of a roof designed to support roof loads. The rafters of a flat roof are sometimes called roof joists. Resilient Flooring – Vinyl flooring used in areas such as kitchens, halls, bathrooms, and laundry rooms. It is capable of withstanding shock without permanent deformation. Ridge Vent – An open vent system located along roof peaks, which in conjunction with soffit vents, creates ventilation through the passage of natural air. Roof Sheathing – Boards or sheet material fastened to roof rafters on which the shingles or other roof covering is laid. 72 Scaling – In concrete, the breaking away of the top surface of the concrete, caused by a freeze/thaw cycle. In painting, the flaking or peeling away of paint. Sheathing – The structural covering, usually wood boards or plywood, used over studs or rafters of a structure. Structural building board is normally used only as wall sheathing. Shingles – Roof covering of asphalt, asbestos, wood, tile, slate, or other material cut to stock lengths, widths, and thicknesses. Siding – The finish covering the outside walls of a frame building, whether made of horizontal weatherboards, vertical boards with battens, shingles, or other material. Sill – The lowest member of the frame of a structure, resting on the foundation and supporting the floor joists or the uprights of a wall. The member forming the lower side of an opening, as a doorsill or windowsill. Sill Plates – A support member laid on the top of the foundation wall that serves as a base for the wall framing. Silicone – A synthetic lubricating compound with high resistance to temperature change and water. When added to caulking, it extends elasticity properties and increases the life of the caulking. Soffit – Usually the underside of an overhanging cornice or roof. Soffit Vent – A vent located under the ceiling of a roof overhang. Spackle – See joint compound. Spalling – Flaking or chipping of stone or other masonry material. Similar to scaling, but the chips and flakes are larger. Stud – One of a series of slender wood or metal vertical structural members placed as supporting elements in walls and partitions. Sub-Flooring – A wood sheet flooring directly over the joists that supports the underlayment or floor covering. Swale – The soil contour on a building lot deliberately shaped to channel rainwater away from the home. Tack Strips – A wood strip with exposed tack points that is attached to the sub-flooring and holds stretched wall-to-wall carpeting in position. Tread – The horizontal board in a stairway on which the foot is placed. 73 Trim – The finish materials in a building, such as moldings, applied around openings or at the floor and ceilings of rooms. Trusses – Engineered wood structural members used to construct floors and roofs. Turnaround – An additional section of driveway where cars can be turned around. Underlayment – A flooring layer over the base sub-flooring, over which tile or resilient floor covering is laid. Valley – The internal angle formed by the junction of two sloping sides of a roof. Vacuum Breaker – Also called a back-flow preventer, this device is placed on exterior faucets to allow water to only flow out of the home. Valve Seat – An interior part of the faucet valve assembly where the valve rests. Wall Ties – The metal pieces that tie masonry veneer to the frame of the home, or when pouring concrete, the metal pieces that hold concrete foundation wall forms in place until the concrete cures. Washers – Round, rigid rubber or plastic discs used as a sealing device in water faucet valves. Weather Stripping – A weather insulation strip of material placed around doors and windows to reduce water entry into the home. Also reduces air infiltration into the home or the escape of conditioned air out of the home. Washouts – An area where water has produced soil erosion. Window Balance – A counter balance device in window housings that assists with the opening and closing of a window, and then keeps the window in position. 74