1
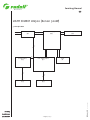
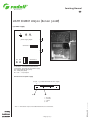
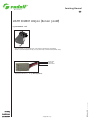
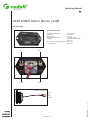
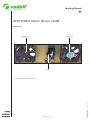
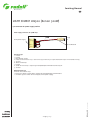
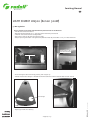
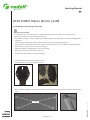
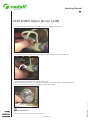
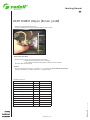
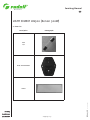
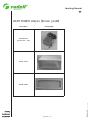
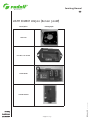
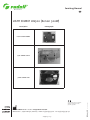
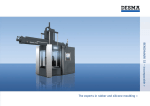
Servicing Manual
GB
LIGHT SOURCE LX 2300 (Xenon 300W)
WA001_GB
2006-01-11_MI
IM 200-300
Servicing Manual
GB
LIGHT SOURCE LX2300 (Xenon 300W)
Summary
1. Warnings and Precautions
2
2. Technical Features
3
3. Principle Plan
4
4. Comprehensive view - Setting up Plan
5
4.1 Filter board
4.2 Push button board
4.3 Standby board
4.4 Power supply
4.5 Servomotors + IRIS
4.6 Time meter
4.7 Rear face
4.8 Connector for power supply outline
6
7
8
9
10
11
12
13
14
6. Proceedings for the Change of the Lamp
15
7. In Case of Breakdown
18
8. Pieces List
19
2006-01-11_MI
5. IRIS Regulating
- Page 1 of 23 -
WA001_GB
Servicing Manual
GB
LIGHT SOURCE LX2300 (Xenon 300W)
1. Warnings and precautions
-Only an authorized staff can use this kind of equipment, after a training.
-Please read carefully the instructions manual before setting up and using the light source.
-Before plugging the light source into the mains, make sure that the electric features of your wiring are quite
the same as those specified on the equipment. The identification label which mention the service voltage,
the electric consumption, etc. is on the rear panel of the appliance.
-Be careful: HIGH VOLTAGE inside the appliance!
Don’t open the rear panel of the equipment! Maintenance only by the authorized staff!
-Never have your eyes neither in the axis of the light output, nor at the light cable output.
-In order to avoid every risk of burn or electrocution, don’t expose this equipment to rain or to an excessive
moisture.
-If any fluid infiltrate into the appliance, stop it immediately and remove the plug from the mains
-Never let the mains flex fall and never put heavy things on it. If the mains flex is damaged, unplug immediately
the light source from the mains. Never start it with a damaged mains flex!
-To remove the mains flex without damaging it, take it by the end. Never pull on the cable itself.
-The mains plug must be near to the light source and easily accessible.
-Check the ventilation to avoid any overheating of the equipment: fasten a minimum space of 15 cm on the left,
on the right and backwards.
-Be careful: Never use the appliance next to a flammable gas.
-Never put the equipment next to a heat source or in a place exposed to vibrations or shocks.
-Don’t use abrasive/corrosive products to clean the surface of the light source: use only cleaning products and
disinfectants generally used in hospitals. Clean the light source as recommended by the standard cleaning
proceedings of your hospital.
-This light source and its accessories require no special treatment at the end of their life.
- Page 2 of 23 -
WA001_GB
2006-01-11_MI
-Be careful: Don’t put the end of the light cable directly on the patient nor on every flammable material (paper,
gauzes, operative fields…) because it may be very hot: risks of burns.
Servicing Manual
GB
LIGHT SOURCE LX2300 (Xenon 300W)
2. Technical Features
-Xenon lamp
-Nominal power: 300 W
-Color temperature: 6 200°K
-Usual life of the lamp: 500 hours (for classical utilization cycles: 30 min. ON - 15 min. OFF)
-Compatible light cables: Storz (Wolf and Olympus with other adaptaters)
-Mechanical IRIS
-Adjustment of the light intensity with the push buttons
-Indication of the minimum and maximum light levels
-Litter: L = 300 mm; D = 311 mm; H = 125 mm
-Weight: 5 kg
-Power supply voltage: 115 - 230 V ~ - 50 - 60 Hz
-Electric Consumption: 350 VA
-2 T4A Fuses
-Working temperature: +10 à + 40°C
-Moisture working: 85%
-Storage temperature: - 20 à + 45°C
-Storage moisture: 85%
-Continuous service
-Unprotected against water falls (IPX0)
- Page 3 of 23 -
WA001_GB
2006-01-11_MI
-Unadapted to an utilization in the presence of an anaesthetic mixture flammable with air with oxygen or nitrous
oxide.
Servicing Manual
GB
LIGHT SOURCE LX2300 (Xenon 300W)
3. Principle Plan
Filter board
§4.1
115/230 V -
Fans
§4.7
Power supply
§4.4
115/230 V -
3
6
Standby board
§4.3
Push button board
§4.2
Lamp
§6
3
4
2006-01-11_MI
Servomotor + IRIS
§4.5
- Page 4 of 23 -
WA001_GB
Servomotor + IRIS
§4.5
Servicing Manual
GB
LIGHT SOURCE LX2300 (Xenon 300W)
4. Comprehensive view - Setting up Plan
blue 0,75mm2
Switch
blue 0,75mm2
brown 0,75mm2
Rear panel
(inside view)
V/J 0,75mm2
black 0,22mm2
red 0,22mm2
red 0,22mm2
red 0,22mm2
black 0,22mm2
green/yellow
black 0,22mm2
blue
P
N
brown
Filter board
N
P
Wire lamp
Xenon lamp
K1
Wire lamp
300 W
Ventilateur
Power supply
IRIS
red 0,22mm2
black 0,22mm2
red/orange or yellow/orange
Twisted cord
Servomotor
Graving piece 3 pts 2,54
red 0,22mm2
- Page 5 of 23 -
2006-01-11_MI
orange 0,22mm2
Time meter
BP Board
WA001_GB
black 0,22mm2
blue 0,22mm2
red or yellow 0,22mm2
Standby
board
black
white
red
Front panel
(inside view)
orange 0,22mm2
Graving piece 6 pts 2,54
Servicing Manual
GB
LIGHT SOURCE LX2300 (Xenon 300W)
4.1 Filter board
green/yellow to the power supply
neutral
phase
blue to the power supply
brown to the power supply
Self
neutral
blue from mains socket
brown from mains socket
phase
3 2 1
Transformateur
Self
- Page 6 of 23 -
WA001_GB
CN2 Autocom bracket 3pts (2,54) to BP board
1 : Unregulated 24V output : 16V to 30V
2 : Ground
3 : Starting control of the main power supply - (with a relay unit) flow from 0 - -> nearly 3V (2,8 to 3,5V) for the
starting (setting off of the relay unit on and after 2,5V)
2006-01-11_MI
CN2
Servicing Manual
GB
LIGHT SOURCE LX2300 (Xenon 300W)
4.2 Push button board
1
6
CN10
CN5
4
Microcontroller
1
CN1
3 2 1
CN3
To the power supply
Potentiometer for the
regulation of the servomotor
(iris position)
CN3 Molex bracket 2 pts (2,54)
(cf. connectors for 300W power supply)
1 - 2 : Switch on control of the lamp :
continuity between 1 and 2 = switched on lamp
uncontinuity between 1 and 2 = switched off lamp
CN5 Molex bracket 4pts (2,54) to the time meter
1 : orange = reset of the time meter (+5V, during the operation 5ms)
2 : blue = counting (+5V)
3 : red = +5V
4 : black = Ground
- Page 7 of 23 -
2006-01-11_MI
WA001_GB
CN1 Autocom bracket 3pts (2,54) to the filter board
1 : Unregulated 24V input (16V to 30V)
2 : Ground
3 : Starting control of the main power supply - (with a relay unit) : flow from 0 - - > nearly 3V (2,8 to 3,5V) for starting
(releasing of the relay from 2,5V)
CN10 Autocom bracket 6pts (2,54) to the standby board
1 : Ground
2 : Standby button (+5V switched on lamp)
3 : Led of the “Standby” button : (0V switched on lamp/switched off led, 0-5V cyclic connection when winking led)
4 : CTN (voltage which depends on the temperature : switching off voltage of the lamp > = 2V)
5 : +5V
6 : Servomotor control : square cyclic signal 0V/5V, 0V duration which gives the iris position : whatever the condition
of the source : switched on or in standby
Servicing Manual
GB
LIGHT SOURCE LX2300 (Xenon 300W)
4.3 Standby board
CN9
1
6
3 2 1
CN4
CN4 socket Molex 3pts - 2,54 towards servomotor
1 : black = Ground
2 : red = +5V
3 : white = Servomotor control: cycle square signal 0/5V, time at 0V indicating to the servomoto the IRIS location,
regardless of state of the light state (ON or stand by)
2006-01-11_MI
CN9 socket Autocom 6pts - 2,54 towards Standby board
1 : Ground
2 : Standby Pushbutton (0/5V)
3 : Led of Standby Pushbutton (0V when light ON/led is OFF, 0-5V cycle when led is flickering)
4 : CTN (voltage depending on temperature: switching off voltage forsecurity: >= 2V)
5 : +5V
- Page 8 of 23 -
WA001_GB
Servicing Manual
GB
LIGHT SOURCE LX2300 (Xenon 300W)
4.4 Power supply
110V
220V
HV+
power supply DC300
connector J1
HV-
PT1
PT2
connector J2
J2 connector : connector for power outline
J1 connector : connector for fan power supply
PT1 : Control voltage (test point)
PT2 : 0 Volt (test point)
HV + / HV - : lamp output
Connector for fans power supply
K1 4pts - 2,54 Molex connector for fans supply
4
-The “+” wire of the lamp can be identified thanks to a red sheath.
- Page 9 of 23 -
2006-01-11_MI
1 : Unused
2 : Unused
3 : 12V DC
4 : 0V
red
WA001_GB
black
1
Servicing Manual
GB
LIGHT SOURCE LX2300 (Xenon 300W)
4.5 Servomotor + Iris
-The connector has got three wires and allows to control the servomotor.
-There are the earth (black wire), the +5V (red wire) and the control (white wire).
black wire
red wire
white wire
- Page 10 of 23 -
WA001_GB
2006-01-11_MI
-Adjustment of the iris : see §5 (IRIS Regulation).
Servicing Manual
GB
LIGHT SOURCE LX2300 (Xenon 300W)
4.6 Time meter
Technical specification:
Recording and display:
99 999.9 hours
Precision:
+/- 0.04%
Consumption:
1 mA max
Utilization temperature:
- 40°C to + 85°C
Moisture:
95% HR (uncondensed)
when 38°C
Connection on “faston” type hull:4.76 mm
Service voltage:
5 to 12 Vcc
red
black
orange
blue
Molex 2,54 4 points
- Page 11 of 23 -
WA001_GB
2006-01-11_MI
black
red
blue
orange
Servicing Manual
GB
LIGHT SOURCE LX2300 (Xenon 300W)
4.7 Rear face
outcoming air
incoming air
SUNON KDE 1208PTS3 fan
SUNON KDE 1208PTS3 fan
switch
- Page 12 of 23 -
WA001_GB
2006-01-11_MI
- SUNON fan KDE 1208PTS3 DC 12V 1.4W
Servicing Manual
GB
LIGHT SOURCE LX2300 (Xenon 300W)
4.8 Connector for power supply outline
Power supply connectors for 300W lamp
300W
red/red 3
orange 4
2
1
orange
red
to the BP board
red/red 6
red 8
Connector 9pts
1 : Unused
2 : Unused
3 : Connected on 6 (12V)
4 : Switch on control of the lamp : return of the signal from the pin 8 (0V switched off lamp or 12V switched on lamp)
5 : Unused
6 : Power circuit/lamp
7 : Unused
8 : Switch on circuit lamp : output signal to optocoupler on BP board continually 12V
9 : Unused
Molexconnector 2pts
Switch on circuit of the lamp
1 : Going signal (from 8 to the power supply) From the optocoupler to the BP board
2 : 12V return signal to switch on the lamp (to 4 of the power supply)
2006-01-11_MI
- Page 13 of 23 -
WA001_GB
to the power supply
Servicing Manual
GB
LIGHT SOURCE LX2300 (Xenon 300W)
5. IRIS regulation
The iris position can be finely adjusted with the potentio-meter of the BP board.
-Connect the source to the mains
-Rock the switch backwards on “I”. The green led on the front panel flashes
-Switch on the source with the Standby button
-Press until it lights up to have the maximum light
-Keep on pressing the button and regulate the potentio-meter to put the IRIS at 2 or 3 mm from the brace
put the IRIS at 2 or 3
mm from the brace
potentio-meter
-Lessen the light to the minimum by pressing until it lights up
-Control that the beam of light is directed on the IRIS steel sheet and that the IRIS doesn‘t touch the fan
some mm from the fan
-Adjust again from the necessary
- Page 14 of 23 -
WA001_GB
2006-01-11_MI
beam of light
Servicing Manual
GB
LIGHT SOURCE LX2300 (Xenon 300W)
6. Proceedings for the change of the lamp
Warnings and precautions
-A change of lamp can be made only by an authorized staff who must take safety rules into consideration.
-Before any handling, wait for the cooling of the lamp!
-The powers and electric currents involved by the power supply of the source require a perfect knowledge of the
equipment.
-Send back your source to your supplier who will seize to make a servicing of your equipment.
-If you have to change the lamp whereas the source is still tepid, always use a pair of gloves and protective glasses.
-After removing the lamp, put it in its original packaging.
-Never let it without any protection (gas under high tension).
-Don’t bring any pressure nor tension on the lamp.
-Send it back to the supplier in its original packaging.
-Switch off the source and unplug it from the mains.
-Put the source on a large and stable working area.
Position on « O »
-With a cruciform screwdriver, unscrew the 4 screws on the left side of the casing of the source to have access to the
lamp.
- Page 15 of 23 -
WA001_GB
2006-01-11_MI
4 screws
Servicing Manual
GB
LIGHT SOURCE LX2300 (Xenon 300W)
-Unplug the white connector by a simultaneous pressure on both of the sides of it.
-Unscrew manually the metallic knurl which holds the lamp (if there is a nut, don‘t loosen it).
Warnings and precautions
-Don‘t let any fingers mark on the lamp! Use gloves.
- Page 16 of 23 -
WA001_GB
2006-01-11_MI
-Remove carefully the lamp from its stand by pulling it aft.
-Then put the new lamp in the same position as the former one, according to the opposite proceedings.
-It‘s not at all necessary to screw or unscrew the nut behind the wheel.
Servicing Manual
GB
LIGHT SOURCE LX2300 (Xenon 300W)
-Control the right position of the lamp.
-Always be careful to have at least one replacement lamp in stock.
Reset of the time meter
-After changing a lamp, you have to reset the time meter:
- control that the light source is on “Standby”
- press simultaneously the two brightness buttons for ten seconds.
-The time meter must be reset.
Remark:
-The usual lasting of the lamp is : 500 hours. It’s an average for 30 min. ON and 15 min. OFF
-Shorter utilizations can reduce the lasting in a significant way.
16
Rated lamp wattage
W
300
Initial voltage range
V
14 … 19
Ignition voltage (cold/hot)
kV
Max. 20/max. 20
Colour temperature
K
Approx. 6.200
Colour rendering index
Ra
>95
Beam to axis angle
deg
Max. 30
Length l
mm
Max. 80
Length p
mm
Max. 30
Length r
mm
Max. 62
Reflector diameter D
mm
Max. diam. 82.5
Diameter d1
mm
Diam 31
- Page 17 of 23 -
2006-01-11_MI
A
WA001_GB
Rated lamp current
The technical data is:
Servicing Manual
GB
LIGHT SOURCE LX2300 (Xenon 300W)
7. In case of breakdown
No particular maintenance is necessary for this light source. Actually, it’s enough to control the brightness intensity
produced by the source and to change the lamp if necessary.
Nevertheless you might be confronted with a minor incident during its utilization.
Here above the causes and consequences of incidents which you could easily cure are listed.
In all the other situations, please contact our After Sales Service that will be able to help you as soon as possible.
No signal of the front panel lights up when you switch the source on
-Control if the mains outlet on the rear face of the light source is rightly connected up to the network.
-Control the good working order of the fuses (use only fuses as specified on the rear face : T4A).
The front panel of the light source lights up but the brightness flow is insufficient
-Control if the iris isn’t totally closed by pressing the right button.
-Control the working order of your light cable and of your optics.
-Change your lamp.
The images produced are too clear
-Control if the iris isn’t too opened.
There is no more light but the fan works and the led of the 2 brightness buttons flash
-The light source has a safety system which stops the power supply of the lamp if the inside temperature of the source
is too high. When the light source has finally cooled, it can be switched on again.
- Control if there’s enough space all around the light source to allow a good cooling (15 cm on each side).
- Control that there isn’t any obstacle to the ventilation on the rear face of the source.
-If the defect is persistent and if you have to send us back the light source, take care of sending it in its original packing.
Then it’s better to add your light cable to the packing so that we can examine your outline.
-In such a case, it would be kind of you to add to your delivery note a little explanation regarding the defect you have
noticed.
-When you will receive your equipment, it will be advisable to control its working order and enter reservations in
respect of the transport note if necessary. Then you will spare 48 hours to confirm them by registered letter to
the carrier. After this delay, the carrier will be able to refuse those reservations.
- Page 18 of 23 -
WA001_GB
2006-01-11_MI
-If an equipment sent by us is damaged during its transport, the amount of the repair will be charged either to the
carrier if the reservations have been entered within the required time, or to the consignee in the opposite case.
So remember to control as soon as possible the good working order of the equipment which has just been carried.
Servicing Manual
GB
LIGHT SOURCE LX2300 (Xenon 300W)
8. Pieces list
Description
Photographs
FUSE
T4A
BLOC ALIMENTATION
- Page 19 of 23 -
WA001_GB
2006-01-11_MI
HATCH
Servicing Manual
GB
LIGHT SOURCE LX2300 (Xenon 300W)
Description
Photographs
MO XENON IRIS
(Servomotor + IRIS)
XENON JACKET
- Page 20 of 23 -
WA001_GB
2006-01-11_MI
XENON FRAME
Servicing Manual
GB
LIGHT SOURCE LX2300 (Xenon 300W)
Description
Photographs
SHORT STORZ CONNECTOR
WOLF CONNECTOR
- Page 21 of 23 -
WA001_GB
2006-01-11_MI
SHORT OLYMPUS CONNECTOR
Servicing Manual
GB
LIGHT SOURCE LX2300 (Xenon 300W)
Description
Photographs
REAR FAN
ELECTRIC TIME METER
FILTER BOARD
- Page 22 of 23 -
WA001_GB
2006-01-11_MI
STANDBY BOARD
Servicing Manual
GB
LIGHT SOURCE LX2300 (Xenon 300W)
Description
Photographs
PUSU BUTTON BOARD
S300 POWER SUPPLY
- Page 23 of 23 -
2006-01-11_MI
RUDOLF MEDICAL GmbH + Co.KG · [email protected]
Zollerstraße 1 · 78567 Fridingen, Germany · Phone +49(74 63)99 56-0 · Fax +49(74 63)99 56-56
WA001_GB
CE conformity label in compliance
with the requirements of the
guideline 93/42/EEC
300W CENTRAL FAN