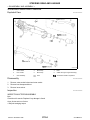
1
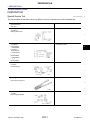
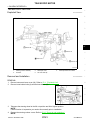
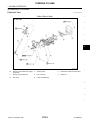
STEERING
SECTION
ST
STEERING SYSTEM
A
B
C
D
E
CONTENTS
FUNCTION DIAGNOSIS ............................... 3
HEATED STEERING WHEEL ............................. 3
System Diagram ........................................................ 3
System Description ................................................... 3
Component Parts Location ........................................ 3
Component Description ............................................. 4
COMPONENT DIAGNOSIS .......................... 5
HEATED STEERING WHEEL ............................. 5
Wiring Diagram ......................................................... 5
STEERING WHEEL .......................................... 15
Inspection ................................................................15
POWER STEERING OIL PUMP ....................... 17 ST
Inspection ................................................................17
ON-VEHICLE REPAIR ................................. 18
STEERING WHEEL .......................................... 18
TILT MOTOR ..................................................... 19
TELESCOPIC MOTOR ..................................... 21
NVH Troubleshooting Chart ...................................... 8
PRECAUTION ............................................... 9
STEERING COLUMN ........................................ 23
Exploded View .........................................................23
Removal and Installation .........................................24
PRECAUTIONS ................................................... 9
J
K
L
STEERING GEAR AND LINKAGE ................... 27
Exploded View .........................................................27
Removal and Installation .........................................27
M
POWER STEERING OIL PUMP ....................... 29
Exploded View .........................................................29
Removal and Installation .........................................29
PREPARATION ........................................... 11
HYDRAULIC LINE ............................................ 30
PREPARATION ..................................................11
Exploded View .........................................................30
Removal and Installation .........................................31
Special Service Tool ............................................... 11
Commercial Service Tool ........................................ 12
DISASSEMBLY AND ASSEMBLY .............. 32
ON-VEHICLE MAINTENANCE .................... 13
STEERING COLUMN ........................................ 32
POWER STEERING FLUID ...............................13
Disassembly and Assembly .....................................32
Inspection ................................................................ 13
Draining ................................................................... 13
Refilling ................................................................... 13
STEERING GEAR AND LINKAGE ................... 34
Revision: November 2009
I
Exploded View .........................................................19
Removal and Installation .........................................19
Exploded View .........................................................21
Removal and Installation .........................................21
Precaution for Supplemental Restraint System
(SRS) "AIR BAG" and "SEAT BELT PRE-TENSIONER" ................................................................... 9
Precautions Necessary for Steering Wheel Rotation after Battery Disconnect (Early Production,
With Electronic Steering Column Lock) ..................... 9
Service Notice or Precautions ................................. 10
H
Removal and Installation .........................................18
SYMPTOM DIAGNOSIS ............................... 8
NOISE, VIBRATION AND HARSHNESS
(NVH) TROUBLESHOOTING ............................. 8
F
ST-1
Exploded View .........................................................34
Disassembly ............................................................34
2010 Maxima
N
O
P
Inspection ............................................................... 34
Assembly ................................................................ 35
SERVICE DATA AND SPECIFICATIONS
(SDS) ................................................................. 38
POWER STEERING OIL PUMP ........................ 37
Disassembly and Assembly .................................... 37
SERVICE DATA AND SPECIFICATIONS
(SDS) ........................................................... 38
Revision: November 2009
ST-2
Steering Wheel ....................................................... 38
Steering Angle ........................................................ 38
Steering Column ..................................................... 38
Steering Gear .......................................................... 39
Oil Pump ................................................................. 40
Steering Fluid .......................................................... 40
2010 Maxima
HEATED STEERING WHEEL
< FUNCTION DIAGNOSIS >
FUNCTION DIAGNOSIS
A
HEATED STEERING WHEEL
System Diagram
INFOID:0000000005462665
B
C
D
E
F
ST
AWGIA0104GB
System Description
INFOID:0000000005462666
The heated steering wheel switch controls the heated steering relay. When the switch is turned on, the relay is
energized and the heated steering system will operate. The heated steering system will turn off when the
steering wheel temperature reaches approximately 86° F (30° C). Heated steering system operation can also
be canceled by pressing the heated steering wheel switch again.
NOTE:
If the surface temperature of the steering wheel is below 68° F (20° C), the system will heat the steering wheel
and cycle off and on to maintain a temperature above 68° F (20° C). The indicator light will remain on as long
as the system is on. Push the switch again to turn the heated steering wheel system off manually. The indicator light will go off.
Component Parts Location
H
I
J
K
INFOID:0000000005462667
L
M
N
O
P
AWGIA0088ZZ
1.
Heated steering relay M97
4.
Heated steering wheel M114
Revision: November 2009
2.
Heated steering wheel switch M96
ST-3
3.
Spiral cable M26
2010 Maxima
HEATED STEERING WHEEL
< FUNCTION DIAGNOSIS >
Component Description
INFOID:0000000005462668
Heated steering wheel switch
• Controls the heated steering relay and operates the heated steering wheel system.
• Turns the indicator lamp ON when the system is activated.
Heated steering relay
• Operates the heated steering system with the control signal from the heated steering
wheel switch.
Heated steering wheel
• Heats the heating element with the power supplied from the heated steering relay.
Revision: November 2009
ST-4
2010 Maxima
HEATED STEERING WHEEL
< COMPONENT DIAGNOSIS >
COMPONENT DIAGNOSIS
A
HEATED STEERING WHEEL
Wiring Diagram
INFOID:0000000005462669
B
C
D
E
F
ST
H
I
J
K
L
M
N
O
P
ABGWA0006GB
Revision: November 2009
ST-5
2010 Maxima
HEATED STEERING WHEEL
< COMPONENT DIAGNOSIS >
ABGIA0009GB
Revision: November 2009
ST-6
2010 Maxima
HEATED STEERING WHEEL
< COMPONENT DIAGNOSIS >
A
B
C
D
E
F
ST
H
I
J
K
L
M
N
O
ABGIA0010GB
P
Revision: November 2009
ST-7
2010 Maxima
Symptom
Steering
Revision: November 2009
ST-34
ST-34
ST-34
ST-13
ST-15
ST-34
Outer socket ball joint end play
Steering fluid leakage
Steering wheel play
Steering gear rack sliding force
Drive belt looseness
×
×
×
×
×
×
×
×
×
Shudder
ST-8
Shake
×
×
Vibration
×
×
Shimmy
×
×
×
×
×
×
×
×
×
×
×
×
×
×
Refer to FSU-2, "NVH Troubleshooting Chart"
Refer to WT-57, "NVH Troubleshooting Chart"
Refer to WT-57, "NVH Troubleshooting Chart"
Refer to FAX-2, "NVH Troubleshooting Chart"
Refer to BR-6, "NVH Troubleshooting Chart"
TIRES
ROAD WHEEL
DRIVE SHAFT
BRAKES
ST-27
Steering linkage looseness
AXLE and SUSPENSION
ST-24
Improper installation or looseness of steering column
Refer to FAX-2, "NVH Troubleshooting Chart"
×
WHEEL HUB
ST-27
ST-32
Steering column deformation or damage
—
Improper installation or looseness of tilt lock lever
Mounting rubber deterioration
—
Improper steering wheel
EM-14, "Checking Drive Belts"
—
Outer socket ball joint rotating torque
Noise
Outer socket ball joint swinging force
Possible cause and SUSPECTED PARTS
Air in hydraulic system
ST-13
Reference page
Fluid level
NOISE, VIBRATION AND HARSHNESS (NVH) TROUBLESHOOTING
< SYMPTOM DIAGNOSIS >
SYMPTOM DIAGNOSIS
NOISE, VIBRATION AND HARSHNESS (NVH) TROUBLESHOOTING
NVH Troubleshooting Chart
INFOID:0000000005462670
Use chart below to help you find the cause of the symptom. If necessary, repair or replace these parts.
×
×
×
×
×
×
×
×
×
×
×
×
×
×
×: Applicable
2010 Maxima
PRECAUTIONS
< PRECAUTION >
PRECAUTION
A
PRECAUTIONS
Precaution for Supplemental Restraint System (SRS) "AIR BAG" and "SEAT BELT
PRE-TENSIONER"
B
INFOID:0000000005462671
The Supplemental Restraint System such as “AIR BAG” and “SEAT BELT PRE-TENSIONER”, used along C
with a front seat belt, helps to reduce the risk or severity of injury to the driver and front passenger for certain
types of collision. This system includes seat belt switch inputs and dual stage front air bag modules. The SRS
system uses the seat belt switches to determine the front air bag deployment, and may only deploy one front
D
air bag, depending on the severity of a collision and whether the front occupants are belted or unbelted.
Information necessary to service the system safely is included in the SR and SB section of this Service Manual.
WARNING:
E
• To avoid rendering the SRS inoperative, which could increase the risk of personal injury or death in
the event of a collision which would result in air bag inflation, all maintenance must be performed by
an authorized NISSAN/INFINITI dealer.
F
• Improper maintenance, including incorrect removal and installation of the SRS, can lead to personal
injury caused by unintentional activation of the system. For removal of Spiral Cable and Air Bag
Module, see the SR section.
• Do not use electrical test equipment on any circuit related to the SRS unless instructed to in this ST
Service Manual. SRS wiring harnesses can be identified by yellow and/or orange harnesses or harness connectors.
H
PRECAUTIONS WHEN USING POWER TOOLS (AIR OR ELECTRIC) AND HAMMERS
WARNING:
• When working near the Airbag Diagnosis Sensor Unit or other Airbag System sensors with the Ignition ON or engine running, DO NOT use air or electric power tools or strike near the sensor(s) with a
hammer. Heavy vibration could activate the sensor(s) and deploy the air bag(s), possibly causing
serious injury.
• When using air or electric power tools or hammers, always switch the Ignition OFF, disconnect the
battery, and wait at least 3 minutes before performing any service.
Precautions Necessary for Steering Wheel Rotation after Battery Disconnect (Early
Production, With Electronic Steering Column Lock)
INFOID:0000000005885916
I
J
K
NOTE:
• Before removing and installing any control units, first turn the push-button ignition switch to the LOCK position, then disconnect both battery cables.
• After finishing work, confirm that all control unit connectors are connected properly, then re-connect both
battery cables.
• Always use CONSULT-III to perform self-diagnosis as a part of each function inspection after finishing work.
If a DTC is detected, perform trouble diagnosis according to self-diagnosis results.
This vehicle is equipped with a push-button ignition switch and a steering lock unit.
If the battery is disconnected or discharged, the steering wheel will lock and cannot be turned.
If turning the steering wheel is required with the battery disconnected or discharged, follow the procedure
below before starting the repair operation.
M
OPERATION PROCEDURE
O
1.
2.
3.
4.
Connect both battery cables.
NOTE:
Supply power using jumper cables if battery is discharged.
Carry the Intelligent Key or insert it to the key slot and turn the push-button ignition switch to ACC position.
(At this time, the steering lock will be released.)
Disconnect both battery cables. The steering lock will remain released with both battery cables disconnected and the steering wheel can be turned.
Perform the necessary repair operation.
Revision: November 2009
ST-9
2010 Maxima
L
N
P
PRECAUTIONS
< PRECAUTION >
5. When the repair work is completed, re-connect both battery cables. With the brake pedal released, turn
the push-button ignition switch from ACC position to ON position, then to LOCK position. (The steering
wheel will lock when the push-button ignition switch is turned to LOCK position.)
6. Perform self-diagnosis check of all control units using CONSULT-III.
Service Notice or Precautions
INFOID:0000000005462673
• In case of removing steering gear assembly, make the final tightening with grounded and unloaded vehicle
condition, and then check wheel alignment.
• Observe the following precautions when disassembling.
- Before disassembly, thoroughly clean the outside of the unit.
- Disassembly should be done in a clean work area. It is important to prevent the internal parts from becoming
contaminated by dirt or other foreign matter.
- For easier and proper assembly, place disassembled parts in order on a parts rack.
- Use nylon cloth or paper towels to clean the parts; common shop rags can leave lint that might interfere with
their operation.
- Do not reuse non-reusable parts.
- Before assembling, apply the specified grease to the directed parts.
Revision: November 2009
ST-10
2010 Maxima
PREPARATION
< PREPARATION >
PREPARATION
A
PREPARATION
Special Service Tool
INFOID:0000000005462674
B
The actual shapes of Kent-Moore tools may differ from those of special service tools illustrated here.
Tool number
(Kent-Moore No.)
Tool name
Description
C
ST27180001
(J-25726-A)
Steering wheel puller
Removing steering wheel
D
E
F
S-NT544
ST3127S000
(J-25765-A)
Preload gauge
1. GG9103000
(J-25765-A)
Torque wrench
2. HT62940000
( – )
Socket adapter
3. HT62900000
( – )
Socket adapter
Inspecting of rotating torque for ball joint
and steering column
ST
H
S-NT541
KV48103500
(J-26357)
Pressure gauge
I
Measuring oil pump relief pressure
J
K
S-NT547
KV40107300
( — )
Boot clamp crimping tool
L
Installing boot clamps
M
N
ZZA1229D
KV48102500
(J-33914)
Pressure gauge adapter
Measuring oil pump relief pressure
O
P
S-NT542
Revision: November 2009
ST-11
2010 Maxima
PREPARATION
< PREPARATION >
Tool number
(Kent-Moore No.)
Tool name
Description
—
(J-44372)
Spring gauge
Measuring steering wheel turning force,
rack sliding force and ball joint swinging
force
LST024
HT72520000
(J-25730-A)
Ball joint remover
Removing ball joint
NT146
Commercial Service Tool
INFOID:0000000005462675
Tool number
Tool name
Description
Power tool
• Removing wheel nuts
• Removing undercover
PBIC0190E
Revision: November 2009
ST-12
2010 Maxima
POWER STEERING FLUID
< ON-VEHICLE MAINTENANCE >
ON-VEHICLE MAINTENANCE
A
POWER STEERING FLUID
Inspection
INFOID:0000000005462676
B
FLUID LEVEL
• Check fluid level with engine stopped.
• Make sure that fluid level is between MIN and MAX.
• Fluid levels at HOT (A) and COLD (B) are different. Do not confuse
them.
HOT (A)
COLD (B)
C
D
: Fluid temperature 50° - 80 °C (122° - 176°F)
: Fluid temperature 0° - 30°C (32° - 86°F)
CAUTION:
• The fluid level should not exceed the MAX line. Excessive
fluid will cause fluid leakage from the cap.
• Do not reuse drained power steering fluid.
• Recommended fluid is Genuine Nissan PSF or equivalent.
E
F
ALGIA0002GB
FLUID LEAKAGE
Check hydraulic connections for fluid leakage, cracks, damage,
looseness, or wear.
1. Run engine until the fluid temperature reaches 50° to 80° C
(122° to 176°F) in reservoir tank, and keep engine speed idle.
2. Turn steering wheel several times from full left stop to full right
stop.
3. Hold steering wheel at each lock position for five seconds and
carefully, check for fluid leakage.
CAUTION:
Do not hold the steering wheel in a locked position for more
SGIA0506E
than 10 seconds. (There is the possibility that oil pump may
be damaged.)
4. If fluid leakage at connections is noticed, then loosen flare nut and then retighten. Do not overtighten connector as this can damage O-ring, washer and connector.
5. If fluid leakage from oil pump is noticed, check oil pump. Refer to ST-29, "Removal and Installation".
6. Check steering gear boots for accumulation of fluid indicating leakage from steering gear.
Draining
1.
2.
ST
H
I
J
K
L
INFOID:0000000005462677
M
Disconnect both high and low pressure lines from power steering gear.
Drain into a suitable container.
Refilling
INFOID:0000000005462678
N
FILLING HYDRAULIC SYSTEM
1.
2.
3.
Fill power steering reservoir while checking fluid level.
Bleed air from hydraulic system.
Check for fluid leaks.
O
P
AIR BLEEDING HYDRAULIC SYSTEM
If air bleeding is not complete, the following symptoms can be observed.
• Bubbles are created in reservoir tank.
• Clicking noise can be heard from oil pump.
• Excessive buzzing in the oil pump.
NOTE:
Revision: November 2009
ST-13
2010 Maxima
POWER STEERING FLUID
< ON-VEHICLE MAINTENANCE >
Fluid noise may occur in the steering gear or oil pump. This does not affect performance or durability of the
system.
1. Turn steering wheel several times from full left stop to full right stop with engine off.
CAUTION:
Turn steering wheel while filling reservoir tank with fluid so as not to lower fluid level below the
MIN line.
2. Start engine and hold steering wheel at each lock position for 3 seconds at idle to check for fluid leakage.
3. Repeat step 2 above several times at approximately 3-second intervals.
CAUTION:
Do not hold the steering wheel in a locked position for more than 10 seconds. (There is the possibility that oil pump may be damaged.)
4. Check fluid for bubbles and white contamination.
5. Stop engine if bubbles and white contamination do not drain out. Perform step 2 and 3 above after waiting
until bubbles and white contamination drain out.
6. Stop the engine, and then check fluid level.
Revision: November 2009
ST-14
2010 Maxima
STEERING WHEEL
< ON-VEHICLE MAINTENANCE >
STEERING WHEEL
A
Inspection
INFOID:0000000005462679
INSTALLATION CONDITION
B
• Check installation conditions of steering gear assembly, front suspension assembly, axle and steering column assembly.
• Check if movement exists when steering wheel is moved up and down, to the left and right and to the axial
direction.
Steering wheel axial end play
: Refer to ST-38, "Steering Wheel"
C
D
• Check steering gear assembly bolts and nut for looseness. Refer to ST-27, "Exploded View".
E
STEERING WHEEL PLAY
• Turn steering wheel so that front wheels come to the straight-ahead position. Start engine and lightly turn
steering wheel to the left and right until front wheels start to move. Measure steering wheel movement on the
outer circumference.
F
Steering wheel play : Refer to ST-38, "Steering Wheel"
• When the measurement value is outside the standard value, check backlash for each joint of steering column assembly and installation condition of steering gear assembly.
ST
H
NEUTRAL POSITION OF STEERING WHEEL
• Make sure that steering gear assembly, steering column assembly and steering wheel are installed in the
correct position.
• Perform neutral position inspection after wheel alignment. Refer to FSU-7, "Inspection and Adjustment".
• Set vehicle to the straight-ahead position and confirm steering wheel is in the neutral position.
• Loosen outer socket lock nut and turn inner socket to left and right equally to make fine adjustments if steering wheel is not in the neutral position.
I
J
STEERING WHEEL TURNING FORCE
1.
2.
3.
4.
Park vehicle on a level, dry surface and set parking brake.
Start engine.
Bring power steering fluid up to adequate operating temperature. Make sure the fluid temperature is
approximately 60 to 80°C (140 to 176°F).
Tires need to be inflated to normal pressure.
Check steering wheel turning force using Tool when steering
wheel has been turned 360 degrees from the neutral position.
Tool number
:
Steering wheel turning
force
: Refer to ST-38, "Steering
Wheel"
K
L
M
— (J-44372)
N
O
WGIA0035E
5.
P
If steering wheel turning force is out of specification, check rack sliding force.
Revision: November 2009
ST-15
2010 Maxima
STEERING WHEEL
< ON-VEHICLE MAINTENANCE >
a. While pulling outer socket slowly in ±11.5 mm (±0.453 in) range
from neutral position, make sure rack sliding force is within
specification using Tool.
b.
6.
Tool number
:
— (J-44372)
Rack sliding force
: Refer to ST-39, "Steering Gear"
If rack sliding force is not within specification, replace steering
gear assembly.
If rack sliding force is OK, inspect steering column. Refer to ST24, "Removal and Installation".
SST090B
FRONT WHEEL TURNING ANGLE
• Check front wheel turning angle after toe-in inspection. Place front
wheels on turning radius gauges and rear wheels on stands.
Check the maximum inner and outer wheel turning angles for LH
and RH road wheels.
FAA0016D
• With the engine at idle, turn steering wheel from full left stop to full
right stop and measure the turning angles.
Inner wheel angle (A)
Outer wheel angle (B)
: Refer to ST-38, "Steering
Angle"
: Refer to ST-38, "Steering
Angle"
SGIA0055E
• Measure rack stroke in neutral position if angles are outside the
specified value.
Rack stroke in neutral
position (L)
: Refer to ST-39, "Steering
Gear"
AWGIA0003GB
Revision: November 2009
ST-16
2010 Maxima
POWER STEERING OIL PUMP
< ON-VEHICLE MAINTENANCE >
POWER STEERING OIL PUMP
A
Inspection
INFOID:0000000005462680
RELIEF OIL PRESSURE
B
CAUTION:
Make sure that belt tension is normal before starting the following procedure.
1. Connect the Tool between oil pump discharge connector and
high-pressure hose. Bleed air from the hydraulic circuit while
opening valve fully. Refer to ST-13, "Inspection".
C
Tool numbers
2.
3.
D
: KV48103500 (J-26357)
: KV48102500 (J-33914)
E
Start engine. Run engine until oil temperature reaches 50° to
80°C (122° to 176°F).
CAUTION:
• Leave the valve of the hydraulic pressure gauge [SST]
fully open while starting and running engine. If engine is
started with the valve closed, the hydraulic pressure in oil
pump goes up to the relief pressure along with unusual
increase of oil temperature.
• Be sure to keep hose clear of belts and other parts when
engine is started.
Fully close the Tool valve with engine at idle and measure the
relief oil pressure.
F
ST
H
Relief oil pressure : Refer to ST-40, "Oil Pump"
4.
5.
I
CAUTION:
SGIA0915E
Never keep valve closed for 10 seconds or longer.
Open the valve slowly after measuring. Replace oil pump if the relief oil pressure is outside the standard.
After inspection, disconnect the Tool from hydraulic circuit, then add fluid and bleed air. Refer to ST-13,
"Inspection".
J
K
L
M
N
O
P
Revision: November 2009
ST-17
2010 Maxima
STEERING WHEEL
< ON-VEHICLE REPAIR >
ON-VEHICLE REPAIR
STEERING WHEEL
Removal and Installation
INFOID:0000000005462681
REMOVAL
NOTE:
When reconnecting spiral cable, fix cable with a tape so that fixing case and rotating part keep aligned. This
will omit neutral position alignment procedure during spiral cable installation.
1. Set vehicle to the straight-ahead position.
2. Remove driver air bag module. Refer to SR-5, "Removal and Installation".
3. Remove steering wheel lock nut after steering is locked.
4. Remove steering wheel using Tool (A).
Tool number (A)
: ST27180001 (J-25726-A)
JSGIA0341ZZ
INSTALLATION
Installation is in the reverse order of removal.
CAUTION:
Never twist spiral cable freely or excessively after it becomes tight (doing so may cause the cable to
tear off).
NOTE:
Check the spiral cable neutral position after replacing or rotating spiral cable. Refer to SR-8, "Removal and
Installation".
Revision: November 2009
ST-18
2010 Maxima
TILT MOTOR
< ON-VEHICLE REPAIR >
TILT MOTOR
A
Exploded View
INFOID:0000000005568707
B
C
D
E
F
ST
H
I
J
ALGIA0054GB
1.
Steering column assembly
2.
Telescope motor
4.
Tilt motor
5.
Tilt motor bolt cap
3.
K
Telescope motor link bracket
Removal and Installation
INFOID:0000000005568003
L
REMOVAL
1.
2.
Remove instrument lower cover (LH). Refer to IP-11, "Exploded View".
Remove knee bolster bolts (A) and the knee bolster (B).
M
N
O
P
ALGIA0050ZZ
3.
4.
Telescope the steering wheel to the full out position and tilt to highest position.
NOTE:
If either function is inoperative you can do this manually prior to installation.
Remove the steering column covers. Refer to IP-12, "Removal and Installation".
NOTE:
Revision: November 2009
ST-19
2010 Maxima
TILT MOTOR
< ON-VEHICLE REPAIR >
The tilt/telescope switch can remain attached to the side cover.
5. Remove the tilt motor as follows.
1. Disconnect the tilt motor electrical connector (A).
2. Remove the tilt motor link bolts (B).
ALGIA0051ZZ
3. Remove the tilt motor bolt (A) from the RH side of column.
4. Remove the tilt motor.
NOTE:
If the steering wheel could not be tilted to the highest position,
manually tilt steering wheel to the highest position.
ALGIA0052ZZ
INSTALLATION
Installation is in the reverse order of removal
NOTE:
• Upon installation of the tilt motor link bolts manually move steering wheel up and down to align the bolts.
• Inform customer that they will need to rest their Automatic Drive Positioner (ADP) settings.
Revision: November 2009
ST-20
2010 Maxima
TELESCOPIC MOTOR
< ON-VEHICLE REPAIR >
TELESCOPIC MOTOR
A
Exploded View
INFOID:0000000005568708
B
C
D
E
F
ST
H
I
J
ALGIA0054GB
1.
Steering column assembly
2.
Telescope motor
4.
Tilt motor
5.
Tilt motor bolt cap
3.
K
Telescope motor link bracket
Removal and Installation
INFOID:0000000005568004
L
REMOVAL
1.
2.
Remove instrument lower cover (LH). Refer to IP-11, "Exploded View".
Remove knee bolster bolts (A) and the knee bolster (B).
M
N
O
P
ALGIA0050ZZ
3.
4.
Telescope the steering wheel to the full out position and tilt to highest position.
NOTE:
If either function is inoperative you can do this manually prior to installation.
Remove the steering column covers. Refer to IP-12, "Removal and Installation".
NOTE:
Revision: November 2009
ST-21
2010 Maxima
TELESCOPIC MOTOR
< ON-VEHICLE REPAIR >
The tilt/telescope switch can remain attached to the side cover.
5. Remove telescope motor as follows.
1. Disconnect telescope motor electrical connector (A).
2. Remove the two telescope link screws (B) and link bracket.
3. Remove telescope bolt (C).
4. Remove the telescope motor (D).
NOTE:
If the steering wheel could not be telescoped to full out position manually pull steering wheel to the full out position
ALGIA0053ZZ
INSTALLATION
Installation is in the reverse order of removal.
NOTE:
• Adjust the telescope link to full out position and adjust as needed to fit into proper installed position.
• Inform customer that they will need to rest their Automatic Drive Positioner (ADP) settings.
Revision: November 2009
ST-22
2010 Maxima
STEERING COLUMN
< ON-VEHICLE REPAIR >
STEERING COLUMN
A
Exploded View
INFOID:0000000005462682
Without Electric Motor
B
C
D
E
F
ST
H
I
J
AWGIA0105GB
1-4.
Steering column assembly nut tight- 5.
ening order
Steering wheel
6.
Combination switch and spiral cable
7.
Steering column assembly
8.
Hole cover seal
9.
Herbie clip
10.
Hole cover
11.
Lower shaft assembly
K
L
M
N
O
P
Revision: November 2009
ST-23
2010 Maxima
STEERING COLUMN
< ON-VEHICLE REPAIR >
With Electric Motor
AWGIA0098GB
1-4.
Steering column assembly nut tightening order
5.
Steering wheel
6.
Combination switch and spiral cable
7.
Steering column assembly
8.
Hole cover seal
9.
Herbie clip
10.
Hole cover
11.
Lower shaft assembly
Removal and Installation
INFOID:0000000005462683
REMOVAL
Hole Cover Seal, Hole Cover and Lower Shaft Assembly
1. Set wheels to the straight-ahead position.
• Steering gear (2)
2. Remove lower side bolt (A) of lower shaft assembly (1).
ALGIA0041ZZ
Revision: November 2009
ST-24
2010 Maxima
STEERING COLUMN
< ON-VEHICLE REPAIR >
3. Remove bolt (A) and nut (B) of column upper joint (2), then
remove lower shaft assembly (1).
4. Loosen herbie clip, then remove hole cover seal from hole
cover.
5. Remove nuts of hole cover, and then remove clamp and hole
cover from dash panel.
A
B
C
ALGIA0042ZZ
D
Steering Column Assembly
1.
2.
3.
4.
5.
6.
7.
8.
9.
Set wheels to the straight-ahead position.
Remove driver air bag module. Refer to SR-5, "Removal and Installation".
Remove steering wheel. Refer to ST-18, "Removal and Installation".
Remove instrument side mask (LH). Refer to IP-11, "Exploded View".
Remove instrument lower cover (LH). Refer to IP-11, "Exploded View".
Remove knee protector bolts, then remove knee protector (1).
Refer to IP-11, "Exploded View".
Remove steering column cover (upper and lower). Refer to IP11, "Exploded View".
Remove combination switch and spiral cable. Refer to SR-8,
"Removal and Installation".
Disconnect each switch connector installed to steering column
assembly, and then disconnect harness from steering column
assembly.
E
F
ST
H
I
ALGIA0043ZZ
• Lower shaft assembly (1)
10. Remove bolt (A) and nut (B) of column upper joint (2).
11. Remove steering column assembly and nuts, then remove
steering column assembly.
J
K
L
ALGIA0042ZZ
M
INSPECTION AFTER REMOVAL
Hole Cover Seal, Hole Cover and Lower Shaft Assembly
Check each part of hole cover seal, hole cover and steering column and lower shaft assembly for damage or
other malfunctions. Replace if necessary.
N
Steering Column Assembly
• Check each part of steering column assembly for damage or other malfunctions. Replace entire steering column assembly if any parts are damaged.
O
P
Revision: November 2009
ST-25
2010 Maxima
STEERING COLUMN
< ON-VEHICLE REPAIR >
• Measure the length (L) as shown if vehicle has been involved in a
minor collision. Replace steering column assembly if outside the
specifications.
Steering column length (L)
: Refer to ST-38, "Steering
Column"
SGIA1177E
• Measure steering column rotating torque using Tool. Replace steering column assembly if outside the standard.
Tool number
: ST3127S000 (J-25765-A)
Rotating torque
: Refer to ST-38, "Steering Column"
• Check tilt and telescopic mechanism operating range (L1), (L2) as
shown.
Tilt operating range (L1)
Telescopic operating range
(L2)
: Refer to ST-38, "Steering
Column"
: Refer to ST-38, "Steering
Column"
SGIA1179E
INSTALLATION
Steering Column Assembly
Installation is in the reverse order of removal.
Hole Cover Seal, Hole Cover and Lower Shaft Assembly
Installation is in the reverse order of removal.
• When installing lower shaft assembly to steering gear assembly, follow the procedure listed below.
- Set rack of steering gear in the neutral position.
NOTE:
To get the neutral position of rack, turn gear sub-assembly and measure the distance of inner socket, and
then measure the intermediate position of the distance.
- Align rear cover cap projection (A) with the marking position (B) of
gear housing assembly.
- Install slit part of lower shaft assembly (C) aligning with the projection (A) of rear cover cap (1). Make sure that the slit part of lower
shaft assembly (C) is aligned with both the projection (A) of rear
cover cap (1) and the marking position (B) of gear housing assembly.
- Perform final tightening of nuts and bolts on each part under
unladen conditions with tires on level ground when removing steering gear assembly. Check wheel alignment. Refer to FSU-7,
"Inspection and Adjustment".
Revision: November 2009
ST-26
SGIA1175E
2010 Maxima
STEERING GEAR AND LINKAGE
< ON-VEHICLE REPAIR >
STEERING GEAR AND LINKAGE
A
Exploded View
INFOID:0000000005462684
B
C
D
E
F
ST
AWGIA0006GB
1.
Cotter pin
2.
Steering gear assembly
Removal and Installation
Front
H
INFOID:0000000005462685
I
REMOVAL
1.
2.
3.
4.
5.
Remove front tires using power tool. Refer to WT-63, "Adjustment".
Drain power steering fluid. Refer to ST-13, "Draining".
Disconnect front stabilizer connecting rods from front stabilizer and reposition front stabilizer. Refer to
FSU-13, "Removal and Installation".
Remove steering outer socket cotter pins (1), and then loosen
the nuts.
Remove steering outer sockets (2) from steering knuckles (3) so
as not to damage ball joint boots (4) using Tool.
CAUTION:
Temporarily tighten the nut to prevent damage to threads
and to prevent the Tool from suddenly coming off.
Tool number
• Steering gear assembly (2)
6. Remove side bolt (A) of lower shaft assembly (1) and disconnect
lower shaft assembly.
7. Remove front exhaust tube. Refer to EX-6, "Removal and Installation".
8. Disconnect SSPS valve harness connector. Refer to ST-34,
"Exploded View".
9. Disconnect high and low pressure piping from steering gear
assembly.
10. Remove steering hydraulic piping bracket from front suspension
ALGIA0041ZZ
member.
11. Remove bolts and nuts of steering gear assembly, and then remove steering gear assembly from vehicle.
ST-27
K
L
M
: HT72520000 (J-25730-A)
SGIA1183E
Revision: November 2009
J
2010 Maxima
N
O
P
STEERING GEAR AND LINKAGE
< ON-VEHICLE REPAIR >
INSPECTION AFTER REMOVAL
Check for fluid leaks or damage to steering gear assembly. If any exist, replace steering gear assembly.
INSTALLATION
Installation is in the reverse order of removal.
• When installing lower shaft assembly to steering gear assembly, follow the procedure listed below.
- Set rack of steering gear in the neutral position.
NOTE:
To get the neutral position of rack, turn gear sub-assembly and measure the distance of inner socket, and
then measure the intermediate position of the distance.
- Align rear cover cap projection (A) with the marking position (B) of
gear housing assembly.
- Install slit part of lower shaft assembly (C) aligning with the projection (A) of rear cover cap (1). Make sure that the slit part of lower
shaft assembly (C) is aligned with both the projection (A) of rear
cover cap (1) and the marking position (B) of gear housing assembly.
• After installation, bleed air from the steering hydraulic system.
Refer to ST-13, "Inspection".
• Perform final tightening of nuts and bolts on each part under
unladen conditions with tires on level ground when removing steerSGIA1175E
ing gear assembly. Check wheel alignment. Refer to FSU-7,
"Inspection and Adjustment".
INSPECTION AFTER INSTALLATION
Make sure that steering wheel operates smoothly by turning several times from full left stop to full right stop.
Revision: November 2009
ST-28
2010 Maxima
POWER STEERING OIL PUMP
< ON-VEHICLE REPAIR >
POWER STEERING OIL PUMP
A
Exploded View
INFOID:0000000005462686
B
C
D
E
F
ST
AWGIA0099GB
1.
Rear bracket
2.
Power steering oil pump assembly
Removal and Installation
3.
Front bracket
H
INFOID:0000000005462687
REMOVAL
I
1.
2.
3.
4.
5.
J
6.
7.
8.
Remove front tire (RH) using power tool. Refer to WT-63, "Adjustment".
Remove engine side undercover.
Remove hood ledge cover (RH).
Drain power steering fluid. Refer to ST-13, "Draining".
Disconnect high pressure piping and suction hose from power steering oil pump. Refer to ST-30,
"Exploded View".
Loosen drive belt. Refer to EM-14, "Removal and Installation".
Remove drive belt from power steering oil pump pulley.
Remove power steering oil pump bolts, and then remove power steering oil pump.
K
L
INSTALLATION
Installation is in the reverse order of removal.
• When installing power steering oil pump, install all bolts by hand initially, then tighten bolts to specification.
• Perform the following procedures after installing.
- Check belt tension. Refer to EM-14, "Checking Drive Belts".
- Bleed air from power steering system. Refer to ST-13, "Refilling".
M
N
O
P
Revision: November 2009
ST-29
2010 Maxima
HYDRAULIC LINE
< ON-VEHICLE REPAIR >
HYDRAULIC LINE
Exploded View
INFOID:0000000005462688
CAUTION:
Securely insert harness connector to pressure sensor.
ALGIA0046GB
1.
High pressure hose
2.
Suction hose
3.
Reservoir tank bracket
4.
Reservoir tank
5.
Oil pump assembly
6.
Power steering fluid cooler
7.
Power steering fluid cooler brackets
8.
Steering gear assembly
9.
Low pressure piping
10.
Eye bolt
11. High pressure piping
12.
Copper washer
Revision: November 2009
ST-30
2010 Maxima
HYDRAULIC LINE
< ON-VEHICLE REPAIR >
13.
Eye bolt
16.
Eye-joint (assembled to high-pressure side hose)
14. Copper washer
15.
Pressure sensor
A
Removal and Installation
INFOID:0000000005462689
B
REMOVAL
Refer to ST-30, "Exploded View" for removal.
C
INSTALLATION
• Insert hose securely until it contacts tube spool.
CAUTION:
Do not apply fluid.
D
E
F
SGIA0514E
ST
• Install eye-bolt (1), copper washers (2) and eye-joint (assembled to
high-pressure hose) (4) onto oil pump assembly (3), and then
tighten it to the specified torque after tightening by hand.
CAUTION:
Do not reuse copper washers.
H
I
J
AWGIA0106ZZ
K
L
M
N
O
P
Revision: November 2009
ST-31
2010 Maxima
STEERING COLUMN
< DISASSEMBLY AND ASSEMBLY >
DISASSEMBLY AND ASSEMBLY
STEERING COLUMN
Disassembly and Assembly
INFOID:0000000005462690
The steering column assembly without electric motor is not serviceable and must be replaced as an assembly.
With Electric Motor
ALGIA0054GB
1.
Steering column assembly
2.
Telescope motor
4.
Tilt motor
5.
Tilt motor bolt cap
3.
Telescope motor link bracket
DISASSEMBLY
Tilt motor
1.
Remove the tilt motor as follows.
1. Disconnect the tilt motor electrical connector (A).
2. Remove the tilt motor link bolts (B).
ALGIA0051ZZ
Revision: November 2009
ST-32
2010 Maxima
STEERING COLUMN
< DISASSEMBLY AND ASSEMBLY >
3. Remove the tilt motor bolt (A) from the RH side of column.
4. Remove the tilt motor.
NOTE:
If the steering wheel could not be tilted to the highest position,
manually tilt steering wheel to the highest position.
A
B
C
ALGIA0052ZZ
D
Telescope motor
1.
Remove telescope motor as follows.
1. Disconnect telescope motor electrical connector (A).
2. Remove the two telescope link screws (B) and link bracket.
3. Remove telescope bolt (C).
4. Remove the telescope motor (D).
NOTE:
If the steering wheel could not be telescoped to full out position manually pull steering wheel to the full out position
E
F
ST
ALGIA0053ZZ
ASSEMBLY
H
Assembly is in the reverse order of removal
NOTE:
• Upon installation of the tilt motor link bolts manually move steering wheel up and down to align the bolts.
• Adjust the telescope link to full out position and adjust as needed to fit into proper installed position.
• Inform customer that they will need to rest their Automatic Drive Positioner (ADP) settings.
I
J
K
L
M
N
O
P
Revision: November 2009
ST-33
2010 Maxima
STEERING GEAR AND LINKAGE
< DISASSEMBLY AND ASSEMBLY >
STEERING GEAR AND LINKAGE
Exploded View
INFOID:0000000005462691
AWGIA0101GB
1.
Outer socket
2.
4.
Inner socket
5.
7.
Gear assembly
Boot clamp
3.
Boot
Boot clamp
6.
SSPS valve (part of gear assembly)
Front
Three Bond 1111B or equivalent
Disassembly
1.
2.
3.
INFOID:0000000005462692
Remove outer socket locknut and outer socket.
Remove boot clamps and boot.
Remove inner socket.
Inspection
INFOID:0000000005462693
INSPECTION AFTER DISASSEMBLY
Boot
Check boot for cracks. Replace if any damage is found.
Outer Socket and Inner Socket
• Ball joint swinging torque
Revision: November 2009
ST-34
2010 Maxima
STEERING GEAR AND LINKAGE
< DISASSEMBLY AND ASSEMBLY >
- Hook a spring balance to the ball stud and inner socket measuring
point (*) and pull the spring balance. Make sure that the spring balance reads the specified value when ball stud and inner socket
start to move. Replace outer socket and steering gear assembly if
they are outside the standard.
Tool number
:
Swinging torque
A
B
— (J-44372)
C
: Refer to ST-39, "Steering Gear"
SGIA0896E
D
• Ball joint rotating torque
- Make sure that the reading is within the following specified range
using Tool. Replace outer socket if the reading is outside the specified value.
Tool number
Rotating torque
E
: ST3127S000 (J-25765-A)
F
: Refer to ST-39, "Steering Gear"
ST
SGIA0941E
H
• Ball joint axial end play
- Apply an axial load of 490 N (50 kg, 111 lb) to ball stud. Measure
amount of stud movement using a dial gauge and then make sure
that the value is within the following specified range. Replace outer
socket and inner socket if the measured value is outside the standard.
I
J
Axial end play
: Refer to ST-39, "Steering Gear"
K
SGIA0057E
Assembly
1.
2.
3.
INFOID:0000000005462694
Apply Three Bond 1111B or equivalent to inner socket and turn pinion fully to retract inner socket into gear
housing assembly.
Install large end (1) of boot (2) to gear housing assembly.
Install small end (3) of boot (2) to inner socket boot mounting
groove.
L
M
N
O
P
AWGIA0107ZZ
Revision: November 2009
ST-35
2010 Maxima
STEERING GEAR AND LINKAGE
< DISASSEMBLY AND ASSEMBLY >
4. Install boot clamp to boot small end.
5. Install boot clamp to boot large end using Tool.
CAUTION:
Do not reuse boot clamps.
Tool number
: KV40107300 (
—
)
AST139
6.
Adjust inner socket to standard length (L), and then tighten lock
nut to the specified torque. Check length of inner socket (L)
again after tightening lock nut. Make sure that the length is the
standard.
Inner socket length (L)
: Refer to ST-39, "Steering
Gear"
CAUTION:
Adjust toe-in after this procedure. The length achieved after
toe-in adjustment is not necessarily the above value.
SGIA0167E
Revision: November 2009
ST-36
2010 Maxima
POWER STEERING OIL PUMP
< DISASSEMBLY AND ASSEMBLY >
POWER STEERING OIL PUMP
A
Disassembly and Assembly
INFOID:0000000005462695
The power steering oil pump and pulley is not serviceable and should be replaced as an assembly. For front
and rear bracket removal, refer to ST-29, "Exploded View".
B
C
D
E
F
ST
H
I
J
K
L
M
N
O
P
Revision: November 2009
ST-37
2010 Maxima
SERVICE DATA AND SPECIFICATIONS (SDS)
< SERVICE DATA AND SPECIFICATIONS (SDS)
SERVICE DATA AND SPECIFICATIONS (SDS)
SERVICE DATA AND SPECIFICATIONS (SDS)
Steering Wheel
INFOID:0000000005462696
Steering wheel axial end play
0 mm (0 in)
Steering wheel play
0 - 35 mm (0 - 1.38 in)
Steering wheel turning force
39 N (4 kg-f, 9 lb-f) or less
Steering Angle
INFOID:0000000005462697
Unit: Degee minute (Decimal Degree)
SGIA0055E
Tire size
Minimum
Inner wheel angle (A)
Outer wheel angle (B)
P245/45R18
P245/40R19
33° 30′ (33.5°)
33° 30′ (33.5°)
Nominal
36° 30′ (36.5°)
36° 30′ (36.5°)
Maximum
37° 30′ (37.5°)
37° 30′ (37.5°)
Nominal
31° 0′ (31.0°)
31° 0′ (31.0°)
Steering Column
INFOID:0000000005462698
STEERING COLUMN LENGTH
Unit: mm (in)
SGIA1177E
Steering column length (L)
Telescopic maximum
513 - 543 (20.20 - 21.38)
Telescopic minimum
503 - 513 (19.80 - 20.20)
STEERING COLUMN ROTATING TORQUE
Unit: N·m (kg-m, in-lb)
Rotating torque
0 - 0.25 (0 - 0.03, 0 - 2)
TILT MECHANISM OPERATING RANGE
Revision: November 2009
ST-38
2010 Maxima
SERVICE DATA AND SPECIFICATIONS (SDS)
< SERVICE DATA AND SPECIFICATIONS (SDS)
Unit: mm (in)
A
B
C
D
SGIA1179E
Tilt operating range
(L1)
2
Telescopic operating range (L )
Without electric motor
With electric motor
41 (1.61)
49.63 (1.95)
40 (1.57)
40 (1.57)
Steering Gear
E
INFOID:0000000005462699
F
STEERING OUTER SOCKET AND INNER SOCKET
Steering gear type
Swinging torque
Outer socket
0.1 - 2.9 N·m (0.01 - 0.29 kg-m, 1.0 - 25 in-lb)
• Measurement on spring balance
• Measuring point: cotter pin hole of stud
1.4 - 42.7 N (0.14 - 4.4 kg, 12 - 31 lb)
Rotating torque
0.3 - 2.9 N·m (0.03 - 0.29 kg-m, 3.0 - 25 in-lb)
Axial end play
0.5 mm (0.020 in) or less
Swinging torque
Inner socket
ST
PR26AF
H
I
0.1 - 7.8 N·m (0.01 - 0.79 kg-m, 1.0 - 69 in-lb)
• Measurement on spring balance
• Measuring point at * mark shown
0.8 - 64 N (0.082 - 6.5 kg, 0.18 - 14.4 lb)
Axial end play
J
0.2 mm (0.008 in) or less
Inner socket length (L)
119.5 mm (4.705 in) or less
K
L
M
SGIA0950E
RACK STROKE
N
O
P
Revision: November 2009
ST-39
2010 Maxima
SERVICE DATA AND SPECIFICATIONS (SDS)
< SERVICE DATA AND SPECIFICATIONS (SDS)
Steering gear model
Tire size
PR26AF
P245/45R18
Rack stroke in neutral position (L)
P245/40R19
69.5 mm (2.735 in)
AWGIA0003GB
RACK SLIDING FORCE
Tire size
P245/45R18
Rack sliding force
205 - 285 N (20.9 - 29.1 kg, 46.1 - 64.1 lb)
Oil Pump
Relief oil pressure
INFOID:0000000005462700
9,500 - 10,300 kPa (96.87 - 105.03 kg/cm2, 1,377.85 - 1,493.88 psi)
Steering Fluid
Fluid type and capacity
Revision: November 2009
P245/40R19
INFOID:0000000005462701
Refer to MA-18, "FOR NORTH AMERICA : Fluids and Lubricants".
ST-40
2010 Maxima