1
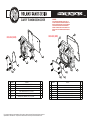
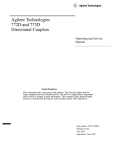
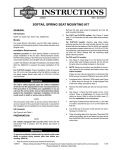
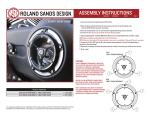
ASSEMBLY INSTRUCTIONS
0048-0913
CLARITY TRANSMISSION COVERS
6SPD
5SPD
REVISION A
11/8/12
PAGE 1
1. Turn off motorcycle, disconnect the battery, and place securely on a lift or sidestand.
2. 5spd models: Some Softail models require removal of the oil tank and frame backbone to allow installation
as well as the removal of the front starter bolt. Consult the HD service manual for specific instructions.
Once accesible disconnect the neutral switch and remove the factory transmission cover.
6spd models: Simply remove the factory cover.
CONTRAST CUT
3. Once the existing transmission cover is removed, clean all gasket/mounting surfaces
and wipe out all excess oil.
WARNING: DO NOT USE HARSH CHEMICALS SUCH AS BRAKE CLEANER OR ACETONE DURING CLEANING.
4. 5spd models: Remove the tranmission vent fitting/tube and the transmission neutral switch. These
components will be reused.
6spd models: Remove the transmission vent fitting/tube. This will be reused.
BLACK OPS FINISH
5spd
CHROME
6spd
5. Install the transmission vent fitting/tube into the RSD transmission cover using teflon tape or liquid
thread sealant. Clock the vent fitting to match the factory position.
Note: 2007 6spd models use a threaded vent fitting and 08-up 6spd models use a push-in rubber vent
tube.
6. 5spd models only: Install the neutral switch into the RSD transmission cover.
2007-LATER TWIN CAM MODELS (6SPD) including 06 DYNA MODELS
1987-2006 BIG TWIN MODELS (5SPD) except 06 DYNA MODELS
0203-2004
0203-2005
7. Install the RSD transmission cover onto the tranmission using the supplied gasket. Install bolts and
torque to 105 in-lbs.
Caution: On some exhasut systemts the Clarity Clutch Actuator can be very close to the exhaust. When
installing, please verify there is an adequate distance of at least 5/16” between the Clarity window and the
exhaust pipe to allow adequate air flow and cooling. Failure to verify the gap distance may result in
severe damage to the Clarity windows, window discoloration, and potential oil leakage.
Disclaimer: Roland Sands Design is not responsible for damage caused by improper installation.
For questions pertaining to the installation of this product, please contact the Performance Machine technical
department at 1-800-479-4037. This product is manufactured in the USA by Performance Machine LLC.
8. Reinstall any components that were removed for access and go for a ride.
0048-0913
CLARITY TRANSMISSION COVER
11/8/12
PAGE 2
WARNING:
CLARITY WINDOW IS PERMANENTLY INSTALLED AT THE
FACTORY AND SHOULD NOT BE REMOVED OR SERVICED. IF
REMOVAL IS NECESSARY CONTACT THE TECH DEPARTMENT
FOR SPECIAL SERVICE INSTRUCTIONS. PERFORMANCE
MACHINE THE MANUFACTURER IS NOT RESPONSIBLE FOR
DAMAGE TO THE CLARITY WINDOW CAUSED BY IMPROPER
SERVICE.
0203-2005 (5SPD)
0203-2004 (6SPD)
REVISION A
5
1
4
2
5
3
6
2
1
3
ITEM
NO.
1
2
3
PART NUMBER
4
0203-0009
GASKET 6 SPEED TRANS COVER, 07-09 ST, 07/09 FL, 06-09 DYNA
1
5
0203-0014
CLARITY 6 SPEED TRANS COVER, 07-09 ST, 07/09 FL, 06-09 DYNA
1
6
0203-0015
0101-9034-SS
0101-1008-CH
0177-1025
7
4
DESCRIPTION
SHCS LOW HEAD 8-32 X 1/2 W/ VIBRA-TITE
SHCS 1/4-20 X 3/4 CHROME
MOLDED O-RING, CLARITY 6 SPEED TRANS COVER
WINDOW, RSD CLARITY, 6 SPEED TRANNY, 07-12 ST, 07/12 FL, 06-12 DYNA
QTY.
4
6
1
1
For questions pertaining to the installation of this product, please contact the Performance Machine technical
department at 1-800-479-4037. This product is manufactured in the USA by Performance Machine LLC.
ITEM
NO.
PART NUMBER
1
2
3
4
5
6
7
0101-1012-CH
0101-1022-CH
0101-9034-SS
0177-1026
0203-0013
0203-0016
0203-0017
6
DESCRIPTION
SHCS 1/4-20 X 1 CHROME
SHCS 1/4-20 X 1-3/4, CHROME
SHCS LOW HEAD 8-32 X 1/2 W/ VIBRA-TITE
MOLDED O-RING, CLARITY 5 SPEED TRANS COVER
GASKET, RSD 5 SPEED TRANS COVER
COVER WINDOW, CLARITY 5 SPEED TRANS COVER
CLARITY 5 SPEED TRANS COVER, 00-06 FXST/FLST, 01-06 FLHT/FLHR/FLTR
Defau
lt/QT
Y.
4
1
4
1
1
1
1