1
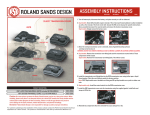
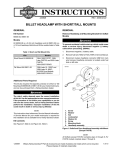
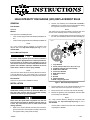
-J03833
REV. 2005-12-14
HIGH INTENSITY DISCHARGE (HID) REPLACEMENT BULB
2.
GENERAL
Part Number
68639-06
Remove the headlamp. See HEADLAMP ASSEMBLY;
REMOVAL for your model in the Service Manual. Unplug
the high beam connector from the headlamp.
NOTE
The rubber boot (4) and bulb assembly (6) will fall away from
the rear of the headlamp reflector in the following step.
Models
This replacement headlamp bulb fits:
•
FLHT models equipped with HID Headlamp Kit 68043-04,
and
•
FLHR models equipped with HID Headlamp Kit 68094-04
3.
See Figure 1. Remove the two screws (2) and clip (1) from
the rear of the headlamp reflector and lens assembly (3).
is00728
2
1
6
NOTE
3
Hg - Lamp Contains Mercury. Manage in accordance with
disposal laws. See: http://www.lamprecycle.org/ or call 1414-343-4056.
4
7
Service Manual Required
5
8
9
The rider's safety depends upon the correct installation
of this kit. Use the appropriate service manual procedures.
If the procedure is not within your capabilities or you do
not have the correct tools, have a Harley-Davidson dealer
perform the installation. Improper installation of this kit
could result in death or serious injury. (00333a)
10
1.
2.
3.
4.
5.
6.
7.
8.
9.
10.
NOTE
This instruction sheet references Service Manual information.
A Service Manual for your model motorcycle is required for
this installation and is available from a Harley-Davidson Dealer.
Kit Contents
There are no Service Parts available for this kit.
Figure 1. HID Headlamp Components
INSTALLATION
Handle bulb carefully and wear eye protection. Bulb contains gas under pressure, which, if not handled carefully,
could cause serious eye injury. (00062b)
Clip, HID boot
Screw, Phillips head, Hi-Lo, #6 x 5/16 in. (2)
Headlamp reflector and lens assembly
Rubber boot, HID bulb
Connector, HID bulb
Bulb, HID low beam
Gasket
Bracket
Gasket, HID bulb
Bulb, halogen high beam
4.
Pull the rubber boot (4) off of the bulb assembly (6), and
slide it down the wire to expose the connector (5).
5.
Disconnect the wire connector from the bulb assembly.
6.
Remove the gasket (7) from the old bulb, and set it aside
for assembly to the new bulb.
NOTE
Never touch the quartz bulb. Fingerprints will etch the
glass and decrease bulb life. Grab the bulb with paper or
a clean, dry cloth. Failure to do so could result in bulb
damage. (00210a)
1.
Refer to the Service Manual and follow the instructions
given to remove the maxi-fuse (later models) or disconnect
the negative battery cable (earlier models).
-J03833
Hg - Lamp Contains Mercury. Manage in accordance with
disposal laws. See: http://www.lamprecycle.org/ or call 1414-343-4056.
•
Use the plastic container and insert from the new bulb to
re-package the old bulb.
1 of 2
screws removed earlier to retain the rubber boot. Tighten
the screws to 6.5-8.5 in-lbs (9.0-11.5 Nm)
Never touch the quartz bulb. Fingerprints will etch the
glass and decrease bulb life. Grab the bulb with paper or
a clean, dry cloth. Failure to do so could result in bulb
damage. (00210a)
7.
Install the new bulb in the headlamp, using the gasket
removed earlier.
8.
Connect the wire connector to the bulb assembly.
9.
Slide the rubber boot back up to the bulb assembly (6),
and press it into place to cover the rear of the bulb
assembly.
10. Press the bulb up against the rear of the headlamp
reflector and lens assembly. Install the clip with the two
-J03833
NOTE
Install the headlamp with the H8 Halogen high-beam bulb (10)
toward the bottom, and the HID low-beam bulb toward the top.
11. Install the headlamp. See HEADLAMP ASSEMBLY;
INSTALLATION for your model in the Service Manual.
12. Refer to the Service Manual and follow the instructions
given to re-install the maxi-fuse (later models) or re-connect the negative battery cable (earlier models).
13. Test the headlamp for proper operation. Check the headlamp beam for proper alignment. See HEADLAMP
ADJUSTMENT in the Service Manual.
2 of 2