1
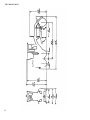
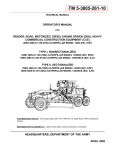
TM 5-3805-263-14&P-2
TECHNICAL MANUAL
UNIT, DIRECT AND GENERAL SUPPORT
MAINTENANCE MANUAL
FOR
GRADER, HEAVY, ROAD, MOTORIZED,
TYPE I NONSECTIONALIZED
NSN 3805-01-252-0128
TYPE II SECTIONALIZED
NSN 3805-01-251-8252
HEADQUARTERS, DEPARTMENT OF THE ARMY
APRIL 1989
TM 5-3805-263-14&P-2
TECHNICAL MANUAL
NO. 5-3805-263-14&P-2
HEADQUARTERS
DEPARTMENT OF THE ARMY
Washington, DC, 14 April 1989
UNIT, DIRECT AND GENERAL SUPPORT
MAINTENANCE MANUAL
FOR
GRADER, HEAVY, ROAD, MOTORIZED,
TYPE I NONSECTIONALIZED
NSN 3805-01-252-0128
TYPE II SECTIONALIZED
NSN 3805-01-251-8252
REPORTING OF ERRORS
You can help improve this manual if you find any mistakes or if you know of a way to
improve the procedures, please let us know. Mail your letter, DA Form 2028
(Recommended Changes to Publications and Blank Forms) or DA Form 2028-2 located
in the back of this manual direct to: Commander, US Army Tank Automotive
Command, ATTN: AMSTA-MB, Warren, MI 48397-5000. A reply will be furnished direct
to you.
TABLE OF CONTENTS
General Description and Specifications
PART ONE
Engine
Index . . . . . . . . . . . . . . . . . . . . . . . . . . . . . . . . . . . . . . . . . . . . . . . . . . . . . . . . . . . . . . . . . . . . . . . . . . . . . . . . . . . . . .
Chapter 1 Systems Operation - Testing and Adjusting . . . . . . . . . . . . . . . . . . . . . . . . . . . . . . . . . . . . . . . . . . . . . .
Chapter 2 Disassembly and assembly. . . . . . . . . . . . . . . . . . . . . . . . . . . . . . . . . . . . . . . . . . . . . . . . . . . . . . . . . . .
Chapter 3 Specifications . . . . . . . . . . . . . . . . . . . . . . . . . . . . . . . . . . . . . . . . . . . . . . . . . . . . . . . . . . . . . . . . . . . . .
PAGE
l-l
1-2
1-80
1-221
PART TWO
Power Train
Index . . . . . . . . . . . . . . . . . . . . . . . . . . . . . . . . . . . . . . . . . . . . . . . . . . . . . . . . . . . . . . . . . . . . . . . . . . . . . . . . . . . .
Chapter 1 Systems Operation - Testing and Adjusting . . . . . . . . . . . . . . . . . . . . . . . . . . . . . . . . . . . . . . . . . . . . . .
Chapter 2 Power Shift Transmission - Test and Adjust . . . . . . . . . . . . . . . . . . . . . . . . . . . . . . . . . . . . . . . . . . . . . .
Chapter 3 Disassembly and Reassembly . . . . . . . . . . . . . . . . . . . . . . . . . . . . . . . . . . . . . . . . . . . . . . . . . . . . . . . .
Chapter 4 Specifications . . . . . . . . . . . . . . . . . . . . . . . . . . . . . . . . . . . . . . . . . . . . . . . . . . . . . . . . . . . . . . . . . . . . .
2-1
2-2
2-32
2-40
2-124
This technical manual is an authentication of the manufacturers commercial literature
and does not conform with the format and content specified in AR 310-3, Military
Publications. This technical manual does, however, contain available information that
is essential to the operation and maintenance of the equipment
i
TM 5-3805-263-14&P-2
ii
TM 5-3805-263-14&P-2
TECHNICAL DATA VEHICLE CHARACTERISTICS
1. NAME: GRADER; ROAD, MOTORIZED. (INC. 05701)
2. WHEEL QUANTITY; 6
3. DRIVE WHEEL QUANTITY; 4
4. STEERABLE WHEEL QUANTITY; 2 FRONT WHEELS
5. FRONT WHEEL TYPE; LEANING
6. PRIMER MOVER TYPE; DIESEL ENGINE
7. ENGINE MANUFACTURER’S NAME; CATERPILLAR TRACTOR CO.
8. ENGINE MODEL NUMBER; MODEL NUMBER 3304DIT
9. BLADE OVERALL LENGTH-THE DIMENSION MEASURED ALONG THE LONGITUDIAL AXIS WITH TERMINATION
POINTS AT THE EXTREME ENDS OF THE ITEM; 12 FT
10. MINIMUM CLEARANCE BETWEEN CUTTING EDGE AND GROUND AT MAXIMUM BLADE ELEVATION; 17.25 IN.
11. BLADE MAXIMUM BANK CUTTING ANGLE IN DEGREES; 90° RIGHT OR LEFT
12. BLADE CONTROL METHOD; HYDRAULIC CONTROL
13. AUTOMATIC BLADE CONTROL; NOT INCLUDED
14. BLADE PULL RATING; 18,000 LBS AT 2 MPH ± 0.1 LB WITH A LIMIT OF 15% SLIPPAGE
15. STEERING CONTROL METHOD; HYDRAULIC
16. VEHICULAR TURN RADIUS; 24 FT
17. SPECIAL FEATURES; ROLL OVER PROTECTIVE STRUCTURE, SCARIFIERS, LIFTING ATTACHMENT, BLACKOUT
LIGHTS, FRONT AND REAR TOW PINS, CAB
18. MANUFACTURER’S MODEL NUMBER FOR THIS GRADER; 130G
iii
TM 5-3805-263-14&P2
INTRODUCTION
This publication has instructions and procedures for the subject on the front cover. The
information and specifications in this publication are on the basis of information that was
current at the time this issue was written.
Some photographs in this publication show
details that may be different from your
machine. Also, for some photographs, guards
or covers may have been removed for
illustrative purposes.
Correct operation, maintenance, test and repair
procedures will give this product a long service
life. Before starting a test, repair or rebuild job,
the serviceman must read the respective
chapters of the Service Manual, and know all
the components he will work on.
Your safety, and the safety of others is at all
times very important. When you see this symbol
in the manual, you must know that
caution is needed for the procedure next to it.
The symbol is a warning. To work safely, you
must understand the job you do. Read all instructions to know what is safe and what is
not safe.
It is very important to know the weight of
parts. Do not lift heavy parts by hand. Use a
hoist. Make sure heavy parts have good stability on the ground. A sudden fall can cause an
accident. When lifting part of a machine, make
sure the machine has blocks at front and rear.
Never let the machine hang on a hoist, put
blocks or stands under the weight.
When using a hoist, follow the recommendation in the manual. Use correct lift tools as
shown in illustrations to get the correct balance
of the component you lift. This makes your
work safer at all times.
The specifications, torques, pressures of operation, measurements, adjustments; and other
items can change at any time. These changes
can effect the service given to the product. Get
the complete and most current information
before you start any job.
When the words “use again” are in the
description, the specification given can be used
to determine if a part can be used again. If the
part is equal to or with in the specification
given, use the part again.
When the word “permissable” is in the description, the specification given is the “maximum
or minimum” tolerance permitted before adjustment, repair and/or new parts are needed.
A comparison can be made between the
measurements of a worn part, and the
specifications of a new part to find the amount
of wear. A part that is worn can be safe to use
if an estimate of the remainder of its service life
is good. If a short service life is expected,
replace the part.
WARRANTY STATEMENT
The Caterpillar 130 G Motor Grader is
warranted by Caterpillar Tractor Co. for
15 months or 1500 hours of operation,
whichever occurs first. The warranty starts
on the date found on the DA form 2408-9 in
the log book. Report all defects in material
or workmanship to your supervisor, ‘who will
take appropriate action through your
organizational maintenance shop.
iv
TM 5-3805-263-14&P-2
TABLE OF CONTENTS
PART ONE
ENGINE
Page
INDEX . . . . . . . . . . . . . . . . . . . . . . . . . . . . . . . . . . . . . . . . . . . . . . . . . . . . . . . . . . . . . . . . . . . . . . . . .
1-1
CHAPTER 1
SYSTEMS OPERATION
TESTING AND ADJUSTING . . . . . . . . . . . . . . . . . . . . . . . . . . . . . . . . . . . . . . . . . . . . . . . . . . .
1-2
CHAPTER 2
DISASSEMBLY AND ASSEMBLY. . . . . . . . . . . . . . . . . . . . . . . . . . . . . . . . . . . . . . . . . . . . . . . . . . 1-80
CHAPTER 3
SPECIFICATIONS . . . . . . . . . . . . . . . . . . . . . . . . . . . . . . . . . . . . . . . . . . . . . . . . . . . . . . . . . . . . . . . . 1-221
PART TWO
POWER TRAIN
INDEX . . . . . . . . . . . . . . . . . . . . . . . . . . . . . . . . . . . . . . . . . . . . . . . . . . . . . . . . . . . . . . . . . . . . . . . 2-1
CHAPTER 1
SYSTEMS OPERATION
TESTING AND ADJUSTING . . . . . . . . . . . . . . . . . . . . . . . . . . . . . . . . . . . . . . . . . . . . . . . . . . . .
CHAPTER 2
POWER SHIFT TRANSMISSION
TESTING AND ADJUSTING . . . . . . . . . . . . . . . . . . . . . . . . . . . . . . . . . . . . . . . . . . . . . . . . . . . . . . . . 2-32
CHAPTER 3
DISASSEMBLY AND ASSEMBLY. . . . . . . . . . . . . . . . . . . . . . . . . . . . . . . . . . . . . . . . . . . . . . . . . . . . 2-40
CHAPTER 4
SPECIFICATIONS . . . . . . . . . . . . . . . . . . . . . . . . . . . . . . . . . . . . . . . . . . . . . . . . . . . . . . . . . . . . . . . . 2-124
2-2
PART THREE
VEHICLE SYSTEMS
INDEX . . . . . . . . . . . . . . . . . . . . . . . . . . . . . . . . . . . . . . . . . . . . . . . . . . . . . . . . . . . . . . . . . . . . . . . . . . 3-1
3-2
CHAPTER 1
HYDRAULIC SYSTEM . . . . . . . . . . . . . . . . . . . . . . . . . . . . . . . . . . . . . . . . . . . . . . . . . . . . . . . . . . . . . .
CHAPTER 2
AIR SYSTEM . . . . . . . . . . . . . . . . . . . . . . . . . . . . . . . . . . . . . . . . . . . . . . . . . . . . . . . . . . . . . . . . . . . . . 3-108
CHAPTER 3
DISASSEMBLY AND ASSEMBLY . . . . . . . . . . . . . . . . . . . . . . . . . . . . . . . . . . . . . . . . . . . . . . . . . . . . 3-156
PART FOUR
OPERATORS STATION
INDEX . . . . . . . . . . . . . . . . . . . . . . . . . . . . . . . . . . . . . . . . . . . . . . . . . . . . . . . . . . . . . . . . . . . . . . . . . . 4-1
CHAPTER 1
OPERATORS STATION AND
ELECTRICAL SYSTEM . . . . . . . . . . . . . . . . . . . . . . . . . . . . . . . . . . . . . . . . . . . . . . . . . . . . . . . . . . . . . 4-2
CHAPTER 2
DISASSEMBLY AND ASSEMBLY . . . . . . . . . . . . . . . . . . . . . . . . . . . . . . . . . . . . . . . . . . . . . . . . . . . . 4-66
PART FIVE
MAINTENANCE
INDEX . . . . . . . . . . . . . . . . . . . . . . . . . . . . . . . . . . . . . . . . . . . . . . . . . . . . . . . . . . . . . . . . . . . . . . 5-1
v (vi Blank)
TM 5-3805-263-14&P-2
PART ONE
ENGINE
TORQUE SPECIFICATIONS: You will find instances in this publication where the
manufacturer has used “Meter-Kilograms” or “Centimeter-Kilograms” in place of
“Newton-Meters” for the metric torque. In these instances, use the following conversion factors to obtain the metric torque in “Newton-Meters.”
lb. ft. x 1.355819 = N•m
lb, in. x 0.1129848 = N•m
INDEX
Page
CHAPTER 1
SYSTEMS OPERATION
TESTING AND ADJUSTING. . . . . . . . . . . . . . . . . . . . . . . . . . . . . . . . . . 1-2
CHAPTER 2
DISASSEMBLY AND ASSEMBLY . . . . . . . . . . . . . . . . . . . . . . . . . . . . . 1-80
CHAPTER 3
SPECIFICATIONS . . . . . . . . . . . . . . . . . . . . . . . . . . . . . . . . . . . . . . . . . 1-221
1-1
TM 5-3805-263-14&P-2
CHAPTER 1
ENGINE
Systems Operation, Testing and Adjusting
INDEX
Page
SYSTEMS OPERATION
Air Inlet and Exhaust System . . . . . . . . . . . . . . . . . . . . . . . . . . . . . . . . . . . . . . . . . . . . . . . . . . . . . . .
Air Inlet and Exhaust System . . . . . . . . . . . . . . . . . . . . . . . . . . . . . . . . . . . . . . . . . . . . . . . . . . . . .
Timing Gears . . . . . . . . . . . . . . . . . . . . . . . . . . . . . . . . . . . . . . . . . . . . . . . . . . . . . . . . . . . . . . . . . .
Turbocharger . . . . . . . . . . . . . . . . . . . . . . . . . . . . . . . . . . . . . . . . . . . . . . . . . . . . . . . . . . . . . . . . . .
Valves and Valve Mechanism . . . . . . . . . . . . . . . . . . . . . . . . . . . . . . . . . . . . . . . . . . . . . . . . . . . . .
Cylinder Head and Valves . . . . . . . . . . . . . . . . . . . . . . . . . . . . . . . . . . . . . . . . . . . . . . . . . . . . . . . .
1-12
1-12
1-13
1-13
1-14
1-14
Basic Block . . . . . . . . . . . . . . . . . . . . . . . . . . . . . . . . . . . . . . . . . . . . . . . . . . . . . . . . . . . . . . . . . . . . . . 1-20
Crankshaft . . . . . . . . . . . . . . . . . . . . . . . . . . . . . . . . . . . . . . . . . . . . . . . . . . . . . . . . . . . . . . . . . . . . 1-20
Cylinder Block . . . . . . . . . . . . . . . . . . . . . . . . . . . . . . . . . . . . . . . . . . . . . . . . . . . . . . . . . . . . . . . . .
Pistons, Rings, and Connecting Rods . . . . . . . . . . . . . . . . . . . . . . . . . . . . . . . . . . . . . . . . . . . . . . . 1-20
Cooling System . . . . . . . . . . . . . . . . . . . . . . . . . . . . . . . . . . . . . . . . . . . . . . . . . . . . . . . . . . . . . . . . . . 1-18
Coolant for Air Compressor . . . . . . . . . . . . . . . . . . . . . . . . . . . . . . . . . . . . . . . . . . . . . . . . . . . . . . 1-19
Electrical System . . . . . . . . . . . . . . . . . . . . . . . . . . . . . . . . . . . . . . . . . . . . . . . . . . . . . . . . . . . . . . . . .
Charging System Components . . . . . . . . . . . . . . . . . . . . . . . . . . . . . . . . . . . . . . . . . . . . . . . . . . . .
Electrical System Schematic . . . . . . . . . . . . . . . . . . . . . . . . . . . . . . . . . . . . . . . . . . . . . . . . . . . . . .
Other Components . . . . . . . . . . . . . . . . . . . . . . . . . . . . . . . . . . . . . . . . . . . . . . . . . . . . . . . . . . . . .
Starting System Components . . . . . . . . . . . . . . . . . . . . . . . . . . . . . . . . . . . . . . . . . . . . . . . . . . . . .
1-21
1-21
1-24
1-23
1-22
Fuel System . . . . . . . . . . . . . . . . . . . . . . . . . . . . . . . . . . . . . . . . . . . . . . . . . . . . . . . . . . . . . . . . . . . . . .
Fuel Flow . . . . . . . . . . . . . . . . . . . . . . . . . . . . . . . . . . . . . . . . . . . . . . . . . . . . . . . . . . . . . . . . . . . . .
Fuel Injection Nozzle . . . . . . . . . . . . . . . . . . . . . . . . . . . . . . . . . . . . . . . . . . . . . . . . . . . . . . . . . . . .
Fuel Injection Nozzle . . . . . . . . . . . . . . . . . . . . . . . . . . . . . . . . . . . . . . . . . . . . . . . . . . . . . . . . . . . .
Fuel Transfer Pump . . . . . . . . . . . . . . . . . . . . . . . . . . . . . . . . . . . . . . . . . . . . . . . . . . . . . . . . . . . . .
Governor . . . . . . . . . . . . . . . . . . . . . . . . . . . . . . . . . . . . . . . . . . . . . . . . . . . . . . . . . . . . . . . . . . . . . .
Oil Flow for Fuel Pump and Governor . . . . . . . . . . . . . . . . . . . . . . . . . . . . . . . . . . . . . . . . . . . . .
1-6
1-6
1-7
1-6
1-8
1-9
l-8
Engine Design . . . . . . . . . . . . . . . . . . . . . . . . . . . . . . . . . . . . . . . . . . . . . . . . . . . . . . . . . . . . . . . . . . . .
1-5
Lubrication System . . . . . . . . . . . . . . . . . . . . . . . . . . . . . . . . . . . . . . . . . . . . . . . . . . . . . . . . . . . . . . . 1-15
Oil Flow In The Engine . . . . . . . . . . . . . . . . . . . . . . . . . . . . . . . . . . . . . . . . . . . . . . . . . . . . . . . . . . 1-16
Oil Flow Through The Oil Filter and Oil Cooler . . . . . . . . . . . . . . . . . . . . . . . . . . . . . . . . . . . . . 1-16
1-2
TM 5-3805-263-14&P-2
INDEX
Page
TESTING AND ADJUSTING
Air Inlet and Exhaust System
Compression
Crankcase (Crankshaft Compartment) Pressure
Cylinder Head
Measurement of Exhaust Temperatures
Measurement of Pressure in Inlet Manifold
Procedure for Measuring Camshaft Lobes
Restriction of Air Inlet and Exhaust
Turbocharger
Valve Clearance
1-57
1-59
1-58
1-59
1-58
1-57
1-61
1-57
1-58
1-60
Basic Block
Connecting Rod and Main Bearings
Connecting Rods and Pistons
Cylinder Block
Cylinder Liner Projection
Flywheel and Flywheel Housing
Oil Pump Installation
Piston Ring Grooves
1-70
1-70
1-70
1-71
1-70
1-71
1-74
1-70
Cooling System
Checking Coolant Temperature.
Checking Fan Speed
Checking Radiator Air Flow.
Filler Cap and Pressure Relief Valve
1-64
1-64
1-66
1-66
1-68
1-68
1-67
1-67
1-64
1-69
1-64
1-69
Testing Radiator and Cooling System For Leaks
Testing the Cooling System
V-Belt Tension `Chart
Visual Inspection of the Cooling System
Warning Light For Water Temperature
Water Temperature Regulators
Electrical System
Battery
Charging System
Starting System
1-75
1-75
1-75
1-77
Fuel System
Checking Engine Cylinders Separately
Checking Engine Timing With 6V3100 Diesel Engine
Timing Indicator Group
Checking the Plunger and Lifter of an Injection Pump
Checking Timing by Fuel Flow Method
Checking Timing by Timing Pin Method
Fuel Injection Lines
Fuel System Inspection
1-37
1-37
1-50
1-42
1-45
1-48
1-42
1-37
1-3
TM 5-3805-263-14&P-2
INDEX
1-4
Page
Governor Adjustments . . . . . . . . . . . . . . . . . . . . . . . . . . . . . . . . . . . . . . . . . . . . . . . . . . . . . . . . . .
Locating Top Center Compression Position
for No. 1 Piston . . . . . . . . . . . . . . . . . . . . . . . . . . . . . . . . . . . . . . . . . . . . . . . . . . . . . . . . . . . . . .
Measuring Engine Speed . . . . . . . . . . . . . . . . . . . . . . . . . . . . . . . . . . . . . . . . . . . . . . . . . . . . . . . . .
Rack Setting procedure . . . . . . . . . . . . . . . . . . . . . . . . . . . . . . . . . . . . . . . . . . . . . . . . . . . . . . . . . .
Removal and Installation of Fuel Injection Pumps . . . . . . . . . . . . . . . . . . . . . . . . . . . . . . . . . . .
Testing 8N7005 Fuel Injection Nozzles . . . . . . . . . . . . . . . . . . . . . . . . . . . . . . . . . . . . . . . . . . . . .
1-45
1-53
1-51
1-42
1-38
Lubrication System . . . . . . . . . . . . . . . . . . . . . . . . . . . . . . . . . . . . . . . . . . . . . . . . . . . . . . . . . . . . . . .
Oil Pressure . . . . . . . . . . . . . . . . . . . . . . . . . . . . . . . . . . . . . . . . . . . . . . . . . . . . . . . . . . . . . . . . . .
Oil Pressure is Low . . . . . . . . . . . . . . . . . . . . . . . . . . . . . . . . . . . . . . . . . . . . . . . . . . . . . . . . . . . . .
Too Much Bearing Wear . . . . . . . . . . . . . . . . . . . . . . . . . . . . . . . . . . . . . . . . . . . . . . . . . . . . . . . . .
Too Much Oil Consumption . . . . . . . . . . . . . . . . . . . . . . . . . . . . . . . . . . . . . . . . . . . . . . . . . . . . . .
1-62
1-63
1-62
1-63
1-62
Troubleshooting . . . . . . . . . . . . . . . . . . . . . . . . . . . . . . . . . . . . . . . . . . . . . . . . . . . . . . . . . . . . . . . . .
1-25
1-55
SYSTEMS OPERATION
GENERAL INFORMATION
TM 5-3805-263-14&P-2
ENGINE DESIGN
4.75 in. (120.7 mm)
Bore ..................................................................
6.0 in. (152.4 mm)
Stroke ................................................................
...................................................................
4
Number of Cylindera
Cylinder Arrangement . . . . . . . . . . . . . . . . . . . . . . . . . . . . . . . . . . . . . . . . . . . . . . . . . . *in-line
Firing Order (Injection Sequence) . . . . . . . . . . . . . . . . . . . . . . . . . . . . . . . . . . . . . . . 1,3,4,2
Direction of Flotation
(when seen from flywheel end). . . . . . . . . . . . . . . . . . . . . . . . . . . . . . . . . Counterclockwise
*No. 1 Cylinder Is Opposite Flywheel End.
1-5
FUEL SYSTEM
SYSTEMS OPERATION
TM 5-3805-263-14&P-2
FUEL SYSTEM
FUEL FLOW
Fuel is pulled from fuel tank (1) through primary
fuel filter (7) and check valves (8) by fuel transfer
pump (9). From the fuel transfer pump the fuel is
pushed through secondary fuel filter (10) and to the
fuel manifold in fuel injection pump housing (12). A
bypass valve in the fuel transfer pump keeps the fuel
pressure in the system at 170 to 280 kPa (25 to 40
psi). Constant bleed valve (11) lets a constant flow of
fuel go through fuel return line (2) back to fuel tank
(1). The constant bleed valve returns approximately
34 liters (9 gal.) per hour of fuel and air to the fuel
tank. This helps keep the fuel cool and free of air.
There is also a manual bleed valve that can be used
when the fuel priming pump is used to remove air
from the system. Fuel injection pump (6) gets fuel
from the fuel manifold and pushes fuel at very high
pressure through fuel line (5) to fuel injection nozzle
(4). The fuel injection nozzle has very small holes in
1-6
the tip that change the flow of fuel to a very fine
spray that gives good fuel combustion in thecylinder.
FUEL INJECTION PUMP
The fuel injection pump increases the pressure of
the fuel and sends an exact amount of fuel to the fuel
injection nozzle. There is one fuel injection pump for
each cylinder in the engine.
The fuel injection pump is moved by cam (14) of
the fuel pump camshaft. When the camshaft turns,
the cam raises lifter (11) and pump plunger (6) to the
top of the stroke. The pump plunger always makes a
full stroke. As the camshaft turns farther, spring (8)
returns the pump plunger and lifter to the bottom of
the stroke.
FUEL SYSTEM
When the pump plunger is at the bottom of the
stroke, fuel at transfer pump pressure goes into inlet
passage (2), around pump barrel (4) and to bypass
closed port (5). Fuel fills the area above the pump
plunger.
After the pump plunger begins the up stroke, fuel
will be pushed out the bypass closed port until the top
of the pump plunger closes the port. As the pump
plunger travels farther up, the pressure of the fuel
increases. At approximately 690 kPa (100 psi),
check valve (1) opens and lets fuel flow into the fuel
injection line to the fuel injection nozzle. When the
pump plunger travels farther up, scroll (9) uncovers
spill Port (10). The fuel above the pump plunger goes
through slot (7), along the edge of scroll (9) and out
spill port (10) back to fuel manifold (3). This is the
end of the injection stroke. The pump plunger can
have more travel up, but no more fuel will be sent to
the fuel injection nozzle.
SYSTEMS OPERATION
TM 5-3805-263-14&P-2
scroll (9) changes the distance the pump plunger
pushes fuel between bypass closed port (5) and spill
port (10) opening. The longer the distance from the
top of the pump plunger to the point where scroll (9)
uncovers spill port (10), the more fuel will be
injected.
To stop the engine, the pump plunger is rotated so
that slot (7) on the pump plunger is in line with spill
port (10). The fuel will now go out the spill port and
not to the injection nozzle.
FUEL INJECTION NOZZLE
The fuel injection nozzle goes through the cylinder
head into the combustion chamber. The fuel injection pump sends fuel with high pressure to the fuel
injection nozzle where the fuel is made into a fine
spray for good combustion.
Seal (2) goes against the cylinder head and prevents leakage of compression from the cylinder. Carbon dam (1) keeps carbon out of the bore in the
cylinder head for the nozzle.
When the pump plunger travels down and uncovers bypass closed port (5), fuel begins to fill the
area above the pump plunger again, and the pump is
ready to begin another stroke.
The amount of fuel the injection pump sends to the
injection nozzle is changed by the rotation of the
Pump plunger. Gear (13) is attached to the pump
plunger and is in mesh with fuel rack (12). The
governor moves the fuel rack according to the fuel
needs of the engine. When the governor moves the
fuel rack, and the fuel rack turns the pump plunger,
Fuel with high pressure from the fuel injection
pump goes into inlet passage (5). Fuel then goes
through filter screen (4) and into passage (9) to the
area below diameter (8) of valve (7). When the pressure of the fuel that pushes against diameter (8)
becomes greater than the force of spring (3), valve
(7) lifts up. When valve (7) lifts, the tip of the valve
comes off of the nozzle seat and the fuel will go
through the nine 0.20 mm (.008 in.) orifices (6) into
the combustion chamber.
The injection of fuel continues until the pressure of
fuel against diameter (8) becomes less than the force
of spring (3). With less pressure against diameter
(8). spring (3) pushes valve (7) against the nozzle
seat and stops the flow of fuel to the combustion
chamber.
1-7
FUEL SYSTEM
TM 5-3805-263-14&P-2
The 8N7005 Fuel Injection Nozzle can not be
disassembled and no adjustments can be made.
FUEL TRANSFER PUMP
SYSTEMS OPERATION
The fuel transfer pump is a two-piston pump that
is moved by a cam (eccentric) on the camshaft for the
fuel injection pump. The transfer pump is located on
the right side of the fuel injection pump housing.
When the camshaft turns, the cam lifts push rod
(10) up. The push rod lifts large piston (9), push
plate (6) and small piston (3). As the pistons move
up, inlet check valve (5) and outlet check valve (8)
close. Pumping check valve (7) in the large piston
opens and fuel goes through the holes in the bottom
of the large piston and fills the passages and chamber
between the bottom of the large piston and outlet
check valve (8). As small piston (3) moves up, the
pressure of the fuel above the piston increases and
flows out of the pump through outlet (4).
As the camshaft continues to turn, the cam lowers
push rod (10) down. Pumping spring (2) pushes
small piston (3), push plate (6) and large piston (9)
down. When the piston moves down, inlet check valve
(5) and outlet check valve (8) open. Pumping check
valve (7) in the large piston closes and the pressure of
the fuel below the check valve increases. Fuel now
flows through the outlet check valve. A part of the
fuel goes through outlet (4) and the remainder goes
to the area above small piston (3).
As the large piston moves down, fuel from the fuel
tank is pulled through inlet check valve (5) into the
area between the large and small piston. The pump is
now ready to start a new cycle.
Bypass valve (1) controls the outlet pressure of the
fuel. If the fuel pressure goes beyond 170 to 280 kPa
(25 to 40 psi), the bypass valve opens and fuel flows
to the inlet of the pump.
OIL FLOW FOR FUEL PUMP AND GOVERNOR
Oil from the side of the cylinder block goes to
support (9) and into the bottom of front governor
housing (4). The flow of oil now goes in three different directions.
A part of the oil goes to the rear camshaft bearing
in fuel pump housing (5). The bearing has a groove
around the inside diameter. Oil goes through the
groove and into the oil passage in the bearing surface
(journal) of camshaft (7). A drilled passage through
the center of the camshaft gives oil to the front
camshaft bearing and to the thrust face of the camshaft drive gear. Drain hole (6) in the front of ‘fuel
pump housing (5) keeps the level of the oil in the
housing even with the center of the camshaft. The oil
returns to the oil pan through the timing gear
housing.
1-8
FUEL SYSTEM
SYSTEMS OPERATION
TM 5-3805-263-14&P-2
Oil also goes from the bottom of the front governor
housing through a passage to the fuel pump housing
and to governor servo (2). The governor servo gives
hydraulic assistance to move the fuel rack.
Oil from the governor returns to the oil pan
through a hole in the bottom of the front governor
housing and through passages in the support and
cylinder block.
The remainder of the oil goes through passages
to the rear of rear governor housing (3) and into the
compartment for the governor controls. Drain hole
(8) keeps the oil at the correct level. The oil in this
compartment is used for lubrication of the governor control components and the oil is the supply
for the dashpot.
GOVERNOR
The internal parts of the governor are lubricated
by oil leakage from the servo and the oil is thrown by
parts in rotation. The flyweight carrier thrust bearing gets oil from the passage at the rear of the
camshaft.
The governor controls the amount of fuel needed
by the engine to maintain a desired rpm.
The governor flyweights (8) are driven directly by
the fuel pump camshaft. Riser (10) is moved by
flyweights (8) and governor spring (1). Lever (7)
connects the riser with sleeve (2) which is fastened to
valve (3). Valve (3) is a part of governor servo (5) and
moves piston (4) and fuel rack (6). The fuel rack
moves toward the front of the fuel pump housing (to
the right in the illustration) when moved in the
FUEL OFF direction.
1-9