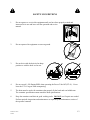
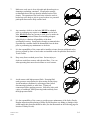
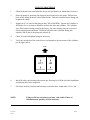
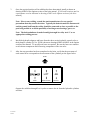
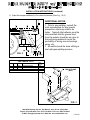
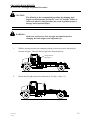
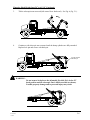
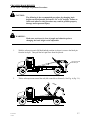
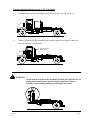
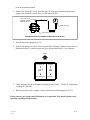
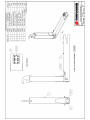
1
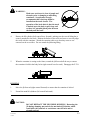
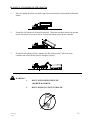
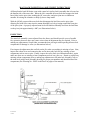
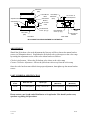
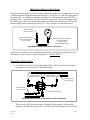
Model SL-412 Parts and Operations Manual Hoist Serial Number: ____________________ SWAPLOADER U.S.A., LTD. 1800 N.E. BROADWAY AVENUE DES MOINES, IA 50313 WARRANTY REGISTRATION CARD Model_______________________ Serial No.____________________ MOUNTED ON VEHICLE: Manufacturer ______________________________________________ Model ____________________________________________________ Year ____________________________________________________ Wheel Base ______________________________________________ Chassis Serial #______________________________________________ DISTRIBUTOR: PTO Type ______________________________________________ PTO Ratio ______________________________________________ Name (print) ________________________________________________ Address ________________________________________________ City, State, Zip ________________________________________________ The unit has been checked and serviced according to the Pre-delivery inspection report. The proper mechanical operation of the unit as described in the written operational instructions provided by SwapLoader U.S.A., Ltd. has been discussed with the customer. ____________________________________ Customer Name (please print) Date Installed_______________________ ____________________________________ Address (please print) Date Inspected______________________ ____________________________________ City, State, Zip (please print) ____________________________________ Customer Phone Number (required) ____________________________________ Customer Signature __________________________________ Distributor Signature Type of Application SwapLoader hoist will be used in: Waste Industry Landscaping Public Works Construction Tree/Nursery General Construction Recycling Roofing Other__________________________ 2007OCT30 PREDELIVERY CHECK LIST SWAPLOADER ALL MODEL HOIST INSTALLATION Conducted by: Date: Dealer: Customer: I. COMPONENT INFORMATION Hoist Serial No.: Truck Chassis: Identification No.: GVW: Distance from rear of cab to the Center Line of Rear Axle/Tandem (CA/CT): Distance From Center Line of Rear Axle/Tandem to Rear of Hoist (AF): II. PTO: Make: Model: Serial No.: % of Engine RPM: Hyd. Pump: Make: Model: Serial No.: INSTALLATION TO CHASSIS Were there any problems installing the hoist to the truck chassis? YES NO If yes, please describe All bolts checked for proper tightness. Please include photos of the hoist installed on the truck chassis. Be sure to include at least one photo from each side. III. CONTROLS Controls easy to reach from driver's seat. Movement of controls correct per installation instructions. ALL-MODEL.PRE 06/2006 PAGE 1 PREDELIVERY CHECK LIST SWAPLOADER ALL MODEL HOIST INSTALLATION IV. HYDRAULICS INSTALLATION Correct hydraulic oil level in reservoir Check for leaks Any abnormal noise during operation: YES If yes, explain: NO WITH ENGINE OPERATING @ 1000 RPM, RECORD THE FOLLOWING INFORMATION: Cycle time for dump mode: Up Sec. Down Sec. Cycle time for load/unload mode: Unload Sec. Load Sec. Filter pressure PSI. Main pressure, controls in neutral PSI. Main relief pressure when extending jib cylinder (bottomed out)___________PSI. Main relief pressure when extending lift cylinders (bottomed out)___________PSI. NOTE: Connect pressure gauge to fitting provided on inlet section of Hyd. Control Valve (Ref. Pt. No. 10P37 fitting on Hyd. Pump Circuit Drawing found in the Parts List section of the Hoist Operations Manual). V. OPERATION Jib operates freely in both directions. Jib cannot be extended or retracted when raised in dump position or when pivot joint is tilted in unload position. Both safety hooks are fully engaged when jib is extended. Parts and operators manual in cab. Lubricate sliding jib and all grease zerks per installation instructions. VI. DECALS All safety decals and product decals installed per enclosed decal drawing (found attached to the inside of the hoist operations manual cover or at the back of the Parts List section of the hoist operations manual). ADDITIONAL COMMENTS: SEND COMPLETED FORM TO: SWAPLOADER U.S.A., LTD. 1800 N.E. BROADWAY AVENUE DES MOINES, IOWA 50313-2644 RETAIN ONE COPY FOR YOUR FILE. ALL-MODEL.PRE 06/2006 PAGE 2 TABLE OF CONTENTS I. INTRODUCTION V. Letter to Customer Warranty Statement Safety Suggestions II. III. Adjustable Jib Base Hoist Assembly Fixed Jib Base Hoist Assembly Mainframe Subassembly Adjustable Jib Assembly Fixed Jib Assembly Rear Pivot Subassembly Telescopic Jib Subassembly Mast Lock (Safety Latch) Assembly Hoist Installation Kit Assembly Manual Control Assembly, 2 Section Hyd. Sub-Ass’y – Base Cylinder Circuit Hyd. Sub-Ass’y – Chassis-Tank Circuit Hydraulic Sub-Assembly – Pump Circuit Decal Assembly INSTALLATION Initial Inspection Hoist Installation Controls Installation Hydraulic Tank Installation P.T.O. Selection Pump Installation Start Up Procedure 400 Series Subframe Dimensions 300 Series Subframe Dimensions Stabilizer Installation (Optional) Accessory Installation Bumper Assembly Bumper Assembly, w/ Extension Bumper Assembly, Folding Bumper Assembly, Drop Down Cab Guard Assembly Fender Assembly, Tandem Axle Rear Light Bar Assembly Roller & Roller Mount Toolbox Assembly PARTS LIST VI. OPTIONS Air Shift Control Assembly, 2 Section Air Circuit, 2 Section Manual Control Assembly, 3-Section Air Shift Control Assembly, 3-Section Air Circuit, 3-Section Stabilizer Final Assembly Stabilizer Sub-Assembly Hyd. Sub-Assembly – Stabilizer Circuit OPERATION Loading a Container Dumping a Container Placing a Container on the Ground Operating the Stabilizer Changing Hook Heights Adjustable Jib (Optional) IV. MAINTENANCE Weekly Service (50 Operations) Monthly Service (200 Operations) Yearly Service Lubrication Diagram Hydraulic Oil Specifications Hydraulic Filter Interchange General Maintenance Parts List Replacement Bearing List Mast Lock (Safety Latch) Inspection & Adjustment Instructions Pressure Check Instructions SL-412 Rev. 11//2014 INTRODUCTION SWAPLOADER U.S.A., LTD. TO THE CUSTOMER Your new SwapLoader Hoist was carefully designed and manufactured to give years of dependable service. To keep it operating efficiently, read the instructions in this manual thoroughly. It contains detailed descriptions and instructions for the efficient operation and maintenance of your SwapLoader. Each section is clearly identified so you can easily find the information that you need. Read the Table of Contents to learn where each section is located. All instructions are recommended procedures only. Throughout this manual you will come across "Dangers," "Warnings," or "Cautions" which will be carried out in bold type and preceded by the symbol as indicated to the left. Be certain to carefully read the message that follows to avoid the possibility of personal injury or machine damage. Record your SwapLoader Hoist serial number in the appropriate space provided on the title page. Your SwapLoader dealer needs this information to give you prompt, efficient service when you order parts. It pays to rely on an authorized SwapLoader Distributor for your service needs. For the location of the Distributor nearest you, contact SwapLoader. NOTE: INTRODUCTION 09/2009 It is SwapLoader's policy to constantly strive to improve SwapLoader products. The information, specifications, and illustrations in this publication are based on the information in effect at the time of approval for printing and publishing. SwapLoader therefore reserves the right to make changes in design and improvements whenever it is believed the efficiency of the unit will be improved without incurring any obligations to incorporate such improvements in any unit which has been shipped or is in service. It is recommended that users contact an authorized SwapLoader Distributor for the latest revisions. 1-1 SWAPLOADER, U.S.A., LTD. 1800 N.E. BROADWAY, DES MOINES, IOWA 50313 LIMITED WARRANTY STATEMENT Effective September 1, 2009 SwapLoader U.S.A., Ltd., (SwapLoader), warrants to the original purchaser of any new SwapLoader product sold by an authorized SwapLoader distributor or service center, that such products are free of defects in material and workmanship. All SwapLoader products with an original factory invoice date of September 1, 2009 or later qualify for warranty as defined in this Limited Warranty Statement. Repair or replacement of parts on SwapLoader products are covered under warranty for forty-eight (48) months from date of Retail Sale by an authorized SwapLoader Distributor or service center, subject to any applicable federal, state or local taxes, and not to extend beyond sixty (60) months from the original factory invoice date. SwapLoader will, at its discretion, either repair the defective parts or replace them with equivalent parts, subject to the conditions below. Labor charges authorized by the SwapLoader Warranty Department are covered under warranty for a period of twelve (12) months from the date of Retail Sale by an authorized SwapLoader Distributor or service center, and not to extend beyond twenty-four (24) months labor from the original factory invoice date. Warranty Registration Card must be returned within 15 days of Retail Sale of SwapLoader hoist to SwapLoader, Des Moines, Iowa. If unit has not been registered, then the warranty start date will revert to the original factory invoice date. Warranty Registration is the ultimate responsibility of the owner and may be accomplished by the completion and return of the product registration form included in the SwapLoader hoist manual. If the owner is not sure that product registration is completed, then SwapLoader encourages them to contact us at 888-767-8000 to confirm. Defective parts must be reported to SwapLoader within 30 days of discovery on a SwapLoader warranty claim report form. A Return Goods Authorization (RGA) number must be issued to the claiming party prior to the return of any defective part to be considered for warranty. Warranty service must be performed by a distributor or service center authorized by SwapLoader to sell and/or service SwapLoader products, which will use only new or remanufactured parts or components furnished by SwapLoader U.S.A., Ltd. SwapLoader will invoice the distributor or authorized service center for the replacement parts and freight. Upon completion of the repair any defective parts to be returned for warranty consideration must be returned freight prepaid with a copy of the SwapLoader issued RGA form and a copy of the completed warranty claim report form. Upon evaluation of the returned parts, once warranty is approved, credit will be issued to the appropriate account for the approved warranty costs which may include parts, labor, and/or freight. The warranty covers only defective material and workmanship. It does not cover depreciation or damage caused by normal wear and tear, accident, mishap, untrained operators, or improper or unintended use. The owner has the obligation of performing routine care and maintenance duties as stated in SwapLoader’s written instructions, recommendations, and specifications. Any damage resulting from owner/ operator failure to perform such duties shall void the coverage of this warranty. The cost of labor and supplies associated with routine maintenance will be paid by the owner. In no event will SwapLoader, the SwapLoader distributor or any company affiliated with SwapLoader be liable for business interruptions, costs of delay, or for any special, indirect, incidental or consequential costs or damages. Such costs may include, but are not limited to loss of time, loss of revenue, loss of use, wages, salaries, commissions, lodging, meals, towing, hydraulic fluid, travel, mileage, or any other incidental costs. SwapLoader is not responsible for the removal or replacement of accessories (fenders, toolbox, etc.). Warranty shall not apply if the equipment is operated at capacities in excess of factory recommendations. Warranty is expressly void if the seal on the main relief control valve has been broken. SwapLoader will ship the replacement part by the most economical, yet expedient means possible. Expedited freight delivery will be at the expense of the owner. Warranty is expressly void if serial number plate or stamping is tampered with. IT IS EXPRESSLY UNDERSTOOD AND AGREED THAT THERE ARE NO WARRANTIES MADE BY THE MANUFACTURER OR ITS AGENTS, REPRESENTATIVES OR DISTRIBUTORS, EITHER EXPRESSED, IMPLIED, OR IMPLIED BY LAW, EXCEPT THOSE EXPRESSLY STATED ABOVE IN THIS STANDARD LIMITED WARRANTY AGAINST DEFECTS IN MATERIAL AND WORKMANSHIP. THE MANUFACTURER AND ITS AGENTS, REPRESENTATIVES AND DISTRIBUTORS SPECIFICALLY DISCLAIM ANY IMPLIED WARRANTY OR MERCHANTABILITY OR FITNESS FOR ANY PARTICULAR PURPOSE. SWL Warranty 083109 INTRODUCTION 09/2009 1-2 SAFETY SUGGESTIONS 1. Do not operate or service this equipment until you have been properly trained and instructed in its use and have read the operation and service manual. 2. Do not operate this equipment on uneven ground. 3. Do not drive with the hoist in the dump position or with the hook to the rear. 4. Do not exceed 1,500 Engine RPM when operating the Power Take Off (P.T.O.). Never leave the P.T.O. in gear while transporting. 5. The hoist must be used with containers that properly fit the hook and rear holddowns. The container specifications must match the hoist specifications. 6. Keep the containers and hoist in good working order. DO NOT use if repairs are needed. Perform periodic inspections and maintenance as required by the maintenance section of the operator's manual. INTRODUCTION 09/2009 1-3 7. Make sure work area is clear of people and obstacles prior to dumping or unloading containers. SwapLoader strongly recommends that a back up alarm be installed on the truck chassis. The operation of the hook hoist is that the truck is backed up to the body to pick it up and so there is a potential pinch point between the body and the hook. 8. Any container, which is on the hoist, MUST be unloaded prior to performing any repairs or maintenance to the hoist. Also, DO NOT allow any person to work on or be under the hoist in a raised position without first installing adequate safety blocks to eliminate all possibility of the hoist accidentally lowering. SwapLoader strongly recommends that if possible the container should be dismounted from the hoist prior to performing any maintenance to the hoist. 9. It is the responsibility of the owner and/or installer to insure that any additional safety devices required by state or local codes are installed on the SwapLoader Hoist and/or Truck Chassis. 10. Keep away from overhead power lines. Serious injury or death can result from contact with electrical lines. Use care when operating hoist near electrical lines to avoid contact. 11. Avoid contact with high-pressure fluids. Escaping fluid under pressure can penetrate the skin causing serious injury. Avoid hazardous conditions by relieving pressure before disconnecting hydraulic or other lines. Tighten all connections before applying pressure. Search for leaks with a piece of cardboard, while protecting hands and body from the high-pressure fluids. 12. It is the responsibility of the owner to provide proper maintenance of the Safety Decals. Regular inspection and replacing of Safety Decals that have any fading or damage which would impair their function should be done (See the illustration on the following page for location of Safety Decals). INTRODUCTION 09/2009 1-4 ITEM 1 2 3 4 5 6 7 8 9 QTY 2 2 ONE ONE 2 ONE ONE ONE ONE P/N 90P07 90P08 90P09 90P10 90P11 90P13 90P18 90P52 90P78 DESCRIPTION OPERATION & SERVICE MANUAL HOIST-BODY SPECIFICATIONS HYDRAULIC OIL SPECIFICATIONS HYDRAULIC OIL FLAMMABLE HOIST FALLING SAFETY INSTRUCTIONS RELIEF VALVE PROP DECAL HIGH-PRESSURE FLUID The following is a list of all the Swaploader Safety Decals, and their part numbers. Please use when reordering replacement decals. WARNING Do not operate or sevice this equipment until you have been properly trained and instructed in its use and have read the operation and service manual. 90P07 – OPERATIONS & SERVICE MANUAL ADVERTENCIA Este equipo no debe ser operado ni puesto en servicio hasta que el operador haya sido entrenado e instruido apropiadamente en su uso y haya leído el manual de operación y servicio. 90P 07 INTRODUCTION 09/2009 1-5 CAUTION This hoist MUST BE used with containers that properly fit the front hook and rear holddowns. The container specifications MUST MATCH hoist specifications. NON-COMPLIANCE COULD RESULT IN DAMAGE TO EQUIPMENT AND/OR INJURY TO PERSONS. COMPLIANCE IS THE OPERATOR/OWNER'S RESPONSIBILITY. 90P08 – HOIST-BODY SPECIFICATIONS CUIDADO Este Gancho de Levante DEBE SER usado con contenedores que se ajusten apropiadamente al gancho y al sistema de enganche posterior. Las especificaciones del contenedor DEBEN COINCIDIR con las especificaciones del Gancho de Levante. ~ EL NO CUMPLIMIENTO PUEDE OCASIONAR DANOS EN EL EQUIPO Y / O LESIONES PERSONALES. EL CUMPLIMIENTO DE ESTA Y TODAS LAS NORMAS DE SEGURIDAD ES RESPONSABILIDAD DEL OPERADOR / PROPIETARIO. 90P08 HYDRAULIC OIL SPECIFICATION Refer to the maintenance section of the operation and service manual for hydraulic oil specifications. 90P09 – HYDRAULIC OIL SPECIFICATIONS Referirse al sección de mantenimiento en el manual de operación y servicio para especificaciónes del aceite hidráulico. 90P09 DANGER 90P10 – HYDRAULIC OIL FLAMMABLE PELIGRO 90P10 DANGER Do not go under raised hoist! IT MAY DROP AND KILL YOU 90P11 – HOIST FALLING PELIGRO 90P1 1 SWAPLOADER SAFETY INSTRUCTIONS 1. 2. 3. 4. 5. 6. 90P13 – SWAPLOADER SAFETY INSTRUCTIONS Do not operat e or service t his equipment unt il you have been properly t rained and instructed in its use and have read the operat ion and service manual. Do not operat e this equipment on uneven ground. Do not drive with the cont ainer in a dump posit ion or with the hook to the rear. Do not exceed 1,500 engine R.P. M. when operating t he P ower Take Off (P.T.O.). Never leave the P.T.O. in gear while t ransporting. The hoist must be used with containers that properly fit the hook and rear holddowns. The container specifications must match t he hoist specificat ions. Keep the containers and hoist in good working order. DO NOT use if repairs are needed. Perform periodic inspect ions and maint enace as required by the maintenance sect ion of the operator's manual. 7. Make sure work area is clear of people and obstacles prior to dumping or unloading containers. AV OID OVERHEAD POWER LINES as cont act can result in serious injury or death. 8. DO NOT allow any person to work on or be under t he hoist in a raised position wit hout first installing ade quate safet y blocks to eliminate all possibility of the hoist accidently lowering. 9. It is t he responsibility of the owner and/or installer to investigate and insure compliance with any additional saf ety specif ications as may be required by st ate or local codes. INSTRUCCIONER DE SEGURIDAD 1. Este equipo no debe ser operado ni puesto en servicio hasta que el operador haya sido entrenado e inst ruido apropiadament e en su uso y haya leído el manual de operación y servicio. 2. No operar el equipo en terreno desnivelado. 3. No conducir el vehículo con el contenedor en posición de volt eo o con el contenedor en posición de levant e. 4. No exceder 1500 Revoluciones P or Minuto (R.P.M.) en el motor cuando se opere la Toma de Fuerza (P.T.O.). Nunca dejar la Toma de Fuerza (P.T.O.) engranada durante el transporte. 5. El Gancho de Levante debe ser usado con contenedores que se ajusten apropiadamente al gancho y al sistema de enganche posterior. Las especificaciones del contenedor deben coincidir con las especificaciones del Gancho de Levant e. 6. Mantener los contenedores y G ancho de Levant e en buenas condiciones de trabajo. NO USA R si se necesit an reparaciones. Realizar inspecciones periódicas y mantenimiento cuando se requiera de acuerdo con la sección de mantenimiento en el manual de operación. 7. Asegurarse que en el área de trabajo no haya personas ni obstáculos antes de volt ear o descargar los contenedores. EV ITAR LÍNEA S ELÉCTRICAS AÉ REAS ya que el contacto con ellas puede causar lesiones graves o incluso la muerte. 8. NO PERMITIR el acceso de trabajadores sobre o bajo el Gancho de Levante cuando esté levantado sin antes instala r los elementos de seguridad necesarios para eliminar cualquier posibilidad de que el Gancho de Levant e accidentalment e se caiga. 9. Es responsabilidad del propietario y/ o del usuario investigar y asegurar el cumplimiento de cualquie r especificación o regulación de seguridad adicional local. 90P13 IMPORTANT NOTICE Do not tamper with the main hydraulic relief valve setting. Warranty is expressly voided if seal has been broken! 90P18 – RELIEF VALVE AVISO IMPORTANTE No forzar la válvula principal de alivio hidráulico. La garantía se pierde si el sello está roto! ! 90P18 INTRODUCTION 09/2009 1-6 Hoist Prop Operation 90P52 – PROP DECAL (OPTIONAL) WARNING 90P78 – HIGH-PRESSURE FLUID Avoid contact with high-pressure fluids. Escaping fluid under pressure can penetrate the skin causing serious injury. SEEK MEDICAL ATTENTION IMMEDIATELY! ADVERTENCIA Evitar el contacto con fluidos a alta presión. El fluido lanzado 90P78 INTRODUCTION 09/2009 1-7 INSTALLATION INITIAL INSPECTION When the SwapLoader hoist is received from the factory, you should inspect the hoist for damage, which may have occurred in shipment. If damage has occurred, you should contact the shipper immediately. Be sure to note any damage or missing items on bill of Lading. You should then check the hoist to insure you have received all the parts as indicated by the Packing List and the Ship Loose Box List. If you have any problems, shortages, or questions, please contact SwapLoader U.S.A., Ltd. immediately. GENERAL INSTALLATION PROCEDURE The installation of the SwapLoader on a truck chassis will generally follow these steps: 1. Install hoist assembly onto truck chassis. 2. Mount the hydraulic control valve to the hoist and install the hydraulic plumbing from the control valve to the hydraulic cylinders. Then install the control levers in the cab and route the control cables or air lines to the hydraulic control value assembly. 3. Install the hydraulic tank, hydraulic filter, and hydraulic plumbing between the hydraulic tank and the control valve assembly. 4. Select and install the P.T.O. on the truck transmission. (Note: This can be done prior to hoist installation on the truck chassis.) 5. Install the hydraulic pump and the plumbing from the pump to the hydraulic tank and control valve assembly. 6. Fill the hydraulic tank with oil, bleed the air from the pump suction line, and start up the unit. Although SwapLoader attempts to include the mounts and attaching fasteners with each hoist unit, your particular installation may require some additional mounts or modifications. If you have problems with your installation, please contact SwapLoader at 1-888-767-8000, as we may be aware of another customer who has installed a SwapLoader on a similar truck chassis. SL-412.INS 09/2014 2-1 HOIST INSTALLATION TO TRUCK CHASSIS 1. Place the SL-412 hoist assembly on the truck chassis. The truck chassis mounting surface should be flat without any steps or protrusions. If necessary shim bars need to be added to ensure a flat surface on which to support hoist. The truck chassis should meet the following minimum specifications (See Figures A): RBM for each frame channel: 2,000,000 in.-lb. Total RBM: 4,000,000 in.-lb. Minimum clear frame rail for mounting: 169" (See Fig. A) Front Axle Cap: 12,000 lb. (Min) Total Rear Axle Capacity: 34,000 lb. (Min) CA Dim: 102” to 114” (114” preferred) Figure A Note: The above specifications are a minimum requirement. It is the responsibility of the owner/operator to ensure the completed chassis meets or exceeds all federal, state, and local regulations. Also, the hoist should not be used to lift and haul any load that exceeds the load rating of any of the individual components of the completed chassis (tires, axles, suspension, etc.) The clear frame dimension indicated in the picture above allows for the overall length of the hoist plus 5 inches for cab clearance and rear light bar mounting. Extra frame length may be needed to allow for mounting additional accessories (e.g. Cab Guard, Tarper, Light Kit, Stabilizer, etc.). For example, when mounting a light kit on a truck with a long CA, check that the hoist and the light kit are positioned far enough back to eliminate any interference between the fender and the light kit. You should also consider the final weight distribution with regard to the bridge code when positioning the hoist. SL-412.INS 09/2014 2-2 2. The SL-412 features chassis mount brackets (Pt. No. 88H21) that bolt to the mainframe of the hoist and the chassis of the truck. Figure B Bolt the mount brackets to the side of the hoist as indicated in Figure B. Adjust locations as necessary to miss chassis suspension, brackets etc. When positioning the brackets allow for mounting the control valve assembly and the hydraulic tank. You should consult the truck chassis supplier for any limitations regarding drilling mount holes in the truck chassis frame rails. Typically, the holes must be at least 2 ¾” from the top of the truck chassis rails (Reference figure C). Once the locations of the mount brackets have been determined, use the mount brackets as a template for marking the mounting holes in the truck chassis frame rails. Drill the 21/32 diameter holes required and attach the brackets to the truck chassis with the 5/8inch diameter bolts, washers, and locking hex nuts provided. Torque to 220 ft.lbs. Bolt the mount brackets to the hoist mainframe as indicated on Figures C thru E. You may need to modify the mount brackets or add shim plates to allow for variances in the width of the truck chassis as well as to allow for top rivets, stepped channels, etc. Figure C SL-412.INS 09/2014 2-3 SL-412.INS 09/2014 2-4 CONTROLS INSTALLATION - MANUAL 1. Attach the valve mount bracket (Pt. No. 41H01) to the mainframe as indicated on Dwg. No. 90H57 with the fasteners provided (See Drawing 43H97). 2. Mount the hydraulic control valve assembly (Pt. No. 20P88) to the valve mount bracket as shown on Drawing No. 90H57 with the fasteners provided. 3. Install the hydraulic adapters, connect the hydraulic tubing (Pt. No. 13P11), and connect the hydraulic hose assemblies (Pt. Nos. 11P98 and 11P99) to the control valve assembly as indicated on Drawing No. 91H13. The clamp assemblies that are provided in the Loose Parts Box should support the tubing (See Drawing 43H31). 4. Determine the best location in the cab for the control levers (Pt. No. 20P08). The location should be such that the controls can be easily reached while operating the truck. A control lever console (Pt. No. 20P09) is provided to facilitate the mounting of the control levers. 5. Assemble and install the control lever console (See diagram below). Typically the console is fastened to the floor of the cab and the control cables are routed through additional holes drilled in the floor. Your particular installation may require that additional brackets be fabricated or other modifications made. SL-412.INS 09/2014 2-5 SL-412 91H-18 SL-412.INS 09/2014 2-6 SL-412.INS 09/2014 2-7 2 HOIST CONTROL 5 (TYP) 3 JIB CONTROL 2 (TYP) 4 1 6 24 (REF) HYD TANK (REF) 90H57 ~ REV A SL-330/400/406/412 MANUAL CONTROL ASS'Y - 2 SECTION 6. Attach the control cables to the control levers and route the cable through the holes in the cab. Install the control levers in the console. Levers should be installed such that when the levers are pushed forward the control cable is extended. See Drawing No. 90H57 (Manual Control Assembly) for control lever orientation. 7. Route the cables to the control valve location and attach them to the control valve with the bonnet connection kits provided (Pt. No. 20P10). See the following instruction sheet for installation procedures. The control cables supplied are 96 inches long. Your particular mounting may require different length control cables, which can be purchased locally or through Swaploader. Take proper care when routing the control cables, as a good cable path is essential for a proper operating system. Keep bends in the cable path to a minimum and be as generous as possible. Under no circumstances should any bend be tighter than an 8" radius. Protect the cable from heat above 225 degrees F. and avoid hot areas such as exhaust pipes, etc. Protect the cable from physical damages such as pinching or crushing, and do not use cable supports, which may crush or deform the cable. Allow room for flexing where the cable is attached to moving parts of the equipment, so that the cable is neither kinked nor stretched. SL-412.INS 09/2014 2-8 INSTALLATION PROCEDURE FOR A HYDRAULIC CONTROL CABLE TO HYDRAULIC VALVE WITH BONNET CONNECTION KIT 1. Turn .750-16 UNF Jam Nut entire length of Threaded Hub back over the Cable. Place Flange onto Sleeve. 2. Turn Flange/Sleeve Assembly entire length of Threaded Hub back over the Cable. 3. Turn .250-28 UNF Jam Nut onto Threaded Rod until it bottoms. 4. Turn Terminal Eye onto Treaded Rod until it bottoms against Jam Nut. (Minor adjustments may be necessary to align Terminal Eye with spool yoke.) 5. Slide the Terminal Eye into yoke on spool and align the holes. Insert Clevis Pin through yoke and Terminal Eye holes. Install Retaining Ring into groove between Terminal Eye and one side of the Yoke. 6. Now, with the Cable attached to the valve and control head, turn the Flange/Sleeve Assemble back onto the Threaded Hub until it is flush with the valve face. When turning on the Flange/Sleeve Assembly, make sure that the control head remains in neutral. 7. Thread the .750-16 UNF Jam Nut back over Threaded Hub and tighten against the Sleeve to lock in position. 8. Bring Flange into position on bolt assembly to valve housing. NOTE: FOR WORK SECTION NEXT TO INLET COVER, USE SPACER KIT. RETURN NUT SCREW NUT BACK ALIGN HOLES AND INSERT PIN FACE OF VALVE SCREW FLANGE SLEEVE BACK SCREW FLANGE SLEEVE FLUSH WITH FACE OF VALVE VALVE BODY SCREW TERMINAL EYE BOLT FLANGE TO VALVE BODY SCREW NUT ON ROD SL-412.INS 09/2014 2-9 CONTROLS INSTALLATION - AIR SHIFT (OPTION) 1. Attach the valve mount bracket (Pt. No. 41H01) to the mainframe as indicated on Drawing No. 90H58 with the fasteners provided (See Drawing 43H31). 2. Mount the hydraulic control valve assembly (Pt. No. 20P88) to the valve mount bracket as shown on Drawing No. 90H58 with the fasteners provided. Attach the airshift kits (Pt. No. 20P95) to the hydraulic control valve. Reference installation instructions included with the airshift kits. 3. Install the hydraulic adapters and connect the hydraulic hose assemblies (Pt. Nos. 11P98 and 11P99) and the hydraulic tubing (Pt. No. 13P11) to the control valve assembly as indicated on Drawing No. 91H13. The clamp assemblies that are provided in the Loose Parts Box should support the tubing (See Drawing 43H31). 4. Determine the best location in the cab for the control handle assembly (Pt. No. 20P72). The location should be such that the controls can be easily reached while operating the truck. A control handle console (Pt. No. 51H27) is provided to facilitate the mounting of the control handles (See diagram below). 5. Install the air fittings and hose as shown on Drawing No. 90H60 (Air Circuit, Control Valve). An air pressure protection valve (Pt. No. 20P74) is provided so you can tap into the truck’s air supply without jeopardizing the integrity of the air system. The air hose is provided in bulk length, which you can cut to length as required for running the air lines. Take care in routing the air lines and avoid hot areas such as exhaust pipes, etc. SL-412.INS 09/2014 2-10 SL-412.INS 09/2014 2-11 7 (TYP) 4 JIB CONTROL 2 1/4-18 NPTF PORT AIR SUPPLY 5 HOIST CONTROL 2 1 3 6 1 90H58 ~ REV C SL-330/400/406/412 AIR CONTROL ASS'Y - 2 SECTION 3 SL-412.INS 09/2014 2-12 AIR PRESS PROTECTION VALVE (20P74) (REF) 1/4 O.D. NYLON TUBE, BLACK BRASS ADP, PUSH-ON TUBE/ MP SVL 90° (-4-2) LEAVE EXHAUST PORT OPEN AIR SUPPLY 1/4-18 NPTF PORT BRASS ADP, PUSH-ON TUBE/MP (-4-4) 1/4 O.D. NYLON TUBE, BLACK BRASS ADP, PUSH-ON TUBE/MP (-4-2) HYD ADP, MP/FMP (-4-2) BRASS ADP, PUSH-ON TUBE/MP (-4-2) CONTROL HANDLE ASS'Y 2 SECTION AIR (20P72) (REF) HYD CONTROL VALVE ASS'Y (20P88) (REF) W/ AIR SHIFT KITS (20P95) (REF) 90H60 ~ REV A SL-330/400/406/412 HYD ADP, MP/FMP (-4-2) BRASS ADP, PUSH-ON TUBE/ MP SVL 90° (-4-2) HYDRAULIC TANK INSTALLATION 1. Select a location to mount the hydraulic tank. Reference Figure F or Drawing No. 90H57 for the suggested location of the hydraulic tank to the rear of the control valve assembly on the left-hand side of the truck. The hydraulic hoses have been sized for the tank to be mounted in this general area. The tank can be located on the right-hand side or behind the cab, if necessary, which means longer hoses may be required. 3. Drill four (4) holes for 5/8-inch diameter bolts (provided) in the mount angle of the hydraulic tank (two per angle) and the frame rails of the truck chassis. Mount the hydraulic tank and install the hydraulic filter. Install the hydraulic return hose and the hose barb fitting between the filter and the control valve assembly as shown on Drawing No. 91H13. The hose length can be shortened if necessary. Secure the hose to the barb fittings with the hose clamps provided. Figure F SL-412.INS 09/2014 2-13 P.T.O. SELECTION The next step is to select and install a direct drive type P.T.O. to the transmission. Please contact your local truck equipment representative for the correct unit sized on the following criteria: P.T.O. Torque Rating: 200 ft.-lbs. (See Note 1) Power at 1500 RPM: 57 H.P. (See Note 1) Mount Flange (For Driveline Installation) SAE B 4 Bolt Hydraulic Pump Keyed Shaft Specifications: 7/8-13T 16/32 DP Hydraulic Pump Rotation: L.H. or R.H. Available (See Note 2). NOTE 1: P.T.O. torque and power requirements are based on the unit operating at main relief pressure. Normal operating pressure will be less. NOTE 2: P.T.O. output rotation will need to be R.H. (clockwise) as viewed looking at output flange of P.T.O. for a L.H. Pump. NOTE 3: Do not operate pump at speeds over 1500 R.P.M. NOTE 4: Always disengage the P.T.O. after each operating cycle. SL-412.INS 09/2014 2-14 HOW TO IDENTIFY WHAT PUMP IS NEEDED The optional SwapLoader factory supplied pump is a bushing style gear pump, because of the pressure requirements of the SwapLoader hooklift hoist. By design the bushing style pumps are single rotation (rotation specific). Most manual transmission applications require a CCW (left hand rotation) pump. For most automatic transmission applications a CW (right hand rotation) pump is needed; call SwapLoader for price and availability. NOTE: Consult the PTO supplier whenever uncertain about the correct pump rotation for a particular application. The table below lists the SwapLoader part number for both left and right hand rotation pumps for the SL-412 hoist model: MODEL L.H. Rotation Pump (manual) R.H. Rotation Pump (automatic) SL-412 20P87 21P03 HOW TO IDENTIFY PUMP ROTATION To better understand the effects of pump rotation we must consider the path that oil takes through the pump. Oil enters the pump through the inlet (suction) port, travels around the outside of the gears, and is forced out through the outlet (exhaust) port. Oil enters and exits the pump in the direction of its rotation. OPPOSITE ENGINE ROTATION (PTO) VIEW PUMP VIEW FROM FRONT OF VEHICLE ENGINE ROTATION (PTO) OPPOSITE ENGINE ROTATION (PTO) VIEW FROM REAR OF VEHICLE BELLY DOWN ENGINE ROTATION (PTO) Determine pump rotation by positioning the pump belly side down (see illustration above). Looking at the rear of the pump if the suction (largest) port is to the left side, then the pump is a CCW or left hand rotation. If the suction (largest) port is on the right side, then the pump is CW or right hand rotation. PUMP INSTALLATION SL-412.INS 09/2014 2-15 1. Install the hydraulic pump to the P.T.O. (Bolts are not provided). 2. Install the hydraulic fittings into ports on the hydraulic pump as shown on Drawing No. 91H04. 3. Connect the suction hose assembly to the hydraulic tank (1 1/2" I.D. hose) and route to the hydraulic pump in as short and straight line as possible. Be sure to route the hose clear of exhaust components and of the drive shaft. Extra hose is provided so the hose can be shortened to an appropriate length. Install the hose on the hose barb fittings at the tank and at the pump and secure with the hose clamps provided. NOTE: Prior to startup, this hose must be filled with oil. 4. The pressure hose the hydraulic pump to the control valve assembly is not supplied with the hoist as it must be made to the proper length. This hose must be purchased from a local hydraulic hose assembly supplier per the following specifications: Hose I.D.: Working Pressure: Hose Fitting Threads: 5. SL-412.INS 09/2014 3/4 inch 3500 PSI SAE 37° (JIC) 1 1/16-12 Install the pressure hose as indicated. Tie up the pressure and suction hoses as necessary. Again, be sure the hoses are routed to avoid exhaust components and to stay clear of the drive shaft. 2-16 SL-412.INS 09/2014 2-17 4 5 HYD CONTROL VALVE (REF) SUPPLIED BY CUSTOMER 2 HYD PUMP (REF) 1 3 5 6 7 TANK STRAINER (REF) (21P16) 91H04 SL-330/400/406/412 HYD TANK (REF) (20P86) START UP PROCEDURE 1. Fill the hydraulic tank with hydraulic oil (see oil specification in Maintenance Section.) 2. Prime the pump by loosening the clamp on the suction hose at the pump. Pull the hose back off the fitting till the air is bled from the line. Push the hose back on the fitting and retighten the clamp. 3. Engage the P.T.O. and run the pump at idle (700 to 900 RPM). Operate the cylinders at full stroke five to ten times to bleed the air from the lines and cylinders. The cylinders were filled with oil during testing at the factory, but some seepage may have occurred during shipping and installation. Refill the hydraulic tank, if needed, during this sequence and do not let the pump run without oil. 4. Check for leaks and tighten fittings as necessary. 5. Verify the movement of the control levers corresponds to the movement of the cylinders per the figure below. FRONT LOWER/LOAD EXTEND LIFT JIB RAISE/UNLOAD RETRACT 6. Install all safety decals and product decals per Drawing No. 43H98 after final installation and painting have been completed. 7. Fill out pre-delivery checklist and warranty card and mail to SwapLoader U.S.A., Ltd. NOTE: SL-412.INS 09/2014 Failure to fill out and return warranty card within 15 days of installation may possibly void the warranty. 2-18 CAUTION: The SwapLoader hoist must be used with bodies or containers that properly fit the front hook and the rear hold-downs (See figure S288). If possible, pick up one of the containers that will actually be used with the SwapLoader hoist and verify the following: - Outside dimensions of the long sills match the guiding rollers on the hoist. - The front hook dimensions are correct for the hoist. - The rear hold-downs of the container latch into the hold-downs on the hoist. - Check for any interference between the container and any part of the hoist (i.e.: Hydraulic tank, hydraulic tubing or hose, hydraulic valve, etc.) When the SL-412 hoist is equipped with a standard 61-3/4” fixed jib see subframe Drawing No. S-936, otherwise when equipped with the optional 61-3/4” to 53-7/8” adjustable dual height jib see subframe Drawing No.’s S-936 or S-935. SL-412.INS 09/2014 2-19 SL-412.INS 09/2014 2-20 SL-412.INS 09/2014 2-21 STABILIZER INSTALLATION (OPTION) 1. The hoist installation for a unit with the stabilizer option is much the same as that for the standard unit except that a three section hydraulic control valve is used. (See Drawing No. 90H68 for Manual Control or Drawing No. 90H69 for Air Controls for the correct installation and plumbing diagrams for a hoist with three control circuits in the Option section of the Parts List pages of the manual). 2. The following diagram gives the approximate position of the stabilizer roller from the top of the truck chassis frame rail with the mounts as provided by SwapLoader. When extended down, the roller should touch the ground only when the vehicle is loading a heavy container. Therefore, with the truck empty, leave 2 to 3 inches of clearance between the ground and the roller. Also, you will need to check that when the roller is up in the transport position it does not interfere with any part of the rear axle, rear suspension, or brake components. If some interference will occur, you may slant the stabilizer mounting back from the vertical position until you leave sufficient clearance. This can be achieved by cutting the truck chassis frame rails off at an angle before installing the stabilizer mounts. Do not slant the mounting more than eight degrees (about a 14:2 pitch). SL-412.INS 09/2014 2-22 3. Once the required position of the stabilizer has been determined, install as shown on drawing 42H62 in the Options section of the hoist manual. [Field weld locations and size requirements are also indicated on drawing 42H62 in the Options section of the hoist manual.] Note: Prior to any welding, consult the truck manufacturer for any special precautions that may need to be taken. Typically the batteries must be disconnected and the ground lead from the welder should be connected as close as possible to the part being welded to avoid the possibility of arching across bearings, gears, etc. Note: The hoist mainframe is made from high strength low alloy steel. Use an appropriate welding process. 4. Install the hydraulic adapters and hoses from the three section hydraulic control valve to the hydraulic cylinder (Pt. No. 21P84) shown on drawings 42H62 & 90H83 in the Option section of the manual. Tie up all loose hoses as required. Be sure the hoses are routed to avoid exhaust components and all moving components of the rear axles. 5. After the start procedure has been completed on the hoist, verify that the movement of each control lever corresponds to the movement of the cylinders per the figure below. FRONT LOWER RAISE LOWER/LOAD EXTEND LIFT JIB RAISE/UNLOAD RETRACT Operate the stabilizer through 5 to 8 cycles to remove the air from the hydraulic cylinders and lines. SL-412.INS 09/2014 2-23 REAR BUMPER ASSEMBLY (52H11) INSTALLATION INSTRUCTIONS 1. Review all directions and diagrams provided before starting bumper installation. 2. Trim truck frame to indicated dimensions (See Fig. 1). These dimensions will facilitate the mounting of the rear light assembly if it is also being mounted. 3. Measure the distance from the top of the truck frame to the ground (NOTE: This should be performed on a level surface). Based on this measurement and the dimensions in Fig. 1, the vertical channel [P/N: 63H94] may need to be modified in length to meet the Office of Motor Carrier Safety (OMCS) regulations. Regulation 393.86 requires that no bumper be located more than 30” off the ground when the truck is empty, and the end of the bumper should not be located more than 24” from the extreme rear of the vehicle, including truck bodies (See Fig. 2). Once the length has been determined for the vertical channels, weld them to the bottom of the truck frame (See additional notes on next page). 4. Center the bumper weldment [P/N: 52H12] on the vertical channels [P/N: 63H94]. Position rear of bumper from rear of the hoist as indicated by the bumper location chart. This is crucial in order to ensure that the container longsills do not contact the bumper during the dump cycle (See Fig. 1 & 2). BUMPER LOCATION CHART DIM B. (Max) DIM. A SL-180 SL-105 FIG. 1 SL-220/222 SL-145 SL-2418 & SL-185 & SL-240 SL-406 & SL-330 & SL-400 SL-412 SL-650 SL-505/545 24 5/8” 13 1/2 15 3/4 15 1/4 17 14 1/4 14 13 1/2 16 1/2 22 5/8” 12 1/4 14 1/2 14 15 3/4 13 12 3/4 12 15 20 5/8” 11 13 12 3/4 14 1/4 11 3/4 18 5/8” 9 3/4 11 3/4 11 1/2 All Figures are for Illustration Purposes Only 02/08/11 18 REAR BUMPER ASSEMBLY (52H11) INSTALLATION INSTRUCTIONS (continued) 5. Weld the bumper weldment to the vertical channels (See Fig. 1 & 3). ADDITIONAL NOTES: 1. Prior to any welding, consult the truck manufacture for any special precautions that may need to be taken. Typically the batteries must be disconnected and the ground lead from the welder should be as close to the part being welded to avoid the possibility of arcing across bearings, gears, etc. 2. All welds should be done utilizing a low hydrogen welding process. MATERIAL LIST ITEM QTY P/N 1 2 1 2 52H12 63H94 WT lb. PER EA. 95.66 9.58 114.82 2 DESCRIPTION REAR BUMPER WDMT VERTICAL CHANNEL TOTAL TRUCK FRAME (REF) 2 1 FIG. 2 1800 NE Broadway Avenue, Des Moines, Iowa, U.S.A. 50313-2644 Phone: (515) 266-3042 Fax: (515) 313-4426 Toll Free: (888) 767-8000 E-Mail: [email protected] Web Site: www.swaploader.com FIG. 3 02/08/11 REAR BUMPER ASS’Y w/ EXTENSIONS (52H11 with 52H13 Extensions) INSTALLATION INSTRUCTIONS 1. Review all directions and diagrams provided before starting bumper installation. 2. Trim truck frame to indicated dimensions (See Fig. 1). These dimensions will facilitate the mounting of the rear light assembly if it is also being mounted. 3. Measure the distance from the bottom of the truck frame to the ground (NOTE: This should be performed on a level surface). Based this measurement and the dimensions in Fig. 1, the vertical channel [P/N: 63H94] may need to be modified in length to meet the Office of Motor Carrier Safety (OMCS) regulations. Regulation 393.86 requires that no bumper be located more than 30” off the ground when the truck is empty, and the end of the bumper should not be located more than 24” from the extreme rear of the vehicle, including truck bodies (See Fig. 2). Once the length has been determined for the vertical channels, weld them to the truck frame (See additional notes on next page). 4. Center the bumper weldment [P/N: 52H12] with factory installed extensions [P/N: 52H13] on the vertical channels [P/N: 63H94]. Position rear of bumper from rear of the hoist as indicated by the bumper location chart. This is crucial in order to ensure that the container longsills do not contact the bumper during the dump cycle (See Fig. 1 & 2). BUMPER LOCATION CHART DIM B. (Max) DIM. A FIG. 1 SL-105 SL-145 SL-180 & SL-185 SL-220/222 & SL-240 SL-2418 SL-330 & SL-400 24 5/8” 19 3/4 22 1/2 21 3/4 25 1/4 21 3/4 21 1/2 * 22 5/8” 18 1/2 21 20 1/2 23 3/4 20 1/2 20 * 20 5/8” 17 1/4 19 1/2 19 1/4 22 1/4 19 1/4 18 5/8” 16 18 1/4 18 SL-412 21 1/4 * 19 ¾ * SL-406 & SL-505/545 SL-650 24 1/4 * 27 22 3/4 * * Dimensions assume 6” tall longsills. For 8” tall longsills add 2 ¼” to the dimension shown. All Figures are for Illustration Purposes Only 11/24/14 REAR BUMPER ASS’Y w/ EXTENSIONS (52H11 with 52H13 Extensions) INSTALLATION INSTRUCTIONS (continued) 5. Weld the bumper weldment to the vertical channels (See Fig. 1 & 3). ADDITIONAL NOTES: 1. Prior to any welding, consult the truck manufacture for any special precautions that may need to be taken. Typically the batteries must be disconnected and the ground lead from the welder should be as close to the part being welded to avoid the possibility of arcing across bearings, gears, etc. 2. All welds should be done utilizing a low hydrogen welding process. FIG. 2 MATERIAL LIST ITEM QTY P/N DESCRIPTION 1 2 3 1 2 1 52H12 63H94 52H13 REAR BUMPER WDMT VERTICAL CHANNEL REAR BUMPER EXTENSIONS TOTAL WT lb. PER EA. 95.66 9.58 58.42 173.24 TRUCK FRAME (REF) 2 1 3 FIG. 3 1800 NE Broadway Avenue, Des Moines, Iowa, U.S.A. 50313-2644 Phone: (515) 266-3042 Fax: (515) 313-4426 Toll Free: (888) 767-8000 E-Mail: [email protected] Web Site: www.swaploader.com 11/24/14 FENDER ASSEMBLY, TANDEM AXLE Steel (11H14) INSTALLATION INSTRUCTIONS 1. Review all directions and diagrams provided before starting fender installation. 2. Center fender above tire using block to maintain the proper height. Fender should be approximately 6” above tire to allow for suspension movement (See Fig. 1). A maximum width of 48” from center of the truck to the outside edge of the fender should be maintained (See Fig. 2). 3. Place fender bracket weldments [Part No. 10H74] on fender. Position the brackets to avoid any mounting obstacles on hoist and/or truck chassis. Approximately 6” 48” MAX HOIST MAINFRAME (REF) TRUCK FRAME (REF) TIRE (REF) TRUCK FIG. 1 FIG. 2 All Figures are for Illustration Purposes Only 10/05/09 FENDER ASSEMBLY, TANDEM AXLE Steel (11H14) INSTALLATION INSTRUCTIONS (continued) 4. Mark mounting holes through the fender bracket weldment onto the fender. Remove the bracket and drill 7/16” dia. Holes in fender (See FIG. 3). 5. Attach fender bracket weldments to fender using fasteners provided. 6. Weld mounting plates [Part No. 21H37] to fender tubes [Part No. 21H61]. 7. Position fender tubes with mount plates on hoist mainframe; align with fender bracket weldments. (NOTE: Fender tube length may need to be modified to fit specific application.) MATERIAL LIST 8. Weld fender tubes to hoist mainframe. If attaching the fender tubes to the truck chassis, an additional mount plate may need to be fabricated so the assembly can be bolted to the truck chassis. 9. Attach fender bracket weldment [Part No. 10H74] to mounting plate [Part No. 21H37] using fasteners provided (See FIG. 3). ITE M QTY P/N DESCRIPTION 1 6 10H74 FENDER BRACKET WDMT. 8.05 2 6 21H37 MOUNTING PLATE 1.09 3 6 21H42 RUBBER SPACER .85 4 6 21H61 FENDER TUBE 5 48 00P34 3/8-16 UNC LOCKING NUT .02 .05 1.26 6 72 00771 3/8 DIA. FLAT WASHER 7 24 00P78 3/8 DIA. NYLON WASHER - 8 24 00P44 3/8-16 UNC X 1-1/2 HHCS .07 9 16 01P21 3/8-16 UNC X 2-1/2 HHCS .09 10 8 00P99 3/8-16 UNC x 4 HHCS 11 2 90P36 FENDER, STEEL TANDEM .11 TOTAL 4 6 WT lb. PER EA. 77.00 228.86 2 5 5 1 HOIST MAINFRAME (REF) 6 3 8 ADDITIONAL NOTE: Prior to any welding, consult the truck manufacturer for any special precautions that may need to be taken. Typically the batteries must be disconnected and the ground lead from the welder should be as close to the part being welded to avoid the possibility of arcing across bearings, gears, etc. 5 7 6 6 TRUCK (REF) 9 2X4 SPACER 7 6 10 4 @ 6” CENTERS 11 7/16 DIA. HOLE 1800 NE Broadway Avenue, Des Moines, Iowa, U.S.A. 50313-2644 Phone: (515) 266-3042 • Fax: (515) 313-4426 • Toll Free: (888) 767-8000 E-Mail: [email protected] • Web Site: www.swaploader.com 11/02/99 REAR LIGHT BAR ASSEMBLY (LED-LB) 1/5/15 REAR LIGHT BAR ASSEMBLY (LED-LB) INSTALLATION INSTRUCTIONS 1. Review all directions and diagrams provided before starting rear light bar installation. 2. Trim truck frame to indicated dimensions (See Fig. 1). This step may have already been preformed if a bumper was previously installed. 3. Position center plate [Part No. 63H08] on the rear of the main frame. Weld center plate to truck frame (See Fig. 2 & Additional Notes). 4. Position stub light bar weldment [Part No. 51H69] on truck frame. Stub light bar weldment should be as high and as far back as possible on the truck frame to avoid interference with the bumper and fenders. It may be necessary to modify the stub light bar weldment to avoid interference. Drill mounting holes as required and mount using fasteners provided (See Fig. 3). 5. Attach the tail light module to the stub light bar weldments with the fasteners provided (See Fig 3). 6. Mount the identification light bar at top center of the center plate [Part No. 63H08] using the fasteners provided (See Fig. 3). 7. Mount license lamp right of the license plate (See Fig. 2) using the fasteners provided (See Fig. 3). T RU CK F RAM E ( R EF ) CEN TER PL ATE C E N T ER IN DE N T IFICAT IO N LIG H T RAIL LICE N S E LA M P L I C E N S E P L A TE (R E F ) J U N C T IO N B O X (BE YO N D ) T A IL L I G H T M O D U L E FIG. 1 FIG. 2 All Figures are for Illustration Purposes Only 1/5/15 REAR LIGHT BAR ASSEMBLY (LED-LB) 8. Mount junction box on the back left side of center plate (See Fig. 2), using the fasteners provided (See Fig. 3). 9. Route all wire harnesses into the junction box. Wire harnesses must enter the junction box through a compression fitting (Based on the size of the wire harness, choose a compression fitting with an appropriately sized grommet). Make wiring connections in junction box with wire harness from truck cab as indicated on wiring diagram (See Fig.4). ADDITIONAL NOTES: Prior to any welding, consult the truck manufacture for any special precautions that may need to be taken. Typically the batteries must be disconnected and the ground lead from the welder should be as close to the part being welded to avoid the possibility of arcing across bearings, gears, etc. FIG. 3 1800 NE Broadway Avenue, Des Moines, Iowa, U.S.A. 50313-2644 Phone: (515) 266-3042 Fax: (515) 313-4426 Toll Free: (888) 767-8000 E-Mail: [email protected] Web Site: www.swaploader.com 1/5/15 1/5/15 OPERATION OPERATING INSTRUCTIONS During all operations of the SwapLoader, the speed of the engine should be maintained at 1,000 to 1,200 RPM, assuming the ratio of the Power Take Off is about 100%. LOADING A CONTAINER 1. Engage the P.T.O. (Refer to P.T.O. manual for operation). FRONT LOWER/LOAD EXTEND LIFT JIB RAISE/UNLOAD RETRACT 2. Retract the jib (right control lever backward). Then, extend the lift cylinders (left control lever backward). 3. Make sure the work area in front of the container is clear of people and obstacles. Move the truck backwards until the hook engages the curved lifting bar of the container. NEVER EXTEND THE JIB to reach the proper catching height, rather extend the dump cylinders to align the jib hook to the lift bar. SL-412.OPE 11/2014 3-1 WARNING: Make sure work area is clear of people and obstacles prior to dumping or unloading containers. SwapLoader strongly recommends that a back up alarm be installed on the truck chassis. The operation of the hook hoist is that the truck is backed up to the body to pick it up and so there is a potential pinch point between the body and the hook. 4. Retract the lift cylinders (left control lever forward), making sure the curved lifting bar is securely attached to the hook. Release the brakes of the truck and steer to correctly align the truck with the container. Watch the container rails to see that they come to rest centered on the rear rollers. Do not extend the jib during lifting. 5. When the container is resting on the frame, extend the jib forward all the way to ensure the container is held in the body locks (right control lever forward). Disengage the P.T.O. DUMPING 1. Move the jib forward (right control forward) to ensure that the container is locked. 2. Extend the main lift cylinders (left control backward). CAUTION: DO NOT RETRACT THE JIB WHILE DUMPING. Retracting the jib during dumping may unlock the mechanical jib latches which could allow the container to crash down onto the hoist and/or abruptly unload. SL-412.OPE 11/2014 3-2 PLACING A CONTAINER ON THE GROUND 1. Move the sliding jib all the way back (right control backward) until mechanical jib latches unlock. 2. Extend the lift cylinders (left control backward). When the container touches the ground, release the brakes to free the truck for forward movement caused by the container. 3. Extend the lift cylinders till the container lays flat on the ground. Pull away from container and rotate jib back into the transport position. WARNING: SL-412.OPE 11/2014 1. DON'T OVER SPEED THE PUMP 1,500 RPM MAXIMUM. 2. DON'T DUMP ON UNEVEN GROUND. 3-3 WARNING: (CONTINUED) 3. DON'T DRIVE WITH THE HOIST IN THE DUMP POSITION OR WITH THE HOOK TILTED BACK. OPERATING THE STABILIZER If loading or unloading a heavy container that would cause the front end of the truck to lift off the ground, then a stabilizer should be utilized if the unit is equipped with one. When Loading a Container the stabilizer should be lowered between steps 3 & 4, while when Placing the Container on the Ground the stabilizer should be lowered between steps 1 &2 (see the previous operating instructions on pages 3-1 to 3-3). FRONT LOWER RAISE LOWER/LOAD EXTEND LIFT JIB RAISE/UNLOAD RETRACT To lower the stabilizer, push forward on the left control lever until the roller is all the way down. When finished with loading or unloading the container the stabilizer roller should be raised prior to disengaging the P.T.O. To raise the stabilizer, push backward on the left control lever until the roller is all the way up. SL-412.OPE 11/2014 3-4 CHANGING HOOK HEIGHTS 54” to 61-3/4” Jib Height Adjustment Procedure: CAUTION: The following is the recommended procedure for changing hook heights on the adjustable jib from 54” to 61-3/4” heights. Failure to follow and adhere to this procedure may result in possible property damage and/or personal injury. WARNING: Make sure work area is clear of people and obstacles prior to changing the hook height on the adjustable jib. 1. With the telescopic arm in the transport position (as shown); remove the hitch pin from the lock pin. Then pull the lock pin loose from the jib arm. Lock pin secured with hitch pin 2. SL-412.OPE 11/2014 Retract the jib (right control lever backward). See Fig. A (Pg. 3-1). 3-5 Changing Hook Height from 54” to 61-3/4” Continued: 3. Tilt the telescopic arm rearward (left control lever backward). See Fig. A (Pg. 3-1). 4. Continue to tilt telescopic arm rearward until the dump cylinders are fully extended. Replace lock pin and secure with hitch pin. Lock pin secured with hitch pin WARNING: Do not remove lock pin on the adjustable jib while jib is in the 54” hook position and the telescopic arm is tilted rearward (as shown). Possible property damage and/or personal injury may result. SL-412.OPE 11/2014 3-6 CHANGING HOOK HEIGHTS 61-3/4” to 54” Jib Height Adjustment Procedure: CAUTION: The following is the recommended procedure for changing hook heights on the adjustable jib from 61-3/4” to 54” heights. Failure to follow and adhere to this procedure may result in possible property damage and/or personal injury. WARNING: Make sure work area is clear of people and obstacles prior to changing the hook height on the adjustable 1. With the telescopic arm in full load/unload position (as shown); remove the hitch pin from the lock pin. Then pull the lock pin loose from the jib arm. Lock pin secured with hitch pin 2. SL-412.OPE 11/2014 Tilt the telescopic arm toward the cab (left control lever forward). See Fig. A (Pg. 3-1). 3-7 Changing Hook Height from 61-3/4” to 54” Continued: 3. Extend the jib toward the cab (right control lever forward). See Fig. A (Pg. 3-1). 4. With the telescopic jib fully extended in the transport position (as shown); replace the lock pin and secure with hitch pin. Lock pin secured with hitch pin WARNING: Do not remove lock pin on the adjustable jib while jib is up in the 61-3/4” hook position and telescopic arm in transport position (as shown). Possible property damage and/or personal injury may result. SL-412.OPE 11/2014 3-8 MAINTENANCE MAINTENANCE INSTRUCTIONS WEEKLY SERVICE - (50 OPERATIONS) 1. Lubricate with grease (Refer to Lubrication Diagram) - Lifting hook on jib - Jib slide - top, bottom, and side guides 2. Check hydraulic oil level. With the hoist in the transport position (lift cylinders retracted and jib cylinder extended – see diagram on front cover) the oil level in the tank should read approximately one inch below the top of the glass sight on the temperature/sight gauge (see diagram ). 3. Check hydraulic hose and fittings for leaks. Also check hydraulic hose for wear. Repair and/or retighten as necessary. MONTHLY SERVICE - (200 OPERATIONS) 1. Lubricate with grease (Refer to Lubrication Diagram) - Fittings on lift cylinders (quantity: 4) - Front pins on rear pivot joint weldment (quantity: 2) - Fittings on rear pivot pins and rollers (quantity: 4) 2. Check all bolts and retighten as required. 3. Check adjustments on mast lock (safety latch) mechanism. Refer to the Mast Lock Inspection & Adjustment Instructions on page 4-7 of the maintenance section. 4. Check adjustments on the jib lockout valve. Refer to the Jib Lockout Valve Inspection & Adjustment Instructions on page 4-9 of the maintenance section. YEARLY SERVICE 1. Check for proper gapping on outer tube clamp assembly. Refer to the Outer Tube Clamp Inspection & Adjustment Instructions on page 4-13 of the maintenance section. 2. Change hydraulic oil, replace hydraulic filter element, and wash out suction strainer. 3. Check main relief valve setting. Refer to the Pressure Check Instructions on page 4-11 of the maintenance section. (Pressure should be 3,500 PSI minimum). SL-412.MAI 11/2014 4-1 SL-412.MAI 11/2014 4-2 HYDRAULIC OIL SPECIFICATION & INTERCHANGE CHART Select an ISO grade of Premium Anti-Wear Hydraulic Oil that is optimum for your location. HYDRAULIC OIL SELECTION CHART ISO Grade 32 46 Ambient Temperature Range °F °C -10 to 85 -23 to 29 10 to 110 -12 to 43 Viscosity SUS @ 100 °F 150-170 195-240 NOTE 1: Always consult your local hydraulic oil supplier for more information. NOTE 2: Use caution when operating at or beyond the recommended temperature extremes. NOTE 3: Do not operate the hooklift hoist when hydraulic oil temperature on tank gauge exceeds 160 °F (71 °C) as damage to hydraulic components can occur. ISO Grade 32 Company Name Castrol (BP) CITGO Exxon Mobil Shell SUNOCO ISO Grade 46 Brand Name & Grade Paradene 32AW A/W 32 Nuto H 32 DTE 24 (DTE 13) Tellus 32 Sun Vis 706 (816 WR) Company Name Castrol (BP) CITGO Exxon Mobil Shell SUNOCO Brand Name & Grade Paradene 46AW A/W 46 Nuto H 46 DTE 25 (DTE 15) Tellus 46 Sun Vis 747 (821 WR) HYDRAULIC FILTER ELEMENT SPECIFICATIONS & INTERCHANGE CHART Element Size: Mounting Thread: Filtration Rating: Flow Rating: Company Name Baldwin Can Flo Case Donaldson Fleetguard FPC 5.10 x 10.9” 1 1/2-16 UN-2B 10 micron (Nominal) 60 GPM Filter Part Number BT-388-10 RSE60-10N D-130046 HSM6047 R750-H-0825A HF6711 Company Name Hydac LHA Norman Parker Wix Zinga * Filter Part Number 0180MA010P SPE60-10 610 927736 51860 LE-10 * Brand of Element supplied from factory on hoist. SL-412.MAI 11/2014 4-3 GENERAL MAINTENANCE PARTS LIST PT. NO. DESCRIPTION 22P24 HYDRAULIC CYLINDER 6 X 56 (Lift/Dump) 22P43 LINE ASS’Y, HYDRAULIC CYLINDER 22P41 SEAL KIT, HYDRAULIC CYLINDER 21P11 HYDRAULIC VALVE CARTRIDGE, COUNTERBALANCE 22P15 SPHERICAL BEARING 3” ID 22P19 SNAP RING FOR BEARING * * * * * * * * 22P25 HYDRAULIC CYLINDER 4 X 30 (Jib) 22P42 SEAL KIT, HYDRAULIC CYLINDER 21P17 HYDRAULIC VALVE CARTRIDGE, COUNTERBALANCE * * * * * * * * 20P87 21P03 HYDRAULIC PUMP, GEAR (3.83 CID, L.H. ROT.) - Optional HYDRAULIC PUMP, GEAR (3.83 CID, R.H. ROT.) - Optional 20P41 SEAL KIT, HYDRAULIC PUMP * * * * * * * * 20P61 HYDRAULIC FILTER ASSEMBLY, 60 GPM 20P66 HYDRAULIC FILTER ELEMENT 20P64 INDICATOR GAUGE, FILTER * * * * * * * * 20P86 HYDRAULIC TANK, 30 GALLON LS 21P16 STRAINER, TANK MOUNTED - 50 GPM 20P96 SIGHT GAUGE, HYDRAULIC TANK SL-412.MAI 11/2014 4-4 20P97 BREATHER CAP ASSEMBY, HYDRAULIC TANK * * * * * * * * 20P88 HYDRAULIC CONTROL VALVE, 2 SECT. 21P04 HYDRAULIC RELIEF VALVE CARTRIDGE (3,500 PSI) * * * * * * * * 21P28 HYDRAULIC VALVE, 2-WAY 21P38 SEAL KIT FOR 21P28 * * * * * * * * 90P71 WEAR PAD, 12” - (Z-CHANNEL) 00755 3/8 LOCK WASHER 00P14 3/8-16 HEX NUT 00P68 3/8-16 x 1 1/4 FL HD SCREW (SST) * * * * * * * * 80H35 CLAMP LINER – (OUTER TUBE) 00P68 3/8-16 x 1 1/4 FL HD SCREW (BRASS) * * * * * * * * 87H44 CLAMP LINER – (OUTER TUBE SIDES) 87H45 WEAR BLOCK SHIM 00P79 3/8-16 x 3/4 FL HD SCREW (BRASS) * * * * * * * * 60H11 WEAR BLOCK – (JIB) 61H90 WEAR BLOCK SPACER 01P51 3/8-16 x 1 FL HD SCREW (BRASS) * * * * * * * * SL-412.MAI 11/2014 4-5 REPLACEMENT BEARING LIST PT. NO. DESCRIPTION 41H99 PIVOT PIN (FOR 43H69 PIVOT JOINT SUB-ASSEMBLY) 50P20 ALUMINUM BRONZE BEARING; QTY: 1 PER PIN * * * * * * * * 42H10 MAIN PIVOT PIN (FOR 43H69 PIVOT JOINT SUB-ASSEMBLY) 50P20 ALUMINUM BRONZE BEARING; QTY: 1 PER PIN * * * * * * * * 80P09 ROLLER ASSEMBLY (FOR 43H69 PIVOT JOINT SUB-ASSEMBLY) 23H07 BRONZE BEARING; QTY: 1 PER ROLLER * * * * * * * * SL-412.MAI 11/2014 4-6 MAST LOCK INSPECTION & ADJUSTMENT INSTRUCTIONS All SwapLoader hook-lift hoists come with a mast lock (safety latch) assembly that is located on the bottom side of the outer tube. When the jib is extended the mast lock then engages the latch bars (forks) on the pivot joint, making the jib, outer tube, and pivot joint into a continuous member for raising the container or body up into a dump mode. With the jib fully retracted the mast lock then disengages the latch bars on the pivot joint allowing the hook-lift to enter into the mount-dismount cycle by pivoting around the front pins of the pivot joint. A properly adjusted mast lock will function smoothly and clear the latch bars on the pivot joint approximately a 1/4" (see illustrations below). INSPECTION The mast lock assembly comes adjusted from the factory and should provide years of trouble free operation, however there may come a time when an adjustment may be required. Prior to making any adjustments, SwapLoader recommends that you begin with inspecting all mast lock components for damage or wear (see illustrations below). First inspect the adjustment tube and bolt on the jib; make sure nothing is missing or bent. Next, inspect the release lever and connection bar on the outer tube; look for any missing or bent components such as ears or pins. Finally, inspect the safety latch (see illustration below); again make sure there are no missing or bent components such as ears, pins, etc. Repair or replace any missing or bent components prior to making any adjustment to the mast lock assembly; refer to the mast lock (safety latch) assembly drawing for proper part numbers and identification of the components (See Drawing No. 43H62 in the Part List pages of the manual). SL-412.MAI 11/2014 4-7 ADJUSTMENT If after inspecting all mast lock components and making any necessary repairs the gap between the mast lock and latch bars on the pivot joint is still incorrect, then an adjustment will need to be made. Please complete the following steps: 1. Retract the telescopic jib until the cylinder completely bottoms out (fully retracted). 2. Inspect the gap between the mast lock latch and the latch bar on the pivot joint. Look for a clearance of approximately 1/4" (if not proceed to steps 3-5). 3. Loosen the jam nut on the adjustment bolt. 4. Turn the adjustment bolt; counter-clockwise to increase the gap or clockwise to decrease the gap. 5. Once the 1/4" clearance is achieved, then tighten the jam nut. Make sure to hold the adjustment bolt from turning when tightening the jam nut. Please contact your SwapLoader Distributor or SwapLoader USA should you have any questions regarding this procedure. SL-412.MAI 11/2014 4-8 JIB LOCKOUT VALVE INSPECTION & ADJUSTMENT INSTRUCTIONS All SwapLoader hook-lift hoists have a jib lockout valve (see illustration below) to prevent accidental operation of the telescopic jib, while the hoist is up in a dump mode. Because the jib lockout valve can block the flow of hydraulic oil to the jib cylinder, should the valve come out of adjustment the telescopic jib may experience a reduction in extension or retraction speed to the point of stalling out. End Cap Roller Spring Cap JIB LOCKOUT VALVE ILLUSTRATION INSPECTION When a noticeable loss in extension or retraction speed of the telescopic jib is experienced, the first step should be to inspect the jib lockout valve and valve mount ramp to ensure that they are adjusted properly and in good working order. The jib lockout valve is located on the inside rail of the hoist mainframe approximately two-thirds of the way back on the driver side of the hoist (see Drawing No. 43H27 in the Part List pages of the manual). Visually inspect the jib lockout valve roller and the condition of the valve ramp on the hoist pivot joint without a container on the hoist (see illustration on the next page); this is most easily performed with the hoist back in a dismount mode. If either part shows signs of wear or damage then replace or repair as needed. With the jib lockout valve roller and valve ramp in good condition the next step is to check that the valve is positioned correctly with respect to the valve ramp. While looking at the roller end of the jib lockout valve, notice that the roller moves in and out of an end cap. With the hoist pivot joint in the down position, or horizontal to the hoist mainframe, the valve ramp should be in contact with the jib lockout valve roller. The roller should be depressed by the valve ramp so that 1/8” to 3/16” of the roller is exposed from the end cap (see illustrations above and on next page). SL-412.MAI 11/2014 4-9 Mainframe (Ref) Valve Mount Base Valve Ramp 1/8" to 3/16" of Roller Exposed Mainframe (Ref) Valve Mount Bracket Adjustment Screw Valve Ramp Side View Side View Jib Lockout Valve Mount Bracket Screw (2-Typ) Pivot Joint (Ref) TOP VIEW Mount Bracket Screw (2-Typ) Valve Valve Mount Bracket SIDE VIEW JIB LOCKOUT VALVE ADJUSTMENT ILLUSTRATION ADJUSTMENT Should the jib lockout valve need adjustment the first step will be to loosen the mount bracket screws (see illustration above). Reposition the jib lockout valve with respect to the valve ramp by turning the adjustment screw on the valve mount bracket as follows: Clockwise Adjustment – Moves the jib lockout valve closer to the valve ramp Counter-Clockwise Adjustment – Moves the jib lockout valve away from the valve ramp Once the valve has been moved back into proper adjustment, then tighten up the mount bracket screws. PART NUMBER & SPECIFICATION SwapLoader Pt. No. Work Port Size Spool Type Pressure (Maximum) Flow Rate (Maximum) 21P28 3/4-16 ORB (SAE 8) 2-Way, 2-Position N.C. 4,600 PSI (Nominal) 16 GPM (Nominal) Please contact your SwapLoader Distributor or SwapLoader USA should you have any questions regarding this procedure. SL-412.MAI 11/2014 4-10 PRESSURE CHECK INSTRUCTIONS When performing a pressure check on a SwapLoader hook-lift hoist, we recommend that you use a calibrated pressure gauge that reads pressures up to 3,500 PSI (a 0 to 5,000 PSI range gauge is recommended). As a minimum, the gauge should have 100 PSI graduation marks (50 PSI is preferred), and a 3 inch diameter dial size (4 inch dial is preferred). The pressure gauge should be outfitted with a female JIC #4 hydraulic adapter; preferably located at the end of a 3/8 inch diameter high pressure hydraulic hose that is 2 to 3 foot in length (see illustration below). Hydraulic Adapter FMJIC Swivel (-4) 2000 1500 3000 3500 4000 500 4500 0 Hydraulic Hose Assembly High Pressure 3/8 Dia. 2' to 3' in length 2500 1000 5000 Pressure Gauge (recommended) 0 to 5,000 PSI Range 4" Dia. Dial Size 50 PSI Graduation Marks RECOMMENDED PRESSURE GAUGE ILLUSTRATION Should you not be able to source a hydraulic gauge locally, SwapLoader can provide one at a reasonable cost (Hyd. Pressure Gauge & Hose Ass’y – Part No. 22P10). PRESSURE CHECK STEPS 1. Locate the 90 male JIC #4 hydraulic adapter (SWL #10P37) found on the top of the hoist hydraulic control valve (see illustration below). SWL P/N: 10P37 Hydraulic Adapter MP/MJIC 90° (-4-4) SWL P/N: 10P38 Hydraulic Adapter FMJIC Cap (-4) Hyd. Tubing Ass'y (to rear of hoist) Hyd. Hose Ass'y (to front of hoist) Hyd Control Valve Ass'y PRESSURE CHECK HYDRAULIC ADAPTER LOCATION ILLUSTRATION This 90 male #4 JIC hydraulic adapter is supplied by SwapLoader, and should be installed in the hydraulic control valve at the time of the hoist installation (see the hoist SL-412.MAI 11/2014 4-11 parts & operations manual). 2. Remove the female JIC #4 cap from the male JIC #4 adapter and attach the pressure gauge to the hydraulic control valve (see illustration below). SWL P/N: 10P37 Hydraulic Adapter MP/MJIC 90° (-4-4) 2000 2500 1500 1000 500 0 3000 3500 4000 4500 5000 Pressure Gauge Hyd Control Valve Ass'y PRESSURE GAUGE TO HYDRAULIC ADAPTER ILLUSTRATION 3. Start the truck and engage the P.T.O. 4. Push the lift (dump) circuit lever forward until the lift (dump) cylinders bottom out (see illustration below). Continue to push the lever forward until steps 5-6 are complete. FRONT LOWER/LOAD EXTEND LIFT JIB RAISE/UNLOAD RETRACT 5. Check the gauge for the maximum developed system pressure. The SL-412 should have a reading of 3,500 PSI. 6. With the pressure check complete; release all functions and disengage the P.T.O. Please contact your SwapLoader Distributor or SwapLoader USA should you have any questions regarding this procedure. SL-412.MAI 11/2014 4-12 OUTER TUBE CLAMP ASSEMBLY INSPECTION INSTRUCTIONS All SwapLoader hooklift hoists come equipped with an outer tube clamp assembly located on the bottom of the outer tube at the opening where the jib telescopes in and out (see illustration below). On SwapLoader 400 series hoist models the outer clamp assembly is fixed in height. INSPECTION The illustration below is a typical hoist clamp assembly for the SwapLoader 400 series hoist models. For optimum performance out of your SwapLoader SL-406 hooklift the gap between the top of the jib horizontal tube and the top inside surface of the outer tube should be kept between 1/16” to 1/8” (see Section View A-A below). When a gap greater than 1/8” exists, since the clamp assembly has a fixed elevation, inspect the clamp liner, clamp plate, and fasteners for excessive wear or damage (see Section View A-A below). Replace parts as needed to bring the outer tube clamp assembly back to recommended specifications (see Drawing No. 43H29 in the Parts List pages of the manual). 1/16" TO 1/8" GAP OUTER TUBE JIB JIB CLAMP PLATE A OUTER TUBE CLAMP LINER (WEAR PAD) 5/8 DIA. BOLT & LOCK WASHER SECTION VIEW A-A A OUTER TUBE CLAMP ASSEMBLY 400 SERIES HOISTCLAMP CLAMP ASSEMBLY ILLUSTRATION LARGE HOIST ASSEMBLY ILLUSTRATION SL-412.MAI 11/2014 4-13 PARTS LIST OPTIONS HYD CONTROL VALVE ASS'Y (20P88) (REF) W/ AIR SHIFT KITS (20P95) (REF) BRASS ADP, PUSH-ON TUBE/ MP SVL 90° (-4-2) CONTROL HANDLE ASS'Y 2 SECTION AIR (20P72) (REF) LEAVE EXHAUST PORT OPEN HYD ADP, MP/FMP (-4-2) BRASS ADP, PUSH-ON TUBE/ MP SVL 90° (-4-2) BRASS ADP, PUSH-ON TUBE/MP (-4-2) HYD ADP, MP/FMP (-4-2) BRASS ADP, PUSH-ON TUBE/MP (-4-2) 1/4 O.D. NYLON TUBE, BLACK 1/4 O.D. NYLON TUBE, BLACK BRASS ADP, PUSH-ON TUBE/MP (-4-4) AIR PRESS PROTECTION VALVE (20P74) (REF) 1/4-18 NPTF PORT AIR SUPPLY SL-330/400/406 90H60 ~ REV A HYD CONTROL VALVE ASS'Y (21P88) (REF) W/ AIR SHIFT KITS (20P71) (REF) BRASS ADP, PUSH-ON TUBE/ MP SVL 90° (-4-2) CONTROL HANDLE ASS'Y 3 SECTION AIR (20P73) (REF) LEAVE EXHAUST PORT OPEN BRASS ADP, PUSH-ON TUBE/MP (-4-2) BRASS ADP, PUSH-ON TUBE/ MP SVL 90° (-4-2) BRASS ADP, PUSH-ON TUBE/MP (-4-2) 1/4 O.D. NYLON TUBE, BLACK 1/4 O.D. NYLON TUBE, BLACK BRASS ADP, PUSH-ON TUBE/MP (-4-4) AIR PRESS PROTECTION VALVE (20P74) (REF) 1/4-18 NPTF PORT AIR SUPPLY SL-650 90H45 ~ REV B TRUCK FRAME (REF) 4 13 4 13 TRUCK FRAME (REF) 16 16 10 1 1 10 18 9 39 5 15 13 17 16 6 15 2 17 2 5 3 7 8 13 16 18 12 2" - 3" GROUND CLEARANCE 3 22 11/16 14 LOCTITE 00P03 INTO 42H64 62 1/4 STABILIZER FINAL ASSEMBLY 42H62 1800 NE Broadway Avenue, Des Moines, Iowa, U.S.A. 50313-2644 Phone: (515) 266-3042 • Fax: (515) 313-4426 • Toll Free: (888) 767-8000 E-Mail: [email protected] • Web Site: www.swaploader.com