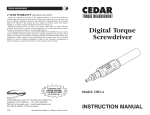
1
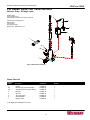
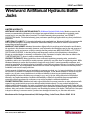
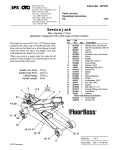
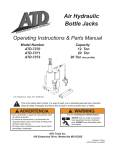
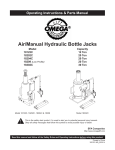
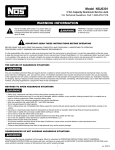
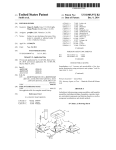
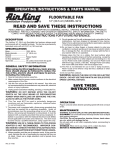
1ZKX7 and 1ZKX8
Operating Instructions & Parts Manual
Please read and save these instructions. Read carefully before attempting to assemble, install, operate or maintain the product described. Protect yourself
and others by observing all safety information. Failure to comply with instructions could result in personal injury and/or property damage! Retain
instructions for future reference.
Westward Air/Manual
Hydraulic Bottle Jacks
®
Description
Westward air/manual hydraulic bottle jacks, Models 1ZKX7 and 1ZKX8 are ideal for use
in the shop, home, or in an industrial setting. The manual function allows for normal
operation any where, even without an air supply. RECOMMENDED AIR SUPPLY: 110175 PSI at 7.8 CFM. A minimum of 150 PSI is required to lift rated capacity load. Jacks
can be manually operated vertically or in the horizontal position with pump positioned
directly below the reservoir (see Figure 2). However, air operation jacks need to be in
vertical position. These jacks are designed to meet or exceed ANSI / PALD Standards.
b. Oil surface of ram as well as all
moving parts in the handle and lifting
mechanism.
Reservoir
Specifications
Model
Capacity
Base Size
Min.
Height
Max.
Height
1ZKX7
1ZKX8
12 Ton
20 Ton
8" x 6 1 /2"
8 1/ 2" x 7 1 /4 "
9 1/ 2"
9 3/ 4"
18 1 /2 "
18 3 /4 "
Pump
Figure 2 - Jack in Horizontal Position
Operation
LIFTING
Saddle
Air Motor
Oil Filler Plug*
Handle Sleeve
(*) Oil Filler Screw
for 1ZKY8
Air Control Valve
Handle
Carry Handle
Release Valve
Figure 1- Air/Manual Hydraulic Bottle Jack Components
General Safety Information
Study, understand,
and follow all
instructions before operating this device.
Lifting device only. Intended use is for
lifting part of a total vehicle, only one
wheel or axle at a time. Immediately after
lifting, support vehicle with appropriate
means. Do not exceed rated capacity. Use
only on a hard level surface capable of
sustaining rated capacity loads. Lift only
on those areas of the vehicle as specified
by the vehicle manufacturer. Ensure that
the lift point is properly centered on the
jack saddle. Always wear safety glasses
when using this equipment. Inspect jack
before each use. Do not use if bent,
broken, leaking, or damaged components
are noted. No alteration of this product is
allowed. Do not use this device for any
purpose other than that for which it was
intended. Failure to heed any one or
SHI 006
Printed in China
06/06
combination of these warnings may result
in severe personal injury and/or property
damage.
Before Use
1. Occasionally hydraulic jacks become
air bound and will not function properly.
To correct this condition, remove oil
filler plug. This will allow any
pressurized air to escape.
a. Ensure the oil level is even with or
just below the oil filler plug hole.
b. Reinstall the oil filler plug.
2. Thoroughly lubricate all moving parts
of the jack.
a. Raise the saddle to full height by
closing release valve and pumping
handle.
1. Prevent inadvertent vehicle movement
by fully engaging emergency brake,
putting transmission in park. Use
wheel chocks in pairs on the wheel
diagonally opposed to the wheel or
axle being lifted.
2. Assemble 3 piece handle by lining up
spring pins with corresponding slots.
3. Close release valve by turning handle
clockwise until it is firmly closed.
4. Position jack under load (refer to
vehicle owners manual for proper lift
point location), close release valve by
turning clockwise firmly. Operate
manually by pumping with handle or by
connecting to air supply and squeezing
air control valve until saddle contacts
load. To end air lift simply release grip
on air control valve.
5. Raise load to desired height and
immediately transfer load to jack
stands.
Off center loads and
loads lifted while
jack is not level may damage the jack or
cause personal injury.
1ZKX7 and 1ZKX8
Westward Operating Instructions and Parts Manual
Westward Air/Manual Hydraulic Bottle
Jacks
®
Operation (Continued)
Maintenance
LOWERING
IMPORTANT: Use only a good grade
hydraulic jack oil such as Mobil DTE 13M
or equivalent. Avoid mixing types of oil.
Do not use brake fluid, alcohol, glycerin,
detergent motor oil, or dirty oil. Improper
fluid can cause serious internal damage to
the jack rendering it inoperative.
1. Insert handle onto release valve and
slowly turn handle counterclockwise no
more than one full turn.
IMPORTANT: Avoid “shock loads”
created by quickly opening and closing
the release valve as load is being
lowered. This may result in an
overloading of the hydraulic circuit and
possible damage to the jack.
2. Push handle sleeve down manually if
still extended to reduce piston exposure
to rusting.
ADDING OIL
1. With saddle fully lowered and piston
depressed, set jack in its upright level
position and remove oil filler plug.
2. Fill until oil is level with or just below
filler plug hole.
CHANGING OIL
1. For best performance and longest life,
replace the complete oil supply at least
once a year.
2. To drain oil completely, remove the filler
plug.
3. Lay the jack on its side and allow the oil
to run out into suitable drain pan.
Dispose of hydraulic oil in accordance
with local regulations.
4. Replace with proper oil as described
above.
LUBRICATION
Add lubricating oil to all pivoting sections
every 3 months.
RUST PREVENTION
Check ram and piston for signs of rust on
a regular basis. Clean as needed with a
lint free, oil saturated cloth.
NOTE: When not in use, always leave the
saddle and ram all the way down.
Troubleshooting Chart
Symptom
Jack will not lift load
Jack lift but not maintaining pressure
Jack will not lower after unloading
Poor lift performance
Will not lift to full height
Possible Cause(s)
Corrective Action
1. Release valve not tightly closed
1. Ensure release valve tightly closed
2. Overload condition
2. Remedy overload condition
3. Pressure of air pressure too low
3. Change to adequate air pressure.
1. Same as above
1. Same as above
2. Hydraulic unit malfunctioning
2. Replace hydraulic unit
1. Reservoir overfilled
1. Drain fluid to proper level
2. Linkages binding
2. Clean and lubricate moving parts
1. Fluid level low
1. Ensure proper fluid level
2. Air trapped in system
2. With ram fully retracted, remove oil
filler plug to let pressurized air
escape, reinstall oil filler plug
Fluid level low
Ensure proper fluid level
2
Westward Operating Instructions and Parts Manual
1ZKX7 and 1ZKX8
For Repair Parts, call 1-800-323-0620
24 hours a day - 365 days a year
Please provide following information:
-Model number
-Serial number (if any)
-Part description and number as shown in parts list
6
4
Address parts correspondence to:
Grainger Parts
P.O. Box 3074
1657 Shermer Road
Northbrook, IL 60065-3074 U.S.A.
5
3
1
2A
2B
7
Figure 3 -Repair Parts Illustration
Repair Parts List
Reference
Number
1
2A
2B
3
4
5
6
7
Description
Part Number
Quantity
Handle
Oil Filler Plug (for model 1ZKX7)
Oil Filller Screw (for model 1ZKX8)
*Air Motor
Air Hose
Air Control Valve
Swivel Manifold
Release Valve
A1206S-01
A1206S-02
A1906S-02
A1206S-03
A1206S-04
A1206S-05
A1206S-06
A1206S-07
1
1
1
1
1
1
1
1
(*) No repair parts available for air motor.
3
Westward Operating Instructions and Parts Manual
1ZKX7 and 1ZKX8
Westward Air/Manual Hydraulic Bottle
Jacks
®
LIMITED WARRANTY
WESTWARD ONE-YEAR LIMITED WARRANTY. Air/Manual Hydraulic Bottle Jacks, Models covered in this
manual, are warranted by Westward to the original user against defects in workmanship or materials under
normal use for one year after date of purchase. For limited warranty claim procedures, see PROMPT
DISPOSITION below. This limited warranty gives purchasers specific legal rights which vary from jurisdiction to
jurisdiction.
LIMITATION OF LIABILITY. To the extent allowable under applicable law, Westward's liability for consequential
and incidental damages is expressly disclaimed. Westward's liability in all events is limited to and shall not
exceed the purchase price paid.
WARRANTY DISCLAIMER. Westward has made a diligent effort to provide product information and illustrate
the products in this literature accurately; however, such information and illustrations are for the sole purpose of
identification, and do not express or imply a warranty that the products are MERCHANTABLE, or FIT FOR A
PARTICULAR PURPOSE, or that the products will necessarily conform to the illustrations or descriptions.
Except as provided below, no warranty or affirmation of fact, expressed or implied, other than as stated in the
"LIMITED WARRANTY" above is made or authorized by Westward.
PRODUCT SUITABILITY. Many jurisdictions have codes and regulations governing sales, construction,
installation, and/or use of products for certain purposes, which may vary from those in neighboring areas. While
Westward attempts to assure that its products comply with such codes, it cannot guarantee compliance, and
cannot be responsible for how the product is installed or used. Before purchase and use of a product, review the
product applications, and all applicable national and local codes and regulations, and be sure that the product,
installation, and use will comply with them.
Certain aspects of disclaimers are not applicable to consumer products; e.g., (a) some jurisdictions do not allow
the exclusion or limitation of incidental or consequential damages, so the above limitation or exclusion may not
apply to you; (b) also, some jurisdictions do not allow a limitation on how long an implied warranty lasts,
consequentially the above limitation may not apply to you; and (c) by law, during the period of thisLlimited
Warranty, any implied warranties of implied merchantability or fitness for a particular purpose applicable to
consumer products purchased by consumers, may not be excluded or otherwise disclaimed.
PROMPT DISPOSITION. Westward will make a good faith effort for prompt correction or other adjustment with
respect to any product which proves to be defective within limited warranty. For any product believed to be
defective within limited warranty, first write or call dealer from whom the product was purchased. Dealer will give
additional directions. If unable to resolve satisfactorily, write to Westward at address below, giving dealer's name,
address, date, and number of dealer's invoice, and describing the nature of the defect. Title and risk of loss pass
to buyer on delivery to common carrier. If product was damaged in transit to you, file claim with carrier.
Manufactured for Grainger International, 100 Grainger Pkwy., Lake Forest, Illinois 60045 U.S.A.
Manufactured for Grainger International, Inc.
Lake Forest, Illinois 60045 U.S.A.