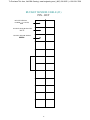
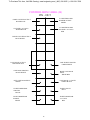
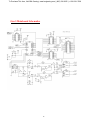
1
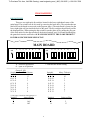
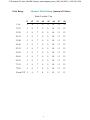
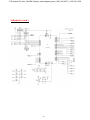
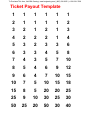
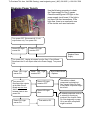
To Purchase This Item, Visit BMI Gaming | www.bmigaming.com | (800) 746-2255 | +1.561.391.7200
POPCORN
INSTRUCTION
MANUAL
Version PC 1-08
BAY-TEK INC.
1077 EAST GLENBROOK DRIVE
PULASKI, WI 54162
E-MAIL: [email protected]
PHONE: (920) 822-3951
FAX: (920) 822-8936
To Purchase This Item, Visit BMI Gaming | www.bmigaming.com | (800) 746-2255 | +1.561.391.7200
TABLE OF CONTENTS
TABLE OF CONTENTS
OBJECT
INSTALLATION INSTRUCTIONS
SPECIAL FEATURES
EYE CATCHING GRAPHICS
ATTENTION GETTING AUDIO
ACCESSIBLE CIRCUIT BOARDS
PROGRAMMING
DIPSWITCHES
TICKET PATTERNS
MAINTENANCE SCHEDULE
TROUBLESHOOTING
SPARE PARTS PRICE LIST
CABLE PIN-OUTS
SCHEMATICS
WARRANTY INFORMATION
TICKET DISPENSER INFORMATION
1
2
2
3
3
3
3
4
4
5-6
7
8-10
11
12-15
16-24
25
INSERT 1
1
To Purchase This Item, Visit BMI Gaming | www.bmigaming.com | (800) 746-2255 | +1.561.391.7200
GENERAL INFORMATION
OBJECT
Player inserts a coin into the coin/token mechanism. Once the game has recognized
that a coin/token has been inserted into the coin mechanism, the blower motor will start
circulating ping pong balls in the playfield. The player moves the popcorn bucket left and
right trying to catch as many ping pong balls in the bucket in the amount of time set by the
operator. The player then retrieves the tickets dispensed by the game.
INSTALLATION INSTRUCTIONS
Inspect all cargo for damage to the outside of carton before removing. If there is any
sign of damage, indicate on the Bill of Lading prior to driver departing. If damage is
found after the driver leaves, contact Bay-Tek immediately.
Remove keys from the coin returns in the bottom of the coin mechanism.
The power cord is coiled up and laying in the back of the game. Uncoil the cord and
lay it in the slot that is in the center of the back of the game underneath the back door.
Close and lock the back door.
Place the game in the desired location and plug the game in.
Use glass cleaner and a soft clean cloth to clean the acrylic and glass inside and
outside of the game.
The game is set to the standard factory settings. Variations and user changeable
features are listed in this manual.
Check the game to make sure that everything is working. If something is not working
or if anything goes wrong during the life of the game, contact the service department
at: [email protected], or (920) 822-3951.
2
To Purchase This Item, Visit BMI Gaming | www.bmigaming.com | (800) 746-2255 | +1.561.391.7200
SPECIAL FEATURES
EYE CATCHING GRAPHICS
Bay-Tek has incorporated into the Popcorn game the most durable exterior graphics that have
ever been placed on a Bay-Tek game. The durable lexan coating needs no additional care
other than routine cleaning. And will show less damage by the aggressive players. Bay-Tek
had small children in mind when the graphics were designed, however we are confident the
game will attract children of all ages.
ATTENTION GETTING AUDIO
Bay-Tek strives to provide a high quality audio experience with every one of its games, and
the Popcorn game is no exception. With high quality stereo sound and cartoon like voices,
the Popcorn game will be a hit with everyone.
ACCESSIBLE CIRCUIT BOARDS
To access the main board, power supply, AC driver board, display boards, and rear turbo
lights, simply remove the back door. All of the aforementioned parts are located in the back
compartment. To access the front chaselights remove the front glass and the chaselights are
right in the open. To access the bucket sensor, remove the front glass and the three screws
that attach the top of the popcorn bucket to the bottom half of the popcorn bucket. The sensor
is in the bottom of the bucket. To remove the sensor, remove the two screws that are holding
the sensor in place, and unplug the sensor from the harness. Be careful not to drop any
screws or nuts into the blower motor! ALWAYS DISCONNECT THE GAME FROM
THE POWER SOURCE BEFORE SERVICING!
3
To Purchase This Item, Visit BMI Gaming | www.bmigaming.com | (800) 746-2255 | +1.561.391.7200
PROGRAMMING
DIPSWITCHES
There are two eight pole dip switches located in the lower right-hand corner of the
main board. The switches can be accessed by removing the back door. (The switches that are
labeled S2 on the board are not used on the Popcorn game.) The main board is located on the
lower right right wall just inside the back of the game. The dip switches should look just like
the diagram below. When setting the dip switches, turn the game off by pulling the plug out
of the wall outlet. Set the dip switches to the desired settings, wait 30 seconds and then plug
the game back into the wall outlet. ALWAYS DISCONNECT THE GAME FROM ITS
POWER SOURCE BEFORE SERVICING!
MAIN BOARD
ON
1
2
3
4
5
6
7
8
ON
X – closed or on position
O – open or off position
1
2
3
4
5
6
7
* - indicates the default setting
Group #1 (S1)
Switch #
Ticket Pattern
1 2 3
O O O
1*
O O X
2
O X O
3
O X X
4
X O O
5
X O X
6
X X O
7
X X X
8
Switch #
4 5 6
O O O
O O X
O X O
O X X
X O O
X O X
X X O
X X X
Mercy Ticket(s)
0*
1
2
3
4
5
6
7
***See pages 5 and 6 for ticket patterns.***
Switch #
7
X
O
Attract Mode
Switch #
8
X
O
On*
Off
4
Coins per Play
2
1*
8
To Purchase This Item, Visit BMI Gaming | www.bmigaming.com | (800) 746-2255 | +1.561.391.7200
DIPSWITCHES (cont.)
Group #2 (SW2)
Switch #
Countdown Timer
1 2
OO
30 seconds*
OX
35 seconds
XO
40 seconds
XX
45 seconds
Switch #
8
O
X
Switch #
7
O
X
Standard vs. Alternate patterns
Standard ticket patterns*
Alternate ticket patterns (NJ)
Insertion of coin during game
Does not affect current game*
Ends current game. Begins new game immediately.
TICKET PATTERNS
Point Range
Standard Ticket Pattern (Amount of Tickets)
Bank 2 switch #7 off
#2
#3
#4
#5
#6
#7
#8
1
1
1
1
1
0
0
1-16
#1
1
17-22
2
1
1
1
1
2
0
0
23-28
3
2
1
2
1
3
0
0
29-34
4
2
2
2
1
4
0
0
35-40
5
3
2
3
3
6
0
0
41-46
6
3
3
4
5
8
0
0
47-52
7
4
3
5
7
10
0
0
53-58
8
5
4
6
9
12
0
0
59-64
9
6
4
7
10
15
0
0
65-70
10
7
5
10
15
18
0
0
71-76
15
8
5
20
20
25
0
0
77-82
25
9
10
30
25
30
0
0
50
25
20
50
30
40
0
0
83 and UP
5
To Purchase This Item, Visit BMI Gaming | www.bmigaming.com | (800) 746-2255 | +1.561.391.7200
Point Range
Alternate Ticket Pattern (Amount of Tickets)
Bank 2 switch #7 on
1-16
#1
5
#2
6
#3
7
#4
8
#5
9
#6
10
#7
11
#8
12
17-22
5
6
7
8
9
10
11
12
23-28
5
6
7
8
9
10
11
12
29-34
5
6
7
8
9
10
11
12
35-40
5
6
7
8
9
10
11
12
41-46
5
6
7
8
9
10
11
12
47-52
5
6
7
8
9
10
11
12
53-58
5
6
7
8
9
10
11
12
59-64
5
6
7
8
9
10
11
12
65-70
5
6
7
8
9
10
11
12
71-76
5
6
7
8
9
10
11
12
77-82
5
6
7
8
9
10
11
12
83 and UP 5
6
7
8
9
10
11
12
6
To Purchase This Item, Visit BMI Gaming | www.bmigaming.com | (800) 746-2255 | +1.561.391.7200
MAINTENANCE SCHEDULE
A clean, well-maintained game will attract more players, operate more efficiently and
in turn, generate more revenue. The following is a short list of general maintenance and
cleaning information. We recommend you follow these procedures on a regular basis.
NOTE: WHEN SERVICING THE GAME, ALWAYS MAKE SURE THE UNIT IS
TURNED OFF!
Daily Basis:
Fill ticket tray to capacity
Empty cash box as needed.
Weekly Basis:
Clean the front glass, lexan, and acrylic pieces with a soft cloth and glass cleaner.
Inspect attraction lighting for non-working halogen lights, turbo lights, and chaselight
LEDs
Check the condition of the balls. Make sure that there are no cracked, split, pieces of
ping pong balls in the blower assembly or ball track.
Vacuum the black carpet in the front of the game.
Apply “Static Guard” or equivalent to prevent static buildup.
Quarterly Basis:
Check the tightness of the bolts and nuts on the front handle brace.
Check for proper function of the ball sensor in the popcorn bucket.
Visually inspect the popcorn bucket on handle for loose or broken parts.
7
To Purchase This Item, Visit BMI Gaming | www.bmigaming.com | (800) 746-2255 | +1.561.391.7200
TROUBLESHOOTING
Following is a list of malfunctions that may occur with your game. If you should
experience a malfunction, follow the solutions in the order they are listed. If you can not
solve the problem, replace the main board with a main board from a working game if
available. This will enable you to isolate the problem to the main board. If you have a
malfunctioning main board, please have the serial number ready and contact the service
department at Bay-Tek for prompt shipment of an advanced replacement main board.
REMEMBER TO TURN THE GAME OFF WHEN SERVICING.
Game Has No Function:
Check to make sure the power strip is turned on.
Check for proper connection of the power cord to the power supply.
Ensure proper connection of power strip to the power outlet.
Check for voltage at the outlet.
Check for voltage at the power supply.
No Audio:
Turn the volume control knob back and forth a few times.
Check the connection of the audio cable at the main board.
Check connections at speaker terminals.
Replace the main board with the main board from a working Popcorn to isolate
the problem to the main board. If one is not available, contact the service department
at Bay-Tek.
Tickets Do Not Dispense:
Check connections between the ticket dispenser and the main cable
harness.
Check the connection of the main cable at the main board.
Replace the main board with the main board from a working Popcorn to isolate
the problem to the main board. If one is not available, contact the service department
at Bay-Tek.
Game Dispenses Wrong Amount Of Tickets:
Clean opto-electronic beam breaker sensor located on the ticket dispenser circuit
board. To clean, simply blow on sensor to get most of the debris out and finish with
Isopropyl alcohol and a cotton swab.
Check for the correct dipswitch settings on the main board.
Replace the ticket dispenser with a ticket dispenser from a working game to isolate
the problem to the ticket dispenser.
Replace the main board with the main board from a working Popcorn to isolate
the problem to the main board. If one is not available, contact the service department
at Bay-Tek.
8
To Purchase This Item, Visit BMI Gaming | www.bmigaming.com | (800) 746-2255 | +1.561.391.7200
TROUBLESHOOTING (cont.)
Attraction Lighting Not Functioning Properly:
Chaselights:
Check to see that the black cable telephone connectors on the main board are
connected properly.
Check the wires and the solder connection of the black cable to the chaselight
board itself.
Replace the main board with the main board from a working Popcorn game to
isolate the problem to the main board. If one is not available, contact the
service department at Bay-Tek.
Turbo-lights:
Check the individual bulbs to see if they are burned out.
Check the turbo-light sockets for damaged wires or loose solder connection.
Check the connection of the turbo-light cable to the main board.
Replace the main board with the main board from a working Popcorn game to
isolate the problem to the main board. If one is not available, contact the
service department at Bay-Tek.
Halogen lights:
Check for a burned out halogen lamp.
Check the condition of the halogen lamp socket.
Check the halogen lamp socket cable for damaged wires.
Check connection of Halogen lamp cable to the power supply.
Popcorn Bucket sensor not functioning properly:
Check the connection of the bucket sensor to the bucket sensor jumper.
Check the connection of the bucket sensor jumper to the bucket sensor cable.
Check the connection of the bucket sensor cable to the main board.
Check the jumper and cable for damaged wires.
Replace the bucket sensor with a bucket sensor from a working game to isolate the
problem to the sensor.
Replace the main board with a main board from a working Popcorn game. If one is
not available (also if a bucket sensor is not available) contact the service department
at Bay-Tek.
Blower does not function properly:
Make sure the blower fan can spin freely. If it can not remove what ever debris is in
the way.
Check the connection of the blower to the blower power cable.
9
To Purchase This Item, Visit BMI Gaming | www.bmigaming.com | (800) 746-2255 | +1.561.391.7200
TROUBLESHOOTING (cont.)
Blower does not function properly (cont):
Check the connection of the blower power cable to the AC driver board.
Check to see if the fuse is blown in the “FUSE 1” position.
Check the connection of the AC driver board power cable from the AC board to the
power strip.
Check the connection of the signal cable at the AC driver board.
Check the connection of the signal cable at the main board.
Check for damaged wires on the signal cable.
Replace the AC driver board with the AC driver board from a working Popcorn
game. If one is not available, contact the service department at Bay-Tek.
Replace the main board with the main board from a working Popcorn game. If one is
not available, contact the service department at Bay-Tek.
10
To Purchase This Item, Visit BMI Gaming | www.bmigaming.com | (800) 746-2255 | +1.561.391.7200
POPCORN – SPARE PARTS LIST
ACRYLIC PIECES
A5AC1100 – SIDE WINDOWS
A5AC1130 – PAYOUT INFO PLEXI
A5TG1100 – TOP GLASS
$ 48.00
$ 15.00
$ 40.00
DECALS
A5DC1130 –
A5DC1131 –
A5DC1132 –
A5DC1133 –
A5DC1134 –
A5DC1135 –
A5DC1136 –
A5DC1137 –
TOP DOOR DECAL
TOP OF PIPE DECAL
TUB COVER DECAL
TOP BACK INSIDE DECAL
DOOR, BOTTOM DECAL
“ TO WIN TICKETS” INSTRUCTION DECAL
BOTTOM SIDE DECAL
SET OF POPCORN FACES
$ 20.00
$ 20.00
$ 25.00
$ 75.00
$ 20.00
$ 25.00
$ 36.00
$ 36.00
ELECTRONICS
AABD5021 – AC DRIVER BOARD, FUSES
A5PS1001 – POWER SUPPLY
AABD2603 – TICKETS OWED DISPLAY BOARD
AABD2602 – SCORE/TIME DISPLAY BOARD
AAMB5A – MAIN BOARD, GEN5
AAEP-POP - SOUND EPROM, POPCORN
AAMC-POP- MICROCONTROLLER, POPCORN
$ 30.00
$ 90.00
$ 150.00
$ 100.00
$ 600.00
$ 35.00
$ 55.00
HANDLE ASSEMBLY
A5HA6006 – OUTSIDE BLACK HANDLE
A5VF1100 – BUCKET, VACUUM FORMED
AABD4011 – BALL SENSOR BOARD
6338K461 – BEARINGS
$ 40.00
$ 25.00
$ 30.00
$ 2.00
MISC. PARTS
AABL1100 –
A5TD1
–
A5SP1050 –
A5LA9050 –
A5LA1100 –
A5TL2000 –
A5BA1100 –
A5BA4050 –
BLOWER ASSEMBLY
TICKET DISPENSER
SPEAKER
HALOGEN LAMP
TURBO LIGHTS FOR BACK WALL
YELLOW LIGHT COVERS
WHITE POPCORN BALLS
YELLOW POPCORN BALLS
REV. 9/19/02
11
$ 150.00
$ 210.00
$ 15.00
$ 15.00
$ 2.50
$ 2.00
$ 1.15
$ 1.15
To Purchase This Item, Visit BMI Gaming | www.bmigaming.com | (800) 746-2255 | +1.561.391.7200
12 VOLT JUMPER CABLE (J1)
PIN - OUT
12 VOLT INPUT
WHITE
12 VOLT GROUND
GREEN
IN FROM POWER
SUPPLY, TO
MAIN BOARD
12 VOLT INPUT
WHITE
12 VOLT GROUND
GREEN
VOLUME CABLE (J2)
PIN - OUT
RIGHT AUDIO OUTPUT
WHITE
RIGHT AUDIO GROUND
GREEN
LEFT AUDIO GROUND
BLACK
LEFT AUDIO OUTPUT
RED
12
To Purchase This Item, Visit BMI Gaming | www.bmigaming.com | (800) 746-2255 | +1.561.391.7200
BUCKET SENSOR CABLE (J3)
PIN - OUT
BUCKET SENSOR
POWER (+12 VOLTS)
RED
BUCKET SENSOR GROUND
WHITE
BUCKET SENSOR SIGNAL
GREEN
13
To Purchase This Item, Visit BMI Gaming | www.bmigaming.com | (800) 746-2255 | +1.561.391.7200
CONTROL BOX CABLE (J4)
PIN - OUT
AC DRIVER BOARD
BLOWER OUTPUT
GREEN
GAME COUNTER OUTPUT
BLUE/BLACK
AC DRIVER BOARD
BLOWER +12 VOLTS
RED
COUNTER +12 VOLTS
WHITE/BLACK
TICKETCOUNTER OUTPUT
BLUE/WHITE
LOW TICKET OUTPUT
ORANGE/BLACK
LOW TICKET GROUND
GREEN/WHITE
COIN DOOR GROUND
BLACK/WHITE
RIGHT COIN DOOR
INPUT
WHITE/RED
LEFT COIN DOOR INPUT
GREEN
COIN DOOR +12 VOLTS
GREEN BLACK
TICKET DISPENSOR
GROUND
BLACK
TICKET NOTCH
BLUE
TICKET DISPENSOR
ENABLE
WHITE
TICKET DISPENSOR
+12 VOLTS
RED
14
To Purchase This Item, Visit BMI Gaming | www.bmigaming.com | (800) 746-2255 | +1.561.391.7200
TURBO-LIGHT CABLE (J5)
PIN - OUT
BULB #1-3 GROUND
BLACK
BULB #1 OUTPUT
RED
BULB #2 OUTPUT
ORANGE
BULB #3 OUTPUT
WHITE
BULB #4 OUTPUT
PINK
BULB #5 OUTPUT
YELLOW
BULB #6 OUTPUT
BLUE
BULBS #4-6 GROUND
GREEN
15
To Purchase This Item, Visit BMI Gaming | www.bmigaming.com | (800) 746-2255 | +1.561.391.7200
Gen 5 Mainboard Schematics
16
To Purchase This Item, Visit BMI Gaming | www.bmigaming.com | (800) 746-2255 | +1.561.391.7200
Schematics (cont.)
17
To Purchase This Item, Visit BMI Gaming | www.bmigaming.com | (800) 746-2255 | +1.561.391.7200
Schematics (cont.)
18
To Purchase This Item, Visit BMI Gaming | www.bmigaming.com | (800) 746-2255 | +1.561.391.7200
Schematics (cont.)
19
To Purchase This Item, Visit BMI Gaming | www.bmigaming.com | (800) 746-2255 | +1.561.391.7200
Schematics (cont.)
20
To Purchase This Item, Visit BMI Gaming | www.bmigaming.com | (800) 746-2255 | +1.561.391.7200
Schematics (cont.)
21
To Purchase This Item, Visit BMI Gaming | www.bmigaming.com | (800) 746-2255 | +1.561.391.7200
Schematics (cont.)
22
To Purchase This Item, Visit BMI Gaming | www.bmigaming.com | (800) 746-2255 | +1.561.391.7200
Schematics (cont.)
23
To Purchase This Item, Visit BMI Gaming | www.bmigaming.com | (800) 746-2255 | +1.561.391.7200
Schematics (cont.)
24
To Purchase This Item, Visit BMI Gaming | www.bmigaming.com | (800) 746-2255 | +1.561.391.7200
WARRANTY INFORMATION
Bay-Tek, Inc. warrants to the original purchaser that the game will be free of
defects in workmanship and materials for a period of six months from the date
of installation.
Bay-Tek, Inc. will without charge, repair or replace, at its option, defective
product or component parts upon notification to the factory service
department. Serial number identification will be required for warranty
consideration. Warranty replacement part(s) will be shipped immediately via
ground service, along with an RMA number for the return of the defective
part(s). Defective parts must be shipped back to Bay-Tek, Inc. unless
otherwise instructed.
This warranty does not apply in the event of any misuse or abuse of the
product, or as a result of any unauthorized repairs or alterations. This
warranty does not apply if the serial number is altered, defaced or removed
from its original position.
Should your game need servicing, determine the serial number from the logic
unit of the game, and call 920-822-3951 or email [email protected]
REPAIR OF NON-WARRANTY UNITS
Should your game need servicing, determine the serial number from the logic,
and call 920-822-3951 or email [email protected]. An estimate of repair
charges will be quoted to you for approval.
Proceed in one of the two following ways:
1. Request immediate shipment of advanced replacement parts.
2. Send in the defective unit for repair and return.
If advanced replacement(s) are requested, you will receive with your parts an
RMA number for the return of the faulty part(s). You must return defective
parts within 14 days to avoid additional charges.
Should you choose to return for repair include the following:
a.
b.
c.
Name, address and phone number including area code.
Game serial information
A purchase order number, work order number or signed
authorization to perform service.
Repair and Return parts will be shipped back using the same mode of transportation
under which they were received. Repairs are warranted for a period of thirty (30) days
from the date installed into service.
25
To Purchase This Item, Visit BMI Gaming | www.bmigaming.com | (800) 746-2255 | +1.561.391.7200
Ticket Payout Template
1
1
1
1
1
1
2
1
1
1
1
2
3
2
1
2
1
3
4
2
2
2
1
4
5
3
2
3
3
6
6
3
3
4
5
8
7
4
3
5
7
10
8
5
4
6
9
12
9
6
4
7
10
15
10
7
5
10
15
18
15
8
5
20
20
25
25
9
10
30
25
30
50
25
20
50
30
40
To Purchase This Item, Visit BMI Gaming | www.bmigaming.com | (800) 746-2255 | +1.561.391.7200
POPCORN
TROUBLESHOOTING & DIAGNOSTICS
Troubleshooting Strategy
Use common sense and a systematic method of troubleshooting to determine the exact problem,
probable cause and remedy. Use the process of elimination to find the faulty component. Always
check for the simple and obvious causes first such as unplugged, loose or broken wires and bad
sensors, bent, pinched, stuck or jammed components.
Troubleshooting Chart
Problem
No power to the
game.
Probable Cause
a. Unplugged.
b. Blown fuse
c. Outlet strip or building circuit
breaker tripped.
d. Bad power supply.
No Audio
a. Volume too low.
b. Loose wire.
c. Defective Potentiometer.
d. Main circuit board
malfunction.
Halogen lighting
not functioning
properly.
a. Burned out lamps.
b. Wiring damaged or
disconnected from power
supply.
c. Lamp socket damaged or
bad solder connections.
d. Bad power supply.
Chaselights not
functioning
properly.
a. Cable problem at the main
board or at the LED board
connection.
b. Main circuit board
malfunction.
Turbo lights not
functioning
properly.
a. Burned out lamps.
b. Wiring damaged or
disconnected from power
supply.
c. Lamp socket damaged or
bad solder connections
Remedy
a. Check wall outlet.
b. Check transformer fuse (220v applications
only).
c. Check voltage at outlets. Try to determine
cause then reset the circuit breaker.
d. See power supply diagnostic. Replace if
faulty. ( A5PS1001)
a. Increase the volume at the volume control
at the inside of the front door panel.
b. Check audio cable connections to speaker,
volume control and main circuit board.
c. Replace pot. ( A5PO1K)
d. Replace main board with board from
another Gen 5 game if possible to isolate
the problem to the main circuit board.
a. Replace only with 12 Volts, 20 watt, MR16
halogen bulbs. (A5LA9050)
b. Check for 12 Volts to fixtures.
c. Repair or Replace faulty sockets.
d. See power supply diagnostic. Replace if
faulty. ( A5PS1001)
a. Check cable to main board and solder
connection at chaselights. Repair or replace
as necessary.
b. Replace main board with a spare Gen 5
board if possible to isolate the problem to
the main circuit board.
a. Replace lamps. ( A5LA1100)
b. Check for 12 Volts pulse to fixtures.
c. Repair or Replace faulty sockets.
To Purchase This Item, Visit BMI Gaming | www.bmigaming.com | (800) 746-2255 | +1.561.391.7200
Troubleshooting Chart
Problem
Lo flashing on
display.
Probable Cause
a. Ticket tray empty.
b.
c.
Bucket sensor not
counting balls
correctly.
Faulty low ticket switch.
Broken/loose wires.
a. Bucket sensor is dirty,
blocked, or defective.
b. Sensor cable problem.
c. Main circuit board
malfunction.
a. Debris in blower.
Blower does
not function
properly,
Check AC
driver
board for
green LED
on when
game is
played.
Tickets do not
dispense.
Green
LED is on.
b. Blown fuse on AC
driver board.
c. Faulty blower.
d. AC driver board
malfunction.
e. Cable problem.
Green
LED does
not come
on.
a. Bad connection or
broken signal cable.
b. Faulty main board.
a. Ticket tray empty due to
faulty low ticket sensor
switch or broken/loose wires.
Sensor switch stuck or
switch wire bent out of
position.
b. Faulty cable to dispenser.
c. Dirty opto-sensor or paper
dust buildup in ticket
dispenser.
d. Notch on tickets too shallow.
e. Ticket dispenser faulty.
f.
Main circuit board
malfunction.
Remedy
a. Load tickets. Make sure ticket stack rests
on top of wire actuator of switch.
b. Replace switch. (AASW200)
c. Check cable connections from switch to
main circuit board.
a. Clean sensor and realign optos on board.
Replace if necessary. (AASE1100)
b. Check cable connections from sensor to
main circuit board. There is a Molex
connection at bucket arm to check also.
c. Replace main board with a spare Gen 5
board if possible to isolate the problem to
the main circuit board.
a. Check to see that blower can spin freely.
Remove any obstruction.
b. Replace fuse in position 1. (A5FUSE4)
c. Replace blower. (AABL1100)
d. Replace main board with a spare Gen 5
board if possible to isolate the problem to
the main circuit board.
e. Check 110 Volt AC lines from power strip to
AC driver board, to blower.
a. Check wiring from AC board to main circuit
board.
b. Replace main board with a spare Gen 5
board if possible to isolate the problem to
the main circuit board.
a. Fill ticket tray. Replace low ticket sensor
switch. Repair wiring. Clean ticket tray of
dirt and loose tickets or debris. Bend switch
wire to correct position under tickets.
b. Check wiring continuity from dispenser to
main board. Check for pinched, broken or
disconnected wires. Replace as necessary.
c. Clean with compressed air and if necessary
wipe sensor with isopropyl alcohol on a
cotton swab.
d. Flip tickets and load upside-down to have
large cut notch toward opto sensor.
e. Replace dispenser with spare working
dispenser.
f. Replace main board with a spare Gen 5
board if possible to isolate the problem to
the main circuit board.
To Purchase This Item, Visit BMI Gaming | www.bmigaming.com | (800) 746-2255 | +1.561.391.7200
Troubleshooting Chart
Problem
Wrong number of
tickets dispensed.
Probable Cause
Remedy
a. Ticket Pattern or other ticket
dipswitches set wrong.
b. Dirty opto-sensor on ticket
dispenser.
c. Many tickets in memory. If
ticket meter is counting the
tickets coming out, then
reset tickets owed.
d. Faulty ticket dispenser.
a. Check and reset dipswitches for proper
setting.
b. Clean with compressed air or wipe with
isopropyl alcohol on a cotton swab.
c. Push reset tickets owed button “up button”
on bracket to reset tickets out.
e. Main circuit board
malfunction.
e. Replace main board with a spare Gen 5
board if possible to isolate the problem to
the main circuit board.
d. Replace with spare working dispenser.
To Purchase This Item, Visit BMI Gaming | www.bmigaming.com | (800) 746-2255 | +1.561.391.7200
Diagnose Power Supply
Use the following procedure to check
the Power supply for Gen 5 games.
Check the small green LED light on the
power supply circuit board. If the light is
out there is a short somewhere. If the
light dims, there is an overload in one
of the circuits such as a bad motor.
Turn power OFF. Disconnect all 12 volt
output wires only. Turn power ON.
Green LED Light
comes ON.
Green LED Light
remains OFF.
Replace Power
Supply.
Turn power OFF. Unplug all outputs from the Gen 5 Circuit Board.
Reconnect the 12 volt output wires to the Power Supply. Turn power
ON.
Green LED Light
comes ON.
Turn power OFF.
Reconnect the outputs
at the Main Circuit
Board one at a time.
Wait 3 minutes
between tests to turn
power ON.
Green LED Light
comes ON.
Green LED Light
remains OFF.
Short in Main Board
- Replace.
Green LED Light
remains OFF.
Green LED Light
dims.
That cable is OK.
That cable or related
component is shorted out.
See Jumper Cable Pin-Outs
to see which component might
be at fault.
A related component such as
a solenoid is causing an
overload. See Jumper Cable
Pin-Outs beginning on page
18 to see which component
might be at fault.
To Purchase This Item, Visit BMI Gaming | www.bmigaming.com | (800) 746-2255 | +1.561.391.7200