1
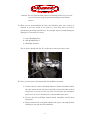
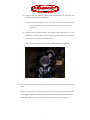
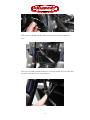
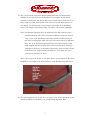
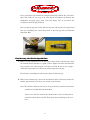
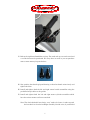
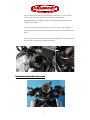
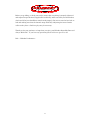
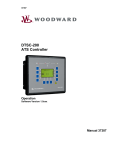
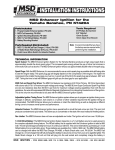
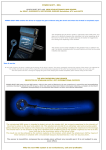
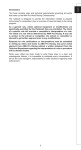
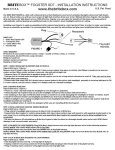
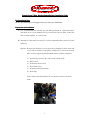
Yamaha GenGen-2 VV-Max Holeshot Superbike Bars Installation Guide
PrePre-Installation Note
Be sure to read and go over all pages before you start your installation
Preparation for Installation
A) It is recommended that you first get your bike positioned on a flat hard surface
and lifted up on a rear paddock stand, a front wheel chock or both, so that the
bike is sitting upright, in a stable state.
B) Although it is not totally necessary, it is also recommended that you do one of the
following.
Option-1: Remove the following, so as to prevent any damage to those items and
as you will see further in this guide, it makes for a convenient resting
place for the temporarily disassembled master cylinder assemblies.
1) Ignition Key (only the key and not the switch itself)
2) Rider’s Seat
3) Instrument Panel Cover
4) Faux Tank Cover
5) Instrument Panel Assembly
6) Air Scoops
This is what it should look like, IF, you decide to remove the above
items.
1
Option-2: Use two good size bath towels or something similar to lay over the
top cover and air scoops for protection during the installation
process.
C) While you are disassembling the bike, the following items may need to be
removed or at least, moved to one side for a later step when you will be
repositioning the brake hydraulic line, so you might want to consider doing this,
although it is not totally necessary.
1) Lower Headlight Stay
2) Side Headlight Stays
3) Headlight Assembly
This is what it should look like, IF, you decide to remove the above items.
D) Next, you will now need to disassemble the handlebar assembly.
1) Unbolt both the Clutch and Brake Master Cylinder Assemblies which
have the mirror mounts and levers attached to them and either let them
hang down or you can use the top of the air box where the instrument
panel use to be, if you decided above, to disassemble those parts.
2) Unscrew the Left and Right Control Switch Assemblies and let them
hang down.
3) Remove both the left and right handlebar end caps by removing the bolts
holding the end caps onto the handlebars.
2
4) Unfasten the two throttle cables from the Throttle Grip and slide the
Throttle Grip off of the handlebars.
Note: If you have a helper, you can also leave the throttle cables attached
to the throttle tube and slide it off the bars with the cables still
connected.
5) Take the four Chrome Plastic “bolt head” caps and bolts off of the
handlebar mounting plate and pull off the mounting plate as you hold
the handlebars and set everything aside.
This is what it should look like, after you disassemble everything.
E) Now, you will need to unclamp and re-position the brake and clutch hydraulic
hoses.
There is a black plastic clamp for the brake hose that needs to be removed and it
is no longer needed. Also, there is a metal clamp that needs to be unbolted, the
brake hydraulic hose pushed down and then the hose re-clamped again.
3
This is what it should look like, after you push down the brake hydraulic
hose.
There are two rubber grommets that are no longer needed. You can either peel
them off of the hose or just leave them as is.
4
F) Now, you will need prepare the Holeshot Superbike Bars for installation by
drilling the necessary holes for the handlebar left and right switch control
assemblies and throttle. The set-pin hole on the bottom center of the bars is no
longer used or needed, and this will allow you to rotate and adjust the bars to
your liking. You will therefore need to remove the set-pin on the handlebar
mount, if it remains on the mount when you remove your current handlebars.
Note: The Holeshot Superbike bars are mounted on the bike with the center
punch mark facing “UP”. Since there may be differences in your current
setup, as far as the handlebars and control switch assemblies that you
may have installed. This guide will not go into exactly where to drill those
holes, but we do recommend getting the bars on, centered in the clamp,
hand snugged and then rotated close to where you like them. Putting a
small dot of “white-out” on the switch / throttle pin, then touching it firmly
to the bars in the proper location will make for a nice mark, for you to
center punch and drill the holes.
Again, the set-pin hole shown in the photo below on the bottom of the Stock
Handlebars is no longer used. Do not drill one in the Holeshot Superbike Bars.
G) The last preparation you need to do, is to remove your left hand grip off of your
current handlebars and transfer it to your Holeshot Superbike Bars.
5
Using a small flat tip screwdriver with glue dissolving solution like “Goo Gone”
Spray Gel, makes it very easy to do. Just slip the screwdriver tip between the
handlebars and grip, spray some “Goo Gone Spray Gel” in and rotate the
screwdriver until the grip slides off.
Once you get the grip off, wash it with warm water and soap, dry it real good and
then use something like, “Scott Grip Stick” to put the grip onto the Holeshot
Superbike Bars.
Final Mounting of the Holeshot Superbike Bars
A) Make any final adjustments to the bars then torque down to specification, using
the Yamaha Service Manual as a guide. I like to tighten the front bolts first then
the rear bolts. 14 to 16 ft lbs max. is all that is needed. Be sure to use a proper
calibrated inch pound or 3 /8 drive foot pound torque wrench only.
Finish off by reinstalling the four chrome plastic bolt head caps.
B) Slide on the throttle grip, connect the two throttle cables and loosely mount the
throttle grip housing, if you have yet to slide on the throttle
Note: The throttle cables need to now be on top, and come up and over the master
cylinder for the Holeshot Superbike Bars.
Also, be sure that the inside of the throttle tube is clean and dry, then it
should be lubed a little with Tri- Flow spray when installing on the new
bars.
6
C) Bolt on the right hand handlebar end cap. The stock end cap can not be used and
a set like this must be purchased. We carry these in stock or you can purchase
some at most motorcycle parts dealers.
D) Now, position the throttle grip and housing so that the throttle twists freely and
tighten the bolts.
E) Install and tighten both the left and right control switch assemblies using the
pre-drilled set-pin holes as the guides.
F) Install and tighten both the left and right master cylinder assemblies which
have the mirror mounts and levers attached.
Note: The clutch hydraulic hose banjo, “may” need to be loosen, in order to push
the hose down to clear the headlight assembly left side cover, if you decided
7
not to remove that cover in the beginning. In that case, you will need to
“bleed” your clutch line after the installation of the Holeshot
Superbike Bars is all complete. Refer to the Yamaha Service Manual for
“bleeding” procedure.
If you do need to bleed the clutch line, be sure to have a rag under the
banjo bolt when loosening, being careful not to drip any brake fluid on any
parts.
Also, you will need to loosen and push down and back, the clutch hydraulic
hose into the left side of the bike’s main frame.
The Holeshot Superbike Bars fully installed
8
Before you go riding, re-check your work, ensure that everything is properly tightened
and torqued to specification (if applicable) and finally, make sure that your front brakes,
clutch and all of your handlebar controls work properly. Be sure to turn the bars lock to
lock and making sure that the throttle snaps back fully. Adjusting the inner throttle
cables so they have a little free play may be necessary.
Thank you for your purchase, we hope that you enjoy your Holeshot Superbike Bars and
always “Ride Safe”. If you have any questions please feel free to give us a call.
Dale – Holeshot Performance
9