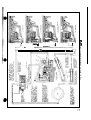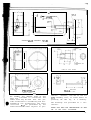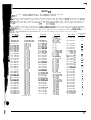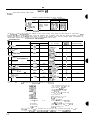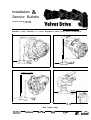
1
B! l B o k L g M hrn e r. A uto m otiv e ,: Transmission Systems SERVICE MANUAL Pri c e $ 5.0 0 UYVR ~ltlIC TRAN&WSION DIRECT DRIVE MODEL 70C & 71C SERIES Th i s Serv i ce Manua l i s prepared and i l l us t ra t ed for t he ASI-70C and ASI-7lC d i rec t dr i ve t ransm i ss i on , bu t i t a l so con t a i ns supp l emen t ary i nforma t i on and i l l us t rat i ons wh i ch a l l ow i t t o be used for t he serv i c i ng of t he o t her ear l i er mode l t ransm i ss i ons , ASI-7OF.3, ASI7lB, ASI - and ASI-71. B -W A uo tr og m o tai vr ne ,e r In c. TS ryasnt se m m iss s i o n 5K4i l0q 1o r e M l nudni ca ine a T3 e1 l7e p 2h 8o n6 e6 1 0 0 Avenue 47304 T ele x 27 491 B orgW arn er A uto m otiv e FORM 1137 / lo-85 PRINTED IN U.S A TABLE OF CONTENTS .5 INSTALLATION DRAWINGS AND INFORMATION . . . . . . . . . . . . . . . . . . . . . . . . . . . . . . . . . . . . . . . . .fi CROSS SECTlON ASSEMBLY DRAWlNGS . . . . . . . . . . . . . . . . . . . . . . . . . . . . . . . . . . . . . . . . . . . . . . I2 EXPLODED VIEWS AND PARTS LISTS . . . . . . . . . . . . . . . . . . . . . . . . . . . . . . . . . . . . . . . . . . . . . . . . I9 ClRCULATION DIAGRAM . . . . . . . . . . . . . . . . . . . . . . . . . . . . . . . . . . . . . . . . . . . . . . . . . . . . . . . . . DESCRIPTION..................................................................2 0 lNSTALLATIONPRECAUTIONS.....................................................2 I .2 1 Transmission oil cooler. . . . . . . . . . . . . . . . . . . . . . . . . . . . . . . . . . . . . . . . . . . . . . . . . . . . . . . . . . .2l Control lever position. . . . . . . . . . . . . . . . . . . . . . . . . . . . . . . . . . . . . . . . . . . . . . . . . . . . . . . . . . . ,2 l Front pump mounting . . . . . . . . . . . . . . . . . . . . . . . . . . . . . . . . . . . . . . . . . . . . . . . . . . . . . . . . . . 21 LUBRICATION RECOMMENDATlONS ................................................. .2 I 1 ............................. Checking oil level . . . . . . . . . . . . . . . . . . . . . . . . . . . . . . . . .2 1 Changing oil . . . . . . . . . . . . . . . . . . . . . . . . . . . . . . . . . . . . . . . . . . . . . . . . . . . . . . . . . . . . . . . . . .2 1 Transmission fluid . . . . . . . . . . . . . . . . . . . . . . . . . . . . . . . . . . . . . . . . . . . . . . . . . . . . . . . . . . . . . Oilcapacity..................................................................7 1 TIiANSMISSIONOPERATlON.......................................................2 2 ...2 2 Forward . . . . . . . . . . . . . . . . . . . . . . . . . . . . . . . . . . . . . . . . . . . . . . . . . . . . . . . . . . . . . . . . . Ncutr:~l.....................................................................~2 Revcrsc.....................................................................2 . 2~ Frecwhceling . . . . . . . . . . . . . . . . . . . . . . . . . . . . . . . . . . . . . . . . . . . . . . . . . . . . . . . . . . . . . . . . . Oilpressures..................................................................2 2 .24 DISASSEMBLY OF TRANSMISSION. . . . . . . . . . . . . . . . . . . . . . . . . . . . . . . . . . . . . . . . . . . . . . . . . . .24 Oil draining procedure . . . . . . . . . . . . . . . . . . . . . . . . . . . . . . . . . . . . . . . . . . . . . . . . . . . . . . . . . . 24 Disassembly ofvalvc and spring asscrnhly from transmission . . . . . . . . . . . . . . . . . . . . . . . . . . . . . . . . . . .24 Removal of front pump assembly . . . . . . . . . . . . . . . . . . . . . . . . . . . . . . . . . . . . . . . . . . . . . . . . . . . 35 Removal of adapter and reverse clutch piston . . . . . . . . . . . . . . . . . . . . . . . . . . . . . . . . . . . . . . . . . . . . . . . . . . . . . . . .75 Removal of thrust washer, reverse clutch pressure plate, pressure plate springs and dowel pins .25 Removal of drive gear and clutch assembly . . . . . . . . . . . . . . . . . . . . . . . . . . . . . . . . . . . . . . . . . . . . . .2S Dissssen~hly of forward cluicl~ . . . . . . . . . . . . . . . . . . . . . . . . . . . . . . . . . . . . . . . . . . . . . . . . . . . . . .25 Removal of pinion cage and output shaft assembly from transmihon case . . . . . . . . . . . . . . . . . . . . . . . . .26 Removal of rear bearing . . . . . . . . . . . . . . . . . . . . . . . . . . . . . . . . . . . . . . . . . . . . . . . . . . . . . . . . . ..2 6 REASSEMBLYPRECAUTIONS.. .................................................. .27 INSPECTION AND GENERAL INSTRUCTIONS. . . . . . . . . . . . . . . . . . . . . . . . . . . . . . . . . . . . . . . . . . ..2 7 ASSEMBLYOFTRANSMlSSlON . . . . . . . . . . . . . . . . . . . . . . . . . . . . . . . . . . . . . . . . . . . . . . . . . . . .27 Assembling oil seal in bearing retainer . . . . . . . . . . . . . . . . . . . . . . . . . . . . . . . . . . . . . . . . . . . . . . . . .28 Installation of baffle in the transmission case . . . . . . . . . . . . . . . . . . . . . . . . . . . . . . . . . . . . . . . . . . . . .28 Installation of pinion cage and output shaft assembly in the transmission case. . . . . . . . . . . . . . . . . . . . . . .3 I Assembly of the forward clutch into tl~c ring gear . . . . . . . . . . . . . . . . . . . . . . . . . . . . . . . . . . . . . . . . .34 Asscmhly of forward clutch huh and sealing rings on drive gears. . . . . . . . . . . . . . . . . . . . . . . . . . . . . . . .35 Assemhlillg drive gear and clutch assembly . . . . . . . . . . . . . . . . . . . . . . . . . . . . . . . . . . . . . . . . . . . . . Instnllation of drive gear and clutch assembly. reverse clutch plate, and reverse clutch prcssurc plate in .30 transInissiot~ case . . . . . . . . . . . . . . . . . . . . . . . . . . . . . . . . . . . . . . . . . . . . . . . . . . . . . . . . . . . . Assembly of I-everse clutch piston into adapter . . . . . . . . . . . . . . . . . . . . . . . . . . . . . . . . . . . . . . . . . . . 3X 3’) Asscml~ly of adapter and I-CV~I-SC clutch piston onto transmission cast . . . . . . . . . . . . . . . . . . . . . . . . . . . . .40 Assembly of front pump. . . . . . . . . . . . . . . . . . . . . . . . . . . . . . . . . . . . . . . . . . . . . . . . . . . . . . . . . .41 Mounting front pump or1 transmission . . . . . . . . . . . . . . . . . . . . . . . . . . . . . . . . . . . . . . . . . . . . . . . . .4’3 Assembling valve spring assembly . . . . . . . . . . . . . . . . . . . . . . . . . . . . . . . . . . . . . . . . . . . . . . . . . . . . . . . . . . . . . . . . . . . . . . . . . . . . . . .43 Installation of the valve and spring assembly in the transmission’casc. .44 Assembly of shili lever . . . . . . . . . . . . . . . . . . . . . . . . . . . . . . . . . . . . . . . . . . . . . . . . . . . . . . . . . . .45 Installation of oil strainer assembly and oil drain plug into transmission case. . . . . . . . . . . . . . . . . . . . . . . .45 Installation of miscellaneous transmission parts. . . . . . . . . . . . . . . . . . . . . . . . . . . . . . . . . . . . . . . . . . EXTRAEQUIPMENT..............,.....,........................................46 Assembly of neutral switch kit. . . . . . . . . . . . .46 SPECIAL INFORMATION AND INSTRUCTIONS -MODEL 70C AND 7 IC TRANSMISSIONS. . . .47 Installation of oil filler cap and dipstick assembly . . . . . . . . . . . . .47 Installation of oil strainer assembly and oil drain plug into transmission case. .47 Installation of breather assembly . . . . . . . . . . . . . . . . . . . .48 Assembly of front pump. . . . . . . . . . . . . . . . . . . . . . . . . . . . . . . .48 Mounting front pump on transmissiori. . / ,. . . SO Elimination of regulator valve buzz. . . . . . . . . . . . . . . .5 I Drive gear and plug assemblies . . . . . . . . . . .52 Pinion cage and output shaft assembly. . . . . . . . . . . . . . . . . . .52 Forward and reverse gear transmission case and bushing assembly. . . . . . . . .52 SPECIAL INFORMATION AND INSTRUCTIONS - MODEL 70B AND 7 1B TRANSMISSIONS .53 Instailation of breather assembly . . . . . . . . . . . . . . . . .53 Assembly of front pump. . . . . . . . . . . . . . . . . . . .5? Drive gear and plug assembly. . . . . . .53 Assembly of shift lever. . . . . . . . . . . . . . .53 Adapter capscrews. . . . . .54 SPECIAL INFORMATION AND 1NSTRUCTIONS - MODEL 70 AND 71 TRANSMISSIONS . . .S4 Assembly of front pump. . . . . . . . . . . . . . . . . . . .54 Installation of the baffle in the transmission case, .S4 Installation of oil strainer assembly and oil drain plug into transmission case. .55 Cooler return to transmission. . . . . . . . .S5 SERVICE INSTRUCTIONS FOR SERIES lo-17 AND lo-18 TRANSMISSIONS ..56 TKOUBLE SHOOTING Cl IART . . , . . .58 BOLT TORQUE SPEClFlCATlONS. 1.1. . . . . .60 ASSEMBLY TOOL DRAWINGS . . . . .6 1 6 Fig. 3 Cross Sec t i on of Mode l ASI -7 l C Transm i ss i on REFER TO ON THIS PARTS DRAWING ASSEMBLIES . NUMBERS IN PARTS INDEX LETTERS REPLACEMENT 17 . PART PAGE IDENTIFY LIST TO ON REPLACEMENT NUMBERS INDEX USE WHEN Fig . 4 Cross Sec t i on of Mode l ASI -70B Transm i ss i on ON THIS REPLACEMENT NUMBERS ORDERING INDEX PARTS DRAWING IDENTIFY PART NUMBERS IN PARTS INDEX LETTERS LIST ON PAGE 18 . REFER TO REPLACEMENT ASSEMBLIES . TO USE WHEN , .FFin. G urns ..Sectioq p f 36 3 M,n&1,,ASl~7l& 60 ).-;I: Tylnsmissinn WHEN ORDERING REPLACEMENT PARTS USE INDEX NUMBERS ON THIS DRAWING TO IDENTIFY PART NUMBERS IN PARTS INDEX LETTERS LIST ON PAGE 18. REFER TO REPLACEMENT ASSEMBLIES. F i g . 6 Cross Sec t i on of Mode l ASI- Transm i ss i on ON TH!S REPLACEMENT NUMBERS ORDERING INDEX PARTS DRAWING IDENTIFY PART NUMBERS IN PARTS INDEX LETTERS LIST ON PAGE 18 . REFER TO REPLACEMENT ASSEMBLIES . TO USE WHEN 28 is 65 / 9667 10-18-000-001 12 P A R T S L I S T F O R 1 0-l 7 & l o-1 8 D I R E C T D R I V E U N I T S DESCRIPTION NO. INDEX T.S. REQ. NO. PART NO. 7 . 29 31 I00001 03319 10000179791 5 I Lockwasher 1 l/4-20 x l/2 Hex head bolt TE I 1 D o w e l Din (lo-171 * . N.I.-NOT 5C-A66A T 3 3 NOTE 3 NOTF 3 4 1 1 1 1 ‘ N O T E 2 - S e e page 6 2 * N O T E 3 - S e a page 6 3 * N O T E 4 - S e e page 6 4 1 _ , ILLUSTATED 13 c-3 N 14 1 ASl-70C P A R T S L I S T JDEX NO. W.G. PART NO. 1 1000179822 i/16-18 x l-1/2 0-00-l 83-02 1 b/16-18 x l-3/8 Hex Head Bolt ‘1 C-A60 :ront 2 1 C-62A 3 J.S.S. 4 5 zi. Y-- IO. EQ. IDEX UO. W.G. ‘ART NO. i-- N.I. O-04-559-001 lipstick Assembly-New Type 4 N.I. lipstick 1 57 I-04-034-002 300145366 )il Seal Assembly 1 ‘58 38-AlA rransmisslonCase :ront Pump Housing 1 59 it A4867VV 1 J.S.S. :ront 1 60 18-140 Zase Bushings (Two Presized Bushing) Baffle J.S.S. I-61 :ront Pump Drive Gear :ront Pump Gasket 1 1 C-A98 1 C-84 3il 1 61 62 3il Return Tube 1 1 191 1 1840D :apscrew - 12 Point Head deedle Bearing 4 63 B85B Reducing 1 1 64 000444866 3/8-18 ‘1 C-A8 :orwald E 1 -A244A /4-27 Dryseal Plug 7everse Clutch Piston ;ealing Ring Valve & Spring Assembly Snap Ring 12 100044469 1 ‘l-35 1805A 1 1 1 13 1804G ‘0” 14 ‘I-1448 :ase 15 ‘l-71 ‘l-87 ‘I -8JA ?everse N.I. A 6 7 8 9 IO 11 N.I. 16 17 18 N.I. DESCRIPTION Hex Head Bolt Pump Assembly Pump Driven Gear & Reverse Adapter Ring & Adapter Gasket Clutch Pressure Plate lowel Pin (Used With Fiber Plate) ‘l-97 Iowel Pin (Used With Metal ic Plate) ‘ressure Plate Spring ‘l-86 qeverse Clutch Plate Fiber ‘2.A66B ‘l-158 qeverse Clutch Plate Metalic DESCRIPTION Tube 1 2 3rive Screw Strainer & Bushing Assembly Assembly Pipe Bushing Dryseal Plug 821 l-246 1 1 67 l-242 Valve Spring Retabner Valve Spring 68 l-243 Pressure 1 69 I-244A 1 1 70 804H Forward & Reverse Gear Trans. Valve “0” Ring 3 1-14 Valve Cover Gasket 3 71 72 l-4 1 1 12 1 73 74 000103319 Valve Cover l/4 Lockwasher 000179793 l/4-20 x 5/8 Hex Head Bolt 1 75 l-42 Poppet Spring Regulator Valve 1 1 76 000453632 5/l 6 Steel Ball 77 l-798 21 36A-7% ;nap Ring 1734 X-33 inap Ring Clutch Spring Bearing Ring 1 1 ,78 22 23 Forward & Reverse Shift Lever Control Lever Washer 5/16 Lockwasher 1 80 24 25 ‘l-45 iL-36 -orward Clutch Piston jealing Ring 1 1 81 82 26 jM-122 ‘0” 1 27 3-37 Clutch 28 jL-67 :lutch Pressure Plate 1 1 29 jC-A66A Clutch 30 31 3-176 i%-175A Clutch Outer Plate Clutch Pressure Plate 32 33 1822 1755 ?ing Gear Snap Ring Iutch Spring Snap Ring 34 70-6 qing Gear 35 II-70 -orward 36 1495 snap Ring 1 37 71-40 -orward 1 38 71C-3Al6 Irive 39 40 41 U.S.S. 71-17 3/8 Taper Plug rhrust Washer Key No. 9 - No Rock Sealing Ring 4873 42 43 44 45 4806J 0000218211 0000179859 0000103322 Spring Inner Plate Assembly Oil Seal Bearing 48 49 50 71-147 Bearing 4775L Main Shaft Nut Coupling 51 B208AGS 71.lA2 Annular K\t A4867DD Maln 4636E X 71-Al95 Name Plate 52 53 54 55 56 4547BA N.I. - NOT ILLUSTRATED N.I. r4867AH N.1, r486JAQ Clutch Pack Kit Forward Clutch Cylinder Kit N.I. N.I. r4867HA Gasket & Seal Kit r4867WW Small Parts Kit 3 1 1 1 1 1 1 1 1 1 2 1 6 6 1 1 1 Gasket 1 1 1 Output Shaft Assembly Drive Gear Bushing -Two Presized Bushing in Kit Dipstick l/8-27 Dryseal Plug 3 1 1 Bearing Pinion Cage & 000444687 1 1 Retainer Retainer 5116-24 Hex Nut Breather 1 1 Woodruff Key 7/16-14x l-l/8 Hex Head Bolt 7116 Lockwasher 70-J 000108579 000115729 ~47406 1 ‘I 1 Gear & Plug Assembly 71c-110 000103340 1 1 1 1 Clutch Hub 46 79 3 2 Clutch Cylinder 47 1 65 66 yhrust Washer 3all Bearing Ring 1 3 %107A 19 20 1 Assembly-Screw-in N.S.S. - Type 1 1 1 - - - NOT SERVICED SEPARATELY 15 m 16 / \ ,i.- ..” ,j - 2c 1 ASI-71C PARTS LIST IDEX UO. W.O. PART NO. DESCRIPTION 0. Ea. DEX IO. W.O. PART NO. 1 loo01 79822 l/16-18 x l-l/Z Hex Heed Bolt i -- N.I. O-00-183-021 l/16-18 x l-3/8 Hex Head Bolt 4 V.I. V.I. 10-04-559-001 10-04-034-002 NO. DESCRIPTION REQ. Dipstick Assembly-New Type Dipstick Tube 1 1 2 A ‘lCA60 :ront Pump Assembly 1 67 0000145366 Drive Screw 2 ‘lC62A )il Seal Assembly 1 58 71B-AlA TransmissionCase 3 4 J.S.S. :ront Pump Housing 1 59 Kit A4867VV Case Bushings (Two Presired J.S.S. :ront Pump Driven Gear 1 60 718.140 Baffle 1 6 4.s.s. :ront Pump Drive Gear 1 61 71C-A98 Oil Strainer Assembly 1 6 7 l-61 I91 1 :ront Pump Gasket 1 62 71c-84 Oil Return Tube 1 8 1840D Zapscrew. 12 Point Head Jeedle Bearing 4 1 1 1 ‘lCA8 1000444691 ‘l-35 :orward & Reverse Adapter l/4-27 Dryseal Plug 1 1 48858 0000444066 71-A244A Reducing Pipe Bushing 3/8-18 Dryseal Plug 9 10 11 e3 64 E 65 4821 Valve & Spring Assembly Snap Ring 1 1 12 1805A 1804G Reverse Clutch Piston ;ealing Ring 1 1 66 67 71-246 71.242 Valve Sprlng Retainer Valve Spring 1 1 ‘0” Ring :ase & Adapter Gasket 1 1 68 71-243 Pressure Regulator Valve 1 xeverse 1 69 70 71-244A 4804H Forward 81 Reverse Gear Trans. Valve “0” Ring 1 1 3 3 71 72 71-14 71-4 Valve Cover Gasket Valve Cover 1 1 12 1 73 74 0000103319 0000179793 l/4 Lockwasher 114-20 x 610 Hex Head Bolt 3 3 13 14 r1-1446 11-71 15 Clutch Pressure Plate & Bushing Assembly Buehlng) 1 1 11-87 II-87A Iowa1 Pin (Used With Fiber Plate) 16 17 18 N.I. 71-97 71-86 72.A660 ‘ressure Plate Spring qeverse Reverse Clutch Plate - Fiber Clutch Plate - Matalic 1 76 71-42 Poppet Spring 1 71.158 fhrust Washer 3all Bearing 1 1 76 0000453632 5116 Steel Ball 1 Ring 1 71.798 0000 103340 Forward & Reverse Shift Lever Control Lever Washer 1 snap 77 78 jnap Ring 1 1 79 80 81 0000108579 0000115729 A4740G 5116 Lockwesher 5116-24 Hex Nut Breather 1 1 1 1 N.I. 19 20 Iowel Pin (Used With Metalic Plate1 21 3107A R6A-7% 22 23 4734 X-33 24 71-45 Clutch Spring Bearing Ring Forward Clutch Piston 25 JL-36 Sealing Ring 1 26 27 5M-122 “0” Ring 1 02 N.I. 0000444607 A4867AE 118-27 Dryseal Plug Clutch Pack Kit 3-37 ‘kl. A4867AQ Forward Clutch Cylinder Kit 5L-67 Clutch Spring Clutch Pressure 1 28 N.I. 29 30 5C-A66A 3-176 Clutch Inner Plate Assembly Clutch Outer Plate 1 5 A4867HA A4867WW Gasket & Seal Kit Small Parts Kit 31 32 5%175A Clutch Pressure Plate 4822 4755 71-6 Rrng 33 34 35 Gear Snap Ring 1 1 Clutch Spring Snap Ring Ring Gear ,I 1 71-70 Forward Clutch Cylinder 1 4495 Snap Ring 1 37 71-40 71C-3A16 Forward Clutch Hub 1 Drive Gear & Plug Assembly 1 39 40 N.S.S. 3/8 Taper Plug 71-17 Thrust Washer 1 1 41 42 4873 4806J 0000218211 Key No. 9 - No Rock Sealing Ring Woodruff Key 7/16-14 x l-1/8 Hex Head Bolt 7116 Lockwasher Oil Seal 1 2 1 43 44 45 46 0000179859 0000103322 71c-110 6 6 1 71-7 71-147 Bearing Retainer 48 Bearing Retainer Gasket 1 1 49 4775L Main Shaft Nut 1 50 51 45470A Coupling 1 8308AGS 71-lA2 Annular Bearing 1 Pinion Cage 61 Output Shaft Assembly 1 Kit A4867DD Main Drive Gear Bushing Two Presized Bushing in Kit Name Plate Dipstick AssemblyScrew-in Type 1 47 52 53 54 55 4636FD 56 71.A195 - NOT ILLUSTRATED N.I. 4 36 38 N.I. Plate 1 1 I I 1 - N.S.S. - NOT SERVICED SEPARATELY 17 38 Fi 14 Par ts Display for Forward & Reverse AS!170 & ASI- Transmissions Onl Those Par ts Di fferent from the ASI- iOC & kl -71C Assembly Are I l lust rated. 13 Par ts Display for Forward & Reverse i i?l7OB & ASI-7IB Transmissions Onl Those Par ts Di fferent from the ASI-7OC & AS11-7lC Assembly Are I l lust rated. ASI-71B & ASI-70B ASI- & ASl -70 PARTS LIST PARTS LIST " ‘nnooEX. pi$. j 179825 5/16-18x1-7/8 HEX HEAD BOLT INDEX PARTS 2 3 '+ 5 84, & 8 MUST BE ORDE ' ED AS ABOVE A&EMBLY: SEAL INDEX NO. 2 P IS AVAILABLE SEPAR TELY F R REa LACEMENT OR IN SMALL PARTS KITlA4867Mj INDEX PARTS 84 & 85 MAY BE OBTAINED SEPARATELY. I OIL SEAL ASSEMBLY 2 71-62 I 3 71-60 PUMP HOUSING I FORWARD h REVERSE ADAPTER 9 71-88 I B 7l -Al6 DRIVE GEAR L PLUG ASSEMBLY INDEX PARTS 38 & 39 MUST BE ORDERED AS ABOVE ASSEMBLY. 38 71-16 DRIVE GEAR I 41 431787 WOODRUFF KEY #6t I 55 4636EK NAME PLATE(ASI-70B ONLY) I 4636EL NAME PLATE(ASI-71B ONLY) I, I I 56 3-2Al95 OIL FILLER CAP & DIPSTICK 1 IASSEMBLY I PART NAME 5/16-18x1-7/8 HEX HEAD BOLT 4 FRONT PUMP ASSEMBLY I I fi 85 MUST BE ORDERED INDEX PARTS 2,3,4,5,84 INDEX NO. 2 IS AS ABOVE ASSEMBLY. 0 R IN AVAILABLE SEPARATELY 85"A~~yPsAERTOSsTKAIlTN~~4~~7pAM~iTE:yNPEX PARtS 84 L 71-62 OIL SEAL ASSEMBLY 71-60 PUMP HOUSING FORWARD & REVERSE ADAPTER 71-88 DRIVE GEAR & PLUG ASSEMBLY 7l -Al6 INDEX PARTS 38 & 39 MUST BE ORDERED AS ABOVE ASSEMBLY . _ DRIVE GEAR 38 71-16 WOODRUFF KEY # 61 41 431787 NAME PLATE(ASI-70 ONLY) 55 4636DF NAME PLATE(ASi-71 ONLY) 4636DL I 3-2Al95 OIL FILLER CAP dr DIPSTICK 56 I I I ASSEMBLY D TRANSMISSION CASE & BUSH70-AIC ING ASSEMBLY(ASl -70 ONLY) TRANSMISSION CASE dr BUSH7l -AIG ING ASSEMBLY(ASI-71 ONLY) INDEX PARTS 58 & 59 MUST BE ORDERED AS ABOVE BUSHINGS INDEX NO. 59 ARE pl ;Y. FOR REPLACE ti ENT IN SERVIC L KIT (A4867VV Y. 60 61 63 81 83 84 85 71-140 7l -A98C 9885 AJ2-87 3-196 71-3 110533 FORWARD & RE ERSE TRANSMISSION CASE Y AS I - ONLY) FORWARD & RE ERSE TRANSMISSION CASE Y ASI- ONLY) BAFFLE OIL STRAINER BUSHING BREATHER ASSEMBLY OIL FILLER TUBE PUMP BACKING PLATE [ : ;#: ; ;3&" ' HEAD 86 120428 ANNULAR GASKET 58 NOTE: WHEN ORDERING PARTS FOR ASI-70B, ASI7lB, ASl -70 & ASl-71 TRANSMISSIONS, USE THE APPROPRIATE ASI-70C or ASI-71C PARTS LIST TO IDENTIFY THOSE PARTS WHOSE INCEX NUMBERS ARE NOT LISTED IN THE ABOVE PARTS LIST. THE ABOVE ASl -70B, ASl -7lB, ASI - & AS I PARTS LIST SHOW ONLY THOSE PARTS WHICH DIFFER FROM THOSE IN ASl -70C & ASl r71c. 18 70-IC 71-16 I I 3 I I I1 r----J I- - - i r-------l I iii- -- , ._____ J 1 c - - - - - _, I I II ---_I I---- - IL ---J I L----, 1 i I 1 I I I -----------.-, I-_-___ ---------------_--_ I ’ --------------J ------------__J 1 - .-5 a DESCRIPTION RIGHT SIDE Fig. 16 External Views ASI-70C o r ASI-7lC Tllis manual is prepared primarily fok ttle Model 7OC & 7 I(’ direct drive transmissions. tlowever, all additional supplemel~tary descriptions and illustrations are included to allow it to be used for the Muriel 7013, 7 I B, 70 and 71 Iransmiss~ons. The material in this manual is also used in conjunction with t l lo prcJp21 reductioii gear marluals for servicing all 70, 70R, 70(‘, 7OCIli. 7 1, 7 I R, 7 I(’ i~nil 7 1CR reductioil gear transinisslons. The following list identifies the important features of the vat-ious model transmissions in (Figs. I (J and I (>A): A. Oil filler cap cYC dipstick asstTmtIlp B. Oil outlet to coolet C. O i l inlc! 1‘1.0111 cooie1 1). Oil drain plug E. Oil pimp F. Moul1ting pads & mounting bolt Iloles RIGHT SIDE LEFT SIDE G. Drive Gear II. Output shaft Ilange I . Sllifl level .I. Valve cover , I(. Breather I.. Main line pressure tap M. Reverse clutch pressure lap The transmission consists of a planetary gear set, a forward ClUtcll, a reverse clutcll, an oil pump, ~lnci ;I pressure regulatar a11d irotary control valve. All of these are contained in a CUst ilon IIousing along wit11 necessary shafts and connectors, to plovicic forward, I-cvcrse and ncut~al operation. A dklK( drive ratio is used for all (orward operation. In reverse. the speed of the output shaft is equal to input speed, LEFT SIDE Fig. l6A E x t e r n a l V i e w s ASI- o r ASl-71 but in the opposite direction. Helical gearing is used to provide quieter operation than can be obtained with spur gear gearing. The transmission is fast shifting to give the boat operator complete control of the vessel. Shifting is accomplished by the fore and aft movement of the shift lever, (Fig. 16). This movement rotates the control valve and directs oil under controlled pressure to ttie required channels. Oil pressure is provided by the crescent type pump, the drive gear of which is keyed to the drive shaft and operates at transmission input speed to provide screened oil to the pressure regulator. From the regulator valve the oil is directed through the proper circuits to the bushings and anti-friction bearings requiring lubrication. A flow of lubricant is present at the required parts whenever the front pump is turning and it should be noted that supply is positive in forward, neutral and reverse conditions. The unit has seals to prevent excape of oil. Both the input and output shafts are coaxial, with the input shaft splined for the installation of a drive damper, and the output shaft provided with a flange for connecting to the propeller shaft. RATIO AS SHOWN IN COLUMN “B” MODEL AS SHOWN IN COLUMN “A” Tile l‘ollowillg are the identiticatlon markings for tile Warner Gear “VELVET DRIVE Marine Transmissions. “A” MODEL HAND OF ROTATION “A” MODEL HAND OF ROTATION “ASI-71C CLOCKWISE “ASI-71CR COUNTER ASI-71B CLOCKWISE ASI-71BR C O U N T E R ASl-71 CLOCKWISE ASl-71R COUNTER *ASI-70C CLOCKWISE *ASI-70CR C O U N T E R ASl-70B CLOCKWISE ASI-70BR C O U N T E R ASl-70 CLOCKWISE ASI-70R C O U N T E R t CLOCKWISE CLOCKWISE CLOCKWISE CLOCKWISE CLOCKWISE CLOCKWISE THESE AREAS TO INDICATE BASIC MODEL COLOR CODE IN COLUMN “C” “B” RATIO I:1 I:1 I:1 1:l I:1 1:l 1 “C” COLOR The hand of rat&ion referred to above is when viewed from stern of boat looking forward. *TRANSMISSION ASSEMBLIES PRESENTLY IN PRODUCTION. 20 RED RED RED BLUE BLUE BLUE 7 INSTALLATION PRECAUTIONS TRANSMISSION OIL COOLER CONTROL LEVER POSITION The oil cooler must be properly connected to the transmssion before the engine is cranked or started. Failure to properly connect the oil coolerwill result in the blowing out of the forward clutch piston due to over pressurization. NO WARRANTY claims due to this type failure will be allowed as this is the responsibility of the Boat Builder, Engine Manufacturer or Conversion Engine Manufacturer. The position of the control lever on transmission when in forward should be shifted to the point where it covers the letter “F” on the case casting, and is located in its proper position by the poppet ball. The WARRANTY is cancelled if the shift lever poppet spring and/or ball is permanently removed, or if the control lever is changed in any manner, or repositioned, or if linkage between remote control and transmission shift lever does not have sufficient travel in both directions. This does not apply to transmissions equipped with Warner Gear electrical shift control. A cooler of sufficient size shall be used to assure that the maximum oil temperature of the transmission will not exceed 190°F. Failure to provide proper cooling may result in damage to the transmission from insufficient oil flows and pressures if the transmission is operated at temperatures above the maximum recommended. The proper oil cooler inlet and outlet connections are shown in (Figures 16 Et 16A). PROCEDURE FOR FILLING TRANSMISSION WITH OIL When filling the transmission, oil should be added until it reaches the full mark on the dipstick. The quantity of oil depends upon the angle of the installation, but information to serve as a guide on possible amount needed may be found in chart below. The unit should be turned over at engine idle speed for a short time in order to fill all circuits, including the cooler and cooler piping. NOTE: Be sure the cooler is properly installed and the transmission contains oil before cranking or starting engine. CHECKING OIL LEVEL Check the oil level daily before starting the engine. Oil will sometimes drain back into the transmission from the cooler when improperly installed. It is important that oil level checks on new installations be made immediately after the engine has been shut off and before the oil has had a chance to drain back. If you have drain back, correct the installation. CHANGING FRONT PUMP MOUNTING Before mounting the transmission on the engine be sure that the pump is correctly installed. Orient the pump mounting bolt holes and arrows indicating direction of rotation to correspond with the direction of rotation required by the engine. If the pump is not installed for the proper rotation the pump will not produce oil pressure to operate the transmission when engine is started. Lubricating oils which are recommended for use in diesel engines and also meet Detroit Allison Type C3 specifications may be used if the engine speed does not exceed 3000 RPM. SAE #30 is preferred. SAE #40 is acceptable if high operat,ing temperatures are to be encountered. Multiviscosity oils such as 1 OW-40 are not acceptable. The first choice is an oil which falls in the SAE-API service Class “CD.” The second choice would be an oil which falls in the SAE-API service Class “CC.” The equivalent DOD mil specs are: “CD” “CC” Mil-L-21048 Mil-L-45199 The new C3 specifications were developed by Detroit Diesel Allison Division of General Motors to outline the requirements of an oil suitable for use in their heavy duty hydraulic automatic and powershift transmissions. The oil companies should be able to provide information as to the suitability of their product for use in a given application. OIL A seasonal oil change is recommended In pleasure boats. Work boats require more frequent changes. Change oil anytime the oil becomes contaminated, changes color, or becomes ranted smelling. TRANSMISSION FLUID Dexron@II, Type F, and other hydraulic transmission fluids which meetthe Detroit Diesel Allison Type C3 specifications are recommended for use in all Velvet Drive@ marine transmissions. 01 L CAPACITY TRANSMISSION MODEL ~R~NsMlssioN LEVEL or CR 1.8 ASlJlC or CR 1.8 ASI-70C 0iL 1 C APACIT Y (QUARTS) 15” INCLlNtb 1.3 I 1.3 I NOTE: OILCAPACITY DOES NOT INCLUDE CAPACITY NEEDED FOR TRANSMISSION COOLER AND OILLINES, WHICH MAY IN MANY CASES REQUIRE AN ADDITIONAL AMOUNT GREATER THAN IN ABOVE TABLE. 21 TRANSMISSION OPERATION REVERSE Fig. 17 ASI-7lC Shift Lever Positions FORWARD Move the transmssion shift lever to the extreme forward position where the spring-loaded ball enters the chamfered hole in the side of tile shift Icver and properly locates it in the “forward” position, (Fig. 17). With the shift lever so located, oil at regulated pressure flows from the control Valve into porting in the transmission case, output shaft, drive gear, forward clutch cylinder, and into the i‘c;rward clutch cavity. The resulting movement of the forward clutch piston and the lever action of the clutch spring forces the multiple discs of the furward clutch together and, with the sid of the fol-ward clutch hub, locks the input shaft to thz ring gear. This in turn prevents rotation of the planetary pinions about their own axes and thus locks the input shaft, ring gear and output shaft together, causing them to rotate as a solid concentric coupling. In this way, input shaft speed and direction of rotation arc transmitted directly to the output shaft. NEUTRAL Move the transmission shift lever to the center position where the spring-loaded hall enters the chamfered hole in the side of the shift lever and properly locates it *in the “11eutra1” position, (Fig. 17). With the shift lever so locatcd, flow of pressurized oil to the clutches is blocked at the control valve. The clutches are also vented, by a different portion of the control valve, to the sump aI-e;l inside the transmission case and thus free-running open clutches are insured. '22 Move the transmission shift lever to the extreme rearward position where the spring-loaded ball enters the chamfered hole in the side of the shift lever and properly locates it in the “reverse” position, (Fig. 17). With the shift lever SO located, oil at regulated pressure flows from the control valve into porting in the transmission case, thence back to the adapter and into the reverse clutch cavity. The resulting movement of the revel-se clutch piston and the reverse clutch pressure plate locks the reverse clutch plate to the transmission case. The stationary reverse clutch plate, through splined connectors, thus prevents rotation of the ring gear. With the ring gear held and the sun gear rotating at input speed, the pinions of the compound planetary gearset are free to rotate about their own axes and reveee the direction of rotation of the pmion carrier and output shaft. FREEWHEELING Under sail with the propeller turning, or at trolling speeds with one of two engines shut down, the design of the Velvet DI ive gear maintains adequate cooling and lubrication. OlL PRESSUliES Transmission line pressure should be between 1 1 O-I 50 PSI at engine speeds between 450 and 2000 RPM at normal operating temperatures of 150-l h5°F. When operating the transnlissioll at low temperatures or excessive speeds pressures of 200-250 PSI may be obtained. A maximum transmission oil temperature of 1’90°F. is recommended See page 23 for pressure specifications 01) 10-I 7 units. DISASSEMBLY OF TRANSMISSION NOTE: Tear down procedure should not begin until the transmission exterior and work area have been Is thoroughly cleaned. and spring assembly out right side, (Fig. 73). 6. OIL DRAINING PROCEDURE 1. Remove oil filler plug located below the shift lever on transmission case. 2. rear left side of If space permits, place container having approximately two (2) quart capacity under drain cap, located as shown in (Fig.18). Unscrew the drain plug and cooler return tube assembly, reach into the opening with a suitable tool, and remove the strainer assembly, (Fig. 77). Allow oil to drain into pan. Remove three (3) hex head bolts, lockwashers, valve cover and valve cover gasket, as shown in (Fig. 74) 4. Remove shift lever parts, (Fig. 75). 5. Tap with soft hammer on exposed threaded shaft, upon which shift lever was mounted, and pull valve and associated case from Place valve and spring assembly in a suitable holder, (Fig. 71). Depress the valve spring retainer and valve spring until the snap ring is free to be removed. The components of the valve and spring assembly can now be removed in the order shown in (Fig. 70). NOTE: The control valve assembly can also be disassembled by using an arbor press with suitable tools as shown in (Fig. 72). REMOVAL OF FRONT PUMP ASSEMBLY 7. Remove the four (4) front pump attaching bolts, (Fig. 69), place a protective covering over splines to prevent damage to seal lip, and lift pump assembly squarely up and over the protruding input shaft, (Fig. 67). 8. Remove pump drive gear, front pump g a s k e t , and Woodruff key, (Fig. 66). DISASSEMBLY OF VALVE AND SPRING ASSEMBLY FROM TRANSMISSION 3. of Two different pump assemblies NOTE: are used. One includes a backing plate which must be removed before the gears are exposed. For additional information and description see pages 40 and 48-51. 9. For the pump assembly with the backing plate, remove the one (1) flat head machine screw, (Fig. 96) and lift backing plate to expose gears. 10. Mark gears to identify for proper relocation of gear faces during (Figs. 65 and 94). reassembly, (Figs. 62 and 91) show views of the different front pump parts when completely disassembled. Fig. 18 D r a i n i n g T r a n s m i s s i o n O i l 24 I, DISASSEMBLY OF ADAPTER AND REVERSE CLUTCH PISTON 11. Remove the four (4) cap screws (12 Lift the point 'head), (Fig. 61). adapter and reverse clutch piston, If necessary, tap the (Fig. 60). adapter with asoft hammer to remove. CAUTION: The reverse clutch pressure plate may stick momentarily to the reverse clutch piston. To avoid damage, prevent pressure plate from dropping. 12. Force compressed air into reverse clutch cavity while holding piston, as shown in (Fig. 19) and piston will pop up out of reverse clutch cavity. 13. Remove sealing rings as shown in (Figs. 57 and 58). REMOVAL OF THRUST WASHER, REVERSE CLUTCH PRESSURE PLATE, PRESSURE PLATE SPRINGS AND DOWEL PINS 14. Thrust washer can position shown in now be lifted (Fig. 56). 15. Remove clutch pressure shown in (Fig. 55). 16. The twelve (12) pressure plate springs and the three (3) dowel pins can now be removed, (Fig. 54). DISASSEMBLY OF DRIVE CLUTCH ASSEMBLY from plate GEAR as 20. While holding the ring gear, tap the front end of the drive gear with soft hammer. The drive gear and forward clutch hub assembly will pass through the ring gear and forward clutch assembly to come out of the rear end of the ring gear, (Fig. 47). DI'2ASSEMBLY OF FORWARD CLUTCH 21. Remove bearing from clutch cylinder by tapping with soft blunt tool. 22. Remove ring gear snap ring,(Fig.43). 23. While holding ring gear, tap with soft blunt tool on exposed face of forward clutch cylinder inside of ring gear. Forward clutch cylinder will move forward to disassemble out of front of ring gear. After removing the clutch spring and the clutch spring snap ring, all parts of the forward clutch can be disassembled as shown in (Figs. 34, 35, 36, 37 & "38). 24. Piston can be removed from forward clutch cylinder to position in (Fig. 41) by applying compressed air to clutch cavity through one of three (3) holes in inside diameter of forward clutch cylinder, while other holes are blocked. AND 17. Grasp the exposed front end of the input gear and lift straight up; drive gear and clutch assembly parts easily lift out of opening in front, (Fig. 53). 18. Remove thrust was$er located between drive gear and planetary carrier, (Fig. 52). 19. Stand drive gear and clutch assembly in suitable fixture and remove internal & external snap rings at ball bearing from the drive gear and clutch cylinder, (Figs. 50 and 51). Do not permit drive gear to move forward after the above snap rings are removed. F i g . 19 D i s a s s e m b l i n g R e v e r s e C l u t c h Piston in Adapter 25 25. Remove forward clutch sealing as shown in (Figs. 39 & 40). rings, REMOVAL OF PINION CAGE AND OUTPUT SHAFT ASSEMBLY FROM TRANSMISSION CASE 26. Remove main (Fig. 33). shaft nut shown iRlN in 27. Using bearing puller, pull coupling from output shaft. 28. Remove six (6) hex head bolts and lockwashers, (Fig. 31). 29. Remove bearing retainer and gasket. REMOVAL OF REAR BEARING The following paragraphs (30 NOTE: & 31) describe alternate methods of Either removing the rear bearing. method is equally desireable. 30. Using bearing,puller, grasp bearing by exposed groove in outside diameter and gently pull bearing from case, (Fig. 20). F i g . 20 Remov i ng Bear i ng f rom Case 31. Place transmission, with front face Using suitclown, on arbor press. able tool, press down on exposed end of output shaft until shaft is free of bearing inside diameter. Protect pinion cage and output shaft from damage from fall during this operation. REASSEMBLY PRECAUTIONS The following list contains a number of assembly problems which it is felt requires special attention during the reassembly of the direct drive transmissions. The information below includes the locations in the manual where information and instructions are available on these important assembly features. 4. Installation of adapter on transmission case should follow the procedures outlined, (Page 39, Paragraph 56), for tightening the If bolts are not altercapscrews. nately tightened a small amount, damage can result to the needle bearing and its input shaft race. 5. 1. Installation of proper pinion cage and output shaft assembly in transmission cases without bushings, (Page 52, Paragraphs 18 & 19). 2. Selection of the proper clutch spring snap ring, (Page 31, Para,I graph 23). 3. Selection of the proper ring gear snap ring, (Page 33, Paragraph 30). 26 Protection of pump seal during assembly of pump assembly over input drive gear, (Page 41, Paragraph 65). 6. Mounting pump to correspond to the ;;yine rotation, (Page 42, Paragraph . 7. Check input shaft to insure that it rotates freely when turned by hand after transmission is assembled (Page 42, Paragraph 69). INSPECTION 1. AND GENERAL Cleanliness is absolutely necessary during assembly to insure proper functioning of transmission. Trans mission case passages should always have pipe plugs removed to allow for thorough cleaning. When available, use compressed air to dry parts before they are assembled. Do not wipe parts with rags to clean or dry them as lint from the cloth may cause erratic valve action. 2. Inspect all parts for damage or wear. Replace defective parts. 3. All gaskets, oil seals and rubber sealing rings should be replaced except in relatively new units. Judgement should then be exercised as to the need for replacing these parts. 4. INSTRUCTIONS Oil seals and bearings are stalled by using an arbo suitable fixtures, and properly align parts being best inr press, tools to assembl- ed. Hammering seals and bearings “into position can severly damage parts. 5. Automatic transmission fluid type “A” s u f f i x “A” should\ b e u s e d t o lubricate parts as they are assemblPetroleum jelly may be used on ed. gaskets or other parts that must be held in position during assembly. A l l rubber parts will slide more freely if lubricated. 6. Tighten all bolts and screws evenly to the recommended torque, (See page 60). A S S E M B L Y O F TRANSMISSION ASSEMBLING RETAINER 1. 2. OIL SEAL IN into bore of housing with seal lip positioned as shown in (Fig. 21). Caution should be observed to insure that too much sealant is not used. BEARING I n s p e c t r u b b e r l i p o f cracks, holes or brittle of rubber lip material. s e a l f o r condition P l a c e f r o n t <face o f b e a r i n g r e t a i n e r on arbor press table. Apply a suitable sealant to the outside diameter of seal before installing squarely 3. Using arbor press and suitable tool, a s s h o w n i n ( F i g . 22), p r e s s t h e o i l seal into the bearing retainer until the rear face o f t h e o i l s e a l i s flush with the rear face of the bearing retainer, PROP OF 0 SEAL OIL F i g . 21 Ins tal l ing Oi l Seal klg- 22 Press i ng O i l Sea l i n Re t a i ner 27 TRANSMISSION PINION CAGE AND OUTPUT SHAFT ASSEMBLY Fig . 23 Ins t a l l i ng Mode l 718 & 7lC Baf f l e INSTALLATION OF THE BAFFLE IN THE THANSMISSION CASE 4. Insert the baffle inside the transmission case with the notched side toward the front and the curve o f b a f f l e t o w a r d t h e b o t t o m o,E t h e transmission case, (Fig. 23). 5. Press down on t h e h a f f l e a n d s n a p t h e r e c t a n g u l a r slot,s a t e a c h e n d on to the cast, bosses at each side O S the case, ( F i g . 2 4 ) . These bosses will position and hold the baffle in its proper place. Fig. 25 Pinion Cage and Ou t pu t Shaf t in P l ace on Arbor Press Assemb l y INSTALLATION OF PINION CAGE AND OUTPUT SHAFT ASSEMBLY IN THE TRANSMISSION CASE 6. Place the pinion cage and output shaft assembly on a 5 inch diameter b y 2-5/8 l o n g a s s e m b l y t o o l , w h i c h i n t u r n i s mounted on an arbor press, as indicated in (Fig. 25). case I f t h e transmission NOTE: does not have bronze bushings for the output shaft journal, use only the output shafts of the design with three o i l g r o o v e s a s shown in See page 52 (paragraphs (Fig. 26). further information. 1 8 & 191,f o r SHAFT WITH OIL GR,OOVES Fig. 24 28 Mode l 708 & 70C O i l Baf f l e Proper l y Ins tal led F i g . 26 La t e and Ear l y Mode l P i n i on Cage and Ou t pu t Shaf t s SHYT ASSEMBLY F i g . 27 Case Assemb l ed over P i n i on C& c and pu t Shaf t Assemb l y and Asscmb P y Tool ISSION t- Place the transmission case over the pinion cage and output shaft assembl y s o t r a n s m i s s i o n c a s e r e s t s 7. squarely on arbor press table which is supporting assembly tool (Fig. 27). a. Inspect the bearing ble dirt or burrs. 9. Inspect the rear bearing for scored or damaged balls and races and for loose or cracked ball retainer. Replace the bearing with a new part if damage is detected. 10. bore for possi- Fig. I, 29 Rear Bear i ng Pressed i n P l ace ing until clean and lubricate with automatic transmission fluid, type ” A ” , suffix “A”, before assembly. 11. With the groove on the outside diameter of the bearing located toward the rear of the transmission, as s h o w n i n ( F i g . 28), p l a c e t h e b e a r ing over the projecting output shaft and squarely in the bearing bore. 12. Using an assemb l y tool designed to press evenly on the bearing outer and inner races, press bearing down until seated against shoulder, (Fig. 29). Inspect the bearing for presence of dirt. I f d i r t i s p r e s e n t , w a s h bear- shaft or case REAR BEARING WITH GROOVE F i g . 28 Rear Bear i ng Proper l y Pos i t i oned on Transm i ss i on Case F i g . 30 Bear i ng Re t a i ner Gaske t I I i n P l ace 29 7 / 16 LOCKWASHER BEARING RETAINER \ F i g . 31 13. $s . f?;?Aing Bear i ng Re t a i ner on Rear Place bearing retainer gasket on rear of transmission case as shown in (Fig. 30). Gasket may be coated with petroleum jelly for easier assembly. 14. Place bearing retainer in place on rear of case as shown in (Figi'31). Install six (6) 7/16 lockwashers and six (6) 7/16-14 hex head bolts; tighten bolts to a torque of 42-50 pounds-feet. ' ig. 33 V i ; ; , of Comp l e t e l y Assemb l ed Ou t pu t 15. Inspect and lubricate the hub diameter of rear coupling which runs in contact withtherubber lip of oil seal. If this surface is scratched or burred, replace the part with a new piece to prevent seal-lip damage and subsequent oil leakage. 16. After lubricating the splined porthe tion of coupling, assemble splined coupling onto the externally splined portion of the output shaft. When the coupling has been aligned squarely on the output shaft and hand assembly has proceeded as far as possible, place a suitable tool on the coupling, (Fig. 32), and gently press the coupling with arbor press until contact with the bearing inner race is made. 17. Assemble main shaft nut in place on output shaft and tighten to prescribed torque of 100 to 200 poundsThis should bring inner race feet. of bearing solidly in contact with the shoulder on output shaft and eliminate any detectable end play in the coupling and output shaft combination, (Fig. 33). F i g . 32 Press i ng Rear Coup l i ng i n P l ace 30 F i g . 34 Ins t a l l i ng C l u t ch Pressure P l a t e (Rear ) F i g . 35 Ins t a l l i ng Forward C l u t ch P l a t es ASSEMBLY OF THE FORWARD CLUTCH INTO THE RING GEAR 18. Place the ring gear on a clean surface with the external teeth up, as shown in (Fig. 34). 19. Remove all dirt and solid particles from the shoulder inside the gear formed by the top of the internal helical gear, (Fig. 34). 20. With the smoothly ground face in the upward position, install the clutch pressure plate (rear) in the ring as shown in (Fig. 34). Assemgear, bly is complete when the clutch pressure plate is firmly and squarely seated on the shoulder at the bottom of the internal splines. 21A For (5) (4) and 22. Install clutch pressure plate (front) with flat face down in cont ac t with clutch plate, as shown in (Fig. 36). 23. Install clutch spring snap ring, Assembly is complete (Fig. 37). when snap ring is squarely and firmly seated on the internal shoulder provided by the top of the internal splines. I BE SURE YOU HAVE THE PROPCAUTION: THE CLUTCH SPRING ER SNAP RING. the Model 71C lubricate five clutch inner plates and four outer clutch plates, arrange assemble, as shown in (Fig. 35). 21B For the Model 70C lubricate three (3) clutch inner plates and four (2) outer clutch plates, arrange and assemble, as illustrated in (Fig. 35) for the Model 71C. F i g . 36 Ins t a l l i ng C l u t ch Pressure P l a t e (Fron t ) 31 SNAP RING IS .090 TO THICK AND HAS A FREE S-19/32 + l/16 INCHES. 24. With the concave side of the clutch spring down, install in ring gear, as shown in (Fig. 30). Assembly is complete when the clutch spring is seated firmly and squarely on clutch snap ring. 25. ring and a lubricated clutch sealing ring, as shown in (Fig. 39). Inspect the inside diameter of the forward clutch piston having contact with the sealing ring; remove all burrs or scratches and lubricate before assembly. .093 INCHES DIAMETER OF 26. Assemble on the forward clutch piston, the clutch spring bearing Install in forward clutch cylinder a well lubricated sealing ring, (Fig. 40). Lubricate entire forward clutch cylinder before continuing a s s emb l y . I CLUTCH SPRING F i g . 37 I Ins t a l l i ng C l u t ch Spr i ng Snap R i ng CLlJfCH Fig. CL"Td SPRING BEARING RING 39 Ins t a l l i ng C l u t ch Sea l i ng R i ng CLUTCH CYLINDER Fig . 32 38 Ins t a l l i ng C l u t ch Spr i ng Fig . 40 Ins t a l l i ng Sea l i ng R i ng I 27. After aligning the assembled forward clutch piston squarely on the assembled forward clutch cylinder, press the clutch piston into the forward c l u t c h c y l i n d e r , as shown in (Fig. 41) . This is a hand assembly and should not require pounding by hammer or pressing on arbor press. Assembly is complete when piston “bottoms” in forward clutch cylinder. 28. Place the combined parts, as assembled in steps 18 through 24 inelusive, o n a suit;able s u p p o r t w h i c h has been placed on an arbor press, (Fig. 42). Center the clutch spring in the ring gear. 29. 30 . ma i n t a i n i ng load from arbor press, assemble ring gear snap ring, ( F i g . 43). Tap ring while in place to insure full seating of ring in groove. Wh i l e CAUTION: B E SIJRE Y O U H A V E T H E PROPER SNAP RING. THE RING GEAR S N A P R I N G I S . 0 7 4 T O .078 I N C H E S ” THICK AND HAS A FREE DIAMETER OF S-7/8 + l/16 I N C H E S . Place the parts assembled in steps 25 through 27 inclusive into the open top of the assembly described Place a i n s t e p 2 8 , ( F i g . 42). suitable assembly tool squarely on top of the forward clutch cylinder and press down with the arbor press until the forward clutch cylinder is firmly seated on the snap ring and the groove for the snap ring is Check, by looking fully exposed. into rear of ring gear, to be sure that the clutch spring bearing ring is properly assembled on the forward clutch piston. Fig. 42 Press i ng Forward C l u t ch Cy l i nder Into R i ng Gear gi!ACRHD CYLINDER F i g . 41 lns tal l i ng Forward C l u t ch P i s t on F i g . 43 t a l l i ng R i ng Gear Snap Ring Ins 33 ASSEMBLY OF FORWARD CLUTCH HUB AND SEALING RINGS ON DRIVE GEAR 1I 31. Place the forward clutch hub on a suitable support placed on an arbor press in the position shown in (Fig. 44). 32. Assemble Woodruff key in the keyway provided on the drive gear,(Fig. 44). 33. Lubricate the outside diameter of the drive gear on that area which presses into the forward clutch hub. Fig. 44 Press i ng Dr i ve Gear C l u t ch Hub 34. Install the drive gear and Woodruff key squarely into the forward clutch hub, being careful to align the Woodruff key with the mating keyway in the forward clutch hub,(Fig. 44). Press the drive gear into the forward clutch hub until the gear "bottoms" on the face of the forward clutch hub and the groove for the uncovered. snap ring is fully 35. Invert the parts referred to in step 34 and install snap ring in the groove provided, (Fig. 45). Tap ring after assembly with suitable tool to insure full seating in groove. 36. Install two (2) forward clutch sealing rings in grooves provided on drive gear, (Fig. 46). After installing rings in groove, hook ends and turn rings to insure freedom of rotation. i n t o Forward FORWAR 'EulUeTCH F i g . 45 Ins t a l l i ng C l u t ch Hub Snap R i ng I 34 I F i g . 46 Forward C l u t ch Sea l i ng Ins tal l in R i ngs on B r i ve Gear ASSEMBLING ASSEMBLY 37. DRIVE GEAR AND CLUTCH With drive gear and clutch hub in assembly tool as shown in (Figs. 45 a n d 46), p l a c e r i n g g e a r a n d f o r ward clutch assembly over drive gear as shown in (Fig. 47). 39. Place aligned parts and assembly tool in place on arbor press. Place bearing over protruding drive gear and squarely into bore at front of forward clutch cylinder; press bearing down with arbor press until bearing is fully seated on shoulder and snap ring grooves in front of bearing are exposed (Fig. 49). 38. Lower ring gear and clutch assembly u n t i l i n t e r n a l t e e t h o f c l u t c h plates begin to engage teeth on forRotate ring gear ward clutch hub. to align teeth of plates with teeth Do not force ring on clutch hub. a s d a m a g e to teeth on plates gear, When ring gear and will result. clutch are in correct position, rear end of ring gear should be against the assembly tool or “flush” with the rear thrust face of drive gear, as shown in (Fig. 48). Do not remove drive gear and clutch assembly from assemb l y tool or move drive gear forward until steps 39, 40 and Any movemen t of 41 are completed. the drive gear forward will result in the clutch plates becoming disengaged with clutch hub and sealing rings moving out of position. Fig. F i g . 47 Assemb l i ng R i ng Gear and C l u t ch Assemb l y on Dr ive Gear 48 Assemb l i ng R i ng Gear and C l u t ch Assemb l y on Dr ive Gear F i g . 49 Press i ng C l u t ch Bear i ng i n P l ace . 35 INSTALLATION OF DRIVE GEAR AND CLUTCH ASSEMBLY, REVERSE CLUTCH PLATE, AND REVERSE CLUTCH PRESSURE PLATE IN TRANSMISSION CASE 42. Place the parts assembled in steps 1 through 17 inclusive, on a smooth, clean surface in the upright position indicated in (Fig. 52). In this position, the rear face of rear coupling will provide sufficient base to enable assembly to proceed. TOOL , Fig. 50 Instal l ing Snap Ring ; 40. I n s t a l l e x t e r n a l s n a p r i n g o n d r i v e gear, (Fig. 50). 41. Install internal snap cylinder, (Fig. 51). ring in clutch WASHER Fig. 52 Instal l ing Thrust Washer 43. Coat the drive gear thrust washer with petroleum jelly and assemble into pinion cage and output shaft assembly, as shown in (Fig. 52). Center the washer carefully over bore provided for rear of drive gear. 44. Fig. 51 36 Instal l ing Snap Ring After lubricating the rear end of the drive gear and checking centered position of the thrust washer, install the drive gear and clutch assembly into the case and pinion cage and output shaft assembly, Care and proper center(Fig. 53). ing must be exercised to prevent damage to when the rear diameter gear enters the output at this point the bushings of the drive shaft. $5, I n s t a l l t h e t w e l v e ( 1 2 ) p r e s s u r e I plate springs in the holes provided _ in the reverse clutch cavity, (Fig. The holes should be free from 54). dirt and all springs should be firmly seated. 46. lwRE SPRING PRESSURE PLATE SPR IJG Coat the three (3) dowel pins with petroleum jelly and assemble them in the three (3) grooves provided at the outside diameter of the reverse c l u t c h c a v i t y , ( F i g . 54,). A s s e m b l y is complete when the dowel pin is firmly seated on end and into the groove, as far as groove contour will permit. E p ‘1.’ F i g . 54 !?s t a l !a t j on of Twe l ve (1,2) Pressure r late Spr i ngs and Three (3) Dowe l P i ns required to locate the pressure plate with relation to the pressure plate springs, (Fig. 55). A properly assembled reverse pressure plate w i l l a p p e a r a s s h o w n i n ( F i g . Sri). I f p r e s s u r e p l a t e does not drop down to position, approximately flush with transmission case front face, c h e c k t h e t,hree ( 3 ) d o w e l p i n s f o r possible misalignment. Fig . 47. 53 Ins t a l l i ng Dr i ve Gear and C l u t ch Assemb l y Install reverse clutch plate over e x p o s e d spllned t e e t h o f r i n g g e a r . C l u t c h plat,e m u s t b e f i r m l y a n d evenly seated on the case face forming the rear of the reverse clutch cavity, (Fig. 55). 48. I n s t a l l t h e r e v e r s e c l u t c h p r e s s u r e plate with the twelve (12) holes in the downward position. Align the cast slot in the pressure plate with the large oil hole in the front face of the transmission case, (Fig. 55). Since the twelve (12) pressure plate springs are not evenly spaced, the slot and oil hole alignment are Fig . I 55 Ins t a l l i ng Reverse C l u t ch Pressure Plate I 37 (b) Oil passages free sence of dirt and from preobstruction. (c ) Reverse clutch cavity outer wall, smooth clean surface free from scratches or burrs and coated generously with petroleum jelly. Coat sealing ring with petroleum jelly and install in groove of adapter hub, as shown in (Fig. 57). 51. After lubricating sealing ring with petroleum jelly, assemble in groove of reverse clutch piston, as shown in (Fig. 58). ,:: F i g . 56 Ins tal l in Thrus t Washer and Reverse C 9 utch Pressure P l a t e ,I REVERSE s:Kg 49 . Coa t t hrus t washer with assemble, as petroleum shown in ASSEMBLY OF REVERSE PISTON INTO ADAPTER CLUTCH jelly and (Fig. 56). 50. After checking adapter for the following, place it on clean surface in position, shown in (Fig. 57). (a) Clean needle bearing assembly, properly installed and free from damage. Fig. 58 Assemb l i ng Sea l i ng R i ng 52. Examine inside diameter of reverse clutch piston for smooth clean surface free from scratches or burrs and coat generously with petroleum LUBR I CATE jel ly. PASSAGE Fig. 38 57 Assemb l i ng Sea l i ng Rini ' 53. Place the reverse clutch piston, as assembled in step 51 on the adapter, as assembled in step 50, (Fig. 59). Press down on reverse clutch piston while pulling a smooth, clean screwdriver blade around the exposed This portion of the sealing ring. will aid the chamfered bore in the adapter to compress the sealing ring into the groove in the outside diameter of the piston. Assembly can be completed by using hand pressure until piston has "bottomed" in reverse clutch cavity. Exposed face of clutch piston should be flush with adjacent surrounding surface on adapter when assembly is completed. ASSEMBLY OF ADAPTER AND REVERSE CLUTCH PISTON ONTO TRANSMISSION CASE 54. With parts assembled, in steps 1 through 49 inclusive, resting on the rear face of coupling, coat the exposed front of the transmission case with petroleum jelly and assemble inplace the caseand adapter gasket, (Fig. 60). Fig. 60 Assembl ing Adapter and Reverse Clutch Assembly onto Case PULL SCREWDRIVER BLADE IN THIS DlRECf lON , SMODTI; CLEAN SCREWDRIVER SEALING RI:G ADAPTER adapter is squarely in place, install the four (4) cap screws, as shown in (Fig. 61). The adapter can now be pulled down squarely, until contact with the case is made, by alternately tightening the cap screws a small amount and checking frequently for binding. When adapter is pulled down as far as possible, tighten the four (4) cap screws to 27 to 37 pounds-feet torque. Fig. 69 Instal l ing Reverse Clutch Piston in Adapter 55. Lift combined parts assembled in steps 50 through 53 inclusive, above parts assembled in steps 1 through 49 inclusive, as shown in (Fig. 60). Align the oil holes as indicated in (Fig. 60), then lower the reverse clutch piston and adapter assembly squarely onto the input gear and transmission case. 56. When the shoulder on the rear of the adapter has entered the mating bore in the reverse clutch cavity, located in the front of the transmission case, and a check of the gap between case and adapter indicates the Fig. 61 Mount ing Adapter to Case 39 NOTE:Two different pump assemblies have been used on the Model 70C & 71C transmission. If the pump assembly on your transmission includes a backing plate see page 48 (paragraphs 5 through 10) for important information concerning its assembly and service. DRIVE‘GEAR I OIL SEAL PUMP dOUSING DRIVEN GEAR The front pump assembly without the backing plate can only be used with the new (71C-A8) adapter (Fig. 61), the new key .(4873), and the new version of the drive gear with the relocated pump keyway. For identification of the proper parts see (Fig. 90). 1 Fig. 62 Front Pump Par ts for Assembly 71C-A60 ASSEMBLY OF FRONT PUMP 57. Collect the parts shown in (Fig. 62) and check carefully for the following; (a) Scoring in gear pocke'ts, and gear face. crescent, (b) for brittle Oil seal lip condition, cracks and cuts. Oil seal outside diameter for dents or scratches. (c) Gear teeth for burrs. Fig. 64 P, ; ' ;sA;g Pump Oi l Seal into OIL SEAL WITH LIP IN PROPE\POSITION 58. ,, PUMP HOUSING Fig. 63 instal l ing Pump Oi l 40 Seal Place pump housing squarely on arbor press table. Apply a suitable sealant to the outside diameter of seal before installing squarely into bore of housing with seal lip positioned as shown in (Fig. 63). Caution should be observed to insure that too much sealant is not used, that any excess is wiped away after the seal is installed, and that the sealant does not get on the sealing element. 59. Using tool, front front an arbor press and suitable press seal into housing until face of seal is flush with face of pump housing (Fig. 64). $$(l, LZ & *i I _, After seal is assembled, lubricate the pump housing with the proper transmission oil and place as shown Install lubricated in (Fig. 65). driven pump gear with identification mark as shown in (Fig. 65). MOUNTING FRONT PUMP ON TRANSMISSION 61. Place parts assembled in steps 1 through 56 inclusive as shown in (Fig. 611, after inspecting the adapter face for dirt and obstructions. 62. Lubricate and install front pump gasket, (Fig. 66). F i g . 66 Ins t a l l i ng Pump Dr i ve Gear Key and Fron t Pump Gaske t 65. Cover the splined portion of input drive gear with asuitable to protect the rubber lip on seal during the assembly of the maining front pump parts, (Fig. the tool the re66). 66. With the pump driven gear proper Y installed in the front pump housing, assemble the housing and pump driven gear squarely over the protruding input shaft and assembly tool. A ,, slight rotation of the pump housing and pump driven gear will allow engagement of pump gear teeth, (Fig. 67). F i g . 65 Ins t a l l i ng Pump Dr i ven Gear 63. Install Woodruff key, (Fig. r 66). Check (Fig. 90) to determing NOTE: that proper key and shaft are used. 64. Install the pump drive gear on the input shaft, with one of the Woodruff key slots in drive gear mating with the Woodruff key on the input shaft, (Fig. 66). The two pump gears should be NOTE: assembled so that the same gear faces are matched with the machined face of the pump housing as found Marks should have at disassembly. been applied at disassembly to insure proper reassembly, (Page 24, paragraph 10). F i g . 67 i ns t a l l i ng Pump over Sea l Pro t ec t or 41 7lC- THE HAND WAS ORIGINALLY ASSEMBLED. OF ROTATION OF THE PUMP ON A 2.10/l TRANSMISSION SHOULD ALWAYS AGREE WITH ORIGINAL FACTORY INSTALLATION AND MUST NOT BE CHANGED. 8 ADAPTER NEW 68. With the pump assemb l ed squarely against the adapter and pump gasket, and the seal assemb l y tool removed, install four (4) 5/16-18 hex head bolts, (Fig. 69). Tighten hex head bolts evenly to torque of 17-22 pounds-feet. 69. Check freedom of rotation of pump gears in pump housing by rotating If the,pump will the input shaft. not rotate freely, disassemble the pump and check for foreign material Fig. 68 Or i en t a t i on Mark i ngs for Presen t 7 l C-A60 Pump on t he 7 l C-8 Adap t er "0" RING \ ' 67. Orient the pump mounting bolt holes and arrow indicating direction of rotation to correspond with t,he direction of rotation required by the engine, (Fig. 68). If not installed for the proper rotation the pump will not produce oil pressure to operate the transmission when engine is started. NOTE: WITH THE EXCEPTION OF THE 2.10/l., REDUCTION GEAR THE ORIENTATION OF THE PUMP ON THE TRANSMISSION MAY BE CHANGED FOR INSTALLATION ON ENGINES WITH ROTATION OPPOSITE TO THAT FOR WHICH THE TRANSMISSION SPRING F i g . 70 Exp l oded V i ew of Va l ve and Spr i ng Assemb l y in the pump. Any dirt particles on the adapter face will also tend to cock the pump when mounted on the adapter and cause it to seize. FRONT PUMP ASSEMBLY ASSEMBLING VALVE AND SPRING ASSEMBLY 70. Collect the valve and spring assembly components, as shown in (Fig. 70) on a clean surface and note carefully the following: (a) F i g . 69 Moun t i ng Fron t Pump t o Adap t er 42 The hollow portion of the pressure regulator valve faces the valve spring. i f (b) (c) 4’ “I The concave assembles regulator portion of the v a l v e s p r i n g r e t a i n e r assembles over the valve spring. . c p i.t,>s I! r 3: Lr The valve spring into the pressure valve. ' ORWARD AND After carefully checking the pressure regulator valve and the bore in t h e f o r w a r d a n d r e v e r s e g e a r transmission valve for dirt and burrs, a s s e m b l e a l l v a l v e a n d s p r i n g components shown in (Fig. 70). Fig . 72 Ins t a l l a t i on of Snap R i ng INSTALLATION OF THE VALVE AND SPRING ASSEMBLY IN THE TRANSMISSION CASE 73. Place parts assembled in steps 1 through 69 inclusive, on clean flat surface. Into the opening provided high on the right-rear side of the transmission case, place the valve and spring assembly, threaded end entering first, (Fig. 73). This is a hand assembly and is completed when the valve and spring assembly “bottoms” against the shoulder in the case bore. F i g . 71 Con t ro l Va l ve Assemb l y i n F i x t ure 72. Place the assembled parts in a suitable assembly fixture, (Fig. 71). Turning handle of threaded plunger, compress the regulator valve spring u n t i l t h e g r o o v e f o r t h e s n a p ring in the pressure regulator valve is Install snap ring fully exposed. shown in (Fig. 71). The “0” ring shown in (Fig. 70) should be installed on end of valve. The control valve assembly NOTE : can also be assembled by using an arbor press with suitable tools, as shown in (Fig. 72). F i g . 73 lns tal la%ion Assemb l y of Va l ve and Spr i ng 43 Fig. 74 Assemb l y of Va l ve Cover Fig. ASSEMBLY 74. To insure neutral positioning of valve and easier assembly of lever, a l i g n .369-,376 width slot in valve w i t h b o t t o m l/4-20 b o l t h o l e i n valve cover face of case as shown in (Fig. 73). 75. Assemble the valve cover gasket, valve cover, lockwashers and hex head bolts as indicated in (Fig. 74). Torque hex h e a d b o l t s t o ,8 - 1 1 pounds-feet. - \ ?/I 6 LtVtK e II Ic POPPET SP.RINQ 76. 76 Sh i f t Lever Assemb l ed OF SHIFT Assemble shift lever and related parts in the order shown in (Fig. 75). Torque the hex nut 8 to 11 pounds-feet, (Fig. 76). Rotation of the valve and spring assembly through the forward, neutral and reverse positions should require no m o r e t.han f i n g e r t i p e f f o r t . I f v a l v e b i n d s i n r o t a t i o n , remove and inspect. I & OOLER F i g . 75 Assemb l y of Sh i f t Lever and Re l a t ed Par t s 44 LEVER Fig . 77 RETURN TUBE Ins tal l in O i l S t ra i ner & Coo l er Re t urn Tu % e & Bush i ng Assemb l y I INSTALLATION OF‘ A S S E M B L Y AND 011.2 TRANSMl 7 7 . SSION Assemble the o i l strainer tet.~~rn bushing ret,urn t,iibe shown (Fig. oil 77). the be approximately is 78, in assembly of face o f Tighten I/? l ine to the assembly rptrlrn and oil torque Fig . 79 i ns t a l l a t i on of D i p S t i ck Assemb l y SCELL,AKEOUS P A R T S 1 t h e shown in ( F i g . top illllstrated sealing o f below the 35 p o u n d s f e e t . Instal the order recommended INSTALLATION OF‘ RI I on cool- the inst,atled. cooler TRAKSMISSION 79. in inch t.hc (‘asew h e n bushing o f 25 Lo assembly, and The s c r e e n e n d assemh1.y s h o u l d st,rainer correctly drain STRAINER CASE cooler line er OTL DHA I N P L U G I N T O of a hreathcr ‘78). the s a s s c 11 b 1 y as 110 not h a m m e r hreatllrr. t,his assemI) y wil 1 damage t.lle cLem~iit.. Fo 1 i n s t. a 1 1 a 1. i 0 n othrr t-.yp~ t~r~,athcr ass~tml~)l its see page 48, (paragraphs 3 R 4,) f o r UT. Inst.al I drys t xa l to :ii(i- I il, 1 ,/ 4. - 1 il a n d 1 / Ii - 2 7 fjlr,gs, (F i g . n 0 ) a n d t 0 I q 1 I C‘ va l nes i n d i c a t e d o n p a g e 62. instructions. BREATHER %ELMBL Fig. 78 A47 ' +OG BREATHE R I Ins t a l l a t i on of Brea t her Assemb l y F i g . 80 Ins t a l l a t i on of Pipe Plugs M i sce l l aneous EXTRA EQUIPMENT ASSEMBLY 1. 2. OF NEUTRAL SWITCH Unscrew three (3) hex head bolts, remove valve cover and gasket, as shown in (Fig. 74). Discard valve cover, gasket, hex head bolts and lockwashers. Shift control lever into neutral position, see page 23 (Fig. 17). Assemble gasket provided in neutral switch kit. Assemble neutral switch cam , m a k i n g s u r e t o a l i g n t a n g “A” o n c a m w i t h s l o t “B” i n v a l v e , a s I jY LOCKWASHERS \ 1/ '+-20 HEX HEAD BOLTS f ig. 81 Neu t ra l Neutral switch shown in (Fig. 82). cam correctly assembled as shown in (Fig. 83). K I, T, 3. Assemble valve cover and neutral switch with neutral switch located b e t w e e n t w o ( 2 ) t o p l/4-20 b o l t s , as shown in (Fig. 84). Use the three ( 3 ) l/4-20-7/8 i n c h l o n g h e x h e a d bolts provided in neutral switch kit. Tighten hex head bolts to rec o m m e n d e d t o r q u e o f 8 t o 1 1 poundsfeet and assemble starter solenoid wires to switch. I SWITCH CAM Sw i t ch Par t s F i g . 83 Neu t ra l Sw i t ch Cam i n Cor rec t Pos i t i on Fig. 46 84 Neu t ra l Sw i t ch Cor rec t l y Assemb l ed i^ SPEClAl INFORMATlON AND INSTRUCTIONS MODEL 70C & 71C TRANSMWONS ; NOTE: : >,' It may be found that in a M o d e l 7 0 C o r 71C t r a n s m i s s i o n assembly a number of components may vary from the description and illustrations presented in the preceding This reportion of this manual. sults from changes which have been made since the first introduction of In this section the inthis model. formation and description is presented for those features which are no l o n g e r i n c o r p o r a t e d i n t h e current production models. INSTALLATION OF OIL FILLER AND DIP STICK ASSEMBLY ‘1. Place oil filler cap and assembly in the oil filler vided on rear left side of s i o n c a s e , ( F i g . 85). P u s h 2. and (4885A) in the order shown The small end of oil in (Fig. 86). strainer assembly should protrude out of tapped hole in case approxim a t e l y l/16 i n c h w h e n i n s t a l l e d t o full depth. /* down on f i l l e r c a p a n d d i p s t i c k u n t i l assembly “ b o t t o m s ” o n t u b e , t h e n turn cap to right as far as cap screw permits. Assemble the oil strainer assembly and cooler line return (71B-A98) bushing CAP dipstick tube protransmis- F i g . 85 Ins t a l l a t i on of O i l F i l l er Cap D i ps t i ck Assemb l y INSTALLATION OF OIL STRAINER ASSEMBLY AND OIL DRAIN PLUG INTO TRANSMISSION CASE B u s h i n g (4885B) i l l u s t r a t e d NOTE : in (Fig. 77) as used with present oil strainer assembly, may be used with the old oil strainer assembly (71B-A98) s h o w n i n ( F i g . 85). O n the other hand, the old bushing (4aasA4) i s n o t t h r e a d e d t h e e n t i r e l e n g t h o f i t s i n t e r n a l t h r e a d . Therefore, it cannot be assembled w i t h t h e c o o l e r r e t u r n t u b e (?lC8 4 s h o w n i n ( F i g . 77). Either com plete assembly of parts, illustrated i n ( F i g . 77) o r ( F i g . 861, c a n b e used as they are interchangeable. Fig. 86 Ins t a l l a t i on of O i l S t ra i ner Assemb l y and Coo l er L i ne Re t urn Bush i ng INSTALLATION OF BREATl1EH Fig. 87 Ins t a l l a t i on of Brea t her Assemb l y ASSEMBLY 3. In addition to the breather assemb l y s h o w n i n ( F i g . 781, o t h e r b r e a t h e r assemb l i es will be found in use as i l l us t ra t ed in (Fig. 87) and (Fig. The above illustrations demon88) . strate the manner in which these breather assemblies are installed. 4. T h e b r e a t h e r in(Fig. 88)is s u p p l i e d for those installations where a pressure type breather replaces the b r e a t h e r s h o w n i n ( F i g . 87). T h i s breather is used with an internally threaded bushing which presses into the case before the installation of the threaded breather assemb l y . ASSEMBLY OF F R O N T PU4lP NOTE: The following instructions are for the assembly of the front pump with a backing plate, (Fig. 91). This pump can be used with either o f t h e t w o d i f f e r e n t a d a p t e r housi rigs, b u t i t should normally be found assembled on the one shown in ( F i g . 89). A n y o f t,he v a r ions v e r s i o n s o f t h e i n p u t , shafts may be used with this pump, b u t the proper key must always be used with each shaft D S e e ( F i g . 90) f o r c o m p a r i s o n of the installation o f t he t wo pump assemh l i e s a n d informat ion on the other related parts. Fig. 88 Adap t i ng Brea t her Assemb l i es " 71 ' 260 PUMP -- *CHECK THESE DIMENS FOR PROPER KEY SELECTION AND DRIVF GEAR IDtN I >FIC-\IION F i g . 89 Pump Por t i ng i n 48 71B-8 Adap t er F i g . 90 I l l us t ra t i on of t he Ins t a l l a t i on of fbe , Two Type: Of Pump Assemb l i es and lnel r Kelatea rar t s . ,I 5. 1 i C o l l e c t the p a r t s s h o w n i n ( F i g . 9 1 ) a n d c h e c k rarcfully f o r t h e f o l l o w ing: (a) S c o r i n g i n gear p o c k e t s , crcscent., h a c k i n g p l a t e a n d g e a r faces. (b) Dx t n t,s a n d burrs o n o f backi\ng p l a t e . OIL SEAL both f a c e s (c) O i l s e a l l i p f o r b r i t t l e condi tion, cracks and cuts. Oi 1 seal outside diameter for dents or scratches. (d) G e a r t.veth f o r b u r r s . 6. P l a c e p u m p hoLlsing s q u a r e l y o n a r b o r p r c s s t. a h I c . A p p l y a suit.ablc s~aiant. LO t,he o u t s i d e d i a m e t e r of s e a l b e f o r e instal I i n g sqIlarF\l y i nt 0 Ilore o f h o u s i n g wil,h sc>al L i p posiI.ioncd a s s Ii 0 w n i n ( F i g : . 92). Caut. i o n s hou Id hc obsf,rved t 0 i n s u r e t h a t too much sealant i s not used, that a n y e x c e s s i s wiped a w a y a f t e r Lhe s e a 1 i s installed, and that the s e a l a n t , dors n o t g e t o n t h e s e a l i n g e 1 cm c’ II Fig. 92 Ins t a l l i ng oil Sea l t. . a I1 a r b o r p r e s s anI:i slii.table t. 0 0 1 , p r e s s s e a l i n t o h o u s i n g Ilntil front face of seal is flush with f r o n t f a c e o f p u m p h o u s i n g , (I;i g. 93). 7. 11s ing n. PI a c e h o u s i n g , I II b r i c a t e d w i t, h a II t o matic t r a n s m i s s i o n f l u i d t,ype “ A ” , s u f f i x “ A ” , and complete with seal i II p 0 s i L i 0 n s 11 0 w I1 i n (Fig. 94). I n s L a 1 1 1 II 11 r i (‘ a t, P d g P ;I r s ;1 s s h o w n , wit11 reassem l r l y idcnt.i l’ication marks rnat rhet l , (Fig. 94.). Fig . 91 Fron t Pump Par t s w i t h Back i ng P l a t e , Assemb l y 71- IA60 Fig. 93 Press i ng O i l Sea l Fig . 94 i ns t a l l i ng Pump Gears 49 BACKING PLATE 9. Inspect both faces of backing plate for dirt, lubricate and assemble, as shown in (Fig. 95). 10. Install the flat head machine screw and tighten to final torque of 25 to 35 pounds-inch, (Fig. 96). Check rotation of gears as assembled in pump housing; disassemble and inspect if gears do not turn freely. MOUNTING MISSION PUMP Fig. H\OUSING 95 Ins t a l l i ng Back i ng P l a t e FRONT PUMP ON TRANS- 11. Place assembled transmission on rear face of coupling in upright posiI I1 tion, as shown in (Fig. 97). spect u p p e r e x p o s e d a d a p t e r f a c e f o r dirt and obstructions, then lubricate and install front pump gasket. 12. Install Woodruff key. Check (Fig. 90) to determing NOTE: that proper key and shaft are used. 13. Use a s u i t a b l e t o o l t o c o v e r the splined portion of the input shaft and thereby protect the rubber lip on the oil seal during assembly of front pump, (Fig. 97). 14. Fig . 96 Ins t a l l i ng F l a t Head Mach i ne Screw t hrough Sack i ng P l a t e After checking the following items, place the front pump assembly, steps 5 through 10 inclusive, squarely down over the protruding input shaft and assembly tool, (Fig. 97). (a) Alignment of Woodruff key slot in drive gear with mating Woodruff key on the input shaft. (b) Orientation of pump mounting bolt holes and direction of rotation arrow, depending on desired direction of input rotation, (Fig. 98 or Fig. 99). (c) F r e e d o m o f r o t a t i o n gears in housing. Fig. 50 97 Moun t i ng Fron t pump of pump The location of the markings NOTE : o n t h e 7 1 - 6 0 p u m p h o u s i n g identifying the orientation of the pump assembly on the adapter for right or left hand rotation will vary depend- $, $ ‘I 1:: :, I I 71-88 ADAPTER ing upon which pump assemblies and adapters are used. ‘1 The newer pump assembly with backing plate, identified by the rib on the pump housing, w i l l b e p r o p e r l y m o u n t e d w h e n t h e m a r k i n g o n t h e pump h o u s i n g a p p e a r s a s s h o w n i n ( F i g . 98), w h e n m o u n t e d o n t h e 71-8B a d a p t e r , If the same pump were (Fig. 89). m o u n t e d o n t h e n e w a d a p t e r 71C-8, ( F i g . 61), t h e p u m p m a r k i n g s w o u l d be identical to those illustrated f o r t h e n e w 71C-A60 p u m p a s s e m b l y in (Fig. 68). L EI r IM*m R O T N DI RlG H T H A N) ROTATCN F i g . 98 Or i en t a t i on Markin s for New 71- IA60 Pump Assemb l y on 7 9 -88 Adap t er 71- 00 A D A P T E R a The older pump assemb l y with backing plate, identified by the absence of the rib on the 71-60 pump housing, would appear as i l l u s t r a t e d i n (Fig. 99) when mounted on the old 71-1~60 OLD fuws 71-8B a d a p t e r ( F i g . 8 9 ) . T h i s o l d e r pump assembly with backing plate could also be mounted on the new 71C-8 a d a p t e r ( F i g . 61), b u t t h i s has not been illustrated as no original factory installations were made in this manner. 15. With front pump assembly resting squarely on gasket and seal assembly t o o l r e m o v e d , i n s t a l l f o u r ( 4 ) l-7/8 (Fig. 100). l o n g hex head bo l t s , Tighten hex head bolts evenly to torque of 17 to 22 pounds-feet. ELIMINATION OF REGULATOR F i g . 99 Or i en t a t i on Markin s for O l d 71- IA60 Pump Assemb l y on 7 B -89 Adap t er VALVE BUZZ 16. N e w p r e s s u r e r e g u l a t o r v a l v e s (71243) have a relief at the outer diameter at the closed end for the elimination of regulator valve buzz, ( F i g . 1 0 1 ) . I f a t r a n s m i s s i o n should have a valve buzz and contains a 71-243 pressure regulator valve which does not have the relief, the valve should be replaced, Or reoperated as i l l u s t r a t e d . Fig. 100 Bo l t i ng Fron t Pump Assemb l y 51 DRIVE 17. GEAR AND PLUG ASSEMBLIES The two methods of sealing the end of the drive gear are illustrated in ( F i g . 1 0 2 ) . S k e t c h “B” i l l u s t r a t e s the method now used and sketch “A” The two the method formerly used. drive gear assemblies, varying only in the method of sealing the end of the shaft, are fully interchangeable. PINION CAGE AND OUTPUT SHAFT ASSEMBLY I Fig. 101 Reopera t i on t o E l i m i na t e Regu l a t or Va l ve BUZZ 18. Pinion cage and output shaft assembly has been supplied with three oil grooves around the shaft diameter as This shaft can shown in (Fig. 103). be used to replace any shafts. However, shafts without the grooves must not be used with those forward 45720 PRESSED IN TO THS DMNXW and reverse transmission cases supplied without the 71-28B bushings. FORWARD AND REVERSE GEAR TRANSMISSION CASE AND BUSHING ASSEMBLY PRESS PIN 4808 BELOW DIA SURFACE-BOTH ENOS -T\ F i g . 102 Vers i ons of Dr i ve Gear and P l ug Assemb l i es SHAFT ASSEMB Fig. 52 103 P i n i on Cage and Ou t pu t Shaf t Assemb l y w i t h O i l Grooves 19. Two versions of the transmission case have been supplied; one includes bronze bushings for the output shaft journal, the other is designed for use without the bushings. These two versions of the transmission case are completely interchangeable, except that the case without bushings cannot be used with the output shaft assemblies which do n o t h a v e t h e o i l g r o o v e ( F i g . 103). Information regarding the service of case bushings can replacement be found on page 59, (Fig. 111). If it becomes necessary to replace a case of the design without bushings because of worn journals, it can be returned to your engine supplier. He can return the case to Warner Gear for reoperation and installation of bushings and can furnish information concerning the cost of this service. SPECIAL INFORMATION AND INSTRUCTIONS MODEL 70B & 71B TRANSMISSIONS Except for the discussions NOTE : and illustrations on the features included in this section all other information concerning the Model 7 0 B a n d 71B T r a n s m i s s i o n s m a y b e found in preceding sections of the manual containing information for the assembly or disassembly of the Model 70C and 71C Transmission, or in the special supplementary section for these transmissions, pages 47 to 52. INSTALLATION 1. Assemble the assembly as ASSEMBLY 2. OF OF BREATHER ASSEMBLY screw-in type breather s h o w n i n ( F i g . 104). FRONT DRIVE GEAR & PLUG ASSEMBLY 3. II The drive gear assembly has a ferent input drive spline. other instructions see page (paragraph difFor 52, 17). ASSEMBLY OF SHIFT LEVER 4. For assemb l y of shift lever see page 4 4 , ( p a r a g r a p h 76). The assembly procedure is the same for the Model 7 0 B a n d 7 1 B Tral)smissions a s t h a t described and illustrated for the M o d e l 7 0 C a n d 7 1C. A l t h o u g h tk ie PUMP The pump assembly for the Model 70B’ a n d 7 1 B t r a n s m i s s i o n s (71-A60) c o n tains a different seal than the pump assembly with backing plate for the M o d e l 7 0 C a n d 7 1 C (71-lA60). They are identical in all other respects. T h e r e f o r e , when assembling the front pump assembly 71-A60 follow the information in (paragraphs S-15) pages 48 t o 51, w i t h t h e e x c e p t i o n t h a t t h e s e a l s h o u l d b e p r e s s e d i n t o the, pump housing until front face of s e a l i s l/8 i n c h ,above f r o n t f a c e o f Dump housing, (Fig. 105). F i g . 105 Press i ng O i l Sea l I Fig. 104 Ins t a l l a t i on of Assemb l y Brea t her Fig. 106 ASI - & ASI Lever Pos i t i ons -I Sh i f t 53 present shift lever (71-79B), (Fig. can be substituted for the 17) , lever shown in (Fig. 106), it would change the travel of the control linkage for shifts between "Neutral" and "Forward" positions, see (Fig. 17) and (Fig. 106). ADAPTER 5. CAPSCREWS The 3/8-16x1-1/4 hex socket capscrews (138243) formerly used to fasten the adapter to the transmission case have now been replaced with a twelve (12)point capscrew (4911) which has better locking characteristics. The two types are completely interchangeable. SPECIAL INFORMATION AND INSTRUCTlONS MODEL 70 & 71 TRANSMISSIONS NOTE: Except for the discussions and illustrations on the features included in this section all other information concerning the Model 70 and 71 Transmissions may be found in the manual information for the assembly or disassembly of the Model 70C and 71C Transmission, or in the special supplementary sections, Pages 47 ASSEMBLY 1. to OF INSTALLATION OF THE BAFFLE IN THE TRANSMISSION CASE 2. Place the baffle inside the transmission case with the curved portion below the cast spherical bosses in the case as shown in (Fig. 107). Also refer to (Fig. 6) and (Fig. 7). 3. Position the front end of the baffle so that the center of the baffle rests on top of the boss at the front center of the transmission case and the turned down corners of the baffle are located below the cast spherical bosses at the front of the transmission case. 53. FRONT PUMP On early production Model 70 and 71 transmissions the overall height of the pump housing between faces measured l-7/8 inches instead of l-5/8 on all other latter pump assemblies. For any pump housing h-aving the l-7/8 inch dimension, assemble the seal l/8 inch below appropriate pump face. For all other information regarding the front pump see page 53, (paragraph 2). Snap the baffle into position by lifting up on the curved portion so that the two large holes are located firmly on the spherical bosses at the rear of the transmission case as shown in (Fig. 107). I Fig. 54 107 Instal l ing Baff le OIL COOLER FLOW FORMERLY RETURNED HERE AGXER Fig. 108 instal lat ion of Oi l Drain Plug and Related Par ts e*t the closed end and wire ring, should not be confused with either of the two above oil strainer assemblies. I t can only be used when cooler ret:rrrrl f l o w d o e s n o t r e t u r n t h r o u g h t,he oi 1 s t r a i n e r a s s e m b l y . ITALLATION OF OIL STRAINER EMBLY AND OIL DRAIN PLUG INTO NSMISSION CASE ill s i n g t h e oil s t r a i n e r a s s e m b l y , r a n n u l a r gasket a n d o i l d r a i n p l u g !L a s s h o w n i n ( F i g . 108) p r o c e e d a s k follows: 72 P 1 (a) Insert the oil strainer into :, the tapped hole provided in I $ the lower-right side of the The end of transmission case. the oil strainer assembly will b e a p p r o x i m a t e l y l/2 i n c h below the finished face of the c a s e b o s s w h e n p r o p e r l y assembled. (b) hlount the a n n u l a r g a s k e t o n t !I,> o i l d r a i n p l u g a n d s c r e w t.!le o i l d r a i n p l u g i n t o t h e Tighten plug case drain hole, t o a t o r q u e o f 2 5 - 3 5 poundsfeet. N O T E : T h e o i l strainer a s s e m b l y 71CA98A s h o w n i n ( F i g . 1 0 8 ) h a s r e p l a c e d a s i m i l a r o i l strai.ner a s s e m b l y 71-A98C, b u t t h e s e t w o p a r t s are fully interchangeable. However, o i l s t r a i n e r a s s e m b l y 71-A98, w i t h COOLER RETURN TO TRANSMISSION 5. O n t h e M o d e l 70 a n d 7 1 t r a n s m i s s i o n s i t i s n o w recol nended ; h a t t h e c o o l e r o i l f’ow ‘)e r e t urned t o t h e transmisslr)ll a s e a: ,Tllclwn i n ( F i g . Transmiss;ons V: i tii t h e c o o l e r 19. f I ow rc;..llrning in : fanner o t h e r t h a n t h a t n o w Itcomm-l:ded n e e d n o t b e c h a n g e d . l;n\c~lrer, t h e a r r a n g e m e n t n o w recommended conforms to practices followed on other transm i s s i o n i n s t a l l a t i o n s and permits better control of the cooler return oil flow to the pump suction. N O T E : I f c,ooler r e t u r n f l o w i s c h a n g e d t o t.h( :rew l o c a t i o n b e s u r e t h a t t h e 01-i s t r a i n e r i n s t a l l e d i s similar to the one illustrated in (Fig. 108). The old strainer assemb l y w i t h o n e end e n c l o s e d w o u l d block the flow of the cooler return oil. II - IMPORTANT SERIES lo-17 AND 10-18 SERVICE INSTRUCTIONS Practically all information which has been written for the 71 C and 72C Velvet Drive transmissrons applies to the 1 O-1 7 and lo-18 assemblres. Use the appropriate instructlons given in the 71C and 72C service manuals when servicing the lo-17 and 10-l 8 transmrssions. Chart Comparing New Models to Early Models NEW TRANSM I SS I ON ASSEMBLY NUMBER TEN DIGIT NUMBERFOR OR I G I NAL TRANSM I SS I ON OR I G I NAL TRANSM I SS I ON ASSEMBLY NUMBER ,NPUl -TOOUTW SPEED RATIO 10-04-000-036 10-04-000-037 10-04-000-038 10-04-000-039 10-04-000-042 10-04-000-043 10-04-000-050 10-04-000-051 10-04-000-044 10-04-000-045 10-04-000-046 10-04-000-047 10-04-000-048 10-04-000-049 10-04-000-040 10-04-000-041 10-18-000-001 10-18-000-002 10-18-000-003 10-18-000-004 10-18-000-005 10-18-000-006 10-18-000.007 10.05.ooo10-05-00AF 35 AS l -71C ASI -71CR AS l . 71CE AS l -71CBR ASZ-71C ASZ-71CR AS?-71C AS15-72C ASl572CR ASZO-72C ASZO-72CR Pump 4rr0V-d ‘OlntS REV FWD REV ,121 ' ROP IEQ ' D , (3l c w c w I 1 1 191 1 2 10 1 2 . 10 $ 1 1 291 1 11 / 10-18-000-00 Ill T FWD 10.17-000-001 10-17-000-002 1 O-1 7.000.003 10-17-000-004 10-17-000-005 10-17-000.006 10-17-000-007 10-17-000-008 10-17-000-009 10-17-000-010 10-l J-000-01 1 10.1 J-000.01 2 10-17-000-013 10 17.000-014 10-17-000-015 10-17-000-016 ROTATION 1 . 52 1 1 . 52 1 1 . 91 . 1 1 . 91 1 2 . 10 1 2 10 1 2.57 1 2 . 57 2 . 91 . 1 2 . 91 1 1 1 1 1 / 11 1 52 1 1 52 1 2 10 1 2 . 57 1 /' c w ccw c w ccw c w ccw 11 1 10 1 1 . 10 1 168 1 1 . 68 1 2 . 10 1 2101 2 . 31 1 231 1 283 1 2 . 83 1 1 . 10 1 110 1 c w ccw c w ccw ccw c w c w ccw C W ccw %W EW c w c w ccw ccw c w ccw c w ccw c w ccw c w RH LH RH LH RH LH LH RH RH LH RH LH RH LH ccw c w ccw c w c w ccw ccw c w ccw RH LH RH LH LH RH RH LH RH KW kHH LH ZW c w as clockwise (CW) or counter clockwise (CCW) when the observer is standacing towards front or input shaft end of transmission. er is standing in front of transmrssion facing the pump. The arrow located e direction pump will be driven by the Input shaft. IT SHOULD BE REALPPOSITE ROTATION DOES NOT CAUSE OUTPUT SHAFT ROTATION It the transmission to be used behind an opposite rotating engine. II assemblies except 2.1O:l reduction units is the only difference between C and CR assembly uyzd in C units is different than the one used in CR units in the2.10.1 the pump for opposite rotatron is not permitted on these assemblies. No warranty used by improper pump indexing on 2.1O:l reduction units. (3)/The propeller is described when the observer IS standing behind the boat looking forward, A right hand (RH) move the boat forward when rotated clockwise. prop.wrll THE 71-28C BUSHING IS THE PRE-SIZED BUSHING FOR FIELD SERVICE NOTE: OF THE ORIGINAL 71-288 BUSHING INSTALLED Ai ' FACTORY. r I [TRANSMISSION CASE 8 SERVICE BUSHINGS INSTRUCTION KEY TO TROUBLE SHOOTING CHART I. 2. 3. 4. 5. 6. 7. 8. 9. IO. I I. 12. 13. 14. 15. 16 . 17. 18. 19. 20 . 21 . 22 . 23 . 24 . 25. 26 . 27 . 28 . 29 . 30 . 31 . 32 . 33 . 34 . 518 Loose bo l t s- t i gh t en . Damaged gaske t . Damaged oi l seal . O i l l i ne f i t t i ngs l oose- t i gh t en . Case l eaks , poros i t y- rep l ace . Oi l fi l ler plug or cap leaks-replace or t ighten. Damaged control valve "0" ring. Foreign material on mat ing surfacesc l ean . Damaged o i l coo l er , wa t er and o i l II m i x i ng- rep l ace . No oi l-check at once. Pump i mproper l y l oca t ed for eng i ne ro t a t i on- l oca t e cor rec t l y . Sheared dr i ve key- rep l ace . Fau l t y o i l gauge-c l ean or rep l ace , bleed air from gauge l ine. D i r t y o i l screen-c l ean or rep l ace . Low o i l l eve l -add o i l t o proper l eve l . Regu l a t or va l ve s t uck-c l ean sur faces of bur rs , d i r t , or scor i ng . Po l i sh i nner bore w i t h crocus c l o t h un t i l valve moves freely. Worn o i l pump- rep l ace i f necessary . Regu l a t or spr i ng we i gh t l ow- rep l ace . 98-108 #G l-l /16 i nch he i gh t H i gh o i l l eve l -dra i n o i l t o proper 0/ l eve l . Low wa t er l eve l i n coo l i ng sys t em . Dirty oi l cooler-clean or replace. Coo l er t oo sma l l - rep l ace w i t h l arger coo l er . Worn or m i sa l i gned bush i ngs in t ransm i ss i on case- rep l ace . Worn or damaged c l u t ch p i s t on o i l sea l s . Worn or damaged c l u t ch sea l i ng r i ngs . C l u t ch i mproper l y assemb l ed . Damaged or broken bel levi l le spring. Worn or damaged c l u t ch p l a t e(s) rep l ace . Damaged or broken c l u t ch spr i ngs . Regu l a t or va l ve no t -no t ched-see (Paragraph 16, Page 51) . Inadequa t e t orque on ou t pu t sha4t nu t - t i gh t en . N i cks on gears- remove w i t h s t one . Excess i ve runou t be t ween eng i ne hous i ng and crankshaf t . Wrong damper assemb l y . 35 . 36 . 37 . 38 . 39 . 40 . 41. 42 . 43. Damaged damper assemb l y par t s- rep l ace . Body- f i t bo l t s no t used i n moun t i ng ho l es . Con t ro l l i nkage i mproper l y adjustedsee (Page 23) . Con t ro l l ever and poppe t ba l l cor roded-c l ean and l ubr i ca t e . Con t ro l l i nkage i n t er ference-check . Wrong o i l used i n t ransmissionchange . Cold Oi l . P l ane t ary gear fa i l ure- rep l ace or repair if necessary. Ring gear mount ing plate not securel y he l d(on l y reduc t i on un i t s AS+- , ASl4- , AS5- , and ASl5- ). COMPLAINTS & SYMPTOMS INTERNAL & EXTERNAL LEAKS REMEDY TRANSMISSION IN BOAT II TRANSMISSION REMOVFD I4 6 7 I 2* 3* 8 9 2 I. OIL LEAKS AT PUMP 2. OIL ON EXTERIOR OF TRANSMISSION 3. OIL LEAKS AT REAR BEARING RETAINER 4. WATER IN TRANSMISSION OIL OR OIL IN COOLING WATER 12 3 5 8 8 TRANSMISSION MALFUNCTIONS IN ALL RANGES I. 2. 3. 4. NO OIL PRESSURE LOW OIL PRESSURE HIGH OIL TEMPERATURE FAILURE OF REDUCTION GEAR IO 13 9 I'+ I5 15 I9 I6 20 I8 21 I3 37 14 I5 I6 18 22 II I2 I7 42 42 43 TRANSMISSION MALFUNCTIONS IN FORWARD RANGE I . LOW OIL PRESSURE 2. FORWARD CLUTCH ENGAGES IMPROPERLY 3. FORWARD CLUTCH DRAGS 4. REDUCTION UNIT FAILURE 37 I7 12 23 26 27 42 43 " 24 28 25 28 29 29 TRANSMISSION MALFUNCTIONS IN REVERSE RANGE I . LOW OIL PRESSURE 2. REVERSE CLUTCH ENGAGES IMPROPERLY 3. REVERSE CLUTCH DRAGS 4. REVERSE GEAR SET FAILURE I3 37 37 I4 I5 16 5. REDUCTION GEAR SET FAILURE I8 I7 2'+ 26 26 28 42 42 43 TRANSMlSSlON MALFUNCTIONS IN NEUTRAL I . OUTPUT SHAFT DRAGS EXCESSIVELY IN FORWARD ROTATION 37 26 27 28 2. 37 26 28 29 OUTPUT SHAFT DRAGS EXCESSIVELY IN REVERSE ROTATION MISCELLANEOUS TRANSMISSION PROBLEMS I. 2. 3. 4. 5. 6. 7. REGULATOR VALVE BUZZ GEAR NOISE-FORWARD GEAR NOISE-REVERSE PUMP NOISE DAMPER NOISE OR FAILURE SHIFTS HARD HIGH OIL PRESSURES 42 /I 30 31 31 I5 I6 I6 39 40 32 32 I7 33 7 41 ' IF INSTALLATION ALLOWS ACCESS, OTHERWISE REMOVE TRANSMISSION. 43 42 43 32 34 35 37 38 36 26 27 2 TORQUE .SPECIFICATIONS PART IUMBER .79822 TORQUE LBS.-FT 17-22 DESCRIPTION 5,'16-18 x l-l,'2 HEX HEAD BOLT APPLICATION PUMP TO ADAPTER E911 3/8-16 x l-1/4 12 POINT CAPSCREW ADAPTER .79793 l/4-20 x 5,'8 HEX HEAD BOLT VALVE COVER TO CASE 8-11 15729 S/16-24 SHIFT LEVER TO VALVE 8-11 79859 7/16-14 x HEX HEAD BOLT NUT l-1/4 BEARING TO CASE RETAINER 27-37 TO CASE 27-32 1775L l-20 NUT 48858 3/4-14 BUSHING $44687 l/8-27 PLUG DRYSEAL PIPE CASE 444691 l/4-18 PLUG DRYSEAL PIPE ADAPTER 12-20 144866 3,'8-18 PLUG DRYSEAL PIPE CASE 17-27 (l-Al95 3,'4-14 PlPE PLUG I' OUTPUT SHAFT NUT COOLER DIPSTICK RETURN TO 100-200 CASE 25-35 7-12 ASS'Y. INTO CASE 10-15 L \WELD -% CONTROL WLVE & - 20 UN.E 28 THREAD-,, ASSEMBLY FIXTLRE GRI N D C-2$----i “& GRIND DIA. PUMP OIL SEAL SLEEVE WTIONAL:MATERIAL MAY R E M O V E D FOR HAND GRt? BEARING ASSEMBLY BE DRIVE~IN BREATHER ASSEMBLY TOOL TOOC The assembly tool drawings shown on this page are included to illustrate how Most will prothese tools may be made. vide convenience in assembling and disassembling the transmission and their f unctions may be performed by the substitution of other objects or pro- However, the use of the oil cedures. pump assembly tool, or other means of protecting the seal lip, is a necessity. The drawings venience. are provided as a con- WARNER GEAR DOES NOT MANIJFACTURE OR SELL ANY OF THE TOOLS ILLUSTRATED. 61 *NOTE #2 SUBJECT: DIPSTICK OIL LEVEL MARKING CHANGE. 4 The low oil level mark has been removed from all Velvet Drive Marine Transmission dipsticks. A single mark on the dipstick indicates level at which the oil should be maintained. Three dipstick assemblies are involved in this change. Dipstick 10-04-559-001 is used in all 7OC, 71 C and 72C reduction units. Dipstick 10-l 3559-001 is used in all CR2 units and all 7OC, 71 Cand 72C direct drive units. Dipstick 10-06-559-001 is used in all 73C units and all V-Drive units. The approximate distance from end of dipstick to the tinder side of the cap (dimension A) and from end of dipstick to the oil level mark (dimension 6) are charted below. These dimensions will help identify each dipstick. DIPSTICK PART NUMBER DIMENSION A inches centimeters DIMENSION B inches centimeters 10-04-559-001 4.51 11.46 1.76 4.47 1 O-06-559-001 6.00 15.24 .75 1.91 10~13-559-001 4.64 11.79 .a3 2.1 1 Plain Green Red 4 k c i;”,. *NOTE #3 &JECT: SEALING RINGSADDEDTOALL IN-LINE ANDV-DRIVE ASSEMBLIES i:I Velvet Drive In-Line and V-Drive assembl ies have been changed to use four 48068 cast Iron seal ing rings. New pinion Ige and output shaft assembl ies having four ring grooves for the seal ing rings wi l l be used in the forward and reverse $ort ion of these assembl ies. These new pinion cage and output shaft assembl ies have a larger diameter; therefore the ,71.159 thrust washer when used w ill be replaced by a new 10-17~193-001 thrust washer wi th a larger inside diameter , The two bushings, which were pressed into the 1.989-1.990" (50.5-50.55 mm) bore at the rear of the forward and reverse , transmission case are no longer required and wi l l be removed. The case bore size wi l l be changed to 2.000-2.005" (50.8. 50.93 mm) diameter to accommodate the new seal ing rings. Early uni ts may be updated by using al l three new parts as required.The 10-04-000-001 and 10-05-000-001 uni ts are the forward and reverse port ion of the V-Drive uni ts, Uses Thrust Old Case 0.04-000-001 10-04-565-003 10-04-565-005 0-05-000-001 10-05-565-002 10-05-565-012 7lB-AlA 71BAlA 71C-Al 71C-Al 71-AlK 71.AlK 71-AlK 71-AlK 71-AlK 71.AlK 71.AlK Jl -AIK 71.AlK 71.AlK 71.AlK 71.AIK 72-AIJ 72.AlJ 72.AlK 72.AlK 72.AlK 72.AlK 72.AlK 72.AlK 72.AlK 72.AIK 72.AlK 72.AlK 72.AlK 72.AlK 72.AIK 72.AlK 10.17-065-004 10-17-065-004 10-17-065~006 10-17-065-006 10-17-565-002 10-17-565-002 10-17-565-002 10-17-565-002 10-17-565-002 10-17-565-002 10-17-565-002 10-17-565-002 10-17-565-002 10-17-565-002 10-17-565-002 10-17-565-002 10-18-565-001 10-18-565-001 10-18-565-002 10-18-565-002 10-18-565-002 10-18-565-002 10-18-565-002 10-18-565-002 10-18-565-002 10-18-565-002 10-18-565-002 70-18-565-002 10-18-565-002 10-18-565-002 10-18-565-002 10-18-565-002 10-17-000-001 10~17-000~002 ; l&17-000-003 10-17~000-004 10-17-000-005 10-17-000-006 10-17-000-007 10-17-000-008 G 10-I 7-000-009 e: 10-17-000-010 10-17-000-011 1; 10-17-000-012 ;" 10-17-000-013 ; 10-17-000-014 j 10-17-000-015 10-17-000-016 1 o-1 8-000-001 10-18-000-002 10-18-000-003 10-18-000-004 10-18-000-005 f" I New Case Trans. Assy. 1 o-1 8-000-006 10-18-000-007 10-18-000-008 10-18-000-009 10-18-000-010 10-18-000-011 10-18-000-012 10-18-000-013 10-18-000-014 10-18-000-015" 10-18-000-016" Old Shaft 71- lA2Aor 10-17-659-002 72. lA2A or 10-18-659-002 A2 A2 A2 A2 7-659-002 7-659-002 71. lA2C 71. lA2C 10-17-659-004 10-17-659-004 71. lA2C 71. lA2C 71. lA2C 71. lA2C 71. lA2A 71. lA2A 72. lA2 72. lA2 10-18-659-002 IO- 18-659-002 72. lA2C 72.1A2C 10-18-659-004 10-18-659-004 72. lA2C 72. lA2C 72. lA2C 72. lA2C 72.1A2A 72. lA2A 72. lA2A 72.1A2A New Shaft Washer 10-17-695-020 Yes 10-18-659-014 Yes 10-17-659-012 10-17-659-012 10-17-659-012 10-17-659-012 1 O-l 7-659-020 1 O-1 7-659-020 10-l 7-659-O lo- 17-659-01 10-17-659-01 10-17-659-01 10-17-659-01 10-17-659-01 10-17-659-01 10-17-659-018 1 O-l 7-659-020 10-17-659-020 10-18-659-006 10-18-659-006 10-18-659-014 10-18-659-014 10-18-659-012 10-18-659-012 10-18-659-010 10-18-659-010 10-18-659-012 10-18-659-012 10-18-659-012 10-18-659-012 10-18-659-014 10-18-659-014 lo- 18-659-008 10-18-659-008 Yes Yes Yes Yes Yes Yes Yes Yes Yes Yes Yes Yes - *Inact ive Lists 1 h3 ,, *NOTE #4 Subiect: Velvet Drive Reverse Clutch Plates. CHART LISTING REVERSE CLUTCH PLATES PART NUMBER 71-86 (1) 72.A66 72.A66B 1 O-l 7-666-001 72-l 76 PLATE THICKNESS mm Inch DESCRIPTION Fiber Sintered Copper Sintered Copper Cellulose Steel ,247 -.252 .0605-,063 .I 135..I 16 ,113 -.118 .0665-.07 1 6.27-6.40 1.54-1.60 2.88-2.95 2.87-3.00 1.69-l .80 (1) No longer avarlable form Warner Gear. The followrng chart WIII srmplify the selection of the correct reverse clutch plates for field servicing of Velvet Drive transmrssion. The reverse clutch cavity depth should be measured and a suitable clutch plate and dowel combination should be selected according to the model and cavity depth as shown in the following chart. The new cellulose plates 10-17-666-001 are recommended, however proper combinatrons of earlrer clu,tch plates can be used, COMBINATION TRANSMISSION 1 _ MODEL L CLUTCH CAVITY DEPTH Inch mm 70&71 All 72 Drrect Drive ,782 19.9 ,782 19.9 3 7 1 Reductrons .a57 21.8 1.074 27.3 2 PART NUMBER OF PLATES 71-86 7 1.87 dp>-.. 72-A% 72-176 71 a7dr, x 72:A66B 72-176 R6-177 dp* 72.A66B 72-l 76 4622E dp’ 72.A66 72-l 76 71-87 dp” 72.A66B I I - 8 7 A dp” 1 O-l 7-666-001 71.87A dp” IO- 17-666-00 1 72 Direct Drive -T- /2 Reductions 5 _____- 72 ,911 23.1 ,646 16.4 Reductions 6 _ D 7 , 8 9 71 i r e c t Drive ,71 Direct Drive 71 Reductions 72 D i r e c t Drove 72 ,646 16.4 .a57 2~ .a - Reductron 1.074 = dowel pin 1 3 2 1 3 2 1 3 2or 10 None a 9 ; i 2 3 None 7 i 1 3 2 R6-177 dp” 1 O-l 7-666-001 27.3 6 3 i 3 2 3 72-176 ,782 4622E dp” 1 O-l 7-666-001 72-176 71-87 dp” 19.9 I OTHER COMBINATIONS 72-176 1 0 70&71 All NUMBER REQ’D. Ail k i t s h a v e b e e n drsconrrnued 1 : 3 e x c e p t f o r t h e followtng: A4867AB “72C” Forward Clutch “ 7 1 C ” F o r w a r d Ciutch A4867 AE A4867DD Pack Kit Pack Kit O u t p u t S h a f t Bushrng K i t Oil Seal & Sealing Rrng Kit C a s e Bushmg K i t A4867HA A4867VV A4867 HB Gasket, Oil Seal & Sealing Ring Kit for “73C” Pilot Light Kit A4867HS A4867DW A4867HN Small Parts Kit for “73C” Drove G e a r A l a r m K i t 1 O-04-420-052 1 o-95-4 1 O-002 lndivlduai 4 Neutral Swatch Kit S n a p R i n g K i t f o r A l l 7OC, 72C, & 7 2 C Units Gasket & S e a l K i t f o r A l l C R 2 Unrrs 10-13-410-001 10-13-410-002 S m a l l P a r t s K i t f o r C R 2 Unrts 13-08-4 1 O-001 V-Drive Overhaul Kit p a r t s m a y stall b e p u r c h a s e d f r o m k i t s t h a t h a v e b e e n o b s o l e t e d e v e n t h o u g h t h e krts w i l l n o l o n g e r b e serviced. U s e krts 10~95410-002 and A4867HA t o r e p l a c e krt A4867WW Installation & Service Bulletin Original Issue 7/l 5/86 SUBJECT: Cooler installation on current Borg-Warner Velvet Drive marine transmissions. O IL FLOW I- OIL FLOW I , I f 2- &WATER -FLOW Cooler circuit for 1 O-04 and 1 O-05 “V-Drive” units. Cooler circuits for 1 O-23 (series 1500) units. Cooler circuit for 1 O-06 (73C) units. L Cooler circuit for lo-26 (series 7000) units. (SEE OTHER SIDE) B o r g-W a r n e r A U t O V ll O tiW, In c. Tronsmisrion systems post B O X 2o 6n 8 i8r . IMnudnicai ne a 3T 1e 7l e p2h8o6n 6e 1 0 0 47302 Telex 27 491 B o r g W a rr Automoth OIL FLOW i===- OIL FLOW i, Cooler circuit for 1 O-l 3 and 1 O-l 4 drop-center units and 1 O-l 7 and 1 O-l 8 reduction units EXCEPT 2.lO:l 0’ ratio. Cooler circuit for 1 O-l 7 and 1 O-l 8 reduction units 2.lO:‘l ratio. OIL FLOW /’ OIL FLOW f-F- - WATER - J - FLOW Cooler circuit for 1 O-l 7 and 1 O-l 8 direct-drive units EXCEPT 10-l 7-000-001, -002, - 0 0 3 , a n d - 0 0 4 models. Cooler circuit f o r 1 O-l 7-000-001, -002, -003, and -004 models. Installation & Service Bulletin July 1, 1982 MB48 SUBJECT: Lubrication Recommendations This bulletin updates our recommendations for the oils recommended for use in all Velvet Drive@ marine gears. Dexron@ 11, Type F , and o t h e r h y d r a u l i c t r a n s m i s s i o n f l u i d s w h i c h m e e t t h e D e t r o i t D i e s e l A l l i s o n T y p e c3 specifications are recommended for use in all Velvet Drive@ marine transmissions. Lubricating oils which are recommended for use in diesel engines and also meet the Detroit Allison Type C3 specifications may be used if the engine speed does not exceed 3000 RPM. SAE #30 is preferred. SAE #40 is acceptable if high operating temperatures are to be encountered. Multiviscosity oils such as low-40 are not acceptable. The first choice is an oil which falls in the SAE-API service Class”CD.” The second choice would be an oil which fails in the SAE-API service Class “CC,” The equivalent DOD mil specs are: “CD” “CC” Mil-L-2104B Mil-L-451 99 8, The new C3 specifications were developed by Detroit Diesel Allison Division of General Motors to outline the requirements of an oil suitable for use in their heavy duty hydraulic automatic and powershift transmissions. The oil companies should be able to provide information as to the suitability of their product for use in a given application. I , Warner Gear Dwsion of Borg-Warner Corporation P.O. Box 2688. Munwa, IndIana 47302 Telephone: 317/286-6100 Telex: 27-491 Installation & Service Bulletin Original Issue August 7, 1986 MB70 SUBJECT: Proper Oil Level in Velvet Drive Marine Transmissions I, Due to various installation angles and oil cooler set-ups, it may be necessary to adjust the oil level in your Velvet Drive marine transmission. The following procedure is recommended to achieve the correct oil level. lai c WARNING: Do not remove transmission dipstick with engine running. Hot oil can cause burns. 1 Inl ! CAUTION: Clean around the area of the dipstick before removing. Small particles of dirt can cause damage to internal components and cause valves to stick. Warm Oil Level Check The transmission should be at operating temperature (190°F maximum) to get an accurate oil level reading. Oil will expand when it is heated, Oil will drain back from the cooler and cooler lines. Expansion and drainback can significantly affect oil level. When the transmission is at operating temperature, place selector lever in neutral. Shut off engine. Carefully remove transmission dipstick. I,mmediately insert clean dipstick and read oil level. NOTE: Oil level must be checked immediately after engine shutdown to prevent an incorrect reading. Oil drains back into transmission from the cooler and cooler lines. Add or remove oil if necessary, Repeat the above checking procedure as required until oil is at the dipstick mark. Cold Oil Level Check For ease of checking the oil level prior to engine start-up, a cold oil level mark can be made. To find the cold oil level mark, the oil level must first be set according to the warm oil level checking procedure. Then, let the boat sit overnight. Insert clean dipstick and read oil level, Put a mark on the dipstick at the cold oil level reading. You can use the new mark to check the oil level when cold. If oil level adjustment is needed, add oil to the new mark. Type of Oil Dexron II, Type F, or any hydraulic fluid which meets the C-3 oil specification is acceptable. Do not mix different brands or types of oil. If engine doesn’t exceed 3000 R.P.M., a premium grade 30 weight engine oil is acceptable. 40 weight and multi-viscosity oils are not recommended. lf the transmission oil temperature has exceeded 1 gOoF, the oil must be changed in the transmission and cooler system. If the transmission alarm sounds, the oil must be changed also, Oil Any changes or modifications to the transmission cooling system will require that the oil level be readjusted. Any additions to the boat which will change the installation angle of the transmission at rest(such as extra fresh water tanks, fuel supply etc.) will require an oil level adjustment. B o r g-W e r n e r A ulo m otiv e, In c. m si s s i o n ST ry as nt es m PB oOs Xt 2 o6ffi 8 8c e IMn ud ni at ni ea 3T 1e 7l e p2h8o6n 6e 1 0 0 47302 T ele x 27 491 B orgW arn er Automotive