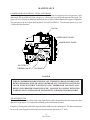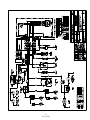
1
BOSS RX70 24HP
OPERATORS, MAINTENANCE
AND PARTS MANUAL
P/N: 307239
11/29/2010 MCM
TABLE OF CONTENTS
Operation & Maintenance Section
Page
Specifications ............................................................................................................... 6
Safety ............................................................................................................................ 7
Description of Components ...................................................................................... 17
Compressor Operation ............................................................................................. 21
Compressor Inspection, Lubrication, and Maintenance ...................................... 25
Troubleshooting ......................................................................................................... 36
Recommended Spare Parts ...................................................................................... 39
Warranty Information/Claims ................................................................................. 40
Parts & Illustration Section ..................................................................................... 46
4
P/N:307239
SPECIFICATIONS
COMPRESSOR SPECIFICATIONS
ENGINE SPECIFICATIONS
HONDA 4-CYCLE, VTWIN OHV AIR
COOLED GASOLINE
MODEL
RX 70
TYPE
DELIVERY (CFM)
70 CFM @ 100 PSIG
(1.98M3/MIN)
MODEL
OPERATING
80-115 PSIG
PRESSURE RANGE
AMBIENT OPERATING
-20° TO +105°
TEMPERATURE
FAHRENHEIT
RANGE
.75 GALLONS (2.83
OIL SUMP CAPACITY
LITERS)
TOTAL SYSTEM
1.0 GALLONS (3.80
CAPACITY
LITERS)
AIR SERVICE
1/2" NPT
CONNECTIONS
TYPE COOLING
OIL TO AIR
SYSTEM
AIR INTAKE FILTER
SINGLE STAGE DRY
TYPE OF CONTROL
0 - 100% DEMAND
8
7
6
GX670
POWER @ 3600 RPM 24 HP (15.8kw)
HP (kw)
DISPLACEMENT cubic inches (cc)
40.9 cubic inches
(670cc)
B - 3.0 (77MM) & S 2.80 inches (72mm)
OIL CAPACITY WITH
1.69 QUARTS (1.6
FILTER
LITERS)
12V - 227cca @ O°
BATTERY
FAHRENHEIT
5.2 GALLONS (20
FUEL TANK CAPACITY
LITERS)
BORE & STROKE
WEIGHT 430lbs (195kg)
5
4
3
2
1
Parts List
D
ITEM
QTY
1
2
3
4
5
6
NS
NS
1
1
1
1
1
1
1
1
PART NUMBER
200381
200367
200365
200366
200380
200215
307239
303807
DESCRIPTION
INST. PANEL & PARTS, 24HP RX70
FRAME & PARTS, 24HP RX70
COMPRESSOR & PARTS, 24HP RX70
ENGINE & PARTS, 24HP RX70
COOLER & PARTS, 24HP RX70
HOSE AND PARTS, RX70
MANUAL, BOSS 24HP RX70
CRATE, SHIPPING BULLET 36X50X45
D
19 3/8 in
[490.5 mm]
C
C
31 1/2 in
[799.1 mm]
B
B
35 1/4 in
[894.7 mm]
29 1/4 in
[743.8 mm]
5 in
[126.5 mm]
20
A
19
18 5/8 in
[471.7 mm]
18
17
16
15
14
13
REV
58 3/4 in
[1491.3 mm]
8
7
6
5
4
6
P/N:307239
UPDATED
UPDATED
REV 5
UPDATED
UPDATED
UPDATED
UPDATED
UPDATED
UPDATED
200365 TO REV 12
200365 TO REV 11 & 200367 TO
200365 TO REV 10
200365 TO REV 9
200365 TO REV 8
200366 TO REV 2
200366 TO REV 1
200381 TO REV 3
DESCRIPTION
REVISION HISTORY
3
11/8/2010
MCM
10/18/2010 MCM
9/20/2010
7/12/2010
6/16/2010
4/20/2010
3/22/2010
3/10/2010
DATE
MCM
CRH
MCM
CRH
MCM
DCL
ENG
PROPRIETARY INFORMATION
MACHINED SURFACES UNMACHINED SURFACES
R
THIS DRAWING AND ALL ITS
NOMINAL DIM.
FRACTIONAL ` 1/16
CONTENTS ARE PROPERTY
0.000 TO 1.000 ` .010
DECIMAL ` .03
OF BOSS INDUSTRIES, INC.
1.001 TO 5.000 ` .015
ANGULAR ` 1°
AND MUST NOT BE COPIED
5.001 TO 10.000 `.020
OR MADE PUBLIC. IT IS
DO NOT SCALE
DESCRIPTION
TOLERANCES
LOANED AND IS SUBJECT TO
10.001 & OVER `.025
UNLESS NOTED
RETURN UPON DEMAND. THE
INFORMATION CONTAINED IN DRAWN
RX70 PORTABLE 24HP
2/12/2008
THIS DRAWING IS
MCM
CONFIDENTIAL AND MUST
CHECKED
2/12/2008
NOT BE USED, DIRECTLY OR
NDD
SIZE SCALE
DWG NO
INDIRECTLY, IN ANY WAY
MATERIAL
D 1=4
20071-001
DETRIMENTAL TO THE
N/A
INTEREST OF BOSS
PATH
INDUSTRIES, INC.
G:\Inventor Files\20k\20071-001.dwg
2
BOSS INDUSTRIES
1761 GENESIS DR.
LA PORTE, IN 46350
REV
20
SHEET
1
1
OF
1
A
SAFETY
WARNING
ALL UNITS ARE SHIPPED WITH A DETAILED OPERATORS, INSTALLATIONS AND
PARTS MANUAL. THIS MANUAL CONTAINS VITAL INFORMATION FOR SAFE AND
EFFICIENT OPERATION OF THIS UNIT. CAREFULLY READ THE OPERATORS
MANUAL BEFORE STARTING THE UNIT. FAILURE TO READ AND COMPREHEND
THE INSTRUCTIONS COULD RESULT IN SERIOUS BODILY INJURY OR PROPERTY
DAMAGE.
GENERAL
The compressor is designed and manufactured to operate with relative safety. However, the responsibility for
safe operation rests with those who use and maintain these products. The following safety precautions are
offered as a guide, which, if conscientiously followed, will minimize the possibility of accidents throughout the
useful life of this equipment.
Only those who have read and understand this operator’s manual should operate this air compressor. Failure
to follow the instructions, procedures and safety precautions in this manual may increase the possibility of
accidents and injuries.
Never start this air compressor unless it is safe to do so. Do not attempt to operate the air compressor with a
known unsafe condition. Tag the air compressor and render it inoperative by disconnecting the battery so
others who may not know of the unsafe condition will not attempt to operate it until the unsafe condition is
corrected.
Use and operate this air compressor only in full compliance with all pertinent OSHA requirements and all
pertinent Federal, State and Local codes or requirements.
Do not modify this compressor except with written factory approval. Any unauthorized modification automatically
voids the factory warranty.
The operation of engine-powered equipment will always be somewhat dangerous. Do not consider this
section to be complete, but always continue to be alert for hazards.
PARKING OR LOCATING COMPRESSOR
Locate compressor on level areas, if possible. If not, locate compressor across grade, so the compressor
does not tend to roll down hill. Do not locate compressor on grades exceeding 15 degrees (27%).
Make sure compressor is parked or located on a firm surface that can support its weight.
Locate compressor so the wind, if any, tends to carry the engine exhaust fumes and radiator heat away from
the compressor air inlet openings and also where the compressor will not be exposed to excessive dust from
the work site. Muffler side of package must have 12 inches of clearance so engine-cooling air can escape from
package without restriction or re-circulation. The topside of package at the compressor oil cooling fan must
also have 12 inches of clearance so cooling air can escape from package without restriction or re-circulation.
Block or chock both sides of all wheels.
7
P/N:307239
SAFETY
PRESSURE RELEASE
Install the appropriate flow limiting valves between the compressor service air outlet and the shut-off (throttle)
valve. Air hoses exceeding 1/4” inside diameter are to be connected to the shut-off (throttle) valve to reduce
pressure in case of hose or connection failure, per OSHA Standard 29 CFR 1926.302 (as) (7).
When the hose is to be used to supply a manifold, install an additional appropriate flow limiting valve between
the manifold and each air hose exceeding 1/4” inside the diameter that is to be connected to the manifold to
reduce pressure in case of hose failure.
Provide a flow-limiting valve every 75 feet of hose in runs of air hose exceeding 1/4” inside diameter to reduce
pressure in case of hose failure.
Flow limiting valves are listed by pipe size and rated CFM. Select appropriate valves accordingly.
Do not use tools that are rated below the maximum relief valve rating on this compressor. Select tools, air
hoses, pipes, valves, filters and fittings accordingly. Do not exceed manufacturer’s rated safe operating pressures
for these items.
Secure all hose connections by wire, chain or other suitable retaining devices to prevent tools or hose ends
from being accidentally disconnected and expelled.
Open compressor oil filler cap only when compressor is not running and is not pressurized. Shut down the
compressor and bleed the sump (open service valve) pressure to zero before removing the oil filler cap.
Vent all internal pressure prior to opening any line, fitting, hose, valve, drain plug, connection or other components
such as filters or line oilier, and before attempting to refill optional air line anti-ice systems with antifreeze
compound.
Keep personnel out of line with and away from the discharge opening of hoses or tools or other points of
compressed air discharge.
Do not use air pressures higher than 30 PSIG (207kPa) for cleaning purposes, and then only with effective
chip guarding and personal protective equipment per OSHA Standard 29 CFR 1910.242 (b).
Do not play with air hoses, as serious injury or death may result.
8
P/N:307239
SAFETY
FIRE AND EXPLOSION
Refuel at a service station or from a fuel tank designed for its intended purpose. If this is not possible then,
ground the machine to the dispenser prior to refueling.
Immediately clean up any spills or leaking fuel, battery electrolyte, oil or antifreeze solution.
Shut off the air compressor and allow it to cool. Then keep sparks, flames and other sources of ignition away
and do not permit smoking in the vicinity when adding fuel, when checking or adding electrolyte to batteries,
when checking or adding oil, or when refilling air line anti-ice systems with antifreeze compound.
Do not permit liquids, including air line anti-ice system antifreeze compound or oil film to accumulate on bottom
covers or on, under or around any external or internal surfaces of the air compressor. Wipe down using an
industrial cleaner or steam clean as required. Do not use flammable solvents for cleaning purposes.
Disconnect the ground (negative) battery connection prior to attempting any repairs or cleaning inside the
enclosure. Tag the battery connection so others will not unexpectedly reconnect it.
Keep electrical wiring, including the battery terminals and other terminals, in good condition. Replace any
wiring that has cracked, cut, abraded, or otherwise degraded insulation; or terminals that are worn, discolored
or corroded. Keep all terminals clean and tight.
Turn off battery charger before making or breaking connections to the battery.
Keep grounded conductive objects such as tools away from exposed live electrical parts such as terminals, to
avoid arcing, which might serve as a source of ignition.
Replace damaged fuel tanks or lines immediately, rather than attempting to repair them. Do not store or
attempt to operate the compressor with any known leaks in the fuel system or any oil lines.
Remove any other material that may be damaged by heat or that may support combustion, including anti-ice
system components containing antifreeze compound, prior to attempting weld repairs.
Keep a suitable fully charged class BC or ABC fire extinguisher or extinguishers nearby when servicing and
operating the compressor.
Do not store any type of containers with fuel or lubricants inside, or outside of canopy.
Keep oily rags, trash, leaves, litter or other combustibles out of and away from the
compressor.
Open all access doors and allow the enclosure to ventilate prior to attempting to start the engine. (Use this time
to check the engine and compressor oil levels, etc.)
Do not operate compressor under low overhanging leaves or permit such leaves to contact hot exhaust system
surfaces when operating in forested areas.
Do not attempt to use ether as a starting aid in gasoline engines, as serious personal injury or property damage
may result.
9
P/N:307239
SAFETY
FIRE AND EXPLOSION (CONT.)
Antifreeze compound used in air line anti-ice systems contains methanol, which if flammable. Use systems and
refill with compound only in well-ventilated areas away from heat, open flames, or sparks. Do not expose any
part of these systems or the antifreeze compound to the temperatures above 150 degrees F (65 degrees C).
Vapors from the antifreeze compound are heavier than air. Do not store compound or discharge treaded air in
confined or unventilated area. Do not store containers or antifreeze compound in direct sunlight.
MOVING PARTS
Keep hands, arms and other parts of the body and also clothing away from belts pulleys and other moving
parts.
Do not attempt to operate the compressor with the fan guard or other guards removed.
Wear snug fitting clothing and confine long hair when working around this compressor, especially when exposed to hot or moving parts inside the enclosure.
Keep access doors closed except when making repairs, adjustments or performing service.
Make sure all personnel are clear of the compressor prior to attempting to start to operate it, or shutting it off.
Shut off engine before adding fuel, oil, lubrications, air line anti-freeze compound, or battery electrolyte.
Disconnect the grounded negative battery connection to prevent accidental engine operation prior to attempting repair or make adjustments. Tag the battery connection so others won’t unexpectedly reconnect it. (Use
appropriate lockout / tag-out procedures).
Make adjustments only when the engine is shut off. When necessary, make adjustment, and then start engine
to check adjustment. If adjustment is incorrect shut off engine, readjust, and then restart engine to recheck
adjustment.
10
P/N:307239
SAFETY
HOT SURFACES, SHARP EDGES AND SHARP CORNERS, VACUUM
Avoid bodily contact with hot oil, hot coolant, hot surfaces and sharp edges and corners.
Keep all parts of the body away from all points of air discharge and away from hot exhaust gases.
Wear personal protective equipment, including gloves and head covering when working in, on, or around the
compressor.
Keep a first aid kit handy. Seek medical assistance promptly in case of injury. Do not ignore small cuts and
burns, as they may lead to infection.
Keep all loose clothing and parts of the body away from engine, compressor, and air filter intakes.
TOXIC AND IRRITATING SUBSTANCES
Do not use air from this compressor for breathing except in full compliance with OSHA Standards 29 CFM
1920 and any other Federal, State or Local Codes or Regulations.
Do not use air line anti-ice systems in air lines supplying respirators or other breathing air utilization equipment,
and do not discharge air from these systems in non-ventilated or other confined areas.
Operate the compressor only in open or well-ventilated areas.
If the machine is operated indoors, discharge engine exhaust outdoors, being certain that there are no exhaust
system leaks.
Locate this compressor so that exhaust is not apt to be carried towards personnel, air intakes servicing personnel
areas, or towards the air intake of this or any other portable or stationary compressor.
TOXIC AND IRRITATING SUBSTANCES (CONT.)
Fuels, oils, coolants, lubricants and battery electrolyte used in this compressor are typical of the industry. Care
should be taken to avoid accidental ingestion and/or skin or eye contact. In the event of indigestion, seek
medical treatment promptly. Do not induce vomiting if fuel is ingested. Wash with soap and water in the event
of skin contact.
Wear an acid resistant apron and a face shield or goggles when servicing the battery. If electrolyte is spilled on
skin or clothing, immediately flush with large quantities of water.
If air line anti-ice system antifreeze compound enters the eyes or if fumes irritate the eyes, they should be
washed with large quantities of clean water for 15 minutes. A physician, preferably an ophthalmologist, or eye
specialist, should be contacted immediately.
The antifreeze compound used in air line anti-ice systems contains methanol and is toxic, harmful or fatal if
swallowed. Avoid contact with the skin or eyes and avoid breathing the fumes. Call a physician immediately.
expose live parts of the electrical system.
11
P/N:307239
SAFETY
ELECTRICAL SHOCK
Keep the compressor or equipment carrier, compressor hoses, tools and all personnel at least 10 feet from
power lines and buried cables.
Keep all parts of the body and any hand-held tools or other conductive objects away from exposed live parts
of the electrical system. Maintain dry footing, stand on insulating surfaces and do not contact any other portion
of the compressor when making adjustments or repairs to expose live parts of the electrical system.
Attempt repairs only in clean, dry, well lighted and ventilated areas.
LIFTING
This compressor is provided with a lifting bail for routine lifting, loading onto trucks, etc. Compressors to be
air lifted by helicopter must not be supported by the lifting bail, but by slings with appropriate spreader bars
instead. In any event, lift only in full compliance with OSHA standards 29 CFR 1910 subpart N. Inspect lifting
bail and points of attachment for cracked welds, for cracked, bent, corroded or otherwise degraded members,
and for loose bolts or nuts prior to lifting.
Make sure entire lifting, rigging and supporting structure has been inspected and is in good condition. Verify
the rated capacity is at least the net weight of the compressor plus an additional 10% allowance for the weight
of snow, ice, mud or stored tools and equipment. If you are unsure of the weight, then weigh the compressor
before lifting.
Make sure lifting hook has a functional safety latch, or equivalent, and is fully engaged once it has been lifted
clear of the ground.
Do not attempt to lift in high winds.
Keep all personnel out from under and away from the compressor when suspended.
Lift compressor slowly and smoothly, without jerking.
Lift compressor no higher than necessary.
Keep lift operators in constant attendance whenever compressor is suspended.
Set compressor down only on level surfaces capable of supporting at least its net weight plus an additional
10% allowance for the weight of snow, ice, mud or stored tools and equipment.
Chock both sides of wheels plus stabilizer legs before disengaging the lifting hook.
12
P/N:307239
SAFETY
JUMP STARTING
Observe all safety precautions mentioned elsewhere in this manual.
Batteries may contain and/or generate gases that are flammable and explosive. Keep flames, sparks and other
sources of ignition away.
Batteries contain acid that is corrosive. Do not allow battery acid to contact eyes, fabrics, or painted surfaces,
as serious personal injury or property damage may result. Flush any contacted areas thoroughly with water
immediately. Wear an acid resistant apron and face shield when attempting to jump-start the compressor.
Remove all vent caps from the battery in the compressor. Do not permit dirt or foreign matter to enter the open
cells. Do not attempt to open sealed maintenance free batteries.
Check fluid level. If low, bring fluid to proper level before attempting to jump-start.
Do not attempt to jump-start if fluid is frozen or slushy. Bring batteries up to at least 40 degrees F (5 degrees
C) before attempting to jump-start.
Cover open cells of all compressor batteries with clean dampened cloths before attempting to jump-start.
Attempt to jump start only with a vehicle with a negative ground electrical system with the same voltage and
which is equipped with a battery of comparable size or larger than supplied with the compressor. Do not
attempt to jump-start by using motor generator sets, welders, or other sources of DC power, as serious
damage may result.
Bring the starting vehicle alongside the compressor, but do not permit metal-to-metal contact between the
compressor and the starting vehicle.
Set the parking brakes of the starting vehicle, chock compressor wheels and stabilizer legs on both sides.
* The use of maintenance-free batteries may eliminate this step.
Place the starting vehicle in neutral or park, turn off all nonessential accessory electrical loads and start its
engine.
Use only jumper cables that are clean, in good condition, and are heavy enough to handle the starting current.
Avoid accidental contact between jumper cable terminal clips or clamps and each other or any metallic portion
of either the compressor or the starting vehicle to minimize the possibility of uncontrolled arcing, which might
serve as a source of ignition.
Positive battery terminals are usually identified by a plus (+) sign on the terminal and the letters POS adjacent
to the terminal. Negative battery terminals are usually identified by a minus (-) sign on the terminal and the
letters NEG adjacent to the terminal.
Connect one end of a jumper cable to the positive POS (+) battery terminal in the starting vehicle.
Connect one end of the other jumper cable to the grounded negative (NEG) terminal of the battery in the
starting vehicle.
13
P/N:307239
SAFETY
JUMP STARTING (CONT.)
Connect one end of a jumper cable to the positive POS (+) battery terminal in the starting vehicle.
Connect one end of the other jumper cable to the grounded negative (NEG) terminal of the battery in the
starting vehicle.
Check you connections. Do not apply 24V to a 12V system in the compressor.
Connect the other end of this same jumper cable to a clean portion of the compressor engine block away from
fuel lines, the crank case breather opening, and the battery.
Start the compressor in accordance with normal procedure. Avoid prolonged cranking.
Allow the compressor to warm-up. When the compressor is warm and operating smoothly at normal ideal
RPM, disconnect the jumper cable from the engine block on the compressor, then disconnect the other end of
this same cable from the grounded negative (NEG) terminal of the battery in the starting vehicle. Then disconnect
the other jumper cable from the positive (POS) (+) terminal of the battery in the compressor, and
finally, disconnect the other end of this same jumper cable from the positive (POS) (+) terminal of the
battery in the starting vehicle.
14
P/N:307239
SAFETY
NOTE
THE OWNER, LEASER, OR OPERATOR OF THE COMPRESSOR IS HEREBY
NOTIFIED AND FOREWARNED THAT ANY FAILURE TO OBSERVE THESE SAFETY
PRECAUTIONS MAY RESULT IN DAMAGE OR INJURY
NOTE
BOSS INDUSTRIES EXPRESSLY DISCLAIMS RESPONSIBILITY OR LIABILITY FOR
ANY INJURY OR DAMAGE CAUSED BY FAILURE TO OBSERVE THESE SPECIFIED
PRECAUTIONS OR BY FAILURE TO EXERCISE THAT ORDINARY CAUTION AND
DUE CARE REQUIRED WHEN OPERATING OR HANDLING THE COMPRESSOR,
EVEN THOUGH NOT EXPRESSLY SPECIFIED ABOVE.
Compliments of warning decals are supplied with each unit. These decals are affixed to the unit after it
has been painted, prior to being put into service. The decals are placed so as to be clearly visible to the
user and service personnel.
P/N: 300039
P/N: 300038
15
P/N:307239
SAFETY
P/N 300042
P/N 300040
P/N 300041
P/N 300968
16
P/N:307239
DESCRIPTION OF COMPONENTS
POWER UNIT
The power unit used to drive the compressor is a gasoline engine that has been carefully selected for its ability
to provide an efficient and reliable source of power. For detailed information on the power unit, refer to the
Engine Operator’s Manual provided separately.
COMPRESSOR ASSEMBLY
The RX70 compressor assembly is a positive displacement, oil flooded, rotary screw type unit employing one
stage of compression to achieve the desired pressure. Components include a housing (stator) two screws
(rotors), bearings and bearing supports. The power source drives the male rotor through the inlet housing.
The male rotor drives the female rotor.
PRINCIPLES OF OPERATION
In operation, two helical grooved rotors mesh to compress air. Inlet air is trapped as the male lobes roll down
the female grooves, pushing trapped air along, compressing it until it reaches the discharge port in the end of the
stator and delivers smooth-flowing, pulse-free air to the receiver.
During the compression cycle, oil is injected into the compressor and serves these purposes:
1. Lubricates the rotating parts and bearings.
2. Serves as a cooling agent for the compressed air.
3. Seals the running clearances.
LUBRICATION SYSTEM
Oil from the compressor oil sump, at the compressor discharge pressure, is directed through the oil cooling
system, then the oil filter, and back to the compressor stator, where it is injected into the compressor. At the
same time oil is directed to the bearings and shaft seal of the compressor.
SAFETY VALVE
The pop safety valve is set at 175 PSI and is located at the top of the air/oil sump. This valve acts as a backup
to protect the system from excessive pressure that might result from a malfunction.
AIR/OIL COALESCER
The coalescer is self-contained within a spin-on housing and is separate of the sump. When air is demanded at
the service line, it passes through the coalescer, which efficiently provides the final stage of oil separation.
MINIMUM PRESSURE VALVE
The minimum pressure valve is located at the outlet of the compressor and serves to maintain a minimum
discharge pressure of 60 PSIG in operation, which is required to assure adequate compressor lubrication
pressure, and air/oil separation at the coalescer element.
OIL FILTER
The compressor oil filter is the full-flow replaceable element type and has a safety by-pass built into it. This
element screws directly to the compressor stator housing. See Compressor Mounting System in the illustration
section.
17
P/N:307239
DESCRIPTION OF COMPONENTS
COMPRESSOR COOLING SYSTEM
The compressor cooling system consists of an oil cooler and electric fan assembly. See Cooler and Parts
System in the illustration section.
An automated thermostatic control system maintains a continuous temperature check of the lubricant. The fan
sensor trips a normally open relay which sends power to the fan motor once compressor oil temperature
reaches 190°F. The fan sensor stops power to the fan motor once the compressor oil temperature drops to
160°F.
INSTRUMENT PANEL AND OPERATING CONTROLS
The instrument panel contains all the necessary gauges and instruments for operation and is located outside of
the main enclosure. The following is an explanation of their use. See Electrical System & Wiring Diagram in
the illustration section.
1. Start (key)
The starter switch is used to electrically energize the engine starter motor solenoid to begin cranking of
engine.
2. Choke (Gasoline Engine Only)
The choke is used to provide a richer fuel mixture to the engine for cold starts. Pulling the choke cable
out increases the fuel mixture. As the engine warms up, the choke should be pushed inward. The
engine should operate without choking as soon as possible after starting to avoid flooding or dilution of
lubricating oil.
3. Hourmeter
The hourmeter records the total number of operating hours. It serves as a guide towards following the
recommended inspection and maintenance schedule.
4. Pressure Meter
The pressure meter displays compressor discharge air pressure. This meter also has a shutdown
feature and will shutdown the engine if the discharge air pressure reaches 150 psi.
5. Temperature Meter
The temperature meter displays compressor discharge air temperature. This meter also has a shutdown
feature and will shutdown the engine if the discharge air reaches 250°F.
Note: If the compressor shuts down on high discharge air pressure or high discharge air temperature, find and
fix the problem before restarting. Also, the shutdown relay reset button must be reset before the engine can be
restarted.
CONTROL SYSTEM
The prime components of the compressor control system include the compressor inlet valve and an air cylinder.
The control system is designed to match air supply to air demand and to prevent excessive discharge pressure
when compressed air is not being used. Control of air delivery is accomplished by the inlet valve regulation as
directed by the discharge pressure regulator.
18
P/N:307239
DESCRIPTION OF COMPONENTS
CONTROL SYSTEM OPERATION
The following discussion explains the operation of the control system from a condition of “no load” to a
condition of ‘full capacity” at working pressure. For the working pressure range of your machine, refer to
applicable data in the specification sections.
The pressure Regulator and engine speed regulating cylinder operates as follows:
1. As the demand for air decreases, the receiver pressure rises; and when this pressure exceeds the set point
of the pressure regulator, the regulator opens sending a pressure signal to the inlet valve, and to the regulating
cylinder.
a. The inlet valve disc moves towards the valve inlet against the force of the modulating spring inside
the valve. This regulates the opening area of the inlet valve.
b. The regulating cylinder will reduce engine speed somewhere between full load and compressor
idle.
2. If the air demand goes to zero, (service valve closed) the inlet valve will close completely, and the regulating
cylinder will bring the engine to compressor idle.
3. As the demand for air increases, receiver pressure drops slightly below the set point of the pressure
regulator eliminating the signal to the inlet valve and regulator cylinder.
a. Inlet valve disc opens fully.
b. Regulating cylinder retracts allowing the engine governor spring to bring the engine and compressor
up to its high rpm.
INLET VALVE
The compressor inlet valve is a piston operated disc valve that has a dual function of regulating the inlet opening
to control capacity and serving as a check valve at shutdown.
DISCHARGE PRESSURE REGULATOR VALVE
This valve is used to select the desired discharge pressure within the operating pressure range. Turning the
regulator screw clockwise increases the working pressure, a counter-clockwise movement of the screw reduces
working pressure. Do not set pressure over 125 psi. Normal set pressure is 80 to 120 psig.
COMPRESSOR DISCHARGE PRESSURE GAUGE
This gauge indicates the discharge air pressure. Operate compressor with discharge pressure within 80 to 120
PSIG.
AUTOMATIC BLOW DOWN VALVE
The automatic blow down valve. This valve will automatically bleed the sump to zero pressure when the
compressor is stopped.
19
P/N:307239
DESCRIPTION OF COMPONENTS
ELECTRICAL AND PROTECTIVE CIRCUIT SYSTEM
The compressor electrical system is a 12-volt negative ground type. It is equipped with a protective circuit to
minimize damage which could be caused by high compressor discharge temperature, or high discharge pressure.
See wiring diagram and electrical system in the illustrations section.
The following conditions will cause automatic shutdown of the compressor:
1. Compressor discharge temperature switch exceeds approximately 250°F.
2. Compressor discharge pressure that exceeds 150 psi.
NOTE
WHENEVER THE OPERATION OF THE PROTECTIVE CIRCUIT SHUTS THE
MACHINE OFF, THE RESET BUTTON ON THE CONTROL PANEL MUST BE RESET
(PUSHED IN) BEFORE YOU CAN RESTART THE COMPRESSOR. “DO NOT”
RESTART THE COMPRESSOR UNTIL THE CAUSE OF THE SHUTDOWN IS FOUND
AND FIXED.
DUE TO THE FACT THAT THE COMPRESSOR PROTECTIVE CIRCUIT IS AN
“ENERGIZED TO RUN” SYSTEM, ANY INTERRUPTION OF CURRENT WILL SHUT
THE UNIT DOWN. IN EVENT OF AUTOMATIC SHUTDOWN, IT IS ALWAYS GOOD
POLICY TO CHECK FOR LOOSE OR BROKEN WIRES OR CORRODED
CONNECTIONS BY THE SHUTDOWN SWITCH LOCATED IN THE DISCHARGE LINE
AT SUMP. IF THE ELECTRICAL SYSTEM CHECKS OUT PROPERLY, REFER TO
TROUBLESHOOTING SECTION.
20
P/N:307239
COMPRESSOR OPERATION
GENERAL
Every RX70 compressor has been operated and tested at the factory before shipment. This testing assures
that the unit is operating properly and that the compressor will deliver its rated capacity. Regardless of the care
taken at the factory, there still exists a possibility that damage may occur during shipment. For this reason, it is
recommended that the unit be carefully inspected for evidence of damage in shipment. During the first few
hours of operation the machine should be carefully observed for any possible malfunction.
Satisfactory performance of the machine depends on the operator’s knowledge of the controls, instruments,
and recommended operating procedures. Consequently, the preceding sections of this manual should be read
and understood before attempting to start and operate this machine.
PREPARATION FOR INITIAL START-UP
Inspect the compressor, engine, and other assemblies for loose connections or damage occurring during shipment.
Position the compressor package on a level surface so the proper amounts of fluids can be added. Check the
engine crankcase oil level. If required, add oil as recommended in the Engine Operator’s manual. Fill fuel tank
with grade of fuel recommended in the Engine Operator’s manual. Connect negative battery cable to (-)
battery terminal. Check the compressor oil sump level. If oil level is low, add ATF Dexron III. See below for
fill plug and sight glass locations. DO NOT OVER FILL.
NOTE
PROPER COMPRESSOR OIL LEVEL SHOULD FILL HALF OF THE UPPER
SIGHTGLASS WHEN THE COMPRESSOR IS LEVEL AND THE COMPRESSOR IS
NOT RUNNING .
OIL FILL
UPPER SIGHT GLASS
LOWER SIGHT GLASS
OIL FILTER
THERMAL VALVE
OIL DRAIN
21
P/N:307239
COMPRESSOR OPERATION
NORMAL STARTING - GASOLINE ENGINE
1. Inspect the compressor, engine, and other assemblies for loose connections or damage that might have
occurred since the last operation.
2. Check engine oil and fluid levels.
3. Check compressor oil sump level.
4. Ensure service valves are closed.
5. Verify cold start switch is in the “ON” position.
6. Pull the choke out as required, but avoid flooding the engine. Release the choke as soon after starting as
possible.
7. Turn engine start switch and hold until engine starts, but do not hold any longer than 10 seconds at a time.
8. Let the machine run for 3-5 minutes to allow the engine to warm-up.
9. Toggle the cold start switch to the “OFF” position. The system is now ready for full-load operation.
10. Service valves can now be opened.
NOTE
IF ENGINE SHOULD STOP, DO NOT ATTEMPT TO RESTART WITH THE OIL
SUMP UNDER PRESSURE, ALLOW BLOW DOWN OF SUMP TO END. REPEAT
THE ABOVE PROCEDURE FROM STEP 3.
NORMAL STOPPING
1. Close the service valves.
2. Toggle cold start switch to the “ON” position.
3. Let the compressor run for a few minutes to allow machine to cool down an for system pressure to unload.
4. Turn key to
OPERATING UNDER EXTREME CONDITIONS
When operating the compressor in extreme conditions, perform the following service functions as applicable.
COLD WEATHER OPERATION
When operating in lower than -20 degrees F ambient, change engine oil per engine owner’s manual and let the
engine and compressor warm-up before opening the service valve.
HOT WEATHER OPERATION
Keep the engine filled with clean oil and check the oil level more frequently than usual. Keep the outside of the
compressor oil cooler clean. Locate the unit in a well-ventilated area. When operating in humid conditions, it
is recommended that the compressor oil change interval be shortened.
DUSTY OR SANDY AREAS
When possible, wet down the area surrounding the operating site to keep dust and blowing sand to a minimum.
Inspect air filters more frequently.
22
P/N:307239
COMPRESSOR OPERATION
WARNING
CHECK THE COMPRESSOR SUMP OIL LEVEL ONLY WHEN THE COMPRESSOR
IS NOT OPERATING AND SYSTEM IS COMPLETELY RELIEVED OF PRESSURE.
OPEN SERVICE VALVE TO ENSURE RELIEF OF SYSTEM AIR PRESSURE WHEN
PERFORMING MAINTENANCE ON COMPRESSOR AIR/OIL SYSTEM. FAILURE
TO COMPLY WITH THIS WARNING MAY CAUSE PROPERTY DAMAGE AND
SERIOUS BODILY HARM OR DEATH.
OPERATING CONDITIONS
For maximum compressor performance, the compressor should be as close to level as possible
when operating. The compressor will operate on a 15-degree sideward lengthwise tilt without
any adverse problems. Fluid carryover and oil starvation may occur if operated beyond this tilt.
NOTE
IF THE COMPRESSOR IS BEING USED TO POWER SANDBLASTING EQUIPMENT
OR AN AIR TANK, USE A CHECK VALVE DIRECTLY AFTER THE SERVICE VALVE
TO PREVENT BACK-FLOW INTO THE SUMP. THIS CHECK VALVE SHOULD HAVE
A MAXIMUM PRESSURE DROP RATING OF 2 PSIG (13.78 kPa) OPERATING AND A
CAPACITY RATING EQUAL TO THE MAXIMUM RATING OF THE COMPRESSOR.
OPERATING SUGGESTIONS
Replace any faulty gauge immediately.
Allow at least ten feet of unobstructed area in front of the engine muffler to assure good airflow. Do not place
items under the package.
Check instruments periodically during operation. If not in normal operating zone, refer to Section 6, “Troubleshooting”.
Make sure that correct type and viscosity lubricating oils and fuel are used, especially in extreme ambient
temperatures.
Keep batteries fully charged and properly maintained.
Keep control linkage clean and lightly lubricated.
23
P/N:307239
COMPRESSOR OPERATION
While BOSS Industries has built into its compressor several controls and indicators to assure you that it is
running properly, you will want to recognize and interpret the readings which will call for service or indicate the
beginning of a malfunction. Before starting the compressor, read this section thoroughly. Familiarize yourself
with the controls and indicators, their purpose, location, and use.
CONTROL OR INDICATOR
PURPOSE
AIR PRESSURE GAUGE
Continually monitors the sump pressure at various load and unload conditions
FAN SWITCH
Monitors the temperature of the air/fluid mixture leaving the compressor unit.
The normal reading should be approximately 140 to 220° Fahrenheit. Switch
closes to activate fan motor.
COMPRESSOR HIGH DISCHARGE
Opens the electrical circuit to shut the machine down when the discharge
TEMPERATURE SHUTDOWN
temperature reaches 250° Fahrenheit.
SWITCH
Indicates the fluid level in sump. Proper level should fill half of the top sight
FLUID LEVEL SIGHTGLASS
glass. Check this level when the machine is shutdown.
Vents sump pressure to the atmosphere should pressure inside the sump
PRESSURE RELIEF VALVE
exceed 175 PSIG.
COMPRESSOR INLET CONTROL Regulates the amount of air intake in accordance with the amount of
VALVE
compressed air being used. Isolates fluid in compressor unit on shutdown.
Senses air pressure from sump to provide automatic regulation of the
PRESSURE REGULATING VALVE
compressor inlet control valve and load controller.
Restricts airflow to balance sump and service air pressure. Assures a
MINIMUM PRESSURE VALVE
minimum of 60 PSIG to the service line.
24
P/N:307239
COMPRESSOR INSPECTION, LUBRICATION, AND MAINTENANCE
This section contains instructions for performing the inspection, lubrication and maintenance procedures required
in maintaining the compressor in proper operating condition. The importance of performing the maintenance
described herein cannot be over emphasized.
Periodic maintenance procedures to be performed on the equipment covered by this manual are listed below.
It should be understood that the intervals between inspections specified are maximum intervals. More frequent
inspections should be made if the unit is operating in a dusty environment, in high ambient temperature, or in
other unusual conditions. A planned program of periodic inspection and maintenance will help to avoid premature
failure and costly repairs. Daily visual inspections should become a routine.
The LUBRICATION AND MAINTENANCE CHART lists serviceable items on this compressor package.
The items are listed according to their frequency of maintenance, followed by those items which need only “As
Required” maintenance. The maintenance time intervals are expressed in hours. Use the hourmeter readings
for determining your maintenance schedules. Perform the maintenance at multiple intervals of the hours shown.
For example, when the hourmeter shows “100” on the dial, all items listed under “EVERY 10 HOURS” should
be serviced now for the tenth time, and all items under “EVERY 50 HOURS” should be served for the second
time. In addition to the following LUBRICATION AND MAINTENANCE CHART refer to the Engine
Operator’s manual for recommended engine lubrication and maintenance.
DANGER
COMPRESSOR MUST BE SHUT DOWN AND COMPLETELY RELIEVED OF
PRESSURE PRIOR TO CHECKING FLUID LEVELS. OPEN SERVICE VALVE TO
ASSURE RELIEF OF SYSTEM AIR PRESSURE. FAILURE TO COMPLY WITH THIS
WARNING MAY CAUSE DAMAGE TO PROPERTY AND SERIOUS BODILY HARM.
25
P/N:307239
COMPRESSOR INSPECTION, LUBRICATION, AND MAINTENANCE
CHART
INTERVAL
EVERY 10 HOURS OR
DAILY
EVERY 50 HOURS OR
WEEKLY
EVERY 500 HOURS
OR 6 MONTHS
EVERY 1000 HOURS
OR 1 YEAR
EVERY 2000 HOURS
OR 1 YEAR
PERIODICALLY OR AS
REQUIRED
ACTION
1. Check compressors oil level.
2. Check air filter.
3. Check for oil and air leaks.
4. Check fuel supply after running.
5. Check for fuel, oil and compressor fluid leaks.
1. Drain water from compressor oil at sump.
2. Check belt tension.
3. Drain water and sediment from fuel tank.
1. Change compressor oil and oil filter.
2. Check air filter piping, fittings and clamps.
3. Install new air filter element. (Shorter interval may be necessary under dusty
conditions).
4. Check tire pressure.
5. Check for excessive wear on drive belts. Replace if necessary.
1. Check safety circuit switches.
2. Clean battery terminals.
3. Check compressor shaft seal for leakage.
1. Install new air filter element. (Shorter interval may be necessary under
dusty conditions).
1. Inspect air filter element
2. Replace spin-on coalescer element if necessary.
3. Inspect and clean compressor oil system cooler, etc.
4. Check engine speed control adjustment, at hi-low compressor settings.
5. Inspect lifting frame (before each lift).
6. Grease wheel bearings
7. Check engine and compressor supports.
NOTE: See Maintenance Section for clarification on above.
26
P/N:307239
COMPRESSOR INSPECTION, LUBRICATION,
AND MAINTENANCE
NOTE
OBSERVE ALL GAUGE READINGS. NOTE ANY CHANGE FROM THE NORMAL
READING AND DETERMINE THE CAUSE. HAVE NECESSARY REPAIRS MADE.
“NORMAL” IS THE USUAL GAUGE READING WHEN OPERATING AT SIMILAR
CONDITIONS ON A DAY-TO-DAY OPERATION.
FIRST COMPRESSOR OIL AND OIL FILTER ELEMENT CHANGE SHOULD BE MADE
AT 50 HOURS. ALSO, MORE FREQUENT OIL CHANGES WILL BE REQUIRED
UNDER EXTREME OPERATING CONDITIONS OF EXTREMELY HIGH OR LOW
TEMPERATURES, AND HIGH HUMIDITY.
CHANGE OIL EVERY SIX MONTHS, EVEN IF THE NORMAL OIL CHANGE PERIOD,
IN HOURS, HAS NOT YET ELAPSED.
ALWAYS WARM UP THOROUGHLY PRIOR TO CHANGING EITHER THE ENGINE
OIL OR THE COMPRESSOR OIL.
DO NOT OPEN COMPRESSOR OIL DRAIN; OIL FILTER CAP, OR OIL FILTER UNTIL
ALL PRESSURE HAS BEEN RELIEVED. CHECK BY MANUALLY OPENING THE
ASME SUMP PRESSURE RELIEF VALVE.
27
P/N:307239
LUBRICATION
LUBRICANT RECOMMENDATIONS
WARNING
IT IS IMPORTANT THAT THE COMPRESSOR FLUID BE OF A RECOMMENDED
TYPE AND THAT THIS OIL AS WELL AS THE AIR FILTER, OIL FILTER AND
SEPARATOR ELEMENTS BE INSPECTED AND REPLACED AS STATED IN THIS
MANUAL.
THE COMBINATION OF A SEPARATOR ELEMENT LOADED WITH DIRT AND
OXIDIZED OIL PRODUCTS TOGETHER WITH INCREASED AIR VELOCITY AS A
RESULT OF THIS CLOGGED CONDITION MAY PRODUCE A CRITICAL POINT
WHILE THE MACHINE IS IN OPERATION WHERE IGNITION CAN TAKE PLACE
AND COULD CAUSE A FIRE IN THE OIL SUMP.
FAILURE TO COMPLY WITH THIS WARNING MAY CAUSE DAMAGE TO PROPERTY
AND SERIOUS BODILY HARM.
The following general characteristics categorize lubricants that have been found to be satisfactory for use in
helical screw type air compressors. Due to the impossibility of establishing limits on all physical and chemical
properties of lubricants which can affect their performance in the compressor over a broad range of environmental
influences, the responsibility for recommending and consistently furnishing a suitable heavy-duty lubricant must
rest with the individual supplier. The lubricant supplier’s recommendation must, therefore, be based upon not
only the following general characteristics, but also upon his own knowledge of the suitability of the recommended
lubricant in helical screw type air compressors operating in the particular environment involved.
CAUTION
MIXING DIFFERENT TYPES OF BRANDS OF LUBRICANTS IS NOT
RECOMMENDED DUE TO THE POSSIBILITY OF A DILUTION OF THE ADDITIVES
OR A REACTION BETWEEN ADDITIVES OF DIFFERENT TYPES.
28
P/N:307239
LUBRICATION
APPLICATION GUIDE
Not all lubricating oils are suitable for rotary screw compressor use. The most satisfactory oils are the nondetergent types that contain high levels of corrosion, oxidation, and foam inhibitors.
Your RX70 compressor is factory filled with Dexron® III ATF. Other non-detergent motor oils, SAE 10W,
class SE or CD, and SAE 30 that meet the requirements below can be used. However, BOSS recomends you
to use Dexron® III ATF.
The viscosity of the oil chosen depends largely on the ambient operating temperature range. The oil must
provide sufficient lubrication for bearings and rotors at operating temperature, and it must have a pour point
low enough to provide fluidity at low starting temperatures. In general, the viscosity range represented by
these SAE grades is satisfactory for the temperature range shown:
+40° F to 120° F SAE 30
-10° F to 75° F SAE 10 W (-20° F Pour Point)
-40° F to 100° F Auto Trans. Fluid (-50° F Pour Point)
PRIME LUBRICANT CHARACTERISTICS
1. Flash point 400° F minimum (ASTM D-92 — COC).
2. Pour point must be at least 20° F lower than the lowest expected ambient temperature.
3. Contain rust and oxidation inhibitors.
4. Contain foam suppressers.
SYNTHETIC DIESTER AND SYNTHESIZED HYDROCARBON LUBRICANTS OIL
All elastomeric components and all metal used in the compressor are fully compatible with synthetic diester and
synthesized hydrocarbon lubricants. The viscosity grade chosen for synthetic diester base or SHC lubricants
should be based upon the suggested viscosity ranges listed under prime lubricant characteristics and the lubricant
supplier.
29
P/N:307239
LUBRICATION
NOTE
UNKNOWN INFLUENCES OF ENVIRONMENTAL FACTORS SUCH AS THE INTAKE
OF REACTIVE GASES OR VAPORS IN THE AIR MAY LEAD TO CHEMICAL
CHANGES IN ANY OIL. CAUSING PREMATURE FAILURE OF THE LUBRICANT AND
THE USEFUL LIFE OF ALL “EXTENDED LIFE” LUBRICANTS MAY BE SHORTER
THAN QUOTED BY THE LUBRICANT SUPPLIER. BECAUSE THE NORMAL “DRAIN
AND REPLACE” PERIOD MAY BE EXCEEDED USING SYNTHETIC LUBRICANTS,
DIFFERING FROM THOSE SPECIFIED IN THIS MANUAL, BOSS ENCOURAGES THE
USER TO CLOSELY MONITOR THE LUBRICANT CONDITION AND TO
PARTICIPATE IN AN OIL ANALYSIS PROGRAM WITH THE SUPPLIER.
NOTE
NO LUBRICANT, HOWEVER GOOD AND/OR EXPENSIVE, CAN REPLACE PROPER
MAINTENANCE AND ATTENTION. SELECT AND USE IT WISELY.
ENGINE LUBRICATION
Refer to Engine Operator’s manual for recommended engine lubricating oil.
30
P/N:307239
MAINTENANCE
COMPRESSOR OIL SUMP FILL, LEVEL, AND DRAIN
Before adding or changing compressor oil make sure that the sump is completely relieved of pressure. Oil is
added at the fill cap on the side of the compressor. A drain plug is provided at the bottom of the sump. The
proper oil level, when unit is shutdown and has had time to settle is at the midpoint of the upper oil sightglass.
The package must be level when checking the oil. DO NOT OVERFILL. The oil sump capacity is given in
“Compressor Specifications”.
OIL FILL
UPPER SIGHT GLASS
LOWER SIGHT GLASS
OIL FILTER
THERMAL VALVE
OIL DRAIN
DANGER
WHILE COMPRESSOR IS RUNNING DO NOT ATTEMPT TO DRAIN CONDENSATE,
REMOVE THE OIL LEVEL FILL PLUG OR BREAK ANY CONNECTION IN THE AIR
OR OIL SYSTEM WITHOUT SHUTTING OFF COMPRESSOR AND MANUALLY
RELIEVING PRESSURE FROM THE SUMP. FAILURE TO COMPLY WITH THIS
WARNING MAY CAUSE DAMAGE TO PROPERTY AND SERIOUS BODILY HARM.
AIR INTAKE FILTER
The air intake filter is a heavy-duty single-stage high efficiency filter designed to protect the compressor from
dust and foreign objects. See compressor mounting system in illustration section.
Frequency of maintenance of the filter depends on dust conditions at the operating site. The filter element must
be serviced when clogged (maximum pressure drop for proper operation is 15” H2O).
31
P/N:307239
MAINTENANCE
AIR/OIL COALESCER
The air/oil coalescer employs an element permanently housed within a spin-on canister. This is a single piece
unit that requires replacement when it fails to remove the oil from the discharge air.
To replace element, P/N 302600, proceed as follows:
1.
2.
3.
4.
5.
6.
Shutdown compressor and wait for complete blow down (zero pressure).
Turn element counterclockwise for removal (as viewed from bottom).
Install new rubber seal in head and supply a film of fluid directly on the seal.
Rotate element clockwise by hand until element contact seal (as viewed from bottom).
Rotate element at top edge of can one more turn clockwise with band wrench.
Run system and check for leaks.
WARNING
DO NOT SUBSTITUTE ELEMENT. USE ONLY A GENUINE BOSS INDUSTRIES
REPLACEMENT ELEMENT. THIS ELEMENT IS RATED AT 200 PSI WORKING
PRESSURE. USE OF ANY OTHER ELEMENT MAY BE HAZARDOUS AND COULD
IMPAIR THE PERFORMANCE AND RELIABILITY OF THE COMPRESSOR,
POSSIBLY VOIDING THE WARRANTY.
COALESCER
REGULATOR VALVE
1/2" FNPT SERVICE
VALVE
MINIMUM PRESSURE
VALVE
32
P/N:307239
MAINTENANCE
OIL FILTER
The compressor oil filter is a cartridge, throw away type. It is designed with a built in by-pass so that if there
is a large restriction, due to cold oil or clogged element, the compressor will still be lubricated.
To replace filter proceed as follows:
1.
2.
3.
4.
5.
6.
7.
Make sure system pressure is relieved.
Unscrew with 14mm allen wrench.
Remove oil filter from housing.
Remove gasket and clean or replace the screen.
Reinsert filter and gasket into housing and tighten with 14mm allen wrench.
Add oil, re-tighten filler cap.
Check for leaks in operation.
WARNING
DO NOT SUBSTITUTE ELEMENT. USE ONLY A GENUINE BOSS INDUSTRIES
REPLACEMENT ELEMENT. THIS ELEMENT IS RATED AT 200 PSI WORKING
PRESSURE. USE OF ANY OTHER ELEMENT MAY BE HAZARDOUS AND COULD
IMPAIR THE PERFORMANCE AND RELIABILITY OF THE COMPRESSOR,
POSSIBLY VOIDING THE WARRANTY.
OIL FILL
UPPER SIGHT GLASS
LOWER SIGHT GLASS
OIL FILTER
THERMAL VALVE
OIL DRAIN
33
P/N:307239
MAINTENANCE
NOTE
PARTS REQUIRED FOR ENGINE MAINTENANCE MAY BE FOUND IN THE ENGINE
PARTS MANUAL, A COPY OF WHICH IS PROVIDED WITH EACH UNIT.
FULL LOAD SPEED
Using an air flow silencer, open service air valve until 100 PSI is being held on receiver pressure gauge. Be
sure there is no air leakage from pressure regulator vent hole.
With the use of an electronic photo tachometer, set the full load speed at 3500 - 3600 RPM. The governor
spring tension held by an anchor bolt allows adjustments to be made.
IDLE SPEED
To adjust idle speed, close service air valve and set idle speed to 2000 - 2500 RPM by moving idle stop screw
at carburetor as required. For operation at higher altitudes, it may be
desirable to raise the idle speed to improve part load response and acceleration. High altitude engine kits are
available.
ENGINE INSPECTION, LUBRICATION AND MAINTENANCE
The following is a regular schedule of inspection and servicing for the engine based on operating hours. Use the
factory recommended Periodic Maintenance Schedule (based on favorable operating conditions) to serve as
a guide to get long and efficient engine life. Regular service periods are recommended for normal service and
operating conditions. For severe duty, extreme temperature, etc., service more frequently. Neglecting routine
maintenance can result in engine failure or permanent damage.
For any abnormalities in operation, unusual noises from the engine or accessories, loss of power, overheating,
etc. contact your nearest Honda Service Center.
BELT TENSIONING PROCEDURE
1. Use a 9/16" wrench and a 15/16" socket wrench to set the tension on the belt. Turn the 15/16" bolt,
on the front of the tensioner, clockwise to set the tension. Use the 9/16" wrench to tighten the bolt
on the backside of the tensioner bracket to hold the tensioner arm in place.
2. Proper tension is 1/4" deflection with a deflection force of 9.4 lbs minimum to 13.8 lbs maximum.
BELT REPLACEMENT PROCEDURE
1. Remove compressor belt guard.
2. Use a 9/16" wrench and a 15/16" socket wrench to release the tension on the belt. Hold the 15/16"
bolt, on the front of the tensioner, use the 9/16" wrench to loosen the bolt on the backside of the
tensioner bracket. Turn the 15/16" bolt counter-clockwise until the tension is fully released from the
belt.
3. Remove the old belt.
4. Install new belt.
5. Use a 9/16" wrench and a 15/16" socket wrench to set the tension on the belt. Turn the 15/16" bolt,
on the front of the tensioner, clockwise to set the tension. Use the 9/16" wrench to tighten the bolt
on the backside of the tensioner bracket to hold the tensioner arm in place.
6. Use a belt tensiometer to properly tension the belt.
7. Proper tension is 1/4" deflection with a deflection force of 9.4 lbs minimum to 13.8 lbs maximum.
34
P/N:307239
MAINTENANCE
ENGINE, INSPECTION, LUBRICATION, AND MAINTENANCE CHART
AFTER EACH CYCLE OF INDICATED
HOURS
SERVICE THESE ITEM S
HOURS
8
INSPECT ENGINE GENERALLY
X
CHECK OIL LEVEL
X
25
50
100
SERVICE AIR CLEANER
ELEMENT WRAPPER
X
CHANGE CRANKCASE OIL (ALL
ENGINES WITHOUT FILTER)
X
CHANGE CRANKCASE OIL
(STANDARD WITH FILTER)
X
CHANGE CRANKCASE OIL
(HIGH CAPACITY BASE WITH
FILTER)
X
X
REPLACE OIL FILTER
X
X
200
500
X
CHECK BATTERY ELECTROLYTE
LEVEL
X
CLEAN COOLING FANS
X
REPLACE AIR CLEANER
ELEMENT
X
REPLACE FUEL FILTER
X
CHECK OR REPLACE SPARK
PLUGS
X
1. Check for fuel leaks. With engine running, visually and audibly check exhaust system for leaks.
2. Perform more often when running under severe operating conditions.
3. Required for initial break-in only.
4. For detailed maintenance, refer to the HONDA SERVICE MANUAL.
35
P/N:307239
TROUBLESHOOTING
This section contains instructions for troubleshooting the equipment following a malfunction. The troubleshooting procedures to be performed on the equipment are listed below. Each symptom of trouble for a component
or system is followed by a list of probable causes of the trouble and suggested procedures to be followed to
eliminate the cause.
In general, the procedures listed should be performed in the order in which they are listed, although the order
may be varied if the need is indicated by conditions under which the trouble occurred. In any event, the
procedures that can be performed in the least amount of time and with the least amount of removal or disassembly or parts should be performed first.
MACHINE WILL NOT START
1. High pressure or high temperature safety trip. Reset safety relay. Push button in on control panel.
2. Check fuel level and add fuel if necessary.
3. Plugged fuel filter and replace if necessary.
4. Low battery voltage, recharge if necessary.
5. Loose battery cables, tighten cable; dirty battery cables, clean thoroughly.
6. Plugged air filter, replace the element.
7. Engine problems may have developed, refer to your Engine Manual.
8. Defective engine oil level switch, check continuity and replace if necessary.
9. Blown fuse in wiring harness, check continuity of fuse and replace if necessary. Fuse located by engine
starter solenoid.
UNPLANNED SHUTDOWN
When the operation of the machine has been interrupted by an unexplained shutdown, check the following:
1. Check to determine if compressor oil is at proper level.
2. Check oil cooler for dirt, slush, ice on the fins, or any other obstructions to cooling airflow.
3. Make a thorough external check for any cause of shutdown such as broken hose, broken oil lines, loose or
broken wire, etc.
4. Check electric fan motor and wiring.
5. Check fuses in wire harness, check continuity of fuse and replace if necessary. Fuse located by starter
solenoid.
6. Check the engine oil level with the engine stopped and in a level position. If the oil level is low, remove the
oil filler cap, and fill to the upper limit mark on the dipstick with the recommended oil.
ENGINE OVERHEATING
1. Low oil level, refill.
2. Air blockage into engine from blower/PTO side.
3. Air blockage from exhaust side of engine.
4. Dirty oil in engine.
36
P/N:307239
TROUBLESHOOTING
IMPROPER DISCHARGE PRESSURE
1. If discharge pressure is too low, check the following:
a. Too much air demand.
b. Service valves open blowing to atmosphere.
c. Leaks in service line.
d. Restricted compressor inlet air filter.
e. Faulty control system operation (regulator, inlet valve etc.)
f. Low engine speed.
2. If discharge pressure is too high or safety valve blows, check the
following:
a. Oil separator plugged up.
b. Faulty safety valve.
c. Faulty regulator or set to high.
d. Inlet valve leaking, or partially open. Loss of pressure signal to inlet valve from regulator causing
inlet valve to stay open.
COMPRESSOR
Abnormal compressor oil consumption or oil in service line, check for the following:
1.
2.
3.
4.
5.
6.
Over filling of oil sump.
Leaking oil lines or oil cooler.
Plugged oil return line: check entire line and check valve/orifice fitting at compressor port.
Defective separator element.
Compressor shaft seal leakage.
Discharge pressure below 55 PSI.
SEPARATOR PLUGGING
If the separator element has to be replaced frequently because it is plugging up, it is an indication that foreign
material may be entering the compressor inlet or the compressor oil is breaking down.
Compressor oil can break down prematurely for a number of reasons.
1. Extreme operating temperature
2. Negligence in draining condensate from oil sump
3. Using the improper type of oil
4. Dirty oil.
The complete inlet system should be checked for leaks.
37
P/N:307239
TROUBLESHOOTING
HIGH COMPRESSOR DISCHARGE TEMPERATURE
1. Check compressor oil level. Add oil if required (see section for oil specifications).
2. Check electric fan and switch.
3. Clean outside of oil cooler.
4. Clean oil system (cooler) internally.
5. Plugged compressor oil filter. Change element.
6. Plugged oil return line, clean orifice and check valve.
INSUFFICIENT AIR DELIVERY
1. Plugged compressor air filter, clean or replace.
2. Plugged air/oil separator. Replace separator element and also change compressor oil and oil filter at this
time.
3. Defective pressure regulator, adjust or repair.
4. Engine speed too low, readjust engine speed.
38
P/N:307239
RECOMMENDED SPARE PARTS
ENGINE M AINTENANCE PARTS
304968
ENGINE OIL FILTER
304969
ENGINE FUEL FILTER
304967
ENGINE AIR CLEANER ELEMENT
304971
SPARK PLUGS
COM PRESSOR M AINTENANCE PARTS
307275
DRIVE BELTS (2 QTY)
307152
COMPRESSOR AIR CLEANER ELEMENT
302601
COMPRESSOR OIL FILTER
302600
COMPRESSOR COALESCING ELEMENT
302865
FAN SENSOR
307471
REGULATOR REPAIR KIT
307117
SHAFT SEAL REPAIR KIT SCI8D
39
P/N:307239
WARRANTY INFORMATION/CLAIMS
40
P/N:307239
WARRANTY
Boss Industries, Inc.. (BOSS) warrants that this Rotary Screw Compressor unit conforms to applicable
drawings and specifications approved in writing by BOSS. The unit assembly will be free from defects in
material and workmanship for a period of two (2) years from the date of initial operation or thirty (30) months
from the date of shipment, whichever period first expires. All other components and parts of BOSS
manufacture, will be free from defects in material and workmanship for a period of one (1) year from the date
of initial operation or eighteen (18) months from the date of shipment, whichever period first expires. If within
such period BOSS receives from the Buyer written notice of and alleged defect in or non-conformance of the
unit, all other components and parts of BOSS manufacture and if in the judgment of BOSS these items do not
conform or are found to be defective in material of workmanship, BOSS will at its option either, (a) furnish a
Service Representative to correct defective workmanship, or (b) upon return of the item F.O.B. BOSS
original shipping point, repair or replace the item or issue credit for the replacement item ordered by Buyer,
(Defective material must be returned within thirty (30) days of return shipping instructions from BOSS. Failure
to do so within specified time will result in forfeiture of claim), or (c) refund the full purchase price for the item
without interest. Factory installed units will also include warranty on installation for a period of one (1) year.
This warranty does not cover damage caused by accident, misuse or negligence. If the compressor unit is
disassembled the warranty is void. BOSS’s sole responsibility and Buyer’s exclusive remedy hereunder is
limited to such repair, replacement, or repayment of the purchase price. Parts not of BOSS manufacture are
warranted only to the extent that they are warranted by the original manufacture. BOSS shall have no
responsibility for any cost or expense incurred by Buyer from inability of BOSS to repair under said warranty
when such inability is beyond the control of BOSS or caused solely by Buyer.
There are no other warranties, express, statutory or implied, including those of
merchantability and of fitness of purpose; nor any affirmation of fact or representation
which extends beyond the description of the face hereof.
This warranty shall be void and BOSS shall have no responsibility to repair, replace, or repay the purchase
price of defective or damaged parts or components resulting directly or indirectly from the use of repair or
replacement parts not of BOSS manufacture or approved by BOSS or from Buyer’s failure to store, install,
maintain, and operate the compressor according to the recommendations contained in the Operating and Parts
Manual and good engineering practice. The total responsibility of BOSS for claims, losses, liabilities or
damages, whether in contract or tort, arising out of or related to its products shall not exceed the purchase
price. In no event shall BOSS be liable for any special, indirect, incidental or consequential damages of any
charter, including, but not limited to, loss of use of productive facilities or equipment, loss of profits, property
damage, expenses incurred in reliance on the performance of BOSS, or lost production, whether suffered by
Buyer or any third party.
BOSS INDUSTRIES
1761 GENESIS DRIVE
LA PORTE, IN 46350
1-800-635-6587
41
P/N:307239
SUMMARY OF MAIN WARRANTY PROVISIONS
As claims, policies and procedure are governed by the terms of BOSS Industries; warranty, it is
necessary to outline some of the more important provisions.
The BOSS INDUSTRIES warranty applies only to new and unused products which, after shipment
from the factory, have not been altered, changed, repaired or mistreated in any manner whatsoever.
Normal maintenance items such as lubricants, filters, and shaft seals are not warrantable items.
Parts not of BOSS INDUSTRIES manufacture are warranted only to the extent they are warranted by
the original manufacturer.
Damage resulting from abuse, neglect, misapplication or overloading of a machine, accessory or part
is not covered under warranty.
Deterioration or wear occasioned by chemical and/or abrasive action or excessive heat shall not
constitute defects.
Parts replacement and/or correction of defective workmanship will normally be handled by BOSS
INDUSTRIES or their authorized distributor.
Failure to file a detailed warranty claim/service report for each occurrence of material defect of
defective workmanship will cause warranty claim to be rejected.
Defective material must be returned within 30 days of receipt of shipping instructions. Failure to do
so within specified time will result in forfeiture of claim.
The distributor is responsible for the initial investigation and write up of the warranty claim.
Distributor shall be allowed no more than 30 days from date of repair to file a warranty claim/service
report.
Warranty for failure of BOSS INDUSTRIES replacement parts covers the net cost of the party only,
not labor and mileage.
The BOSS INDUSTRIES warranty does not cover diagnostic calls and travel. That is time spent
traveling to the machine to analyze the problem and returning with the proper tools and parts to
correct the problem.
BOSS INDUSTRIES will deduct from allowable credits for excess freight caused by sender failing to
follow return shipping instructions.
Distributors or end-users automatically deducting the value of a warranty claim from outstanding
balances due and payable to BOSS INDUSTRIES prior to receiving written notification of BOSS
INDUSTRIES approval of the warranty claim may be subject to forfeiture of the entire claim.
42
P/N:307239
WARRANTY/RETURN GOODS INSTRUCTIONS
The warranty/return procedure outlined below is provided to give the claimant the information
necessary to file a warranty/return claim, and enable BOSS INDUSTRIES the ability to best serve
its’ customers.
Please see the following instructions to initiate a return:
Contact BOSS INDUSTRIES Returns Department by telephone at 219.324.7776 or via email at
[email protected]. You may also send a fax at 219.324.7470.
WARRANTY CLAIMS – PREPARATION OF PART RETURN
Parts returned to the factory must be properly packaged to prevent damage during shipment. Damage
to a part as a result of improper handling or packing could be cause for denial. When addressing the
package for shipment, the following information must be on the outside of, or tagged clearly, to the
package.
1.
2.
3.
4.
Return Goods Authorization #.
Distributor or end-users return address.
Correct factory address.
Number of packages pertaining to each claim.
NOTE: Our warranty requires that all defective parts be returned to BOSS INDUSTRIES freight
prepaid. Items sent without RGA number will not be accepted. Unauthorized Returns Will
Immediately Be Refused At Dock.
RETURN OR WARRANTY CLAIMS – FILING PROCEDURES
1. Initiate through a purchase order for warranty part or request for credit.
2. RGA will accompany replacement part.
3. BOSS INDUSTRIES will confirm disposition of failed part within 30 days of receipt and or
request additional information.
4. Claim denial will result in issuance of a letter of denial.
5. BOSS INDUSTRIES will consider each claim on its’ own merit and reserves the right to
accept or reject claim request. In case of air-ends, these will be returned to the manufacturer
for their analysis/input.
6. Send Warranty Claim to:
BOSS INDUSTRIES, INC.
1761 Genesis Drive
LaPorte, IN 46350
Attn: Returns Dept.
43
P/N:307239
GENERAL
An approved claim depends on the following provision:
1. An RGA # must be issued by BOSS INDUSTRIES. (See filing procedures.)
2. Failed part must be returned within 30 days of original invoice date, freight prepaid, with
RGA #.
3. Part is determined to be defective.
4. Workmanship is determined to be defective.
5. Machine is within warranty period.
6. Machine has been operated within design conditions.
Claims made through distributors must be verified by distributor prior to contacting
BOSS INDUSTRIES.
DAMAGE IN TRANSIT
Do not return damaged merchandise to BOSS INDUSTRIES, please follow claim procedure.
1. Loss in transit:
The merchandise in our kit or provided in our factory installations has been thoroughly
inspected or carefully installed and tested before leaving our plant. However, regardless of
the care taken at the factory, there is a possibility that damage may occur in shipment. For this
reason, it is recommended that the unit be carefully inspected for evidence of possible damage
or malfunction during the first few hours of operation. Responsibility for the safe delivery of
the kit or factory installed unit was assumed by the carrier at the time of shipment. Therefore,
claims for loss or damage to the contents of the kit or factory installed unit should be made
upon the carrier.
2. Concealed loss or damage:
Concealed loss or damage means loss or damage, which does not become apparent until the
kit is unpacked or the factory-installed unit is run by the enduser. The contents of the kit or
factory installed unit may be damaged due to rough handling while in route to its destination,
even thought the kit or factory installed unit shows no external damage. When the damage is
discovered upon unpacking, make a written request for inspection by the carrier agent within
fifteen days of delivery date. Then file a claim with the carrier since such damage is the
carrier’s responsibility.
By following these instructions carefully, we guarantee our full support of your claims, to protect you
against loss from concealed damage.
3. Visible Loss or Damage
Any external evidence of loss or damage must be noted on the Freight Bill or Express
Receipt, and signed by the carrier’s agent. Failure to adequately describe such external
evidence of loss, or damage may result in the carrier refusing to honor a damage claim. The
carrier will supply the form required to file such a claim.
44
P/N:307239
SCREW COMPRESSOR AIR-END EXCHANGE PROGRAM
Replacement air-ends are available from the factory. For current prices and availability, contact BOSS
INDUSTRIES, Inc. or an authorized BOSS INDUSTRIES distributor. Prices are F.O.B. shipping point.
Prices do not include labor for removal or installation.
45
P/N:307239
PARTS & ILLUSTRATION SECTION
46
P/N:307239
47
P/N:307239
A
B
C
D
8
5 in
[126.5 mm]
35 1/4 in
[894.7 mm]
8
7
18 5/8 in
[471.7 mm]
7
6
58 3/4 in
[1491.3 mm]
6
5
5
4
18
17
16
15
14
13
REV
19
20
UPDATED
UPDATED
REV 5
UPDATED
UPDATED
UPDATED
UPDATED
UPDATED
UPDATED
29 1/4 in
[743.8 mm]
19 3/8 in
[490.5 mm]
4
1
1
1
1
1
1
1
1
1
2
3
4
5
6
NS
NS
3
200365 TO REV 10
200365 TO REV 9
200365 TO REV 8
200366 TO REV 2
200366 TO REV 1
200381 TO REV 3
DESCRIPTION
REVISION HISTORY
200365 TO REV 12
200365 TO REV 11 & 200367 TO
QTY
3
ITEM
9/20/2010
7/12/2010
6/16/2010
4/20/2010
3/22/2010
3/10/2010
DATE
MCM
MCM
CRH
MCM
CRH
MCM
DCL
ENG
Parts List
2
DESCRIPTION
PROPRIETARY INFORMATION
R
2
THIS DRAWING AND ALL ITS
NOMINAL DIM.
FRACTIONAL ` 1/16
CONTENTS ARE PROPERTY
0.000 TO 1.000 ` .010
DECIMAL ` .03
OF BOSS INDUSTRIES, INC.
1.001 TO 5.000 ` .015
ANGULAR ` 1°
AND MUST NOT BE COPIED
5.001 TO 10.000 `.020
OR MADE PUBLIC. IT IS
DO NOT SCALE
DESCRIPTION
TOLERANCES
LOANED AND IS SUBJECT TO
10.001 & OVER `.025
UNLESS NOTED
RETURN UPON DEMAND. THE
INFORMATION CONTAINED IN DRAWN
RX70 PORTABLE 24HP
2/12/2008
THIS DRAWING IS
MCM
CONFIDENTIAL AND MUST
CHECKED
2/12/2008
NOT BE USED, DIRECTLY OR
NDD
SIZE SCALE
DWG NO
INDIRECTLY, IN ANY WAY
MATERIAL
D 1=4
20071-001
DETRIMENTAL TO THE
N/A
INTEREST OF BOSS
PATH
INDUSTRIES, INC.
G:\Inventor Files\20k\20071-001.dwg
MACHINED SURFACES UNMACHINED SURFACES
INST. PANEL & PARTS, 24HP RX70
FRAME & PARTS, 24HP RX70
COMPRESSOR & PARTS, 24HP RX70
ENGINE & PARTS, 24HP RX70
COOLER & PARTS, 24HP RX70
HOSE AND PARTS, RX70
MANUAL, BOSS 24HP RX70
CRATE, SHIPPING BULLET 36X50X45
31 1/2 in
[799.1 mm]
10/18/2010 MCM
11/8/2010
200381
200367
200365
200366
200380
200215
307239
303807
PART NUMBER
1
SHEET
1
OF
1
20
REV
BOSS INDUSTRIES
1761 GENESIS DR.
LA PORTE, IN 46350
1
A
B
C
D
48
P/N:307239
A
B
C
D
1
23
8
8
7
8
16
7
DETAIL A
SCALE 1 / 2
15
7
6
22
10
10
12
20
10
1
6
6
8
14
13
21
8
2
9
18
11
10
11
17
8
5
2
1
REV
1
5
2
5
3
A
FLIPPED 158-36347 TO CLEAR MUFFLER
GUARD
REPLACED 300745-112 WITH 300745-144.
DESCRIPTION
REVISION HISTORY
4
23
4
3
4/20/2010
3/20/2010
DATE
4
3
3
CRH
MCM
ENG
`.015
`.020
`.025
1.001 TO 5.000
5.001 TO 10.000
10.001 & OVER
`1/ 16
`.03
`1~
FRACTIONAL
DECIMAL
ANGULAR
U
UN
NM
MA
ED
D S
RFA
S
ACH
C
CH
HIIIIN
NE
SU
UR
F
FA
AC
CE
ES
`.010
0.000 TO 1.000
NOMINAL DIM.
DO NOT SCALE
TOLERANCES
UNLESS NOTED
MACHINED SURFACES
1
2
DRAWN
R
1
1
2
OF
REV
SHEET
DWG NO
200366
1=4
D
SCALE
SIZE
1
BOSS INDUSTRIES
1761 GENESIS DR.
LA PORTE, IN 46350
ENGINE & PARTS, 24HP RX70
TITLE
DESCRIPTION
ENGINE, HONDA 24 HP 3600 RPM
CLAMP,1 1/2 EXHAUST
WASHER, FLAT GR8 3/8
NUT, NYLOC GR8 3/8-16
BOLT, HEX GR8 3/8-16 X 2
CYLINDER, AIR ENGINE SPEED
BALL JOINT, 1/4-28 THRD
NUT, NYLOC GR5 1/4-20
BRACKET,PIVOT AIR CYLINDER
BOLT, HEX GR5 1/4-20 X 1
WASHER, FLAT GR5 1/4
ELBOW, 1/4 TUBE SWVL X 1/8 MNPT
BRACKET, AIR CYLINDER RX70
CLAMP, HOSE 1 1/4"
NUT, JAM 1/4-28
SPRING, PISTON RETURN
BOLT, HEX GR10.9 8MM X 25MM
WASHER, LOC 8MM
BUSHING, SDS 1.4375 X .375 KEY
PULLEY, 6.5 3GR 3V
MUFFLER, 24HP HONDA TOP MT RIGHT
DECAL, ENGINE OIL FILL
BELT, 3 BANDED 3VX500
ELBOW, EXHAUST 24HP RX70
2
Parts List
THIS DRAWING AND ALL
MCM
2/13/2008
INFORMATION THEREIN IS
CHECKED
THE PROPERTY OF BOSS
INDUSTRIES, INC., IS CONFIDENTIAL AND MUST NOT
BEMADE PUBLIC OR
COPIED. IT IS LOANED
SUBJECT TO RETURN UPON PATH
DEMAND, IS NOT TO BE
G:\Inventor 9.0\ 100K-200K
USED DIRECTLY OR INMATERIAL
DIRECTLY IN ANYWAY DETRIMENTIAL TO THE INTEREST OF BOSS INDUSTRIES, INC.
ITEM QTY PART NUMBER
1
1 307236
2
1 120-11601
3
8 938206-071
4
4 925506-198
5
4 929806-200
6
1 120-36345
7
1 120-19071
8
6 924304-145
9
1 158-36347
10
5 929104-100
11
6 938604-071
12
1 980704-012
13
1 304602
14
2 304957
15
1 924604-164
16
1 120-16580
17
1 929208-250
18
1 938808-200
20
1 300745-144
21
1 300936
22
1 304890
23
1 300516
24
1 307275
27
1 307307
A
B
C
D
49
P/N:307239
A
B
C
D
8
8
7
21
TO AIR PRESSURE
GAUGE ON INST PANEL
7
20
12
19
3
15
7
6
TO SPEED CYLINDER
ON ENGINE
6
14
16
25
17
6
23
13
12
5
26
9
24
13
7
5
2
6
22
1
COMPRESSOR OUTLET
TO AIR COOLER
14
15
5
COMPRESSOR INLET
FROM OIL COOLER
4
8
18
5
4
4
REV
5
12
11
10
9
8
7
6
3
DCL
ENG
9/11/2009
DATE
MCM
MCM
MCM
CRH
MCM
MCM
MCM
Parts List
2
DESCRIPTION
1
MACHINED SURFACES UNMACHINED SURFACES
R
2
THIS DRAWING AND ALL ITS
NOMINAL DIM.
FRACTIONAL ` 1/16
CONTENTS ARE PROPERTY
0.000 TO 1.000 ` .010
DECIMAL ` .03
OF BOSS INDUSTRIES, INC.
1.001 TO 5.000 ` .015
ANGULAR ` 1°
AND MUST NOT BE COPIED
5.001 TO 10.000 `.020
OR MADE PUBLIC. IT IS
DO NOT SCALE
DESCRIPTION
TOLERANCES
10.001 & OVER `.025
LOANED AND IS SUBJECT TO
UNLESS NOTED
RETURN UPON DEMAND. THE
INFORMATION CONTAINED IN DRAWN
COMPRESSOR & PARTS,
2/13/2008
THIS DRAWING IS
MCM
CONFIDENTIAL AND MUST
CHECKED
NOT BE USED, DIRECTLY OR
SIZE SCALE
DWG NO
INDIRECTLY, IN ANY WAY
MATERIAL
D 1=4
200365
DETRIMENTAL TO THE
N/A
INTEREST OF BOSS
PATH
INDUSTRIES, INC.
G:\Inventor Files\200k\200365.dwg
1
SHEET
1
24HP RX70
OF
1
12
REV
BOSS INDUSTRIES
1761 GENESIS DR.
LA PORTE, IN 46350
A
B
VALVE, SERVICE 1/2 VENTED PORT
VALVE, REGULATOR 1/4
ASSY, AIREND SCI8D INTEGRATED
ADAPTER, 1/2 BSPP X 1/2 NPT
D
PLUG, PIPE 1/8 BSPP HEX DRIVE
ELBOW, PIPE STREET 1/2 GAL
CAP, PIPE HEX 1/2 ZINC
NIPPLE, PIPE 1/2 X 2 GAL SCH40
NIPPLE, HYD HEX RED 1/4 X 1/8
ELBOW, HYD 1/2 MBSPP X 1/2 MJIC
ADAPTER, 1/8 MBSPP X 1/8 FNPT
ELBOW, 1/4 TUBE SWVL X 1/8 MNPT
ADAPTER, SCI8 O-RING SOLENOID BLOCK
BOLT, SOC HD 4MM X 35MM GR10.9
TEE, MR 1/4F X 1/4M X 1/4F
ELBOW, 1/4 TUBE SWVL X 1/4 MNPT
PULLEY, 2.8 3GR 3V TAPER-LOCK
BUSHING, TAPER-LOCK #1108 25MM
CONNECTOR, TUBE 1/4 PAR X 1/4 NPT
ELBOW, HYD 1/4 FNPT X MNPT STREET
O-RING, 5/32 ID X 9/32 OD X 1/16 THICK
C
WASHER, LOC 4MM
SEAL, WASHER 1/2 MBSPP
TUBE, AIR BRAKE .25
TUBE, PARAFLEX 1/4 OD X .040 WALL X FT NYLON
PROPRIETARY INFORMATION
300022-050
300057
40034
302631
305624
901115-020
906030-020
922108-020
961604-012
970608-050
970802-012
980704-012
307990
929304-350
964804-025
980704-025
307248
307249
980604-025
960704-025
307987
938804-090
308525
89034176
301960-025
PART NUMBER
11/8/2010
10/15/2010
9/16/2010
7/12/2010
6/16/2010
12/22/2009
9/22/2009
1
1
1
1
1
1
1
1
1
2
2
2
1
4
1
1
1
1
1
1
2
4
1
3 ft
6 in
1
2
3
4
5
6
7
8
12
13
14
15
16
17
18
19
20
21
22
23
24
25
26
NS
NS
UPDATED 40034 TO REV 2
UPDATED PARTS TO ADD A SLIDE PLATE
UPDATED 40034 TO REV 1
ADDED 308525
REPLACED 301722 WITH 40034
ADDED (4) 938804-090
UPDATED 307990 TO REV 1
REPLACED 307132 WITH 307990; ADDED
307987
DESCRIPTION
REVISION HISTORY
QTY
3
ITEM
50
P/N:307239
A
B
C
D
12
7
10
6
4
9
4
2
1
4
10
11
3
3
7
6
Parts List
1
3
8
5
`.015
`.020
`.025
1.001 TO 5.000
5.001 TO 10.000
10.001 & OVER
`1/ 16
`.03
`1~
FRACTIONAL
DECIMAL
ANGULAR
U NMACHIN ED SURFACES
`.010
0.000 TO 1.000
NOMINAL DIM.
DO NOT SCALE
TOLERANCES
UNLESS NOTED
MACHINED SURFACES
2
THIS DRAWING AND ALL
CRH
2/20/2008
INFORMATION THEREIN IS
CHECKED
2/20/2008
THE PROPERTY OF BOSS
NDD
INDUSTRIES, INC., IS CONFIDENTIAL AND MUST NOT
BEMADE PUBLIC OR
COPIED. IT IS LOANED
SUBJECT TO RETURN UPON PATH
DEMAND, IS NOT TO BE
G:\INVENTOR 9.0\ 100K-200K
USED DIRECTLY OR INMATERIAL
DIRECTLY IN ANYWAY DETRIMENTIAL TO THE INTEREST OF BOSS INDUSTRIES, INC.
DRAWN
R
1=4
SCALE
C
SIZE
1
200380-999
DWG NO
SHEET
1
OF
1
0
REV
EN Num.
BOSS INDUSTRIES
1761 GENESIS DR.
LA PORTE, IN 46350
COOLER & PARTS, 24HP RX70
TITLE
Rev. Num. Rev. Date Released For
ITEM QTY PART NUMBER
DESCRIPTION
1
1 302253
FAN ASSY, W/MOTOR & GRILL 14.09 PULLER
CURVED BLADE
4 300817
2
FASTENER, FAN CLR MTG EACH
3
1 300424
COOLER, OIL 17.5
4
4 304957
CLAMP, HOSE 1 1/4"
5
2 922208-000
NIPPLE, PIPE 1/2 X CLOSE GAL SCH80
6
2 902415-020
TEE, PIPE 1/2 GAL 150PSI
7
2 960108-050
CONNECTOR, 1/2 MJIC X 1/2 MNPT
8
1 302087
BULBWELL, 5/8 UNF X 1/2 NPT
9
1 302865
SENSOR, TEMP 175 F NO W/WP CONN
10
8 938206-071
WASHER, FLAT GR8 3/8
11
4 925506-198
NUT, NYLOC GR8 3/8-16
12
4 929806-125
BOLT, HEX GR8 3/8-16 X 1 1/4
NS
2 ft 300444
TAPE, 1/16 X 1/2 CLOSED CELLO
2
A
B
C
D
51
P/N:307239
A
B
C
D
14
21
11
8
30
6
4
29
23
13
7
Parts List
DESCRIPTION
6
21
4
36
4
15
35
3
7
11
23
11
1
1
9
16
33
37
8
7
6
AXLE, PNEUMATIC WHEEL 60GP
BRACKET, BATTERY HOLD DOWN 4" TO 6 1/8"
HANDLE, RX70 WHEELBARROW
WASHER, FLAT GR8 3/8
DETAIL A
SCALE 1 / 4
11
5
PART NUMBER
304537
305422
304721
938206-071
15
2
1
1
16
1
2
3
4
8
QTY
ITEM
19
38
34
18
5
6
7
8
ITEM
41
22
10
1
1
2
QTY
5
26
5
44
B
2
925506-198
304965
304561
304709
Parts List
4
DESCRIPTION
11
8
46
43
4
31
9
40
10
47
1
A
42
4
5
4
20
28
27
9
10
11
12
13
14
15
16
18
19
20
21
22
23
24
25
26
27
28
29
30
31
32
33
34
35
36
37
38
39
40
41
42
43
44
45
46
47
NS
NS
NS
NS
NS
NS
NS
NS
NS
NS
ITEM
3
3
UPDATED PARTS TO ADD A SLIDE PLATE
ADDED (1) 304562
REMOVED BELT TENSIONER PARTS
307702-025 WAS 300524; 307702-031 WAS
2
300524-031
1 CHANGED FUEL TANK AND FITTINGS
REV
DESCRIPTION
REVISION HISTORY
5
4
3
12
3
12
25
DETAIL B
SCALE 1 / 4
32
NUT, NYLOC GR8 3/8-16
PANEL, FINGER GUARD FS-200
FITTING, FUEL PICK-UP 1/4 MNPT
SPACER, AXLE 3/4" I.D. X 1" LG.
39
45
24
PART NUMBER
CRH
BSM
ENG
2/27/2009
1/15/2008
DATE
Parts List
2
DESCRIPTION
1
2
THIS DRAWING AND ALL ITS
NOMINAL DIM.
FRACTIONAL ` 1/16
CONTENTS ARE PROPERTY
0.000 TO 1.000 ` .010
DECIMAL ` .03
OF BOSS INDUSTRIES, INC.
1.001 TO 5.000 ` .015
AND MUST NOT BE COPIED
ANGULAR ` 1°
5.001 TO 10.000 `.020
OR MADE PUBLIC. IT IS
DO NOT SCALE
DESCRIPTION
TOLERANCES
10.001 & OVER `.025
LOANED AND IS SUBJECT TO
UNLESS NOTED
RETURN UPON DEMAND. THE
INFORMATION CONTAINED IN DRAWN
FRAME & PARTS, 24HP
1/15/2008
THIS DRAWING IS
CRH
CONFIDENTIAL AND MUST
CHECKED
1/15/2008
NOT BE USED, DIRECTLY OR
NDD
SIZE SCALE
DWG NO
INDIRECTLY, IN ANY WAY
MATERIAL
D 1=8
200367
DETRIMENTAL TO THE
N/A
INTEREST OF BOSS
PATH
INDUSTRIES, INC.
G:\Inventor Files\200k\200367.dwg
MACHINED SURFACES UNMACHINED SURFACES
1
SHEET
1
OF
1
5
REV
BOSS INDUSTRIES
1761 GENESIS DR.
LA PORTE, IN 46350
RX70
R
TIRE-WHEEL, 12.7" X 4.9" X 6"RIM 3/4" SHAFT
BATTERY, 12V EVER-START ES16B
WASHER, NYLON 3/8 X .06 X 3/4
GRIP, RX70 HANDLE 1 1/4 I.D.
BRACKET, FINGER GUARD FS-200
BOLT, WHIZLOCK GR5 1/4-20 X 1/2
CAP, 1 1/4 I.D. PLASTIC
ISOLATOR, 1/4 X 8 1/2 X 14 1/2 #264 NEOPRENE
CASTER WHEEL, 6.000in SWIVEL 440 LBS
DECAL, COMPR SIGHT GLASS
DECAL, OIL DRAIN
DECAL, HOT EXHAUST 2-377
DECAL, FUEL FILL
DECAL, BELT GUARD
DECAL, 12 VOLT 2-380
DECAL, WARNING CONNECT AIR
DECAL, WARNING READ MANUAL
DECAL, DANGER HOT OIL
DECAL, DANGER BREATHING
DECAL, RX70 LOGO
DECAL, BOSS
BOLT, HEX GR8 3/8-16 X 3 1/2
DECAL, SERIAL TAG BOSS
RIVET, POP 3/16 X 1/2 ALUMINUM
FRAME, RX70
NUT, TINNERMAN 1/4-20
BOLT, HEX GR8 3/8-16 X 1
ASSY, RX70 FUEL TANK
COUPLER, 1/2 BARB X 1/4 FNPT
PLATE, ADJ. COMP SCI 8
PLATE, ADJ. BASE RX70 SCI8
BOLT, HEX GR8 3/8-16 X 1 1/4
BOLT, HEX GR8 1/2-13 X 3 FULL THRD
NUT, NYLOC GR8 1/2-13
BOLT, HEX GR10.9 10MM X 25MM
WASHER, LOC 10MM
WASHER, FLAT 10MM
WASHER, LOC GR8 1/2
STRAP, TIE DOWN 20" TO 40" W/ 1" HOOKS
HOSE, CARB CERT FUEL LINE 5/16"
HOSE, CARB CERT FUEL LINE 1/4"
CLAMP, HOSE 1/4"
BULB, FUEL PRIMER 1/4" BARB ENDS
CABLE, BATTERY NEG 24" BLACK
CABLE ASSY RED 2GA 32"
FITTING, FUEL MARINE X 3/8" BARB
COVER, BATTERY CABLE END POS
COVER, BATTERY CABLE END NEG
PROPRIETARY INFORMATION
304692
304521
977006-062
304959
304964
929704-050
305017
301941
304753
302568
300913
104-90027
300515
300968
104-90032
300042
300039
300038
300040
304672
300649
929806-350
305761
943103-025
304545
961504-090
929806-100
40012
307324
307361
308779
929806-125
307360
925508-262
929210-250
938810-220
938910-200
937808-125
304712
307702-031
307702-025
301861
305407
300801
123-65929
304562
301174
301175
PART NUMBER
10/18/2010 MCM
2/3/2010 MCM
8/31/09
DCL
2
1
6
2
1
5
2
1
1
1
1
2
1
2
1
1
1
1
1
1
1
2
1
4
1
5
4
1
1
1
1
4
1
1
4
4
4
1
1
1 ft
1 ft
1
1
1
1
1
1
1
QTY
A
B
C
D
52
P/N:307239
A
B
C
D
4
4
3
10
6
1
REV
2
3
1
2
1
1
1
1
1
1
1
1
1
1
1
32 in
1
2
3
4
5
6
7
8
9
10
NS
NS
3
2
7/7/2008
DATE
9/8/2009
2
2
DCL
MCM
ENG
MCM
DESCRIPTION
2
PROPRIETARY INFORMATION
8
5
MACHINED SURFACES UNMACHINED SURFACES
7
4
2
THIS DRAWING AND ALL ITS
NOMINAL DIM.
FRACTIONAL ` 1/16
CONTENTS ARE PROPERTY
0.000 TO 1.000 ` .010
DECIMAL ` .03
OF BOSS INDUSTRIES, INC.
1.001 TO 5.000 ` .015
ANGULAR ` 1°
AND MUST NOT BE COPIED
5.001 TO 10.000 `.020
OR MADE PUBLIC. IT IS
DO NOT SCALE
DESCRIPTION
TOLERANCES
LOANED AND IS SUBJECT TO
10.001 & OVER `.025
UNLESS NOTED
RETURN UPON DEMAND. THE
INFORMATION CONTAINED IN DRAWN
INST. PANEL
2/20/2008
THIS DRAWING IS
CRH
CONFIDENTIAL AND MUST
CHECKED
2/20/2008
NOT BE USED, DIRECTLY OR
NDD
SIZE SCALE
INDIRECTLY, IN ANY WAY
MATERIAL
C 1=2
DETRIMENTAL TO THE
N/A
INTEREST OF BOSS
PATH
INDUSTRIES, INC.
G:\Inventor Files\200k\200381.dwg
2
1
200381
DWG NO
1
B
C
D
SHEET
1
OF
1
3
REV
BOSS INDUSTRIES
1761 GENESIS DR. A
LA PORTE, IN 46350
& PARTS, 24HP RX70
R
SWITCHGAUGE, TMP 4 ft - 250
GAUGE, HOURMETER
SWITCH, SHUTDOWN 117
SWITCHGAUGE, PRESSURE
CABLE, CHOKE
DECAL, INST PANEL RX70
WASHER, FLAT GR5 5/16
COUPLING, PIPE 1/8 GAL 150PSI
ELBOW, 1/8 MNPT X 1/4 TUBE 200PSI 250 DEG
SWITCH, TOGGLE ON/OFF GEN DPDT
HARNESS, RX70
LOOM, 1.5" HIGH TEMP
Parts List
ADD ENGINE KEY SWITCH HERE
PART NUMBER
300076-004
300074
300079
300075
300399
304622
938605-071
901215-005
987304-012
300555
305043
302089-150
3/10/2010
9
QTY
ITEM
UPDATED 305043 TO REV 4.
REPLACED 302142 WITH 300075; 302141-004
WITH 300076-004; 901215-010 WITH
901215-050; 987304-025 WITH 987304-012.
UPDATED 305043 TO REV 3.
DESCRIPTION
REVISION HISTORY
3
53
P/N:307239