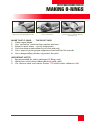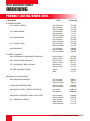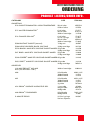
1
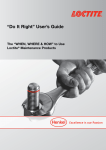
For product availability,
technical information
and material safety data
sheets (MSDS) call:
Henkel Australia Pty. Ltd.
1 Clyde Street
Silverwater NSW 2128
Ph: 1300 88 555 6
Fax: (02) 9525 5643
Or visit Loctite at:
www.loctite.com.au
Do It Right
Users’ Guide
The “when, where and
how” to use Loctite®
maintenance products
Prism, Quick Metal, Master Pipe Sealant, Yuk Off, Blue Maxx, Black Maxx, Copper Maxx, Grey Maxx and Tak Pak are Trade Marks, Loctite is a
Registered Trade Mark of Henkel Loctite, USA.
*Trade Marks of their respective owners. ART0404A ©2/1995, Henkel Australia Pty. Ltd. Specifications subject to change without notice.
LOCTITE MAINTENANCE PRODUCTS
CONTENTS
The primary function of this User‘s Guide is to help
you, the maintenance professional, with the proper
selection and use of Loctite® products. A wide variety
of preventative maintenance, as well as repair
techniques, are explained in step-by-step detail.
Consider this a supplemental service manual for
every piece of equipment in your plant. Our goal is
to make it easier for you to use our products to your
benefit for faster repair times, reduced downtime,
and extended equipment life. Additional information
on these products, as well as others, is available by
contacting your local Loctite adhesives and sealants
representative at the telephone number listed on the
back cover of this guide.
THREADLOCKING
THROUGH HOLES (BOLTS AND NUTS)
BLIND HOLES
2
4,5
STUDS
5
HIGH STRENGTH DISASSEMBLY
5
PRE-ASSEMBLED FASTENERS
6
ADJUSTMENT SCREWS
6
STRIPPED THREAD REPAIR
7
THREADLOCKER QUICK SELECTOR
8
PREVENTING FASTENER SEIZURE/ANTI-SEIZE
8
WHY USE PRIMERS?
8
THREADLOCKING TECHNICAL DATA
THREAD SEALING
PAGE 4
STANDARD FITTINGS
9
10
PIPE UNIONS
10
COMPRESSION FITTINGS
11
FLARED / SWAGED FITTINGS
11
HOSE ENDS
12
THREAD SEALING QUICK SELECTOR
12
THREAD SEALING TECHNICAL DATA
13
LOCTITE DO IT RIGHT USERS’ GUIDE
LOCTITE MAINTENANCE PRODUCTS
CONTENTS
PUNCTURE SEALING
TANKS, VESSELS, ETC.
14
POROSITY SEALINGS
EXISTING WELDS
15
NEW WELDS
15
CASTINGS
15
SEALING CAST RIGID FLANGES
16
GASKETING QUICK SELECTOR
16
GASKET DRESSING
SEALED FLANGES
17
FLANGE SEALING
TECHNICAL DATA
18
STAMPED OR SHEET METAL FLANGES
19
SILICONE QUICK SELECTOR
20
MAXX VS STANDARD SILICONES
20
STANDARD DUTY
21
HEAVY DUTY
22
REPAIRING BADLY WALLOWED KEYWAYS
23
FORM-IN-PLACE GASKETING
FORM-IN-PLACE GASKETING
KEYED ASSEMBLIES
SHAFT MOUNTED ASSEMBLIES
HOUSED COMPONENTS
CLEANING
24
SLIP FIT – LIGHT DUTY
25
SLIP FIT – HEAVY DUTY
26
PRESS FIT
27
SLIP FIT – LIGHT DUTY
28
SLIP FIT – HEAVY DUTY
29
RETAINING (LARGE GAPS)
30
SEALING/RETAINING METALLIC SEALS
31
RETAINING COMPOUNDS QUICK SELECTOR
32
RETAINING - TECHNICAL DATA
33
GUIDE TO SUCCESSFUL BONDING
34
PROPER JOINT DESIGN
35
BONDING
RUSTPROOFING
REPAIRING BADLY WORN SHAFTS
ADHESIVE QUICK SELECTOR
36
OPTIMUM USE OF EXTEND® RUST TREATMENT
37
ODC-FREE CLEANER / HAND CLEANING
38
MAKING O-RINGS
ORDERING
TROUBLESHOOTING CHECKLIST
39
PRODUCT LISTING
40,41,42
43
3
LOCTITE MAINTENANCE PRODUCTS
THREADLOCKING
THROUGH HOLE (BOLTS AND NUTS)
Apply Here
Not Here
1.
Clean all threads (bolt and nut) with Loctite® ODC-Free Cleaner
& Degreaser.
If necessary, spray all threads with Loctite® Primer (Refer to Technical
Data). Allow to dry.
Select the proper strength Loctite Threadlocker product.
Insert bolt into through hole assembly.
Apply several drops of Threadlocker onto bolt at targeted tightened
nut engagement area. Avoid touching bottle tip to metal.
Assemble and tighten nut as usual.
2.
3.
4.
5.
6.
BLIND HOLES (CAP SCREWS, ETC.)
Onto
Threads
Onto
Threads
1.
Clean all threads (bolt and hole) with Loctite® ODC-Free Cleaner
& Degreaser.
If necessary, spray (bolt and hole) with Primer (Refer to Technical
Data). Allow to dry.
Select the proper strength Threadlocking product.
Squirt several drops down the sides of the female threads.
Apply several drops to bolt. Avoid touching bottle tip to metal.
Tighten as usual.
Note: Using Loctite® Threadlockers will virtually eliminate stripped
threads in aluminium or magnesium housings caused by
galvanic corrosion.
2.
3.
4.
5.
6.
4
LOCTITE DO IT RIGHT USERS’ GUIDE
LOCTITE MAINTENANCE PRODUCTS
THREADLOCKING
BLIND HOLES (STUDS, ETC.)
Onto
Threads
243
Into
Hole
262
1.
Clean all threads (bolt and hole) with Loctite® ODC-Free Cleaner
& Degreaser.
2.
If necessary, spray all threads with Primer (Refer to Technical Data).
Allow to dry.
3.
Squirt several drops Loctite® 262 Threadlocker down the sides of the
female threads. Avoid touching bottle tip to metal.
Note:
Use 277* Threadlocker if stud is over 25mm diameter.
4.
Apply several drops 262 Threadlocker onto stud threads.
5.
Install studs.
6.
Position cover, head, etc.
7.
Apply drops of Loctite® 243 Threadlocker onto exposed threads.
8.
Tighten nuts as required.
* Worldwide or Application-Specific Alternative
HIGH STRENGTH DISASSEMBLY
Localized Heating Methods
1.
Apply localized heat to nut or stud (230°C for 5 minutes).
2.
Disassemble while HOT.
Note:
Use standard hand tools for disassembly of low and medium
strength Threadlockers.
5
LOCTITE MAINTENANCE PRODUCTS
THREADLOCKING
PRE-ASSEMBLED FASTENERS
290 Here
Not Here
1.
Clean bolts and nuts with Loctite® ODC-Free Cleaner & Degreaser.
2.
Assemble components.
3.
Tighten nuts.
4.
Apply drops of Loctite® 290 Threadlocker at the nut and bolt
juncture.
5.
Avoid touching bottle tip to metal.
Note:
For preventive maintenance on existing equipment:
RETIGHTEN nuts and apply Loctite® 290 Threadlocker at the
nut and bolt juncture.
ADJUSTMENT SCREWS
Apply Here
Plunger
1.
Adjust screw to proper setting.
2.
Apply drops of Loctite® 290 Threadlocker at screw and body juncture.
3.
Avoid touching bottle tip to metal.
Note:
• If re-adjustment is difficult, apply heat to screw with
soldering gun (230°C).
• Use Loctite 222 when low strength locking is required.
6
LOCTITE DO IT RIGHT USERS’ GUIDE
LOCTITE MAINTENANCE PRODUCTS
THREADLOCKING
STRIPPED THREAD REPAIR
Cleaned Bolt
Release Agent
Cover
Plate
Threadlocker
Release Agent
Stripped
Threads
FORM-ATHREAD®
FORM-ATHREAD®
Half Fill Only
Tape
New
Threads
Tape
Step 1
Step 2
Step 3
STANDARD THREAD REPAIR
1.
Follow instructions on Loctite® FORM-A-THREAD® package.
2.
If cover plate is used for bolt alignment:
(a) Apply release agent to mating faces around repair area.
(b) Use “waxed” paper or similar film between faces.
3.
A “jiggling/twisting” motion when initially inserting bolt improves
threadconformation.
Note:
NOT intended for engine stud repair.
SMALL HOLE/FINE THREAD REPAIR
OPTION 1. Drill out damaged hole to oversize then follow STANDARD
THREAD REPAIR.
OPTION 2. Apply FORM-A-THREAD® to screw and insert into damage
hole. Clamp in place while product cures.
STUD INSTALLATION — PERMANENT (LIGHT DUTY)
1.
Use stud or cut “all thread” to desired length.
2.
Do NOT apply release agent to stud.
3.
Proceed as STANDARD THREAD REPAIR.
4.
Allow 30 minutes to cure.
5.
Assemble as required.
7
LOCTITE MAINTENANCE PRODUCTS
THREADLOCKING
QUICK SELECTOR
LOCTITE THREADLOCKER QUICK SELECTOR
®
Strength
Product
Color
Small Screws
Use
Low
222
Purple
Nuts & Bolts
Medium
243
Blue
Pre-Assembled
Medium
290
Green
Nuts & Bolts
High
262
Red
Studs (up to 25mm)
High
262
Red
Studs (over 25mm)
High
277
Red
WHY USE A PRIMER?
1.
Primers activate inactive surfaces.
2.
Primers speed cure times for faster return to service.
3.
Primers speed curing through larger gaps and deep threads.
4.
Primers substantially speed cure times on cold parts.
5.
Primers act as cleaning agents.
Active surfaces (Primer optional): Brass, copper, bronze, iron, soft steel, nickel.
Inactive surfaces (Primer required): Aluminium, stainless steel, magnesium,
zinc, black oxide, cadmium, titanium, others.
PREVENTING FASTENER SEIZURE — ANTI-SEIZE
LOCTITE® ANTI-SEIZE QUICK SELECTOR
Type
Heavy Duty
Max Temp.
1315°C
Silver Grade
870°C
General purpose heavy duty,
high temperature grade.
Nickel
760°C
Marine applications, highly chemical
resistant, copper free.
General purpose, stainless
steel compatible,
lead copper and sulphur free.
Anti-Seize compounds protect mated metal parts against friction, galling and
corrosion. Anti-Seize also reduces wrench torque to facilitate assembly and
disassembly of threaded connections.
8
LOCTITE DO IT RIGHT USERS’ GUIDE
LOCTITE MAINTENANCE PRODUCTS
THREADLOCKING
TECHNICAL DATA
PRODUCT
222
SUPER
SCREW LOCK
243
SUPER NUT
LOCK
262
SUPER STUD
LOCK
277
HIGH
STRENGTH
290
SUPER
WICK-IN
up to M36
up to M36
up to M36
over M36
up to M20
Low
Medium
High
High
Medium
6/4
20/7
22/32
32/32
10/29
Temperature
Range (°C)
-55 to +150
-55 to +150
-55 to +150
-55 to +150
-55 to +150
Cure Speed
Medium
Size of Thread
Strength
Breakaway/Prevail
Torque (N.m) on MIO
Slow/Med
Medium
Medium
Slow
Primer
7471
7471
7649
7649
7649
Colour
Purple
Blue
Red
Red
Green
7,000
20
Viscosity (c.P)
1,200
2,250
1,800
Thixotropic Liquid
Thixotropic Liquid
Thixotropic Liquid
WHEN TO USE PRIMERS
Primers are used when the surfaces to be threadlocked and sealed are not
active enough to cause curing to take place or when the cure is required to
be accelerated. The table below shows common materials and when to use
primer. Select the correct primer from the above.
ACTIVE SURFACE (PRIMER NOT REQUIRED)
INACTIVE SURFACE (PRIMER REQUIRED)
Brass
Copper
Aluminium
Bronze
Iron
Stainless Steel
Black Oxide
Anodised
Magnesium
Passivated Surfaces
Zinc
Titanium
Nickel
CHARCTERISTICS/ADVANTAGES OF ANAEROBIC THREADLOCKERS
• Flat washer can still be used with threadlockers.
• Threadlockers lubricate threads for proper assembly torque tension ratio.
• Threadlockers work on all size and types of fasteners (SAE or Metric).
• Threadlocker strength is selectable (High, Medium, Low) depending on
requirements.
• Threadlockers improve breakaway and prevailing torque.
• Threadlockers lock and seal, preventing corrosion and leakage.
• High strength threadlockers can be disassembled with heat (230°C for 5
minutes).
IMPORTANT NOTE: Do not use anaerobic threadlockers on most thermoplastics (ABS, PVC, etc).
Softening and/or stress cracking may occur. Anaerobic threadlockers can be used with 7649 Primer
on Nylon and thermoset plastics. All anaerobic threadlockers have high chemical resistance.
9
LOCTITE MAINTENANCE PRODUCTS
THREADSEALING
STANDARD FITTINGS — PIPE, HYDRAULICS,
POTABLE WATER OR AIR
Loctite Product
Loctite Product
1.
2.
3.
4.
Clean parts of contamination with ODC-Free Degreaser Cleaner.
If necessary, spray Loctite® Primer (Refer to Technical Data) onto
threaded parts (male and female). Allow to dry.
Note: Primer is not required for brass parts.
Apply a band of Loctite Product to male threads starting one to two
threads from end of pipe.
Assemble parts snugly. Do not overtighten.
If initial pressure exceeds 6.9 MPa*, wait 30 minutes before
pressurizing.
Note:
• For stainless steel components, use PST® Pipe Sealant 567.
• For general purpose thread sealing, use PST® Pipe Sealant 567.
• For fine filtration systems requiring zero contamination, use
Hydraulic/Pneumatic Sealant 569.
• If sealing chemicals or strong acids/bases, refer to Fluid
Compatibility Chart (in 567 brochure).
• If sealing potable water system use universal pipe sealant 577 or
55 Pipe Sealing Cord.
• Do not use on oxygen or strong oxidizers (chlorine).
• Do not use Loctite 567 or 577 on PVC or ABS pipe. Use Loctite 55.
*Depending on conditions
METAL PIPE UNIONS
567 Band
567 Band
567 Band
567 Coating (May be used for badly damaged seat)
1.
Disassemble and if necessary, spray all components with Loctite®
7649 Primer N. Allow to dry.
2.
Apply a thin coating of PST® Pipe Sealant 567 to union face.
3.
Apply a band of PST® Pipe Sealant 567 to male threads.
4.
Assemble parts snugly.
10
LOCTITE DO IT RIGHT USERS’ GUIDE
LOCTITE MAINTENANCE PRODUCTS
THREADSEALING
METAL COMPRESSION FITTINGS
567 Coating
567 Band
567 Band
1.
Clean parts. Slide fitting nut and ferrule back approximately 20mm
from end of tubing.
2.
If necessary, spray the entire assembly with Loctite® 7649 Primer (N).
Allow to dry.
Note: Primer is not required for brass parts.
3.
Apply a thin coating of PST® Pipe Sealant 567 to tubing where ferrule
will be located.
4.
Slide ferrule forward over PST® Pipe Sealant 567 coated tubing, then
apply a thin bead of PST® Pipe Sealant 567 coating to ferrule.
5.
Slide ferrule forward over 567 coated tubing.
6.
Apply a small band of PST® Pipe Sealant 567 to male threads.
7.
Assemble and tighten normally.
Note: Do not use on plastic fittings or tubing.
METAL FLARED/SWAGED FITTINGS
567 Coating (For damaged flare or seat)
567 Band
1.
Disassemble and if necessary, spray all components with
Loctite® 7649 Primer (N). Allow to dry.
2.
Apply a thin coating of PST® Pipe Sealant 567 to fitting face.
3.
Apply a band of PST® Pipe Sealant 567 to male threads.
4.
Assemble parts snugly.
11
LOCTITE MAINTENANCE PRODUCTS
THREADSEALING
HOSE ENDS - AIR & HYDRAULIC
Loctite Product Band
1.
If necessary, spray adapter threads with Loctite® Primer (Refer to
Technical Data). Allow to dry.
2.
Insert barbed hose stem into hose I.D. with slight twisting motion.
3.
Install appropriate hose clamp.
4.
Apply a band of Loctite Product to male hose stem threads upon
installation or adding accessory device. Tighten snugly.
Note: Loctite Product may attack synthetic rubber tubing.
THREAD SEALING QUICK SELECTOR (TAPERED THREADS)
Application
Stainless Steel
and All Other
Metal Fittings
Product
Potable
Water Systems
Instant
Seal
PST® Pipe (N)7649 3.4MPa
Sealant 567
500 PSI
High Filtration/
Hydraulic/
Zero Contamina- Pneumatic
tion Systems
Sealant 569
Potable
Water Systems
Primer
Max.
Max.
Pressure Steam
Temp.
Range
24 Hours 0.9MPa -55°C to
69MPa (130 PSI) +205°C
(10,000 PSI)
(T)7471 10 Mins. 24 Hours
N.A.
3.4MPa
69MPa
500 PSI (10,000 PSI)
-55°C to
+150°C
Universal
(N)7649 10 Mins. 24 Hours
N.A.
Sealant 577
3.4MPa
69MPa
500 PSI (10,000 PSI)
-55°C to
+150°C
55 Sealing Cord
–
Instant
Instant
69MPa
69MPa
N.A.
-55°C to
+130°C
(10,000 PSI)(10,000 PSI)
DO NOT USE THESE PRODUCTS ON OXYGEN OR STRONG OXIDIZERS.
FLUID COMPATIBILITY QUESTIONS?
1.
Refer to Fluid Compatibility Chart – inside 567 brochure.
2.
Contact your local Industrial Distributor.
3.
Call Loctite Technical Information. See back cover for the Loctite
Technical Information number in your area.
12
LOCTITE DO IT RIGHT USERS’ GUIDE
LOCTITE MAINTENANCE PRODUCTS
THREADSEALING
TECHNICAL DATA
PRODUCT
Size of Thread
569
HYDRAULIC
SEALANT
567
MASTER PIPE
SEALANT
577
HIGH PRESSURE
PIPE SEALANT
55
up to 3/4”
up to 3”
up to 3”
up to 6”
Strength
Low
Low
Medium
Low
Breakaway/Prevail
Torque (N.m) on MIO
4/2
1.7/NA
11/6
NA
Temperature
Range (°C)
-55 to +150
-55 to +205
-55 to +150
-55 to +130
Cure Speed
Instant
Medium
Slow
Medium
Optional Primer
7471
7649
7649
NA
Colour/Format
Brown/Liquid
White/Gel
Yellow/Gel
White/Cord
400
540,000
24,000
NA
Visocisty (c.P)
IMPORTANT PRODUCTS ARE NOT TO BE USED ON OXYGEN SYSTEMS OR IN OXYGEN RICH
ENVIRONMENTS. DO NOT USE WITH STRONG OXIDISERS (CHLORINE). Check compatibility chart
for fluid and gas compatibility.
WHEN TO USE PRIMERS
Primers are used when the surfaces to be threadlocked and sealed are not
active enough to cause curing to take place or when the cure is required to
be accelerated. The table below shows common materials and when to use
primer. Select the correct primer from the table.
ACTIVE SURFACE (PRIMER NOT REQUIRED)
INACTIVE SURFACE (PRIMER REQUIRED)
Brass
Copper
Aluminium
Bronze
Iron
Stainless Steel
Black Oxide
Anodised
Magnesium
Passivated Surfaces
Zinc
Titanium
Nickel
CHARACTERISTICS/ADVANTAGES OF ANAEROBIC THREAD SEALING
• Anaerobic thread sealants flow into and completely fill all voids,
eliminating leak paths.
• Anaerobic thread sealants seal and threadlock simultaneously.
• Thread sealants work on all size and types of fittings (see quick selector).
• Thread sealant strength is selectable (Medium or Low) depending on
requirements.
• Thread sealants can be disassembled with normal tools.
• Loctite 55 is a non curing impregnated nylon cord.
IMPORTANT NOTE: Do not use anaerobic sealants on plastic pipe or plastic fittings. For plastic
fittings use Loctite 55.
13
LOCTITE MAINTENANCE PRODUCTS
PUNCTURE SEALING
TANKS, VESSELS, ETC.
Roughened Area
Epoxy Layer 2
Epoxy Layer 1
Metal Disc Patch
Tank Wall
1.
IMPORTANT! TAKE PROPER SAFETY PRECAUTIONS WHEN
WORKING WITH FLAMMABLE LIQUID TANKS. AVOID USE WITH
COMPRESSIBLE GASSES.
2.
Clean the repair area with Loctite® ODC-Free Cleaner & Degreaser.
3.
Roughen a 25mm - 50mm radius around hole with emery cloth.
Clean again.
4.
Prepare a metal disc patch slightly larger than hole.
5.
Mix Loctite® 5 Minute Epoxy (A and B) as per directions.
6.
Apply a thin layer of 5 Minute Epoxy to roughened area.
7.
Immediately position disc patch over hole.
8.
Apply a cover layer of Five Minute Epoxy over disc patch and Epoxy
layer 1.
9.
Allow to cure before service use:
a. Liquid storage — 1 hour.
b. Low pressure (under 1000kPa) — 1 hour.
c. High Pressure — Not Recommended over 1000kPa.
10. Paint as required.
SEALING CRACKS
1.
Drill termination holes to prevent further cracking.
2.
Follow directions above. Modify as needed.
1.
Follow directions above. No disc patch needed.
SEALING PINHOLES
14
LOCTITE DO IT RIGHT USERS’ GUIDE
LOCTITE MAINTENANCE PRODUCTS
POROSITY SEALING
POROSITIES IN WELDS AND CASTINGS
290
Weld Bead
Tank Wall
Weld Porosity
1.
IMPORTANT! TAKE PROPER SAFETY PRECAUTIONS WHEN
WORKING WITH FLAMMABLE LIQUID TANKS. AVOID USE WITH
COMPRESSIBLE GASSES.
2.
Wire brush to remove paint, rust, etc. from repair area.
3.
Clean repair area with Loctite® ODC-Free Cleaner & Degreaser.
4.
Apply localized heat to bring repair area to approx. 120°C.
5.
Allow repair area to cool to approx. 50°C.
6.
Brush or spray 290 on repair area.
Note:
• Not recommended for “blowholes”
• Maximum porosity sealed = 0.1mm
7.
Allow to cure for 30 minutes (for high pressure above 1000kPa,
allow a minimum of 1 hour)
8.
Clean with Loctite® ODC-Free Cleaner & Degreaser to remove excess
sealant. Do not grind.
9.
Paint as required.
Note:
Casting repair uses same procedure.
SEALING NEW WELDS — PREVENTATIVE MAINTENANCE
1.
Remove all slag and scale while hot.
2.
Apply sealant when weld is 50°C and cooling down.
3.
Follow information above.
15
LOCTITE MAINTENANCE PRODUCTS
FORM-IN-PLACE GASKETING
SEALING CAST RIGID FLANGES
Continuous Bead
Circle Bolt Holes
Flat Flange
1.
Raised Flange
Remove old gasketing material and other heavy contaminants with
Loctite® CHISEL® Gasket Remover. Use mechanical removal technique
if required.
Note: Avoid grinding.
2.
Clean both flanges with Loctite® ODC-Free Cleaner & Degreaser.
3.
Spray Loctite® Primer (Refer Technical Data) on only one surface.
Allow to dry.
4.
Apply a continuous bead of SELECTED LOCTITE GASKETING
PRODUCT to the other surface.
Note: Circle all bolt holes with sealant, if appropriate.
5.
Mate Parts. Assemble and tighten as required. Note: Immediate
assembly not required; however avoid delays over 45 minutes.
6.
Allow to cure:
a. No pressure – immediate service
b. Low pressure (up to 3.45MPa) – 30 to 45 minutes
c. High pressure (3.45 to 17.2MPa) – 4 hours
d. Extreme high pressure (17.2 to 34.45MPa) – 24 hours
LOCTITE® GASKETING QUICK SELECTOR
Use
Product
Gap
Fill
Temp.
Range
0.5mm
-55°C to +150°C
FLANGE SEALANT MASTER GASKET
General
FLANGE SEALANT 518
General
MASTER GASKET 515
0.5mm
-55°C to +150°C
Hi-Temp
GASKET ELIMINATOR® 510
0.25mm
-55°C to +200°C
16
LOCTITE DO IT RIGHT USERS’ GUIDE
LOCTITE MAINTENANCE PRODUCTS
GASKET DRESSING
SEALED FLANGES WITH GASKET
243
SELECTED LOCTITE PRODUCT
(on both sides of gasket)
243
243
1.
Primer on flange
surface only
Remove old gasketing material and other heavy contaminants with
Loctite® CHISEL® Gasket Remover. Use mechanical removal technique
if required.
Note: Avoid grinding.
2.
Clean both flanges with Loctite® ODC-Free Cleaner & Degreaser.
3.
Spray Loctite® Primer (Refer Technical Data) on both flange faces.
Allow to dry.
4.
Smear SELECTED LOCTITE PRODUCT to both sides of precut gasket with a
clean applicator.
5.
Place coated gasket on flange surface and assemble parts
immediately.
Note:
• If cover bolts into blind holes (as above), apply 243
Threadlocker into hole and on threads. Tighten normally.
• If through bolt assembly, apply 243 Threadlocker to
bolt threads only.
6.
Tighten as per standard practice.
17
LOCTITE MAINTENANCE PRODUCTS
FLANGE SEALING
TECHNICAL DATA
PRODUCT
510
GASKET
ELIMINATOR
515
MASTER
GASKET
518
MASTER
GASKET
Flange Type
Rigid
Rigid
Rigid Alloy
Temperature
-55 to +200
-55 to +150
-55 to +150
Gap Fill (mm)
up to 0.25
up to 0.5
up to 0.5
Medium
Medium
Fast
7471
7649
7649
Viscosity (c.P)
12,000
262,500
800,000
Oil Resistance
Excellent
Excellent
Excellent
Petrol Resist.
Excellent
Excellent
Excellent
Cure Speed
Optional Primer
WHEN TO USE PRIMERS
Primers are used when the surfaces to be sealed are not active enough to
cause curing to take place or when the cure is required to be accelerated.
The table below shows common materials and when to use primer. Select
the correct primer from the table.
ACTIVE SURFACE (PRIMER NOT REQUIRED)
INACTIVE SURFACE (PRIMER REQUIRED)
Brass
Copper
Aluminium
Bronze
Iron
Stainless Steel
Black Oxide
Anodised
Magnesium
Passivated Surfaces
Zinc
Titanium
Nickel
CHARCTERISTICS/ADVANTAGES OF GASKETING
• Form-in-place gasketing resists compression set.
• Form-in-place gasketing fills all voids eliminating gaps.
• Form-in-place gasketing provides a universal fit and is always in stock.
• Form-in-place gasketing provides on-site applications and saves you time.
• Form-in-place gasketing is easy to clean up.
IMPORTANT NOTE: Do not use anaerobic flange sealants on most thermoplastics (ABS, PVC, etc).
Softening and/or stress cracking may occur. Anaerobic flange sealants can be used with 7649
Primer on Nylon and thermoset plastics.
18
LOCTITE DO IT RIGHT USERS’ GUIDE
LOCTITE MAINTENANCE PRODUCTS
FORM-IN-PLACE GASKETING
STAMPED OR SHEET METAL FLANGES
1.
Remove old gasketing material and other heavy contaminants with
Loctite® CHISEL® Gasket Remover.
2.
Clean both flanges with Loctite® ODC-Free Cleaner & Degreaser.
3.
Apply a continuous bead of the selected Loctite® MAXX SILICONE to
sealing surface. Circle all bolt holes.
Note:
• Use proper bead diameter to seal flange width and depth.
• Minimize excessive material “squeeze in”.
4.
Assemble within 10 minutes by pressing together. Tighten as
required.
5.
Clean up any excess.
6.
Cure times will vary with temperature, humidity, and gap. Typical full
cure time is 24 hours.
19
LOCTITE MAINTENANCE PRODUCTS
FORM-IN-PLACE GASKETING
MAXX SERIES SILICONES
LOCTITE® MAXX SERIES SILICONES QUICK SELECTOR
PRODUCT
587
BLUE
MAXX
5900
BLACK
MAXX
5699
GREY
MAXX
COPPER
MAXX
INSTANT
GASKET
Flexible
Flexible
Japanese Vehicle
Flexible
Flexible
Temperature1
-60 to +260°C
-60 to +200°C
-60 to +200°C
-60 to +316°C
-60 to +200°C
Gap Fill (mm)
6mm
6mm
3mm
6mm
6mm
Flange Type
Sensor Safe
Cure (Tack Free)
Full Cure
Oil Resistance
Instant Seal
Yes
Yes
Yes
Yes
Yes
30 min.
5 min.
10 min.
60 min.
5 min.
24 hrs.
24hrs.
24 hrs.
24 hrs.
24 hrs.
Excellent
Excellent
Excellent
Excellent
Excellent
No
Yes
No
No
Yes
2
2
1. Continuous service. Intermittent temperature higher than established range.
2. Seals instantly at zero gap.
Note: Silicones used at extreme high temperatures can seal but lose
various properties.
REASONS TO USE MAXX SERIES SILICONES
INSTEAD OF STANDARD RTV SILICONES
®
• LOCTITE MAXX SERIES SILICONES WILL NOT CORRODE STEEL OR
ALUMINIUM. Standard RTV acetoxy silicones (vinegar smell) should not be
used to seal closed systems (gear boxes, electrical boxes, etc.). Acetic acid will
corrode internal parts (bearings, contacts, etc.).
®
• LOCTITE MAXX SERIES SILICONES ARE 8 TIMES MORE OIL RESISTANT THAN
STANDARD RTV SILICONES. Standard RTV silicones should not
be used to seal ”Hot Oil” systems (oil pan, etc.). They swell and lose
sealing ability.
REASONS TO USE LOCTITE ANAEROBIC GASKETING
PRODUCTS (510, 515 OR 518)
INSTEAD OF STANDARD RTV SILICONES
®
• LOCTITE ANAEROBIC GASKETING PRODUCTS ARE RESISTANT TO GASOLINE
AND FUEL OILS. Silicones should not be used to seal fuel systems. They swell
and lose sealing ability.
®
• LOCTITE ANAEROBIC GASKETING PRODUCTS RESIST “BLOW-OUT”. Silicones
are not recommended for high pressure applications.
20
LOCTITE DO IT RIGHT USERS’ GUIDE
LOCTITE MAINTENANCE PRODUCTS
STRENGTHEN KEYED ASSEMBLIES
KEYED ASSEMBLIES - STANDARD DUTY
243 dab here
641 Coating Here
641
ASSEMBLY
1.
Clean all parts with Loctite® ODC-Free Cleaner & Degreaser.
2.
If necessary, spray all parts (I.D. and O.D.) with Loctite® Primer (Refer
Technical Data).
3.
Apply Loctite® 641 coating into keyway and on key.
4.
Apply dab(s) of 641 onto shaft opposite keyway or
evenly spaced around shaft. Avoid touching bottle tip to metal.
5.
Assemble parts. Wipe off excess.
6.
Apply 243 dab to set screw.
7.
Tighten set screw.
8.
Allow 5-10 minutes cure time prior to service.
Note:
• LOCTITE 641 is NOT recommended for radial gaps
exceeding 0.2mm on shaft or keyway.
• See BADLY WALLOWED KEYWAY for procedure page 23.
DISASSEMBLY
1.
Tap component and key with hammer.
2.
Pull as usual.
21
LOCTITE MAINTENANCE PRODUCTS
STRENGTHEN KEYED ASSEMBLIES
KEYED ASSEMBLIES-HEAVY DUTY
243 dab here
609 or 680
Coating Here
ASSEMBLY
1.
Clean all parts with Loctite® ODC-Free Cleaner & Degreaser.
2.
Apply a 609 or 680 coating around shaft, into keyway,
and on key. Avoid touching bottle tip to metal.
3.
Assemble parts. Wipe off excess.
4.
Apply a 243 dab to screw.
5.
Tighten set screw.
6.
Allow 30 minutes cure time prior to service.
Note:
• If gap exceeds 0.1mm, use Loctite® 7471 Primer (T) on appropriate
area (shaft or keyway).
• LOCTITE 609 and 680 are NOT recommended for radial gaps
exceeding 0.2mm on shaft or keyway.
• See BADLY WALLOWED KEYWAY for procedure page 23.
DISASSEMBLY
1.
Tap component and key with hammer.
2.
If necessary, apply localized heat (230°C for five minutes).
3.
Pull while hot.
22
LOCTITE DO IT RIGHT USERS’ GUIDE
LOCTITE MAINTENANCE PRODUCTS
STRENGTHEN KEYED ASSEMBLIES
REPAIR BADLY WALLOWED KEYWAY
QUICK METAL® 660 Coated Keyway
QUICK METAL® 660 Coated Shim
1.
Determine the gap width on each side of key.
2.
Select and trim appropriate shim stock.
3.
Clean all parts with Loctite® ODC-Free Cleaner & Degreaser.
4.
If necessary, spray all parts with Loctite® 7471 Primer (T). Allow to
dry.
5.
Apply a Loctite® QUICK METAL® 660 coating into keyway
6.
Install shims.
7.
Assemble as required using QUICK METAL® 660.
8.
Allow 30-60 minute cure time.
Note:
• Minimise gap, by using shim stock.
• QUICK METAL® 660 is NOT recommended for lateral gaps
exceeding 0.5mm.
• Higher strengths are obtained by NOT using 7471 Primer (T) with
small (0.05mm - 0.1mm) gap, and allowing longer cure (4-24
hours).
EMERGENCY REPAIR ONLY!
Due to the nature of the damage, this should be considered
a temporary repair until the unit can be replaced.
23
LOCTITE MAINTENANCE PRODUCTS
SHAFT MOUNTED COMPONENTS
REPAIR BADLY WORN SHAFT
Bearing
641
Sleeve
680 or
QUICK METAL® 660
Shaft
1.
Determine a minimum radial gap.
2.
Select and trim appropriate sleeve to allow component slip fit.
3.
Roughen sleeve O.D. with emery cloth.
4.
Clean all parts with Loctite® ODC-Free Cleaner & Degreaser.
5.
Spray all parts with Primer (Refer Technical Data). Allow to dry.
6.
Apply a Loctite® 680 or Loctite® QUICK METAL® 660 coating around
the shaft. Avoid touching bottle tip to metal.
7.
Install sleeve.
8.
Apply a coating of Loctite® 641 to sleeve O.D.
9.
Install component as required onto sleeved shaft.
10. Allow 30-60 minute cure time.
Note:
• Minimize gap fill using shim stock or sleeve material.
• QUICK METAL® 660 is NOT recommended for radial gaps
exceeding 0.5mm.
• Higher strengths are obtained by NOT using Primer with small radial
(0.05mm - 0.1mm) gap, and allowing longer cure (4-24 hours).
EMERGENCY REPAIR ONLY!
Due to the nature of the damage, this should be considered
a temporary repair until the unit can be replaced.
24
LOCTITE DO IT RIGHT USERS’ GUIDE
LOCTITE MAINTENANCE PRODUCTS
SHAFT MOUNTED COMPONENTS
SLIP FIT — LIGHT DUTY
Bearing
BEARING MOUNT 641 OR
QUICK METAL 660
Shaft
ORIGINAL
1.
Machine shaft to 0.05mm radial slip fit with 50-80 rms finish (second
cut).
2.
Clean all parts with Loctite® ODC-Free Cleaner & Degreaser.
3.
Spray all parts (I.D. and O.D.) with Loctite® Primer (Refer Technical
Data).
4.
Apply Loctite® 641 dabs around shaft at engagement area.
5.
Assemble parts. Do not rotate.
6.
Wipe off excess.
7.
Allow ten minutes cure time prior to service.
WORN SHAFT
Follow directions above except:
1.
Determine radial gap.
2.
If radial gap exceeds 0.1mm, Loctite® Primer must be used.
3.
Take steps to maintain concentricity with large gaps.
4.
Larger gaps require longer cure times (30-60 minutes).
5.
Loctite® QUICK METAL® 660 is NOT recommended for radial gaps
exceeding 0.5mm.
6.
See procedure for BADLY WORN SHAFT page 24.
Note: Loctite® QUICK METAL® 660 is very fast fixturing (30 seconds
or less) with Loctite® 7471 Primer (T).
25
LOCTITE MAINTENANCE PRODUCTS
SHAFT MOUNTED COMPONENTS
SLIP FIT — HEAVY DUTY
Bearing
620 or 680 or
QUICK METAL 660
Shaft
ORIGINAL
1.
2.
3.
4.
5.
6.
7.
Machine shaft to 0.05mm radial slip fit with 50-80 rms finish (second
cut).
Clean all parts with Loctite® ODC-Free Cleaner & Degreaser.
Do NOT use Loctite® Primer.
Apply a Loctite® 680 coating around shaft and engagement area. Avoid
touching bottle tip to metal.
Assemble parts with rotating motion.
Wipe off excess.
Allow 2 hours minimum cure time prior to service.
WORN SHAFT
Follow directions above except:
1. Determine radial gap.
2. If radial gap exceeds 0.1mm, Loctite® Primer must be used.
3. Take steps to maintain concentricity with large gaps.
4. Larger gaps require longer cure times (30-60 minutes).
5. QUICK METAL® 660 is NOT recommended for radial gaps exceeding
0.5mm.
6. See procedure for BADLY WORN SHAFT page 24.
MAXIMUM TEMPERATURE (200°C continuous)
1.
Same as above, except use Loctite® 620 with Loctite® Primer.
1.
2.
Pull as usual.
If necessary, apply localized heat (230°C for 5 minutes). Pull while hot.
DISASSEMBLY
26
LOCTITE DO IT RIGHT USERS’ GUIDE
LOCTITE MAINTENANCE PRODUCTS
SHAFT MOUNTED COMPONENTS
PRESS FIT
Bearing
609
Shaft
STANDARD
1.
Clean shaft O.D. and Component I.D with ODC-Free Cleaner.
Do NOT use Primer.
2.
Apply a bead of Loctite® 609 to circumference of shaft and bearing
at leading edge of insertion or leading area of engagement. Avoid
touching bottle tip to metal.
Note:
• Retaining compound will always be squeezed to the outside when
applied to shaft.
• Do NOT use with Loctite® Anti-Seize or similar product.
3.
Press on as usual. Wipe off excess.
4.
No cure time required.
Note: 609 is used due to low viscosity and wetting properties.
TANDEM MOUNT
1.
Apply retaining compound to bore of inside component.
2.
Continue assembly as above.
27
LOCTITE MAINTENANCE PRODUCTS
HOUSED COMPONENTS
SLIP FIT – LIGHT DUTY
660 or 641 Dab
Shaft
660 or 641 Dab
660 or 641 Dab
Housing
ORIGINAL
1.
Select component to fit shaft.
2.
Machine to reduce component O.D. or increase housing I.D. to
permit approximate 0.05mm - 0.1mm diametral slip fit.
3.
Clean all parts with Loctite® ODC-Free Cleaner & Degreaser and
spray with Loctite® Primer (Refer to Technical Data).
4.
Apply several Loctite® 641 dabs to component O.D. Avoid touching
bottle tip to metal.
5.
Install component. Do not rotate.
6.
Wipe off excess.
7.
Allow five minutes cure time prior to service.
WORN
Procedures identical to original slip fit, except:
1.
Determine the maximum radial gap.
2.
If the maximum gap exceeds 0.1mm, use QUICK METAL 660 and
7471 Primer (T).
3.
Take steps to maintain concentricity on large gaps.
4.
Large gaps require longer cure times (30-60 minutes).
5.
QUICK METAL® 660 is NOT recommended for radial gaps
exceeding 0.5mm.
28
LOCTITE DO IT RIGHT USERS’ GUIDE
LOCTITE MAINTENANCE PRODUCTS
HOUSED COMPONENTS
SLIP FIT – HEAVY DUTY
609 or 680
Shaft
ORIGINAL
Housing
1.
Select component to fit shaft.
2.
Machine to reduce component O.D. or housing I.D. to permit
approximate 0.05mm - 0.1mm diametral slip fit.
3.
Clean all parts with Loctite® ODC-Free Cleaner & Degreaser.
4.
Do NOT use Primer.
5.
Apply Loctite® 609 or 680 coating to component O.D.
6.
Install component with twisting motion.
7.
Wipe off excess.
8.
Allow 2 hours cure time prior to service.
WORN
Procedures are identical to original slip fit, except:
1.
Determine the maximum radial gap.
2.
If the maximum radial gap exceeds 0.1mm, use QUICK METAL 660
and Loctite® 7471 Primer (T).
3.
Take steps to maintain concentricity on large gaps.
4.
Large gaps require longer cure times (30-60 minutes).
5.
QUICK METAL® 660 is NOT recommended for radial gaps
exceeding 0.5mm.
DISASSEMBLY
1.
Pull as usual.
2.
If necessary, apply localized heat (230° C for five minutes).
3.
Pull while hot.
29
LOCTITE MAINTENANCE PRODUCTS
HOUSED COMPONENTS
RETAINING (LARGE GAPS)
480 Shims
Shim
EXCESSIVE / EVEN WEAR
1.
Clean parts with ODC-Free Cleaner.
2.
Position the component in bore.
3.
Select three equilateral mounting points.
4.
Determine the radial gap at those points.
5.
Select appropriate shim stock.
6.
Cut three pieces approx. 3mm wide to fit bore depth.
7.
Bond the shims to bore at mounting points using Loctite® 480.
8.
Assemble per instructions page 29.
30
LOCTITE DO IT RIGHT USERS’ GUIDE
LOCTITE MAINTENANCE PRODUCTS
HOUSED COMPONENTS
SEALING/RETAINING – METALLIC SEAL
243 Bead
1.
Clean the housing I.D. and seal O.D. with Loctite® ODC-Free
Cleaner & Degreaser.
2.
Spray both the housing and seal with Loctite® 7471 Primer (T).
3.
Apply a bead of Loctite® 243 Threadlocker to the leading edge of
metallic seal O.D. Avoid touching bottle tip to metal.
Note: Virtually any Loctite® Threadlocking product will work here.
Low strength liquid is recommended due to normal gap and
strength requirement.
4.
Install as usual.
5.
Wipe off excess.
6.
Allow to cure 30 minutes prior to service.
Note:
• Loctite® 243 Threadlocker is normally used with worn seal
housings to prevent leakage or slippage.
• It is not generally necessary to remove pre-applied sealant from
seal O.D.
31
LOCTITE MAINTENANCE PRODUCTS
RETAINING COMPOUNDS
QUICK SELECTOR
Application
Product
Primer
Retaining Compound 609
NONE
Small Gap (0.05mm Radial max.)
Retaining Compound 609
(T)7471
Larger Gap (0.5mm Radial max.)
QUICK METAL 660
(T)7471
Shaft Mount – Press fit
Shaft Mount – Slip Fit
®
Maximum Strength (0.2mm Radial max.)Retaining Compound 680
Maximum Temperature (200°C)
Retaining Compound 620
(0.2mm Radial max.)
(T)7471
(T)7471 or
N 7649
Housing Mount – Press Fit
Maximum Strength
Retaining Compound 609
NONE
Bearing Mount 641
NONE
Maximum Strength
Retaining Compound 680
(T)7471
High Strength
Retaining Compound 609
(T)7471
Bearing Mount 641
(N)7649
Medium Strength
Housing Mount – Slip Fit
Medium Strength
Note:
• Softer metals (Aluminium, Bronze, etc.) provide lower shear strengths
than ferrous components.
• Excessive gap reduces shear strengths.
• Ideal surface finish — 0.8 to 3.2 microns (50 to 80 rms) .
Refer to Technical Data Sheets for more information.
32
LOCTITE DO IT RIGHT USERS’ GUIDE
LOCTITE MAINTENANCE PRODUCTS
RETAINING
TECHNICAL DATA
PRODUCT
Strength
641
BEARING
MOUNT
609
620
MEDIUM/HIGH
HIGH
STRENGTH
TEMPERATURE
660
QUICK
METAL
680
VERY HIGH
STRENGTH
Low
Medium/High
HIgh
High
Very High
7 to 16
16 to 30
17 to 37
15 to 30
Nominal
28
Temperature
Range (°C)
-55 to +150
-55 to +150
-55 to 230
-55 to +150
-55 to +150
Gap Fill (mm)
up to 0.2
Shear Strength
(N/mm)
up to 0.2
up to 0.2
up to 0.25
up to 0.5
Cure Speed
Fast
Fast
Medium
Slow
Fast
Optional Primer
7649
7471
7471 or 7649
7471
7471
Colour
Yellow
Green
Green
Silver
Green
Viscosity (c.P.)
525
Liquid
125
Liquid
1800
Liquid
250,000
Paste
1,250
Liquid
WHEN TO USE PRIMERS
Primers are used when the surfaces to be threadlocked and sealed are not
active enough to cause curing to take place or when the cure is required to
be accelerated. The table below shows common materials and when to use
primer. Select the correct primer from the table.
ACTIVE SURFACE (PRIMER NOT REQUIRED)
INACTIVE SURFACE (PRIMER REQUIRED)
Brass
Copper
Aluminium
Bronze
Iron
Stainless Steel
Black Oxide
Anodised
Magnesium
Passivated Surfaces
Zinc
Titanium
Nickel
CHARCTERISTICS/ADVANTAGES OF RETAINING COMPOUND
• Retaining compound flows into all voids between mating parts, retaining
and sealing.
• Can double press fit strengths (steel to steel).
• Slip fits can exceed heavy press/shrink strength (steel to steel).
• Slip fits (Steel:Aluminium:Bronze) can equal press fit strength.
• Unitised assemblies are stronger and resist micro movement/key wallow.
• High strength retained assemblies can be dissassembled with heat
(approx. 230°C to 300°C)
IMPORTANT NOTE: Do not use anaerobic retaining compounds on most thermoplastics (ABS, PVC,
etc). Softening and/or stress cracking may occur. Anaerobic retaining compounds can be used with
7471 or 7649 Primer on nylon and thermoset plastics.
33
LOCTITE MAINTENANCE PRODUCTS
BONDING
GUIDE TO SUCCESSFUL BONDING
I.
JOB EVALUATION — Answer These Questions.
A.
What materials are to be bonded? What kind of rubber, plastic, etc.?
Porous? Slick? Rough?
B.
What kind of service? Operating temperature? Impact? Moisture or
water exposure?
C. What kind of stresses? Avoid peel or cleavage!
D. Is gap filling or bridging needed? How much?
E.
II.
What cure speed or “return to service” time is needed?
ADHESIVE SELECTION (See page 36.)
III. SURFACE PREPARATION
1.
Part must be clean. No oil. No grease. No residue.
2.
Remove paint from bond area for maximum strength.
3.
Roughen smooth surfaces with emery cloth.
4.
Treat selected “hard to bond” materials as directed:
a. Polyethylene, etc. – Use Loctite® Prism® Primer 770 and adhesive
401 or 406.
b. PTFE – Use appropriate etching agent.
5.
Clean parts with ODC-Free Cleaner.
IV. APPLICATION TECHNIQUES/TIPS
A.
Read and follow adhesive package instructions.
B.
Use the minimum amount of adhesive to one part only.
Apply activator (if required) to other part.
C. Avoid “jiggling” mated parts. Apply clamp pressure if possible.
D. Allow maximum cure time possible. See technical data for
recommended cure times.
V.
QUESTIONS? Call Loctite Technical Information. See back cover for
the Loctite Technical Information number in your area.
34
LOCTITE DO IT RIGHT USERS’ GUIDE
LOCTITE MAINTENANCE PRODUCTS
BONDING
PROPER JOINT DESIGN
TYPES OF JOINTS
LAP/OVERLAP
GOOD
JOGGLE LAP
GOOD
BUTT
FAIR/POOR
SCARF
FAIR
SINGLE STRAP
GOOD
DOUBLE STRAP
BEST
TYPES OF STRESSES
TENSILE
FAIR
CLEAVAGE
POOR
COMPRESSIVE
GOOD
SHEAR
GOOD
PEEL
POOR
DESIGN GUIDELINES
1. Maximize shear/minimize peel and cleavage.
2. Maximize compression/minimize tensile.
3. Joint width more important than overlap.
35
LOCTITE MAINTENANCE PRODUCTS
BONDING
ADHESIVE QUICK SELECTOR
PRODUCT
TYPICAL
APPLICATIONS
401- A general purpose Instant
Adhesive
Metal, plastic, rubber, cork,
wood, paper, leather, etc
406 – A low viscosity Instant
Adhesive ideal for difficult to
bond surfaces.
Plastic, rubber, metal, etc
454 – A no run, no drip Gel
Instant Adhesive suitable for
bonding porous materials.
Metal, plastic, rubber, cork,
wood, paper, leather, etc
480 – A high impact, high shear
strength, toughened Instant
adhesive
Metal, most rubbers, plastics,
etc
TAK PAK®– An Instant Adhesive
used with spray mist Accelerator
7452
Components on PC boards,
metal, plastic, rubber, etc
324 – An Impact Resistant
Structural Adhesive for gaps
up to 1mm. Used with Activator
7075.
Metal, timber, glass
330 Multibond® – A Structural
Adhesive for gaps up to 0.5mm.
Used with Activator 7387.
Metal, plastic, timber, glass, etc
3801- A five minute, general
purpose two part clear epoxy
Metal, timber, ceramic,
concrete, fibreglass, etc
3805 – A high strength two part
Steel and Aluminium Epoxy Filler
suitable for gap filling
Metal, timber, ceramic,
concrete
36
LOCTITE DO IT RIGHT USERS’ GUIDE
LOCTITE MAINTENANCE PRODUCTS
RUSTPROOFING
OPTIMUM USE OF EXTEND ® RUST TREATMENT
SURFACE PREPARATION — OLD STEEL:
Loose or “flaky” rust must be removed. Only conversion of firmly
bonded rust will result in durable protection. Oil, grease, old paint, mill
scale, form oil, fingerprints and water soluble surfaces and chlorides must
be removed to allow Loctite® Extend® to react with rust.
Loose rust, mill scale and oil paint should be removed preferably by
power wirebrushing, followed by rinsing with water to remove powder
and solubles. Manual wirebrushing, chipping, scraping and particularly
rotopeening can also be used. Ideal surfaces will show light rust as well as
bare metal surfaces.
RUST CONVERSION TIME AND APPEARANCE:
Two coats of Loctite® Extend® are recommended.
On lightly rusted steel (that has been wirebrushed), the first coat will
start to develop a violet color within 60 seconds. This will become satin
to flat black in appearance. The second coat should dry to a satin black
appearance.
On heavily rusted steel (that has been wirebrushed), the first coat
should develop a purple-black color within seconds. The second coat
should dry to a black color with gloss varying from flat to satin. The second
coat should be applied within 15-30 minutes of the first coat.
Note: May cause staining of surrounding painted finishes.
APPLICATION CONDITIONS:
Loctite® Extend® may be applied when surface and air is between
+10°C minimum and 32°C maximum. Reaction is slower at lower
temperatures. If temperature is too hot, film may surface dry and bubble.
High humidity is beneficial; it slows drying but assists rust conversion.
Extend® should not be applied in conditions of condensing humidity (e.g.
fog, dew), on ice, in rain or in heavy sea (salt) spray atmospheres. Steel
surface may be damp but not wet (i.e. continuous visible film of water). DO
®
®
NOT APPLY LOCTITE EXTEND TO SURFACES IN DIRECT SUNLIGHT.
APPLICATION EQUIPMENT METHODS:
Loctite® Extend® may be applied by brush, roller, or spray. Brush or
roller is suitable for small areas. Avoid sags and ridges and keep edges wet
by coating about a square yard at a time. Roll away from previously coated
area then roll back. Do not pour unused material back into the original
container. NEVER add solvents to Loctite® Extend®. Spray application is
recommended for larger areas. Airless spray equipment is faster, and
provides more effective conversion due to improved surface penetration.
Conventional air-spray equipment may be used, but Loctite® Extend® may
require thinning up to 10% with water for proper spraying.
37
LOCTITE MAINTENANCE PRODUCTS
CLEANING
ODC – FREE CLEANER
Loctite® ODC – Free Cleaner & Degreaser® is a non-aqueous,
hybrocarbon-based, non-CFC solvent designed for cleaning and
degreasing of surfaces to be bonded with adhesives.
TYPICAL APPLICATIONS:
Used as a final pre-assembly cleaning treatment to remove most
greases, oils, lubrication fluids, metal cuttings and fines, for all surfaces
to be bonded with adhesives. It is designed to be used as a spray or in
immersion cleaning processes, at room temperature or heated.
HAND CLEANING
For fast, effective hand cleaning without skinirritating petroleum solvents, use YUK OFF
ORANGE® Natural Citrus Hand Cleaner. YUK
OFF ORANGE® Hand Cleaner removes grease,
grime, paint, oil and ink and contains aloe and
lanolin to keep hands from cracking and drying
out. It’s even biodegradable.
38
LOCTITE DO IT RIGHT USERS’ GUIDE
LOCTITE MAINTENANCE PRODUCTS
MAKING
THREADLOCKING
0-RINGS
Cut rubber cord stock to length in fixture
supplied in Loctite O-Ring Splicing Kit.
Apply Loctite Prism Adhesive 406 to
end of cord diameter.
Press cord ends together for 30
seconds in groove of fixture. O-Ring is
now ready to use.
MAKE THAT O-RING . . . THE RIGHT WAY
1. Clean razor blade.
2. Use “guillotine” cutter for best square end cuts.
3. Keep cut ends clean – no oily fingerprints.
4. Use one drop instant adhesive on one end only.
5. Use v-groove jig for proper ailgnment and hold for 30 seconds.
6. Use waterproofing solution to protect the joint.
IMPORTANT NOTES
1. Recommended for static-stationary O-Rings only.
2. Works best with nitrile rubber (Buna N) cord stock.
3. On silicone stock use Loctite® Primer 770 with Loctite® Adhesive 406.
39
39
LOCTITE MAINTENANCE PRODUCTS
ORDERING
PRODUCT LISTING/ORDER INFO.
CATEGORY
SIZE
ITEM NO.
222 SMALL SCREW
10 ml bottle
50 ml bottle
250 ml bottle
22220
22250
22270
243 REMOVABLE
10 ml bottle
50 ml bottle
250 ml bottle
21320
21321
21322
262 PERMANENT
10 ml bottle
50 ml bottle
250 ml bottle
26220
26250
26270
277 LARGE STUD
50 ml bottle
250 ml bottle
27750
27770
290 WICKING
10 ml bottle
50 ml bottle
250 ml bottle
29020
29050
29070
569 HYDRAULIC/PNEUMATIC SEALANT
50 ml bottle
250 ml tube
56950
56970
567 MASTER PIPE SEALANT
50 ml tube
250 ml tube
56747A
56741
577 UNIVERSAL PIPE SEALANT
50 ml tube
250 ml tube
19259
34112
55 PIPE SEALANT CORD
150m
31899
50m
37371
609 GENERAL PURPOSE
10 ml bottle
50 ml bottle
250 ml bottle
30013
30015
30014
620 HIGH TEMPERATURE
50 ml bottle
250 ml bottle
62050
62070
660 QUICK METAL® PRESS FIT REPAIR
6 ml tube
50 ml tube
680 HIGH STRENGTH/HIGH VISCOSITY
50 ml bottle
250 ml bottle
68050
68070
641 BEARING MOUNT
10ml bottle
50ml bottle
250ml bottle
21314
21315
21316
THREADLOCKERS
THREAD SEALANTS
RETAINING COMPOUNDS
40
66010A
66040A
LOCTITE DO IT RIGHT USERS’ GUIDE
LOCTITE MAINTENANCE PRODUCTS
ORDERING
PRODUCT LISTING/ORDER INFO.
CATEGORY
SIZE
ITEM NO.
GASKETING
510 GASKET ELIMINATOR® HIGH TEMPERATURE
50 ml tube
250 ml tube
25555A
25554
515 MASTER ELIMINATOR®
6 ml tube
50 ml tube
300 ml cartridge
51517
51531A
33530
518 FLANGE SEALANT®
6 ml tube
25 ml syringe
50 ml tube
300 ml cartridge
51817
51827
25583A
51845
5900 INSTANT GASKET (aerosol)
198g can
30507
5900 HEAVY BODIED BLACK SILICONE
390g cartridge
20166
5910 BLACK® MAXX RTV SILICONE GASKET MAKER 95g tube
390g cartridge
34250
20166
587 BLUE® MAXX RTV SILICONE GASKET MAKER
34848
34888
95g tube
370g cartridge
5920 COPPER® MAXX RTV SILICONE GASKET MAKER 85g tube
5699 GREY® MAXX RTV SILICONE GASKET MAKER 95g tube
420g cartridge
34249
34238
18581A
ADHESIVES
330 MULTIBOND® NO-MIX
Also (see Activator 7387)
300 ml cartridge
406
25ml bottle
100ml bottle
500ml bottle
40633-25
33533
33534
401
25ml bottle
100ml bottle
500ml bottle
3g tube
40124-25
33531
33532
16704A
454 PRISM® SURFACE INSENSITIVE GEL
3 gm tube
20 gm tube
200g tube
45404
45416A
45474
480 PRISM® TOUGHENED
25ml bottle
500g bottle
16819-25
16887
5 MINUTE EPOXY
29.5ml syringe
33064A
20981
Various Epoxies
41
LOCTITE MAINTENANCE PRODUCTS
ORDERING
PRODUCT LISTING/ORDER INFO.
CATEGORY
SIZE
ITEM NO.
PRIMERS
7471 PRIMER T (Acetone)
2L Can
125g
24062
21356
7649 PRIMER N (Acetone)
2L Can
100ml
24063
22410
770 PRISM® PRIMER (Heptane)
100ml bottle
1L Can
29520
24377
7387 330 ACTIVATOR
100ml
1L
20g aerosol
1L
24058
24059
21520
24064
C5-A® COPPER ANTI-SEIZE
3.63Kg Can
453g brush top
aerosol
51009
51007
51003
NICKEL ANTI-SEIZE 771
28g Tube
454g
SILVER GRADE ANTI-SEIZE
250g tube
454g brush top
200g aerosol
76741
76764
76756
5kg pail
10kg pail
236ml brush top
76731
76785
76732
YUK OFF ORANGE® pumice formula (lotion)
400ml bottle
4L pump bottle
15L pump
31908
31909
31910
ODC-FREE CLEANER & DEGREASER
473ml pump spray
20162
EXTEND® RUST TREATMENT
18.9L
946ml bottle
3.75L bottle
75465
75430
75448
FORM-A-THREAD® STRIPPED THREAD REPAIR
13.1 ml syringe
O-RING SPLICING KIT “Inch”
Kit
10361A
O-RING SPLICING KIT “Metric”
Kit
16224A
FIXMASTER METAL MAGIC STEEL STICK
113g
7452 TAK PAC ACCELERATOR
LUBRICANTS
28182A
77164
CLEANERS
GENERAL MAINTENANCE
42
STR1
98853
LOCTITE DO IT RIGHT USERS’ GUIDE
LOCTITE MAINTENANCE PRODUCTS
TROUBLESHOOTING
1. What type failure is occurring? Has the application worked before?
2. Was proper and adequate adhesive/sealant used?
3. Was proper and adequate primer/activator used?
4. Do service conditions exceed the capability of the adhesive sealant?
(a) operating temperature
(c) fluid compatibility
(b) excessive pressure too soon
5. Were parts adequately cleaned prior to applying adhesive?
Note: If adhesive failure, is cured residue on one or both parts? If one
part is bare, check that part for contamination.
6. Were proper assembly techniques utilized?
7. Was adhesive/sealant allowed adequate cure time prior to service?
8. Do assembly/part conditions exceed capability of the adhesive/
sealant?
(a) excessive gaps
(c) improper joint design
(b) component materials
(d) inadequate clamping/fixturing
9. If additional assistance is required, please call our HENKEL LOCTITE
TECHNICAL INFORMATION LINE. See back cover for the Loctite
Technical Information number in your area.
LIMITATION OF WARRANTY
The data contained herein are furnished for
information only and are believed to be reliable. We
cannot assume responsibility for the results obtained
by others over whose methods we have no control.
It is the user’s responsibility to determine suitability
for the user’s purpose of any production methods
mentioned herein and to adopt such precautions as
may be advisable for the protection of property and
of persons against any hazards that may be involved
in the handling and use thereof.
In light of the foregoing, HENKEL AUSTRALIA PTY.
LTD. SPECIFICALLY DISCLAIMS ALL WARRANTIES OF
MERCHANTABILITY OR FITNESS FOR A PARTICULAR
PURPOSE ARISING FROM SALE OR USE OF ANY
PRODUCTS HEREIN . HENKEL AUSTRALIA PTY.
LTD. SPECIFICALLY DISCLAIMS ANY LIABILITY FOR
CONSEQUENTIAL OR INCIDENTAL DAMAGES OF
ANY KIND, INCLUDING LOST PROFITS.The discussion
herein of various processes or compositions is not to
be interpreted as representation that they are free
from domination of patents owned by others or as a
license under any Henkel patents which may cover
such processes or compositions. We recommend that
each prospective user test the proposed application
to determine its suitability for the purposes intended
prior to incorporating any product or application
in its manufacturing process using this data as a
guide. Some products may be covered by one or
more United States or foreign patents or patent
applications.
43