1
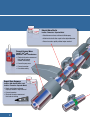
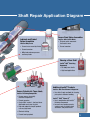
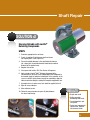
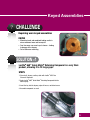
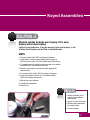
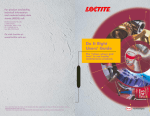
Shaft Repair
Service Manual
Introduction
This guide has been designed to provide quick and easy assistance to the
professionals responsible for the maintenance and repair of shaft assemblies.
With the help of this guide, you can:
• Easily select the right way to repair a variety of shaft assemblies
• Pinpoint the most suitable repair method for worn parts, or prevent wear proactively
• Determine the best Loctite® product for your particular maintenance or repair problem
Most shaft assemblies are incorporated into systems carrying a significant capital equipment value. It is therefore vital to maximize their useful lives and ensure reliable performance. Proactive
maintenance can reduce downtime, enhance reliability, and dramatically cut costs.
There is a comprehensive range of Loctite® products to:
• Repair and prevent common failures to extend end-product life and minimize downtime
• Reclaim worn or damaged assemblies to avoid scrap and replacement costs
• Assist in assembly, installation and disassembly
• Help ensure reliability and smooth running by restoring performance to “as new” condition
Profit from reliability
At Henkel, we understand the problems you face in ensuring reliability, safety, and durability. We provide a wide
range of industry-leading products for cost-efficient, easy and effective shaft maintenance and repair. When equipment fails, the greatest concern is getting it running again. Loctite® products not only provide reliable on-site
repair capability, but emergency repair and service solutions that last or even extend the lifetime of your equipment.
Our focus on increasing reliability, through the protection of our customers equipment, facilities and people, delivers maximum value to the maintenance process.
i
Table of Contents
Introduction
Shaft Repair Application Diagram
Shaft Repair
i
4
Repairing a badly worn shaft . . . . . . . . . . . . . . . . . . . . . . . . . . . . . . . . . . . . . . . . . . . . . .
2
Securing Cylindrical & Taper Joints
Reliably secure components to shaft. . . . . . . . . . . . . . . . . . . . . . . . . . . . . . . . . . . . . . . .
6
Preventing bearing spinout and component damage. . . . . . . . . . . . . . . . . . . . . . . . . . . . 7
Keyed Assemblies
Preventing keyway wear. . . . . . . . . . . . . . . . . . . . . . . . . . . . . . . . . . . . . . . . . . . . . . . . . .
8
Repairing worn keyed assemblies . . . . . . . . . . . . . . . . . . . . . . . . . . . . . . . . . . . . . . . . . .
9
Spline Assemblies
Reliably securing fixed spline assemblies . . . . . . . . . . . . . . . . . . . . . . . . . . . . . . . . . . . .
12
Lubricate and protect sliding spline assemblies. . . . . . . . . . . . . . . . . . . . . . . . . . . . . . . .
13
Shaft Repair Application Product Table
Additional Services
14
16
To speak with someone in our technical service department
or to contact your local Loctite® product specialist, call
1-800-LOCTITE (562-8483) or 1-800-263-5043 in Canada.
1
Rebuild Worn Shafts
Loctite® Fixmaster® Superior Metal
• Rebuild worn surfaces with metal-filled epoxy
• Machine the shaft after repair to the original diameter
• Return to service quickly without major overhaul
Prevent Keyway Wear
Loctite® 243™ and
QuickStix™ 248™ Threadlockers
• Eliminate the micro-movement
that leads to keyway wallow and fretting
• Prevent keyway wear
• Prevent corrosion
• Ease disassembly
Repair Worn Keyways
Loctite® 660™ Quick Metal® and
Loctite® Fixmaster® Superior Metal
• Repair and restore wallowed keyways without a major overhaul
• Prevent corrosion
• Eliminate the micro-movement that leads to fretting
2
Shaft Repair Application Diagram
Secure Fixed Spline Assemblies
Lubricate and Protect
Spline Assemblies
®
Loctite
Moly Paste
• Prevent wear caused by friction
®
Loctite
660™ Quick Metal®
• Eliminate micro-movement
that leads to wear
• Prevent corrosion
• Prevent corrosion
• Withstands extreme pressure and heavy loads
Sleeving a Worn Shaft
Loctite® 609™ Retaining
Compound
• For badly worn shafts
• High load applications
Additional Loctite® Products:
Secure Cylindrical & Taper Joints
Loctite® Retaining Compounds
• Recover worn or incorrectly machined components
• Prevent corrosion
• Create 100% contact – load and stress distributed evenly over the joint
• High and moderate strength products can carry high loads
Loctite® ODC-Free Cleaner & Degreaser
• Use with all repair methods for cleaning parts prior to adhesive bonding
Loctite® 7649™ Primer N™
• Use in combination with Loctite®
Retaining Compounds
• Increase cure speed on passive surfaces such as stainless steel, aluminium, and plated metals
• Eliminate fretting
• Prevent bearing spinout
3
? CHALLENGE
Repairing a badly worn shaft
?
Cause
• Out-of-tolerance machining results in loose components; this leads to micro-movement and wear
• Load produces axial forces that are higher than original calculations
• Insufficient interference or inappropriate loads lead to spun bearings
• Use of components in aggressive environments and at elevated operating temperatures
SOLUTION #1
Rebuilding the damaged shaft with Loctite® Fixmaster® Superior Metal
Steps
1.Using a lathe, undercut the shaft in the worn area as follows:
Shaft diameter: 13 mm–25 mm; desired undercut: 1.5 mm
Shaft diameter: 25 mm–75 mm; desired undercut: 3 mm
2.Dovetail the ends of the worn area to anchor the application into place.
3.Finish undercutting by machining a rough cut surface (e.g., Rz := 100 µm). The larger the shaft diameter, the coarser the cut.
4.Clean parts with Loctite® ODC Free Cleaner & Degreaser.
5.Apply a very thin layer of Loctite® Fixmaster® Superior Metal and force it into the rough surface finish. Turn the shaft at a very low speed and continue to apply adhesive using a putty knife or similar. Build the surface above the final desired level.
6.Allow the adhesive to cure for 12 hours at room temperature. If necessary, apply dry heat to the repair area to speed the cure.
7.Machine the repair to the required dimensions.
8.Cut the material with the component dry, using carbide or high speed steel. If polishing is required, use an abrasive paper.
Note:
When mounting components to the rebuilt surface with Loctite® Retaining
Compounds, Loctite® 7649™ Primer N™ is required.
4
RESULTS
• Prevent downtime
and scrap costs by
reparing worn shaft
• Epoxy solution uses
standard machine
tools, no special
equipment or training required
Shaft Repair
SOLUTION #2
Sleeving Reliably with Loctite®
Retaining Compounds
Steps
1. Determine appropriate size of sleeve.
2. Create a transition fit joint between shaft and sleeve (for tapered joints, create a press fit).
3. Ensure the outside diameter is the specified shaft diameter
(for a taper joint, the outside diameter should be the nominal diameter of the original cone).
4. Roughen the surface.
5. Clean parts with Loctite® ODC-Free Cleaner & Degreaser.
6.
Apply a bead of Loctite® 609™ Retaining Compound to the circumference of the shaft at the leading edge of the component to be inserted. Apply the adhesive to both parts of the assembly. In the case of a shrink fit (using thermal energy for assembling), apply the adhesive onto the cold part, coating the complete engagement area.
7. Assemble sleeve; in some cases, heat should be applied to the fit.
8. Wipe off excess adhesive.
9. Allow adhesive to cure.
10. Follow the same procedure for press-fit joints between the sleeve and bearing.
RESULTS
• Repair worn shaft
• Unitize assembly, distributing load evenly
• Prevent downtime and scrap costs
• Protect new components against wear, abrasion, and chemical attack
5
? CHALLENGE
Reliably secure components to shaft
?
Cause
• Out-of-tolerance machining results in loose components; this leads to micro-movement and wear
• Load produces axial forces that are higher than original calculations
• Insufficient interference or inappropriate loads lead to spun bearings
• Use of components in aggressive environments and at elevated operating temperatures
SOLUTION
Mount components to shaft using Loctite® Retaining Compounds
Steps
Select the proper repair adhesive according to the extent of component wear or gap fill required
Type of Fit
Press Fit
Slip Fit
Medium to Large Gaps
Loctite®
Retaining Compound
Benefit
Maximum Repair Gap
Cure Time
(Setup/Full Strength)
Loctite® 603™
Oil Tolerant
up to 0.005" (0.1 mm)
10 min/24 hrs
Loctite® QuickStix™ 668™
Semisolid
up to 0.005" (0.1 mm)
30 min/24 hrs
Loctite® 609™
General Purpose
up to 0.005" (0.1 mm)
10 min/24 hrs
Loctite® 620™
High Temp
up to 0.015" (0.4 mm)
30 min/24 hrs
Loctite® 680™
High Strength
up to 0.015" (0.4 mm)
10 min/24 hrs
Loctite® 660™ Quick Metal®
Restore Worn Parts
up to 0.020" (0.5 mm)
20 min/24 hrs
1.Clean parts with Loctite® ODC-Free Cleaner & Degreaser.
2.Roughen the shaft-mounted component and shaft with abrasive paper at the bonding area.
3.Re-clean parts.
4.Apply a bead of the repair adhesive to the circumference of the shaft at the leading edge of the component. Apply the adhesive to both parts of the assembly. In the case of a shrink fit (using thermal energy for assembling), apply the adhesive onto the cold part, coating the complete engagement area.
5.Assemble shaft-mounted component; in some cases, heat should be applied to the transition fit.
6.Wipe off excess.
7.Allow to cure.
6
RESULTS
• Adhesive fills airspace –
sealing from leaks, rust,
and corrosion
• Eliminates micro-
movement between component and shaft
• Provides 100% contact, distributing loads and stress evenly
Securing Cylindrical & Taper Joints
? CHALLENGE
RESULTS
Prevent bearing spinout, corrosion, and component damage
Cause
• Bearings are prone to spinning either on their shafts or within their housings. This results in damage to these parts regardless of whether or not they are a press, shrink, or slip fit.
• The airspace that exists between a bearing and shaft is an area where rust can form and cause damage to the parts and can also be a leak path for fluids.
• Airspace allows micro-movement leading to fretting and corrosion.
SOLUTION #2
SOLUTION #1
SOLUTION
Retain joints using Loctite® 609™
General Purpose or Loctite® 603™
High Strength Retaining Compounds
Steps
1.Clean parts with Loctite® ODC-Free Cleaner & Degreaser.
SOLUTION #3
2.Apply a bead of Loctite® Retaining Compound to the circumference of the shaft at the leading area of the component.
3.Press the bearing onto the shaft using normal techniques.
4.Wipe off excess material.
RESULTS
• Reduces shaft and/or bearing
housing damaged
• Fills airspace – sealing from leaks, rust, and corrosion
• Eliminates micro-movement between bearing and shaft that could lead to fretting damage
• Provides 100% contact, distributing loads and stress evenly
7
?
? CHALLENGE
Preventing keyway wear
?
Cause
In a new assembly the fit between the key and keyway is usually tight; however, over time
wear can cause this fit to loosen, leading to damage to the keyway.
SOLUTION
Loctite® Medium Strength Threadlocker is appropriate for
the gap fill and will provide the needed strength while
allowing easy removal for servicing.
Steps
1.Clean the keyway and key with Loctite® ODC-Free Cleaner & Degreaser.
2.Apply several drops of Loctite® 243™ Medium Strength Threadlocker into the keyway or apply Loctite® QuickStix™ 248™ to the key.
3.Insert the key into the keyway.
4.Wipe off excess adhesive.
5.Allow to cure before assembling the shaft-mounted component.
RESULTS
• Eliminates micro-
movements that can lead to fretting
• Prevents keyway wear
• Prevents corrosion
• Eases disassembly
8
Keyed Assemblies
? CHALLENGE
Repairing worn keyed assemblies
Cause
• Alternating loads and combined loading results in micro-movement wear and loose parts
• Over time wear can cause keys to loosen – leading to damage of the keyway.
• Out-of-tolerance machining
SOLUTION #1
Loctite® 660™ Quick Metal® Retaining Compound is a very thick
product, allowing it to fill large gaps.
Steps
1.Clean shaft, keyway, and key stock with Loctite® ODC-Free Cleaner & Degreaser.
2.Apply Loctite® 660™ Quick Metal® Retaining Compound into the worn keyway.
3.Insert the key into the keyway, wipe off excess, and allow to cure.
4.Assemble component as usual.
9
?
SOLUTION #2
Repairing badly worn keyed assemblies by
resizing the existing keyway
Steps
1. Resize the worn keyway.
2. Select proper keystock to fit the new keyway.
3. Machine a step in the new key to fit the female component.
4. Clean parts with Loctite® ODC-Free Cleaner & Degreaser.
5. Apply Loctite® 609™ retaining compound to the keyway of the shaft (where there is a high power application, apply Loctite® 609™ onto the whole shaft at the engagement area).
6. Assemble the key into the shaft.
7. Wipe off excess adhesive.
8. Allow product to cure.
10
Keyed Assemblies
SOLUTION #3
Alternate solution for badly worn keyway: fill in worn
keyway and cut new keyway
If parts are very badly worn, it may be necessary to cut new keyways. In this
situation the old keyways can be filled as described below.
Steps
1. Clean parts with Loctite® ODC-Free Cleaner & Degreaser.
2. Apply Loctite® Fixmaster® Superior Metal into the keyway of both the shaft and collar. Fill all the available space. Allow to cure.
3. If a rounded surface is required, machine the repair to the original
dimensions of the shaft and bore of the collar.
4. Machine a new keyway in the shaft and collar, opposite the original keyway.
5. Re-clean parts with Loctite® ODC-Free Cleaner & Degreaser.
6. Apply several drops of Loctite® 243™ Threadlocker directly into the new keyway and insert key.
7. Wipe off any excess adhesive.
8. Assemble the components.
9. Allow to cure.
RESULTS
• Restores assembly, so it is ready for service without a major overhaul
• Secures the key in the keyway
• Eliminates micro-movements that lead to fretting
• Prevents corrosion
11
? CHALLENGE
Reliably securing fixed spline assemblies
?
Cause
• Out-of-tolerance machining of components leads to micro-movement and wear
• Alternating loads
• Worst case combined loading
• Damage during assembly
• Incorrect assembly due to contamination of the parts
• Incorrectly specified spline drive – producing overload during operations
SOLUTION
Secure fixed spline assembly with
Loctite® 660™ Quick Metal®
Steps
1.Create a chamfer on the leading edges of the socket if there isn’t one, using a file or grinding wheel.
2.Abrasive-blast
the surface of the splines.
3.Clean parts with Loctite® ODC-Free Cleaner & Degreaser.
4.Apply Loctite® 660™ Quick Metal® to the shaft. Do not apply product into the socket.
5.Immediately push the spline/toothed shaft into the socket and remove excess adhesive.
6.Allow the adhesive to cure before returning to service.
RESULTS
• Restores assembly, so it is ready for service without a major overhaul
• Reduces scrap and costs by salvaging components
• Reduces downtime
12
Spline Assemblies
? CHALLENGE
RESULTS
Lubricate and protect sliding spline assemblies from
unnecessary fretting and wear
Cause
• Wear will occur where there is friction and movement in the spline coupling
• Contamination between shaft and socket
SOLUTION
SOLUTION #1
SOLUTION #2
Apply Loctite® Moly Paste to splines during assembly
to reduce friction
Steps
1.Clean mating surfaces before application with
Loctite® ODC-Free Cleaner & Degreaser.
2.Coat mating surfaces with Loctite® Moly Paste.
3.Assemble parts.
SOLUTION #3
RESULTS
• Withstands extreme pressure and heavy loads
• Prevents wear caused by
friction for long-lasting
assemblies
• Prevents corrosion
13
?
Shaft Application Product Table
Loctite®
Solution
Application
Benefits
Sizes
Part
No.
Page
Shaft Repair
Repairing badly worn shaft
Loctite® Fixmaster®
Superior Metal
Non-rusting, ferro-silicone-filled epoxy. Extremely high compressive strength and wear resistance. Sets in 20 minutes.
Sleeving
Loctite® 609™ Retaining Compound
General purpose, low viscosity adhesive for bonding cylindrical assemblies. Ideal for gap distances up to 0.005" diametral clearance. Fixtures in 10 minutes.
1 lb. Kit
97473
4 kg Kit
40900
50 ml
60931
5
4
Securing Cylindrical & Taper Joints
Press Fit – Mounting components to shaft
Slip Fit – Mounting
components to shaft
Mount components
requiring medium to
large gap fill
Prevent bearing spinout, corrosion
and component damage
14
Loctite® 603™
Retaining Compound
A retaining compound tolerant of oil and other contamination.
Seals and secures gaps up to 0.005" diametral clearance.
Fixtures in 10 minutes.
50 ml
21441
6
Loctite® QuickStix™ 668™
Retaining Compound
Convenient semisolid formula. Withstands temperatures to
400ºF (204ºC). Ideal for gaps up to 0.005" in diameter.
19 g stick
39148
6
Loctite® 609™
Retaining Compound
Low viscosity adhesive for bonding cylindrical assemblies.
Ideal for gap distances up to 0.005" diametral clearance.
Fixtures in 10 minutes.
50 ml
60931
6
Loctite® 620™ Retaining Compound
High temperature resistance up to 450ºF. High viscosity
securing cylindrical assemblies up to 0.015" diametral clearance.
50 ml
62040
6
Loctite® 680™ Retaining Compound
A high strength retaining compound capable of filling diametral gaps up to 0.015". Allows for more relaxed machining tolerances.
50 ml
68035
6
Loctite® 660™ Quick Metal® Retaining Compound
A creamy, non-running gel ideal for filling surface imperfections and worn areas. Ideal for gaps up to 0.020".
50 ml
66040
6
Loctite® 609™ Retaining Compound
Low viscosity adhesive for bonding cylindrical assemblies.
Ideal for gap distances up to 0.005" diametral clearance.
Fixtures in 10 minutes.
50 ml
60931
7
Loctite® 603™ Retaining Compound
A retaining compound tolerant of oil and other contamination.
Seals and secures gaps up to 0.005" diametral clearance.
Fixtures in 10 minutes.
50 ml
21441
7
Application
Loctite®
Solution
Benefits
Sizes
Part
No.
Page
Keyed Assemblies
Prevent keyway wear
Repair worn keyways
Loctite® 243™
Threadlocker
Anaerobic adhesive fills airspace, eliminating any micro-movement between the parts. Oil resistant, removable strength.
50 ml
Loctite® QuickStix™248™
Medium Strength
Threadlocker
Convenient semisolid anaerobic adhesive fills airspace, eliminating any micro-movement between the parts.
Removable strength.
19 g stick
37087
Loctite® 660™ Quick Metal® Retaining Compound
A creamy, non-running gel ideal for filling surface
imperfections and worn areas. Ideal for gaps up to 0.020".
50 ml
66040
9
Loctite® 609™ Retaining Compound
Low viscosity adhesive for bonding cylindrical assemblies.
Ideal for gap distances up to 0.005" diametral clearance.
Fixtures in 10 minutes.
50 ml
60931
10
Loctite® 243™
Threadlocker
Anaerobic adhesive fills airspace eliminating, any micro-movement between the parts. Oil resistant, removable strength.
50 ml
24078
8, 11
Loctite® Fixmaster®
Superior Metal
Non-rusting, ferro-silicone-filled epoxy. Extremely high compressive strength and wear resistance. Sets in 20 minutes.
1 lb. Kit
97473
4 kg Kit
40900
50 ml
66040
8 oz. brushtop can
51048
1 lb. brushtop can
51049
15 oz. net wt.
aerosol
22355
—
1.75 fl. oz.
bottle
38402
—
25 g net wt.
aerosol can
21347
—
24078
8
11
Spline Assemblies
Securing fixed spline assemblies
Protect sliding spline
assemblies from
fretting and wear
Loctite® 660™ Quick Metal® Retaining Compound
A creamy, non-running gel ideal for filling surface imperfections and worn areas. Ideal for gaps up to 0.020".
Loctite Moly Paste
Metal-free, general purpose lubricant. Lubricates and protects
especially well during break-in and under high loads up to
750ºF (400ºC).
®
12
13
Cleaner and Primer
Cleaning and
degreasing prior to bonding
Priming components
Loctite® ODC-Free Cleaner & Degreaser
Non-aqueous, hydrocarbon-based solvent for cleaning and
degreasing surfaces to be bonded with adhesives, as well as
any general purpose industrial cleaning.
Loctite 7649 Primer N
Use with Loctite® Retaining and Threadlocking products to
speed the cure on active metals or to ensure cure on inactive
metals (stainless steel, aluminum, plated parts, etc.).
®
™
™
15
At Henkel Corporation we invent more than just quality Loctite® brand products, we
provide solutions to industries’ biggest challenges. Whether looking to reduce costs,
increase the reliability of equipment, or assist in product application, Henkel is
dedicated to earning and keeping the trust of our customers.
Here are just a few Loctite® tools and services you may be interested in:
Loctite® Maintenance Workshop
Two hours of on-site training reviewing common maintenance challenges
and the appropriate Loctite® product solution customized to the needs of
your plant. Visit our website to learn more, download Literature “LT-3690”, or contact your local Loctite® Specialist to schedule a workshop.
Loctite® Industrial Pump Rebuild and Maintenance Guide
This comprehensive guide details the assembly and repair steps that can be taken to increase
efficiency and reduce or even eliminate common failures with centrifugal pumps. To get a
copy of this guide, visit our website or call us and reference “LT-4047”.
ox
rb
l Gea l
stria
a
Indu e Manu
ic
Serv
16
Loctite® Industrial Gearbox Service Manual
This guide is designed to provide quick and easy assistance to professionals
who service industrial gearboxes and look for reliability, longevity, and cost
reduction. To get a copy of this guide, visit our website or call us and reference “LT-4872”.
Henkel –
Your worldwide partner
USA
Henkel Corporation
Engineering Adhesives
1001 Trout Brook Crossing
Rocky Hill, CT 06067
Tel: 1.800.562.8483
Tel: 860.571.5100
Fax: 860.571.5465
Henkel Corporation
Engineering Adhesives
1001 Trout Brook Crossing
Rocky Hill, CT 06067
U.S.A.
www.henkelna.com/mro
www.loctite.com
Canada
Henkel Canada Corporation
Engineering Adhesives
2225 Meadowpine Blvd.
Mississauga, Ontario L5N 7P2
Tel: 1.800.263.5043 (within Canada)
Tel: 905.814.6511
Fax: 905.814.5391
and ™ designate trademarks, except where noted below, of Henkel Corporation or its affiliates.
= registered in the U.S. and elsewhere.© Henkel Corporation, 2008.
All rights reserved. 5544/LT-5338 (12/08)
®
®