1
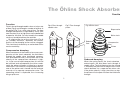
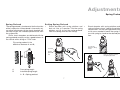
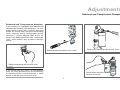
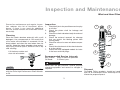
OWNER’S MANUAL
Öhlins Shock Absorber for MX/ Enduro/ Off Road
Before Installing
Safety Precautions
Öhlins Racing AB cannot be held
responsible for any damage to the shock
absorber or vehicle, or injury to persons,
if the instructions for installing and maintenance are not followed exactly.
Similarly the warranty will become
null and void if the instructions are not
followed.
NOTE!
Öhlins products are subject to continuous
improvement and development. Therefore,
although these instructions include the most
up-to-date information available at the time
of printing, there may be minor differences
between your shock absorber and this manual. Please consult your Öhlins dealer if you
have any questions regarding the contents of
the manual.
Before riding the vehicle, always make
sure that the basic settings made by
Öhlins are correct. See the Mounting
instructions for recommended Set-up
data. Contact an Öhlins dealer if you
have any questions about setting the
shock absorber.
!
Safety Signals
In this manual, mounting instructions and
other technical documents, important information concerning safety is distinguished
by the following notations:
!
The Safety alert symbol means: Warning!
Your safety is involved.
!
WARNING!
The Warning symbol means: Failure to follow
warning instructions can result in severe or
fatal injury to anyone working with, inspecting or using the shock absorber, or to
bystanders.
CAUTION!
WARNING!
Installing a shock absorber, that is not
approved by the vehicle manufacturer,
may affect the stability of your vehicle. Öhlins Racing AB cannot be held
responsible for any personal injury or
damage that may occur after installing
the shock absorber.
Please study and make certain that you
fully understand this manual and the
mounting instructions before handling
this shock absorber. If you have any
questions regarding proper installation
procedures or maintenance, please contact an Öhlins dealer.
Refer to the vehicle service manual when
installing this shock absorber.
The Caution symbol means: Special precautions must be taken to avoid damage to the
shock absorber.
NOTE!
The Note symbol indicates information that
is of importance regarding procedures.
1
© Öhlins Racing AB. All rights reserved. Any reprinting or unauthorized use without the written permission of Öhlins Racing AB is
prohibited. Printed in Sweden.
Öhlins Racing AB
The Story
Öhlins Racing AB
Congratulations!
It was the 1970’s, a young man named Kenth
Öhlin spent most of his spare time pursuing
his favourite sport: motocross.
A careful observer, Kenth’s attention
was continually drawn to one specific detail
- motocross bikes had more engine power
than their suspension could handle. It was
not long before Kenth realised that better
performance could be achieved by improved
wheel suspension.
You are now the owner of an Öhlins Shock
Absorber. More than one hundred World
Championships and other major world
titles are definitive proof that Öhlins shock
absorbers offer outstanding performance
and reliability.
Every product has gone through rigorous
testing and engineers have spent thousands
of hours, doing their very best to use every
possible experience from our 30 years within
the racing sport.
Öhlins Racing was established in 1976, and
just two years later the company won its first
World Championship title. Despite being in
the business for 30 years, the search for perfection and new functions is still the main
focus of the company.
The product that you now have in your possession is pure racing breed that is built to
withstand. By installing this shock absorber
on your vehicle you have made a clear statement… you are a serious rider with a focus on
getting the maximal handling ability and outstanding feedback from your vehicle. Along
comes the fact that your shock absorber will
be a long lasting friend, delivering the very
best of comfort and performance every time
you go for a ride.
Go explore!
2
Contents
pg
Before Installing
Öhlins Racing AB
The Öhlins Shock Absorber
Design
Function
Adjustments
General
Spring Preload
Rebound and Compression
High and low speed Compression
Ride Height and Free Sag
Set Up Your Motorcycle
General Handling Set-up
Inspection and Maintenance
1
2
4
5
6
7
8
9
10
11
12
14
3
The Öhlins Shock Absorber
Design
Design
Most of Öhlins suspensions are a high pressure
monotube type. The fluid is put under gas pressure and the gas and the fluid are kept apart by
a separating piston. The piston is usually fitted
in an external reservoir, connected by a hose
(Fig. 1.4) or fixed directly on top of the shock absorber (Fig 1.3).
In some models everything is fitted inside the
main shock absorber (Fig 1.2).
A few shock absorbers are of emulsion type,
oil and gas mixed inside the shock absorber
(Fig 1.1).
Pressurisation of the fluid is made with nitrogen.
The pressurisation prevents cavitation of the fluid
and the shock absorbing action is therefore more
even. The external reservoir also contributes to
better cooling of the fluid, giving longer service
life for the fluid as well as the components.
Öhlins shock absorbers with external rebound
adjustment have an integrated temperature compensation. As the temperature increases, and the
fluid flows more easily, the flow is controlled accordingly. The shock absorbing effect is therefore
independent of the temperature.
The more advanced models permit individual adjustment of compression and rebound damping.
Öhlins shock absorbers provide the possibility of adjustment, making them adaptable to
most motorcycles, riders and ranges of use. All
of the shock absorbers with springs have adjustable preload of the spring action.
Fig 1 Design types
1.1
1.3
1.2
1.4
N2
Separating
piston
Oil
Emulsion shock absorber
Internal gas reservoir
4
External piggyback
reservoir
External reservoir with hose
connection
The Öhlins Shock Absorber
Function
Function
Fluid is forced through needle valves at a low rate
of flow (Fig 6) and through a number of orifices in
the piston (Fig 7) at a high rate of flow. The flow
through these orifices is regulated by shims (thin
steel washers) that at high pressure are deflected
to open for the fluid. On most models the needle
valve can be adjusted from the outside.
By altering the size of the shim-stack (Fig 8)
(i.e. number, thickness, diameter) the characteristics of the damping action can be changed.
This should only be done by an authorized Öhlins
service workshop.
Fig 6 Flow through
needle valve
Fig 7 Flow through
piston
Fig 8 Shim stack
Stop washer
Shim stack
Rebound
flow
Compression
flow
Piston
Compression damping
When movement of the motorcycle causes compression of the shock absorber, the fluid flows
through the needle valve (combined compression and rebound valve) in the piston rod. If the
velocity of the compression movement is high,
i.e., in the case of rapid compression, this will not
be sufficient and consequently the shims underneath the piston will open to allow for a greater
rate of flow. The fluid that is displaced by the volume of the piston rod is forced into the external
reservoir via a separate compression valve. The
separating piston is displaced, thus increasing
the gas pressure.
Rebound damping
When the spring forces the shock absorber to
extend again, the fluid flows back through the
needle valve. The fluid flowing into the chamber
is forced by the pressure of the gas back into the
shock absorber via a separate non-return valve.
If the piston velocity is high, the shims on top of
the piston will also open to allow the fluid to flow
through.
5
Adjustments
General
Stability and traction
All motorcycles are designed with a suspension
geometry that includes height and fork angle.
The changing of components can affect this and
it is therefore essential that both the front and the
rear ends match each other.
Changing to Öhlins suspension gives optimum performance only when both the front fork
and the rear suspension interact properly. It is
very important that the front and the rear loaded
heights are within the specified values.
Front Fork Springs
To optimize the stability and traction of your motorcycle the front fork must match the rear suspension. Öhlins Racing has a variety of front fork
springs available for a large number of motorcycle models. The springs in combination with the
Öhlins shock absorbers contribute to superior
stability and traction. See the Öhlins Recommendation List by contacting your nearest Öhlins
dealer or using our web site.
!
WARNING!
If there are no matching spring for your motorcycle model, use the original springs, however,
they must be in good condition and not fatigued.
Change the oil in the front fork at least once every
year. Contact an Öhlins dealer for recommended
front fork oil.
!
WARNING!
Adjustments
When delivered, the Öhlins shock absorber is
dialed to the recommended settings for the specific brand and make of the motorcycle. Before
riding, always ensure that the basic settings made
by Öhlins are correct.
Always make notes, adjust in small steps and
make only one adjustment at a time.
To set the adjuster:
(compression and rebound)
Most Öhlins shock absorbers for motorcycle are
equipped with spring preload, compression and
rebound damping adjusters. Due to limited space
in some vehicles it is not possible to have all adjusters in certain models.
The three adjusters mentioned above, will be
discussed in the following chapters. A deeper
understanding for the different types of adjustments will give you a good knowledge of how
you can get better performance from your Öhlins
shock absorber.
The turn adjusters have a normal right hand
thread. Turn the damping adjusters clockwise to
fully closed (position zero [0]). Then, turn counter
clockwise to open, and count the clicks until you
reach the recommended number of clicks. See
Set-up data in the Mounting Instructions for the
shock absorber.
•
Do not use force, delicate sealing surfaces can be
damaged. Handtighten only.
•
6
•
Spring preload when adjusting the spring
preload, you move the spring seat. This will
lower or raise the ride height.
Compression damping controls the energy
absorption when the shock absorber is being compressed, thus controls how easy the
shock absorber compresses when you hit
a bump.
Rebound damping controls the energy absorption when the shock absorber is being
extended and, thus controls how fast the
shock absorber returns to its normal position after being compressed.
Adjustments
Spring Preload
Spring Preload
Setting Spring Preload
The spring preload is fundamental for the function
of the suspension. If the preload is incorrectly set,
any other adjustments to the shock absorber will
not help to get the intended performance from
the suspension.
Öhlins shock absorbers are delivered with the
spring preload carefully set for a good balance in
the vehicle with a 80 kg or 175 lb. rider.
•
Shock absorber with spring platform and
lock nut: Use a C-spanner. Turn the spring
platform nut (A) to set the spring preload.
Lock the setting with the lock nut (B).
•
Shock absorber with spring platform and a
spring platform clamp: Loosen the platform
clamp screw. Turn the spring platform clamp
as far up as needed to move the spring. Or,
turn the spring by hand to the desired position.
The spring preload is the
difference between A and B;
Loosen the
platform clamp
screw.
Lock nut
Spring
platform
nut
Use a C-spanner or turn
the spring by hand.
A
B
A
B
Free spring length
Installed spring length
A - B = Spring preload
7
Adjustments
Rebound and Compression Damping
Rebound and Compression damping
If your motorcycle is equipped with rebound and
compression damping, the damping is set with
knobs and/or screws with a normal right-hand
thread. By turning them clockwise the damping
action increases and by turning them counter
clockwise it will be reduced. Most of the adjusters have definite positions with a noticeable
“click”, which makes it easy to count to the right
setting.
Rebound damping adjuster with screw.
Compression damping adjuster with screw
Rebound damping adjuster with knob.
NOTE!
If you cannot feel the “clicks” on the rebound
knob, the shock absorber must be inspected by
an authorized Öhlins service workshop. It could
be due to low gas pressure or lack of oil.
Compression damping
adjuster with knob
8
Adjustments
High and Low Speed Compression Damping
High and Low speed
Some models (called PRX) have separate adjusters for high and low speed compression. The low
speed compression is adjusted in 25 steps. The
high speed adjuster has a wide range without
steps.
The compression damping affects the energy
absorption during compression and thus the
force needed to compress the suspension. More
compression damping will make the suspension
firmer and make the vehicle run a little bit higher.
NOTE!
The damping forces are related to the speed
between the shock absorber piston and the
shock absorber body. The damping forces do
not vary with the position of the piston inside the
shock absorber.
On PRX shock absorbers, the X stands for high
and low speed compression adjuster.
•
Low speed circuit: More damping will make
the ride firmer and higher.
•
High speed circuit: More damping gives a
firmer ride and more resistance against bottoming.
The rebound damping affects the energy absorption during rebound and thus the force needed
to extend the shock absorber. More rebound
damping will make the extension slower, and vice
versa. The external rebound adjustment actually
also affects the compression damping by the ratio of approximately 90% rebound damping and
10% compression damping.
High and Low speed Compression damping.
High speed: Hexagon screw
Low speed: Slotted centre screw
9
Adjustments
Setting Ride Height and Free Sag
The spring preload is very important since it affects the height of the motorcycle and the front
fork angle. Therefore, handling characteristics
can be changed, even negatively.
F1
R1
Recommended Ride Height and Free Sag
If no recommendations are given in the Mounting
Instructions, use the following:
Free sag: (R1-R2), (F1-F2)
Measure ride height and free sag:
•
•
•
•
•
Put the motorcycle on a stand so that the
front fork and the rear end are in fully extended position.
Measure the distance from the lower edge
of the rear mudguard or from another point
marked by a piece of tape, immediately
above the rear wheel axle, to the wheel axle
(R1).
Take a similar measurement on the front
axle, for example from the bottom of the upper triple clamp to the front wheel axle (F1).
Apply load on the springs and repeat the
measuring procedure (R2, F2).
Take the same measurements with the rider
and equipment on the motorcycle (R3, F3).
It is important that the rider has a correct
riding posture, so that the weight is balanced on the front and the rear wheel in the
same way as when riding.
Rear:
Front:
Motorcycle on a stand.
F2
R2
30±5 mm
30±5 mm
Ride height: (R1-R3), (F1-F3)
Rear
Front
100±5 mm
30% of the total stroke
80±5 mm
Adjust the Spring Preload
Motorcycle on the ground.
F3
If your measures differ from the recommendations in the Mounting Instructions or above, adjust the spring preload according to the section
Adjustments - How to Set the Spring Preload in
this manual.
!
R3
Motorcycle with rider on.
10
WARNING!
Incorrect spring action may produce a fork angle
that is too steep or too flat. This in turn will give a
tendency for over- or under steering, which could
seriously affect the handling characteristics of the
motorcycle.
Set Up Your Motorcycle
How to prepare the settings
With the adjustment possibilities explained earlier in this manual, you can test by trial and error,
and learn how they affect your vehicle.
If the motorcycle feels
unstable
•
loose
•
bouncy
•
...increase rebound damping
Start with a test ride with all adjustments at their
basic setting. Choose a short run of varying character, for example long and sharp bends, hard
and soft bumps. Keep to the same run and adjust
only one setting at a time.
If the motorcycle feels
hard
•
bumpy
•
...decrease rebound damping
Recommended Adjustment Range
•
•
Rebound/ Low speed compression damping: ±5 clicks from original (basic) setting.
High speed compression damping: ±1 turn
from original (basic) setting.
Start with Rebound Damping
If the motorcycle feels unstable, loose and rather
bouncy - increase the rebound damping. Begin
by turning the adjuster knob two steps (clicks).
Test run again and adjust one step back if it felt
too hard and bumpy.
If the motorcycle feels hard and bumpy, especially over a series of bumps - reduce the
rebound damping. Turn two steps, test run and
make the necessary adjustments. For original rebound setting see the Mounting Instructions for
your shock absorber.
If the motorcycle
feels soft
•
feels low
•
is bottoming
•
...increase compression
damping
Compression Damping
If the motorcycle feels soft, has low riding position and a tendency to bottom easily in long dips
- increase the compression damping.
If the motorcycle feels harsh and has hard resilience - reduce the compression damping.
If your shock absorber is equipped with high and
low speed compression damping adjuster, adjust
the high speed compression only.
Turn ¼ turn at a time. Test run and make necessary corrections. When you have sufficient
feel of the motorcycle you can make further fine
adjustments. It is feeling and experience that
counts.
11
If the motorcycle feels
harsh
•
hard
•
...decrease compression
damping
NOTE!
Make sure that the springs are properly preloaded before attempting to make any adjustments. A
simple rule is that increased preload of the spring
should be followed by an increase of rebound
damping by two steps.
When you feel that you have achieved an improvement, go back to where you started and
check once more. Note other relevant factors
such as tires, temperature etc. Test run to make
sure whether further fine adjustments should be
made.
General Handling Set-up
Trouble Shooting
Front end falls into the corners (over-steering)
especially in sand.
Steep front fork angle. Front end too low in
comparison to rear end.
•
Increase the front fork
compression damping.
•
Change to harder springs.
•
Lower fork leg approximately
5 mm in the triple clamp.
Front end unstable during deceleration.
Front fork angle too steep during braking.
Front end too low or rear end too high.
•
Increase the oil level in the front fork.
•
Change to harder fork springs.
•
Increase the front fork
compression damping.
Front end ”ploughs”, understeers.
Shallow front fork angle. Front end too high in
comparison to rear end.
•
Decrease the front fork
compression damping.
•
Raise the fork legs approximately
5 mm in the triple clamp.
•
Change to softer fork springs.
Front fork travel is not used to its full capacity.
Harsh feeling, front wheel grip is not satisfactory in bumpy turns.
Suspension too hard.
•
Decrease the front fork
compression damping.
•
Change to softer springs.
Front end unstable at high speed, unstable
when accelerating out of curves.
Front fork angle too steep. Front end too low
in comparison to rear end.
•
Lower the fork legs approximately
5 mm in triple clamp.
•
Change the front fork springs to hard
er ones.
Front suspension
Suspension bottoming, too soft during entire
travel.
Spring too weak or compression damping too
soft.
•
Increase oil level 5 mm.
•
Increase compression damping.
•
Change to stiffer springs.
12
Suspension bottoming, but can handle smaller
bumps.
Damping force not progressive enough.
•
Increase the oil level.
Can handle smaller bumps but is too hard
during the last part of the travel.
Damping force is too progressive.
•
Decrease the oil level.
Front end feels low, initially feels soft, but is
not bottoming.
The initial spring rate is too soft or spring
preload is too low.
•
Increase the spring pre-load.
Feels harsh over small bumps, but using full
wheel travel.
Too much spring pre-load or too much compression damping.
•
Increase the oil level or change
to softer springs.
•
Decrease the compression damping.
•
Decrease the spring pre-load.
•
Clean the oil seals and scrapers. Use
Öhlins red grease 00146-01.
General Handling Set-up
Trouble Shooting
Can handle the first in a series of bumps but
feels hard after a few more bumps. Frontal
grip insufficient in rough and bumpy turns.
Too much rebound damping.
•
Decrease the rebound damping.
Front end rebound too fast after a bump. Front
wheel grip insufficient in bumpy curves.
Not enough rebound damping, or too much
spring pre-load
•
Increase the rebound damping.
•
Decrease the spring pre-load.
Rear suspension
Rear suspension stroke is not used to its full
capacity. Suspension feels harsh. Traction not
satisfactory in bumpy curves.
Suspension hard in general or too much compression damping, too much spring pre-load.
•
Decrease the compression damping.
•
Decrease the rebound damping.
•
Change to softer spring.
Suspension is bottoming, feels soft during the
entire wheel travel.
Spring too soft, compression damping too
low.
•
Increase the compression damping.
•
Change to harder spring.
Suspension is bottoming, feels harsh and sags
down too much with the rider in the saddle.
Spring too soft or compression damping too
low.
•
Increase the spring pre-load,
check ride height: 95 ± 5 mm.
•
Change to harder spring if the load is
more than 100 mm.
•
Increase compression damping.
Rear wheel jumps over small bumps during
deceleration or when going downhill. Traction
not satisfactory in washboard curves.
Too much spring pre-load, as the spring is probably too soft, will cause the spring to extend too fast.
•
Change to a harder spring in order to
achieve a balanced position using less
spring preload.
•
Check the static sag and ride height.
Rear end kicks up over bumps with sharp
13
edges, but can handle bumps with round
edges.
Compression damping too hard.
•
Decrease the compression damping.
Rear end becomes too low in series of bumps.
Traction not satisfactory in washboard type
curves or when decelerating on washboard
ground.
Rebound damping too slow.
•
Decrease the rebound damping.
Rear end very unstable. Shock absorber does
not respond to adjustments.
Shock absorber damping is gone, caused
by low gas pressure, bad oil is used, or components are broken in the shock absorber. Service
is needed.
•
Gas filling required.
•
Change shock oil.
•
Repair the shock absorber.
NOTE!
Recommended measures are not listed in order
of importance. One of the listed measures can be
sufficient to solve a particular handling problem.
Inspection and Maintenance
What and How Often?
Preventive maintenance and regular inspection reduces the risk of functional disturbance. If there is any need for additional
service, please contact an authorized Öhlins
workshop.
Inspection
2.
3.
Cleaning
Clean the shock absorber externally with a soft
detergent. Use compressed air. Be careful that
all ice water, dirt and debris is removed. Lift the
bump rubber and clean the area below from ice
and dirt. Keep the shock absorber clean and always spray it with oil (QS 14, WD40 or CRC 5-56)
after washing.
1
Check ball joints for possible excessive play
or stiction.
Check the piston shaft for leakage and
damage.
Check the shock absorber body for external
damage.
Check the external reservoir for damage
that can restrict the floating piston from
moving freely.
Check for excessive wear of rubber components.
Check the attachment of the shock absorber to the vehicle.
Check the hose equipped models for leaks
in the hose and inlet plugs.
1.
4.
5.
6.
7.
Lift the bump rubber and
clean the area below.
4
3
2
5
Recommended Service intervals
MX/ Enduro:
Off-Road:
!
NOTE!
The Öhlins shock absorber should only be filled
with the Öhlins High Performance Shock Absorber Oil.
3
Every 20 hours of operation
2-3 times/ year
WARNING!
Never alter the gas pressure. Special purpose
charging equipment and access to nitrogen is
required.
1
Disposal
Discarded Öhlins products should be handed
over to an authorized Öhlins workshop or distributor for proper disposal.
14
www.ohlins.com
Owner’s Manual 07251-02 Issued 2006 11 17
Öhlins Racing AB, Tiina Harakka Carlsson