1
•
J
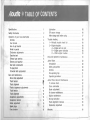
Aleueite· $ TABLE pF ·coNTENTS
Specifications
Safety information
2
Operation of your new snowmobile
Controls
Fuel mi xture .
How to get started
Break in period
Carbu retor adjustments
Gasol ine tank ..................... ................ .
Exhaust gas warn ing .. .. .......
Extreme cold weather .
Gas tank condensati on
To ope hood ................................. .
Converter belt replacement
4
4
5
6
6
7
8
8
8
8
8
9
Care and maintenance
Drive chain adjustment ..................... .. .
Track ten sion
Track alignment ..........
.. ............ ..
Tracks suspension adjustments
Track tension
Track alignment
.............................................. .. ..
Suspension adjustments ....................................... .
Suspension tension
Brake adjustment
Spark plugs
Fuse location
9
9
10
11
11
11
12
13
14
15
15
16
Lu brication
Off season storage
After storage and before using
Trouble shooting .................................... .
1 - Period ic trouble check list
2 - Engine troubles .......................... .
A - Eng ine will not start .... .
B - Eng ine power dwindles
C - Other engine troubles
16
16
17
18
18
18
18
18
18
Drive be lt preventive maintenance .............. ..
19
Juni or Brute
. . .. . . . . . . . . . . . . . . . . . . . . . . . . . . . . . . . . . . . . . . . . . . . . . . . . . . . . . ... .
Introduc tion
Safety precaution s
.................. .
Controls ......... .............. ............ . ..
Pre-operating tips
Operating procedure . . ... .... . . ... . .. . .......... . . .. ... .
20
20
20
20
Junior Brute ca re and maintenance
To remove hood
Ch ain lubricati on
........................ .
Brake adjustment ..... ....... ... . . ...
Air cleaner maintenance ..... ..................... ....... ..
Engine maintenance ............... .
Ski leg lubrication ............. .. .
Track alignment & tension .... . ........ .. .. . .. ..
Carbureto r adjustment
Warranty
21
21
22
22
22
22
22
22
23
23
23
24
~
Alau~t~
.
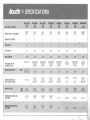
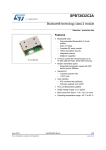
*-SPECIFICAT:ioNs
:
•
~~
"'!'!'
~
'·
~
• •••
l·t·
.
>.
ENGINE MAKE & DISPLACEMENT
•
.
SUPER BRUTE
440 LC
74-391
SUPER BRUTE
440
74-461
SUPER BRUTE
340
74·451
SUPER BRUTE
295
74-441
SNO BRUTE
440
74-322
SNO DUSTER
340
74-143
SNO DUSTER
295
74-142
JUNIOR BRUTE
Alouette
436 cc
Sachs
437 cc
Sa chs
338 cc
Sachs
291 cc
Sachs
437 cc
Kohler
338 cc
Kohler
294 cc
Tecumseh
209 cc
2
2
NUMBER OF CYLINDERS
2
HORSE POWER
:
.•
-
MODEL NAME & NUMBER
t
··, ,
·> • • .
I
••
74-412
•
45
42
32
24
35
27
20
FUEL MIXTURE
20:1
25:1
25:1
25:1
25:1
20:1
20:1
SPARK PLUG GAP
.028"
.020"
.020"
.020''
.020"
.020"
.020"
.030"
NGK B & ES
Bosch-W260T2
Champion
N-60, N-2
Bosch-W260T2
Champ ion
N-60, N-2
Bosch-W260T2
Champion
N-60, N-2
Bosch-W260T2
Champion
N-60, N-2
Bosch
Champion
Bosch-M240Tl
Champion
K-7, K-8
AC-C45
Champion
J-8
.016"
.016"
.016"
.016"
.016"
.016"
.020"
3.2 mm
3.6 mm
.126"-.142"
3.2 mm
3.6 mm
.126"-.142"
3.2 mm
3.6 mm
.126"-.142"
3.2 mm
3.6 mm
.126"-.142"
2.28 mm
2.45 mm
.090"
.098"
1.39 mm
1.27 mm
.055"-.050"
12 volts
140 watts
12 volts
75 watts
12 volts
75 watts
12 volts
75 watts
12 volts
75 watts
12 volts
75 watts
12 vo lts
75 watts
12 volts
84 watts
CARBURETOR LOW SPEED JET
ADJUSTMENT
Fixed jet
carb.
Fixed jet
carb.
Fixed jet
carb.
Fixed jet
carb.
1 turn
1Vs turns
CARBURETOR HIGH SPEED JET
ADJUSTMENT
Fixed jet
carb.
Fixed jet
carb.
Fixed jet
carb.
Fixed je t
carb.
1 turn
7/s tu rn
SPARK PLUG TYPE OR
ALTERNATIVE TYPE
IGNITION BREAKER GAP
{points)
IGNITION TIMING BTDC
(Fully advanced position)
LIGHTING CIRCUIT:
CO Ignition
(Breakerless)
21' BTOC
volts
watts
'
Alaue1te $ SAFETY INFORMATION
LET'S ADMIT IT ! SNOWMOBILES CAN BE
DANGEROUS! But they can also be safe. Alouette
has incorporated numerous safety features in the
snowmobile you have purchased. But it's still up
to you ! You can be a safe operator if you :
1. KNOW YOUR MACHINE.
Read this manual thoroughly. Spend some time
examining your Alouette to see how it operates.
Once you are thoroughly familiar with the
snowmobile , take it out for a slow ride. Start
with level terrain. Note that when turning you
should shift your weight toward the direction
of the turn . The sharper the turn desired , the
greater weight shift required . For sharp turns
a kneeling position usually provides the best
·· weight balance.
After the fundamentals are mastered , you are
ready to experiment with various terrains and
speeds. Experiment in steps. Adhere to the old
adage, " Learn to walk before you run ."
2
You will learn that as you increase speed, it
becomes increasingly important that you be
able to qu ickly shift your weight in any direction . Kneel ing or standing gives best results
at higher speeds. Downhill driving can be difficult. On steep hills don 't attempt to go straight
down. Take it slow, weaving back and forth
across the slope. Keep the throttle closed ,
using engine compression to keep your sled
speed to a minimum. Use the brake, but do not
lock the track since the machine may slide or
tip over.
2. USE COMMON SENSE.
-
Young children and inexperienced operators have no place on your snowmobile.
-
Lake ice can be deceiving. It can look safe
and solid when it isn 't. Fresh snow can hide
weak areas. Use extreme caution when
venturing onto ice.
-
Trailing on railroad right-of-ways is foolhardy. You ' ll probably never hear or see
an approaching train. Even worse - the
engineer will probably never see you.
- Unfamiliar fields and trails may harbor
unexpected obstacles such as barbed wire,
water, and sudden drops. Heading into
· unknown snow fs dangerous by day and even more so at night.
-
Never venture out on the snow alone. Use
the " Buddy System " . It's a good idea to
always leave word with someone about
where you are heading and when you expect to return.
6e the same person on a snowmobile as
you are off. Common sense can prevent
most snowmobile mishaps.
3. OBEY THE LAW.
Know the laws for operating snowmobiles in
your State or Province . . . and obey them.
Be aware of pending legislation. Support sensible laws. Realistic restrictions help all
snowmobilers.
4. BE A GOOD NEIGHBOR.
Respect the property of others.
Preserve the beauty of winter by leaving
behind only the tracks of your sled.
-
Animals need all the strength they can
master to survive the winter. Don 't put
them in jeopardy by irresponsible chasing
or harassing .
-
Respect quiet hours and quiet zones. In the
middle of the night a snowmobile is
" louder" than during the day. Or at least,
people seem to notice it more !
Be an expert and safe driver.
Be responsible. Don 't endanger others.
,.-
Alaue1te $ OPERATION OF YOUR NEW SNOWMOBILE
9
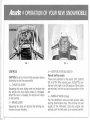
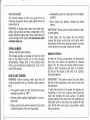
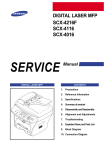
FIG. 1
FIG. 2
CAUTION. Be sure of free throttle operation before
attempting to start the snowmobile.
1 - THROTTLE LEVER
Squeezing this lever allows more fuel mixture into
the engine and thus engine speed is increased.
When this lever is released, the engine will return
to idle position.
2 - BRAKE LEVER
Squeezing this lever will activate the braking mechanism on your Alouette.
3 - IGNITION STARTING SWITCH
Manual starting models
There are 3 positions for the switch. OFF, LIGHTS
ON, and ON. When starting your ALOUETTE, turn
the key to the right to the ON position. When lights
are required, turn the key back one position to the
left.
4 - WARM-UP KNOB (choke)
Pull the dashboard warm-up knob upward when
starting (Cold engine only). This enriches the fuel
supply to the carburetor. Once the engine has
started, push the knob back to its original position.
CONTROLS
4
3
5-
SPEEDOMETER/ODO METE R Std . Equipment
on Sno Brute & Super Brutes (only).
The speedometer indicates the forward speed of
your ALOUETTE in miles per hour. Th e odometer
or mileage reco rder registers the accumulated
mileage th e vehicle has been driven .
6 - TACHOMETER Std . Equipment on Sno Brute
440 (o nly).
The tachometer is designed to inform the driver of
the speed of the engine in revolutions per minute
and to serve as an aid in eval uat ing engine
performance.
7 - EM ERGENCY SHUT-OFF SWITCH
a. SNO DUSTER 295-340, SNO BRUTE 440
2 positions (ON/OFF) positive action swi tch . Push
button down to cut engine power, push down again
to return switch to ON position. Be sure switch is in
the ON position before attem pting to start engine.
b. Super Brute 295 , 340, 440, 440LC are equipped
with a 3 position emergency switch. Move switch
lever forward or barckward will shut off the motor,
center position is normal running.
8 - DIMMER SWITCH (headlamp)
There are 2 positions on the dimmer switch for
high and low beam operation.
9 - ENGINE TEMP GAUGE
Indicates cylinder head temperature. The yellow
area of the gauge indicates that th e engi ne is
starting to overheat and you should moderate your
speed. The red area of the temperature gauge
indicates Danger and possible engine damage
could occur. Have your engine checked by an
Alouette Dealer if your temperature gauge continues to operate in the Red.
FUEL MIXTURE
Your ALOUETTE is powered by a two-cycle, air
cooled engine which requires a certain amount of
oil added to the gasoline for lubrication.
GASOLINE
Use a good quality regu la r grade 92 octane (or
better) gasoline. No lead or low lead grades are
not recommend ed. They cause preignition because
of their low octane rating.
MIXING PROCEDURE
For correct mixing , always pour some of the gasoline into the mixing container first, then add the
oil. Agitate this partial mixture and then add the
rest of the gasoline. Agitate again. Mixing directly
in the snowmobile gasoline tank is not recommended since the oil and gas usually do not mix
properly.
KOHLER ENGINES & ALOUETTE 440LC
The correct mixture is 20 :1; one quart of oil to
5 gallons of gasoline. Use a good quality two-cycle
snowmobile oil.
5
SACHS ENGINES
The correct mixture is 25:1; one quart of oil to
6 gallons of gasoline. Use a good quality two-cycle
snowmobile oil.
WARNING : A mixi ng ratio lower t han those prescribed can produce excessive carbonation of the
engine. Mixtures higher than those prescrib ed will
cause damage to the engine. Do not use two-cycle
outboard motor oil.
SERIAL NUMBER
(Vehicle Identifi cation Number)
The chassis numbe r is located on t he fro nt right
side of the Frame Tunnel on al l 1974 Alouette
Snowmobiles. Please refer to this num ber when
filling out the Warranty Regi st rat ion Card in the
rear of this manual.
HOW TO GET STARTED
WARNING : Before starting , make sure that all
controls operate freely (i.e. throttle , brake, steering
etc.)
- Turn ignition switch to "ON" posi tion and insure
emergency switch is " OFF".
- Activate choke control (Applicable to cold engine only) .
- Slowly, pull -out th e starter handle until you feel
a slight resi stance, then pull vigorously.
6
-Immediately guide the rope back to its original
position.
- Once engine has started , release the c hoke
co ntrol.
IMPORTANT: Never use the choke control to start
a warm engine.
If after many tries the engine has not started ,
release the cho ke control and crank again while
hol ding the throttle lever slightly pressed . As soon
as the engine has started release the throttle.
BREAK IN PERIOD
For the first 10 hours of operation, we recommend
that your new vehicle be operated at reduced
speed. This will allow the various engine components to seat themselves and wear in properly.
Do not tax the engine to the limit of its capacity
during this period.
IMPORTANT : The break-in period will also affect
the life of the components, such as the track and
the drive belt.
A well done break-in will pe rmit the glazing (or
hardening) of the track surfaces where the steel
slid e rail co ntacts the track surface. To obtain
perfect glazing of the track, the first operation on
hard pack snow or ice shoul·d not exceed 40 mph
until 30-40 miles have been accumulated under
these conditions.
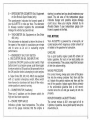
-
2. Unscrew idle Jet A as per specification.
(See page 1).
3. Unscrew high speed Jet B as per specification.
(See page 1).
Your engine should now function properly.
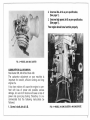
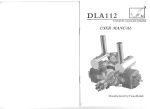
FIG. 3 • M ODEL 295 SNO DUSTER
CARBURETOR ADJUSTMENTS
Sno Duster 295, 340 & Sno Brute 440.
Th e carburetor adjustment on your machine is
important for smooth, efficient running and long
engine life.
A too lean mixture will cause the engine to overheat w ith loss of power and possible serious
damage. An over-rich mixture will cause a loss of
power and spark plug fouling . Tllerefore, it is reco mmended that the fo ll owing instructions be
fo llowed.
1. Screw i n both Jets A & B.
FIG. 4 • MODEL 340 SNO DUSTER & 440 SNO BRUTE
7
SUP ER BRUTE 295 , 340, 440 & 440LC
Capacity (5 Imperial Gallons)- 6 US Gallons
Filler Cap see Fig . 5 item C
CAUTION: When filling with gas/oil mixture,
always use a funnel with a fine screen.
WARNING: Never fill the tank with the engine
running or hot.
EXHAUST GAS WARN IN G
Avoid inhaling exhaust gases especially in an
enclosed area such as a garage. Exhaust gases
contain a percentage .of carbon monoxide which
is a potentially poisonous gas that, by itself, is
tasteless, colorless and odorless.
FIG. 5 • MODELS SUPER BRUTE 295 , 340, 440, AND 440LC
CARBURETOR ADJUSTMENT:
SUPE R BRUTE 295, 340, 440 AND 440LC
1. Adjust desired engine idle speed by turning
adjuster screw A.
2. Adjust Idle Air Mixture Screw B until engine
runs smooth. (approx. 1-1 V2 turns open).
Note: On this type of carburetor there is no high
and low speed adjusting screws. As it is a
!ixed jet type of carburetor.
GASOLINE TANK:
SN O DUSTER 295, 340 & SNO BRUTE 440
Capacity (4 Imperial Gall ons) - 5 US Gall ons
8
EXTREME COLD WEATHER
Extreme cold weather can cause a slowdown in
the operation of the drive and track mechanism
of your vehicle. In the event of this occurrence
operate machine slowly until all moving parts
loosen up.
GAS TANK CONDENSATION
To prevent water condensation from getting into
the gasoline tank, make sure tank is full when
bringing snowmobile into a warm garage.
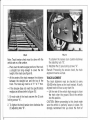
TO OPEN HOOD
1. Re lease the latches on the right & left sides of
the hood.
2. Tilt the hood forward.
I
Alaue1te
~ CARE AND MAINTENANCE
CONVERTER BELT REPLACEMENT
a. Open hood and remove cl utch guard .
b. Separate th e driven pulley by pulling and
twisting the sliding half.
c . Press the upper part of the drive belt down on
the driven pulley shaft. This will hold the driven
pull ey open .
d. Slip the belt out of the bottom of the driven
pulley and remove from the clutch pulley.
e. Reverse procedure to install the new belt.
,,
FIG. 6
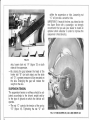
DRIVE CHAIN ADJUSTMENT
SNO DUSTER 295, 340 & SNO BRUTE 440
Chec k the tension of the drive chain periodically.
There should be 3/a" free movement measured on
the outer circumference of the brake pulley (Points
A & B).
9
To tig hten chain, move screw C inwards, and to
loosen chain , move screw C outwards.
Drive chain runs in 6-8 oz. of SAE 30 oil, which
is poured in through filler plug D.
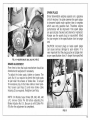
SUPER BRUTE 295, 340, 440, 440LC
NOTE: For maximum performance the drive chain
tension must be checked periodically. Since this
adjustment is relat ively critical , we strongly recommend that you see your Dealer if a readjustment
is required.
-Remove the drive belt from the pulleys.
-Check the chain free play by moving the driven
pulley back and forth and by measuring at the
outside diameter of the sheave the total free
movement of the pulley (see figure 7).
- I f the free play is within the specifications
reinstall the drive belt. If not see your Dealer to
have the cha in read j usted as soon as possible.
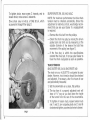
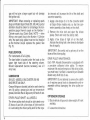
TRACK TENSION
SNO DUSTER 295, 340 & SNO BRUTE 440
The track on your ALOUETTE is adjusted by your
dealer. However, track tension should be checked
and adjusted , if necessary, after five hours of use
and periodically thereafter.
1. Set the snowmobile on a clean , flat surface.
2. The top face of a properly adjusted track will
have a 1114" sag as you look down the inside
of the tunnel from the rear of the snowmobile.
3. To tighten or loosen track, loosen tension nuts
(ref. 1 and 2), turn adjusting bolts (ref. 3 and 4)
clockwise to tighten, counterclockwise to loosen.
FIG. 7
10
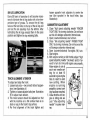
3. The rear rubber sprocket teeth must be perfectly centered in the track slots.
4. If track must be adjusted to the right , loosen
left locking nut (ref. 1 in picture, under TRACK
TE NSION section.). Tighten (clockwise) left
adjusting bolt (ref. 3) Retighten left locking nut.
If adjustment is to the left, loosen right locking
nut (ref. 2). Tighten right adjusti ng bolt (ref. 4).
Retighten right locking nut.
FIG. 8
4. To complete adjust ment, tighten tens ion bolts
(ref. 1 and 3).
TRACK ALIGNMENT
It is essential that the track be in alignment at all
times in order to keep rubber sprocket teeth wear
to a minimum. Improper adjustment of track tension can seriously alter the track alignment. To
adjust, follow these steps.
1. Raise up the rear of the vehicle until track
runs free .
2. Start machine and allow track to run free at low
speed for two or three revolutions.
TRACKS SUSPENSION ADJUSTMENTS
Note: On the pre-delivery inspection , the track and
suspension of the vehicle has been adjusted by
your dealer. The adjustments done will permit good
handling of your snowmobile under normal driving
conditions.
At the end of the break-in period the under carriage must be checked and if necessary readjusted by your dealer. At that time, upon your
request, the dealer may adjust the suspension to
fit your type of driving , and the ground conditions
of your area.
Following you will find a brief description of the
adjustment related to the suspension of the Super
Brute.
TRACK TENSION:
The track tension must be checked at every 100200 miles of operation. A properly tensioned tra ck
will have a longer life and will provide better
performance.
11
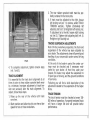
FIG. 9
FIG. tO
Note: Track tension check must be done with the
vehicle set on a flat surface.
- Place over the centra l upper portion of the track
a straight bar long enough to cover the full
length of the track (see figure 9).
- At the center of the track measure the distance
between the straight bar and the top of th e
track. The track sag must be of 1/2" to 1" max.
- If the tension does not meet the specifications
readjust as fo llows (refer to figure 10) :
To slacken the tension turn counter-clockw ise
the adjusting nuts " B".
3. Retighten the (2) axle lock ing screws " A ". ·
Remark: Proceeding the tension check, the track
alignment must be ver ified .
1. On each side of the track unscrew the (2) axle
locking screws " A " .
2. To t ighten the track tension turn clockwise the
(2) adjusting nuts "B".
12
TRACK ALIGNM ENT
The track alignment must be checked at every
100-200 miles (same as the track tension). A badly
aligned track will have a very short life.
-Li ft the rear of the vehicle high enough to have
the track clear the ground . Block the vehicle
into this position.
CAUTION: Before proceeding to this check make
sure the veh ic le is perfectly secure in place. We
strongly recommend that you block the front of
vehicle by placing the ski ends against a wall or a
similar obstacle.
-Start the engine and have the track rotate
slowly.
-Wi th the track turning . visually check, on one
side, the distance between the drive cogs and
the side of suspension rail (ref. A fi g . 11 ). The
distance should be equal at the front and at the
rear (see illustration 11 ).
-
1.
2.
3.
4.
FIG. 11
If it happens that the dista.nce between the 2
reference po ints is not the same correct the
alignment as follows:
Stop the engine.
If there is a larger distance at front correct by
slackening the (2) locking screw " A" of the rear
ax le (see photo 10) and slacken the adjusting
nut " B" .
If the distance is larger at the rear correct by
tightening the adjust ing nut " B" .
Retighten the (2) axle locking screw " A" .
Start the engine and check if the adjustment
done has corrected the misalignment.
SUSPENSION ADJUSTMENTS.
SUPER BRUTE
Your Alouette Super Brute is equipped with a
unique suspension system permitting complete
adjusting of the ride smoothness and vehicle
weight transfer.
Weight transfer adjustment. This adjustment will
permit the transfer of more or less pressure on the
skis. Therefore perfect steering on hard surface
can be obtained by transferring a greater amount
of the vehicle weight on the skis. Lighter weight on
the skis will improve the vehicle performance into
deep snow and increase its climbing ability.
-To increase or decrease the pressure on t he
13
stiffen the suspension or ride. Loosening nut
"C" will provide a smoother ride.
IMPORTANT. If most of the time, you intend to ride
the Super Brute with a passenger, we strongly
recommend that you ask your dealer to install an
optional shock absorber in order to improve the
suspension characteristics .
FIG.12
-
skis , loosen lock nut " A " (figure 12) on both
sides of the suspension.
By closing the gap between the head of the
limiter bolt " B" (on both sides) and the slide
rail " D" a greater pressure will be executed on
the skis. Enlarging the gap will reduce the
weight on the skis.
SUSPENSION TENSION.
The suspension tension or stifness should be adjusted accordingly to the driver's weight and/or
to the type of ground on which the vehicle will
operate.
- The nut " C" controls the tension of the spring
" G" (figure 12). Tightening the nut " C" will
FIG. 13 • SNO DUSTER 295, 340 & SNO BRUTE 440
14
SPARK PLUGS
Since Snowmobile engines operate on a gasoline
and oil mixture , it is quite common for spark plugs
to become fouled much quicker than in engines
which use only gasoline fuel. Therefore engine
performance will be improved if the spark plugs
are pe riodica lly c hecked and cleaned or replaced.
Always use the spark plug (or equivalent) listed
for your engine in the specification chart on page
one.
CAUTION: Incorrect plugs or loose spark plugs
can cause serious damage to your engine. It is
very important that the plug gap be set (page one)
as per specification chart. A larger than specified
FIG. 14 • SUPER BRUTE 295 , 340, 440, 440 LC
BRAKE ADJUSTMENT
From time to time the brake mec hanism should be
checked and readjusted if necessary.
To adjust the brake pads, tighten or loosen . The
Lock Nut (1) as required to permit the brake pads
to just clear the sheave or brake disc. To adjust
for excessive play in the brake ca bl e or lever posi tion , loosen Jam Nuts (2) and move brake cable
housing (3) as required. Retigh ten Jam Nuts.
NOTE : On Models Super Brute 295, 340, 440, 440
L/C, remove Cotter Pin (R) before adjusting the
Brake Ad juster Nut (1) . Be sure to refit Cotter Pin
(R) after the adjustment is completed.
FIG.15
15
gap will not give a larger spark but w ill damage
th e ignition coil.
IMPORTANT : When removing or replacing spa rk
plugs .on Models Super Brute 295, 340, 440, special
attent1on should be taken to not damage t he temperature gaug e therm al couple on the Number 1
Cylinder spa rk p lug (Clutc h Sid e). NOTE - w hen
fitting a new spark plug to the Number 1 Cyli nde r
only, th e spark plug gas ket must not be instal led
as the thermal couple replaces the g asket. See
Fig . 15.
FUSE LOCATION:
(For instruments & Tail Ligh ts).
The fuse holder is located und er t he hood on the
upper right hand side of the steering c olu mn.
Should replacement becom e necessary, use a 9
amp. fuse.
LUBRICATION
SKI LEG- MODELS: SNO DUSTER 295-340
SNO BRUTE 440 ONLY.
Grease fittings are located just below eac h stee ring
arm . By using a grease gun and low tempe rat ure
grease , lubricate the ski legs every 40 hours of use.
DRIVEN PULLEY SHAFT : ALL MODELS.
The driven pulley sh aft sh ould be lubric ated every
25 hours of use with a few drops of light machine
oil . Lubricating the driven pulley shaft at the reg u-
16
lar intervals will increase the life of the shaft and
converter assembly.
1. A pp ly a few drops of oil to the converter shaft
on Super Brute models only, so that the converter assembly slides freely on the shaft.
2. Remove the drive belt and open the driven
p ulley (Push and twist the sliding half) .
3. App ly a few drops of light oil on the shaft.
A ct ivate the sliding half a few times to distribute
the oil equally.
IMPO RTANT: Be careful not to get any oil on the
face s of the driven pulley.
DRI VE PULLEY MAINTENANCE:
Each 1974 Alouette Snowmobile is equipped with
a precision calibrated drive pulley. To ensure
maxim um life and performance of the drive pulley,
you must have it verified & cleaned by an Alouette
dealer every 40-50 hrs of use.
IMPORTAN T: Do not attempt to service the clutch
as it requ ires special tools to disassemble and reassem bl e without damaging the drive pulley assem bly.
OFF SEASON STORAGE
1. Block vehicle off ground to take weight off track
and skis.
2. Loosen track tensioner.
3. Drain gasoline from gas tank.
4. Drain carburetor by disconnecting fuel line.
Start engine and run until carburetor is dry.
5. Remove spark plug and pour 1 tablespoon of
S.A.E. 30 oil through spark plug hole. Turn over
engine 4 times by pulling starter rope. Replace
spark plug.
6. Wipe down all parts with oily rag.
AFTER STORAGE AND BEFORE USING
1. Align and adjust track.
2. Replace gasoline filter.
3. Tighten all screws and nuts.
4. Check spark plugs and reset or replace if necessary.
5. Fill gasoline tank with recommended gas/oil
mixture.
'
.
Aleuette
~~ TROUBLE SHOOTING
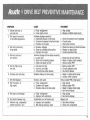
1. PERIODIC TROUBLE CHECK LIST
CHECK FUEL Fu el in tank
SYSTEM
Proper fuel mi xture
FOR .
. ........ Fuel fl ow to ca rburetor
Proper carburetor adjustment
Chec k ca rburetor impul se line
Loose spark plug lead
CHECK
Loose spark plug
IGNI TION
(Poo r com pression)
SYSTEM
Incorrect spark plug gap
FOR .
Spark plug carboned
or burned
CHECK
Worn Belt - lo ss of
DRIVE BELT
normal speed
Broke n belt
AND
DRIVE CHAIN Impro per chain ten sion
FOR ..
... ..
. Dry c hain
Broken chai n
CHECK
Tension
TRACK
.Alignment
FOR .
11. ENGINE TROUBLES
A. Engine will not start
a. There is no igniti on spark be cause:
1. Spark plug is oi led-up, wet. bridged or
damaged.
2. Spa rk plug is wet (Outside) .
3. Ignition cab le loose or fractured.
4. Ignition sw itch defective.
5. Contact-breaker poi nt oi led-up , wet or
corroded .
18
6. Ignition coil faulty .
7. Condense r faulty .
b. Engin e is getting no fuel because :
1. Strainer in fuel tap is clog ged with dirt.
2. Fu el pipe kinked or pinched .
3. Fu el st ra iner in ca rburetor clogged w ith
dirt.
4. Carburetor defective.
c. En gi ne not getting suitable explosive mixture because :
1. Water in the ca rburetor.
2. Air infiltrating throug h loose carburetor
or fuel line.
d. Lack of com pression because:
1. Air vent cock at the c rankcase is open.
2. Cylinder head is loose.
3. Pi ston rings fra ct ured .
4. Pi ston and cylinder excessively worn .
B. Engine Power Dwindles
a. Du e to dirt because :
1. Air filter clogged w ith dirt.
2. Exhaust port c logged w ith oi l carbon .
3. Excessive ca rbon deposits in muffler.
d. Du e to lack of com pression:
1. (See poin t D of the section , " Engine w ill
not start " ).
C. Other Engine Troubles
a. Irregular running because :
1. Ignition cable d isconnected or damaged.
2. Overheated engine: thi s gives rise to
b.
c.
d.
e.
bubbles of fuel vapou r in the carburetor
which obstruct the fuel su pply.
3. Contact-breaker points oiled-u p or
corroded.
Engine 4-strokes and will not reach its
nor mal speed because:
1. Choke is closed.
2. Carburetor overflow ing, because of the
float needle seat dirty or damaged.
3. Exhaust port is clogged with oil/carbon .
Engine develops a pinging noise when run
at full throttle under load because :
1. Too much ignition advance.
2. An excessi vely thi ck layer of carbon in
the combustion chamber.
Engine backfires or blow-back occurs in
carburetor because:
1. En gine not gett ing enough fuel .
2. Spark plug incandescent because of
wrong therm al value .
3. Spark plug fouled , dirty o r faulty .
4. Air inf iltrating into engine .
5. Water in ca rburetor.
Overheated engine, piston jamming ,
because :
1. Engine not correctly decarbonized (piston head has been cleaned to a bright
finish , whereas , firmly adhering carbon
should be left in position).
2. Engine not getting en ough fuel.
3. Too lean carb uretor mixture .
4. Not enough oil in gas mixture.
Aleue1te
~~ DRIVE BELT PREVENTIVE MAINTENANCE
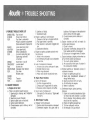
SYMPTOMS
1. Uneven belt wear on
one side only.
2. Belt glazed excessively
or has baked appearance.
3. Belt worn excessively
in top width .
4. Belt worn narrow in
one section.
5. Belt too tight during
one idle.
6. Concave worn belt sides.
7. Belt Disintegration.
8. Belt " Flip-Over" at
high speed .
9. Be lt edge co rd breakage.
10. Flex cracks between cogs.
11 . Sheared cogs, com pression
section fractured or torn .
CAUSE
TREATMENT
a. Align pulleys
a. Pulley misalignment
b. Loose engine mount
b. Replace or tighten engine mount
Excessive slippage caused by :
a. Ch eck drive pulley for worn flyweights
a. Insuffi cie nt pressure on belt sides
b. Excessive horsepower for belt and clutch
b. Consult deal er
c . Clean pulley surfaces
c. Excessive oil on pulley
a. Check driver pulley for smooth actuatio n
a. Excessive slippage
b. Rough or scratched pu lley surface
b. Replace or repair pulley
c. Impro per belt angle
c . Consult application data
Excessive slip pag e in driver pu lley caused by :
a. Locked track
a. Rotate track by hand until free
b. Clutch not functioning properly
b. Rep ai r or replace clu tc h pu ll ey(s)
c. Engine idle speed too high
c . Reduce engine RPM
a. Idle speed too high
a. Red uce engine RPM
b. Incor rect belt length
b. Con sult application date
c . Incorrect drive center di stance
c . See Service Manual
Excessive ri de-out on driver pu lley
a. Repair or replace driver pulley
b. Increase center distance
Excessive belt speed
Reduc e engine RPM at high speed
a. Pulley misalignment
a. Align pulleys
b. Excessive belt speed
b. Reduce engine RPM
c . Excessive ride-o ut on d ri ve pulley
c . Repair or replace driver pulley
d. See Service Manual
a. Pulley mi sali gnment
a. Align pulleys
d. See Service Manual
b. Improper belt installations
Replace belt
Consi derable use, belt wearing out
a. Improper belt installation
a. See Owner's Manual
b. Belt rubbing stationary object
b. Check drive components
19
I
I
Aleuette $ JUNIOR BRUTE
INTRODUCTION
The Alouette Junior Brute is a scaled-down snowmobile designed and produced exclusively for a
child 's use. The recommended age group being
from 6-10 years old and up to 95-100 pounds rider
weight. The Alouette Junior Brute should be used
exclusively by children and only when under adult
supervision to ensure the child's safety.
SAFETY PRECAUTIONS
1. Dress your child in proper snowmobile clothing
including an approved helmet. Be sure that your
child is not wearing any loose-fitti ng garments
such as a scarf or stocking cap which could
entangle in the track or any other moving part
of the snowmobile.
2. Never operate the Junior Brute with the shroud
removed.
3. Instruct your child to keep his feet firmly placed
on the running boards while operating the
snowmobile.
4. Instruct your children to ride safely ; and, only
in an open field where you are sure there are no
hidden obstructions or steep hills. NEVER allow
your children to operate the Junior Brute on or
near roads , country lanes , etc . ..
20
5. Instru ct your children of the proper use of the
emergency switch located on the handle bar.
CONTROLS
1 - Throttle Lever
2 - Brake Lever
3 - Dimmer Switch
4 - Emergency Kill Switch
5 - Choke Lever
6 - Recoil Starter
7 - Ignition and Headlamp Switch combined .
PRE-OPERATING TIPS
The items listed below should be checked each
time that the machine is going to be used.
1. Check the throttle control lever. It should depress without excess effort and return freely
when released.
2. Check the brake lever operation. The brake
lever should have V2" free movement before
operating the brake. If there is more than V2"
free play see " Brake Adjustment- Page 22 " .
3. Check the steering to make sure that the skis
turn freely.
4. Check fuel supply and always fill the tank before
starting the engine. NEVER fill the tank when
the engine is hot.
5. Check for loose nuts and bolts. Tighten if
necessary.
6. Check motor oil level. Add , if necessary, oil type
SAE 1OW, below 32 °F.
7. Check emergency switch (mounted on the
handle bar) after starting the engine to see if it
is operating correctly.
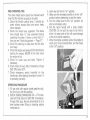
3. Insert key and turn to "on" position.
4. Make sure the emergency switch is in the "off"
position before attempting to start the motor.
5. Turn the choke lever to the "on" position. (to
start a cold engine only)
6. Pull the recoil handle with a brisk motion.
CAUTION: Do not pull the rope to its limit or
allow it to snap back as this will cause damage
to the recoil starter assembly.
7. Once the engine is started, allow the engine to
warm up for a few moments then, turn the choke
to the "off" position.
---.....
OPERATING PROCEDURE
1. Fill gas tank with regular grade gasoline only.
Do not mix oil with the gasoline.
2. CHECK ENGINE CRANKCASE OIL- Fill crankcase with fresh clean oi I, SAE 1OW, if necessary,
through filler plug. Be sure snowmobile is on a
level surface when filling or checking engine
crankcase oil.
21
Alaueite $ CARE AND MAINTENANCE
TO REMOVE HOOD
1. Remove console cover
2. Remove 4 screws- 2 from each side of the hood
3. Lift hood, disconnect head lamp connecto r,
then , turn hood to one side and lift over the
handle bars (See illustrations page 21)
CHAIN LUBRICATION
Lubricate the drive chain every 8-10 hours of use
with a dry, graphite base chain lubricant which is
obtainable in spray cans. If spray lubricant is
unobtainable then , use 2 or 3 drops of motor oil to
lubricate chain.
BRAKE ADJUSTMENT
When a brake adjustment becomes necessary reposition the retaining pin at the lower end of the
brake cable and adjust the retainer so that the
brake locks tightly but releases completely.
AIR CLEANER MAINTENANCE
The air cleaner should be removed frequently and
tapped lightly against a solid surface which will
dislodge loose dirt accumulation . The pores will
eventually clog (engine will begin to lose power)
and , at this point, it will have to be replaced. Your
Tecumseh dealer stocks them.
NEVER wash the paper air cleaner or attempt to
brush dirt from it as this destroys its filtering ability.
NEVER run the eng ine without the filter in place or
with a filter that has a hole punctured in the paper.
ENGINE MAINTENANCE
1. Check equipment and engine periodically and
retighten any loose engine base mounting
screws, air cleaner cover mounting screws and
other exposed hardware.
2. Change oil regularly. Be sure oil drain plug is
replaced securely before refilling.
IMPORTANT- AFTER FIRST TWO TANKS OF
GAS HAVE BEEN USED, DRAIN OIL COMPLETELY AND REFILL AS DIRECTED IN PARAGRAPH " 2" ABOVE . OIL LEVEL SHOULD BE
CHECKED FREQUENTLY DURING THIS
" BREAK-IN " PERIOD.
3. Check oil level frequently between changes.
Add oil if necessary.
4. Keep head and cylinder fins clean. This is an
air-cooled engine and will operate efficiently
only if kept clean. Over-heating and any resultant damage from clogged cylinder fins is NOT
covered by Warranty.
SKI LEG LUBRICATION
Every 30 hours of operation it will become necessary to lubricate the ski leg shafts with a low temperature type of grease. To remove the ski legs
take out the two bolts on the top of the ski leg and
pull out the ski assembly from the bottom . After
lubricating the ski legs reinstall them in the same
position and tighten the top retaining bolts.
TRACK ALIGNMENT & TENSION
To adjust and align the track:
1. Loosen lock nuts - two on each side of suspension. (see illustration A)
2. Tight en or loosen ad juster bolts (see illustration
B) to adjust track tension.
·
3. The track tension should be · adjusted so that
with the machine on a flat surface there is no
slack or sag in the track 's top surface.
4. For final alignment of the track tighten and
loosen opposite track adjusters to center the
rear idler sprocket in the track holes. (see
illustration)
CARBURETOR ADJUSTMENT
1. Close " high speed adjusting.. needle" FINGER
TIGHT ONLY by turning clockwise. Do not force
as this will damage carburetor internal seat.
2. Open (counterclockwise) one full turn.
3. Close "idle adjusting needle" FINGER TIGHT
ONLY by turning clockwise. Do not force as this
will damage carburetor internal seat.
4. Open (counterclockwise) five-eights (5/a) turn.
5. Start engine.
6. With engine running at full throttle adjust " high
speed adjusting needle" backward and/or forward Ys turn at a time until engine runs smooth.
Allow engine to run at
"'
each new needle setting for at least 10
seconds to give engine
time to react to each
new setting. When
engine is running
smoothly correct setting has been reached.
7. Close throttle until engine is idling and adjust "idle adjusting
needle" in same manner.
23
WARRANTY PERIOD:
Each new Alouette snowmobile, with the exception of the Junior Brute snowmobile, is warranted to be free from defects in materials and
workmanship for a period of ninety (90) days
from the date of sale to the original retail purchaser; and in the case of the Junior Brute only
for a period of thirty (30) days from the date of
sale. The months of April through November will
not be applied against the warranty period.
WHAT IS WARRANTABLE:
a. Any part that is judged to be defective due to
faulty workmanship or material will be replaced
free of charge.
b. Any repairs or adjustments that are necessary
due to faulty workmanship or material.
WARRANTY REGISTRATION :
The original purchaser must complete the Warranty Registration Form, which is located at the
rear of the Owner's Manual and return this form
to Alouette Recreational Products Ltd. within ten
(10) days of the date of purchase to validate the
warranty. Note: - It w ill be necessary for the
consumer to present his copy of the Warranty
Registration Card to the servicing dealer should
warranty service become necessary.
WARRANTY EXCLUSIONS:
The Alouette Warranty will not apply to:
-Machines used for competition or racing of
any kind
- Machines designed specifically for racing
-Machines used for rental or leasing
24
-
Ma<:hines .that are subjected to abuse, neglect,
acc1dent, Improper storage, or that are altered
from the factory specifications
-Machines run on surfaces other than snow or
ice
-Machines on which the engine serial number
or frame serial numbers have been changed
or defaced
-Machines on which parts other than genuine
Alouette replacement parts have been used
-Machines that have been serviced or repaired
(with exception of normal customer maintenance) by anyone other than an authorized
Alouette Servicing Dealer
Parts such as ski runners, clutch drive belt
spark plugs, light bulbs, track inserts, nylon slid~
bar (slide suspension models) and throttle or
brake cables which are subject to normal wear
and tear during normal use are excluded from
this warranty. Alouette Recreational Products
Ltd. sole and exclusive liability for defects in
material and workmanship shall be limited to
repair and replacement and Alouette Recreational
Products Ltd. shall in no event be liable for any
incidental, consequential , contingent or any other
damages. This warranty does not obligate
Alouette Recreational Products Ltd. to bear the
cost of transportation charges in connection with
the repair or replacement of defective parts . This
warranty is made in lieu of any other warranty or
warranties of every kind whatsoever whether
expressed , implied or statutory and, ~xcept for
the foregoing warranty which is exclusive, there
are no express or implied warranties of merchantability or of any other type.