1
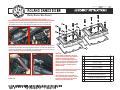
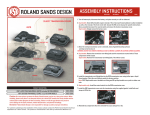
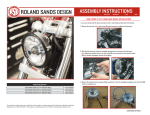
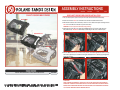
ASSEMBLY INSTRUCTIONS
0048-0931
REVISION A
2/7/13
PAGE 1
RSD CLARITY ROCKER BOX COVERS INSTALLATION
CLARITY ROCKER BOX COVERS
1. Turn your motorcycle off, place securely on a lift or side stand and disconnect the battery.
BLACK-OPS
2. Remove the fuel tank. Note: refer to the HD service manual for additional instructions.
3. With the tank removed, remove the factory rocker box covers. Clean and inspect all sealing surfaces.
Note: refer to the HD service manual for specific instructions.
WARNING: Do not use any harsh chemicals during cleaning!
4. Install the front rocker box cover gasket (9) and RSD rocker box (7) from the right side of the
bike (exhaust side). Disclaimer: install slowly to avoid damge to the cover or the motorcycle.
CONTRAST CUT
CHROME
5. Once the RSD rocker box cover is in the correct position, insert the 6 supplied 5/16 “ bolts (1, 2, 3, 4)
and washers (6) and torque to 15-18 ft-lbs using blue threadlocker. Note: Review page 2 diagram for
proper bolt positions.
2000-UP TWIN CAM MODELS: CLARITY ROCKER BOX COVERS
0177-2034
%
&
%
"
!
#
$
CAUTION:
CLARITY WINDOW IS PERMANENTLY INSTALLED AT THE FACTORY AND SHOULD NOT BE REMOVED
OR SERVICED. IF REMOVAL IS NECESSARY CONTACT THE TECH DEPARTMENT FOR SPECIAL SERVICE
INSTRUCTIONS. PERFORMANCE MACHINE THE MANUFACTURER IS NOT RESPONSIBLE FOR DAMAGE
TO THE CLARITY WINDOW CAUSED BY IMPROPER SERVICE.
0048-0931
A 2/7/13
Clarity Rocker Box Covers
RSD CLARITY ROCKER BOX COVERS INSTALLATION (continued)
6. Install the rear rocker box cover gasket (9) and RSD rocker box (7) from the right side of the
bike (exhaust side). Disclaimer: install slowly to avoid damge to the cover or the motorcycle.
2
1
1
3
4
8
3
6
5
7
7. Once the RSD rocker box cover is in the correct position, insert the 6 supplied 5/16 “ bolts (1, 2, 3, 4)
and washers (6) and torque to 15-18 ft-lbs using blue threadlocker. Note: Review the diagram to the
right for proper bolt positions. Tip: On some models there is limited clearance on the rear cylinder so
using a small hex driver and wrench will allow easier installation FIG A.
9
CAUTION:
FIG A
CLARITY WINDOW IS PERMANENTLY INSTALLED
AT THE FACTORY AND SHOULD NOT BE REMOVED
OR SERVICED. IF REMOVAL IS NECESSARY
CONTACT THE TECH DEPARTMENT FOR SPECIAL
SERVICE INSTRUCTIONS. PERFORMANCE MACHINE
THE MANUFACTURER IS NOT RESPONSIBLE FOR
DAMAGE TO THE CLARITY WINDOW CAUSED BY
IMPROPER SERVICE.
USE ONLY POLYCARBONATE APPROVED CLEANERS SUCH
AS PLEXUS TO CLEAN YOUR CLARITY WINDOW.
HARSH CHEMICALS MAY CAUSE DAMAGE.
%
&
%
#
$
"
!
9. Hit the road!
NOTE: FOGGING MAY OCCUR ON THE INSIDE OF
THE LEXAN WINDOWS DUE TO HUMIDITY CHANGES.
IF FOGGING IS VISIBLE START THE MOTORCYCLE
AND RUN UNTIL FOGGING DISAPPEARS.
8. Install the fuel tank and any other components that have been removed.
ITEM
NO.
1
2
3
4
5
6
7
8
9
DESCRIPTION
QTY.
SHCS 5/16-18 X 7/8
SHCS 5/16-18 X 1 - CHROME
SHCS 5/16-18 X 1-1/2 CHROME
SHCS 5/16-18 X 1-3/4, CHROME
SHCS LOW HEAD 8-32 X 1/2 W/ VIBRA-TITE
WASHER .316 X .440 X .060, STAINLESS
RSD CLARITY, TWIN CAM ROCKER COVER BOX, 1999-UP
4
2
4
2
10
12
2
WINDOW, RSD CLARITY TWIN CAM ROCKER BOX COVER
GASKET, TWIN CAM ROCKER BOX COVER 1999-UP
2
2