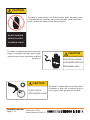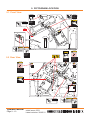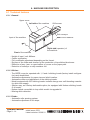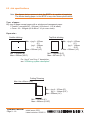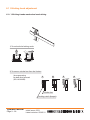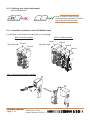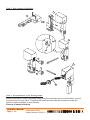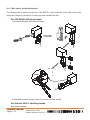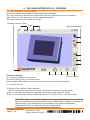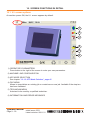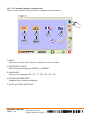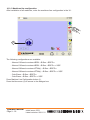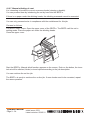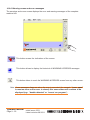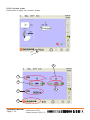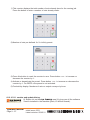
1
OPERATOR
MANUAL
Initial issue: 05/11
Latest revision : 08/11/2011
9.134.247
Content of this documentation has a confidential nature and remains
the exclusive property of c.p. bourg s.a. It is only put at the user
(including without limitation: Renter or Purchaser or their employees)
disposal within the exclusive scope of using and servicing the product.
Without c.p. bourg s.a. prior agreement in writing, disclosure to
third party and/or reproductions as well as changes are prohibited.
Operator Manual Initial issue: 05/11
Page 9 - 2
Latest revision: 25/05/11
TABLE OF CONTENTS
1. Important . . . . . . . . . . . . . . . . . . . . . . . . . . . . . . . . . . . . . . . . . . . . . . 6
2. Warnings . . . . . . . . . . . . . . . . . . . . . . . . . . . . . . . . . . . . . . . . . . . . . . 7
2.1 Prior to the installation . . . . . . . . . . . . . . . . . . . . . . . . . . . . . . . . . . . . . . . . . 7
3. Introduction . . . . . . . . . . . . . . . . . . . . . . . . . . . . . . . . . . . . . . . . . . . . 8
3.1 Foreword . . . . . . . . . . . . . . . . . . . . . . . . . . . . . . . . . . . . . . . . . . . . . . . . . . 8
3.2 Job Definition Format (JDF) Capability . . . . . . . . . . . . . . . . . . . . . . . . . . . 9
4. Warning pictograms . . . . . . . . . . . . . . . . . . . . . . . . . . . . . . . . . . . . 10
5. Pictogram location . . . . . . . . . . . . . . . . . . . . . . . . . . . . . . . . . . . . . 13
5.1 Front View . . . . . . . . . . . . . . . . . . . . . . . . . . . . . . . . . . . . . . . . . . . . . . . . . 13
5.2 Rear VIew . . . . . . . . . . . . . . . . . . . . . . . . . . . . . . . . . . . . . . . . . . . . . . . . . 13
6. Machine description . . . . . . . . . . . . . . . . . . . . . . . . . . . . . . . . . . . . 14
6.1 Technical features . . . . . . . . . . . . . . . . . . . . . . . . . . . . . . . . . . . . . . . . . . . 14
6.1.1 General : . . . . . . . . . . . . . . . . . . . . . . . . . . . . . . . . . . . . . . . . . . . . . . . 14
6.1.2 Stitcher : . . . . . . . . . . . . . . . . . . . . . . . . . . . . . . . . . . . . . . . . . . . . . . . 14
6.1.3 Folder : . . . . . . . . . . . . . . . . . . . . . . . . . . . . . . . . . . . . . . . . . . . . . . . . 14
6.1.4 Trimmer : . . . . . . . . . . . . . . . . . . . . . . . . . . . . . . . . . . . . . . . . . . . . . . 15
6.1.5 Conveyor : . . . . . . . . . . . . . . . . . . . . . . . . . . . . . . . . . . . . . . . . . . . . . 15
6.2 Job specifications . . . . . . . . . . . . . . . . . . . . . . . . . . . . . . . . . . . . . . . . . . . 16
6.3 Stitching system description . . . . . . . . . . . . . . . . . . . . . . . . . . . . . . . . . . . 18
6.4 Stitching possibilities with Jogger Type 0 . . . . . . . . . . . . . . . . . . . . . . . . . 19
7. Process description . . . . . . . . . . . . . . . . . . . . . . . . . . . . . . . . . . . . 24
8. Connecting the machine to mains . . . . . . . . . . . . . . . . . . . . . . . . 25
8.1 Stitching head adjustment . . . . . . . . . . . . . . . . . . . . . . . . . . . . . . . . . . . . . 26
8.1.1 Stitching heads mechanical unclutching . . . . . . . . . . . . . . . . . . . . . . 26
8.1.2 Stitching wire length adjustment . . . . . . . . . . . . . . . . . . . . . . . . . . . . 27
8.1.3 Cassettes replacement with ISP M2000 heads . . . . . . . . . . . . . . . . . 27
8.1.4 Wire spool replacement (for Hohner 43/6 S heads) . . . . . . . . . . . . . 30
8.1.5 Wire jam in the stitching head . . . . . . . . . . . . . . . . . . . . . . . . . . . . . . 31
9. The User Interface (U.I.) screens . . . . . . . . . . . . . . . . . . . . . . . . . . 32
10. Screen functions in detail . . . . . . . . . . . . . . . . . . . . . . . . . . . . . . 33
10.1 U.I. screen options . . . . . . . . . . . . . . . . . . . . . . . . . . . . . . . . . . . . . . . . . . 33
10.1.1 U.I. screen Operator's preferences . . . . . . . . . . . . . . . . . . . . . . . . . 34
10.1.2 Machines line configuration . . . . . . . . . . . . . . . . . . . . . . . . . . . . . . . 35
10.1.3 JDF Mode Selection . . . . . . . . . . . . . . . . . . . . . . . . . . . . . . . . . . . . . 40
10.1.4 File menu . . . . . . . . . . . . . . . . . . . . . . . . . . . . . . . . . . . . . . . . . . . . 41
10.2 BDFE-x tab options . . . . . . . . . . . . . . . . . . . . . . . . . . . . . . . . . . . . . . . . . 42
10.2.1 Paper size and Stitcher parameters screen . . . . . . . . . . . . . . . . . . 43
10.2.2 Folding parameter . . . . . . . . . . . . . . . . . . . . . . . . . . . . . . . . . . . . . . 45
10.2.3 Trimming parameter . . . . . . . . . . . . . . . . . . . . . . . . . . . . . . . . . . . . 46
Operator Manual Initial issue: 05/11
Page 9 - 3
Latest revision: 08/11/11
10.2.4 Output conveyor parameter . . . . . . . . . . . . . . . . . . . . . . . . . . . . . . 47
10.2.5 File menu parameter . . . . . . . . . . . . . . . . . . . . . . . . . . . . . . . . . . . . 48
10.2.6 Preferences Menu . . . . . . . . . . . . . . . . . . . . . . . . . . . . . . . . . . . . . . 53
10.2.7 Manual stitching of a set . . . . . . . . . . . . . . . . . . . . . . . . . . . . . . . . . 54
10.2.8 Warning screen and error messages . . . . . . . . . . . . . . . . . . . . . . . 55
10.2.9 Counter of set . . . . . . . . . . . . . . . . . . . . . . . . . . . . . . . . . . . . . . . . . 56
10.2.10 U.I. version and update history . . . . . . . . . . . . . . . . . . . . . . . . . . . 57
10.3 RUN tab options . . . . . . . . . . . . . . . . . . . . . . . . . . . . . . . . . . . . . . . . . . . 58
10.3.1 BDFE-x adjustment in RUN mode . . . . . . . . . . . . . . . . . . . . . . . . . 59
10.4 List of errors . . . . . . . . . . . . . . . . . . . . . . . . . . . . . . . . . . . . . . . . . . . . . . . 63
10.5 4 - Remedies . . . . . . . . . . . . . . . . . . . . . . . . . . . . . . . . . . . . . . . . . . . . . . 66
11. PREVENTIVE MAINTENANCE . . . . . . . . . . . . . . . . . . . . . . . . . . . 68
12. Environmental compliance . . . . . . . . . . . . . . . . . . . . . . . . . . . . . . 71
12.1 Product recycling and Disposal . . . . . . . . . . . . . . . . . . . . . . . . . . . . . . . . 71
Operator Manual Initial issue: 05/11
Page 9 - 4
Latest revision: 08/11/11
This page is intentionally left blank.
Operator Manual Initial issue: 05/11
Page 9 - 5
Latest revision: 25/05/11
1. IMPORTANT
F: Important
Cette machine ne peut fonctionner qu'avec toutes les sécurités au repos (capots) et tous les
accessoires (plateau de réception ou de transfert, convoyeur de sortie, conteneur déchets de
coupe) en place.
Attention: Garder les mains à l’écart des pièces en mouvement.
GB/US: Important
This machine will operate only with all the safety devices of the collating / finishing line deactived (guards) and delivery/transfer tray or conveyor waste container connected in working position.
Caution: Keep hands clear of moving parts.
PT: Importante
Esta máquina apenas funcionará com todos os dispositivos de segurança da linha de separação/acabamento desactivados (protecções) e com o tabuleiro de saída/transferência ou o
compartimento de desperdícios do transportador ligados na posição de funcionamento.
Cuidado: Manter as mãos afastadas das peças móveis.
D: Wichtig
Diese Maschine kann nur in Betrieb genommen werden, wenn alle Sicherheitsvorrichtungen
der Verarbeitungsstrasse (Plexihauben, Notschalter, Empfangs oder Transfertplatte Auslage)
sich in Arbeitsposition befinden.
Achtung: Hände nicht in die Nähe laufender Maschinenteile bringen.
ESP: Importante
Esta máquina sólo se pondrá en funcionamiento cuando todos los dispositivos de seguridad
de la línea de clasificación / acabado estén desactivados (dispositivos protectores) y la bandeja de salida / transferencia o el contenedor de desechos de la transportadora estén conectados en la posición de funcionamiento.
Precaución: Mantenga las manos alejadas de las partes móviles.
Operator Manual Initial issue: 05/11
Page 9 - 6
Latest revision: 25/05/11
2. WARNINGS
2.1 Prior to the installation
Verify that your electrical mains corresponds with one of the following three networks:
USA
120V AC +/- 10% - 60Hz
EUROPE
230V AC +/- 10% - 50Hz
JAPAN
230V AC +/- 10% - 60Hz
THE LABEL APPLIED ON YOUR MACHINE INDICATES FOR WHICH MAINS
THE MACHINE IS CABLED.
Verify your environmental conditions.
This machine is planned for the following environment:
Storage and transport::
Temperature: -34°C through 60°C : -30°F through 140°F
Relative humidity: 5 through 90% RH
Altitude: -31 m through 12 192 m / -100st through 4000st
Atmospheric pressure: ≥ 56Pa (420mm HG)
Work environment:
Temperature: 10°C through 32°C
Relative humidity: 10 through 85% RH
Consumption: 750 Watt
Noise level: 70 db
Warning: Never remove wall plug when the machine is running.
Operator Manual Initial issue: 05/11
Page 9 - 7
Latest revision: 25/05/11
3. INTRODUCTION
3.1 Foreword
Thank you for choosing a c.p. bourg product.
This manual is a guide to operate the Bourg Document Finisher E-Series.
The BOURG DOCUMENT FINISHER E-Series (BDFE) is an automatic machine for the production of books; it staples, folds and face trim sets originating from, a printer or a press
machine.
The system is composed of:
- Input module,
- Stitcher, folder and trimmer module,
- Output conveyor.
Please follow carefully the instructions and you will enjoy years of excellent work with your system.
If you have any difficulty using your equipment, please call us and ask for technical assistance
(all the phone numbers are available at the end of this manual).
We will be delighted to help you.
All the information in this publication is based on the latest information available at the time of
approval for printing.
We reserve the right to revise this publication and to make changes in the content without
obligation to notify such revision or changes.
THIS MANUAL IS INTENDED TO BE USED EXCLUSIVELY BY QUALIFIED PERSONNEL
Operator Manual Initial issue: 05/11
Page 9 - 8
Latest revision: 07/06/11
3.2 Job Definition Format (JDF) Capability
A new Web to Finish solution makes touch less workflow achievable from order to finished product with no manual setup or intervention; thus, helping automatic print production by giving
the finishing devices an integral role in the manufacturing process.
Integrating finishing equipment capabilities into the job definition at the prepress stage reduces
or eliminates operator involvement and reduces or eliminates job setup time.
A new device, the called Bourg Box, allows BDFE-x to communicate with any type of Xerox
digital printer.
The WorkFlow Manager (WFM) embedded in BDFE-x GUI allows the BDFE-x of a BB/BDFE-x configuration, to be set up for jobs and service using the BDFE-x GUI.
The WFM uses a digital job ticket to set up the finishing equipment automatically.
Note: T
he optional SQE (Square Edge Module) does not feature the automatic setup
capability.
The job ticket is an XML based file format standard for information exchange in the graphic
arts environment.
The JMF (Job Message Format) synchronization between Ultimate Bindery and the Bourg
finisher informs Ultimate Bindery of the finisher status. When the finisher is ready, Ultimate
Bindery releases the job at the FFPS queue and the job is printed and finished.
Note: - Press should have software FFPS version 7.0 SP3 and higher.
- JDF mode is only enabled with the optional Bourg JDF Kit.
FreeFlow Web
Services
Solution Workflow Diagram
1
JDF instructions and PDF file via JMF
FreeFlow Process
Manager
2
PDF File via Hot Folder
Ultimate Impostrip
OnDemand Digital
3
Imposed PDF is
submitted via IPP
FFPS returns Job ID
Ultimate Bindery
4
Release job via IPP
Xerox FreeFlow
Print Server
Finishing setup info
passed in JDF via JMF
5
Nuvera/
ColorPress
6
DFA level 1
Bourg Box
7
GUI
CAN
BIP
Operator Manual Initial issue: 05/11
Page 9 - 9
BDFE-x
Latest revision: 02/09/11
CAN
BIP
4. WARNING PICTOGRAMS
The BDFE-x is equipped by a touch screen and this screen contains a battery
Danger of explosion if battery is wrongly replaced. Replace only with the same or
equivalent type recommended by the manufacturer Dispose of used batteries according to the manufacturer's instructions. Please call for qualified technician to replace
the battery.
Please pay attention to the following signs:
Caution:
on a yellow background,
indicates a hazardous situation that can cause small or severe injury.
Warning:
on a orange background,
is used to indicate a hazardous situation which has some probability of death or severe
injury.
Warning should not be considered for property damage accidents unless personal injury
risk is present.
Danger:
on a red background,
indicates a hazardous situation with a high risk of death or severe injury. The ‘danger’
sign does not apply to accidents causing material damage, unless they can cause
personal injury.
WARNING
This label is located near the main power unit. It warns of a high risk
of electrocution when opening the power supply box with a risk of
severe injury or death.
HAZARDOUS VOLTAGE
CAN CAUSE SEVERE
INJURY OR DEATH
Operator Manual Initial issue: 05/11
Page 9 - 10
Latest revision: 25/05/11
This label is located near the knife of the
folding machine. It warns of a high risk of
severe hand injuries when placing your
hands under the knife.
WARNING
KEEP HANDS CLEAR
CAN CAUSE
SEVERE INJURY
CAUTION
This label is located near the knife of the press-cutter. It indicates a high
risk of severe injury if you put you hands under the knife.
This label is located near the wheel-work of the chain. It indicates
a high risk of injury to your fingers if they get stuck between the
wheel-work and the chain.
CAUTION
This label is located near the stapling head. It indicates a high risk of
severe injury to your fingers if you place them under this head.
KEEP HANDS CLEAR
DO NOT OPERATE
WITHOUT SAFETY
CAUTION
COVERS IN PLACE
This label is located on the centering plate.
Operator Manual Initial issue: 05/11
Page 9 - 11
Latest revision: 25/05/11
Crush hazard
Machine may move
when changing
paper size.
Stay clear of this
area.
CAUTION
This label is located at the rear of the machine under the safety cover.
It indicates that the machine may not be operated, under no circumstances, without the safety covers being in place.
DO NOT OPERATE
WITHOUT SAFETY
COVERS IN PLACE
This label is located near the main power
supply. It indicates that this power supply
cabinet may only be opened by qualified
personnel.
CAUTION
ELECTRICAL HAZARD
AUTHORIZED SERVICE
PERSONNEL ONLY
CAUTION
PINCH POINTS
KEEP HANDS CLEAR
Operator Manual Initial issue: 05/11
Page 9 - 12
Latest revision: 25/05/11
This label is located near the primary shaft.
It indicates a high risk of severe injury to
your fingers if they get stuck in the belt.
5. PICTOGRAM LOCATION
5.1 Front View
CAUTION
WARNING
KEEP HANDS CLEAR
CAN CAUSE
SEVERE INJURY
CAUTION
KEEP HANDS CLEAR
CAUTION
DO NOT OPERATE
WITHOUT SAFETY
COVERS IN PLACE
PINCH POINTS
KEEP HANDS CLEAR
S98s
CAUTION
S98s
WA
RN
ING
HAZ
ARD
OUS
CAN
VOL
CAU
TAG
INJU
SE
SEV
E
RY
ERE
OR
DEA
TH
WARNING
CAUTION
CAUTION
HAZARDOUS VOLTAGE
CAN CAUSE SEVERE
5.2 Rear VIew
INJURY OR DEATH
KEEP HANDS CLEAR
DO NOT OPERATE
DO NOT OPERATE
WITHOUT SAFETY
WITHOUT SAFETY
COVERS IN PLACE
CAUTION
CA
UTI
CAUTION
KE
EP
HA
DO
ND
NO
T OP S CL
WI
TH
EA
ER
OU
R
CO
T SA ATE
VE
RS
FE
TY
IN
PL
AC
E
DO NOT OPERATE
WITHOUT SAFETY
ON
COVERS IN PLACE
CAUTION
DO NOT OPERATE
WITHOUT SAFETY
COVERS IN PLACE
COVERS IN PLACE
DO NOT OPERATE
WITHOUT SAFETY
COVERS IN PLACE
CAUTION
CA
UT
IO
N
WARNING
HAZARDOUS VOLTAGE
CAN CAUSE SEVERE
INJURY OR DEATH
CAUTION
WARNING
PINCH POINTS
KEEP HANDS CLEAR
HAZARDOUS VOLTAGE
CAN CAUSE SEVERE
INJURY OR DEATH
Operator Manual Initial issue: 05/11
Page 9 - 13
Latest revision: 30/05/11
6. MACHINE DESCRIPTION
6.1 Technical features
6.1.1 General :
Upper cover
Left side of the machine
GUI screen
Exit conveyor
Input of the machine
Rear of the machine
Right side (operator) of
the machine
Front of the machine
-
Height of input / exit: 860mm.
Center registration.
Fully automatic adjustment depending on the format.
By-pass of the folder and trimmer for the production of top stitched brochures.
Detection of any «jam» or open baffles or covers on the paper path.
Detection of conveyor or chip container full.
6.1.2 Stitcher :
- The BDFE-x may be operated with 1, 2 and 4 stitching heads (factory install configuration) and deactivated.
- Automatic adjustments for paper size and stitch location.
- Automatic motion and adjustment of the stitching heads.
- Model equipped with ISP stitching heads: toolless change over self threading cassette
for stitch wire supply.
- Stitcher may, as a factory deliverable option, be equipped with Hohner stitching heads
(2-4 heads).
- Hohner heads convertible to loop stitch model via upgrade kit.
- Missing stitch detection.
6.1.3 Folder :
- Automatic roller spacing system.
- Automatic adjustment of the stops.
Operator Manual Initial issue: 05/11
Page 9 - 14
Latest revision: 02/09/11
6.1.4 Trimmer :
- Paper chips ejected to waste container, with “full” condition sensor.
- Automatic adjustment of the stops.
6.1.5 Conveyor :
- Adjustment of the conveyor steps via operator’s GUI.
Operator Manual Initial issue: 05/11
Page 9 - 15
Latest revision: 02/09/11
6.2 Job specifications
Note: T
he figures below represent what the BDFE-x is capable of producing.
The device feeding paper to the BDFE-x may alter those specifications.
Type of paper :
Any type of paper except paper with a window and transparent paper.
• Coated / uncoated (60 - 200gsm) (16 lb bond - 110 lb index).
• Cover : 80 - 300gsm (20 lb bond - 10 pt cover stock).
Paper size :
Saddle stitching
Top/Side stitching
Min = jog 0 : 127mm
(5")
jog 1 : 134mm
(5.3")
Max = 356mm (14")
Min = jog 0 : 127mm
(5")
jog 1 : 134mm
(5.3")
Max = 356mm (14")
Min = 160mm (6.3")
Max = 297mm (11.7")
Min = 203mm (8")
Max = 520mm (20.5")
For “Jog 0” and “Jog 1” description,
see “3-Stitching system description”.
Folding/Trimming
Max. trim =20mm (0.8")
Min = jog 0 : 127mm (5")
jog 1 : 134mm (5.3")
Max = 356mm (14")
Min = 101mm (4")
Max = 260mm (10.25")
Operator Manual Initial issue: 05/11
Page 9 - 16
Latest revision: 25/05/11
Book thickness :
Saddle stitching (stitches in the middle of the paper sheets, then fold and trim) :
- between 2 and 22 sheets of 80gsm (20 Lbs bond) or equivalent thickness (cover included).
Corner or top stitching:
- between 2 to 55 paper sheets of 80gsm (20Lbs bond) or equivalent thickness (cover
included).
Note: W
hen an Nuvera 3 is connected to the BDFE-x.
The parameters should be checked to avoid sending 55 sheets with
saddle stitching and damaging the folder module.
Call for technician to change the parameters.
Depending on the quantity of sheets per set
and the parameters setted in the downstream machines (see install manual).
Number of sets per hour :
- Stitching only:
- Stitching and folding :
- Stitching, folding and trimming :
Input speed of the machine :
500 mm/s to1280 mm/s.
Stitcher limits:
See “Stitching system description” further.
Folder :
Automatic spacing of the rollers :
Min.
0.25 mm (9.8 mil.)
Pos. # 1
Max.
4 mm (0.16 in.)
Pos. # 10
Default value
0.4 mm (5.7 mil.)
Pos. # 2
Theorical values.
Trimmer :
Min.
0 mm (0 in.)
Max.
20 mm (0.8 in.)
Standard 5 mm (0.2 in.)
Length of the cut.
Capacity of chip container: cuts from 8000 sheets of 80 gsm (20Lb bond) with a 5 mm cut.
Conveyor :
Motion step.
Capacity : 42 sets of A4 (8x10) size composed of 10 sheets of 80gsm (20lb bond).
Min.
+/- 6 mm (+/- 0.2")
position 1
Max.
+/- 180 mm (+/- 7")
position 30
Default value
+/-48 mm (+/- 1.9")
position 8
Operator Manual Initial issue: 05/11
Page 9 - 17
Latest revision: 07/06/11
6.3 Stitching system description
Side joggers type
Joggers type 0.
LH
RH
One type of side jogger is used:
- type 0, with cut-out.
Operator Manual Initial issue: 05/11
Page 9 - 18
Latest revision: 08/12/11
6.4 Stitching possibilities with Jogger Type 0
Paper width
Stitch
Machine Type
position
2 saddle or
2 heads on 2
top
bracket heads
1 corner
4 heads on 4
bracket heads*
2 saddle or
top
187 mm (7.3")
to 270 mm (10.6")
270 mm (10.6")
to 356 mm (14")
Space between stitches = 80 mm (3.1") to paper width - 30 mm (1.2")
YES (left or right)
4 saddle or
top
1 corner
2 heads on 4
bracket heads
127 mm (5") to
187 mm (7.3")
Not possible
YES (left or right
middle brackets**)
Not possible
"Space between stitches =
80 mm (3.1") to 166 mm (6.4")"
(middle heads)
YES (left or right
Not possible
middle head)
* Requires installation of heads on proper brackets (middle or outside ones)
** Stitching head position at installation
1 corner
"Space between stitches
=
80 mm (3.1") to 166 mm
(6.4")" (middle heads)
YES (left or right outside
brackets**)
"Space between stitches
=
240 mm (9.4") to paper
width - 30 mm (1.2")
(outside heads)"
YES (left or right outside
heads **)
15mm
7mm
Illustration 1 : Corner stitch with Jogger Type 0
Operator Manual Initial issue: 05/11
Page 9 - 19
Latest revision: 25/05/11
How to use these chart
In this case, if the width of the sheet is between 127 and 356mm, spacing staples will be
between 80 and 326mm
Then stitching with BDF 2H on 2 brackets
with jogger type 0 is possible
Authorized work area
For example: X
A sheet of width 250mm (W) allows a gap for the stitchers (E) between 80 and 220mm, in
this case 130mm
Operator Manual Initial issue: 05/11
Page 9 - 20
Latest revision: 08/12/11
Operator Manual Initial issue: 05/11
Page 9 - 21
Latest revision: 08/12/11
Operator Manual Initial issue: 05/11
Page 9 - 22
Latest revision: 08/12/11
Operator Manual Initial issue: 05/11
Page 9 - 23
Latest revision: 08/12/11
7. PROCESS DESCRIPTION
1
3
5
7
6
3
8
8 1
1
8
1
4 5
8
1
4
6
1
5
8
1
1
6
4
1
5
3
1
8
1
4
1
1
1
5
8
8
1
Page 9 - 24
Latest revision: 25/05/11
1
8
Operator Manual Initial issue: 05/11
8. CONNECTING THE MACHINE TO MAINS
In order to prevent any danger during the installation, the usage or the maintenance
of the equipment, the connection to the mains must be located near the equipment
and be accessible at all times.
The BDFE-x must be connected to the main power protected by a 15 A circuit breaker.
Bo
ur
g
Bo
x
Push on main switch to set it on position “I”.
The green led lights. After a few seconds, the machine initialize itself.
Starting order : (1) Bourg Box - (2) BDFE-x.
x
E
F
1
BD
I
0
2
0
I
To store the parameters in the machine, wait 30 secondes, after finishing the job, before
switch off the machine.
Note: There is no switch on G.U.I., it is supplied with electricity by the BDFE-x.
Operator Manual Initial issue: 05/11
Page 9 - 25
Latest revision: 25/05/11
8.1 Stitching head adjustment
8.1.1 Stitching heads mechanical unclutching
1) To unclutch the locking catch:
2) To remove stitcher bar from the Stacker:
Same procedure
for both kind of heads
(ISP & HOHNER)
1
2
Stitcher bar
Locking catch (keeper)
Operator Manual Initial issue: 05/11
Page 9 - 26
Latest revision: 25/05/11
3
4
8.1.2 Stitching wire length adjustment
See Head Manuals.
Note: There is a risk of injury
while handling a booklet if a stitch
leg is shorter than the other.
8.1.3 Cassettes replacement with ISP M2000 heads
Localization of the heads according the error message.
With 4 stitching heads:
With 2 stitching heads:
Head 1
Operator side
Operator side Head 1
Head 2
Head 3
Head 2
Head 4
Step 1: Remove the empty cassette:
1
4
3
2
Operator Manual Initial issue: 05/11
Page 9 - 27
Latest revision: 08/12/11
Step 2: Stitching head prevention cleaning:
The stitching head must be lubricated each time the cassette is replaced. Please use the tube
of vaseline delivered together with the cassettes.
Note: According to MSDS and 2000/532/EC lubricant is not a hazardous substance.
The lubricant should be used until the tube is empty. The empty tube should be
thrown away to domestic or industrial waste.
See Head manuals.
Operator Manual Initial issue: 05/11
Page 9 - 28
Latest revision: 25/05/11
Step 3: New cassette installation:
2
1
3
5
7
4
6
Step 4: Re-initialization of the stitching head:
When removing the rotator operating spring from the stitching head (for lubrification) you will
loose the wire for next stitch. Therefore the stitching head must be actuated to make the
machine again available for next booklet.
Execute a manual stitching.
Operator Manual Initial issue: 05/11
Page 9 - 29
Latest revision: 25/05/11
8.1.4 Wire spool replacement (for Hohner 43/6 S heads)
Note: Oil the felt discs on the wire bow of the Hohner
For Hohner 43/6 S stitching heads
43/6 S heads.
3
1
hoh
UNIV
ner
ERS
48/5
AL
S
2
-Remove pin ref.1 and washer ref.2.
-Remove the empty spool.
-Install a new spool ref.3 (pay attention to wire direction).
-Reinstall the washer ref.2 and the pin ref.1 in the shaft groove.
Operator Manual Initial issue: 05/11
Page 9 - 30
Latest revision: 08/12/11
8.1.5 Wire jam in the stitching head
If a missing stitch is noticed at the exit of the BDFE-x, there might be a wire jam in the head.
Apply the following instructions to clear jam and reinstall the wire.
For ISP M2000 stitching heads
1) Remove cassette with jam as follows.
2
1
9mm
2) Reinstall cassette (steps 3 and 4 of a new cassette install).
For Hohner 43/6 S stitching heads
See Head manuals.
Operator Manual Initial issue: 05/11
Page 9 - 31
Latest revision: 08/12/11
9. THE USER INTERFACE (U.I.) SCREENS
The User Interface is a touch screen.
Select your choice by pressing on the screen with your finger.
The User Interface is divided into several tabs that vary according to the configuration.
Each tab has its own preference and/or adjustment buttons.
The control buttons are common to all tabs.
Software version / Date
Tabs
Adjustment buttons
Care and cleaning
Control buttons
Do not place anything on the screen.
Do not let liquid get on or into the screen.
Use a regular glass cleaner to clean the screen (proceed as explained below).
To clean the screen:
1) S
witch off the Stitcher/Folder machine.
Do not use a spray cleaner on the screen, because the cleaner may drip inside.
2) Wet a soft cotton cloth with the cleaning solution and gently wipe the screen.
3) Do not use cleaning solutions containing solvents. Dry with a clean, soft cotton cloth.
CAUTION : Danger of explosion if battery is wrongly replaced. Replace only with the
same or equivalent type recommended by the manufacturer. Dispose of used batteries according to the manufacturer's instructions. See Section Adjustment/
Replacement of Service Manual for battery replacement.
Operator Manual Initial issue: 05/11
Page 9 - 32
Latest revision: 25/05/11
10. SCREEN FUNCTIONS IN DETAIL
10.1 U.I. screen options
At machine power ON, the U.I. screen appears by default.
1
2
3
4
5
6
1) O
PERATOR'S PARAMETERS
Press button to the right of the screen to enter your own parameters.
2) MACHINE LINE CONFIGURATION
3) J DF MODE SELECTION
See chapter "10.1.3 JDF Mode Selection", page 40
4) F
ILE MENU
Allows to open/delete an existing job or create/save a new job. Available if the step two
has been validated.
5) T
ECHNICIAN MENU
Autorised to be used by a qualified technician.
6) INFORMATION AND ERROR MESSAGES
Operator Manual Initial issue: 05/11
Page 9 - 33
Latest revision: 08/11/11
10.1.1 U.I. screen Operator's preferences
The U.I. screen option allows the user to configure his preferences.
1
2
3
4
5
1) U
NITS
Allow you to select your choice for measures in mm or inches.
2) K
EYBOARD CHOICE
Select the kind of keyboard AZERTY or QWERTY.
3) L
ANGUAGE
Choose your language (GB - FR - IT - DE - ES - NL - PT).
4) S
CREEN PARAMETERS
Graphical User Interface calibration.
5) DATE and HOUR SETTINGS
Operator Manual Initial issue: 05/11
Page 9 - 34
Latest revision: 25/05/11
10.1.2 Machines line configuration
After installation of all machines, enter the machines line configuration in the U.I.
1
2
The following configurations are available:
- Nuvera 1020mm/s centered-BFM + B.Box + BDFE-x
- Nuvera 1020mm/s centered-BFM + B.Box + BDFE-x + SQE
- Nuvera 1280mm/s centered-FTM(s) + B.Box + BDFE-x
- Nuvera 1280mm/s centered-FTM(s) + B.Box + BDFE-x + SQE
- ColorPress + B.Box + BDFE-x
- ColorPress + B.Box + BDFE-x + SQE
Press Machine Line Configuration button (1).
Press the blue arrow (2) to access to the dialogue box.
Operator Manual Initial issue: 05/11
Page 9 - 35
Latest revision: 08/11/11
Nuvera + Bourg Box + BDFE-x configuration.
Select the first machine of your line.
Press "V" to validate.
The machine appears on the screen.
Press the blue right arrow again.
Operator Manual Initial issue: 05/11
Page 9 - 36
Latest revision: 08/11/11
Select the Bourg Box.
Press "V" to validate.
The machine appears on the screen.
Press the blue right arrow again.
Operator Manual Initial issue: 05/11
Page 9 - 37
Latest revision: 05/12/11
Select the BDFE.
Press "V" to validate.
The machine appears on the screen.
When machines line configuration is complete, press "V" to validate.
Operator Manual Initial issue: 05/11
Page 9 - 38
Latest revision: 05/12/11
A message appears. To confirm your configuration press YES.
Note: If a SQE is present, it should not be selected in the U.I.
The screen shuts down and then self-restarts.
Some new tabs appear according to the configuration.
A new tab "RUN" also appears to make some fine adjustments while machines are running.
Tabs
ATTENTION: For Printer / BDFE-x configuration, Printer tab will not appear.
The BDFE-x has its own screen.
Operator Manual Initial issue: 05/11
Page 9 - 39
Latest revision: 30/05/11
10.1.3 JDF Mode Selection
Note: JDF mode is only enabled with the optional Bourg JDF Kit.
Press this button to
cancel the job.
"JDF never" mode
The finisher set up is made through the GUI attached on the BDFE-x. It is the usual way of
working by keying job parameters then validate them to get the finisher ready to receive jobs
from the Printer/Press.
The GUI enables to save jobs and make a recall to save settings time.
"JDF only" mode
The finisher set up is always made automatically by receiving JDF from Ultimate Bindery.
The GUI is switched in JDF mode then manual job settings and pre-defined job recall are
disabled (gray color). After job imposition is made by Ultimate Impostrip and sent to the FFPS
(FreeFlow Print Server) hold queue, Ultimate Bindery consumes the job and sends the JDF to
the finisher.
The JMF (Job Message Format) synchronization between Ultimate Bindery and the Bourg
finisher informs Ultimate Bindery of the finisher status. When the finisher is ready, Ultimate
Bindery releases the job at the FFPS queue and the job is printed and finished.
The automatic mode
The automatic mode enable to make the finisher set up by selecting or defining the job with
the GUI (on BDFE-x) and also dynamically by receiving a JDF as described here above.
Operator Manual Initial issue: 05/11
Page 9 - 40
Latest revision: 08/11/11
10.1.4 File menu
This menu allows to save, delete, open and recall a job (program).
This menu is fully detailed in chapter : "10.2.5 File menu parameter", page 48.
Operator Manual Initial issue: 05/11
Page 9 - 41
Latest revision: 25/05/11
10.2 BDFE-x tab options
The “BDFE-x” screen option allows the user to define the realization of the booklet.
1
2
3
4
5
6
7
8
13
12
11
10
9
1)
Stitching/paper size screen: Allows programming the stitching parameters.
2)
Folding screen: Allows programming the folding parameters.
3)
Trimmer screen: Allows programming the trimming parameters.
4)
Output conveyor screen: Allows programming the output conveyor parameters.
5)File menu: Allows the recording, the creation of a new job and to open or erase an
existing job.
6)
Preference menu.
7)
Error warning.
8)
Stop: End of cycle.
9)
Start of job.
10) Pause: N
ot used.
11) Purge: Clears the machine after a jam.
12)Counters.
13) Software version: Software update history.
Operator Manual Initial issue: 05/11
Page 9 - 42
Latest revision: 25/05/11
10.2.1 Paper size and Stitcher parameters screen
Press the button " STITCHING/PAPER SIZE SCREEN" to have access to the stitching
parameters.
• Press on value to edit
• Enter the value by using the keypad.
• Press "V" to validate.
•
"V" Valid the adjustment parameters entered in the different screen.
"X" Cancel the last modifications entered in the defined job.
The following adjustments are available:
1
2
Summary area
See "Summary
screen", page
47
3
4
Operator Manual Initial issue: 05/11
Page 9 - 43
Latest revision: 08/11/11
1) Space between stitches.
Only for saddle and top stitch.
Determine the value through the numerical keypad.
Press "V" to validate.
2) Stitching mode choice.
Saddle stitching.
Top stitch.
Left corner stitching.
Right corner stitching.
Cancel stitching function.
3) Paper width choice.
4) Paper length choice.
Attention: When the values are not compatibles, the affected area is in red colour.
You have to change the value to validate the configuration.
Operator Manual Initial issue: 05/11
Page 9 - 44
Latest revision: 08/11/11
10.2.2 Folding parameter
Press the button "FOLDING" to have access to the folding parameters.
The following adjustments are available:
1
2
1) Folding function selection:
Folding option activated.
Folding function not activated. Sets are sent to the upper reception tray and the 2
other parameters are not available.
2) F
olding pressure selection:
By default, the pressure will always be maximum.
Decrease the pressure if there are too many cracks or marks on the cover.
More pressure
Less pressure
"V" Validation of the adjustment parameters entered in the different screens.
"X" Cancel the last values entered in the defined job.
Operator Manual Initial issue: 05/11
Page 9 - 45
Latest revision: 25/05/11
10.2.3 Trimming parameter
Press the button "TRIMMING" to have access to the trimming parameters.
The following adjustments are available:
1
2
3
4
3
1) Trimming function selection.
Trimming option activated (go to the three additional options described below).
Trimming option not activated (go directly to output conveyor parameter).
2) Booklet
final length selection, press (2)
Choose the size of the book by entering its final value through the numerical keypad
Press "V" to validate.
3)You can also enter the value of the chip (3) in the same way as in 2
4) Activate or deactivate the blower to evacuate the chips.
"V" Validation of the adjustment parameters entered in the different screens.
"X" Cancel the last values entered in the defined job.
Operator Manual Initial issue: 05/11
Page 9 - 46
Latest revision:08/11/11
10.2.4 Output conveyor parameter
Press the button "CONVEYOR" to have access to the output conveyor parameters.
The following adjustments are available :
2
1
1) S
ummary screen.
On each screen, the summary screen shows the main parameters entered for stitching,
folding and trimming.
2) Output conveyor advances selection.
Adjust the output conveyor advance (1 to 30) to obtain the space desired between the booklets.
1 = small space
29 = long space
30 = continuous advance
Determine the value through the numerical keypad, Press "V" to validate.
"V" Validation of the adjustment parameters entered in the different screens.
"X" Cancel the last values entered in the defined job.
Operator Manual Initial issue: 05/11
Page 9 - 47
Latest revision: 08/11/11
10.2.5 File menu parameter
The BDFE-x graphical interface allows an easy and performing jobs management.
Press the button "FILE MENU" to have access to the file parameters.
Five adjustments are available:
1
2
3
4
1) Make a comment on the saved jobs.
2) Open a job saved by the operator.
3) Save a new job with his name and characteristics.
4) Erase an existing job no longer used.
Operator Manual Initial issue: 05/11
Page 9 - 48
Latest revision: 05/12/11
Make a comment
This menu allows to make a personal comment on a saved job.
1
Select a job and press button (1) to access to the dialogue box.
4 lines are available to write the comments through the alphanumeric keyboard.
Press enter to display the comment on the line.
Press "V" to validate.
Operator Manual Initial issue: 05/11
Page 9 - 49
Latest revision: 25/05/11
Opening an existing job
This menu allows to open a job saved by the operator.
2
Select a job in the left column and press button (2).
Press YES to open the selected job or NO to return to the previous screen and select another job.
This job can be the starting point to define a new job.
Operator Manual Initial issue: 05/11
Page 9 - 50
Latest revision: 05/12/11
Save a job
When a job has been defined by the operator, it can be saved as follow.
3
Press button (3).
Enter a name for the job on the alphanumeric keyboard and confirm it with the “ENTER” key.
The new job appears in the left column.
If the name given already exists and that you press “enter”, a message will appear to ask you
to confirm the replacement of an existing file by the new one.
Press YES to replace the existing job by the new one or NO to return to the previous screen
and rename the new job.
Note: Approximately 500 jobs can be stored.
Operator Manual Initial issue: 05/11
Page 9 - 51
Latest revision: 08/11/11
Erasing a job
This menu allows to erase an existing job.
4
Attention: Once deleted, there is no way to recover the deleted program.
Select the job to be erased in the left column.
Press button (4).
The following screen appears.
Press YES to erase the selected job or NO to cancel and return to the previous screen.
‘A5 bc.job29‛job?
Operator Manual Initial issue: 05/11
Page 9 - 52
Latest revision: 08/11/11
10.2.6 Preferences Menu
Save Adjustments
Disabled: Ask to operator to save adjustments.
Enabled: Always save adjustments.
Stitch Head Form
Select the desired stitch head form: Normal Stitch OR Loop Stitch.
Stitch single sheet
Permitted or not a single sheet stitching
Reset BDFE
The machine goes to home position.
Manual Stitch
Allows manual stitching.
refer to"10.2.7 Manual stitching of a set", page 54
Allows technician to enter in the technical menu. This menu is protected by a password.
It is intended to be used exclusively by qualified technical personnel.
Operator Manual Initial issue: 05/11
Page 9 - 53
Latest revision: 08/11/11
10.2.7 Manual stitching of a set
It is interesting to be able to correct erroneous books (missing or double).
You can process them by introducing the set by hand into the BDFE-x.
If there is no paper under the stitching heads, the stitching command cannot be executed.
You can only process books in compliance with the variables set for this job.
Proceed as follows.
You are in «Run» menu. Open the upper cover of the BDFE-x. The BDFE-x will be set in
waiting mode. Place the paper set under the stitching heads.
Close the upper cover.
Start the BDFE-x. Manual stitch function appears on the screen. Push on the button, the inserted set will be stitched, folded, cut and ejected according to the job description.
You can continue the on-line job.
The BDFE-x is ready to continue the on-line job. If more books need to be corrected, repeat
the same operation.
Operator Manual Initial issue: 05/11
Page 9 - 54
Latest revision: 25/05/11
10.2.8 Warning screen and error messages
The warnings and errors screen displays the error and warning messages of the complete
machine line.
This button erases the indications of the screen.
This button allows to display the historical of WARNING & ERRORS messages
This button allows to reach the WARNING & ERRORS screen from any other screen.
Note: Some messages disappear when the error is corrected (for example: ”cover open”
is reset as soon as the cover is closed). But some others will continue to be
displayed (e.g.: "double detected" or "cannot run program").
Operator Manual Initial issue: 05/11
Page 9 - 55
Latest revision:08/12/11
10.2.9 Counter of set
Press button to open the "counter" screen.
2
1
3
4
5
6
Operator Manual Initial issue: 05/11
Page 9 - 56
Latest revision: 08/11/11
1) This counter displays the total number of sets already done for the running job.
Press the button to enter a number of sets already made.
2) Number of sets pre-defined. 0= X= infinity preset.
3) Press this button to reset the counter to zero. Press button + or - to increase or
decrease the counter by 1.
4) Activate or desactivate the preset. Press button + or - to increase or decrease the
counter by 1. For BDFE-x the preset is not activated.
5) Productivity display. Numbers of sets on output conveyor by hour.
10.2.10 U.I. version and update history
6) Simple clic on the c.p. bourg area (6) gives you all the software
Version installed in the machine (pack, UI and all boards).
Operator Manual Initial issue: 05/11
Page 9 - 57
Latest revision: 25/05/11
10.3 RUN tab options
The RUN tab allows you to perform some fine adjustments while machines are running.
1
1) BDFE-x adjustments in mode RUN.
Operator Manual Initial issue: 05/11
Page 9 - 58
Latest revision: 08/11/11
10.3.1 BDFE-x adjustment in RUN mode
This menu gives an overview and allows parameters adjustment while machine is running.
Press the BDFE-x button to access to the setting parameters.
Output
conveyor
Folder
Stitcher
Trimmer
Four adjustment areas are available:
- Stitcher area for paper size and stitching.
- Folder area for folding.
- Trimmer format for trimming.
- Output conveyor area for output conveyor.
This buttons are used as described below:
Press this button to reset the counter output conveyor value and force the offset of
a booklet.
Output conveyor forced advance.
Activation and deactivation of the folding (and so of the trimmer).
When this function is deactivated, the next set will come out in the upper receiving
tray.
Activation and deactivation of the trimmer.
When this function is deactivated, the next set will come out on the output conveyor
but not trimmed.
Operator Manual Initial issue: 05/11
Page 9 - 59
Latest revision: 08/11/11
Stitcher area : Adjustment according to the paper format and Stitcher
1
3
2
Adjustment of the stitcher while running (Stitcher).
1) Adjustment on paper length, maximum modification ± 3mm.
2) Adjustment on paper width, maximum modification ± 3 mm.
Left side jogger
Right side jogger
+
3) Adjustment on stitch position on paper length.
-
+
+ Stitches offset to the paper front, maximum modification ± 3mm.
- Stitches offset to the paper rear, maximum modification ± 3mm.
Operator Manual Initial issue: 05/11
Page 9 - 60
Latest revision: 30/05/11
Folder area: Folder adjustment while running
4
4) Folding pressure adjustment (maximum by default).
5) Fold position adjustment in relation to stitches.
+ Final booklet upper face will be longer.
- Final booklet lower face will be longer.
5
Maximum modification ± 1,5mm.
Trimmer area: Trimmer adjustment while running
6
6) B
ooklet final length adjustment.
Maximum modification ± 3mm.
Output conveyor area: Output conveyor adjustment while running
7
7) Output conveyor advance correction.
Operator Manual Initial issue: 05/11
Page 9 - 61
Latest revision: 08/11/11
Refer to the figure below for the direction of the motion and the corresponding button.
-
+
+
Stitcher front jog
+
-
Stitcher back stop
-
-
Trimmer stop
+
Folder back stop
+
Operator Manual Initial issue: 05/11
Page 9 - 62
Latest revision: 08/11/11
10.4 List of errors
0.20«Sheets too late in area A . . . . . . . . . . . . . . . . . . . . .
0.29«Sheets too late in area C» . . . . . . . . . . . . . . . . . . . .
0.55«Sheets too late in area D» . . . . . . . . . . . . . . . . . . . .
0.65«Booklet too late in folder» . . . . . . . . . . . . . . . . . . . . .
0.69«Booklet too late in area F» . . . . . . . . . . . . . . . . . . . .
0.81«Booklet too late in area G» . . . . . . . . . . . . . . . . . . . .
0.84«Booklet too late in area H» . . . . . . . . . . . . . . . . . . . .
0.91«Booklet too late in area D» . . . . . . . . . . . . . . . . . . . .
0.94«Booklet too late in area J» . . . . . . . . . . . . . . . . . . . .
see"10.5
see"10.5
see"10.5
see"10.5
see"10.5
see"10.5
see"10.5
see"10.5
see"10.5
4
4
4
4
4
4
4
4
4
-
Remedies"point
Remedies"point
Remedies"point
Remedies"point
Remedies"point
Remedies"point
Remedies"point
Remedies"point
Remedies"point
a
a
a
a
a
a
a
a
a
1.20«Sheets in area B» . . . . . . . . . . . . . . . . . . . . . . . . . . . .
1.29«Sheets in stitcher» . . . . . . . . . . . . . . . . . . . . . . . . . . .
1.55«Booklet in area E» . . . . . . . . . . . . . . . . . . . . . . . . . . .
1.65«Booklet in folder» . . . . . . . . . . . . . . . . . . . . . . . . . . . .
1.69«Booklet in area F» . . . . . . . . . . . . . . . . . . . . . . . . . . .
1.81«Booklet in area G» . . . . . . . . . . . . . . . . . . . . . . . . . . .
1.84«Booklet in area H» . . . . . . . . . . . . . . . . . . . . . . . . . . .
1.91«Booklet in area I» . . . . . . . . . . . . . . . . . . . . . . . . . . . .
1.94«Booklet in area J» . . . . . . . . . . . . . . . . . . . . . . . . . . .
1.95«Jam TD»
see"10.5
see"10.5
see"10.5
see"10.5
see"10.5
see"10.5
see"10.5
see"10.5
see"10.5
4
4
4
4
4
4
4
4
4
-
Remedies"point
Remedies"point
Remedies"point
Remedies"point
Remedies"point
Remedies"point
Remedies"point
Remedies"point
Remedies"point
a
a
a
a
a
a
a
a
a
2.20«Unexpected sheets in B area» . . . . . . . . . . . . . . . . . .
2.29«Unexpected sheets in stitcher» . . . . . . . . . . . . . . . . .
2.55«Unexpected sheets in area E» . . . . . . . . . . . . . . . . . .
2.65«Unexpected sheets in folder» . . . . . . . . . . . . . . . . . . .
2.69«Unexpected sheets in area F» . . . . . . . . . . . . . . . . . .
2.81«Unexpected sheets in in area G» . . . . . . . . . . . . . . . .
2.84«Unexpected sheets in area H» . . . . . . . . . . . . . . . . . .
2.91«Unexpected sheets in area I» . . . . . . . . . . . . . . . . . .
2.94«Unexpected sheets in area J» . . . . . . . . . . . . . . . . . .
3.01«Trim waste not present» . . . . . . . . . . . . . . . . . . . . . .
3.02«Jack did not reach reference» . . . . . . . . . . . . . . . . . .
3.04«ITB motor did not reached ref» . . . . . . . . . . . . . . . . .
3.20«Wire spool 1 nearly empty» . . . . . . . . . . . . . . . . . . . .
3.21«Wire spool 3 nearly empty» . . . . . . . . . . . . . . . . . . . .
3.22«Wire spool 2 nearly empty» . . . . . . . . . . . . . . . . . . . .
3.23«Wire spool 4 nearly empty» . . . . . . . . . . . . . . . . . . . .
3.24«Eject belt did not reach home» . . . . . . . . . . . . . . . . .
3.25«Move wire holder to upper hole»
3.26«Front jog did not return home» . . . . . . . . . . . . . . . . . .
3.29«No paper under stitching heads» . . . . . . . . . . . . . . . .
3.30«Stitch.heads did not return home»
3.35«Stitch 1 is missing» . . . . . . . . . . . . . . . . . . . . . . . . . .
3.36«Stitch 3 is missing» . . . . . . . . . . . . . . . . . . . . . . . . . .
3.37«Stitch 2 is missing» . . . . . . . . . . . . . . . . . . . . . . . . . .
3.38«Stitch 4 is missing» . . . . . . . . . . . . . . . . . . . . . . . . . .
see"10.5
see"10.5
see"10.5
see"10.5
see"10.5
see"10.5
see"10.5
see"10.5
see"10.5
see"10.5
see"10.5
see"10.5
see"10.5
see"10.5
see"10.5
see"10.5
see"10.5
4
4
4
4
4
4
4
4
4
4
4
4
4
4
4
4
4
-
Remedies"point
Remedies"point
Remedies"point
Remedies"point
Remedies"point
Remedies"point
Remedies"point
Remedies"point
Remedies"point
Remedies"point
Remedies"point
Remedies"point
Remedies"point
Remedies"point
Remedies"point
Remedies"point
Remedies"point
a
a
a
a
a
a
a
a
a
b
c
c
d or
d or
d or
d or
c.
Operator Manual Initial issue: 05/11
Page 9 - 63
Latest revision: 08/11/11
see"10.5 4 - Remedies"point c.
see"10.5 4 - Remedies"point i.
see"10.5
see"10.5
see"10.5
see"10.5
4
4
4
4
-
Remedies"point
Remedies"point
Remedies"point
Remedies"point
f.
f.
f.
f.
e.
e.
e.
e.
3.41«LH stitch jog not reached home» . . . . . . . . . . . . . . . .
3.45«RH stitch guide not reached home» . . . . . . . . . . . . . .
3.51«Stitch rear stop not reached home» . . . . . . . . . . . . . .
3.66«Rolls adjust. not reached home»
3.68«Folder paper st. not reached home» . . . . . . . . . . . . .
3.78«Trimmer did not do a full turn» . . . . . . . . . . . . . . . . . .
3.79«Trimmer stops not reached home» . . . . . . . . . . . . . .
3.92«Conveyor not in place . . . . . . . . . . . . . . . . . . . . . . . .
3.93«Conveyor not connected» . . . . . . . . . . . . . . . . . . . . .
3.95«TD not ready»
see"10.5 4 - Remedies"point c.
see"10.5 4 - Remedies"point c.
see"10.5 4 - Remedies"point c.
see"10.5
see"10.5
see"10.5
see"10.5
see"10.5
4
4
4
4
4
-
Remedies"point
Remedies"point
Remedies"point
Remedies"point
Remedies"point
c.
c.
c.
g.
g.
4.02«Front cover RH open» . . . . . . . . . . . . . . . . . . . . . . . .
4.03«Front cover LH open» . . . . . . . . . . . . . . . . . . . . . . . .
4.06«Top cover open» . . . . . . . . . . . . . . . . . . . . . . . . . . . .
4.10«A deflector open» . . . . . . . . . . . . . . . . . . . . . . . . . . . .
4.11«B deflector open» . . . . . . . . . . . . . . . . . . . . . . . . . . . .
4.12«C deflector open» . . . . . . . . . . . . . . . . . . . . . . . . . . . .
4.13«D deflector open» . . . . . . . . . . . . . . . . . . . . . . . . . . . .
4.14«E deflector open» . . . . . . . . . . . . . . . . . . . . . . . . . . . .
4.15«F deflector open» . . . . . . . . . . . . . . . . . . . . . . . . . . . .
4.16«G deflector open» . . . . . . . . . . . . . . . . . . . . . . . . . . . .
4.17«H deflector open» . . . . . . . . . . . . . . . . . . . . . . . . . . . .
4.18«I deflector open» . . . . . . . . . . . . . . . . . . . . . . . . . . . .
4.19«J deflector open» . . . . . . . . . . . . . . . . . . . . . . . . . . . .
4.35«2 stitches missing»
4.99«Interlock» . . . . . . . . . . . . . . . . . . . . . . . . . . . . . . . . . .
see"10.5
see"10.5
see"10.5
see"10.5
see"10.5
see"10.5
see"10.5
see"10.5
see"10.5
see"10.5
see"10.5
see"10.5
see"10.5
4
4
4
4
4
4
4
4
4
4
4
4
4
-
Remedies"point
Remedies"point
Remedies"point
Remedies"point
Remedies"point
Remedies"point
Remedies"point
Remedies"point
Remedies"point
Remedies"point
Remedies"point
Remedies"point
Remedies"point
h.
h.
h.
h.
h.
h.
h.
h.
h.
h.
h.
h.
h.
see"10.5 4 - Remedies"point h.
5.01«Motor not running» . . . . . . . . . . . . . . . . . . . . . . . . . . . see"10.5 4 - Remedies"point c.
5.02«Too high jack diff. gap»
5.20«Too many sheets»
5.29«Paper in stitcher»
5.35«2 consecutive stitch missings head 1»
5.36«2 consecutive stitch missings head 3»
5.37«2 consecutive stitch missings head 2»
5.38«2 consecutive stitch missings head 4»
5.76«Trimwaste bin full» . . . . . . . . . . . . . . . . . . . . . . . . . . . see"10.5 4 - Remedies"point b.
5.91«Conveyor full» . . . . . . . . . . . . . . . . . . . . . . . . . . . . . . see"10.5 4 - Remedies"point g.
6.35«Bad stitch mis. head 1 detec»
6.36«Bad stitch mis. head 3 detec»
6.37«Bad stitch mis. head 2 detec»
6.38«Bad stitch mis. head 4 detec»
9.00«Program error»
9.01«Program error»
9.02«Program error»
9.03«Memory error»
9.04«Memory error»
9.05«Memory reinitialisation»
Operator Manual Initial issue: 05/11
Page 9 - 64
Latest revision: 08/11/11
Identification of the baffles
D
A
B
E
C
I
F
H
G
Operator Manual Initial issue: 05/11
Page 9 - 65
Latest revision: 25/05/11
J
10.5 4 - Remedies
a - Jam clearance
Any paper jam in the machine is indicated by an error message specifying the zone involved.
Note: After cleaning a jam, always verify that no paper pieces are left in the paper path.
As a general rule
Open the front doors or the upper cover and remove the sheets of paper from the
specified zones, refer to "Identification of the baffles", page 65
Close again the door.
If all zones are empties, the messages disappeared and the machine goes back to the
RUN menu.
b - Trim waste bin
Open both doors and empty the trim waste bin.
«Trim waste bin removed».
Put the trim waste bin back and close again the both doors.
« Start again the BDF».
Note: If error still present,- Check that the “Trim waste bin full” detection system is
cleared of paper cuts.- Call service engineer.
c- Element that has not reached its reference
- Do again a set-up (Go back to the Main Menu then to the Run Menu) and try to start again
the job.
- Shut down and start again the machine and try to start again the job.
Note: If the error is not eliminated, call for service.
Operator Manual Initial issue: 05/11
Page 9 - 66
Latest revision: 08/11/11
d - Cassettes replacement with ISP M2000 heads
See"8.1.3 Cassettes replacement with ISP M2000 heads", page 27
e - Wire spool replacement (for Hohner 43/6 S heads)
See"8.1.4 Wire spool replacement (for Hohner 43/6 S heads)", page 30
f - Wire jam in the stitching head
See"8.1.5 Wire jam in the stitching head", page 31
g - Conveyor
«Exit conveyor not installed»:
Install your conveyor in compliance with the Installation Manual.
« Exit conveyor not connected»:
Connect the conveyor in compliance with the procedure described in the Installation Manual.
«Exit conveyor full»:
A stop switch at the end of the conveyor detects if the conveyor is full. Empty the conveyor.
If the conveyor is installed, connected and empty and if the error message does not disappear,
call the technician.
h - Baffle, cover or door open
Close the baffles, covers and doors. If the error message is not eliminated call the technician.
The message «Interlock» is displayed combined with the message «Door or cover open».
If the message «Interlock» is displayed alone, the rear cover is open.
i- Paper not detected in the stitching machine
For a request «Manual stitching of a set», there is a safety function. The operation is not
allowed if there is no paper in the stitching machine. The “Stitch pulse” function is not displayed on the screen.
Operator Manual Initial issue: 05/11
Page 9 - 67
Latest revision: 08/12/11
11. PREVENTIVE MAINTENANCE
For the BDFE-x:
Switch off the machine.
Open the upper cover and the doors.
Daily maintenance
1) Remove the metal parts (stitches) from clinchers by pushing on the handle 3 times.
If you do not do it, there is a risk of poor stitching or jam.
2) E
mpty the waste bin. If you do not do it, there is a risk of machine stop with the error message “waste bin full”. Lift up to pull out the bin.
Operator Manual Initial issue: 05/11
Page 9 - 68
Latest revision: 25/05/11
Weekly maintenance
1) Clean the belts, the transport wheels with a cloth and a specific cleaning solution. If you do
not do it there is a risk of smeared sheets.
2) C
lean the threaded rod of the stitching heads with a brush. If you do not do it there is a risk
of not smooth movement.
Never grease the threaded rod.
3) Refer to head manual for maintenance.
- ISP M2000 : Use vaseline (CPB P/N 9142021) according to stitch head manual
(this vaseline is supplied with each new cassette).
- Hohner 43/6 S : U
se grease (CPB P/N ND783959) and oil (CPB P/N 9142006) according to stitch head manual.
Operator Manual Initial issue: 05/11
Page 9 - 69
Latest revision: 25/05/11
Monthly maintenance
Refer to head manual for maintenance.
Every 3 month maintenance
Clean stop fingers of the stitching area with compressed air and then with a cotton cloth
and a specific cleaning solution.
If you do not do it there is a risk that the stop fingers jam.
Operator Manual Initial issue: 05/11
Page 9 - 70
Latest revision: 25/05/11
12. ENVIRONMENTAL COMPLIANCE
12.1 Product recycling and Disposal
ENGLISH:
Application of this symbol on your equipment is confirmation that you must dispose of this
equipment in compliance with agreed national Procedures.
In accordance with European legislation dealing with "end of life electrical and electronic
equipment", equipment subject to disposal must be managed within agreed procedures.
Prior to disposal please contact your local representative for end of life take back information.
FRANÇAIS:
La présence de ce symbole sur cet équipement indique que ce dernier doit être mis au
rebut selon les conventions nationales.
Conformément à la législation européenne, tout équipement électrique et électronique en
fin de vie et destiné au rebut doit être manipulé selon les procédures convenues.
Veuillez contacter votre distributeur pour en savoir plus sur la reprise du matériel avant
toute mise au rebut.
ESPAÑOL:
La aplicación de este símbolo en el equipo es una confirmación de que en el momento
de deshacerse de este equipo debe de hacerlo de acuerdo con los procedimientos nacionales acordados.
La legislación europea exige que para deshacerse de equipos eléctricos y electrónicos al
final de su duración útil deben seguirse los procedimientos acordados.
Antes de deshacerse de un equipo póngase en contacto con su distribuidor local o con el
representante para obtener información sobre su devolución.
Operator Manual Initial issue: 05/11
Page 9 - 71
Latest revision: 25/05/11
DEUTSCH:
Geräte die dieses Symbol tragen, müssen den nationalen Richtlinien gemäß entsorgt
werden.
Den europäischen Bestimmungen zum Umgang mit elektrischen und elektronischen
Altgeräten ist Folge zu leisten.
Bei der Entsorgung des Geräts den Partner kontak-tieren.
ITALIANO:
Questo simbolo applicato sulla macchina indica la necessità di smaltire il prodotto in
conformità con le normative nazionali vigenti.
La legislazione europea richiede che lo smaltimento dei dispositivi elettrici ed elettronici a
fine vita venga gestito in conformità con le normative vigenti.
Prima di smaltire il dispositivo, rivolgersi al rivenditore autorizzato di zona per informazioni sul ritiro dei prodotti a fine vita.
NEDERLANDS:
De aanwezigheid van dit symbool op uw apparatuur geeft aan dat u zich van deze apparatuur moet ontdoen overeenkomstig de daarvoor in het betreffende land geldende procedures.
Krachtens de Europese wetgeving moet de verwerking van afval van gebruikte
elektrische en elektronische apparatuur geschieden overeenkomstig de daarvoor geldende procedures.
Neem voordat u de apparatuur wegdoet contact op met uw plaatselijke dealer of vertegenwoordiger voor informatie over inzameling.
PORTUGAIS:
A utilização deste símbolo no nosso equipamento confirma que deverá eliminar este
equipamento de acordo com os procedimentos adequados do seu país.
De acordo com a legislação Europeia, o fim de vida de equipamento eléctrico e electrónico
sujeito a eliminação, deverá ser realizado de acordo com procedimentos acordados.
Antes da eliminação, contacte o seu revendedor local ou a Xerox para obter mais informação.
Operator Manual Initial issue: 05/11
Page 9 - 72
Latest revision: 30/05/11
NOTES
......................................................................................................................................................
......................................................................................................................................................
......................................................................................................................................................
......................................................................................................................................................
......................................................................................................................................................
......................................................................................................................................................
......................................................................................................................................................
......................................................................................................................................................
......................................................................................................................................................
......................................................................................................................................................
......................................................................................................................................................
......................................................................................................................................................
......................................................................................................................................................
......................................................................................................................................................
......................................................................................................................................................
......................................................................................................................................................
......................................................................................................................................................
......................................................................................................................................................
......................................................................................................................................................
......................................................................................................................................................
......................................................................................................................................................
......................................................................................................................................................
......................................................................................................................................................
......................................................................................................................................................
......................................................................................................................................................
......................................................................................................................................................
......................................................................................................................................................
......................................................................................................................................................
......................................................................................................................................................
......................................................................................................................................................
......................................................................................................................................................
......................................................................................................................................................
......................................................................................................................................................
......................................................................................................................................................
......................................................................................................................................................
......................................................................................................................................................
......................................................................................................................................................
......................................................................................................................................................
......................................................................................................................................................
......................................................................................................................................................
......................................................................................................................................................
......................................................................................................................................................
......................................................................................................................................................
......................................................................................................................................................
......................................................................................................................................................
......................................................................................................................................................
Operator Manual Initial issue: 05/11
Page 9 - 73
Latest revision: 25/05/11
NOTES
......................................................................................................................................................
......................................................................................................................................................
......................................................................................................................................................
......................................................................................................................................................
......................................................................................................................................................
......................................................................................................................................................
......................................................................................................................................................
......................................................................................................................................................
......................................................................................................................................................
......................................................................................................................................................
......................................................................................................................................................
......................................................................................................................................................
......................................................................................................................................................
......................................................................................................................................................
......................................................................................................................................................
......................................................................................................................................................
......................................................................................................................................................
......................................................................................................................................................
......................................................................................................................................................
......................................................................................................................................................
......................................................................................................................................................
......................................................................................................................................................
......................................................................................................................................................
......................................................................................................................................................
......................................................................................................................................................
......................................................................................................................................................
......................................................................................................................................................
......................................................................................................................................................
......................................................................................................................................................
......................................................................................................................................................
......................................................................................................................................................
......................................................................................................................................................
......................................................................................................................................................
......................................................................................................................................................
......................................................................................................................................................
......................................................................................................................................................
......................................................................................................................................................
......................................................................................................................................................
......................................................................................................................................................
......................................................................................................................................................
......................................................................................................................................................
......................................................................................................................................................
......................................................................................................................................................
......................................................................................................................................................
......................................................................................................................................................
......................................................................................................................................................
Operator Manual Initial issue: 05/11
Page 9 - 74
Latest revision: 25/05/11
rue des Technologies, 22
B-1340 Ottignies (Belgium)
Tel.: + 32 (0) 10 62 22 11
Fax: + 32 (0) 10 61 69 03
e-mail: [email protected]
Inc.
PARC D'AFFAIRES SILIC
32, rue des Gémeaux
BP 60410
F-94573 Rungis Cedex (France)
Tel.: +33 (1) 46 87 32 14
Fax: +33 (1) 46 87 52 17
e-mail: [email protected]
New Bedford Industrial Park
50 Samuel Barnet Blvd.
Massachussets 02745 (USA)
1285 New Bedford
Tel.: +1 (508) 998 2171
Fax: +1 (508) 998 2391
e-mail: [email protected]
G.M.B.H.
Schweizertrasse 70 / 1
D-72336 Balingen (Deutschland)
Tel.: +49 (0) 7433 9981 680
Fax: +49 (0) 7433 9981 686
e-mail: [email protected]
Millewee, 14 BP85
L-7201 Walferdange (Luxembourg)
Tel.: +352 33 24 47
Fax: +352 33 19 99
e-mail: [email protected]
http://www.cpbourg.com
Operator Manual Initial issue: 05/11
Page 9 - 75
Latest revision: 25/05/11