1
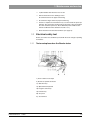
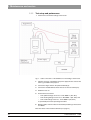
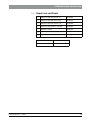
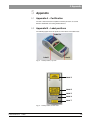
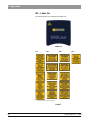
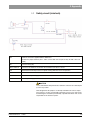
kÉï=~ë=çÑW=
NNKOMMT
pfoli~ëÉê
p~ÑÉíó=qÉëí=pÉêîáÅÉ=j~åì~ä=
båÖäáëÜ
No part of this publication may be reproduced, transmitted, stored or
translated into any language, in any form or through any electronic, magnetic,
optical, chemical, manual, physical device or other means, without the prior
written consent of Sirona Dental Systems GmbH, Fabrikstrasse 31,
64625 Bensheim, Germany.
Sirona Dental Systems GmbH reserves the right to correct or modify the
present document without prior notice.
0123
2
SIROLaser is manufactured in compliance with the provisions
of Council Directive 93/42/EEC concerning medical devices
(MDD). Compliance is determined based on the following
standards: IEC 60601-1: 1998, IEC 60601-1/A2: 1998 and
IEC 60601-2-22: 1997.
61 96 542 D 3485
D 3485.076.02.01.02 11.2007
Contents
61 96 542 D 3485
D 3485.076.02.01.02
11.2007
1
Warning and safety information.....................................
4
1.1
Before you begin..........................................................................
4
1.1.1
Preparation for testing ................................................................
4
1.1.2
Laser protection ..........................................................................
4
1.1.3
Measuring equipment .................................................................
4
1.2
Highlighting of warning and safety information ............................
5
1.3
Intended use ................................................................................
5
1.4
Wireless phone interference ........................................................
6
1.5
Disposal .......................................................................................
6
2
Glossary, symbols and abbreviations ...........................
7
2.1
Symbols on the SIROLaser .........................................................
7
2.2
Glossary.......................................................................................
9
2.3
Abbreviations ...............................................................................
9
3
Maintenance and service ................................................ 10
3.1
Checking the calibration .............................................................. 10
3.1.1
Calibration check without an external power meter .................... 10
3.1.2
Error message and incorrect parameter values .......................... 11
3.2
Function check............................................................................. 12
3.2.1
Visual inspection ......................................................................... 12
3.2.2
General function check ............................................................... 12
3.3
Electrical safety test..................................................................... 13
3.3.1
Tester setup based on the Bender tester ................................... 13
3.3.2
Test setup and performance ....................................................... 14
3.4
Repair test certificate ................................................................... 15
3.5
Final work .................................................................................... 17
3.6
Technical support ........................................................................ 17
4
Technical data.................................................................. 18
5
Appendix .......................................................................... 19
5.1
Appendix A – Certification ........................................................... 19
5.2
Appendix B – Label positions ...................................................... 19
5.3
Safety circuit (interlock) ............................................................... 23
3
båÖäáëÜ
Contents
1 Warning and safety information
1
Warning and safety information
1.1
Before you begin
i
NOTE
Technical information concerning parts requiring repair will be supplied by
Sirona only to authorized agents whose technical personnel have completed a
corresponding product training course. No maintenance or repairs may be
performed on the SIROLaser without the corresponding product training.
i
NOTE
Knowledge and understanding of the operating instructions is required to operate the unit. Please read the operating instructions prior to startup to familiarize yourself with the operation of the SIROLaser.
CAUTION
Perform maintenance only on a cleaned and disinfected unit.
1.1.1
Preparation for testing
Testing may be performed only by authorized personnel. If deviations from
the specified values are detected during the tests, their cause must be determined immediately.
1.1.2
Laser protection
i
NOTE
Laser protection: Observe the relevant national regulations and ordinances
when repairing and/or servicing the SIROLaser.
Regarding the installation and startup of the SIROLaser, Sirona Dental
Systems GmbH requires in particular:
• Compliance with IEC 60825-1 including all annexes.
If you have any further questions, please contact your laser protection officer.
Testing of the SiroLaser may be performed only in a room that complies with
the relevant laser protection requirements
The testing personnel must be properly instructed by the laser protection
officer.
During testing, suitable safety goggles must be worn as soon as the laser is
switched on.
Noone except for persons directly involved with the testing may be located in
the laser testing room.
1.1.3
Measuring equipment
The following measuring equipment is required for the test run:
Tester for leakage current tests acc. to IEC 60601-1
Optical power meter 0.1 – 10 W for 970 nm with accuracy of ± 5 %
Good as new optical fiber reserved for calibration, dia. 320 µm
(Mat. No.: 60 53 578)
4
61 96 542 D 3485
D 3485.076.02.01.02 11.2007
1 Warning and safety information
1.2
Highlighting of warning and safety
information
To prevent any personal injury or material damage, please observe the warning and safety information provided in the present operating instructions.
The information is highlighted as follows:
i
NOTE
for additional information,
CAUTION
if there is any risk of damage to the laser unit,
WARNING
if there is any hazard to the life or health of persons.
This symbol indicates that you have to take action.
This symbol indicates that a certain result will occur.
1.3
Intended use
i
NOTE
SIROLaser is intended for surgery and coagulation of oral soft tissue in periodontal pockets and root canals. This laser unit may only be used by trained
and qualified personnel in compliance with the applicable occupational safety
regulations and accident prevention measures as well as the operating instructions and the present service manual.
i
NOTE
The SIROLaser is also suitable for surgical interventions and for stopping
bleeding in soft tissue. This laser device may be operated only in a dental practice by trained persons who are familiar with the labor protection laws and accident prevention regulations and have read the present maintenance and operating instructions.
i
NOTE
Users are obliged to use only faultless materials, to ensure correct application
and to protect themselves, the patient and other persons against hazards.
WARNING
This laser unit is not intended for operation in areas subject to explosion hazards or in the vicinity of flammable materials or substances.
WARNING
Public legal provisions may include special safety regulations for the protection of persons against laser radiation. These regulations must be complied
with.
61 96 542 D 3485
D 3485.076.02.01.02
11.2007
5
1 Warning and safety information
WARNING
WARNING: Using controls or settings or performing procedures other than
those specified in this manual may result in hazardous radiation exposure.
1.4
Wireless phone interference
CAUTION
To ensure safe operation of medical electrical equipment, the use of mobile
wireless phones in practice or hospital environments must be prohibited.
1.5
Disposal
If you plan to discontinue the use of your SIROLaser and intend to dispose of
the unit, make sure to observe the applicable legal provisions.
6
61 96 542 D 3485
D 3485.076.02.01.02 11.2007
2 Glossary, symbols and abbreviations
2
2.1
Glossary, symbols and
abbreviations
Symbols on the SIROLaser
CE mark in accordance with Council Directive 93/42/EEC, stating the
manufacturer’s recognized certifying body
(depending on the Sirolaser SW)
GOST Certificate for Russia
(depending on the Sirolaser SW)
UL/CSA Certificate for the USA/Canada
(depending on the Sirolaser SW)
Date of manufacture (January 2005)
01-2005
Best-before date: Do not use after January 2007
01-2007
LOT
Batch number (consecutive number/month/year)
0123 / 12 / 05
Type B applied part according to IEC 60601-1
Please refer to manual first
Refers to directive 2002/96/EC and EN 50419
Do not dispose with domestic waste
DC IN Optical fiber
INTERLOCK/
SWITCH
Socket for DC input from Sinpro MPU50–105 switching power supply
Socket for optical fiber
Socket for interlock connector
Laser radiation warning
61 96 542 D 3485
D 3485.076.02.01.02
11.2007
7
2 Glossary, symbols and abbreviations
Specification of laser output power and wavelength of IR and aiming beam
(see also Chapter "Technical data")
States the compliance of the SIROLaser with IEC 60825-1, edition 1.2
Warns of potential laser radiation hazards when opening the unit
Warns of class 4 laser radiation hazards when using the laser unit
“LASER STOP” button: Press this button in case of an emergency
Laser
STOP
Operate the laser unit exclusively with the Sinpro MPU50-105 power supply
Can be sterilized in an autoclave with saturated water vapor at
135 °C (275 °F), 3 min. holding time and 2.13 bar (30.89 PSI)
Can be sterilized in an autoclave with saturated water vapor at
132°C (270 °F), 3 min. holding time and 1.87 bar overpressure (27.12 PSI)
8
61 96 542 D 3485
D 3485.076.02.01.02 11.2007
2 Glossary, symbols and abbreviations
2.2
CONTINUOUS EMISSION
PULSED EMISSION
FREQUENCY
HERTZ
INTERLOCK
JOULE
Pulsed laser emission (chopped mode)
Number of laser pulses per second
Unit of measure for frequency
Safety device that stops laser radiation when the door of the treatment room
is opened
Unit of measure for emitted energy
Unit of measure for laser power
STOP
End of treatment or treatment break
TIME
Treatment time setting mode
2.3
Abbreviations
Hz
s
W
mW
Y
nm
V
IR
NOHD
11.2007
Continuous laser emission
WATT
cm2
61 96 542 D 3485
D 3485.076.02.01.02
Glossary
Square centimeter
Hertz
Seconds
Watt
Milliwatt (one thousandth of a Watt)
Joule
Nanometer
Volt
Infrared diode
Nominal Ocular Hazard Distance according to EN 60825-1: 2003
9
3 Maintenance and service
3
Maintenance and service
3.1
Checking the calibration
3.1.1
Calibration check with an external power meter
Connect an optical fiber to the SIROLaser.
Aim the optical fiber at the measuring head of the power meter. Keep a
minimum distance of 20 mm between the optical fiber and the surface of
the measuring head. This will prevent damage to the measuring
instrument due to the high energy density resulting from the small
diameter of the optical fiber.
Wear the laser protective goggles and verify that the entrance to the room
where the calibration is being performed is controlled by an interlock
device or is locked.
Switch on the SIROLaser and go to the "MANUAL SETTING" area.
Select "MANUAL SETTINGS NO. 1".
Check to see that the optical fiber is neatly cut and that the laser beam
projects a red circle. The circle must be as well defined as possible.
The first test is performed at 0.5 W.
Press the “ENTER” key until the "W" are is highlighted.
Select the required power level with the "RIGHT ARROW" key or the
LEFT ARROW" key.
You can quit the "MANUAL SETTINGS" area once again by pressing the
"ENTER" key.
The test is performed in the following steps: 0.5 W, 1 W, 2 W, 3 W, 4 W, 5 W,
6 W, 7 W (see "Calibration/Optical power measurement" table).
Test at 0.5 W
Trigger the foot or finger switch until the power meter displays a stable
value.
Check whether the reading displayed on the power meter is within
the permissible range. Acc. to the standard, the maximum deviation is
+/- 20 %. However, Sirona Dental Systems GmbH recommends
performing recalibration if the deviation is +/- 5 %.
Test at 1 W
Trigger the foot or finger switch until the power meter displays a stable
value.
Check whether the reading displayed on the power meter is within
the permissible range. Acc. to the standard, the maximum deviation is
+/- 20 %. However, Sirona Dental Systems GmbH recommends
performing recalibration if the deviation is +/- 5 %.
Test at 2 W
Trigger the foot or finger switch until the power meter displays a stable
value.
Check whether the reading displayed on the power meter is within
the permissible range. Acc. to the standard, the maximum deviation is
+/- 20 %. However, Sirona Dental Systems GmbH recommends
performing recalibration if the deviation is +/- 5 %.
10
61 96 542 D 3485
D 3485.076.02.01.02 11.2007
3 Maintenance and service
Test at 3 W
Trigger the foot or finger switch until the power meter displays a stable
value.
Check whether the reading displayed on the power meter is within
the permissible range. Acc. to the standard, the maximum deviation is
+/- 20 %. However, Sirona Dental Systems GmbH recommends
performing recalibration if the deviation is +/-5 %.
Test at 4 W
Trigger the foot or finger switch until the power meter displays a stable
value.
Check whether the reading displayed on the power meter is within
the permissible range. Acc. to the standard, the maximum deviation is
+/- 20 %. However, Sirona Dental Systems GmbH recommends
performing recalibration if the deviation is +/- 5 %.
Test at 5 W
Trigger the foot or finger switch until the power meter displays a stable
value.
Check whether the reading displayed on the power meter is within
the permissible range. Acc. to the standard, the maximum deviation is
+/- 20 %. However, Sirona Dental Systems GmbH recommends
performing recalibration if the deviation is +/- 5 %.
Test at 6 W
Trigger the foot or finger switch until the power meter displays a stable
value.
Check whether the reading displayed on the power meter is within
the permissible range. Acc. to the standard, the maximum deviation is
+/- 20 %. However, Sirona Dental Systems GmbH recommends
performing recalibration if the deviation is +/- 5 %.
Test at 7 W
i
NOTE
The maximum value for a setting of 7 W is 6.5 W.
Trigger the foot or finger switch until the power meter displays a stable
value.
Check whether the reading displayed on the power meter is within
the permissible range. Acc. to the standard, the maximum deviation is
+/- 20 %. However, Sirona Dental Systems GmbH recommends
performing recalibration if the deviation is +/- 5 %.
Quit the calibration menu by pressing the "ENTER" key.
If the process is completed without errors and the values measured with the
power meter are within the permissible range, the calibration of the
SIROLaser has been tested successfully.
Enter the values in the attached certificate (see page 15).
Enter the measured values in the medical product log.
3.1.2
Error message and incorrect parameter values
If the following screen appears during one of the three calibration tests:
61 96 542 D 3485
D 3485.076.02.01.02
11.2007
11
3 Maintenance and service
Repeat the test from the beginning. If the error persists, do not continue working with the unit in any case. Please contact our Service in Bensheim.
3.2
Function check
3.2.1
Visual inspection
Damage and completeness check
Perform a completeness check according to the current SiroLaser Operating
Instructions.
i
NOTE
If the laser including all accessories is not complete, the visual check must be
regarded as passed only to a limited degree. Missing parts must be entered in
the test certificate and in the medical product log.
If the customer demands a test of an incomplete unit this also must be documented.
If any parts are damaged or missing, the resulting safety impairment must be
calculated and entered in the test certificate.
Example: A deep scratch in the paint job of the foot switch is not safety impairing. A deep scratch in the glass of the safety goggles is safety impairing.
Enter the defects in the attached certificate (see page 15).
3.2.2
General function check
Switch the unit on and check each key for proper functioning.
Select an indication and check the corresponding functions one after
the other:
4 green diodes are flashing.
Red pilot beam is ON.
Check readiness for exposure.
Pull off the interlock connector: The laser emission is terminated
immediately and the message
appears on the display.
Reconnect the interlock connector: The display indicates the start parameter and the laser is ready for operation again.
Check of fiber optic cable connection
Pull off the fiber optic cable connection: The laser emission is terminated
immediately and the message
appears on the display.
Reconnect the fiber optic cable: the display indicates the start parameter
and the laser is ready for operation again.
12
61 96 542 D 3485
D 3485.076.02.01.02 11.2007
3 Maintenance and service
4 yellow diodes flash when the laser is ON.
Activate the buzzer in the "Settings" menu.
Check the the buzzer for proper functioning.
Check the the finger switch for proper functioning.
Perform a complete test treatment in any case and check the power parameters: The power must not fluctuate by more than ± 20 % throughout
the entire treatment (However, Sirona Dental Systems GmbH recommends recalibration if the deviation exceeds ± 5 %).
Enter the items in the attached certificate (see page 15).
3.3
Electrical safety test
Before you run the test, familiarize yourself with the tester using its operating
instructions.
3.3.1
Tester setup based on the Bender tester
1) Power outlet for test object
4) Sockets for patient electrodes
11) Selection keys
15) Alphanumeric keyboard
16) Program control keys
18) Function key
20) Test prod
21) Test terminal
61 96 542 D 3485
D 3485.076.02.01.02
11.2007
13
3 Maintenance and service
3.3.2
Test setup and performance
Perform this test with the leakage current tester.
Fig. 1:
Cable connections of the SIROLaser to the leakage current tester
1.
Plug the connector of the SIROLaser power supply into the socket of the
tester (1) provided for that purpose.
2.
Connect the finger switch to the patient elektrode (4).
3.
Connect the metallic SMA socket of the laser to the test terminal (21).
4.
Switch the laser on.
5.
Perform the measurement
-
of the patient leakage current acc. to IEC 6060 1-1 (NC, SFC)
-
of the housing leakage current acc. to IEC 60601-1 (NC, SFC) and
-
of the earth leakage current acc. to IEC 60601-1 (NC, SFC)
as specified by the Tester Operating Instructions.
6.
During an STK, enter the values in the medical product log of the laser if it
is available.
Enter the values in the attached certificate (see page 15).
14
61 96 542 D 3485
D 3485.076.02.01.02 11.2007
3 Maintenance and service
3.4
Repair test certificate
□
SIROLaser (DE, EN, FR, ES, IT)
60 46 960
□
SIROLaser (EN, DK, SV, FI, NO)
60 46 978
□
SIROLaser (EN, FR, ES, NL, PT)
60 46 986
□
SIROLaser (EN, RUS, PL, TR, GR)
60 46 994
□
SIROLaser (USA)
60 88 749
□
...............................................................
□
...............................................................
Serial number.:
Software version:
61 96 542 D 3485
D 3485.076.02.01.02
11.2007
15
3 Maintenance and service
Safety tests
Performed by:
.......................................................... , Date:....................
Test:
Passed Y/N
Remarks:
1. Visual inspection of unit and accessories for
mechanical damage
2. General function check
3. Check of the audible and visual indicators
4. Measured values according
to EN 60601-1: 1990
Limit
value1
Earth leakage current NC:
_____________ mA
0.5
Patient leakage current NC:
_____________ mA
0.01
Housing leakage current NC:
_____________ mA
0.1
Earth leakage current SFC:
_____________ mA
1
Patient leakage current SFC:
_____________ mA
0.05
Housing leakage current SFC:
_____________ mA
0.5
5. Laser power measurement2 with calibrated measuring
instrument in the range of 0.5 to 7 W
0.5W:
.......................................
1W:
.......................................
2W:
.......................................
3W:
.......................................
4W:
.......................................
5W:
.......................................
6W:
.......................................
7W:
.......................................
1.
2.
If the limit values are exceeded, the laser must be repaired by Sirona or by an authroized dealer.
If one of the tests is not passed, the laser must be repaired by Sirona or by an authroized dealer.
___________________________________
Signature
16
61 96 542 D 3485
D 3485.076.02.01.02 11.2007
3 Maintenance and service
3.5
Final work
Switch unit off and pull power plug
Enter readings in "test certificate"
If a medical product log is present, it must be filled out
Complete as required by the customer if necessary
3.6
Accessories completed at the customer's request
□ Yes
□ No
STK performed and parameters entered in medical
product log or supplementary attached sheet
(repeated measurement)
□ Yes
□ No
Test certificate completed and attached to laser
□
□ No
Yes
Technical support
Technical information concerning parts requiring repair will be supplied by
Sirona only to authorized agents whose technical personnel have completed
a corresponding product training course. Please contact your local dental
depot or authorized service center for technical support.
Please always use the original packaging when shipping the laser unit.
Please disinfect and sterilize the laser unit according to the relevant
Operating Instructions before shipping it.
61 96 542 D 3485
D 3485.076.02.01.02
11.2007
17
4 Technical data
4
Technical data
Laser system
Class IV (according to DIN EN IEC 60825-1: 2003)
Equipment classification
Class IIb (according to Council Directive 93/42/EEC)
IP degree of protection
Laser unit: IP20; foot control: IPX5
Wavelength
970 nm +/- 15 nm
Power max.
Approx. 7 W CW
Aiming beam
635 or 650 nm, 1 mW max.
Emission mode
CW (continuous wave) or modulated 1 to 10 kHz
Pulse (chopped mode)
Single or repeated pulse
Pulse duration
100 ms to 60 sec in steps of 50 ms
Optical fiber thickness
200 µm, 320 µm and 400 µm, NA >= 0.22
Start
Electrical foot control/finger switch plus electronic access key
Adapter
External, 90 - 264 VAC, 47 - 63 Hz
Insulation class
Class 1, type B
Performance data displays
On graphic display
Dimensions
Approx. 87 x 54 x 190 mm (3.43 x 2.1 x 7.48 in.)
Weight
Approx. 0.45 kg (1 lb)
Power supply
The SIROLaser may only be operated with the Sinpro MPU50-105 power
supply
NOHD (Nominal Ocular
Hazard Distance)
Approx. 1.5 m for 10 s radiation exposure of the unprotected eye (numerical
aperture of the optical fiber NA = 0.22)
18
61 96 542 D 3485
D 3485.076.02.01.02 11.2007
5 Appendix
5
Appendix
5.1
Appendix A – Certification
The unit is manufactured in compliance with the provisions of Council
Directive 93/42/EEC concerning medical devices.
5.2
Appendix B – Label positions
The following figures show the positions of the labels on the SIROLaser.
Label 1a
Label 1
Fig. 2:
Label 4
Label positions, top view
Label 2
Label 6
Label 3
Label 8
Label 7
Fig. 3:
61 96 542 D 3485
D 3485.076.02.01.02
11.2007
Label positions, bottom view
19
5 Appendix
B2 – Label list
The following labels are attached to the SIROLaser:
Label 1a
CU1
1.
CN1
SA1
US1
Software extension (CU, NU, SA, US)
Label 1
20
61 96 542 D 3485
D 3485.076.02.01.02 11.2007
5 Appendix
CU1
1.
CN1
SA1
US1
Software extension (CU, NU, SA, US)
Label 2
Label 3
Label 4
61 96 542 D 3485
D 3485.076.02.01.02
11.2007
21
5 Appendix
Label 5
Label 6
CU, US1
1.
NU1
SA1
Software extension (CU, NU, SA)
Label 71
CU, NU, SA1
1.
USA1
GUS1
Software extension (CU, NU, SA, USA, GUS)
Label 8
USA
SA (up to SN 4225)
US/SA (from SN 4226)
Label 9
1.
22
Dependent on the SIROLaser version
61 96 542 D 3485
D 3485.076.02.01.02 11.2007
5 Appendix
5.3
JP1
Safety circuit (interlock)
Interlock connection supplied with the SIROLaser
(Insulate the jumper between pins 1 and 2; connect both of these pins to relay K1 with a two-core
cable.)
K1
Low-level relay (AC)
Door switch S1
must close the interlock circuit when the treatment room door is closed
Lp1
Optional low-level lamp used as an optical warning while the laser is in operation
T1
Power transformer
S2
Main switch for power supply
J1
Possible power supply for the SIROLaser
CAUTION
It is recommended to keep the distance between connection JP1 and relay K1
as short as possible.
Units designed for this purpose are already available from various companies, however, are also unreasonably expensive in some cases. We recommend having the installation performed by a qualified electrician who is also
responsible for the electrical system.
61 96 542 D 3485
D 3485.076.02.01.02
11.2007
23
5 Appendix
24
61 96 542 D 3485
D 3485.076.02.01.02 11.2007
tÉ=êÉëÉêîÉ=íÜÉ=êáÖÜí=íç=ã~âÉ=~åó=~äíÉê~íáçåë=ïÜáÅÜ=ã~ó=ÄÉ=êÉèìáêÉÇ=ÇìÉ=íç=íÉÅÜåáÅ~ä=áãéêçîÉãÉåíëK
«=páêçå~=aÉåí~ä=póëíÉãë=dãÄe=OMMS
a=PQURKMTSKMOKMNKMO=NNKOMMT
péê~ÅÜÉW ÉåÖäáëÅÜ=
ûKJkêKW MMM=MMM
páêçå~=aÉåí~ä=póëíÉãë=dãÄe
få=íÜÉ=rp^W
få=`~å~Ç~W
c~Äêáâëíê~ëëÉ=PN
SQSOR=_ÉåëÜÉáã
dÉêã~åó
ïïïKëáêçå~KÅçã
páêçå~=aÉåí~ä=póëíÉãë=ii`
QUPR=páêçå~=aêáîÉI=pìáíÉ=NMM
`Ü~êäçííÉI=k`=OUOTP
rp^
páêçå~=`~å~Ç~
PORM=oáÇÖÉï~ó=aêáîÉ=J=råáí=R
jáëëáëë~ìÖ~I=låí~êáç=iRi=RvS
`~å~Ç~
mêáåíÉÇ=áå=dÉêã~åó
fãéêáã¨=Éå=^ääÉã~ÖåÉ
lêÇÉê=kçK
SN=VS=RQO=a=PQUR