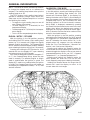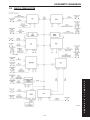
1
TABLE OF CONTENTS
1.0
INTRODUCTION . . . . . . . . . . . . . . . . . . . . . . . . . . . . . . . . . . . . . . . . . . . . . . . . . . . . . . . . .1
1.1
1.2
SYSTEM COVERAGE . . . . . . . . . . . . . . . . . . . . . . . . . . . . . . . . . . . . . . . . . . . . . . .1
SIX-STEP TROUBLESHOOTING PROCEDURE . . . . . . . . . . . . . . . . . . . . . . . . . .1
2.0
IDENTIFICATION OF SYSTEM . . . . . . . . . . . . . . . . . . . . . . . . . . . . . . . . . . . . . . . . . . . . .1
3.0
SYSTEM DESCRIPTION AND FUNCTIONAL OPERATION . . . . . . . . . . . . . . . . . . . . . .1
3.1
3.2
3.3
3.4
3.5
3.6
3.7
3.8
3.9
4.0
AIRBAG SYSTEM . . . . . . . . . . . . . . . . . . . . . . . . . . . . . . . . . . . . . . . . . . . . . . . . . . .1
3.1.1
DRIVER AIRBAG (DAB) . . . . . . . . . . . . . . . . . . . . . . . . . . . . . . . . . . . . . .2
3.1.2
CLOCKSPRING. . . . . . . . . . . . . . . . . . . . . . . . . . . . . . . . . . . . . . . . . . . . .3
3.1.3
PASSENGER AIRBAG (PAB) . . . . . . . . . . . . . . . . . . . . . . . . . . . . . . . . . .3
3.1.4
SIDE IMPACT AIRBAG CONTROL MODULES (SIACM) . . . . . . . . . . . .3
3.1.5
SEAT AIRBAGS . . . . . . . . . . . . . . . . . . . . . . . . . . . . . . . . . . . . . . . . . . . . .3
3.1.6
SPECIAL TOOLS. . . . . . . . . . . . . . . . . . . . . . . . . . . . . . . . . . . . . . . . . . . .4
3.1.7
DIAGNOSTIC TROUBLE CODES . . . . . . . . . . . . . . . . . . . . . . . . . . . . . .4
3.1.7.1 ACTIVE CODES . . . . . . . . . . . . . . . . . . . . . . . . . . . . . . . . . . . . . . . . . . . .4
3.1.7.2 STORED CODES . . . . . . . . . . . . . . . . . . . . . . . . . . . . . . . . . . . . . . . . . . .5
AUDIO SYSTEM . . . . . . . . . . . . . . . . . . . . . . . . . . . . . . . . . . . . . . . . . . . . . . . . . . . .5
COMPASS/TEMPERATURE MIRROR. . . . . . . . . . . . . . . . . . . . . . . . . . . . . . . . . . .5
EXTERIOR LIGHTING . . . . . . . . . . . . . . . . . . . . . . . . . . . . . . . . . . . . . . . . . . . . . . .8
ELECTRO/MECHANICAL INSTRUMENT CLUSTER (EMIC). . . . . . . . . . . . . . . . .8
INTERIOR LIGHTING . . . . . . . . . . . . . . . . . . . . . . . . . . . . . . . . . . . . . . . . . . . . . . . .9
REMOTE KEYLESS ENTRY MODULE . . . . . . . . . . . . . . . . . . . . . . . . . . . . . . . . . .9
3.7.1
VEHICLE THEFT SECURITY SYSTEM . . . . . . . . . . . . . . . . . . . . . . . . .9
3.7.2
VEHICLE THEFT SECURITY SYSTEM (EXPORT ONLY) . . . . . . . . .10
3.7.3
POWER DOOR LOCKS . . . . . . . . . . . . . . . . . . . . . . . . . . . . . . . . . . . . .10
3.7.3.1 CENTRAL LOCKING (W/VTSS ONLY) . . . . . . . . . . . . . . . . . . . . . . . . .10
3.7.3.2 ROLLING (AUTOMATIC) DOOR LOCKS. . . . . . . . . . . . . . . . . . . . . . . .10
3.7.3.3 DOOR LOCK INHIBIT . . . . . . . . . . . . . . . . . . . . . . . . . . . . . . . . . . . . . . .10
3.7.3.4 POWER DECKLID RELEASE . . . . . . . . . . . . . . . . . . . . . . . . . . . . . . . .10
3.7.3.5 PANIC MODE (IF EQUIPPED) . . . . . . . . . . . . . . . . . . . . . . . . . . . . . . . .10
VEHICLE COMMUNICATION . . . . . . . . . . . . . . . . . . . . . . . . . . . . . . . . . . . . . . . . .10
USING THE DRBIIIT . . . . . . . . . . . . . . . . . . . . . . . . . . . . . . . . . . . . . . . . . . . . . . . .12
3.9.1
DRBIIIT ERROR MESSAGES AND BLANK SCREEN . . . . . . . . . . . . .12
3.9.2
DRBIIIT DOES NOT POWER UP. . . . . . . . . . . . . . . . . . . . . . . . . . . . . .12
3.9.3
DISPLAY IS NOT VISIBLE . . . . . . . . . . . . . . . . . . . . . . . . . . . . . . . . . . .12
DISCLAIMERS, SAFETY, WARNINGS . . . . . . . . . . . . . . . . . . . . . . . . . . . . . . . . . . . . . .13
4.1
4.2
4.3
DISCLAIMERS. . . . . . . . . . . . . . . . . . . . . . . . . . . . . . . . . . . . . . . . . . . . . . . . . . . . .13
SAFETY . . . . . . . . . . . . . . . . . . . . . . . . . . . . . . . . . . . . . . . . . . . . . . . . . . . . . . . . . .13
4.2.1
TECHNICIAN SAFETY INFORMATION . . . . . . . . . . . . . . . . . . . . . . . . .13
4.2.2
VEHICLE PREPARATION FOR TESTING. . . . . . . . . . . . . . . . . . . . . . .13
4.2.3
SERVICING SUB-ASSEMBLIES . . . . . . . . . . . . . . . . . . . . . . . . . . . . . .13
4.2.4
DRBIIIT SAFETY INFORMATION. . . . . . . . . . . . . . . . . . . . . . . . . . . . . .13
WARNINGS . . . . . . . . . . . . . . . . . . . . . . . . . . . . . . . . . . . . . . . . . . . . . . . . . . . . . . .14
4.3.1
VEHICLE DAMAGE WARNINGS . . . . . . . . . . . . . . . . . . . . . . . . . . . . . .14
4.3.2
ROAD TESTING A COMPLAINT VEHICLE . . . . . . . . . . . . . . . . . . . . . .14
5.0
REQUIRED TOOLS AND EQUIPMENT . . . . . . . . . . . . . . . . . . . . . . . . . . . . . . . . . . . . .14
6.0
GLOSSARY OF ACRONYMS . . . . . . . . . . . . . . . . . . . . . . . . . . . . . . . . . . . . . . . . . . . . .14
i
TABLE OF CONTENTS - Continued
7.0
DIAGNOSTIC INFORMATION AND PROCEDURES . . . . . . . . . . . . . . . . . . . . . . . . . . .15
AIRBAG
ACCELEROMETER 1 . . . . . . . . . . . . . . . . . . . . . . . . . . . . . . . . . . . . . . . . . . . . . . . . . . . .16
ACCELEROMETER 2 . . . . . . . . . . . . . . . . . . . . . . . . . . . . . . . . . . . . . . . . . . . . . . . . . . . .16
INTERNAL 1 . . . . . . . . . . . . . . . . . . . . . . . . . . . . . . . . . . . . . . . . . . . . . . . . . . . . . . . . . . .16
OUTPUT DRIVER 1 . . . . . . . . . . . . . . . . . . . . . . . . . . . . . . . . . . . . . . . . . . . . . . . . . . . . .16
OUTPUT DRIVER 2 . . . . . . . . . . . . . . . . . . . . . . . . . . . . . . . . . . . . . . . . . . . . . . . . . . . . .16
SAFING SENSOR . . . . . . . . . . . . . . . . . . . . . . . . . . . . . . . . . . . . . . . . . . . . . . . . . . . . . . .16
STORED ENERGY FIRING 1. . . . . . . . . . . . . . . . . . . . . . . . . . . . . . . . . . . . . . . . . . . . . .16
STORED ENERGY LOGIC . . . . . . . . . . . . . . . . . . . . . . . . . . . . . . . . . . . . . . . . . . . . . . . .16
AIRBAG WARNING INDICATOR OPEN . . . . . . . . . . . . . . . . . . . . . . . . . . . . . . . . . . . . .19
AIRBAG WARNING INDICATOR SHORT . . . . . . . . . . . . . . . . . . . . . . . . . . . . . . . . . . . .19
CLUSTER MESSAGE MISMATCH . . . . . . . . . . . . . . . . . . . . . . . . . . . . . . . . . . . . . . . . .21
CONFIGURATION ERROR . . . . . . . . . . . . . . . . . . . . . . . . . . . . . . . . . . . . . . . . . . . . . . .23
DRIVER SQUIB 1 CIRCUIT OPEN . . . . . . . . . . . . . . . . . . . . . . . . . . . . . . . . . . . . . . . . .25
DRIVER SQUIB 1 CIRCUIT SHORT . . . . . . . . . . . . . . . . . . . . . . . . . . . . . . . . . . . . . . . .28
DRIVER SQUIB 1 SHORT TO BATTERY . . . . . . . . . . . . . . . . . . . . . . . . . . . . . . . . . . . .31
DRIVER SQUIB 1 SHORT TO GROUND . . . . . . . . . . . . . . . . . . . . . . . . . . . . . . . . . . . .34
INTERROGATE LEFT SIACM . . . . . . . . . . . . . . . . . . . . . . . . . . . . . . . . . . . . . . . . . . . . .37
INTERROGATE RIGHT SIACM . . . . . . . . . . . . . . . . . . . . . . . . . . . . . . . . . . . . . . . . . . . .39
LOSS OF IGNITION RUN - START . . . . . . . . . . . . . . . . . . . . . . . . . . . . . . . . . . . . . . . . .41
LOSS OF IGNITION RUN ONLY . . . . . . . . . . . . . . . . . . . . . . . . . . . . . . . . . . . . . . . . . . .44
MODULE NOT CONFIGURED FOR SAB . . . . . . . . . . . . . . . . . . . . . . . . . . . . . . . . . . . .47
NO CLUSTER MESSAGE . . . . . . . . . . . . . . . . . . . . . . . . . . . . . . . . . . . . . . . . . . . . . . . .49
NO LEFT SIACM MESSAGE . . . . . . . . . . . . . . . . . . . . . . . . . . . . . . . . . . . . . . . . . . . . . .51
NO PCI TRANSMISSION . . . . . . . . . . . . . . . . . . . . . . . . . . . . . . . . . . . . . . . . . . . . . . . . .53
NO RIGHT SIACM MESSAGE . . . . . . . . . . . . . . . . . . . . . . . . . . . . . . . . . . . . . . . . . . . . .56
PASSENGER SQUIB 1 CIRCUIT OPEN . . . . . . . . . . . . . . . . . . . . . . . . . . . . . . . . . . . . .58
PASSENGER SQUIB 1 CIRCUIT SHORT . . . . . . . . . . . . . . . . . . . . . . . . . . . . . . . . . . . .61
PASSENGER SQUIB 1 SHORT TO BATTERY . . . . . . . . . . . . . . . . . . . . . . . . . . . . . . . .64
PASSENGER SQUIB 1 SHORT TO GROUND . . . . . . . . . . . . . . . . . . . . . . . . . . . . . . . .67
SEAT SQUIB CIRCUIT OPEN . . . . . . . . . . . . . . . . . . . . . . . . . . . . . . . . . . . . . . . . . . . . .70
SEAT SQUIB CIRCUIT SHORT . . . . . . . . . . . . . . . . . . . . . . . . . . . . . . . . . . . . . . . . . . . .73
SEAT SQUIB SHORT TO BATTERY . . . . . . . . . . . . . . . . . . . . . . . . . . . . . . . . . . . . . . . .76
SEAT SQUIB SHORT TO GROUND . . . . . . . . . . . . . . . . . . . . . . . . . . . . . . . . . . . . . . . .79
*AIRBAG INDICATOR ON WITHOUT ACM TROUBLE CODES . . . . . . . . . . . . . . . . . .82
AUDIO
ALL OUTPUTS SHORT . . . . . . . . . . . . . . . . . . . . . . . . . . . . . . . . . . . . . . . . . . . . . . . . . .83
CASSETTE PLAYER INOP . . . . . . . . . . . . . . . . . . . . . . . . . . . . . . . . . . . . . . . . . . . . . . .86
CD MECHANICAL FAILURE . . . . . . . . . . . . . . . . . . . . . . . . . . . . . . . . . . . . . . . . . . . . . .86
NO PCI TRANSMISSION . . . . . . . . . . . . . . . . . . . . . . . . . . . . . . . . . . . . . . . . . . . . . . . . .86
*AM/FM SWITCH INOPERATIVE . . . . . . . . . . . . . . . . . . . . . . . . . . . . . . . . . . . . . . . . . . .86
*ANY STATION PRESET SWITCH INOPERATIVE. . . . . . . . . . . . . . . . . . . . . . . . . . . . .86
*BALANCE INOPERATIVE . . . . . . . . . . . . . . . . . . . . . . . . . . . . . . . . . . . . . . . . . . . . . . . .86
*CD EJECT SWITCH INOPERATIVE. . . . . . . . . . . . . . . . . . . . . . . . . . . . . . . . . . . . . . . .86
*EQUALIZER INOPERATIVE . . . . . . . . . . . . . . . . . . . . . . . . . . . . . . . . . . . . . . . . . . . . . .86
*FADER INOPERATIVE . . . . . . . . . . . . . . . . . . . . . . . . . . . . . . . . . . . . . . . . . . . . . . . . . .86
*FF/RW SWITCH INOPERATIVE . . . . . . . . . . . . . . . . . . . . . . . . . . . . . . . . . . . . . . . . . . .86
*HOUR/MINUTE SWITCHES INOPERATIVE . . . . . . . . . . . . . . . . . . . . . . . . . . . . . . . . .86
*PAUSE/PLAY SWITCH INOPERATIVE . . . . . . . . . . . . . . . . . . . . . . . . . . . . . . . . . . . . .86
*PWR SWITCH INOPERATIVE . . . . . . . . . . . . . . . . . . . . . . . . . . . . . . . . . . . . . . . . . . . .86
ii
TABLE OF CONTENTS - Continued
*SCAN SWITCH INOPERATIVE. . . . . . . . . . . . . . . . . . . . . . . . . . . . . . . . . . . . . . . . . . . .86
*SEEK SWITCH INOPERATIVE . . . . . . . . . . . . . . . . . . . . . . . . . . . . . . . . . . . . . . . . . . . .86
*SET SWITCH INOPERATIVE . . . . . . . . . . . . . . . . . . . . . . . . . . . . . . . . . . . . . . . . . . . . .86
*TAPE EJECT SWITCH INOPERATIVE. . . . . . . . . . . . . . . . . . . . . . . . . . . . . . . . . . . . . .86
*TIME SWITCH INOPERATIVE . . . . . . . . . . . . . . . . . . . . . . . . . . . . . . . . . . . . . . . . . . . .86
*TUNE SWITCH INOPERATIVE. . . . . . . . . . . . . . . . . . . . . . . . . . . . . . . . . . . . . . . . . . . .86
CD CHANGER MECHANICAL FAILURE . . . . . . . . . . . . . . . . . . . . . . . . . . . . . . . . . . . . .88
CD CHANGER READ FAILURE. . . . . . . . . . . . . . . . . . . . . . . . . . . . . . . . . . . . . . . . . . . .89
CD CHANGER TEMPERATURE HIGH . . . . . . . . . . . . . . . . . . . . . . . . . . . . . . . . . . . . . .90
CD PLAY FAILURE . . . . . . . . . . . . . . . . . . . . . . . . . . . . . . . . . . . . . . . . . . . . . . . . . . . . . .91
CD READ FAILURE . . . . . . . . . . . . . . . . . . . . . . . . . . . . . . . . . . . . . . . . . . . . . . . . . . . . .92
CD TEMPERATURE HIGH . . . . . . . . . . . . . . . . . . . . . . . . . . . . . . . . . . . . . . . . . . . . . . . .93
LOW VOLTAGE LEVEL . . . . . . . . . . . . . . . . . . . . . . . . . . . . . . . . . . . . . . . . . . . . . . . . . .94
NO ANTENNA CONNECTION . . . . . . . . . . . . . . . . . . . . . . . . . . . . . . . . . . . . . . . . . . . . .95
POWER AMP SHUTDOWN . . . . . . . . . . . . . . . . . . . . . . . . . . . . . . . . . . . . . . . . . . . . . . .96
COMMUNICATION
*NO RESPONSE FROM ACM . . . . . . . . . . . . . . . . . . . . . . . . . . . . . . . . . . . . . . . . . . . . .99
*NO RESPONSE FROM COMPASS/TEMPERATURE MIRROR . . . . . . . . . . . . . . . . .101
*NO RESPONSE FROM CONTROLLER ANTILOCK BRAKE . . . . . . . . . . . . . . . . . . .103
*NO RESPONSE FROM INSTRUMENT CLUSTER . . . . . . . . . . . . . . . . . . . . . . . . . . .105
*NO RESPONSE FROM LEFT SIACM . . . . . . . . . . . . . . . . . . . . . . . . . . . . . . . . . . . . .107
*NO RESPONSE FROM PCM (PCI BUS) - NGC . . . . . . . . . . . . . . . . . . . . . . . . . . . . .109
*NO RESPONSE FROM PCM (PCM SCI ONLY) - NGC . . . . . . . . . . . . . . . . . . . . . . .110
*NO RESPONSE FROM RADIO . . . . . . . . . . . . . . . . . . . . . . . . . . . . . . . . . . . . . . . . . .113
*NO RESPONSE FROM RIGHT SIACM . . . . . . . . . . . . . . . . . . . . . . . . . . . . . . . . . . . .115
*NO RESPONSE FROM RKE . . . . . . . . . . . . . . . . . . . . . . . . . . . . . . . . . . . . . . . . . . . .117
*NO RESPONSE FROM SENTRY KEY IMMOBILIZER MODULE. . . . . . . . . . . . . . . .119
*NO RESPONSE FROM TRANSMISSION CONTROL MODULE - NGC . . . . . . . . . .121
*PCI BUS COMMUNICATION FAILURE . . . . . . . . . . . . . . . . . . . . . . . . . . . . . . . . . . . .124
COMPASS/MINI-TRIP COMPUTER
COMPASS/TEMPERATURE MIRROR INTERNAL FAILURE . . . . . . . . . . . . . . . . . . . .127
*COMPASS/TEMPERATURE MIRROR DOES CALIBRATE . . . . . . . . . . . . . . . . . . . .128
*COMPASS/TEMPERATURE MIRROR INOPERATIVE . . . . . . . . . . . . . . . . . . . . . . . .130
*TEMPERATURE DISPLAY INOPERATIVE OR WRONG (2.0L ONLY). . . . . . . . . . . .132
EXTERIOR LIGHTING
*HIGH BEAM HEADLAMPS WILL NOT TRN ON . . . . . . . . . . . . . . . . . . . . . . . . . . . . .133
*HIGH BEAM HEADLAMPS WILL NOT TURN OFF . . . . . . . . . . . . . . . . . . . . . . . . . . .135
*LOW BEAM HEADLAMPS WILL NOT TURN OFF . . . . . . . . . . . . . . . . . . . . . . . . . . .136
*LOW BEAM HEADLAMPS WILL NOT TRN ON . . . . . . . . . . . . . . . . . . . . . . . . . . . . .137
INSTRUMENT CLUSTER
ABS INDICATOR CIRCUIT OPEN . . . . . . . . . . . . . . . . . . . . . . . . . . . . . . . . . . . . . . . . .139
AIRBAG INDICATOR CIRCUIT OPEN. . . . . . . . . . . . . . . . . . . . . . . . . . . . . . . . . . . . . .139
ABS MESSAGE NOT RECEIVED . . . . . . . . . . . . . . . . . . . . . . . . . . . . . . . . . . . . . . . . .140
ACM MESSAGE NOT RECEIVED . . . . . . . . . . . . . . . . . . . . . . . . . . . . . . . . . . . . . . . . .140
EATX MESSAGE NOT RECEIVED . . . . . . . . . . . . . . . . . . . . . . . . . . . . . . . . . . . . . . . .140
SBEC MESSAGE NOT RECEIVED . . . . . . . . . . . . . . . . . . . . . . . . . . . . . . . . . . . . . . . .140
SKIM MESSAGE NOT RECEIVED . . . . . . . . . . . . . . . . . . . . . . . . . . . . . . . . . . . . . . . .140
BATTERY LOSS . . . . . . . . . . . . . . . . . . . . . . . . . . . . . . . . . . . . . . . . . . . . . . . . . . . . . . .142
CLUSTER BUS TX SHUTDOWN. . . . . . . . . . . . . . . . . . . . . . . . . . . . . . . . . . . . . . . . . .144
iii
TABLE OF CONTENTS - Continued
NO PCI BUS TRANSMISSION. . . . . . . . . . . . . . . . . . . . . . . . . . . . . . . . . . . . . . . . . . . .144
EATX MISMATCH . . . . . . . . . . . . . . . . . . . . . . . . . . . . . . . . . . . . . . . . . . . . . . . . . . . . . .145
FUEL LEVEL SENSOR OPEN . . . . . . . . . . . . . . . . . . . . . . . . . . . . . . . . . . . . . . . . . . . .146
FUEL LEVEL SENSOR SHORT . . . . . . . . . . . . . . . . . . . . . . . . . . . . . . . . . . . . . . . . . . .148
PANEL DIMMER OPEN . . . . . . . . . . . . . . . . . . . . . . . . . . . . . . . . . . . . . . . . . . . . . . . . .150
*ALL GAUGES INOPERATIVE . . . . . . . . . . . . . . . . . . . . . . . . . . . . . . . . . . . . . . . . . . . .152
*ANY OR ALL GAUGE POINTER(S) ON WRONG SIDE OF STOP . . . . . . . . . . . . . .154
*ANY PCI BUS INDICATOR INOPERATIVE . . . . . . . . . . . . . . . . . . . . . . . . . . . . . . . . .155
*BRAKE WARNING INDICATOR ALWAYS ON . . . . . . . . . . . . . . . . . . . . . . . . . . . . . . .156
*BRAKE WARNING INDICATOR INOPERATIVE . . . . . . . . . . . . . . . . . . . . . . . . . . . . .158
*FRONT FOG LAMP INDICATOR INOPERATIVE . . . . . . . . . . . . . . . . . . . . . . . . . . . .161
*FUEL GAUGE INACCURATE . . . . . . . . . . . . . . . . . . . . . . . . . . . . . . . . . . . . . . . . . . . .162
*HIGH BEAM INDICATOR INOPERATIVE. . . . . . . . . . . . . . . . . . . . . . . . . . . . . . . . . . .164
*INSTRUMENT CLUSTER DIMMING INOPERATIVE. . . . . . . . . . . . . . . . . . . . . . . . . .165
*LOW OIL PRESSURE INDICATOR ALWAYS ON . . . . . . . . . . . . . . . . . . . . . . . . . . . .166
*LOW OIL PRESSURE INDICATOR INOPERATIVE. . . . . . . . . . . . . . . . . . . . . . . . . . .167
*ONE GAUGE INOPERATIVE . . . . . . . . . . . . . . . . . . . . . . . . . . . . . . . . . . . . . . . . . . . .169
*PRND OR AUTOSTICK INDICATOR DISPLAY INACCURATE OR INOPERATIVE .170
*REAR FOG LAMP INDICATOR INOPERATIVE - BUX ONLY. . . . . . . . . . . . . . . . . . .171
*SEATBELT INDICATOR INOPERATIVE . . . . . . . . . . . . . . . . . . . . . . . . . . . . . . . . . . . .172
*VF DISPLAY INOPERATIVE . . . . . . . . . . . . . . . . . . . . . . . . . . . . . . . . . . . . . . . . . . . . .174
INTERIOR LIGHTING
*COURTESY LAMPS INOPERATIVE - ALL LAMPS . . . . . . . . . . . . . . . . . . . . . . . . . . .175
*COURTESY LAMPS ON AT ALL TIMES . . . . . . . . . . . . . . . . . . . . . . . . . . . . . . . . . . .176
*ILLUMINATED ENTRY INOPERATIVE. . . . . . . . . . . . . . . . . . . . . . . . . . . . . . . . . . . . .179
POWER DOOR LOCKS/RKE
BODY STYLE MISMATCH . . . . . . . . . . . . . . . . . . . . . . . . . . . . . . . . . . . . . . . . . . . . . . .180
DRIVER DOOR SWITCH SHORTED OR STUCK . . . . . . . . . . . . . . . . . . . . . . . . . . . .181
INCORRECT MODULE TYPE CONFIGURATION FOR PART NUMBER . . . . . . . . . .183
INTERIOR DECKLID RELEASE SWITCH SHORTED OR STUCK . . . . . . . . . . . . . . .184
MODULE NOT CONFIGURED FOR RKE . . . . . . . . . . . . . . . . . . . . . . . . . . . . . . . . . . .186
NO AIRBAG MESSAGES RECEIVED . . . . . . . . . . . . . . . . . . . . . . . . . . . . . . . . . . . . . .187
NO PCM MESSAGES RECEIVED. . . . . . . . . . . . . . . . . . . . . . . . . . . . . . . . . . . . . . . . .188
NO SKIM MESSAGES RECEIVED . . . . . . . . . . . . . . . . . . . . . . . . . . . . . . . . . . . . . . . .189
PASSENGER DOOR SWITCH FAILURE . . . . . . . . . . . . . . . . . . . . . . . . . . . . . . . . . . .190
*ALL DOOR LOCKS INOPERATIVE . . . . . . . . . . . . . . . . . . . . . . . . . . . . . . . . . . . . . . .192
*ALL DOORS EXCEPT DRIVER FAIL TO LOCK AND UNLOCK. . . . . . . . . . . . . . . . .196
*ALL DOORS EXCEPT DRIVER FAIL TO UNLOCK. . . . . . . . . . . . . . . . . . . . . . . . . . .197
*ALL DOORS FAIL TO LOCK . . . . . . . . . . . . . . . . . . . . . . . . . . . . . . . . . . . . . . . . . . . . .198
*ALL LOCKS INOPERATIVE FROM A DOOR LOCK SWITCH . . . . . . . . . . . . . . . . . .200
*AUTOMATIC DOOR LOCKS INOPERATIVE . . . . . . . . . . . . . . . . . . . . . . . . . . . . . . . .202
*DECKLID SOLENOID INOPERATIVE . . . . . . . . . . . . . . . . . . . . . . . . . . . . . . . . . . . . .203
*DOORS LOCKABLE WITH KEY IN IGNITION & DRIVER DOOR OPEN . . . . . . . . .204
*DRIVER DOOR FAILS TO LOCK & UNLOCK . . . . . . . . . . . . . . . . . . . . . . . . . . . . . . .206
*DRIVER DOOR FAILS TO UNLOCK . . . . . . . . . . . . . . . . . . . . . . . . . . . . . . . . . . . . . .208
*ONE PASSENGER DOOR FAILS TO LOCK & UNLOCK . . . . . . . . . . . . . . . . . . . . . .209
*RKE INOPERATIVE . . . . . . . . . . . . . . . . . . . . . . . . . . . . . . . . . . . . . . . . . . . . . . . . . . . .211
VEHICLE THEFT/SECURITY
HOOD AJAR SWITCH MISSING (EXPORT ONLY) . . . . . . . . . . . . . . . . . . . . . . . . . . .213
MODULE PREVIOUSLY CONFIGURED FOR VTSS . . . . . . . . . . . . . . . . . . . . . . . . . .215
iv
TABLE OF CONTENTS - Continued
*ALARM TRIPS ON ITS OWN . . . . . . . . . . . . . . . . . . . . . . . . . . . . . . . . . . . . . . . . . . . .216
*HEADLAMPS FAIL TO FLASH DURING ALARM . . . . . . . . . . . . . . . . . . . . . . . . . . . .217
*HORN FAILS TO SOUND DURING ALARM . . . . . . . . . . . . . . . . . . . . . . . . . . . . . . . .218
*INTRUSION SENSOR CANNOT BE DISABLED (EXPORT ONLY) . . . . . . . . . . . . . .219
*INTRUSION SENSOR FAILS TO TRIP VTSS (EXPORT ONLY) . . . . . . . . . . . . . . . .220
*INTRUSION SENSOR REPEATEDLY TRIGGERS VTSS (EXPORT ONLY) . . . . . . .222
*OPEN DRIVER DOOR FAILS TO TRIP ALARM . . . . . . . . . . . . . . . . . . . . . . . . . . . . .223
*OPEN PASSENGER DOOR FAILS TO TRIP ALARM . . . . . . . . . . . . . . . . . . . . . . . . .224
*PARK LAMPS FAIL TO FLASH DURING ALARM . . . . . . . . . . . . . . . . . . . . . . . . . . . .227
*VTSS FAILS TO ARM FROM DRIVER DOOR CYLINDER LOCK SWITCH (EXPORT
ONLY) . . . . . . . . . . . . . . . . . . . . . . . . . . . . . . . . . . . . . . . . . . . . . . . . . . . . . . . . . . . . . . .228
*VTSS FAILS TO ARM/DISARM FROM DRIVER DOOR CYLINDER LOCK
SWITCH . . . . . . . . . . . . . . . . . . . . . . . . . . . . . . . . . . . . . . . . . . . . . . . . . . . . . . . . . . . . . .228
*VTSS FAILS TO ARM FROM PASSENGER DOOR CYLINDER LOCK SWITCH
(EXPORT ONLY) . . . . . . . . . . . . . . . . . . . . . . . . . . . . . . . . . . . . . . . . . . . . . . . . . . . . . . .229
*VTSS INDICATOR FAILS TO FLASH . . . . . . . . . . . . . . . . . . . . . . . . . . . . . . . . . . . . . .230
*VTSS INDICATOR STAYS ON STEADY DURING ARMING. . . . . . . . . . . . . . . . . . . .231
*VTSS SIREN INOPERATIVE (EXPORT ONLY). . . . . . . . . . . . . . . . . . . . . . . . . . . . . .233
VERIFICATION TESTS
VERIFICATION TESTS . . . . . . . . . . . . . . . . . . . . . . . . . . . . . . . . . . . . . . . . . . . . . . . . . .235
8.0
COMPONENT LOCATIONS . . . . . . . . . . . . . . . . . . . . . . . . . . . . . . . . . . . . . . . . . . . . . .239
8.1
8.2
8.3
8.4
8.5
8.6
8.7
9.0
AIRBAG SYSTEM . . . . . . . . . . . . . . . . . . . . . . . . . . . . . . . . . . . . . . . . . . . . . . . . .239
8.1.1
AIRBAG CONTROL MODULE (ACM) . . . . . . . . . . . . . . . . . . . . . . . . .239
8.1.2
AIRBAG MODULE (DRIVER) . . . . . . . . . . . . . . . . . . . . . . . . . . . . . . . .239
8.1.3
AIRBAG MODULE (PASSENGER) . . . . . . . . . . . . . . . . . . . . . . . . . . .239
8.1.4
CLOCKSPRING. . . . . . . . . . . . . . . . . . . . . . . . . . . . . . . . . . . . . . . . . . .240
8.1.5
SIDE IMPACT AIRBAG CONTROL MODULE (SIACM) . . . . . . . . . . .240
DATA LINK CONNECTOR . . . . . . . . . . . . . . . . . . . . . . . . . . . . . . . . . . . . . . . . . .240
FUSE BLOCK . . . . . . . . . . . . . . . . . . . . . . . . . . . . . . . . . . . . . . . . . . . . . . . . . . . .241
INSTRUMENT CLUSTER . . . . . . . . . . . . . . . . . . . . . . . . . . . . . . . . . . . . . . . . . . .241
8.4.1
BASE CLUSTER . . . . . . . . . . . . . . . . . . . . . . . . . . . . . . . . . . . . . . . . . .241
8.4.2
PREMIUM CLUSTER . . . . . . . . . . . . . . . . . . . . . . . . . . . . . . . . . . . . . .241
POWER DOOR LOCKS . . . . . . . . . . . . . . . . . . . . . . . . . . . . . . . . . . . . . . . . . . . .242
8.5.1
REMOTE KEYLESS ENTRY MODULE . . . . . . . . . . . . . . . . . . . . . . . .242
8.5.2
DECKLID RELEASE SOLENOID . . . . . . . . . . . . . . . . . . . . . . . . . . . .242
8.5.3
DOOR LOCK MOTOR . . . . . . . . . . . . . . . . . . . . . . . . . . . . . . . . . . . . .243
VEHICLE COMMUNICATION . . . . . . . . . . . . . . . . . . . . . . . . . . . . . . . . . . . . . . . .243
8.6.1
CONTROLLER ANTILOCK BRAKE MODULE . . . . . . . . . . . . . . . . . .243
8.6.2
SENTRY KEY IMMOBILIZER MODULE (SKIM) . . . . . . . . . . . . . . . . .243
VEHICLE THEFT SECURITY . . . . . . . . . . . . . . . . . . . . . . . . . . . . . . . . . . . . . . . .244
8.7.1
REMOTE KEYLESS ENTRY MODULE . . . . . . . . . . . . . . . . . . . . . . . .244
8.7.2
HOOD AJAR SWITCH (EXPORT) . . . . . . . . . . . . . . . . . . . . . . . . . . . .244
8.7.3
DOOR CYLINDER LOCK SWITCH (IF EQUIPPED). . . . . . . . . . . . . .244
8.7.4
DECKLID SECURITY SWITCH . . . . . . . . . . . . . . . . . . . . . . . . . . . . . .245
CONNECTOR PINOUTS . . . . . . . . . . . . . . . . . . . . . . . . . . . . . . . . . . . . . . . . . . . . . . . .247
AIRBAG CONTROL MODULE - YELLOW 23 WAY . . . . . . . . . . . . . . . . . . . . . . . . . . .247
C208 - YELLOW (SEAT SIDE) . . . . . . . . . . . . . . . . . . . . . . . . . . . . . . . . . . . . . . . . . . . .247
C208 - YELLOW (SIDE IMPACT AIRBAG JUMPER SIDE) . . . . . . . . . . . . . . . . . . . . .247
v
TABLE OF CONTENTS - Continued
C209 - YELLOW (SEAT SIDE) . . . . . . . . . . . . . . . . . . . . . . . . . . . . . . . . . . . . . . . . . . . .247
C209 - YELLOW (SIDE IMPACT AIRBAG JUMPER SIDE) . . . . . . . . . . . . . . . . . . . . .248
CLOCKSPRING - GREEN 7 WAY . . . . . . . . . . . . . . . . . . . . . . . . . . . . . . . . . . . . . . . . .248
COMPACT DISC CHANGER - BLACK 8 WAY . . . . . . . . . . . . . . . . . . . . . . . . . . . . . . .248
COMPASS/TEMPERATURE MIRROR - BLACK 10 WAY. . . . . . . . . . . . . . . . . . . . . . .248
CONTROLLER ANTILOCK BRAKE - BLACK 24 WAY . . . . . . . . . . . . . . . . . . . . . . . . .249
DATA LINK CONNECTOR - WHITE 16 WAY . . . . . . . . . . . . . . . . . . . . . . . . . . . . . . . .249
DECKLID RELEASE SWITCH (POWER RELEASE) - BLACK 2 WAY . . . . . . . . . . . .250
DECKLID SECURITY SWITCH (KNOCK OUT) - GRAY 2 WAY . . . . . . . . . . . . . . . . .250
DECKLID SOLENOID - BLACK 2 WAY . . . . . . . . . . . . . . . . . . . . . . . . . . . . . . . . . . . . .250
DOME LAMP/INTRUSION SENSOR (EXPORT) - NATURAL 4 WAY . . . . . . . . . . . . .250
DRIVER AIRBAG SQUIB 1 - YELLOW 2 WAY . . . . . . . . . . . . . . . . . . . . . . . . . . . . . . .251
DRIVER DOOR AJAR SWITCH - BLACK 2 WAY . . . . . . . . . . . . . . . . . . . . . . . . . . . . .251
DRIVER DOOR LOCK MOTOR/AJAR SWITCH - BLACK 4 WAY . . . . . . . . . . . . . . . .251
FUEL PUMP MODULE - LT. GRAY 4 WAY . . . . . . . . . . . . . . . . . . . . . . . . . . . . . . . . . .251
HOOD AJAR SWITCH (EXPORT) - BLACK 2 WAY . . . . . . . . . . . . . . . . . . . . . . . . . . .252
IGNITION SWITCH C1 - BLACK 10 WAY . . . . . . . . . . . . . . . . . . . . . . . . . . . . . . . . . . .252
IGNITION SWITCH C2 - WHITE 2 WAY . . . . . . . . . . . . . . . . . . . . . . . . . . . . . . . . . . . .252
INSTRUMENT CLUSTER - BLACK 26 WAY . . . . . . . . . . . . . . . . . . . . . . . . . . . . . . . . .253
LEFT CYLINDER LOCK SWITCH (PREMIUM) - BLACK 2 WAY. . . . . . . . . . . . . . . . .253
LEFT DOOR LOCK SWITCH - BLACK 3 WAY . . . . . . . . . . . . . . . . . . . . . . . . . . . . . . .254
LEFT FRONT DOOR SPEAKER - 3 WAY . . . . . . . . . . . . . . . . . . . . . . . . . . . . . . . . . . .254
LEFT INSTRUMENT PANEL SPEAKER - WHITE 2 WAY . . . . . . . . . . . . . . . . . . . . . .254
LEFT REAR DOOR AJAR SWITCH - BLACK 2 WAY. . . . . . . . . . . . . . . . . . . . . . . . . .254
LEFT REAR DOOR LOCK MOTOR/AJAR SWITCH - BLACK 4 WAY. . . . . . . . . . . . .255
LEFT REAR SPEAKER - 3 WAY . . . . . . . . . . . . . . . . . . . . . . . . . . . . . . . . . . . . . . . . . .255
LEFT SEAT AIRBAG SQUIB - 2 WAY . . . . . . . . . . . . . . . . . . . . . . . . . . . . . . . . . . . . . .255
LEFT SIDE IMPACT AIRBAG CONTROL MODULE - 8 WAY . . . . . . . . . . . . . . . . . . .255
MULTI-FUNCTION SWITCH - GRAY 20 WAY. . . . . . . . . . . . . . . . . . . . . . . . . . . . . . . .256
PASSENGER AIRBAG SQUIB 1 - YELLOW 2 WAY. . . . . . . . . . . . . . . . . . . . . . . . . . .256
PASSENGER DOOR AJAR SWITCH - BLACK 2 WAY . . . . . . . . . . . . . . . . . . . . . . . .257
PASSENGER DOOR LOCK MOTOR/AJAR SWITCH - BLACK 4 WAY . . . . . . . . . . .257
HORN RELAY . . . . . . . . . . . . . . . . . . . . . . . . . . . . . . . . . . . . . . . . . . . . . . . . . . . . . . . . .258
POWERTRAIN CONTROL MODULE C1 - BLACK 38 WAY. . . . . . . . . . . . . . . . . . . . .259
RADIO C1 - DK. GRAY 22 WAY . . . . . . . . . . . . . . . . . . . . . . . . . . . . . . . . . . . . . . . . . .260
RADIO C2 (COMPACT DISC CHANGER) - DK. GRAY 10 WAY . . . . . . . . . . . . . . . . .260
REMOTE KEYLESS ENTRY MODULE - BLACK 26 WAY . . . . . . . . . . . . . . . . . . . . . .261
RIGHT CYLINDER LOCK SWITCH (EXPORT) - BLACK 2 WAY. . . . . . . . . . . . . . . . .261
RIGHT DOOR LOCK SWITCH - BLACK 3 WAY. . . . . . . . . . . . . . . . . . . . . . . . . . . . . .262
RIGHT FRONT DOOR SPEAKER - 3 WAY. . . . . . . . . . . . . . . . . . . . . . . . . . . . . . . . . .262
RIGHT INSTRUMENT PANEL SPEAKER - WHITE 2 WAY . . . . . . . . . . . . . . . . . . . . .262
RIGHT REAR DOOR AJAR SWITCH - BLACK 2 WAY . . . . . . . . . . . . . . . . . . . . . . . .263
RIGHT REAR DOOR LOCK MOTOR/AJAR SWITCH - BLACK 4 WAY . . . . . . . . . . .263
RIGHT REAR SPEAKER - 3 WAY . . . . . . . . . . . . . . . . . . . . . . . . . . . . . . . . . . . . . . . . .263
RIGHT SEAT AIRBAG SQUIB - 2 WAY . . . . . . . . . . . . . . . . . . . . . . . . . . . . . . . . . . . . .263
RIGHT SIDE IMPACT AIRBAG CONTROL MODULE - 8 WAY . . . . . . . . . . . . . . . . . .263
SEAT BELT SWITCH - BLACK 2 WAY . . . . . . . . . . . . . . . . . . . . . . . . . . . . . . . . . . . . .264
SENTRY KEY IMMOBILIZER MODULE - BLACK 6 WAY . . . . . . . . . . . . . . . . . . . . . .264
SIREN (EXPORT) - BLACK 4 WAY . . . . . . . . . . . . . . . . . . . . . . . . . . . . . . . . . . . . . . . .264
vi
TABLE OF CONTENTS - Continued
10.0
SCHEMATIC DIAGRAMS. . . . . . . . . . . . . . . . . . . . . . . . . . . . . . . . . . . . . . . . . . . . . . . .265
10.1 AIRBAG SYSTEM . . . . . . . . . . . . . . . . . . . . . . . . . . . . . . . . . . . . . . . . . . . . . . . . .265
10.2 AUDIO SYSTEM . . . . . . . . . . . . . . . . . . . . . . . . . . . . . . . . . . . . . . . . . . . . . . . . . .266
10.2.1 CD CHANGER . . . . . . . . . . . . . . . . . . . . . . . . . . . . . . . . . . . . . . . . . . .267
10.3 COMPASS/TEMPERATURE MIRROR. . . . . . . . . . . . . . . . . . . . . . . . . . . . . . . . .267
10.4 EXTERIOR LIGHTING . . . . . . . . . . . . . . . . . . . . . . . . . . . . . . . . . . . . . . . . . . . . .268
10.5 INSTRUMENT CLUSTER . . . . . . . . . . . . . . . . . . . . . . . . . . . . . . . . . . . . . . . . . . .269
10.6 INTERIOR LIGHTING . . . . . . . . . . . . . . . . . . . . . . . . . . . . . . . . . . . . . . . . . . . . 270
10.7 POWER DOOR LOCKS/RKE . . . . . . . . . . . . . . . . . . . . . . . . . . . . . . . . . . . . . . 270
10.8 VEHICLE COMMUNICATION . . . . . . . . . . . . . . . . . . . . . . . . . . . . . . . . . . . . . . 271
10.9 VEHICLE THEFT SECURITY SYSTEM . . . . . . . . . . . . . . . . . . . . . . . . . . . . . . 272
vii
NOTES
viii
GENERAL INFORMATION
1.0
•
INTRODUCTION
•
The procedures contained in this manual include
all the specifications, instructions and graphics
needed to diagnose 2004 body system problems. The
diagnostics in this manual are based on the failure
condition or symptom being present at the time of
diagnosis.
Please follow the recommendations below when
choosing your diagnostic path.
1. First make sure the DRBIIIt is communicating
with the appropriate modules; i.e., if the
DRBIIIt displays a ‘‘No Response’’ or “Bus +/signal open” condition, you must diagnose that
first.
2. Read DTC’s (diagnostic trouble codes) with the
DRBIIIt.
•
•
symptom analysis
problem isolation
repair of isolated problem
verification of proper operation
2.0
IDENTIFICATION OF
SYSTEM
The vehicle systems that are part of the ‘‘body’’
system are:
• Airbag System
• Audio
•
•
•
Compass/Temperature Mirror
Instrument Cluster
•
Interior Lighting
Power Door Locks/Remote Keyless Entry
Vehicle Communications
•
Vehicle Theft Security System
3. If no DTC’s are present, identify the customer
complaint.
4. Once the DTC or customer complaint is identified, locate the matching test in the Table of
Contents and begin to diagnose the symptom.
All component location views are in Section 8.0. All
connector pinouts are in Section 9.0. All schematics
are in Section 10.0.
An * placed before the symptom description indicates a customer complaint.
When repairs are required, refer to the appropriate service manual for the proper removal and
repair procedure.
Diagnostic procedures change every year. New
diagnostic systems may be added and carryover
systems may be enhanced. READ THIS MANUAL
BEFORE TRYING TO DIAGNOSE A VEHICLE
DIAGNOSTIC TROUBLE CODE. It is recommended that you review the entire manual to become familiar with all the new and changed diagnostic procedures.
This book reflects many suggested changes from
readers of past issues. After using this book, if you
have any comments or suggestions, please fill out
the comment form in the back of the book and mail
it back to us.
The body system on the 2004 PL consists of a
combination of modules that communicate over the
PCI bus (Programmable Communication Interface
multiplex system). Through the PCI bus, information about the operation of vehicle components and
circuits is relayed quickly to the appropriate module(s). All modules receive all the information transmitted on the bus even though a module may not
require all information to perform it’s function. It
will only respond to messages ‘‘addressed’’ to it
through a binary coding process. This method of
data transmission significantly reduces the complexity of the wiring in the vehicle and the size of
wiring harnesses. All of the information about the
functioning of all the systems is organized, controlled, and communicated by the PCI bus, which is
described in the Vehicle Communication Section of
this general information.
1.1
3.1
•
3.0
SYSTEM COVERAGE
This diagnostic procedures manual covers all
2004 PL NEON vehicles.
1.2
SYSTEM DESCRIPTION AND
FUNCTIONAL OPERATION
AIRBAG SYSTEM
The Airbag Control Module (ACM) is bolted to the
floor panel transmission tunnel rearward from the
gear shift selector inside the vehicle. The ACM
mounting bracket is welded to the tunnel and is not
serviced with the ACM. The ACM contains a microprocessor, the impact sensor, and energy storage
capacitor. The microprocessor contains the airbag
system logic. The ACM system logic includes OnBoard Diagnostics (OBD) capability, and communicates with the instrument cluster circuitry via the
PCI data bus to control the airbag indicator lamp.
SIX-STEP TROUBLESHOOTING
PROCEDURE
Diagnosis of the body system is done in six basic
steps:
• verification of complaint
• verification of any related symptoms
1
GENERAL INFORMATION
system malfunction. Whenever the ignition key is
turned to the ‘‘run’’ or ‘‘start’’ position, the MIC
performs a lamp check by turning the airbag warning lamp on for 6-8 seconds. If the lamp turns off, it
means that the ACM has checked the system and
found it to be free of discernible malfunctions. If the
lamp remains on, there could be an active fault in
the system or the MIC lamp circuit may be internally shorted to ground. If the lamp comes on and
stays on for a period longer than 6-8 seconds then
goes off, there is usually an intermittent problem in
the system.
The ACM cannot be repaired or adjusted and, if
damaged or faulty, it must be replaced.
The microprocessor in the ACM monitors the
impact sensor signal and the airbag system electrical circuits to determine the system readiness. If
the ACM detects a monitored system fault, it sends
messages to the instrument cluster on the PCI data
bus to turn on the airbag indicator lamp. A preprogrammed decision algorithm in the ACM microprocessor determines when the deceleration rate as
signaled by the sensor indicates an impact that is
severe enough to require airbag system protection.
When the programmed conditions are met, the
ACM sends an electrical signal to deploy the airbag
system components.
The impact sensor is an accelerometer that
senses the rate of vehicle deceleration, which provides verification of the direction and severity of an
impact. The impact sensor is calibrated for the
specific vehicle, and is only serviced as a unit with
the ACM.
The ACM also contains an energy-storage capacitor. The purpose of the capacitor is to provide
airbag system protection in a severe secondary
impact if the initial impact has damaged or disconnected the battery, but was not severe enough to
deploy the airbags.
3.1.1
DRIVER AIRBAG (DAB)
The airbag protective trim cover is the most
visible part of the driver side airbag system. The
module is mounted directly to the steering wheel.
Located under the trim cover are the horn switch,
the airbag cushion, and the airbag cushion supporting components. The airbag module includes a
housing to which the cushion and inflator are
attached and sealed. The airbag module cannot be
repaired, and must be replaced if deployed or in any
way damaged. The inflator assembly is mounted to
the back of the airbag module. The inflator seals the
hole in the airbag cushion so it can discharge the
gas it produces directly into the cushion when
supplied with the proper electrical signal. The protective trim cover is fitted to the front of the airbag
module and forms a decorative cover in the center of
the steering wheel. Upon airbag deployment, this
cover will split at a predetermined breakout line.
WARNING: THE AIRBAG SYSTEM IS A
SENSITIVE, COMPLEX ELECTROMECHANICAL UNIT. BEFORE ATTEMPTING TO DIAGNOSE OR SERVICE ANY AIRBAG SYSTEM
OR RELATED STEERING WHEEL, STEERING
COLUMN, OR INSTRUMENT PANEL COMPONENTS YOU MUST FIRST DISCONNECT AND
ISOLATE
THE
BATTERY
NEGATIVE
(GROUND) CABLE. WAIT TWO MINUTES FOR
THE SYSTEM CAPACITOR TO DISCHARGE
BEFORE FURTHER SYSTEM SERVICE. THIS
IS THE ONLY SURE WAY TO DISABLE THE
AIRBAG SYSTEM. FAILURE TO DO THIS
COULD RESULT IN ACCIDENTAL AIRBAG
DEPLOYMENT AND POSSIBLE PERSONAL
INJURY OR DEATH.
WARNING: THE AIRBAG INFLATOR ASSEMBLY CONTAINS SODIUM AZIDE AND
POTASSIUM NITRATE. THESE MATERIALS
ARE POISONOUS AND EXTREMELY FLAMMABLE. CONTACT WITH ACID, WATER, OR
HEAVY METALS MAY PRODUCE HARMFUL
AND IRRITATING GASES (SODIUM HYDROXIDE IS FORMED IN THE PRESENCE OF
MOISTURE) OR COMBUSTIBLE COMPOUNDS. IN ADDITION, THE PASSENGER
AIRBAG MODULE CONTAINS ARGON GAS
PRESSURIZED TO OVER 2500 PSI. DO NOT
ATTEMPT TO DISMANTLE AN AIRBAG
MODULE OR TAMPER WITH ITS INFLATOR.
DO NOT PUNCTURE, INCINERATE, OR
BRING INTO CONTACT WITH ELECTRICITY.
DO NOT STORE AT TEMPERATURE
EXCEEDING 93°C (200°F). FAILURE TO TAKE
THE PROPER PRECAUTIONS COULD
RESULT IN ACCIDENTAL AIRBAG DEPLOYMENT AND PERSONAL INJURY OR DEATH.
WARNING: NEVER STRIKE OR KICK THE
AIRBAG CONTROL MODULE, AS IT CAN
DAMAGE THE IMPACT SENSOR OR AFFECT
ITS CALIBRATION. IF AN AIRBAG CONTROL
MODULE IS ACCIDENTALLY DROPPED
DURING SERVICE, THE MODULE MUST BE
SCRAPPED AND REPLACED WITH A NEW
UNIT. FAILURE TO TAKE THE PROPER
PRECAUTIONSCOULDRESULTINACCIDENTAL AIRBAG DEPLOYMENT AND PERSONAL
INJURY OR DEATH.
The airbag warning lamp is the only point at
which the customer can observe ‘‘symptoms’’ of
2
GENERAL INFORMATION
3.1.2
CLOCKSPRING
(200°F). FAILURE TO TAKE THE PROPER
PRECAUTIONSCOULDRESULTINACCIDENTAL AIRBAG DEPLOYMENT AND PERSONAL
INJURY OR DEATH.
The clockspring is mounted on the steering column behind the steering wheel. This assembly
consists of a plastic housing which contains a flat,
ribbon-like, electrically conductive tape that winds
and unwinds with the steering wheel rotation. The
clockspring is used to maintain a continuous electrical circuit between the instrument panel wire
harness and the driver side airbag module, the horn
switch, and the vehicle speed control switches on
vehicles that are so equipped. The clockspring must
be properly centered when it is installed on the
steering column following any service removal, or it
will be damaged. The clockspring cannot be repaired it must be replaced.
3.1.3
WARNING: REPLACE AIRBAG SYSTEM
COMPONENTS ONLY WITH PARTS SPECIFIED IN THE CHRYSLER MOPAR PARTS
CATALOG.
SUBSTITUTE
PARTS
MAY
APPEAR INTERCHANGEABLE, BUT INTERNAL DIFFERENCES MAY RESULT IN INFERIOR
OCCUPANT PROTECTION. THE FASTENERS,
SCREWS, AND BOLTS ORIGINALLY USED
FOR THE AIRBAG SYSTEM COMPONENTS
HAVE SPECIAL COATINGS AND ARE
SPECIFICALLY DESIGNED FOR THE AIRBAG
SYSTEM. THEY MUST NEVER BE REPLACED
WITH ANY SUBSTITUTES. ANY TIME A NEW
FASTENER IS NEEDED, REPLACE IT WITH
THE CORRECT FASTENERS PROVIDED IN
THE SERVICE PACKAGE OR SPECIFIED IN
THE MOPAR PARTS CATALOG. FAILURE TO
TAKE THE PROPER PRECAUTIONS COULD
RESULT IN ACCIDENTAL AIRBAG DEPLOYMENT AND PERSONAL INJURY OR DEATH.
PASSENGER AIRBAG (PAB)
The airbag door in the instrument panel top cover
above the glove box is the most visible part of the
passenger side airbag system. Located under the
airbag door is the airbag cushion and its supporting
components. The airbag module includes a housing
to which the cushion and inflator are attached and
sealed. The airbag module cannot be repaired, and
must be replaced if deployed or in any way damaged. The inflator assembly is mounted to the back
of the airbag module. The inflator includes a small
canister of highly compressed argon gas. The inflator seals the hole in the airbag cushion so it can
discharge the compressed gas it contains directly
into the cushion when supplied with the proper
electrical signal. The airbag door has a living hinge
at the top, which is secured to the instrument panel
top cover. The door also has predetermined breakout lines concealed beneath its decorative cover.
Upon airbag deployment, the airbag door will split
at the breakout lines and the door will pivot out of
the way.
3.1.4
SIDE IMPACT AIRBAG CONTROL
MODULES (SIACM)
They are located on the left and right B-post. The
SIACM perform self diagnostics and circuit tests to
determine if the system is functioning properly. If
the test finds a problem the SIACM will set both
active and stored diagnostic trouble codes. If a DTC
is active the SIACM will request that the airbag
warning lamp be turned on. The results of the
system test are transmitted on the PCI Bus to the
ACM once each second or on change in lamp state.
If the warning lamp status message from the either
SIACM contains a lamp on request the ACM will set
an active DTC. At the same time as the DTC is set
the ACM sends a PCI Bus message to the mechanical instrument cluster (MIC) requesting the airbag
warning lamp be turned on. Observe all ACM
warning and caution statements when servicing or
handling the SIACM. SIACM are not repairable
and must be replaced if they are dropped.
WARNING: THE AIRBAG INFLATOR ASSEMBLY CONTAINS SODIUM AZIDE AND POTASSIUM NITRATE. THESE MATERIALS ARE
POISONOUS AND EXTREMELY FLAMMABLE.
CONTACT WITH ACID, WATER, OR HEAVY
METALS MAY PRODUCE HARMFUL AND
IRRITATING GASES (SODIUM HYDROXIDE IS
FORMED IN THE PRESENCE OF MOISTURE)
OR
COMBUSTIBLE
COMPOUNDS.
IN
ADDITION, THE PASSENGER AIRBAG
CONTAINS ARGON GAS PRESSURIZED TO
OVER 2500 PSI. DO NOT ATTEMPT TO
DISMANTLE AN AIRBAG MODULE OR
TAMPER WITH ITS INFLATOR. DO NOT
PUNCTURE, INCINERATE, OR BRING INTO
CONTACT WITH ELECTRICITY. DO NOT
STORE AT TEMPERATURE EXCEEDING 93°C
NOTE: When the Airbag Warning Indicator is
illuminated, interrogate the ACM.
3.1.5
SEAT AIRBAGS
The Left and Right seat airbag modules are
located in the outboard end of the front seat backs.
The airbag module contains a bag, an inflator (a
small canister of highly compressed argon gas) and
3
GENERAL INFORMATION
and protect the connector terminal during testing.
When using the load tool follow all of the safety
procedures in the service information for disconnecting airbag system components. Inspect the wiring, connector and terminals for damage or misalignment. Substitute the airbag load tool in place
of a Driver or Passenger Airbag, curtain airbag,
clockspring, or seat belt tensioner (use a jumper if
needed). Then follow all of the safety procedures in
the service information for connecting airbag system components. Read the module active DTC’s. If
the module reports NO ACTIVE DTC’s the defective
component has been removed from the system and
should be replaced. If the DTC is still active, continue this process until all components in the circuit
have been tested. Then disconnect the module connector and connect the matching adapter to the
module connector. With all airbags disconnected
and the adapter installed the squib wiring can be
tested for open and shorted conditions.
a mounting bracket. The seat airbag module cannot
be repaired and must be replaced if deployed or in
any way damaged. When supplied with the proper
electrical signal the inflator seals the hole in the
airbag cushion so it can discharge the compressed
gas it contains directly into the cushion. Upon
deployment, the seat back trim cover will tear open
and allow the seat airbag to fully deploy between
the seat and the door.
NOTE: It will be necessary to remove the seat
back trim to gain access to the seat airbag
module connector when diagnosing the seat
airbag system.
WARNING: THE SEAT AIRBAG CONTAINS
ARGON GAS PRESSURIZED TO OVER 2500
PSI. DO NOT ATTEMPT TO DISMANTLE AN
AIRBAG MODULE OR TAMPER WITH ITS
INFLATOR. DO NOT PUNCTURE, INCINERATE, OR BRING INTO CONTACT WITH
ELECTRICITY. DO NOT STORE AT TEMPERATURE EXCEEDING 93°C (200°F). REPLACE
AIRBAG SYSTEM COMPONENTS ONLY WITH
PARTS SPECIFIED IN THE CHRYSLER
MOPAR PARTS CATALOG. SUBSTITUTE
PARTS MAY APPEAR INTERCHANGEABLE,
BUT INTERNAL DIFFERENCES MAY RESULT
IN INFERIOR OCCUPANT PROTECTION. THE
FASTENERS, SCREWS, AND BOLTS ORIGINALLY USED FOR THE AIRBAG SYSTEM
COMPONENTS HAVE SPECIAL COATINGS
AND ARE SPECIFICALLY DESIGNED FOR
THE AIRBAG SYSTEM. THEY MUST NEVER
BE REPLACED WITH ANY SUBSTITUTES.
ANY TIME A NEW FASTENER IS NEEDED,
REPLACE IT WITH THE CORRECT FASTENERS PROVIDED IN THE SERVICE PACKAGE
OR SPECIFIED IN THE CHRYSLER MOPAR
PARTS CATALOG. FAILURE TO TAKE THE
PROPER PRECAUTIONS COULD RESULT IN
ACCIDENTAL AIRBAG DEPLOYMENT AND
PERSONAL INJURY OR DEATH.
3.1.6
3.1.7
DIAGNOSTIC TROUBLE CODES
Airbag diagnostic trouble codes consist of active
and stored codes. If more than one code exists,
diagnostic priority should be given to the active
codes.
Each diagnostic trouble code is diagnosed by
following a specific testing procedure. The diagnostic test procedures contain step-by-step instructions
for determining the cause of the trouble codes. It is
not necessary to perform all of the tests in this book
to diagnose an individual code.
Active diagnostic trouble codes for the airbag
system are not permanent and will change the
moment the reason for the code is corrected. In
certain test procedures within this manual, diagnostic trouble codes are used as a diagnostic tool.
3.1.7.1
ACTIVE CODES
The code becomes active as soon as the malfunction is detected or key-off, whichever occurs first.
An active trouble code indicates an on-going malfunction. This means that the malfunction is currently there every time the control module checks
that circuit/function. It is impossible to erase an
active code; active codes automatically erase by
themselves when the reason for the code has been
corrected.
With the exception of the warning lamp trouble
codes or malfunctions, when a malfunction is detected, the airbag lamp remains lit for a minimum
of 12 seconds or as long as the malfunction is
present.
An “Interrogate Right SIACM or Interrogate left
SIACM” diagnostic trouble code indicates an active
trouble code in the respective module.
SPECIAL TOOLS
Some airbag diagnostic tests use special tools,
8310 and 8443 airbag load tool, for testing squib
circuits. The load tools contain fixed resistive loads,
jumpers and adapters. The fixed loads are connected to cables and mounted in a storage case. The
cables can be directly connected to some airbag
system connectors. Jumpers are used to convert the
load tool cable connectors to the other airbag system connectors. The adapters are connected to the
module harness connector to open shorting clips
4
GENERAL INFORMATION
3.1.7.2
STORED CODES
circuit is repaired. The radio will also set a trouble
code, which the DRBIIIt can display.
The in-dash CD-changer is designed to fit into the
existing cubby bin in the center stack. This new
cartridge-less CD-changer is controlled by your radio, and allows you to individually load up to four
discs at one time. However, due to its compact
design, the CD-changer can only carry out one
operation at a time. For example you can not load a
new disc while playing another at the same time.
Each operation happens sequentially.
The radio unit installed with your system provides control over all features of the CD-changer
with the exception of the CD load and eject functions, which are controlled by buttons located on the
front of the CD-changer. The radio also supplies the
power, ground, PCI Bus, left and right speaker
output through a single DIN cable. All features you
would expect , such as Disc Up/Down, Track Up/
Down, Random and Scan are controlled by the
radio, which also displays all relevant CD-changer
information on the radio display.
The CD-changer contains a Load/Eject button
and an indicator light for each of the four disc
positions. The individual light indicates whether a
CD is currently loaded in that particular chamber of
the CD-changer. Pressing the individual Load/Eject
button for a particular chamber will eject a disc
currently present in the chamber. If the chamber is
currently empty, actuating the Load/Eject button
will position that chamber to receive and load a new
disc in that chamber.
Airbag codes are automatically stored in the
ACM’s memory as soon as the malfunction is detected. A ‘‘stored’’ code indicates there was an active
code present at some time. However, the code currently may not be present as an active code, although another active code could be.
When a trouble code occurs, the airbag warning
lamp illuminates for 12 seconds minimum (even if
the problem existed for less than 12 seconds). The
code is stored, along with the time in minutes it was
active, and the number of times the ignition has
been cycled since the problem was last detected.
The minimum time shown for any code will be one
minute, even if the code was actually present for
less than one minute, Thus, the time shown for a
code that was present for two minutes 13 seconds,
for example, would be three minutes.
When and if the malfunction ceases to exist, an
ignition cycle count will be initiated for that code. If
the ignition cycle count reaches 100 without a
reoccurrence of the same malfunction, the diagnostic trouble code is erased and that ignition cycle
counter is reset to zero. If the malfunction reoccurs
before the count reaches 100, then the ignition cycle
counter will be reset and the diagnostic trouble code
will continue to be a stored code.
If a malfunction is not active while performing a
diagnostic test procedure, the active code diagnostic
test will not locate the source of the problem. In this
case, the stored code can indicate an area to inspect.
WARNING: TO AVOID PERSONAL INJURY OR
DEATH, MAINTAIN A SAFE DISTANCE FROM
ALL AIRBAGS WHILE PERFORMING THE
FOLLOWING INSPECTION:
•
•
•
•
•
3.3
DESCRIPTION
The optional Compass/Temperature Mirror has a
vacuum fluorescent (VF) display that is integrated
into the rear view mirror. The Compass/Temp Mirror includes the compass/temperature display and
two map/reading lamps. This display provides the
outside temperature and one of eight compass headings to indicate the direction the vehicle is facing.
The Compass/Temp Mirror displays the compass
heading and the outside temperature at the same
time. The Ambient Temperature Sensor monitors
the outside temperature and is hardwired to the
PCM. The Compass/Temp Mirror also receives and
transmits data on the PCI Bus.
If no obvious problems are found:
Erase the stored codes
Place the ignition in the Run position
Wiggle the wire harness and connectors
Rotate the steering wheel from stop to stop
Recheck for active codes periodically as you work
through the system.
3.2
COMPASS/TEMPERATURE MIRROR
AUDIO SYSTEM
The audio system on the 2004 PL consists of a
radio that communicates over the PCI bus. The
speakers are located in the instrument panel, the
front doors and the rear “D” pillars. The instrument
panel speakers are a tweeter type speaker for high
frequency. The front door speakers are a woofer/
midrange type speaker. The rear “D” pillar speakers
are a full range type speaker. If one of the speaker
circuits experiences a short, the other speakers on
that output channel will also shut down until the
OPERATION
The Compass/Temp Mirror incorporates 2 reading lamp buttons with the STEP button and the
Zone/Calibration button features activated by holding a button for a specified time period. The STEP
button provides the selections between English and
5
GENERAL INFORMATION
CALIBRATION / ZONE MODE
Metric. The Zone/Cal button provides the selection
to change the compass zone or to calibrate the
compass. The reading lamp buttons also cycle the
reading lamps on or off.
The STEP button (right reading lamp button)
operates a momentary contact switch which provides input to the Compass/Temp Mirror in one of
the following four modes:
• To toggle the right reading lamp on and off
upon release of the button.
• To select degrees in F (Fahrenheit) for the
temperature display.
• To select degrees in C (Celsius) for the temperature display.
• To turn off the compass/temperature display.
Refer to the Zone Variance Map. With the ignition
in the ON position, pressing and holding the Zone/
Cal button (left reading lamp button) for 5-10
seconds will illuminate ZONE in the display. Releasing the button while ZONE is illuminated will
enter the compass into the Zone Setting mode. The
Compass/Temp Mirror will illuminate the Zone
Variance number 1 to 15 that is stored in memory.
While ZONE is displayed; momentarily pressing
the Zone/Cal button advances the zone to the next
higher zone. When the desired zone number is
displayed, do not press the Zone/Cal button again.
After 5 seconds, the Zone Variance number will be
stored in the module memory.
With the ignition in the ON position, pressing
and holding the Zone/Cal button for 10-15 seconds
will toggle the CAL (calibration) mode between on
and off. Releasing the button while CAL is displayed enters the compass into the calibration
mode. See ‘‘First Time Calibration’’, ‘‘Manual Calibration’’, and ‘‘Continuous Calibration.’’
Pressing and holding the Zone/Cal button for
15-20 seconds and then releasing will exit the CAL
mode and toggle the display to the current state of
compass/temperature mirror use; OFF, Compass/
Temperature F°, or Compass/Temperature C°.
Pressing and holding the Zone/Cal button for
20-25 seconds will enter the CTM into the selfcheck diagnostic mode upon releasing the button.
Holding the Zone/Cal button for longer than 25
seconds will cause the display to return to its
current state with no changes.
ENGLISH / METRIC / OFF MODE
With the ignition in the ON position, pressing
and holding the STEP button (right reading lamp
button) for 5-10 seconds will toggle the display
between English and Metric. The Compass/Temp
Mirror stores the selected display mode in memory
upon releasing the button during the 5-10 seconds.
Pressing and holding the STEP button for 10-15
seconds will turn the display OFF upon releasing
the button during the 10-15 seconds.
Each time the temperature mode is changed to F°
or C°, the Compass/Temp Mirror stores the new
mode in memory. The selected English or Metric
mode is recalled after the ignition is cycled. The
display OFF mode is not recalled after the ignition
is cycled. The Compass/Temp Mirror will power up
and display the temperature mode (F° or C°) that
was last selected.
6
GENERAL INFORMATION
SETTING COMPASS ZONE
may need to be demagnetized. Refer to Demagnetizing Procedure in the Service Manual.
The compass has a default zone of 8. Refer to the
Zone Variance Map to determine the correct zone
number. The correct compass Zone selection is critical to proper compass operation. With the ignition
in the ON position, pressing the Zone/Cal button
(left reading lamp button) for 5-10 seconds and then
releasing while ZONE is illuminated enters the
compass into the Zone display mode. In the Zone
display mode, ZONE will be illuminated instead of
the temperature. The current Zone number, 1
through 15 will be displayed. While ZONE is illuminated; momentarily pressing the Zone/Cal button advances the zone to the next higher zone.
When the desired zone number is displayed, do not
press the Zone/Cal button again. After 5 seconds,
the Zone Variance number will be stored in the
module memory.
SELF- CHECK DIAGNOSTICS
A new Compass/Temp Mirror is shipped in a first
time calibration mode. CAL is illuminated when the
Compass/Temp Mirror is first powered up. The first
time calibration mode can not be exited until the
first time calibration process is completed. The CAL
icon will remain illuminated to alert the driver that
the Compass/Temp Mirror is operating in the CAL
mode. Move the vehicle to an area away from large
metallic objects or overhead power lines. While CAL
is illuminated in the display the vehicle must be
driven in 3 complete 360 degree circles at less than
5 MPH (8 KPH). The compass will calibrate; CAL
will turn off, and then resume normal operation.
With the ignition ON, the Compass/Temp Mirror
can perform a diagnostic self- check by pressing and
holding the Zone/Cal button (left reading lamp
button) for 20-25 seconds. The internal diagnostics
will sequence the following five tests:
1) VF segment display- Illuminates the segment
patterns one at a time for 1 second each as
follows: CAL; ZONE; N; NE; E; SE; S; SW; W;
NW; 0 through 9; C°; F°
2) CTM memory- ROM Checksum
3) CTM memory- RAM
4) CTM memory- EEPROM
5) Compass Test
During the self- check, if any of the internal tests
fail, the Compass/Temp Mirror will display an ‘‘F’’
and the number of the test that failed. If more than
one test fails ‘‘FO’’ will be displayed. P- Pass or FFail will be displayed until the Zone/Cal button (left
reading lamp button) is pressed and released or the
ignition is cycled. If all of the tests pass, the
Compass/Temp Mirror will display ‘‘P’’. A VF segment that fails to illuminate will not cause the
Compass/Temp Mirror to display an ‘‘F’’. If any
segment fails to illuminate or the Compass/Temp
Mirror displays ‘‘F’’, the Compass/Temp Mirror
must be replaced.
To exit self- check diagnostics, press and release
the Zone/Cal button or cycle the ignition to return to
normal compass/temp operation.
MANUAL CALIBRATION
OUTSIDE TEMPERATURE
With the ignition in the ON position, pressing
and holding the Zone/Cal button (left reading lamp
button) for 10-15 seconds will toggle the display to
CAL. Releasing the button within the 10-15 second
duration will enter the compass into the calibration
mode. CAL will remain illuminated until the calibration is complete or is toggled off by pressing the
Zone/Cal button. Move the vehicle to an area away
from large metallic objects or overhead power lines.
While CAL is illuminated in the display the vehicle
must be driven in 3 complete 360 degree circles at
less than 5 MPH (8 KPH). The compass will calibrate; CAL will turn off, and then resume normal
operation.
The Compass/Temp Mirror utilizes vehicle speed
and engine temperature data received on the PCI
Bus to accurately display the outside temperature
to avoid ‘‘hot soak’’ condition readings. The displayed outside temperature information is stored
within the memory of the compass/temp mirror.
When the Compass/Temp Mirror is first powered
up, it retrieves the temperature data from the
module memory. The memory temperature is compared with the temperature received from the ambient temperature sensor. The colder of the two
temperatures is displayed.
FIRST TIME CALIBRATION
TEMPERATURE UPDATE - WARM
On power up, when the outside temperature
sensed by the ambient temperature sensor is
warmer than the temperature stored in the module
memory, the Compass/Temp Mirror will update the
displayed temperature in relation to vehicle speed
and engine temperature data received on the PCI
Bus.
CONTINUOUS CALIBRATION
During normal operation, the Compass/Temp
Mirror will continuously update the compass calibration to adjust for gradual changes in the vehicle’s magnetic remnant field. If the vehicle is subjected to high magnetic influences, the compass
may appear to indicate false headings or appear
unable to be calibrated. If this occurs the vehicle
7
GENERAL INFORMATION
TEMPERATURE UPDATE - COLD
If there is an OPEN or SHORT circuit condition,
it must be repaired before the Compass/Temp Mirror VF display can be tested.
The ambient temperature sensor can be diagnosed using the following Sensor Test. If there are
no codes stored in the PCM and the ambient temperature sensor and the circuits are confirmed to be
OK, but the temperature display is inoperative or
incorrect, replace the Compass/Temp Mirror.
On power up, when the outside air temperature
sensed by the ambient temperature sensor is colder
than the stored memory temperature, the Compass/
Temp Mirror will update the displayed temperature
to the outside temperature at a rate of -1°F every 2
seconds, regardless if the vehicle is moving or not.
EXTREME TEMPERATURE / OPEN OR SHORT
CONDITION
AMBIENT TEMPERATURE SENSOR TEST
If the measured outside temperature is more
than 60°C (140°F) or the ambient temperature
sensor sense circuit is shorted to ground, the temp
display will be 60°C (140°F) to indicate a short
circuit condition.
If the measured outside temperature is less than
-45°C (-49°F) or the ambient temperature sensor
sense circuit is open, the temp display will be -45°C
(-49°F) to indicate an open circuit condition.
(1) Turn the ignition OFF.
(2) Disconnect and isolate the battery negative
cable.
(3) Disconnect the ambient temperature sensor
harness connector.
(4) Measure the resistance of the ambient temperature sensor using the following values:
• 0° C (32° F) Sensor Resistance = 29.33 – 35.99
Kilohms
• 10° C (50° F) Sensor Resistance = 17.99 –
21.81 Kilohms
• 20° C (68° F) Sensor Resistance = 11.37 – 13.61
Kilohms
• 25° C (77° F) Sensor Resistance = 9.12 – 10.86
Kilohms
• 30° C (86° F) Sensor Resistance = 7.37 – 8.75
Kilohms
• 40° C (104° F) Sensor Resistance = 4.90 – 5.75
Kilohms
The sensor resistance should read between these
min/max values. If the resistance value is OK, refer
to the Wiring Diagrams to test the Signal and
Ground circuits. If the resistance values are not
OK, replace the Sensor.
AMBIENT TEMPERATURE SENSOR
DESCRIPTION
The Ambient Temperature Sensor is hardwired to
the PCM. The ambient air temperature is monitored and displayed by the Compass/Temp Mirror.
The ambient temperature sensor cannot be adjusted or repaired and, if faulty or damaged, it must
be replaced.
OPERATION
The resistance in the ambient temperature sensor changes as the outside temperature rises or
falls. The PCM senses the change in reference
voltage through the ambient temperature sensor
resistor. Based on the resistance of the ambient
temperature sensor, the PCM is programmed to
correspond to a specific temperature. The Compass/
Temp Mirror then displays the proper ambient
temperature.
3.4
EXTERIOR LIGHTING
The Headlamps are controlled by the Instrument
Cluster. The Instrument Cluster is also referred to
as a ‘‘Smart Cluster’’. It receives and sends messages to other modules through the PCI BUS circuit. The Headlamps are wired through the cluster
and then go to the Fuse Block to the lamps. Each
Headlamp has an independent fuse located in the
Fuse Block. For vehicles equipped with Daytime
Running Lamps, the DRL Module is integrated
with the Instrument Cluster.
AMBIENT TEMPERATURE SENSOR
DIAGNOSTICS
The outside temperature function is supported by
the ambient temperature sensor, a signal and
ground circuit hardwired to the PCM and the
Compass/Temp Mirror display.
If the Compass/Temp Mirror display indicates
60°C (140°F) or the ambient temperature sensor
sense circuit is shorted to ground, the temp display
will be 60°C (140°F) to indicate a SHORT circuit
condition.
If the Compass/Temp Mirror display indicates
-45°C (-49°F) or the ambient temperature sensor
sense circuit is open, the temp display will be -45°C
(-49°F) to indicate an OPEN circuit condition.
3.5
ELECTRO/MECHANICAL INSTRUMENT
CLUSTER (EMIC)
There are 4 (four) different types of Instrument
Clusters. Base, Premium, Luxury, and AutoStick.
The Premium cluster is equipped with a tachometer
and a low fuel indicator. The Luxury has the same
features as the Premium with an additional black
overlay and chrome rings. The AutoStick is the
8
GENERAL INFORMATION
go to the front lamps. For vehicles equipped with
Daytime Running Lamps, the DRL module is built
into the cluster.
Luxury cluster with the AutoStick function. The
PCM controls the vacuum fluorescent (VF) PRND
or AutoStick display. The cluster will illuminate the
appropriate PRND or gear position based on PCI
Bus data received from the PCM.
The Instrument Cluster Speedometer, Tachometer, and Engine Coolant Temperature gauges are
positioned using PCI Bus messages received from
the PCM. The Fuel gauge is a hard wired input
from the Fuel Level Sensor in the Fuel Pump
Module.
The Cluster also contains warning indicators that
are illuminated by hard wired inputs or by messages received from other modules on the PCI Bus.
The Trip/Total Odometer is a Vacuum Fluorescent (VF) display that is controlled by PCI Bus
messages received from the PCM. The VF display
also displays the “Door”, “Cruise”, and “Trac” messages. If the Instrument Cluster experiences a loss
of PCI Bus communication with other modules on
the Bus, the Cluster will display “nobuS” in the VF
display.
The illumination lamps are hard wired in the
Instrument Cluster. When the Park or Headlamps
are turned on, the Cluster receives a hard wire
input from the Multi-Function Switch. The Cluster
sends a Panel Lamps Dimmer Signal to ground
through the Multi-Function Switch. The varying
voltage drop is sensed by the Instrument Panel
Drivers to create a corresponding amount of illumination dimming. This dimming level is then sent
out from the Cluster to other components.
The Cluster will communicate with the DRBIIIt
to display PCI Engine Info, PCI Bus info, and
certain inputs/outputs. The Cluster is also capable
of performing a diagnostic Self-Test that is actuated
by depressing and holding the Odometer trip reset
stalk while cycling the ignition from the off to the on
position. The Cluster will position all of the gauges
at specified calibration points and will illuminate
all the PCI Bus controlled indicators. The Cluster
will also illuminate each segment of the VF display.
If the Cluster does not detect voltage on the
Courtesy Lamp circuit, the message “FUSE” will
alternate with the odometer/trip odometer for 30
(thirty) seconds after the ignition is turned on and
for 15 (fifteen) seconds after the vehicle is first
moved.
3.6
3.7
REMOTE KEYLESS ENTRY MODULE
The Remote Keyless Entry module controls the
Power Door Locks and the Vehicle Theft Security
System (VTSS). It also wakes up the Instrument
Cluster to turn on the illuminated entry when it
senses a signal from the RKE transmitter. The
module communicates with other modules via the
PCI bus circuit.
The RKE module monitors the Occupant Restraint Controller messages for the purpose of monitoring the deployment of the airbag. Upon receiving that message along with the verification that
the ignition is on and the vehicle speed is zero, it
will provide the “enhanced accident response feature”. This feature will cause the module to unlockall doors immediately and the instrument cluster to
turn the courtesy lamps on when the vehicle
reaches 0 MPH.
The RKE module communicates with the Powertrain Control Module to receive vehicle speed information to activate the rolling door lock feature,
receive the “okay to lock” message, and receive body
style information. Two transmitters are supplied
with the vehicle but a total of 4 can be programmed
to the module. The horn chirp on vehicle lock
command is customer programmable.
To limit the amount of battery drain during
storage, the IOD fuse may be removed.
3.7.1
VEHICLE THEFT SECURITY SYSTEM
When the VTSS is armed, it will monitor the
ignition switch status, ajar switches for the vehicle
doors and decklid. Also monitored is a decklid
security switch (knockout) for the cylinder lock. If
the alarm is tripped, it will sound the vehicles horn,
flash the exterior lamps and the VTSS indicator
located in the instrument cluster.
Arming the system is accomplished by locking the
doors with the door lock switch following a normal
exit sequence of opening the door pressing the
power lock button and closing the door, by using the
driver door cylinder lock switch or by pressing the
RKE lock button. After all the doors are closed, the
VTSS indicator will flash quickly for sixteenseconds indicating the pre-arm process, after which
it will flash at a slower rate indicating the system is
armed. If during the pre-arm process a door is
opened, the ignition is turned to the Run/Start
position or if the RKE module receives an unlock
request the system will automatically be disarmed.
If the VTSS indicator stays on steady during prearm, it is an indication of an open decklid security
switch sense circuit.
INTERIOR LIGHTING
The Courtesy Lamps are controlled by the instrument cluster. Some of the features that it controls
are the courtesy lamps, chime, and all instrument
illumination. It receives and sends messages to
other modules via the PCI bus circuit. The front
turn signals are wired through the cluster and then
9
GENERAL INFORMATION
program this feature to unlock all doors with one
turn of the key or open the driver door only with the
first turn of the key and open the other doors with
the second turn. Altering the operation of the unlock function via the key cylinder switch from one
turn to two turns will also alter the operation of the
RKE transmitter from one press to two presses.
Disarming can be accomplished with a RKE unlock, turning the ignition on with a valid Sentry key
or unlocking the vehicle with the driver door cylinder lock. All of the switches for the VTSS system
can be monitored using the DRBIIIt. The DRBIIIt
is also useful to determine the cause of a customer
complaint of the alarm going off with no apparent
reason.
3.7.2
3.7.3.2
VEHICLE THEFT SECURITY SYSTEM
(EXPORT ONLY)
All vehicle doors are locked automatically once
the vehicle reaches a speed of 15 mph and all doors
are closed. This feature can be also be enabled/
disabled by the customer.
When the VTSS is armed, it will monitor the
interior of the vehicle for movement via an intrusion sensor (if equipped), the ignition switch status,
ajar switches for the vehicle doors, decklid and
hood. Vehicles without an intrusion sensor will
have a decklid security switch (knockout) which will
also be monitored. If the alarm is tripped, it will
sound the vehicles horn or a battery backed siren
for vehicles equipped with the intrusion sensor,
flash the exterior lamps and the VTSS indicator
located in the instrument cluster.
Arming the system is accomplished by locking the
doors with the door lock switch following a normal
exit sequence of opening the door pressing the
power lock button and closing the door, or by using
either door cylinder lock switch or by pressing the
RKE lock button. After all the doors are closed, the
VTSS indicator will flash quickly for sixteenseconds indicating the pre-arm process, after which
it will flash at a slower rate indicating the system is
armed. If during the pre-arm process a door is
opened, the ignition is turned to the Run/Start
position or if the RKE module receives an unlock
request the system will automatically be disarmed.
If the VTSS indicator stays on steady during prearm, it is an indication of the hood ajar circuit being
shorted (hood opened) or the decklid security switch
circuit being open (if equipped). Defeating the intrusion sensor feature for vehicles so equipped can
be done by three additional lock request to the RKE
module within 5 seconds.
Disarming is done by either a RKE unlock or
turning the ignition on with a valid Sentry key. All
of the switches for the VTSS system can be monitored using the DRBIIIt. The DRBIIIt is also useful
to determine the cause of a customer complaint of
the alarm going off with no apparent reason.
3.7.3
3.7.3.1
ROLLING (AUTOMATIC) DOOR
LOCKS
3.7.3.3
DOOR LOCK INHIBIT
This feature disables the door lock command from
the interior door lock switch whenever the driver
door is open and the key is in the ignition. This
prevents the driver from locking the keys in the
ignition when using the power door locks. This
feature is inoperable if the IOD fuse is not installed.
3.7.3.4
POWER DECKLID RELEASE
Electrically releases the decklid upon two presses
of the RKE transmitter decklid release button. This
feature is disabled once the speed of the vehicle is
greater than 5 mph. The decklid can also be released from the switch in the glove box.
3.7.3.5
PANIC MODE (IF EQUIPPED)
Upon activation of the panic function, the headlamps and park lamps flash in an alternating
manner, the horn pulses every second and the
courtesy lamps are turned on. The panic mode
allows normal nightime driving by allowing the
headlamps and park lamps to be on steady when
the headlamp switch is in the on position. Panic
mode is activated immediately by pressing the
panic button once. It does not disarm the VTSS or
unlock the doors. It is canceled by pressing the
button a second time, reaching a vehicle speed
greater than 15 mph or after 3 minutes has elapsed
in panic mode. Once panic mode has been activated
there is a 2-second delay before it will turn off. Once
it is cancelled there is a 2-second delay before it can
be reactivated. This is to avoid the problem of
deactivating and immediate reactivating due to
multiple button presses.
POWER DOOR LOCKS
3.8
CENTRAL LOCKING (W/VTSS
ONLY)
VEHICLE COMMUNICATION
The Programmable Communication Interface or
PCI Bus is a single wire multiplexed network capable of supporting binary encoded messages shared
between multiple modules. The PCI bus circuit is
This feature allows the customer to lock/unlock
all vehicle doors with the key from the front door
cylinder lock switch. The customer can choose to
10
GENERAL INFORMATION
pected, begin by identifying which modules the
vehicle is equipped with and then attempt to get a
response from the modules with the DRBIIIt. If any
modules are responding, the failure is not related to
the total bus, but can be caused by one or more
modules PCI circuit or power supply and ground
circuits. The DRBIIIt may display “BUS +/- SIGNALS OPEN” OR “NO RESPONSE” to indicate a
communication problem. These same messages will
be displayed if the vehicle is not equipped with that
particular module. The CCD error message is a
default message used by the DRBIIIt and in no way
indicates whether or not the PCI bus is operational.
The message is only an indication that a module is
either not responding or the vehicle is not equipped.
identified as D25. The modules are wired in parallel. Connections are made in the harness using
splices. The following modules are used on the PL:
•
•
Airbag Control Module
Left Side Impact Airbag Control Module
•
Right Side Impact Airbag Control Module
•
Controller Antilock Brake
Powertrain Control Module
Radio (If equipped)
•
•
•
•
CD Changer (If equipped)
Compass/Temperature Mirror (If equipped)
•
Remote Keyless Entry Module (If equipped)
Sentry Key Immobilizer Module (If equipped)
• Mechanical Instrument Cluster
Each module provides its own bias and termination in order to transmit and receive messages. The
bus voltage is at zero volts when no modules are
transmitting and is pulled up to about seven and a
half volts when modules are transmitting.
The bus messages are transmitted at a rate
averaging 10800 bits per second. Since there is only
voltage present when the modules transmit and the
message length is only about 500 milliseconds, it is
ineffective to try and measure the bus activity with
a conventional voltmeter. The preferred method is
to use the DRBIIIt lab scope. The 12v square wave
selection on the 20-volt scale provides a good view of
the bus activity. Voltage on the bus should pulse
between zero and about seven and a half volts.
Refer to the following figure for some typical displays.
The PCI Bus failure modes are broken down into
two categories. Complete PCI Bus Communication
Failure and individual module no response. Causes
of a complete PCI Bus Communication Failure
include a short to ground or battery on the PCI
circuit. Individual module no response can be
caused by an open circuit at the module, or an open
battery or ground circuit to the affected module.
Symptoms of a complete PCI Bus Communication
Failure would include but are not limited to:
• All gauges on the EMIC stay at zero
• All telltales on EMIC illuminate
• EMIC backlighting at full intensity
•
•
NOTE: For 2004 model year, some vehicles
will integrate the Transmission Control
Module and Powertrain Control Module into a
single control module. This new module is
the
Next
Generation
Controller
for
DaimlerChrysler and will be referred to as the
Powertrain Control Module (PCM). The
Transmission Control Module is part of the
Powertrain Control Module.
Diagnostic procedures and DTC numbers are
some of the changes you will see which
reflect the new combined module technology.
The PCM will have four color coded
connectors C1 through C4, (C1-BLK,
C2-ORANGE, C3-WHITE, C4-GREEN), each
PCM connector will have 38 pins each. Two
new tools are used for probing and repairing
the New PCM connectors. A New tool to
release the pins from the PCM connectors
Miller #3638 is introduced, you must use the
Miller tool #3638 to release the connector
pins or harness and connector damage will
occur. Also a New tool for probing
connectors Miller #8815 is introduced, you
must use the Miller tool #8815 to probe the
PCM pins or harness and connector damage
will occur. There is also a new Verification
test and module replacment procedure for
the PCM.
No response received from any module on the PCI
bus (except PCM)
•
No start (if equipped with Sentry Key Immobilizer)
Symptoms of Individual module failure could
include any one or more of the above. The difference
would be that at least one or more modules would
respond to the DRBIIIt.
Diagnosis starts with symptom identification. If a
complete PCI Bus Communication Failure is sus11
GENERAL INFORMATION
3.9.1
DRBIIIT ERROR MESSAGES AND
BLANK SCREEN
Under normal operation, the DRBIIIt will display one of only two error messages:
– User-Requested WARM Boot or User-Requested
COLD Boot
If the DRBIIIt should display any other error
message, record the entire display and call the Star
Center for information and assistance. This is a
sample of such an error message display:
ver: 2.14
date: 26 Jul93
file: key_itf.cc
date: Jul 26 1993
line: 548
err: 0x1
User-Requested COLD Boot
Press MORE to switch between this display
and the application screen.
Press F4 when done noting information.
3.9.2
3.9
DRBIIIT DOES NOT POWER UP
If the LED’s do not light or no sound is emitted at
start up, check for loose cable connections or a bad
cable. Check the vehicle battery voltage (data link
connector cavity 16). A minimum of 11 volts is
required to adequately power the DRBIIIt.
If all connections are proper between the
DRBIIIt and the vehicle or other devices, and the
vehicle battery is fully charged, and inoperative
DRBIIIt may be the result of faulty cable or vehicle
wiring.
USING THE DRBIIIT
3.9.3
Refer to the DRBIIIt user’s guide for instructions
and assistance with reading trouble codes, erasing
trouble codes and other DRBIIIt functions.
DISPLAY IS NOT VISIBLE
Low temperatures will affect the visibility of the
display. Adjust the contrast to compensate for this
condition.
12
GENERAL INFORMATION
4.0
4.1
improper system operation. Only those components
with approved repair and installation procedures in
the service manual should be serviced.
DISCLAIMERS, SAFETY,
WARNINGS
4.2.4
DISCLAIMERS
WARNING: EXCEEDING THE LIMITS OF THE
DRBIIIT MULTIMETER IS DANGEROUS.
READ ALL DRBIIIT INSTRUCTIONS BEFORE
USING THE MULTIMETER. FAILURE TO
FOLLOW THESE INSTRUCTIONS CAN
RESULT IN PERSONAL INJURY OR DEATH.
All information, illustrations, and specifications
contained in this manual are based on the latest
information available at the time of publication.
The right is reserved to make changes at any time
without notice.
4.2
4.2.1
SAFETY
TECHNICIAN SAFETY INFORMATION
•
Follow the vehicle manufacturer’s service specifications at all times.
•
Do not use the DRBIIIt if it has been damaged.
Do not use the test leads if the insulation is
damaged or if metal is exposed.
To avoid electrical shock, do not touch the test
leads, tips, or the circuit being tested.
•
WARNING! WHEN OPERATING, ENGINES
PRODUCE AN ODORLESS GAS CALLED
CARBON MONOXIDE. INHALING CARBON
MONOXIDE GAS CAN RESULT IN SLOWER
REACTION TIMES AND CAN LEAD TO
PERSONAL INJURY OR DEATH. WHEN THE
ENGINE IS OPERATING, KEEP SERVICE
AREAS WELL VENTILATED OR ATTACH THE
VEHICLE EXHAUST SYSTEM TO THE SHOP
EXHAUST REMOVAL SYSTEM.
•
•
•
Set the parking brake and block the wheels before
testing or repairing the vehicle. It is especially
important to block the wheels on front-wheel drive
vehicles; the parking brake does not hold the drive
wheels.
When servicing a vehicle, always wear eye protection, and remove any metal jewelry such as
rings, watchbands or bracelets that might make an
inadvertent electrical contact.
When diagnosing a body system problem, it is
important to follow approved procedures where
applicable. These procedures can be found in this
General Information Section or in service manual
procedures. Following these procedures is very important to the safety of individuals performing
diagnostic tests.
4.2.2
Choose the proper range and function for the
measurement. Do not try voltage or current measurements that may exceed the rated capacity.
Do not exceed the limits shown in the table below:
FUNCTION
INPUT LIMIT
Volts
0 - 500 peak volts AC
0 - 500 volts DC
Ohms (resistance)*
0 - 1.12 megohms
Frequency Measured
Frequency Generated
0 - 10 kHz
Temperature
-58 - 1100°F
-50 - 600°C
* Ohms cannot be measured if voltage is present.
Ohms can be measured only in a non-powered
circuit.
•
Voltage between any terminal and ground must
not exceed 500v DC or 500v peak AC.
•
Use caution when measuring voltage above 25v
DC or 25v AC.
Use the low current shunt to measure circuits up
to 10A. Use the high current clamp to measure
circuits exceeding 10A.
When testing for the presence of voltage or current, make sure the meter is functioning correctly. Take a reading of a known voltage or
current before accepting a zero reading.
•
VEHICLE PREPARATION FOR
TESTING
•
Make sure the vehicle being tested has a fully
charged battery. If it does not, false diagnostic codes
or error messages may occur.
4.2.3
DRBIIIT SAFETY INFORMATION
•
SERVICING SUB-ASSEMBLIES
Some components of the body system are intended to be serviced as an assembly only. Attempting to remove or repair certain system subcomponents may result in personal injury and/or
•
13
When measuring current, connect the meter in
series with test lead.
Disconnect the live test lead before disconnecting
the common test lead.
GENERAL INFORMATION
•
When using the meter function, keep the
DRBIIIt away from spark plug or coil wires to
avoid measuring error from outside interference.
4.3
4.3.1
6.0
WARNINGS
VEHICLE DAMAGE WARNINGS
Before disconnecting any control module, make
sure the ignition is ‘‘off ’’. Failure to do so could
damage the module.
When testing voltage or continuity at any control
module, use the terminal side (not the wire end) of
the connector. Do not probe a wire through the
insulation, this will damage it and eventually cause
it to fail because of corrosion. Be careful when
performing electrical tests so as to prevent accidental shorting of terminals. Such mistakes can damage fuses or components. Also, a second code could
be set, making diagnosis of the original problem
more difficult.
4.3.2
ROAD TESTING A COMPLAINT
VEHICLE
Some complaints will require a test drive as part
of the repair verification procedure. The purpose of
the test drive is to try to duplicate the diagnostic
code or symptom condition.
WARNING: REASSEMBLE ALL COMPONENTS BEFORE ROAD TESTING A VEHICLE.
DO NOT TRY TO READ THE DRBIIIT SCREEN
OR OTHER TEST EQUIPMENT DURING A
TEST DRIVE. DO NOT HANG THE DRBIIIT OR
OTHER TEST EQUIPMENT FROM THE
REARVIEW MIRROR DURING A TEST DRIVE.
HAVE AN ASSISTANT AVAILABLE TO
OPERATE THE DRBIIIT OR OTHER TEST
EQUIPMENT. FAILURE TO FOLLOW THESE
INSTRUCTIONS CAN RESULT IN PERSONAL
INJURY OR DEATH.
5.0
REQUIRED TOOLS AND
EQUIPMENT
DRBIIIt (diagnostic read-out box)
Jumper Wires
Ohmmeter
Voltmeter
Test Light
8310 Airbag Load Tool
8443 SRS Airbag System Load Tool
14
GLOSSARY OF ACRONYMS
ABS
antilock brake system
ACM
airbag control module
AECM
airbag electronic control module
(ACM)
ASDM
airbag system diagnostic module
(ACM)
BUX
built-up export
CAB
controller antilock brake
CTM
compass/temperature mirror
DAB
driver airbag
DLC
data link connector
DTC
diagnostic trouble code
EMIC
electro/mechanical instrument
cluster
LSIACM
left SIACM
NGC
next generation controller
PAB
passenger airbag
PCI
Programmable Communication
Interface (vehicle communication
bus)
PCM
powertrain control module
PDC
power distribution center
PWM
pulse width modulated
RKE
remote keyless entry
RSIACM
right SIACM
SAB
side airbag
SIACM
side impact airbag control module
SKIM
sentry key immobilizer module
SKIS
sentry key immobilizer system
SQUIB
also called initiator (located in rear
of airbag module)
TCM
transmission control module
VFD
vacuum fluorescent display
VTSS
vehicle theft security system
7.0
DIAGNOSTIC INFORMATION AND
PROCEDURES
15
AIRBAG
Symptom List:
ACCELEROMETER 1
ACCELEROMETER 2
INTERNAL 1
OUTPUT DRIVER 1
OUTPUT DRIVER 2
SAFING SENSOR
STORED ENERGY FIRING 1
STORED ENERGY LOGIC
Test Note:
All symptoms listed above are diagnosed using the same tests.
The title for the tests will be ACCELEROMETER 1.
When Monitored and Set Condition:
ACCELEROMETER 1
When Monitored: With the ignition on, the module on board diagnostics continuously
performs internal circuit tests.
Set Condition:
This DTC will set if the module identifies an out of range internal circuit.
ACCELEROMETER 2
When Monitored: With the ignition on, the module on board diagnostics continuously
performs internal circuit tests.
Set Condition:
This DTC will set if the module identifies an out of range internal circuit.
INTERNAL 1
When Monitored: With the ignition on, the module on board diagnostics continuously
performs internal circuit tests.
Set Condition:
This DTC will set if the module identifies an out of range internal circuit.
OUTPUT DRIVER 1
When Monitored: With the ignition on the module on board diagnostics continuously
performs internal circuit tests.
Set Condition:
This DTC will set if the module identifies an out of range internal circuit.
OUTPUT DRIVER 2
When Monitored: With the ignition on the module on board diagnostics continuously
performs internal circuit tests.
Set Condition:
This DTC will set if the module identifies an out of range internal circuit.
16
AIRBAG
ACCELEROMETER 1 —
Continued
SAFING SENSOR
When Monitored: When the ignition on, the module on board diagnostics continuously
performs internal circuit tests.
Set Condition:
This DTC will set if the module identifies an out of range safing sensor.
STORED ENERGY FIRING 1
When Monitored: With the ignition on the ACM on board diagnostics continuously
performs internal circuit tests.
Set Condition:
This DTC will set if the ACM identifies an out of range internal circuit.
STORED ENERGY LOGIC
When Monitored: With the ignition on the ACM on board diagnostics continuously
performs internal circuit tests.
Set Condition:
This DTC will set if the ACM identifies an out of range internal circuit.
POSSIBLE CAUSES
AIRBAG CONTROL MODULE - ACM
LEFT SIDE IMPACT AIRBAG CONTROL MODULE - LSIACM
RIGHT SIDE IMPACT AIRBAG CONTROL MODULE - RSIACM
17
AIRBAG
ACCELEROMETER 1 —
Continued
TEST
ACTION
APPLICABILITY
1
Turn the ignition on.
Ensure the battery is fully charged.
WARNING: IF THE MODULE IS DROPPED AT ANY TIME, IT MUST BE
REPLACED. FAILURE TO TAKE THE PROPER PRECAUTIONS COULD
RESULT IN ACCIDENTAL AIRBAG DEPLOYMENT AND PERSONAL INJURY OR DEATH.
NOTE: For the purpose of this test, the AECM and ORC modules will be
referred to as an ACM.
From the list below, select the appropriate module reporting this diagnostic trouble
code.
SELECT ONE:
All
ACM - ACTIVE or STORED DTC
Replace the Airbag Control Module in accordance with Service
Instructions.
Perform AIRBAG VERIFICATION TEST - VER 1.
LEFT SIACM - ACTIVE or STORED DTC
WARNING: MAKE SURE THE BATTERY IS DISCONNECTED,
THEN WAIT TWO MINUTES BEFORE PROCEEDING. Replace
the Left Side Impact Airbag Control Module in accordance with
Service Instructions.
Perform AIRBAG VERIFICATION TEST - VER 1.
RIGHT SIACM - ACTIVE or STORED DTC
WARNING: MAKE SURE THE BATTERY IS DISCONNECTED,
THEN WAIT TWO MINUTES BEFORE PROCEEDING. Replace
the Right Side Impact Airbag Control Module in accordance with
Service information.
Perform AIRBAG VERIFICATION TEST - VER 1.
NOTE: When reconnecting Airbag system components, the ignition must be
turned off and the battery must be disconnected.
18
AIRBAG
Symptom List:
AIRBAG WARNING INDICATOR OPEN
AIRBAG WARNING INDICATOR SHORT
Test Note:
All symptoms listed above are diagnosed using the same tests.
The title for the tests will be AIRBAG WARNING INDICATOR
OPEN.
When Monitored and Set Condition:
AIRBAG WARNING INDICATOR OPEN
When Monitored: With ignition on the ACM monitors the PCI Bus for a message from the
MIC containing the airbag warning indicator status. The MIC transmits the message one
time at ignition on, upon lamp state change, or in response to the ACM lamp message.
Set Condition: This DTC will set if the indicator status is OPEN for 2 or 3 consecutive
messages or 2 or 3 seconds.
AIRBAG WARNING INDICATOR SHORT
When Monitored: With ignition on the ACM monitors the PCI Bus for a message from the
MIC containing the airbag warning indicator status. The MIC transmits the message one
time at ignition on, upon lamp state change, or in response to the ACM lamp message.
Set Condition: This DTC will set if the indicator status is SHORT for 2 or 3 consecutive
messages or 2 or 3 seconds.
POSSIBLE CAUSES
MIC, COMMUNICATION FAILURE
WARNING INDICATOR
ACM, WARNING INDICATOR
STORED CODE OR INTERMITTENT CONDITION
ACTIVE CODE PRESENT
TEST
ACTION
APPLICABILITY
1
Turn the ignition on.
Ensure the battery is fully charged.
NOTE: For the purpose of this test, the AECM and ORC modules will be
referred to as an ACM.
SELECT ACTIVE or STORED DTC:
All
ACM - ACTIVE DTC
Go To 2
ACM - STORED DTC
Go To 5
NOTE: When reconnecting Airbag system components, the ignition must be
turned off and the battery must be disconnected.
19
AIRBAG
AIRBAG WARNING INDICATOR OPEN —
TEST
2
3
Continued
ACTION
With the DRBIIIt, ensure PCI Bus communications with the Instrument Cluster.
Is the Instrument Cluster communicating on the PCI Bus?
Yes
→ Go To
No
→ Refer to category COMMUNICATION CATEGORY and select the
related symptom INSTRUMENT CLUSTER BUS +/- SIGNAL
OPEN.
APPLICABILITY
All
3
With the DRBIIIt select PASSIVE RESTRAINTS, AIRBAG and MONITOR DISPLAY.
Using the DRBIIIt, read the WARNING LAMP MONITOR screen.
Select the LAMP STATUS displayed on the DRB monitors screen.
Does the DRBIIIt show the LAMP STATUS: OK?
All
YES
Go To
4
NO
Replace Instrument Cluster.
Perform BODY VERIFICATION TEST - VER 1.
4
WARNING: TO AVOID PERSONAL INJURY OR DEATH, TURN THE IGNITION OFF, DISCONNECT THE BATTERY AND WAIT TWO MINUTES BEFORE PROCEEDING.
WARNING: IF THE AIRBAG CONTROL MODULE IS DROPPED AT ANY
TIME, IT MUST BE REPLACED. FAILURE TO TAKE THE PROPER PRECAUTIONS COULD RESULT IN ACCIDENTAL AIRBAG DEPLOYMENT
AND PERSONAL INJURY OR DEATH.
If there are no possible causes remaining, view repair.
All
Repair
Replace the Airbag Control Module in accordance with Service
Instructions.
Perform AIRBAG VERIFICATION TEST - VER 1.
5
NOTE: Ensure the battery is fully charged.
With the DRBIIIt, record and erase all DTCs from all modules.
All active codes must be resolved before diagnosing any stored codes.
Maintain a safe distance from all airbags while performing the following steps.
With the DRBIIIt monitor active codes as you work through the system.
NOTE: If equipped with Passenger Airbag On-Off switch, read the DTC’s in
all switch positions.
Wiggle the wiring harness and connectors of the appropriate airbag system and
rotate the steering wheel from stop to stop.
NOTE: Check connectors - Clean and repair as necessary.
You have just attempted to simulate the condition that initially set the trouble code
message.
The following additional checks may assist you in identifying a possible intermittent
problem:
- Visually inspect related wire harness connectors. Look for broken, bent, pushed out,
spread, corroded, or contaminated terminals.
- Visually inspect the related harnesses. Look for chafed, pierced, pinched or partially
broken wire.
- Refer to Wiring Diagrams and Technical Service Bulletins that may apply.
Did the DTC become active ?
Yes
→ Select appropriate symptom from Symptom List.
No
→ No problem found at this time. Erase all codes before returning
vehicle to customer.
20
All
AIRBAG
Symptom:
CLUSTER MESSAGE MISMATCH
When Monitored and Set Condition:
CLUSTER MESSAGE MISMATCH
When Monitored: After the MIC bulb test is completed, the ACM compares the Lamp
Request by ACM, On or Off, and the Lamp on by MIC, On or Off, PCI Bus messages. Each
message is transmitted one time per second or when a change in the lamp state occur.
Set Condition: If the Lamp Request by ACM, On or Off, and the Lamp on by MIC, On or
Off, messages do not match, the code will set.
POSSIBLE CAUSES
MIC DIAGNOSTIC CODES
CLUSTER MESSAGE MISMATCH
STORED CODE OR INTERMITTENT CONDITION
ACM, CLUSTER MESSAGE MISMATCH
ACTIVE CODE PRESENT
TEST
ACTION
APPLICABILITY
1
Turn the ignition on.
Ensure the battery is fully charged.
NOTE: For the purpose of this test, the AECM and ORC modules will be
referred to as an ACM.
SELECT ACTIVE or STORED DTC:
All
ACM - ACTIVE DTC
Go To 2
ACM - STORED DTC
Go To 5
NOTE: When reconnecting Airbag system components, the ignition must be
turned off and the battery must be disconnected.
2
Turn the ignition on.
With the DRBIIIt, read the MIC DTCs.
Does the DRBIIIt display any active Diagnostic Codes?
Yes
→ Refer to symptom list for problems related to Instrument Cluster.
No
→ Go To
3
21
All
AIRBAG
CLUSTER MESSAGE MISMATCH —
Continued
TEST
ACTION
APPLICABILITY
3
With the DRBIIIt select PASSIVE RESTRAINTS, AIRBAG, MONITOR DISPLAY
and WARNING LAMP STATUS.
Cycle the ignition key and observe the LAMP ON BY MIC and LAMP REQ BY ACM
monitors after the 6 to 8 second indicator test.
Does the LAMP ON BY MIC and LAMP REQ BY ACM monitors match?
All
YES
Go To
4
NO
Replace Mechanical Instrument Cluster.
Perform BODY VERIFICATION TEST - VER 1.
4
WARNING: TO AVOID PERSONAL INJURY OR DEATH, MAKE SURE THE
BATTERY IS DISCONNECTED, THEN WAIT TWO MINUTES BEFORE PROCEEDING.
WARNING: IF THE AIRBAG CONTROL MODULE IS DROPPED AT ANY
TIME, IT MUST BE REPLACED. FAILURE TO TAKE THE PROPER PRECAUTIONS COULD RESULT IN ACCIDENTAL AIRBAG DEPLOYMENT
AND PERSONAL INJURY OR DEATH.
If there are no possible causes remaining, view repair.
All
Repair
Replace the Airbag Control Module in accordance with Service
Instructions.
Perform AIRBAG VERIFICATION TEST - VER 1.
5
NOTE: Ensure the battery is fully charged.
With the DRBIIIt, record and erase all DTCs from all modules.
All active codes must be resolved before diagnosing any stored codes.
Maintain a safe distance from all airbags while performing the following steps.
With the DRBIIIt monitor active codes as you work through the system.
NOTE: If equipped with Passenger Airbag On-Off switch, read the DTC’s in
all switch positions.
Wiggle the wiring harness and connectors of the appropriate airbag system and
rotate the steering wheel from stop to stop.
NOTE: Check connectors - Clean and repair as necessary.
You have just attempted to simulate the condition that initially set the trouble code
message.
The following additional checks may assist you in identifying a possible intermittent
problem:
- Visually inspect related wire harness connectors. Look for broken, bent, pushed out,
spread, corroded, or contaminated terminals.
- Visually inspect the related harnesses. Look for chafed, pierced, pinched or partially
broken wire.
- Refer to Wiring Diagrams and Technical Service Bulletins that may apply.
Did the DTC become active ?
Yes
→ Select appropriate symptom from Symptom List.
No
→ No problem found at this time. Erase all codes before returning
vehicle to customer.
22
All
AIRBAG
Symptom:
CONFIGURATION ERROR
When Monitored and Set Condition:
CONFIGURATION ERROR
When Monitored: With ignition on the Side Impact Airbag Control Module monitors the
unused squib terminals for the a valid squib circuit resistance.
Set Condition: When the SIACM detects a valid squib circuit resistance across the
unused terminals.
POSSIBLE CAUSES
SELECT MODULE REPORTING DTC
MISS WIRED LEFT SIACM CONNECTOR
MISS WIRED RIGHT SIACM CONNECTOR
LEFT SIDE IMPACT AIRBAG CONTROL MODULE - LSIACM
RIGHT SIDE IMPACT AIRBAG CONTROL MODULE - LSIACM
STORED CODE OR INTERMITTENT CONDITION
ACTIVE CODE PRESENT
TEST
ACTION
APPLICABILITY
1
Turn the ignition on.
NOTE: Ensure that the battery is fully charged.
NOTE: For the purpose of this test, the AECM and ORC modules will be
referred to as an ACM.
SELECT ONE:
All
LEFT SIACM - ACTIVE DTC
Go To 2
LEFT SIACM - STORED DTC
Go To 4
RIGHT SIACM - ACTIVE DTC
Go To 3
RIGHT SIACM - STORED DTC
Go To 4
NOTE: When reconnecting Airbag system components, the ignition must be
turned off and the battery must be disconnected.
23
AIRBAG
CONFIGURATION ERROR —
Continued
TEST
ACTION
APPLICABILITY
2
WARNING: TURN IGNITION OFF, DISCONNECT THE BATTERY AND WAIT
TWO MINUTES BEFORE PROCEEDING.
Disconnect the Left SIACM connector.
NOTE: Check connectors - Clean and repair as necessary.
Using the wiring diagram/schematic as a guide, inspect the Left SIACM connector
wiring.
Is the connector correctly wired?
All
3
4
Yes
→ Replace the Left Side Impact Airbag Control Module in accordance with Service Instructions. WARNING: IF THE SIDE IMPACT AIRBAG CONTROL MODULE IS DROPPED AT ANY
TIME, IT MUST BE REPLACED.
Perform AIRBAG VERIFICATION TEST - VER 1.
No
→ Rewire the Left Side Impact Airbag Control Module connector.
Perform AIRBAG VERIFICATION TEST - VER 1.
WARNING: TURN IGNITION OFF, DISCONNECT THE BATTERY AND WAIT
TWO MINUTES BEFORE PROCEEDING.
Disconnect the Right SIACM connector.
NOTE: Check connectors - Clean and repair as necessary.
Using the wiring diagram/schematic as a guide, inspect the Right SIACM connector
wiring.
Is the connector correctly wired?
Yes
→ Replace the Right Side Impact Airbag Control Module in accordance with Service Instructions. WARNING: IF THE SIDE IMPACT AIRBAG CONTROL MODULE IS DROPPED AT ANY
TIME, IT MUST BE REPLACED.
Perform AIRBAG VERIFICATION TEST - VER 1.
No
→ Rewire the Right Side Impact Airbag Control Module connector.
Perform AIRBAG VERIFICATION TEST - VER 1.
NOTE: Ensure the battery is fully charged.
With the DRBIIIt, record and erase all DTCs from all modules.
All active codes must be resolved before diagnosing any stored codes.
Maintain a safe distance from all airbags while performing the following steps.
With the DRBIIIt monitor active codes as you work through the system.
NOTE: If equipped with Passenger Airbag On-Off switch, read the DTC’s in
all switch positions.
Wiggle the wiring harness and connectors of the appropriate airbag system and
rotate the steering wheel from stop to stop.
NOTE: Check connectors - Clean and repair as necessary.
You have just attempted to simulate the condition that initially set the trouble code
message.
The following additional checks may assist you in identifying a possible intermittent
problem:
- Visually inspect related wire harness connectors. Look for broken, bent, pushed out,
spread, corroded, or contaminated terminals.
- Visually inspect the related harnesses. Look for chafed, pierced, pinched or partially
broken wire.
- Refer to Wiring Diagrams and Technical Service Bulletins that may apply.
Did the DTC become active ?
Yes
→ Select appropriate symptom from Symptom List.
No
→ No problem found at this time. Erase all codes before returning
vehicle to customer.
24
All
All
AIRBAG
Symptom:
DRIVER SQUIB 1 CIRCUIT OPEN
When Monitored and Set Condition:
DRIVER SQUIB 1 CIRCUIT OPEN
When Monitored:
Squib 1 circuits.
Set Condition:
circuits.
With the ignition on the ACM monitors the resistance of the Driver
The ACM detects an open circuit or high resistance in the Driver Squib 1
POSSIBLE CAUSES
DRIVER AIRBAG OPEN
CLOCKSPRING SQUIB CIRCUITS OPEN
DRIVER SQUIB 1 LINE 1 OR LINE 2 CIRCUIT OPEN
ACM, DRIVER SQUIB 1 CIRCUIT OPEN
STORED CODE OR INTERMITTENT CONDITION
ACTIVE CODE PRESENT
TEST
ACTION
APPLICABILITY
1
Turn the ignition on.
NOTE: Ensure that the battery is fully charged.
NOTE: For the purpose of this test, the AECM and ORC modules will be
referred to as an ACM.
SELECT ACTIVE or STORED DTC:
All
ACM - ACTIVE DTC
Go To 2
ACM - STORED DTC
Go To 6
NOTE: When reconnecting Airbag system components, the ignition must be
turned off and the battery must be disconnected.
25
AIRBAG
DRIVER SQUIB 1 CIRCUIT OPEN —
Continued
TEST
ACTION
APPLICABILITY
2
WARNING: TO AVOID PERSONAL INJURY OR DEATH, TURN THE IGNITION OFF, DISCONNECT THE BATTERY AND WAIT TWO MINUTES BEFORE PROCEEDING.
WARNING: DO NOT PLACE AN INTACT UNDEPLOYED AIRBAG FACE
DOWN ON A HARD SURFACE, THE AIRBAG WILL PROPEL INTO THE AIR
IF ACCIDENTALLY DEPLOYED. FAILURETO TAKE THE PROPER PRECAUTIONS COULD RESULT IN ACCIDENTAL AIRBAG DEPLOYMENT
AND PERSONAL INJURY OR DEATH.
Disconnect the Driver Airbag.
NOTE: Check connectors - Clean and repair as necessary.
Connect the appropriate Load Tool to the Driver Airbag connectors.
WARNING: TO AVOID PERSONAL INJURY OR DEATH, TURN THE IGNITION ON, THEN RECONNECT THE BATTERY.
With the DRBIIIt, read the active Airbag DTCs.
Does the DRBIIIt show DRIVER SQUIB 1 CIRCUIT OPEN?
All
3
4
Yes
→ Go To
No
→ Replace the Driver Airbag in accordance with the Service Information.
Perform AIRBAG VERIFICATION TEST - VER 1.
3
WARNING: TO AVOID PERSONAL INJURY OR DEATH, TURN THE IGNITION OFF, DISCONNECT THE BATTERY AND WAIT TWO MINUTES BEFORE PROCEEDING.
Disconnect the Clockspring connector.
NOTE: Check connectors - Clean and repair as necessary.
Connect the appropriate Load Tool to the Clockspring connector.
WARNING: TO AVOID PERSONAL INJURY OR DEATH,TURN THE IGNITION ON, THEN RECONNECT THE BATTERY.
With the DRBIIIt, read the active Airbag DTCs.
Does the DRBIIIt show DRIVER SQUIB 1 CIRCUIT OPEN?
Yes
→ Go To
No
→ Replace the Clockspring in accordance with the Service Information.
Perform AIRBAG VERIFICATION TEST - VER 1.
All
4
WARNING: TO AVOID PERSONAL INJURY OR DEATH, TURN THE IGNITION OFF, DISCONNECT THE BATTERY AND WAIT TWO MINUTES BEFORE PROCEEDING.
Disconnect the Airbag Control Module connector.
NOTE: Check connectors - Clean and repair as necessary.
Connect the appropriate Load Tool adaptor to the Airbag Control Module connector.
Disconnect the Load Tool from the Clockspring connector.
Measure the resistance of the Driver Squib 1 Line 1 and Line 2 circuit between the
ACM adaptor and the Clockspring connector.
Is the resistance below 1.0 ohms on both circuits?
Yes
→ Go To
No
→ Repair open or high resistance in the Driver Squib 1 Line 1 or
Line 2 circuit.
Perform AIRBAG VERIFICATION TEST - VER 1.
5
26
All
AIRBAG
DRIVER SQUIB 1 CIRCUIT OPEN —
Continued
TEST
ACTION
APPLICABILITY
5
WARNING: TO AVOID PERSONAL INJURY OR DEATH, TURN THE IGNITION OFF, DISCONNECT THE BATTERY AND WAIT TWO MINUTES BEFORE PROCEEDING.
WARNING: IF THE AIRBAG CONTROL MODULE IS DROPPED AT ANY
TIME, IT MUST BE REPLACED. FAILURE TO TAKE THE PROPER PRECAUTIONS COULD RESULT IN ACCIDENTAL AIRBAG DEPLOYMENT
AND PERSONAL INJURY OR DEATH.
If there are no possible causes remaining, view repair.
All
Repair
Replace the Airbag Control Module in accordance with Service
Instructions.
Perform AIRBAG VERIFICATION TEST - VER 1.
6
NOTE: Ensure the battery is fully charged.
With the DRBIIIt, record and erase all DTCs from all modules.
All active codes must be resolved before diagnosing any stored codes.
Maintain a safe distance from all airbags while performing the following steps.
With the DRBIIIt monitor active codes as you work through the system.
NOTE: If equipped with Passenger Airbag On-Off switch, read the DTC’s in
all switch positions.
Wiggle the wiring harness and connectors of the appropriate airbag system and
rotate the steering wheel from stop to stop.
NOTE: Check connectors - Clean and repair as necessary.
You have just attempted to simulate the condition that initially set the trouble code
message.
The following additional checks may assist you in identifying a possible intermittent
problem:
- Visually inspect related wire harness connectors. Look for broken, bent, pushed out,
spread, corroded, or contaminated terminals.
- Visually inspect the related harnesses. Look for chafed, pierced, pinched or partially
broken wire.
- Refer to Wiring Diagrams and Technical Service Bulletins that may apply.
Did the DTC become active ?
Yes
→ Select appropriate symptom from Symptom List.
No
→ No problem found at this time. Erase all codes before returning
vehicle to customer.
27
All
AIRBAG
Symptom:
DRIVER SQUIB 1 CIRCUIT SHORT
When Monitored and Set Condition:
DRIVER SQUIB 1 CIRCUIT SHORT
When Monitored:
Squib 1 circuits.
Set Condition:
With the ignition on the ACM monitors the resistance of the Driver
The ACM has detected low resistance on the Driver Squib 1 circuits.
POSSIBLE CAUSES
DRIVER AIRBAG CIRCUIT SHORT
CLOCKSPRING, DRIVER SQUIB 1 CIRCUIT SHORT
DRIVER SQUIB 1 LINE 1 SHORT TO LINE 2
ACM, DRIVER SQUIB 1 CIRCUIT SHORT
STORED CODE OR INTERMITTENT CONDITION
ACTIVE CODE PRESENT
TEST
ACTION
APPLICABILITY
1
Turn the ignition on.
NOTE: Ensure that the battery is fully charged.
NOTE: For the purpose of this test, the AECM and ORC modules will be
referred to as an ACM.
SELECT ACTIVE or STORED DTC:
All
ACM - ACTIVE DTC
Go To 2
ACM - STORED DTC
Go To 6
NOTE: When reconnecting airbag system components the Ignition must be
turned off and the Battery must be disconnected.
28
AIRBAG
DRIVER SQUIB 1 CIRCUIT SHORT —
Continued
TEST
ACTION
APPLICABILITY
2
WARNING: TO AVOID PERSONAL INJURY OR DEATH, TURN THE IGNITION OFF, DISCONNECT THE BATTERY AND WAIT TWO MINUTES BEFORE PROCEEDING.
Disconnect the Driver Airbag.
WARNING: DO NOT PLACE AN INTACT UNDEPLOYED AIRBAG FACE
DOWN ON A HARD SURFACE, THE AIRBAG WILL PROPEL INTO THE AIR
IF ACCIDENTALLY DEPLOYED. FAILURE TO TAKE THE PROPER PRECAUTIONS COULD RESULT IN ACCIDENTAL AIRBAG DEPLOYMENT
AND PERSONAL INJURY OR DEATH.
NOTE: Check connectors - Clean and repair as necessary.
Connect the appropriate Load Tool to the Driver Airbag connectors.
WARNING: TO AVOID PERSONAL INJURY OR DEATH,TURN THE IGNITION ON, THEN RECONNECT THE BATTERY.
With the DRBIIIt, read the active Airbag DTCs.
Does the DRBIIIt show DRIVER SQUIB 1 CIRCUIT SHORT?
All
3
4
Yes
→ Go To
No
→ Replace Driver Airbag.
Perform AIRBAG VERIFICATION TEST - VER 1.
3
WARNING: TO AVOID PERSONAL INJURY OR DEATH, TURN THE IGNITION OFF, DISCONNECT THE BATTERY AND WAIT TWO MINUTES BEFORE PROCEEDING.
Disconnect the Clockspring connector.
NOTE: Check connectors - Clean and repair as necessary.
Connect the appropriate Load Tool to the Clockspring connector.
WARNING: TO AVOID PERSONAL INJURY OR DEATH, TURN THE IGNITION ON, THEN RECONNECT THE BATTERY.
With the DRBIIIt, read the active Airbag DTCs.
Does the DRBIIIt show DRIVER SQUIB 1 CIRCUIT SHORT?
Yes
→ Go To
No
→ Replace Clockspring.
Perform AIRBAG VERIFICATION TEST - VER 1.
All
4
WARNING: TO AVOID PERSONAL INJURY OR DEATH, TURN THE IGNITION OFF, DISCONNECT THE BATTERY AND WAIT TWO MINUTES BEFORE PROCEEDING.
Disconnect the Airbag Control Module connector.
NOTE: Check connectors - Clean and repair as necessary.
Connect the appropriate Load Tool adaptor to the Airbag Control Module connector.
Disconnect the Load Tool from the Clockspring connector.
Measure the resistance between the Driver Squib 1 Line 1 and Line 2 at the
Clockspring connector.
Is the resistance below 10K ohms?
Yes
→ Repair the Driver Squib 1 Line 1 circuit shorted to Driver Squib
1 Line 2 circuit.
Perform AIRBAG VERIFICATION TEST - VER 1.
No
→ Go To
5
29
All
AIRBAG
DRIVER SQUIB 1 CIRCUIT SHORT —
Continued
TEST
ACTION
APPLICABILITY
5
WARNING: TO AVOID PERSONAL INJURY OR DEATH, TURN THE IGNITION OFF, DISCONNECT THE BATTERY AND WAIT TWO MINUTES BEFORE PROCEEDING.
WARNING: IF THE AIRBAG CONTROL MODULE IS DROPPED AT ANY
TIME, IT MUST BE REPLACED. FAILURE TO TAKE THE PROPER PRECAUTIONS COULD RESULT IN ACCIDENTAL AIRBAG DEPLOYMENT
AND PERSONAL INJURY OR DEATH.
If there are no possible causes remaining, view repair.
All
Repair
Replace the Airbag Control Module in accordance with Service
Instructions.
Perform AIRBAG VERIFICATION TEST - VER 1.
6
NOTE: Ensure the battery is fully charged.
With the DRBIIIt, record and erase all DTCs from all modules.
All active codes must be resolved before diagnosing any stored codes.
Maintain a safe distance from all airbags while performing the following steps.
With the DRBIIIt monitor active codes as you work through the system.
NOTE: If equipped with Passenger Airbag On-Off switch, read the DTC’s in
all switch positions.
Wiggle the wiring harness and connectors of the appropriate airbag system and
rotate the steering wheel from stop to stop.
NOTE: Check connectors - Clean and repair as necessary.
You have just attempted to simulate the condition that initially set the trouble code
message.
The following additional checks may assist you in identifying a possible intermittent
problem:
- Visually inspect related wire harness connectors. Look for broken, bent, pushed out,
spread, corroded, or contaminated terminals.
- Visually inspect the related harnesses. Look for chafed, pierced, pinched or partially
broken wire.
- Refer to Wiring Diagrams and Technical Service Bulletins that may apply.
Did the DTC become active ?
Yes
→ Select appropriate symptom from Symptom List.
No
→ No problem found at this time. Erase all codes before returning
vehicle to customer.
30
All
AIRBAG
Symptom:
DRIVER SQUIB 1 SHORT TO BATTERY
When Monitored and Set Condition:
DRIVER SQUIB 1 SHORT TO BATTERY
When Monitored:
1 circuits.
Set Condition:
With the ignition on the ACM monitors the voltage of the Driver Squib
The ACM has detected high voltage on the Driver Squib 1 circuits.
POSSIBLE CAUSES
DRIVER AIRBAG CIRCUIT SHORT TO BATTERY
CLOCKSPRING, DRIVER SQUIB 1 CIRCUIT SHORT TO BATTERY
DRIVER SQUIB 1 LINE 1 OR LINE 2 SHORT TO BATTERY
ACM, DRIVER SQUIB 1 CIRCUITS SHORT TO BATTERY
STORED CODE OR INTERMITTENT CONDITION
ACTIVE CODE PRESENT
TEST
ACTION
APPLICABILITY
1
Turn the ignition on.
NOTE: Ensure that the battery is fully charged.
NOTE: For the purpose of this test, the AECM and ORC modules will be
referred to as an ACM.
SELECT ACTIVE or STORED ACM DTC:
All
ACM - ACTIVE DTC
Go To 2
ACM - STORED DTC
Go To 6
NOTE: When reconnecting Airbag system components, the ignition must be
turned off and the battery must be disconnected.
31
AIRBAG
DRIVER SQUIB 1 SHORT TO BATTERY —
Continued
TEST
ACTION
APPLICABILITY
2
WARNING: TO AVOID PERSONAL INJURY OR DEATH, TURN THE IGNITION OFF, DISCONNECT THE BATTERY AND WAIT TWO MINUTES BEFORE PROCEEDING.
WARNING: DO NOT PLACE AN INTACT UNDEPLOYED AIRBAG FACE
DOWN ON A HARD SURFACE, THE AIRBAG WILL PROPEL INTO THE AIR
IF ACCIDENTALLY DEPLOYED, AND COULD RESULT IN SERIOUS OR
FATAL INJURY.
Disconnect the Driver Airbag.
NOTE: Check connectors - Clean and repair as necessary.
Connect the appropriate Load Tool to the Driver Airbag connectors.
WARNING: TO AVOID PERSONAL INJURY OR DEATH, TURN THE IGNITION ON, THEN RECONNECT THE BATTERY.
With the DRBIIIt, read the active Airbag DTCS.
Does the DRBIIIt show DRIVER SQUIB 1 SHORT TO BATTERY?
All
3
4
Yes
→ Go To
No
→ Replace the Driver Airbag in accordance with the Service Information.
Perform AIRBAG VERIFICATION TEST - VER 1.
3
WARNING: TO AVOID PERSONAL INJURY OR DEATH, TURN THE IGNITION OFF, DISCONNECT THE BATTERY AND WAIT TWO MINUTES BEFORE PROCEEDING.
Disconnect the Clockspring connector.
NOTE: Check connectors - Clean and repair as necessary.
Connect the appropriate Load Tool to the Clockspring connector.
WARNING: TO AVOID PERSONAL INJURY OR DEATH, TURN THE IGNITION ON, THEN RECONNECT THE BATTERY.
With the DRBIIIt, read the active Airbag DTCs.
Does the DRBIIIt show DRIVER SQUIB 1 SHORT TO BATTERY ?
Yes
→ Go To
No
→ Replace the Clockspring in accordance with the Service Information.
Perform AIRBAG VERIFICATION TEST - VER 1.
All
4
WARNING: TO AVOID PERSONAL INJURY OR DEATH, TURN THE IGNITION OFF, DISCONNECT THE BATTERY AND WAIT TWO MINUTES BEFORE PROCEEDING.
WARNING: IF THE AIRBAG CONTROL MODULE IS DROPPED AT ANY
TIME, IT MUST BE REPLACED. FAILURE TO TAKE THE PROPER PRECAUTIONS COULD RESULT IN ACCIDENTAL AIRBAG DEPLOYMENT
AND PERSONAL INJURY OR DEATH.
Disconnect the Airbag Control Module connector.
NOTE: Check connectors - Clean and repair as necessary.
Connect the appropriate Load Tool adaptor to the Airbag Control Module connector.
WARNING: TO AVOID PERSONAL INJURY OR DEATH, TURN THE IGNITION ON, THEN RECONNECT THE BATTERY.
Disconnect the Load Tool from the Clockspring connector.
Measure the voltage on the Driver Squib 1 Line 1 and Line 2 circuits between the
Clockspring connector and ground.
Is there any voltage present?
Yes
→ Repair the Driver Squib 1 Line 1 or Line 2 circuits shorted to
battery.
Perform AIRBAG VERIFICATION TEST - VER 1.
No
→ Go To
5
32
All
AIRBAG
DRIVER SQUIB 1 SHORT TO BATTERY —
Continued
TEST
ACTION
APPLICABILITY
5
WARNING: TO AVOID PERSONAL INJURY OR DEATH, TURN THE IGNITION OFF, DISCONNECT THE BATTERY AND WAIT TWO MINUTES BEFORE PROCEEDING.
WARNING: IF THE AIRBAG CONTROL MODULE IS DROPPED AT ANY
TIME, IT MUST BE REPLACED. FAILURE TO TAKE THE PROPER PRECAUTIONS COULD RESULT IN ACCIDENTAL AIRBAG DEPLOYMENT
AND PERSONAL INJURY OR DEATH.
If there are no possible causes remaining, view repair.
All
Repair
Replace the Airbag Control Module in accordance with Service
Instructions.
Perform AIRBAG VERIFICATION TEST - VER 1.
6
NOTE: Ensure the battery is fully charged.
With the DRBIIIt, record and erase all DTCs from all modules.
All active codes must be resolved before diagnosing any stored codes.
Maintain a safe distance from all airbags while performing the following steps.
With the DRBIIIt monitor active codes as you work through the system.
NOTE: If equipped with Passenger Airbag On-Off switch, read the DTC’s in
all switch positions.
Wiggle the wiring harness and connectors of the appropriate airbag system and
rotate the steering wheel from stop to stop.
NOTE: Check connectors - Clean and repair as necessary.
You have just attempted to simulate the condition that initially set the trouble code
message.
The following additional checks may assist you in identifying a possible intermittent
problem:
- Visually inspect related wire harness connectors. Look for broken, bent, pushed out,
spread, corroded, or contaminated terminals.
- Visually inspect the related harnesses. Look for chafed, pierced, pinched or partially
broken wire.
- Refer to Wiring Diagrams and Technical Service Bulletins that may apply.
Did the DTC become active ?
Yes
→ Select appropriate symptom from Symptom List.
No
→ No problem found at this time. Erase all codes before returning
vehicle to customer.
33
All
AIRBAG
Symptom:
DRIVER SQUIB 1 SHORT TO GROUND
When Monitored and Set Condition:
DRIVER SQUIB 1 SHORT TO GROUND
When Monitored:
Squib 1 circuits.
Set Condition:
With the ignition on the ACM monitors the resistance of the Driver
The ACM has detected a short to ground in the Driver Squib 1 circuits.
POSSIBLE CAUSES
DRIVER AIRBAG CIRCUIT SHORT TO GROUND
CLOCKSPRING, DRIVER SQUIB 1 CIRCUIT SHORT TO GROUND
DRIVER SQUIB 1 LINE 1 OR LINE 2 SHORTED TO GROUND
ACM, DRIVER SQUIB 1 CIRCUITS SHORT TO GROUND
STORED CODE OR INTERMITTENT CONDITION
ACTIVE CODE PRESENT
TEST
ACTION
APPLICABILITY
1
Turn the ignition on.
NOTE: Ensure that the battery is fully charged.
NOTE: For the purpose of this test, the AECM and ORC modules will be
referred to as an ACM.
SELECT ACTIVE or STORED DTC:
All
ACM - ACTIVE DTC
Go To 2
ACM - STORED DTC
Go To 5
NOTE: When reconnecting Airbag system components, the ignition must be
turned off and the battery must be disconnected.
34
AIRBAG
DRIVER SQUIB 1 SHORT TO GROUND —
Continued
TEST
ACTION
APPLICABILITY
2
WARNING: TO AVOID PERSONAL INJURY OR DEATH, TURN THE IGNITION OFF, DISCONNECT THE BATTERY AND WAIT TWO MINUTES BEFORE PROCEEDING.
WARNING: DO NOT PLACE AN INTACT UNDEPLOYED AIRBAG FACE
DOWN ON A HARD SURFACE, THE AIRBAG WILL PROPEL INTO THE AIR
IF ACCIDENTALLY DEPLOYED. FAILURE TO TAKE THE PROPER PRECAUTIONS COULD RESULT IN ACCIDENTAL AIRBAG DEPLOYMENT
AND PERSONAL INJURY OR DEATH.
Disconnect the Driver Airbag Module.
NOTE: Check connectors - Clean and repair as necessary.
Connect the appropriate Load Tool to the Driver Airbag connectors.
WARNING: TO AVOID PERSONAL INJURY OR DEATH, TURN THE IGNITION ON, THEN RECONNECT THE BATTERY.
With the DRBIIIt, read the active Airbag DTCs.
Does the DRBIIIt show DRIVER SQUIB 1 SHORT TO GROUND?
All
3
4
Yes
→ Go To
No
→ Replace the Driver Airbag in accordance with the Service Information.
Perform AIRBAG VERIFICATION TEST - VER 1.
3
WARNING: TO AVOID PERSONAL INJURY OR DEATH, TURN THE IGNITION OFF, DISCONNECT THE BATTERY AND WAIT TWO MINUTES BEFORE PROCEEDING.
Disconnect the Clockspring connector.
NOTE: Check connectors - Clean and repair as necessary.
Connect the appropriate Load Tool to the Clockspring connector.
WARNING: TO AVOID PERSONAL INJURY OR DEATH, TURN THE IGNITION ON, THEN RECONNECT THE BATTERY.
With the DRBIIIt, read the active Airbag DTCs.
Does the DRBIIIt show DRIVER SQUIB 1 SHORT TO GROUND?
Yes
→ Go To
No
→ Replace the Clockspring.
Perform AIRBAG VERIFICATION TEST - VER 1.
All
4
WARNING: TO AVOID PERSONAL INJURY OR DEATH, TURN THE IGNITION OFF, DISCONNECT THE BATTERY AND WAIT TWO MINUTES BEFORE PROCEEDING.
Disconnect the Airbag Control Module connector.
NOTE: Check connectors - Clean and repair as necessary.
Connect the appropriate Load Tool adaptor to the Airbag Control Module connector.
Disconnect the Load Tool from the Clockspring connector.
Measure the resistance of the Driver Squib 1 Line 1 and Line 2 circuits between
Clockspring connector and ground.
Is the resistance below 10K ohms on either circuit?
Yes
→ Repair Driver Squib 1 Line 1 or Line 2 circuits shorted to ground.
Perform AIRBAG VERIFICATION TEST - VER 1.
No
→ Replace the Airbag Control Module in accordance with Service
Instructions.
Perform AIRBAG VERIFICATION TEST - VER 1.
35
All
AIRBAG
DRIVER SQUIB 1 SHORT TO GROUND —
Continued
TEST
ACTION
APPLICABILITY
5
NOTE: Ensure the battery is fully charged.
With the DRBIIIt, record and erase all DTCs from all modules.
All active codes must be resolved before diagnosing any stored codes.
Maintain a safe distance from all airbags while performing the following steps.
With the DRBIIIt monitor active codes as you work through the system.
NOTE: If equipped with Passenger Airbag On-Off switch, read the DTC’s in
all switch positions.
Wiggle the wiring harness and connectors of the appropriate airbag system and
rotate the steering wheel from stop to stop.
NOTE: Check connectors - Clean and repair as necessary.
You have just attempted to simulate the condition that initially set the trouble code
message.
The following additional checks may assist you in identifying a possible intermittent
problem:
- Visually inspect related wire harness connectors. Look for broken, bent, pushed out,
spread, corroded, or contaminated terminals.
- Visually inspect the related harnesses. Look for chafed, pierced, pinched or partially
broken wire.
- Refer to Wiring Diagrams and Technical Service Bulletins that may apply.
Did the DTC become active ?
All
Yes
→ Select appropriate symptom from Symptom List.
No
→ No problem found at this time. Erase all codes before returning
vehicle to customer.
36
AIRBAG
Symptom:
INTERROGATE LEFT SIACM
When Monitored and Set Condition:
INTERROGATE LEFT SIACM
When Monitored: With ignition on, the ACM monitors the PCI Bus for a Left SIACM
status message containing the airbag warning lamp 9On or OFF9 request. The status
message is sent to the ACM once each second or upon any change in the active DTCs.
Set Condition: The Code will set, if the ACM receives an Lamp On status message from
the Left SIACM. NOTE: This indicates that there was an active diagnostic trouble code in
the Left SIACM.
POSSIBLE CAUSES
INTERROGATE LEFT SIACM
ACM, NO ACTIVE LEFT SIACM DTCS
STORED CODE OR INTERMITTENT CONDITION
ACTIVE CODE PRESENT
TEST
ACTION
APPLICABILITY
1
NOTE: Ensure that the battery is fully charged.
Ensure the battery is fully charged.
NOTE: For the purpose of this test, the AECM and ORC modules will be
referred to as an ACM.
SELECT ACTIVE or STORED DTC:
All
ACM - ACTIVE DTC
Go To 2
ACM - STORED DTC
Go To 4
NOTE: When reconnecting Airbag system components, the ignition must be
turned off and the battery must be disconnected.
2
Turn the ignition on.
With the DRBIIIt read the Left SIACM active DTCs.
Did the DRBIIIt show any active DTCs?
Yes
→ Refer to symptom list for problems related to Left SIACM.
Perform AIRBAG VERIFICATION TEST - VER 1.
No
→ Go To
3
37
All
AIRBAG
INTERROGATE LEFT SIACM —
Continued
TEST
ACTION
APPLICABILITY
3
WARNING: TURN THE IGNITION OFF, DISCONNECT THE BATTERY AND
WAIT TWO MINUTES BEFORE PROCEEDING.
If there are no possible causes remaining, view repair.
All
Repair
Replace the Airbag Control Module in accordance with Service
Instructions. WARNING: IF THE AIRBAG CONTROL MODULE
IS DROPPED AT ANY TIME, IT MUST BE REPLACED.
Perform AIRBAG VERIFICATION TEST - VER 1.
4
NOTE: Ensure the battery is fully charged.
With the DRBIIIt, record and erase all DTCs from all modules.
All active codes must be resolved before diagnosing any stored codes.
Maintain a safe distance from all airbags while performing the following steps.
With the DRBIIIt monitor active codes as you work through the system.
NOTE: If equipped with Passenger Airbag On-Off switch, read the DTC’s in
all switch positions.
Wiggle the wiring harness and connectors of the appropriate airbag system and
rotate the steering wheel from stop to stop.
NOTE: Check connectors - Clean and repair as necessary.
You have just attempted to simulate the condition that initially set the trouble code
message.
The following additional checks may assist you in identifying a possible intermittent
problem:
- Visually inspect related wire harness connectors. Look for broken, bent, pushed out,
spread, corroded, or contaminated terminals.
- Visually inspect the related harnesses. Look for chafed, pierced, pinched or partially
broken wire.
- Refer to Wiring Diagrams and Technical Service Bulletins that may apply.
Did the DTC become active ?
Yes
→ Select appropriate symptom from Symptom List.
No
→ No problem found at this time. Erase all codes before returning
vehicle to customer.
38
All
AIRBAG
Symptom:
INTERROGATE RIGHT SIACM
When Monitored and Set Condition:
INTERROGATE RIGHT SIACM
When Monitored: With ignition on, the ACM monitors the PCI Bus for a Right SIACM
status message containing the airbag warning indicator On - OFF request. The status
message is sent to the ACM once each second or upon any change in the active DTCs.
Set Condition: The Code will set, if the ACM receives an Lamp On status message from
the Right SIACM. NOTE: This indicates that there is an active diagnostic trouble code in
the Right SIACM.
POSSIBLE CAUSES
INTERROGATE RIGHT SIACM
NO ACTIVE RIGHT SIACM DTCS
STORED CODE OR INTERMITTENT CONDITION
ACTIVE CODE PRESENT
TEST
ACTION
APPLICABILITY
1
NOTE: Ensure that the battery is fully charged.
Ensure the battery is fully charged.
NOTE: For the purpose of this test, the AECM and ORC modules will be
referred to as an ACM.
SELECT ACTIVE or STORED DTC:
All
ACM - ACTIVE DTC
Go To 2
ACM - STORED DTC
Go To 4
NOTE: When reconnecting Airbag system components, the ignition must be
turned off and the battery must be disconnected.
2
Turn the ignition on.
With the DRBIIIt read the Right SIACM active DTCs.
Did the DRBIIIt show any active DTCs?
Yes
→ Refer to symptom list for problems related to Right SIACM.
Perform AIRBAG VERIFICATION TEST - VER 1.
No
→ Go To
3
39
All
AIRBAG
INTERROGATE RIGHT SIACM —
Continued
TEST
ACTION
APPLICABILITY
3
WARNING: TURN THE IGNITION OFF, DISCONNECT THE BATTERY AND
WAIT TWO MINUTES BEFORE PROCEEDING.
If there are no possible causes remaining, view repair.
All
Repair
Replace the Airbag Control Module in accordance with Service
Instructions. WARNING: IF THE AIRBAG CONTROL MODULE
IS DROPPED AT ANY TIME, IT MUST BE REPLACED.
Perform AIRBAG VERIFICATION TEST - VER 1.
4
NOTE: Ensure the battery is fully charged.
With the DRBIIIt, record and erase all DTCs from all modules.
All active codes must be resolved before diagnosing any stored codes.
Maintain a safe distance from all airbags while performing the following steps.
With the DRBIIIt monitor active codes as you work through the system.
NOTE: If equipped with Passenger Airbag On-Off switch, read the DTC’s in
all switch positions.
Wiggle the wiring harness and connectors of the appropriate airbag system and
rotate the steering wheel from stop to stop.
NOTE: Check connectors - Clean and repair as necessary.
You have just attempted to simulate the condition that initially set the trouble code
message.
The following additional checks may assist you in identifying a possible intermittent
problem:
- Visually inspect related wire harness connectors. Look for broken, bent, pushed out,
spread, corroded, or contaminated terminals.
- Visually inspect the related harnesses. Look for chafed, pierced, pinched or partially
broken wire.
- Refer to Wiring Diagrams and Technical Service Bulletins that may apply.
Did the DTC become active ?
Yes
→ Select appropriate symptom from Symptom List.
No
→ No problem found at this time. Erase all codes before returning
vehicle to customer.
40
All
AIRBAG
Symptom:
LOSS OF IGNITION RUN - START
When Monitored and Set Condition:
LOSS OF IGNITION RUN - START
When Monitored: With the ignition in the Run or Start position the module monitors the
Run - Start circuit for proper system voltage.
Set Condition: The code will set, if the voltage on the Run - Start circuit drops below
approximately 4.5 volts for the ACM or 6.7 volts for the SIACM.
POSSIBLE CAUSES
AIRBAG SYSTEM COMPONENT SHORTED TO GROUND
IGNITION SWITCH RUN-START CIRCUIT OPEN
FUSED IGNITION SWITCH OUTPUT RUN-START CIRCUIT OPEN
ACM, FUSED IGNITION OUTPUT RUN-START CIRCUIT OPEN
MODULE RUN - START SHORTED TO GROUND
RSIACM, LOW IGNITION RUN - START VOLTAGE
LSIACM - LOW IGNITION RUN - START VOLTAGE
STORED CODE OR INTERMITTENT CONDITION
ACTIVE CODE PRESENT
TEST
ACTION
APPLICABILITY
1
Turn the ignition on.
NOTE: Ensure that the battery is fully charged.
NOTE: For the purpose of this test, the AECM and ORC modules will be
referred to as an ACM.
From the list below, select the appropriate module and DTC type for the this
diagnostic trouble code.
SELECT ONE:
All
ACM - ACTIVE DTC
Go To 2
ACM - STORED DTC
Go To 7
LEFT SIACM - ACTIVE DTC
Go To 8
RIGHT SIACM - ACTIVE DTC
Go To 9
NOTE: When reconnecting Airbag system components, the ignition must be
turned off and the battery must be disconnected.
41
AIRBAG
LOSS OF IGNITION RUN - START —
TEST
2
3
Continued
ACTION
Turn ignition off.
Remove and inspect the Airbag Run - Start Fuse.
NOTE: Check connectors - Clean and repair as necessary.
Is the Fuse open?
Yes
→ Go To
3
No
→ Go To
4
WARNING: TO AVOID PERSONAL INJURY OR DEATH, TURN IGNITION
OFF, DISCONNECT THE BATTERY AND WAIT TWO MINUTES BEFORE
PROCEEDING.
Measure the resistance of the Fused Ignition Switch Output Run-Start circuit
between the Airbag Run-Start Fuse and ground.
While monitoring the ohmmeter, disconnect each airbag system component on the
Run - Start circuit one at a time.
NOTE: Refer to the service information and system schematics to identify
component(s) on the run - start circuit.
Is the resistance above 10K ohms:
APPLICABILITY
All
All
Yes - after removing a component?
Replace the shorted airbag system component in accordance with
Service Instructions and replace the airbag Run - Start fuse.
Perform AIRBAG VERIFICATION TEST - VER 1.
No - after all components are removed?
Repair the Fused Ignition Run - Start circuit shorted to ground
and replace Airbag Run-Start Fuse.
Perform AIRBAG VERIFICATION TEST - VER 1.
4
5
Turn the ignition on.
Measure the voltage of the Ignition Switch Output circuit between the Airbag Run Start Fuse and ground.
Is the voltage above approximately 4.5 volts?
Yes
→ Go To
No
→ Repair the open Ignition Switch Output Run-Start circuit.
Perform AIRBAG VERIFICATION TEST - VER 1.
All
5
WARNING: TO AVOID PERSONAL INJURY OR DEATH, TURN THE IGNITION OFF, DISCONNECT THE BATTERY AND WAIT TWO MINUTES BEFORE PROCEEDING.
Disconnect the Airbag Control Module connector.
NOTE: Check connectors - Clean and repair as necessary.
Reinstall the previously removed Airbag Run-Start Fuse.
WARNING: TO AVOID PERSONAL INJURY OR DEATH, TURN THE IGNITION ON, THEN RECONNECT THE BATTERY.
Measure the voltage of the Fused Ignition Switch Output Run-Start Circuit between
the Airbag Control Module connector ground.
Is the voltage above approximately 4.5 volts?
Yes
→ Go To
No
→ Repair open Fused Ignition Switch Output Run-Start circuit.
Perform AIRBAG VERIFICATION TEST - VER 1.
6
42
All
AIRBAG
LOSS OF IGNITION RUN - START —
Continued
TEST
ACTION
APPLICABILITY
6
WARNING: TO AVOID PERSONAL INJURY OR DEATH, TURN IGNITION
OFF, DISCONNECT THE BATTERY AND WAIT TWO MINUTES BEFORE
PROCEEDING.
WARNING: IF THE AIRBAG CONTROL MODULE IS DROPPED AT ANY
TIME, IT MUST BE REPLACED. FAILURE TO TAKE THE PROPER PRECAUTIONS COULD RESULT IN ACCIDENTAL AIRBAG DEPLOYMENT
AND PERSONAL INJURY OR DEATH.
If there are no possible causes remaining, view repair.
All
Repair
Replace the Airbag Control Module in accordance with Service
Instructions.
Perform AIRBAG VERIFICATION TEST - VER 1.
7
8
NOTE: Ensure the battery is fully charged.
With the DRBIIIt, record and erase all DTCs from all modules.
All active codes must be resolved before diagnosing any stored codes.
Maintain a safe distance from all airbags while performing the following steps.
With the DRBIIIt monitor active codes as you work through the system.
NOTE: If equipped with Passenger Airbag On-Off switch, read the DTC’s in
all switch positions.
Wiggle the wiring harness and connectors of the appropriate airbag system and
rotate the steering wheel from stop to stop.
NOTE: Check connectors - Clean and repair as necessary.
You have just attempted to simulate the condition that initially set the trouble code
message.
The following additional checks may assist you in identifying a possible intermittent
problem:
- Visually inspect related wire harness connectors. Look for broken, bent, pushed out,
spread, corroded, or contaminated terminals.
- Visually inspect the related harnesses. Look for chafed, pierced, pinched or partially
broken wire.
- Refer to Wiring Diagrams and Technical Service Bulletins that may apply.
Did the DTC become active ?
Yes
→ Select appropriate symptom from Symptom List.
No
→ No problem found at this time. Erase all codes before returning
vehicle to customer.
WARNING: TURN IGNITION OFF, DISCONNECT THE BATTERY AND WAIT
TWO MINUTES BEFORE PROCEEDING.
If there are no possible causes remaining, view repair.
All
All
Repair
Replace the Left Side Impact Airbag Control Module in accordance
with Service Instructions. WARNING: IF THE MODULE IS
DROPPED AT ANY TIME, IT MUST BE REPLACED.
Perform AIRBAG VERIFICATION TEST - VER 1.
9
WARNING: TURN IGNITION OFF, DISCONNECT THE BATTERY AND WAIT
TWO MINUTES BEFORE PROCEEDING.
If there are no possible causes remaining, view repair.
Repair
Replace the Right Side Impact Airbag Control Module in accordance with Service information. WARNING: IF THE MODULE IS
DROPPED AT ANY TIME, IT MUST BE REPLACED.
Perform AIRBAG VERIFICATION TEST - VER 1.
43
All
AIRBAG
Symptom:
LOSS OF IGNITION RUN ONLY
When Monitored and Set Condition:
LOSS OF IGNITION RUN ONLY
When Monitored: With the ignition in the run position the module monitors the Run Only
circuit for proper system voltage.
Set Condition:
set.
If the voltage on the Run Only circuit drops below 4.5 volts, the code will
POSSIBLE CAUSES
IGNITION SWITCH OUTPUT RUN CIRCUIT OPEN
FUSED IGNITION SWITCH OUTPUT RUN CIRCUIT OPEN
ACM, FUSED IGNITION OUTPUT RUN CIRCUIT OPEN
CHECKING FOR A SHORTED RUN CIRCUIT
FUSED IGNITION SWITCH OUTPUT RUN CIRCUIT SHORT TO GROUND
ACM, FUSED IGNITION RUN CIRCUIT SHORT TO GROUND
TEST
ACTION
APPLICABILITY
1
Turn the ignition on.
Ensure the battery is fully charged.
NOTE: For the purpose of this test, the AECM and ORC modules will be
referred to as an ACM.
SELECT ACTIVE :
All
ACM - ACTIVE DTC
Go To 2
NOTE: When reconnecting Airbag system components, the ignition must be
turned off and the battery must be disconnected.
2
3
Turn the ignition off.
Remove and inspect the Airbag Run circuit fuse.
Is the Fuse open?
Yes
→ Go To
3
No
→ Go To
6
Remove the Airbag Run fuse.
NOTE: Check connectors - Clean and repair as necessary.
Measure the resistance of the Fused Ignition Switch Output Run circuit between the
Run Fuse and ground.
Is the resistance below 10.0 ohms ?
Yes
→ Go To
No
→ Replace the defective fuse.
Perform AIRBAG VERIFICATION TEST - VER 1.
4
44
All
All
AIRBAG
LOSS OF IGNITION RUN ONLY —
Continued
TEST
ACTION
APPLICABILITY
4
WARNING: TO AVOID PERSONAL INJURY OR DEATH, TURN THE IGNITION OFF, DISCONNECT THE BATTERY AND WAIT TWO MINUTES BEFORE PROCEEDING.
Disconnect the Airbag Control Module connector.
NOTE: Check connectors - Clean and repair as necessary.
Measure the resistance of the Fused Ignition Switch Output Run circuit between the
ACM connector and ground.
Is the resistance below 10K ohms ?
All
5
Yes
→ Repair the Fused Ignition Switch Output Run circuit for a short
to ground and replace Airbag Run Fuse.
Perform AIRBAG VERIFICATION TEST - VER 1.
No
→ Go To
5
WARNING: TO AVOID PERSONAL INJURY OR DEATH, TURN IGNITION
OFF, DISCONNECT THE BATTERY AND WAIT TWO MINUTES BEFORE
PROCEEDING.
WARNING: IF THE AIRBAG CONTROL MODULE IS DROPPED AT ANY
TIME, IT MUST BE REPLACED. FAILURE TO TAKE THE PROPER PRECAUTIONS COULD RESULT IN ACCIDENTAL AIRBAG DEPLOYMENT
AND PERSONAL INJURY OR DEATH.
If there are no possible causes remaining, view repair.
All
Repai:
Replace the Airbag Control Module in accordance with Service
Instructions and replace the Run Only Fuse.
Perform AIRBAG VERIFICATION TEST - VER 1.
NOTE: When reconnecting Airbag system components, the ignition must be
turned off and the battery must be disconnected.
6
7
Turn the ignition on.
Measure the voltage of the Ignition Switch Output Run circuit between the Airbag
Run circuit fuse and ground.
Is the voltage above approximately 4.5 volts?
Yes
→ Go To
No
→ Repair the open Ignition Switch Output Run circuit.
Perform AIRBAG VERIFICATION TEST - VER 1.
All
7
WARNING: TO AVOID PERSONAL INJURY OR DEATH, TURN THE IGNITION OFF, DISCONNECT THE BATTERY AND WAIT TWO MINUTES BEFORE PROCEEDING.
Disconnect the Airbag Control Module connector.
NOTE: Check connectors - Clean and repair as necessary.
Reinstall the airbag Run fuse.
WARNING: TO AVOID PERSONAL INJURY OR DEATH, TURN THE IGNITION ON, THEN RECONNECT THE BATTERY.
Measure the voltage of the Fused Ignition Switch Output Run circuit at the Airbag
Control Module connector.
Is the voltage above approximately 4.5 volts?
Yes
→ Go To
No
→ Repair the an open or high resistance in the Fused Ignition
Switch Output Run circuit.
Perform AIRBAG VERIFICATION TEST - VER 1.
8
45
All
AIRBAG
LOSS OF IGNITION RUN ONLY —
Continued
TEST
ACTION
APPLICABILITY
8
WARNING: TO AVOID PERSONAL INJURY OR DEATH, TURN THE IGNITION OFF, DISCONNECT THE BATTERY AND WAIT TWO MINUTES BEFORE PROCEEDING.
WARNING: IF THE AIRBAG CONTROL MODULE IS DROPPED AT ANY
TIME, IT MUST BE REPLACED. FAILURE TO TAKE THE PROPER PRECAUTIONS COULD RESULT IN ACCIDENTAL AIRBAG DEPLOYMENT
AND PERSONAL INJURY OR DEATH.
If there are no possible causes remaining, view repair.
All
Repair
Replace the Airbag Control Module in accordance with Service
Instructions.
Perform AIRBAG VERIFICATION TEST - VER 1.
46
AIRBAG
Symptom:
MODULE NOT CONFIGURED FOR SAB
When Monitored and Set Condition:
MODULE NOT CONFIGURED FOR SAB
When Monitored: With ignition on, the ACM monitors the PCI Bus for a message
containing an 9A9 in the 4 th position of the VIN. This character identifies the type of safety
equipment and should match the VIN. The PCM transmits the VIN every 13.76 seconds.
Set Condition: The code will set, if the ACM detects a Side Impact Airbag Module active
on the PCI Bus and the 4 th character of the VIN message is not an 9A9.
POSSIBLE CAUSES
CHECK PCM VIN
PCM, PCI COMMUNICATION FAILURE
MODULE NOT CONFIGURED
ACM, NOT CONFIGURED FOR SIDE AIRBAGS
STORED CODE OR INTERMITTENT CONDITION
ACTIVE CODE PRESENT
TEST
ACTION
APPLICABILITY
1
Turn the ignition on.
Ensure the battery is fully charged.
NOTE: For the purpose of this test, the AECM and ORC modules will be
referred to as an ACM.
SELECT ACTIVE or STORED DTC:
All
ACM - ACTIVE DTC
Go To 2
ACM - STORED DTC
Go To 6
NOTE: When reconnecting Airbag system components, the ignition must be
turned off and the battery must be disconnected.
2
Turn the ignition on.
Connect the DRB to the data link connector and select PCM, SYSTEM TEST.
Does the DRB show PCM Active on the Bus:?
Yes
→ Go To
No
→ Refer to category COMMUNICATION and select the related
symptom.
Perform AIRBAG VERIFICATION TEST - VER 1.
3
47
All
AIRBAG
MODULE NOT CONFIGURED FOR SAB —
Continued
TEST
ACTION
APPLICABILITY
3
With the DRB read the Vehicle Identification Number in the Powertrain Control
Module.
Compare the VIN displayed on the DRB screen and the Vehicle VIN plate.
Does the VIN plate and the PCM VIN match?
All
4
5
Yes
→ Go To
No
→ Replace the Powertrain Control Module and program with the
correct vehicle identification number.
Perform AIRBAG VERIFICATION TEST - VER 1.
4
Using the DRB select MISCELLANEOUS and then CONFIGURE FOR SIDE
AIRBAGS.
Then press the continue button to display the current side airbag status.
Does the DRBIIIt show current status as ACM WITHOUT SIDE AIRBAG?
Yes
→ Using the DRB select ACM WITH SIDE AIRBAGS to configure
the ACM for Side Airbags.
Perform AIRBAG VERIFICATION TEST - VER 1.
No
→ Go To
All
5
WARNING: TURN THE IGNITION OFF, DISCONNECT THE BATTERY AND
WAIT TWO MINUTES BEFORE PROCEEDING.
WARNING: IF THE AIRBAG CONTROL MODULE IS DROPPED AT ANY
TIME, IT MUST BE REPLACED.
If there are no possible causes remaining, view repair.
All
Repair
Replace the Airbag Control Module in accordance with Service
Instructions. WARNING: IF THE AIRBAG CONTROL MODULE
IS DROPPED AT ANY TIME, IT MUST BE REPLACED.
Perform AIRBAG VERIFICATION TEST - VER 1.
6
NOTE: Ensure the battery is fully charged.
With the DRBIIIt, record and erase all DTCs from all modules.
All active codes must be resolved before diagnosing any stored codes.
Maintain a safe distance from all airbags while performing the following steps.
With the DRBIIIt monitor active codes as you work through the system.
NOTE: If equipped with Passenger Airbag On-Off switch, read the DTC’s in
all switch positions.
Wiggle the wiring harness and connectors of the appropriate airbag system and
rotate the steering wheel from stop to stop.
NOTE: Check connectors - Clean and repair as necessary.
You have just attempted to simulate the condition that initially set the trouble code
message.
The following additional checks may assist you in identifying a possible intermittent
problem:
- Visually inspect related wire harness connectors. Look for broken, bent, pushed out,
spread, corroded, or contaminated terminals.
- Visually inspect the related harnesses. Look for chafed, pierced, pinched or partially
broken wire.
- Refer to Wiring Diagrams and Technical Service Bulletins that may apply.
Did the DTC become active ?
Yes
→ Select appropriate symptom from Symptom List.
No
→ No problem found at this time. Erase all codes before returning
vehicle to customer.
48
All
AIRBAG
Symptom:
NO CLUSTER MESSAGE
When Monitored and Set Condition:
NO CLUSTER MESSAGE
When Monitored: With ignition on, the ACM monitors the PCI Bus for a message from
the MIC containing the airbag warning indicator status. The MIC transmits the message
one time at ignition on, lamp state change, or in response to the ACM message.
Set Condition:
will set.
If the MIC message is not received for 10 consecutive seconds, the code
POSSIBLE CAUSES
MIC, COMMUNICATION FAILURE
ACM, NO CLUSTER MESSAGES
STORED CODE OR INTERMITTENT CONDITION
ACTIVE CODE PRESENT
TEST
ACTION
APPLICABILITY
1
NOTE: Ensure that the battery is fully charged.
NOTE: For the purpose of this test, the AECM and ORC modules will be
referred to as an ACM.
Turn the ignition on.
SELECT ACTIVE or STORED DTC:
All
ACM - ACTIVE DTC
Go To 2
ACM - STORED DTC
Go To 4
NOTE: When reconnecting Airbag system components, the ignition must be
turned off and the battery must be disconnected.
2
Turn the ignition on.
With the DRBIIIt, ensure PCI Bus communications with the Instrument Cluster.
Is the Instrument Cluster communicating on the PCI Bus?
Yes
→ Go To
No
→ Refer to category COMMUNICATION CATEGORY and select the
related symptom INSTRUMENT CLUSTER BUS +/- SIGNAL
OPEN or NO RESPONSE.
3
49
All
AIRBAG
NO CLUSTER MESSAGE —
Continued
TEST
ACTION
APPLICABILITY
3
WARNING: TO AVOID PERSONAL INJURY OR DEATH, TURN THE IGNITION OFF, DISCONNECT THE BATTERY AND WAIT TWO MINUTES BEFORE PROCEEDING.
WARNING: IF THE AIRBAG CONTROL MODULE IS DROPPED AT ANY
TIME, IT MUST BE REPLACED. FAILURE TO TAKE THE PROPER PRECAUTIONS COULD RESULT IN ACCIDENTAL AIRBAG DEPLOYMENT
AND PERSONAL INJURY OR DEATH.
If there are no possible causes remaining, view repair.
All
Repair
Replace the Airbag Control Module in accordance with Service
Instructions.
Perform AIRBAG VERIFICATION TEST - VER 1.
NOTE: When reconnecting airbag system components the Ignition must be
turned off and the Battery must be disconnected.
4
NOTE: Ensure the battery is fully charged.
With the DRBIIIt, record and erase all DTCs from all modules.
All active codes must be resolved before diagnosing any stored codes.
Maintain a safe distance from all airbags while performing the following steps.
With the DRBIIIt monitor active codes as you work through the system.
NOTE: If equipped with Passenger Airbag On-Off switch, read the DTC’s in
all switch positions.
Wiggle the wiring harness and connectors of the appropriate airbag system and
rotate the steering wheel from stop to stop.
NOTE: Check connectors - Clean and repair as necessary.
You have just attempted to simulate the condition that initially set the trouble code
message.
The following additional checks may assist you in identifying a possible intermittent
problem:
- Visually inspect related wire harness connectors. Look for broken, bent, pushed out,
spread, corroded, or contaminated terminals.
- Visually inspect the related harnesses. Look for chafed, pierced, pinched or partially
broken wire.
- Refer to Wiring Diagrams and Technical Service Bulletins that may apply.
Did the DTC become active ?
Yes
→ Select appropriate symptom from Symptom List.
No
→ No problem found at this time. Erase all codes before returning
vehicle to customer.
50
All
AIRBAG
Symptom:
NO LEFT SIACM MESSAGE
When Monitored and Set Condition:
NO LEFT SIACM MESSAGE
When Monitored: With ignition on, the ACM monitors the PCI Bus for the Left Side
Impact Airbag Control Module status message. The Left SIACM transmits the status
message to the ACM at 1 - second intervals.
Set Condition: If the ACM fails to see the Left SIACM status message on the PCI Bus for
10 seconds the code will set.
POSSIBLE CAUSES
NO LEFT SIACM MESSAGE
ACM, NO LEFT SIACM MESSAGE
STORED CODE OR INTERMITTENT CONDITION
ACTIVE CODE PRESENT
TEST
ACTION
APPLICABILITY
1
NOTE: Ensure the battery is fully charged.
Turn the ignition on.
NOTE: For the purpose of this test, the AECM and ORC modules will be
referred to as an ACM.
SELECT ACTIVE or STORED DTC:
All
ACM - ACTIVE DTC
Go To 2
ACM - STORED DTC
Go To 4
2
3
With the DRBIIIt select PASSIVE RESTRAINTS, SIDE AIRBAG then LEFT SIDE
from the DRB menu.
Does the DRBIIIt show NO RESPONSE or BUS +/- SIGNAL OPEN?
Yes
→ Refer to the Communication category for the related symptom.
Perform AIRBAG VERIFICATION TEST - VER 1.
No
→ Go To
All
3
WARNING: TURN THE IGNITION OFF, DISCONNECT THE BATTERY AND
WAIT TWO MINUTES BEFORE PROCEEDING.
If there are no possible causes remaining, view repair.
Repair
Replace the Airbag Control Module in accordance with Service
Instructions. WARNING: IF THE AIRBAG CONTROL MODULE
IS DROPPED AT ANY TIME, IT MUST BE REPLACED.
Perform AIRBAG VERIFICATION TEST - VER 1.
51
All
AIRBAG
NO LEFT SIACM MESSAGE —
Continued
TEST
ACTION
APPLICABILITY
4
NOTE: Ensure the battery is fully charged.
With the DRBIIIt, record and erase all DTCs from all modules.
All active codes must be resolved before diagnosing any stored codes.
Maintain a safe distance from all airbags while performing the following steps.
With the DRBIIIt monitor active codes as you work through the system.
NOTE: If equipped with Passenger Airbag On-Off switch, read the DTC’s in
all switch positions.
Wiggle the wiring harness and connectors of the appropriate airbag system and
rotate the steering wheel from stop to stop.
NOTE: Check connectors - Clean and repair as necessary.
You have just attempted to simulate the condition that initially set the trouble code
message.
The following additional checks may assist you in identifying a possible intermittent
problem:
- Visually inspect related wire harness connectors. Look for broken, bent, pushed out,
spread, corroded, or contaminated terminals.
- Visually inspect the related harnesses. Look for chafed, pierced, pinched or partially
broken wire.
- Refer to Wiring Diagrams and Technical Service Bulletins that may apply.
Did the DTC become active ?
All
Yes
→ Select appropriate symptom from Symptom List.
No
→ No problem found at this time. Erase all codes before returning
vehicle to customer.
52
AIRBAG
Symptom:
NO PCI TRANSMISSION
When Monitored and Set Condition:
NO PCI TRANSMISSION
When Monitored:
PCI BUS.
With the ignition on and the module transmitting information on the
Set Condition: The code will set if the onboard diagnostic cannot detect the module
transmitting information on the PCI BUS for 4 consecutive seconds. NOTE: Any PCI Bus
Failure will may cause a stored code to set.
POSSIBLE CAUSES
AIRBAG CONTROL MODULE - ACM
LEFT SIDE IMPACT AIRBAG CONTROL MODULE - LSIACM
RIGHT SIDE IMPACT AIRBAG CONTROL MODULE - RSIACM
STORED CODE OR INTERMITTENT CONDITION
ACTIVE CODE PRESENT
53
AIRBAG
NO PCI TRANSMISSION —
Continued
TEST
ACTION
APPLICABILITY
1
NOTE: Ensure that the battery is fully charged.
IF THE MODULE IS DROPPED AT ANY TIME, IT MUST BE REPLACED.
Turn the ignition on.
From the list below, select the appropriate module and DTC type for the this
diagnostic trouble code.
NOTE: For the purpose of this test, the AECM and ORC modules will be
referred to as an ACM.
Select the appropriate module and type of DTC
All
ACM - ACTIVE
Replace the Airbag Control Module in accordance with Service
Instructions.
Perform AIRBAG VERIFICATION TEST - VER 1.
ACM - STORED
Go To 2
LEFT SIACM - ACTIVE
WARNING: TURN THE IGNITION OFF, DISCONNECT THE
BATTERY AND WAIT TWO MINUTES BEFORE PROCEEDING.
Replace the Left Side Impact Airbag Control Module in accordance
with Service Instructions.
Perform AIRBAG VERIFICATION TEST - VER 1.
LEFT SIACM - STORED
Go To 2
RIGHT SIACM - ACTIVE
WARNING: TURN THE IGNITION OFF, DISCONNECT THE
BATTERY AND WAIT TWO MINUTES BEFORE PROCEEDING.
Replace the Right Side Impact Airbag Control Module in accordance with Service information.
Perform AIRBAG VERIFICATION TEST - VER 1.
RIGHT SIACM - STORED
Go To 2
54
AIRBAG
NO PCI TRANSMISSION —
Continued
TEST
ACTION
APPLICABILITY
2
NOTE: Ensure the battery is fully charged.
With the DRBIIIt, record and erase all DTCs from all modules.
All active codes must be resolved before diagnosing any stored codes.
Maintain a safe distance from all airbags while performing the following steps.
With the DRBIIIt monitor active codes as you work through the system.
NOTE: If equipped with Passenger Airbag On-Off switch, read the DTC’s in
all switch positions.
Wiggle the wiring harness and connectors of the appropriate airbag system and
rotate the steering wheel from stop to stop.
NOTE: Check connectors - Clean and repair as necessary.
You have just attempted to simulate the condition that initially set the trouble code
message.
The following additional checks may assist you in identifying a possible intermittent
problem:
- Visually inspect related wire harness connectors. Look for broken, bent, pushed out,
spread, corroded, or contaminated terminals.
- Visually inspect the related harnesses. Look for chafed, pierced, pinched or partially
broken wire.
- Refer to Wiring Diagrams and Technical Service Bulletins that may apply.
Did the DTC become active ?
All
Yes
→ Select appropriate symptom from Symptom List.
No
→ No problem found at this time. Erase all codes before returning
vehicle to customer.
55
AIRBAG
Symptom:
NO RIGHT SIACM MESSAGE
When Monitored and Set Condition:
NO RIGHT SIACM MESSAGE
When Monitored: With ignition on, the ACM monitors the PCI Bus for the Right Side
Impact Airbag Control Module status message. The Right SIACM transmits the status
message to the ACM at 1 - second intervals.
Set Condition: If the ACM fails to see the Right SIACM status message on the PCI Bus
for 10 seconds the code will set.
POSSIBLE CAUSES
NO RIGHT SIACM MESSAGE
ACM, NO RIGHT SIACM MESSAGE
STORED CODE OR INTERMITTENT CONDITION
ACTIVE CODE PRESENT
TEST
ACTION
APPLICABILITY
1
NOTE: Ensure the battery is fully charged.
Turn the ignition on.
NOTE: For the purpose of this test, the AECM and ORC modules will be
referred to as an ACM.
SELECT ACTIVE or STORED DTC:
All
ACM - ACTIVE DTC
Go To 2
ACM - STORED DTC
Go To 4
NOTE: When reconnecting Airbag system components, the ignition must be
turned off and the battery must be disconnected.
2
With the DRBIIIt select SIDE AIRBAG and the RIGHT SIDE AIRBAG from the
DRBIIIt menu.
Does the DRBIIIt show NO RESPONSE or BUS +/- SIGNAL OPEN?
Yes
→ Refer to the COMMUNICATION category for the related symptom.
Perform AIRBAG VERIFICATION TEST - VER 1.
No
→ Go To
3
56
All
AIRBAG
NO RIGHT SIACM MESSAGE —
Continued
TEST
ACTION
APPLICABILITY
3
WARNING: TURN THE IGNITION OFF, DISCONNECT THE BATTERY AND
WAIT TWO MINUTES BEFORE PROCEEDING.
If there are no possible causes remaining, view repair.
All
Repair
Replace the Airbag Control Module in accordance with Service
Instructions. WARNING: IF THE AIRBAG CONTROL MODULE
IS DROPPED AT ANY TIME, IT MUST BE REPLACED.
Perform AIRBAG VERIFICATION TEST - VER 1.
NOTE: When reconnecting airbag system components the Ignition must be
turned off and the Battery must be disconnected.
4
NOTE: Ensure the battery is fully charged.
With the DRBIIIt, record and erase all DTCs from all modules.
All active codes must be resolved before diagnosing any stored codes.
Maintain a safe distance from all airbags while performing the following steps.
With the DRBIIIt monitor active codes as you work through the system.
NOTE: If equipped with Passenger Airbag On-Off switch, read the DTC’s in
all switch positions.
Wiggle the wiring harness and connectors of the appropriate airbag system and
rotate the steering wheel from stop to stop.
NOTE: Check connectors - Clean and repair as necessary.
You have just attempted to simulate the condition that initially set the trouble code
message.
The following additional checks may assist you in identifying a possible intermittent
problem:
- Visually inspect related wire harness connectors. Look for broken, bent, pushed out,
spread, corroded, or contaminated terminals.
- Visually inspect the related harnesses. Look for chafed, pierced, pinched or partially
broken wire.
- Refer to Wiring Diagrams and Technical Service Bulletins that may apply.
Did the DTC become active ?
Yes
→ Select appropriate symptom from Symptom List.
No
→ No problem found at this time. Erase all codes before returning
vehicle to customer.
57
All
AIRBAG
Symptom:
PASSENGER SQUIB 1 CIRCUIT OPEN
When Monitored and Set Condition:
PASSENGER SQUIB 1 CIRCUIT OPEN
When Monitored: When the ignition is On, the ACM monitors the resistance of the
Passenger Squib 1 circuits.
Set Condition: The ACM has detected an open circuit or high resistance on the Passenger
Squib 1 circuits.
POSSIBLE CAUSES
PASSENGER AIRBAG OPEN
PASSENGER SQUIB 1 LINE 1 OR LINE 2 CIRCUIT OPEN
STORED CODE OR INTERMITTENT CONDITION
ACM, PASSENGER SQUIB 1 CIRCUIT OPEN
ACTIVE CODE PRESENT
TEST
ACTION
APPLICABILITY
1
NOTE: Ensure the battery is fully charged.
Turn the ignition on.
NOTE: For the purpose of this test, the AECM and ORC modules will be
referred to as an ACM.
SELECT ACTIVE or STORED DTC:
All
ACM - ACTIVE DTC
Go To 2
ACM - STORED DTC
Go To 4
NOTE: When reconnecting Airbag system components, the ignition must be
turned off and the battery must be disconnected.
58
AIRBAG
PASSENGER SQUIB 1 CIRCUIT OPEN —
Continued
TEST
ACTION
APPLICABILITY
2
WARNING: TO AVOID PERSONAL INJURY OR DEATH, TURN THE IGNITION OFF, DISCONNECT THE BATTERY AND WAIT TWO MINUTES BEFORE PROCEEDING.
WARNING: DO NOT PLACE AN INTACT UNDEPLOYED AIRBAG FACE
DOWN ON A HARD SURFACE, THE AIRBAG WILL PROPEL INTO THE AIR
IF ACCIDENTALLY DEPLOYED, AND COULD RESULT IN SERIOUS OR
FATAL INJURY.
Disconnect the Passenger Airbag.
NOTE: Check connectors - Clean and repair as necessary.
Connect the appropriate Load Tool to the Passenger Airbag connector.
WARNING: TO AVOID PERSONAL INJURY OR DEATH, TURN IGNITION
ON, THEN RECONNECT THE BATTERY.
With the DRBIIIt, read the active Airbag DTCs.
Does the DRBIIIt show PASSENGER SQUIB 1 CIRCUIT OPEN?
All
3
Yes
→ Go To
No
→ Replace the Passenger Airbag in accordance with the Service
Information.
Perform AIRBAG VERIFICATION TEST - VER 1.
3
WARNING: TO AVOID PERSONAL INJURY OR DEATH, TURN THE IGNITION OFF, DISCONNECT THE BATTERY AND WAIT TWO MINUTES BEFORE PROCEEDING.
Disconnect the Airbag Control module connector.
NOTE: Check connectors - Clean and repair as necessary.
Connect the appropriate Load Tool adaptor to the Airbag Control Module connector.
Disconnect the Load Tool from the Passenger Airbag connector.
Measure the resistance of the Passenger Squib 1 Line 1 and Line 2 circuit between
the ACM Adaptor and the Passenger Airbag connector.
Is the resistance below 1.0 ohms on both circuits?
Yes
→ Replace the Airbag Control Module in accordance with Service
Instructions.
Perform AIRBAG VERIFICATION TEST - VER 1.
No
→ Repair open or high resistance in Passenger Squib 1 Line 1 or
Line 2 circuits.
Perform AIRBAG VERIFICATION TEST - VER 1.
59
All
AIRBAG
PASSENGER SQUIB 1 CIRCUIT OPEN —
Continued
TEST
ACTION
APPLICABILITY
4
NOTE: Ensure the battery is fully charged.
With the DRBIIIt, record and erase all DTCs from all modules.
All active codes must be resolved before diagnosing any stored codes.
Maintain a safe distance from all airbags while performing the following steps.
With the DRBIIIt monitor active codes as you work through the system.
NOTE: If equipped with Passenger Airbag On-Off switch, read the DTC’s in
all switch positions.
Wiggle the wiring harness and connectors of the appropriate airbag system and
rotate the steering wheel from stop to stop.
NOTE: Check connectors - Clean and repair as necessary.
You have just attempted to simulate the condition that initially set the trouble code
message.
The following additional checks may assist you in identifying a possible intermittent
problem:
- Visually inspect related wire harness connectors. Look for broken, bent, pushed out,
spread, corroded, or contaminated terminals.
- Visually inspect the related harnesses. Look for chafed, pierced, pinched or partially
broken wire.
- Refer to Wiring Diagrams and Technical Service Bulletins that may apply.
Did the DTC become active ?
All
Yes
→ Select appropriate symptom from Symptom List.
No
→ No problem found at this time. Erase all codes before returning
vehicle to customer.
60
AIRBAG
Symptom:
PASSENGER SQUIB 1 CIRCUIT SHORT
When Monitored and Set Condition:
PASSENGER SQUIB 1 CIRCUIT SHORT
When Monitored: When the ignition is on, the ACM monitors the resistance of the
Passenger Squib 1 circuits.
Set Condition:
The ACM has detected low resistance in the Passenger Squib 1 circuits.
POSSIBLE CAUSES
PASSENGER AIRBAG CIRCUIT SHORT
PASSENGER SQUIB 1 LINE 1 SHORT TO LINE 2
ACM, PASSENGER SQUIB 1 CIRCUIT SHORT
STORED CODE OR INTERMITTENT CONDITION
ACTIVE CODE PRESENT
TEST
ACTION
APPLICABILITY
1
NOTE: Ensure that the battery is fully charged.
Turn the ignition on.
NOTE: For the purpose of this test, the AECM and ORC modules will be
referred to as an ACM.
SELECT ACTIVE or STORED DTC:
All
ACM - ACTIVE DTC
Go To 2
ACM - STORED DTC
Go To 4
NOTE: When reconnecting Airbag system components, the ignition must be
turned off and the battery must be disconnected.
61
AIRBAG
PASSENGER SQUIB 1 CIRCUIT SHORT —
Continued
TEST
ACTION
APPLICABILITY
2
WARNING: TO AVOID PERSONAL INJURY OR DEATH, TURN THE IGNITION OFF, DISCONNECT THE BATTERY AND WAIT TWO MINUTES BEFORE PROCEEDING.
WARNING: DO NOT PLACE AN INTACT UNDEPLOYED AIRBAG FACE
DOWN ON A HARD SURFACE, THE AIRBAG WILL PROPEL INTO THE AIR
IF ACCIDENTALLY DEPLOYED, AND COULD RESULT IN SERIOUS OR
FATAL INJURY.
Disconnect the Passenger Airbag.
NOTE: Check connectors - Clean and repair as necessary.
Connect the appropriate Load Tool to the Passenger Airbag connector.
WARNING: TO AVOID PERSONAL INJURY OR DEATH, TURN THE IGNITION ON, THEN RECONNECT THE BATTERY.
With the DRBIIIt, read the active airbag DTCs.
Does the DRBIIIt show PASSENGER SQUIB 1 CIRCUIT SHORT?
All
3
Yes
→ Go To
No
→ Replace Passenger Airbag in accordance with the Service Information.
Perform AIRBAG VERIFICATION TEST - VER 1.
3
WARNING: TO AVOID PERSONAL INJURY OR DEATH, TURN THE IGNITION OFF, DISCONNECT THE BATTERY AND WAIT TWO MINUTES BEFORE PROCEEDING.
Disconnect the Airbag Control Module connector
NOTE: Check connectors - Clean and repair as necessary.
Connect the appropriate Load Tool adapter to the Airbag Control Module connector.
Disconnect the Load Tool from the Passenger airbag connector.
Measure the resistance between Passenger Squib 1 Line 1 and Squib 1 Line 2 circuit
at the Passenger Airbag connector.
Is the resistance below 10K ohms?
Yes
→ Repair Passenger Squib 1 Line 1 circuit short to Passenger Squib
1 Line 2 circuit.
Perform AIRBAG VERIFICATION TEST - VER 1.
No
→ Replace the Airbag Control Module in accordance with Service
Instructions.
Perform AIRBAG VERIFICATION TEST - VER 1.
NOTE: When reconnecting airbag system components the Ignition must be
turned off and the Battery must be disconnected.
62
All
AIRBAG
PASSENGER SQUIB 1 CIRCUIT SHORT —
Continued
TEST
ACTION
APPLICABILITY
4
NOTE: Ensure the battery is fully charged.
With the DRBIIIt, record and erase all DTCs from all modules.
All active codes must be resolved before diagnosing any stored codes.
Maintain a safe distance from all airbags while performing the following steps.
With the DRBIIIt monitor active codes as you work through the system.
NOTE: If equipped with Passenger Airbag On-Off switch, read the DTC’s in
all switch positions.
Wiggle the wiring harness and connectors of the appropriate airbag system and
rotate the steering wheel from stop to stop.
NOTE: Check connectors - Clean and repair as necessary.
You have just attempted to simulate the condition that initially set the trouble code
message.
The following additional checks may assist you in identifying a possible intermittent
problem:
- Visually inspect related wire harness connectors. Look for broken, bent, pushed out,
spread, corroded, or contaminated terminals.
- Visually inspect the related harnesses. Look for chafed, pierced, pinched or partially
broken wire.
- Refer to Wiring Diagrams and Technical Service Bulletins that may apply.
Did the DTC become active ?
All
Yes
→ Select appropriate symptom from Symptom List.
No
→ No problem found at this time. Erase all codes before returning
vehicle to customer.
63
AIRBAG
Symptom:
PASSENGER SQUIB 1 SHORT TO BATTERY
When Monitored and Set Condition:
PASSENGER SQUIB 1 SHORT TO BATTERY
When Monitored:
Squib 1 circuits.
Set Condition:
When the ignition is on, the ACM monitors the voltage of the Passenger
The ACM has detected high voltage on the Passenger Squib 1 circuits.
POSSIBLE CAUSES
PASSENGER AIRBAG CIRCUIT SHORT TO BATTERY
PASSENGER SQUIB 1 LINE 1 OR LINE 2 SHORT TO BATTERY
ACM, PASSENGER SQUIB 1 CIRCUIT SHORT TO BATTERY
STORED CODE OR INTERMITTENT CONDITION
ACTIVE CODE PRESENT
TEST
ACTION
APPLICABILITY
1
NOTE: Ensure that the battery is fully charged.
Turn the ignition on.
NOTE: For the purpose of this test, the AECM and ORC modules will be
referred to as an ACM.
SELECT ACTIVE or STORED DTC:
All
ACM - ACTIVE DTC
Go To 2
ACM - STORED DTC
Go To 4
NOTE: When reconnecting Airbag system components, the ignition must be
turned off and the battery must be disconnected.
64
AIRBAG
PASSENGER SQUIB 1 SHORT TO BATTERY —
Continued
TEST
ACTION
APPLICABILITY
2
WARNING: TO AVOID PERSONAL INJURY OR DEATH, TURN THE IGNITION OFF, DISCONNECT THE BATTERY AND WAIT TWO MINUTES BEFORE PROCEEDING.
WARNING: DO NOT PLACE AN INTACT UNDEPLOYED AIRBAG FACE
DOWN ON A HARD SURFACE, THE AIRBAG WILL PROPEL INTO THE AIR
IF ACCIDENTALLY DEPLOYED. FAILURE TO TAKE THE PROPER PRECAUTIONS COULD RESULT IN ACCIDENTAL AIRBAG DEPLOYMENT
AND PERSONAL INJURY OR DEATH.
Disconnect the Passenger Airbag connector.
NOTE: Check connectors - Clean and repair as necessary.
Connect the appropriate Load Tool to the Passenger Airbag connector.
WARNING: TO AVOID PERSONAL INJURY OR DEATH, TURN THE IGNITION ON, THEN RECONNECT THE BATTERY.
With the DRBIIIt, read the active Airbag DTCs.
Does the DRBIIIt show PASSENGER SQUIB 1 CIRCUIT SHORT TO BATTERY?
All
3
Yes
→ Go To
No
→ Replace Passenger Airbag in accordance with the Service Information.
Perform AIRBAG VERIFICATION TEST - VER 1.
3
WARNING: TO AVOID PERSONAL INJURY OR DEATH, TURN THE IGNITION OFF, DISCONNECT THE BATTERY AND WAIT TWO MINUTES BEFORE PROCEEDING.
Disconnect the Airbag Control Module connector.
NOTE: Check connectors - Clean and repair as necessary.
Connect the appropriate Load Tool adaptor to the Airbag Control Module connector.
WARNING: TO AVOID PERSONAL INJURY OR DEATH, TURN IGNITION
ON, THEN RECONNECT THE BATTERY.
Disconnect the Load Tool from the Passenger Airbag connector.
Measure the voltage on the Passenger Squib 1 Line 1 and Line 2 circuits between the
Passenger Airbag connector and ground.
Is there any voltage present?
Yes
→ Repair Passenger Squib 1 Line 1 or Line 2 circuit short to battery.
Perform AIRBAG VERIFICATION TEST - VER 1.
No
→ Replace the Airbag Control Module in accordance with Service
Instructions.
Perform AIRBAG VERIFICATION TEST - VER 1.
65
All
AIRBAG
PASSENGER SQUIB 1 SHORT TO BATTERY —
Continued
TEST
ACTION
APPLICABILITY
4
NOTE: Ensure the battery is fully charged.
With the DRBIIIt, record and erase all DTCs from all modules.
All active codes must be resolved before diagnosing any stored codes.
Maintain a safe distance from all airbags while performing the following steps.
With the DRBIIIt monitor active codes as you work through the system.
NOTE: If equipped with Passenger Airbag On-Off switch, read the DTC’s in
all switch positions.
Wiggle the wiring harness and connectors of the appropriate airbag system and
rotate the steering wheel from stop to stop.
NOTE: Check connectors - Clean and repair as necessary.
You have just attempted to simulate the condition that initially set the trouble code
message.
The following additional checks may assist you in identifying a possible intermittent
problem:
- Visually inspect related wire harness connectors. Look for broken, bent, pushed out,
spread, corroded, or contaminated terminals.
- Visually inspect the related harnesses. Look for chafed, pierced, pinched or partially
broken wire.
- Refer to Wiring Diagrams and Technical Service Bulletins that may apply.
Did the DTC become active ?
All
Yes
→ Select appropriate symptom from Symptom List.
No
→ No problem found at this time. Erase all codes before returning
vehicle to customer.
66
AIRBAG
Symptom:
PASSENGER SQUIB 1 SHORT TO GROUND
When Monitored and Set Condition:
PASSENGER SQUIB 1 SHORT TO GROUND
When Monitored: When the ignition is on, the ACM monitors the resistance of the
Passenger Squib 1 circuits for low resistance.
Set Condition:
The ACM has detected a short to ground in the Passenger Squib 1 circuits.
POSSIBLE CAUSES
PASSENGER AIRBAG CIRCUIT SHORT TO GROUND
PASSENGER SQUIB 1 LINE 1 AND LINE 2 SHORT TO GROUND
STORED CODE OR INTERMITTENT CONDITION
ACM, PASSENGER SQUIB 1 CIRCUIT SHORT TO GROUND
ACTIVE CODE PRESENT
TEST
ACTION
APPLICABILITY
1
NOTE: Ensure that the battery is fully charged.
Turn the ignition on.
NOTE: Connect the appropriate Load Tool to the Passenger Airbag connector.
SELECT ACTIVE or STORED DTC:
All
ACM - ACTIVE DTC
Go To 2
ACM - STORED DTC
Go To 5
NOTE: When reconnecting Airbag system components, the ignition must be
turned off and the battery must be disconnected.
67
AIRBAG
PASSENGER SQUIB 1 SHORT TO GROUND —
Continued
TEST
ACTION
APPLICABILITY
2
WARNING: TO AVOID PERSONAL INJURY OR DEATH, TURN THE IGNITION OFF, DISCONNECT THE BATTERY AND WAIT TWO MINUTES BEFORE PROCEEDING.
WARNING: DO NOT PLACE AN INTACT UNDEPLOYED AIRBAG FACE
DOWN ON A HARD SURFACE, THE AIRBAG WILL PROPEL INTO THE AIR
IF ACCIDENTALLY DEPLOYED, AND COULD RESULT IN SERIOUS OR
FATAL INJURY.
Disconnect the Passenger Airbag connector.
NOTE: Check connectors - Clean and repair as necessary.
Connect the appropriate Load Tool to the Passenger Airbag connector.
WARNING: TO AVOID PERSONAL INJURY OR DEATH, TURN THE IGNITION ON, THEN RECONNECT THE BATTERY.
With the DRBIIIt, read the active Airbag DTCs.
Does the DRBIIIt show PASSENGER SQUIB 1 CIRCUIT SHORT TO GROUND?
All
3
4
Yes
→ Go To
No
→ Replace the Passenger Airbag in accordance with the Service
Information.
Perform AIRBAG VERIFICATION TEST - VER 1.
3
WARNING: TO AVOID PERSONAL INJURY OR DEATH, TURN THE IGNITION OFF, DISCONNECT THE BATTERY AND WAIT TWO MINUTES BEFORE PROCEEDING.
Disconnect the Airbag Control Module connector
NOTE: Check connectors - Clean repair as necessary.
Connect the appropriate Load Tool adaptor to the Airbag Control Module connector.
Disconnect the Load Tool from the Passenger Airbag connector.
Measure the resistance of the Passenger Squib 1 Line 1 or Line 2 circuit between the
Passenger Airbag Module Connector and ground.
Is the resistance below 10K ohms on either circuit?
Yes
→ Repair Passenger Squib 1 Line 1 and Line 2 circuits for a short to
ground.
Perform AIRBAG VERIFICATION TEST - VER 1.
No
→ Go To
All
4
WARNING: TO AVOID PERSONAL INJURY OR DEATH, TURN THE IGNITION OFF, DISCONNECT THE BATTERY AND WAIT TWO MINUTES BEFORE PROCEEDING.
WARNING: IF THE AIRBAG CONTROL MODULE IS DROPPED AT ANY
TIME, IT MUST BE REPLACED. FAILURE TO TAKE THE PROPER PRECAUTIONS COULD RESULT IN ACCIDENTAL AIRBAG DEPLOYMENT
AND PERSONAL INJURY OR DEATH.
If there are no possible causes remaining, view repair.
Repair
Replace the Airbag Control Module in accordance with Service
Instructions.
Perform AIRBAG VERIFICATION TEST - VER 1.
68
All
AIRBAG
PASSENGER SQUIB 1 SHORT TO GROUND —
Continued
TEST
ACTION
APPLICABILITY
5
NOTE: Ensure the battery is fully charged.
With the DRBIIIt, record and erase all DTCs from all modules.
All active codes must be resolved before diagnosing any stored codes.
Maintain a safe distance from all airbags while performing the following steps.
With the DRBIIIt monitor active codes as you work through the system.
NOTE: If equipped with Passenger Airbag On-Off switch, read the DTC’s in
all switch positions.
Wiggle the wiring harness and connectors of the appropriate airbag system and
rotate the steering wheel from stop to stop.
NOTE: Check connectors - Clean and repair as necessary.
You have just attempted to simulate the condition that initially set the trouble code
message.
The following additional checks may assist you in identifying a possible intermittent
problem:
- Visually inspect related wire harness connectors. Look for broken, bent, pushed out,
spread, corroded, or contaminated terminals.
- Visually inspect the related harnesses. Look for chafed, pierced, pinched or partially
broken wire.
- Refer to Wiring Diagrams and Technical Service Bulletins that may apply.
Did the DTC become active ?
All
Yes
→ Select appropriate symptom from Symptom List.
No
→ No problem found at this time. Erase all codes before returning
vehicle to customer.
69
AIRBAG
Symptom:
SEAT SQUIB CIRCUIT OPEN
When Monitored and Set Condition:
SEAT SQUIB CIRCUIT OPEN
When Monitored:
Squib circuits.
With the ignition is On, the SIACM monitors the resistance of the Seat
Set Condition: When the SIACM detects an open circuit or high resistance on the Seat
Squib circuits.
POSSIBLE CAUSES
SEAT AIRBAG OPEN
SEAT SQUIB LINE 1 OR LINE 2 CIRCUIT OPEN
SIACM, SEAT SQUIB CIRCUIT OPEN
STORED CODE OR INTERMITTENT CONDITION
ACTIVE CODE PRESENT
TEST
ACTION
APPLICABILITY
1
Ensure the battery is fully charged.
Turn the ignition on.
NOTE: For the purpose of this test, the AECM and ORC modules will be
referred to as an ACM.
SELECT ONE:
All
LEFT SIACM - ACTIVE DTC
Go To 2
LEFT SIACM - STORED DTC
Go To 4
RIGHT SIACM - ACTIVE DTC
Go To 2
RIGHT SIACM - STORED DTC
Go To 4
NOTE: When reconnecting Airbag system components, the ignition must be
turned off and the battery must be disconnected.
70
AIRBAG
SEAT SQUIB CIRCUIT OPEN —
Continued
TEST
ACTION
APPLICABILITY
2
WARNING: TURN IGNITION OFF, DISCONNECT THE BATTERY AND WAIT
TWO MINUTES BEFORE PROCEEDING.
WARNING: DO NOT PLACE AN INTACT UNDEPLOYED SEAT BACK PADDED SIDE DOWN ON A HARD SURFACE, THE AIRBAG WILL PROPEL
INTO THE AIR IF ACCIDENTALLY DEPLOYED, AND COULD RESULT IN
SERIOUS OR FATAL INJURY.
Disconnect the Seat Airbag connector.
NOTE: Check connectors - Clean and repair as necessary.
Connect the appropriate Load Tool to the Seat Airbag connector.
WARNING: TURN IGNITION ON, THEN RECONNECT THE BATTERY.
With the DRBIIIt, read the SIACM active DTC’s.
Does the DRB show SEAT SQUIB CIRCUIT OPEN?
All
3
Yes
→ Go To
No
→ Replace Seat Airbag in accordance with the Service Information.
Perform AIRBAG VERIFICATION TEST - VER 1.
3
WARNING: TURN IGNITION OFF, DISCONNECT THE BATTERY AND WAIT
TWO MINUTES BEFORE PROCEEDING.
WARNING: DO NOT PLACE AN INTACT UNDEPLOYED SEAT BACK PADDED SIDE DOWN ON A HARD SURFACE, THE AIRBAG WILL PROPEL
INTO THE AIR IF ACCIDENTALLY DEPLOYED, AND COULD RESULT IN
SERIOUS OR FATAL INJURY.
Disconnect the Airbag Load Tool Jumper.
Disconnect the Side Impact Airbag Control Module Connector.
NOTE: Check connectors - Clean and repair as necessary.
Connect the appropriate Load Tool adaptor to the Side Impact Airbag Control Module
connector.
Measure the resistance of the Seat Squib Line 1 and Line 2 circuits between the Load
Tool SIACM adaptor and the Seat Airbag connector.
Is the resistance below 1.0 ohms on both circuits?
Yes
→ Replace the Side Impact Airbag Control Module in accordance
with the Service information. WARNING: IF THE SIDE IMPACT
AIRBAG CONTROL MODULE IS DROPPED AT ANY TIME, IT
MUST BE REPLACED.
Perform AIRBAG VERIFICATION TEST - VER 1.
No
→ Repair open or high resistance in the Seat Squib Line 1 or Line 2
circuits.
Perform AIRBAG VERIFICATION TEST - VER 1.
71
All
AIRBAG
SEAT SQUIB CIRCUIT OPEN —
Continued
TEST
ACTION
APPLICABILITY
4
NOTE: Ensure the battery is fully charged.
With the DRBIIIt, record and erase all DTCs from all modules.
All active codes must be resolved before diagnosing any stored codes.
Maintain a safe distance from all airbags while performing the following steps.
With the DRBIIIt monitor active codes as you work through the system.
NOTE: If equipped with Passenger Airbag On-Off switch, read the DTC’s in
all switch positions.
Wiggle the wiring harness and connectors of the appropriate airbag system and
rotate the steering wheel from stop to stop.
NOTE: Check connectors - Clean and repair as necessary.
You have just attempted to simulate the condition that initially set the trouble code
message.
The following additional checks may assist you in identifying a possible intermittent
problem:
- Visually inspect related wire harness connectors. Look for broken, bent, pushed out,
spread, corroded, or contaminated terminals.
- Visually inspect the related harnesses. Look for chafed, pierced, pinched or partially
broken wire.
- Refer to Wiring Diagrams and Technical Service Bulletins that may apply.
Did the DTC become active ?
All
Yes
→ Select appropriate symptom from Symptom List.
No
→ No problem found at this time. Erase all codes before returning
vehicle to customer.
72
AIRBAG
Symptom:
SEAT SQUIB CIRCUIT SHORT
When Monitored and Set Condition:
SEAT SQUIB CIRCUIT SHORT
When Monitored: When the ignition is on, the SIACM monitors the resistance between
the Seat Squib circuits.
Set Condition:
circuits.
When the SIACM detects a low resistance between the Seat Squib
POSSIBLE CAUSES
SEAT AIRBAG SHORT
SEAT SQUIB LINE 1 SHORT TO LINE 2
SIACM, SEAT SQUIB CIRCUIT SHORT
STORED CODE OR INTERMITTENT CONDITION
ACTIVE CODE PRESENT
TEST
ACTION
APPLICABILITY
1
Ensure the battery is fully charged.
Turn the ignition on.
NOTE: For the purpose of this test, the AECM and ORC modules will be
referred to as an ACM.
SELECT ONE:
All
LEFT SIACM - ACTIVE DTC
Go To 2
LEFT SIACM - STORED DTC
Go To 4
RIGHT SIACM - ACTIVE DTC
Go To 2
RIGHT SIACM - STORED DTC
Go To 4
NOTE: When reconnecting Airbag system components, the ignition must be
turned off and the battery must be disconnected.
73
AIRBAG
SEAT SQUIB CIRCUIT SHORT —
Continued
TEST
ACTION
APPLICABILITY
2
WARNING: TURN THE IGNITION OFF, DISCONNECT THE BATTERY AND
WAIT TWO MINUTES BEFORE PROCEEDING.
WARNING: DO NOT PLACE AN INTACT UNDEPLOYED SEAT BACK PADDED SIDE DOWN ON A HARD SURFACE, THE AIRBAG WILL PROPEL
INTO THE AIR IF ACCIDENTALLY DEPLOYED, AND COULD RESULT IN
SERIOUS OR FATAL INJURY.
Disconnect the Seat Airbag connector.
NOTE: Check connectors - Clean repair as necessary.
Connect the appropriate Load Tool to the Seat Airbag connector.
WARNING: TURN IGNITION ON, THEN RECONNECT THE BATTERY.
With the DRB, read the SIACM active DTC’s.
Does the DRB show SEAT SQUIB CIRCUIT SHORT?
All
3
Yes
→ Go To
No
→ Replace Seat Airbag in accordance with the Service Information.
Perform AIRBAG VERIFICATION TEST - VER 1.
3
WARNING: TURN THE IGNITION OFF, DISCONNECT THE BATTERY AND
WAIT TWO MINUTES BEFORE PROCEEDING.
WARNING: DO NOT PLACE AN INTACT UNDEPLOYED SEAT BACK PADDED SIDE DOWN ON A HARD SURFACE, THE AIRBAG WILL PROPEL
INTO THE AIR IF ACCIDENTALLY DEPLOYED, AND COULD RESULT IN
SERIOUS OR FATAL INJURY.
NOTE: Check connectors - Clean and repair as necessary.
Connect the appropriate Load Tool adaptor to the SIACM connector.
Disconnect the Side Impact Airbag Control Module connector
Measure the resistance between the Seat Squib Line 1 and Line 2 circuits at the Seat
Airbag connector.
Is the resistance below 10K ohms?
Yes
→ Repair Seat Squib Line 1 shorted to Line 2 circuit.
Perform AIRBAG VERIFICATION TEST - VER 1.
No
→ Replace the Side Impact Airbag Control Module in accordance
with Service Instructions. WARNING: IF THE SIDE IMPACT
AIRBAG CONTROL MODULE IS DROPPED AT ANY TIME, IT
MUST BE REPLACED.
Perform AIRBAG VERIFICATION TEST - VER 1.
74
All
AIRBAG
SEAT SQUIB CIRCUIT SHORT —
Continued
TEST
ACTION
APPLICABILITY
4
NOTE: Ensure the battery is fully charged.
With the DRBIIIt, record and erase all DTCs from all modules.
All active codes must be resolved before diagnosing any stored codes.
Maintain a safe distance from all airbags while performing the following steps.
With the DRBIIIt monitor active codes as you work through the system.
NOTE: If equipped with Passenger Airbag On-Off switch, read the DTC’s in
all switch positions.
Wiggle the wiring harness and connectors of the appropriate airbag system and
rotate the steering wheel from stop to stop.
NOTE: Check connectors - Clean and repair as necessary.
You have just attempted to simulate the condition that initially set the trouble code
message.
The following additional checks may assist you in identifying a possible intermittent
problem:
- Visually inspect related wire harness connectors. Look for broken, bent, pushed out,
spread, corroded, or contaminated terminals.
- Visually inspect the related harnesses. Look for chafed, pierced, pinched or partially
broken wire.
- Refer to Wiring Diagrams and Technical Service Bulletins that may apply.
Did the DTC become active ?
All
Yes
→ Select appropriate symptom from Symptom List.
No
→ No problem found at this time. Erase all codes before returning
vehicle to customer.
75
AIRBAG
Symptom:
SEAT SQUIB SHORT TO BATTERY
When Monitored and Set Condition:
SEAT SQUIB SHORT TO BATTERY
When Monitored:
Squib circuits.
Set Condition:
When the ignition is on, the SIACM monitors the voltage of the Seat
When the SIACM detects high voltage on the Seat Squib circuits.
POSSIBLE CAUSES
SEAT AIRBAG SHORT TO BATTERY
SEAT SQUIB LINE 1 OR LINE 2 SHORTED TO BATTERY
SIACM, SEAT SQUIB SHORT TO BATTERY
STORED CODE OR INTERMITTENT CONDITION
ACTIVE CODE PRESENT
TEST
ACTION
APPLICABILITY
1
Turn the ignition on.
Ensure the battery is fully charged.
NOTE: For the purpose of this test, the AECM and ORC modules will be
referred to as an ACM.
SELECT ONE:
All
LEFT SIACM - ACTIVE DTC
Go To 2
LEFT SIACM - STORED DTC
Go To 4
RIGHT SIACM - ACTIVE DTC
Go To 2
RIGHT SIACM - STORED DTC
Go To 4
NOTE: When reconnecting Airbag system components, the ignition must be
turned off and the battery must be disconnected.
76
AIRBAG
SEAT SQUIB SHORT TO BATTERY —
Continued
TEST
ACTION
APPLICABILITY
2
WARNING: TURN IGNITION OFF, DISCONNECT THE BATTERY AND WAIT
TWO MINUTES BEFORE PROCEEDING.
WARNING: DO NOT PLACE AN INTACT UNDEPLOYED SEAT BACK PADDED SIDE DOWN ON A HARD SURFACE, THE AIRBAG WILL PROPEL
INTO THE AIR IF ACCIDENTALLY DEPLOYED, AND COULD RESULT IN
SERIOUS OR FATAL INJURY.
Disconnect the Seat Airbag connector.
NOTE: Check connectors - Clean and repair as necessary.
Connect the appropriate Load Tool to the Seat Airbag connector.
WARNING: TURN IGNITION ON, THEN RECONNECT THE BATTERY.
With the DRBIIIt, read SIACM active DTC’s.
Does the DRBIIIt display SEAT SQUIB SHORT TO BATTERY?
All
3
Yes
→ Go To
No
→ Replace Seat Airbag in accordance with the Service Information.
Perform AIRBAG VERIFICATION TEST - VER 1.
3
WARNING: TURN IGNITION OFF, DISCONNECT THE BATTERY AND WAIT
TWO MINUTES BEFORE PROCEEDING.
WARNING: DO NOT PLACE AN INTACT UNDEPLOYED SEAT BACK PADDED SIDE DOWN ON A HARD SURFACE, THE AIRBAG WILL PROPEL
INTO THE AIR IF ACCIDENTALLY DEPLOYED, AND COULD RESULT IN
SERIOUS OR FATAL INJURY.
Disconnect the Airbag Load Tool Jumper.
Disconnect the Side Impact Airbag Control Module connector.
NOTE: Check connectors - Clean and repair as necessary.
Connect the appropriate Load Tool SIACM adaptor to the SIACM connector.
WARNING: TURN IGNITION ON, THEN RECONNECT THE BATTERY.
Measure the voltage of the Seat Squib Line 1 and Line 2 circuits between the Seat
Airbag connector and ground.
Is any voltage present on either circuit?
Yes
→ Repair Seat Squib Line 1 or Line 2 shorted to battery.
Perform AIRBAG VERIFICATION TEST - VER 1.
No
→ Replace the Side Impact Airbag Control Module in accordance
with Service Instructions. WARNING: IF THE SIDE IMPACT
AIRBAG CONTROL MODULE IS DROPPED AT ANY TIME, IT
MUST BE REPLACED.
Perform AIRBAG VERIFICATION TEST - VER 1.
77
All
AIRBAG
SEAT SQUIB SHORT TO BATTERY —
Continued
TEST
ACTION
APPLICABILITY
4
NOTE: Ensure the battery is fully charged.
With the DRBIIIt, record and erase all DTCs from all modules.
All active codes must be resolved before diagnosing any stored codes.
Maintain a safe distance from all airbags while performing the following steps.
With the DRBIIIt monitor active codes as you work through the system.
NOTE: If equipped with Passenger Airbag On-Off switch, read the DTC’s in
all switch positions.
Wiggle the wiring harness and connectors of the appropriate airbag system and
rotate the steering wheel from stop to stop.
NOTE: Check connectors - Clean and repair as necessary.
You have just attempted to simulate the condition that initially set the trouble code
message.
The following additional checks may assist you in identifying a possible intermittent
problem:
- Visually inspect related wire harness connectors. Look for broken, bent, pushed out,
spread, corroded, or contaminated terminals.
- Visually inspect the related harnesses. Look for chafed, pierced, pinched or partially
broken wire.
- Refer to Wiring Diagrams and Technical Service Bulletins that may apply.
Did the DTC become active ?
All
Yes
→ Select appropriate symptom from Symptom List.
No
→ No problem found at this time. Erase all codes before returning
vehicle to customer.
78
AIRBAG
Symptom:
SEAT SQUIB SHORT TO GROUND
When Monitored and Set Condition:
SEAT SQUIB SHORT TO GROUND
When Monitored:
Squib circuits.
Set Condition:
When the ignition is on, the SIACM monitors the resistance of the Seat
When the SIACM detects a short to ground on the Seat Squib circuits.
POSSIBLE CAUSES
SEAT AIRBAG SHORT TO GROUND
SEAT SQUIB LINE 1 OR LINE 2 SHORTED TO GROUND
SIACM, SEAT SQUIB SHORT TO GROUND
STORED CODE OR INTERMITTENT CONDITION
ACTIVE CODE PRESENT
TEST
ACTION
APPLICABILITY
1
Ensure the battery is fully charged.
Turn the ignition on.
NOTE: For the purpose of this test, the AECM and ORC modules will be
referred to as an ACM.
SELECT ONE:
All
LEFT SIACM - ACTIVE DTC
Go To 2
LEFT SIACM - STORED DTC
Go To 4
RIGHT SIACM - ACTIVE DTC
Go To 2
RIGHT SI ACM - STORED DTC
Go To 4
NOTE: When reconnecting Airbag system components, the ignition must be
turned off and the battery must be disconnected.
79
AIRBAG
SEAT SQUIB SHORT TO GROUND —
Continued
TEST
ACTION
APPLICABILITY
2
WARNING: TURN IGNITION OFF, DISCONNECT THE BATTERY AND WAIT
TWO MINUTES BEFORE PROCEEDING.
WARNING: DO NOT PLACE AN INTACT UNDEPLOYED SEAT BACK PADDED SIDE DOWN ON A HARD SURFACE, THE AIRBAG WILL PROPEL
INTO THE AIR IF ACCIDENTALLY DEPLOYED, AND COULD RESULT IN
SERIOUS OR FATAL INJURY.
Disconnect the Seat Airbag connector.
NOTE: Check connectors - Clean and repair as necessary.
Connect the appropriate Load Tool to the Seat Airbag connector.
WARNING: TURN IGNITION ON, THEN RECONNECT THE BATTERY.
With the DRBIIIt, read SIACM active DTC’s.
Does the DRBIIIt display SEAT SQUIB SHORT TO GROUND?
All
3
Yes
→ Go To
No
→ Replace the Seat Airbag in accordance with Service Instructions.
Perform AIRBAG VERIFICATION TEST - VER 1.
3
WARNING: TURN IGNITION OFF, DISCONNECT THE BATTERY AND WAIT
TWO MINUTES BEFORE PROCEEDING.
WARNING: DO NOT PLACE AN INTACT UNDEPLOYED SEAT BACK PADDED SIDE DOWN ON A HARD SURFACE, THE AIRBAG WILL PROPEL
INTO THE AIR IF ACCIDENTALLY DEPLOYED, AND COULD RESULT IN
SERIOUS OR FATAL INJURY.
Disconnect the Airbag Load Tool Jumper.
Disconnect the Side Impact Airbag Control Module connector.
NOTE: Check connectors - Clean and repair as necessary.
Connect the appropriate Load Tool SIACM adaptor to the SIACM connector.
Measure the resistance of the Seat Squib Line 1 and Line 2 circuits between the
Curtain Squib connector and ground.
Is the resistance below 10K ohms on either circuit?
Yes
→ Repair Seat Squib Line 1 or Line 2 shorted to ground.
Perform AIRBAG VERIFICATION TEST - VER 1.
No
→ Replace the Side Impact Airbag Control Module in accordance
with Service Instructions. WARNING: IF THE SIDE IMPACT
AIRBAG CONTROL MODULE IS DROPPED AT ANY TIME, IT
MUST BE REPLACED.
Perform AIRBAG VERIFICATION TEST - VER 1.
80
All
AIRBAG
SEAT SQUIB SHORT TO GROUND —
Continued
TEST
ACTION
APPLICABILITY
4
NOTE: Ensure the battery is fully charged.
With the DRBIIIt, record and erase all DTCs from all modules.
All active codes must be resolved before diagnosing any stored codes.
Maintain a safe distance from all airbags while performing the following steps.
With the DRBIIIt monitor active codes as you work through the system.
NOTE: If equipped with Passenger Airbag On-Off switch, read the DTC’s in
all switch positions.
Wiggle the wiring harness and connectors of the appropriate airbag system and
rotate the steering wheel from stop to stop.
NOTE: Check connectors - Clean and repair as necessary.
You have just attempted to simulate the condition that initially set the trouble code
message.
The following additional checks may assist you in identifying a possible intermittent
problem:
- Visually inspect related wire harness connectors. Look for broken, bent, pushed out,
spread, corroded, or contaminated terminals.
- Visually inspect the related harnesses. Look for chafed, pierced, pinched or partially
broken wire.
- Refer to Wiring Diagrams and Technical Service Bulletins that may apply.
Did the DTC become active ?
All
Yes
→ Select appropriate symptom from Symptom List.
No
→ No problem found at this time. Erase all codes before returning
vehicle to customer.
81
AIRBAG
Symptom:
*AIRBAG INDICATOR ON WITHOUT ACM TROUBLE CODES
POSSIBLE CAUSES
INSTRUMENT CLUSTER PROBLEMS
ACM, INDICATOR ON NO CODES
TEST
ACTION
APPLICABILITY
1
Turn the ignition on.
Make sure that all active DTC’s have been repaired before performing this procedure.
WARNING: TO AVOID PERSONAL INJURY OR DEATH, TURN IGNITION
OFF, DISCONNECT THE BATTERY AND WAIT TWO MINUTES BEFORE
PROCEEDING.
Does the DRBIIIt show LAMP REQ BY ACM: ON?
All
Yes
→ Go To
No
→ Refer to INSTRUMENT CLUSTER CATEGORY symptom list for
problems related to Instrument Cluster.
Perform AIRBAG VERIFICATION TEST - VER 1.
2
NOTE: When reconnecting Airbag system components, the ignition must be
turned off and the battery must be disconnected.
2
WARNING: TO AVOID PERSONAL INJURY OR DEATH, TURN IGNITION
OFF, DISCONNECT THE BATTERY AND WAIT TWO MINUTES BEFORE
PROCEEDING.
WARNING: IF THE AIRBAG CONTROL MODULE IS DROPPED AT ANY
TIME, IT MUST BE REPLACED. FAILURE TO TAKE THE PROPER PRECAUTIONS COULD RESULT IN ACCIDENTAL AIRBAG DEPLOYMENT
AND PERSONAL INJURY OR DEATH.
If there are no possible causes remaining, view repair.
Repair
Replace the Airbag Control Module in accordance with the Service
information.
Perform AIRBAG VERIFICATION TEST - VER 1.
82
All
AUDIO
Symptom:
ALL OUTPUTS SHORT
When Monitored and Set Condition:
ALL OUTPUTS SHORT
When Monitored:
Set Condition:
Ignition in RUN and IOD fuse installed.
The radio has sensed a short on the output for more than 10 seconds.
POSSIBLE CAUSES
DETERMINE FAULT
FRONT SHORTED SPEAKER
I/P SHORTED SPEAKER
REAR SHORTED SPEAKER
(+) CIRCUIT SHORTED TO GROUND
(-) CIRCUIT SHORTED TO GROUND
SPEAKER (+) & (-) CIRCUITS SHORTED TOGETHER
SPEAKER SECTION OF RADIO
TEST
1
ACTION
Turn the ignition on.
Turn the Radio on.
With the DRBIIIt, erase the audio DTC’s.
Cycle the ignition switch from off to on and wait 10 seconds.
With the DRBIIIt, read the audio DTC’s.
Does the DRBIIIt display ALL OUTPUTS SHORT?
Yes
→ Go To
No
→ Refer to the wiring diagrams located in the service information to
help isolate a possible intermittent short.
Perform BODY VERIFICATION TEST - VER 1.
2
83
APPLICABILITY
All
AUDIO
ALL OUTPUTS SHORT —
Continued
TEST
ACTION
APPLICABILITY
2
Turn the ignition off.
NOTE: Perform this procedure after disconnecting each front speaker
connector.
Disconnect each front speaker harness connector one at a time.
Turn the ignition on.
Turn the radio on.
With the DRBIIIt, erase the audio DTCs.
Cycle the ignition switch from off to on and wait 10 seconds.
With the DRBIIIt, read DTC’s.
Does the DRBIIIt display ALL OUTPUTS SHORT with all the front speakers
disconnected?
All
3
4
Yes
→ Go To
No
→ Replace the Speaker that when disconnected the DTC did not
reset.
Perform BODY VERIFICATION TEST - VER 1.
3
Turn the ignition off.
NOTE: Perform this procedure after disconnecting each I/P speaker connector.
Disconnect each I/P speaker harness connector one at a time.
Turn the ignition on.
Turn the radio on.
With the DRBIIIt, erase the audio DTCs.
Cycle the ignition switch from off to on and wait 10 seconds.
With the DRBIIIt, read DTC’s.
Does the DRBIIIt display ALL OUTPUTS SHORT with all the I/P speakers
disconnected?
Yes
→ Go To
No
→ Replace the Speaker that when disconnected the DTC did not
reset.
Perform BODY VERIFICATION TEST - VER 1.
All
4
Turn the ignition off.
NOTE: Perform this procedure after disconnecting each rear speaker
connector.
Disconnect each rear speaker harness connector one at a time.
Turn the ignition on.
Turn the radio on.
With the DRBIIIt, erase the audio DTCs.
Cycle the ignition switch from off to on and wait 10 seconds.
With the DRBIIIt, read DTC’s.
Does the DRBIIIt display ALL OUTPUTS SHORT with all the rear speakers
disconnected?
Yes
→ Go To
No
→ Replace the Speaker that when disconnected the DTC did not
reset.
Perform BODY VERIFICATION TEST - VER 1.
5
84
All
AUDIO
ALL OUTPUTS SHORT —
TEST
5
6
7
8
Continued
ACTION
Turn the ignition off.
Disconnect each front, I/P and rear speaker harness connector.
Disconnect the Radio C1 harness connector.
Measure the resistance between ground and each speaker (+) circuit.
Is the resistance below 1000.0 (1K) ohms?
Yes
→ Repair the speaker (+) circuit for a short to ground.
Perform BODY VERIFICATION TEST - VER 1.
No
→ Go To
APPLICABILITY
All
6
Turn the ignition off.
Disconnect each front, I/P and rear speaker harness connector.
Disconnect the Radio C1 harness connector.
Measure the resistance between ground and each speaker (-) circuit.
Is the resistance below 1000.0 (1K) ohms?
Yes
→ Repair the speaker (-) circuit for a short to ground.
Perform BODY VERIFICATION TEST - VER 1.
No
→ Go To
All
7
Turn the ignition off.
Disconnect each front, I/P and rear speaker harness connector.
Disconnect the Radio C1 harness connector.
Measure the resistance between each speaker (+) circuit and each speaker (-) circuit.
Is the resistance below 1000.0 (1K) ohms for any of the measurements?
Yes
→ Repair the speaker circuits shorted together.
Perform BODY VERIFICATION TEST - VER 1.
No
→ Go To
All
8
If there are no possible causes remaining, view repair.
Repair
Replace the Radio.
Perform BODY VERIFICATION TEST - VER 1.
85
All
AUDIO
Symptom List:
CASSETTE PLAYER INOP
CD MECHANICAL FAILURE
NO PCI TRANSMISSION
*AM/FM SWITCH INOPERATIVE
*ANY STATION PRESET SWITCH INOPERATIVE
*BALANCE INOPERATIVE
*CD EJECT SWITCH INOPERATIVE
*EQUALIZER INOPERATIVE
*FADER INOPERATIVE
*FF/RW SWITCH INOPERATIVE
*HOUR/MINUTE SWITCHES INOPERATIVE
*PAUSE/PLAY SWITCH INOPERATIVE
*PWR SWITCH INOPERATIVE
*SCAN SWITCH INOPERATIVE
*SEEK SWITCH INOPERATIVE
*SET SWITCH INOPERATIVE
*TAPE EJECT SWITCH INOPERATIVE
*TIME SWITCH INOPERATIVE
*TUNE SWITCH INOPERATIVE
Test Note:
All symptoms listed above are diagnosed using the same tests.
The title for the tests will be CASSETTE PLAYER INOP.
When Monitored and Set Condition:
CASSETTE PLAYER INOP
When Monitored:
Set Condition:
Continuously with the ignition and radio turned on.
The code will set if the radio detects a internal cassette failure.
CD MECHANICAL FAILURE
When Monitored:
Set Condition:
Continuously with the ignition and CD player turned on.
The code will set if the radio detects a CD mechanical failure.
POSSIBLE CAUSES
INTERNAL FAILURE
86
AUDIO
CASSETTE PLAYER INOP —
Continued
TEST
ACTION
APPLICABILITY
1
NOTE: If a DTC is set, erase the DTC and attempt to reset the DTC. If DTC
resets, follow this test.
This is an internal radio failure.
View repair
All
Repair
Replace the Radio.
Perform BODY VERIFICATION TEST - VER 1.
87
AUDIO
Symptom:
CD CHANGER MECHANICAL FAILURE
When Monitored and Set Condition:
CD CHANGER MECHANICAL FAILURE
When Monitored:
Set Condition:
Continuously with the ignition and CD Changer turned on.
The code will set if the CD Changer detects a mechanical failure.
POSSIBLE CAUSES
INTERNAL FAILURE
TEST
1
ACTION
NOTE: Erase DTC and attempt to reset. If DTC resets, follow this test.
This is an internal CD Changer failure.
View repair
Repair
Replace the CD Changer.
Perform BODY VERIFICATION TEST - VER 1.
88
APPLICABILITY
All
AUDIO
Symptom:
CD CHANGER READ FAILURE
When Monitored and Set Condition:
CD CHANGER READ FAILURE
When Monitored:
Continuously with the ignition and CD Changer turned on.
Set Condition: The code will set if a CD that is not formatted as a music CD is installed
in the CD Changer.
POSSIBLE CAUSES
CD CHANGER READ FAILURE
TEST
1
ACTION
Replace the problem CD with a good, clean, unscratched, music CD.
Turn the radio on and select the good CD.
With the DRBIIIt, read DTC’s.
Does the DRBIIIt display CD CHANGER READ FAILURE?
Yes
→ Replace the CD Changer.
Perform BODY VERIFICATION TEST - VER 1.
No
→ Test Complete.
89
APPLICABILITY
All
AUDIO
Symptom:
CD CHANGER TEMPERATURE HIGH
When Monitored and Set Condition:
CD CHANGER TEMPERATURE HIGH
When Monitored:
Set Condition:
C (+145° F).
Continuously with the ignition and CD Changer turned on.
The code will set if the temperature inside the CD Changer is above +65°
POSSIBLE CAUSES
HIGH TEMPERATURE FAILURE
TEST
ACTION
APPLICABILITY
1
With the DRBIIIt, erase the audio DTC’s.
Start the engine and allow the engine to reach normal operating temperature.
If the vehicle has been in the hot sunlight or extreme cold move the vehicle indoors
and open the doors to allow the inside temperature to stabilize.
The CD Changer will operate between -23° C and 65° C (-10° F and +145° F).
With the DRBIIIt, read DTC’s.
Does the DRBIIIt display CD CHANGER TEMPERATURE HIGH?
All
Yes
→ Replace the CD Changer.
Perform BODY VERIFICATION TEST - VER 1.
No
→ Test Complete.
90
AUDIO
Symptom:
CD PLAY FAILURE
When Monitored and Set Condition:
CD PLAY FAILURE
When Monitored:
Continuously with the ignition and the radio CD player turned on.
Set Condition: The code will set if a CD that is not formatted as a music CD or is
scratched, dirty so the radio can not play the CD.
POSSIBLE CAUSES
CD PLAY FAILURE
TEST
1
ACTION
Replace the problem CD with a good, clean, unscratched, music CD.
Turn the radio CD player on.
With the DRBIIIt, read DTC’s.
Does the DRBIIIt display CD PLAY FAILURE?
Yes
→ Replace the Radio.
Perform BODY VERIFICATION TEST - VER 1.
No
→ Test Complete.
91
APPLICABILITY
All
AUDIO
Symptom:
CD READ FAILURE
When Monitored and Set Condition:
CD READ FAILURE
When Monitored:
Continuously with the ignition and the radio CD player turned on.
Set Condition: The code will set if a CD that is not formatted as a music CD is installed
in the radio CD player.
POSSIBLE CAUSES
CD READ FAILURE
TEST
1
ACTION
Replace the problem CD with a good, clean, unscratched, music CD.
Turn the radio CD player on.
With the DRBIIIt, read DTC’s.
Does the DRBIIIt display CD READ FAILURE?
Yes
→ Replace the Radio.
Perform BODY VERIFICATION TEST - VER 1.
No
→ Test Complete.
92
APPLICABILITY
All
AUDIO
Symptom:
CD TEMPERATURE HIGH
When Monitored and Set Condition:
CD TEMPERATURE HIGH
When Monitored:
Continuously with the ignition and the radio CD player turned on.
Set Condition: The code will set if the temperature inside the radio CD player is above
+85° C (+185° F).
POSSIBLE CAUSES
HIGH TEMPERATURE FAILURE
TEST
ACTION
APPLICABILITY
1
With the DRBIIIt, erase the audio DTC’s.
Start the engine and allow the engine to reach normal operating temperature.
If the vehicle has been in the hot sunlight or extreme cold move the vehicle indoors
and open the doors to allow the inside temperature to stabilize.
The radio CD player will operate between -30° C and 85° C (-22° F and +185° F).
With the DRBIIIt, read DTC’s.
Does the DRBIIIt display CD TEMPERATURE HIGH?
All
Yes
→ Replace the Radio.
Perform BODY VERIFICATION TEST - VER 1.
No
→ Test Complete.
93
AUDIO
Symptom:
LOW VOLTAGE LEVEL
When Monitored and Set Condition:
LOW VOLTAGE LEVEL
When Monitored:
Set Condition:
The radio detects lower than normal voltage.
POSSIBLE CAUSES
CHECK CHARGING SYSTEM
CHECK VOLTAGE LEVEL AT RADIO
RADIO
TEST
1
2
3
ACTION
Check the charging system in accordance with the service information.
Is the charging system operating properly?
Yes
→ Go To
No
→ Refer to the appropriate service information and repair as necessary.
Perform BODY VERIFICATION TEST - VER 1.
APPLICABILITY
All
2
Turn the ignition off.
Disconnect the Radio harness connector.
Start the engine.
Measure the voltage of each Fused B+ circuit and the Fused Ignition Switch Output
circuit.
Is the voltage above or approximately 14 volts for each measurement?
Yes
→ Go To
No
→ Repair the circuit for high resistance.
Perform BODY VERIFICATION TEST - VER 1.
All
3
Note: Reconnect all previously disconnected components.
Turn the ignition and Radio on.
With the DRBIIIt, erase the audio DTC’s.
Start the engine.
With the DRBIIIt, read the audio DTC’s.
Did this DTC reset?
Yes
→ Replace the Radio.
Perform BODY VERIFICATION TEST - VER 1.
No
→ Test Complete.
94
All
AUDIO
Symptom:
NO ANTENNA CONNECTION
When Monitored and Set Condition:
NO ANTENNA CONNECTION
When Monitored:
With the ignition on and the radio in seek up/down mode.
Set Condition: With the radio in seek or scan mode for two minutes and the radio does not
detect an antenna connection or does not receive a radio station signal.
POSSIBLE CAUSES
BAD ANTENNA CONNECTION
TEST ANTENNA
RADIO
TEST
1
2
3
ACTION
APPLICABILITY
All
Turn the ignition off.
Disconnect the Radio Antenna connector.
Inspect the Radio Antenna connection.
Was the Antenna connection clean and tight?
Yes
→ Go To
No
→ Repair Antenna connection as needed.
Perform BODY VERIFICATION TEST - VER 1.
2
Refer to the Audio System in the service information and test the Antenna in
accordance with the service procedure.
Is the Antenna ok?
Yes
→ Go To
No
→ Repair or replace the Antenna assembly as necessary.
Perform BODY VERIFICATION TEST - VER 1.
All
3
NOTE: Reconnect all previously disconnected components.
Turn the ignition and Radio on.
NOTE: Move vehicle outside approximately 30ft from any structure.
With the DRBIIIt, erase the audio DTC’s, put the radio in seek up and seek down
mode for approximately 2 minutes before proceeding.
With the DRBIIIt, read the audio DTC’s.
Did this DTC reset?
Yes
→ Replace the Radio.
Perform BODY VERIFICATION TEST - VER 1.
No
→ Test Complete.
95
All
AUDIO
Symptom:
POWER AMP SHUTDOWN
When Monitored and Set Condition:
POWER AMP SHUTDOWN
When Monitored:
Set Condition:
Ignition in RUN and IOD fuse installed.
The radio has sensed a short on the output for more than 10 seconds.
POSSIBLE CAUSES
DETERMINE FAULT
FRONT SHORTED SPEAKER
I/P SHORTED SPEAKER
REAR SHORTED SPEAKER
(+) CIRCUIT SHORTED TO GROUND
(-) CIRCUIT SHORTED TO GROUND
SPEAKER (+) & (-) CIRCUITS SHORTED TOGETHER
SPEAKER SECTION OF RADIO
TEST
1
ACTION
Turn the ignition on.
Turn the Radio on.
With the DRBIIIt, erase the audio DTC’s.
Cycle the ignition switch from off to on and wait 10 seconds.
With the DRBIIIt, read the audio DTC’s.
Does the DRBIIIt display POWER AMP SHUTDOWN?
Yes
→ Go To
No
→ Refer to the wiring diagrams located in the service information to
help isolate a possible intermittent short.
Perform BODY VERIFICATION TEST - VER 1.
2
96
APPLICABILITY
All
AUDIO
POWER AMP SHUTDOWN —
Continued
TEST
ACTION
APPLICABILITY
2
Turn the ignition off.
NOTE: Perform this procedure after disconnecting each front speaker
connector.
Disconnect each front speaker harness connector one at a time.
Turn the ignition on.
Turn the radio on.
With the DRBIIIt, erase the audio DTCs.
Cycle the ignition switch from off to on and wait 10 seconds.
With the DRBIIIt, read DTC’s.
Does the DRBIIIt display POWER AMP SHUTDOWN with all the front speakers
disconnected?
All
3
4
Yes
→ Go To
No
→ Replace the Speaker that when disconnected the DTC did not
reset.
Perform BODY VERIFICATION TEST - VER 1.
3
Turn the ignition off.
NOTE: Perform this procedure after disconnecting each I/P speaker connector.
Disconnect each I/P speaker harness connector one at a time.
Turn the ignition on.
Turn the radio on.
With the DRBIIIt, erase the audio DTCs.
Cycle the ignition switch from off to on and wait 10 seconds.
With the DRBIIIt, read DTC’s.
Does the DRBIIIt display POWER AMP SHUTDOWN with all the I/P speakers
disconnected?
Yes
→ Go To
No
→ Replace the Speaker that when disconnected the DTC did not
reset.
Perform BODY VERIFICATION TEST - VER 1.
All
4
Turn the ignition off.
NOTE: Perform this procedure after disconnecting each rear speaker
connector.
Disconnect each rear speaker harness connector one at a time.
Turn the ignition on.
Turn the radio on.
With the DRBIIIt, erase the audio DTCs.
Cycle the ignition switch from off to on and wait 10 seconds.
With the DRBIIIt, read DTC’s.
Does the DRBIIIt display POWER AMP SHUTDOWN with all the rear speakers
disconnected?
Yes
→ Go To
No
→ Replace the Speaker that when disconnected the DTC did not
reset.
Perform BODY VERIFICATION TEST - VER 1.
5
97
All
AUDIO
POWER AMP SHUTDOWN —
TEST
5
6
7
8
Continued
ACTION
Turn the ignition off.
Disconnect each front, I/P and rear speaker harness connector.
Disconnect the Radio C1 harness connector.
Measure the resistance between ground and each speaker (+) circuit.
Is the resistance below 1000.0 (1K) ohms?
Yes
→ Repair the speaker (+) circuit for a short to ground.
Perform BODY VERIFICATION TEST - VER 1.
No
→ Go To
APPLICABILITY
All
6
Turn the ignition off.
Disconnect each front, I/P and rear speaker harness connector.
Disconnect the Radio C1 harness connector.
Measure the resistance between ground and each speaker (-) circuit.
Is the resistance below 1000.0 (1K) ohms?
Yes
→ Repair the speaker (-) circuit for a short to ground.
Perform BODY VERIFICATION TEST - VER 1.
No
→ Go To
All
7
Turn the ignition off.
Disconnect each front, I/P and rear speaker harness connector.
Disconnect the Radio C1 harness connector.
Measure the resistance between each speaker (+) circuit and each speaker (-) circuit.
Is the resistance below 1000.0 (1K) ohms for any of the measurements?
Yes
→ Repair the speaker circuits shorted together.
Perform BODY VERIFICATION TEST - VER 1.
No
→ Go To
All
8
If there are no possible causes remaining, view repair.
Repair
Replace the Radio.
Perform BODY VERIFICATION TEST - VER 1.
98
All
COMMUNICATION
Symptom:
*NO RESPONSE FROM ACM
POSSIBLE CAUSES
CHECKING FOR VOLTAGE AT ACM
GROUND CIRCUIT OPEN
PCI BUS CIRCUIT OPEN
AIRBAG CONTROL MODULE
TEST
ACTION
APPLICABILITY
1
Ensure that the battery is fully charged.
WARNING: TO AVOID PERSONAL INJURY OR DEATH, TURN THE IGNITION OFF, DISCONNECT THE BATTERY AND WAIT TWO MINUTES BEFORE PROCEEDING.
Disconnect the ACM harness connector.
Connect the appropriate Load Tool ACM Adapter to the ACM connector.
Turn the ignition on and then reconnect the Battery.
Using a 12-volt test light connected to ground, probe the Fused Ignition Switch
Output (Run) Circuit and the Fused Ignition Switch Output (Run/Start) Circuit at
the ACM connector.
NOTE: One open circuit will not cause a NO RESPONSE condition.
Is the test light illuminated on both circuits?
All
Yes
→ Go To
No
→ Repair the Fused Ignition Switch Output (Run) and Fused
Ignition Switch Output (Run/Start) circuits for an open.
Perform AIRBAG VERIFICATION TEST - VER 1.
2
NOTE: When reconnecting airbag system components, the ignition must be
turned off and the battery must be disconnected.
2
Ensure that the battery is fully charged.
WARNING: TO AVOID PERSONAL INJURY OR DEATH, TURN THE IGNITION OFF, DISCONNECT THE BATTERY AND WAIT TWO MINUTES BEFORE PROCEEDING.
Disconnect the ACM harness connector.
Connect the appropriate Load Tool ACM Adapter to the ACM connector.
Using a 12-volt test light connected to 12-volts, probe the ground circuit.
NOTE: Make sure test light is connected to the Battery positive terminal.
Is the test light illuminated?
Yes
→ Go To
No
→ Repair the Ground circuit for an open.
Perform AIRBAG VERIFICATION TEST - VER 1.
3
When reconnecting Airbag system components, the ignition must be turned
off and the battery must be disconnected.
99
All
COMMUNICATION
*NO RESPONSE FROM ACM —
Continued
TEST
ACTION
APPLICABILITY
3
Note: Ensure there is PCI bus communication with other modules. If not,
refer to the PCI Bus Communication Failure symptom and repair as
necessary.
WARNING: TO AVOID PERSONAL INJURY OR DEATH, TURN THE IGNITION OFF, DISCONNECT THE BATTERY AND WAIT TWO MINUTES BEFORE PROCEEDING.
Disconnect the ACM harness connector.
Connect the appropriate Load Tool ACM Adapter to the ACM connector.
Turn the ignition on and then reconnect the Battery.
Use Scope input cable CH7058, Cable to Probe adapter CH7062, and the red and
black test probes.
Connect the scope input cable to the channel one connector on the DRB. Attach the
red and black leads and the cable to probe adapter to the scope input cable.
With the DRBIIIt select Pep Module Tools.
Select lab scope.
Select Live Data.
Select 12 volt square wave.
Press F2 for Scope.
Press F2 and use the down arrow to set voltage range to 20 volts. Press F2 again
when complete.
Connect the Black lead to the chassis ground. Connect the Red lead to the PCI Bus
circuit in the ACM connector.
Observe the voltage display on the DRB Lab Scope.
Does the voltage pulse from 0 to approximately 7.5 volts?
All
4
Yes
→ Go To
No
→ Repair the PCI Bus circuit for an open.
Perform AIRBAG VERIFICATION TEST - VER 1.
4
If there are no possible causes remaining, view repair.
Repair
Replace the Airbag Control Module (ACM) in accordance with the
Service lnformation. WARNING: To avoid personal injury or
death, make sure the battery is disconnected and wait 2 minutes
before proceeding.
Perform AIRBAG VERIFICATION TEST - VER 1.
100
All
COMMUNICATION
Symptom:
*NO RESPONSE FROM COMPASS/TEMPERATURE MIRROR
POSSIBLE CAUSES
OPEN GROUND CIRCUIT
OPEN FUSED B+ CIRCUIT
OPEN FUSED IGNITION SWITCH OUTPUT CIRCUIT
OPEN PCI BUS CIRCUIT
COMPASS/TEMPERATURE MIRROR
TEST
1
2
3
ACTION
Turn the ignition off.
Turn all lights off.
Disconnect the Compass/Temperature Mirror harness connector.
Using a 12-volt test light connected to 12-volts, probe each ground circuit.
Is the test light illuminated for both circuits?
Yes
→ Go To
No
→ Repair the ground circuit for an open.
Perform BODY VERIFICATION TEST - VER 1.
APPLICABILITY
All
2
Turn the ignition off.
Disconnect the Compass/Temperature Mirror harness connector.
Using a 12-volt test light connected to ground, probe the Fused B+ circuit.
Is the test light illuminated?
Yes
→ Go To
No
→ Repair the Fused B+ circuit for an open. Refer to the wiring
diagrams in the service information.
Perform BODY VERIFICATION TEST - VER 1.
All
3
Turn the ignition off.
Disconnect the Compass/Temperature Mirror harness connector.
Turn the ignition on.
Using a 12-volt test light connected to ground, probe the Fused Ignition Switch
Output circuit.
Is the test light illuminated?
Yes
→ Go To
No
→ Repair the Fused Ignition Switch Output circuit for an open.
Refer to the wiring diagrams in the service information.
Perform BODY VERIFICATION TEST - VER 1.
4
101
All
COMMUNICATION
*NO RESPONSE FROM COMPASS/TEMPERATURE MIRROR —
Continued
TEST
ACTION
APPLICABILITY
4
Note: Ensure there is PCI Bus communication with other modules on the
vehicle before proceeding. If not, refer to the symptom list from the menu
and repair as necessary.
Disconnect the Compass/Temperature Mirror harness connector.
Use Scope input cable CH7058, Cable to Probe adapter CH7062, and the red and
black test probes.
Connect the scope input cable to the channel one connector on the DRB. Attach the
red and black leads and the cable to probe adapter to the scope input cable.
With the DRBIIIt select Pep Module Tools.
Select lab scope.
Select Live Data.
Select 12 volt square wave.
Press F2 for Scope.
Press F2 and use the down arrow to set voltage range to 20 volts. Set Probe to x10.
Press F2 again when complete.
Connect the Black lead to the chassis ground. Connect the Red lead to the PCI Bus
circuit in the Compass/Temperature Mirror connector.
Turn the ignition on.
Observe the voltage display on the DRB Lab Scope.
Does the voltage pulse from 0 to approximately 7.5 volts?
All
Yes
→ Replace the Compass/Temperature Mirror in accordance with the
service information.
Perform BODY VERIFICATION TEST - VER 1.
No
→ Repair the PCI Bus circuit for an open.
Perform BODY VERIFICATION TEST - VER 1.
102
COMMUNICATION
Symptom:
*NO RESPONSE FROM CONTROLLER ANTILOCK BRAKE
POSSIBLE CAUSES
NO RESPONSE FROM CAB
GROUND CIRCUIT OPEN
OPEN FUSED IGNITION SWITCH OUTPUT CIRCUIT
OPEN PCI BUS CIRCUIT
CONTROLLER ANTILOCK BRAKE
TEST
ACTION
APPLICABILITY
1
Turn the ignition on.
Note: As soon as one or more module communicates with the DRB, answer
the question.
With the DRB, attempt to communicate with the Airbag Control Module (ACM).
With the DRB, attempt to communicate with the Instrument Cluster (MIC).
Was the DRB able to I/D or establish communications with either of the modules?
All
2
3
Yes
→ Go To
No
→ Refer to the Communications category and perform the symptom
PCI Bus Communication Failure.
Perform ABS VERIFICATION TEST - VER 1.
2
Turn the ignition off.
Disconnect the CAB harness connector.
Using a 12-volt test light connected to 12-volts, probe both ground circuits.
Is the test light illuminated for both circuits?
Yes
→ Go To
No
→ Repair the ground circuit(s) for an open.
Perform ABS VERIFICATION TEST - VER 1.
All
3
Turn the ignition off.
Disconnect the CAB harness connector.
Turn the ignition on.
Using a 12-volt test light connected to ground, probe the Fused Ignition Switch
Output circuit.
Is the test light illuminated?
Yes
→ Go To
No
→ Repair the Fused Ignition Switch Output circuit for an open.
Perform ABS VERIFICATION TEST - VER 1.
4
103
All
COMMUNICATION
*NO RESPONSE FROM CONTROLLER ANTILOCK BRAKE —
Continued
TEST
ACTION
APPLICABILITY
4
Note: Ensure there is PCI Bus communication with other modules on the
vehicle before proceeding. If not, refer to the symptom list from the menu
and repair as necessary.
Disconnect the CAB harness connector.
Use Scope input cable CH7058, Cable to Probe adapter CH7062, and the red and
black test probes.
Connect the scope input cable to the channel one connector on the DRB. Attach the
red and black leads and the cable to probe adapter to the scope input cable.
With the DRBIIIt select Pep Module Tools.
Select lab scope.
Select Live Data.
Select 12 volt square wave.
Press F2 for Scope.
Press F2 and use the down arrow to set voltage range to 20 volts. Press F2 again
when complete.
Connect the Black lead to the chassis ground. Connect the Red lead to the PCI Bus
circuit in the CAB connector.
Turn the ignition on.
Observe the voltage display on the DRB Lab Scope.
Does the voltage pulse from 0 to approximately 7.5 volts?
All
5
Yes
→ Go To
No
→ Repair the PCI Bus circuit for an open.
Perform ABS VERIFICATION TEST - VER 1.
5
If there are no possible causes remaining, view repair.
Repair
Replace the Controller Antilock Brake in accordance with the
Service Information.
Perform ABS VERIFICATION TEST - VER 1.
104
All
COMMUNICATION
Symptom:
*NO RESPONSE FROM INSTRUMENT CLUSTER
POSSIBLE CAUSES
OPEN GROUND CIRCUIT
OPEN FUSED B+ CIRCUIT
OPEN FUSED IGNITION SWITCH OUTPUT CIRCUIT
OPEN PCI BUS CIRCUIT
INSTRUMENT CLUSTER
TEST
1
2
3
ACTION
Turn the ignition off.
Turn all lights off.
Disconnect the Instrument Cluster harness connector.
Using a 12-volt test light connected to 12-volts, probe the ground circuit.
Is the test light illuminated?
Yes
→ Go To
No
→ Repair the ground circuit for an open.
Perform BODY VERIFICATION TEST - VER 1.
APPLICABILITY
All
2
Turn the ignition off.
Disconnect the Instrument Cluster harness connector.
Using a 12-volt test light connected to ground, probe the Fused B+ circuit.
Is the test light illuminated?
Yes
→ Go To
No
→ Repair the Fused B+ circuit for an open. Refer to the wiring
diagrams in the service information.
Perform BODY VERIFICATION TEST - VER 1.
All
3
Turn the ignition off.
Disconnect the Instrument Cluster harness connector.
Turn the ignition on.
Using a 12-volt test light connected to ground, probe the Fused Ignition Switch
Output circuit.
Is the test light illuminated?
Yes
→ Go To
No
→ Repair the Fused Ignition Switch Output circuit for an open.
Refer to the wiring diagrams in the service information.
Perform BODY VERIFICATION TEST - VER 1.
4
105
All
COMMUNICATION
*NO RESPONSE FROM INSTRUMENT CLUSTER —
Continued
TEST
ACTION
APPLICABILITY
4
Note: Ensure there is PCI Bus communication with other modules on the
vehicle before proceeding. If not, refer to the symptom list from the menu
and repair as necessary.
Disconnect the Instrument Cluster harness connector.
Use Scope input cable CH7058, Cable to Probe adapter CH7062, and the red and
black test probes.
Connect the scope input cable to the channel one connector on the DRB. Attach the
red and black leads and the cable to probe adapter to the scope input cable.
With the DRBIIIt select Pep Module Tools.
Select lab scope.
Select Live Data.
Select 12 volt square wave.
Press F2 for Scope.
Press F2 and use the down arrow to set voltage range to 20 volts. Press F2 again
when complete.
Connect the Black lead to the chassis ground. Connect the Red lead to the PCI Bus
circuit in the Instrument Cluster connector.
Turn the ignition on.
Observe the voltage display on the DRB Lab Scope.
Does the voltage pulse from 0 to approximately 7.5 volts?
All
Yes
→ Replace the Instrument Cluster in accordance with the service
information.
Perform BODY VERIFICATION TEST - VER 1.
No
→ Repair the PCI Bus circuit for an open.
Perform BODY VERIFICATION TEST - VER 1.
106
COMMUNICATION
Symptom:
*NO RESPONSE FROM LEFT SIACM
POSSIBLE CAUSES
INTERROGATE ACM
GROUND CIRCUIT OPEN
FUSED IGNITION SWITCH OUTPUT CIRCUIT (RUN/START) OPEN
PCI BUS CIRCUIT OPEN
LEFT SIDE IMPACT AIRBAG CONTROL MODULE
TEST
1
2
ACTION
Turn the ignition on.
With the DRBIIIt select Passive Restraints.
With the DRBIIIt select Airbag and read the active DTC’s.
Is the Loss Of Ignition Run/Start DTC set?
Yes
→ Refer to the symptom list and perform the Loss Of Ignition
Run/Start symptom.
Perform AIRBAG VERIFICATION TEST - VER 1.
No
→ Go To
APPLICABILITY
All
2
Ensure that the battery is fully charged.
Warning: TURN IGNITION OFF, DISCONNECT THE BATTERY AND WAIT
TWO MINUTES BEFORE PROCEEDING.
Disconnect the Left Side Impact Airbag Control Module harness connector.
Connect the appropriate Load Tool SIACM Adapter to the SIACM connector.
Using a 12-volt test light connected to 12-volts, probe the ground circuit.
NOTE: Make sure test light is connected to the Battery positive terminal.
Is the test light illuminated?
Yes
→ Go To
No
→ Repair the Ground circuit for an open.
Perform AIRBAG VERIFICATION TEST - VER 1.
All
3
Note: When reconnecting Airbag system components, the ignition must be
turned off and the battery must be disconnected.
3
Warning: TURN IGNITION OFF, DISCONNECT THE BATTERY AND WAIT
TWO MINUTES BEFORE PROCEEDING.
Disconnect the Left Side Impact Airbag Control Module harness connector.
Connect the appropriate Load Tool SIACM Adapter to the SIACM connector.
Turn the ignition on and then reconnect the Battery.
Measure the voltage of the Fused Ignition Switch Output (Run/Start) circuit.
Is the voltage above 6.0 volts?
Yes
→ Go To
No
→ Repair the Fused Ignition Switch Output (Run/Start) circuit for
an open.
Perform AIRBAG VERIFICATION TEST - VER 1.
4
Note: When reconnecting Airbag system components, the ignition must be
turned off and the battery must be disconnected.
107
All
COMMUNICATION
*NO RESPONSE FROM LEFT SIACM —
Continued
TEST
ACTION
APPLICABILITY
4
NOTE: Ensure there is PCI bus communication with other modules. If not,
refer to the PCI Bus Communication Failure symptom and repair as
necessary.
WARNING: TURN THE IGNITION OFF, DISCONNECT THE BATTERY AND
WAIT TWO MINUTES BEFORE PROCEEDING.
Disconnect the Left Side Impact Airbag Control Module harness connector.
Connect the appropriate Load Tool SIACM Adapter to the SIACM connector.
Turn the ignition on and then reconnect the Battery.
Use Scope input cable CH7058, Cable to Probe adapter CH7062, and the red and
black test probes.
Connect the scope input cable to the channel one connector on the DRB. Attach the
red and black leads and the cable to probe adapter to the scope input cable.
With the DRBIIIt select Pep Module Tools.
Select lab scope.
Select Live Data.
Select 12 volt square wave.
Press F2 for Scope.
Press F2 and use the down arrow to set voltage range to 20 volts. Set Probe to x10.
Press F2 again when complete.
Connect the Black lead to the chassis ground. Connect the Red lead to the PCI Bus
circuit in the Left Side Impact Airbag Control Module connector.
Observe the voltage display on the DRB Lab Scope.
Does the voltage pulse from 0 to approximately 7.5 volts?
All
5
Yes
→ Go To
No
→ Repair the PCI Bus circuit for an open.
Perform AIRBAG VERIFICATION TEST - VER 1.
5
If there are no possible causes remaining, view repair.
Yes
→ Replace the Left Side Impact Airbag Control Module (LSIACM) in
accordance with the Service Information. WARNING: Make sure
the battery is disconnected and wait 2 minutes before proceeding.
Perform AIRBAG VERIFICATION TEST - VER 1.
108
All
COMMUNICATION
Symptom:
*NO RESPONSE FROM PCM (PCI BUS) - NGC
POSSIBLE CAUSES
PCM PCI NO RESPONSE
POWERTRAIN CONTROL MODULE
PCI BUS CIRCUIT OPEN
TEST
ACTION
APPLICABILITY
1
Turn the ignition on.
NOTE: As soon as one or more module communicates with the DRB, answer
the question.
With the DRB, enter Anti-Lock Brakes.
With the DRB, enter Electro/Mechanical Cluster (MIC).
With the DRB, enter Passive Restraints then Airbag.
Were you able to establish communications with any of the modules?
All
2
Yes
→ Go To
No
→ Refer to symptom PCI Bus Communication Failure in the Communications category.
Perform POWERTRAIN VERIFICATION TEST VER - 1.
2
With the DRB read the Powertrain DTC’s. This is to ensure power and grounds to the
PCM are operational.
NOTE: If the DRB will not read PCM DTC’s, follow the NO RESPONSE TO
PCM (PCM SCI only) symptom path.
Turn the ignition off.
Disconnect the PCM harness connectors.
CAUTION: DO NOT PROBE THE PCM HARNESS CONNECTORS. PROBING
THE PCM HARNESS CONNECTORS WILL DAMAGE THE PCM TERMINALS RESULTING IN POOR TERMINAL TO PIN CONNECTION. INSTALL
MILLER SPECIAL TOOL #8815 TO PERFORM DIAGNOSIS.
Use Scope input cable CH7058, Cable to Probe adapter CH7062, and the red and
black test probes.
Connect the scope input cable to the channel one connector on the DRB. Attach the
red and black leads and the cable to probe adapter to the scope input cable.
With the DRBIIIt select Pep Module Tools.
Select lab scope.
Select Live Data.
Select 12 volt square wave.
Press F2 for Scope.
Press F2 and use the down arrow to set voltage range to 20 volts. Press F2 again
when complete.
Connect the Black lead to the chassis ground. Connect the Red lead to the PCI Bus
circuit in the appropriate terminal of special tool #8815.
Turn the ignition on.
Observe the voltage display on the DRB Lab Scope.
Does the voltage pulse from 0 to approximately 7.5 volts?
Yes
→ Replace and program the Powertrain Control Module in accordance with the Service Information.
Perform POWERTRAIN VERIFICATION TEST VER - 1.
No
→ Repair the PCI Bus circuit for an open.
Perform POWERTRAIN VERIFICATION TEST VER - 1.
109
All
COMMUNICATION
Symptom:
*NO RESPONSE FROM PCM (PCM SCI ONLY) - NGC
POSSIBLE CAUSES
CHECK PCM POWERS AND GROUNDS
PCM SCI TRANSMIT CIRCUIT SHORTED TO VOLTAGE
PCM SCI RECEIVE CIRCUIT SHORTED TO VOLTAGE
PCM SCI CIRCUITS SHORTED TOGETHER
PCM SCI TRANSMIT CIRCUIT SHORTED TO GROUND
PCM SCI RECEIVE CIRCUIT SHORTED TO GROUND
PCM SCI RECEIVE CIRCUIT OPEN
PCM SCI TRANSMIT CIRCUIT OPEN
POWERTRAIN CONTROL MODULE
TEST
ACTION
APPLICABILITY
1
Perform the symptom Checking PCM Power and Ground Circuits in the Driveability
category.
NOTE: With the DRBIIIt in the generic scan tool mode, attempt to communicate with the PCM.
NOTE: If the DRBIIIt can communicate with the PCM in the generic scan
tool mode, it may not be necessary to perform this step.
Did the vehicle pass this test?
All
2
3
Yes
→ Go To
No
→ Repair as necessary.
Perform POWERTRAIN VERIFICATION TEST VER - 1.
2
Turn the ignition off.
Disconnect the DRBIIIt from the DLC.
Disconnect the PCM harness connectors.
Turn the ignition on.
Measure the voltage of the PCM SCI Transmit circuit at the Data Link harness
connector (cav 7).
Is the voltage above 1.0 volt?
Yes
→ Repair the PCM SCI Transmit circuit for a short to voltage.
Perform POWERTRAIN VERIFICATION TEST VER - 1.
No
→ Go To
All
3
Turn the ignition off.
Disconnect the DRBIIIt from the DLC.
Disconnect the PCM harness connectors.
Turn the ignition on.
Measure the voltage of the PCM SCI Receive circuit at the Data Link harness
connector (cav 12).
Is the voltage above 1.0 volt?
Yes
→ Repair the PCM SCI Receive circuit for a short to voltage.
Perform POWERTRAIN VERIFICATION TEST VER - 1.
No
→ Go To
4
110
All
COMMUNICATION
*NO RESPONSE FROM PCM (PCM SCI ONLY) - NGC —
Continued
TEST
ACTION
APPLICABILITY
4
Turn the ignition off.
Disconnect the DRBIIIt from the DLC.
Disconnect the PCM harness connectors.
Measure the resistance between the PCM SCI Transmit circuit and the PCM SCI
Receive circuit at the Data Link harness connector (cavs 7 and 12).
Is the resistance below 5.0 ohms?
All
5
6
7
Yes
→ Repair the short between the PCM SCI Transmit and the PCM
SCI Receive circuits.
Perform POWERTRAIN VERIFICATION TEST VER - 1.
No
→ Go To
5
Turn the ignition off.
Disconnect the PCM harness connectors.
Disconnect the DRBIIIt from the DLC.
Measure the resistance between ground and the PCM SCI Transmit circuit at the
Data Link harness connector (cav 7).
Is the resistance below 5.0 ohms?
Yes
→ Repair the PCM SCI Transmit circuit for a short to ground.
Perform POWERTRAIN VERIFICATION TEST VER - 1.
No
→ Go To
All
6
Turn the ignition off.
Disconnect the PCM harness connector.
Disconnect the DRBIIIt from the DLC.
Measure the resistance between ground and the PCM SCI Receive circuit in the Data
Link harness connector (cav 12).
Is the resistance below 5.0 ohms?
Yes
→ Repair the PCM SCI Receive circuit for a short to ground.
Perform POWERTRAIN VERIFICATION TEST VER - 1.
No
→ Go To
All
7
Turn the ignition off.
Disconnect the PCM harness connector.
Disconnect the DRBIIIt from the DLC.
CAUTION: DO NOT PROBE THE PCM HARNESS CONNECTORS. PROBING
THE PCM HARNESS CONNECTORS WILL DAMAGE THE PCM TERMINALS RESULTING IN POOR TERMINAL TO PIN CONNECTION. INSTALL
MILLER SPECIAL TOOL #8815 TO PERFORM DIAGNOSIS.
Measure the resistance of the PCM SCI Receive circuit from the Data Link harness
connector (cav 12) to the appropriate terminal of special tool #8815.
Is the resistance below 5.0 ohms?
Yes
→ Go To
No
→ Repair the PCM SCI Receive circuit for an open.
Perform POWERTRAIN VERIFICATION TEST VER - 1.
8
111
All
COMMUNICATION
*NO RESPONSE FROM PCM (PCM SCI ONLY) - NGC —
Continued
TEST
ACTION
APPLICABILITY
8
Turn the ignition off.
Disconnect the PCM harness connector.
Disconnect the DRBIIIt from the DLC.
CAUTION: DO NOT PROBE THE PCM HARNESS CONNECTORS. PROBING
THE PCM HARNESS CONNECTORS WILL DAMAGE THE PCM TERMINALS RESULTING IN POOR TERMINAL TO PIN CONNECTION. INSTALL
MILLER SPECIAL TOOL #8815 TO PERFORM DIAGNOSIS.
Measure the resistance of the PCM SCI Transmit circuit from the Data Link harness
connector (cav 7) to the appropriate terminal of special tool #8815.
Is the resistance below 5.0 ohms?
All
9
Yes
→ Go To
No
→ Repair the PCM SCI Transmit circuit for an open.
Perform POWERTRAIN VERIFICATION TEST VER - 1.
9
If there are no possible causes remaining, view repair.
Repair
Replace and program the Powertrain Control Module in accordance with the Service Information.
Perform POWERTRAIN VERIFICATION TEST VER - 1.
112
All
COMMUNICATION
Symptom:
*NO RESPONSE FROM RADIO
POSSIBLE CAUSES
NO RESPONSE FROM RADIO
OPEN FUSED IGNITION SWITCH OUTPUT CIRCUIT
OPEN FUSED B+ CIRCUIT
RADIO GROUND CIRCUIT OPEN
OPEN PCI BUS CIRCUIT
RADIO
TEST
ACTION
APPLICABILITY
1
Turn the ignition on.
Note: As soon as one or more module communicates with the DRB, answer
the question.
With the DRB, attempt to communicate with the Airbag Control Module (ACM).
With the DRB, attempt to communicate with the Instrument Cluster (MIC).
Was the DRB able to I/D or establish communications with either of the modules?
All
2
3
Yes
→ Go To
No
→ Refer to the Communications category and perform the symptom
PCI Bus Communication Failure.
Perform BODY VERIFICATION TEST - VER 1.
2
Turn the ignition off.
Disconnect the Radio C1 harness connector.
Turn the ignition on.
Using a 12-volt test light connected to ground, probe the Fused Ignition Switch
Output circuit.
Is the test light illuminated?
Yes
→ Go To
No
→ Check Fuse Block fuse for an open. If ok, repair the Fused Ignition
Switch Output circuit for an open or short. Refer to the wiring
diagrams located in the Service Information.
Perform BODY VERIFICATION TEST - VER 1.
All
3
Turn the ignition off.
Disconnect the Radio C1 harness connector.
Using a 12-volt test light connected to ground, probe the Fused B+ circuit.
Is the test light illuminated?
Yes
→ Go To
No
→ Repair the Fused B+ circuit for an open or short. Refer to the
wiring diagrams located in the Service Information.
Perform BODY VERIFICATION TEST - VER 1.
4
113
All
COMMUNICATION
*NO RESPONSE FROM RADIO —
TEST
4
5
6
Continued
ACTION
Turn the ignition off.
Disconnect the Radio C1 harness connector.
Using a 12-volt test light connected to 12-volts, probe the ground circuit.
Is the test light illuminated?
Yes
→ Go To
No
→ Repair the ground circuit for an open.
Perform BODY VERIFICATION TEST - VER 1.
APPLICABILITY
All
5
Note: Ensure there is PCI Bus communication with other modules on the
vehicle before proceeding. If not, refer to the symptom list from the menu
and repair as necessary.
Disconnect the Radio C1 harness connector.
Use Scope input cable CH7058, Cable to Probe adapter CH7062, and the red and
black test probes.
Connect the scope input cable to the channel one connector on the DRB. Attach the
red and black leads and the cable to probe adapter to the scope input cable.
With the DRBIIIt select Pep Module Tools.
Select lab scope.
Select Live Data.
Select 12 volt square wave.
Press F2 for Scope.
Press F2 and use the down arrow to set voltage range to 20 volts. Press F2 again
when complete.
Connect the Black lead to the chassis ground. Connect the Red lead to the PCI Bus
circuit in the Radio connector.
Turn the ignition on.
Observe the voltage display on the DRB Lab Scope.
Does the voltage pulse from 0 to approximately 7.5 volts?
Yes
→ Go To
No
→ Repair the PCI Bus circuit for an open.
Perform BODY VERIFICATION TEST - VER 1.
All
6
If there are no possible causes remaining, view repair.
Repair
Replace the Radio.
Perform BODY VERIFICATION TEST - VER 1.
114
All
COMMUNICATION
Symptom:
*NO RESPONSE FROM RIGHT SIACM
POSSIBLE CAUSES
INTERROGATE ACM
GROUND CIRCUIT OPEN
FUSED IGNITION SWITCH OUTPUT CIRCUIT (RUN/START) OPEN
PCI BUS CIRCUIT OPEN
RIGHT SIDE IMPACT AIRBAG CONTROL MODULE
TEST
1
2
ACTION
Turn the ignition on.
With the DRBIIIt select Passive Restraints.
With the DRBIIIt select Airbag and read the active DTC’s.
Is the Loss Of Ignition Run/Start DTC set?
Yes
→ Refer to the symptom list and perform the Loss Of Ignition
Run/Start symptom.
Perform AIRBAG VERIFICATION TEST - VER 1.
No
→ Go To
APPLICABILITY
All
2
Ensure that the battery is fully charged.
Warning: TURN IGNITION OFF, DISCONNECT THE BATTERY AND WAIT
TWO MINUTES BEFORE PROCEEDING.
Disconnect the Right Side Impact Airbag Control Module harness connector.
Connect the appropriate Load Tool SIACM Adapter to the SIACM connector.
Using a 12-volt test light connected to 12-volts, probe the ground circuit.
NOTE: Make sure test light is connected to the Battery positive terminal.
Is the test light illuminated?
Yes
→ Go To
No
→ Repair the Ground circuit for an open.
Perform AIRBAG VERIFICATION TEST - VER 1.
All
3
Note: When reconnecting Airbag system components, the ignition must be
turned off and the battery must be disconnected.
3
Warning: TURN IGNITION OFF, DISCONNECT THE BATTERY AND WAIT
TWO MINUTES BEFORE PROCEEDING.
Disconnect the Right Side Impact Airbag Control Module harness connector.
Connect the appropriate Load Tool SIACM Adapter to the SIACM connector.
Turn the ignition on and then reconnect the Battery.
Measure the voltage of the Fused Ignition Switch Output (Run/Start) circuit.
Is the voltage above 6.0 volts?
Yes
→ Go To
No
→ Repair the Fused Ignition Switch Output (Run/Start) circuit for
an open.
Perform AIRBAG VERIFICATION TEST - VER 1.
4
Note: When reconnecting Airbag system components, the ignition must be
turned off and the battery must be disconnected.
115
All
COMMUNICATION
*NO RESPONSE FROM RIGHT SIACM —
Continued
TEST
ACTION
APPLICABILITY
4
NOTE: Ensure there is PCI bus communication with other modules. If not,
refer to the PCI Bus Communication Failure symptom and repair as
necessary.
WARNING: TURN THE IGNITION OFF, DISCONNECT THE BATTERY AND
WAIT TWO MINUTES BEFORE PROCEEDING.
Disconnect the Right Side Impact Airbag Control Module harness connector.
Connect the appropriate Load Tool SIACM Adapter to the SIACM connector.
Turn the ignition on and then reconnect the Battery.
Use Scope input cable CH7058, Cable to Probe adapter CH7062, and the red and
black test probes.
Connect the scope input cable to the channel one connector on the DRB. Attach the
red and black leads and the cable to probe adapter to the scope input cable.
With the DRBIIIt select Pep Module Tools.
Select lab scope.
Select Live Data.
Select 12 volt square wave.
Press F2 for Scope.
Press F2 and use the down arrow to set voltage range to 20 volts. Set Probe to x10.
Press F2 again when complete.
Connect the Black lead to the chassis ground. Connect the Red lead to the PCI Bus
circuit in the Right Side Impact Airbag Control Module connector.
Observe the voltage display on the DRB Lab Scope.
Does the voltage pulse from 0 to approximately 7.5 volts?
All
5
Yes
→ Go To
No
→ Repair the PCI Bus circuit for an open.
Perform AIRBAG VERIFICATION TEST - VER 1.
5
If there are no possible causes remaining, view repair.
Yes
→ Replace the Right Side Impact Airbag Control Module (RSIACM)
in accordance with the Service Information. WARNING: Make
sure the battery is disconnected and wait 2 minutes before
proceeding.
Perform AIRBAG VERIFICATION TEST - VER 1.
116
All
COMMUNICATION
Symptom:
*NO RESPONSE FROM RKE
POSSIBLE CAUSES
OPEN GROUND CIRCUIT
OPEN FUSED B+ CIRCUIT
OPEN FUSED IGNITION SWITCH OUTPUT CIRCUIT
OPEN PCI BUS CIRCUIT
REMOTE KEYLESS ENTRY MODULE
TEST
1
2
3
ACTION
Turn the ignition off.
Turn all lights off.
Disconnect the RKE Module harness connector.
Using a 12-volt test light connected to 12-volts, probe both ground circuits.
Is the test light illuminated for both ground circuits?
Yes
→ Go To
No
→ Repair the ground circuit for an open.
Perform BODY VERIFICATION TEST - VER 1.
APPLICABILITY
All
2
Turn the ignition off.
Disconnect the RKE Module harness connector.
Using a 12-volt test light connected to ground, probe each Fused B+ circuit.
Is the test light illuminated for each Fused B+ circuit?
Yes
→ Go To
No
→ Check the fuses that feed the Fused B+ circuits for an open. If ok,
repair the Fused B+ circuit that did not illuminate the test light
for an open. Refer to the wiring diagrams in the service information.
Perform BODY VERIFICATION TEST - VER 1.
All
3
Turn the ignition off.
Disconnect the RKE Module harness connector.
Turn the ignition on.
Using a 12-volt test light connected to ground, probe the Fused Ignition Switch
Output circuit.
Is the test light illuminated?
Yes
→ Go To
No
→ Repair the Fused Ignition Switch Output circuit for an open.
Perform BODY VERIFICATION TEST - VER 1.
4
117
All
COMMUNICATION
*NO RESPONSE FROM RKE —
Continued
TEST
ACTION
APPLICABILITY
4
Note: Ensure there is PCI Bus communication with other modules on the
vehicle before proceeding. If not, refer to the symptom list from the menu
and repair as necessary.
Disconnect the RKE Module harness connector.
Use Scope input cable CH7058, Cable to Probe adapter CH7062, and the red and
black test probes.
Connect the scope input cable to the channel one connector on the DRB. Attach the
red and black leads and the cable to probe adapter to the scope input cable.
With the DRBIIIt select Pep Module Tools.
Select lab scope.
Select Live Data.
Select 12 volt square wave.
Press F2 for Scope.
Press F2 and use the down arrow to set voltage range to 20 volts. Set probe to x10.
Press F2 again when complete.
Connect the Black lead to the chassis ground. Connect the Red lead to the PCI Bus
circuit in the RKE Module connector.
Turn the ignition on.
Observe the voltage display on the DRB Lab Scope.
Does the voltage pulse from 0 to approximately 7.5 volts?
All
Yes
→ Replace the Remote Keyless Entry Module in accordance with the
service information.
Perform BODY VERIFICATION TEST - VER 1.
No
→ Repair the PCI Bus circuit for an open.
Perform BODY VERIFICATION TEST - VER 1.
118
COMMUNICATION
Symptom:
*NO RESPONSE FROM SENTRY KEY IMMOBILIZER MODULE
POSSIBLE CAUSES
ATTEMPT TO COMMUNICATE WITH THE MIC
GROUND CIRCUIT OPEN
FUSED IGNITION SWITCH OUTPUT CIRCUIT OPEN
FUSED B(+) CIRCUIT OPEN
OPEN PCI BUS CIRCUIT
SENTRY KEY IMMOBILIZER MODULE
TEST
1
2
3
4
ACTION
Turn the ignition on.
With the DRB, enter Body then Electro/Mech Cluster (MIC).
Was the DRB able to I/D or communicate with the MIC?
Yes
→ Go To
No
→ Refer to the symptom list for problems related to no communication with the MIC.
Perform SKIS VERIFICATION.
APPLICABILITY
All
2
Turn the ignition off.
Disconnect the SKIM harness connector.
Measure the resistance between ground and the ground circuit.
Is the resistance below 5.0 ohms?
Yes
→ Go To
No
→ Repair the ground circuit for an open.
Perform SKIS VERIFICATION.
All
3
Turn the ignition off.
Disconnect the SKIM harness connector.
Turn the ignition on.
Using a 12-volt test light connected to ground, probe the Fused Ignition Switch
Output circuit.
Is the test light illuminated?
Yes
→ Go To
No
→ Repair the Fused Ignition Switch Output circuit for an open.
Perform SKIS VERIFICATION.
All
4
Turn the ignition off.
Disconnect the SKIM harness connector.
Using a 12-volt test light connected to ground, probe the Fused B(+) circuit.
Is the test light illuminated?
Yes
→ Go To
No
→ Repair the Fused B+ circuit for an open.
Perform SKIS VERIFICATION.
5
119
All
COMMUNICATION
*NO RESPONSE FROM SENTRY KEY IMMOBILIZER MODULE —
Continued
TEST
ACTION
APPLICABILITY
5
Note: Ensure there is PCI Bus communication with other modules on the
vehicle before proceeding. If not, refer to the symptom list from the menu
and repair as necessary.
Disconnect the SKIM harness connector.
Use Scope input cable CH7058, Cable to Probe adapter CH7062, and the red and
black test probes.
Connect the scope input cable to the channel one connector on the DRB. Attach the
red and black leads and the cable to probe adapter to the scope input cable.
With the DRBIIIt select Pep Module Tools.
Select lab scope.
Select Live Data.
Select 12 volt square wave.
Press F2 for Scope.
Press F2 and use the down arrow to set voltage range to 20 volts. Press F2 again
when complete.
Connect the Black lead to the chassis ground. Connect the Red lead to the PCI Bus
circuit in the SKIM connector.
Turn the ignition on.
Observe the voltage display on the DRB Lab Scope.
Does the voltage pulse from 0 to approximately 7.5 volts?
All
6
Yes
→ Go To
No
→ Repair the PCI Bus circuit for an open.
Perform SKIS VERIFICATION.
6
If there are no possible causes remaining, view repair.
Repair
Replace and program the Sentry Key Immobilizer Module in
accordance with the Service Information.
Perform SKIS VERIFICATION.
120
All
COMMUNICATION
Symptom:
*NO RESPONSE FROM TRANSMISSION CONTROL MODULE - NGC
POSSIBLE CAUSES
NO RESPONSE FROM TRANSMISSION CONTROL MODULE
FUSED IGNITION SWITCH OUTPUT CIRCUIT OPEN
FUSED B(+) CIRCUIT OPEN
GROUND CIRCUIT(S) OPEN
PCI BUS CIRCUIT OPEN
POWERTRAIN CONTROL MODULE
TEST
ACTION
APPLICABILITY
1
Turn the ignition on.
Note: As soon as one or more module communicates with the DRB, answer
the question.
With the DRB, attempt to communicate with the Instrument Cluster.
With the DRB, attempt to communicate with the Airbag Control Module.
Was the DRB able to I/D or establish communications with both of the modules?
All
2
Yes
→ Go To
No
→ Refer to the Communications category and perform the appropriate symptom.
Perform 40/41TE (NGC) TRANSMISSION VERIFICATION
TEST - VER 1.
2
Turn the ignition off.
Disconnect the PCM harness connectors.
CAUTION: DO NOT PROBE THE PCM HARNESS CONNECTORS. PROBING
THE PCM HARNESS CONNECTORS WILL DAMAGE THE PCM TERMINALS RESULTING IN POOR TERMINAL TO PIN CONNECTION. INSTALL
MILLER SPECIAL TOOL #8815 TO PERFORM DIAGNOSIS.
Turn the ignition on.
Using a 12-volt test light connected to ground, probe both Fused Ignition Switch
Output circuits (cavs 11 and 12) in the appropriate terminal of special tool #8815.
NOTE: The test light must illuminate brightly. Compare the brightness to
that of a direct connection to the battery.
Is the test light illuminated for both circuits?
Yes
→ Go To
No
→ Repair the Fused Ignition Switch Output circuit for an open.
Refer to the wiring diagrams located in the Service Information.
Perform 40/41TE (NGC) TRANSMISSION VERIFICATION
TEST - VER 1.
3
121
All
COMMUNICATION
*NO RESPONSE FROM TRANSMISSION CONTROL MODULE - NGC —
Continued
TEST
ACTION
APPLICABILITY
3
Turn the ignition off.
Disconnect the PCM harness connectors.
CAUTION: DO NOT PROBE THE PCM HARNESS CONNECTORS. PROBING
THE PCM HARNESS CONNECTORS WILL DAMAGE THE PCM TERMINALS RESULTING IN POOR TERMINAL TO PIN CONNECTION. INSTALL
MILLER SPECIAL TOOL #8815 TO PERFORM DIAGNOSIS.
Using a 12-volt test light connected to ground, probe the Fused B(+) circuit in the
appropriate terminal of special tool #8815.
NOTE: The test light must illuminate brightly. Compare the brightness to
that of a direct connection to the battery.
Is the test light illuminated?
All
4
Yes
→ Go To
No
→ Repair the Fused B(+) circuit for an open. Refer to the wiring
diagrams located in the Service Information.
Perform 40/41TE (NGC) TRANSMISSION VERIFICATION
TEST - VER 1.
4
Turn the ignition off.
Disconnect the PCM harness connectors.
CAUTION: DO NOT PROBE THE PCM HARNESS CONNECTORS. PROBING
THE PCM HARNESS CONNECTORS WILL DAMAGE THE PCM TERMINALS RESULTING IN POOR TERMINAL TO PIN CONNECTION. INSTALL
MILLER SPECIAL TOOL #8815 TO PERFORM DIAGNOSIS.
Using a 12-volt test light connected to 12-volts, probe each ground circuit in the
appropriate terminal of special tool #8815.
NOTE: The test light must illuminate brightly. Compare the brightness to
that of a direct connection to the battery.
Is the light illuminated at all ground circuits?
Yes
→ Go To
No
→ Repair the Ground circuit(s) for an open. Check the main ground
connection to engine block and/or chassis. Refer to the wiring
diagrams located in the Service Information.
Perform 40/41TE (NGC) TRANSMISSION VERIFICATION
TEST - VER 1.
5
122
All
COMMUNICATION
*NO RESPONSE FROM TRANSMISSION CONTROL MODULE - NGC —
Continued
TEST
ACTION
APPLICABILITY
5
Note: Ensure there is PCI Bus communication with other modules on the
vehicle before proceeding. If not, refer to the symptom list from the menu
and repair as necessary.
Disconnect the PCM harness connectors.
CAUTION: DO NOT PROBE THE PCM HARNESS CONNECTORS. PROBING
THE PCM HARNESS CONNECTORS WILL DAMAGE THE PCM TERMINALS RESULTING IN POOR TERMINAL TO PIN CONNECTION. INSTALL
MILLER SPECIAL TOOL #8815 TO PERFORM DIAGNOSIS.
Use Scope input cable CH7058, Cable to Probe adapter CH7062, and the red and
black test probes.
Connect the scope input cable to the channel one connector on the DRB. Attach the
red and black leads and the cable to probe adapter to the scope input cable.
With the DRBIIIt select Pep Module Tools.
Select lab scope.
Select Live Data.
Select 12 volt square wave.
Press F2 for Scope.
Press F2 and use the down arrow to set voltage range to 20 volts. Press F2 again
when complete.
Connect the Black lead to the chassis ground. Connect the Red lead to the PCI Bus
circuit in the appropriate terminal of special tool #8815.
Turn the ignition on.
Observe the voltage display on the DRB Lab Scope.
Does the voltage pulse from 0 to approximately 7.5 volts?
All
6
Yes
→ Go To
No
→ Repair the PCI Bus circuit for an open.
Perform 40/41TE (NGC) TRANSMISSION VERIFICATION
TEST - VER 1.
6
Using the schematics as a guide, inspect the wiring and connectors. Repair as
necessary. Pay particular attention to all power and ground circuits.
If there are no possible causes remaining, view repair.
Repair
Replace and program the Powertrain Control Module in accordance with the service information. WITH THE DRBIIIt PERFORM QUICK LEARN AND REPROGRAM PINION FACTOR.
Perform 40/41TE (NGC) TRANSMISSION VERIFICATION
TEST - VER 1.
123
All
COMMUNICATION
Symptom:
*PCI BUS COMMUNICATION FAILURE
POSSIBLE CAUSES
WIRING HARNESS INTERMITTENT
OPEN PCI BUS CIRCUIT AT THE DATA LINK CONNECTOR (DLC)
PCI BUS CIRCUIT SHORTED TO VOLTAGE
MODULE SHORT TO VOLTAGE
PCI BUS CIRCUIT SHORTED TO GROUND
MODULE SHORT TO GROUND
TEST
ACTION
APPLICABILITY
1
Note: Determine which modules this vehicle is equipped with before beginning.
Note: When attempting to communicate with any of the modules on this
vehicle, the DRB will display 1 of 2 different communication errors: a NO
RESPONSE message or a BUS +/- SIGNALS OPEN message.
Turn the ignition on.
Using the DRB, attempt to communicate with the following control modules:
Airbag Control Module
SKIM (SENTRY KEY IMMOBILIZER)
MIC (INSTRUMENT CLUSTER)
Was the DRBIIIt able to communicate with one or more Module(s)?
All
2
Yes
→ Go To
2
No
→ Go To
3
Turn the ignition off.
Note: Visually inspect the related wiring harness. Look for any chafed,
pierced, pinched, or partially broken wires.
Note: Visually inspect the related wire harness connectors. Look for broken,
bent, pushed out, or corroded terminals.
Note: If the DRB can not communicate with a single module, refer to the
category list for the related symptom.
Were any problems found?
Yes
→ Repair wiring harness/connectors as necessary.
Perform BODY VERIFICATION TEST - VER 1.
No
→ Test Complete.
124
All
COMMUNICATION
*PCI BUS COMMUNICATION FAILURE —
Continued
TEST
ACTION
APPLICABILITY
3
Turn the ignition off.
Disconnect the PCM harness connector. Note: If equipped with NGC follow the
caution below.
CAUTION: DO NOT PROBE THE PCM HARNESS CONNECTORS. PROBING
THE PCM HARNESS CONNECTORS WILL DAMAGE THE PCM TERMINALS RESULTING IN POOR TERMINAL TO PIN CONNECTION. INSTALL
MILLER SPECIAL TOOL #8815 TO PERFORM DIAGNOSIS.
Disconnect the DRB from the Data Link Connector (DLC).
Disconnect the negative battery cable.
Measure the resistance of the PCI Bus circuit between the Data Link Connector
(DLC) and the PCM harness connector.
Is the resistance below 5.0 ohms?
All
4
5
Yes
→ Go To
No
→ Repair the PCI Bus circuit for an open.
Perform BODY VERIFICATION TEST - VER 1.
4
NOTE: Reconnect the PCM harness connector and the negative battery
cable.
Turn the ignition on.
Measure the voltage of the PCI Bus circuit at the Data Link Connector (DLC).
Is the voltage above 7.0 volts?
Yes
→ Go To
5
No
→ Go To
6
Turn the ignition off.
Using a voltmeter, connect one end to the PCI Bus circuit at the DLC, and the other
end to ground.
Note: When performing the next step turn the ignition off (wait one minute)
before disconnecting any module. When the module is disconnected turn
the ignition on to check for a short to voltage.
Turn the ignition on.
While monitoring the voltmeter, disconnect each module the vehicle is equipped with
one at a time.
Is the voltage steadily above 7.0 volts with all the modules disconnected?
Yes
→ Repair the PCI Bus circuit for a short to voltage.
Perform BODY VERIFICATION TEST - VER 1.
No
→ Replace the module that when disconnected the short to voltage
was eliminated.
Perform BODY VERIFICATION TEST - VER 1.
125
All
All
COMMUNICATION
*PCI BUS COMMUNICATION FAILURE —
Continued
TEST
ACTION
APPLICABILITY
6
Turn the ignition off.
Disconnect the negative battery cable.
Using a ohmmeter, connect one end to the PCI Bus circuit at the DLC, and the other
end to ground.
While monitoring the ohmmeter, disconnect each module the vehicle is equipped with
one at a time.
NOTE: Total bus resistance to ground thru all of the modules is typically
between 350 to 1000 ohms. The more modules on the bus, the lower the total
bus resistance will be.
Is the resistance below 150.0 ohms with all the modules disconnected?
All
Yes
→ Repair the PCI Bus circuit for a short to ground.
Perform BODY VERIFICATION TEST - VER 1.
No
→ Replace the module that when disconnected the short to ground
was eliminated.
Perform BODY VERIFICATION TEST - VER 1.
126
COMPASS/MINI-TRIP COMPUTER
Symptom:
COMPASS/TEMPERATURE MIRROR INTERNAL FAILURE
POSSIBLE CAUSES
COMPASS/TEMP MIRROR
TEST
1
ACTION
Perform the Compass/Temp Mirror Self-Check.
Turn the ignition on.
Press and hold the left lamp button for 20-25 seconds.
The display will illuminate each of the VF segments:
CAL
ZONE
N, NE, E, SE, S, SW, W, NW
The numerals 0 through 9
C° and F°
The Compass/Temp Mirror will test the memory and the compass.
Press the left lamp button or cycle the ignition to exit the Self-Check.
The Compass/Temp Mirror will display a 9P9 for Pass or an 9F9 for Fail.
Did the Compass/Temp Mirror display an 9F9 after the Self-Check?
Yes
→ Replace the Compass/Temp Mirror in accordance with the Service
Information.
Perform BODY VERIFICATION TEST - VER 1.
No
→ Test Complete.
127
APPLICABILITY
All
COMPASS/MINI-TRIP COMPUTER
Symptom:
*COMPASS/TEMPERATURE MIRROR DOES CALIBRATE
POSSIBLE CAUSES
CALIBRATION PROCEDURE
COMPASS/TEMPERATURE MIRROR
TEST
ACTION
APPLICABILITY
1
Perform the Compass/Temp Mirror Self-Check.
Turn the ignition on.
Depress and hold the Zone/Cal button (left reading lamp button) for 20 - 25 seconds.
Turn the ignition on and then release the STEP button.
NOTE: The Compass/Temp Module will illuminate all of the VF segments
and then display a (P( for Pass or an (F( for Fail.
Exit the self-check by depressing the Zone/Cal button or cycling the ignition.
Did the Compass/Temp Mirror display an 9F9 during the self-check?
All
Yes
→ Replace the Compass/Temp Mirror in accordance with the Service
Information. NOTE: After replacing the CTM, it must be calibrated to operate properly. Refer to Overhead Console in the
Service Information or 9CTM Does Not Calibrate9 in this section.
Perform BODY VERIFICATION TEST - VER 1.
No
→ Go To
2
128
COMPASS/MINI-TRIP COMPUTER
*COMPASS/TEMPERATURE MIRROR DOES CALIBRATE —
Continued
TEST
ACTION
APPLICABILITY
2
NOTE: Ensure that the vehicle has been properly demagnetized before
attempting to calibrate the compass. Refer to Overhead Console in the
Service Manual.
NOTE: The compass must be calibrated after any replacement or display
(lock-up(.
Calibrate the compass using the following steps:
Drive the vehicle to an area away from any large metal objects or overhead power
lines.
Ensure that the proper magnetic variance zone is stored in the compass memory.
Turn the ignition on and ensure that the compass display is not blank.
Depress and hold the STEP button for 5-10 seconds until 9ZONE9 appears in the
display, then release the STEP button.
The number displayed is the variance zone stored in the compass memory.
If necessary, refer to the Variance Map in Overhead Console in the Service Manual.
To change the variance zone, depress the STEP button to scroll through the zone
numbers 1-15 until the desired zone is displayed.
After selecting the proper zone, wait approximately 15 seconds for the compass
display to return to normal.
With the engine running, depress and hold the STEP button for 5-10 seconds, 9ZONE9
will appear, then 9CAL9.
Release the STEP button within 2 seconds of 9CAL9 illuminating.
With 9CAL9 displayed, drive slowly, less than 5 MPH (8 kPH) in 3 complete 360
degree circles.
9CAL9 will turn off and the compass will be calibrated.
Did the compass calibrate?
All
Yes
→ Test Complete.
No
→ Ensure that all calibration instructions have been followed carefully. Attempt to re-calibrate the compass, if unsuccessful, replace
the Compass/Temp Mirror in accordance with the Service Instructions.
Perform BODY VERIFICATION TEST - VER 1.
129
COMPASS/MINI-TRIP COMPUTER
Symptom:
*COMPASS/TEMPERATURE MIRROR INOPERATIVE
POSSIBLE CAUSES
NO RESPONSE - PCI BUS - COMPASS
FUSED B(+) CIRCUIT SHORT TO GROUND
FUSED B(+) CIRCUIT OPEN
FUSED IGNITION SWITCH OUTPUT CIRCUIT SHORT TO GROUND
FUSED IGNITION SWITCH OUTPUT CIRCUIT OPEN
GROUND CIRCUIT OPEN
COMPASS/TEMPERATURE MIRROR
TEST
ACTION
APPLICABILITY
1
Turn the ignition on.
With the DRBIIIt, attempt to I/D or communicate with the Compass/Temperature
Mirror.
Was the DRBIIIt able to communicate with the Compass/Temperature Mirror.
All
2
3
Yes
→ Go To
No
→ Refer to Communications for the related symptom(s).
Perform BODY VERIFICATION TEST - VER 1.
2
Turn the ignition off.
Remove and inspect the #4 Fuse in the Fuse Block.
If the fuse is open, replace with the proper rated fuse.
Turn the ignition on for approximately 1 minute.
Turn the ignition off.
Remove and inspect the #4 Fuse in the Fuse Block.
Is the #4 Fuse open?
Yes
→ Check the Fused B(+) circuit for a short to ground and repair as
necessary. If the Fused B(+) circuit is not shorted to ground,
replace the Compass/Temperature Mirror.
Perform BODY VERIFICATION TEST - VER 1.
No
→ Go To
All
3
Turn the ignition off.
Remove and inspect the #7 Fuse in the Fuse Block.
If the fuse is open, replace with the proper rated fuse.
Turn the ignition on for approximately 1 minute.
Turn the ignition off.
Remove and inspect the #7 Fuse in the Fuse Block.
Is the #7 Fuse open?
Yes
→ Check the Fused Ignition Switch Output circuit for a short to
ground and repair as necessary. If the Fused Ignition Switch
Output circuit is not shorted to ground, replace the Compass/
Temperature Mirror.
Perform BODY VERIFICATION TEST - VER 1.
No
→ Go To
4
130
All
COMPASS/MINI-TRIP COMPUTER
*COMPASS/TEMPERATURE MIRROR INOPERATIVE —
TEST
4
5
6
Continued
ACTION
Turn the ignition off.
Disconnect the Compass/Temperature Mirror harness connector.
Measure the voltage between the Fused B(+) circuit and ground.
Is the voltage below 10.5 volts?
Yes
→ Repair the Fused B(+) circuit for an open.
Perform BODY VERIFICATION TEST - VER 1.
No
→ Go To
APPLICABILITY
All
5
Turn the ignition off.
Disconnect the Compass/Temperature Mirror harness connector.
Turn the ignition on.
Measure the voltage between the Fused Ignition Switch Output circuit and ground.
Is the voltage below 10.5 volts?
Yes
→ Repair the Fused Ignition Switch Output circuit for an open.
Perform BODY VERIFICATION TEST - VER 1.
No
→ Go To
All
6
Turn the ignition off.
Disconnect the Compass/Temperature Mirror harness connector.
Measure the resistance between ground and the Compass/Temperature Mirror
Ground circuit.
Is the resistance above 5.0 ohms?
Yes
→ Repair the Ground circuit for an open.
Perform BODY VERIFICATION TEST - VER 1.
No
→ Replace the Compass/Temperature Mirror in accordance with the
Service Information.
Perform BODY VERIFICATION TEST - VER 1.
131
All
COMPASS/MINI-TRIP COMPUTER
Symptom:
*TEMPERATURE DISPLAY INOPERATIVE OR WRONG (2.0L ONLY)
POSSIBLE CAUSES
DTC PRESENT IN PCM
AMBIENT TEMPERATURE SENSOR
COMPASS/TEMPERATURE MIRROR
TEST
1
2
ACTION
With the DRBIIIt, read DTCs.
Does the DRBIIIt display any PCM Ambient Temp DTCs?
Yes
→ Refer to DRIVEABILITY for the related symptom(s).
Perform BODY VERIFICATION TEST - VER 1.
No
→ Go To
APPLICABILITY
All
2
Turn the ignition off.
Disconnect the Ambient Temperature Sensor harness connector.
Measure the Ambient Temperature Sensor using the following values:
10°C (50°F) Sensor Resistance = 17.99 - 21.81 Kilohms
20°C (68°F) Sensor Resistance = 11.37 - 13.61 Kilohms
25°C (77°F) Sensor Resistance = 9.12 - 10.88 Kilohms
30°C (86°F) Sensor Resistance = 7.37 - 8.75 Kilohms
40°C (104°F) Sensor Resistance = 4.90 - 5.75 Kilohms
50°C (122°F) Sensor Resistance = 3.33 - 3.88 Kilohms
Does the Ambient Temperature Sensor resistance measure between the min/max
specifications?
Yes
→ Replace the Compass/Temp Mirror in accordance with the Service
Information.
Perform BODY VERIFICATION TEST - VER 1.
No
→ Replace the Ambient Temperature Sensor in accordance with the
Service Information.
Perform BODY VERIFICATION TEST - VER 1.
132
All
EXTERIOR LIGHTING
Symptom:
*HIGH BEAM HEADLAMPS WILL NOT TRN ON
POSSIBLE CAUSES
OPEN FUSED B+
DIMMER SWITCH LOW BEAM OUTPUT CIRCUIT SHORT TO GROUND
DIMMER SWITCH HIGH BEAM OUTPUT CIRCUIT SHORT TO GROUND
OPEN FUSE
DIMMER SWITCH LOW BEAM OUTPUT CIRCUIT OPEN
INSTRUMENT CLUSTER
MULTIFUNCTION SWITCH
TEST
1
2
3
4
ACTION
Remove Circuit Breaker 2 from the Fuse Block.
Measure voltage of the Fused B+ circuit at the Circuit Breaker connector.
Is the voltage above 10.0 volts?
Yes
→ Go To
No
→ Repair the open Fused B+ circuit from Fuse Block fuse 15.
Perform BODY VERIFICATION TEST - VER 1.
APPLICABILITY
All
2
Check fuse 15 in the Fuse Block.
Is fuse 15 open?
Yes
→ Go To
3
No
→ Go To
5
All
Remove fuse 15 from the Fuse Block.
Disconnect the Multifunction Switch connector.
Measure resistance of the Dimmer Switch Low Beam Output Circuit to ground.
Is the resistance below 5.0 ohms?
Yes
→ Repair the Dimmer Switch Low Beam Output Circuit for a short
to ground condition.
Perform BODY VERIFICATION TEST - VER 1.
No
→ Go To
All
4
Remove Circuit Breaker 2 from the Fuse Block.
Disconnect the Multifunction Switch connector.
Measure resistance of the Dimmer Switch High Beam Output Circuit and ground.
Is the resistance below 5.0 ohms?
Yes
→ Repair the Dimmer Switch High Beam Output Circuit for a short
to ground condition.
Perform BODY VERIFICATION TEST - VER 1.
No
→ Go To
5
133
All
EXTERIOR LIGHTING
*HIGH BEAM HEADLAMPS WILL NOT TRN ON —
TEST
5
6
7
Continued
ACTION
Turn the ignition off.
Check Circuit Breaker 2
Is Circuit Breaker 2 open?
APPLICABILITY
All
Yes
→ Replace the open Fuse.
Perform BODY VERIFICATION TEST - VER 1.
No
→ Go To
6
Disconnect the Multifunction Switch connector.
Turn the headlamps on.
Measure voltage of the Fused B+ Circuit in the Multifunction Switch connector.
Is the voltage below 1.0 volt.
Yes
→ Go To
No
→ Repair the Dimmer Switch Low Beam Output Circuit for an open
condition.
Perform BODY VERIFICATION TEST - VER 1.
All
7
Disconnect the Multifunction Switch connector.
Turn the headlamps on.
Connect a jumper wire between the Dimmer Switch Low Beam Output Circuit and
the Dimmer Switch High Beam Output Circuit in the Multifunction Switch connector.
Did the High Beam Headlamps come on?
Yes
→ Replace the Instrument cluster.
Perform BODY VERIFICATION TEST - VER 1.
No
→ Replace the Multifunction Switch.
Perform BODY VERIFICATION TEST - VER 1.
134
All
EXTERIOR LIGHTING
Symptom:
*HIGH BEAM HEADLAMPS WILL NOT TURN OFF
POSSIBLE CAUSES
DIMMER SWITCH HIGH BEAM OUTPUT CIRCUIT SHORT TO VOLTAGE
INSTRUMENT CLUSTER
MULTIFUNCTION SWITCH
TEST
1
2
ACTION
Remove Circuit Breaker 2 from the Fuse Block.
Do the High Beam Headlamps turn off?
Yes
→ Go To
No
→ Repair the Dimmer Switch High Beam Output Circuit for a short
to voltage condition.
Perform BODY VERIFICATION TEST - VER 1.
APPLICABILITY
All
2
Disconnect the Instrument Cluster connector.
Disconnect the Multifunction Switch connector.
Measure resistance of the Dimmer Switch High Beam Output Circuit to ground.
Is the resistance below 5.0 ohms?
Yes
→ Replace the Instrument Cluster.
Perform BODY VERIFICATION TEST - VER 1.
No
→ Replace the Multifunction Switch.
Perform BODY VERIFICATION TEST - VER 1.
135
All
EXTERIOR LIGHTING
Symptom:
*LOW BEAM HEADLAMPS WILL NOT TURN OFF
POSSIBLE CAUSES
MULTIFUNCTION SWITCH
DIMMER SWITCH LOW BEAM OUTPUT CIRCUIT SHORT TO VOLTAGE
FUSE BLOCK
INSTRUMENT CLUSTER
TEST
1
2
3
ACTION
Turn the headlamp switch to the off position.
With the DRBIIIt, read the Headlamp Switch Voltage.
Does the DRBIIIt display Headlamp Switch Voltage between 4.3 and 4.8 Volts?
Yes
→ Go To
No
→ Replace the Multifunction Switch.
Perform BODY VERIFICATION TEST - VER 1.
APPLICABILITY
All
2
Turn the ignition off.
Disconnect the Instrument Cluster.
Turn the ignition on.
Measure voltage of the Dimmer Switch Low Beam Output Circuit.
Is the voltage below 1.0 volt?
Yes
→ Go To
No
→ Repair the Dimmer Switch Low Beam Output Circuit for a short
to voltage condition.
Perform BODY VERIFICATION TEST - VER 1.
All
3
Turn the ignition off.
Remove Circuit Breaker 2 from the Junction Block.
Disconnect the Instrument Cluster harness connector.
Measure resistance of the Dimmer Switch Low Beam Output Circuit and ground.
Is the resistance below 100.0 ohms?
Yes
→ Replace the Fuse Block.
Perform BODY VERIFICATION TEST - VER 1.
No
→ Replace the Instrument Cluster.
Perform BODY VERIFICATION TEST - VER 1.
136
All
EXTERIOR LIGHTING
Symptom:
*LOW BEAM HEADLAMPS WILL NOT TRN ON
POSSIBLE CAUSES
MULTIFUNCTION SWITCH
FUSE BLOCK
DIMMER SWITCH LOW BEAM OUTPUT CIRCUIT OPEN
INSTRUMENT CLUSTER
OPEN FUSED B+ TO FUSE BLOCK
FUSED B+ CIRCUIT SHORT TO GROUND
B+ CIRCUIT BREAKER 2
TEST
1
2
3
4
ACTION
Turn the Headlamps on.
With the DRBIIIt read the Headlamp Switch voltage.
Does the DRBIIIt display Headlamp Switch voltage below 5.0 volts?
Yes
→ Go To
No
→ Replace the Multifunction Switch.
Perform BODY VERIFICATION TEST - VER 1.
APPLICABILITY
All
2
Remove Circuit Breaker 2 from the Fuse Block.
Measure voltage of the Fused B+ circuit in the Circuit Breaker connector.
Is the voltage above 10.0 volts?
Yes
→ Go To
No
→ Replace the Fuse Block.
Perform BODY VERIFICATION TEST - VER 1.
All
3
Remove Circuit Breaker 2 from the Fuse Block.
Measure voltage of the Fused B+ Circuit in the Circuit Breaker connector.
Is the voltage above 10.0 volts?
Yes
→ Go To
4
No
→ Go To
5
Disconnect the Multifunction Switch harness connector.
Connect a 12 volt test light between the Dimmer Switch Low Beam Output Circuit
and the Fused B+ Circuit in the Multifunction Switch connector.
Did the test light illuminate brightly?
Yes
→ Repair the Dimmer Switch Low Beam Output Circuit for an open
condition.
Perform BODY VERIFICATION TEST - VER 1.
No
→ Replace the Instrument Cluster.
Perform BODY VERIFICATION TEST - VER 1.
137
All
All
EXTERIOR LIGHTING
*LOW BEAM HEADLAMPS WILL NOT TRN ON —
TEST
5
6
Continued
ACTION
Remove and test Fuse 15 from the Fuse Block.
Is the Fuse open?
Yes
→ Go To
No
→ Repair the open Fused B+ Circuit between the Multifunction
Switch and the Fuse Block.
Perform BODY VERIFICATION TEST - VER 1.
APPLICABILITY
All
6
Remove Circuit Breaker 2 from the Fuse Block.
Measure resistance of the Fused B+ circuit in the fuse connector to ground.
Is the resistance below 5.0 ohms?
Yes
→ Repair the Fused B+ Circuit for a short to ground condition.
Perform BODY VERIFICATION TEST - VER 1.
No
→ Replace the Circuit Breaker and retest the system.
Perform BODY VERIFICATION TEST - VER 1.
138
All
INSTRUMENT CLUSTER
Symptom List:
ABS INDICATOR CIRCUIT OPEN
AIRBAG INDICATOR CIRCUIT OPEN
Test Note:
All symptoms listed above are diagnosed using the same tests.
The title for the tests will be ABS INDICATOR CIRCUIT
OPEN.
When Monitored and Set Condition:
ABS INDICATOR CIRCUIT OPEN
When Monitored:
Set Condition:
indicator.
With the ignition on and requested to turn on by the ABS module.
The Instrument Cluster detects an open during the internal test on the
AIRBAG INDICATOR CIRCUIT OPEN
When Monitored:
Set Condition:
indicator.
With the ignition on and requested to turn on by the ACM.
The Instrument Cluster detects an open during the internal test on the
POSSIBLE CAUSES
INSTRUMENT CLUSTER
TEST
ACTION
APPLICABILITY
1
NOTE: The Instrument Cluster performs internal tests on the ABS and
Airbag indicators each ignition cycle. These indicator LEDs are not replaceable.
With the DRBIIIt, erase DTCs.
Cycle the ignition and wait approximately 1 minute.
Did the ABS or Airbag indicator DTC reset?
All
Yes
→ Replace the Instrument Cluster in accordance with the Service
Information.
Perform BODY VERIFICATION TEST - VER 1.
No
→ Test Complete.
139
INSTRUMENT CLUSTER
Symptom List:
ABS MESSAGE NOT RECEIVED
ACM MESSAGE NOT RECEIVED
EATX MESSAGE NOT RECEIVED
SBEC MESSAGE NOT RECEIVED
SKIM MESSAGE NOT RECEIVED
Test Note:
All symptoms listed above are diagnosed using the same tests.
The title for the tests will be ABS MESSAGE NOT RECEIVED.
When Monitored and Set Condition:
ABS MESSAGE NOT RECEIVED
When Monitored:
With the ignition in the Run/Start position.
Set Condition: The Instrument Cluster detects no PCI Bus message from the CAB
module for 12 (twelve) seconds.
ACM MESSAGE NOT RECEIVED
When Monitored:
With the ignition in the Run/Start position.
Set Condition: The Instrument Cluster detects no PCI Bus message from the AECM for
5 (five) seconds.
EATX MESSAGE NOT RECEIVED
When Monitored:
Set Condition:
(five) seconds.
With the ignition on.
The Instrument Cluster detects no PCI Bus message from the EATX for 5
SBEC MESSAGE NOT RECEIVED
When Monitored:
With the ignition in the Run/Start position.
Set Condition: The Instrument Cluster detects no PCI Bus message from the SBEC for
20 (twenty) seconds.
SKIM MESSAGE NOT RECEIVED
When Monitored:
With the ignition in the Run/Start position.
Set Condition: The Instrument Cluster detects no PCI Bus message from the SKIM
Module for 20 (twenty) seconds.
POSSIBLE CAUSES
BUS MESSAGE NOT RECEIVED DTC PRESENT
INTERMITTENT CONDITION
INSTRUMENT CLUSTER
140
INSTRUMENT CLUSTER
ABS MESSAGE NOT RECEIVED —
Continued
TEST
ACTION
APPLICABILITY
1
With the DRBIIIt, attempt to communicate with the ABS, ACM, EATX, SBEC, or
SKIM module.
Was the DRBIIIt able to I/D or communicate with the Module in question?
All
2
Yes
→ Go To
No
→ Refer to Communication category for the related symptom(s).
2
With the DRBIIIt, erase DTCs.
Cycle the ignition, wait approximately 1 minute.
With the DRBIIIt, read DTCs.
Did the DTC reset?
Yes
→ Replace the Instrument Cluster in accordance with the Service
Information.
Perform BODY VERIFICATION TEST - VER 1.
No
→ The condition is not present at this time. Monitor DRBIIIt
parameters while wiggling the related wire harness. Refer to any
Technical Service Buletins (TSB) that may apply. Visually inspect
the related wiring harness and connector terminals.
141
All
INSTRUMENT CLUSTER
Symptom:
BATTERY LOSS
When Monitored and Set Condition:
BATTERY LOSS
When Monitored:
With the ignition on.
Set Condition: When the Instrument Cluster detects that the ignition has been turned on
but detects no Fused B(+) circuit.
POSSIBLE CAUSES
PDC FUSE #13 DEFECTIVE
PDC FUSED B(+) CIRCUIT SHORT TO GROUND
FUSE BLOCK #4 FUSE DEFECTIVE
FUSE BLOCK FUSED B(+) CIRCUIT SHORT TO GROUND
B(+) TO PDC #13 FUSE OPEN
B(+) TO FUSE BLOCK #4 FUSE OPEN
FUSED B(+) CIRCUIT TO INSTRUMENT CLUSTER OPEN
INSTRUMENT CLUSTER
TEST
1
2
ACTION
Turn the ignition off.
Remove and inspect the #13 Fuse in the PDC.
If the fuse is open, replace with the proper rated fuse.
Turn the ignition on for approximately 1 minute.
Turn the ignition off.
Remove and inspect the #13 Fuse in the PDC.
Is the #13 Fuse in the PDC open?
Yes
→ Repair the PDC #13 Fused B(+) circuit for a short to ground.
Perform BODY VERIFICATION TEST - VER 1.
No
→ Go To
APPLICABILITY
All
2
Turn the ignition off.
Remove and inspect the Fuse Block #4 Fuse.
If the fuse is open, replace with the proper rated fuse.
Turn the ignition on for approximately 1 minute.
Turn the ignition off.
Remove and inspect the Fuse Block #4 Fuse.
Is the Fuse Block #4 Fuse open?
Yes
→ Repair the Fuse Block Fused B(+) circuit for a short to ground.
Perform BODY VERIFICATION TEST - VER 1.
No
→ Go To
3
142
All
INSTRUMENT CLUSTER
BATTERY LOSS —
Continued
TEST
3
4
5
ACTION
Turn the ignition off.
Measure the voltage between the PDC #13 Fuse and ground.
Is the voltage above 10.5 volts?
Yes
→ Go To
No
→ Repair the B(+) circuit to the PDC #13 Fuse for an open.
Perform BODY VERIFICATION TEST - VER 1.
APPLICABILITY
All
4
Turn the ignition off.
Measure the voltage between the Fuse Block #4 Fuse and ground.
Is the voltage above 10.5 volts?
Yes
→ Go To
No
→ Repair the B(+) circuit to the Fuse Block #4 Fuse for an open.
Perform BODY VERIFICATION TEST - VER 1.
All
5
Turn the ignition off.
Disconnect the Instrument Cluster harness connector.
Check connectors - Clean/repair as necessary.
Measure the voltage between the Fused B(+) circuit and ground.
Is the voltage above 10.5 volts?
Yes
→ Replace the Instrument Cluster in accordance with the Service
Information.
Perform BODY VERIFICATION TEST - VER 1.
No
→ Repair the Fused B(+) circuit for an open between the Fuse Block
#4 Fuse and the Instrument Cluster.
Perform BODY VERIFICATION TEST - VER 1.
143
All
INSTRUMENT CLUSTER
Symptom List:
CLUSTER BUS TX SHUTDOWN
NO PCI BUS TRANSMISSION
Test Note:
All symptoms listed above are diagnosed using the same tests.
The title for the tests will be CLUSTER BUS TX SHUTDOWN.
When Monitored and Set Condition:
CLUSTER BUS TX SHUTDOWN
When Monitored:
Set Condition:
Continuous.
The Instrument Cluster fails the loop- back test on the PCI Bus.
NO PCI BUS TRANSMISSION
When Monitored:
Set Condition:
Bus.
Continous.
The Instrument Cluster microprocessor fails the loop- back test on the PCI
POSSIBLE CAUSES
INSTRUMENT CLUSTER
TEST
1
ACTION
With the DRBIIIt, erase DTCs.
Cycle the ignition and wait approximately 1 minute.
With the DRBIIIt, read DTCs.
Did this DTC reset?
Yes
→ Replace the Instrument Cluster in accordance with the Service
Information.
Perform BODY VERIFICATION TEST - VER 1.
No
→ Test Complete.
144
APPLICABILITY
All
INSTRUMENT CLUSTER
Symptom:
EATX MISMATCH
When Monitored and Set Condition:
EATX MISMATCH
When Monitored:
With the ignition on.
Set Condition: The Instrument Cluster detects that the configuration programmed by the
plant does not equal the configuration of the cluster.
POSSIBLE CAUSES
EATX BUS MESSAGE DTC PRESENT
INSTRUMENT CLUSTER CONFIGURATION INCORRECT
INSTRUMENT CLUSTER
TEST
1
2
ACTION
With the DRBIIIt, read DTCs.
Does the DRBIIIt display 9EATX Bus Message Not Received9?
Yes
→ Refer to Communication for the related symptom.
No
→ Go To
APPLICABILITY
All
2
With the DRBIIIt in Cluster Type, ensure that the Instrument Cluster is correctly
configured.
Is the Instrument Cluster configured correctly?
Yes
→ Replace the Instrument Cluster in accordance with the Service
Information.
Perform BODY VERIFICATION TEST - VER 1.
No
→ With the DRBIIIt, configure the Instrument Cluster.
Perform BODY VERIFICATION TEST - VER 1.
145
All
INSTRUMENT CLUSTER
Symptom:
FUEL LEVEL SENSOR OPEN
When Monitored and Set Condition:
FUEL LEVEL SENSOR OPEN
When Monitored:
With the ignition on. (Customer Complaint: fuel gauge displays empty)
Set Condition: The Instrument Cluster monitors the Fuel Level Sensor Signal circuit
resistance. If the Cluster detects a resistance greater than 1500 ohms or less than 25 ohms
for 18 seconds, this code will set.
POSSIBLE CAUSES
INTERMITTENT CONDITION
FUEL LEVEL SENSOR SIGNAL CIRCUIT SHORT TO VOLTAGE
FUEL LEVEL SENSOR SIGNAL CIRCUIT OPEN
FUEL PUMP MODULE GROUND CIRCUIT OPEN
FUEL LEVEL SENSOR
INSTRUMENT CLUSTER
TEST
1
2
ACTION
Turn the ignition on.
With the DRBIIIt, erase DTC’s.
Cycle the ignition off and then back on.
With the DRBIIIt, read DTC’s.
Does the DRBIIIt display 9Fuel Level Sensor Open9?
No
→ Test complete. DTC is intermittent. Road test the vehicle and
recheck for DTC’s. If the code returns, rerun this test. Refer to any
Technical Service Bulletins (TSB) that may aply. Inspect related
harness and connectors.
Perform BODY VERIFICATION TEST - VER 1.
Yes
→ Go To
APPLICABILITY
All
2
Turn the ignition off.
Disconnect the Fuel Pump Module harness connector.
Disconnect the Instrument Cluster harness connector.
Check connectors - Clean/repair as necessary.
Turn the ignition on.
NOTE: The ignition must be turned off for at least 10 minutes to allow the
cluster to go to (sleep( before proceeding with this test.
Measure the voltage between the Fuel Level Sensor Signal circuit and ground.
Is there any voltage present?
Yes
→ Repair the Fuel Level Sensor Signal circuit for a short to voltage.
Perform BODY VERIFICATION TEST - VER 1.
No
→ Go To
3
146
All
INSTRUMENT CLUSTER
FUEL LEVEL SENSOR OPEN —
TEST
3
4
5
Continued
ACTION
Turn the ignition off.
Disconnect the Fuel Pump Module harness connector.
Check connectors - Clean/repair as necessary.
Connect a jumper wire between the Fuel Level Sensor Signal circuit and ground.
Turn the ignition on.
With the DRBIIIt in Sensors, read the Fuel Sender Volts.
Does the DRBIIIt display 0 (zero) volts?
Yes
→ Go To
No
→ Repair the Fuel Level Sensor Signal circuit for an open.
Perform BODY VERIFICATION TEST - VER 1.
APPLICABILITY
All
4
Turn the ignition off.
Disconnect the Fuel Pump Module harness connector.
Check connectors - Clean/repair as necessary.
Measure the resistance between ground and the Fuel Level Sensor Ground circuit.
Is the resistance below 5.0 ohms?
Yes
→ Go To
No
→ Repair the Fuel Pump Module Ground circuit for an open.
Perform BODY VERIFICATION TEST - VER 1.
All
5
Turn the ignition off.
Disconnect the Fuel Pump Module harness connector.
Check connectors - Clean/repair as necessary.
Measure the resistance of the Fuel Level Sensor between the Sensor Signal circuit
pin and the Sensor Ground circuit pin.
Is the resistance above 1500 ohms?
Yes
→ Replace the Fuel Level Sender in accordance with the Service
Information.
Perform BODY VERIFICATION TEST - VER 1.
No
→ Replace the Instrument Cluster in accordance with the Service
Information.
Perform BODY VERIFICATION TEST - VER 1.
147
All
INSTRUMENT CLUSTER
Symptom:
FUEL LEVEL SENSOR SHORT
When Monitored and Set Condition:
FUEL LEVEL SENSOR SHORT
When Monitored:
empty).
When the ignition is on. (Customer Complaint: fuel gauge displays
Set Condition: The Instrument Cluster monitors the fuel level sensor signal circuit for a
resistance value between approximately 25 ohms to 1100 ohms. If the Cluster senses a
resistance less than 25 ohms, this code will set.
POSSIBLE CAUSES
FUEL LEVEL SENSOR SHORT INTERMITTENT CONDITION
FUEL LEVEL SENSOR
FUEL LEVEL SENSOR SIGNAL CIRCUIT SHORT TO SENSOR GROUND CIRCUIT
INSTRUMENT CLUSTER
TEST
1
2
ACTION
With
Turn
With
Does
the
the
the
the
DRBIIIt, erase DTC’s.
ignition on, wait for one minute.
DRBIIIt, read DTC’s.
DRBIIIt display Fuel Level Sensor Short?
No
→ Test complete. DTC is intermittent. Road test the vehicle and
recheck for DTC’s. If the code returns, rerun this test. Refer to any
Technical Service Bulletins (TSB) that may apply. Inspect related
harness and connectors.
Perform BODY VERIFICATION TEST - VER 1.
Yes
→ Go To
APPLICABILITY
All
2
Turn the ignition off.
Disconnect the Fuel Pump Module harness connector.
Check connectors - Clean/repair as necessary.
Measure the resistance of the Fuel Level Sensor between the Sensor Signal circuit
pin and the Sensor Ground circuit pin (sensor side).
Is the resistance below 50.0 ohms?
Yes
→ Replace the Fuel Level Sensor in accordance with the Service
Information.
Perform BODY VERIFICATION TEST - VER 1.
No
→ Go To
3
148
All
INSTRUMENT CLUSTER
FUEL LEVEL SENSOR SHORT —
TEST
3
Continued
ACTION
Turn the ignition off.
Disconnect the Instrument Cluster harness connector.
Disconnect the Fuel Pump Module harness connector.
Check connectors - Clean/repair as necessary.
Measure the resistance of the Fuel Level Sensor Signal circuit to ground.
Is the resistance below 10,000 (10 K) ohms? NOTE: it should be infinite.
Yes
→ Repair the Fuel Level Sensor Signal circuit for a short to the
Sensor Ground circuit.
Perform BODY VERIFICATION TEST - VER 1.
No
→ Test Complete.
149
APPLICABILITY
All
INSTRUMENT CLUSTER
Symptom:
PANEL DIMMER OPEN
When Monitored and Set Condition:
PANEL DIMMER OPEN
When Monitored:
When the ignition is on.
Set Condition: The Instrument Cluster monitors the panel lamps dimmer signal circuit
for a resistance value between 0.0 ohms and approximately 3,650 ohms. When the cluster
senses a value greater than 30,000 ohms for more than 5 seconds, this code will set. When
this condition occurs, the cluster illumination will default to full brightness.
POSSIBLE CAUSES
INTERMITTENT CONDITION
PANEL LAMPS DIMMER SIGNAL CIRCUIT SHORT TO VOLTAGE
PANEL LAMPS DIMMER SIGNAL CIRCUIT OPEN
MULTI- FUNCTION SWITCH
MULTI- FUNCTION SWITCH GROUND CIRCUIT OPEN
INSTRUMENT CLUSTER
TEST
1
2
ACTION
With the DRBIIIt, erase DTC’s.
Turn the Park Lamps on.
Wait 10 (ten) seconds.
Rotate the Panel Lamps Dimmer Switch through the full range of adjustment.
With the DRBIIIt, read DTC’s.
Does the DRBIIIt display Panel Dimmer Open?
Yes
→ Go To
No
→ The condition is not present at this time. Monitor DRBIIIt
parameters while wiggling the related wire harness. Refer to any
Technical Service Bulletins (TSB) that may apply. Visually inspect the related wiring harness and connector terminals.
Perform BODY VERIFICATION TEST - VER 1.
APPLICABILITY
All
2
Turn the ignition off.
Disconnect the Instrument Cluster harness connector.
Disconnect the Multi- function Switch harness connector.
Check connectors - Clean/repair as necessary.
Turn the ignition on.
Measure the voltage between the Panel Lamps Dimmer Signal circuit and ground.
Is there any voltage present?
Yes
→ Repair the Panel Lamps Dimmer Signal circuit for a short to
voltage.
Perform BODY VERIFICATION TEST - VER 1.
No
→ Go To
3
150
All
INSTRUMENT CLUSTER
PANEL DIMMER OPEN —
TEST
3
Continued
ACTION
Turn the ignition off.
Disconnect the Instrument Cluster harness connector.
Disconnect the Multi-Function Switch harness connector.
Check connectors - Clean/repair as necessary.
Measure the resistance of the Panel Lamps Dimmer Signal circuit.
Is the resistance below 5.0 ohms?
Yes
→ Go To
No
→ Repair the open in the Panel Lamps Dimmer Signal circuit.
Perform BODY VERIFICATION TEST - VER 1.
APPLICABILITY
All
4
NOTE: Reconnect the Multi-Function Switch harness connector before
proceeding.
4
5
Turn the ignition off.
Disconnect the Multi-Function Switch harness connector.
Check connectors - Clean/repair as necessary.
Measure the resistance of the Multi- Function Switch Ground circuit to a known good
ground.
Does the resistance measure less than 5.0 ohms?
Yes
→ Go To
No
→ Repair the open in the Multi- Function Switch Ground circuit.
Perform BODY VERIFICATION TEST - VER 1.
All
5
Turn the ignition off.
Disconnect the Instrument Cluster harness connector.
Ensure the Multi-Function Switch is connected before proceeding.
Measure the resistance of the Panel Lamps Dimmer Signal circuit from the
Instrument Cluster harness connector to ground.
Move the Instrument Panel Dimmer Switch through the entire range of adjustment
while observing the ohmmeter.
Did the resistance increment smoothly between approximately 0.0 ohms to approximately 3,500 ohms?
Yes
→ Replace the Instrument Cluster in accordance with the Service
Information.
Perform BODY VERIFICATION TEST - VER 1.
No
→ Replace the Multi-Function Switch in accordance with the Service
Information.
Perform BODY VERIFICATION TEST - VER 1.
151
All
INSTRUMENT CLUSTER
Symptom:
*ALL GAUGES INOPERATIVE
POSSIBLE CAUSES
NO RESPONSE - PCI BUS
NO RESPONSE - PCI BUS - POWERTRAIN CONTROL MODULE
NO RESPONSE - PCI BUS - INSTRUMENT CLUSTER
FUSED IGNITION SWITCH OUTPUT CIRCUIT SHORT TO GROUND
FUSED IGNITION SWITCH OUTPUT CIRCUIT OPEN
INSTRUMENT CLUSTER GROUND CIRCUIT OPEN
INSTRUMENT CLUSTER
TEST
1
2
3
ACTION
Turn the ignition on.
With the DRBIIIt, select System Monitors, then J1850 Module Scan.
Does the DRBIIIt display MIC PRESENT on the BUS?
Yes
→ Go To
No
→ Refer to the COMMUNICATION category and perform the appropriate symptom.
APPLICABILITY
All
2
Turn the ignition on.
With the DRBIIIt, select Body, MIC, SYSTEM TESTS, PCM Monitor.
Does the DRBIIIt display PCM INACTIVE ON THE BUS?
Yes
→ Refer to the symptom list for problems related to *NO RESPONSE FROM THE POWERTRAIN CONTROL MODULE.
No
→ Go To
All
3
Turn the ignition on.
With the DRBIIIt, select Body, MIC, MODULE DISPLAY.
Does the DRBIIIt display NO RESPONSE from MIC?
Yes
→ Refer to the symptom list for problems related to *NO RESPONSE FROM THE INSTRUMENT CLUSTER.
No
→ Go To
4
152
All
INSTRUMENT CLUSTER
*ALL GAUGES INOPERATIVE —
Continued
TEST
ACTION
APPLICABILITY
4
Turn the ignition off.
Inspect the #11 Fuse in the Fuse Block for LHD vehicles (#12 Fuse for LHD autostick
equipped vehicles); #10 Fuse in the Fuse Block for RHD vehicles (#9 Fuse for RHD
autostick equipped vehicles).
If the fuse is open, replace with proper rated fuse.
Turn the ignition on for one minute.
Turn the ignition off.
Inspect the #11 Fuse in the Fuse Block for LHD vehicles (#12 Fuse for LHD autostick
equipped vehicles); #10 Fuse in the Fuse Block for RHD vehicles (#9 Fuse for RHD
autostick equipped vehicles).
Is the fuse open?
All
5
6
Yes
→ Repair the Fused Ignition Switch Output circuit for a short to
ground.
Perform BODY VERIFICATION TEST - VER 1.
No
→ Go To
5
Turn the ignition off.
Disconnect the Instrument Cluster harness connector.
Turn the ignition on.
Measure the voltage between the Fused Ignition Switch Output circuit (pin 15) and
ground. For autostick equipped vehicles, also measure the voltage between the Fused
Ignition Switch Output circuit (pin 9) and ground.
Is the voltage above 10.5 volts?
Yes
→ Go To
No
→ Repair the Fused Ignition Switch Output circuit for an open.
Perform BODY VERIFICATION TEST - VER 1.
All
6
Turn the ignition off.
Disconnect the Instrument Cluster harness connector.
Measure the resistance between ground and the Instrument Cluster Ground circuit.
Is the resistance below 5.0 ohms?
Yes
→ Replace the Instrument Cluster in accordance with the Service
Information.
Perform BODY VERIFICATION TEST - VER 1.
No
→ Repair the Instrument Cluster Ground circuit for an open.
Perform BODY VERIFICATION TEST - VER 1.
153
All
INSTRUMENT CLUSTER
Symptom:
*ANY OR ALL GAUGE POINTER(S) ON WRONG SIDE OF STOP
POSSIBLE CAUSES
INSTRUMENT CLUSTER
TEST
ACTION
APPLICABILITY
1
To repair any or all gauges with the pointer on the wrong side of the stop, perform
either of the following procedures:
Procedure 1:
Turn the ignition off.
Remove the #4 Fuse from the Fuse Block.
Turn the ignition on, then off.
Reinstall the #4 Fuse to the Fuse Block.
Procedure 2:
Perform the Instrument Cluster self-test.
Turn the ignition off.
Press and hold the Trip Reset button.
Turn the ignition on.
Did the gauge pointer(s) in question return to the proper position?
All
Yes
→ Test Complete.
No
→ Replace the Instrument Cluster in accordance with the Service
Information.
Perform BODY VERIFICATION TEST - VER 1.
154
INSTRUMENT CLUSTER
Symptom:
*ANY PCI BUS INDICATOR INOPERATIVE
POSSIBLE CAUSES
*LED DEFECTIVE
INSTRUMENT CLUSTER
TEST
ACTION
APPLICABILITY
1
NOTE: Refer to the Service Information: Diagnosis and Testing - Instrument
Cluster Lamps for complete list of Indicators that will illuminate during the
Self Test.
NOTE: Ensure that the Instrument Cluster communicates on the PCI Bus.
NOTE: Diagnose and repair any PCM, ACM, ABS, RKE, or SKIM DTCs before
proceeding with this test.
Turn the ignition off.
Remove the Instrument Cluster.
Remove the inoperative LED from the Instrument Cluster.
Using a DVOM, select 9Diode Mode9, and connect the leads across the LED.
NOTE: Ensure that the RED lead is on the (+( of the LED.
Did the LED illuminate?
All
Yes
→ Replace the Instrument Cluster in accordance with the Service
Information.
Perform BODY VERIFICATION TEST - VER 1.
No
→ Replace the Indicator LED in accordance with the Service Information.
Perform BODY VERIFICATION TEST - VER 1.
155
INSTRUMENT CLUSTER
Symptom:
*BRAKE WARNING INDICATOR ALWAYS ON
POSSIBLE CAUSES
BRAKE WARNING INDICATOR CIRCUIT SHORT TO GROUND
RED BRAKE WARNING INDICATOR DRIVER CIRCUIT SHORT TO GROUND
PARK BRAKE SWITCH
BRAKE FLUID LEVEL SWITCH
INSTRUMENT CLUSTER
POWERTRAIN CONTROL MODULE
TEST
1
2
3
ACTION
Turn the ignition on.
Ensure that the Parking Brake is disengaged.
With the DRBIIIt in Inputs/Outputs, read the Parking Brake Switch state.
Does the DRBIIIt display 9Closed9 with the Parking Brake disengaged?
Yes
→ Go To
2
No
→ Go To
4
Turn the ignition off.
Disconnect the Park Brake Switch harness connector.
Turn the ignition on.
With the DRBIIIt in Inputs/Outputs, read the Parking Brake Switch state.
Does the DRBIIIt display 9Open9?
Yes
→ Replace the Park Brake Switch in accordance with the Service
Information.
Perform BODY VERIFICATION TEST - VER 1.
No
→ Go To
APPLICABILITY
All
All
3
Turn the ignition off.
Disconnect the Park Brake Switch harness connector.
Disconnect the Instrument Cluster harness connector.
Measure the resistance between ground and the Brake Warning Indicator Driver
circuit.
Is the resistance below 10,000 ohms (should be infinite)?
Yes
→ Repair the Brake Warning Indicator circuit for a short to ground
(between the Park Brake Switch and the Instrument Cluster).
Perform BODY VERIFICATION TEST - VER 1.
No
→ Replace the Instrument Cluster in accordance with the Service
Information.
Perform BODY VERIFICATION TEST - VER 1.
156
All
INSTRUMENT CLUSTER
*BRAKE WARNING INDICATOR ALWAYS ON —
Continued
TEST
ACTION
APPLICABILITY
4
NOTE: Ensure that the brake fluid is properly filled to the correct level, and
the Base Brake system operates properly.
Turn the ignition on.
With the DRBIIIt in Inputs/Outputs, read the Brake Fluid Level Switch state.
Disconnect the Brake Fluid Level Switch harness connector.
With the DRBIIIt in Inputs/Outputs, read the Brake Fluid Level Switch state.
Did the DRBIIIt Brake Fluid Level Switch input change states?
All
5
Yes
→ Replace the Brake Fluid Level Switch in accordance with the
Service Information.
Perform BODY VERIFICATION TEST - VER 1.
No
→ Go To
5
Turn the ignition off.
Disconnect the Brake Fluid Level Switch harness connector.
Disconnect the PCM (C2 connector for 2.0L vehicles) harness connector.
Measure the resistance between ground and the Red Brake Warning Indicator Driver
circuit.
Is the resistance below 10,000 ohms (should be infinite)?
Yes
→ Repair the Red Brake Warning Indicator Driver circuit for a short
to ground (between the Brake Fluid Level Switch and the Instrument Cluster).
Perform BODY VERIFICATION TEST - VER 1.
No
→ Test Complete.
157
All
INSTRUMENT CLUSTER
Symptom:
*BRAKE WARNING INDICATOR INOPERATIVE
POSSIBLE CAUSES
BRAKE WARNING INDICATOR CIRCUIT OPEN
INDICATOR LED
BRAKE FLUID LEVEL SWITCH
PARK BRAKE SWITCH
RED BRAKE WARNING INDICATOR DRIVER CIRCUIT OPEN
BRAKE FLUID LEVEL SWITCH GROUND CIRCUIT OPEN
INSTRUMENT CLUSTER
POWERTRAIN CONTROL MODULE
TEST
ACTION
APPLICABILITY
1
NOTE: The Brake Warning Indicator should illuminate during the bulb
check cycle, and will also illuminate using the Self Test.
Observe the Brake Warning Indicator during the bulb check or Instrument Cluster
Self Test.
Did the indicator illuminate?
All
2
3
Yes
→ Go To
2
No
→ Go To
8
NOTE: The Brake Warning Indicator illuminates with the Park Brake
engaged or with low Brake Fluid.
Is the Brake Warning Indicator inoperative with the use of the Park brake?
Yes
→ Go To
3
No
→ Go To
5
Turn the ignition off.
Disconnect the Park Brake Switch harness connector.
Connect a jumper wire between the Brake Warning Indicator circuit and ground.
Turn the ignition on and observe the Brake Warning Indicator.
Does the Indicator illuminate?
Yes
→ Replace the Park Brake Switch in accordance with the Service
Information.
Perform BODY VERIFICATION TEST - VER 1.
No
→ Go To
4
158
All
All
INSTRUMENT CLUSTER
*BRAKE WARNING INDICATOR INOPERATIVE —
TEST
4
5
6
7
Continued
ACTION
Turn the ignition off.
Disconnect the Instrument Cluster harness connector.
Disconnect the Park Brake Switch harness connector.
Measure the resistance of the Brake Warning Indicator circuit.
Is the resistance below 5.0 ohms?
Yes
→ Replace the Instrument Cluster in accordance with the Service
Information.
Perform BODY VERIFICATION TEST - VER 1.
No
→ Repair the Brake Warning Indicator circuit for an open.
Perform BODY VERIFICATION TEST - VER 1.
Turn the ignition on.
With the DRBIIIt in Inputs/Outputs, read the Brake Fluid Level Switch state.
Disconnect the Brake Fluid Level Switch harness connector.
Connect a jumper wire between cavity A and cavity B of the Brake Fluid Level Switch
harness connector.
With the DRBIIIt, observe the Brake Fluid Level input.
Did the Brake Fluid Level input change state?
Yes
→ Replace the Brake Fluid Level Switch in accordance with the
Service Information.
Perform BODY VERIFICATION TEST - VER 1.
No
→ Go To
APPLICABILITY
All
All
6
Turn the ignition off.
Disconnect the Brake Fluid Level Switch harness connector.
Measure the resistance of the Brake Fluid Level Switch ground circuit.
Is the resistance above 5.0 ohms?
Yes
→ Repair the Brake Fluid Level Switch Ground circuit for an open.
Perform BODY VERIFICATION TEST - VER 1.
No
→ Go To
All
7
Turn the ignition off.
Disconnect the PCM (C2 connector for 2.0L equipped vehicles) harness connector.
Disconnect the Brake Fluid Level Switch harness connector.
Measure the resistance of the Red Brake Warning Indicator Driver circuit.
Is the resistance above 5.0 ohms?
Yes
→ Repair the Red Brake Warning Indicator Driver circuit for an
open.
Perform BODY VERIFICATION TEST - VER 1.
No
→ Replace the Powertrain Control Module in accordance with the
Service Information.
Perform BODY VERIFICATION TEST - VER 1.
159
All
INSTRUMENT CLUSTER
*BRAKE WARNING INDICATOR INOPERATIVE —
TEST
8
Continued
ACTION
Turn the ignition off.
Remove the Instrument Cluster.
Remove the inoperative Indicator LED.
Using a DVOM, select 9Diode Mode9, and attach the leads across the LED.
NOTE: Ensure that the RED lead is on the (+( of the LED.
Did the LED illuminate?
Yes
→ Replace the Instrument Cluster in accordance with the Service
Information.
Perform BODY VERIFICATION TEST - VER 1.
No
→ Replace the Brake Warning Indicator LED in accordance with the
Service Information.
Perform BODY VERIFICATION TEST - VER 1.
160
APPLICABILITY
All
INSTRUMENT CLUSTER
Symptom:
*FRONT FOG LAMP INDICATOR INOPERATIVE
POSSIBLE CAUSES
FRONT FOG LAMP INDICATOR CIRCUIT OPEN
INDICATOR LED
INSTRUMENT CLUSTER
TEST
ACTION
APPLICABILITY
1
NOTE: Ensure that the Fog Lamps operate properly before proceeding with
this test. If not, select (Service Information( from the menu and repair as
necessary.
Disconnect the Instrument Cluster harness connector.
Turn the Headlamps on.
Turn the Fog Lamps on.
NOTE: Ensure that the battery is fully charged.
Measure the voltage between the Fog Lamp Switch Output circuit and ground.
Is the voltage greater than 10.0 volts?
All
2
Yes
→ Go To
No
→ Repair the open in the Front Fog Lamp Switch Output circuit.
Perform BODY VERIFICATION TEST - VER 1.
2
Turn the ignition off.
Remove the Instrument Cluster.
Remove the inoperative LED.
Using a DVOM, select 9Diode Mode9, and attach the leads across the LED.
NOTE: Ensure that the RED lead is on the (+( of the LED.
Did the indicator illuminate?
Yes
→ Replace the Instrument Cluster in accordance with the Service
Information.
Perform BODY VERIFICATION TEST - VER 1.
No
→ Replace the inoperative indicator LED in accordance with the
Service Information.
Perform BODY VERIFICATION TEST - VER 1.
161
All
INSTRUMENT CLUSTER
Symptom:
*FUEL GAUGE INACCURATE
POSSIBLE CAUSES
DTC PRESENT
FUEL LEVEL SENSOR
INTERMITTENT CONDITION
INSTRUMENT CLUSTER
TEST
1
2
ACTION
Turn the ignition on.
With the DRBIIIt, read DTCs.
Does the DRBIIIt display Fuel Level Sensor Open or Fuel Level Sensor Short?
Yes
→ Refer to Fuel Level Sensor Open or Fuel Level Sensor Short for
the related symptom(s).
No
→ Go To
APPLICABILITY
All
2
Perform the Instrument Cluster Self Test.
Turn the ignition off.
Press and hold the Trip Reset button.
Turn the ignition on.
Observe the Fuel Gauge during the Self Test.
The Fuel Gauge pointer should pause at each of these following positions: E, 1/2, Full.
Did the Fuel Gauge perform the Self Test properly?
Yes
→ Go To
No
→ Replace the Instrument Cluster in accordance with the Service
Information.
Perform BODY VERIFICATION TEST - VER 1.
3
162
All
INSTRUMENT CLUSTER
*FUEL GAUGE INACCURATE —
Continued
TEST
ACTION
APPLICABILITY
3
Turn the ignition off.
Remove the Fuel Pump Module from the Fuel Tank.
NOTE: Inspect for physical obstructions in the Fuel Tank. Inspect the Fuel
Level Sensor for bent or damaged parts.
Measure the resistance of the Fuel Level Sensor while moving the float arm through
the complete range of motion.
The Fuel Level Sensor should measure the following resistances:
E = 184 - 204 ohms
1/4 = 360 - 410 ohms
1/2 = 565 - 585 ohms
3/4 = 741 - 791 ohms
Full = 947 - 967 ohms
NOTE: The Fuel Level Sensor should read resistance through the full range
of float arm motion.
Does the Fuel Level Sensor read the proper resistance values through the full range
of motion?
All
Yes
→ The condition is not present at this time. Monitor DRBIIIt
parameters while wiggling the related wire harness. Refer to any
Technical Service Bulletins (TSB) that may apply. Visually inspect the related wiring harness and connector terminals.
No
→ Replace the Fuel Level Sensor in accordance with the Service
Information.
Perform BODY VERIFICATION TEST - VER 1.
163
INSTRUMENT CLUSTER
Symptom:
*HIGH BEAM INDICATOR INOPERATIVE
POSSIBLE CAUSES
HIGH BEAM INDICATOR CIRCUIT OPEN
HIGH BEAM INDICATOR BULB
INSTRUMENT CLUSTER
TEST
ACTION
APPLICABILITY
1
NOTE: Ensure that the High Beam headlamps operate properly before
proceeding with this test.
Turn the ignition off.
Disconnect the Instrument Cluster harness connector.
Turn on the headlamps and actuate the High Beams.
Using a 12-volt test light connected to ground, check the High Beam Indicator circuit.
Does the test light illuminate brightly?
All
2
Yes
→ Go To
No
→ Repair the High Beam Indicator circuit for an open.
Perform BODY VERIFICATION TEST - VER 1.
2
Turn the ignition off.
Disconnect the Instrument Cluster harness connector.
Remove and inspect the High Beam Indicator bulb.
Is the bulb open?
Yes
→ Replace the High Beam Indicator bulb in accordance with the
Service Information.
Perform BODY VERIFICATION TEST - VER 1.
No
→ Replace the Instrument Cluster in accordance with the Service
Information.
Perform BODY VERIFICATION TEST - VER 1.
164
All
INSTRUMENT CLUSTER
Symptom:
*INSTRUMENT CLUSTER DIMMING INOPERATIVE
POSSIBLE CAUSES
DTC PRESENT
HEADLAMP SWITCH OUTPUT CIRCUIT OPEN
ILLUMINATION BULB
INSTRUMENT CLUSTER
TEST
1
2
3
ACTION
Turn the ignition on.
With the DRBIIIt, read DTCs.
Does the DRBIIIt display Panel Dimmer Open?
Yes
→ Refer to the Service Information to diagnose 9Panel Dimmer
Open9.
Perform BODY VERIFICATION TEST - VER 1.
No
→ Go To
APPLICABILITY
All
2
NOTE: Ensure that the Park Lamps operate properly before proceeding
with this test.
Turn the ignition off.
Disconnect the Instrument Cluster harness connector.
Turn the Park Lamps on.
Using a 12-volt test light connected to ground, check the Headlamp Output circuit.
Does the test light illuminate brightly?
Yes
→ Go To
No
→ Repair the Headlamp Switch Output circuit for an open.
Perform BODY VERIFICATION TEST - VER 1.
All
3
Turn the ignition off.
Disconnect the Instrument Cluster harness connector.
Inspect the Illumination Bulb in question.
Is the Illumination Bulb filament open?
Yes
→ Replace the Illumination Bulb in accordance with the Service
Information.
Perform BODY VERIFICATION TEST - VER 1.
No
→ Replace the Instrument Cluster in accordance with the Service
Information.
Perform BODY VERIFICATION TEST - VER 1.
165
All
INSTRUMENT CLUSTER
Symptom:
*LOW OIL PRESSURE INDICATOR ALWAYS ON
POSSIBLE CAUSES
ENGINE OIL PRESSURE SWITCH
ENGINE OIL PRESSURE SWITCH SENSE CIRCUIT SHORT TO GROUND
POWERTRAIN CONTROL MODULE
INSTRUMENT CLUSTER
TEST
ACTION
APPLICABILITY
1
NOTE: Ensure that Engine oil pressure is within normal operating range.
Refer to the Service Information for specifications.
Allow the engine to idle.
With the DRBIIIt in Sensors, read the Engine Oil Pressure Switch state.
Does the Engine Oil Pressure Switch status read 9Closed9?
All
2
3
Yes
→ Go To
No
→ Replace the Instrument Cluster in accordance with the Service
Information.
Perform BODY VERIFICATION TEST - VER 1.
2
Turn the ignition off.
Disconnect the Engine Oil Pressure Switch harness connector.
With the DRBIIIt in Sensors, read the Engine Oil Pressure Switch status.
Does the Engine Oil Pressure Switch status read 9Closed9?
Yes
→ Go To
No
→ Replace the Engine Oil Pressure Switch in accordance with the
Service Information.
Perform BODY VERIFICATION TEST - VER 1.
All
3
Turn the ignition off.
Disconnect the Engine Oil Pressure Switch harness connector.
Disconnect the PCM (C1 connector on 2.0L equipped vehicles) harness connector.
Measure the resistance between ground and the Engine Oil Pressure Switch Sense
circuit.
Is the resistance below 5.0 ohms?
Yes
→ Repair the Engine Oil Pressure Switch Sense circuit for a short to
ground.
Perform BODY VERIFICATION TEST - VER 1.
No
→ Replace the Powertrain Control Module in accordance with the
Service Information.
166
All
INSTRUMENT CLUSTER
Symptom:
*LOW OIL PRESSURE INDICATOR INOPERATIVE
POSSIBLE CAUSES
ENGINE OIL PRESSURE SWITCH
ENGINE OIL PRESSURE SWITCH SENSE CIRCUIT OPEN
INDICATOR LED
POWERTRAIN CONTROL MODULE
INSTRUMENT CLUSTER
TEST
1
2
3
ACTION
Turn the ignition off.
Perform the Instrument Cluster Self Test.
Depress and hold the Trip Odometer reset button while turning the ignition on.
Did the Low Oil Pressure Indicator illuminate?
Yes
→ Go To
2
No
→ Go To
4
Turn the ignition on.
With the DRBIIIt in Sensors, read the Oil Pressure Switch state.
Disconnect the Engine Oil Pressure Switch harness connector.
With the DRBIIIt in Sensors, read the Oil Pressure Switch state.
Did the Engine Oil Pressure Switch change states?
Yes
→ Replace the Engine Oil Pressure Switch in accordance with the
Service Information.
Perform BODY VERIFICATION TEST - VER 1.
No
→ Go To
APPLICABILITY
All
All
3
Turn the ignition off.
Disconnect the Engine Oil Pressure Switch harness connector.
Disconnect the PCM (C1 connector on 2.0L equipped vehicles) harness connector.
Measure the resistance of the Engine Oil Pressure Switch Sense circuit.
Is the resistance below 5.0 ohms?
Yes
→ Replace the Powertrain Control Module in accordance with the
Service Information.
No
→ Repair the Engine Oil Pressure Switch Sense circuit for an open.
Perform BODY VERIFICATION TEST - VER 1.
167
All
INSTRUMENT CLUSTER
*LOW OIL PRESSURE INDICATOR INOPERATIVE —
TEST
4
Continued
ACTION
Turn the ignition off.
Remove the Instrument Cluster.
Remove the Low Oil Pressure indicator LED.
Using a DVOM, select 9Diode Mode9, and attach the leads across the LED.
NOTE: Ensure that the RED lead is on the (+( of the LED.
Did the LED illuminate?
Yes
→ Replace the Instrument Cluster in accordance with the Service
Information.
Perform BODY VERIFICATION TEST - VER 1.
No
→ Replace the Low Oil Pressure Indicator LED in accordance with
the Service Information.
Perform BODY VERIFICATION TEST - VER 1.
168
APPLICABILITY
All
INSTRUMENT CLUSTER
Symptom:
*ONE GAUGE INOPERATIVE
POSSIBLE CAUSES
POWERTRAIN CONTROL MODULE DTCS
INSTRUMENT CLUSTER
TEST
ACTION
APPLICABILITY
1
Turn the ignition off.
With the DRBIIIt, read DTCs.
NOTE: The PCM will not store any DTCs regarding Oil Pressure concerns.
NOTE: If Oil Pressure gauge readings are in question and the gauge tests
good, a mechanical oil pressure gauge must be attached to the engine.
Does the DRBIIIt display any PCM DTCs?
All
2
Yes
→ Refer to the DRIVEABILITY category and perform the apropriate
symptom.
No
→ Go To
2
Perform the Instrument Cluster Self Test.
Turn the ignition off.
Press and hold the Trip Reset button.
Turn the ignition on.
Observe the gauge in question while the Instrument Cluster performs the Self Test.
The gauges should position at the following calibration points:
Speedometer: 30mph (51km/h BUX), 60mph (102km/h BUX), 90mph (153km/h
BUX), 120mph
Tachometer: 2000, 4000, 6000, 8000
Fuel: E, 1/2, Full
Temperature: Lo, Mid Lo, High
Did the gauge in question operate properly?
Yes
→ Test Complete.
No
→ Replace the Instrument Cluster in accordance with the Service
Information.
Perform BODY VERIFICATION TEST - VER 1.
169
All
INSTRUMENT CLUSTER
Symptom:
*PRND OR AUTOSTICK INDICATOR DISPLAY INACCURATE OR
INOPERATIVE
POSSIBLE CAUSES
DTC PRESENT
INTERMITTENT CONDITION
INSTRUMENT CLUSTER
TEST
ACTION
APPLICABILITY
1
NOTE: Ensure that there is communication between the MIC, PCM, and the
TCM before proceeding with this test.
NOTE: Diagnose and repair any DTCs before proceeding with this test.
NOTE: Ensure that the TCM passes the Shift Lever Test with the DRBIIIt
before proceeding with this test.
Turn the ignition on.
With the DRBIIIt, read DTCs.
Does the DRBIIIt display any MIC, PCM, or TCM DTCs?
All
2
Yes
→ Refer to symptom list for problems related to DTC’s.
No
→ Go To
2
Perform the Instrument Cluster Self Test.
Turn the ignition off.
Press and hold the Trip Reset button.
Turn the ignition on.
Observe the PRND / AutoStick VF display during the Self Test.
Did any part of the VF display fail to illuminate?
Yes
→ Replace the Instrument Cluster in accordance with the Service
Information.
Perform BODY VERIFICATION TEST - VER 1.
No
→ The condition is not present at this time. Monitor DRBIIIt
parameters while wiggling the related wire harness. Refer to any
Technical Service Bulletins (TSB) that may apply. Visually inspect the related wiring harness and connector terminals.
170
All
INSTRUMENT CLUSTER
Symptom:
*REAR FOG LAMP INDICATOR INOPERATIVE - BUX ONLY
POSSIBLE CAUSES
REAR FOG LAMP INDICATOR CIRCUIT OPEN
INDICATOR LED
INSTRUMENT CLUSTER
TEST
ACTION
APPLICABILITY
1
NOTE: Ensure that the Rear Fog Lamps operate correctly before proceeding with this test.
Turn the ignition off.
Disconnect the Instrument Cluster harness connector.
Turn the Rear Fog Lamp switch on.
Using a 12-volt test light connected to ground, check the Rear Fog Lamp Indicator
circuit.
Does the test light illuminate brightly?
All
2
Yes
→ Go To
No
→ Repair the Rear Fog Lamp Indicator circuit for an open.
Perform BODY VERIFICATION TEST - VER 1.
2
Turn the ignition off.
Remove the Instrument Cluster.
Remove the inoperative LED.
Using a DVOM, select 9Diode Mode9, and attach the leads across the LED.
NOTE: Ensure that the RED lead is on the (+( of the LED.
Did the LED illuminate?
Yes
→ Replace the Instrument Cluster in accordance with the Service
Information.
Perform BODY VERIFICATION TEST - VER 1.
No
→ Replace the Rear Fog Lamp Indicator LED in accordance with the
Service Information.
Perform BODY VERIFICATION TEST - VER 1.
171
All
INSTRUMENT CLUSTER
Symptom:
*SEATBELT INDICATOR INOPERATIVE
POSSIBLE CAUSES
INDICATOR LED
SEAT BELT INDICATOR CIRCUIT OPEN
SEAT BELT SWITCH GROUND OPEN
SEAT BELT SWITCH
INSTRUMENT CLUSTER
TEST
1
2
3
4
ACTION
Turn the ignition off.
Perform the Instrument Cluster Self Test.
Did the Seat Belt Indicator illuminate?
Yes
→ Go To
3
No
→ Go To
2
APPLICABILITY
All
Turn the ignition off.
Remove the Instrument Cluster.
Remove the inoperative indicator.
Using a DVOM, select 9Diode Mode9, and attach the leads across the LED.
NOTE: Ensure that the RED lead is on the (+( of the LED.
Did the LED illuminate?
Yes
→ Go To
No
→ Replace the Seat Belt Indicator LED in accordance with the
Service Information.
Perform BODY VERIFICATION TEST - VER 1.
All
3
Turn the ignition off.
Disconnect the Instrument Cluster harness connector.
Disconnect the Seat Belt Switch harness connector.
Measure the resistance of the Seat Belt Indicator circuit.
Is the resistance below 5.0 ohms?
Yes
→ Go To
No
→ Repair the Seat Belt Indicator circuit for an open.
Perform BODY VERIFICATION TEST - VER 1.
All
4
Turn the ignition off.
Disconnect the Seat Belt Switch harness connector.
Measure the resistance between ground and the Seat Belt Switch Ground circuit.
Is the resistance below 5.0 ohms?
Yes
→ Go To
No
→ Repair the Seat Belt Switch Ground circuit for an open.
Perform BODY VERIFICATION TEST - VER 1.
5
172
All
INSTRUMENT CLUSTER
*SEATBELT INDICATOR INOPERATIVE —
Continued
TEST
ACTION
APPLICABILITY
5
Turn the ignition off.
Disconnect the Seat Belt Switch harness connector.
Measure the resistance of the Seat Belt Switch between the Indicator circuit pin and
the Ground circuit pin.
Is the resistance below 5.0 ohms?
All
Yes
→ Replace the Instrument Cluster in accordance with the Service
Information.
Perform BODY VERIFICATION TEST - VER 1.
No
→ Replace the Seat Belt Switch in accordance with the Service
Information.
Perform BODY VERIFICATION TEST - VER 1.
173
INSTRUMENT CLUSTER
Symptom:
*VF DISPLAY INOPERATIVE
POSSIBLE CAUSES
INSTRUMENT CLUSTER
TEST
ACTION
APPLICABILITY
1
Ensure that the Instrument Cluster communicates on the PCI Bus.
NOTE: The Instrument Cluster must be operational for the result of this test
to be valid.
The Instrument Cluster Odometer vacuum fluorescent (VF) Display is not a
repairable or replaceable item.
If there are no possible causes remaining, view repair.
All
Repair
Replace the Instrument Cluster in accordance with the Service
Information.
Perform BODY VERIFICATION TEST - VER 1.
174
INTERIOR LIGHTING
Symptom:
*COURTESY LAMPS INOPERATIVE - ALL LAMPS
POSSIBLE CAUSES
FUSED B+ CIRCUIT OPEN
INSTRUMENT CLUSTER - COURTESY LAMP OPEN
COURTESY LAMP DRIVER CIRCUIT OPEN
INTERMITTENT CONDITION
TEST
1
2
3
ACTION
Remove the dome lamp lens.
Remove and ensure the bulb is good.
Using a 12-volt test light connected to ground, check the Fused B+ circuit.
Does the test light illuminate brightly?
Yes
→ Go To
No
→ Repair the open Fused B+ Circuit.
Perform BODY VERIFICATION TEST - VER 1.
APPLICABILITY
All
2
Disconnect the Instrument Cluster.
Connect a jumper wire between the Courtesy Lamp Driver Circuit and ground.
Observe the Dome Lamp.
Does the test light illuminate brightly?
Yes
→ Replace the Instrument Cluster.
Perform BODY VERIFICATION TEST - VER 1.
No
→ Go To
All
3
Remove the dome lamp bulb.
Disconnect the Instrument Cluster.
Connect a jumper wire between the Courtesy Lamp Driver Circuit in the Instrument
Cluster connector and ground.
Measure the resistance of the Courtesy Lamp Driver Circuit from the Dome Lamp to
the Instrument Cluster connector.
Is the resistance below 5.0 ohms?
Yes
→ The condition that caused this symptom is currently not present.
Inspect the related wiring for a possible intermittent condition.
Look for any chafed, pierced, pinched or partially broken wires.
Perform BODY VERIFICATION TEST - VER 1.
No
→ Repair the open Courtesy Lamp Driver Circuit.
Perform BODY VERIFICATION TEST - VER 1.
175
All
INTERIOR LIGHTING
Symptom:
*COURTESY LAMPS ON AT ALL TIMES
POSSIBLE CAUSES
DRIVERS DOOR AJAR SWITCH
DRIVERS DOOR AJAR SWITCH SENSE WIRE SHORT TO GROUND
REMOTE KEYLESS ENTRY MODULE - IF EQUIPPED
INSTRUMENT CLUSTER
INSTRUMENT CLUSTER
PANEL LAMPS DIMMER SIGNAL WIRE SHORT TO GROUND
MULTIFUNCTION SWITCH
OPEN DOOR AJAR SWITCH
REMOTE KEYLESS ENTRY MODULE - IF EQUIPPED
PASSENGER DOOR AJAR/RKE SENSE WIRE SHORT TO GROUND
INSTRUMENT CLUSTER
COURTESY LAMP DRIVER CIRCUIT SHORT TO GROUND
INSTRUMENT CLUSTER
TEST
1
ACTION
Close all the doors.
Turn the Panel Lamps Dimmer Switch to the MID position.
With the DRBIIIt, read the Electro/Mech Cluster, I/O’s.
Observe the: Drv Door Ajar Sw, Dome Lamp, and the Pass Door Ajar Sw Output.
Does the DRBIIIt read as follows?
APPLICABILITY
All
Drv Door Ajar: CLOSED
Go To 2
Dome Lamp Output: ON
Go To 5
Pass Door Ajar Sw: CLOSED
Go To 7
No
2
→ Go To
10
Open the Drivers door.
Disconnect the Driver Door Ajar Switch connector.
With the DRBIIIt select: Body, Electro/Mech Cluster, Input/Output.
Read the: Drv Door Ajar Sw - state.
Does the DRBIIIt show: Open?
Yes
→ Replace the Drivers Door Ajar Switch.
Perform BODY VERIFICATION TEST - VER 1.
No
→ Go To
3
176
All
INTERIOR LIGHTING
*COURTESY LAMPS ON AT ALL TIMES —
Continued
TEST
ACTION
APPLICABILITY
3
Turn the ignition off.
Disconnect the Driver Door Ajar Switch connector.
Disconnect the Instrument Cluster connector.
Disconnect the RKE Module connector - If Equipped.
Measure the resistance of the Driver Door Ajar Switch Sense Circuit from the door
ajar switch connector to ground.
Is the resistance below 100.0 ohms?
All
4
5
6
7
Yes
→ Repair the Drivers Door Ajar Switch Sense Wire for a short to
ground.
Perform BODY VERIFICATION TEST - VER 1.
No
→ Go To
4
Ensure the Instrument Cluster is connected.
Disconnect the RKE Module connector.
With the DRBIIIt select: Body, Electro/Mech Cluster, Input/Output.
Read the: Drv Door Ajar Sw - state
Does the DRBIIIt show: Drv Door Ajar Sw:Open?
Yes
→ Replace the Remote Keyless Entry Module.
Perform BODY VERIFICATION TEST - VER 1.
No
→ Replace the Instrument Cluster.
Perform BODY VERIFICATION TEST - VER 1.
Turn the Panel Lamps Dimmer to the MID position.
Remove the Instrument Cluster.
Measure the resistance between ground and the Panel Lamps Dimmer Signal Circuit
in the C2 connector.
Is the resistance below 100.0 ohms?
Yes
→ Go To
No
→ Replace the Instrument Cluster.
Perform BODY VERIFICATION TEST - VER 1.
All
All
6
Disconnect the Instrument Cluster.
Disconnect the Multifunction Switch connector.
Measure the resistance of the Panel Lamps Dimmer Signal Circuit in the instrument
cluster connector to ground.
Is the resistance below 200.0 ohms?
Yes
→ Repair the Panel Lamps Dimmer Signal Wire for a short to
ground.
Perform BODY VERIFICATION TEST - VER 1.
No
→ Replace the Multifunction Switch.
Perform BODY VERIFICATION TEST - VER 1.
Close all the passenger doors.
With the DRBIIIt select: Body, Electro/Mech Cluster, Input /Output.
Read the, Pas Door Ajar Sw - state.
Remove each passenger door ajar switch and observe the DRBIIIt.
Did the DRBIIIt change states to read: Pas Door Ajar Sw: Open?
Yes
→ Replace the applicable open Door Ajar Switch.
Perform BODY VERIFICATION TEST - VER 1.
No
→ Go To
8
177
All
All
INTERIOR LIGHTING
*COURTESY LAMPS ON AT ALL TIMES —
TEST
8
9
10
Continued
ACTION
Remove all 3 passenger door ajar switches.
With the DRBIIIt,select: Body,Electro/Mech Cluster,Input/Output.
Read the Pas Door Ajar Sw-state.
Disconnect the RKE Module connector while observing the DRBIIIt.
Did the DRBIIIt show, Pas Door Ajar Sw: Open?
Yes
→ Replace the Remote Keyless Entry Module.
Perform BODY VERIFICATION TEST - VER 1.
No
→ Go To
APPLICABILITY
All
9
Turn the ignition off.
Disconnect all 3 passenger door ajar switches.
Disconnect the RKE Module connector - If Equipped.
Disconnect the Instrument Cluster connector.
Measure the resistance of the Passenger Door Ajar Circuit in the Passenger Door
Ajar Switch connector.
Is the resistance below 100.0 ohms?
Yes
→ Repair the Passenger Door Ajar/RKE Sense Wire for a short to
ground.
Perform BODY VERIFICATION TEST - VER 1.
No
→ Replace the Instrument Cluster.
Perform BODY VERIFICATION TEST - VER 1.
Turn the Panel Lamps Dimmer to the MID position.
Disconnect the Instrument Cluster Connector.
Measure the resistance between ground and the Courtesy Lamp Driver Circuit.
Is the resistance below 100.0 ohms?
Yes
→ Repair the Courtesy Lamp Driver Circuit for a short to ground.
Perform BODY VERIFICATION TEST - VER 1.
No
→ Replace the Instrument Cluster.
Perform BODY VERIFICATION TEST - VER 1.
178
All
All
INTERIOR LIGHTING
Symptom:
*ILLUMINATED ENTRY INOPERATIVE
POSSIBLE CAUSES
COURTESY LAMPS OPERATIONAL
INTERMITTENT CONDITION
ILLUMINATED ENTRY NOT ENABLED
TEST
ACTION
APPLICABILITY
1
Check the Courtesy Lamps for proper operation.
Does the Courtesy Lamp operate properly from the Door Ajar Switches and the Dome
Light Switch?
All
2
Yes
→ Go To
No
→ Refer to Symptom list for problems related to COURTESY
LAMPS INOPERATIVE.
Perform BODY VERIFICATION TEST - VER 1.
2
With the DRBIIIt select: THEFT ALARM - VTSS - MISCELLANEOUS - ENABLE
ILLUMINATED ENTRY.
With the DRBIIIt, read the ILLUMINATED ENTRY status.
Does the DRBIIIt display ENABLED?
Yes
→ The condition that caused this symptom is currently not present.
Inspect the related wiring harness for a possible intermittent
condition. Look for any chafed, pierced, pinched or partially
broken wires.
Perform BODY VERIFICATION TEST - VER 1.
No
→ With the DRB, enable the Illuminated Entry.
Perform BODY VERIFICATION TEST - VER 1.
179
All
POWER DOOR LOCKS/RKE
Symptom:
BODY STYLE MISMATCH
When Monitored and Set Condition:
BODY STYLE MISMATCH
When Monitored: When the ignition is in the run position during Remote Keyless Entry
Module configuration.
Set Condition: Once the body style configuration is complete, the RKE compares its
configuration information with the PCI bus message transmitted by the Powertrain
Control Module pertaining to body style. A miscomparison will result in setting the trouble
code.
POSSIBLE CAUSES
BODY STYLE MISMATCH
Repair Instructions:
BODY STYLE MISMATCH
With the DRBIII select: 9Theft Alarm9, 9Miscellaneous9, 9Configure Module9 and follow
instructions on the screen.
Perform BODY VERIFICATION TEST - VER 1.
180
POWER DOOR LOCKS/RKE
Symptom:
DRIVER DOOR SWITCH SHORTED OR STUCK
When Monitored and Set Condition:
DRIVER DOOR SWITCH SHORTED OR STUCK
When Monitored:
10.0 volts.
Whenever the RKE module is connected and battery voltage is above
Set Condition: When a lock or unlock input from the driver door switch to the RKE
module is present for more than 8 seconds.
POSSIBLE CAUSES
DTC PRESENT
REMOTE KEYLESS ENTRY MODULE - SHORTED
DOOR LOCK SWITCH SHORTED
CYLINDER LOCK SWITCH SHORTED
DRIVER DOOR SWITCH MUX CIRCUIT SHORT TO GROUND.
TEST
ACTION
APPLICABILITY
1
Turn the ignition on.
With the DRBIIIt, erase DTCs.
Operate the door locks several times from the driver door lock switch and the cylinder
lock switch if VTSS equipped..
With the DRBIIIt, read DTCs.
Does the DRBIIIt display: DRIVER DOOR SWITCH FAILURE?
All
2
Yes
→ Go To
No
→ The causes for setting this code are not present at this time. Using
the wiring diagram/schematic as a guide, inspect the wiring and
connectors.
Perform BODY VERIFICATION TEST - VER 1.
2
Disconnect the Remote Keyless Entry module connector.
Turn the ignition off.
Measure the resistance between ground and the driver Door Switch Mux circuit
(cavity 10) in the RKE module connector
Is the resistance below 8000.0 ohms?
Yes
→ Go To
No
→ Replace the Remote Keyless Entry module.
Perform BODY VERIFICATION TEST - VER 1.
3
181
All
POWER DOOR LOCKS/RKE
DRIVER DOOR SWITCH SHORTED OR STUCK —
Continued
TEST
ACTION
APPLICABILITY
3
NOTE: This test is for vehicles with VTSS. If this vehicle is not equipped
with VTSS, answer YES to the question and continue.
Turn the ignition off.
Disconnect the Remote Keyless Entry module connector.
Remove the driver door inner trim panel.
Disconnect the Cylinder Lock Switch connector.
Measure the resistance between ground and the driver Door Switch Mux circuit
(cavity 10).
Is the resistance below 8000.0 ohms?
All
4
Yes
→ Go To
No
→ Replace the Cylinder Lock Switch.
Perform BODY VERIFICATION TEST - VER 1.
4
Turn the ignition off.
Disconnect the Door Lock Switch connector.
Disconnect the Remote Keyless Entry module connector.
Measure the resistance between ground and the driver Door Switch Mux circuit
(cavity 10).
Is the resistance below 8000.0 ohms?
Yes
→ Repair the Driver Door Switch Mux circuit for a short to ground.
Perform BODY VERIFICATION TEST - VER 1.
No
→ Replace the Door Lock Switch.
Perform BODY VERIFICATION TEST - VER 1.
182
All
POWER DOOR LOCKS/RKE
Symptom:
INCORRECT MODULE TYPE CONFIGURATION FOR PART NUMBER
When Monitored and Set Condition:
INCORRECT MODULE TYPE CONFIGURATION FOR PART NUMBER
When Monitored: When the ignition is in the run position during Remote Keyless Entry
Module configuration.
Set Condition: When the operator attempts to choose a configuration which is not
compatible with the part number. Example: Selecting BUX RKE when the module is a
Domestic part number, The RKE frequencies are not compatible.
POSSIBLE CAUSES
INCORRECT MODULE TYPE CONFIGURATION FOR PART NUMBER
TEST
ACTION
APPLICABILITY
1
Ensure the module type corresponds with the correct module part number.
If the module type corresponds with the module part number the RKE module is
defective.
If there are no possible causes remaining, view repair.
All
Repair
Replace the Remote Keyless Entry Module.
Perform BODY VERIFICATION TEST - VER 1.
183
POWER DOOR LOCKS/RKE
Symptom:
INTERIOR DECKLID RELEASE SWITCH SHORTED OR STUCK
When Monitored and Set Condition:
INTERIOR DECKLID RELEASE SWITCH SHORTED OR STUCK
When Monitored:
volts..
Set Condition:
Whenever the RKE module is connected and the battery is above 10.0
When a decklid release input is present for more than 8 seconds.
POSSIBLE CAUSES
DTC PRESENT
DECKLID RELEASE SWITCH SHORT TO GROUND.
DECKLID RELEASE RELAY CONTROL CIRCUIT SHORT TO GROUND.
REMOTE KEYLESS ENTRY MODULE - SHORTED
TEST
ACTION
APPLICABILITY
1
With the DRBIIIt, erase DTCs.
Turn the ignition on.
Operate the decklid release from the interior switch.
With the DRBIIIt, read DTCs.
Does the DRBIIIt display: INTERIOR DECKLID RELEASE SWITCH SHORTED
OR STUCK?
All
2
Yes
→ Go To
No
→ The causes for setting this code are not present at this time. Using
the wiring diagram/schematic as a guide, inspect the wiring and
connectors.
Perform BODY VERIFICATION TEST - VER 1.
2
Disconnect the interior Decklid Release Switch connector.
Turn the ignition on.
Measure the voltage between ground and the Decklid Release Relay Control circuit
in the switch connector
Is the voltage above 10.0 volts?
Yes
→ Replace the Decklid Release Switch.
Perform BODY VERIFICATION TEST - VER 1.
No
→ Go To
3
184
All
POWER DOOR LOCKS/RKE
INTERIOR DECKLID RELEASE SWITCH SHORTED OR STUCK —
Continued
TEST
ACTION
APPLICABILITY
3
Disconnect the RKE module connector.
Disconnect the interior Decklid Release Switch connector.
Measure the resistance between ground and the Decklid Release Relay Control
circuit.
Is the resistance below 1000.0 ohms?
All
Yes
→ Repair the Decklid Release Relay Control circuit for a short to
ground.
Perform BODY VERIFICATION TEST - VER 1.
No
→ Replace the Remote Keyless Entry module.
Perform BODY VERIFICATION TEST - VER 1.
185
POWER DOOR LOCKS/RKE
Symptom:
MODULE NOT CONFIGURED FOR RKE
When Monitored and Set Condition:
MODULE NOT CONFIGURED FOR RKE
When Monitored: When the ignition is in the run position during Remote Keyless Entry
transmitter programming.
Set Condition: When the operator attempts to program a transmitter and the RKE
module is not configured for RKE.
POSSIBLE CAUSES
MODULE NOT CONFIGURED FOR RKE
TEST
ACTION
APPLICABILITY
1
The RKE transmitter will not program because the module is not configured for RKE.
View repair.
All
Repair
Using the DRBIIIt, configure the module for Remote Keyless
Entry.
Perform BODY VERIFICATION TEST - VER 1.
186
POWER DOOR LOCKS/RKE
Symptom:
NO AIRBAG MESSAGES RECEIVED
When Monitored and Set Condition:
NO AIRBAG MESSAGES RECEIVED
When Monitored:
Set Condition:
With the ignition on or in the run position.
The RKE Module does not receive any airbag messages for 12 seconds.
POSSIBLE CAUSES
ATTEMPT TO COMMUNICATE WITH THE ACM
RKE MODULE
TEST
1
2
ACTION
Turn the ignition on.
With the DRB, attempt to communicate with the ACM.
Was the DRB able to I/D or communicate with the ACM?
Yes
→ Go To
No
→ Refer to the Communication category for the related symptom(s).
Perform BODY VERIFICATION TEST - VER 1.
APPLICABILITY
All
2
With the DRB, erase DTC’s.
Turn the ignition on and wait approximately 1 minute.
With the DRB, read DTC’s.
Did this DTC reset?
Yes
→ Replace the Remote Keyless Entry Module.
Perform BODY VERIFICATION TEST - VER 1.
No
→ Test Complete.
187
All
POWER DOOR LOCKS/RKE
Symptom:
NO PCM MESSAGES RECEIVED
When Monitored and Set Condition:
NO PCM MESSAGES RECEIVED
When Monitored:
Set Condition:
With the ignition on or in the run position.
The RKE Module does not receive any PCM messages for 12 seconds.
POSSIBLE CAUSES
NO PCM MESSAGES RECEIVED
ATTEMPT TO COMMUNICATE WITH THE PCM
PCI BUS CIRCUIT OPEN
POWERTRAIN CONTROL MODULE
TEST
1
2
3
ACTION
Turn the ignition on.
With the DRB, enter SYSTEM MONITORS then J1850 MODULE SCAN.
Is the PCM present on the bus?
Yes
→ With the DRB, erase DTCs. Cycle the ignition switch and check
for DTCs. If DTC resets, replace the RKE Module.
Perform BODY VERIFICATION TEST - VER 1.
No
→ Go To
APPLICABILITY
All
2
Turn the ignition on.
With the DRB, attempt to communicate with the PCM.
Was the DRB able to communicate with the PCM?
Yes
→ Go To
No
→ Refer to the communication category and perform the appropriate
symptom.
Perform BODY VERIFICATION TEST - VER 1.
All
3
Turn the ignition off.
Disconnect the PCM harness connectors.
Disconnect the RKE Module harness connector.
Measure the resistance of the PCI Bus circuit between the RKE Module connector
and the PCM connector.
Is the resistance below 5.0 ohms?
Yes
→ Replace the Powertrain Control Module.
Perform BODY VERIFICATION TEST - VER 1.
No
→ Repair the PCI Bus circuit for an open.
Perform BODY VERIFICATION TEST - VER 1.
188
All
POWER DOOR LOCKS/RKE
Symptom:
NO SKIM MESSAGES RECEIVED
When Monitored and Set Condition:
NO SKIM MESSAGES RECEIVED
When Monitored:
Set Condition:
With the ignition on or in the run position.
The RKE Module does not receive any SKIM messages for 12 seconds.
POSSIBLE CAUSES
ATTEMPT TO COMMUNICATE WITH THE SKIM
RKE MODULE
TEST
1
2
ACTION
Turn the ignition on.
With the DRB, attempt to communicate with the SKIM.
Was the DRB able to I/D or communicate with the SKIM?
Yes
→ Go To
No
→ Refer to the Communication category for the related symptom(s).
Perform BODY VERIFICATION TEST - VER 1.
APPLICABILITY
All
2
With the DRB, erase DTC’s.
Turn the ignition on and wait approximately 1 minute.
With the DRB, read DTC’s.
Did this DTC reset?
Yes
→ Replace the Remote Keyless Entry Module.
Perform BODY VERIFICATION TEST - VER 1.
No
→ Test Complete.
189
All
POWER DOOR LOCKS/RKE
Symptom:
PASSENGER DOOR SWITCH FAILURE
When Monitored and Set Condition:
PASSENGER DOOR SWITCH FAILURE
When Monitored:
10.0 volts.
Whenever the RKE module is connected and battery voltage is above
Set Condition: When a lock or unlock input from the passenger door switch to the RKE
module is present for more than 8 seconds.
POSSIBLE CAUSES
DTC PRESENT
REMOTE KEYLESS ENTRY MODULE - SHORTED
DOOR LOCK SWITCH SHORTED
CYLINDER LOCK SWITCH SHORTED - EXPORT ONLY
PASSENGER DOOR SWITCH MUX CIRCUIT SHORT TO GROUND.
TEST
ACTION
APPLICABILITY
1
Turn the ignition on.
With the DRBIIIt, erase DTCs.
Operate the door locks several times from the passenger door lock switch and the
cylinder lock switch if VTSS equipped..
With the DRBIIIt, read DTCs.
Does the DRBIIIt display: PASS DOOR SWITCH FAILURE?
All
2
Yes
→ Go To
No
→ The causes for setting this code are not present at this time. Using
the wiring diagram/schematic as a guide, inspect the wiring and
connectors.
Perform BODY VERIFICATION TEST - VER 1.
2
Disconnect the Remote Keyless Entry module connector.
Turn the ignition off.
Measure the resistance between ground and the passenger Door Switch Mux circuit
(cavity 11) in the RKE module connector
Is the resistance below 8000.0 ohms?
Yes
→ Go To
No
→ Replace the Remote Keyless Entry module.
Perform BODY VERIFICATION TEST - VER 1.
3
190
All
POWER DOOR LOCKS/RKE
PASSENGER DOOR SWITCH FAILURE —
Continued
TEST
ACTION
APPLICABILITY
3
NOTE: This test is for an EXPORT vehicle only. If this is a DOMESTIC
vehicle, answer YES to the question and continue.
Turn the ignition off.
Disconnect the Remote Keyless Entry module connector.
Remove the passenger door inner trim panel.
Disconnect the Cylinder Lock Switch connector.
Measure the resistance between ground and the passenger Door Switch Mux circuit
(cavity 11).
Is the resistance below 8000.0 ohms?
All
4
Yes
→ Go To
No
→ Replace the Cylinder Lock Switch.
Perform BODY VERIFICATION TEST - VER 1.
4
Turn the ignition off.
Disconnect the Door Lock Switch connector.
Disconnect the Remote Keyless Entry module connector.
Measure the resistance between ground and the passenger Door Switch Mux circuit
(cavity 11).
Is the resistance below 8000.0 ohms?
Yes
→ Repair the passenger Door Switch Mux circuit for a short to
ground.
Perform BODY VERIFICATION TEST - VER 1.
No
→ Replace the Door Lock Switch.
Perform BODY VERIFICATION TEST - VER 1.
191
All
POWER DOOR LOCKS/RKE
Symptom:
*ALL DOOR LOCKS INOPERATIVE
POSSIBLE CAUSES
DECKLID RELEASE RELAY OUTPUT WIRE SHORT TO GROUND
FUSED B(+) CIRCUIT OPEN
FUSED B(+) WIRE SHORT TO GROUND.
GROUND CIRCUIT OPEN
DOOR LOCK RELAY OUTPUT CIRCUIT OPEN
DRIVER DOOR UNLOCK RELAY OUTPUT SHORT TO DOOR LOCK RELAY OUTPUT
DRIVER DOOR UNLOCK RELAY OUTPUT WIRE SHORT TO GROUND
DOOR LOCK RELAY OUTPUT WIRE SHORT TO GROUND
DOOR UNLOCK RELAY OUTPUT SHORT TO DOOR LOCK RELAY OUTPUT
DECKLID RELEASE SOLENOID-SHORTED
DOOR UNLOCK RELAY OUTPUT WIRE SHORT TO GROUND
DEFECTIVE FUSE #14
RKE MODULE - B(+) SHORT TO GROUND
RKE MODULE - RELAYS OPEN
RKE MODULE - SHORTED
TEST
ACTION
APPLICABILITY
1
Note: Ensure there is communication with the RKE module (with the DRB
select (Vehicle Theft() before proceeding. If not, refer to the (COMMUNICATION( catagory.
Test Fuse #14 in the fuse block.
Is the fuse open?
All
2
Yes
→ Go To
2
No
→ Go To
13
Turn ignition off.
Remove Fuse #14 in the Fuse Block.
Measure the resistance of the fused B(+) circuit from the fuse output cavity to
ground.
Is the resistance below 100.0 ohms?
Yes
→ Go To
3
No
→ Go To
4
192
All
POWER DOOR LOCKS/RKE
*ALL DOOR LOCKS INOPERATIVE —
Continued
TEST
ACTION
APPLICABILITY
3
Turn ignition off.
Remove Fuse #14 in the Fuse Block.
Disconnect the RKE Module connector.
Measure the resistance of the fused B(+) circuit (cavity #3) in the RKE connector to
ground.
Is the resistance below 100.0 ohms?
All
4
5
6
7
Yes
→ Repair fused B(+) wire for a short to ground and replace blown
fuse.
Perform BODY VERIFICATION TEST - VER 1.
No
→ Replace the Remote Keyless Entry Module and replace the blown
fuse.
Perform BODY VERIFICATION TEST - VER 1.
Replace fuse #14.
Operate all the door locks including the decklid release (if equipped).
Did the system operate properly without blowing the fuse?
Yes
→ Test complete. If Fuse #14 blows again, check with the customer
as to when it blew and rerun this test.
Perform BODY VERIFICATION TEST - VER 1.
No
→ Go To
All
5
Disconnect the Remote Keyless Entry module connector.
Measure the resistance of the Decklid Release Relay Output circuit to ground.
Is the resistance below 0.5 ohms?
Yes
→ Go To
6
No
→ Go To
7
Disconnect the Remote Keyless Entry module connector.
Disconnect the Decklid Solenoid connector.
Measure the resistance of the Decklid Release Relay Output circuit to ground.
Is the resistance below 100.0 ohms?
Yes
→ Repair the Decklid Release Relay Output wire for a short to
ground.
Perform BODY VERIFICATION TEST - VER 1.
No
→ Replace the Decklid Release Solenoid.
Perform BODY VERIFICATION TEST - VER 1.
Turn ignition off.
Disconnect the Remote Keyless Entry module connector.
Measure the resistance of the Driver Door Unlock Relay Output circuit in the RKE
module connector to ground.
Is the resistance below 1000.0 ohms?
Yes
→ Repair the Driver Door Unlock Relay Output wire for a short to
ground.
Perform BODY VERIFICATION TEST - VER 1.
No
→ Go To
8
193
All
All
All
POWER DOOR LOCKS/RKE
*ALL DOOR LOCKS INOPERATIVE —
Continued
TEST
ACTION
APPLICABILITY
8
Disconnect the Remote Keyless Entry module connector.
Measure the resistance of the Door Lock Relay Output circuit in the RKE module
connector to ground.
Is the resistance below 1000.0 ohms?
All
9
10
11
12
Yes
→ Repair the Door Lock Relay Output wire for a short to ground.
Perform BODY VERIFICATION TEST - VER 1.
No
→ Go To
9
Turn ignition off.
Disconnect the Remote Keyless Entry module connector.
Measure the resistance of the Door Unlock Relay Output circuit in the RKE module
connector to ground.
Is the resistance below 1000.0 ohms?
Yes
→ Repair the Door Unlock Relay Output wire for a short to ground.
Perform BODY VERIFICATION TEST - VER 1.
No
→ Go To
All
10
Disconnect the Remote Keyless Entry module connector.
Measure the resistance between the Driver Door Unlock Relay Output circuit and the
Door Lock Relay Output circuit in the RKE module connector..
Is the resistance below 3.5 ohms?
Yes
→ Repair the Driver Door Unlock Relay Output circuit for a short to
the Door Lock Relay Output circuit.
Perform BODY VERIFICATION TEST - VER 1.
No
→ Go To
All
11
Disconnect the Remote Keyless Entry module connector.
Measure the resistance between the Door Unlock Relay Output circuit and the Door
Lock Driver Relay Output in the RKE module connector..
Is the resistance below 1.5 ohms?
Yes
→ Repair the Door Unlock Relay Output circuit for a short to the
Door Lock Relay Output circuit.
Perform BODY VERIFICATION TEST - VER 1.
No
→ Go To
All
12
If there are no possible causes remaining, view repair.
All
Repair
Replace the Remote Keyless Entry Module and replace the fuse.
Perform BODY VERIFICATION TEST - VER 1.
13
Disconnect the RKE Module connector.
Using a test light, test both sides of Fuse #14 to ensure the fuse is Okay and that the
12.0 volt supply is not open.
Measure the Voltage of the Fused B(+) circuit (cavity #3) in the RKE Module
connector.
Is the voltage above 10.0 volts?
Yes
→ Go To
No
→ Repair the open Fused B(+) wire from the RKE Module connector
to the fuse.
Perform BODY VERIFICATION TEST - VER 1.
14
194
All
POWER DOOR LOCKS/RKE
*ALL DOOR LOCKS INOPERATIVE —
Continued
TEST
ACTION
APPLICABILITY
14
Turn ignition off.
Disconnect the RKE Module connector.
Measure the resistance of the ground circuit (cavity #8) in the RKE Module
connector.
Is the resistance below 5.0 ohms?
All
15
16
Yes
→ Go To
No
→ Repair the open ground circuit.
Perform BODY VERIFICATION TEST - VER 1.
15
Disconnect the Remote Keyless Entry module connector.
Measure the resistance between the Driver Door Unlock Relay Output circuit and the
Door Lock Relay Output circuit in the RKE module connector..
Is the resistance LESS than 17.0 ohms?
Yes
→ Go To
No
→ Repair the open Door Lock Relay Output circuit.
Perform BODY VERIFICATION TEST - VER 1.
All
16
If there are no possible causes remaining, view repair.
Repair
Replace the Remote Keyless Entry Module (relays open).
Perform BODY VERIFICATION TEST - VER 1.
195
All
POWER DOOR LOCKS/RKE
Symptom:
*ALL DOORS EXCEPT DRIVER FAIL TO LOCK AND UNLOCK
POSSIBLE CAUSES
RKE MODULE - OPEN DOOR UNLOCK RELAY OUTPUT
DOOR UNLOCK RELAY OUTPUT WIRE OPEN
DOOR LOCK RELAY OUTPUT WIRE OPEN
OPEN MOTORS
TEST
ACTION
APPLICABILITY
1
Disconnect the Remote Keyless Entry module connector.
Lower the passenger door window.
Connect a jumper wire between the Door Lock Relay Output ckt and the Ground ckt
in the RKE module connector.
Connect a jumper wire to the Door Unlock Relay Output ckt and momentarily touch
it to the Fused B(+) ckt and observe the passenger door locks.
Reverse the jumper wires to drive the motors in the opposite direction.
Did the passenger doors Lock and Unlock?
All
2
3
4
Yes
→ Replace the Remote Keyless Entry Module.
Perform BODY VERIFICATION TEST - VER 1.
No
→ Go To
2
Turn the ignition off.
Remove the passenger door inner trim panel to gain access to the door lock motor
connector.
Disconnect the Passenger Door Lock Motor/Ajar Switch connector.
Disconnect the Remote Keyless Entry Module connector.
Measure the resistance of the Door Unlock Relay Output circuit between the RKE
module connector and the Door Lock Motor/Ajar Switch connector.
Is the resistance below 5.0 ohms?
Yes
→ Go To
No
→ Repair the Door Unlock Relay Output circuit for an open.
Perform BODY VERIFICATION TEST - VER 1.
All
3
Turn the ignition off.
Remove the passenger door inner trim panel to gain access to the door lock motor
connector.
Disconnect the Passenger Door Lock Motor/Ajar Switch connector.
Disconnect the Remote Keyless Entry Module connector.
Measure the resistance of the Door Lock Relay Output circuit between the RKE
module connector and the Door Lock Motor/Ajar Switch connector.
Is the resistance below 5.0 ohms?
Yes
→ Go To
No
→ Repair the Door Lock Relay Output circuit for an open.
Perform BODY VERIFICATION TEST - VER 1.
All
4
If there are no possible causes remaining, view repair.
Repair
Replace the Door Lock Motors as necessary.
Perform BODY VERIFICATION TEST - VER 1.
196
All
POWER DOOR LOCKS/RKE
Symptom:
*ALL DOORS EXCEPT DRIVER FAIL TO UNLOCK
POSSIBLE CAUSES
DOOR UNLOCK RELAY OUTPUT CIRCUIT SHORT TO GROUND
REMOTE KEYLESS ENTRY MODULE - UNLOCK RELAY
TEST
ACTION
APPLICABILITY
1
Turn the ignition off.
Disconnect the Remote Keyless Entry module connector.
Measure the resistance between ground and the Door Unlock Relay Output circuit.
Is the resistance below 1000.0 ohms?
All
Yes
→ Repair the Door Unlock Relay Output circuit for a short to
ground.
Perform BODY VERIFICATION TEST - VER 1.
No
→ Replace the Remote Keyless Entry Module.
Perform BODY VERIFICATION TEST - VER 1.
197
POWER DOOR LOCKS/RKE
Symptom:
*ALL DOORS FAIL TO LOCK
POSSIBLE CAUSES
DOOR LOCK RELAY OUTPUT CIRCUIT SHORT TO GROUND
DECKLID RELEASE RELAY OUTPUT SHORT TO DOOR LOCK RELAY OUTPUT
DECKLID RELEASE RELAY OUTPUT SHORT TO DRIVER DOOR UNLOCK RELAY OUTPUT
DECKLID RELEASE RELAY OUTPUT SHORT TO DOOR UNLOCK RELAY OUTPUT
REMOTE KEYLESS ENTRY MODULE - UNLOCK GROUND OPEN
TEST
ACTION
APPLICABILITY
1
Disconnect the Remote Keyless Entry module connector.
Measure the resistance of the Door Lock Relay Output circuit in the RKE module
connector to ground.
Is the resistance below 1000.0 ohms?
All
2
3
4
Yes
→ Repair the Door Lock Relay Output circuit for a short to ground.
Perform BODY VERIFICATION TEST - VER 1.
No
→ Go To
2
Disconnect the Remote Keyless Entry module connector.
Measure the resistance between the Decklid Release Relay Output terminal and the
Door Lock Relay Output terminal in the RKE Module connector.
Is the resistance below 100.0 ohms?
Yes
→ Repair the Decklid Release Relay Output wire for a short to the
Door lock Relay Output wire.
Perform BODY VERIFICATION TEST - VER 1.
No
→ Go To
All
3
Disconnect the Remote Keyless Entry module connector.
Measure the resistance between the Decklid Release Relay Output terminal and the
Driver Door Unlock Relay Output terminal in the RKE Module connector.
Is the resistance below 100.0 ohms?
Yes
→ Repair the Decklid Release Relay Output wire for a short to the
Driver Door Unlock Relay Output wire.
Perform BODY VERIFICATION TEST - VER 1.
No
→ Go To
All
4
Disconnect the Remote Keyless Entry module connector.
Measure the resistance between the Decklid Release Relay Output terminal and the
Door Unlock Relay Output terminal in the RKE Module connector.
Is the resistance below 100.0 ohms?
Yes
→ Repair the Decklid Release Relay Output wire for a short to the
Door Unlock Relay Output wire.
Perform BODY VERIFICATION TEST - VER 1.
No
→ Go To
5
198
All
POWER DOOR LOCKS/RKE
*ALL DOORS FAIL TO LOCK —
TEST
5
Continued
ACTION
If there are no possible causes remaining, view repair.
Repair
Replace the Remote Keyless Entry Module.
Perform BODY VERIFICATION TEST - VER 1.
199
APPLICABILITY
All
POWER DOOR LOCKS/RKE
Symptom:
*ALL LOCKS INOPERATIVE FROM A DOOR LOCK SWITCH
POSSIBLE CAUSES
DTC PRESENT
DOOR SWITCH GROUND WIRE OPEN
DOOR SWITCH MUX WIRE SHORT TO VOLTAGE
DOOR SWITCH MUX WIRE OPEN
DOOR LOCK SWITCH - OPEN
REMOTE KEYLESS ENTRY MODULE - HIGH VOLTAGE
REMOTE KEYLESS ENTRY MODULE - LOW VOLTAGE
TEST
1
2
ACTION
With the DRBIIIt, read DTCs.
Are there any POWER DOOR LOCK related Trouble Codes?
Yes
→ Refer to symptom list for problems related to POWER DOOR
LOCKS.
Perform BODY VERIFICATION TEST - VER 1.
No
→ Go To
APPLICABILITY
All
2
With the DRBIIIt in Sensors, read the appropriate DOOR LOCK SW voltage..
Select the reading found:
All
Between 0.0 and 3.7 volts.
Replace the Remote Keyless Entry module.
Perform BODY VERIFICATION TEST - VER 1.
Between 4.9 and 5.5 volts.
Go To 3
Above 5.6 volts.
Go To 6
3
Turn the ignition off.
Disconnect the Door Lock Switch connector.
Measure the resistance between ground and the Ground circuit in the appropriate
Door Lock Switch connector..
Is the resistance below 5.0 ohms?
Yes
→ Go To
No
→ Repair the Ground circuit for an open.
Perform BODY VERIFICATION TEST - VER 1.
4
200
All
POWER DOOR LOCKS/RKE
*ALL LOCKS INOPERATIVE FROM A DOOR LOCK SWITCH —
Continued
TEST
ACTION
APPLICABILITY
4
Turn the ignition off.
Disconnect the Remote Keyless Entry Module connector.
Disconnect the Door Lock Switch connector.
Measure the resistance of the appropriate Door Switch Mux circuit between the RKE
connector and the Door Lock Switch connector.
Is the resistance below 5.0 ohms?
All
5
Yes
→ Go To
No
→ Repair the Door Switch Mux wire for an open.
Perform BODY VERIFICATION TEST - VER 1.
5
If there are no possible causes remaining, view repair.
All
Repair
Replace the Door Lock Switch - open resistor.
Perform BODY VERIFICATION TEST - VER 1.
6
Turn the ignition off.
Disconnect the Remote Keyless Entry Module connector.
Disconnect the Door Lock Switch connector.
Measure the voltage between the appropriate Door Switch Mux circuit and ground.
Is there any voltage present?
Yes
→ Repair the Door Switch Mux wire for a short to voltage.
Perform BODY VERIFICATION TEST - VER 1.
No
→ Replace the Remote Keyless Entry module.
Perform BODY VERIFICATION TEST - VER 1.
201
All
POWER DOOR LOCKS/RKE
Symptom:
*AUTOMATIC DOOR LOCKS INOPERATIVE
POSSIBLE CAUSES
AUTO DOOR LOCKS NOT ENABLED
DOOR AJAR STATUS
PCM DTC’S PRESENT
RKE MODULE DEFECTIVE - AUTO LOCKS INOPERABLE
TEST
1
2
3
4
ACTION
With the DRBIII select: 9Theft Alarm9 9VTSS9 9Miscellaneous9 9Auto Door Locks9
Does the DRB show 9Auto Door Locks: ENABLED9?
Yes
→ Go To
No
→ With the DRBIII, enable the Auto Door Locks and retest the
System.
Perform BODY VERIFICATION TEST - VER 1.
APPLICABILITY
All
2
Ensure all doors are closed.
With the DRBIII read all DOOR AJAR states
Do any door ajar states show CLOSED?
All
Yes
→ Refer to symptom COURTESY LAMPS ON AT ALL TIMES in the
INTERIOR LIGHTING category.
Perform BODY VERIFICATION TEST - VER 1.
No
→ Go To
3
With the DRBIII read 9Engine9 DTC’s.
Are there any TPS or Vehicle Speed DTC’s present?
Yes
→ Refer to symptom list for problems related to DRIVEABILITY..
Perform BODY VERIFICATION TEST - VER 1.
No
→ Go To
All
4
If there are no possible causes remaining, view repair.
Repair
Replace the Remote Keyless Entry Module.
Perform BODY VERIFICATION TEST - VER 1.
202
All
POWER DOOR LOCKS/RKE
Symptom:
*DECKLID SOLENOID INOPERATIVE
POSSIBLE CAUSES
SOLENOID GROUND OPEN
DECKLID RELEASE SOLENOID OPEN
DECKLID RELEASE RELAY OUTPUT WIRE OPEN
RKE MODULE - DECKLID RELAY OPEN
TEST
ACTION
APPLICABILITY
1
Disconnect the Decklid Solenoid connector.
Connect a test light between the Decklid Release Relay Output circuit and the
Ground circuit in the Decklid Solenoid connector.
With the DRBIII actuate the 9Decklid Solenoid9.
Did the test light illuminate when the solenoid was actuated?
All
2
3
4
Yes
→ Replace the Decklid Release Solenoid.
Perform BODY VERIFICATION TEST - VER 1.
No
→ Go To
2
Turn ignition off.
Disconnect the Decklid Solenoid connector.
Using a 12-volt test light connected to 12-volts, check the Ground circuit in the
Decklid Release connector.
Does the test light illuminate brightly?
Yes
→ Go To
No
→ Repair the open ground wire.
Perform BODY VERIFICATION TEST - VER 1.
All
3
Turn ignition off.
Disconnect the Remote Keyless Entry module connector.
Disconnect the Decklid Solenoid connector.
Measure the resistance of the Decklid Release Relay Output wire from the RKE
module connector to the Decklid Solenoid connector.
Is the resistance below 5.0 ohms?
Yes
→ Go To
No
→ Repair the open Decklid Release Relay Output wire.
Perform BODY VERIFICATION TEST - VER 1.
All
4
If there are no possible causes remaining, view repair.
Repair
Replace the Remote Keyless Entry Module.
Perform BODY VERIFICATION TEST - VER 1.
203
All
POWER DOOR LOCKS/RKE
Symptom:
*DOORS LOCKABLE WITH KEY IN IGNITION & DRIVER DOOR
OPEN
POSSIBLE CAUSES
DRIVER DOOR AJAR SWITCH - OPEN
OPEN DRIVER DOOR AJAR SWITCH SENSE TO RKE MODULE
IGNITION SWITCH OPEN
KEY-IN IGNITION SWITCH SENSE WIRE OPEN
OPEN DRIVER DOOR AJAR SWITCH SENSE TO CLUSTER
INSTRUMENT CLUSTER - KEY-IN IGNITION OPEN
INSTRUMENT CLUSTER DEFECTIVE-DRIVER DOOR AJAR OPEN
RKE MODULE DEFECTIVE-OPEN DRIVER DOOR AJAR
TEST
1
2
3
ACTION
Open the Drivers door.
With the DRB III select: 9Body9 9Electro/Mech Cluster9 9Input/Output9
Read the 9Drv Door Ajar Sw9 state.
Does the DRBIII Show: 9CLOSED9?
No
→ Go To
2
Yes
→ Go To
5
Remove the driver door inner trim panel to gain access to the Door Lock Motor/Ajar
Switch connector.
Disconnect the Door Lock Motor/ Ajar Switch connector (Left Front or Right Front).
Connect a jumper wire between Door Ajar Switch Sense circuit (driver door) and
ground.
With the DRB III select: 9Body9 9Electro/Mech Cluster9 9Input/Output9
Read the 9Drv Door Ajar Sw9 state.
Does the DRBIII show: 9Closed9?
Yes
→ Replace the Driver Door Ajar Switch.
Perform BODY VERIFICATION TEST - VER 1.
No
→ Go To
APPLICABILITY
All
All
3
Turn ignition off.
Disconnect the Door Lock Motor/Ajar Switch (driver door) connector.
Disconnect the Instrument Cluster connector.
Measure the resistance of the Door Ajar Switch Sense (driver door) circuit between
the Door Lock Motor/Ajar Switch connector and the Instrument Cluster connector.
Is the resistance below 5.0 ohms?
Yes
→ Go To
No
→ Repair the Driver Door Ajar Switch Sense wire for an open.
Perform BODY VERIFICATION TEST - VER 1.
4
204
All
POWER DOOR LOCKS/RKE
*DOORS LOCKABLE WITH KEY IN IGNITION & DRIVER DOOR OPEN —
Continued
TEST
4
ACTION
If there are no possible causes remaining, view repair.
APPLICABILITY
All
Repair
Replace the Instrument Cluster
Perform BODY VERIFICATION TEST - VER 1.
5
6
7
8
Note: Ensure that the Key is still in the Ignition Switch.
With the DRB, read the Key-In Ignition status.
Does the DRB show KEY-IN IGN: CLOSED ?
No
→ Go To
6
Yes
→ Go To
9
Ensure the Instrument Cluster is connected before proceeding.
Disconnect the Ignition Switch connector.
Connect a jumper wire from the Key-In Ignition Switch Sense circuit in the ignition
switch connector to ground.
With the DRB, read the Key-In Ignition status.
Does the DRB show KEY-IN IGN: CLOSED ?
Yes
→ Replace the Ignition Switch.
Perform BODY VERIFICATION TEST - VER 1.
No
→ Go To
All
All
7
Disconnect the Ignition Switch connector.
Disconnect the Instrument Cluster connector.
Measure the resistance of the Key-In Ignition Switch Sense circuit between the
ignition switch connector and the instrument cluster connector.
Is the resistance below 5.0 ohms?
Yes
→ Go To
No
→ Repair the open Key-In Ignition Switch Sense wire.
Perform BODY VERIFICATION TEST - VER 1.
All
8
If there are no possible causes remaining, view repair.
All
Repair
Replace the Instrument Cluster (key-in ign open).
Perform BODY VERIFICATION TEST - VER 1.
9
10
Turn ignition off.
Remove the driver door inner trim panel.
Disconnect the Driver Door Lock Motor/Ajar Switch connector.
Disconnect the RKE Module connector.
Measure the resistance of the Driver Door Ajar Switch Sense circuit between the
Driver Door Lock Motor/Ajar Switch connector and the RKE module connector.
Is the resistance below 5.0 ohms?
Yes
→ Go To
No
→ Repair the open Driver Door Ajar Switch Sense wire.
Perform BODY VERIFICATION TEST - VER 1.
All
10
If there are no possible causes remaining, view repair.
Repair
Replace the Remote Keyless Entry Module.
Perform BODY VERIFICATION TEST - VER 1.
205
All
POWER DOOR LOCKS/RKE
Symptom:
*DRIVER DOOR FAILS TO LOCK & UNLOCK
POSSIBLE CAUSES
RKE MODULE - OPEN DRIVER UNLOCK CIRCUIT
DRIVER DOOR LOCK MOTOR - OPEN
DRIVER DOOR LOCK RELAY OUTPUT WIRE OPEN
DRIVER DOOR UNLOCK RELAY OUTPUT WIRE OPEN
TEST
ACTION
APPLICABILITY
1
Disconnect the Remote Keyless Entry module connector.
Lower the driver door window.
Connect a jumper wire between the Door Lock Relay Output ckt and the Ground ckt
in the RKE module connector.
Connect a jumper wire to the Driver Door Unlock Relay Output ckt and momentarily
touch it to the Fused B(+) ckt and observe the door lock.
Reverse the jumper wires to drive the motor in the opposite direction.
Did the drivers door Lock and Unlock?
All
2
3
Yes
→ Replace the Remote Keyless Entry Module.
Perform BODY VERIFICATION TEST - VER 1.
No
→ Go To
2
Ensure the RKE module is connected before proceeding.
Remove the inner door trim panel to gain access to the Door Lock Motor connector.
Disconnect the Door Lock Motor connector.
Connect a test light between the Door Lock Relay Output and the Driver Door Unlock
Relay Output circuits in the door lock motor connector.
Press the door lock switch to the Lock and Unlock positions.
Did the test light illuminate when the lock switch was pressed in both directions?
Yes
→ Replace the Driver Door Lock Motor.
Perform BODY VERIFICATION TEST - VER 1.
No
→ Go To
All
3
Remove the inner door trim panel to gain access to the Door Lock Motor connector.
Disconnect the Door Lock Motor connector.
Disconnect the Remote Keyless Entry module connector.
Measure the resistance of the Door Lock Relay Output wire between the RKE
connector and the door lock motor connector.
Is the resistance below 5.0 ohms?
Yes
→ Go To
No
→ Repair the Driver Door Lock Relay Output Wire for an open.
Perform BODY VERIFICATION TEST - VER 1.
4
206
All
POWER DOOR LOCKS/RKE
*DRIVER DOOR FAILS TO LOCK & UNLOCK —
Continued
TEST
ACTION
APPLICABILITY
4
Remove the inner door trim panel to gain access to the Door Lock Motor connector.
Disconnect the Door Lock Motor connector.
Disconnect the Remote Keyless Entry module connector.
Measure the resistance of the Driver Door Unlock Relay Output wire between the
RKE connector and the door lock motor connector.
Is the resistance below 5.0 ohms?
All
Yes
→ Test Complete.
No
→ Repair the open Driver Door Unlock Relay Output wire.
Perform BODY VERIFICATION TEST - VER 1.
207
POWER DOOR LOCKS/RKE
Symptom:
*DRIVER DOOR FAILS TO UNLOCK
POSSIBLE CAUSES
DRIVER DOOR UNLOCK RELAY OUTPUT WIRE SHORT TO GROUND
RKE MODULE DEFECTIVE - DRIVER UNLOCK OPEN
TEST
ACTION
APPLICABILITY
1
Turn ignition off.
Disconnect the Remote Keyless Entry module connector.
Measure the resistance of the Driver Door Unlock Relay Output circuit in the RKE
module connector to body ground.
Is the resistance below 1000.0 ohms?
All
Yes
→ Repair the Driver Door Unlock Relay Output wire for a short to
ground.
Perform BODY VERIFICATION TEST - VER 1.
No
→ Replace the Remote Keyless Entry Module.
Perform BODY VERIFICATION TEST - VER 1.
208
POWER DOOR LOCKS/RKE
Symptom:
*ONE PASSENGER DOOR FAILS TO LOCK & UNLOCK
POSSIBLE CAUSES
DOOR LOCK MOTOR - OPEN
DOOR UNLOCK RELAY OUTPUT WIRE OPEN
DOOR LOCK RELAY OUTPUT WIRE OPEN
DOOR UNLOCK RELAY OUTPUT WIRE SHORT TO GROUND
DOOR UNLOCK RELAY OUTPUT SHORT TO DOOR LOCK RELAY OUTPUT
DOOR LOCK RELAY OUTPUT WIRE SHORT TO GROUND
TEST
ACTION
APPLICABILITY
1
Remove the inner door trim panel to gain access to the Door Lock Motor connector.
Disconnect the appropriate Door Lock Motor connector.
Connect a test light between the Door Lock Relay Output and the Door Unlock Relay
Output circuits in the door lock motor connector.
Press the door lock switch to the Lock and Unlock positions.
Did the test light illuminate when the lock switch was pressed in both directions?
All
2
3
Yes
→ Replace the Door Lock Motor.
Perform BODY VERIFICATION TEST - VER 1.
No
→ Go To
2
Turn ignition off.
Remove the appropriate inner door trim panel to gain access to the Door Lock Motor
connector.
Disconnect the Door Lock Motor connector.
Disconnect the Remote Keyless Entry module connector.
Measure the resistance of the Door Lock Relay Output wire between the RKE module
connector and the door lock motor connector.
Is the resistance below 5.0 ohms?
Yes
→ Go To
No
→ Repair the Door Lock Relay Output wire for an open.
Perform BODY VERIFICATION TEST - VER 1.
All
3
Turn ignition off.
Remove the appropriate inner door trim panel to gain access to the Door Lock Motor
connector.
Disconnect the Door Lock Motor connector.
Disconnect the Remote Keyless Entry module connector.
Measure the resistance of the Door Unlock Relay Output wire between the RKE
module connector and the door lock motor connector.
Is the resistance below 5.0 ohms?
Yes
→ Go To
No
→ Repair the Door Unlock Relay Output wire for an open.
Perform BODY VERIFICATION TEST - VER 1.
4
209
All
POWER DOOR LOCKS/RKE
*ONE PASSENGER DOOR FAILS TO LOCK & UNLOCK —
Continued
TEST
ACTION
APPLICABILITY
4
Turn ignition off.
Remove the appropriate inner door trim panel to gain access to the Door Lock Motor
connector.
Disconnect the Door Lock Motor connector.
Disconnect the Remote Keyless Entry module connector.
Measure the resistance of the Door Unlock Relay Output wire to ground.
Is the resistance below 1000.0 ohms?
All
5
6
Yes
→ Repair the Door Unlock Relay Output wire for a short to ground.
Perform BODY VERIFICATION TEST - VER 1.
No
→ Go To
5
Turn ignition off.
Remove the appropriate inner door trim panel to gain access to the Door Lock Motor
connector.
Disconnect the Door Lock Motor connector.
Disconnect the Remote Keyless Entry module connector.
Measure the resistance between the Door Unlock Relay Output circuit and the Door
Lock Relay Output circuit
Is the resistance below 1000.0 ohms?
Yes
→ Repair the Door Unlock Relay Output wire for a short to the Door
Lock Relay Output wire.
Perform BODY VERIFICATION TEST - VER 1.
No
→ Go To
All
6
Turn ignition off.
Remove the appropriate inner door trim panel to gain access to the Door Lock Motor
connector.
Disconnect the Door Lock Motor connector.
Disconnect the Remote Keyless Entry module connector.
Measure the resistance of the Door Lock Relay Output wire to ground.
Is the resistance below 1000.0 ohms?
Yes
→ Repair the Door Lock Relay Output wire for a short to ground.
Perform BODY VERIFICATION TEST - VER 1.
No
→ Test Complete.
210
All
POWER DOOR LOCKS/RKE
Symptom:
*RKE INOPERATIVE
POSSIBLE CAUSES
TEST TRANSMITTER WITH TESTER
RKE TRANSMITTER NOT PROGRAMMED
TEST RKE TRANSMITTER
RKE TRANSMITTER - INOPERATIVE
RKE MODULE
RKE MODULE - RECEIVER INOPERABLE
TEST
ACTION
APPLICABILITY
1
NOTE: Ensure the RKE module is configured for RKE and the M1 (IOD) fuse
is installed.
Note: Ensure the voltage of each battery is greater than 3.0 volts before
proceeding.
Do you have access to the Miller Tool 99001 RF DETECTOR9? ?
All
2
3
Yes
→ Go To
2
No
→ Go To
4
Using the 9001 RF Detector, follow the instructions on the back of the tester and test
the transmitter several times.
Does the signal strength measure 9STRONG9?
Yes
→ Go To
No
→ Replace the transmitter.
Perform BODY VERIFICATION TEST - VER 1.
All
3
Turn the ignition on
Place transmission in the Park position.
Ensure Vehicle Theft Security System (if equipped) is in Disarm Mode.
With the DRBIIIt, select Theft Alarm, VTSS, MISCELLANEOUS, then PROGRAM
RKE. Follow the instructions on the screen.
Exit PROGRAM RKE.
Activate the Door Locks using the RKE Transmitter.
Did the door locks respond properly to the RKE transmitter commands?
Yes
→ Repair complete.
Perform BODY VERIFICATION TEST - VER 1.
No
→ Replace the Remote Keyless Entry Module and reprogram all
transmitters used with this vehicle.
Perform BODY VERIFICATION TEST - VER 1.
211
All
POWER DOOR LOCKS/RKE
*RKE INOPERATIVE —
Continued
TEST
ACTION
APPLICABILITY
4
Using the DRBIII select Theft Alarm, VTSS, MISCELLANEOUS then RKE FOB &
Module Test. Follow the instructions on the DRBIII screen.
Try the Door Locks using the original Transmitter.
Did the Door Locks respond properly to the Transmitter commands ?
All
5
Yes
→ Using the DRBIII, program the transmitter and recheck the
system. If okay, program all Transmitters that will be used with
this vehicle.
Perform BODY VERIFICATION TEST - VER 1.
No
→ Go To
5
Secure a known good Transmitter from another PL or PT vehicle.
Using the DRBIII select BODY, Theft Alarm, VTSS, MISCELLANEOUS then RKE
FOB & Module Test. Follow the instructions on the DRBIII screen.
Try the Door Locks using the Transmitter.
Did the Door Locks respond properly to the Transmitter commands ?
Yes
→ Replace the original Transmitter. Program all Transmitters that
will be used with this Vehicle.
Perform BODY VERIFICATION TEST - VER 1.
No
→ Replace the Remote Keyless Entry Module.
Perform BODY VERIFICATION TEST - VER 1.
212
All
VEHICLE THEFT/SECURITY
Symptom:
HOOD AJAR SWITCH MISSING (EXPORT ONLY)
When Monitored and Set Condition:
HOOD AJAR SWITCH MISSING (EXPORT ONLY)
When Monitored:
Module.
With the ignition on during configuration of the Remote Keyless Entry
Set Condition: If the Hood Ajar Switch RKE Module input is NOT grounded while the
module is being configured for VTSS, this code will set.
POSSIBLE CAUSES
MODULE CONFIGURATION TEST
HOOD AJAR SWITCH OPERATIONAL TEST
OPEN GROUND CIRCUIT
HOOD AJAR SWITCH SENSE CIRCUIT OPEN
HOOD AJAR SWITCH
RKE MODULE - HOOD AJAR
TEST
1
2
3
ACTION
Was the hood open during module configuration?
Yes
→ Go To
No
→ Open the hood and attempt to reconfigure the RKE module.
APPLICABILITY
All
2
Open the hood.
With the DRBIIIt select: VEHICLE THEFT, VTSS, INPUT/OUTPUT.
Read the HOOD AJAR SW state.
Does the DRBIIIt show CLOSED?
Yes
→ Replace the Remote Keyless Entry Module.
Perform VTSS VERIFICATION TEST - 1A.
No
→ Go To
All
3
Disconnect the Hood Ajar Switch connector.
Measure the resistance of the Ground circuit in the Hood Ajar connector.
Is the resistance below 5.0 ohms?
Yes
→ Go To
No
→ Repair the Ground circuit for an open.
Perform VTSS VERIFICATION TEST - 1A.
4
213
All
VEHICLE THEFT/SECURITY
HOOD AJAR SWITCH MISSING (EXPORT ONLY) —
Continued
TEST
ACTION
APPLICABILITY
4
Disconnect the Hood Ajar Switch connector.
Disconnect the Remote Keyless Entry Module connector.
Measure the resistance of the Hood Ajar Switch Sense circuit between the switch
connector and the RKE module connector.
Is the resistance below 5.0 ohms?
All
5
Yes
→ Go To
No
→ Repair the Hood Ajar Switch Sense circuit for an open.
Perform VTSS VERIFICATION TEST - 1A.
5
Disconnect the Hood Ajar Switch connector.
Connect a jumper wire between the Hood Ajar Switch Sense circuit and ground.
Does the DRBIIIt show Hood Ajar Sw: Closed?
Yes
→ Replace the Hood Ajar Switch.
Perform VTSS VERIFICATION TEST - 1A.
No
→ Replace the Remote Keyless Entry Module.
Perform VTSS VERIFICATION TEST - 1A.
214
All
VEHICLE THEFT/SECURITY
Symptom:
MODULE PREVIOUSLY CONFIGURED FOR VTSS
When Monitored and Set Condition:
MODULE PREVIOUSLY CONFIGURED FOR VTSS
When Monitored:
Entry Module.
With the ignition on during the configuration of the Remote Keyless
Set Condition: If the configuration of the module type has been previously set for VTSS,
an attempt to set the module for non-VTSS will cause the new configuration to fail. This
code should only appear if attempting to re-configure a used RKE module.
POSSIBLE CAUSES
REMOTE KEYLESS ENTRY MODULE
TEST
ACTION
APPLICABILITY
1
The RKE module attempting to be configured to non-VTSS, has originally been
configured to be used on a VTSS equipped vehicle.
If the vehicle is NOT VTSS equipped (does not have either a hood ajar or a decklid
security switch (knockout)) the RKE module attempting to be configured should be
replaced.
If there are no possible causes remaining, view repair.
All
Repair
Replace the Remote Keyless Entry Module.
Perform VTSS VERIFICATION TEST - 1A.
215
VEHICLE THEFT/SECURITY
Symptom:
*ALARM TRIPS ON ITS OWN
POSSIBLE CAUSES
LAST VTSS CAUSE
ATTEMPT TO TRIP ALARM
INTERMITTENT CONDITION
TEST
ACTION
APPLICABILITY
1
With the DRBIIIt in Theft Alarm Monitor Display, read the Alarm Tripped By state.
Were there any causes displayed?
All
2
3
4
Yes
→ Check for a possible intermittent condition with the circuit
indicated by the DRBIIIt.
Perform VTSS VERIFICATION TEST - 1A.
No
→ Go To
2
Is this an export vehicle equipped with a hood ajar switch?
Yes
→ Go To
3
No
→ Go To
4
Remove the ignition key (but keep in hand).
Lock the vehicle and close all the doors and hood.
Allow the VTSS to arm.
Lightly tap on hood near ajar switch to simulate wind and noise vibration.
Did the VTSS trip to the alarming state?
Yes
→ Replace the hood ajar switch.
Perform VTSS VERIFICATION TEST - 1A.
No
→ Go To
All
All
4
NOTE: The condition that caused the alarm is not present at this time. The
following list may help in indentifying the intermittent condition.
Refer to any Technical Service Bulletins (TSB) that may apply.
Visually inspect related wiring harnesses. Look for chafed, pierced, pinched, or
partially broken wires.
Visually inspect the related wiring harness connectors. Look for loose connections,
broken, bent, pushed out, or corroded terminals.
Were any of the above conditions present?
Yes
→ Repair as necessary
Perform VTSS VERIFICATION TEST - 1A.
No
→ Test Complete.
216
All
VEHICLE THEFT/SECURITY
Symptom:
*HEADLAMPS FAIL TO FLASH DURING ALARM
POSSIBLE CAUSES
DIMMER SWITCH LOW BEAM OUTPUT CIRCUIT OPEN
REMOTE KEYLESS ENTRY MODULE
TEST
ACTION
APPLICABILITY
1
Ensure the Low Beam Headlamps are operational before proceeding. If the lamps are
not working properly, refer to symptom LOW BEAM HEADLAMPS WILL NOT
TURN ON in the EXTERIOR LIGHTING category.
Disconnect the Remote Keyless Entry module connector.
Connect a test light from the Dimmer Switch Low Beam Output circuit to ground.
Turn the Low Beam Headlamps on.
Does the test light illuminate when the low beam headlamps are on?
All
Yes
→ Replace the Remote Keyless Entry Module.
Perform VTSS VERIFICATION TEST - 1A.
No
→ Repair the Dimmer Switch Low Beam Output circuit for an open.
Perform VTSS VERIFICATION TEST - 1A.
217
VEHICLE THEFT/SECURITY
Symptom:
*HORN FAILS TO SOUND DURING ALARM
POSSIBLE CAUSES
HORN RELAY CONTROL CIRCUIT OPEN
REMOTE KEYLESS ENTRY MODULE
TEST
ACTION
APPLICABILITY
1
Ensure the horn is operational from the horn switch before proceeding. If the horn
does not work properly, refer to the appropriate Service Information and repair the
Horn circuit as necessary.
Disconnect the Remote Keyless Entry module connector.
Connect one end of a jumper wire to the Horn Relay Control circuit in the RKE
connector.
Momentarily touch the other end of the jumper wire to ground.
Did the horn sound when the jumper wire was attached?
All
Yes
→ Replace the Remote Keyless Entry Module.
Perform VTSS VERIFICATION TEST - 1A.
No
→ Repair the Horn Relay Control circuit for an open.
Perform VTSS VERIFICATION TEST - 1A.
218
VEHICLE THEFT/SECURITY
Symptom:
*INTRUSION SENSOR CANNOT BE DISABLED (EXPORT ONLY)
POSSIBLE CAUSES
INTRUSION SENSOR
REMOTE KEYLESS ENTRY MODULE
TEST
1
ACTION
Disconnect the Dome Lamp/Intrusion Sensor connector.
Measure the voltage between the Intrusion Sensor Signal circuit and ground.
Is the voltage above 10.0 volts?
Yes
→ Replace the Intrusion Sensor.
Perform VTSS VERIFICATION TEST - 1A.
No
→ Replace the Remote Keyless Entry Module in accordance with the
Service Information.
Perform VTSS VERIFICATION TEST - 1A.
219
APPLICABILITY
All
VEHICLE THEFT/SECURITY
Symptom:
*INTRUSION SENSOR FAILS TO TRIP VTSS (EXPORT ONLY)
POSSIBLE CAUSES
INTRUSION SENSOR
OPEN FUSED B(+) CIRCUIT
OPEN GROUND CIRCUIT
INTRUSION SENSOR SIGNAL CIRCUIT OPEN
INTRUSION SENSOR SIGNAL CIRCUIT SHORTED TO GROUND
INTRUSION SENSOR
REMOTE KEYLESS ENTRY MODULE
TEST
ACTION
APPLICABILITY
1
Ensure the IOD fuse is installed.
Using the DRBIIIt, read the module configuration and ensure it is configured for
PREMIUM VTA.
With the DRBIIIt select: THEFT ALARM, VTSS, SYSTEM TEST and INTRUSION
SENSOR TEST.
While waving your hand around the Intrusion Sensor, read the DRBIIIt.
Does the DRBIIIt display INTRUSION DETECTED?
All
2
3
Yes
→ Verify the system has not been armed with the intrusion sensor
disabled. Replace the Intrusion Sensor if the problem remains
intermittent.
Perform VTSS VERIFICATION TEST - 1A.
No
→ Go To
2
Disconnect the Dome Lamp/Intrusion Sensor connector.
Measure the voltage between the Fused B(+) circuit and ground.
Is the voltage above 10.0 volts?
Yes
→ Go To
No
→ Repair the Fused B(+) circuit for an open between the IOD fuse
and the Intrusion Sensor.
Perform VTSS VERIFICATION TEST - 1A.
All
3
Disconnect the Dome Lamp/Intrusion Sensor connector.
Turn the ignition and all the lights off.
Measure the resistance between ground and the Ground circuit.
Is the resistance below 5.0 ohms?
Yes
→ Go To
No
→ Repair the Ground circuit for an open.
Perform VTSS VERIFICATION TEST - 1A.
4
220
All
VEHICLE THEFT/SECURITY
*INTRUSION SENSOR FAILS TO TRIP VTSS (EXPORT ONLY) — Continued
TEST
ACTION
APPLICABILITY
4
Disconnect the Dome Lamp/Intrusion Sensor connector.
Disconnect the Remote Keyless Entry Module connector.
Measure the resistance of the Intrusion Sensor Signal circuit between the sensor
connector and the RKE module connector.
Is the resistance below 5.0 ohms?
All
5
6
Yes
→ Go To
No
→ Repair the Intrusion Sensor Signal circuit for an open.
Perform VTSS VERIFICATION TEST - 1A.
5
Turn the ignition and all the lights off.
Disconnect the Dome Lamp/Intrusion Sensor connector.
Disconnect the Remote Keyless Entry Module Connector.
Measure the resistance of the Intrusion Sensor Signal circuit to ground.
Is the resistance below 1000.0 ohms?
Yes
→ Repair the Intrusion Sensor Signal circuit for a short to ground.
Perform VTSS VERIFICATION TEST - 1A.
No
→ Go To
All
6
Disconnect the Dome Lamp/Intrusion Sensor connector.
Backprobe a voltmeter lead to the Intrusion Sensor Signal circuit in the sensor
connector and the other lead to ground.
Reconnect the Intrusion Sensor Signal connector.
Wave your hand around the Intrusion Sensor and observe the voltmeter.
Is the voltage between 3.0 and 6.0 volts?
Yes
→ Replace the Remote Keyless Entry Module in accordance with the
Service Information.
Perform VTSS VERIFICATION TEST - 1A.
No
→ Replace the Intrusion Sensor in accordance with the Service
Information.
Perform VTSS VERIFICATION TEST - 1A.
221
All
VEHICLE THEFT/SECURITY
Symptom:
*INTRUSION SENSOR REPEATEDLY TRIGGERS VTSS (EXPORT
ONLY)
POSSIBLE CAUSES
INTRUSION SENSOR
REMOTE KEYLESS ENTRY MODULE
TEST
ACTION
APPLICABILITY
1
NOTE: Ensure there are no hanging objects or loose seat belts causing the
false triggering. Also, ensure there is no dust or debris around the intrusion
sensor causing the false triggering.
Disconnect the Dome Lamp/Intrusion Sensor connector.
Close all the doors and arm the VTSS.
Does the alarm inadvertently trigger due to intrusion sense even though the sensor
is disconnected?
All
Yes
→ Replace the Remote Keyless Entry Module in accordance with the
Service Information.
Perform VTSS VERIFICATION TEST - 1A.
No
→ Replace the Intrusion Sensor in accordance with the Service
Information.
Perform VTSS VERIFICATION TEST - 1A.
222
VEHICLE THEFT/SECURITY
Symptom:
*OPEN DRIVER DOOR FAILS TO TRIP ALARM
POSSIBLE CAUSES
DRIVER DOOR AJAR SWITCH
DRIVER DOOR AJAR SWITCH GROUND CIRCUIT OPEN
DRIVER DOOR AJAR SWITCH SENSE CIRCUIT OPEN
REMOTE KEYLESS ENTRY MODULE
TEST
ACTION
APPLICABILITY
1
Disconnect the Driver Door Ajar switch connector.
Using a 12-volt Test Light connected to 12-volts, test the Ground circuit for
continuity.
Does the light illuminate?
All
2
3
Yes
→ Go To
No
→ Repair the Driver Door Ajar Switch Ground circuit for an open.
Perform BODY VERIFICATION TEST - VER 1.
2
Disconnect the Driver Door Lock Motor/Ajar Switch connector.
Connect a jumper wire between the Door Ajar Switch Sense circuit and ground.
With the DRBIIIt select: THEFT ALARM, VTSS, INPUT/OUTPUT.
With the DRBIIIt, read the DRV DOOR AJAR SW state.
Does the DRBIIIt show: CLOSED?
Yes
→ Replace the Driver Door Lock Motor/Ajar Switch.
Perform VTSS VERIFICATION TEST - 1A.
No
→ Go To
All
3
Turn the ignition off.
Disconnect the Driver Door Lock Motor/Ajar Switch connector.
Disconnect the RKE Module connector.
Measure the resistance of the Door Ajar Switch Sense circuit between the door ajar
switch connector and the RKE module connector.
Is the resistance below 5.0 ohms?
Yes
→ Replace the Remote Keyless Entry Module.
Perform VTSS VERIFICATION TEST - 1A.
No
→ Repair the Door Ajar Switch Sense circuit for an open.
Perform VTSS VERIFICATION TEST - 1A.
223
All
VEHICLE THEFT/SECURITY
Symptom:
*OPEN PASSENGER DOOR FAILS TO TRIP ALARM
POSSIBLE CAUSES
LEFT REAR DOOR AJAR SWITCH GROUND CIRCUIT OPEN
PASSENGER DOOR AJAR SWITCH
PASSENGER DOOR AJAR SWITCH GROUND CIRCUIT OPEN
RIGHT REAR DOOR AJAR SWITCH GROUND CIRCUIT OPEN
PASSENGER DOOR AJAR/RKE SENSE CIRCUIT OPEN
LEFT REAR DOOR AJAR SWITCH
PASSENGER DOOR AJAR/RKE SENSE CIRCUIT OPEN
RIGHT REAR DOOR AJAR SWITCH
PASSENGER DOOR AJAR/RKE CIRCUIT OPEN
PASSENGER DOOR AJAR/RKE SENSE CIRCUIT OPEN
REMOTE KEYLESS ENTRY MODULE
RKE MODULE - PASSENGER DOOR AJAR SENSE
TEST
1
ACTION
Close all passenger doors.
With the DRBIIIt select: THEFT ALARM, VTSS, INPUT/OUTPUT.
Read the PASS DOOR AJAR SW state and open and close each passenger door.
Select the door(s) that did not show CLOSED when that door was opened.
Passenger
Go To
2
Left Rear
Go To
4
Right Rear
Go To
6
APPLICABILITY
All
All Passenger Doors
Go To 8
All Door States Read Correctly
Retest the VTSS system. If the passenger doors will still not trip
the alarm, replace the Remote Keyless Entry Module.
Perform VTSS VERIFICATION TEST - 1A.
2
Disconnect the Passenger Door Ajar switch connector.
Using a 12-volt Test Light connected to 12-volts, test the Ground circuit for
continuity.
Does the light illuminate?
Yes
→ Go To
No
→ Repair the Passenger Door Ajar Switch Ground circuit for an
open.
Perform VTSS VERIFICATION TEST - 1A.
3
224
All
VEHICLE THEFT/SECURITY
*OPEN PASSENGER DOOR FAILS TO TRIP ALARM —
Continued
TEST
ACTION
APPLICABILITY
3
Open the Passenger Door.
Disconnect the Passenger Door Lock Motor/Ajar Switch connector.
Close all the other passenger doors.
Connect a jumper wire from the Passenger Door Ajar/RKE Sense circuit to ground.
With the DRBIIIt select: THEFT ALARM, VTSS, INPUT/OUTPUT.
With the DRBIIIt, read the PASS DOOR AJAR SW state.
Does the DRBIIIt show: CLOSED?
All
4
5
6
Yes
→ Replace the Passenger Door Lock Motor/Ajar Switch.
Perform VTSS VERIFICATION TEST - 1A.
No
→ Repair the Door Ajar Switch Sense circuit for an open between the
door ajar switch and the splice.
Perform VTSS VERIFICATION TEST - 1A.
Disconnect the Passenger Door Ajar switch connector.
Using a 12-volt Test Light connected to 12-volts, test the Ground circuit for
continuity.
Does the light illuminate?
Yes
→ Go To
No
→ Repair the Left Rear Door Ajar Switch Ground circuit for an open.
Perform VTSS VERIFICATION TEST - 1A.
All
5
Open the Left Rear Door.
Disconnect the Left Rear Door Ajar Switch connector.
Close all the other Passenger Doors.
Connect a jumper wire from the Passenger Door Ajar/RKE Sense circuit to ground.
With the DRBIIIt select: THEFT ALARM, VTSS, INPUT/OUTPUT.
With the DRBIIIt, read the PASS DOOR AJAR SW state.
Does the DRBIIIt show: CLOSED?
Yes
→ Replace the Left Rear Door Ajar Switch.
Perform VTSS VERIFICATION TEST - 1A.
No
→ Repair the Door Ajar Switch Sense circuit for an open between the
door ajar switch and the splice.
Perform VTSS VERIFICATION TEST - 1A.
Disconnect the Driver Door Ajar switch connector.
Using a 12-volt Test Light connected to 12-volts, test the Ground circuit for
continuity.
Does the light illuminate?
Yes
→ Go To
No
→ Repair the Right Rear Door Ajar Switch Ground circuit for an
open.
Perform VTSS VERIFICATION TEST - 1A.
7
225
All
All
VEHICLE THEFT/SECURITY
*OPEN PASSENGER DOOR FAILS TO TRIP ALARM —
Continued
TEST
ACTION
APPLICABILITY
7
Open the Right Rear Door.
Disconnect the Driver Door Ajar Switch connector.
Close all the other Passenger Doors.
Connect a jumper wire from the Passenger Door Ajar/RKE Sense circuit to ground.
With the DRBIIIt select: THEFT ALARM, VTSS, INPUT/OUTPUT.
With the DRBIIIt, read the PASS DOOR AJAR SW state.
Does the DRBIIIt show: CLOSED?
All
8
Yes
→ Replace the Right Rear Door Ajar Switch.
Perform VTSS VERIFICATION TEST - 1A.
No
→ Repair the Door Ajar Switch Sense circuit for an open between the
door ajar switch and the splice.
Perform VTSS VERIFICATION TEST - 1A.
Turn the ignition off.
Disconnect the Passenger Door Ajar Switch connector.
Disconnect the RKE Module connector.
Measure the resistance of the Passenger Door Ajar/RKE Sense circuit between the
door ajar switch connector and the RKE module connector.
Is the resistance below 5.0 ohms?
Yes
→ Replace the Remote Keyless Entry Module.
Perform VTSS VERIFICATION TEST - 1A.
No
→ Repair the Passenger Door Ajar/RKE Sense circuit for an open.
Perform VTSS VERIFICATION TEST - 1A.
226
All
VEHICLE THEFT/SECURITY
Symptom:
*PARK LAMPS FAIL TO FLASH DURING ALARM
POSSIBLE CAUSES
PARK LAMP SWITCH OUTPUT CIRCUIT OPEN
REMOTE KEYLESS ENTRY MODULE
TEST
ACTION
APPLICABILITY
1
Ensure the park lamps are operational from the multifunction switch. If the park
lamps are inoperative, refer to the appropriate Service Information and repair the
Park Lamp circuit as necessary.
Disconnect the Remote Keyless Entry Module connector.
Connect a test light to the Park Lamp Switch Output circuit (cav 2) to ground.
Turn the Park Lamps on.
Does the test light illuminate when the Park Lamps are on?
All
Yes
→ Replace the Remote Keyless Entry Module.
Perform VTSS VERIFICATION TEST - 1A.
No
→ Repair the Park Lamp Switch Output circuit for an open.
Perform VTSS VERIFICATION TEST - 1A.
227
VEHICLE THEFT/SECURITY
Symptom List:
*VTSS FAILS TO ARM FROM DRIVER DOOR CYLINDER LOCK
SWITCH (EXPORT ONLY)
*VTSS FAILS TO ARM/DISARM FROM DRIVER DOOR CYLINDER
LOCK SWITCH
Test Note:
All symptoms listed above are diagnosed using the same tests.
The title for the tests will be *VTSS FAILS TO ARM FROM
DRIVER DOOR CYLINDER LOCK SWITCH (EXPORT ONLY).
POSSIBLE CAUSES
DOOR LOCK OPERATION TEST
GROUND CIRCUIT OPEN
DRIVER DOOR SWITCH MUX CIRCUIT OPEN
DRIVER CYLINDER LOCK SWITCH FAULTY
TEST
1
2
3
ACTION
Open the driver door and operate the door locks from the door lock switch.
Did the door locks operate properly?
Yes
→ Go To
No
→ Refer to symptom: *ALL LOCKS INOPERATIVE FROM DRIVER
DOOR LOCK SWITCH in the POWER DOOR LOCKS/RKE
category.
APPLICABILITY
All
2
Disconnect the Cylinder Lock Switch connector.
Measure the resistance of the ground circuit to body ground.
Is the resistance below 5.0 ohms?
Yes
→ Go To
No
→ Repair the ground circuit for an open.
Perform VTSS VERIFICATION TEST - 1A.
All
3
Disconnect the Cylinder Lock Switch connector.
Measure the voltage between the Driver Door Switch Mux circuit and ground.
Is the voltage approximately 5.0 volts?
Yes
→ Replace the Driver Cylinder Lock Switch.
Perform VTSS VERIFICATION TEST - 1A.
No
→ Repair the Driver Door Switch Mux circuit for an open.
Perform VTSS VERIFICATION TEST - 1A.
228
All
VEHICLE THEFT/SECURITY
Symptom:
*VTSS FAILS TO ARM FROM PASSENGER DOOR CYLINDER LOCK
SWITCH (EXPORT ONLY)
POSSIBLE CAUSES
DOOR LOCK OPERATION TEST
GROUND CIRCUIT OPEN
PASSENGER DOOR SWITCH MUX CIRCUIT OPEN
PASSENGER CYLINDER LOCK SWITCH FAULTY
TEST
1
2
3
ACTION
Open the passenger door and operate the door locks from the door lock switch.
Did the door locks operate properly?
Yes
→ Go To
No
→ Refer to symptom: *ALL LOCKS INOPERATIVE FROM PASSENGER DOOR LOCK SWITCH in the POWER DOOR LOCKS/
RKE category.
APPLICABILITY
All
2
Disconnect the Cylinder Lock Switch connector.
Measure the resistance of the ground circuit to body ground.
Is the resistance below 5.0 ohms?
Yes
→ Go To
No
→ Repair the ground circuit for an open.
Perform VTSS VERIFICATION TEST - 1A.
All
3
Disconnect the Cylinder Lock Switch connector.
Measure the voltage between the Passenger Door Switch Mux circuit and ground.
Is the voltage approximately 5.0 volts?
Yes
→ Replace the Passenger Cylinder Lock Switch.
Perform VTSS VERIFICATION TEST - 1A.
No
→ Repair the Passenger Door Switch Mux circuit for an open.
Perform VTSS VERIFICATION TEST - 1A.
229
All
VEHICLE THEFT/SECURITY
Symptom:
*VTSS INDICATOR FAILS TO FLASH
POSSIBLE CAUSES
REMOTE KEYLESS ENTRY MODULE
INSTRUMENT CLUSTER
VTSS INDICATOR DRIVER CIRCUIT OPEN
VTSS LED OPEN
TEST
ACTION
APPLICABILITY
1
NOTE: The VTSS must be enabled for the Indicator Lamp to operate. To help
ensure an accurate diagnosis, verify the system is enabled before proceeding.
Disconnect the Remote Keyless Entry Module connector.
Connect a jumper wire between the VTSS Indicator Driver circuit and ground.
Does the VTSS Indicator illuminate?
All
2
3
Yes
→ Replace the Remote Keyless Entry Module.
Perform VTSS VERIFICATION TEST - 1A.
No
→ Go To
2
Disconnect the Remote Keyless Entry Module connector.
Disconnect the Instrument Cluster connector.
Measure the resistance of the VTSS Indicator Driver circuit between the RKE
module connector and the Instrument Cluster connector.
Is the resistance below 5.0 ohms?
Yes
→ Go To
No
→ Repair the VTSS Indicator Driver circuit for an open.
Perform VTSS VERIFICATION TEST - 1A.
All
3
Remove the VTSS Indicator LED from the Instrument Cluster.
Test the VTSS Indicator LED for functionality.
Does the VTSS Indicator LED light?
Yes
→ Replace the Instrument Cluster.
Perform VTSS VERIFICATION TEST - 1A.
No
→ Replace the VTSS LED.
Perform VTSS VERIFICATION TEST - 1A.
230
All
VEHICLE THEFT/SECURITY
Symptom:
*VTSS INDICATOR STAYS ON STEADY DURING ARMING
POSSIBLE CAUSES
DECKLID SECURITY SWITCH SENSE CIRCUIT OPEN (IF EQUIPPED)
DECKLID SECURITY SWITCH GROUND CIRCUIT OPEN (IF EQUIPPED)
DECKLID SECURITY SWITCH (IF EQUIPPED)
HOOD AJAR SWITCH SENSE CIRCUIT SHORTED TO GROUND (IF EQUIPPED)
HOOD AJAR SWITCH (IF EQUIPPED)
RKE MODULE - VTSS INDICATOR
RKE MODULE - HOOD AJAR (IF EQUIPPED)
RKE MODULE - DECKLID SECURITY (IF EQUIPPED)
TEST
1
2
3
4
5
ACTION
Is this vehicle equipped with a hood ajar switch?
Yes
→ Go To
2
No
→ Go To
4
Ensure the hood is closed and aligned properly.
With the DRBIIIt, read the Hood Ajar status.
Does the DRBIIIt show OPEN?
Yes
→ Go To
4
No
→ Go To
3
Disconnect the Hood Ajar switch connector.
Disconnect the Remote Keyless Entry Module connector.
Measure the resistance of the Hood Ajar Switch Sense circuit to ground.
Is the resistance below 1000.0 (1k) ohms?
Yes
→ Repair the Hood Ajar Switch Sense circuit for a short to ground.
Perform VTSS VERIFICATION TEST - 1A.
No
→ Replace the Hood Ajar Switch.
Perform VTSS VERIFICATION TEST - 1A.
Is this vehicle equipped with a Decklid Security switch?
Yes
→ Go To
No
→ Replace the Remote Keyless Entry Module.
Perform VTSS VERIFICATION TEST - 1A.
APPLICABILITY
All
All
All
All
5
With the DRBIIIt, read the VTSS Decklid Security Switch state.
Does the DRBIIIt show PRESENT?
Yes
→ Replace the Remote Keyless Entry Module.
Perform VTSS VERIFICATION TEST - 1A.
No
→ Go To
6
231
All
VEHICLE THEFT/SECURITY
*VTSS INDICATOR STAYS ON STEADY DURING ARMING —
TEST
6
7
8
ACTION
Disconnect the Remote Keyless Entry Module connector.
Measure the resistance of the Decklid Security Switch Sense circuit to ground.
Is the resistance below 10.0 ohms?
Yes
→ Replace the Remote Keyless Entry Module.
Perform VTSS VERIFICATION TEST - 1A.
No
→ Go To
Continued
APPLICABILITY
All
7
Disconnect the Decklid Security Switch connector (behind decklid lock cylinder).
Using a 12-volt Test Light connected to 12-volts, test the Ground circuit for
continuity.
Does the light illuminate?
Yes
→ Go To
No
→ Repair the Decklid Security Switch Ground circuit for an open.
Perform VTSS VERIFICATION TEST - 1A.
All
8
Turn the ignition off.
Disconnect the Remote Keyless Entry Module connector.
Disconnect the Decklid Security Switch connector (behind decklid lock cylinder).
Connect a jumper wire between the Decklid Security Switch Sense circuit and
ground.
Measure the resistance of the Decklid Security Switch Sense circuit in the RKE
module connector.
Is the resistance below 5.0 ohms?
Yes
→ Replace the Decklid Security Switch.
Perform VTSS VERIFICATION TEST - 1A.
No
→ Repair the Decklid Security Switch Sense circuit for an open.
Perform VTSS VERIFICATION TEST - 1A.
232
All
VEHICLE THEFT/SECURITY
Symptom:
*VTSS SIREN INOPERATIVE (EXPORT ONLY)
POSSIBLE CAUSES
SIREN FUNCTIONAL TEST
OPEN FUSED B(+) CIRCUIT
OPEN GROUND CIRCUIT
FAULTY SIREN
SIREN CONTROL CIRCUIT OPEN
SIREN CONTROL CIRCUIT SHORTED TO GROUND
REMOTE KEYLESS ENTRY MODULE
TEST
ACTION
APPLICABILITY
1
Ensure the IOD fuse is installed and the vehicle is in the Customer Usage Mode.
Using the DRBIIIt, read the module configuration and ensure it is configured for
PREMIUM VTA.
With the DRBIIIt, actuate the SIREN.
Does the Siren actuate and sound proper?
All
2
3
Yes
→ The condition that caused this symptom is currently not present.
Inspect the related wiring harness for a possible intermittent
condition. Look for any chafed, pierced, pinched or partially
broken wires.
Perform VTSS VERIFICATION TEST - 1A.
No
→ Go To
2
Disconnect the Siren connector.
Measure the voltage of the Fused B(+) circuit in the Siren connector.
Is the voltage above 10.0 volts?
Yes
→ Go To
No
→ Repair the Fused B(+) circuit for an open between the IOD fuse
and the Intrusion Sensor.
Perform VTSS VERIFICATION TEST - 1A.
All
3
Turn the ignition off.
Disconnect the Siren connector.
Measure the resistance between ground and the Ground circuit in the Siren
connector.
Is the resistance below 5.0 ohms?
Yes
→ Go To
No
→ Repair the Ground circuit for an open.
Perform VTSS VERIFICATION TEST - 1A.
4
233
All
VEHICLE THEFT/SECURITY
*VTSS SIREN INOPERATIVE (EXPORT ONLY) —
Continued
TEST
ACTION
APPLICABILITY
4
Use the DRBIIIt and set up as follows:
Use the Scope input cable CH7058, Cable to Probe adapter CH7062, and the red and
black test probes.
Connect the scope input cable to the channel one connector on the DRBIIIt. Attach
the red and black leads and the cable to probe adapter to the scope input cable.
Select DRBIIIt Standalone.
Select lab scope.
Select Live.
Select 12 volt square wave.
Press F2 for Scope.
Press F2 and use the down arrow to set voltage range to 20 volts. Press F2 again
when complete.
Disconnect the Siren connector.
Connect the black lead to the chassis ground. Connect the red lead to the Siren
Control circuits (cavities 1 & 2) in the Siren connector.
Observe the voltage displayed on the DRBIIIt Lab Scope.
Is there a voltage square wave present in each cavity every 1 or 2 seconds?
All
5
6
Yes
→ Replace the Siren in accordance with the Service Information.
Perform VTSS VERIFICATION TEST - 1A.
No
→ Go To
5
Turn the ignition off.
Disconnect the Siren connector.
Disconnect the Remote Keyless Entry Module connector.
Measure the resistance of the Siren Control circuit between the Siren connector
(cavities 1&2) and the RKE module connector (cavity 15).
Is the resistance below 5.0 ohms at all cavities?
Yes
→ Go To
No
→ Repair the Siren Control circuit for an open between the Siren
and the RKE module connector.
Perform VTSS VERIFICATION TEST - 1A.
All
6
Turn the ignition off.
Disconnect the Siren connector.
Disconnect the Remote Keyless Entry Module connector.
Measure the resistance of the Siren Control circuit to ground.
Is the resistance below 1000.0 ohms?
Yes
→ Repair the Siren Control circuit for a short to ground.
Perform VTSS VERIFICATION TEST - 1A.
No
→ Replace the Remote Keyless Entry Module in accordance with the
Service Information.
Perform VTSS VERIFICATION TEST - 1A.
234
All
VERIFICATION TESTS
Verification Tests
40/41TE (NGC) TRANSMISSION VERIFICATION TEST - VER 1
APPLICABILITY
1. NOTE: After completion of the Transmission Verification Test, the Powertrain
Verification Test must be performed. Refer to the Powertrain Category.
2. Connect the DRBIIIt to the Data Link Connector (DLC).
3. Reconnect any disconnected components.
4. With the DRBIIIt, erase all Transmission DTC’s, also erase the PCM DTC’s.
5. Perform *PRNDL FAULT CLEARING PROCEDURE after completion of repairs for P0706
CHECK SHIFTER SIGNAL.
6. With the DRBIIIt, display Transmission Temperature. Start and run the engine until the
Transmission Temperature is HOT, above 43° C or 110° F.
7. Check the transmission fluid and adjust if necessary. Refer to the Service Information for the
Fluid Fill procedure.
8. NOTE: If the Transmission Control Module or Torque Converter has been replaced,
or if the Transmission has been repaired or replaced, it is necessary to perform the
DRBIIIt Quick Learn Procedure and reset the (Pinion Factor(.
9. Road test the vehicle. With the DRBIIIt, monitor the engine RPM. Make 15 to 20 1-2, 2-3,
3-4 upshifts. Perform these shifts from a standing start to 45 MPH with a constant throttle
opening of 20 to 25 degrees.
10. Below 25 MPH, make 5 to 8 wide open throttle kickdowns to 1st gear. Allow at least 5
seconds each in 2nd and 3rd gear between each kickdown.
11. For a specific DTC, drive the vehicle to the Symptom’s When Monitored/When Set
conditions to verify the DTC is repaired.
12. If equipped with AutoStickt, upshift and downshift several times using the AutoStickt
feature during the road test.
13. NOTE: Use the EATX OBDII task manager to run Good Trip time in each gear, this
will confirm the repair and to ensure that the DTC has not re-matured.
14. Check for Diagnostic Trouble Codes (DTC’s) during the road test. If a DTC sets during the
road test , return to the Symptom list and perform the appropriate symptom.
15. NOTE: Erase P0700 DTC in the PCM to turn the MIL light off after making
transmission repairs.
Were there any Diagnostic Trouble Codes set during the road test?
All
Yes
→ Repair is not complete, refer to the appropriate symptom.
No
→ Repair is complete.
235
VERIFICATION TESTS
Verification Tests —
Continued
ABS VERIFICATION TEST - VER 1
APPLICABILITY
1. Turn the ignition off.
2. Connect all previously disconnected components and connectors.
3. Ensure all accessories are turned off and the battery is fully charged.
4. Ensure that the Ignition is on, and with the DRBIII, erase all Diagnostic Trouble Codes from
ALL modules. Start the engine and allow it to run for 2 minutes and fully operate the system
that was malfunctioning.
5. Turn the ignition off and wait 5 seconds. Turn the ignition on and using the DRBIII, read
DTC’s from ALL modules.
6. If any Diagnostic Trouble Codes are present, return to Symptom list and troubleshoot new
or recurring symptom.
7. NOTE: For Sensor Signal and Pump Motor faults, the CAB must sense all 4 wheels
at 25 km/h (15 mph) before it will extinguish the ABS Indicator.
8. If there are no DTC’s present after turning ignition on, road test the vehicle for at least 5
minutes. Perform several antilock braking stops.
9. Caution: Ensure braking capability is available before road testing.
10. Again, with the DRBIIIt read DTC’s. If any DTC’s are present, return to Symptom list.
11. If there are no Diagnostic Trouble Codes (DTC’s) present, and the customer’s concern can no
longer be duplicated, the repair is complete.
Are any DTC’s present or is the original concern still present?
All
Yes
→ Repair is not complete, refer to appropriate symptom.
No
→ Repair is complete.
AIRBAG VERIFICATION TEST - VER 1
APPLICABILITY
1. Remove any special tools or jumper wires and reconnect all previously disconnected
components - except the Battery.
2. WARNING: TO AVOID PERSONAL INJURY OR DEATH, TURN THE IGNITION ON,
THEN RECONNECT THE BATTERY.
3. Connect the DRBIIIt to the Data Link Connector - use the most current software available.
4. Use the DRBIIIt and erase the stored codes in all airbag system modules.
5. Turn the Ignition Off, and wait 15 seconds before turning the Ignition On.
6. Wait one minute, and read active codes and if there are none present read the stored codes.
7. Note: If equipped with Airbag On-Off switch, read the DTC’s in all switch positions.
8. Note: Read the DTC’s in all airbag system related modules.
9. If the DRBIIIt shows any active or stored codes, return to the Symptom list and follow path
specified for that trouble code. If no active or stored codes are present, the repair is complete.
Are any DTC’s present or is the original condition still present?
All
YES
Repair is not complete, refer to appropriate symptom list.
NO
Repair is complete.
236
VERIFICATION TESTS
Verification Tests —
Continued
BODY VERIFICATION TEST - VER 1
APPLICABILITY
1. Disconnect all jumper wires and reconnect all previously disconnected components and
connectors.
2. NOTE: If the SKIM or PCM was replaced, refer to the service information for
proper programming procedures.
3. If the Remote Keyless Entry module was replaced, using the DRBIIIt select 9Theft Alarm9
9VTSS9 9Miscellaneous9 and 9Configure Module9. If the vehicle is equipped with VTSS, use the
DRBIIIt and enable VTSS.
4. Program all RKE transmitters and other options as necessary.
5. Ensure all accessories are turned off and the battery is fully charged.
6. With the DRBIIIt, record and erase all DTC’s from ALL modules. Start and run the engine
for 2 minutes. Operate all functions of the system that caused the original concern.
7. Turn the ignition off and wait 5 seconds. Turn the ignition on and using the DRBIIIt, read
DTC’s from ALL modules.
Are any DTC’s present or is the original condition still present?
All
Yes
→ Repair is not complete, refer to the appropriate symptom.
No
→ Repair is complete.
POWERTRAIN VERIFICATION TEST VER - 1
APPLICABILITY
1. NOTE: After completing the Powertrain Verification Test the Transmission Verification Test must be performed.
2. NOTE: If the PCM has been replace and the vehicle is equipped with a 2.4L Turbo,
Manual Transmission, the Pinion Factor MUST be programmed into the PCM.
Failure to do so will cause the speedometer to become inoperative or inaccurate.
3. NOTE: If the PCM has been replaced and the correct VIN and mileage have not
been programmed, a DTC will be set in the ABS Module, Airbag Module and the
SKIM.
4. NOTE: If the vehicle is equipped with a Sentry Key Immobilizer System, Secret Key
data must be updated. Refer to the Service Information for the PCM, SKIM and the
Transponder (ignition key) for programming information.
5. Inspect the vehicle to ensure that all components related to the repair are connected properly.
6. Inspect the engine oil for fuel contamination. Replace the oil and filter as necessary.
7. Attempt to start the engine.
8. If the No Start condition is still present, refer to the symptom list and perform the diagnostic
testing as necessary. refer to and Technical Service Bulletins that may apply.
9. Run the engine for one warm-up cycle to verify operation.
10. With the DRBIIIt, confirm that no DTCs or Secondary Indicators are present and that all
components are functioning properly.
11. If a DTC is present, refer to the appropriate category and select the corresponding symptom.
Are any DTCs present?
All
Yes
→ Repair is not complete, refer to appropriate symptom.
No
→ Repair is complete.
237
VERIFICATION TESTS
Verification Tests —
Continued
SKIS VERIFICATION
APPLICABILITY
1. Reconnect all previously disconnected components and connectors.
2. Obtain the vehicle’s unique Personal Identification Number (PIN) assigned to it’s original
SKIM. This number can be obtained from the vehicle’s invoice or Chrysler’s Customer Center
(1-800-992-1997).
3. NOTE: When entering the PIN, care should be taken because the SKIM will only
allow 3 consecutive attempts to enter the correct PIN. If 3 consecutive incorrect
PIN’s are entered the SKIM will Lock Out the DRB III for 1 hour.
4. To exit Lock Out mode, the ignition key must remain in the Run position continually for 1
hour. Turn off all accessories and connect a battery charger if necessary.
5. With the DRB III, select Theft Alarm, SKIM and Miscellaneous. Then select desired
procedure and follow the steps that will be displayed.
6. If the SKIM has been replaced, ensure all of the vehicle ignition keys are programmed to the
new SKIM.
7. NOTE: Prior to returning vehicle to the costumer, perform a module scan to be sure
that all DTC’s are erased. Erase any DTC’s that are found.
8. With the DRB III erase all DTC’s. Perform 5 ignition key cycles leaving the key on for at least
90 seconds per cycle.
9. With the DRB III, read the SKIM DTC’s.
Are there any SKIM DTC’s?
All
Yes
→ Repair is not complete, refer to appropriate symptom.
No
→ Repair is complete.
VTSS VERIFICATION TEST - 1A
APPLICABILITY
1. Ensure all doors and the decklid are closed.
2. Open the driver door.
3. Remove the ignition key (but keep in hand).
4. Lock the doors with RKE transmitter.
5. Close the driver door.
6. - If the VTSS indicator lamp flashes rapidly and after approximately 15 seconds changes to
a slower flash, the system is operational.
7. - If the indicator fails to flash as described, there is a problem with the system. Select the
Identifying VTSS symptom from the Symptom List to troubleshoot.
Does the VTSS indicator lamp flash as specified?
All
Yes
→ Repair is complete.
No
→ Repair is not complete, refer to appropriate symptom.
238
COMPONENT LOCATIONS
8.0
8.1
8.1.1
COMPONENT LOCATIONS
AIRBAG SYSTEM
AIRBAG CONTROL MODULE (ACM)
C
O
M
P
O
N
E
N
T
L
O
C
A
T
I
O
N
S
8.1.2
AIRBAG MODULE (DRIVER)
8.1.3
AIRBAG MODULE (PASSENGER)
239
C
O
M
P
O
N
E
N
T
COMPONENT LOCATIONS
8.1
AIRBAG SYSTEM (Continued)
8.1.4
CLOCKSPRING
8.1.5
SIDE IMPACT AIRBAG CONTROL MODULE (SIACM)
L
O
C
A
T
I
O
N
S
8.2
DATA LINK CONNECTOR
240
COMPONENT LOCATIONS
8.3
8.4
FUSE BLOCK
L
O
C
A
T
I
O
N
S
INSTRUMENT CLUSTER
8.4.1
BASE CLUSTER
8.4.2
PREMIUM CLUSTER
C
O
M
P
O
N
E
N
T
241
C
O
M
P
O
N
E
N
T
COMPONENT LOCATIONS
8.5
POWER DOOR LOCKS
8.5.1
REMOTE KEYLESS ENTRY MODULE
8.5.2
DECKLID RELEASE SOLENOID
L
O
C
A
T
I
O
N
S
242
COMPONENT LOCATIONS
8.5.3
8.6
DOOR LOCK MOTOR
C
O
M
P
O
N
E
N
T
L
O
C
A
T
I
O
N
S
VEHICLE COMMUNICATION
8.6.1
CONTROLLER ANTILOCK BRAKE MODULE
8.6.2
SENTRY KEY IMMOBILIZER MODULE (SKIM)
243
C
O
M
P
O
N
E
N
T
COMPONENT LOCATIONS
8.7
VEHICLE THEFT SECURITY
8.7.1
REMOTE KEYLESS ENTRY MODULE
8.7.2
HOOD AJAR SWITCH (EXPORT)
8.7.3
DOOR CYLINDER LOCK SWITCH (IF EQUIPPED)
L
O
C
A
T
I
O
N
S
244
COMPONENT LOCATIONS
8.7.4
DECKLID SECURITY SWITCH
C
O
M
P
O
N
E
N
T
L
O
C
A
T
I
O
N
S
245
NOTES
246
CONNECTOR PINOUTS
9.0
CONNECTOR PINOUTS
AIRBAG CONTROL MODULE - YELLOW 23 WAY
CAV
CIRCUIT
FUNCTION
1
-
-
2
-
-
3
-
-
4
Z6 20BK/PK
GROUND
5
R45 20DG/LB
DRIVER SQUIB 1 LINE 2
6
R43 20BK/LB
DRIVER SQUIB 1 LINE 1
7
R42 20BK/YL
PASSENGER SQUIB 1 LINE 1
8
R44 20DG/YL
PASSENGER SQUIB 1 LINE 2
9
-
-
10
-
-
11
-
-
12
-
-
13
-
14
F15 20DG/WT
FUSED IGNITION SWITCH OUTPUT (RUN-START)
15
F25 20TN/LG
FUSED IGNITION SWITCH OUTPUT (RUN)
-
16
-
-
17
-
-
18
-
-
19
-
-
20
21
-
-
D25 20VT/YL
PCI BUS
22
-
-
23
-
-
C
O
N
N
E
C
T
O
R
C208 - YELLOW (SEAT SIDE)
CAV
CIRCUIT
1
-
2
-
3
R32 18OR
4
R34 18WT
C208 - YELLOW (SIDE IMPACT AIRBAG JUMPER SIDE)
CAV
CIRCUIT
1
-
2
-
3
R32 20YL/OR
4
R34 20OR/YL
C209 - YELLOW (SEAT SIDE)
CAV
CIRCUIT
1
-
2
247
-
3
R31 18OR
4
R33 18WT
P
I
N
O
U
T
S
CONNECTOR PINOUTS
C209 - YELLOW (SIDE IMPACT AIRBAG JUMPER SIDE)
CAV
CIRCUIT
1
-
2
-
3
R31 20YL/OR
4
R33 20OR/YL
CLOCKSPRING - GREEN 7 WAY
CAV
C
O
N
N
E
C
T
O
R
P
I
N
O
U
T
S
CIRCUIT
FUNCTION
1
R45 20DG/LB
DRIVER SQUIB 1 LINE 2
2
R43 20BK/LB
DRIVER SQUIB 1 LINE 1
3
-
4
-
-
5
X3 22BK/RD
HORN RELAY CONTROL
6
V37 20RD/LG (2.0L SPEED
CONTROL)
S/C SWITCH SIGNAL
7
K914 20BR/WT (2.0L
SPEED CONTROL)
GROUND
COMPACT DISC CHANGER - BLACK 8 WAY
CAV
CIRCUIT
FUNCTION
1
24GY/WT
AUDIO OUT RIGHT
2
24OR/YL
PANEL LAMPS DIMMER SIGNAL
3
24VT/YL
PCI BUS
4
24RD
FUSED IGNITION SWITCH OUTPUT
5
24DG/WT
AUDIO OUT LEFT
6
24BK/OR
GROUND
7
22BK/YL
GROUND
8
22GY/YL
B(+)
COMPASS/TEMPERATURE MIRROR - BLACK 10 WAY
CAV
CIRCUIT
FUNCTION
1
F20 20BK/WT
FUSED IGNITION SWITCH OUTPUT (RUN)
2
M1 20BK/PK
FUSED B(+)
3
-
4
-
-
5
D25 20BK/VT
PCI BUS
6
Z3 20BK/OR
GROUND
7
M2 20BK/YL
COURTESY LAMP CONTROL
8
-
9
-
10
Z3 20BK/OR
248
GROUND
CONNECTOR PINOUTS
CONTROLLER ANTILOCK BRAKE - BLACK 24 WAY
CAV
CIRCUIT
FUNCTION
1
Z1 12BK
GROUND
2
B1 18YL/DB
RIGHT REAR WHEEL SPEED SENSOR SIGNAL
3
B2 18YL
RIGHT REAR WHEEL SPEED SENSOR 12 VOLT SUPPLY
4
-
-
5
D25 18VT/YL
PCI BUS
6
B6 18WT/DB
RIGHT FRONT WHEEL SPEED SENSOR SIGNAL
7
B7 18WT
RIGHT FRONT WHEEL SPEED SENSOR 12 VOLT SUPPLY
8
-
9
A20 12RD/DB
FUSED B(+)
-
10
F12 18DB/WT (2.0L)
FUSED IGNITION SWITCH OUTPUT (RUN-START)
10
F12 18DB/RD (2.4L
TURBO)
FUSED IGNITION SWITCH OUTPUT (RUN-START)
11
-
-
12
-
-
13
-
-
14
-
-
15
-
16
-
Z1 12BK
GROUND
17
-
18
L50 18WT/TN
BRAKE LAMP SWITCH OUTPUT
-
19
B3 18LG/DB
LEFT REAR WHEEL SPEED SENSOR SIGNAL
20
B4 18LG
LEFT REAR WHEEL SPEED SENSOR 12 VOLT SUPPLY
21
-
-
22
B8 18RD/DB
LEFT FRONT WHEEL SPEED SENSOR SIGNAL
23
B9 18RD
LEFT FRONT WHEEL SPEED SENSOR 12 VOLT SUPPLY
24
A10 12RD/DG
FUSED B(+)
DATA LINK CONNECTOR - WHITE 16 WAY
CAV
CIRCUIT
1
-
2
D25 20VT/YL
3
Z12 20BK/TN
5
Z12 20BK/TN
6
GROUND
D21 20PK
SCI TRANSMIT (PCM)
D6 20PK/LB (2.0L)
10
-
11
-
12
GROUND
-
8
9
PCI BUS (PCM)
-
4
7
FUNCTION
D20 20LG
SCI RECEIVE (TCM)
SCI RECEIVE (PCM)
13
-
14
-
-
15
D15 20WT/DG (2.0L)
SCI TRANSMIT (TCM)
16
A14 18RD/WT
FUSED B(+)
249
C
O
N
N
E
C
T
O
R
P
I
N
O
U
T
S
CONNECTOR PINOUTS
DECKLID RELEASE SWITCH (POWER RELEASE) - BLACK 2 WAY
CAV
CIRCUIT
FUNCTION
1
Q33 20BR/LB
DECKLID RELEASE RELAY CONTROL
2
Z1 20BK
GROUND
DECKLID SECURITY SWITCH (KNOCK OUT) - GRAY 2 WAY
CAV
C
O
N
N
E
C
T
O
R
P
I
N
O
U
T
S
CIRCUIT
FUNCTION
1
Z1 20BK
GROUND
2
G71 20VT/YL
DECKLID SECURITY SWITCH SENSE
DECKLID SOLENOID - BLACK 2 WAY
CAV
CIRCUIT
FUNCTION
1
Q2 14LG/BK
DECKLID RELEASE RELAY OUTPUT
2
Z1 14BK
GROUND
DOME LAMP/INTRUSION SENSOR (EXPORT) - NATURAL 4 WAY
CAV
CIRCUIT
FUNCTION
1
M2 20YL
COURTESY LAMP CONTROL
2
M1 18PK
FUSED B(+)
3
Z1 18BK
GROUND
4
G120 18WT/DB
INTRUSION SENSOR SIGNAL
250
CONNECTOR PINOUTS
DRIVER AIRBAG SQUIB 1 - YELLOW 2 WAY
CAV
CIRCUIT
FUNCTION
1
R43 18BK/LB
DRIVER SQUIB 1 LINE 1
2
R45 18DG/LB
DRIVER SQUIB 1 LINE 2
DRIVER DOOR AJAR SWITCH - BLACK 2 WAY
CAV
CIRCUIT
FUNCTION
1
G75 20TN
LEFT FRONT DOOR AJAR SWITCH SENSE
2
Z14 20BK/YL
GROUND
DRIVER DOOR LOCK MOTOR/AJAR SWITCH - BLACK 4 WAY
CAV
CIRCUIT
FUNCTION
1
G75 20TN (LHD)
LEFT FRONT DOOR AJAR SWITCH SENSE
1
G74 20TN/RD (RHD)
RIGHT FRONT DOOR AJAR SWITCH SENSE
2
Z14 20BK/YL
GROUND
3
P34 18PK/BK
DRIVER DOOR UNLOCK RELAY OUTPUT
4
P33 18OR/BK
DOOR LOCK RELAY OUTPUT
FUEL PUMP MODULE - LT. GRAY 4 WAY
CAV
CIRCUIT
FUNCTION
1
Z1 18BK
GROUND
2
Z2 20BK/LG
GROUND
3
G4 20DB
FUEL LEVEL SENSOR SIGNAL
4
A141 18DG/WT
FUEL PUMP RELAY OUTPUT
251
C
O
N
N
E
C
T
O
R
P
I
N
O
U
T
S
CONNECTOR PINOUTS
HOOD AJAR SWITCH (EXPORT) - BLACK 2 WAY
CAV
CIRCUIT
FUNCTION
1
G70 20BR/TN
HOOD AJAR SWITCH SENSE
2
Z1 20BK
GROUND
IGNITION SWITCH C1 - BLACK 10 WAY
CAV
C
O
N
N
E
C
T
O
R
P
I
N
O
U
T
S
CIRCUIT
FUNCTION
1
A1 14RD
FUSED B(+)
2
A21 14DB
IGNITION SWITCH OUTPUT (RUN-START)
3
F30 16RD/BK
IGNITION SWITCH OUTPUT (RUN-ACC)
4
F1 16DB/BK
FUSED B(+)
5
G26 22LB
KEY-IN IGNITION SWITCH SENSE
6
A41 14YL
IGNITION SWITCH OUTPUT (START)
7
A31 14BK/WT
IGNITION SWITCH OUTPUT (RUN-ACC)
8
A22 12BK/OR
IGNITION SWITCH OUTPUT (RUN)
9
A2 12PK/BK
FUSED B(+)
10
-
CAV
CIRCUIT
-
IGNITION SWITCH C2 - WHITE 2 WAY
FUNCTION
1
A81 20DG/RD
FUSED B(+)
2
F11 20RD/WT (AUTOSTICK)
IGNITION SWITCH OUTPUT (OFF-RUN-START)
252
CONNECTOR PINOUTS
INSTRUMENT CLUSTER - BLACK 26 WAY
CAV
CIRCUIT
FUNCTION
1
L38 16BR/WT (EXPORT)
REAR FOG LAMP FEED
2
D25 20VT/YL
PCI BUS
3
M2 20YL
COURTESY LAMP CONTROL
4
L27 16WT/TN (DAYTIME
RUNNING LAMPS)
FOG LAMP SWITCH SENSE
4
L39 20LB (EXCEPT
EXPORT/EXCEPT DAYTIME
RUNNING LAMPS)
FRONT FOG LAMP SWITCH OUTPUT
4
L39 16LB (EXPORT)
FRONT FOG LAMP SWITCH OUTPUT
5
G69 20BK/OR
VTSS INDICATOR DRIVER
6
E19 22RD
PANEL LAMPS DIMMER SIGNAL
7
G4 20DB
FUEL LEVEL SENSOR SIGNAL
8
-
9
G5 20DB/WT (AUTOSTICK)
FUSED IGNITION SWITCH OUTPUT (RUN-START)
10
Z3 16BK/OR
GROUND
11
-
-
-
12
E2 22OR
PANEL LAMPS DRIVER
13
M9 20LB/OR
PASSENGER DOOR AJAR/RKE SENSE
14
L7 18BK/YL
HEADLAMP SWITCH OUTPUT
15
F11 20RD/WT (AUTOSTICK)
IGNITION SWITCH OUTPUT (OFF-RUN-START)
15
G5 20DB/WT (EXCEPT AUTOSTICK)
FUSED IGNITION SWITCH OUTPUT (RUN-START)
16
L161 18LG/OR (EXCEPT
EXPORT)
LEFT TURN SIGNAL
17
L160 18TN/RD (EXCEPT
EXPORT)
RIGHT TURN SIGNAL
18
L61 18LG
LEFT TURN SIGNAL
19
L60 18TN
RIGHT TURN SIGNAL
20
L4 16VT/WT (EXCEPT EXPORT)
DIMMER SWITCH LOW BEAM OUTPUT
21
M1 18PK
FUSED B(+)
22
G11 20WT/BK
RED BRAKE WARNING INDICATOR DRIVER
23
G26 22LB
KEY-IN IGNITION SWITCH SENSE
24
G75 20TN/BK (EXCEPT
EXPORT)
LEFT FRONT DOOR AJAR SWITCH SENSE
24
G74 20TN/RD (EXPORT)
RIGHT FRONT DOOR AJAR SWITCH SENSE
25
G10 20LG/RD
SEAT BELT SWITCH SENSE
26
L3 16RD/OR
DIMMER SWITCH HIGH BEAM OUTPUT
LEFT CYLINDER LOCK SWITCH (PREMIUM) - BLACK 2 WAY
CAV
CIRCUIT
FUNCTION
1
P97 18LG
LEFT DOOR SWITCH MUX
2
Z14 18BK
GROUND
253
C
O
N
N
E
C
T
O
R
P
I
N
O
U
T
S
CONNECTOR PINOUTS
LEFT DOOR LOCK SWITCH - BLACK 3 WAY
CAV
CIRCUIT
1
-
FUNCTION
-
2
P97 20LG
LEFT DOOR SWITCH MUX
2
P97 18LG (PREMIUM)
LEFT DOOR SWITCH MUX
3
Z14 20BK/YL
GROUND
3
Z14 18BK (PREMIUM)
GROUND
LEFT FRONT DOOR SPEAKER - 3 WAY
CAV
1
CIRCUIT
X55 20BR/RD
2
3
C
O
N
N
E
C
T
O
R
FUNCTION
LEFT FRONT SPEAKER (-)
-
-
X53 20DG
LEFT FRONT SPEAKER (+)
LEFT INSTRUMENT PANEL SPEAKER - WHITE 2 WAY
CAV
CIRCUIT
FUNCTION
1
X53 20DG
LEFT FRONT SPEAKER (+)
2
X55 20BR/RD
LEFT FRONT SPEAKER (-)
P
I
N
O
U
T
S
LEFT REAR DOOR AJAR SWITCH - BLACK 2 WAY
CAV
CIRCUIT
FUNCTION
1
G76 20TN/YL
PASSENGER DOOR AJAR/RKE SENSE
2
Z1 20BK
GROUND
254
CONNECTOR PINOUTS
LEFT REAR DOOR LOCK MOTOR/AJAR SWITCH - BLACK 4 WAY
CAV
CIRCUIT
FUNCTION
1
G77 20TN/OR
PASSENGER DOOR AJAR/RKE SENSE
2
Z1 20BK
GROUND
3
P36 18PK/VT
DOOR UNLOCK RELAY OUTPUT
4
P33 18OR/BK
DOOR LOCK RELAY OUTPUT
LEFT REAR SPEAKER - 3 WAY
CAV
1
CIRCUIT
X51 20BR/YL
2
3
FUNCTION
LEFT REAR SPEAKER (+)
X57 20BR/LB
LEFT REAR SPEAKER (-)
LEFT SEAT AIRBAG SQUIB - 2 WAY
CAV
CIRCUIT
FUNCTION
1
R31 18OR
LEFT SEAT SQUIB LINE 2
2
R33 18WT
LEFT SEAT SQUIB LINE 1
LEFT SIDE IMPACT AIRBAG CONTROL MODULE - 8 WAY
CAV
1
CIRCUIT
F15 20DG/WT
FUNCTION
FUSED IGNITION SWITCH OUTPUT (RUN-START)
2
-
3
R33 20OR/YL
LEFT SEAT SQUIB LINE 1
4
R31 20YL/OR
LEFT SEAT SQUIB LINE 2
5
Z6 20BK/PK
GROUND
6
-
7
-
8
D25 20VT/YL
255
-
PCI BUS
C
O
N
N
E
C
T
O
R
P
I
N
O
U
T
S
CONNECTOR PINOUTS
MULTI-FUNCTION SWITCH - GRAY 20 WAY
CAV
CIRCUIT
L50 18WT/TN (EXCEPT
EXPORT)
2
L61 18LG
LEFT TURN SIGNAL
2
L61 18LG (EXPORT)
LEFT TURN SIGNAL
3
L6 20RD/WT
FUSED IGNITION SWITCH OUTPUT (RUN-ACC)
4
L63 18DG/RD
LEFT TURN SIGNAL
4
L63 18DG/RD (EXPORT)
LEFT TURN SIGNAL
5
L62 18BR/RD
RIGHT TURN SIGNAL
5
L62 18BR/RD (EXPORT)
RIGHT TURN SIGNAL
6
L60 18TN
RIGHT TURN SIGNAL
6
L60 18TN (EXPORT)
RIGHT TURN SIGNAL
7
Z3 20BK/OR
GROUND
8
E19 22RD
PANEL LAMPS DIMMER SIGNAL
9
L7 18BK/YL
10
C
O
N
N
E
C
T
O
R
P
I
N
O
U
T
S
FUNCTION
1
BRAKE LAMP SWITCH OUTPUT
HEADLAMP SWITCH OUTPUT
-
-
11
A15 18WT
FUSED B(+)
12
L38 16BR/WT (EXPORT)
REAR FOG LAMP FEED
12
L38 16BR/WT (EXPORT)
REAR FOG LAMP FEED
13
L4 14VT/WT (EXCEPT EXPORT)
DIMMER SWITCH LOW BEAM OUTPUT
13
F61 16WT/OR (EXPORT)
FUSED B(+)
14
F39 14PK/LG (EXCEPT EXPORT)
FRONT FOG LAMP SWITCH OUTPUT
14
L39 16LB (EXPORT)
FRONT FOG LAMP SWITCH OUTPUT
14
L39 16LB (EXPORT)
FRONT FOG LAMP SWITCH OUTPUT
15
-
-
16
L4 12VT/WT
DIMMER SWITCH LOW BEAM OUTPUT
17
L33 14LG/BR
DIMMER SWITCH HIGH BEAM OUTPUT
18
F3 12LB/OR
FUSED B(+)
19
F3 12LB/OR
FUSED B(+)
20
F33 18PK/RD
FUSED B(+)
PASSENGER AIRBAG SQUIB 1 - YELLOW 2 WAY
CAV
CIRCUIT
FUNCTION
1
R42 20BK/YL
PASSENGER SQUIB 1 LINE 1
2
R44 20DG/YL
PASSENGER SQUIB 1 LINE 2
256
CONNECTOR PINOUTS
PASSENGER DOOR AJAR SWITCH - BLACK 2 WAY
CAV
CIRCUIT
FUNCTION
1
G74 20TN
RIGHT FRONT DOOR AJAR SWITCH SENSE
2
Z14 20BK/YL
GROUND
PASSENGER DOOR LOCK MOTOR/AJAR SWITCH - BLACK 4 WAY
CAV
CIRCUIT
FUNCTION
1
G74 20TN/RD (LHD)
RIGHT FRONT DOOR AJAR SWITCH SENSE
1
G75 20TN (RHD)
LEFT FRONT DOOR AJAR SWITCH SENSE
2
Z14 20BK/YL
GROUND
3
P36 18PK/VT
DOOR UNLOCK RELAY OUTPUT
4
P33 18OR/BK
DOOR LOCK RELAY OUTPUT
C
O
N
N
E
C
T
O
R
P
I
N
O
U
T
S
257
CONNECTOR PINOUTS
C
O
N
N
E
C
T
O
R
P
I
N
O
U
T
S
HORN RELAY
CAV
CIRCUIT
FUNCTION
39
F62 20RD (2.0L)
FUSED B(+)
39
F62 18RD (2.4L TURBO)
FUSED B(+)
40
F62 20RD (2.0L)
FUSED B(+)
40
F62 18RD (2.4L TURBO)
FUSED B(+)
41
X2 20DG/RD (2.0L)
HORN RELAY OUTPUT
41
X2 18DG/RD (2.4L TURBO) HORN RELAY OUTPUT
42
43
X3 20BK/RD
HORN RELAY CONTROL
258
CONNECTOR PINOUTS
POWERTRAIN CONTROL MODULE C1 - BLACK 38 WAY
CAV
CIRCUIT
FUNCTION
1
-
-
2
-
-
3
-
-
4
-
-
5
-
-
6
-
-
7
-
-
8
-
9
Z11 18BK/WT
10
GROUND
-
-
11
F12 18DB/WT (2.0L)
FUSED IGNITION SWITCH OUTPUT (RUN-START)
11
F12 18DB/RD (2.4L
TURBO)
FUSED IGNITION SWITCH OUTPUT (RUN-START)
12
F11 20RD/WT (2.0L AUTOSTICK)
IGNITION SWITCH OUTPUT (OFF-RUN-START)
12
F11 20RD/WT (2.0L EXCEPT AUTOSTICK)
FUSED IGNITION SWITCH OUTPUT (RUN-START)
13
G7 20WT/OR
VEHICLE SPEED SIGNAL
14
G9 20GY/BK
BRAKE FLUID LEVEL SWITCH SENSE
15
K55 18LB (2.4L TURBO)
16
TIP SOL CONTROL
-
-
17
K150 18DB/YL (2.4L
TURBO)
SURGE SOL CONTROL
18
Z12 18BK/TN
GROUND
19
20
G6 20GY
21
OIL PRESSURE SIGNAL
-
-
22
K145 20BR/OR
AAT SIGNAL
23
K153 18LB (2.4L TURBO)
TIP SIGNAL
24
-
-
25
D20 20LG
SCI RECEIVE (PCM)
26
D6 20PK/LB (2.0L)
SCI RECEIVE (TCM)
27
K6 20VT/WT (2.0L)
5 VOLT SUPPLY
27
K6 18VT/WT (2.4L TURBO) 5 VOLT SUPPLY
28
K137 18DB/GY (2.4L
TURBO)
WASTEGATE SOL CONTROL
29
A14 18RD/WT
FUSED B(+)
30
A41 16YL
FUSED IGNITION SWITCH OUTPUT (START)
31
-
-
32
-
-
33
-
-
34
-
-
35
-
-
36
D21 20PK
SCI TRANSMIT (PCM)
37
D15 20WT/DG (2.0L)
SCI TRANSMIT (TCM)
38
D25 20VT/YL
PCI BUS (PCM)
259
C
O
N
N
E
C
T
O
R
P
I
N
O
U
T
S
CONNECTOR PINOUTS
RADIO C1 - DK. GRAY 22 WAY
CAV
P
I
N
O
U
T
S
FUNCTION
1
M11 16PK/LB
2
X12 18RD/WT
FUSED IGNITION SWITCH OUTPUT (RUN-ACC)
3
E2 20OR
PANEL LAMPS DRIVER
FUSED B(+)
4
-
-
5
-
-
6
-
-
7
X54 20VT
RIGHT FRONT SPEAKER (+)
8
X56 20DB/RD
RIGHT FRONT SPEAKER (-)
9
X55 20BR/RD
LEFT FRONT SPEAKER (-)
10
X53 20DG
LEFT FRONT SPEAKER (+)
11
Z9 16BK
GROUND
12
-
13
-
14
C
O
N
N
E
C
T
O
R
CIRCUIT
D25 20VT/YL
PCI BUS
15
-
-
16
-
-
17
-
-
18
X51 20BR/YL
LEFT REAR SPEAKER (+)
19
X57 20BR/LB
LEFT REAR SPEAKER (-)
20
X58 20DB/OR
RIGHT REAR SPEAKER (-)
21
X52 20DB/WT
RIGHT REAR SPEAKER (+)
22
-
-
RADIO C2 (COMPACT DISC CHANGER) - DK. GRAY 10 WAY
CAV
CIRCUIT
FUNCTION
1
24GY/WT
AUDIO OUT RIGHT
2
24BK/OR
GROUND
3
22BK
SHIELD GROUND
4
24VT/YL
PCI BUS
5
24RD
FUSED IGNITION SWITCH OUTPUT
6
24DG/WT
AUDIO OUT LEFT
7
22BK/YL
GROUND
8
-
-
9
24OR/YL
PANEL LAMPS DIMMER SIGNAL
10
22GY/YL
B(+)
260
CONNECTOR PINOUTS
REMOTE KEYLESS ENTRY MODULE - BLACK 26 WAY
CAV
CIRCUIT
1
L4 16VT/WT (EXCEPT EXPORT)
DIMMER SWITCH LOW BEAM OUTPUT
FUNCTION
1
L63 18DG/RD (EXPORT)
LEFT TURN SIGNAL
2
L7 18BK/YL (EXCEPT EXPORT)
PARK LAMP SWITCH OUTPUT
2
L62 18BR/RD (EXPORT)
RIGHT TURN SIGNAL
3
F35 18RD
FUSED B(+)
4
P33 18OR/BK
DOOR LOCK RELAY OUTPUT
5
P34 18PK/BK
DRIVER DOOR UNLOCK RELAY OUTPUT
6
P36 18PK/VT
DOOR UNLOCK RELAY OUTPUT
7
M9 20LB/OR
PASSENGER DOOR AJAR/RKE SENSE
8
Z2 18BK/LG
GROUND
9
M1 18PK
FUSED B(+)
10
P97 20LG (LHD)
LEFT DOOR SWITCH MUX
10
P96 20LG/BK (RHD)
RIGHT DOOR SWITCH MUX
11
P96 20LG/BK (LHD)
RIGHT DOOR SWITCH MUX
11
P97 20LG (RHD)
LEFT DOOR SWITCH MUX
12
Z1 20BK
GROUND
13
-
14
Q33 20BR/LB
DECKLID RELEASE RELAY CONTROL
15
X5 22WT/RD (EXPORT)
SIREN CONTROL
16
Q2 16LG/BK
DECKLID RELEASE RELAY OUTPUT
17
G69 20BK/OR
VTSS INDICATOR DRIVER
18
X3 22BK/RD
HORN RELAY CONTROL
19
D25 20VT/YL
PCI BUS
20
G120 18WT/DB (EXPORT)
INTRUSION SENSOR SIGNAL
21
-
-
-
22
G5 20DB/WT
FUSED IGNITION SWITCH OUTPUT (RUN-START)
23
G70 20BR/TN (EXPORT)
HOOD AJAR SWITCH SENSE
24
G71 20VT/BK
DECKLID SECURITY SWITCH SENSE
25
G75 20TN/BK (LHD)
LEFT FRONT DOOR AJAR SWITCH SENSE
25
G74 20TN/RD (RHD)
RIGHT FRONT DOOR AJAR SWITCH SENSE
26
-
-
RIGHT CYLINDER LOCK SWITCH (EXPORT) - BLACK 2 WAY
CAV
CIRCUIT
FUNCTION
1
P96 18LG
RIGHT DOOR SWITCH MUX
2
Z14 18BK
GROUND
261
C
O
N
N
E
C
T
O
R
P
I
N
O
U
T
S
CONNECTOR PINOUTS
RIGHT DOOR LOCK SWITCH - BLACK 3 WAY
CAV
CIRCUIT
1
-
FUNCTION
-
2
P96 20LG/BK
RIGHT DOOR SWITCH MUX
2
P96 18LG (ALARM)
RIGHT DOOR SWITCH MUX
3
Z14 20BK/YL
GROUND
3
Z14 18BK (ALARM)
GROUND
3
Z14 20BK/YL (EXCEPT
ALARM)
GROUND
RIGHT FRONT DOOR SPEAKER - 3 WAY
CAV
1
CIRCUIT
X56 20DB/RD
2
3
C
O
N
N
E
C
T
O
R
FUNCTION
RIGHT FRONT SPEAKER (-)
X54 20VT
RIGHT FRONT SPEAKER (+)
RIGHT INSTRUMENT PANEL SPEAKER - WHITE 2 WAY
CAV
CIRCUIT
FUNCTION
1
X54 20VT
RIGHT FRONT SPEAKER (+)
2
X56 20DB/RD
RIGHT FRONT SPEAKER (-)
P
I
N
O
U
T
S
262
CONNECTOR PINOUTS
RIGHT REAR DOOR AJAR SWITCH - BLACK 2 WAY
CAV
CIRCUIT
FUNCTION
1
G76 20TN/YL
PASSENGER DOOR AJAR/RKE SENSE
2
Z1 20BK
GROUND
RIGHT REAR DOOR LOCK MOTOR/AJAR SWITCH - BLACK 4 WAY
CAV
CIRCUIT
FUNCTION
1
G77 20TN/OR
PASSENGER DOOR AJAR/RKE SENSE
2
Z1 20BK
GROUND
3
P36 18PK/VT
DOOR UNLOCK RELAY OUTPUT
4
P33 18OR/BK
DOOR LOCK RELAY OUTPUT
RIGHT REAR SPEAKER - 3 WAY
CAV
1
CIRCUIT
X52 20DB/WT
2
-
3
X58 20DB/OR
FUNCTION
RIGHT REAR SPEAKER (+)
RIGHT REAR SPEAKER (-)
RIGHT SEAT AIRBAG SQUIB - 2 WAY
CAV
CIRCUIT
FUNCTION
1
R32 18OR
RIGHT SEAT SQUIB LINE 2
2
R34 18WT
RIGHT SEAT SQUIB LINE 1
RIGHT SIDE IMPACT AIRBAG CONTROL MODULE - 8 WAY
CAV
1
CIRCUIT
F15 20DG/WT
FUNCTION
FUSED IGNITION SWITCH OUTPUT (RUN-START)
2
-
3
R34 20OR/YL
RIGHT SEAT SQUIB LINE 1
4
R32 20YL/OR
RIGHT SEAT SQUIB LINE 2
5
Z6 20BK/PK
GROUND
6
-
7
-
8
D25 20VT/YL
263
C
O
N
N
E
C
T
O
R
-
PCI BUS
P
I
N
O
U
T
S
CONNECTOR PINOUTS
SEAT BELT SWITCH - BLACK 2 WAY
CAV
CIRCUIT
FUNCTION
1
G10 20LG/RD
SEAT BELT SWITCH SENSE
2
Z1 20BK
GROUND
SENTRY KEY IMMOBILIZER MODULE - BLACK 6 WAY
CAV
CIRCUIT
1
-
2
D25 22VT/YL
3
C
O
N
N
E
C
T
O
R
FUNCTION
PCI BUS
-
-
4
G5 20DB/WT
FUSED IGNITION SWITCH OUTPUT (RUN-START)
5
Z2 20BK/LG
GROUND
6
M1 20PK
FUSED B(+)
SIREN (EXPORT) - BLACK 4 WAY
CAV
CIRCUIT
FUNCTION
1
X5 20WT/RD
SIREN CONTROL
2
X5 20WT/RD
SIREN CONTROL
3
Z1 18BK
GROUND
4
M1 18PK
FUSED B(+)
P
I
N
O
U
T
S
264
SCHEMATIC DIAGRAMS
10.0
10.1
SCHEMATIC DIAGRAMS
AIRBAG SYSTEM
S
C
H
E
M
A
T
I
C
D
I
A
G
R
A
M
S
265
SCHEMATIC DIAGRAMS
10.2
AUDIO SYSTEM
S
C
H
E
M
A
T
I
C
D
I
A
G
R
A
M
S
266
SCHEMATIC DIAGRAMS
10.2.1
10.3
CD CHANGER
COMPASS/TEMPERATURE MIRROR
S
C
H
E
M
A
T
I
C
D
I
A
G
R
A
M
S
267
SCHEMATIC DIAGRAMS
10.4
EXTERIOR LIGHTING
S
C
H
E
M
A
T
I
C
D
I
A
G
R
A
M
S
268
SCHEMATIC DIAGRAMS
10.5
INSTRUMENT CLUSTER
S
C
H
E
M
A
T
I
C
D
I
A
G
R
A
M
S
269
SCHEMATIC DIAGRAMS
10.6
10.7
INTERIOR LIGHTING
POWER DOOR LOCKS/RKE
S
C
H
E
M
A
T
I
C
D
I
A
G
R
A
M
S
270
SCHEMATIC DIAGRAMS
10.8
VEHICLE COMMUNICATION
S
C
H
E
M
A
T
I
C
D
I
A
G
R
A
M
S
271
SCHEMATIC DIAGRAMS
10.9
VEHICLE THEFT SECURITY SYSTEM
S
C
H
E
M
A
T
I
C
D
I
A
G
R
A
M
S
272
DIAGNOSTIC TEST PROCEDURES — TELL US!
DaimlerChrysler Corporation is constantly working to provide the technician the best diagnostic manuals possible.
Your comments and recommendations regarding the diagnostic manuals and procedures are appreciated.
To best understand your suggestion, please complete the form giving us as much detail as possible.
Model
Transmission
Diagnostic Procedure
Year
Body Type
Vehicle Mileage
Book No.
Comments/recommendations (if necessary, draw sketch)
Name
Submitted by:
Address
City/State/Zip
Business Phone #
All comments become property of DaimlerChrysler Corporation and may be used without compensation.
Engine
MDH
Page
Dealer Technical Operations
800 Chrysler Drive
CIMS 486-02-76
Auburn Hills, MI 48326-2757