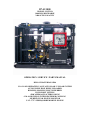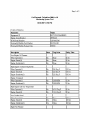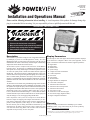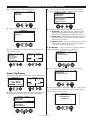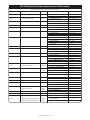
1
ATTENTION!
Please fill out and return!
Your new Hurricane Compressor is covered by the warranty as explained in the
warranty section in the end of this manual. Please fill in the following information and
mail or fax this sheet back to the attention of the warranty department within 10 days of
start-up of the unit to register your compressors. Thanks.
Mailing Address:
Warranty Department
Atlas Copco Hurricane LLC
1015 Hurricane Road
Franklin, Indiana 46131
Phone Number:
317-736-3800
Fax Number:
317-736-3801
Compressor Model Number_________________ Compressor Serial Number_______________
Date Placed In Service_____________________ Hour meter Reading____________________
End User Company Name_______________________________________________________
End User Company Street Address________________________________________________
End User City, State, Country, Zip_________________________________________________
End User Company Contact Person_______________________________________________
End User Telephone and Fax Numbers_____________________________________________
Distributor Name, City, State, Country______________________________________________
Comments or Suggestions:
B7-41/1000
350 PSIG SUCTION
1000 PSIG DISCHARGE
2400 SCFM CAPACITY
OPERATION / SERVICE / PARTS MANUAL
BILL OF MATERIAL 10206
CO-AX AIR OPERATED VALVE AUTOLOAD / UNLOAD SYSTEM
AUTO ENGINE IDLE WHEN UNLOADED
BURGESS-MANNING INLET SCRUBBER
FOUR POINT LIFTING
+50°F APPROACH AFTERCOOLING
#2 & #4 HOUSINGS WITH RINGFEDER COUPLING
MURPHY PV100 ENGINE MONITOR
CAT C7 T3 250HP@1899RPM DRIVE ENGINE
OPERATION, MAINTENANCE AND PARTS MANUAL
GENERAL SAFETY
How to Work Safely With Your Compressor
Before You Start the Compressor
• Check all fluid levels and for possible leaks
• Use adequate pressure rated hoses and couplings with proper cable restraints
• Remove all tools and/or loose items from engine and pumper areas including fan area
Use of Compressed Air
• Air from this machine is NOT fit for human consumption- do NOT use air for
breathing for food processing
• Never operate in an enclosed area
• Never use compressed air to clean your clothes; and never direct it at another person - IT
CAN KILL
• Wear eye protection
Other Safety Precautions
• Do not touch hot surfaces or moving parts - such as piping, exhaust, coolers
• Do not adjust or restrict safety relief valves
• Do not disconnect or alter shutdown sensors or switches
• Do not clean machine with gasoline or volatile fluids
• Do not refuel while machine is running; shutdown and allow to cool before refueling
• Do not jump-start with cable connections direct on battery. Connect ground last, away
from battery or frame
Servicing
• Disconnect battery if mechanical work is being performed
• Remove radiator cap with caution, it may be pressurized when hot
• Wipe up any spills resulting from servicing
Lifting Procedure
Designated personal shall do lifting or hoisting. The load capacity rating shall be clearly marked
on hoist. Do not exceed load rating. Inspection and testing for cracks or defects in hoist system
shall be performed on a regular basis. Before lifting, alert personnel in immediate areas. Do not
stand under unit while it is being moved from one area to another on a hoist. Do not stand under
unit to do service work.
Read Manufacturer’s Service Manual Before Operating Compressor/Booster
Failure to heed any of the above warnings or misuse of the compressor/booster even though not
previously mentioned herein may result in severe injury or death, property damage, and
mechanical failure, for which Atlas Copco Hurricane nor the Compressed Air and Gas Institute
can be held responsible.
GENERAL SAFETY (continued)
If an operator cannot read or understand the manufactures safety and operating instructions, we
strongly suggest the employer read (translate) and explain this information to the operator.
Important Safety Instructions
Look for these signs, which point out potential hazards to the safety of you and others. Read and
understand thoroughly. Heed warnings and follow instructions. If you do not understand, inform
your supervisor.
Indicates the presence of a hazard, which WILL cause severe
injury, death or property damage, if ignored. Indicates the presence of a hazard, which CAN cause severe
injury, death or property damage, if ignored.
Indicates the presence of a hazard, which WILL or CAN
cause injury, death or property damage, if ignored Indicates important setup, operating or maintenance
information.
California Proposition 65 Warning – Diesel engine exhaust and some of its constituents are
known to the state of California to cause cancer, birth defects and other reproductive harm.
Warnings: This machine produces loud noises with the service valve vented. Extended
exposure to loud noise can cause hearing loss. Always wear hearing protection when service
valve is vented.
Warning: High-pressure air can cause severe injury or death. Relieve pressure before
recovering filter plugs, caps, fittings or covers.
Danger: Air pressure can remain trapped in air supply line, which can result in serious injury or
death. Always carefully vent air supply line at vent valve before performing any service.
Warning: Do not remove the pressure cap from a HOT radiator. Allow radiator to cool before
removing pressure cap.
Danger: Disconnected air hoses whip. They can cause severe injury, death or property damage.
Always use cable restraints.
GENERAL SAFETY (continued)
Warning: Never run unit with guard covers or screens removed. Keep hands, hair, clothing,
tools, air gun tips, etc. away from moving parts.
Hazardous Substance Precaution
The following substances are used in the manufacture of this machine and may be hazardous to
health if used incorrectly.
Substance
Antifreeze
Compressor Lubricating Oil
Engine Lubricating Oil
Preservative Grease
Rust Preventative
Diesel Fuel
Battery Electrolyte
Precaution
Avoid ingestion, skin contact and breathing fumes
Avoid ingestion, skin contact and breathing fumes
Avoid ingestion, skin contact and breathing fumes
Avoid ingestion, skin contact and breathing fumes
Avoid ingestion, skin contact and breathing fumes
Avoid ingestion, skin contact and breathing fumes
Avoid ingestion, skin contact and breathing fumes
The following substances may be produced during the operation of this machine and may be
hazardous to health.
Substance
Engine Exhaust Fumes
Engine Exhaust Fumes
Precaution
Avoid breathing
Avoid build-up of fumes in confined spaces
COMPRESSOR
CAPACITY @ 350 PSIG SUCTION
2400 SCFM
@ 700 PSIG DISCHARGE @ 1925 RPM
SEE CAPACITY SHEET IN OPERATION SECTION FOR MORE DETAIL
MAXIMUM DISCHARGE PRESSURE
1000 PSIG
OPERATING SPEED
1200 RPM - 1925 RPM
MAXIMUM OVERALL COMPRESSION RATIO 2.78:1
FROM SUCTION
ENGINE
MODEL
RATING
FUEL
ELECTRICAL SYSTEM
CATERPILLAR C7 T3
250 BHP @ 1800 RPM
IND-C INTERMITTENT CURVE
DIESEL
24 VDC
BOOSTER MEASUREMENTS
OVERALL LENGTH
OVERALL HEIGHT
OVERALL WIDTH
8'-10" (106")
6'-8" (81")
5'-11" (71")
WEIGHT
DRY
6850 POUNDS
WET
7870 POUNDS
(WET INCLUDES OIL, OIL, COOLANT, FUEL, BATTERIES)
FLUID CAPACITIES
PUMPER LUBRICATING OIL
ENGINE LUBRICATING OIL
COOLANT SYSTEM
FUEL TANK
2.25 GALLONS (INCLUDES FILTER)
7.50 GALLONS (INCLUDES FILTER)
22 GALLONS
80 GALLONS
PUMPER
STROKE
1ST STAGE DIAMETER
5.00"
2.50" x 4 CYLINDERS
SAFETY RELIEF VALVE SETTINGS
SUCTION
1ST STAGE
450 PSIG
1200 PSIG
SET PRESSURES
UNLOAD VALVE REGULATOR
BACK PRESSURE REGULATOR
DISCAHRE PRESSURE SWITCH
100 PSIG
400 PSIG
1000 PSIG MAXIMUM, OR DESIRED
UNLOAD PRESSURE
SHUT DOWN SET POINTS
SUCTION HIGH GAS TEMPERATURE
1ST STAGE HIGH GAS TEMPERATURE
LOW PUMPER OIL PRESSURE
ENGINE OVERSPEED
160ºF
400ºF
20 PSIG
2100 RPM
BATTERIES
SIZE
CCA @ 32ºF
CCA @ 0ºF
BATTERY VOLTAGE
CIRCUIT
CIRCUIT VOLTAGE
QUANTITY
1231MF
1260
1100
12 VDC
SERIES
24 VDC
2
INSTRUMENT PANEL
SHUTDOWN SETPOINTS
SUCTION HIGH GAS
TEMPERATURE 160deg. F
DISCHARGE HIGH GAS
TEMPERATURE 400deg. F
LOW PUMPER OIL
PRESSURE 20 PSIG
PRIOR TO START UP
1)
SET THE BOOSTER ON LEVEL GROUND NOT TO EXCEED 5deg. IN ANY
DIRECTION.
2)
DO NOT SET BOOSTER WITHIN 8 FEET OF OTHER MACHINERY, BUILDINGS,
OR ANY OBSTRUCTIONS THAT MAY HAMPER COOLING AIR FLOW TO AND
FROM BOOSTER.
3)
CONFIRM PRESSURE SWITCH AUTO UNLOAD PRESSURE.
4)
CHECK ENGINE/PUMPER OIL AND COOLANT LEVELS.
5)
DRAIN FLUID FROM INLET SCRUBBER TANK.
6)
DRAIN FLUID FROM INTERSTAGE SEPERATOR TANKS.
7)
CHECK THAT SUCTION HOSES ARE CLEAR OF DIRT AND DEBRIS.
8)
DO NOT OPERATE WITHOUT SAFETY CABLES ON AIR HOSES.
9)
DO NOT OPERATE WITH SAFETY DEVICES BY-PASSED.
10)
DO NOT ATTEMPT TO START WITH AIR IN SYSTEM.
11)
WARM UP PRIMARY SCREW COMPRESSORS.
START UP PROCEDURE
1)
CLOSE SUCTION AND DISCHARGE VALVES.
2)
CLOSE INLET SCRUBBER TANK VALVE.
3)
CONFIRM EMERGENCY STOP BUTTON IS IN EXTENDED POSITION.
4)
TURN UNLOAD/AUTOLOAD SWITCH TO UNLOAD.
5)
TURN OFF/RUN/BY-PASS SWITCH TO BY-PASS.
6)
RESET ANY TRIPPED TATTLE-TALES.
7)
PUSH START BUTTON AND HOLD IN UNTIL ENGINE FIRES. DO NOT
ENGAGE STARTER FOR MORE THAN 15 SECONDS INTERVALS, ALLOWING
TIME FOR STARTER TO COOL.
8)
HOLD OFF/RUN/BY-PASS SWITCH TO BY-PASS POSITION UNTIL PUMPER OIL
PRESSURE IS ABOVE 20 PSIG. WHEN PRESSURE OF PUMPER IS ABOVE 20
PSIG, RELEASE SWITCH TO RUN POSITION. IF PUMPER OIL PRESSURE DOES
NOT IMMEDIATELY CLIMB, STOP BOOSTER AND INVESTIGATE PROBLEM.
9)
SLOWLEY OPEN SUCTION VALVE.
10)
DO NOT LOAD BOOSTER UNTIL COOLANT TEMPERATURE REACHES 1301F.
11)
SLOWLEY OPEN DISCHARGE VALVE.
AUTOMATIC BOOSTER LOADING
1)
TURN UNLOAD/AUTOLOAD SWITCH TO AUTOLOAD POSITION.
2)
INCREASE / DECREASE ENGINE SPEED TO MATCH DESIRED CAPACITY.
3)
BOOSTER WILL BEGIN TO BUILD PRESSURE IF THERE IS SUFFICIENT
RESTRICTION DOWN LINE.
4)
BOOSTER WILL AUTOMATICALLY UNLOAD AND LOAD ACCORDING TO
PRESSURE SWITCH SETTING.
MANUAL UNLOAD
1)
TURN UNLOAD/AUTOLOAD SWITCH TO UNLOAD POSITION.
ROUTINE SHUTDOWN PROCEDURE
1)
TURN UNLOAD/AUTOLOAD SWITCH TO UNLOAD POSITION.
2)
ALLOW BOOSTER TO RUN FOR 5 MINUTES TO COOLDOWN.
3)
CLOSE SUCTION AND DISCHARGE VALVES.
4)
TURN OFF/RUN/BY-PASS SWITCH TO OFF POSITION.
5)
OPEN INLET SCRUBBER TANK VALVE.
EMERGENCY SHUTDOWN PROCEDURE
1)
PRESS EMERGENCY STOP BUTTON ON SIDE OF INSTRUMENT PANEL.
2)
CLOSE SUCTION AND DISCHARGE VALVES.
3)
OPEN INLET SCRUBBER TANK VALVE.
4)
TURN OFF/RUN/BY-PASS SWITCH TO OFF POSTION.
5)
TURN UNLOAD/AUTOLOAD SWITCH TO UNLOAD POSITION.
CAPACITY CHART
B7-41/1000
2.50 DIAMETER PISTONS
350 PSIG MAXIMUM SUCTION
1000 PSIG MAXIMUM DISCHARGE
2.78:1 MAXIMUM OVERALL
COMPRESSION RATIO FROM SUCTION
CAPACITY SCFM AT VARIOUS PRESSURE AND RPM
SUCTION
PSIG
DISCHARGE
PSIG
1925
RPM
1800
RPM
1600
RPM
1400
RPM
1200
RPM
350
1000
N/R
2160 SCFM
1920 SCFM
1680 SCFM
1440 SCFM
350
700
2440 SCFM
2280 SCFM
2030 SCFM
1770 SCFM
1520 SCFM
325
930
2150 SCFM
2010 SCFM
1790 SCFM
1570 SCFM
1340 SCFM
300
860
2000 SCFM
1870 SCFM
1660 SCFM
1450 SCFM
1240 SCFM
275
790
1840 SCFM
1720 SCFM
1530 SCFM
1340 SCFM
1150 SCFM
250
750
1680 SCFM
1570 SCFM
1400 SCFM
1220 SCFM
1050 SCFM
CAPACITY (S L/s) AT VARIOUS PRESSURE AND RPM
SUCTION
BAR
DISCHARGE
BAR
1925 RPM
1800 RPM
1600 RPM
1400 RPM
1200 RPM
24
69
N/R
1019
906
793
680
24
48
1152
1076
958
835
717
22
64
1015
949
845
741
632
21
59
944
883
783
684
585
19
54
868
812
722
632
543
17
52
793
741
661
576
496
PREVENTATIVE MAINTENANCE SCHEDULE
IF OPERATING IN EXTREME ENVIRONMENTAL CONDITIONS (VERY HOT, COLD,
DUSTY, OR WET), THESE TIME PERIODS SHOULD BE REDUCED.
R = REPLACE
C = CHECK (ADJUST OR REPLACE IF NECESSARY)
L = LUBRICATE
HOURLY
DRAIN INLET SCRUBBER TANK (OR AS NEEDED).
CAUTION - DRAIN INLET SCRUBBER TANK MORE OFTEN AS
NEEDED WHEN OPERATING DURING HIGH HUMIDITY.
DANGER - DO NOT ALLOW INLET SCRUBBER TANK FLUID
LEVEL TO RISE ABOVE SIGHT GLASS.
DANGER - FAILURE TO DRAIN INLET SCRUBBER TANK MAY
RESULT IN COMPRESSOR VALVE DAMAGE OR HYDRAULIC LOCK.
C
DAILY
WALK AROUND INSPECTION
PUMPER OIL LEVEL
ENGINE OIL LEVEL
C
COOLANT SYSTEM LEVEL
AIR FILTER RESTRICTION INDICATOR
GAUGES/LIGHTS
FUEL TANK (FILL AT END OF DAY)
C
C
C
C
MONTHLY
FAN BELTS
HOSES AND CLAMPS (AIR, OIL, COOLANT)
COOLERS AND RADIATOR
AUTOMATIC SHUTDOWN SYSTEM (TEST)
FASTENERS
C
C
C
C
C
3 MONTHS
COOLERS AND RADIATOR (CLEAN EXTERIOR)
C
250 HOURS
PUMPER OIL AND FILTER CHANGE
L/R
MAINTAIN DRIVE ENGINE PER CATERPILLAR ENGINE MANUAL
C
C
DRIVE ENGINE
REFER TO CATERPILLAR ENGINE MANUALS FOR ALL CATERPILLAR ENGINE
RELATED SERVICE, ADJUSTMENTS, AND SPECIFICATIONS.
DRIVE ENGINE AND PUMPER OIL LEVEL
MAINTAIN BETWEEN FULL AND ADD
CRANKCASE LUBRICATION OIL
LUBRICANT VISCOSITY CHART FOR OUTSIDE AMBIENT TEMPERATURES
OIL
VISCOSITY
SAE 0W-20
SAE 0W-30
SAE 0W-40
SAE 5W-30
SAE 5W-40
SAE 10W-30
SAE 15W-40
-
-
AMBIENT 1F
MINIMUM
MAXIMUM
-40
50
-40
86
-40
104
-22
86
-22
104
-4
104
5
122
SELECT OIL VISCOSITY BASED UPON MAXIMUM EXPECTED OPERATING
TEMPERATURE. START UP AT LOWER THAN SPECIFIED AMBIENT
TEMPERATURE REQUIRES CAUTION. START UP AT VERY LOW AMBIENT
TEMPERATURES MAY REQUIRE AUXILIARY OIL HEATERS AND JACKET
WATER HEATERS OR OTHER METHODS TO INCREASE CRANKCASE
TEMPERATURES.
TO DETERMINE IF THE OIL IN THE CRANKCASE WILL FLOW IN COLD
WEATHER, REMOVE THE OIL DIPSTICK BEFORE STARTING. IF THE OIL
WILL FLOW OFF THE DIPSTICK, THE OIL IS FLUID ENOUGH TO CIRCULATE
PROPERLY.
SELECT AN OIL WITH API CH-4 (PREFERRED) OR API CG-4 (PREFERRED) OR
API CF-4 (ACCEPTABLE) CERTIFICATION.
SYNTHETIC BASE STOCK OILS ARE ACCEPTABLE FOR USE.
SYNTHETIC BASE STOCK OILS OUTPERFORM NON-SYNTHETIC OILS IN
IMPROVED LOW TEMPERATURE VISCOSITY CHARACTERISTICS,
ESPECIALLY IN ARCTIC CONDITIONS, AND IMPROVED OXIDATION
STABILITY, ESPECIALLY AT HIGH OPERATING TEMPERATURES.
RECOMMENDED CRANKCASE OILS
-
MOBIL DELVAC 1300 SUPER 15W-40
MOBIL DELVAC 1300 SUPER 10W-30
MOBIL DELVAC 1 SYNTHETIC 5W-40
RADIATOR
THE ENGINE COOLING SYSTEM IS FILLED AT THE FACTORY WITH A 50/50
MIXTURE OF DISTILLED WATER AND ETHYLENE GLYCOL. THIS IS A PERMANENT
TYPE ANTIFREEZE WHICH CONTAINS RUST INHIBITORS AND PROVIDES
PROTECTION TO -35deg. F. IT IS RECOMMENDED THAT THE RADIATOR BE
CLEANED BY DIRECTING COMPRESSED AIR OPPOSITE FAN FLOW DIRECTION
WHICH CONTAINS A NON-FLAMMABLE SAFETY SOLVENT THROUGH THE CORE
OF THE COOLER FINS. VENT SYSTEM WHEN FILLING, INCLUDING PUMPER
BLOCK AND COMPRESSOR VALVE COOLING FITTINGS.
COOLERS
THE COMPRESSOR SUCTION AND DISCHARGE AIR COOLS BY MEANS OF FIN AND
TUBE TYPE COOLERS, LOCATED AT THE PUMPER END OF THE COMPRESSOR. THE
AIR FLOWING INTERNALLY THROUGH THE TUBE SECTION IS COOLED BY THE AIR
STREAM PASSING THROUGH THE FIN SECTION FROM THE FAN. WHEN GREASE,
OIL, AND DIRT ACCUMULATE ON THE EXTERIOR SURFACES OF THE COOLERS
THEIR EFFICIENCY IS IMPAIRED. IT IS RECOMMENDED THAT THE COOLERS BE
CLEANED BY DIRECTING COMPRESSED AIR OPPOSITE FAN FLOW DIRECTION
WHICH CONTAINS A NON-FLAMMABLE SAFETY SOLVENT THROUGH THE CORE
OF THE COOLER FINS.
BATTERIES
HEAVY-DUTY, DIESEL CRANKING TYPE BATTERIES WERE INSTALLED AT THE
FACTORY. KEEP BATTERY POST TO CABLE CONNECTIONS CLEAN, TIGHT, AND
LIGHTLY COATED WITH CORROSION PREVENTATIVE. THE ELECTROLYTE LEVEL
IN EACH CELL SHOULD COVER THE TIPS OF THE PLATES. IF NECESSARY, TOPOFF WITH DISTILLED WATER.
INLET SCRUBBER TANK
DRAIN HOURLY OR AS NEEDED.
CAUTION - DRAIN INLET SCRUBBER TANK MORE OFTEN AS NEEDED WHEN
OPERATING DURING HIGH HUMIDITY.
DANGER - DO NOT ALLOW INLET SCRUBBER TANK FLUID LEVEL TO RISE ABOVE
SIGHT GLASS.
DANGER - FAILURE TO DRAIN INLET SCRUBBER TANK MAY RESULT IN
COMPRESSOR VALVE DAMAGE OR HYDRAULIC LOCK.
AIR CLEANER
THE DRIVE ENGINE IS EQUIPPED WITH AIR FILTER RESTRICTION INDICATOR. IF
THE INDICATOR SHOWS RED THE ELEMENT SHOULD BE REPLACED. THE AIR
CLEANER HOUSING AND PIPING SHOULD BE INSPECTED FOR LEAKAGE PATHS OR
INLET OBSTRUCTIONS.
COMPRESSOR VALVE INSPECTION
1)
2)
3)
4)
5)
6)
REMOVE SUCTION PIPING FROM BOOSTER HEAD.
PRESSURIZE DISCHARGE MANIFOLD WITH AIR OR NITROGEN FROM 80
PSIG TO 100 PSIG
CHECK ALL AREAS FOR O-RING LEAKS
AIR LEAKING INTO THE SUCTION PORT OF THE HEAD IS MOST LIKELY A
DAMAGED INNER O-RING ON VALVE ADAPTER PLATE OR HEAD. IT
COULD ALSO BE A WORN/BROKEN COMPRESSOR VALVE OR DAMAGED
INTERNAL COMPRESSOR VALVE O-RING.
USE A STRAIGHT BLADED SCREWDRIVER TO PUSH THE INTAKE PLATE
OF THE COMPRESSOR VALVE DOWN. THIS MAY REQUIRE A SLIGHT
BUMP FROM THE HEEL OF YOUR HAND. A BURPING SOUND AND A
SHORT RUSH OF AIR IS NORMAL. A VERY SLIGHT LEAK INDICATED BY
A QUIET HISSING SOUND IS OKAY. CONTINUE BUMPING THE INTAKE
PLATE AROUND THE COMPRESSOR VALVE TO CLEAN OUT ANY OIL
AND/OR DEBRIS.
A CONTINUED RUSH AND LOUD HISSING OF AIR WHILE HOLDING THE
INTAKE PLATE OPEN IS MOST LIKELY A WORN/BROKEN DISCHARGE
SIDE COMPRESSOR VALVE. IT COULD ALSO BE A DAMAGED INTERNAL
COMPRESSOR VALVE O-RING.
SERVICE INTERVALS
B-41 BOM 10206
1
2
3
4
5
6
7
8
9
10
11
12
13
14
15
16
17
18
19
20
21
22
23
24
25
26
27
(1)
(2)
(3)
(4)
Service Packs Part Numbers
Drain inlet scrubber tank & interstage seperator tank (1)
Take service readings (air, oil temps/pressures)
Check for air- fuel- coolant- & oil leakage
Check electrolyte level and terminals of battery
Check fixation of hoses, cables and pipes
Check oil and coolant level ( Pumper & Engine )
Check air filter restriction indicator
Check all sensitive bolt connections
Check shutdown devices
Check coolers and clean externally
Check condition of cooling fan assembly
Clean air cleaner and dust bowl
Drain water in fuel filter
Inspect fuel tank for condensate and drain
Replace engine oil & filter
Lubricate pumper fan drive
Replace pumper oil & filter
Replace engine fuel filter
Check glycol & PH level in coolant (3)
Test shutdown system
Check the tension and condition of the drive belts
Check all sensitive bolt connections
Change element air cleaner primary
Change element air cleaner safety cartridge
Change Pumper O-rings
Check piston and replace if needed (4)
Change valves
Hourly
NA
x
Drain more often as needed when operating during high humidity
Use genuine ParOIL
PARcool change interval = min. every 5 years
Piston service pack can be ordered : Service Pack # 2236 2000 08
Daily
NA
x
x
x
x
x
x
x
x
x
x
x
x
x
250
500 or 1 year
1000
2000
HRS
2236 2000 04 2236 2000 05 2236 2000 06 2236 2000 07
x
x
x
x
x
x
x
x
x
x
x
x
x
x
x
x
x
x
x
x
x
x
x
x
x
x
x
x
x
x
x
x
x
x
x
x
x
x
x
x
x
x
x
x
x
x
x
x
x
x
x
x
x
x
x
x
x
x
x
x
x
x
x
x
x
x
x
x
x
x
x
x
x
x
x
x
x
x
x
x
x
x
x
x
x
x
x
x
x
x
x
x
x
x
x
x
x
x
Hurricane Compressors
Booster Fogging Procedures
If the booster is not going to be used for a period over 7 days, the following
procedure should be used to minimize internal rusting of booster components
Do not run the drive engine at any point during this procedure
1. Drain all water from the scrubber tank(s) and close the valve(s)
2. Prepare the sprayer with a 50/50 mix of engine oil and volatile corrosion
inhibitor (VCI) oil (HPN 64117)
3. Remove connections at booster suction and discharge valves
4. Open the booster suction and discharge valves
Do not allow the engine to start during step 5
5. Crank the drive engine at 15 second intervals, pausing one minute between
cranking, while spraying the oil mixture into the suction valve
6. Repeat step 5 until oil mist is visible from discharge valve, a minimum of 6
ounces is recommended
7. Close booster suction valve/connection
8. Close booster discharge valve/connection
9. Plug pumper block breather hoses
10. Ensure that the scrubber tank valves are closed and the system is
completely sealed
INSTRUMENT PANEL FAULT CODES
ENGINE FAULT
THE ENGINE FAULT TATTLETALE WILL POP OUT AND SHUTDOWN THE BOOSTER
FOR THE FOLLOWING REASONS:
1)
LOW PUMPER OIL PRESSURE
AIR TEMP FAULT
THE AIR TEMP FAULT TATTLETALE WILL POP OUT AND SHUTDOWN THE
BOOSTER FOR THE FOLLOWING REASONS:
1)
HIGH SUCTION AIR TEMPERATURE
2)
HIGH 1ST STAGE AIR TEMPERATURE
3)
HIGH DISCHARGE AIR TEMPERATURE
THE LIQUID LEVEL FAULT TATTLETALE WILL POP OUT AND SHUTDOWN THE
BOOSTER FOR THE FOLLOWING REASONS:
1)
HIGH LIQUID LEVEL IN SCRUBBER TANK
MURPHY POWERVIEW 100
CATERPILLAR ENGINE FAULTS WILL DISPLAY ON THE MURPHY POWERVIEW 100.
REFER TO THE CATERPILLAR MANUAL FOR MORE INFORMATION.
PV-02124N
Revised 09-03
Section 78
00-02-0528
Installation and Operations Manual
Please read the following information before installing. A visual inspection of this product for damage during shipping is recommended before mounting. It is your responsibility to have a qualified person install this unit.
GENERAL INFORMATION
WARNING
BEFORE BEGINNING INSTALLATION OF THIS MURPHY PRODUCT
✔
✔
✔
✔
Disconnect all electrical power to the machine.
Make sure the machine cannot operate during installation.
Follow all safety warnings of the machine manufacturer.
Read and follow all installation instructions.
Description
Display Parameters
The PowerView is a powerful new display in a line of components manufactured
by FWMurphy as part of its J1939 MurphyLink™† Family. The J1939
MurphyLink™ Family of products have been developed to meet the needs for
instrumentation and control on electronically controlled engines communicating
using the SAE J1939 Controller Area Network (CAN).
The PowerView System is comprised of the PowerView and the Mlink™
PowerView Gages. The PowerView is a multifunction tool that enables equipment operators to view many different engine or transmission parameters and service codes. The system provides a window into modern electronic engines and
transmissions. The PowerView includes a graphical backlit LCD screen. It has
excellent contrast and viewing from all angles. Back lighting can be controlled via
menu or external dimmer potentiometer. The display can show either a single
parameter or a quadrant display showing 4 parameters simultaneously. Diagnostic
capabilities include fault codes with text translation for the most common fault
conditions.
The PowerView has four buttons using self-calibrating charge transfer activation
technology, which eliminates the concern for pushbutton wear and failure. In addition operators can navigate the display with ease. Enhanced alarm indication with
ultra bright alarm and shutdown LEDs (amber & red). It has a wide operating temperature range of -40 to +85º C (-40 to185º F), display viewing -40 to +75º C (-40
to 167º F), and increased environmental sealing to +/- 5 PSI (± 34kPa). In addition
it features Deutsch DT style connectors molded into the case and fits quickly and
easily into existing 2-1/16 in. (52 mm) gage opening with little effort.
The following are some of the engine and transmission parameters displayed
by the PowerView in English or Metric units (when applicable, consult
engine or transmission manufacturer for SAE J939 supported parameters):
❖ Engine RPM
❖ Engine Hours
❖ Machine Hours
❖ System Voltage
❖ % Engine Load at the current RPM
❖ Coolant Temperature
❖ Oil Pressure
❖ Fuel Economy
❖ Throttle Position
❖ Engine Manifold Air Temperature
❖ Current Fuel Consumption
❖ Transmission Gear Oil Pressure
❖ Transmission Gear Oil Temperature
❖ Transmission Gear Position
❖ Active Service Codes
❖ Stored Service Codes from the engine
❖ Set Units for display (English or Metric)
❖ Engine Configuration Parameters
Other components in the system are microprocessor-based Mlink™
PowerView Gages for displaying critical engine data broadcast by an electronic engine or transmission’s Engine Control Unit (ECU): engine RPM, oil
pressure, coolant temperature, system voltage, etc. and a combination audible alarm and relay unit for warning and shutdown annunciation. Up to 32
components may be linked to the PowerView using a simple daisy chain
wire connection scheme using RS485. The PowerView and all connected
components can be powered by 12 or 24-volt systems.
Warranty
A two-year warranty on materials and workmanship is given with this
FWMurphy product. A copy of the warranty may be viewed or printed by
going to www.fwmurphy.com/warranty.asp.
† MurphyLinkTM is a registered trademark of FWMurphy. All other trademarks and service marks used in this document are the property of their respective owners.
PV-02124N page 1 of 17
GENERAL INFORMATION continued
Key Pad Functions
Table of Contents
1.
2.
3.
4.
5.
6.
7.
8.
General Information
page #
Warnings.................................................... 1
Description................................................. 1
Display Parameters.................................... 1
General Information (continued)
Table of Contents....................................... 2
Key Pad Functions..................................... 2
Mechanical Installation
Specifications............................................. 3
Typical Mounting Dimensions................... 3
Typical Quick-connect Diagram................ 3
Electrical Installation
PIN Connectors Nomenclature.................. 4
Typical Wiring Diagram............................ 4
Operations
First Time Start Up................................... 5
Main Menu Navegation............................. 5
Stored Fault Codes.................................... 6
Engine Configuration Data....................... 6
Faults and Warnings............................... .7
Active Fault Codes................................... 8
Shutdown Codes...................................... 8
Back Light Adjustment............................ 9
Contrast Adjustment.............................. 10
Select Units............................................... 10
Setup 1-Up Display................................... 11
Setup 4-Up Display.................................. 14
Utilities.....................................................15
J1939 Parameters....................................16
Glossary...................................................17
Amber Warning LED
Display
Menu Key
Left Arrow Key
Right Arrow Key
Enter Key
Bezel
Red Shutdown/Derate LED
1
8
2
7
3
6
4
5
Keypad Functions
The keypad on the PowerView is a capacitive touch sensing system.
There are no mechanical switches to wear or stick, and the technology
has been time proven in many applications. It operates in extreme temperatures, with gloves, through ice, snow, mud, grease, etc., and it allows
complete sealing of the front of the PowerView. The ‘key is pressed’
feedback is provided by flashing the screen. The keys on the keypad perform the following functions:
– Menu Key - The Menu Key is pressed to either
enter or exit the menu screens.
– Left Arrow - The Left Arrow Key is pressed
to scroll through the screen either moving the parameter selection toward the left or downward.
– Right Arrow - The Right Arrow Key is
pressed to scroll through the screen either moving
the parameter selection toward the right or upward.
– Enter Key - The Enter Key (also known as Enter
Button) is pressed to select the parameter that is highlighted on the screen.
PV-02124N page 2 of 17
MECHANICAL INSTALLATION
Specifications
Typical Mounting Dimensions
Display: 1.3 x 2.6 in. (33 x 66 mm), 64 x 128 pixels.
Operating Voltage: 8 VDC minimum to 32 VDC max.
Reversed Polarity: Withstands reversed battery terminal
polarity indefinitely within operating temperatures.
Operating Temperature: -40 to +85ºC (-40 to185ºF).
Display Viewing Temperature: -40 to +75ºC (-40 to 167ºF).
Storage Temperature: -40 to +85ºC (-40 to185ºF).
Environmental Sealing: IP68, +/- 5 PSI (+/- 34.4 kPa).
Power Supply Operating Current: (@ 14 VDC)=
52 mA minimum; 268 mA maximum (LCD heater on).
CAN BUS: SAE J1939 Compliant.
Case: Polycarbonate / Polyester.
Clamp: Polyester (PBT).
Connectors: 6-Pin Deutsch DTO6 Series.
Maximum Panel Thickness: 3/8 in. (9.6 mm).
Mounting Hole: 2.062 inch (52 mm) in diameter.
Auxiliary Communications (Gages):
One (1) RS485 port, MODBUS RTU master,
38.4K baud, N, 8, 1 or 2, half duplex.
Potentiometer Input: 1K ohm, 1/4 W
Shipping Weights (all models): 1 lb. (450 g.)
Shipping Dimensions (all models): 6 x 6 x 6 in. (152 x 152 x
152 mm).
FRONT
BACK
4.25 in.
(108 mm)
4.25 in.
(108 mm)
3.489 in.
(89 mm)
SIDE
HOLE CUTOUT
2.062 in.
(52 mm)
diameter
1.94 in.
(50 mm)
1.972 in.
(50 mm)
2.070 in.
(53 mm)
.953 in.
(24 mm)
0.78 in.
(20 mm)
R 0.063 in.
(1.6 mm)
0.125 in.
(3 mm)
2.41 in.
(61 mm)
OR
3.18 in.
(81 mm)
Use a 2.062 in. (52 mm) diameter round hole.
Typical Quick-Connect Diagram
Last PVA Gage or
PVAA Audible Alarm
To Engine
ECU
A
To optional
external device
To PVAA
Audible Alarm
B
Terminating
Resistor PVJR
To Battery
Power
PVW-CH
POWERVIEW
PV100
A
Relay N.O.
B
Relay N.C.
OR
Ext.
Sonalert
PVW-PH
Relay Comm.
Optional PVW-A wire harness
Customer provided wire
harness or CAN extension
harnesses or power
extension harnesses.
(includes terminating resistor)
A
B
PVA Gage
Next PVA Gage
Wire harness
PVW-J
External Dimmer
Wire 24 inch.
A
External
Dimmer
B
A
B
B+
GRND
CAN–SHLD
CAN–LO
CAN–HI
Wire harness PVW-P
Wire harness PVW-J
PV-02124N page 3 of 17
Wire harness PVW-J
ELECTRICAL INSTALLATION
PowerView Unit Back View
Deutsch DT06-6S Style Connections
Plug A
Plug B
PIN 3 CAN LO
–
PIN 4 CAN SHLD
–
PIN 2 CAN HI
–
PIN 5 Dimmer
Potentiometer
PIN 1 V+
PIN 3 RS485+
A
PIN 4 RS485 –
B
PIN 6 GRND
PIN 1 V+
PIN 6 GRND
Recommended Connectors:
Body: Deustch DT06-6S
Wedge Lock: W6S
Terminals: 0462-201-16141
Sealing Plug: 114017
Typical Wiring Diagram
IMPORTANT: To eliminate external interference: RS485(+) and RS485(-) should be twisted pair cable or twist wires together, one twist per
inch minimum. CAN–L, CAN–H and CAN Shield should be approved J1939 CAN bus cable (CAN wire for example: RADOX plug and play cable,
from Champlain cable). (RS485 wire for example: BELDEN 9841 or 3105A).
PowerView Deutsch DT06-6S Style
Unit Back View
White
NOTE 5
NOTE 4
RS485 (+) Data
Pin 3
Green-CAN_L
Yellow-CAN_H
120 Ω
See
NOTE 6
Pin 3
120 Ω
See Note
or
Pin 2
NOTE 1
Pin 1
Pin 5
Pin 1
Pin 6
Red-V+
Ignition
Switch
RS485 (-) Data
Pin 4
Pin 4
Pin 6
ENGINE
CONTROL
MODULE
(SAE J1939
Compliant)
Orange
NOTE 2
Gray-CAN_SHLD
PVA Gage
Black GRND
Red V+
Black-Ground
Brown-Back Light
Battery
Illumination
Control*(optional)
NOTE 3
Note 1: Place Resistor between
CAN–H and CAN–L Line near
PowerView (included in PVW-P or
factory purchased panels).
Note 4: Only use 120 ohm
Note 2: Use SAE J1939 compliant
to PowerView end only.
wiring or equipment.
Note 3: Electronic dimmer switch
recommended with 4A, capacity
or heavy duty rheostat switch,
1000 ohm, 0.25 watt.
PV-02124N page 4 of 17
characteristic impedance cable,
ex Belden 9841.
Note 5: RS485 shield connected
Note 6: Place Resistor at End of
Line on last PVA gage. (Included
for factory purchased panels.)
POWERVIEW OPERATION
PowerView Menus
2. The first seven items of the “Main Menu” will be displayed.
GO TO 1-UP DISPLAY
STORED CODES
ENGINE CONF
SETUP 1-UP DISPLAY
SETUP 4-UP DISPLAY
SELECT UNITS
ADJUST BACKLIGHT
First Time Start Up
1. When power is first applied to the PowerView, the "Logo Screen"
will be displayed.
3. Depressing the "Arrow Buttons" will scroll through the menu selections.
GO TO 1-UP DISPLAY
STORED CODES
ENGINE CONF
SETUP 1-UP DISPLAY
SETUP 4-UP DISPLAY
SELECT UNITS
ADJUST BACKLIGHT
2. The "Wait to Start" message will be displayed for engines with a
pre-startup sequence. Once the "Wait to Start" message is no longer displayed the operator may start the engine. Note: Displays only when SAE
J1939 message is supported by engine manufacturer.
WAIT TO
START
4. Pressing the right arrow button will scroll down to reveal the last
items of “Main Menu” screen highlighting the next item down.
PREHEAT
ADJUST
ADJUST CONTRAST
CONTRAST
UTILITIES
3. Once the engine has started the display will show the single engine
parameter display.
0
1500
3000
1800 RPM
ENG RPM
COOL TEMP
5. Use the arrow buttons to scroll to the desired menu item or press the
"Menu Button" to exit the Main menu and return to the engine parameter
display.
GO TO 1-UP DISPLAY
Main Menu Navigation
1. Starting at the single or four engine parameter display, depress the
"Menu Button".
98%
0
1500
3000
1800 RPM
ENG RPM
COOL TEMP
LOAD@RPM
14.2
BAT VOLT
STORED CODES
ENGINE CONF
SETUP 1-UP DISPLAY
SETUP 4-UP DISPLAY
SELECT UNITS
ADJUST BACKLIGHT
1000 RPM
ENG RPM
57 PSI
OIL PRES
PV-02124N page 5 of 17
98%
LOAD@RPM
14.2
BAT VOLT
1000 RPM
ENG RPM
57 PSI
OIL PRES
POWERVIEW OPERATION continued
Stored Fault Codes
5. Press the "Menu Button" to return to the main menu.
1. Starting at the single or four engine parameter display depress the
"Menu Button".
1500
3000
ENG RPM
ENG RPM
▼
1800 RPM
SPN110 FMI10
HIGH COOLANT TEMP
1000 RPM
14.2
COOL TEMP
BAT VOLT
MORE
▼
0
98%
LOAD@RPM
1 of x
HIDE
57 PSI
OIL PRES
2. The main menu will pop up on the display. Use the "Arrow Buttons" to
scroll through the menu until the "Stored Fault Codes" is highlighted.
6. Press the "Menu Button" to exit the Main menu and return to the
engine parameter display.
GO TO 1-UP DISPLAY
98%
STORED CODES
ENGINE CONFG
SETUP 1-UP DISPLAY
SETUP 4-UP DISPLAY
SELECT UNITS
ADJUST BACKLIGHT
GO TO 1-UP DISPLAY
STORED
CODES
STORED CODES
ENGINE CONFG
SETUP 1-UP DISPLAY
SETUP 4-UP DISPLAY
SELECT UNITS
ADJUST BACKLIGHT
LOAD@RPM
14.2
BAT VOLT
1000 RPM
ENG RPM
57 PSI
OIL PRES
Engine Configuration Data
1. Starting at the single or four engine parameter display press the
"Menu Button".
3. Once the "Stored Fault Codes" menu item has been highlighted
press the "Enter Button" to view the "Stored Fault Codes".
GO TO 1-UP DISPLAY
STORED
CODES
STORED CODES
ENGINE CONFG
SETUP 1-UP DISPLAY
SETUP 4-UP DISPLAY
SELECT UNITS
ADJUST BACKLIGHT
98%
0
1500
3000
1800 RPM
ENG RPM
COOL TEMP
LOAD@RPM
14.2
BAT VOLT
1000 RPM
ENG RPM
57 PSI
OIL PRES
2. The main menu will pop up on the display. Use the "Arrow Buttons"
to scroll through the menu until the "Engine Configuration" is highlighted.
GO TO 1-UP DISPLAY
STORED CODES
ENGINE
ENGINE CONFG
CONFG
SETUP 1-UP DISPLAY
SETUP 4-UP DISPLAY
SELECT UNITS
ADJUST BACKLIGHT
4. If the word "MORE" appears above the "Arrow Buttons" there are
more stored fault codes that may be viewed. Use the "Arrow Buttons" to
scroll to the next Stored Diagnostic Code.
1 of x
3. Once the "Engine Configuration" menu item has been highlighted
press the "Enter Button" to view the engine configuration data.
▼
MORE
▼
SPN110 FMI10
HIGH COOLANT TEMP
GO TO 1-UP DISPLAY
STORED CODES
ENGINE
ENGINE CONFG
CONFG
SETUP 1-UP DISPLAY
SETUP 4-UP DISPLAY
SELECT UNITS
ADJUST BACKLIGHT
HIDE
PV-02124N page 6 of 17
POWERVIEW OPERATION continued
4. Use the "Arrow Buttons" to scroll through the engine configuration data.
ENGINE SPEED PT 1
or normal operation an auxiliary gage should fail the single or four parameter screen will be replaced with the "MLink Gage Fault" message.
1000 RPM
ENGINE OIL PRESSURE
GAGE NOT RESPONDING
▼
▼
MORE
1 of x
HIDE
5. Press the "Menu Button" to return to the main menu.
3. To acknowledge and "Hide" the fault and return to the single or
four parameter display press the "Enter Button".
ENGINE SPEED PT 1
1000 RPM
1 of x
ENGINE OIL PRESSURE
GAGE NOT RESPONDING
▼
▼
MORE
HIDE
6. Press the "Menu Button" to exit the Main menu and return to the
engine parameter display.
GO TO 1-UP DISPLAY
STORED CODES
ENGINE CONFG
CONFG
SETUP 1-UP DISPLAY
SETUP 4-UP DISPLAY
SELECT UNITS
ADJUST BACKLIGHT
98%
LOAD@RPM
14.2
BAT VOLT
1000 RPM
ENG RPM
4. The display will return to the single or four parameter screen.
!
57 PSI
OIL PRES
0
1500
3000
1800 RPM
ENG RPM COOL TEMP !
Faults and Warnings
Auxiliary Gage Fault
1. During normal operation the single or four parameter screen will be
displayed.
98%
0
1500
3000
1800 RPM
ENG RPM
COOL TEMP
LOAD@RPM
14.2
BAT VOLT
98%
1000 RPM
LOAD@RPM
ENG RPM
!
14.2
BAT VOLT
!
Indicates Auxiliary Gage Fault
.!
Indicates Fault Warning
!
Indicates Derate or Shutdown Condition Fault
57 PSI
OIL PRES
!
5. Pressing the "Enter Button" will redisplay the hidden fault. Pressing
the "Enter Button" once again will hide the fault and return the screen to
the single or four parameter display. NOTE: The fault can only be
cleared by correcting the cause of the fault condition.
1000 RPM
ENG RPM
57 PSI
OIL PRES
2. The PVA Series of auxiliary gages can be attached to the PowerView.
These auxiliary gages communicate with the Modbus master PowerView
via a daisy-chained RS-485 port. If at any time during system initialization
PV-02124N page 7 of 17
1 of x
ENGINE OIL PRESSURE
GAGE NOT RESPONDING
HIDE
POWERVIEW OPERATION continued
Active Fault Codes
1. During normal operation the single or four parameter screen will be
displayed.
98%
0
1500
LOAD@RPM
3000
1800 RPM
ENG RPM
14.2
COOL TEMP
BAT VOLT
!
1000 RPM
0
ENG RPM
1500
98%
3000
1000 RPM
LOAD@RPM
ENG RPM
1800 RPM
ENG RPM
57 PSI
COOL TEMP
!
14.2
!
57 PSI
OIL PRES
BAT VOLT
!
OIL PRES
2. When the PowerView receives a fault code from an engine control
unit the single or four parameter screen will be replaced with the "Active
Fault Codes" message.
1 of x
5. The display will return to the single or four parameter display, but the
display will contain the "Active Fault"warning icon. Pressing the "Enter
Button" will redisplay the hidden fault.
6. Pressing the "Enter Button" once again will hide the fault and return
the screen to the single or four parameter display.
WARNING
1 of x
WARNING
SPN110 FMI0
HIGH COOLANT TEMP
SPN110 FMI0
▼
MORE
▼
HIGH COOLANT TEMP
MORE
HIDE
HIDE
3. If the word "MORE" appears above the "Arrow Buttons" there are
more active fault codes that may be viewed.
Use the "Arrow Buttons" to scroll to the next "Active Fault Code"
7. The Single or Four parameter screen will display the fault icon until
the fault condition is corrected. NOTE: Ignoring active fault codes could
result in severe engine damage.
GO TO 1-UP DISPLAY
98%
STORED CODES
ENGINE CONFG
SETUP 1-UP DISPLAY
SETUP 4-UP DISPLAY
SELECT UNITS
ADJUST BACKLIGHT
1 of x
SPN110 FMI0
1000 RPM
LOAD@RPM
ENG RPM
!
14.2
BAT VOLT
57 PSI
OIL PRES
!
▼
MORE
▼
HIGH COOLANT TEMP
HIDE
Shutdown Codes
1. During normal operation the single or four parameter screen will be displayed.
98%
4. To acknowledge and "Hide" the fault and return to the single or four
parameter display press the "Enter Button".
0
1500
3000
1800 RPM
ENG RPM
1000 RPM
LOAD@RPM
ENG RPM
57 PSI
14.2
COOL TEMP
OIL PRES
BAT VOLT
1 of x
SPN110 FMI0
HIGH COOLANT TEMP
▼
MORE
HIDE
2. When the PowerView receives a severe fault code from an engine control unit the single or four parameter screen will be replaced with the
"Shutdown!" message.
1 of x
SHUTDOWN
SPN110 FMI0
HIGH COOLANT TEMP
MORE
PV-02124N page 8 of 17
HIDE
POWERVIEW OPERATION continued
3. To acknowledge and "Hide" the fault and return to the single or
four parameter display press the "Enter Button".
2. The main menu will pop up on the display. Use the "Arrow Buttons"
to scroll through the menu until the "Adjust Backlight" is highlighted.
SHUTDOWN
1 of x
GO TO 1-UP DISPLAY
STORED CODES
ENGINE CONFG
SETUP 1-UP DISPLAY
SETUP 4-UP DISPLAY
SELECT UNITS
ADJUST BACKLIGHT
ADJUST
BACKLIGHT
SPN110 FM10
HIGH COOLANT TEMP
MORE
HIDE
4. The display will return to the single or four parameter display, but
the display will contain the "Shut Down" icon. Pressing the "Enter
Button" will redisplay the hidden fault.
!
0
1500
98%
1800 RPM
GO TO 1-UP DISPLAY
STORED CODES
ENGINE CONFG
SETUP 1-UP DISPLAY
SETUP 4-UP DISPLAY
SELECT UNITS
ADJUST BACKLIGHT
1000 RPM
LOAD & RPM
3000
3. Once the "Adjust Backlight" menu item has been highlighted press
the "Enter Button" to activate the "Adjust Backlight" function.
ENG RPM
!
57 PSI
14.2
ENG RPM COOL TEMP!
OIL PRES
BAT VOLT
5. Pressing the "Enter Button" once again will hide the fault and return
the screen to the single or four parameter display.
1 of x
4. Use the "Arrow Buttons" to select the desired backlight intensity.
SHUTDOWN
SPN110 FM10
HIGH COOLANT TEMP
MORE
ADJUST BACKLIGHT
HIDE
6. The Single or Four parameter screen will display the fault icon until
the fault condition is corrected. NOTE: Ignoring active fault codes could
result in severe engine damage.
!
0
1500
3000
98%
ADJUST BACKLIGHT
1000 RPM
LOAD & RPM
ENG RPM
!
1800 RPM
ENG RPM
5. Press the "Menu Button" to return to the main menu.
14.2
COOL TEMP !
BAT VOLT
57 PSI
OIL PRES
!
Back Light Adjustment
1. Starting at the single or four engine parameter display press the
"Menu Button".
6. Press the "Menu Button" to exit the Main menu and return to the
engine parameter display.
GO TO 1-UP DISPLAY
98%
0
1500
3000
1800 RPM
ENG RPM
COOL TEMP
LOAD@RPM
14.2
BAT VOLT
1000 RPM
ENG RPM
57 PSI
STORED CODES
ENGINE CONFG
SETUP 1-UP DISPLAY
SETUP 4-UP DISPLAY
SELECT UNITS
ADJUST BACKLIGHT
OIL PRES
PV-02124N page 9 of 17
98%
LOAD@RPM
14.2
BAT VOLT
1000 RPM
ENG RPM
57 PSI
OIL PRES
POWERVIEW OPERATION continued
Contrast Adjustment
1. Starting at the single or four engine parameter display depress the
"Menu Button".
98%
0
1500
3000
1800 RPM
ENG RPM
COOL TEMP
LOAD@RPM
14.2
BAT VOLT
6. Press the "Menu Button" to exit the Main menu and return to the
engine parameter display.
GO TO 1-UP DISPLAY
98%
STORED CODES
ENGINE CONFG
SETUP 1-UP DISPLAY
SETUP 4-UP DISPLAY
SELECT UNITS
ADJUST BACKLIGHT
1000 RPM
ENG RPM
57 PSI
LOAD@RPM
14.2
BAT VOLT
1000 RPM
ENG RPM
57 PSI
OIL PRES
OIL PRES
2. The main menu will pop up on the display. Use the "Arrow Buttons"
to scroll through the menu until "Adjust Contrast" is highlighted.
Select Units
1. Starting at the single or four engine parameter display depress the
"Menu Button".
GO TO 1-UP DISPLAY
STORED CODES
ENGINE CONFG
SETUP 1-UP DISPLAY
SETUP 4-UP DISPLAY
SELECT UNITS
ADJUST BACKLIGHT
98%
0
1500
1800 RPM
ENG RPM
3. Once the "Adjust Contrast" menu item has been highlighted press
the "Enter Button" to activate the "Adjust Contrast" function.
4. Use the "Arrow Buttons" to select the desired contrast intensity.
COOL TEMP
LOAD@RPM
14.2
BAT VOLT
1000 RPM
ENG RPM
57 PSI
OIL PRES
2. The main menu will pop up on the display. Use the arrow buttons to
scroll through the menu until the "Select Units" is highlighted.
GO TO 1-UP DISPLAY
STORED CODES
ENGINE CONFG
SETUP 1-UP DISPLAY
SETUP 4-UP DISPLAY
SELECT
SELECTUNITSD
UNITS
ADJUST BACKLIGHT
STORED CODES
ENGINE CONFG
SETUP 1-UP DISPLAY
SETUP 4-UP DISPLAY
SELECT UNITS
ADJUST BACKLIGHT
ADJUST CONTRAST
3. Once the "Select Units" menu item has been highlighted press the
"Enter Button" to access the "Select Units" function.
GO TO 1-UP DISPLAY
STORED CODES
ENGINE CONFG
SETUP 1-UP DISPLAY
SETUP 4-UP DISPLAY
SELECT
SELECTUNITSD
UNITS
ADJUST BACKLIGHT
ADJUST CONTRAST
5. Press the "Menu Button" to return to the main menu.
3000
4. Use the arrows to highlight the desired units. "English" for Imperial
units i.e. PSI, ºF or Metric kPa, Metric Bar for IS units i.e. kPa, Bar, ºC.
ENGLISH
METRIC KPA
METRIC BAR
ADJUST CONTRAST
PV-02124N page 10 of 17
POWERVIEW OPERATION continued
5. Press the "Enter Button" to select the highlighted units.
3. Once the "Setup 1-up Display" menu item has been highlighted
press the "Enter Button" to access the "Setup 1-up Display" function.
ENGLISH
METRIC KPA
METRIC BAR
GO TO 1-UP DISPLAY
STORED CODES
ENGINE CONFG
SETUP
SETUP1-UP
1-UPDISPLAY
DISPLAY
SETUP 4-UP DISPLAY
SELECT UNITSD
ADJUST BACKLIGHT
6. Press the "Menu Button" to return to the "Main Menu".
4. Three options are available for modification of the 1-Up display.
a). Use Defaults – This option contains a set of engine parameters:
Engine Hours, Engine RPM, System Voltage, Battery Voltage, %
Engine Load at Current RPM, Coolant Temperature, Oil Pressure.
b). Custom Setup – This option allows for the modification of what
parameter, the number of parameters, and the order in which the
parameters are being displayed.
c). Automatic Scan – Selecting the scan function will cause the
1-Up Display to scroll through the selected set of parameters
one at a time, momentarily pausing at each.
ENGLISH
METRIC KPA
METRIC BAR
7. Press the "Menu Button" to exit the Main menu and return to the
engine parameter display.
GO TO 1-UP DISPLAY
98%
STORED CODES
ENGINE CONFG
SETUP 1-UP DISPLAY
SETUP 4-UP DISPLAY
SELECT UNITS
ADJUST BACKLIGHT
LOAD@RPM
14.2
BAT VOLT
5. Use Defaults - To select "Use Defaults" use the arrow buttons to
scroll to and highlight "Use Defaults" in the menu display.
USE DEFAULTS
DEFAULTS
USE
CUSTOM SETUP
AUTOMATIC SCAN OFF
1000 RPM
ENG RPM
57 PSI
OIL PRES
6. Press the "Enter Button" to activate the "Use Defaults" function.
USE
USEDEFAULTS
DEFAULTS
CUSTOM SETUP
AUTOMATIC SCAN OFF
Setup 1-Up Display
1. Starting at the single engine parameter display press the "Menu Button".
98%
0
1500
3000
1800 RPM
ENG RPM
COOL TEMP
LOAD@RPM
14.2
BAT VOLT
1000 RPM
ENG RPM
57 PSI
OIL PRES
2. The main menu will pop up on the display. Use the "Arrow Buttons" to
scroll through the menu until the "Setup 1-up Display" is highlighted.
7. A message indicating the “Single Engine” parameter display parameters are reset to the factory defaults will be displayed, then the display
will return to the “Custom Setup” menu.
RESTORED TO
DEFAULTS
GO TO 1-UP DISPLAY
STORED CODES
ENGINE CONFG
SETUP1-UP
1-UPDISPLAY
DISPLAY
SETUP
SETUP 4-UP DISPLAY
SELECT UNITSD
ADJUST BACKLIGHT
PV-02124N page 11 of 17
POWERVIEW OPERATION continued
8. Custom Setup - To perform a custom setup of the 1-Up Display use
the arrow buttons to scroll to and highlight "Custom Setup" on the display.
13. Press the "Enter button" to select the highlighted parameter for inclusion
in the Single Engine Parameter Display.
USE DEFAULTS
CUSTOM
CUSTOMSETUP
SETUP
AUTOMATIC SCAN OFF
ENGINE SPEED
PERCENT LOAD AT CURRENT RPM 2
ENGINE OIL PRESSURE
1
ENGINE COOLANT TEMP
3
9. Pressing the "Enter Button" will display a list of engine parameters.
USE DEFAULTS
CUSTOM
CUSTOMSETUP
SETUP
AUTOMATIC SCAN OFF
14. Continue to scroll and select additional parameters for the custom
1-Up Display. Press the "Menu button" at any time to return to the "Custom
Setup" menu.
15. Automatic Scan - Selecting the scan function will cause the 1Up Display to scroll through the selected set of parameters one at a time.
Use the "Arrow Buttons" to scroll to the "Automatic Scan" function.
USE DEFAULTS
CUSTOM SETUP
AUTOMATIC
OFF
AUTOMATICSCAN
SCAN
OFF
10. Use the "Arrow Buttons" to scroll to and highlight a selected parameter (parameter with a # symbol to right of it).
USE
DEFAULTS
ENGINE
SPEED
1
PERCENT LOAD AT CURRENT RPM 3
ENGINE OIL PRESSURE
2
ENGINE COOLANT TEMPERATURE
This number indicates
the order of display for
the parameters and
that the parameter is
selected for display.
16. Pressing the "Enter Button" toggles the "Automatic Scan" function on.
USE DEFAULTS
CUSTOM SETUP
AUTOMATIC
OFF
AUTOMATICSCAN
SCAN
ON
11. Press the "Enter Button" to diselect the selected parameter removing it from the list of parameters being displayed on the 1-up display.
USE
DEFAULTS
ENGINE
SPEED
1
PERCENT LOAD AT CURRENT RPM 3
ENGINE OIL PRESSURE
2
ENGINE COOLANT TEMPERATURE
17. Pressing the "Enter Button" again toggles the "Automatic Scan"
function off.
USE DEFAULTS
CUSTOM SETUP
AUTOMATIC
OFF
AUTOMATICSCAN
SCAN
OFF
12. Use the "Arrow Buttons" to scroll and highlight the desired parameter
that has not been selected for display.
ENGINE SPEED
PERCENT LOAD AT CURRENT RPM 2
ENGINE OIL PRESSURE
1
ENGINE COOLANT TEMP
Note that the numbers
now indicate the new
order of display for
the parameters.
PV-02124N page 12 of 17
POWERVIEW OPERATION continued
18. Once the "Use Defaults", "Custom Setup" and "Automatic Scan" functions have been set press the "Menu Button" to return to the main menu.
4. Press the "Enter Button" to activate the "Use Defaults" function. This
action will reset the unit to the factory default.
USE
USE DEFAULTS
DEFAULTS
CUSTOM SETUP
USE DEFAULTS
CUSTOM SETUP
AUTOMATIC
OFF
AUTOMATICSCAN
SCAN
ON
19. Press the "Menu Button" to exit the Main menu and return to the
engine parameter display.
5. The "Use Defaults"screen will be displayed during the reseting period then will automatically return to the "Setup 4-Up Display" menu.
GO TO 1-UP DISPLAY
STORED CODES
ENGINE CONFG
SETUP 1-UP DISPLAY
SETUP 4-UP DISPLAY
SELECT UNITS
ADJUST BACKLIGHT
0
1500
RESTORED TO
DEFAULTS
3000
1800 RPM
ENG RPM
COOL TEMP
6. Select the "4-Up Custom Setup" from the "4-Up Setup" menu.
Setup 4-Up Display
USE DEFAULTS
CUSTOM
CUSTOM SETUP
SETUP
1. From the single or four engine parameter display press the "Menu Button".
98%
0
1500
3000
1800 RPM
ENG RPM
COOL TEMP
LOAD@RPM
14.2
BAT VOLT
1000 RPM
ENG RPM
57 PSI
OIL PRES
2. The main menu will pop up on the display. Use the "Arrow Buttons" to
scroll through the menu until the "Setup 4-Up Display" is highlighted.
7. The quadrent with the backlit parameter value is the current selected
parameter. Use the "Arrow Buttons" to highlight the parameter value in
the quadrant you wish to place a new parameter.
GO TO 1-UP DISPLAY
STORED CODES
ENGINE CONFG
SETUP 1-UP DISPLAY
SETUP 4-UP DISPLAY
SELECT UNITS
ADJUST BACKLIGHT
3. Once the "Setup 4-Up Display" menu item has been highlighted press
the "Enter Button" to activate the "Setup 4-Up Display" menu.
125°F
COOL TEMP
1000 RPM
ENG RPM
14.2
14.2
BAT VOLT
57 PSI
OIL PRESP
8. Press the "Enter Button" and a list of parameters will appear.
GO TO 1-UP DISPLAY
STORED CODES
ENGINE CONFG
SETUP 1-UP DISPLAY
SETUP
SETUP 4-UP
4-UP DISPLAY
DISPLAY
SELECT UNITS
ADJUST BACKLIGHT
PV-02124N page 13 of 17
125°F
COOL TEMP
1000 RPM
ENG RPM
14.2
14.2
BAT VOLT
57 PSI
OIL PRESP
POWERVIEW OPERATION continued
9. The parameter that is highlighted is the selected parameter for the
screen. Use the "Arrow Buttons" to highlight the new parameter to be
placed in the quadrent selected in the previous screen.
ENGINE SPEED
ENGINE HOURS
ENGINE COOLANT TEMPERATURE
BATTERY POTENTIAL
ENGINE OIL TEMPERATURE
TEMPERATURE
ENGINE OIL PRESSURE
3
1
2
4
The number to the right of the
parameter indicates the quadrant
in which it is displayed.
1. = Upper Left Quadrent
2. = Lower Left Quadrent
3. = Upper Right Quadrent
4.= Lower Right Quadrent
10. Press the "Enter Button" to change the selected parameter in the
quadrant to the new parameter.
ENGINE SPEED
ENGINE HOURS
ENGINE COOLANT TEMPERATURE
BATTERY POTENTIAL
ENGINE OIL TEMPERATURE
TEMPERATURE
ENGINE OIL PRESSURE
143°F
OIL TEMP
143°F
OIL TEMP
143°F
OIL TEMP
125%
1500
3000
1800 RPM
ENG RPM
4
1000 RPM
ENG RPM
57 PSI
OIL PRES
COOL TEMP
COOL TEMP
143°F
OIL TEMP
1000 RPM
ENG RPM
57 PSI
OIL PRES
2. The main menu will be displayed. Use the “Arrow buttons” to scroll
through the menu until the “Utilities” is highlighted.
STORED CODES
ENGINE CONFG
SETUP 1-UP DISPLAY
SETUP 4-UP DISPLAY
SELECT UNITS
ADJUST BACKLIGHT
UTILITIES
1
Note the number to the right of
the selected parameter indicating
that the parameter is now
assigned to that display location.
3. Once the “Utilities” menu item has been highlighted, press the “Enter
Button” to activate the “Utilities” functions.
STORED CODES
ENGINE CONFG
SETUP 1-UP DISPLAY
SETUP 4-UP DISPLAY
SELECT UNITS
ADJUST BACKLIGHT
UTILITIES
ØRPM
1000
RPM
ENG RPM
57 PSI
OIL PRESP
13. Repeat the parameter selection process until all spaces are filled.
14. Press the "Menu Button" to return to the main menu.
125°F
COOL TEMP
COOL TEMP
1. Starting at the single or four engine parameter display, press the “Menu button”.
3
2
4
125%
Utilities (Information and troubleshooting)
0
1
2
12. The parameter in the selected quadrent has changed to the parameter selected in the previous screen.
125°F
COOL TEMP
GO TO 1-UP DISPLAY
STORED CODES
ENGINE CONFG
SETUP 1-UP DISPLAY
SETUP 4-UP DISPLAY
DISPLAY
SELECT UNITS
ADJUST BACKLIGHT
3
11. Use the "Menu Button" to return to the “4-UP Custom Setup” screen.
ENGINE SPEED
ENGINE HOURS
ENGINE COOLANT TEMPERATURE
BATTERY POTENTIAL
ENGINE OIL TEMPERATURE
TEMPERATURE
2
ENGINE OIL PRESSURE
15. Press the "Menu Button" to exit the Main menu and return to the
engine parameter display.
4. Press "Select" to enter the “Gages Data” display. When “Gage Data” is
selected the PowerView will communicate with the analog gages at a fixed
rate of 38.4 k Baud, 8 data bits, no parity check, 1 stop bits, half duplex.
GAGE DATA
REMOVE ALL GAGES
SOFTWARE VERSION
FAULT CONVERSION
ØRPM
1000
RPM
ENG RPM
57 PSI
OIL PRESP
PV-02124N page 14 of 17
POWERVIEW OPERATION continued
5. Use the “Arrow buttons” to scroll through the items or press “Menu”
to return to the “Utilities” menu.
1 of x
ENGINE OIL PRESSURE
ADDRESS: 20
SOFTWARE REVISION #:
ERRORS: NONE
6. Press “Menu Button” to return to the “Utilities” menu.
11. Using the “Arrow” buttons scroll to highlight the version to be
selected. Press the“Select” button to select the version. Note that an
asterisks appears to the right of the selection.
NOTE: There are four (4) different methods for converting fault codes.
The PowerView always looks for J1939 Version 4 and can be set to use
one of the three (3) other J1939 versions. Most engine ECU’s use
Version 4, therefore in most cases adjustment of this menu option will
not be required.
Upon receiving an unrecognizable fault, change to a different J1939
Version. If the fault SPN does not change when the version is changed, the
ECU generating the fault is using Fault Conversion method 4. If the SPN
number does change but is still unrecognizable, try changing to another
J1939 Version not yet used and continue to check the SPN number.
1 of x
J1939 VERSION
VERSION11
J1939 VERSION 2
J1939 VERSION 3
ENGINE OIL PRESSURE
ADDRESS: 20
SOFTWARE REVISION #:
ERRORS: NONE
7. Use the “Arrows” to highlight “Remove All Gages”. Press “Select” to
clear gage data from memory. It takes a moment to clear all gages.
*
12. Press the “Menu” button to return to “Utilities” menu. Press the
“Menu” button again to to return to the “Main” menu.
CLEARING GAGES
PLEASE WAIT
STORED CODES
ENGINE CONFG
SETUP 1-UP DISPLAY
SETUP 4-UP DISPLAY
SELECT UNITS
ADJUST BACKLIGHT
UTILITIES
8. When the gage data has cleared, the display automatically returns to
the “Utilities” menu. Scroll to “Software Version”. Press “Select” to
view the software version currently in the PowerView.
SOFTWARE
VERSION
MURPHY: X.XX
9. Press “Menu” to return to “Utilities”. Highlight “Fault Convertion”
using the “Arrows”. Press “Select” to enter the Fault convertion menu.
GAGE DATA
REMOVE ALL GES
SOFTWARE VERSION
FAULT
FAULTCONVERTION
CONVERSION
PV-02124N page 15 of 17
SAE J1939 MurphyLink System Implementation of J1939 Parameters
Source: SAEJ1939-71 Surface Vehicle Recommended Practice
SAE J1939 Section
Description
PGN
Parameter
Display Value
5.3.6
Elec Eng Cont #2 - EEC2
61443
Accelerator Pedal Position
Percent Load at Current RPM
THROTTLE
LOAD@RPM
5.3.7
Elec Eng Cont #1 - EEC1
61444
Actual engine % torque
Engine Speed
ENG TORQUE
ENG RPM
5.3.14
Vehicle Distance
65248
Trip Distance
Total Vehicle Distance
TRIPSPNEDIST
VEH DIST
5.3.19
Engine hours, Revolutions
65253
Total Engine Hours
ENG HRS
5.3.23
Fuel Consumption
65257
Trip Fuel
Total Fuel Used
TRIP FUEL
FUELUSED
5.3.28
Engine Temperature
65262
Engine Coolant Temp
Fuel Temperature
Engine Oil Temperature
Engine Intercooler Temperature
COOL TEMP
FUEL TEMP
OIL TEMP
INTC TEMP
5.3.29
Engine Fluid Level/Pressure
65263
Fuel Delivery Pressure
Engine Oil Level
Engine Oil Pressure
Coolant Pressure
Coolant Level
FUEL PRES
OIL LVL
OIL PRES
COOL PRES
COOL LVL
5.3.31
Cruise Control /Vehicle Speed
65265
Wheel Based Vehicle Speed
VEH SPD
5.3.32
Fuel Economy
65266
Fuel Rate
Instantaneous Fuel Economy
Average Fuel Economy
FUEL RATE
FUEL ECON
AVG ECON
5.3.35
Ambient Conditions
65269
Barometric Pressure
Air Inlet Temperature
BARO PRES
AIR IN TEMP
5.3.36
Inlet/Exhaust Conditions
65270
Boost Pressure
Intake Manifold Temp
Air Filter Differential Pressure
Exhaust Gas Temperature
BST PRES
MANI TMP
AIRDIFPR
EXH TEMP
5.3.37
Vehicle Electrical Power
65271
Alternator Voltage
Electrical Potential (Voltage)
Battery Pot. Voltage (Switched)
ALT VOLT
SYS VOLT
BAT VOLT
5.3.8
Electronic Transmission Controller #2
61445
61445
Selected Gear
Current Gear
SELECT GEAR
CURNT GEAR
5.3.38
Transmission Fluids
65272
Transmission Oil Pressure
TRAN PRES
Transmission Oil Temperature
TRAN TEMP
5.3.46
Engine Fluid Level/Pressure #2
65243
Injector Metering Rail 1 Pres
Injector Metering Rail 2 Pres
INJ PRES1
INJ PRES2
5.3.58
Fan Drive
65213
5.3.111
Auxiliary Pressures & Temperatures
65164
Auxiliary Temperature
AUX TEMP
Auxiliary Pressure
AUX PRES
Diagnostic Messages
65226
65227
65228
DM1 - Active Diagnostic
DM2 - Previously Act Diag Codes
DM3 - Diagnostic Clear
SRVCCODE
STORCODE
J1939 N/A
Machine Hours (PowerView Calculated)
N/A
Machine Hours
MACH HRS
5.3.17
Engine Conf.
65251
Engine Configuration
ENG CONF
Electronic Transmission Controller #1
61442
Output Shaft Speed
OUT SFT SPD
Electronic Transmission Controller #1
61442
Input Shaft Speed
IN SFT SPD
Electronic Transmission Controller #1
61442
Torque Converter Lockup Engaged
TORQ LOCK
5.3.5
FAN SPD
PV-02124N page 16 of 17
GLOSSARY (Troubleshooting information)
CANBUS FAILURE
PowerView has not received any CAN messages for at least 30 seconds.
NO DATA
PowerView has not received the particular message being displayed for
at least 5 seconds.
NOT SUPPORTED
PowerView has received a message from the ECU stating the displayed
message is not supperted.
DATA ERROR
PowerView has received an error message from the ECU for the displayed message.
EMPTY
No parameter selected for this 4-UP quadrant.
WAIT TO START PREHEATING
This is a message from the engine indicating it is in a preheating cycle.
Wait until this message clears before starting the engine.
TIMEOUT ECU NOT RESPONDING
The ECU did not respond to th PowerView request.
NO GAGE DATA
The PowerView has no record of connected gages to the RS485 bus.
MURPHY SWITCH OF CALIFORNIA
41343 12th Street West
Palmdale, California 93551-1442; USA
(661) 272-4700 fax (661) 947-7570
e-mail [email protected]
www.murphyswitch.com
GI
D
MURPHY DE MEXICO, S.A. DE C.V.
Blvd. Antonio Rocha Cordero 300, Fracción del Aguaje
San Luis Potosí, S.L.P.; México 78384
+52-444-8206264 fax +52-444-8206336
Villahermosa Office +52-993-3162117
e-mail [email protected]
www.murphymex.com.mx
MACQUARRIE CORPORATION
1620 Hume Highway
Campbellfield, Vic 3061; Australia
+61 3 9358-5555 fax +61 3 9358-5558
e-mail [email protected]
RE
P.O. Box 470248
Tulsa, Oklahoma 74147 USA
(918) 317-4100
fax (918) 317-4266
e-mail [email protected]
www.fwmurphy.com
FRANK W. MURPHY, LTD.
Church Rd.; Laverstock, Salisbury SP1 1QZ; U.K.
+44 1722 410055 fax +44 1722 410088
e-mail [email protected]
www.fwmurphy.co.uk
E
FWMurphy
CONTROL SYSTEMS & SERVICES DIVISION
P.O. Box 1819; Rosenberg, Texas 77471; USA
(281) 633-4500 fax (281) 633-4588
e-mail [email protected]
STER
USA–ISO 9001:2000 FM 28221
UK–ISO 9001:2000 FM 29422
In order to consistently bring you the highest quality, full featured products, we reserve the right to change our specifications and designs at any time.
Printed in U.S.A.
PV-02124N page 17 of 17
Sealed Piston Switch
Pressure
Series 9675, A9675
Features
Double make double break capability
Extremely long life
Calibrated dial for easy setpoint adjustment
Tamper-proof external adjustment
Oil & dust tight
Easy setpoint adjustment
Applications
Hydraulic applications
Machine tools
Compressors
Mining
Specialty vehicles
Lubrication equipment
Metal working
General Specifications*
Accuracy:
Switch:
Type:
Rating:
± 2% of the adjustable range
Single pole double throw (SPDT) or
double make double break (DMDB) snap
action; single circuit
9675: (one SPDT) 10 amps @ 125, 250,
or 480 VAC; 7.5 amps @ 600 VAC; 0.03
amps at 250 VDC
Adjustment Instructions:
Loosen adjustment screw cover and open.
Setpoint:
Using a 5/16” allen wrench, turn adjustment
screw clockwise to increase setpoint,
counterclockwise to decrease setpoint.
The setpoint indicator (located inside
enclosure) provides a visual indication of
the approximate setpoint.
Optional adjustable differential models
remove front cover and locate adjustment
screw (identified) using screwdrivers, rotate
screw clockwise to increase differential.
A9675: (one DMDB) 15 amps @ 125, 250,
or 480 VAC; 7.5 amps @ 600 VAC; 0.03
amps at 250 VDC
Wetted Parts:
Process Fitting:
416 stainless steel
O-ring:
Buna-N with Teflon® backup ring
Piston:
416 stainless steel
Enclosure:
Anodized aluminum
Electrical Connection: Through 1/2” NPT conduit connection to
screw terminals
Enclosure Ratings:
NEMA 13
Pressure Connection:
1/4” NPT female
Approvals:
PED (European) :
Compliant to PED 97/23/EC
Wiring Code:
SPDT:
Normally Open (NO), Normally Closed (NC),
and Common (C) terminals are identified on
the limit switches
DMDB:
Two normally open (NO) and two normally
closed.
Options:
-Factory pre-set
-Cleaned for oxygen service
-Adjustable deadband
-Drain port, 1/8” NPT
Shipping Weight:
1.75 lbs. approximate
Wiring Diagram
Temperature Range:
Operating:
-20° to +165°F (-29° to +74°C)
SPDT
DMDB
Storage:
-40° to +200°F (-40° to +93°C)
* See Order Number Key for additional options.
NO
NO
NO
NC
NC
C
NC
P
INCR
P
INCR
1
Sealed Piston Switch
Series 9675, A9675
Technical Drawing
Dimensions in inches (mm)
ADJ. DIFF. SCREW
2-13/16
(71.4)
NORM. OPEN
ADJUSTING
SCREW
2-3/4
(69.0)
2-3/8 (60.3)
1-3/16
(30.1)
NORM. CLOSED
A 9675 CONFIGURATION
DOUBLE MAKE-DOUBLE BREAK SWITCH
2-3/4
(69.0)
GROUND SCREW
3.0
(76.2)
DRAIN
5-3/4
(146.0)
NORM. OPEN
NORM. CLOSED
COMMON
2-13/16
(71.4)
13/16
(20.7)
5/16
(7.14) DIS.
MOUNTING
HOLE (TYP.)
1/4" NPT
PRESSURE PORT
1/2" NPT CONDUIT
CONNECTION
1-1/2
(38.1)
9675 CONFIGURATION
SINGLE POLE-DOUBLE BREAK SWITCH
Order Number Key / Options
D
1/8" NPT
DRAIN PORT
1.0
(25.4)
1-5/8
(41.2)
Example
D
9675
-2
-V
Drain port 1/8” NPT
Options
Base Model
9675
A9675
Base part number
(with SPDT limit switch)
Base part number
(with DMDB limit switch)
Pressure Range
-E
EPR O-ring
-N
Neoprene O-ring
-V
Viton® O-ring
-Z1
Cleaned for oxygen service
Sxxx
Factory pre-set
(consult factory)
For base model: 9675
Adjustable Range
Decreasing - psi (bar)
-0
Increasing - psi (bar)
Approx. Deadband
Proof
(Actuation Value)
Pressure
Min
Max
Min
Max
psi-(bar)
psi (bar)
20 (1.4)
180 (12.2)
25 (1.7)
200 (13.6)
5 - 20 (.3 - 1.4)
3000 (204)
-1
75 (5.1)
505 (34.3)
85 (5.8)
540 (36.7)
10 - 35 (.7 - 2.4)
3000 (204)
-2
100 (6.8)
1400 (95.2)
130 (8.8)
1500 (102)
30 - 100 (2.0 - 6.8)
7000 (476)
-3
235 (16.0)
3200 (218)
295 (20.0)
3400 (231)
60 - 300 (4.1 - 20.6)
7000 (476)
-4
425 (28.9)
5640 (384)
545 (37.0)
6000 (408)
120 - 360 (8.2 - 24.4)
12000 (816)
Deadband
Blank
AA1
Standard
Adjustable deadband
(only available with A9675
model)
For base model: A9675
Adjustable Range
Decreasing - psi (bar)
Increasing - psi (bar)
Min
Max
Approx. Deadband
(Actuation Value)
Proof
Pressure
psi-(bar)
psi (bar)
Min
Max
-0
20 (1.4)
170 (11.6)
30 (2)
200 (13.6)
10 - 30 (.7 - 2.0)
3000 (204)
-1
75 (5.1)
495 (33.7)
95 (6.5)
540 (36.7)
20 - 45 (1.4 - 3.1)
3000 (204)
-2
100 (6.8)
1370 (93)
140 (9.5)
1500 (102)
40 - 130 (2.7 - 8.8)
7000 (476)
-3
235 (16.0)
3075 (209)
365 (24.8)
3400 (231)
130 - 325 (8.8 - 22.1)
7000 (476)
-4
425 (28.9)
5500 (374)
600 (40.8)
6000 (408)
175 - 500 (11.9 - 34.0)
12000 (816)
NOTES:
1
3211 Fruitland Avenue • Los Angeles, CA 90058 •
Consult Supplementary Guide for specific deadband value
800-835-1060 • Fax: 323-589-3463 • www.barksdale.com
See Barksdale’s Standard Conditions of Sale • Specifications are subject to modification at any time • Bulletin #S0075-B • 09/07 • ©2007 • Printed in the U.S.A.
2
R83
UL Listed Pressure Regulator for
Industrial Cylinder Gas 1/4" PTF Port Size
● Underwriters Laboratories, Inc. listed (file number
SA1089) for use with air, argon, carbon dioxide,
helium, krypton, neon, nitrogen, xenon. For use with
other gases, including oxygen, consult Norgren.
● Non-relieving and relieving models. Relieving models
allow reduction of outlet pressure even when the
system is dead-ended
● Two high pressure inlet ports and two regulated
pressure outlet ports
● Diametrically opposite inlet ports provide easy
manifolding of several regulators
● Easily replaceable valve cartridge contains valve,
valve seat, valve spring, and filter element
Ordering Information. Models listed include PTF threads, relieving diaphragm, 5 to 125 psig (0.3 to 8.5 bar) outlet pressure adjustment
range†, and without gauge.
Port
1/4"
Model
R83-200-RNLA
Alternative Models
Diaphragm
Relieving
Non relieving
Flow * scfm dm3/s()
11 (5.2)
Weight lb (kg)
1.3 (0.59)
R 8 3 - 2 0 0 - ★ N ★ A
Outlet Pressure Adjustment Ranges †
2 to 50 psig (0.1 to 3.5 bar)
5 to 125 psig (0.3 to 8.5 bar)
10 to 175 psig (0.7 to 12 bar)
Substitute
R
N
Substitute
E
L
N
*
Approximate flow with 1000 psig (69 bar) inlet pressure, 60 psig (4 bar) set pressure and a 5 psig (0.35 bar) droop from set.
†
Outlet pressure can be adjusted to pressures in excess of, and less than, those specified. Do not use these units to control pressures outside of the specified ranges.
See Section ALE-25 for Accessories
ALE-11-4
Littleton, CO USA
Phone 303-794-2611
Fax 303-795-9487
R83 Pressure Regulator for Industrial Cylinder Gas
Technical Data
* Fluid must be dry enough to avoid ice formation at temperatures below 35°F (2°C).
Typical flow at 1000 psig (69 bar) inlet pressure, 60 psig (4 bar) set pressure and a
droop of 5 psig (0.35 bar) from set: 11 scfm (5.2 dm3/s)
Materials
Body: Brass
Bonnet: Zinc
Cartridge valve: Teflon, brass, stainless steel
Diaphragm: Acetal and nitrile
Seals: Nitrile
Typical Performance Characteristics
bar
psig
FLOW CHARACTERISTICS - CO2
PORT SIZE: 1/4"
SPRING RANGE: 5 to 125 psig (0.3 to 8.5 bar)
INLET PRESSURE: 1000 psig (69 bar)
8
100
OUTLET PRESSURE
Fluid: Air, argon, carbon dioxide, helium, krypton, neon, nitrogen, and xenon. For
use with other gases, including oxygen, consult Norgren. Do not use the R83
regulator in beverage dispensing applications. Other Norgren regulators (R81
for soft drink, R82 for beer, R84 for carbonators) are available for use in
dispensing systems.
Maximum pressure: 3000 psig (207 bar)
Operating temperature: -30° to 140°F (-34° to 60°C) *
6
80
4
60
40
2
20
0
0
0
2
0
1
4
6
2
8
3
10
4
12 scfm
5
dm3/s
FLOW
All Dimensions in Inches (mm)
Service Kits
2.10 (53)
Item
4.41 (112)
0.40 (10)
Service kits
Type
Diaphragm, relieving
Diaphragm, non relieving
Valve cartridge
Part number
570-51
570-10
5086-55
Valve cartridge includes the sealed cartridge and cartridge o-ring.
Warning
1.90 (48)
)
42
6(
1.6
30°
Mounting Holes (2 Places)
0.18" (4.6mm) dia. by 0.39 (10mm) deep.
Use 10-32 thread forming screws.
Littleton, CO USA
These products are intended for use with industrial
compressed air, argon, carbon dioxide, helium, krypton, neon,
nitrogen, and xenon. Do not use these products where
pressures and temperatures can exceed those listed under
‘Technical Data’.
Before using these products with fluids other than those
specified, for non-industrial applications, life-support systems, or
other applications not within published specifications, consult
Norgren.
Through misuse, age, or malfunction, components used in
fluid power systems can fail in various modes. The system
designer is warned to consider the failure modes of all
component parts used in fluid power systems and to provide
adequate safeguards to prevent personal injury or damage to
equipment in the event of such failure.
System designers must provide a warning to end
users in the system instructional manual if protection
against a failure mode cannot be adequately provided.
System designers and end users are cautioned to review
specific warnings found in instruction sheets packed and
shipped with these products.
Phone 303-794-2611
Fax 303-795-9487
ALE-11-5
INSTALLATION AND OPERATING MANUAL
Types : VMK 10 – VMK 50 (H)
VSV-M 40 - VSV-M 50
2/2- way coaxial valve
externally controlled
threaded
VFK 15 - VFK 50 (H)
VSV-F 40 -VSV-F 250
2/2- way coaxial valve
externally controlled
flanged
Principle of valve operation :
The VMK, VFK and VSV series are externally controlled, threaded or flanged, coaxial shut off valves. The
externally controlled valves are available in air operated or hydraulically operated versions.
The air operated valves can be actuated by air or neutral gases. (4 -10 bar, 60 -150 psi.)
The hydraulic operated valves can be actuated by common hydraulic fluids. ( pressure as ordered )
To ensure correct function the valve should be equipped at least with a 4/2-way pilot valve.
The following describes the function of the both normally closed and normally open valves (equipped
with a 5/2-way Bosch pilot valve) :
normally closed :
The outlet B-port is closed by air pressure (+ spring) holding the control tube against the seat. To ensure
that the valve seat is tightly sealed, port 2 of the actuator body must be pressurized (see upper picture).
This is achieved by de-energizing the pilot valve. When the pilot valve is energized port 2 is relieved and
port 4 is pressurized. This moves the control tube away from the seat, opening the valve (see lower
picture).
normally open :
The outlet B-port is opened by air pressure (+ spring) holding the control tube away from the seat. To
ensure that the valve completely opens port 2 of the actuator body must be pressurized. This is achieved
1
by de-energizing the pilot valve. When the pilot valve is energized port 2 is relieved and port 4 is
pressurized. This moves the control tube against the seat, closing the valve.
A.) Installation instructions
To ensure that our maintenance-free equipment remains in perfect working conditions the following points
should be observed.
1.) Pipe work
General :
Before installing the valve, check that the lines are absolutely clean so that no residue from the pipe
installation process can settle in the valve during operation. The flow direction port A à B indicated on the
2/2-way coaxial valves (by arrows) must be maintained (unless the valve is designed for bi-directional flow
applications).
The piping should be designed in a way that no forces act along the valve's longitudinal axis. Also ensure
that no tensile, compression or shearing forces can act on the valve and thereby lead to malfunctioning.
2.) Pilot valve and electrical wiring
General :
Valves rated for temperatures above 140° F must use a remotely mounted pilot valve to prevent damage
from the high temperature.
If the valve has additional features such as a limit switch, explosion proof coil, etc. the installation
instructions on the corresponding data sheet(s) must be followed.
Pneumatic pilot valve :
Port 1 on the pilot valve is the air inlet
Port 2 is connected to port 2 on the
actuator.
Port 4 is connected to port 4 on the
actuator.
Wiring attachment :
Please follow the installation instruction in the appendix.
2
B.) Operating instructions
To ensure that our maintenance-free equipment remains in perfect working conditions the following points
should be observed.
1.) Coax valve
General :
Before switching the valve check that the installation instructions have been complied with and that all
lines and wires are properly connected.
Media, temperature, pressure :
note : the valve is designed for a specific application!!! If application conditions change (media,
temperature or pressure) contact our engineering department.
Also contact our engineering department before installing the valve in an application other than the one it
was originally designed for!!!
2.) Pilot valve ( Standard Bosch pneumatically )
General :
Before operating the valve check that the installation instructions have been complied with and that all
lines and wires are properly connected.
Actuation media :
note : the valve can be actuated by air or inert gases at ambient temperature.
Actuation pressure :
note : To ensure a correct function of the Standard Bosch pilot valve the actuation pressure should be
within the range of
4 - 10 bar (60 - 150 psi.). For all other types of pilot valves, follow the manufacturer’s
specifications.
Voltage :
note : The supply voltage must be the same as stated in the order or on the solenoid.
Speed adjustment by throttles :
note : Our pilot valves are supplied with 2 completely open throttles. To reduce the actuation speed (slow
the valve) the adjustment screws on the throttles must be turned clockwise. The throttle in exhaust-port 2
controls the opening speed, the throttle in exhaust-port 4 controls the closing speed.
3
C.) Appendix
Wiring instructions :
Electrical connections are made as follows; DIN plugs with a barrier diode are polarity sensitive!
DIN- Plug 43650 DC :
DIN- Plug 43650 AC :
4
A
B
C
D
E
F
V
G
J
H
L
U
K
R
Q
P
T
P
N
M
1
Item
A
B
C
D
E
F
G
H
J
K
L
M
N
P
Q
R
S
T
U
V
Part
Number
63336
63337
61312-01
62070
62679
62072
62750
61312-04
60328
61344
61938
63259
61883
62215
62430-03
61798
63277
62430-02
62430-01
62430
Description
0-600 psig Gauge
0-1500 psig Gauge
3 Position Selector Switch
Pushbutton Switch
70 amp circuit breaker
2 Position Selector Switch
Green Lens
3 Position Momentary Switch
Tattle Tale Relay
440°F Switchgauge
0-100 psig Switchgauge
20 amp Circuit Breaker
160°F Switchgauge
15 amp Circuit Breaker
0-100 psig Gauge
Fuel Level Gauge
Exhaust Temperature Gauge
250°F Gauge
Tachometer
Murphy Powerview 100
Qty
1
1
1
1
1
1
1
1
3
1
1
1
1
2
1
1
1
1
1
1
2
Item
A
B
C
D
E
F
G
Part
Number
61312-03
62048
61581
62127
62127-01
60795
62489
62072
Description
Contact Block
Lamp Base
Lamp
Pressure Switch
Microswitch for Pressure Switch
0-2000 psig Gauge
E-Stop Button
2 Position Selector Switch
Qty
9
1
1
1
1
1
1
1
3
Item
A
B
Part No.
62776
61475
Description
Qty.
1
1
Fuel Sender
Fuel Cap
4
K
J
G
F
C
A
B
E
D
Item
A
B
C
D
E
F
G
H
I
J
K
I
Part No.
63746
63746-01
63746-02
63746-03
63746-04
30252
63869-01
62917
90088
61035
Description
Co-Ax Valve Air Operated
Co-Ax Valve rebuild kit
Pilot Valve
Coil
Flow Control Filters
2-219 O-Ring
Absorption element
2-228 O-Ring
2” npt Ball Valve
3” npt Ball Valve
90798
62917
63704
61731
3” Victaulic Gasket
2-228 O-Ring
Backpressure Regulator
450 psig Safety Relief Valve
61563
1200 psig Safety Relief Valve
Qty.
1
1
1
1
1
1
1
3
1
1
3
1
1
1
51
A
B
Item
A
B
Part No.
63140
Description
Back Pressure Regulator
60938
Pilot Valve
Qty.
1
1
C
6
A
B
tem
A
B
Part No.
62512
61853
Description
Regulator
0-100 psig gauge
Qty.
1
1
7
A,B
tem
A
B
C
Part No.
61760-01
61760-02
51176
Description
Primary Filter Element
Safety Filter Element
Exhaust Assembly
C
Qty.
1
1
1
8
ATLAS COPCO HURRICANE LLC
WARRANTY POLICY
The Warranty. Atlas Copco Hurricane LLC products are warranted to be free from defects in
workmanship and material, under normal use and service, for the period or hours of operation stated
below, whichever shall occur first, from the date in service to the first purchaser (beginning at machine
startup if startup occurs within six (6) months after shipment from the Atlas Copco Hurricane LLC
factory and registration card is returned within ten (10) days after startup or thirty (30) days after date of
invoice if registration card not returned).
WARRANTY DURATION
PRODUCT
HOURS
Diesel Rotary, Gas Gathering Compressors
2,000
Multi-Stage & Booster Reciprocating Compressors
2,000
Crankshaft, Crankcase Casting, Connecting Rods,
Crossheads and Compressor Head Castings
Rotary Air Ends
2,000
Parts and Exchange Valves
Unlimited
MONTHS
12
12
36
24
3
Hurricane’s Responsibilities. With respect to a product failure, which occurs as the result of a defect in
workmanship or material during the warranty period, which is not otherwise excluded by this warranty,
Atlas Copco Hurricane LLC shall have the following responsibilities:
Rotary, Gas Gathering Compressors: Atlas Copco Hurricane LLC will pay for parts and labor
during the warranty period.
Multi-Stage Reciprocating and Booster Reciprocating Compressors: Atlas Copco Hurricane
LLC will pay for replacement or repair of parts and labor within the first 90 days from date placed
in service and parts only for the remainder of the warranty period.
Rotary Air Ends: Failures will be replaced with new or exchange air ends. When an air end
(either new or exchange) fails under warranty, it must be returned to the factory in its failed state.
If the air end is disassembled, the warranty is void. The parts covered by this plan include all
components of the air end, with the exception of the drive coupling, air intake housing assembly
and discharge housing assembly, which are not included.
Parts and Exchange Valves: Atlas Copco Hurricane LLC will pay for the replacement or repair
of parts or valves only.
Repairs: Repairs or replacement parts are warranted for 90 days from the date that the repaired or
replaced products are shipped or installed. This warranty does not cover labor costs and other
contingent expenses for the diagnosis of defects or for removal and reinstallation of the
equipment.
Customer Responsibilities: The customer is responsible for the operation and maintenance of the
product as required by good industry practice and as specified in the manual supplied by Hurricane.
In order to make a claim for warranty service, the customer must notify Atlas Copco Hurricane LLC or its
authorized dealer of the defect within the warranty period; return the product or part thereof to Atlas
Copco Hurricane LLC for inspection; pay all shipping charges as required.
The customer is responsible for communication expenses, meals, lodging, travel, access to the
compressor, downtime expenses, all business costs and losses and similar costs incurred resulting from
any warrantable failure.
The warranty period shall be established by the date placed in service by the first user as reported by the
warranty registration card mailed to Atlas Copco Hurricane LLC by the owner or distributor. If a
registration card is not on file, the invoice date will establish the start of the warranty period.
Limitations: Except as otherwise stated, this warranty is limited to the repair or replacement of parts at
distributor net cost if, upon inspection, such parts are found to be defective in material or workmanship.
When requested, allegedly defective parts shall be shipped prepaid to the factory for Atlas Copco
Hurricane LLC inspection. Before parts are returned to the factory for warranty, Hurricane’s warranty
claim form must be filled out and sent to Hurricane, within 30 days from date of failure, for consideration
and instructions regarding further disposition. Claims filed after this 30-day time period will not be
considered. After Atlas Copco Hurricane LLC reviews the claim, a determination will be made as to
whether the parts should be sent back for evaluation. Warranted parts will be repaired or replaced to the
initial user during normal working hours at a Atlas Copco Hurricane LLC Distributor authorized to sell
the type of equipment involved or other establishment authorized by Atlas Copco Hurricane LLC.
This warranty does not apply to (1) any compressor unit that shall have been subject to use outside the
recommended rpm operating range, chemical or abrasive action, negligence, accident or other misuse, (2)
any compressor or part that shall have been repaired or altered by anyone who is not an authorized Atlas
Copco Hurricane LLC distributor if, in the judgement of Atlas Copco Hurricane LLC, its performance
and reliability are adversely affected, (3) any part of a compressor unit improperly applied or installed, (4)
failures in any way resulting from use of parts not manufactured or approved by Atlas Copco Hurricane
LLC or (5) normal maintenance services including, but not limited to, tune-up and repair or replacement
of oil, filters and belts.
Atlas Copco Hurricane LLC shall not be liable for loss of time to the user while the compressor or other
equipment is out of commission or for special, incidental or consequential damage arising for any alleged
breach of warranty.
Engines, electrical equipment, gauges, valves, clutches, radiators, coolers, CNG dispensers, gas dryers
and other items not manufactured by Atlas Copco Hurricane LLC which are warranted by their respective
manufacturers, are not warranted by Hurricane.
Labor charges are paid based on Repair Time Standards and Rates established by Hurricane.
All implied warranties, if any, applicable to consumer products terminate concurrently with the expiration
of the express warranties applied to such product.
There are no other warranties, expressed or implied, including warranties for merchantability or
fitness for a particular purpose by Atlas Copco Hurricane LLC except the warranty against defects
in material and workmanship specified herein. No person is authorized to bind Atlas Copco
Hurricane LLC for any other warranty.
WARRANTY CLAIM PROCEDURE FOR DISTRIBUTOR
Any problem encountered by a customer should be reviewed and, if it cannot be determined if
the problem is covered by warranty, contact the factory.
The procedure for handling warranty repairs on items not warranted by Hurricane is on
the back of this form. Do not process a Hurricane warranty claim form on these items.
The flow of events is:
1.
Customer Experiences Failure – customer’s first concern is to repair the equipment
and return it to service as soon as possible.
2.
Repair Parts – if parts needed for repair are not in your inventory, order the parts
from Hurricane Compressors parts department in the same manner as any other
parts order.
3.
Parts shipped and Billed – parts order will be shipped and billed to your account.
After repairing the unit, complete the three-part Warranty Claim Form and return the
white and yellow copies to Hurricane Compressors within 30 days of the actual
work.
4.
Return Material Authorization (RMA) Number – if it is necessary to return the failed
parts to Hurricane Compressors, an RMA number will be issued to you. This
number is to be marked on the outside of the package or on the packing slip. The
parts must be returned prepaid – no CODs will be accepted.
5.
Processing the Claim – upon receipt of the Warranty Claim Form, a warranty claim
number will be assigned. The warranty department will evaluate the claim and, if it
is valid, a credit memo will be issued. If partial warranty is allowed or the warranty
claim is denied, you will be advised in writing.
NOTE:
For items warranted by their respective manufacturers, the procedure is as follows:
Engines and engine related items
1. Contact the nearest industrial engine manufacturer dealer/distributor as listed in the
Engine Operation and Maintenance Manual or Service Distributor Directory supplied
with the compressor. Do not process a Hurricane Compressors warranty claim
form.
2. If a dealer/distributor cannot be located, contract the Hurricane Compressors factory.
Batteries
Attached to each battery or in the technical literature package on each compressor is a
warranty tag with the name and phone number of the East Penn Manufacturing Company
(1-800-237-6162 or in Florida call collect 813-581-1393), manufacturer of the Deka battery.
Section A is to be filed out by the customer on receipt of the air compressor.
If you have a warranty problem, call the appropriate phone number for your location with
the following information: The problem, name of the battery, where you purchased it and
your location. They will inform you of the nearest distributor.
Limitations
If a replacement part is purchased from someone other than the Hurricane Compressors
factory, the warranty reimbursement should be handled through the source for the part.
Warranty reimbursements on replacement parts from Hurricane Compressors will be at
your cost.
ATLAS COPCO HURRICANE LLC
1015 HURRICANE ROAD
FRANKLIN, IN 46131
317.736.8416 FAX 317.736.3831
TOLL FREE 800.428.9703
317.736.3800 FAX 317.736.3801
TOLL FREE 800.754.7408
WARRANTY CLAIM
Claim#
.
Received___________________
Date_______________________________________
Note:
All claims must be filed within
30 days of the actual work. Parts must
be tagged and held for 60 days from the
date of claim.
Your Customer Name_________________________
Street Address_______________________________
City, State, Zip_______________________________
_________________________________________________________________________
Type of Equipment (Compressor-Air or Gas, Part, etc.)
Model No.
Serial # (Found on Data Plate)
__________________________________________________________________________________________________
Date Sold to Your Customer
Date of Failure
Amount of Hours Used
Give accurate detailed description of problem and how it was handled below, or attach separate paper.
BOOSTER FAILURES (MUST BE FILLED OUT COMPLETELY)
SUCTION PSI
DISCHARGE PSI
RPM
COOLANT
TEMPERATURE
OIL PRESSURE
PARTS LIST
QTY
PART NUMBER
PART NAME
NET COST
QTY
PART NUMBER
PART NAME
NET COST
LABOR
DESCRIPTION
DATE
HOURS
RATE
NET COST
□ Parts are being held for instructions
__________________________________________
Your account #
□ Parts are being returned prepaid per instructions form
__________________________________________
Distributor
_____________________________________________
__________________________________________
□ Other Disposition:_____________________________
Street
_____________________________________________
__________________________________________
City and State
Zip
__________________________________________
Name (Please Print)
Title
_____________________________________________
__________________________________________
Telephone #
Fax#