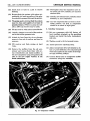
1
628—AIR CONDITIONING
CHRYSLER SERVICE MANUAL
CHRYSLER AIR CONDITIONING
SYSTEM
SPECIFICATIONS
COMPRESSOR
Location
Type
Bore
Stroke
Displacement
Valve
Speeds
Oil Capacity (MOPAR Refrigerant Oil; 300 Saybolt)
On right bank cylinder
2-cylinder
2 inch
1% inch
8.67 cubic inch
Reed Type
935 rpm at 25 mph
12 ounces
CONDENSOR
Location
Front of radiator
RECEIVER STRAINER-DRIER
Type
Location
Cylindrical steel container
Front of Front Frame
Crossmember
REFRIGERANT
Refrigerant
Total Charge
Freon 12
4 pounds
EVAPORATOR
Location
Luggage Compartment
BLOWERS
Type
Location
Capacity
Current Draw
Centrifugal
In evaporator unit
320 cubic feet of air per
minute at high speed
Approximately 20 amps
CHRYSLER SERVICE MANUAL
AIR CONDITIONING—629
SPECIAL TOOLS
(Refer to Figure 27)
Tool Number
C-3354
C-3355
C-3356
C-3444
C-3358
C-3361
C-3372
C-3128
C-3420
C-3421
C-3363
C-3365
C-3366
C-3362
C-804
C-3478
C-3429
C-744
C-3473
Tool Name
TESTING OUTFIT—Consisting of one manifold complete with two
valves; one 30x300 lbs. compound gauge; and one 600 lbs. pressure
gauge. (Use with C-3365 and C-3366 Test Hoses.)
GOGGLES—Safety (Pair).
THERMOMETER SET—Two in separate pocket cases.
(Calibrated from minus 0° to 220° F.)
TORCH—Leak Detector—Includes extra tank of liquid petroleum fluid.
WRENCH—Flare Nut—Open End Box Type %" and 1%" (two per set).
WRENCH—Ratchet Special Refrigeration Type—14" sq. Drive with 3/16"
sq. and V2" Hex. in Handle.
PUMP—Refrigeration Vacuum (Pump charged with 75 Vis. Ref. Oil.)
PLIERS—Drive Pulley Seal Retainer Snap Ring.
ADAPTOR—Freon Cylinder Valve to Test Hose.
CLIP—Set of two—Attaching Thermometer to Tube.
WRENCH SET—Flare Nut—Open End Box Type %" and 1" Openings
(two per set).
HOSE—Test with End Plugs—4 Feet Long (set of two) (use with C-3354).
HOSE—Test with End Plugs—8 Feet Long (use with C-3354).
BENDER SET—For 1/4", y16", %", %6", y2" and %" Tubes.
TOOL—Tube Flaring.
CUTTER—Tube.
SCALE—Freon Weighing.
TEST LAMP.
SEAT PULLER and installing tool.
TIGHTENING REFERENCE
The following parts should be tightened by means of an approved torque wrench to the limits specified below:
Foot-Pounds
Compressor Mounting Bracket to Compressor Bolts
85
Compressor Support Bracket to Compressor Bolts
30
Compressor Cylinder Head Bolts
20
Compressor Suction and Discharge Valves
20
Compressor Pulley to Crankshaft Attaching Bolts
20
Compressor Front Bearing Retainer Bolts
15
Compressor Rear Bearing Retainer Bolts
15
Compressor Adaptor Plate Attaching Bolts
25
Compressor Sight Glass Plug
35
Compressor Muffler Mounting Bolts
20
Compressor Side Plate
20
630—AIR CONDITIONING
CHRYSLER SERVICE MANUAL
1
s
-a
c
o
u
AIR CONDITIONING—631
CHRYSLER SERVICE MANUAL
Section XVII
CHRYSLER AIR CONDITIONING
SYSTEM
1. GENERAL INFORMATION
The occupants of an air conditioned car may
select the temperature and volume of the air
that is circulating in the car interior that will
provide them with the most comfort.
In addition to the conditioned air that is recirculating in the car (Fig. 1), scoops pick up fresh
air from the outside, bring it through ducts into
the evaporator, where it joins with the circulating air.
With the blower operating at high speed, more
than 300 cu. ft. per minute of cool air is forced
into the car. Approximately % of this is outside
air. This will give a complete change of all the
air in the car every li/ 2 minutes.
By providing this complete change of filtered
air in air conditioned cars every li/2 minutes, it
is unnecessary to open the car windows in either
winter or summer. This greatly reduces road
noises and keeps out practically all dirt, when
driving in dusty areas.
Three blower speeds are provided with each
of the two cooling conditions. Low, Medium and
High in the Cold, or full capacity cooling position. Low, Medium and High in the Cool, or
Moderate cooling position. A choice of the three
blower speeds for circulating air without the air
being cooled by the air conditioning unit is also
provided.
The refrigerant used in the Air Conditioning
System is Freon 12.
AIR CONDITIONING SYSTEM COMPONENTS
2. COMPRESSOR
The compressor, as shown in Figure 12, is a two
cylinder reciprocating type unit with a speed of
approximately 935 rpm. at 25 mph.
3. COMPRESSOR LUBRICATION
Lubrication is by a combination of splash and
centrifugal pressure. As the rods, counterweights and slinger rotate through the oil in the
crankcase it is picked up and thrown over the
interior of the crankcase. The rear main bearing
is lubricated by this splash and the connecting
rods are partially splash lubricated.
In addition to the splash lubrication, oil is
thrown into cavities in both bearing retainer
plates. As the shaft rotates, a pressure is built
up on the oil in the rear bearing retainer cavity
and the oil is forced through the rifle drilled
crankshaft. Transverse passages are drilled
through the shaft and supply oil to the connecting rod bearings, the piston pins and the shaft
seal.
The front main bearing is lubricated from the
oil in the front bearing retainer plate oil cavity.
4. COMPRESSOR VALVES
The discharge and suction valves, as shown in
Figures 2 and 3, are inertia type Reed Valves
Fig. 2—Evaporator Installed
CHRYSLER SERVICE MANUAL
AIR CONDITIONING—633
oil seepage is always present at the seal to provide lubrication to the seal. A small fan is attached to the seal assembly to rapidly dissipate
heat.
8. CRANKSHAFT SEAL (Late Type)
A new type oil seal is now in production for the
air conditioning system compressor shaft (Fig.
15). A heavy spring type bellows presses against
a carbon seal which is held into the front bearing retainer plate. An " 0 " ring fits into a groove
in the bearing retainer plate. A smaller " 0 "
ring is mounted inside the bellows and bears
against the compressor shaft. The seal assembly
is held in place by a snap ring.
Fig. 3—Discharge Service Valve
with both the suction and discharge ports in the
one valve plate. The valve plate is located between the cylinder head and the cylinder block.
5. CRANKSHAFT
The crankshaft is a forged steel counterbalanced shaft, utilizing integral cams for the
connecting rod throws. The shaft is mounted in
ball bearings at both ends and is belt driven
through pulleys and a magnetic clutch. Counterweights are attached to the shaft to smooth out
vibrations.
6. CONNECTING RODS
The connecting rods are of forged steel and are
drilled to provide lubrication to the piston pin
bushings. Lubrication to the connecting rod
bearings is provided from drilled passages in the
crankshaft and from splash. The rod bearings
are selected fit bushings.
The piston pins are hardened steel and are a
pressed fit into the connecting rod. Steel backed
bronze bearings are a selective fit to the pins.
7. CRANKSHAFT SEAL (Early Type)
The crankshaft seal surface is a flat vertical
bearing, with a spring loaded bellows attached
to the bearing retainer. A lapped seal face is held
by the constant spring pressure against a lapped
and polished cast iron seal face, as shown in
Figure 11. Two neoprene " 0 " rings used. One
" 0 " ring is located in the bearing retainer plate
and the other in the seal ring. A small amount of
NOTE
The early type seal assembly functions only with
the early type bearing end plate. The late type
seal can be used only with the late type bearing
end plate.
9. CRANKCASE OIL CHECK VALVE
A small self energizing check valve is located in
the oil return passage between the suction manifold and the crankcase. The oil that is entrained
in the refrigerant is separated from the refrigerant in the manifold due to velocity. The oil
flows through the return passage, opens the
check valve and flows into the crankcase.
Another function of the check valve is to reduce the amount of oil pumped out of the compressor after a prolonged idle period. Oil and
Freon 12 are miscible in each other and during
periods of non-operation the oil in the crankcase
absorbs some refrigerant. When the compressor
is started, following a long idle period, the
check valve is closed to a small orifice by crankcase pressure so that pressure will reduce
slowly. The slow reduction of crankcase pressure minimizes foaming of the oil and consequently oil pumping.
10. PISTONS AND PINS
The cast iron pistons are a selective fit to a very
close tolerance with the cylinder bore. Due to
the close fit of the pistons in the cylinder bores
it is not necessary to use piston rings thus reducing friction and wear.
634—AIR CONDITIONING
11. OIL LEVEL
An access plug is provided in the crankcase for
the purpose of measuring the height of the oil in
the crankcase. (See Fig. 12.) A new compressor
before installation contains 12 ounces of oil and
is charged with dry air, however, due to some of
the oil being picked up and entrained in the
system, the crankcase does not contain 12 ounces
of oil after it is in service.
The proper height of the oil in the compressor
after it is in service should not exceed % inch to
one inch as measured on a dip stick inserted
through the access hole. A sight glass is provided to indicate that oil is present, but does not
tell how much.
12. SERVICE VALVES
Due to the fact that it may be necessary to remove the compressor for compressor or engine
service and also to provide means for connecting test equipment, two service valves are
provided.
The suction service valve is attached to the
inlet side of the compressor, as shown in Figure
4. The discharge service valve is connected in the
discharge tube at the inlet side of the condenser.
(See Fig. 3.)
Rotating the valve stems clockwise until the
valves are fully seated, front seats the valve and
isolates the compressor from the system. Rotating the valve stem clockwise from the back-seat
position also opens the service port to supply
pressure to the gauges. Rotating the valve stems
counter-clockwise, back seats the valves and is
the operating position.
13. MAGNETIC CLUTCH
The magnetic clutch shown in Figure 20, is provided in the compressor drive pulley. The clutch
consists of a spring loaded drive plate that is
attached to the compressor crankshaft. The
electro-magnet coil is mounted in the pulley with
the ends of the coil connected to separate brush
or collector rings. Hinged type brush holders
hold the brushes against the collector rings.
When the electro-magnet is not energized the
pulley assembly free-wheels on a double roll ball
bearing. When the electro-magnet is energized
the plate is magnetically attracted to the electro-
CHRYSLER SERVICE MANUAL
magnet and the compressor crankshaft is then
coupled to the drive pulley.
The magnetic clutch can be engaged at any
engine speed without damage. A sintered iron
brake shoe, impregnated with fibrous material
is bonded to the drive plate to reduce chatter
and wear during engagement.
14. EVAPORATOR
The evaporator unit, shown in Figure 2, contains an evaporator wherein the liquid refrigerant vaporizes due to the heat which it absorbs
from the air passing over the evaporator tube
fins. This absorption of heat from the air results
in a considerable reduction in the air temperature. It is located in the luggage compartment
and contains the expansion valve and evaporator coil which is connected by tubing from the
expansion valve to the compressor. The unit also
contains the motor and blower assembly.
15. BLOWER SYSTEM
The blower motor and fans are located in the
evaporator. The blower motor has three speeds;
low, medium and high. The speeds are controlled
through the blower switch located on the instrument panel.
16. SOLENOID VALVE
The solenoid valve is connected into a by-pass
line between the high pressure side of the compressor and the inlet side of the evaporator at
the distributor. The normal position of the valve
is open.
With the blower switch on and the temperature control switch in the "Cool" position, the
valve is not electrically energized and is therefore open. With the valve open, gasflowsthrough
the by-pass line and into the evaporator, mixing
with the liquid refrigerant from the expansion
valve. The amount of heat absorbed from the
air by the evaporator is decreased and the temperature of the car interior will be moderately
cooled.
Rotation of the temperature control to the
"Cold" position completes the electrical circuit to
the solenoid windings, which energizes the solenoid and closes the valve. The flow of hot gas
through the by-pass line is cut-off and the system
can then operate at full capacity.
CHRYSLER SERVICE MANUAL
17. THERMAL SWITCH
A Thermal Switch is provided to prevent frosting
of the evaporator such as might occur on cool
days when the air conditioning system is being
operated in the full capacity cooling position with
the blower speed set at "Low."
The thermal switch, shown in Figure 6, is
attached to the suction pressure line at the evaporator outlet manifold. The electrical contacts
in the switch are connected in series with the
temperature control switch and the solenoid
by-pass valve winding. In the normal position
the contacts are closed. A decrease in the temperature of the refrigerant gas leaving the
evaporator, will cause the thermal blade to bend
and open the electrical circuit to the solenoid
valve when the temperature reaches approximately 25 degrees F. Opening the solenoid valve
allows a charge of hot refrigerant gas to flow
into the evaporator. When the temperature increases again to approximately 40 degrees F.
the contacts close and the solenoid will energize,
closing the by-pass valve.
18. EXPANSION VALVE
The expansion valve, shown in Figure 2, is
attached to the inlet distributor of the evaporator. The purpose of the valve is to meter the
flow of liquid refrigerant to the evaporator. The
valve is also the dividing point between the high
and low pressure and temperature sides.
19. AIR CONDITIONING SYSTEM CYCLE
Starting with the compressor inlet, the vapor
entering the compressor is at a relatively low
temperature and pressure. On the downstroke
of the compressor piston, the suction valve opens
due to differential pressure (not mechanically
operated as in an automobile engine), and vapor
is drawn into the cylinder. On the up-stroke,
the suction valve closes and the vapor is compressed until sufficient pressure is reached to
force open the discharge valve, discharging the
high pressure and temperature vapor into the
condenser.
In the condenser the heat of compression and
the heat absorbed by the refrigerant in the cooling coil is rejected to the air flowing over the
finned condenser tubes, and the refrigerant is
liquefied.
AIR CONDITIONING—635
The liquid refrigerant then flows into the receiver which acts as a storage tank. In the
receiver, it passes through a strainer-drier unit,
which removes dirt and moisture. The liquid
refrigerant then enters the expansion valve
which throttles the flow so that some of the
refrigerant flashes into vapor, and cools the remaining liquid down to the saturation temperature at the expansion valve outlet.
The liquid and vapor then enter the cooling
coil in the evaporator where the remaining liquid
evaporates due to heat absorbed from the air
flowing through it. The cooling of the air effected
by the cooling coil is due to the evaporation of
liquid refrigerant in the coil. The completely
vaporized refrigerant is then drawn back to the
compressor thus completing the refrigeration
cycle.
Control of the flow of refrigerant from the
expansion valve to the evaporator is automatic.
The flow is controlled by spring tension, suction
manifold pressure and temperature. The expansion valve is pre-set at the factory and is nonadjustable.
The temperature control functions through a
manually operated switch, a solenoid by-pass
valve and a thermal switch. The solenoid valve
is normally open. When the temperature control
switch is turned to the cold position the solenoid
is electrically energized and the valve is pulled
closed. This allows the system to operate at full
capacity. Turning the switch to the cool position
breaks the circuit to the solenoid and the valve
opens. This allows hot vapors to flow from the
compressor to the evaporator and moderates
the cooling effect of the system. A drop in the
temperature of the suction pressure line to 30
degrees =fc five degrees, causes the thermal
switch to open and breaks the circuit to the
solenoid valve. When the temperature again
reaches 45 degrees ± five degrees, the thermal
switch closes.
Fundamentally, the refrigerant which is circulated through the system by the compressor,
picks up heat at the evaporator coil, carries it
to the condenser, and there discharges it to the
outside air.
20. OPERATING THE AIR CONDITIONING
SYSTEM
The procedure required of the driver to operate
•
636—AIR CONDITIONING
the Air Conditioning System has been reduced
to a minimum. The only action required when
the occupants of an air conditioned vehicle desire
air conditioning, is to close the car windows and
cowl ventilator (if open) then, with the engine
running, turn on the blower and temperature
control switches. Where a car has been parked
in the hot sun it is sometimes advisable to open
car windows, drive for a few blocks, then close
windows and turn on air conditioning.
CHRYSLER SERVICE MANUAL
The control switches are mounted on a single
shaft and are conveniently located to the left
of the steering column on the instrument panel.
Periodic owner service is limited to an occasional cleaning of the outside of the condenser—
about as often as bugs and other matter are
cleaned out of car radiator. No special care is
required for winter with the exception of closing
the fresh air doors by turning the levers on the
evaporator in the luggage compartment. (See
Fig. 2.)
SERVICE PROCEDURES
21. PRECAUTIONS IN HANDLING FREON 12
Freon 12 when properly used is harmless. However, a few simple precautions should be observed to guard against injuries or sickness that
might occur where it is improperly handled.
a. Do Not Expose Eyes to the Liquid
When working around a refrigerating system
liquid refrigerant may splash and hit your face.
If the eyes are protected with goggles (Tool
C-3355) (or glasses) no serious damage may
result. If a splash of refrigerant does hit the
eyes the eyes must not be rubbed. Freon 12 is at
least 20 degrees below zero—a temperature that
the eyes cannot normally withstand. Apply cold
water immediately to the area of the eye to
gradually get the temperature above freezing
point. Use of an antiseptic oil is helpful as a
protective film over the eye ball until medical
aid can be obtained.
b. Do Not Discharge in Areas Where An
Open Flame Is Exposed
Discharging large quantities of Freon 12 in an
average size work room can usually be done safely as the vapor will produce no ill effect, however,
this should never be done if the area contains an
open flame such as a torch or gas heater. Freon
12 normally is non-poisonous. Concentration of
the gas in a live flame will produce poisonous gas.
Splashing Freon 12 on bright metal or chrome
should be avoided as the gas will tarnish bright
metal.
c. Do Not Leave Charging Drum Uncapped
Charging drums are shipped with a heavy protecting cap. This cap is to protect valve and
safety plug from damage. Always replace cap
after using charge drum.
d. Do Not Expose Drum to High Temperature
The drum should never be exposed to radiant
heat or an open flame as the resultant pressure
from such heat may cause the safety plug to
blow out. In charging the system it may be
necessary to heat the drum to raise the drum
pressure higher than the pressure in the system.
Use a pail of hot water no hotter than you can
put your hand into to supply heat to the drum.
Never transport the charging drum in the
passenger compartment, as this can be done
more safely in the trunk compartment.
22. INSTALLING MANIFOLD GAUGE SET
(1) Remove valve stem protective caps from
compressor discharge and suction service
valves.
(2) Using Tool C-3361 make sure both valves are
completely back-seated (counter-clockwise).
CHRYSLER SERVICE MANUAL
VALVE STEM PROTECTIVE CAP
PORT CAP
AIR CONDITIONING—637
shut off engine. Connect exhaust suction
system to tail pipe. Inspect condenser and
radiator for bugs, etc.
(2) Blow out from side opposite entrance with
compressed air.
(3) Place an electric fan (15 to 20 inch) in front
of radiator in such a manner as to blow as
much air as possible over the condenser and
maintain the temperature pressure relationship, as specified in Paragraph 40.
(4) Place fender covers over fenders. Check
radiator pressure cap. Cars equipped with
air conditioning system require fourteen
pound pressure caps.
Fig. 4—Suction Service Valve
The normal operating position is then rotated in a counter-clockwise direction. This
position also isolates the service valve ports
from the system pressure.
(3) Remove the protective caps from both the
discharge and service port caps.
(4) Install the four foot test hose from the 600
pound gauge fitting on Tool C-3354 to the
discharge service valve port fitting. (See
Fig. 3.)
(5) Install the other four foot test hose from
the 300 pound compound gauge fitting on
Tool C-3354 to the suction service valve
port fitting. (See Fig. 4.)
(5) Replace cap if it does not meet specifications.
Check or add water to cooling system to
maintain proper level.
(6) Check belt tension by applying a 9 to 12
pound pull with a scale at the center of the
longest span. Belt deflections should be *4
inch for compressor belts (each).
(7) Remove cover from evaporator housing. Inspect blower fans for proper installation.
Looking into end of vanes at the bottom of
fan, fan vanes should point up and toward
rear of car. Fans are not interchangeable
with each other and must be installed, as
shown in Figure 5.
(6) Turn both valve handles of gauge set Tool
C-3354 clockwise as far as they will go, as
this will completely seat valves and isolate
gauge set manifold center outlet from test
hoses. To admit pressure to gauges, rotate
valve stems of both suction and discharge
service valves one turn clockwise.
23. INSPECTION AND TESTING OF
COMPLETE AIR CONDITIONING SYSTEM
The following test procedures have been set up
as a logical sequence for testing the air conditioning system for proper operation and isolating
any of its components that are not functioning
as they should.
a. Preparation for Tests
(1) Move car into a well ventilated area and
BOTTOM VANES SLANT UP AND BACK
Fig. 5—Blower Fan (Right)
54x579
638—AIR CONDITIONING
(8) Switch fans to opposite ends of motor shaft
if they are improperly installed at wrong
end of motor. Blower fans should clear inlet
ring not to exceed % inch. Fans may be
moved in or out by loosening Allen set
screw in fan hub.
(9) Check direction of motor armature rotation.
Fans should rotate clockwise when viewed
from left side of car.
(10) Remove motor and turn assembly around
if rotation is incorrect. Be sure blower
fans are properly installed. Check speed
by rotating blower switch to High, Medium
and Low.
(11) Turn blower switch to high position. Test
battery voltage at battery. Fully charged
battery should read from 6 to 6.2 volts with
blower switch on high speed position. (Engine not running.) Test voltage from motor
lead junction block to ground. Difference
(voltage drop) between voltage at battery
and at motor should not exceed 2 volts.
Test ground circuit from motor ground to
frame, voltage drop should not exceed 1
volt.
(12) Clean and tighten all connections if voltage
drop exceeds specifications. Install evaporator housing cover.
b. Testing Compressor Valves
(1) Start engine and operate at 1200 rpm.
(2) Turn blower switch to "High" and the temperature switch to "Cold." Operate for five
to ten minutes to warm compressor, and,
slow to 500 rpm.
(3) Close the suction service valve by rotating
the valve stem, using Tool C-3361, as shown
in Figure 4, clockwise until it is tightly
seated (engine running at idle speed). CAUTION: Never shut off DISCHARGE service
valve with engine running, or the compressor will be damaged. Do not operate system
with suction valve closed any longer than
absolutely necessary.
(4) Observe the suction pressure on the compound gauge. The pressure reading on the
gauge should drop steadily. The pressure
should drop to from 12 to 18 inches of
vacuum if the suction valves are in good
CHRYSLER SERVICE MANUAL
condition. If 12 to 18 inches of vacuum
cannot be obtained, check the suction
service valve to be sure it is fully seated
before condemning and replacing valve plate
assembly.
(5) Shut off engine and watch the suction (compound) gauge. The vacuum should hold
without dropping more than five inches
within one minute if the discharge valve is
in good condition.
(6) Return suction valve stem to full counterclockwise position, then, one turn clockwise.
(7) Replace valve plate assembly if tests do not
meet these test conditions, and refer to
Paragraph 35.
c. Checking Freon Level
(1) Connect a tachometer to the engine. Start
engine and adjust speed to 1200 rpm's.
(2) Turn the Blower control knob to "High"
position and temperature control to "Cold."
Open car windows.
(3) Allow engine to operate at 1200 rpm. to
clear sight glass.
(4) Observe sight glass on right-hand fender
panel. Sight glass should be perfectly clear
(no bubbles) within three to five minutes
from the time engine was started. If sight
glass is not perfectly clear after three to
five minutes operation, the thermal switch
and by-pass valve should be tested as outlined on Page 639.
(5) If this test is O.K., the system should be
partially charged to remove bubbles. (Refer
to Paragraph 27.)
(6) If the high pressure gauge shows a high
pressure and the suction pressure is normal,
it is an indication of too much Freon. In this
case bleed off Freon until bubbles appear in
sight glass and then charge (refer to Paragraph 28) to remove bubbles.
A system that is low on Freon should be tested
for leaks, corrected and system charged.
d. Testing Strainer-Dryer
With engine operating at 1200 rpm. hold hands
on the fittings at both ends of the receiver
strainer-drier. The temperature should be the
CHRYSLER SERVICE MANUAL
same at both ends. If the end towards the lefthand is cooler than it is at the right end, (righthand) the strainer-drier is defective (partially
plugged) and must be replaced. (Refer to Paragraph 45.)
AIR CONDITIONING—639
WADE
CONNECTOR
TERMINAL
TERMINAL
e. Check Compressor Oil Level
Check oil level as outlined in Paragraph 31.
3/4 INCH I 6GAUGE BARE WIRE
f. Testing Thermal Switch and Solenoid
By-Pass Valve
(1) Disconnect the Wade connector at solenoid
valve and insert special adaptor, as shown
in Figure 6, in series with disconnected
connector and Wade terminal.
(2) The adaptor, as shown in Figure 7, is for
testing the thermal switch and solenoid
valve. It may be fabricated by using two
903895 terminals, a 1310489 Wade connector, two inch 16 ga. copper wire stripped
as shown and a piece of 16 ga. bare wire %
inch long to wrap around bared section of
two inch wire and solder in place.
(3) Connect lead from test lamp (Tool C-744)
to adaptor and ground the remaining test
lamp lead to a good clean ground.
(4) Place test lamp suction cup on fender so
light is visible from right rear of car, as
shown in Figure 6.
(5) With engine running at 1200 rpm. turn the
blower control knob to "Low" speed and the
temperature control to "Cold." Close all
car windows, doors and cowl ventilator.
ATTACH TEST LIGHT LEAD
54X536
Fig. 7—Test Adaptor
(6) Install thermometer clip on evaporator suction tube outlet fitting, place thermometer
in clip and wrap clip and bulb with a rag.
(7) Check temperature reading of thermometer
at evaporator suction pressure outlet.
(8) If temperature reading is 45° F. (it 5°) or
higher, the test lamp should be lit.
(9) Allow test to continue. When the temperature of the suction pressure tube at the
evaporator drops to 30° F. (db 5°) the light
should go out.
(10) With the temperature of the suction pressure evaporator outlet at or above 45° F.
( ± 5 ° ) the thermal switch contacts should
be closed and the electrical circuit to the
solenoid complete. If the test results are
as outlined then the solenoid valve is functioning or the temperature would not
change. If the light goes off, and on, the
thermal switch is functioning.
g. Testing Operation of Expansion Valve
for Proper Super Heat
Refer to Paragraph 40 and test operation of
expansion valve for proper super heat.
h. Final Test
Remove test equipment from vehicle and road
test car.
Fig. 6—Thermal Switch and Solenoid Valve
(Test Adaptor Connected)
24. TESTING FOR LEAKS WITH LEAK
DETECTOR
Where a system has been found to be low on
640—AIR CONDITIONING
CHRYSLER SERVICE MANUAL
Freon or following repairs on the system that
necessitated the opening of a connection, it is
necessary to test for leaks and tighten connections or make repairs as required before the
system is charged and put in operation. If a
system has been discharged for making repairs
or to eliminate moisture, the system must be
evacuated before partially charging to test for
a leak.
Partially charge the system with Freon 12 as
outlined in Charging the System with Freon 12,
Paragraph 27, and proceed as follows: This is
necessary only where the Freon supply in the
system is very low or where system has been
evacuated.
The Tool C-3444 using petroleum gas does not
require generating to light. Just turn valve on
and light it, and adjust to small flame.
Move the leak detector snifter tube over all
connections. When a leak is found the flame in
the burner will turn bright green. Move the detector tube around the connection to determine
the magnitude of the leak. If a larger leak is
found the color of the burner will turn from
bright blue to bright purple.
If a leak is found at a flared connection, try
tightening the connection using two wrenches.
If the leak cannot be eliminated by tightening,
the system must be discharged. The connection
or flare must be reseated or replaced and the
system evacuated and again partially charged
and retested. If no leaks are found, add to the
partial charge until the system contains four
pounds of Freon 12.
25. DISCHARGING FREON
Install gauge set manifold Tool C-3354 (if not
installed, as shown in Fig. 8). Using Tool
C-3361 be sure both discharge and suction service valves are fully back-seated (counter-clockwise) . Connect eight foot test hose to the gauge
set manifold center fitting. Insert the free end
of the eight foot test hose into exhaust suction
system and turn exhaust system blower on.
Although Freon is non-toxic unless released in
or near an open flame, expelling the Freon gas
into the exhaust system is a recommended safety
precaution.
Open the discharge and suction service valves
one turn. Crack manifold gauge set discharge
DISCHARGE SERVICE PORT
Fig. 8—Gauge Set Manifold Installed
hand valve a fraction of a turn counter-clockwise
to allow gas to escape. CAUTION: Opening the
manifold discharge hand valve too much in order
to more quickly discharge the system will draw
the compressor lubricant off with the Freon. As
the pressure on the manifold discharge gauge
drops near zero, open the manifold suction hand
valve.
NOTE
If brazing or some similar repair is to be made
on system leave the system open to atmospheric
pressure. After service work has been completed
the system must be evacuated, partially charged
and leak tested before final charge.
26. EVACUATING AND SWEEPING
THE SYSTEM
Whenever the system has been open to atmosphere, as in replacing a component to make repairs or through damage, it is absolutely essential that the system be evacuated and swept with
Freon to remove all air and any moisture that
has entered. Evacuating the system means that
it must be subjected to a suction of 28 inches of
vacuum for a period of 30 minutes, after sweeping with one pound of Freon 12.
Sweeping the system means to charge a discharged system with one pound of Freon 12 or
charge until a pressure of 100 pounds registers
on the discharge gauge. Operate the system for
five minutes and again discharge to remove as
much mositure as possible.
CHRYSLER SERVICE MANUAL
AIR CONDITIONING—641
Evacuate the Air Conditioning System
as Follows:
Close both gauge set manifold hand valves
(clockwise). Turn off vacuum pump and remove
long test hose from pump. Charge system with
one pound of Freon 12, as outlined in Paragraph
27.
Connect gauge set manifold Tool C-3354 to the
compressor (if not installed), as shown in Figure 8.
Discharge system if not previously discharged,
as outlined in Paragraph 27.
CAUTION
Be sure pressure has dropped to zero before attaching hose to vacuum pump.
Connect the eight foot test hose to the center
fitting of the gauge set manifold and to the connection on the vacuum pump (Tool C-3372).
Open both discharge and suction service valves
about one turn, rotating both valve stems clockwise. Open both gauge set manifold hand valves,
(turn counter-clockwise). Start vacuum pump
and observe compound gauge. Operate pump
until gauge registers 26 to 28 inches of vacuum.
Continue evacuating at 26 to 28 inches for five
minutes. Failure to obtain 26 to 28 inches of
vacuum would indicate a leak in the system.
Start the engine and adjust speed to 1200 rpm.
Turn blower control to "High" and temperature
control to "Cold." Operate in this manner for
five minutes, and test for leaks. Discharge the
system, which will sweep out any remaining
moisture. Again evacuate the system at 26 to 28
inches of vacuum for 30 full minutes. Recharge
system with four pounds of Freon 12.
27. CHARGING SYSTEM WITH FREON 12
Connect the eight foot test hose to the center fitting of the gauge manifold and to the connection
of the Freon 12 tank, as shown in Figure 9. Be
sure both gauge manifold valves are fully closed
(clockwise).
Open both the discharge and suction service
valves one turn (clockwise) if not previously
done. NOTE: Where discharge gauge hand fluctuates when engine is running, close discharge
valve slowly (counter-clockwise) until gauge
hand steadies.
Open the valve on the Freon 12 tank slightly
and loosen the eight foot test hose at the gauge
manifold. Leave connection loose for about a
second to purge the air from the hose. Close
Freon tank valve.
Start the engine and operate at 1200 rpm. with
blower control set to "Low" and Temperature
control set at "Cold."
Set the Freon 12 tank (upright) in a pail of
warm water. Temperature of warm water not
to exceed 125 degrees F. Set pail and Freon tank
on scale (Tool C-3429) and weigh assembly.
Make a note of the combined weight.
WARNING
HOT WATER
125 DEGREES
MAXIMUM
54x598
Fig. 9—Charging System with Freon 12
It is absolutely essential that an accurate scale
Tool C-3UZ9 be used. Bath scales are not accurate belotv 100 lbs.
Open the Freon 12 tank valve x/2 turn. Open
suction valve on gauge manifold slightly (counter-clockwise) . Control the Freon 12 entering the
system with this valve. DO NOT allow suction
pressure to exceed 60 psi. Be sure both discharge
and suction pressure service valves are open
642—AIR CONDITIONING
CHRYSLER SERVICE MANUAL
about one turn (clockwise). Carefully watch
scale and shut Freon 12 tank valve off when system has absorbed four pounds of Freon 12. (If
a partial charge is desired for testing leaks,
charge system with one pound of Freon 12, or
charge until 100 pound pressure is reached on
the discharge pressure gauge.)
hose. Disconnect hose after Freon has escaped.
Back seat the suction and discharge service
valves (counter-clockwise). Remove gauge
manifold and install service valve and service
port protective caps.
Close suction valve on gauge manifold (clockwise) . To disconnect Freon 12 tank, loosen eight
foot test hose and allow Freon in hose to escape
slowly, then, remove hose from tank.
a. Cleanliness During Storage and Installation
28. ADDING FREON 12 BY SIGHT GLASS
METHOD
In some cases, due to extenuatingtiircumstances,
it may be necessary to add Freon 12 to the system to provide cooling, without weighing the
Freon as is normally required.
Follow the preliminary steps in charging the
system, but, eliminate those steps involving the
scale. Start the engine and operate at 1200 rpm.
Turn the blower control switch to the "Low"
position and the temperature switch to "Cold."
Rotate both the suction and discharge service
valve stems one turn clockwise. Where discharge
gauge hand fluctuates when engine is running,
close discharge valve slowly (counter-clockwise)
until gauge hand steadies.
Open the Freon tank valve */2 turn. Open the
suction valve on the gauge manifold slightly
(counter-clockwise). Control the Freon entering
the system with this valve. DO NOT allow suction pressure to EXCEED 60 psi.
Carefully watch the sight glass. CLOSE
gauge manifold suction valve (clockwise) the
moment the sight glass is clear of bubbles. Stopping the flow of Freon into the system as soon
as the sight glass is clear (free of bubbles) is
important. Too much Freon in the system can
cause damage.
Operate system for five minutes and again
observe sight glass for presence of bubbles. If
there is still evidence of bubbles, continue to
charge carefully until sight glass is clear and
repeat five minute run. Where no bubbles are
present after five minutes of engine operation;
charge system with additional Freon for ten
seconds.
Close Freon tank valve. Loosen hose connection at tank to gradually release Freon from
29. PRECAUTIONS IN HANDLING TUBING
It is of the utmost importance that refrigeration
tubing be kept clean and dry. Refrigeration
tubing is ordinarily purchased in rolls with the
ends crimped and sealed air tight. When tubing
is used from a roll, reseal the unused portion of
the roll to prevent dirt and moisture from getting inside. A piece of tubing that has been cut,
flared and prepared for installation should have
the ends sealed until the actual installation is
being made.
b. Cutting and Flaring
Tubing should always be cut with a regular tube
cutter, Special Tool C-3478, as shown in Figure
10. Never use a hack saw. After cutting the tube,
ream out the inside of the tube with special
Tool C-3478 to eliminate all burrs and provide
a good seating area when the tube is flared. The
tube should be double flared with special Tool
C-804.
Always inspect a flared joint before installation to determine if there are any cracks or
blemishes on the flare that would cause a possible leak. It should be emphasized that the retention of Freon in a system requires flared or
brazed joints of the highest quality.
•' FLARING
53x225A
Fig. 10—Bending, Cutting and Flaring Tubing
CHRYSLER SERVICE MANUAL
AIR CONDITIONING—643
644—AIR CONDITIONING
Copper washers must be used where joint is
steel to steel or steel to brass. Copper to steel or
brass requires no washer. Use vaseline on flared
surface connections when installing or repairing
leaky tube connections to improve sealing and
reduce torque required.
Never use any sort of sealing compound between the tube flare and the male surface.
c. Securing of Tubing
Tubing that is left free to vibrate and move
about excessively will soon harden the area of
the tube at the flared section so that it may
become brittle and break. It is very important
that copper tubing be attached to the car structure. Flexible connectors, known as "vibration
eliminators," have been placed on either side of
the compressor to guard against tube breakage
at that point.
d. Brazing Joints
Leaks at brazed joints may be repaired with a
Prest-o-lite torch or an ordinary acetylene
torch.
CAUTION
Discharge system before using torch to braze
leaking joints.
Care should be exercised to avoid excessive
heat when using an acetylene flame to solder or
braze a joint, as excessive heat will cause damage to tubing and fittings. Silver solder flux
should be put on the joint before starting the
brazing operation. When a joint is silver soldered
or brazed, clean the newly made joint vigorously
with a stiff wire brush before leak testing the
joint to make sure the joint is properly soldered
or brazed. Very often the flux will melt—forming a hard crust on the joint that is apparently
leak tight until put in service when the slightest
vibration breaks away the crust of the flux
causing a leak. The usual precautions should be
followed before repairing a sweat type joint—
such as cleaning thoroughly, applying sufficient
flux, heating to a temperature that will cause
the silver solder toflowfreely and testing after
repairing the joint.
30. SERVICING THE COMPRESSOR
The following component parts of the compressor, as shown in Figure 11, are available for
service only: compressor unit valve plate assem-
CHRYSLER SERVICE MANUAL
blies, suction service valve, cylinder head, oil
sight glass, gaskets, shaft seal, and support
brackets.
The compressor refrigerant oil may be replaced or corrected to the proper level.
Any damage to the pistons, cylinders, crankshaft or connecting rods, requires replacement
of the complete compressor assembly.
31. REPLACING COMPRESSOR (OIL LEVEL
PRECAUTION)
New compressors are shipped fully equipped
with the exception of the drive pulley and magnetic clutch assembly. The compressors are
charged with treated dry air to prevent air,
moisture or dirt from entering and contain 12
ounces of 300 Saybolt refrigerant oil. (Oil level
at center of sight glass compressor lying horizontal on bench.)
When replacing a compressor for any reason,
it is imperative that the oil level in the compressor be corrected to the proper amount. Even
though the oil compressor had no oil when
removed, some oil may still be in the rest of the
system.
Where an old compressor is found to have no
oil, or where oil level is very low or too high;
the oil in the new compressor must be siphoned
off to the minimum level of % inch. After the
installation is completed the system should be
operated for ten minutes, the engine shut down
and the oil level checked and adjusted as outlined
in Paragraph 14 from % to one inch if required.
(Use a suction gun to remove oil if level is too
high.) This procedure should be repeated several
times until level remains at % to one inch.
CAUTION
When working on the air conditioning system
under pressure, protect your eyes with goggles
(Tool C-3355) or glasses, so no serious damage
can result
32. MEASURING COMPRESSOR OIL LEVEL
(1) Start engine and run at moderate speed
(air conditioning turned on) until compressor is warm. This will automatically cause
the compressor crankcase to become comparatively free of liquid refrigerant. An oil
sight glass is provided in the compressor
CHRYSLER SERVICE MANUAL
crankcase so that the oil splash may be
observed while the compressor is in operation. If a splash is observed it indicates
ONLY that there is oil in the compressor.
It does not tell you if there is TOO MUCH
OR TOO LITTLE OIL. To determine the oil
level accurately it is necessary to measure it
with a dip stick.
(2) Stop engine, remove protective caps from
discharge and suction valves. Using Tool
C-3361 close both valves by turning valve
stems clockwise until they seat firmly. CAUTION: Never start engine with discharge
valve closed and drive belts connected to
engine when magnetic clutch is engaged.
(3) Clean dirt away from compressor oil filler
plug with solvent and blow dry with compressed air. Loosen the cap carefully on the
service port of the discharge valve approximately % turn and gradually release the
gas pressure from the compressor.
(4) When the gas pressure in the head decreases, loosen, but do not remove the oil
filler plug on the side of the compressor.
This will allow the gas pressure in the compressor crankcase to drop. If the oil level is
checked immediately after a trip, driven at
high speeds, the level will be slightly higher
than normal.
(5) Remove the oil filler plug and using a dry,
clean, plunger type dip rod, (% inch welding
rod) measure the oil level. The correct oil
level is from % to one inch.
(6) Siphon off excess oil or add MOPAR Air
Conditioning Compressor Oil (300 Saybolt
at 100 degrees F.) as required.
(7) After oil level has been checked and corrected if required, replace the oil filler plug
but do not tighten at this time.
(8) To purge air out of the compressor cylinder
and crankcase, make sure cap on discharge
valve service port is loosened approximately
Yz turn and oilfillerplug on side of the compressor a full turn.
AIR CONDITIONING—645
(11) Tighten the oil filler plug and the cap on
the discharge service port.
(12) Back-seat both discharge and suction service valves by turning the valve stems counter-clockwise.
(13) Replace protective caps on discharge and
suction service valves.
33. REPLACING DAMAGED COMPRESSOR
To replace an old compressor with a new one,
where the indications are the compressor has
failed, and where metal particles are circulating
in the system, proceed as follows:
a. Removing Compressor
(1) Completely discharge the entire system as
outlined in Paragraph 25.
(2) Remove the drive belts and generator adjusting strap from compressor. (Refer to
Fig. 12).
(3) Disconnect the discharge and suction tube
flared connectors at the compressor mufflers, shown in Figure 12.
(4) Always use two wrenches when disconnecting flared connections to prevent damage to
flares or tubes.
(5) Remove the four compressor to mounting
bracket bolts.
(6) Remove compressor and set on bench. Be
careful not to damage brushes when removing or installing magnetic clutch.
(7) Remove clutch assembly by removing retaining bolt from end of shaft. While supporting clutch with one hand tap on the
pulley with a soft hammer and remove
assembly.
(8) Remove receiver, strainer-drier unit, expansion valve and solenoid valve.
(9) Connect j umper tubes across vacated spaces
left by removal of receiver, strainer-drier
unit, expansion valve and solenoid valve.
(9) Using Tool C-3361, slightly open suction
service valve by turning valve stem counterclockwise.
(10) Connect a pressure pump to the suction
side of the system.
(10) Let gas drift slowly through the compressor for about 10 seconds.
(11) Connect a hose or tube to the discharge
side.
646—AIR CONDITIONING
CHRYSLER SERVICE MANUAL
(12) Insert hose or tube in a pail to receive
flushing.
(13) Reverse flush the system with carbon tetrachloride. At least one gallon of the solution should be pumped through the system.
(14) The pump used to reverse flush the system
must be clean and capable of at least 50
pounds pressure. (Where no pump is available a 1954 type receiver may be used.)
(15) Fill the receiver with carbon tetrachloride.
(16) Attach a jumper to one end of the receiver
and to the suction pressure tube.
(17) Attach air hose from dry air or nitrogen
source to free end of receiver and turn on
pressure.
(18) Fill receiver and flush system at least
twice.
(19) Remove the mufflers from the old compressor and reverse flush them with carbon tetrachloride and install mufflers on
the new compressor using new gaskets. Be
sure to use new copper washers in the
flared connections.
(20) Thoroughly clean the expansion valve inlet screen and valve. Install a new receiver
strainer-drier.
(21) Install a new solenoid valve. Install a clutch
assembly on new compressor.
(22) Lay the compressor flat on bench in horizontal position. Oil level in compressor
should be at center of sight glass.
b
" Installing Compressor
(1) Set new compressor with full factory oil
level (mufflers attached) on the mounting
bracket and install the bolts, lockwashers
and nuts.
(2) Tighten evenly to 85 foot-pounds torque.
(3) Install generator adjusting strap.
(4) Adjust compressor drive belt tension to obtain a yi inch deflection (9 to 12 pound pull
with scale applied at the center of the longest span between pulleys).
(5) Connect flared tubes to compressor muffler
connectors using two wrenches.
Fig. 12—Compressor Installed
CHRYSLER SERVICE MANUAL
AIR CONDITIONING—647
(6) Use new copper washers in flared connections.
(7) Install manifold gauge set Tool C-3354 and
attach eight foot test hose to gauge manifold center fitting and to vacuum pump.
(Refer to Paragraph 22.)
(8) Evacuate and sweep the system as outlined
in Paragraph 26. During the time that the
sweep charge is in the system, test for leaks
as outlined in Paragraph 24. Continue evacuation procedure after eliminating any
leaks found.
(9) Charge system with four pounds of Freon
12 as outlined in Paragraph 27. Operate
system for 20 minutes (engine running at
1200 rpm). Blower control set at "High"
and temperature control at "Cold." Stop
engine and check oil level as outlined in
Paragraph 32.
(10) Rotate discharge and suction service valve
stems counter-clockwise until fully backseated.
(11) Remove gauge set manifold and replace
protective caps.
34. REMOVAL AND INSTALLATION OF
COMPRESSOR FOR ENGINE OR
COMPRESSOR SERVICE
a. Removal
To eliminate the need of discharging the complete system for the removal of the compressor
for engine or compressor service, it is permissible to split the muffler bracket with a hacksaw,
as shown in Figure 31, and proceed as follows:
(1) Start the engine and operate at a fast idle
until compressor is warm then, shut off
engine.
(2) Remove valve stem protective caps from
both the discharge and suction service
valves.
(3) Close off both valves by rotating valve
stems fully clockwise with Tool C-3361.
(4) Loosen the port caps on both the service
valves a couple of turns to gradually release
the Freon gas pressure from the compressor. Loosen oil filler plug a few turns.
(5) Remove the, drive belts and belt tension
adjusting strap from the compressor. Disconnect magnetic clutch electrical lead.
(6) Disconnect the discharge tube flared connection at the discharge (lower) muffler
and cap tube nut and male connector. Remove the Allen screws from the suction
service valve.
(7) Remove the upper muffler bracket to compressor attaching bolt and gently lay the
suction valve, muffler and tube assembly to
one side. Do not bend the vibration eliminator excessively or it may become damaged. Cover suction port in compressor and
suction valve with masking tape.
(8) Remove the compressor to mounting bracket and support bracket bolts and remove
compressor from engine.
b. Installation
(1) Place compressor on mounting bracket and
start bolts, tightening finger tight.
(2) Remove the masking tape from suction
service valve and compressor ports, being
sure both surfaces are clean.
(3) Coat a new suction service valve gasket
with refrigerant oil and place over valve
port.
155x152
Fig. 13—Separating Muffler Bracket
(4) Install suction service valve and tighten
Allen screws to 20 foot-pounds torque.
(5) Install muffler bracket bolt and tighten to
20 foot-pounds torque.
648—AIR CONDITIONING
CHRYSLER SERVICE MANUAL
(6) Tighten compressor mounting bracket to
compressor attaching bolts to 85 footpounds torque.
wise) slightly. Crack discharge gauge hand
valve for an instant to purge air from discharge side of compressor.
(7) Remove caps from discharge tube nut and
muffler connector. Insert a new copper
washer and connect flared connection, tightening securely.
(8) Install compressor drive belts and belt tension adjusting strap.
(14) Rotate both gauge set hand valves clockwise until they are fully seated.
(9) Adjust belts to a 1/4, inch deflection with a 9
to 12 pound pull applied with a scale at the
center of the longest span between pulleys.
(10) Install magnetic clutch electrical lead. Install manifold gauge set (Tool C-3354).
(11) Crack the - suction service valve open
(counter-clockwise), and tighten oil filler
plug.
(12) Crack suction gauge hand valve for an instant to purge air from compressor and
suction tube.
(13) Close suction gauge hand valve and open
discharge service valve (counter-clock-
(15) Rotate both discharge and suction service
valve stems counter-clockwise until they
are fully back-seated.
(16) Start engine, turn on blower and temperature control switches to "high and "cold."
Operate engine for five minutes. Stop
engine and test for leaks as outlined in
Paragraph 24. Test system for operation,
if satisfactory, remove gauge set and replace caps.
35. REPLACING COMPRESSOR VALVE PLATE
ASSEMBLY (See Fig. 14)
a. Testing Valves
The usual indication of defective or damaged
compressor valves is a lack of cooling capacity.
Before condemning valves they should be tested
as follows:
CYLINDER HEAD
SUCTION VALVES
54x608
Fig. 14—Valve Plate Assembly
CHRYSLER SERVICE MANUAL
(1) Install gauge set on compressor, refer to
Paragraph 25.
(2) Start engine, turn on blower and temperature switches to "High" and "Cold." Operate
for 10 to 15 minutes at 1200 rpm to warm
up compressor so that the crankcase is free
of excessive refrigerant saturation.
(3) Slow engine speed to idle and rotate suction
service valve stem clockwise until the valve
is fully front seated.
CAUTION
AIR CONDITIONING—649
the plate and head between the cylinders at
the side of the head, and tapping it.
(6) DO NOT tap the plate near a finished surface. Remove head, valve plate and gaskets.
(7) Examine the valves; if the valves are
broken, and the parts have damaged the top
of the piston or scored the cylinders, replace
the complete compressor.
(8) If the compressor is not damaged clean cylinder block top and cylinder head thoroughly. Be sure to remove all shreds left from
old gaskets.
Never front-seat (clockwise) discharge service
valve while engine is running or compressor will
be damaged.
(9) Install the cylinder head bolts in the head.
(4) Observe suction gauge on gauge set. The
pressure should drop to zero when valve is
seated and on down from 12 to 18 inches of
vacuum if the suction valves are in good
condition.
(5) Replace valve plate assembly if defective.
Shut off engine while watching the gauge.
(6) The vacuum should not lose over five inches
in one minute if the discharge valves are in
good condition.
(11) Place the cylinder head gasket, then the
valve plate, and last, the valve plate gasket
over the bolts. (See Fig. 11.)
(7) If, when the engine is stopped should the
gauge hand drop back to zero, the valves are
defective and should be replaced. Replace
the complete valve plate assembly.
b. Replacing Valve Plate Assembly
(Gauge Set Installed)
(1) Rotate the discharge and suction service
valve stems clockwise until both valves are
fully front-seated.
(2) Slowly open the discharge gauge set hand
valve slightly to relieve compressor pressure
through the center outlet hose and into the
exhaust suction system.
(3) When pressure drops to zero on discharge
gauge, open suction pressure gauge set hand
valve.
(10) Place a piece of cardboard over the bolt
heads and turn assembly upside down. Lay
on the bench with bolts facing up. Handle
new gaskets carefully as they are fragile.
Dip new gaskets in clean refrigeration oil.
(12) Lift the cardboard, turn assembly over
and place the entire assembly carefully on
the-cylinder block and start bolts.
(13) Tighten bolts evenly (from the center out)
to 20 foot-pounds torque. Bleed air from
compressor and remove gauge set.
36. COMPRESSOR SHAFT SEAL
REPLACEMENT
Two types of shaft seals have been used on the
compressors for the Chrysler 1955 model air conditioning equipped cars. The early type seal has
been superseded by the type now in production.
The replacement in the field of the new type seal
for the old type includes the bearing and plate.
Replacement of the new type seal with a seal of
the same type requires the seal only.
a. Preliminary Step for Removal of Seal
(4) Remove compressor cylinder head bolts and
tap the cylinder head with a plastic hammer.
(1) Start engine and operate at a fast idle with
the temperature control switch at "Cold"
and the blower switch set to "High" speed
until compressor is warm, and shut off
engine.
(5) If, when lifting the cylinder head, the valve
plate comes off with it, separate the head
from the plate by placing a brass rod against
(2) Remove valve stem protective caps from
both the discharge and suction service
valves.
CHRYSLER SERVICE MANUAL
650—AIR CONDITIONING
GASKET
END PLATE
" O " RING
l
O" RING
CARBON STEEL
BELLOWS
SNAP RING
55x154
Fig. 15—Compressor Shaft Seal (After Type)
(3) Close off both valves by rotating both valve
stems clockwise with Tool C-3361 until they
are fully seated.
(4) Gradually loosen oil filler plug a few turns
to release pressure from compressor.
(5) Remove the upper right-hand radiator fan
shroud. Remove the self-locking bolt and
washer from the compressor shaft at the
front center of the magnetic clutch.
(6) While supporting pulley and clutch assembly with one hand, tap the pulley with a soft
hammer to jar hub from tapered shaft and
remove assembly from compressor.
(7) Be careful not to damage brushes when removing pulley and clutch assembly. Remove
brush holder assembly.
55x169
Fig. 17—Removing Seal Bellows
b. Removing Before Type Seal
Push seal ring towards compressor and remove
snap ring with snap ring pliers. (Tool C-3106.)
Pull seat assembly from shaft. (Fig. 11.) It may
be necessary to pry bellows from front bearing
end plate with a screwdriver.
c. Removal (After Type Seal) (Fig. 15)
(1) Remove compressor front bearing end plate
screws.
(2) Install special puller (Tool C-3473), as
shown in Figure 16.
(3) Hold compressor shaft from rotating by
placing screwdriver in shaft keyway slot
and allow it to rest against pulley leg, while
turning puller screw. (See Fig. 17.)
(4) When bellows have compressed far enough
to clear the snap ring retainer, remove snap
ring with snap ring pliers.
(5) Change puller screw in center of puller (Fig.
18). Turn in on center screw and remove
compressor front bearing end plate and seal
assembly.
(6) Remove pulley from end plate. Remove
carbon seal and "O" ring from bearing end
plate.
d. Installation (After Type Seal)
Fig. 16—Puller Installed (Tool C-3473)
(1) Coat new bearing end plate gasket and
large "0" ring with refrigerant oil. Install
"0" ring in front bearing end plate. CAUTION: Be sure that oil pocket is up.
CHRYSLER SERVICE MANUAL
AIR CONDITIONING—651
(7) Lubricate "0" ring in bellows with refrigerant oil and place bellows and snap ring
over compressor shaft.
(8) Install puller, as shown in Figure 17. Compress bellows with puller and at same time
rotate the bellows assembly to insure
proper alignment. This will prevent pinching "O" ring which would result in a leaky
seal.
(9) Install snap ring retainer when bellows
clear groove in shaft. Remove puller. Caution: Check the snap ring to be positive
that it is securely seated in the shaft
groove otherwise it may slip out and result
in a leaky seal.
Fig. 18—Removing Bearing End Plate
(2) Install gasket, end plate and two long
screws at opposite sides of end plate.
(3) Start end plate squarely and tighten
screws evenly finger tight. Install puller,
as shown in Figure 19.
(4) While holding compressor shaft with
screwdriver, turn puller screw to pull
bearing end plate into compressor housing.
(5) Remove puller, install end plate screws
and tighten screws evenly to 20 footpounds torque.
(6) Coat carbon seal with refrigerant oil and
place over shaft positioning tangs on carbon in the recesses in the bearing end
plate.
(10) Install brush holder assembly.
(11) Install pulley and magnetic clutch assembly, lining up key and keyway.
(12) Push assembly over shaft and install
washer and self-locking bolt.
(13) Tighten bolt to 20 foot-pounds torque.
Back-seat both service valves and bleed
air from compressor. Tighten oil filler
plug.
(14) Install protective caps and test for leaks.
NOTE
When new seals are installed leaks are more
noticeable than after system has been in operation for a while and parts are worn in.
37. MAGNETIC CLUTCH
Service to the magnetic clutch assembly is limited to the following parts: Drive plate, pulley
and electromagnet assembly, snap rings and
brush holder assembly.
CAUTION
DO NOT attempt to remove the electromagnet
coil from the pulley assembly. The coil is held in
place by a special adhesive material. Once this
bond is broken the coil cannot be re-attached.
a. Testing Electromagnet Current Draw
Fig. 19—Installing Bearing End Plate
To test the coil for a short or open circuit, connect an ammeter (0-10 AMP Scale) in series
with a fully charged 6-volt battery and the insulated brush lead. The current draw at 6 volts
should be 3.3 to 3.6 amperes.
652—AIR CONDITIONING
CHRYSLER SERVICE MANUAL
DRIVE PLATEELECTROMAGNET
TOOL
COLLECTOR
RINGS
DRIVE PLATE
SNAP RING
BEARING
SNAP RING
\X
\j^.
^BEARING SNAP RINGS
* ^ — D R I V E PLATE SNAP RING
54x610
54x5*36
Fig. 20—Magnetic Clutch Assembly (Exploded)
Fig. 21—Removing or Installing Magnetic Clutch
Snap Ring
b. Removing Clutch Assembly from
Compressor
(1) Operate the engine at 1200 rpm. for five to
ten minutes until the compressor is warmed
up and system is stabilized, then shut off
engine. Rotate both compressor service
valve stems fully clockwise.
(2) Loosen both port caps and the oil filler plug
a few turns. This should always be done to
release pressure from the compressor before the pulley and clutch assembly is
removed.
(3) Loosen drive belts and remove them from
the compressor pulley. Remove upper right
shroud section.
(3) Inspect springs for loss of tension and/or
cracks. Inspect liner on face of plate.
(4) Replace drive plate if liner is worn, springs
are weak or broken and if drive plate is
warped.
(5) A sintered iron liner impregnated with fibrous material is bonded to the drive plate. If
this liner is worn through, replace drive
plate.
(6) Start drive plate hub squarely into inner
bearing race.
(7) Place a brass drift against the drive plate
inner hub and tap plate hub into bearing by
tapping on brass drift with a hammer. Install snap ring on drive plate hub.
(4) Remove 5/16 inch special locking bolt and
washer from compressor crankshaft at
front center of clutch. CAUTION: DO NOT
damage brushes when removing or installing clutch.
AIR GAP
ADJUSTING
SCREWS
(5) While supporting clutch assembly with one
hand, tap the pulley with a soft hammer to
jar hub from tapered shaft and remove
assembly from compressor.
c. Removing and Installing Drive Plate
(1) Remove drive plate retaining snap ring hub,
as shown in Figure 21, with Tool C-3301.
(2) Place suitable sleeve against hub and remove drive plate by tapping against sleeve
with a hammer.
AIR GAP
.025 TO 035 INCH
Fig. 22—Adjusting Air G a p
54x605
CHRYSLER SERVICE MANUAL
AIR CONDITIONING—653
(8) Measure air gap between drive plate electromagnet, as shown in Figure 22. Air gap
should measure .025 to .035 inch.
copper strips between the thermal bulb and
the well. The strips must be inserted with
the bulb for proper thermal contact.
(9) The air gap is adjusted by turning the
screws located in the center of the three
hexagon headed nuts on the front face of
the drive plate. Adjust all three screws to
obtain evenly spaced air gap. Measure air
gap with a long feeler that will reach into
gap at hub.
(5) Disconnect the expansion valve to distributor flared connection and remove expansion
valve.
d. Installing Clutch Assembly on Compressor
Align key and key way. Push assembly over shaft
and key. Install self-locking bolt and washer. Install upper right shroud section. Back-seat both
service valves and tighten oil filler plug.
38. REPLACING BRUSH ASSEMBLY
(1) Remove the ground brush lead screw from
the compressor.
(2) Disconnect the insulated lead Wade connector.
(3) Remove the two screws attaching brush
holder to the compressor and remove brush
holder assembly.
(4) Clean collector rings in clutch assembly with
carbon tetrachloride and wipe the surplus
grease from around clutch bearing.
(5) Install new brush holder assembly. CAUTION: Be careful not to break brushes. If
brushes are allowed to snap to the end of
their travel they may break.
39. EXPANSION VALVE REMOVAL AND
INSTALLATION (See Fig. 2)
a. Removal
To remove the valve for cleaning or replacement,
it is necessary to discharge the system as outlined in Paragraph 25, and proceed as follows:
(1) Remove fresh air levers and the evaporator
rear cover.
(2) Loosen the expansion valve mounting clip
from the distributor head flared nut.
(3) Disconnect the liquid tube and the equalizer
tube.
(4) Remove the thermostatic capillary tube bulb
from the suction tube well. Save the two
CAUTION
Protect trim and finish against oil or refrigerant
escaping from valve body when removed. Use
extreme care not to damage tubing flares. Always use two wrenches when possible. SEAL
OR PLUG all openings to system immediately
if valve is removed for cleaning. INSTALL new
valve immediately if valve was removed for replacement. This will prevent dirt and moisture
from entering the system.
(6) If valve is to be cleaned and reinstalled, remove the liquid tube inlet fitting from the
valve body. The inlet fitting contains the
fine mesh screen. Wash accumulation of any
substance from the screen with carbon
tetrachloride and blow dry with compressed
air.
(7) Remove the protective cap from the valve
spring and remove the valve assembly from
the valve body.
(8) Wash valve parts with carbon tetrachloride
and blow dry with compressed air, and,
.assemble valve.
b. Installation
(1) Clean the thermal bulb well on the suction
tube, the thermal bulb and the copper strips.
This will assure a good thermal contact.
(2) Insert copper strips and thermal bulb in
well.
(3) Connect the expansion valve to distributor
flare connection and install retaining clip.
(4) Connect the liquid tube and the equalizer
tube.
(5) Using two wrenches tighten the flared nuts.
(6) Evacuate and charge the system as outlined
in Paragraphs 26 and 27.
(7) Be sure to test for leaks after partial charge
as outlined in Paragraph 24.
(8) Replace evaporator cover, shield and fresh
air levers. The 1955 model Air Conditioning Expansion Valves are non-adjustable.
654—AIR CONDITIONING
40. TESTING EXPANSION VALVE
OPERATION FOR PROPER SUPER HEAT
The proper super heat should be 8 to 15 degrees
F. Before attempting to measure the super heat,
it is essential that all the components of the air
conditioning system be functioning properly.
With the blowers, condenser, solenoid valve,
thermal switch, strainer-drier and compressor
working properly and with the system charged
with the proper amount of Freon 12 and oil at
100° F. (300 Saybolt), the following test and adjustment should be carefully followed.
Make sure the compressor discharge pressure
does not exceed 275 psi. The pressure will vary
according to the ambient temperature. On hot
days an electric fan placed in front of the car
will hold the pressure down while testing.
On cool days where the temperature is below
70° F., it will be necessary to turn on the car
heater, adjust the heater control valve to the
warmest position and close all windows. The heat
from the heater will warm up the temperature of
air in the car interior and keep the thermal
switch from operating before the reading of the
super heat is obtained.
Install thermometer clip (Tool C-3421) on the
suction tube fitting at evaporator outlet. Be sure
there is a good tight mechanical connection between the fitting and the thermometer clip.
Wrap a soft, dry cloth around the suction tube
fitting and thermometer bulb. This will prevent
the atmospheric temperature from reaching the
thermometer bulb which would increase the
temperature of the bulb and give an incorrect
reading.
CHRYSLER SERVICE MANUAL
Observe compressor pressures. They should
be approximately the same as those shown in
the chart according to the ambient temperature.
If the compressor head pressure is low then the
air blast across the radiator and condenser should
be altered until the proper head pressure is obtained. (Moved further away.)
Average Temperature Pressure Relationship At
An Engine Speed Of 1200 rpnu
Ambient Temperature
60° F.
80° F.
100° F.
110° F.
Discharge Pressure
100 -150
140 - 190
190 - 240
230 - 280
After the thermometer reading and the head
pressures have stabilized, made a note of the indicated readings and refer to the temperature
pressure relation chart on Page 655. As there is
approximately two pounds differential in the observed reading at the suction gauge and that
present at the position of the thermometer on
the suction tube at the evaporator housing, you
must add two pounds to the observed reading on
the suction gauge. This differential in readings
is due to internal friction in the tubes and this
correction factor will give you the actual reading at the thermometer position.
To obtain your actual super heat reading, find
the difference between the thermometer reading
and the corrected chart reading. We will use the
following as an example. Insert values obtained
in test. If super heat is outside specifications of
8 to 15 degrees F., replace the expansion valve.
EXAMPLE OF CHART FOR DETERMINING SUPER HEAT
Observed
Temperature
Degrees F.
Suction Pressure Corrected Suction Pressure
at Gauge
(2 lbs. Added to Observed) From T-P Relation
Temperature at
Thermometer On
Suction Line
55°F.
Super Heat
48 lbs.
43 lbs.
39 lbs.
50 lbs.
45 lbs.
41 lbs.
53°F.
49°F.
45°F.
2°F.
5°F.
54°F.
52°F.
37 lbs.
39 lbs.
42°F.
51°F.
9°F.
35 lbs.
37 lbs.
40°F.
52°F.
12°F.
7°F.
CHRYSLER SERVICE MANUAL
AIR CONDITIONING—655
TEMPERATURE, PRESSURE RELATION CHART
FOR FREON 12
PRESSURES
PRESSURES
PRESSURES
PRESSURES
PRESS.
F 12
TEMP.
op
PRESS.
F 12
TEMP.
op
op
PRESS.
F 12
TEMP.
op
PRESS.
F 12
0
2
4
6
8
10
12
14
16
18
9.1
10.1
11.2
12.3
13.4
14.6
15.8
17.1
18.3
19.7
50
51
52
53
54
55
56
57
58
59
46.6
47.8
48.7
49.8
50.9
52.0
53.1
55.4
56.6
57.1
90
91
92
93
94
95
96
97
98
99
99.6
101.3
103.0
104.6
106.3
108.1
109.8
111.5
113.3
115.1
130
131
132
133
134
135
136
137
138
139
180.2
182.6
185.1
187.6
190.1
192.6
195.2
197.8
200.0
202.9
20
21
22
23
24
25
26
27
28
29
21.0
21.7
22.4
23.1
23.8
24.6
25.3
26.1
26.8
27.6
60
61
62
63
64
65
66
67
68
69
57.7
58.9
60.0
61.3
62.5
63.7
64.9
66.2
67.5
68.g
100
101
102
103
104
105
106
107
108
109
116.9
118.8
120.6
122.4
124.3
126.2
128.1
130.0
132.1
135.1
140
205.5
30
31
32
33
34
35
36
37
38
39
28.4
29.2
30.0
30.9
31.7
32.5
33.4
34.3
35.1
36.0
70
71
72
73
74
75
76
77
78
79
70.1
71.4
72.8
74.2
75.5
76.9
78.3
79.2
81.1
82.5
110
111
112
113
114
115
116
117
118
119
136.0
138.0
140.1
142.1
144.2
146.3
148.4
151.2
152.7
154.9
40
41
42
43
44
45
46
47
48
49
36.9
37.9
38.8
39.7
40.7
41.7
42.6
43.6
44.6
45.6
80
81
82
83
84
85
86
87
88
89
84.0
85.5
87.0
88.5
90.1
91.7
93.2
94.8
96.4
98.0
120
121
122
123
124
125
126
127
128
129
157.1
159.3
161.5
163.8
166.1
168.4
170.7
173.1
175.4
177.8
TEMP.
656—AIR CONDITIONING
CHRYSLER SERVICE MANUAL
41. BLOWER AND MOTOR (See Fig. 2)
b. Assembly and Installation
a. Removal and Disassembly
(1) Place motor mounting brackets on motor
and install the four lockwashers and nuts,
and tighten securely. Install motor. (Make
sure the motor rotates in right direction,
clockwise as viewed from left side of car.)
(1) Remove fresh air control lever from shafts
on either side of evaporator cover.
(2) Remove the evaporator housing rear cover
mounting screws and lockwashers and remove cover.
(2) Inspect the six blower mounting grommets
for deterioration and hardness and replace
if necessary.
(3) Disconnect main lead wire to blower motor
and the thermal switch leads at the terminal block mounting located at side of evaporator assembly.
(.3) Place the two motor mounting plates into
position on brackets and install the six
screws and lockwashers; tighten securely.
(4) Remove the rubber grommet and pull wires
through compartment. Disconnect ground
wire from compartment.
(4) Make sure spacers are inserted in the grommets before assembly. Make sure motor is
installed with wire leads and drain wick
located towards bottom of motor.
(5) Remove the six blower assembly mounting
screws and lift assembly out of compartment.
(6) Remove the eight blower housing mounting
nuts and lockwashers, and remove base
plate from housing.
(5) Install the blower fans on shaft so that air
will be forced out of outlet duct. Vanes at
bottom fan should point up and towards
rear. (Refer to Fig. 5.)
CAUTION
(7) Remove the eight blower motor mounting
plate screws and lockwashers.
Make sure blotver fans are installed correctly,
othervnse car cooling will be affected.
(8) Remove blower housings and note the difference between right and left housing for
correct installation procedure.
(6) Place right and left blower housings over
fans and install the eight mounting screws
and lockwashers. Tighten securely.
(9) Use an Allen wrench to loosen the two
blower fan set screws and remove the blower
fans from shaft.
(7) Place base plate into position on blower
housing and install the eight blower housing mounting nuts and lockwashers; tighten securely.
CAUTION
Blower fans function as right and left and should
be installed accordingly. Always mark for identification before removal.
(10) Remove the six blower motor mounting
screws and lockwashers and remove the
two motor mounting plates. Do not lose
the grommets or spacers from the motor
brackets as they are essential in maintaining vibration-free blower operation.
(11) Remove the four blower mounting bracket nuts and lockwashers and separate
brackets from motor. Motor location
should be marked when removed so the
motor can be reinstalled to rotate in the
right direction.
(8) Position the blower fans as near as possible to outside portion of housing.
(9) Check position of set screws in relation to
flat on the shaft and tighten securely. Rotate fans by hand to make sure there is no
interference between fan and housing at
any point when fans are rotated.
(10) Place blower assembly into position in
evaporator compartment. Install the
mounting screws and tighten securely.
(11) Make sure ground wire terminal surface
is clean, install wire and tighten.
(12) Push blower motor lead wire and thermal
switch leads through opening in compartment and install rubber grommet.
CHRYSLER SERVICE MANUAL
(13) Install wires on terminal block mounting
making sure connections are tight. Check
motor for proper operation.
(14) Place cover into position on evaporator
housing and install mounting screws and
lockwashers. Replace fresh air control
levers.
42. BLOWER FANS
a. Removal and Disassembly
(1) Remove fresh air control lever from shafts
on both sides of evaporator.
(2) Remove the evaporator housing rear cover
mounting screws and washers and remove
cover from compartment.
(3) Remove the four air inlet ring mounting
screws and the air inlet ring.
(4) Use an Allen wrench to loosen the set screw
of the appropriate blower fan and remove
fan from shaft and housing. If both blower
fans are to be removed, mark the right and
left fan so that they may be reinstalled in
the correct location to rotate in the right
direction.
b. Assembly and Installation
(1) Mount correct blower fan on shaft but do
not tighten set screw. (Refer to Fig. 5.)
(2) Replace air inlet ring and tighten the four
mounting screws securely.
(3) Position blower fan on shaft so that it is %
inch from the inlet ring.
(4) Tighten the set screw securely on the flat
of the shaft.
AIR CONDITIONING—657
(3) Remove hood lock plate and support
bracket.
(4) Remove four bolts that attach condenser
brackets to radiator support and lift condenser from car.
b. Installation
(1) Position and install four attaching bolts in
condenser brackets to radiator support.
Tighten bolts to 20 foot-pounds torque.
(2) Remove caps from tubes (and condenser
if so equipped).
(3) Connect condenser to receive tube flared
connection.
(4) Connect discharge and by-pass tubes to
discharge valve.
(5) Charge system with partial charge and test
for leaks as outlined in Paragraphs 24
and 27.
(6) Correct any leaks, and evacuate system.
Charge with four pounds of Freon 12 as
outlined in Paragraph 27. Test system
operation.
44. RECEIVER FUSIBLE PLUG
REPLACEMENT (See Fig. 23)
Where it is found necessary to replace the fusible plug in the receiver (due to having been damaged by a blow or because of melting from temperatures exceeding 210° to 214° F.), it is possible to do so without removing the receiver.
RECEIVER STRAINER-DRIER
(5) Rotate fan by hand to make sure there is no
interference between housing and fan at
any point when fans are rotated. Replace
rear cover. Replace fresh air control levers.
43. CONDENSER REMOVAL AND
INSTALLATION
a. Removal
(1) Discharge system as outlined in Paragraph 25.
(2) Disconnect discharge and by-pass tubes
from discharge valve and liquid line to receiver and cap tubes.
154x5901
Fig. 23—Receiver Strainer-Drier Installed
658—AIR CONDITIONING
CHRYSLER SERVICE MANUAL
Remove the old fusible plug after discharging
system. Apply refrigerant thread sealer to
threads of new plug and install plug in receiver.
Tighten to 20 foot-pounds torque. CAUTION:
Never replace a damaged fusible plug with a
solid plug.
Evacuate system as outlined in Paragraph 26.
Charge system with (4) pounds of Freon 12
as outlined in Paragraph 27.
45. RECEIVER STRAINER-DRIER
REPLACEMENT
Where the receiver strainer-drier unit is found
to be clogged when tested as outlined in Paragraph 23, or where metal particles are found in
the system, it will be necessary to replace the
receiver strainer-drier assembly.
a. Removal
Discharge system as outlined in Paragraph
25. Lift car with hoist.
CAUTION
Protect eyes with goggles or glasses when disconnecting receiver flare connections, to prevent
any drops of liquid refrigerant from dropping
in eyes when connections are broken.
154x6071
Fig. 24—Removing Evaporator Drain Tubes
(3) Remove the evaporator cover and disconnect the electrical lead wires. Place blocks
under evaporator at each end to act as supports when attaching bolt nuts are removed.
(4) Raise the car and disconnect the suction
pressure, liquid and by-pass connectors,
being sure to tag the liquid and by-pass
tubes for identification purposes when reconnecting.
Disconnect flared connections at both ends of
receiver. Remove attaching bolt nuts and remove
receiver. Cap ends of receiver immediately if
unit is to be used again. Leave caps on connectors until ready to make connections when
installed.
(5) Unscrew the drain tubes from the lower
side of the trunk floor pan, as shown in
Figure 24.
b. Installation
(7) Remove mounting brackets to the car body,
attaching nuts and washers.
Position receiver in place and install bolts and
nuts and tighten securely. Remove caps and connect flared connector nuts and tighten securely.
Charge system with partial charge and test for
leaks as outlined in Paragraphs 24 and 27. Correct any leaks and evacuate system as outlined
in Paragraph 24. Charge with four pounds of
Freon 12 as outlined in Paragraph 27.
46. EVAPORATOR REMOVAL AND
INSTALLATION
a. Removal
(1) Discharge the system as outlined in Paragraph 25.
(2) Remove rear seat, seat back and panel.
(6) Lower the car. Remove the fresh air duct
hoses from the fresh air valve flanges at
each end of the evaporator.
(8) Remove evaporator from car, pulling disconnected refrigerant tubes up through
floor pan. CAUTION: Cap all disconnected
connections to prevent entrance of dirt
and/or moisture into the system.
b. Installation
(1) Lift evaporator assembly into car trunk
while guiding refrigerant tubes through
hole infloorpan and set assembly on blocks.
(2) Install attaching bolt washers and nuts. It
may be necessary to pry assembly up to
compress rubber seals so that the nuts can
be started.
CHRYSLER SERVICE MANUAL
AIR CONDITIONING—659
Turn blower control switch to first position,
temperature control switch to second position.
Adjust round adjusting nut on fast idle diaphragm shaft to increase engine 700 to 800 rpm.
With hand brake on, move transmission control lever to drive range and back to neutral position. Readjust fast idle if necessary. Lock round
nut with hex nut.
* VACUUM UNIT
i
55x707
Fig. 25—Fast Idle Device
(3) Install fresh air duct hoses and electrical
lead wires.
(4) Raise the car and connect the suction pressure by-pass and liquid tube connectors,
using new copper washers in flare connections.
(5) Install drain tubes through floor pan and
into evaporator.
(6) Lower car and charge system with a partial
charge, and test for leaks, as outlined in
Paragraphs 24 and 27.
(7) Correct any leaks found, evacuate and
charge system with four pounds of
Freon 12.
(8) Install panel, seat back and rear seat. Replace cover and test operation of blowers
and cooling system.
48. REPLACING EVAPORATOR FILTER
The filter should be replaced whenever it becomes dirty. This would normally be at the time
when bugs, dirt etc., are removed from the radiator and condenser.
To replace the filter remove the evaporator
cover and lift out old filter and place new one in
bottom of evaporator housing and replace cover.
49. ELECTRICAL SYSTEM CIRCUITS (De Luxe)
The electrical circuit wiring diagram is illustrated in Figure 26.
a. Blower Circuit
The voltage drop of the blower circuit from
the battery to the blower motor should not exceed 2 volts. Blower switch set to "High" speed
position and with a battery voltage of 6.0 to 6.2
voltage.
The blower motor current draw at six volts is
19 to 22 amperes, with a battery voltage of 6.0
to 6.2 volts, blowers switch in "High" speed
position, with windows closed and fresh air
vents open.
47. FAST IDLE DEVICE (See Fig. 25)
The fast idle device is intended to increase engine idle speed from 700 to 800 rpm, when the
transmission control lever is moved from drive
to neutral when the air conditioning system is in
operation. This is desirable for prolonged stops
in heavy traffic. If accelerator is depressed and
released when the fast idle device is energized it
will further increase engine speed to approximately 1100 rpm.
To set fast idle device, back off round adjusting nut on diaphragm shaft away from the pawl,
this prevents interference with idle adjustment.
Start engine, attach tachometer and with transmission control lever in "Neutral" position and
engine at operating temperature adjust engine
idle to 475-500 rpm.
b. Temperature Control Circuit
The magnetic clutch coil draws 3.3 to 3.6
amperes at 6.0 to 6.2 volts.
The solenoid valve draws 2.1 to 2.3 amperes
at 6.0 to 6.2 volts.
c. Blower Resistors
In the "Low" speed position the resistors are
in series. The total resistance is .7 ohms
approximately.
In "Medium" speed position, only one resistor
is in the circuit. The resistance of the resistor is
.22 ohms approximately.
In the "High" speed position the circuit is
direct for maximum motor speed.
660—AIR CONDITIONING
CHRYSLER SERVICE MANUAL
I r-HTO COMPRESSOR CLUTCH
TO
I SOLENOID VALVE
(NORMALLY OPEN)
U
16
TO STARTER AND IGNITION SWITCH
ACCESSORY STUD
TEMPERATURE
SWITCH
(EARLY TYPE)
t-1/S BLU
CL#
BLOWER SWITCH
16 REDTO BLOWER
SWITCH (LOW)j
AMPERE
CIRCUIT BREAKER
TEMPERATURE SWITCH AS WIRED WHEN
USING EARLY TYPE ESCUTCHEON
•10 GREENTEMPERATURE SWITCH
.(LATER TYPE)
•10 BLACKCARBUR
SOLENOID
(FAST IDLE)
• — 1 0 RED
Q - | .43 TO .52 OHMS
16 WHITE
I
4 * K > | .20
.20 TO .43
.43 OHMS
\DC^_I
9*
RESISTORS'
h
16 RED
10 GREI
TEMPERATURE SWITCH AS WIRED WHEN
"USING LATER TYPE ESCUTCHEON
-16 BLUE-
- 1 6 ORANGE
•
•16 YELLOW•10 BLACK-
o
IGN. SOL. ARM.
tf
STARTER
RELAY
16 BLACK AND YELLOW
*-> TO THERMAL SWITCH
IN EVAPORATOR UNIT
(NORMALLY CLOSED
ABOVE 45°F.)
TO MOTOR
r
16 BROWN
jTO STARTER AND IGNITION
SWITCH STARTER STUD
NEUTRAL SAFETY SWITCH
55 x 1 56
Fig. 26—Electrical Circuit Wiring Diagram
Some resistor blocks were released with the
resistors reversed. With the wiring connected
according to the diagram to resistors that are
reversed, the proper blower speeds are not possible. To correct for the proper blower speeds,
reverse the red and black wires on the resistor
block (Fig. 26). With the wiring connected to
the proper resistors three distinct blower speeds
are apparent.
the escutcheon plate, is that the early switch has
no terminal markings. The late type switch terminals are marked with an S and a C. The
switches vary internally and the wiring to the
two switches is reversed. The escutcheons and
the switches are not interchangeable.
Two types of temperature control switches
have been used on the 1955 air conditioning
equipped cars, as shown in Figure 26. The only
difference in the outward appearance other than
Determine that the system is now functioning
properly and instruct all parties concerned, including owner, how to obtain the maximum
results from the air conditioning system.
50. ROAD TESTING CAR
CHRYSLER SERVICE MANUAL
AIR CONDITIONING—661
I
I
662—AIR CONDITIONING
CHRYSLER SERVICE MANUAL
SERVICE DIAGNOSIS
The following items of improper functioning
of Air Conditioning System are meant to be
used in conjunction with test procedures as outlined in Paragraph 40. No attempt should be
made to use the diagnosis information as a
method of trouble shooting or spot checking.
Properly used (as an aid to the complete test
procedure) the diagnosis will be of considerable
value to the service man.
51. BLOWERS NOT OPERATING
Possible Causes:
a. Faulty circuit breaker.
b. Open circuit in wiring.
c. Faulty motor winding.
d. Faulty control switch or resistors.
e. Loose connections.
f. Motor burnt out.
g. Armature shorted or grounded.
h. Bearings frozen.
i. Stuck or worn brushes.
52. BLOWERS AND COMPRESSOR
OPERATING—NO COOLING
Possible Causes:
a. Refrigerant low.
b. Refrigeration system restricted.
c. Compressor valves not functioning properly.
d. Expansion valve faulty.
Remedies:
a. Recharge system after testing and repairing all leaks.
b. Test strainer-drier as outlined in Paragraph 23. Test expansion valve. Inspect lines for
kinks.
c. Test compressor head pressures and valves.
d. Test expansion valve as outlined in Paragraph 23. Clean or replace valve.
53. BLOWERS OPERATING—PARTIAL
COOLING
Possible Causes:
Remedies:
a. Refrigerant supply low.
a. Test circuit breaker with jumper wire.
Replace faulty circuit breaker.
b. Expansion valve not functioning properly.
b. Test electrical circuit with point to point
voltmeter test. Replace or repair broken wire.
c. Compressor operating above normal pressure.
c. Replace motor.
d. Test switch and resistors with voltmeter
or jumper wire. Replace faulty switch or resistors.
e. Test circuit with voltmeter for voltage
drop. Clean and tighten all loose connections.
f. Replace motor.
g. Replace armature.
h. Replace motor.
i. Replace brushes, turn and undercut armature.
d. Compressor valves faulty.
e. Restricted condenser or discharge line.
f. Thermal switch or solenoid valve inoperative.
g. Air passages through condenser blocked
by bugs, dirt, mud or by bug screen.
h. Improper refrigerant.
Remedies:
a. Check sight glass for indication of low
refrigerant. Check for leaks, and charge system.
CHRYSLER SERVICE MANUAL
AIR CONDITIONING—663
b. Test expansion valve as outlined in Paragraph 40. Clean, adjust or replace as required.
f. Clean expansion valve as outlined in Paragraph 39.
c. Follow test procedure and eliminate cause.
g. Test compressor valves as outlined in Paragraph 23. Replace assembly if faulty.
d. Test valves as outlined in Paragraph 40.
e. Discharge system, remove discharge line
and inspect for restriction. Replace or clean as
required. Inspect condenser for kinks or obstruction. Clean with air or replace.
55. LOW SUCTION PRESSURE AND HIGH
HEAD PRESSURE
f. Test thermal switch and solenoid valve as
outlined in Paragraph 23.
a. Plugged discharge line or condenser.
g. Inspect for
with warm water
from side next to
on air conditioned
cause of obstruction. Clean
and compressed air applied
engine. Remove bug screens
cars.
h. Test temperature pressure relation of refrigerant.
54. LOW SUCTION PRESSURE AND LOW
HEAD PRESSURE
Possible Cause:
Remedy:
a. Replace or clean line or condenser.
56. HIGH HEAD PRESSURE
Possible Causes:
a. Exterior surfaces of condenser restricts
flow of air due to bugs, dirt, mud or other obstructions.
b. Air and moisture in system.
c. Too much refrigerant.
Possible Causes:
a. Low on refrigerant.
b. Strainer-drier plugged.
c. Liquid line plugged.
d. Expansion valve super heat setting.
e. Expansion valve thermal valve charge lost
or poor contact in wall.
f. Expansion valve screen or port plugged
with dirt or moisture.
g. Compressor valves faulty.
Remedies:
Remedies:
a. Wash out condenser with warm water and
compressed air from side next to engine.
b. Discharge system, refer to Paragraph 25.
Evacuate and recharge system.
c. Discharge until bubbles appear in sight
glass then add Freon until bubbles disappear.
57. SUCTION PRESSURE O.K. AND HIGH
HEAD PRESSURE
Possible Causes:
a. Air in system.
b. Too much refrigerant.
a. Check for leaks, refer to Paragraph 24. Recharge as outlined in Paragraph 27.
b. Test strainer-drier as outlined in Paragraph 23. Replace if faulty.
c. Replace liquid line.
d. Adjust super heat as outlined in Paragraph 40.
e. Check thermal bulb contact. Replace expansion valve if required.
Remedies:
a. Open gauge manifold discharge pressure
valve slightly and leave open for 10 seconds to
purge air. Close valve, start engine and recheck
gauge pressures at 1200 rpm.
b. Operate engine at 1200 rpm with blower
switch turned to high. Discharge Freon slowly
through gauge manifold center fitting until bubbles appear in sight glass. Charge system with
Freon 12 as outlined in Paragraph 27.
664—AIR CONDITIONING
58. LOW SUCTION PRESSURE—HEAD
PRESSURE O.K.
Possible Causes:
a. Blower not operating.
b. Strainer-drier plugged.
c. Expansion valve super heat setting too
high.
Remedies:
a. Test electrical circuit for continuity. Replace faulty motor.
b. Test strainer-drier and replace if required,
as outlined in Paragraph 23.
c. Adjust super heat as outlined in Paragraph 22. Replace valve if faulty.
59. TESTING FOR LEAKS WITH LEAK
DETECTOR (For Diagnosis)
Where a system has been found to be low on
Freon, or following repairs on the system that
CHRYSLER SERVICE MANUAL
necessitated the opening of a connection, it is
necessary to test for leaks and tighten connections or make repairs as required before the system is charged and put in operation. If a system
has been discharged for making repairs or to
eliminate moisture, the system must be evacuated before partially charging for a leak test.
(1) Partially charge the system with Freon 12
as outlined in Charging the System with
Freon 12, Paragraph 27, and proceed as
follows:
This is necessary only where the Freon supply
in the system is very low or where system has
been evacuated.
(2) Operate engine at 1200 rpm with blower
switch turned to "High." Discharge Freon
slowly through gauge manifold center fitting until bubbles appear in sight glass.
Charge system with Freon 12 as outlined in
Paragraph 27.