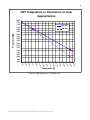
1
!
"
!#"
$%
& !
'
2
Table of Contents
INTRODUCTION: IMPORTANT BASICS ....................................................................................................... 4
Contact Information.................................................................................................................................. 4
SPIFI Quick Locator Guide...................................................................................................................... 5
The SPIFI enclosure ............................................................................................................................. 5
Inside the Pillbox.................................................................................................................................. 6
Inside the left side door of the enclosure.............................................................................................. 7
Inside the right side door of the enclosure ........................................................................................... 8
Catastrophic Mistakes To Avoid .............................................................................................................. 9
Emergency Shutdown Checklists ........................................................................................................... 13
Case 1: You have been notified that there will be a power outage, and the power is currently still on
............................................................................................................................................................ 13
Case 2: The power went out unexpectedly......................................................................................... 15
Power-Up Checklist (After an Emergency Shutdown)........................................................................... 17
The SPIFI Enclosure............................................................................................................................... 19
Temperature ....................................................................................................................................... 19
Mechanical ......................................................................................................................................... 19
PART 1: PREPARATION ............................................................................................................................ 20
Pumping on SPIFI .................................................................................................................................. 20
Pumping SPIFI Down from a Partial Vacuum State.......................................................................... 20
Pumping SPIFI Down from Atmospheric Pressure ........................................................................... 21
Cooling SPIFI Down from 293K............................................................................................................ 22
PART 2: OPERATION ................................................................................................................................ 29
Temperature Monitoring......................................................................................................................... 29
SPIFI Temperature Check.................................................................................................................. 29
ADR Temperature Check................................................................................................................... 30
Maintenance Filling................................................................................................................................ 32
ADR Nitrogen .................................................................................................................................... 32
SPIFI Nitrogen (with no pump attached) ........................................................................................... 33
SPIFI Nitrogen (with pump attached) ................................................................................................ 34
ADR Helium ...................................................................................................................................... 35
SPIFI Helium ..................................................................................................................................... 36
Cycling ................................................................................................................................................... 38
Understanding Magnetic Cooling ...................................................................................................... 38
Understanding the 3He Fridge ........................................................................................................... 41
Step-By-Step Cycling of the ADR and 3He Fridge ........................................................................... 43
Calibration Unit ...................................................................................................................................... 48
Basic description ................................................................................................................................ 48
Chopping ............................................................................................................................................ 49
Using the Gas Cell and Blackbody .................................................................................................... 49
Getting a Sync Signal for Fabry......................................................................................................... 51
Parallelizing the Fabry-Perots ................................................................................................................ 53
The Pre-Amp .......................................................................................................................................... 55
The Battery Box...................................................................................................................................... 57
Understanding the Battery Box .......................................................................................................... 57
Using and Charging the Battery Box ................................................................................................. 59
3
PART 3: WARM UP PROCEDURE ............................................................................................................. 62
Appendix A ............................................................................................................................................ 64
List of Tables
Table 1: Temperatures for SPIFI's Carbon Resistors.................................................................................. 29
Table 2: Summary of Cryogen Tank Maintenance Filling ......................................................................... 32
Table 3: Persistent Switch Settings............................................................................................................. 40
Table 4: Preamp Switch Positions .............................................................................................................. 55
Table 5: Source of Voltage for the Preamp................................................................................................. 58
Table 6: Functions of Battery Box Switches .............................................................................................. 58
Table 7: Height vs. Volume for SPIFI Cryo-Tanks .................................................................................... 64
List of Figures
Figure 1: "The Gang" at the Ceremonial Pole .............................................................................................. 4
Figure 3: SPIFI Pump Manifold.................................................................................................................. 21
Figure 4: Steve's Hand-Carved Wooden Dipper Stick ............................................................................... 22
Figure 5: Swagelok Valve to ADR 3He tank .............................................................................................. 26
Figure 6: Blowing l-N2 Out of the SPIFI l-4He Tank.................................................................................. 27
Figure 7: Pouring l-N2 blown out of SPIFI's l-4He tank into SPIFI's l-N2 tank .......................................... 27
Figure 8: Blowing l-N2 Out of the ADR l-4He Tank................................................................................... 28
Figure 9: Selecting Pill & Pot GRT's on the Small Blue Box (56) ............................................................. 30
Figure 10: GRT Temperature vs. Resistance Plot....................................................................................... 31
Figure 11: Filling SPIFI's l-N2 Tank from the 50L Dewar ......................................................................... 33
Figure 12: Special Pump and Stinger Assembly for Pumping on SPIFI's l-N2........................................... 34
Figure 13: Electrical Schematic for Magnetizing and Demagnetizing the Solenoid .................................. 40
Figure 14: Mechanical and Thermal Schematic of the ADR and 3He Fridge ............................................ 41
Figure 15: Magnet Controller (top) and Magnet Power Supply (bottom) .................................................. 47
Figure 16: Magnet leads plugged into the ADR ......................................................................................... 47
Figure 17: A view of the end of SPIFI opposite the ADR, before SPIFI went into the enclosure ............. 48
Figure 18: The electronic control box for the SPIFI calibration unit.......................................................... 48
Figure 19: Gas cell manifold setup ............................................................................................................. 50
Figure 20: Sync signal cables on the electronic control box for the calibration unit.................................. 51
Figure 21: ATS/RO chopper electronics located in reciever room............................................................. 52
Figure 22: Parallelizing the Fabry-Perots: Observing Fringes.................................................................... 54
Figure 23: Preamp switches ........................................................................................................................ 55
Figure 24: Battery box wiring schematic (for a single battery box) ........................................................... 57
Figure 25: Charging the Battery Box While its in Use (4V Charging Not Shown).................................... 61
4
INTRODUCTION: IMPORTANT BASICS
Contact Information
You will be able to find a good deal of the information you will need for day-to-day operations of SPIFI
in this manual. However, when questions arise, don’t hesitate to contact one of the members of the SPIFI
team:
Thomas Nikola
Cornell University
224 Space Sciences Bldg.
Ithaca, NY 14853
Email: [email protected]
Office Phone: 607-255-3140
Steve Parshley
Cornell University
226 Space Sciences Bldg.
Ithaca, NY 14853
Email: [email protected]
Office Phone: 607-255-4806
Cell Phone: 413-219-6305
Thomas Oberst
Cornell University
226 Space Sciences Bldg.
Ithaca, NY 14853
Email: [email protected]
Office Phone: 607-255-4806
Cell Phone: 607-731-0577
Gordon Stacey
Cornell University
212 Space Sciences Bldg.
Ithaca, NY 14853
Email: [email protected]
Office Phone: 607-255-5900
Home Phone: 607-273-9380
Figure 1: "The Gang" at the Ceremonial Pole
5
SPIFI Quick Locator Guide
Images of SPIFI and of most of our operating equipment are shown below with labels indicating what’s
what. This is intended as a quick guide for understanding the SPIFI setup and for locating equipment discussed in this operation manual. Throughout the rest of this manual, bold numbers in parenthesis
will refer to numbered pictures in this Quick Locator Guide.
The SPIFI enclosure
3
2
4
1
6
5
7
1.
2.
3.
4.
The SPIFI enclosure
The “pillbox”
Right side (or “Fabry” side) of enclosure
Left side (or “battery box” side) of enclosure
5. Roof of enclosure
6. Hatch for SPIFI l-N2 neck
7. Hatch for SPIFI l-4He neck
6
Inside the Pillbox
28
10
9
16
14
15
8
21
20
18
19
17
12
11
25
27
22
24
23
13
26
8. ADR outer shell
9. ADR l-4He neck (connected to pump via
KF end-cap and clamp assembly)
10. ADR l-N2 (“stickstoff”) neck
11. Preamplifier box
12. Data cables (from pre-amp to Fabry)
13. Pre-amp power supply cable (from battery box)
14. Vacuum hose for pumping on ADR l4
He tank
15. ADR l-4He tank pump manifold
16. Main pump valve for the ADR l-4He
tank
17. Pressure gauge for ADR l-4He tank
18. 4He “Gas inlet” (or “Backfill”) valve for
l-4He tank
19. 3He pot heat switch
20. 3He pump heat switch
21. Salt pill heat switch
22. Magnet control box
23. Magnet power supply box
24. Persistent switch switch (yes, the switch
has a switch)
25. Power supply for charcoal heater (also
called the 3He pump heater)
26. Ohmmeter for monitoring temperature
of 3He pump
27. Housekeeping cable
28. Magnet leads
7
Inside the left side door of the enclosure
36
31
30
44
29
45
37.
38.
32
35
38
29.
30.
31.
32.
33.
34.
35.
36.
37
39.
39
40.
41.
42.
43.
40
44.
43
33
45.
42
41
34
SPIFI outer shell
SPIFI l-N2 neck
SPIFI l-4He neck
SPIFI alignment table
Dampers
Enclosure heater
Battery box
“Laser” (must be pronounced as by
Dr. Evil of Austin Powers).
“Laser” power
HOFPI PZT power supply (PI
power supply)
LOFPI PZT power supply (PI
power supply)
Gas cell manifold
Gas cell pump
Gas lecture bottle
Variac voltage regulator (not
currently in use)
Steve’s special hand-carved dipper
stick
Gas cell pump exhaust
8
Inside the right side door of the enclosure
46
47
48
49
50
51
54
53
57
52
55
56
46. Electronic control box for the
calibration unit
47. Resistance bridge for monitoring
GRT temperatures
48. HOFPI and LOFPI stepper motor
box
49. SPIFI motor box
50. Fabry
51. Turbo pump
52. resistor leads for SPIFI
temperature monitoring
53. “laser” mirror mount
54. screen for viewing fringes
55. main SPIFI pump valve
56. The blue box on the wall (“blue
switch board” or “blue connector
box”)
57. Pressure gauge for monitoring
pressure inside SPIFI (displayed
on front of turbo pump)
9
Catastrophic Mistakes To Avoid
In no particular order, here are catastrophic mistakes that must be avoided. You should remind yourself of these
caveats regularly to the point that they become part of your everyday thinking process while operating SPIFI.
This is not a troubleshooting guide: if you have trouble with one of the things listed in this table then it is probably already too late.
Mistake
Undesirable Result
How To Avoid
Where To
Find More
Info
Loosing track of the
HOFPI or LOFPI
position
•
•
When starting a new SPIFI session, make sure
to properly initialize the HOFPI and LOFPI to
the last positions they were in. Although the indexer should remember (if it wasn’t turned off),
refer to your written notes to make sure.
After restarting Fabry (50), you will have to reinitialize the HOFPI and LOFPI to the last position they were in. Although the indexer should
remember, refer to your written notes to be sure.
After turning on the cryo-motor box (48) from
being off, you will have to initialize the HOFPI
and LOFPI to the last positions they were in
(here the indexer will not remember the values,
but will use 0. You will have to use your written notes to correct this).
Keep careful notes of every scan done and of
how many counts either the LOFPI or HOFPI
were moved, and in which direction.
Before starting every scan, make sure you have
reset the LOFPI and/or HOFPI to the desired
starting values (including backlash correction)
in the Matlab environment, and make sure you
have entered these starting values in the scan
GUI.
Double check both your written notes as well as
the values you type into the computer to avoid
typos and transcription errors.
SPIFI Data
Acquisition
Manual
Always disconnect the PZT cables from channels 1, 2, & 3 whenever you turn off the highvoltage power supplies.
Always turn the power to PZT channels 1, 2,
and 3 down all the way before turning on the
power supply (and before hooking up the PZT
leads).
Page 53
Always adjust the PZT voltages slowly and keep
an eye on the nominal values, don’t just stare at
the fringes. Never exceed 700V in any of the
channels 1, 2, or 3.
Always turn the power in channels 1, 2, and 3 to
zero before turning on the PZT power supply
Page 53
•
•
You could crash the
Fabry-Perot plates
and incapacitate
SPIFI.
You could loose all
knowledge of what
order the HOFPI and
LOFPI are in, which
will make the spectra
meaningless
Our summer calibration efforts are
wasted.
•
•
•
•
•
Forgetting to disconnect the PZT cables
before turning on the
high-voltage PZT
power supplies (38)
& (39)
You could destroy the
PZT’s because of a large
startup current (voltage)
Turning up the voltage on any of the
PZT’s to more than
700V
You could destroy the
PZT’s
•
•
•
•
10
Mistake
Undesirable Result
How To Avoid
Where To
Find More
Info
Allowing the SPIFI
enclosure to freeze
inside (go below
0°C)
•
Fabry won’t function
properly
Fans may be destroyed inside Fabry,
the magnet control
boxes, and other
electronics boxes
Other electronic
components may fail
The O-rings in SPIFI
may fail and we’ll
loose our vacuum.
•
Check the temperature (by feel or by thermometer) of the enclosure at the beginning and end of
every day.
Make sure both heaters are working. If one
fails, replace it immediately.
Try not to open the enclosure doors for very
long
Keep the doors shut as far as possible behind
you when working in the enclosure
Always shut the doors and latch them whenever
you are done.
Page 19
Opening the main
yellow valve (55)
between SPIFI and
the turbo pump if
SPIFI is under vacuum and/or the pump
is turned off.
SPIFI may loose pressure
through the turbo pump.
•
Remember to close the valve when you have
finished pumping SPIFI down.
Remember to close the valve if there will be a
power outage and you are still pumping on
SPIFI.
Never open the valve to the atmosphere if SPIFI
is still under vacuum.
Page 20
Opening SPIFI to the
atmosphere in any
way while at low
pressures
The Fabry-Perots will
blow out.
Be extremely careful when working near any
windows on SPIFI. Do not puncture these windows
Don’t let the enclosure freeze, as this will freeze
the o-rings and cause them to fail.
Never open the yellow valve (55) if the other
side is at atmospheric pressure
Page 20
•
•
•
•
•
•
•
•
•
•
•
•
Moving SPIFI within
the enclosure
We loose our alignment
to the telescope and our
offset calculations
•
Over-pressurizing the
calibration gas cell
•
•
•
You will blow out
the windows to the
gas cell
You will have to
jury-rig some type of
new blackbody and
calibration source,
since gas cell and
blackbody are inaccessible for maintenance.
•
•
•
Don’t use the SPIFI alignment table (32) to pull
yourself up into the enclosure.
Try not to bump or push SPIFI or the ADR.
Fill the gas cell very slowly, and monitor the
pressure meter carefully while doing so
Keep the bleeder valve near the lecture bottle
closed, and open the main valve for only a second or two (we call this “one shot”). Close the
main valve, and then very carefully open the
bleeder valve to fill the gas cell. Monitor the
pressure gauge carefully. We typically use
about 50 - 150 Torr.
If you hear any popping noises, shut off the gas
flow immediately. This is the sound of the gas
cell windows bulging.
Page 49
11
Mistake
Undesirable Result
How To Avoid
Where To
Find More
Info
Charging the battery
box (35) incorrectly
You could ruin the batteries in Box #1. Box #2
already has at least one
bad battery. Therefore
there is no immediate
backup if Box #1 is damaged. (However, in an
emergency you could use
whichever batteries are
still good from Box #2
and you could also take
batteries from the “old”
battery box which is in the
SPIFI crate labeled “A2”
in the AST/RO Annex.
•
Page 57
•
•
•
Overfilling l-N2 into
the SPIFI and ADR
l-4He tanks during
an initial cool-down
•
•
You might not be able
to get the l-N2 out of
the tanks
If you are able to get
the l-N2 out using the
special blow-out devices, you will unnecessarily waste some lN2 in the process
Read all the labels and warnings on the front of
the battery box before hooking it up to the
chargers
The normal charging configuration is to have
the two left-hand switches on the battery box all
the way down (they are 3-position switches),
and the two right-hand switches all the way up.
You then connect one blue 12V charger to 12V
battery #1 (red-to-red, black-to-black), and the
other blue 12V charger to 12V battery #2 (redto-red, black-to-black).
(Make sure you connect the charging cables to
the battery box before plugging in the chargers
to avoid the risk of electrical shock. The
chargers have no on/off button, and the charging leads become live as soon as the charger is
plugged in. Also, by the same token, when
charging is complete, unplug the chargers before removing the charging cables).
The switches on the blue power supplies should
be at “Normal/Automotive”, “Charge”, and
“2A-12V Auto.” There is no power button: you
start the charging by plugging the charger into
120AC.
Switch 3 is very important. If switch 3 is up,
then the + terminal of one of the 12V batteries
is connected to the – terminal of the second 12V
battery. This is a special situation that allows
you to charge while observing at the same time.
The charging and switch configuration in this
case is non-trivial. Refer to the circuit diagram
of the battery box, the instructions in this manual, or contact us if you need to.
Follow the cool-down filling instructions carefully
and keep an eye on the temperature.
Page 22
12
Mistake
Undesirable Result
How To Avoid
Where To
Find More
Info
Filling l-N2 or l-4He
too fast (at too high
of a pressure) during
an initial cool-down
from room temperature
You may get an overpressure inside SPIFI’s and the
ADR’s cryogen tanks
which could open up leaks
or cause an explosion.
Fill the cryogen tanks on SPIFI and the ADR slowly
(~1-1.5 psi in the fill Dewar) during an initial cooldown to allow time for boil-off gas to escape out of
the fill necks.
Page 23
Closing the main
brass pump valve on
the SPIFI l-N2 neck
(30) while l-N2 is in
SPIFI’s tank.
You may get an overpressure inside SPIFI’s l-N2
tank which could open up
leaks or cause an explosion.
If you must keep the main pump valve closed for an
extended period of time (more than 2-3 hours, for
instance in the case of an extended power outage),
you should backfill with N2 gas and open the tank to
the atmosphere (see step 2 on page 62).
Pages 34, 14
& 16, and 62
Closing the main
pump valve on the
ADR l-4He pump
manifold (16) while
l-4He is in the
ADR’s tank.
You may get an overpressure inside the ADR’s l4
He tank which could
open up leaks or cause an
explosion.
•
•
•
Opening the second
green Swagelok
valve further back
on the top of the
ADR (see Figure 5
on page 26 below)
• All of our precious 3He
gas will be released from
the 3He fridge into the
atmosphere
• A couple thousand dollars will float away
• The instrument will be
useless
Monitor the pressure gauge (17) on the ADR l4
He manifold to make sure that the pressure
does not start climbing. If the pressure climbs
steadily up to 100 Torr (which is the maximum
value on the gauge) and beyond, there is most
likely significant boil-off and you should either start pumping again or backfill with 4He
gas and open the ADR’s l-4He tank to the atmosphere.
There is a pressure release valve on the ADR l4
He pump manifold which might be able to
handle the job.
However, if you must keep the main pump
valve closed for an extended period of time
(more than 2-3 hours, for instance in the case
of an extended power outage), you should
backfill with 4He gas and open the tank to the
atmosphere (see steps 1-6 of ADR Helium on
page 35).
Don’t touch this valve ever!
Page 35, 14
& 16
Pages 25 &
26
13
Emergency Shutdown Checklists
Outlined below are checklists for shutting down SPIFI in the case of an announced (case 1) or unannounced (case
2) power outage. The information in these lists has been kept as brief as possible so that they can be used quickly
in the case of an emergency. Much more detailed information about all of the procedures involved in shutting
SPIFI down and powering SPIFI back up is provided in other parts of this manual. We covered everything we
could think of here, but in practice new situations always arise which have not been dealt with before. It is therefore very important to think about what you are actually doing to SPIFI while going through these checklists, and
there may be times when you will have to deviate from the lists below to handle whatever circumstances or obstacles arise. Understanding how SPIFI works comes with time and experience, but having read through this manual
ahead of time (before an emergency outage occurs) will certainly help.
Case 1: You have been notified that there will be a power outage, and the power
is currently still on
1.
Secure the ADR (8), including the magnet power supply (23) and magnet control box (22):
Case I.
If time allows, you should always try to have the ADR completely cycled and cold (i.e.
60mK) before the power outage. In this case you don’t need to do anything. The magnet
control box (22), and the magnet power supply (23) should already be turned off in this
case. If they aren’t, turn them off.
Case II.
If the ADR needs to be cycled and there is not time to complete a full cycle before the
power outage, then you have two options:
(a) Wait until the power comes back on to start the cycle, or…
(b) If you have 45 minutes to an hour until the power outage, get the first half of the cycle
done (up to step 21 of Step-By-Step Cycling of the ADR and 3He Fridge on page 45 below). Make sure you turn off the charcoal heater (25) right before the power goes out
(this is not part of the cycling procedure). The magnet control box (22), and the magnet power supply (23) should be turned off by the time of the outage.
Case III.
If the ADR is in the process of being cycled and you don’t have time to finish the cycle before the power outage, then:
(a) If you are in the first stages of cycling and you have enough time, get the first half of
the cycle done (up to step 21 of Step-By-Step Cycling of the ADR and 3He Fridge on
page 45 below). Make sure you turn off the charcoal heater (25) right before the power
goes out (this is not part of the cycling procedure). The magnet control box (22), and
the magnet power supply (23) should be turned off by the time of the outage.
(b) If you don’t have much time, the most important thing to do is make sure there is
no current in the magnet leads when the power goes out. If there is any current in
the leads, power may be dumped into the solenoid when the power goes out and the
whole system will heat up and boil-off cryogens.
Set the current ramp rate on the magnet controller (22). If you are demagnetizing
the solenoid (i.e. if the persistent switch heater (24) is turned on), then 0.1 amps/sec
is ideal, but this takes ½ hour or so. If you don’t have ½ hour then 1 amp/sec is
better than nothing. If you are not demagnetizing the solenoid (i.e. if the persistent
switch heater is turned off) then you can ramp down at 10 amps/sec.
Flip the current ramp direction on the magnet controller to the down position.
Wait until the magnet controller reads 0.00 amps (or 0.01 amps)
Turn off the persistent switch heater (24) (if it was ever on)
Turn off the magnet control box (22) and the magnet power supply (23) at the same
time
14
Also make sure the charcoal heater (25) is turned off.
2.
Secure the PZT’s:
HOFPI
Turn the PZT voltages all the way down (fully counterclockwise) on the PI power supply (38).
Make sure channels 1, 2, and 3 are all at 0V.
Diconnect all three PZT cables (A, B, & C) from the PI power supply and cap them with the resistor caps which should be on top of the PI power supply.
Turn off the PI power supply.
LOFPI (If applicable: We did not need to use the LOFPI PZT’s over the Antarctic summer)
Turn the PZT voltages all the way down (fully counterclockwise) on the PI power supply (39).
Make sure channels 1, 2, and 3 are all at 0V.
Diconnect all three PZT cables (A, B, & C) from the PI power supply and cap them with the resistor caps which should be on top of the PI power supply.
Turn off the PI power supply.
3.
Properly shutdown Fabry (50):
Turn on the monitor inside the right side door of the enclosure
At the prompt, type the following sequence of commands (“>” means type at the prompt, “ ”
means hit the space bar once, and “ ” means strike the enter key):
•
•
> root
> whoami
This last command, “whoami”, will tell you what kind of user you are. If you are the “root” user,
continue. If you are not “root”, type > su
and enter the password > r = fin*ord
to become
the super user. Then continue:
•
•
> cd /
> shutdown
-h
now
Wait for Fabry to go through its shutdown procedure.
When the screen indicates that everything has been halted, go ahead and push the power buttons
on the Fabry PC and on the monitor.
4.
Secure the pumps:
If SPIFI is on the pump you will need to first close the main pump valve (55) and then turn off
the turbo pump (51). The main pump valve is the big yellow valve to the top-left of the
SPIFI/ADR interface. It is spring-loaded and can only be turned to either “open” or “closed”.
If the ADR l-4He tank is on the pump, close the main pump valve (16) on the ADR pump manifold (15) and turn off the corresponding “pumpzilla” in the receiver room by flipping the switch
on the breaker box on the wall.
Warning: After closing the pump valve, the ADR l-4He tank will be a closed system, and boil-off
could create an over-pressure. If the pressure gauge (17) maxes out (i.e. the pressure rises over
100 Torr) then you should backfill with 4He gas and then open the tank to the atmosphere (see
steps 1-6 of ADR Helium on page 35). You probably also need to refill at this point, since a high
pressure indicates lots of boil-off.
If SPIFI’s l-N2 tank is on the pump, close the brass valve on the SPIFI l-N2 neck (29) and turn off
the corresponding “pumpzilla” in the receiver room by flipping the switch on the breaker box on
the wall.
15
Warning: After closing the pump valve, the SPIFI l-N2 tank will be a closed system, and boil-off
could create an over-pressure. If the power outage lasts more than 2-3 hours then you should
backfill with N2 gas and then open the tank to the atmosphere (see step 2 on page 62).
If you have been using the gas cell, make sure the gas cell pump (41) is unplugged (there is no
on/off button on this pump).
5.
Shut down all other electronic devices:
Calibration control box (46): in the following order (and from right to left), turn off the temperature control unit, turn off the driver, turn off the indexer, turn off the main power switch.
Turn off the resistance bridge box (47).
Cryo-motor box (48): in the following order, turn off both the HOFPI and LOFPI driver power,
turn off the indexers’ power, and turn off the main power.
SPIFI motor box (49): in the following order, turn off switch “5,” and then turn off the main
power.
Make sure the “laser” power is turned off (37).
Turn off the battery box (35) by pushing Switch #1 on the battery box down.
Turn off the preamp (11) by moving the two left-most switches to “off” and “bat” (both switches
up).
6.
Don’t let the cryogen tanks run dry during the power outage!
Case 2: The power went out unexpectedly
1.
Secure the ADR (8), including the magnet power supply (23) and magnet control box (22):
Make sure the persistence switch heater (24) on the magnet control box (22) is turned to the “off”
position (key should be vertical).
Make sure the current ramp rate switch on the magnet control box is flipped to “down”.
Make sure the main power switches on the magnet control box and the magnet power supply are
switched to their “off” positions.
Make sure the charcoal heater (25) is turned off.
2.
Secure the PZT’s:
HOFPI
Turn the PZT voltage knobs all the way down (fully counterclockwise) on the PI power supply
(38). Make sure channels 1, 2, and 3 are all turned to 0V.
Move the power switch of the PI power supply to the “off” position.
Disconnect all three PZT cables (A, B, & C) from the PI power supply and cap them with the resistor caps which should be on top of the PI power supply.
LOFPI (If applicable: We did not need to use the LOFPI PZT’s over the Antarctic summer)
Turn the PZT voltages all the way down (fully counterclockwise) on the PI power supply (39).
Make sure channels 1, 2, and 3 are all turned to 0V.
Move the power switch of the PI power supply to the “off” position.
Disconnect all three PZT cables (A, B, & C) from the PI power supply and cap them with the resistor caps which should be on top of the PI power supply.
3.
Unplug Fabry (50). This will prevent Fabry from booting up automatically when the power comes
back on. (Pressing the power switch of Fabry when the power is out does not turn the machine off,
probably because the switch is on a relay which needs electrical power to change its position.)
16
4.
Secure the pumps:
If SPIFI is on the pump you will need to close the main pump valve (55) and also push the power
button on the Turbo pump (51) once so that it is in the “off” setting and does not start up automatically when the power comes back on. The main pump valve is the big yellow valve to the
top-left of the SPIFI/ADR interface. It is spring loaded and can only be turned to either “open” or
“closed”.
If the ADR l-4He tank is on the pump, close the main pump valve (16) on the ADR pump manifold (15) and turn off the corresponding “pumpzilla” in the receiver room by throwing the switch
on the breaker box on the wall.
Warning: After closing the pump valve, the ADR l-4He tank will be a closed system, and boil-off
could create an over-pressure. If the pressure gauge (17) maxes out (i.e. the pressure rises over
100 Torr) then you should backfill with 4He gas and then open the tank to the atmosphere (see
steps 1-6 of ADR Helium on page 35). You probably also need to refill at this point, since a high
pressure indicates lots of boil-off.
If SPIFI’s l-N2 tank is on the pump, close the brass valve on the SPIFI l-N2 neck (29) and turn off
the corresponding “pumpzilla” in the receiver room by throwing the switch on the breaker box on
the wall.
Warning: After closing the pump valve, the SPIFI l-N2 tank will be a closed system, and boil-off
could create an over-pressure. If the power outage lasts more than 2-3 hours then you should
backfill with N2 gas and then open the tank to the atmosphere (see step 2 on page 62).
If you have been using the gas cell, make sure the gas cell pump (41) is unplugged (there is no
on/off button on this pump).
5.
Flip “off” the power switches on all other electronic devices:
Calibration control box (46): turn off the temperature control unit, turn off the driver, turn off the
indexer, and turn off the main power switch.
Turn off the resistance bridge box (47).
Cryo-motor box (48): turn off both the HOFPI and LOFPI driver power, turn off the indexers’
power, and turn off the main power.
SPIFI motor box (49): turn off switch “5” and turn off the main power.
Make sure the “laser” power is turned off (37).
Turn off the battery box (35) by pushing Switch #1 on the battery box down.
Turn off the preamp (11) by moving the two left-most switches to “off” and “bat” (both switches
up).
6.
Don’t let the cryogen tanks run dry during the power outage!
17
Power-Up Checklist (After an Emergency Shutdown)
1.
If SPIFI was on the turbo pump (51) before the power went out, then:
Restart the turbo pump
Ideally you want to have the same pressure on both sides of the main pump valve (55) (This is the
big yellow valve to the top-left of the SPIFI/ADR interface) before opening it. There is no pressure gauge on the vacuum hoses between the main pump valve and the turbo pump, so use your
best estimate of how long to let the turbo pump run to achieve an equilibrium between the pressure in SPIFI and the pressure in the vacuum hose. (The pressure in SPIFI is always the pressure
shown on the front of the turbo pump).
Open the main pump valve. It is spring loaded and can only be turned to either “open” or
“closed”.
2.
Assuming that you didn’t let the cryogen tanks run dry and they don’t need filled, then you can recommence pumping on the ADR l-4He tank and the SPIFI l-N2 tanks:
Turn on the two “pumpzillas” in the receiver room and wait several minutes for the vacuum hoses
to get pumped out.
Slowly open the main pump valve on the ADR l-4He pump manifold (16) to start pumping on the
ADR l-4He tank. You should spend at least 5 minutes cracking this valve to minimize stress on
the pump.
Slowly open the brass valve on the SPIFI l-N2 neck to start pumping on the SPIFI l-N2 tank. You
should spend at least 5 minutes cracking this valve to minimize stress on the pump.
3.
Check the temperature of the ADR (refer to ADR Temperature Check on page 30 below if you don’t
know how to do this).
4.
Cycle the ADR:
Case I.
Case II.
If cycling of the ADR was already complete when the power went out and you are still
within the limits of the hold time (40 hours normally), then you might still be cold. Keep in
mind, however, that the remainder of the hold time will be shortened if the pumps where
turned off, since the temperature in the ADR’s l-4He tank and in SPIFI’s l-N2 tank will have
risen.
If you are powering back up from the four hour waiting period of the cycling process (step
21 of Step-By-Step Cycling of the ADR and 3He Fridge on page 45 below), then you can
pick up the waiting process where you left off:
Make sure that the 3He fridge is still set up properly: the pump heat switch (20) should
be open, the pot heat switch (19) should be closed, the pill heat switch (21) should be
closed, and the housekeeping cable (27) should be plugged into the ADR.
Turn on the charcoal heater (25) and set it to 5 volts.
Check that the resistance (of the 3He pump) is going down on the multimeter (26)
which is connected to the 3He pump heater.
Once the resistance is equal to 2kΩ (which may take up to 40 minutes), turn the 3He
pump heater down to 2 volts.
Now wait up to four hours for the 3He to condense in the pot (i.e., pick up with step 21
of Step-By-Step Cycling of the ADR and 3He Fridge on page 45 below). If you were
already waiting for an hour or two before the power went out then you shouldn’t need
to wait the full four hours since some the 3He will have already condensed in the pot
before the power outage. However, this depends on how long the power was out. If
18
Case III.
the power was out for more than 2-3 hours, all of the 3He that condensed in the pot before the outage may now be evaporated.
Finish the rest of the cycle (after step 21) as described in Step-By-Step Cycling of the
ADR and 3He Fridge on page 45.
If the power went out at any other time during cycling, or if the system is warm for whatever reason, then you will have to re-cycle the ADR. See Step-By-Step Cycling of the ADR
and 3He Fridge on page 43.
5.
Plug-in and reboot Fabry (50). You don’t need to log-on or anything, since this can all be done remotely when you telnet. Just push the power button.
6.
Power up the PZTs:
HOFPI
Make sure the PZT cables are disconnected from the PI power supply (38).
Make sure channels 1, 2, & 3 are turned all the way down to 0V (fully counterclockwise) on the
PI power supply.
Turn on the PI power supply. Make sure all three channels (1, 2, & 3) still read 0V.
Connect the PZT cables to the PI power supply. Make sure you match the correct cable with the
correct channel (A 1, B 2, and C 3). Put the resistor caps which were on the cables on top
of the PI power supply.
Parallelize the HOFPI. Refer to the section below called Parallelizing the Fabry-Perots (page
53).
LOFPI (If applicable: We did not need to use the LOFPI PZT’s over the Antarctic summer)
Make sure the PZT cables are disconnected from the PI power supply (39).
Make sure channels 1, 2, & 3 are turned all the way down to 0V (fully counterclockwise) on the
PI power supply.
Turn on the PI power supply. Make sure all three channels (1, 2, & 3) still read 0V.
Connect the PZT cables to the PI power supply. Make sure you match the correct cable with the
correct channel (A 1, B 2, and C 3). Put the resistor caps which were on the cables on top
of the PI power supply
Parallelize the LOFPI. Refer to the section below called Parallelizing the Fabry-Perots (page
53).
7.
Turn on everything else:
Calibration control box (46): in the following order (and from left to right) turn on the main
power switch, turn on the indexer, turn on the driver, and turn on the temperature control unit.
Cryo-motor box (48): in the following order, turn on the main power switch, turn on the indexers’
power, and then turn on the HOFPI and LOFPI driver power. (You may need to turn this box off
and turn it back on again after logging into Fabry, due to some initialization problem with the indexer that we don’t fully understand. Make sure you always turn on the indexer before the driver,
however.)
SPIFI motor box (49): in the following order, turn on the main power, then turn on switch “5.”
Turn on the battery box (35) by flipping Switch #1 on the battery box up. (Make sure all the other
switches on the battery box are also in the correct positions! See page 58 for more details).
Turn on the preamp (11) by moving the two left-most switches to “on” and “int” (both switches
down).
19
The SPIFI Enclosure
Temperature
•
•
Check periodically to make sure the enclosure is still heated. The enclosure should not drop below 0°C.
If the enclosure does drop below 0°C, lots of bad things can happen: Fabry will not operate properly and
may be damaged; fans inside Fabry and inside other electronics boxes may be destroyed; other electronic components may malfunction; and the o-rings in SPIFI and the ADR can fail, in which case we
would loose our vacuum.
If one of the heaters in the enclosure fails, replace it immediately.
Add more insulation or weather stripping to the enclosure if needed. Realize that the enclosure has never
been tested under Antarctic winter conditions until now, and the winterovers may be called upon to make
adaptations and improvements.
Perhaps the lights could be left on to add some additional heat. When you are observing and all the electronics boxes are running, these should add some heat as well. However, you should not leave the electronics running during months when SPIFI is not being used since this will cause them to wear out faster
and could also cause extensive damage if the enclosure freezes while the fans and other electrical components are powered.
Try to keep the doors closed as much as possible while filling and working in the enclosure to preserve heat.
While you are standing inside the enclosure, pull the door shut as far as possible behind you.
Always latch the doors when going back downstairs, even if you will be returning in a short time.
Mechanical
•
•
•
Make sure the enclosure can clear all objects on the roof of AST/RO before rotating the telescope (such as
Nitrogen tanks, etc.)
Do not overload the pillbox (2): the weight limit is approximately 40lbs.
Do not push or pull on SPIFI when working in the enclosure or when climbing in and out of the enclosure or
we could loose our alignment to the telescope.
Figure 2: Steve stands triumphantly on top of the SPIFI enclosure
20
PART 1: PREPARATION
Pumping on SPIFI
Pumping SPIFI Down from a Partial Vacuum State
We left SPIFI under vacuum when we left the South Pole at the end of the 03-04 summer season. Therefore, the
winterovers (you!) shouldn’t have to pump down SPIFI from atmospheric pressure in winter 2004, although this
full procedure is described in the next section below entitled Pumping SPIFI Down from Atmospheric Pressure
for reference (and just in case). Nevertheless, SPIFI will have inevitably lost some pressure by June or July and
will be in a “partial vacuum state.” Use the steps below to reinitiate pumping on SPIFI from a partial vacuum
state:
1. The main pump valve on SPIFI (55), which is the big yellow-handled valve located above and to the left
of the ADR/SPIFI interface, should be closed (see Figure 3 below). You shouldn’t need to adjust it because we left it closed at the end of the summer. Never open this valve if SPIFI is under vacuum and
you suspect that the hose is not pumped down, or you could blow out the Fabry Perots!
2. Make sure that both the turbo pump (51) and the pressure gauge for SPIFI (57) are plugged in (to
120VAC 60Hz). The turbo pump has a grey power cord and the pressure gauge has a black power cord.
3. Turn on the turbo pump station by pressing the main power button on the front of the pump once.
4. Listen to hear if the turbo pump is running smoothly. If it is not, let it run for a few minutes. Do not
move on to the next step until the pump is running smoothly.
5. Pump out the vacuum hose between the turbo pump and the main SPIFI pump valve. Ideally we want to
have the same pressure inside SPIFI and inside the vacuum hose before opening the main pump valve
(equal pressure on both sides of the valve). To achieve this:
a) If SPIFI is in the Torr range (> 1 Torr), run the turbo pump for about 1 minute before opening
the main pump valve.
b) If SPIFI is in the the sub-Torr range (< 1 Torr), run the turbo pump for 5-10 minutes before
opening the main pump valve.
Note that these times are not written in stone. You should use your best judgment to try to achieve an
equal pressure on both sides of the main pump valve. There is no way to know for sure that the pressures are equal since there is no pressure gauge between the turbo pump and the main pump valve.
6. Once you have pumped out the vacuum hose, open the main SPIFI pump valve. The valve is spring
loaded and can only be turned to either “open” or “closed.” Never open this valve if SPIFI is under
vacuum and you suspect that the hose is not pumped down, or you could blow out the Fabry Perots!
7. Once the pressure in SPIFI reaches about 5×10⁻³ - 8×10⁻³ Torr, the cool-down process can be started.
8. We would like you to keep records of pump-downs in the SPIFI notebook by creating a small table of
pressure versus time. This will allow both us to properly gauge SPIFI’s progress and to compare with
records of past and future pump-downs.
21
Pressure gauge for
monitoring pressure
inside SPIFI (display on front of
turbo pump).
SPIFI
Yellow Vacuum Valve
(Main SPIFI
Valve)
ADR
90° Elbow Pipe
Figure 3: SPIFI Pump Manifold
Pumping SPIFI Down from Atmospheric Pressure
The basic procedure for pumping down SPIFI from atmospheric pressure is described here briefly for reference.
(Note that the AST/RO winterovers should not have to pump down SPIFI from atmospheric pressure during the
2004 winter season, since we left SPIFI under vacuum when we left the South Pole at the end of the 03-04
summer season (see the section above: Pumping SPIFI Down from a Partial Vacuum State))
1. Attach the vacuum hose from the turbo pump to the yellow main pump valve for SPIFI (55) (via a 90°
pipe). Make sure the o-rings and o-ring surfaces are clean, and make sure that the o-rings are slightly
greased with vacuum grease. Don’t touch the yellow valve if SPIFI is under vacuum, or you could
blow out the Fabry Perots!
2. If you are sure SPIFI is at atmospheric pressure, open the main yellow pump valve. The valve is
spring loaded and can only be turned to either “open” or “closed.”
3. Once the yellow valve is opened, then start the turbo pump station (51) by pressing the power button on
the front of the pump once. This will start the diaphragm pump and the turbo pump simultaneously. The
turbo pump is supposed to handle the torture of pumping at atmospheric pressure for a while.
The pump-down time to about 5x10⁻³ Torr is approximately 8 hours. However, this depends strongly on how
long the SPIFI dewar was open to the atmosphere. If the turbo pump station can pump SPIFI down to the few
Torr range within about 30 (to 40) minutes, then that is a good indication that everything is okay. The pressure
should be in the mid-upper 10-2 Torr range within 2 – 3 hours. Once the pressure in SPIFI reaches about 5×10⁻³
- 8×10⁻³ Torr, the cool-down process can be started. Create a small table of pressure versus time in the SPIFI
notebook while you are pumping down. This will allow you to properly gauge SPIFI’s progress and to compare
with records of past and future pump-downs.
(For your reference, after filling cryogens, the final pressure in SPIFI at the pumped l-4He temperature of ~1.5K
should get to between 5×10⁻⁷ and 1×10⁻⁶ Torr. This is discussed below on page 26).
22
Cooling SPIFI Down from 293K
Once the pressure in SPIFI reaches about 5×10⁻³ - 8×10⁻³ Torr, the cool down process can be started. The entire
cool-down takes about two days. Our best estimates for the total cryogens used for a complete cool-down from
room temperature are 170L l-N2 and 150L l-4He. So make sure you have this much cryogens on hand before
you start.
The “SPIFI system” has four cryogen tanks:
•
•
•
•
SPIFI l-N2 tank (capacity = 25L)
SPIFI l-4He tank (capacity = 65L)
ADR l-N2 tank (capacity = 5L)
ADR l-4He tank (capacity = 5L)
The SPIFI tank necks are accessed through the roof hatches in the enclosure. The larger hatch (6), which is
closer to the telescope, is for the SPIFI l-N2 tank neck (30). The smaller hatch (7) is for the SPIFI l-4He tank
neck (31). The ADR tank necks are accessed by opening the back double doors of the pillbox (2) on the enclosure. The ADR l-4He tank neck (9) is labeled “Helium,” and the ADR l-N2 tank neck (10) is labeled
“Stickstoff” (which means “Nitrogen” auf Deutsch).
Because the necks of the ADR’s cryogen tanks are horizontal, it is not possible to directly measure the level of
cryogens in these tanks. However, keeping careful records of times and amounts of fills in the SPIFI notebook
will help you to make close estimates of the cryogen levels and stay on top of the ADR’s tanks. Although we
never want to let the cryogens in SPIFI or the ADR run out once SPIFI has been cooled down to l-4He temperature, if you do suspect that you have accidentally run out of cryogens in either of the ADR’s horizontal tanks
you can use the trick of holding your thumb over the neck vent for a minute or so and then letting go. If a plume
of gas comes out afterwards then you still have cryogens left.
In SPIFI it will be necessary for you to monitor the levels of cryogens in the two SPIFI tanks while you fill.
You can check the level of SPIFI’s l-N2 tank using Steve’s hand-carved wooden dipper stick (which we usually
store on the SPIFI alignment table (32) inside the enclosure on the battery box side of SPIFI):
Figure 4: Steve's Hand-Carved Wooden Dipper Stick
To measure the l-N2 level in SPIFI, put the blue end of the stick all the way down into SPIFI’s l-N2 neck until it
touches the bottom of the tank and hold it there for 10-20 seconds. Remove the stick and blow on the end of it
several times to create a frost line. Use a tape measure to measure the height of the frost line and record it in the
SPIFI notebook. The height of cryogens in the l-4He tank can be measured by traditional means, such as by using a thumper. Also record this height in the SPIFI notebook. Once you have measured the height in either
SPIFI’s l-N2 or l-4He tank, you can use Table 7 in Appendix A to convert your measurement to a volume.
We will begin the cool-down process by filling all four cryogen tanks with l-N2. Be careful not to fill too much
l-N2 into the two l-4He tanks, or else you will have the problem of getting this l-N2 out when it comes time to fill
l-4He and you may loose time and waste cryogens. Also, it is important to initially fill very slowly---with a
“low” N2 pressure (~1-1.5 psi in the fill Dewar). If you fill quickly with high pressure, the boil-off in the tanks
may create a dangerous over-pressure inside the reservois. Keep a record in the SPIFI notebook while you are
cooling down of what times you filled which tanks, how full they are, how long it took to fill them, and how
much cryogens where used in the process. This will help you keep track and gauge the progress of the cooldown process, and will allow us to compare the present cool-down with records of past and future cool downs
23
1. Close all the heat switches on the ADR (pot (19), pump (20), and pill (21)) to make sure everything will
get cold.
2. First slowly (~1-1.5 psi in the fill Dewar) fill l-N2 into the ADR l-N2 (“Stickstoff”) tank until it’s full
(use the procedure described in the section ADR Nitrogen on page 32 below). This normally takes about
15 minutes. Record in the SPIFI notebook the time of the fill, how long it took to fill, and estimate (if
you can) how many liters of cryogens were used.
3. Then slowly (~1-1.5 psi in the fill Dewar) fill l-N2 into the SPIFI l-N2 tank until its full (use the procedure described in the section SPIFI Nitrogen (with no pump attached) on page 33 below). If the vacuum hose and special stinger assembly are still attached to the SPIFI l-N2 tank you will have to remove
them first (See Figure 12 page 34 for a detailed diagram of the special stinger and pumping assembly). (While cooling down SPIFI, the pressure should decrease, as indicated on the LCD display on the
front of the turbo pump (51).) We once measured that to get about 7 inches of l-N2 in this tank from
room temperature takes about 1½ hours (maximum fill height is 11 inches). The 50L l-N2 Dewar won’t
last for both the ADR l-N2 tank fill and the SPIFI l-N2 tank fill, and you will have to refill the Dewar
once before you can top-off the SPIFI l-N2 tank. Record in the SPIFI notebook the time of the SPIFI lN2 tank fill, how long it took to fill, the level of cryogens in the tank, and estimate (if you can) how
many liters of cryogens were used.
4. Next fill l-N2 slowly (~1-1.5 psi in the fill Dewar) into the ADR l-4He tank (use the procedure described
in the section ADR Nitrogen on page 32 below). Since SPIFI cannot be tilted when it’s in the enclosure,
it is difficult to get the l-N2 out of the l-4He tank once the tank reaches 77 K. In this case what we usually do is fill 1-2 liters of l-N2 and watch the temperature (by temporarily closing the pill heat switch and
watching the GRT, for instance). (See Temperature Monitoring below on page 29.) Once the temperature stabilizes or starts to increase, fill another liter or so of l-N2 into the l-4He tank. Continue this process until the temperature stabilizes close to 77 K. To be conservative, stop filling l-N2 when the temperature reaches about 85 – 90 K. (The last time we filled we found that two full fills of the ADR l-4He tank
was too much). One full fill takes about 15 minutes. Record info about the fill in the SPIFI notebook.
5. Top-off the ADR l-N2 tank again with l-N2. Record in the notebook.
6. Lastly, fill the SPIFI l-4He tank slowly (~1-1.5 psi in the fill Dewar) with l-N2 (use the procedure described in the section SPIFI Nitrogen (with no pump attached) on page 33 below). This fill will take a
long time (1½ – 2 hours). Check the level after filling for 1–1½ hours to make sure you don’t get more
than 3 inches of l-N2 in the tank (or you may have trouble blowing it out later and you will waste it).
One to two inches of l-N2 in this tank should be enough. You may need to refill the 50L l-N2 Dewar
during this fill. Record in the SPIFI notebook the time of the fill, how long it took to fill, the level of
cryogens in the tank, and estimate (if you can) how many liters of cryogens were used.
7. Top off the ADR l-N2 tank once more with l-N2. Record in the notebook.
8. After everything reaches 77K, SPIFI should achieve a pressure of ~10-6 Torr (indicated on the turbo
pump (51)). Record the pressure and the time of the reading in the SPIFI notebook.
Wait about a day before filling helium. Before filling l-4He into SPIFI or the ADR check if the HOFPI is
parallel at l-N2 temperatures. (See Parallelizing the Fabry-Perots on page 53 below). If the HOFPI is way out
of parallel, SPIFI will not work properly and it would be a waist of l-4He trying to operate SPIFI. Record the
state of the parallelism in the notebook. Also, it is important to get all of the l-N2 out of the l-4He tanks before
filling l-4He:
9. Parallelize the HOFPI (See Parallelizing the Fabry-Perots on page 53 below).
10. If there is still l-N2 in the ADR l-4He tank, blow it out using the special ADR blow-out invention (see
Figure 8 on page 28 below), which we stored in the SPIFI crate labeled “A2” in the AST/RO Annex.
Record how much l-N2 needed to be blown out in the notebook.
11. Hopefully at this point there is no l-N2 still left in the ADR l-4He tank. Just in case there is, heat the tank
with the pump heater (25) and the persistent switch heater (24):
a) connect the housekeeping cable (27) to the ADR.
b) Make sure the pump heat switch (20) is closed.
24
c) Turn on the pump heater (25) (the small green power supply in the bottom-left corner inside the
pillbox doors) and set it to 5V.
d) To use the persistent switch heater, you will have to turn on the power of both magnet control boxes
simultaneously (22) & (23), and wait a half-minute or so until you hear the fans in these boxes have
started up and are running smoothly: the fans in these boxes don’t like the cold.
e) Next, turn the keyed persistent switch (24) on by rotating the key 90° clockwise (see Figure 15 on
page 47).
Turning on these two heaters will heat up the 4He tank and the remaining l-N2 will hopefully evaporate.
But don’t heat it up too much! I.e., try to keep the ADR below 90K (you can monitor the temperature
by closing the pill heat switch and watching the GRT, for instance (see Temperature Monitoring on
page 29 below)).
12. Once the ADR l-4He tank has no l-N2 in it, fill it completely with l-4He. Make sure you use a low pressure when filling with l-4He for the first time (~1-1.5 psi in the fill Dewar). If you fill too quickly with
too high of a pressure then the tank may become over-pressured and leaks in the l-4He neck could develop. This fill takes about 30 minutes. Record in the SPIFI notebook the time of the fill, how long it
took to fill, and estimate (if you can) how many liters of cryogens were used.
13. Blow all of the l-N2 out of the SPIFI l-4He tank using the special SPIFI blow-out device (see Figure 6 on
page 27 below), which is stored in the SPIFI crate labeled “?” in the AST/RO Annex. Record how
much l-N2 you blew out in the manual. You can use a funnel to pour the blown-out l-N2 into the SPIFI
l-N2 tank so it does not go to waste.
14. Fill the SPIFI l-4He tank completely with l-4He (use the procedure described in SPIFI Helium on page
36 below). Make sure you use a low pressure when filling with l-4He for the first time (~1-1.5 psi in the
fill Dewar). If you fill too quickly with too high of a pressure then the tank may become over-pressured
and leaks in the l-4He neck could develop. This fill takes a while and it might be necessary to stop and
top-off the ADR l-4He tank again before the SPIFI l-4He tank is full. We have estimated that within
about one hour you will get approximately 1.5 inches of l-4He in the SPIFI l-4He tank. A complete fill
takes about 2-3 hours. You will run out of l-4He in the 100L Dewar before you can complete the fills of
both SPIFI’s and the ADR’s l-4He tanks. Therefore, make sure you have enough l-4He (~150L) on hand
before you start. Record in the SPIFI notebook the time of the fill, how long it took to fill, the level of
cryogens in the tank, and estimate (if you can) how many liters of cryogens were used.
After completely filling the l-4He tanks (steps 12 and 14 above), SPIFI should optimally be able to achieve a
pressure between 5×10⁻⁷ and 1×10⁻⁶ Torr. The first cool-down uses a lot of cryogens. Since the ADR’s cryotanks are small they will run out of cryogens quickly and it will be necessary to fill the ADR cryo-tanks again
after about 6 - 8 hours. (Remember, a good way to check if the ADR’s tanks still have cryogens is to hold
your thumb over the neck vents for a minute or so and then release. If you see a plume of cold gas then there are
still cryogens in the tank).
15. After ~ 6-8 hours, top-off the ADR’s cryo-tanks. Record in the SPIFI notebook the time of the fill, how
long it took to fill, and estimate (if you can) how many liters of cryogens were used.
16. About one day after the cool-down from 293K was started, you can start pumping on the ADR l-4He
tank:
a. First make sure that the main valve on the ADR l-4He pump manifold is closed (16).
b. Make sure the gas inlet valve (18) on the manifold is open (to allow boil-off to escape to atmosphere so you don’t get an overpressure).
c. Insert and secure the KF end-cap and clamp assembly (9) with the red vacuum hose (14) attached
into the ADR l-4He neck. The o-ring of the KF cap should be clean and slightly greased with vacuum grease so that you get a good seal. When you attach the red vacuum hose, the hose should
come off the of the top-left of the neck (higher than horizontal: see the picture in the Inside the Pillbox section of the SPIFI Quick Locator Guide on page 6 above). Also, make sure the KF end-cap
and clamp assembly is oriented so that the red vacuum-hose cap of the Stickstoff neck is not
blocked.
25
17.
18.
19.
20.
21.
22.
d. Start the appropriate pumpzilla in the receiver room by flipping the switch on the breaker box on the
wall.
e. Close the gas inlet valve (18) on the manifold and go immediately to the next step.
f. Slowly reopen the main valve (16) on the vacuum manifold. Take at least 5 minutes to completely
open this valve to minimize stress on the pump. You won’t be able to listen to the pump because it
is downstairs, so use your best judgement (although Steve claims he can hear the change in the
pump through its exhaust). You should eventually see the pressure drop on the pressure gauge,
once it gets below 100 Torr (the gauge has a range of 0-100 Torr). The needle may oscillate wildly.
This is normal. Sometimes you can dampen these oscillations by opening or closing the valve a bit.
The oscillations usually dampen out on their own once the pressure gets below about 30 Torr. After
some time (½ hour or so after fully opening the main valve) the pressure should get below 10 Torr.
Make a record of this in the SPIFI notebook. Eventually you will want ~3 Torr.
Either during or after you have pumped down the ADR l-4He tank you will need to close the green
Swagelok valve on the side of the ADR to seal off the 3He tank. This is the first green-colored valve
handle on the “top right” of the ADR, as viewed when looking in through the pillbox doors (see Figure
5 below). This must be closed before cycling the ADR. Don’t touch the other green Swagelok valve
(further back on the ADR) or you will release all our 3He to the atmosphere!
You can also start pumping on SPIFI’s l-N2 tank at the time that you start pumping on the ADR l-4He.
First, reconnect the vacuum hose and special stinger assembly to the SPIFI l-N2 neck. We left the vacuum hose and special stinger assembly for pumping on SPIFI’s l-N2 tank connected to SPIFI’s l-N2 neck
at the end of the 03-04 summer season at Pole. However, you had to remove this assembly in step 3
above in order to fill l-N2. See Figure 12 page 34 for a detailed diagram of the special stinger and
pumping assembly.
a) Make sure the brass valve connecting SPIFI’s l-N2 neck to the vacuum hose is closed.
b) Make sure the yellow latex hose is securely clamped off near the end which connects to the stainless
steel stinger.
c) Start the appropriate pumpzilla in the receiver room by flipping the switch on the breaker box on the
wall.
d) Slowly open the brass valve on SPIFI’s l-N2 neck. Don’t open the valve too fast, or you will overload the pump. It will be difficult to gauge this, since the pump is downstairs and you can’t hear it
(although Steve claims he can hear the change in the pump through its exhaust). But because we
use the same type of pump on SPIFI’s l-N2 as we do to pump on the ADR’s l-4He, the pump-down
rate should be similar. Record the time that your pump-down started in the SPIFI notebook.
Check the ambient temperature inside the SPIFI enclosure after filling to make sure its still warm. By
“warm”, we mean above 0°C: we never want the enclosure to get much colder than this. If the enclosure is below 0°C, take measures to warm it up. This may involve simply keeping the doors of the enclosure closed for a while and letting the heaters in there do their jobs. I could also involve adding another heater or more weather stripping and insulation if needed.
Only if the enclosure is above 0°C, turn on all the electronics in the enclosure to help with heating:
a) Calibration control box (46): in the following order (and from left to right) turn on the main power
switch, turn on the indexer, turn on the driver, and turn on the temperature control unit.
b) Turn on the resistance bridge box (47).
c) Cryo-motor box (48): in the following order, turn on the main power switch, turn on the indexers’
power, and then turn on the HOFPI and LOFPI driver power. (You may need to turn this box off
and turn it back on again after logging into Fabry, due to some initialization problem with the indexer that we don’t fully understand. Make sure you always turn on the indexer before the driver,
however.)
d) SPIFI motor box (49): in the following order, turn on the main power, then turn on switch “5.”
Boot-up Fabry (50). You don’t need to log-on or anything, since this can all be done remotely when
you telnet. Just push the power button. But only turn on Fabry if the temperature is above 0°C!
Parallelize the HOFPI again (See Parallelizing the Fabry-Perots on page 53 below).
26
Green Swagelok valve
to 3He tank (close
before cycling ADR).
Don’t touch this valve (the
other green Swagelok
valve, further back on the
ADR), or you’ll release all
our 3He to the atmosphere!
2L 3He external
storage tank
Don’t touch this guy,
or he’ll release a can
of whoop-ass on you.
Figure 5: Swagelok Valve to ADR 3He tank
Good job: you’re done with the initial cool-down. SPIFI should be getting very cold by now. Watch the pressure on the turbo pump and see if it gets between 5×10⁻⁷ and 1×10⁻⁶ Torr (and record the pressure in the SPIFI
notebook). Also, check the GRT’s and SPIFI’s carbon resistors to monitor the temperature (see Temperature
Monitoring on page 29). Keep a record in the SPIFI notebook every time you check the temperatures.
Now your only worry is to make sure the tanks never run out of cryogens. Refer to Maintenance Filling on page
32 below for regular filling methods and schedules.
27
Figure 6: Blowing l-N2 Out of the SPIFI l-4He Tank
Enclosure Roof
N2 gas input,
~ 5-10 psi
SPIFI l-4He Neck
Access Hatch
Special stinger device for blowing lN2 out of SPIFI l4
He tank
l-N2 blown out of
SPIFI comes
through this tube
SPIFI l-4He Neck
Figure 7: Pouring l-N2 blown out of SPIFI's l-4He tank into SPIFI's l-N2 tank
Thomas Nikola
Handheld Dewar for collecting blown-out
l-N2
SPIFI l-N2 Neck
Access Hatch
Funnel for pouring
blown-out l-N2 into
SPIFI’s l-N2 Tank
SPIFI l-N2
28
Figure 8: Blowing l-N2 Out of the ADR l-4He Tank
N2 gas input,
~ 5-10 psi
ADR He Neck
Rubber Stopper
with small hole
Teflon capillary tube for sucking
out l-N2. On the inner side of the
stopper there is approximately 22”
of Teflon tubing which reaches into
the l-4He neck and bends downwards so that it is immersed in the
l-N2 near the bottom of the l-4He
tank. On the outside, as you can
see, there needs to be enough tubing to direct the blown-out l-N2
into a dewar.
Rubber Vacuum Hose
Makeshift manifold
Handheld Dewar for
collecting the blown-out
l-N2
ADR l-He Tank
N2 gas input,
~ 5–10 psi
ADR He
Neck
Makeshift manifold
Rubber Stopper
with small hole
Rubber
Vacuum
Hose
Teflon
Capillary
tube
ADR
22” of Teflon capillary
tube on this side of stopper. Make sure tube
bends down into l-N2
upon insertion
N2 gas
pressure
l-N2
Blown-out l-N2
29
PART 2: OPERATION
Temperature Monitoring
SPIFI Temperature Check
SPIFI has four carbon resistors inside. The leads of these carbon resistors (52) are hanging over the edge of the
SPIFI alignment table (32) on the Fabry side of SPIFI. The leads are female banana sockets colored red, green,
white, and black, with two sockets of each color. To determine SPIFI’s temperature we usually only use the red
and white resistors:
1. Record in the SPIFI notebook the resistance across the red pair of banana sockets and the white pair of
banana sockets.
2. Use the calibration chart below to interpret the temperature of the red resistor based on your measured
resistance. The red resistor is tied to the LOFPI stage (4.2K stage) in SPIFI’s main Dewar.
3. Use the calibration chart below to interpret the temperature of the white resistor based on your measured
resistance. The white resistor is tied to the HOFPI stage (77K stage) in SPIFI’s main Dewar.
White Resistor (kΩ
Ω)
HOFPI 77K stage
9.31
9.32
9.36
9.40
9.48
9.57
9.66
9.75
9.86
9.97
10.08
10.21
10.34
10.49
10.65
10.84
11.04
11.27
11.53
11.82
13.16
13.31
13.34
13.36
13.39
13.41
13.43
Red Resistor (kΩ
Ω)
LOFPI 4.2K stage
10.8
10.8
10.8
10.8
10.9
10.9
10.9
11.0
11.1
11.1
11.2
11.4
11.5
11.7
11.9
12.1
12.4
12.7
13.1
13.6
15.4
16.0
16.2
16.3
16.4
16.5
16.6
Temperature
(°C)
22.6
21.0
15.0
10.0
0.0
-10.0
-20.0
-30.0
-40.0
-50.0
-60.0
-70.0
-80.0
-90.0
-100.0
-110.0
-120.0
-130.0
-140.0
-150.0
-180.0
-183.5
-184.5
-185.8
-187.1
-187.9
-189.4
Temperature
(K)
295.6
294.0
288.0
283.0
273.0
263.0
253.0
243.0
233.0
223.0
213.0
203.0
193.0
183.0
173.0
163.0
153.0
143.0
133.0
123.0
93.0
89.5
88.5
87.2
85.9
85.1
83.6
Table 1: Temperatures for SPIFI's Carbon Resistors
30
ADR Temperature Check
The temperature in the ADR is monitored through two GRT’s. One is located on the salt pill and the other on
the 3He pot.
1. Plug the housekeeping cable (27) into the ADR. This is the large black braided cable with the military
style connector. It plugs into the bottom-right underside of the end of the ADR near the double pillbox
doors. The connector is not a bayonet-style or screw-on. Rather, just push it straight in snuggly.
2. Next, locate the small blue box (56) on the inner right-hand wall of the enclosure on the Fabry side of
SPIFI. A knob to select which GRT you wish to read is located on the box. Select either position “3:
Pill” or position “2: Pot.” See Figure 9 below.
Knob for selecting “Pot” or
“Pill” GRT
Figure 9: Selecting Pill & Pot GRT's on the Small Blue Box (56)
3. After selecting which GRT you want to use on the small blue box, locate at the Resistor Bridge Box
(47) in the electronics rack (second box from the top of the electronics rack on the Fabry side of SPIFI
in the enclosure). If the Resistance Bridge is not already on, turn it on.
4. Wait several minutes for the resistance to climb and stabilize at its actual value.
5. Once the resistance has become stable (or is bouncing around some mean value), record the resistance
in the SPIFI notebook.
6. Compare your recorded value with the graph below (Figure 10) to get the temperature, and record this
temperature in the SPIFI notebook. Figure 10 is a very rough linear approximation for “high” temperatures (say, above 10K). We do not have good calibration measurements of these GRT’s for temperatures below 4K. However, after cycling the 3He fridge and the ADR, and when the system is cold
enough for observing, the pot GRT should read something on the order of 120Ω (which means the pot is
around 275mK), and the pill GRT should read something between 700Ω up to 5kΩ (which means the
pill and detectors are around 60mK). The wide range of 700-5000Ω is because the resistancetemperature curve of the GRT for very low temperatures is very steep. Therefore a large increase in resistance only corresponds to a small decrease in temperature. Also, you should know that the pill GRT
doesn’t always appear to be stable, and can jump around a bit.
7. When finished unplug the housekeeping cable. If the housekeeping cable is left in, it can add considerable noise to the signal while taking scans. It can also cause a heating of the detectors due to microphonics and the bias current for the GRTs. You can leave the Resistor Bridge Box turned on however to
help with enclosure heating.
31
Resistance (mΩ )
GRT Temperature vs. Resistance: a Linear
Approximation
1800
1750
1700
1650
1600
1550
1500
1450
1400
1350
1300
1250
1200
1150
1100
1050
1000
950
900
Salt Pill
3He Pot
0
31
0
29
0
27
Figure 10: GRT Temperature vs. Resistance Plot
0
25
0
23
0
21
0
19
0
17
0
15
0
13
0
11
90
70
50
30
10
Temperature (K)
32
Maintenance Filling
Table 2 below summarizes the most important facts you need to know about maintenance filling for the four
cryogen tanks in the “SPIFI system” (see page 22 for an introduction to SPIFI’s four cryo-tanks). When checking the level of cryogens in SPIFI’s l-N2 and l-4He tanks, you may also need to refer to the height versus volume
chart for SPIFI’s tanks, which is found in Appendix A on page 64 (Table 7). Keep records in the SPIFI notebook
every time you check the levels in these tanks. Note that from the values shown in Table 2, one can assume an
average usage of about 17L of l-N2 per day, and about 25L of l-4He per day.
Table 2: Summary of Cryogen Tank Maintenance Filling
Tank
Recommended Recommended to check
to refill every… level every…
Cryogens needed per
fill*
Maximum
hold time
Capacity of
tank (L)
ADR l-N2
22 hours (or
more often
when cycling)
not possible
6-7L l-N2
22 hours
5
SPIFI l-N2
(no pump)
2 days
1 day (use Steve’s handcarved wooden dipper), +
before and after fills
20L l-N2
3 days
25
SPIFI l-N2
(with pump)
1 day
not possible
10L l-N2 minimum (make
sure it doesn’t suck air)
(same as
above)
(same as
above)
ADR l-4He
1 day (or more
often when cycling)
not possible
8-10L l- He
1 day
5
5-7 days
check 3 days after a fill,
then check more often as
needed (use thumper).
Also check immediately
before and after any fill.
100L l- He (never start
filling with a partially full
100L Dewar)
7 days
65
4
SPIFI l- He
4
4
*Assuming you refill according to the recommendations in column two.
Detailed instructions for maintenance filling follow in the subsections below. Keep a record in the SPIFI notebook for every fill. Record the time of the fill, the level of cryogens in the tank before and after the fill (if this
can be measured), how long the fill took, and estimate (if you can) the amount of cryogens that were used for
the fill. These notes will help you keep track of the maintenance filling schedule---namely of what tanks need
filled when. They will also allow you to make estimates of SPIFI’s boil-off rate, and help us make sure SPIFI is
behaving well.
ADR Nitrogen
The ADR l-N2 tank must be filled approximately once every 22 hours. Because the ADR is horizontal, there is
no way to check the level in the ADR l-N2 tank (although you can hold your thumb over the vent for a short
while and then release to see if you see a plume---if you do, then there is still l-N2 in the tank), so it is important
to fill on time. The capacity of the tank is 5L, so it should take about 6-7L of l-N2 to fill.
1. Attach the curved copper extension onto the 50L l-N2 Dewar using a crescent wrench. Next, attach the
yellow latex hose---with the stainless steel stinger on the other end---to the end of the copper extension
using a hose clamp. (Note that if the yellow latex hose is too stiff in the Antarctic winter you may need
to switch to Teflon). The copper extension should be rotated so that it curves upwards. (See Figure 11
below.)
2. Position the 50L Dewar midway between the end of the pillbox and the baby-buggy cover.
33
3. Remove the red vacuum hose cap from the ADR’s l-N2 (“Stickstoff”) neck (30).
4. Before opening the l-N2 valve on the Dewar, make sure the yellow latex hose (or Teflon hose) is not
kinked near the end of the copper extension. Also make sure the stainless steel stinger is held at the
height of the Stickstoff neck and is parallel to the ground.
5. Slowly open the l-N2 valve on the Dewar.
6. Just when the hose starts to get stiff, insert the stinger in the Stickstoff neck and move the entire Dewar
towards the pillbox until the stinger is inserted all the way into the Stickstoff neck. The stinger should
be inserted as far as possible until it hits the bottom of the ADR’s l-N2 tank, and then should be backed
off a half-inch or so to allow the l-N2 to flow freely from the end of the stinger.
7. When the ADR’s l-N2 tank is full, shut off the main valve on the Dewar.
8. Move the Dewar back towards the baby-buggy cover to remove the stinger from the Stickstoff neck.
9. Replace the red vacuum hose cap on the Stickstoff neck.
10. Make sure the pillbox doors are closed and latched.
Yellow
latex hose
Top of stainless
steel stinger
Curved copper
extension
50L Dewar
Figure 11: Filling SPIFI's l-N2 Tank from the 50L Dewar
SPIFI Nitrogen (with no pump attached)
The tank should be filled approximately every two days. The maximum hold time for this tank is three days, but
check the level every day to make sure you don’t run out sooner (use Steve’s hand-carved wooden dipper stick--see Figure 4 and instructions for use on page 22 above). If you fill every day, SPIFI will drink about 10L of lN2. If you wait two days, it will drink about 20L. The capacity of the tank is 25L.
One other note: the method described below of putting the 50L l-N2 Dewar inside the enclosure with the door
partly open behind it worked well in the summer. However, in wintertime if this causes too much heat loss inside the enclosure---which it very well may---you might try putting the 50L Dewar on the lift, jacking it up, and
just filling through the roof hatch from the outside. This is especially true if Fabry and other electronics are
running: if it drops below 0°C inside the enclosure Fabry and fans inside electronics boxes may be destroyed.
1. Check the level of l-N2 in the tank before filling and record this value and the time in the SPIFI notebook.
2. Attach the curved copper extension onto the 50L l-N2 Dewar using a crescent wrench. Next, attach the
yellow latex hose---with the stainless steel stinger on the other end---to the end of the copper extension
using a hose clamp. (Note that if the yellow latex hose is too stiff in the Antarctic winter you may need
34
3.
4.
5.
6.
7.
8.
9.
10.
11.
to switch to Teflon). The copper extension should be rotated so that it curves upwards. (See Figure 11
above.)
Lift the 50L Dewar up and set it into the enclosure on the battery box side of SPIFI (or alternatively jack
it up on the lift on the outside of the enclosure). Do not pull or push on SPIFI or the SPIFI alignment
table (32) while doing this, or we could loose our alignment to the telescope. Rotate the Dewar so that
the copper extension is pointed upwards and towards the telescope wall of the enclosure (front of
SPIFI).
Open the roof hatch above SPIFI’s nitrogen neck (30). This is the larger hatch (closest to the telescope
side of the enclosure).
Snake the yellow latex hose (or Teflon hose if latex is too stiff in the winter) through the roof hatch, and
insert the stinger into the l-N2 neck. (If the hose does not reach, then rotate the copper extension or the
50L Dewar until it does---or else get a longer hose).
Making sure there are no kinks in the yellow tubing (or Teflon tubing), open the 50L Dewar’s main
valve and fill SPIFI’s l-N2 tank.
When SPIFI is full, close the main valve on the 50L Dewar.
Let the yellow hose (or Teflon hose) thaw and remove the stinger from SPIFI
Remove the 50L Dewar from the enclosure (or lower it from the lift).
Make sure the enclosure side door and roof hatch are shut and latched.
Record in the SPIFI notebook the time of the fill, how long it took to fill, the level of l-N2 in the tank,
and estimate (if you can) how many liters of l-N2 were used.
SPIFI Nitrogen (with pump attached)
When we pump on the SPIFI l-N2 tank, there is no way to measure the level of l-N2 in the tank (not even with
ingenious hand-carved tools made by Steve). Therefore we must fill this tank every day to make sure it doesn’t
run dry. When filling every day, SPIFI’s l-N2 tank will drink about 10L of l-N2 per fill. Make sure that you
have at least 10L available. If the l-N2 tank starts sucking on air you’ll get an ice plug!
Clamp. Must be
placed as close to
the top of the l-N2 in
the handheld Dewar
as possible
Main brass vacuum valve
Yellow latex hose
Stainless steel stinger
(must reach the bottom
of the handheld Dewar!)
Special filling stinger
for when l-N2 tank is
on pump
Red rubber vacuum hose
SPIFI nitrogen neck
open
SPIFI outer shell, crosssectional view from end
near telescope
Handheld
Dewar >10L
SPIFI l-N2 tank
l-N2 in handheld
Dewar is sucked
into SPIFI’s l-N2
tank by vacuum
l-N2
To vacuum pump
Figure 12: Special Pump and Stinger Assembly for Pumping on SPIFI's l-N2
35
If SPIFI’s l-N2 tank is being pumped on, the vacuum hose and special stinger assembly should already be
connected to SPIFI’s nitrogen neck and the main vacuum valve on the neck should be open. Also, the yellow latex hose should be clamped off near the end before the stainless steel stinger (of course: otherwise the
vacuum would be sucking on the atmosphere!).
1. Fill a handheld Dewar with more than 10L of l-N2. A wide-top Dewar is preferred. If the Dewar
has a narrow neck, be sure to arrange things so that the yellow latex hose and stainless steel stinger
can be removed from the Dewar quickly while still frozen, in case the handheld Dewar runs out of lN2.
2. Close the main brass vacuum valve on the SPIFI nitrogen neck.
3. Place the stainless steel stinger at the end of the yellow latex hose into the l-N2 in the handheld Dewar. The end of the stinger must be at the bottom of the Dewar. Also, if the Dewar has a narrow
neck, make sure the yellow hose and stinger are inserted straight down into the Dewar without
kinks, so that you can get the Dewar out from under them quickly if the l-N2 runs out.
4. Open the clamp on the latex hose and hold it open until the yellow latex hose is frozen stiff, and
then release the clamp and replace it on the hose (this way, when the hose thaws again the clamp
will automatically seal it off). We aren’t sure if there are any of these types of clamps at the South
Pole, so you may have to find or invent something that will work here. It needs to be strong enough
to clamp off the hose tightly but not so tight that it causes damage.
5. At this point SPIFI will simply “drink till she’s full,” meaning that the vacuum in SPIFI’s l-N2 tank
will suck l-N2 out of the handheld Dewar until the tank is full. When the tank is full, SPIFI will
simply stop drinking because the vacuum in SPIFI will have been replaced by l-N2. Make sure the
end of the stainless steel stinger is all the way at the bottom of the handheld Dewar while
SPIFI drinks. Never let SPIFI suck on the atmosphere, as this will cause an ice plug to form!
6. If you happen to run out of l-N2 in the handheld Dewar while SPIFI is drinking, quickly remove the
Dewar and place a rubber stopper (size 0) in the end of the stainless steel stinger to plug the vacuum
(some of these stoppers should already be in the enclosure, or else in the SPIFI crates in the
AST/RO Annex). Refill the handheld Dewar while the yellow latex hose thaws. Once the hose is
flexible, re-clamp it near the end with the stainless steel stinger. Remove the rubber stopper, and
follow steps 1-4 again.
7. Once SPIFI stops drinking (you will see the flow stop through the translucent yellow latex hose, after rubbing the frost off the outside), leave the end of the stainless steel stinger immersed in the l-N2
of the handheld Dewar while the yellow latex hose thaws. When the hose has thawed enough, the
clamp should seal off the hose again.
8. Remove the handheld Dewar and make sure the clamp is secured near the end of the yellow latex
hose near the stainless steel stinger.
9. Slowly open the main vacuum valve on the SPIFI nitrogen neck. (Take at least five minutes to
completely open this valve so that you don’t put too much stress on the pump. You probably won’t
be able to hear the pump because it is downstairs, so use your best judgment.)
ADR Helium
The ADR’s l-4He tank needs to filled once every day. The capacity of the tank is 5L, but the transfer usually
takes between 8-10L depending on the transfer tube used. The level of l-4He in the tank cannot be measured because the neck of the tank is horizontal.
1. In the receiver room, open the 4He gas cylinder (make sure you don’t accidentally hook up the N2 gas)
and adjust the regulator so that about 5 to 10 psi are going to the roof through the clear Teflon tube.
2. Close the main pump valve (16) on the pump manifold on the right-hand wall of the pillbox. This is
the large black-handled valve.
36
3. Attach the 4He gas line (clear Teflon tube which comes up from the receiver room) to the gas inlet nipple (18) on the manifold. You will need to use the small brass/yellow tubing adaptor piece. Make sure
that you feel gas coming out of the Teflon tube. (The pressure should be ~ 5-10 psi.)
4. Slowly crack the gas inlet valve on this nipple to start backfilling the ADR’s l-4He tank with 4He gas.
You should see the pressure in the pressure gauge (17) start to rise. However, this gauge only goes up
to 100 Torr, so you won’t be able to monitor the pressure beyond this value. Make sure you do this
slowly, so that you don’t get an overpressure (above 760 Torr) in the ADR’s l-4He tank. See step 5!
5. At the same time you are letting 4He gas seep into the l-4He tank, loosen and remove the KF clamp on
the ADR’s l-4He neck (9), but don’t take off the end-cap! (Just the clamp). This will allow the KF
end-cap to pop off of the neck in the case of an overpressure (since you can’t monitor pressure above
100 Torr).
6. Once the l-4He tank has reached near atmospheric pressure (or the KF end-cap has popped off), remove
the end cap and shut off the gas inlet nipple valve.
7. You can now start filling with l-4He using a standard l-4He transfer tube. Make sure that liquid is flowing from the end of the transfer tube’s stinger before inserting it into the ADR, or the “warm” 4He gas
could blow all of the l-4He out of the l-4He tank. Insert the stinger all the way into the neck until it
touches the bottom of the ADR’s l-4He tank, and then back it off a half-inch so that the l-4He can flow
freely. (Ideally, to minimize l-4He waste, you will have already set up the l-4He Dewar and transfer tube
by the time the KF end-cap pops off the neck, so that there is already liquid flowing from the end of the
transfer tube’s stinger and you can immediately begin filling. However, this involves good timing and
requires a bit of practice, especially with only one person).
8. Once the l-4He tank is full, remove the stinger and transfer tube from the l-4He neck and from the l-4He
Dewar. Shut off and secure the 100L l-4He Dewar.
9. Crack the main valve of the pump manifold slightly to create a suction. Replace the KF end-cap on the
l-4He neck and make sure it is securely suctioned onto the flange. The O-ring of the KF cap should be
clean and slightly greased with vacuum grease
10. Replace the KF clamp on this end-cap. Make sure it is oriented so that the red vacuum-hose cap of the
stickstoff is not blocked.
11. Slowly reopen the main valve on the vacuum manifold. (Take at least five minutes to completely open
this valve so as to minimize stress on the pump. You won’t be able to listen to the pump because it is
downstairs, so use your best judgement). You should eventually see the pressure drop on the pressure
gauge, once it gets below 100 Torr. The needle may oscillate wildly. This is normal. Sometimes you
can dampen these oscillations by opening or closing the valve a bit. The oscillations usually dampen
out on their own once the pressure gets below about 30 Torr. After some time (about ½ hour or so) the
pressure should get below 10 Torr. Eventually you want ~3 Torr.
12. Don’t forget to shut off the 4He gas downstairs in the receiver room when you are finished!
SPIFI Helium
SPIFI’s l-4He tank can go a maximum of seven days between fills, assuming that everything else stayed cold and
the l-N2 tank never ran out. Therefore, after an initial fill, you should check the level of l-4He in SPIFI’s l-4He
tank after about three days, and then check it just about everyday thereafter. Basically, you should develop a
sense of the rate at which the l-4He is boiling off in the tank, and check the level when you think it is getting
low. Use a thumper to check the level, and use the chart in Appendix A on page 64 (Table 7) to convert the
height of l-4He in the tank to the volume. Each time you check the level in the tank, record the level and the
time at which you checked it in the SPIFI notebook.
The capacity of the tank is 65L, but it always takes about 100L to fill. Therefore, to minimize loss of l-4He, you
should always start with a full 100L Dewar of l-4He before filling SPIFI’s l-4He tank. The reason for this is
that if you run out of l-4He in the 100L Dewar while filling you may not realize it immediately, and you will be
injecting warm air into SPIFI’s l-4He tank, thereby blowing out all the l-4He that was in the tank to begin with,
and any you may have just filled. If you must begin the fill with a partially full 100L capacity Dewar, keep a
37
close eye on the pressure in the Dewar. When it starts to get low, remove the stinger from the SPIFI l-4He tank
frequently to make sure it is still blowing out liquid.
1. Check the level of l-4He in the tank before filling and record this value and the time in the SPIFI notebook.
2. Place a full 100L l-4He Dewar on the hand-crank-lift dolly. Crank the dolly up to a height which allows
the transfer tube to reach the hatch to SPIFI’s helium neck, but not so high up that you can’t get the
transfer tube in under the baby-buggy-cover.
3. Once the stinger of the transfer tube is squirting out liquid only (or else you may blow all the l-4He out
of the SPIFI l-4He tank with “warm” helium gas), fill SPIFI’s l-4He tank as you would in any normal l4
He fill (i.e. 4-5 psi in the 100L Dewar).
4. Record in the SPIFI notebook the time of the fill, how long it took to fill, the level of l-4He in the tank
before and after filling, and estimate (if you can) how many liters of l-4He were used.
38
Cycling
The ADR (8), or adiabatic demagnetization refrigerator, is used to cool our bolometer detectors to approximately 60mK, which is necessary in order to achieve high sensitivity in the detectors. However, the ADR alone
cannot support the heat load which comes in from the ~1.5K pumped l-4He surfaces which surround it, and so
we use a ~300mK 3He fridge system as a thermal guard between the 1.5K and 60mK stages. Because the ADR
needs the 3He guard, you must cycle the two systems (ADR and 3He fridge) at the same time in a synergistic
manner. The hold time of the ADR is limited by the hold time of the 3He fridge, which is approximately 40
hours. During and between this 40 hour hold-time you will have to keep all the cryogenic tanks filled (see
Maintenance Filling on page 32 above). Below you will find explanations of how the ADR and 3He systems
work, followed by step-by-step instructions to guide you through the cycling process.
Understanding Magnetic Cooling
The functioning of the ADR is explained below in the following manner: in the left-hand column is a description
of the general theory of magnetic cooling; in the right-hand column is an explanation of the specifics of our system which correspond to the general theory. Refer to Figure 13, Figure 14, and Table 3 on page 40 below while
reading over the explanations.
General Magnetic Cooling Theory
ADR’s are able to achieve low temperatures by adiabatically demagnetizing a paramagnetic salt. In a
paramagnetic solid (such as a crystalline salt lattice)
the basic atomic unit has unpaired electrons, and thus
contains what are referred to as paramagnetic ions.
Around 1-2K, and in the absence of an externally applied magnetic field, the interaction energy of these
ions with their crystalline environment (the salt lattice)
is much less than the average thermal energy kT.
Therefore, each ion is relatively free and a randomly
oriented system of dipoles results, with negligible net
magnetism of the salt.
If the salt is kept at a constant temperature in contact
with a cold reservoir (around 1-2K), and an external
magnetic field is slowly applied, then the paramagnetic ions in the salt will align themselves with the
external field. Because this is done isothermally (at
some specific temperature in the range of 1-2K) the
temperature of the salt cannot increase. Instead, the
heat of magnetization, ∆Q, is dumped into the cold
reservoir. Therefore the entropy, S, of the salt decreases (recall dS=dQ/T by definition).
Once the external magnet field has been increased to
its maximum value, it should be left at that value until
all but a very small percentage of the paramagnetic
ions in the salt are aligned with the field. The entropy
continues to decrease to some limiting value which
Correspondence in Our System
Our salt pill is a 230g cylindrical pill of FeNH4(SO4)
12H2O, or ferric ammonium aluminum, or FAA. Gold
wires are threaded through the pill and thermally couple the pill to the detector array. FAA can reach temperatures down to 50mK through adiabatic demagnetization.
Our cold reservoir is the pumped l-4He tank, which is
~1.5-1.8K. The salt pill is kept in contact with this
tank during magnetization by closing the pill heat
switch (21), and in practice the pill does actually show
some increase in temperature as can be monitored on
its GRT. The magnetic field is supplied by a superconducting solenoid coil (also at pumped l-4He tank
temperature) which coaxially surrounds the salt pill.
We use the magnet power supply (23) and the magnet
control box (22) to supply 20.2A of current to the solenoid (via the magnet leads (28)) at the “moderate”
ramp-up rate of 1A/s. At 20.2A, the solenoid has an
internal magnetic field of ~4T.
When the solenoid achieves a field of ~4T (at 20.2A)
we close a persistent switch (24) (which was kept open
up to this point). The persistent switch is a superconducting switch that acts as a “short” between the two
magnet leads (28). When the persistent switch is
39
depends on the maximum magnetic field.
Next, adiabatically isolate the salt from the cold tank,
and remove the magnetic field quasi-statically (this is
the adiabatic demagnetization). Because this is done
adiabatically (∆Q=0) and quasi-statically, the entropy
must remain constant (dS=dQ/T). In addition, it can
be calculated that the entropy of a paramagnetic salt is
dependent on the independent variables B and T by a
ratio of (B2+b2)1/2/T, where b is the interaction field
between the ions, and is negligible except at very low
temperatures. Therefore, during adiabatic demagnetization, with S=constant, one can see that Bi/Ti Bf/Tf .
So as B is decreased, T must decreased. (But b prevents Tf from reaching 0K!)
As the salt absorbs heat from its surroundings, the
temperature and entropy rise iso-magnetically (I don‘t
know if that’s a word, but I mean with B=constant=0)
until the salt has reached its initial temperature
(somewhere between 1-2K). The time constant depends on the heat load on the salt, and on the physical
properties of the salt itself.
closed, it is superconducting. The solenoid is, of
course, also superconducting. Therefore, after closing
the persistence switch we can take current out of the
(non-superconducting) leads at a fast rate (10A/s) but
still leave 20.2A flowing around the superconducting
solenoid and through the persistent switch short and
around again and again. The current path is superconducting and hence a 4T field is maintained with no
dissipation. We must leave the solenoid magnetized
for about 30 minutes before continuing.
Open the pill heat switch to thermally decouple the salt
pill from the pumped l-4He tank. Put 20.2A of current
back in the magnet leads (quickly, at 10A/s). The purpose of this is to eliminate any current jump between
the leads and the solenoid, so that no power is dumped
in the ADR when we pull the 20.2A of current out of
the solenoid through the magnet leads Open the persistent switch. This causes the closed circuit through
the persistent switch and around the solenoid to be
interrupted. The new current path flows in from the
magnet controller through the positive magnet lead,
around the solenoid, and out to the magnet controller
ground through the negative magnet lead. Take the
current out of the leads very slowly (0.1A/s) to demagnetize the solenoid quasi-statically. It takes about
30 minutes until the current on the magnet power supply is at 0A. Turn off the persistent switch heater and
then turn off the magnet control box and the magnet
power supply at the same time. Then disconnect the
magnet leads from the ADR. With another ½ hour the
salt pill will be near 60mK.
The heat load to our salt pill is dominated by two
sources which each contribute about 20-30nW: conduction from 300mK through array wiring, and 1.5K
radiation. Therefore we have a total heat load of about
50nW which limits the hold time of 60mK in the salt
pill to 100 hours. However, our whole system is limited by the 3He 300mK stage, which acts as a thermal
conduction shield between the 1.5K stage and the
60mK stage. The hold time of the 3He system is only
about 40 hours. See
Understanding the 3He Fridge below.
40
Figure 13: Electrical Schematic for Magnetizing and Demagnetizing the Solenoid
Table 3: Persistent Switch Settings
Persistent Switch Settings
Key Position
key vertical (90° counter-clockwise)
key horizontal (90° clockwise)
Nominal
Position
“OFF”
“ON”
Temperature Status
State
Switch at 1.5K, not being heated
Switch being heated >1.5K
superconducting
Normal
Switch position
closed
open
41
Figure 14: Mechanical and Thermal Schematic of the ADR and 3He Fridge
Understanding the 3He Fridge
The 3He fridge can achieve a temperature of 280mK for a hold time of approximately 40h. It provides the necessary thermal shield between our pumped l-4He tank (and all the surfaces inside the ADR Dewar which are
connected to it) at ~1.5K, and the salt pill and detector array at 60mK. The primary heat load seen by the 3He
fridge is conduction from the 1.5K stage through the fiberglass G-10 which mechanically supports the fridge
(see Figure 14 above). This load is ~75mW and it vaporizes all of the l-3He from the pot in 40h.
The operation of the 3He fridge is much simpler than that of the ADR. The key components of the 3He fridge--the pump, pot, pumping tube, and heat switches---are shown in the right side of Figure 14 above. The entire
system is closed-cycle: it is a sealed system which contains a fixed amount of 3He at low pressure and exchanges no substances with the outside. It has no moving parts (other than the manually adjusted pump and pot
heat switches (20) & (19)). The construction consists of the pumping chamber being connected to the pot
chamber via the pumping tube. That’s about it. The pump is not a mechanical pump, but rather a piece of charcoal sealed inside the pumping chamber. When the charcoal is cooled to low temperatures (~1.5K) its enormous
surface area adsorbs 3He gas. In this way it “pumps” on the atmosphere inside the closed system. Furthermore,
the pressure inside the fridge is such that 3He goes through the liquid/gas phase transition at ~2-2.5K. This allows the entire fridge to be cycled simply by heating and cooling the pot and pump: they can both be cooled
down to 1.5K by thermally connecting them to the pumped l-4He tank via the pot and pump heat switches, and
the pump can be heated up to 50K via a resistive heater which is thermally strapped to it.
The process for cooling to 280mK is as follows:
42
•
•
•
•
•
First, the pump heat switch is closed (the pot heat switch can be either open or closed, it doesn’t matter).
This cools the charcoal in the pump to ~1.5K, causing it to adsorb most of the 3He in the system. I don’t
know for sure how long this process takes, but this is the state that is achieved at the end of the hold
time of a cycle. Therefore, when you are ready to re-cycle, the 3He is already all adsorbed in the charcoal.
Next, the pot heat switch is closed and the pump heat switch is opened.
The pump is then heated to about 50K. This causes all the 3He to evaporate out of the charcoal. Because the pot heat switch is closed, the pot is at 1.5K. Therefore the evaporated 3He will condense out
into the pot. It takes about four hours for the 3He to be forced out of the charcoal and for the heat of vaporization to be removed from the pot through the heat switch to the l-4He tank.
Once most of the 3He has condensed in the pot, stop heating the pump. Now the heat switches are reversed once again: close the pump and open the pot. This causes the charcoal to once again cool to
1.5K and start “pumping” on the 3He atmosphere above the l-3He in the pot. As the pressure in the pot
decreases, so does the temperature. It takes about ½ hour from this point for the pot to reach ~280mK.
After 40h, the pot will warm back up to 1.5K, and you will have to start the process over again.
When the instrument is at room temperature, the 3He gas inside the fridge collects in an external storage tank
with a volume of ~2L. At room temperature the gas is stored there under a pressure of about three atmospheres.
This storage tank is the long, cylindrical, chrome-plated structure attached to the ADR’s outer shell. When
SPIFI is mounted in the enclosure on AST/RO, this is found on the upper right side of the ADR (see Figure 5 on
page 26 above). There are two green-colored Swagelok valves connected to this tank. The first valve---the
valve closest to the end of the ADR with the l-4He and l-N2 filling necks (closest to the pillbox doors)---connects
the storage tank to the rest of the closed fridge system. This valve should be opened when the ADR is at room
temperature and not being used. It should be closed during cool-down when you start pumping on the ADR l4
He tank, and left closed as long as everything is cold. The second further back Swagelok valve opens the storage tank to the atmosphere. Never touch this valve, or you will release all our 3He to the atmosphere!
43
Step-By-Step Cycling of the ADR and 3He Fridge
Below is a step-by-step procedure for cycling the ADR and 3He Fridge. Notice that the cycling of the two systems is an intermixed process. To help you understand the reasoning behind each step below, a right-hand column with “Explanations” has been included. You may also wish to consult Figure 13, Figure 14, and Table 3
above while going through the cycling to get a better picture of what’s going on inside the ADR.
Step
Action
Explanation
1.
Put the battery box on the charger while you cycle. We only have one working batter box, and it will need
(See The Battery Box on page 57 below for charging to be charged everyday while observing. Since observing can’t take place during cycling, this is an ideal time
instructions.)
to charge the battery box.
2.
4
Top off the ADR l- He (9) and ADR l-N2 (10) tanks This is to make sure you don’t boil off all your liquid
cryogens, since the boil-off rate will increase during
(see Maintenance Filling on page 32 above).
3
cycling due to the He pump heater, the persistent
switch heater, the heat of magnetization, the latent heat
of condensation of 3He, and various other sources of
waste heat from electrical currents and from work being
done on the system.
3.
Open the pump heat switch (20) and close the pot We close the pot switch so that the pot cools down to
1.5K. We open the pump switch because we will soon
heat switch (19).
start heating the pump to a temperature higher than 22.5K in order to evaporate all the l-3He which is soaked
into the charcoal in the pump. Then the gaseous 3He
will flow from the pump to the pot, and condense out in
the pot (which is at 1.5K).
4.
Close the pill heat switch (21).
Makes sure the pill stays at 1.5K during the cycling
process. This is necessary because the ADR cooling
process requires that we magnetize the salt pill isothermally.
5.
Connect the housekeeping cable (27) to the ADR
Connects the electrical inputs for the 3He pump heater,
the persistent switch, and the GRT read-outs.
6.
Put the ADR l-4He back on the pump.
Gets your l-4He surface cold. It must eventually drop
below the boiling point of l-3He in the 3He fridge system. This point depends on the pressure inside the 3He
fridge system, but is probably around 2-2.5K (which is
easily achieved by the ADR l-4He tank when it gets
down below to 5-10 Torr). Note that all three heat
switches (pill, pot, and pump) thermally connect to this
surface when closed.
7.
Turn on the 3He pump heater (25) and set it to 5
volts. This is the small green power supply located
in the bottom left corner of the pillbox, under the
ADR.
Heats the charcoal in the pump to a temperature above
2-2.5K (and up as high as 50K). This causes the 3He to
boil out of the charcoal since its boiling point at the
pressures inside the fridge is ~2-2.5K. The 3He then
flows to the pot (which is at 1.5K because the pot heat
switch is closed) and condenses out there.
8.
Check that the resistance (of the 3He pump) is going This is to make sure the pump is heating up properly
down on the multi-meter (26) which is connected to
the 3He pump heater (via the blue switch board (56)).
9.
Once the resistance is equal to 2kΩ (which takes 2kΩ is the desired temperature (or corresponding resisabout 30-40 minutes), turn the 3He pump heater tance, if you like) at which we would like to heat the
44
down to 2 volts.
pump for the next 4 hours. We start with 5V just to
speed up the process of getting the pump warmed up to
2kΩ. However, if you leave the heater on 5V too long
and let the resistance drop much below 2kΩ, then you
will have to wait longer than 4 hours in step 21 below.
(This is because you will start overheating the 3He gas
which flows to the pot, and it will take longer to condense in the pot. Your l-4He boil off will also increase.)
10.
Plug the magnet leads (28) into the ADR. Match
red to red (tape on ADR) and black to black (paint
on ADR). See Figure 16 below. Make sure the
magnet leads don’t make a short.
Connects the magnet leads from the magnet control box
(22) to the ADR. We will use these leads to get current
into (and out of) the solenoid coil which surrounds the
salt pill. (And hence magnetize (and demagnetize) the
salt pill.) See Figure 13 above.
11.
Check that the current direction on the magnet con- Therefore when you turn on the controller the magnet
troller (22) is set to the down position (see Figure 15 won’t start ramping up automatically. It is important
that you don’t ramp up until the persistent switch is
below).
opened (step 13 below).
12.
Turn on both the magnet controller (22) and magnet The magnet controller and power supply will be used to
power supply (23) at the same time (see Figure 15 activate the persistent switch and to magnetize and debelow). Wait a minute or so until you can hear the magnetize the salt pill.
fans in both boxes start up and running smoothly.
13.
Turn the persistent switch heater (24) on the magnet The persistent switch will open when heated (i.e. it will
controller to on by turning the key 90° clockwise go normal and develop a resistance). This will block
(see Figure 15 and below and Table 3 above). The the “short” between the magnet leads.
green indicator light should come on.
14.
Wait 2 minutes.
Give the persistent switch time to heat up and open.
15.
Set the current rate to 1 amp/sec and flip the current
direction to the up position on the magnet controller.
The controller and power supply should show increasing current on their displays.
Start ramping up the magnet by putting current into the
leads at a rate of 1 amp/sec. Because the persistent
switch is open, the current will flow from the positive
lead, through the solenoid coil, and back out through
the negative lead to ground in the magnet controller.
16.
Once the current has peaked at 20.2 amps (about 1-2
minutes), turn the persistent switch heater off. The
green indicator light should go off and the current
limit LED should light up.
The maximum current we want to leave in the solenoid
is 20.2 amps. By turning the persistent switch heater
off, the switch will go superconducting and close. This
will provide a short between the magnet leads. However, because the solenoid and the persistent switch are
superconducting, and the “warm” leads are not, all of
the 20.2 amps of current will take the path of least resistance, and will flow in a continuous loop around the
solenoid.
17.
Wait 2 minutes.
Give the persistent switch time to go superconducting.
18.
Take the current out of the leads by flipping the current direction to down. If the system is behaving
well (i.e. the current is dropping) at the ramp down
rate of 1 amp/sec, you can increase the rate to 10
amps/sec.
There is still current in the leads (as well as the solenoid
and persistent switch “short”) because of the potential
difference created by the magnet controller between its
leads. Here we can just take the current out of the leads
by ramping down. Note that because the solenoid coil
and the persistent switch “short” are superconducting, a
current of 20.2 amps will be left flowing around the
solenoid. This creates a stable central magnetic field of
approximately 4T, which will magnetize the salt pill
isothermally (since the pill heat switch is closed, the
45
salt pill will be held at 1.5K). To completely magnetize
the salt pill, we must wait for the paramagnetic ions
within the salt to align with the 4T field. This takes
about 30 minutes.
19.
Once the magnet controller reads 0.00 amps (or 0.01 The superconducting solenoid magnet is activated, and
amps), turn off both the magnet controller and mag- we don’t need a current source anymore.
net power supply at the same time.
20.
Check again that the pump heater has stabilized Everyone needs a cup of Joe.
around 2kΩ. You are done with the first half of the
cycle. Go have a coffee.
21.
Wait 4 hours for 3He to condense in pot.
22.
Turn off the 3He pump heater (small green power At this point, all of the 3He should have boiled off from
the charcoal in the pump and condensed in the pot.
supply)
23.
Open the pot heat switch and close the pump heat Opening the pot switch will disconnect the pot from the
1.5K surface and thermally isolate the pot. Closing the
switch (you might try to do this at the same time).
When heating the pump at 2kΩ, it will take approximately 4hrs for all of the 3He to completely evaporate
from the charcoal in the pump and to condense out in
the pot. Note that the salt pill will be completely magnetized after only a half hour. Don’t worry about this.
You can leave the solenoid magnetized for the entire
4hrs without any negative effects while you wait for the
3
He to condense. Note that the limiting process in the
time it takes to cycle is the condensation of 3He in the
pot (4hrs).
pump head switch will connect the charcoal in the
pump to the 1.5K surface. As the charcoal cools, its
large surface area will begin to adsorb 3He gas, and it
will therefore act as a pump on the atmosphere above
the l-3He in the pot. Pumping on the l-3He in the pot
will lower the temperature of the pot to about 280mK.
24.
Open the pill heat switch.
25.
Make sure the current direction on the magnet con- We will need to put current in the leads and use the
troller is set to down and turn on the magnet power persistent switch in order to demagnetize the salt pill.
supply and the magnet controller at the same time.
Wait a minute or so until the fans in the boxes start
up and are running smoothly.
26.
Put current on the leads by flipping the current direc- There are 20.2A of current flowing around the superconducting solenoid, but no current in the leads. Theretion to up. Set the rate to 10 amps/sec.
We have isothermally magnetized the salt pill, and it is
now time to begin an adiabatic demagnetization of the
pill. Opening the pill heat switch will thermally (adiabatically) isolate the pill.
fore, if we were to open the persistent switch without
putting current into the leads first, then the 20.2A
would be quickly forced out of the solenoid through the
leads and to ground in the magnet controller. This
would cause the power stored in the 4T magnetic field
to be dumped into the pill and the ADR in the form of
heat energy, thus causing the temperature of the whole
system to rise drastically. We would then have to refill
the ADR’s liquid cryogen tanks and re-cycle. However, if we first put 20.2A of current in the leads and
then open the persistent switch, we can quasi-statically
46
demagnetize the solenoid by ramping down the current
very slowly.
27.
Once the system is current limited (20.2 amps), turn The leads now have the same current as is flowing
around the superconducting solenoid (20.2A), and there
on the persistence switch heater.
will be no current jump (and hence no power dump)
when we open the persistent switch.
28.
Wait 2 minutes.
29.
Set current rate to 0.1 amps/sec, and flip current di- We now demagnetize the solenoid quasi-statically by
taking current out of the leads at a very slow rate (0.1
rection to down.
Wait for the persistent switch to go normal (open).
amps/sec).
30.
Wait about ½ hour.
Wait for the current to ramp-down.
31.
Once the magnet controller reads 0.00 amps (or 0.01
amps), turn off the persistence switch heater. Then
turn off both the magnet controller and magnet
power supply at the same time. Remove the magnet
leads from the ADR.
We don’t need them anymore. The magnetic field has
now been removed from the salt pill. Within a halfhour, the paramagnetic ions in the salt will start to loose
their alignment. Because the salt pill is thermally isolated (the pill heat switch is open), this demagnetization
will occur adiabatically, and hence the pill will be
forced to very low temperatures (60mK).
32.
Top off the ADR l-4He and ADR l-N2 tanks.
Gotta keep the cryo-tanks happy.
33.
After about ½ hour, the pill GRT should be in the
700Ω-5kΩ range, and the pot GRT should be around
120Ω (see Temperature Monitoring on page 29
above). You are now cold enough to observe.
By now, most of the paramagnetic ions in the salt have
lost their alignment. Through this adiabatic demagnetization the salt will equilibrate at ~60mK after about one
half -hour.
34.
Don’t forget to take the housekeeping cable out of This cable adds noise and heat, and is no longer necessary, except when you want to check the GRTs.
the ADR.
DONE!
47
Persistent (keyed)
switch is shown here
in the on position
Turn on the power to both boxes simultaneously, and wait a half-minute or so
until you hear the fans running smoothly
Current ramp rate
Current ramp direction
Current
limit LED
Figure 15: Magnet Controller (top) and Magnet Power Supply (bottom)
Figure 16: Magnet leads plugged into the ADR
48
Calibration Unit
Basic description
The calibration unit is the aluminum box mounted to the front of SPIFI on the telescope side where the beam
first enters SPIFI from the telescope (see Figure 17 below). It includes the chopping blade, a DC motor for running the chopping blade, a blackbody, a gas cell, a stepper motor for moving the gas cell and blackbody into and
out of the beam path, and various photometric and thermometric sensors. The electronics control box (46) for
the calibration unit is located at the top of the electronics rack on the Fabry side of SPIFI, in the enclosure.
There is a single grey cable which connects the control box with the calibration box. There is also a grey cable
which runs from the control box through the cable-wrap down into the telescope control room, and which connects to “The Remote.” “The Remote” is a remote control device which allows one to operate the chopper motor without going outside. Additionally, there is a BNC cable running from the control box to Fabry which allows Fabry to read the chopping frequency. Finally, the two serial cables on the left side of the control box are
part of a serial cable daisy-chain which allows Fabry to communicate with the stepper motor. (Note: if there is
ever a need to use the remote while on the roof of AST/RO, there is an additional remote control cable located
on the floor of the Fabry side of the enclosure to the left of the electronics rack, and you can simply disconnect
the remote in the telescope control room and take it up on the roof and use the extra cable up there).
External Stepper Motor
for flip mirror
Calibration Unit, which is
now enclosed in the
AST/RO beam tube
Figure 17: A view of the end of SPIFI opposite the ADR, before SPIFI went into the enclosure
Figure 18: The electronic control box for the SPIFI calibration unit
49
Chopping
1. The control box should already be turned on (all the electronics should have been turned on to help heat
the enclosure after SPIFI was first cooled down from room temperature, provided that the temperature
in the enclosure was above 0°C to begin with). If the control box isn’t turned on, then in the following
order turn on the main power, then turn on the indexer, then the driver, and finally the Omega temperature control unit (these switches should run from left to right across the box). Only turn it on if the enclosure temperature is above 0°C.
2. Using “The Remote,” located in the telescope control room, turn the chopping blade on/off switch to on.
The red and green LEDs to the right of this switch should start flashing, indicating that the blade is rotating. The red and green LEDs on the remote are directly connected to two photo-sensors, which are
located on different sides of the beam path in the calibration box itself. Each LED on the remote lights
precisely when the blade passes through its corresponding photo-sensor in the calibration box. If the
LEDs do not immediately start flashing, this means that the speed of the blade is set too low for the
blade to have sufficient start-up inertia. If this is the case, the blade can be started by simply turning up
the blade speed using the pot in the middle of the remote.
3. Once the blade is running, adjust the pot on the remote to achieve the desired chopping frequency. We
usually use 8.2 Hz, which corresponds to a setting of “9.5” on the remote’s pot. A chart for comparing
chopping frequencies to pot settings is located on the back of the remote. (If needed, one can check the
chopping frequency directly by connecting a BNC cable to the top of the remote).
4. To stop the chopping blade, simply move the switch on the remote to the off position. There is a logic
circuit in the control box which should stop the blade only when the blade is completely out of the beam
path. When the blade has been stopped out of the beam path, both the red and green LEDs on the remote should be off. (If either or both of these two LEDs are still lit, it means that circuit has failed to
stop the blade out of the beam path. If the LEDs continue to flash, the circuit has failed to stop the blade
at all. If this is the case, the blade can be stopped by simply turning off the main power to the control
box (see step 5 below). The blade must then be moved out of the beam path by reaching into the calibration box from the telescope hatch door and moving the blade physically with a pen, for instance. Be
careful not to touch the window on SPIFI!) Always stop the chopping blade when you are leaving
AST/RO or when you won’t be using it for a while.
5. You can leave the control box and all its components turned on to help heat the enclosure. However if
you need to turn off the control box for whatever reason, first make sure that the temperature control,
the driver, and indexer have been turned off (in that order), and then turn off the main power. It is okay
to leave the temperature controller set at a high temperature when you turn it off.
Using the Gas Cell and Blackbody
1. The control box should already be turned on (all the electronics should have been turned on to help heat
the enclosure after SPIFI was first cooled down from room temperature, provided that the temperature
in the enclosure was above 0°C to begin with). If the control box isn’t turned on, then in the following
order turn on the main power, then turn on the indexer, then the driver, and finally the Omega temperature control unit (these switches should run from left to right across the box). Only turn it on if the enclosure temperature is above 0°C.
2. The temperature of the blackbody can be set to a constant Celsius temperature by adjusting the up/down
small arrow buttons on the Omega temperature control face. We usually leave it set at 80°C. The bottom of the digital display screen indicates the desired temperature of the blackbody in green. The top
of the digital display screen indicates the actual temperature of the blackbody in red. Upon turning on
the temperature control unit, you should see the red numbers climb as the blackbody warms up. When
the red value finally reaches the green value, the blackbody may continue to heat and the red value may
overshoot the green a little. However, the red value should eventually equilibrate about the green value.
To momentarily check the ambient temperature near the chopping blade, depress the red “check ambient
temperature” button to the left of the temperature controller.
50
3. The blackbody and gas cell together can be moved into or out of the beam path by typing a command in
the Matlab interface on Fabry (via a computer downstairs which is logged on to Fabry). To move the
gas cell into the beam path, type Gas_Cell_in. It takes about a minute to complete this command. To
move the gas cell out, type Gas_Cell_out. If the gas cell is already out of (or in) the beam path and you
type the wrong command, the program will tell you that the gas cell is already out of (or in) the beam
path. You can easily check if the gas cell is in or out of the beam path by typing the wrong command
into the computer and noting the output, or by looking at the yellow and green LEDs at the bottom of
the remote. The yellow LED should light if the gas cell is in the beam path, and the green one should
light if the gas cell is out of the beam path.
lecture bottle
bleeder valve
lecture bottle
main valve
digital
pressure
gauge
“left”
bleeder
valve
(to
lecture
bottle)
“right”
bleeder
valve
(to gas
cell)
line to
gas cell
gas cell (shown here
while removed from
calibration unit)
gas cell pump manifold
gas
lecture
bottle
line to lecture
bottle
pump exhaust line
(to atmosphere)
“bottom”
bleeder valve
(to pump)
pump
Figure 19: Gas cell manifold setup
4. To fill the gas cell with a gas of choice, first make sure that all three green-colored “bleeder” valves on
the gas cell pump manifold (40) (located in the enclosure under SPIFI on the battery box side) are open.
5. Close the main valve on the gas lecture bottle (42) (as it should already be). See Figure 19 above.
6. If the main valve on the gas lecture bottle is closed, open the green-colored bleeder valve on the gas lecture bottle.
7. Turn on the orange pump (41) under SPIFI by plugging it in. (If the pump is very cold then you may
need to physically disconnect the pump from the gas cell manifold and let it pump on the atmosphere
until the oil heats up). The pump should be able to pump-down the manifold, gas cell, and all the connecting lines to about 1-2 Torr if you let it run for several minutes.
8. When all the manifold valves are open and the manifold, gas cell, and connecting lines have been
pumped down to 1-2 Torr, close the valve at the bottom of the manifold to close-off the pump.
9. Close the bleeder valve on the gas lecture bottle.
10. Unplug the pump (it creates vibrations which heat up the detectors).
11. Put a small “shot” of gas from the lecture bottle into the gas cell. You must be extremely careful not
to put too much gas in or you could blow out the fragile plastic windows of the gas cell! We suggest the following method for doing this:
51
12.
13.
14.
15.
a. Make sure the bleeder valve on the gas lecture bottle is closed. (The main valve on the lecture
bottle should also be closed!)
b. Crack open the main valve on the gas lecture bottle for 1 or 2 seconds and then close it immediately. This allows a “shot” of pressurized gas to fill the small cavity between the lecture bottle’s
main valve and the lecture bottle’s bleeder valve. This is our definition of a “shot.”
c. Now slowly crack open the lecture bottle’s bleeder valve and let the “shot” fill the manifold and
the gas cell. Carefully watch the pressure meter to make sure you don’t over-pressurize the gas
cell. One shot should fill the manifold and gas cell with about 50 Torr of gas.
d. Add another shot if you need to.
The optimal pressure of gas to put in the gas cell depends on the spectral line which you are observing,
and typically falls between 50-150 Torr.
When you have the desired pressure of gas in the gas cell, close the bleeder valve on the lecture bottle.
Close the right-hand bleeder valve (to the gas cell) on the pump manifold.
Now the gas cell should be filled with the desired pressure of gas, the blackbody should be heated to the
desired temperature, the gas cell and blackbody should be moved into the beam path, and the chopper
blade should be running at the desired frequency. If this is the case, then you are ready to take calibration scans. Refer to SPIFI Data Acquisition manual.
You can leave the control box and all its components turned on to help heat the enclosure. However if
you need to turn off the control box for whatever reason, first make sure that the temperature control,
the driver, and the indexer have been turned off (in that order), and then turn off the main power. It is
okay to leave the temperature controller set at a high temperature when you turn it off.
Getting a Sync Signal for Fabry
In “Lockin” observing mode---which is the only mode we will be using---the Lockin Tool has to be enabled.
I.e., the Lockin Tool GUI should be displayed on the computer you are using to operate SPIFI (refer to the
SPIFI Data Acquisition manual for more info). If the Lockin Tool is not already up, select “sync present” in the
Data Acquisition Tool GUI.
When carrying out the wavelength calibration (observing the blackbody through the gas cell), the sync signal for
lockin detection is provided by the electronic control box (46) for the SPIFI calibration unit. In this case a BNC
cable must be connected from the data acquisition board in the back of Fabry (50) to the sync signal BNC connector on the front of the electronic control box (this connector is labeled “check chopping frequency”, and it
can be seen in Figure 20 below).
Sync Signal Cable (white) from
Receiver Room.
Sync Signal BNC
Cable (black) to Fabry.
Figure 20: Sync signal cables on the electronic control box for the calibration unit.
On the other hand, when doing observations of a celestial source (in which case the AST/RO tertiary mirror is
used as a chopper), the sync signal is provided by the AST/RO chopper electronics. In this case the white BNC
cable shown in Figure 20 above will carry this signal. This cable must now be connected to Fabry. The easiest
and by far most convenient way to do this is by unplugging the black BNC cable from the “check chopping frequency” connector on the front of the electronic control box and mating it with the white sync signal cable via a
52
female-female BNC adaptor (mate the two cables which are labeled in Figure 20). Also, you need to make sure
the white sync signal cable is actually connected to the AST/RO chopper control electronics in the AST/RO receiver room. Figure 21 shows where the white sync signal cable needs to be plugged in. The black banana-style
connector is for grounding purposes.
Sync signal BNC
connector
SPIFI AST/RO
sync signal cable
(white)
Sync signal
banana-style
connector
(ground)
Figure 21: ATS/RO chopper electronics located in reciever room
Note that the phases also need to be adjusted depending on what kind of observation is carried out. See the SPIFI Data Acquistion manual for details.
53
Parallelizing the Fabry-Perots
In order for our Fabry-Perot interferometers to work, the two plates on each Fabry-Perot must be parallel. This
is accomplished by adjusting three ceramic piezoelectric actuators (PZT’s) which are positioned equidistantly
around the moveable plate of each Fabry-Perot. The PZT’s expand by a small precise amount when a high voltage is applied across them. The high voltage is supplied by the two PI power supply boxes (38) & (39) underneath the SPIFI alignment table inside the battery box side of the enclosure.
This should be done…
•
•
•
•
during an initial cool-down, after all four cryogen tanks have been filled with the appropriate amount of
l-N2 and SPIFI is at approximately 77K (see Cooling SPIFI Down from 293K page 22 above).
after an initial cool-down is complete and the temperature and pressure are stable.
any time you move the HOFPI or LOFPI a large distance (such as when changing orders or wavelengths).
otherwise about once a day.
How to adjust manually…
(This usually only needs to be done for the HOFPI, but the same procedure also applies to the LOFPI).
1. First you must move the flip mirror into the “laser” (must be pronounced as by Dr. Evil in Austin Powers) beam path. The flip mirror (which is located inside the main SPIFI Dewar) is controlled by a stepper motor, which is attached to SPIFI just above the calibration box (see Figure 17 on page 48 above).
The electronics box that controls this motor is located at the very bottom of the electronics rack in the
enclosure on the Fabry side of SPIFI. We call this the “SPIFI Motor Box” (49). The motor box can operate up to four motors (serial addresses 2-5), but the flip mirror’s stepper motor is the only thing connected at the moment (its connected to port “5”). The motor box should already be turned on (all the
electronics should have been turned on to help heat the enclosure after SPIFI was first cooled down
from room temperature, provided that the temperature in the enclosure was above 0°C to begin with). If
it is not already turned on, first turn on the main power switch, and then turn on the power switch located above port “5.” But only turn it on if the enclosure temperature is above 0°C.
2. Move the flip mirror into the “laser” beam by typing the command flip_home in the Matlab interface on
Fabry (via a computer downstairs which is logged onto Fabry). To move the flip mirror out of the beam
path type flip_clear. If the motor box (or Fabry) was not already turned on, you will need to type
flip_home first in order to “initialize” the indexer and driver, so that they know where the flip mirror is
at.
3. Next you will need to go up to the enclosure and turn on the “laser” power. This is the Melles Griot box
(37) located in the middle of the shelf under SPIFI on the battery box side. Turn the key to power on
the “laser.” If you stand up inside the battery box side of the enclosure, you should be able to see a “laser” pattern on the screen (54) hanging opposite the “laser” (36) on the ADR end of SPIFI (see Figure
22 below). If you don’t, then either the flip mirror is not in the beam path, the “laser” is not turned on,
or the external “laser” mirror needs adjusted. Or maybe you just need to turn the lights out! Otherwise,
it means that something catastrophic happened (i.e. the Fabry-Perot meshes are blown-out).
4. Locate the two PI boxes (38) & (39) on the shelf on either side of the Melles Griot box. These are the
high-voltage power supplies that power the PZTs. Do not turn the power of the PI boxes until you have
checked the following three things:
• Do not turn on the PI power supply unless you are either at atmospheric pressure or below
1×10⁻⁴ Torr. At pressures in between you may get arcing in the PZTs, which can ruin them and
other components of the Fabry-Perot and SPIFI.
54
•
Do not turn on the PI power supply unless you have turned the voltages down to 0V on channels 1, 2, and 3. (knobs turned fully counterclockwise.) A large start-up current (voltage) could
damage the PZTs, which should never receive any voltage over 700V.
• Do not turn on the PI power supply unless the PZT cables are unplugged from the PI power
supply. This is necessary because when the PI boxes are first turned on they can output a very high
voltage spike even if all the knobs are turned to 0V. Any voltage over 700V can damage the PZTs.
If the cables are unplugged, the knobs are turned to 0V, and SPIFI is below 1×10⁻⁴ Torr, turn on the PI
box you wish to use. (We usually use the PI box on the left for the HOFPI and the box on the right for
the LOFPI.) Usually the LOFPI is stable, and we only need to make regular adjustments to the HOFPI.
Therefore in most cases you will only need to use the PI box on the left.
5. If channels 1, 2, and 3 are outputting 0V, connect the PZT cables to the PI box you have turned on.
Connect the correct cable to the correct channel. The cables should be labeled (A 1, B 2, and C
3). Place the resistor caps which were on the cables on top of the PI power supply.
6. Carefully watch the fringes that appear on the screen hanging from the external mirror on the ADR end
of SPIFI. Slowly turn up the three voltage knobs on the PI box (one at a time) and watch the fringes
move. When adjusting the voltage knobs, never turn the voltage of one of the PZTs above 700V.
This can destroy or damage the PZT, or greatly reduce its lifetime. Keep an eye not only on the
fringes but on the PI box’s voltage LCD displays as well to make sure each channel is always less
than 700V. When you adjust the knob(s) in one direction the fringes should appear as straight lines and
move in one direction like plane waves. When you turn the knob(s) back the other way the fringes
should move in the opposite direction. At some point the fringes should rotate 90 degrees and move
again in straight lines. The point at which the HOFPI and LOFPI are parallel is the point where the
fringes change their motion by 90 degrees. In particular, you should see two semi-circular patterns of
fringes moving towards each other and then disappearing in the middle. This is the point at which the
Fabry-Perot is parallel.
7. Make a record in the SPIFI notebook that you have parallelized the HOFPI (and/or LOFPI), and record
also the voltages of each channel (1, 2, and 3). This helps us compare records of past parallelizations
with the current attempt, since each PZT may display individualized behavior.
The “Laser” (this must
be pronounced as by Dr.
Evil of Austin Powers).
Screen with
fringe pattern
Figure 22: Parallelizing the Fabry-Perots: Observing Fringes
55
The Pre-Amp
The signals coming from our 25 pixel bolometer array (our detectors) must be filtered and amplified before we
import them into Fabry. This is the job of the pre-amp box (11), which is mounted directly to the lower left side
of the ADR, as viewed when looking in the pillbox doors.
Figure 23: Preamp switches
Switch configuration for having
the preamp turned on and a
21mV bias across the detectors
The two grey cables with D-style connectors (with all the embarrassing packing tape wrapped around them) are
our main data cables (12). These are perhaps the most important cables in the whole enclosure (don’t laugh).
Try not to move or bump these cables too much, since they may become sensitive to noise if moved. The military style cable (13) on the right brings in the power supply to the pre-amp from the battery box (see The Battery
Box on page 57 below for information on the battery box).
Table 4: Preamp Switch Positions
Desired Function of
Pre-amp
Position of
Position of
“bat/int” switch “5.3/2.6” switch
OFF
Position of
(leftmost)
“off/on” switch
“off” (up)
“bat” (up)
doesn’t matter:
switch is inactive
Position of “R/L” Position of
switch
(rightmost)
“21/10.6” switch
doesn’t matter:
doesn’t matter:
switch is inactive switch is inactive
ON & 2.6mV bias
“on” (down)
“int” (down)
“2.6” (down)
“L” (down)
doesn’t matter:
switch is inactive
ON & 5.3mV bias
“on” (down)
“int” (down)
“5.3” (up)
“L” (down)
ON & 10.6mV bias
“on” (down)
“int” (down)
“R” (up)
ON & 21mV bias
“on” (down)
“int” (down)
doesn’t matter:
switch is inactive
doesn’t matter:
switch is inactive
doesn’t matter:
switch is inactive
“10.6” (down)
“R” (up)
“21” (up)
On the top-left-hand side of the pre-amp are five switches (pictured above). The first two (the two switches on
the left-hand side, furthest in from the pillbox doors) power the preamp on and off. To turn the preamp OFF
move these two switches to the “off” and “bat” positions (both switches up). To turn the preamp ON move
these two switches to the “on” and “int” positions (both switches down).
56
The last three switches on the pre-amp (the three switches on the right-hand side, closest to the pillbox doors),
labeled 5.3/2.6, R/L, and 21/10.6 are used to select the bias voltage across the detectors. The four bias voltages
you can choose from are: 2.6mV, 5.3mV, 10.6mV, and 21mV. To choose either 2.6 or 5.3mV, you must have
the R/L switch down on “L” (meaning the left-hand 5.3/2.6 switch is active). To choose either 10.6 or 21mV,
you must have the R/L switch up on “R” (meaning that the right-hand 21/10.6 switch is active). For example, if
you want a 21mV bias on the detectors, put the 12/10.6 switch up on “21”, the R/L switch up on “R”, and the
5.3/2.6 switch doesn’t matter because it is inactive (this is the configuration pictured above). All possible combinations are outlined in Table 4 above. Using a higher bias voltage can in principle result in a stronger signal
and a higher signal-to-noise ratio. However, one disadvantage of using a higher bias voltage is that you can heat
up the detectors and shorten the hold time of the ADR. So far 21mV has worked the best.
Any time you choose a new bias voltage setting for the pre-amp, make a note of the new setting in the SPIFI
notebook.
57
The Battery Box
Understanding the Battery Box
To maintain low levels of noise in our data, it is necessary for the preamp (11) to be powered by an isolated and
shielded set of batteries (35). We have constructed two identical battery boxes for this purpose, with the idea
that one could be used to power the preamp while the other charges, so that there is never a delay in taking data
while we wait for the battery box to charge. Unfortunately, shortly before leaving South Pole Station at the end
of the summer, we discovered that the second battery box (labeled #2) is defective (the military connector on the
outside of the box has all the correct voltages, but when we hook it up to the preamp we get no signal, indicating
that one of the batteries in the box must be incapable of putting out any power).
This is not an immediate problem, since only one battery box is needed to operate the preamp. However, it
means that you (winterovers!) will have to be diligent about putting the only battery box we have on the
charger whenever you leave AST/RO for a while or whenever cycling the ADR. You will also have to be
very careful to use the correct charging method, and to make sure the switches are in the correct positions
when charging so that you don’t damage box #1. It should be noted that the “old” SPIFI battery box is located in the SPIFI crate labeled “A2” in the AST/RO Annex, and it should still have good batteries which can be
used in an emergency.
The preamp requires a power source with DC voltages of +4V, +12V, and -12V, as well as a ground. The wiring schematic for our battery box (Figure 24 below) reveals how we accomplish this using two 12V batteries
and one 4V battery.
Figure 24: Battery box wiring schematic (for a single battery box)
58
Female banana
sockets for charging
Switch 1
Switch 2
6-pin militarystyle connector
out to pre-amp
Switch 4
Switch 3
Cable to pre-amp
There are some important things to take note of in the wiring schematic for the battery box. The most important
by far is switch #3. While the negative terminal of 12V battery #2 and the negative terminal of the 4V battery are always connected, when switch #3 is closed these two negative terminals are both connected with
the positive terminal of 12V battery #1. This is what provides the necessary -12V power source to the preamp.
Table 5: Source of Voltage for the Preamp
Voltage Out to Pre-amp
Source
+12V
positive terminal, 12V battery #2
-12V
negative terminal, 12V battery #1
+4V
positive terminal, 4V battery
floating ground
negative terminal of 12V battery #2, negative terminal of 4V battery, and positive terminal of 12V battery #1 all tied together (when
switch #3 is up).
The result of the positive terminal of 12V battery #1 being connected to the negative terminals of the other two
batteries is that you must take extra caution when charging, and make sure the chargers and the switches of the
battery box are properly configured. The other three switches are not as important: they simply make the outputs of the battery box live or dead (on/off switches). Switch #3 changes the electrical nature of the outputs!
Table 6: Functions of Battery Box Switches
Switch
What it controls
3
connects/disconnects positive terminal of 12V battery #1 to the negative
terminals of the other two batteries in the box
1
livens/deadens the output to the pre-amp
2
livens/deadens the banana plugs for 12V charging imputs
4
livens/deadens the banana plugs for 4V charging inputs
59
One other note: the switches we used for the battery box are 3-position switches. However, only the very top
and very bottom positions have meaning (we were just trying to use up old switches in the lab). Therefore,
when you throw a switch, push it all the way up (two clicks) or all the way down (two clicks). The middle
position isn’t connected to anything.
Using and Charging the Battery Box
Because we are down to only one battery box, it will need to be charged everyday while observing. Therefore,
you will need to get in the habit of putting the battery box on the chargers every time you will be leaving
AST/RO for a while and whenever you are cycling the ADR.
Normal Use (switch 1 & 3 up, switch 2 & 4 down)
Normal use is when the battery box is being used to power the pre-amp, and is not being charged (and not connected to any chargers).
1. Put switch #3 (all the way) up. This connects the positive terminal of 12V battery #1 to the negative
terminals of the other two batteries, and thus provides the necessary -12V to the pre-amp.
2. Put switches #2 and #4 (all the way) down. This is just deadens the female banana sockets used for
charging inputs: a safety measure.
3. With switch #1 in the down position, connect the cable to the pre-amp.
4. Put switch #1 (all the way) up. This livens the output to the pre-amp.
Normal Charging (switch 1 & 3 down, switch 2 & 4 up)
Normal charging refers to the situation where the battery
box is not in use (disconnected from the preamp), and is
being charged with the two independent blue 12V battery
chargers. In this situation, it is imperative to have
switch #3 down. This disconnects the two 12V
batteries completely, and allows them to be charged
separately as normal 12V batteries would.
1. On the battery box, put switch #1 (all the way) down. This will deaden the output to the preamp. Put
switch #3 (all the way) down. This disconnects the two 12V batteries completely, so that they can be
charged independently. If the battery box was in use, switches #2 and #4 should already be down. So at
this point, you should have all four switches on the front of the battery box (all the way) down.
2. Disconnect the cable from the pre-amp, and carry the battery box downstairs to the AST/RO annex, where
the two blue 12V battery chargers are (pictured above right). There should also be a DC power supply there
as well, which we used for charging the 4V battery. Caution: all of the chargers should be unplugged
(the two blue chargers don’t have power buttons, so as soon as they are plugged in they are live!).
3. Now set the chargers to the appropriate charge settings.
a) On the blue 12V chargers:
• The SELECT SETTING switch should be set to “2A-12V AUTO”
• The SELECT FUNCTION switch should be set to “CHARGE”
• The SELECT BATTERY switch should be set to “NORMAL/AUTOMOTIVE”
b) For now, turn the voltage and amperage on the small power supply all the way down to 0. You can adjust these to the appropriate values after everything is hooked up and you plug the power supply in.
4. Make sure all of the switches on the battery box are down and all of the chargers are unplugged. Each of the
two blue 12V battery chargers has two male banana plug leads, one red and one black. Connect these leads
60
5.
6.
7.
8.
9.
10.
11.
12.
13.
to the female banana sockets on the battery box labeled “Charge 12V Battery #1” (top center on the battery
box). Make sure you connect black-to-black and red-to-red. Do the same with the second battery charger
and the second set of female banana sockets on the battery box, located just below the top ones and labeled
“Charge 12V Battery #2.”
At the bottom center of the battery box you will see one more pair of red and black female banana sockets,
labeled “Charge 4V Battery.” Connect these to the positive and negative outputs of the small power supply
via red and black banana plug cables. Make sure you connect the positive output of the power supply to the
red female banana socket at the bottom of the battery box, and the negative output of the power supply to
the black female banana socket at the bottom of the battery box. Note: you only need to do this if the 4V
battery needs charged---it usually lasts much much longer than the 12V batteries.
Check to make sure all your connections make sense. If everything looks okay, plug in the two blue 12V
chargers and the small power supply.
Turn on the power of the small power supply, and set the output voltage and current to slightly above 4V
(say, 4.25V) and to 0.5A, respectively.
Now put switches #2 and #4 on the battery box to the up position (all the way up). This will liven all the
female banana sockets on the battery box and begin the charging process.
When the 12V batteries are fully charged the amperage on the blue chargers will drop down close to 0A,
and the “charge complete” indicator should light up (although I think the “charge complete” indicator is
burned out on one of the two chargers). When the 4V battery is fully charged the amperage on the power
supply will drop close to 0A.
When the batteries are fully charged, put switches #2 and #4 on the battery box to the down position (all the
way down). This will deaden the female banana sockets on the battery box.
Turn the power button of the small power supply off, and unplug the power supply and both blue chargers.
Disconnect all of the charging leads from the battery box (make sure the chargers are all unplugged first, or
these leads will be live).
The box is now ready for use. See Normal Use above.
Using and Charging at the Same Time (All four switches up & special charging configuration)
The reason the battery box is so complicated is to allow the possibility of charging and observing at the same
time. If both battery boxes were working, then we would probably never need to do this. However, with only
one battery box, it is highly likely that we will need to observe when the battery box is in need of charging.
1. Put switch #1 (all the way) down and disconnect the cable to the pre-amp from the battery box. Keep switch
#1 down and the cable to the pre-amp disconnected while you set up the chargers as a precaution against
damaging the pre-amp
2. Make sure switches #2 and #4 are (all the way) down.
3. Put switch #3 (all the way) up. This is very important, since we will now be charging with power supplies
at +12V and -12V.
4. Carry three power supplies up to the enclosure. (You will only need two power supplies if the 4V battery is
okay. The 4V battery usually doesn’t need charged nearly as often as the 12V batteries.)
5. Take two of the power supplies and connect the positive output of the first power supply to the negative
output of the second power supply via a banana plug cable (this is the “ground” cable shown in Figure 25
below).
6. Plug in the two power supplies and turn on the power. Set both power supplies to 12V. Use a voltmeter to
check the outputs of the two power supplies. You should observe that the negative terminal on the first
power supply is outputting -12V (relative to conductor running between the two power supplies) and that
the positive terminal of the second power supply is outputting +12V (relative to the conductor running between the two power supplies). See Figure 25 below.
7. You can now proceed to connect the power supplies to the battery box: connect the first power supply to the
female banana sockets at the top center of the battery box labeled “Charge 12V Battery #1.” Make sure you
connect red-to-red and black-to-black (or + to + and - to -). Next connect the second power supply to the
61
female banana sockets on the battery box labeled “Charge 12V Battery #2.” Again, connect red-to-red and
black-to-black (or + to + and - to -). Make sure that the negative (black) terminal of 12V battery #1 is
receiving -12V (relative to the conductor running between the two power supplies), the positive terminal of 12V battery #2 is receiving +12V (relative to the conductor running between the two power
supplies), and that the other two terminals are receiving common ground (relative to the conductor
running between the two power supplies). Refer to Figure 25 below.
0V relative to
the ground wire
Figure 25: Charging the Battery Box While its in Use (4V Charging Not Shown)
-12V relative to
the ground wire
Cable to Pre-amp
+12V relative to
the ground wire
0V relative to the
ground wire
“ground” wire
8. Turn the current output on both power supplies to 0A.
9. Put switch #2 up (all the way) on the battery box. This will liven the female banana plug sockets to which
the power supplies have been connected.
10. Slowly turn up the output current on the two power supplies used to charge the 12V batteries. This will begin the charging process. You may notice that the output voltage on the power supplies is a function of the
output current. For instance, when the power supply output current is set to the usual 2A used for peak
charging, the output voltage may read lower than 12V. You may want to check the output voltages of the
battery box at the military style connector which connects to the prep-amp, and see if it reads +12V, -12V,
and 4V, (on the top left, top center, and top right pins) relative to ground (which is the bottom center pin).
You may find that you need to turn up the amperage a bit higher to get closer to 12V. This seems to be okay
for a while, but when the batteries become partially charged you may want to turn down the amps.
11. If you also need to charge the 4V battery (which doesn’t need done as often), hook up a third power supply
and connect it to the battery box as described in steps 5 and 7 under Normal Charging on page 60 above.
Depending on how depleted the 4V battery is, you may need to turn up the current a little to keep the output
voltage just above 4V. Also, you will need to put switch #4 (all the way) up on the battery box.
12. Once everything is set up okay, connect the pre-amp cable to the battery box and flip switch #1 to the up
position (all the way). You should now have all four switches on the battery box up (all the way).
13. Now turn on the pre-amp (see The Pre-Amp on page 55) and take a scan to see if you get a signal (refer to
the SPIFI Data Acquistion manual).
62
PART 3: WARM UP PROCEDURE
Whenever SPIFI operations are complete, use the procedure outlined here to safely warm SPIFI up to room
temperature and shut everything down:
1. Backfill the ADR’s l-4He tank with 4He gas and open it to the atmosphere (use steps 1-6 in the ADR Helium subsection under Maintenance Filling on page 35 above). It is very important to do this, or else
you could get an overpressure in the ADR’s l-4He tank as the l-4He boils off.
2. Backfill SPIFI’s l-N2 tank with N2 gas and open the tank to the atmosphere (you may want to refer to
Figure 12 on page 34 above):
In the receiver room, open the N2 gas cylinder (make sure you don’t accidentally hook up the 4He
gas) and adjust the regulator so that about 2 psi are going to the roof through the clear Teflon tube.
Close the main brass vacuum valve on the SPIFI nitrogen neck (30).
Disconnect the pumpzilla vacuum hose from the brass valve on the SPIFI nitrogen neck (but only if
the brass valve is closed!).
Attach the Teflon tube with the N2 gas supply to the brass valve on the nitrogen neck where the
vacuum hose used to be attached via a yellow latex hose. You will need to rig some adaptor here.
Let SPIFI suck on the N2 gas as it warms up. This process can take a very very long time (several
hours). The reason it takes so long is that the N2 in the tank is solid. Therefore the N2 gas going in
immediately becomes liquid and the pressure drops very low (and everything stays cold).
At some point when all of the N2 is liquid, SPIFI will stop sucking and you will get a sudden
large boil-off and an overpressure can quickly develop, so be ready to remove the hose when
SPIFI stops sucking! (Don’t leave AST/RO). To check if SPIFI is still sucking, use one of the
following two methods:
(a) Pinch off the yellow latex hose and let N2 gas build up on one side of the pinch. Then pinch the
hose at a second position on the N2 gas side of your first pinch so that you have trapped N2 gas
between your two pinches. Then remove your first pinch and see if the hose collapses where
you had trapped the N2 gas. If it collapses, SPIFI is still sucking. If it doesn’t collapse, SPIFI is
done.
(b) Another alternative way to check if SPIFI is still sucking is to reclamp (or pinch) the yellow latex hose, remove the Teflon tube with the N2 gas supply, place your thumb over the end of the
yellow latex hose, and briefly open the clamp (or release your pinch) and see if you feel a suction on your thumb. If you do feel a suction, quickly close off the hose again and reattach the N2
gas. Don’t let the l-N2 tank suck on the atmosphere for very long while you are doing this
test or you could get an ice plug in the l-N2 neck!
Once SPIFI is done sucking you can remove the N2 gas supply and leave the l-N2 tank open to the
atmosphere. The l-N2 in the tank will boil off in time. You may want to remove the special stinger
assembly from the l-N2 neck and check that the l-N2 is still boiling off (hold your thumb over the
neck’s vent for a little while, release, and see if you see a plume). If there doesn’t seem to be any
boil-off coming from SPIFI’s l-N2 neck, drop a copper rod down the neck to make sure you don’t
have an ice plug.
It is very important to backfill the SPIFI l-N2 tank and open it to the atmosphere, or else you could get
an overpressure in SPIFI’s l-N2 tank as the l-N2 boils off.
3. Leave the main pump valve (55) on SPIFI closed. You can leave SPIFI under vacuum and let it slowly
rise in pressure on its own before summer 04-05. I.e., leave SPIFI hooked up to the turbo pump and
leave everything alone.
4. Turn off all the pumps if they aren’t off already:
The turbo pump (51) can be turned off by pushing the button on the front once.
The gas cell pump (41) can be turned off by unplugging it.
The two “pumpzillas”in the receiver room can be turned off by flipping off the switches on the
breaker boxes on the wall.
5. Properly shutdown Fabry (50):
63
Turn on the monitor inside the right side door of the enclosure
At the prompt, type the following sequence of commands (“>” means type at the prompt, “ ”
means hit the space bar once, and “ ” means strike the enter key):
•
•
> root
> whoami
This last command, “whoami”, will tell you what kind of user you are. If you are the “root”
user, continue. If you are not “root”, type > su
and enter the password > r = fin*ord
to
become the super user. Then continue:
•
•
> cd /
> shutdown
-h
now
Wait for Fabry to go through its shutdown procedure.
When the screen indicates that everything has been halted, go ahead and push the power buttons on
the Fabry PC and on the monitor.
6. Shutdown the PZT’s:
HOFPI
Turn the PZT voltages all the way down (fully counterclockwise) on the PI power supply (38).
Make sure channels 1, 2, and 3 are all at 0V.
Diconnect all three PZT cables (A, B, & C) from the PI power supply and cap them with the resistor caps which should be on top of the PI power supply.
Turn off the PI power supply.
LOFPI (If applicable: We did not need to use the LOFPI PZT’s over the Antarctic summer)
Turn the PZT voltages all the way down (fully counterclockwise) on the PI power supply (39).
Make sure channels 1, 2, and 3 are all at 0V.
Diconnect all three PZT cables (A, B, & C) from the PI power supply and cap them with the resistor caps which should be on top of the PI power supply.
Turn off the PI power supply.
7. Shut down all other electronic devices:
Calibration control box (46): in the following order (and from right to left), turn off the temperature control unit, turn off the driver, turn off the indexer, turn off the main power switch.
Turn off the resistance bridge box (47).
Cryo-motor box (48): in the following order, turn off both the HOFPI and LOFPI driver power,
turn off the indexers’ power, and turn off the main power.
SPIFI motor box (49): in the following order, turn off switch “5,” and then turn off the main
power.
Make sure the “laser” power is turned off (37).
Turn off the battery box (35) by pushing Switch #1 on the battery box down.
Turn off the preamp (11) by moving the two left-most switches to “off” and “bat” (both
switches up).
Make sure the magnet control box and magnet power supply are turned off (22) & (23).
Make sure the the charcoal heater (small green power supply) is turned off (25).
8. Check around the enclosure one last time to make sure everything is turned off.
9. Leave the heaters in the enclosure running and make sure all the doors and hatches in the enclosure are shut and latched!
DONE!
64
Appendix A
Table 7: Height vs. Volume for SPIFI Cryo-Tanks
4
Height (in)
0.25
0.50
0.75
1.00
1.25
1.50
1.75
2.00
2.25
2.50
2.75
3.00
3.25
3.50
3.75
4.00
4.25
4.50
4.75
5.00
5.25
5.50
5.75
6.00
6.25
6.50
6.75
7.00
7.25
7.50
7.75
8.00
8.25
8.50
8.75
9.00
9.25
9.50
9.75
10.00
10.25
10.50
10.75
11.00
SPIFI l- He Tank
Volume (L)
Height (cm)
1.9
0.5
3.8
1.0
5.7
1.5
7.5
2.0
9.4
2.5
11.3
3.0
13.1
3.5
14.9
4.0
16.8
4.5
18.6
5.0
20.4
5.5
22.2
6.0
24.0
6.5
25.8
7.0
27.5
7.5
29.3
8.0
31.0
8.5
32.7
9.0
34.4
9.5
36.0
10.0
37.7
10.5
39.3
11.0
40.9
11.5
42.5
12.0
44.0
12.5
45.5
13.0
47.0
13.5
48.5
14.0
49.9
14.5
51.3
15.0
52.7
15.5
54.0
16.0
55.3
16.5
56.5
17.0
57.7
17.5
58.9
18.0
60.0
18.5
61.0
19.0
62.0
19.5
62.9
20.0
63.8
20.5
64.6
21.0
65.3
21.5
65.8
22.0
22.5
23.0
23.5
24.0
24.5
25.0
25.5
26.0
26.5
27.0
27.5
28.0
Volume (L)
1.5
3.0
4.5
5.9
7.4
8.9
10.3
11.8
13.3
14.7
16.2
17.6
19.0
20.4
21.9
23.3
24.7
26.1
27.4
28.8
30.2
31.5
32.9
34.2
35.5
36.8
38.1
39.4
40.6
41.9
43.1
44.3
45.5
46.7
47.9
49.0
50.1
51.2
52.3
53.3
54.4
55.4
56.4
57.3
58.2
59.1
60.0
60.8
61.6
62.4
63.1
63.7
64.4
64.9
65.4
65.9
Height (in)
0.25
0.50
0.75
1.00
1.25
1.50
1.75
2.00
2.25
2.50
2.75
3.00
3.25
3.50
3.75
4.00
4.25
4.50
4.75
5.00
5.25
5.50
5.75
6.00
6.25
6.50
6.75
7.00
7.25
7.50
7.75
8.00
8.25
8.50
8.75
9.00
9.25
9.50
9.75
10.00
10.25
10.50
10.75
11.00
SPIFI l-N2 Tank
Volume (L) Height (cm)
0.7
0.5
1.5
1.0
2.2
1.5
2.9
2.0
3.6
2.5
4.4
3.0
5.1
3.5
5.8
4.0
6.5
4.5
7.2
5.0
7.9
5.5
8.6
6.0
9.3
6.5
10.0
7.0
10.7
7.5
11.4
8.0
12.0
8.5
12.7
9.0
13.3
9.5
14.0
10.0
14.6
10.5
15.3
11.0
15.9
11.5
16.5
12.0
17.1
12.5
17.7
13.0
18.3
13.5
18.8
14.0
19.4
14.5
19.9
15.0
20.5
15.5
21.0
16.0
21.5
16.5
22.0
17.0
22.4
17.5
22.9
18.0
23.3
18.5
23.7
19.0
24.1
19.5
24.4
20.0
24.8
20.5
25.1
21.0
25.3
21.5
25.6
22.0
22.5
23.0
23.5
24.0
24.5
25.0
25.5
26.0
26.5
27.0
27.5
28.0
Volume (L)
0.6
1.2
1.7
2.3
2.9
3.4
4.0
4.6
5.1
5.7
6.3
6.8
7.4
7.9
8.5
9.0
9.6
10.1
10.7
11.2
11.7
12.2
12.8
13.3
13.8
14.3
14.8
15.3
15.8
16.3
16.7
17.2
17.7
18.1
18.6
19.0
19.5
19.9
20.3
20.7
21.1
21.5
21.9
22.3
22.6
23.0
23.3
23.6
23.9
24.2
24.5
24.8
25.0
25.2
25.4
25.6
65