1
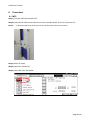
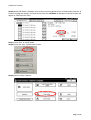
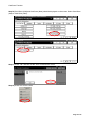
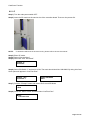
Card Save Function 07/26/2010 Technical Information: Card Save Function Procedure for Storing Print Data onto an SD Card White Paper Document Version 1.0 Copyright 2010 RICOH Americas Corporation. All rights reserved. Visit our Knowledgebase at: http://tsrc.ricoh-usa.com/ref/faq.asp Page 1 of 12 Card Save Function Notice: THIS DOCUMENT MAY NOT BE REPRODUCED OR DISTRIBUTED IN WHOLE OR IN PART, FOR ANY PURPOSE OR IN ANY FASHION WITHOUT THE PRIOR WRITTEN CONSENT OF RICOH COMPANY LIMITED. RICOH COMPANY LIMITED RETAINS THE SOLE DISCRETION TO GRANT OR DENY CONSENT TO ANY PERSON OR PARTY. Copyright © 2009 by Ricoh Company Ltd. All product names, domain names or product illustrations, including desktop images, used in this document are trademarks, registered trademarks or the property of their respective companies. They are used throughout this book in an informational or editorial fashion only. Ricoh Company, Ltd. does not grant or intend to grant hereby any right to such trademarks or property to any third parties. The use of any trade name or web site is not intended to convey endorsement or any other affiliation with Ricoh products. The content of this document, and the appearance, features and specifications of Ricoh products are subject to change from time to time without notice. While care has been taken to ensure the accuracy of this information, Ricoh makes no representation or warranties about the accuracy, completeness or adequacy of the information contained herein, and shall not be liable for any errors or omissions in these materials. The only warranties for Ricoh products and services are as set forth in the express warranty statements accompanying them. Nothing herein shall be construed as constituting an additional warranty. Ricoh does not provide legal, accounting or auditing advice, or represent or warrant that our products or services will ensure that you are in compliance with any law. Customer is responsible for making the final selection of solution and technical architectures, and for ensuring its own compliance with various laws such as the Gramm-Leach-Bliley Act, the Sarbanes-Oxley Act and the Health Insurance Portability and Accountability Act (HIPAA). Version history: Version 1.0 Issue Date Nov. 15,2007 Revised item Initial release NOTE: Throughout this document you may see references such as 04A (2004 Autumn) or 05S (2005 Spring). You will only see an A (Autumn) or S (Spring) attached to the last two digits of a year. These two seasons reflect the time period the machines were manufactured. Page 2 of 12 Card Save Function INDEX 1. Introduction.....................................................................................................................4 2. Target Readers...............................................................................................................4 3. Target Models.................................................................................................................4 4. Requirements .................................................................................................................4 5. Card Save Overview ......................................................................................................5 5-1 Card Save ..................................................................................................................5 5-2 Limitation....................................................................................................................5 6. Procedure.......................................................................................................................6 6-1 MFP............................................................................................................................6 6-2 LP.............................................................................................................................10 7. Error Messages of MFP and LP ...................................................................................12 Page 3 of 12 Card Save Function 1. Introduction A print capture can be made in many ways. This document will describe the Card Save function. Using Card Save, a print capture can be written directly from the printer to an SD Card. 2. Target Readers This document is intended for the support staff of Ricoh family group companies and their subsidiaries. 3. Target Models This document applies to Fall of 2005 or later models. 4. Requirements A standard SD Card is required. Page 4 of 12 Card Save Function 5. Card Save Overview 5-1 Card Save The Card Save function is used to save print jobs received by the printer on an SD card with no print output. Card Save mode is toggled using printer Bit Switch #1-4. Card Save will remain enabled until the SD card becomes full, or until all file names have been used. Captures are stored on the SD card in the folder /prt/cardsave. File names are assigned sequentially from PRT00000.prn to PRT99999.prn. An additional file PRT.CTL will be created. This file contains a list of all files created on the card by the card save function. Previously stored files on the SD card can be overwritten or left intact. Card Save SD has “Add” and “New” menus. Card Save (Add): Append files to the SD Card. Do not overwrite existing files. If the card becomes full or if all file names are used, an error will be displayed on the operation panel. Subsequent jobs will not be stored. Card Save (New): Overwrite files in the card's /prt/cardsave directory. 5-2 Limitation Card Save cannot be used with PJL Status Readback commands. A PJL Status Readback will not work. In addition they will cause the Card Save to fail. Page 5 of 12 Card Save Function 6. Procedure 6-1 MFP Step 1) Turn the main power switch OFF. Step 2) Insert the SD card into the service slot of the controller board. Then turn the power ON. NOTE: To determine which slot is the service slot, please refer to the service manual. Step 3) Enter SP mode. Step 4) Select the “Printer Sp”. Step 5) Select SP-1001 "Bit Switch”. Page 6 of 12 Card Save Function Step 6) Select “Bit Switch 1 Settings” and use the numeric keypad to turn bit 4 ON and then press the “#” button to register the change. The result should look like: 00010000. By doing this Card Save option will appear in “List/Test Print” menu. Step 7) Press “Exit” to exit SP Mode. Step 8) Press the “User Tools/Counter” button. Step 9) Select “Printer Features”. Page 7 of 12 Card Save Function Step 10) Card Save (Add) and Card Save (New) should be displayed on the screen. Select Card Save (Add) or Card Save (New). Step 11) Press “OK” and then exit the “User Tools/Counter” menu. Step 12) Press the “Printer” button. Page 8 of 12 Card Save Function Step 13) Card Save should be displayed in the top left of the display panel. Step 14) Send a job to the printer. The Communicating light should start blinking as shown below. Step 15) As soon as the printer receives the data, it will be stored on the SD card automatically with no print output. Nothing is displayed on the screen indicating that a Card Save operation was successful. Step 16) Press “Offline” and then the “Clear/Stop” button to exit Card Save mode Step 17) Change the Bit Switch Settings back to the default 00000000. Press the “#” button in the numeric keypad to register the changes. Step 18) Remove the SD card after main power switch is turned OFF. Page 9 of 12 Card Save Function 6-2 LP Step 1) Turn the main power switch OFF. Step 2) Insert the SD card into the service slot of the controller board. Then turn the power ON. NOTE: To determine which slot is the service slot, please refer to the service manual. Step 3) Enter SP mode. Step 4) Select “Service Menu”. Step 5) Select SP-1001 "Bit Switch”. SP1001 >> Bit Switch Step 6) Select “Bit Switch 1” and turn bit 4 ON. The result should look like: 00010000. By doing this Card Save option will appear in “List/Test Print”. SP1001 - 001 Bit Switch 1 Sw#1 00010000 Bit4 Step 7) Push the “Escape” button and select “End” to exit SP Mode. SYSTEM ver 1.06 3.End Step 8) Press the “Menu” button and then select “List/Test Print”. Menu: List/Test Print - Page 10 of 12 Card Save Function Step 9) Card Save (Add) and Card Save (New) should be displayed on the screen. Select Card Save (New) or Card Save (Add). List/Test Print: Card Save (New) - List/Test Print: Card Save (Add) - Step 10) To enable the newly configured settings, press the “#” button and then press the “Escape” button to exit the “List/Test Print” menu. Card Save Mode Press # to set Card Save Mode Step 11) Send a job to the printer. Step 12) As soon as the printer receives the data, it will be stored on the SD card automatically with no print output. Nothing is displayed on the screen indicating that a Card Save operation was successful. Step 13) Press the “Online” button and then the “Escape” button to exit Card Save mode. Step 14) Change the Bit Switch Settings back to the default 00000000. Step 15) Remove the SD card after main power switch is turned OFF. Page 11 of 12 Card Save Function 7. Error Messages of MFP and LP Card Save error messages: Init error: A card save process (i.e. card detection, change to kernel mode) failed to initialize. Card not found: Card cannot be detected in the slot. No memory: Insufficient working memory to process the job. Write error: Failed to write to the card. Other error: An unknown error occurred. If an error occurs, pressing “OK” will cause the device to discard the job and return to the ready state. Page 12 of 12