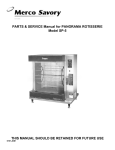
1
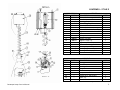
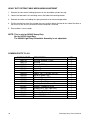
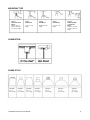
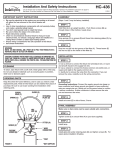
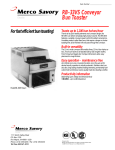
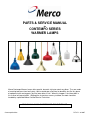
PARTS & SERVICE MANUAL
for
CONTEMPO SERIES
WARMER LAMPS
Merco Contempo Warmer Lamps offer graceful, dramatic styling to match any décor. They are made
of exacting tolerance from heavy duty, solid, mandrelspun aluminum for durability, but like any piece
of equipment with moving parts, physical wear takes its toll. When this happens, the information in
this manual will prove helpful. Although the instructions are easy to follow, the work should be
handled by a qualified Merco Certified Service Technician.
THIS MANUAL SHOULD BE RETAINED FOR FUTURE USE
ContempoServMan
Contempo
1
REV:
B – 8/10/07
Lamps Service Manual
CONTEMPO – STYLE A
COMMON TO ALL
ITEM
PART #
1
000688
2
060434
3
000178
4
000717
5
000430
6
000828
7
000671
8
000449
9
000597
10
000429
11
000469
12
000417
STYLE A
DESCRIPTION
Sticker, M. Contempo, UL/NSF
Bar, Combination, Bracket
Bushing, Snap, HEYCO
Switch, Toggle
Nut, 6-32, HEX, Z
Washer, Lock
Socket, Porcelain
Nut, 1/8 IPS x 9/16, Panel, Z
Screw, 8-32 x ½”, PHP
Nipple, 1/8 x ½ W Hex Nut, BRS
Wirenut
Nipple, 3 ½”, Brass
QTY
1
1
1
1
2
1
1
2
2
1
1
1
ITEM
13
14
15
16
17
18
VARIABLE
DESCRIPTION
Canopy
Stem
Ring, Check
Shade
Lamp, 120V, 250W
Swivel
QTY
1
1
1
1
1
1
PART #
-------------
For all parts not listed, call factory
2
Contempo Lamps Service Manual
CONTEMPO – STYLE C
Contempo Lamps Service Manual
COMMON TO ALL
ITEM
PART #
1
000688
2
060434
3
000178
4
000717
5
000430
6
000828
7
000175
8
000592
9
000174
10
000345
11
001550
12
000664
13
000469
14
000429
15
000597
16
000753
17
000419
STYLE C
DESCRIPTION
Sticker, M. Contempo, UL/NSF
Bar, Combination, Bracket
Bushing, Snap, Heyco
Switch, Toggle
Nut, 6-32, Hex, Z
Washer, Lock
Bushing, Bake Lite, ¼” IPS/FEM
Screw, 8-32 x ¼”, PHP
Bushing, Snap, Shorty
Hickey
Clamp, 2 Ear, Zinc
Socket, Porcelain
Wirenut
Nipple, 1/8 x ½ W Hex Nut, BRS
Screw, 8-32 x ½”, PHP
Terminal, Ring
Nipple, ¼ IPS x ¾, Steel
ITEM
18
19
20
21
22
23
VARIABLE
DESCRIPTION
QTY
Canopy
1
Cord, 18-3, SJO/SJTO, 90C
1
Housing, Switch
1
Ring, Check
1
Shade
1
Lamp, 120V, 250W
1
For all parts not listed, call factory
PART #
-------------
QTY
1
1
1
1
2
1
1
2
1
1
1
1
1
1
2
1
1
3
CONTEMPO – STYLE F
4
COMMON TO ALL
ITEM
PART #
1
000688
2
060434
3
000178
4
000717
5
000430
6
000828
7
000449
8
000597
9
000469
10
000671
STYLE F
DESCRIPTION
Sticker, M. Contempo, UL/NSF
Bar, Combination, Bracket
Bushing, Snap, Heyco
Switch, Toggle
Nut, 6-32, Hex, Z
Washer, Lock
Nut, 1/8 IPS x 9/16, Panel, Z
Screw, 8-32 x 1 ½”, PHP
Wirenut
Socket, Porcelain
ITEM
11
12
14
15
16
18
VARIABLE
DESCRIPTION
QTY
Canopy
1
Stem
1
Ring, Check
1
Shade
1
Lamp, 120V, 250W
1
Rod All Thread
1
For all parts not listed, call factory
PART #
----------000564
QTY
1
1
1
1
2
1
3
2
1
1
Contempo Lamps Service Manual
CONTEMPO – STYLE R
COMMON TO ALL
ITEM
PART #
1
000688
2
060434
3
000178
4
000717
5
000430
6
000828
7
000449
8
000429
9
000469
10
000346
11
000664
12
000416
13
000418
14
060486
15
000181
16
000179
17
000176
18
000592
ITEM
19
20
21
22
23
24
25
26
27
Contempo Lamps Service Manual
PART #
-------------------
STYLE R
DESCRIPTION
Sticker, M. Contempo, UL/NSF
Bar, Combination, Bracket
Bushing, Snap, Heyco
Switch, Toggle
Nut, 6-32, Hex, Z
Washer, Lock
Nut, 1/8 IPS x 9/16, Panel, Z
Nipple, 1/8 x ½ W Hex Nut, BRS
Wirenut
Hickey
Socket, Porcelain
Nipple, 1/8 IPS x 2”
Nipple, 1/8 IPS x 5”
Threaded Rod Assy, 5 ¾”
Bushing, Hey, 90 Degree
Bushing, Heyco
Bushing, Bakelite, 1/8 IPS
Screw, 8-32 x ¼”, PHP
QTY
1
1
1
1
2
1
2
1
1
1
1
1
1
2
1
1
2
2
VARIABLE
DESCRIPTION
QTY
Canopy
1
Cord, Retract
1
Housing, Switch
1
Ring, Check
1
Shade
1
Lamp, 120V, 250W
1
Bracket Assy, Retractable
1
Stem, 4.5”
1
Stem, 1.5”
1
For all parts not listed, call factory
5
CONTEMPO – STYLE S
COMMON TO ALL
ITEM
PART #
1
000688
2
060434
3
000178
4
000717
5
000430
6
000828
7
000449
8
000429
9
000597
10
000469
11
000346
12
000664
ITEM
13
14
15
16
17
18
19
20
21
6
PART #
------------000564
-----
STYLE S
DESCRIPTION
Sticker, M. Contempo, UL/NSF
Bar, Combination, Bracket
Bushing, Snap, Heyco
Switch, Toggle
Nut, 6-32, Hex, Z
Washer, Lock
Nut, 1/8 IPS x 9/16, Panel, Z
Nipple, 1/8 x ½ W Hex Nut, BRS
Screw, 8-32 x 1 ½”, PHP
Wirenut
Hickey
Socket, Porcelain
QTY
1
1
1
1
2
1
3
1
2
3
1
1
VARIABLE
DESCRIPTION
QTY
Canopy
1
Stem, 4.5”
1
Housing, Switch
1
Ring, Check
1
Shade
1
Lamp, 120V, 250W
1
Rod All Thread
--Wire, 18 GA, Black
--Wire, 18 GA, White
--For all parts not listed, call factory
Contempo Lamps Service Manual
CONTEMPO INSTALLATION INSTRUCTIONS
Secure the top portion of the
lamp to the ceiling with the two
8-32 threaded rods provided – as
shown in diagram.
NOTE: A 4” round electrical box
attached to a beam is preferred
to hold the weight and the
adjusting of the lamp up and
down.
ELECTRICAL ATTACHMENTS
BLACK TO BLACK
WHITE TO WHITE
GREEN TO GROUND
Contempo Lamps Service Manual
7
MERCO SAVORY TRACK LIGHTING INSTRUCTIONS
These instructions are for the proper installation of all Halo Track Lighting fixtures. There are several
different configurations of the Merco Savory track lighting fixtures. All mount to the Halo track in the
same manner as described below.
This fixture is for use with Halo Lighting’s L-Series track system only.
The track plug attaches electrically and mechanically anywhere along the Halo Power-Trac. A twoposition conductor allows use in single circuit track and either circuit of two-circuit track. There are
three terminals on the end of each adapter. To insure proper grounding, locate the side of the
adapter with two terminals and locate side of the track that has two recessed power conductors.
Insert adapter into the track and rotate the proper direction to have the two terminals match up. The
adapter should be inserted into the track and rotated 90° until the locking tab snap into place. To
remove the fixture, press in the locking tab while rotating the adapter 90°.
NOTE: If unit does not operate upon installation, push in tab and rotate fixture 180° to insure adapter
has the proper connection.
!
8
CAUTION:
To reduce the risk of burning during re-lamping, remove the entire unit from the track.
Contempo Lamps Service Manual
MINIATURE “TRAC-HEAT” INSTRUCTION SHEET
!
CAUTION:
The maximum electrical capacity for POWER-TRAC is 20 Amps per circuit for
permanent installation to an outlet box or 10 Amps if the L950 Cord and Plug
Connector is used to connect the Trac to a wall outlet.
!
CAUTION:
Turn off switch at main power source (fuse box) before installing any Trac-heat or
fittings.
INSTALLATION OF SINGLE TRAC TO AN OUTLET BOX
1. Punch out proper knock-out holes in ceiling plate for mounting to outlet box and to live end fitting. (Note that
special, smooth plastic finish piece on metal ceiling plate requires caution in determining location of proper
knock-outs before making holes.) Remove flat head screw(s) from back of live end fitting and use to fasten
plate to fitting.
2. Remove cover from live end fitting. Place Trac with ceiling plate attached over outlet box and mark on ceiling
or wall the position of the Trac mounting holes.
3. Drill mounting holes large for toggles and install Trac with furnished toggle bolts. If Trac is to be mounted on a
solid surface, use screws (not supplied) instead of toggle bolts.
4. Fasten ceiling plate to outlet box with two screws. Pull wires from box through open hole in live end as shown.
5. Cut and strip wires from box and fasten to screw terminals in live end fitting (see detail). Push excess wires
back into outlet box. If ground wire is available, fasten it to the green ground screw.
6. Replace cover on live end and tighten screw.
Contempo Lamps Service Manual
9
HEAVY DUTY RETRACTABLE MECHANISM ADJUSTMENT
1. Remove the two screws holding top cover on the retractable cylinder housing.
2. Loosen the two lower hex head-long screws that hold the mounting bracket.
3. Remove the center nut holding the spring mechanism to the mounting bracket.
4. Pull the mechanism out of the cylinder and vary carefully loosen the bolt on the side of the drum a
half turn at a time until the maximum distance required is reached.
5. Reassemble in reverse order.
NOTE: This is only for 060445 Heavy Duty.
Not for 060443 Light Duty.
The 060443 Light Duty Retractable Assembly is not adjustable.
COMMON PARTS TO ALL
PART NUMBER
000176
000179
000181
000346
000416
000418
000429
000435
000469
000592
001673
001813
001881
060443
060479
060486
060506
060516
10
DESCRIPTION
Bushing, Bakelite, 1/8 lps
Bushing
Bushing, 90 Degree
Hickey
Nipple, 2”
Nipple, 5”
Nipple, 1/8 x ½ W/Hex Nut, Brs
Nut 8-32 Acorn, NIK
Wirenut, Plastic, 105C
Screw, 8-32 x ¼
Canopy, Ret. Wht
Housing, Switch, 2-hole, Wht
Adapter, Showbase White
Bracket Assy, Ret, Light Duty
Cord, Retract White
Threaded Rod Assy, 5 ¾”
Stem, 1.5” White
Stem, 4.5” White
QTY
2
1
1
1
1
1
1
2
2
1
1
1
1
1
1
2
1
1
Contempo Lamps Service Manual
MOUNTING TYPE
Type R
Retractable Cord
Mount
Adjusts up and
down to vary heat
30” – 68.5” length
Type S
Stem Mount
Type C
Cord Mount
Type F
Fixed Mount
Up to 71” stem
length
Available in any
length
Up to 71” stem
length
Type A
Adjustable Wall
or Overhead
Mount
Adjusts to desired
position. Max 17”
length
CONNECTION
SHADE STYLE
Style 400 –
6” x 7.5”
Dia. X Height
Style 500 –
6” x 7.5”
Dia. X Height
Style 600 –
6.2” x 8”
Dia. X Height
Contempo Lamps Service Manual
Style 700 –
6.4” x 7.3”
Dia. X Height
Style 725 –
9.5” x 8”
Dia. X Height
Style 750 –
11” x 7.3”
Dia. X Height
Style 775 –
10.3” x 7.6”
Dia. X Height
11
Merco Savory, LLC
1111 North Hadley Road
Fort Wayne, IN 46804
United States of America
Telephone: (260) 459-8200
U.S. Facsimile: (888) 790-8193
Int’l Facsimile: (260) 436-0735
Technical Support Hotline: (800) 678-9511
www.mercosavory.com
12
Contempo Lamps Service Manual