1
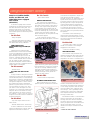
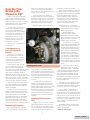
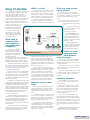
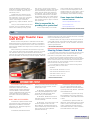
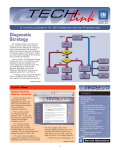
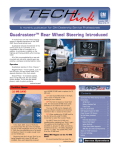
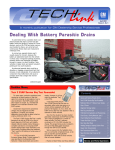
April 2001
Volume 3, No. 4
How to Find a Vehicle’s
RPO Codes
When you’re looking at a vehicle’s Service Parts ID label, you’ll
find a code list of all the Regular
Production Options (RPO) installed
on that vehicle.
If you need a clue in interpreting the RPO codes, help is as close
as SI 2000. Here’s how.
On the Basic Version:
- Open SI 2000
- Click on Service Manual
- “Build” the vehicle
- Click on Service Manual
- Type RPO in the keyword box
and click on Search
- Click on RPO Code List
On the Enhanced Version:
- Open SI 2000
- “Build” the vehicle
- Click on Service Manual
- Type RPO in the keyword box
and click on Search
- Click on RPO Code List
New J-45080 32MB Card for Tech 2
When the Tech 2 was introduced in
1996, it was equipped with a 10MB
(megabyte) card, which had 10 times
the capacity of the original Tech 1’s
mass storage cartridge. The 10MB card
was installed in Slot 1, closest to the
screen, with Slot 2 reserved for future
use.
Vehicle on-board computer capabilities multiply with each new model year,
and the Tech 2 has had to keep pace.
Now, the capacity of the 10MB card is
reaching its limits, and it’s time to
expand again.
Why is a larger memory
card needed?
This brings up a table providing
a description of all the RPOs available on the vehicle.
– Thanks to Mark Stesney
The memory card contains diagnostic
and reprogramming applications, and
space for vehicle calibrations. As the
functions of the Tech 2 expand, more
space is needed for new diagnostic
applications. For convenience, coverage
of the 1991 to 2002 vehicles is being
retained, and capacity is being added to
accommodate upcoming model years.
For one example, calibration files are
continued on page 2
1
Contents
New J-45080 32MB Card for Tech 2 . . . . . . . . .1
How to Find a Vehicle’s RPO Code . . . . . . . . . . .1
Evap Code P0442 Caused by Fuel Sender Seal . . .2
Garage Shift Concern Summary . . . . . . . . . . . . .3
How Do Your Brake Jobs Measure Up? . . . . . . . .4
2001 Vehicle Data Recorder Software Update . . .5
Door Trim Pad Damage . . . . . . . . . . . . . . . . . . .5
Intermittent Communication Conditions . . . . . . . .5
Virus Protection . . . . . . . . . . . . . . . . . . . . . . . .6
TAC Tips . . . . . . . . . . . . . . . . . . . . . . . . . . . . .7
Bulletins . . . . . . . . . . . . . . . . . . . . . . . . . . . . .8
Service Operations
GM TechLink is a monthly magazine
for all GM retail technicians and
service consultants providing timely
information to help increase knowledge about GM products and
improve the performance of the
service department. This magazine
is a companion to the GM Edge
publication.
Publisher & Editor:
Mark Stesney
GM Service Operations
[email protected]
Technical Editor:
Jim Horner
[email protected]
1-248-816-3641
Production Manager:
Marie Meredith
Desktop Publishing:
Greg Szpaichler, MediaWurks
[email protected]
FAX number:
1-248-649-5465
Write to:
TechLink
PO Box 500
Troy, MI 48007-0500
GM TechLink on the Web:
http://service.gm.com
When will the larger
memory card be available?
Beginning in April 2001, all new Tech
2 orders will be shipped with the new
32MB card installed.
10MB card is presently located. The
10MB card should be moved to Slot 2. It
can be utilized for other applications that
are 10MB or less, or older versions of
software (for instance, Saab or Isuzu).
With the new card installed, follow the
normal update procedure using TIS 2000.
Also in April 2001, each dealer will
receive one 32MB card J-45080 to meet
essential tool requirements. The price is
$415.80 plus shipping.
Preliminary software required to recognize the 32MB card has already been
broadcast to GM ACCESS dealers on
February 24 and 25, Blockpoint version
01.1. Users of stand-alone PCs running
TIS 2000 will have two ways to update:
What about additional
memory cards?
- use CD version 01.1, to be shipped
the first week of April, or
Replacement cards for additional
units can be ordered through Kent-Moore
(1.800.GMTOOLS).
- go to website http://service.gm.com
and select Incremental Update for
Standalone Installation.
The Tech 2 requires a 32MB card
called a linear flash card. The low-priced
32MB cards, available on internet sites,
are called strata flash cards, and they will
not work in the Tech 2.
How can I access either
the 32MB card and the
10MB card?
Which software should be
loaded on the new 32MB
card?
The Tech 2 will read whichever card
is selected. At the Tech 2 logo screen,
press the SHIFT key. Use the left and
right arrow keys to select Slot 1 or Slot
2.
The 32MB card will come with startup software only. It should be placed in
Slot 1 (closest to the screen), where the
We’ll bring you news of additional
features as they become available.
– Mark Stesney
2000-2001 Chevrolet Cavalier,
Pontiac Grand Am and Sunfire, and
Oldsmobile Alero
tured in two configurations, called the H
cross-section and the K cross-section.
General Motors service tips ar e
intended for use by professional technicians, not a "do-it-yourselfer." They
are written to inform those technicians of conditions that may occur on
some vehicles, or to provide information that could assist in the proper
service of a vehicle. Properly trained
technicians have the equipment, tools,
safety instructions and know-how to
do a job properly and safely. If a condition is described, do not assume
that the bulletin applies to your vehicle or that your vehicle will have that
condition. See a General Motors dealer servicing your brand of General
Motors vehicle for information on
whether your vehicle may benefit from
the information.
Inclusion in this publication is not necessarily an endorsement of the individual or the company.
Copyright© 2001 General Motors Corporation
All rights reserved.
continually growing in size and will soon
be 1MB.
On some of these vehicles the customer will experience an illuminated SES lamp.
Diagnosis will
reveal a stored
P0442 Evap
code. The cause
may be the seal
between the
fuel tank and the
fuel gauge
sender. If the
seal is deformed and squeezed out, it
can create a small air leak, causing the
vehicle’s self diagnostic to set the code.
Replacing the seal should correct the
condition. The seal has been manufac-
The H-seal was originally used in production, and the K-seal is the replacement. The
part number
for the Kseal is
22626099.
The illustration
shows the
old seal with
an H crosssection and
the new replacement seal with a K
cross-section.
Follow the procedure in SI 2000 when
replacing the seal.
– Thanks to Darryl Butler
2
Return to page 1
2000-2001 Cadillac DeVille,
Seville, and Eldorado, and
Oldsmobile Aurora equipped
with 4T80-E
(RPO MH1)
A number of garage shift concerns
emerged for the 4T80-E transmission in
the 2000 and 2001 model years. The
purpose of this article is to provide a
summary of these concerns and clarify
which model years are affected by which
conditions.
Do this first.
- Verify complaint
Do this fourth.
- Spacer Plate Gasket
2000 and 2001 Vehicles:
The customer may experience a
harsh garage shift from park to reverse
first thing in the morning or first shift of
the day. This may be more prevalent in
cooler weather. The condition will not
repeat itself throughout the day but may
return the following day. If the customer
concern does not exactly match the
above description, this step will not help
and should be skipped.
If the customer concern exactly
matches the above description, a revised
- Note the state where the vehicle
was originally delivered. It affects how
the vehicle was factory calibrated.
Do this second.
- Address DTCs
All 2000 and 2001 Model
Years:
A large number of Diagnostic Trouble
Codes (DTCs) may cause the Powertrain
Control Module (PCM) to command high
line pressure, resulting in possible harsh
garage shifts. Look at Since Cleared and
This Ignition diagnostic screens. Before
any transmission repair is attempted,
perform a system review. You must correct any engine DTC that is set; don’t
just clear it. Once all engine DTCs are
corrected, you can perform transmission
diagnosis. Be sure to follow DTC diagnostic procedures as shown in the service manual. If a DTC is not set, record a
snapshot of the harsh shift for additional
technical assistance.
Do this sixth.
- Check Accumulator Housing
2001 Vehicles ONLY
The customer may comment on a
delayed engagement into reverse at any
time. The condition is not temperature
dependent. The cause is a reverse accuRevised spacer plate gasket with
white stripe
upper valve body spacer plate gasket has
been developed to correct this condition.
The part is currently available through
Technical Assistance until inventory is
available at SPO. A white colored stripe,
running the length of the gasket can
identify this new gasket.
Do this fifth.
- Check Electrical Components
All 2000 and 2001 Model Years:
After correcting any DTC and the
problem persists, examine the transmis-
Do this third.
- Skip This Step if Vehicle is not a
2001 Aurora
- Re-flash PROM 2001, Aurora Only:
A service calibration is under development to address this concern, with an
expected in-field date of March 17.
If the lower control valve body is
removed from the transmission, a new
manual shift shaft retainer (part ID 915 in
the service manual) must be installed
during assembly.
- Skip this step if vehicle is a 2000
model or if condition is not "delayed
engagement into reverse."
2000 (California and
Massachusetts Only) and 2001 (All
states):
Vehicles built for California and
Massachusetts in 2000 and all vehicles
in 2001 are calibrated for ultra-low emissions. Engine speed at start-up is
approximately 1200 rpm for 30 to 40
seconds. A harsher garage shift will
occur in these vehicles than at a normal
idle. No repair for harsh garage shift
should be attempted on these vehicles
unless the concern is exhibited after the
engine attains a normal idle.
sion electrical components. Inspect the
wire harness assembly for being
pinched, nicked or cut. Inspect the input
speed sensor bolt torque (11-13 Nm or
8-9.5 lb-ft) and check the wire for possibly being pinched. Inspect the pressure
control solenoid and the transmission
fluid pressure switch assembly for proper connection and function. Pressure
control solenoids built before Julian date
295 0 (day 295 in the year 2000) should
be replaced.
Manual Shift Shaft Retainer no. 915
Bad chamfer on left, good chamfer
on right
mulator seal (number 947) that is cut. If
the reverse accumulator bore chamfer is
cut too deep, the piston seal can travel
onto the chamfer area, rolling the seal
and cutting it. This is generally found in
vehicles built in August and September
2000. Replace the entire accumulator
housing (number 944).
Be aware that there is a small chance
that you may receive an accumulator
housing from SPO with the chamfer cut
too deep. There is also the possibility
that if you replace the accumulator housing for some other reason, you may
introduce the subject condition into the
vehicle.
– Thanks to Chris Anderson
3
Return to page 1
How Do Your
Brake Jobs
Measure Up?
Bulletin 01-05-23-001, released
February 2001, establishes a new,
tighter lateral runout specification of
0.050 mm (0.002 in.) or less, for new or
refinished brake rotors. The previous
spec was 0.080 mm (0.003 in).
even more important to take steps to
prevent it from occurring again in the
future. This is where the new LRO specification comes into play.
Any time a rotor is serviced, you
should measure LRO after the repair. It’s
that simple. Mount the rotor to the hub
with lug nuts and washers, torqued to
specification, and measure the runout.
Eliminating runout prevents pulsation.
With the tighter specification in mind,
The fact that a runout specification exists suggests that you
must make a measurement to
find out if the rotor you’re dealing
with meets the specification. And
if it doesn’t, you’ll need to do
something to correct it. It may
surprise you that in most cases
excessive lateral runout is not
that difficult to correct.
Let’s begin with a definition
of lateral runout. It’s a measurement of the wobble or waviness
of the rotor face, measured with
a dial indicator placed at right
angles with the rotor face.
During braking, wear typically
Measuring lateral runout
occurs on both the pad and the
rotor. But if the rotor has excessive lateral runout (LRO), additional wear
today's hubless rotor design demands
also occurs on the "high spot" of the
careful attention to the hub-to-rotor interrotor during non-braking situations.
face. Cleaning, machining and proper lug
When the vehicle is being driven, the
nut torque are important elements to
high spot of the rotor rubs the brake pad
consider. Carefully examine the hub-toonce per revolution. In time, this wears
rotor interface every time this area is
down the high spot, causing a thin spot
serviced.
on the rotor (rotor thickness variation).
So how does your brake service
Wear occurs to a rotor with excess
measure up? Are there dial indicators
LRO when the brakes are not applied,
located at the brake lathe? Does your
and the pulsation is evident when the
toolbox include a dial indicator? A quality
brakes are applied.
flex-arm dial indicator with vise grip
attachment is a MUST for every techniPulsation is the result of brake rotor
cian. Using a dial indicator to inspect for
thickness variation causing the brake
lateral runout after the repair is now a
caliper piston to move in and out of the
critical step in the prevention of brake
brake caliper housing. The hydraulic
pulsation.
pumping/pulsing effect is transmitted
It’s certainly important to fix the
cause of a pulsation complaint, but it’s
Indexing The Rotor - Moving the
brake rotor on the hub one lug at
a time will often reduce LRO to
within specifications.
On-Car Lathe - On-car lathe
technology compensates for variables in hub-to-rotor mounting
and will automatically give you a
quality job within LRO specifications. Cleaning is still important
regardless of the machining
process. The Pro-Cut PFM 900
has automatic compensation for
set-up and has set the standard
for the industry. It is precise, it is
easy to operate, and it is a great
time saver for captured rotor situations.
Consequences of
Excessive Lateral
Runout
Preventing Pulsation
Bench Lathe Maintenance - Precision
machining depends on precision equipment. With today's tighter specifications,
bench lathe performance must be
checked regularly. Check adapters for
nicks and burrs, which may affect the
machining process. Also, measure the
runout of the bench lathe arbor to be
sure it is machining accurately.
Parts Replacement Determine what's at fault.
Measure the rotor on the lathe
before mounting it on the vehicle.
Measure runout of the hub.
Replace parts if necessary.
But first, why is lateral runout
so important?
through the brake system and may be
felt in the brake pedal or transmitted
through the vehicle structure, chassis
system components or steering column.
technology presents itself today.
Dealing with Excessive
LRO
What can you do if a rotor is found to
have excessive lateral runout? Its difficult to cover all situations within every
service department, but here are some
points to consider and the options as
Correction Plates - If your
shop doesn’t have an on-car
brake lathe, there is a new technology for correcting brake rotor lateral
runout called Brake Align®. Measure
runout and install a specially selected,
tapered correction plate between the
rotor and the hub. Bulletin 01-05-23-001
provides complete information on this
new service practice.
IMPORTANT: Never attempt to stack
two or more correction plates together
on one hub. And never attempt to reuse
a previously installed correction plate.
Torque Sockets - A perfect job of
final measurement is undone if an
impact wrench is used when remounting
the wheel without the appropriate torque
limiting socket. Uneven torque results in
warping of the rotor, inducing excess lateral runout. Use the appropriate J-39544
Torque Socket or equivalent with your
impact wrench.
For additional details on brake rotor
service guidelines, refer to GM Bulletin
number 00-05-22-002.
– Thanks to Russ Dobson
4
Return to page 1
Door Trim Pad Damage
On 2000 - 2001 Chevrolet Monte
Carlo models, the door trim pad may be
damaged by attempting to remove the
power window switch bezel by prying
between the door trim panel and the
bezel. The bezel does not snap into
place and cannot be removed without
removing the door trim panel from the
door. The power window switch plate,
with integral door pull handle bezel, is
retained by three fasteners. Once the
door trim is removed, two screws located on the metal mounting plate can be
removed to separate the two halves of
the pull handle bezel. An easily overlooked recessed third screw must be
removed from the bottom side of the
door pull to release the bezel.
– Thanks to Gary McAdam
Intermittent
Communication Conditions
When diagnosing intermittent communication problems on 2000 and 2001
S/T pickup and sport utility vehicles, follow service information diagnostic procedures and specifically check G110 at
the radiator core support before replacing the EBCM. DTC codes U1031,
U1041, C0243 through C0248, C0253,
C0255, C0268 and C0286 have often
been traced to a loose ground at the
radiator core support.
– Thanks to Dan Oden
5
Return to page 1
Virus Protection
A dealership’s in-house computer network had become infected with a virus.
They cleaned the server, but did not
clean all of the Techline “clients.” An
infected client reinfected the server,
which passed the virus on to all the other
clients. Before they got the situation
under control, and all the computers
cleaned, down-time was just over three
weeks. This resulted in a lot
of lost business, as vehicles
had to be taken to another
dealership for programming.
What is a virus?
In the medical world, a virus is a tiny
microorganism that invades your body
from outside. This is the virus infection.
Once inside, it attacks, causing a wide
range of effects, from discomfort, to illness, or even in severe cases to death.
Computer viruses are so named
because they behave much like the biological kind. They infect your program by
GM ACCESS is a private
intranet infrastructure that
allows two-way communicaTypical Dealership Intranet
tion between your dealership
and various locations within
the GM Corporation.
entering from the outside, and once
Communication takes place over the PULinside, viruses may cause simple misSAT satellite system. Your dealership is
chief, may interrupt your operating proequipped with a GM ACCESS server to
grams, may destroy data, or cause other
handle communication with the satellite.
disruptions. And frequently, the virus is
designed to self-destruct, so it leaves no
GM ACCESS provides a limited numtrace of itself behind.
ber of direct links to approved websites
from www.gmaccess.com. These include
Once a virus attack has occurred, it
the anti-virus software providers dis may take weeks or months to correct the
cussed later in this article.
situation, resulting in customer dissatis -
E-mail originating from GM won’t be
infected, but it’s possible for infected email to pass through GM ACCESS, for
instance from one dealer to another. An
infected e-mail from the originating
sender can travel within the GM ACCESS
infrastructure.
And finally, within your dealership,
there may be a network of computers communicating with each other
and the GM ACCESS server.
New viruses crop up at the rate of 1012 per day; here are some recent ones,
and a description of what they
do.
W32/Naked@MM (also
known as Naked Wife) -- Emails itself to everyone in
your address book, tries to
delete all system files in the
Windows folder
What kinds of
communication
links connect to
your dealership’s
computers?
In addition, your dealership may have
a connection to the totally public internet,
through an independent ISP (internet service provider). This is how e-mail messages can travel to and from your dealership. The public internet connection represents the weak link in your dealership’s
communication system, because it can not be monitored by GM, as GM
ACCESS is monitored.
At any given time, there may be
50,000 or more viruses in circulation, so
your chances of coming into contact with
one are much greater than you may
think.
Kriz.4050 -- Self replicating virus that tries to format
your hard drive on
Christmas every year
Could something like
that happen in your dealer ship? Can you take precau tions against it? Here’s the
latest information.
Because GM ACCESS is totally within
the control of GM, it is constantly monitored against any virus infections. Viruses
are unlikely to originate from GM due to
the various safeguards built into the corporate infrastructure.
What are some current
typical viruses?
faction, lost productivity and negative
financial impact. Each Techline “client”
must be cleaned or preferably reformatted. The clients can’t log into the server
until all computers are cleaned, as they
risk reinfection. After the clients are
cleaned, the server must be cleaned.
Where do viruses come
from?
Most viruses are carried into your
computer attached to e-mail messages,
downloaded from the internet, or on
infected discs brought in from the outside.
This means that an e-mail from a customer or from a supplier could be infected, without the sender even knowing
about it. By the time the virus is discovered, it’s already been passed on.
Or, one of your fellow employees
may have brought in a copy of a game or
other entertainment. Such files often
pass from machine to machine, and it’s
impossible to determine at which point
the file got corrupted.
VBS/SST@MM (also
known as AnnaKournikova) - E-mails itself to everyone
in your address book, may
also delete various files
What are some
good practices
that minimize
virus infections?
First, every computer in your dealership should have an anti-virus program
installed. And the program should be run
at regular intervals.
Second, never open an e-mail attachment without first scanning it with your
anti-virus software.
Third, never allow a disc from outside
be read into one of your computers without first scanning it with your anti-virus
software.
Anti-Virus Softwar e
The installation and use of antivirus software is your dealership’s
responsibility.
There are numerous anti-virus soft ware programs available in the marketplace. GM has tested all of the major
ones and recommends two that have
few if any incompatibilities with the
Techline terminal.
These are McAfee Viruscan 5.x or
later and Norton Antivirus 2000 or later.
GM Dealer World contains direct links to
both of these software sources. This provides you with a convenient way to contact their websites. You can research
their offerings and can place an order online.
Although software can be purchased
and downloaded from McAfee and
Symantec, it is not a recommended
6
Return to page 1
method of obtaining software. When
software is purchased in a retail store, it
comes on a CD-ROM, which can’t be
infected by a virus.
Suitable anti-virus software can be
purchased for $30-40 at such retail outlets as Best Buy, Circuit City, CompUSA,
Fry’s Electronics, Media Play, Micro
Center, Office Depot, Office Max,
Software City, Staples, WalMart, and others.
Once you have installed the anti-virus
software, you’re not finished. Because
hackers are constantly coming up with
new viruses, your anti-virus softwar e
must be periodically updated. This can be
done automatically. At the intervals you
select with the update tool provided in
the software, your computer will check
the software manufacturer’s data base
for the latest version; this update will be
installed automatically on your computer.
GM considers every 10 days as a reasonable update rate.
ship to install anti-virus software on all
PCs and to educate employees on the
negative impact of a virus attack. If GM is
required to assist in eradicating a virus,
the dealership will be billed accordingly.
Some Important Websites
Anti-virus Software:
www.computerassociates.com
Who is responsible for
providing virus protection?
It is the responsibility of the dealer-
www.mcafee.com
www.symantec.com
– Thanks to Mike Waszczenko and Steven Sturza
TAC Tips
install the steel ring in the correct location will cause a constant
mesh of the blocker ring to the sleeve.
Tracker High Transfer Case
Shift Effort
The brass inner cone may not fit into the drive sprocket on
some 1999 Trackers. Some early built 1999 Trackers may have
the 1998 design drive sprocket. For this condition, order drive
sprocket p/n 91175753.
Bulletin 00-04-21-002 pertains to 1999-2000 Tracker 4WD.
While performing the repair procedures outlined in the bulletin,
some technicians may have concerns of the correct location of
the three inch diameter steel ring which is included in part number 91176201.
– GM Technical Assistance
Parts included in p/n 91176201 are the blocker ring, brass
cone, steel cone and a three inch diameter steel ring. The three
inch diameter steel ring is placed between the blocker ring
teeth and the synchronizer hub. Because the inserts and springs
are to be discarded, the steel ring is used as a spacer. Failure to
Steering Column Doesn't Lock in Park
On some 2001 full-size light duty Chevrolet and GMC trucks,
the steering column doesn't lock and some models in stock
have "ears" on the ignition switch, while others don’t.
The column lock feature has been deleted on the models
listed below with automatic transmissions, and the new ignition
switch will not have the "ears." Models with manual transmission will continue to use the steering column lock and these
ignition switches will have the "ears".
Do not attempt to replace the non-column locking switch
with a locking switch, or vice-versa.
MODELS:
2001 Chevrolet Silverado C1 C2 C3
2001 Chevrolet Silverado K1 K2 K3
2001 GMC Sierra C1 C2 C3
2001 GMC Sierra K1 K2 K3
– GM Technial Assistance
01-07-30-004; 1995-2000 Summary of
4T40/45-E Transaxle Technical
Information; 1995-2000 Chevrolet
Cavalier, Pontiac Sunfire, 1997-2000
Chevrolet Malibu, 1999 Oldsmobile
Cutlass, 1999-2000 Pontiac Grand Am,
Oldsmobile Alero with 4T40/45-E
Automatic Transmission (RPO MN4,
MN5)
BODY AND ACCESSORIES:
01-08-42-001; replaces bulletin 63-8206A; Exterior Lamp Condensation and
Replacement Guidelines; 1993-2001
Passenger Cars, 1993-2002 Light and
Medium Duty Trucks
01-08-48-001; Windshield Reveal
Molding Squeak (Add Anti-Squeak Tape);
1999-2001 Chevrolet Camaro, Pontiac
Firebird with T-Tops
01-08-49-001; Speedometer Control
Unit Configuration/Replacement; 2000
Chevrolet and GMC WT5500 Series
Medium Duty Tilt Cab Models
01-08-58-001; Windnoise Around BPillar (Add Sealer); 1999-2001 Chevrolet
Corvette (Hardtop)
01-08-61-001; Clunk Noise From Front
of Vehicle (Replace Left Front Axle
Mount Bracket, Add Reinforcements to
Frame and Bracket); 1999 Chevrolet and
GMC K1500 Series Pickup Models
(Silverado and Sierra)
01-08-63-001; replaces bulletin 52-1501; Hood Hinge Rattle (Install Spring
Washer); 1995-2001 Chevrolet and GMC
S/T Pickup and Utility Models, 1996-2001
Oldsmobile Bravada
01-08-64-004; High Rear Door Swing
Effort (Replace Check Link); 1997-2001
Chevrolet Malibu, 1997-1999 Oldsmobile
Cutlass
01-08-64-015A; replaces bulletin 0008-64-015; Power Sliding Side Door Edge
Guard Comes Loose (Install New Edge
Guard); 1997-2000 Chevrolet Venture,
Oldsmobile Silhouette, Pontiac Montana,
1997-1999 Pontiac Trans Sport
7
Return to page 1
This review of service bulletins released
through mid-March lists the bulletin number, superseded bulletin number (if applicable), subject and models.
GENERAL INFORMATION:
99-00-89-015A; replaces bulletin 9900-89-015; Light Tactical Support Vehicle
LTSV (Formerly known as the
Commercial Utility Cargo Vehicle -- CUCV
II and III) Service; 1999-2002 Chevrolet KSeries Models with Military Upfit
Automatic Transmission
01-04-17-002; Driveline Vibration
(Inspect and Align Propeller Shaft); 19992001 Chevrolet Tracker
01-04-18-001; replaces bulletin 36-7405A; Driveline Noise (Normal) While
Operating in Four Wheel Drive; 19882001 Chevrolet and GMC K and T
Models
01-00-89-005; January, 2001 Bulletin
Summary; 2001 and Prior Passenger Cars
and Trucks
01-04-19-001; Special Service Policy
for S/T Utility Front Axle Service; 2002
Chevrolet and GMC S/T Utility Models
(Trailblazer, Envoy) and 2002 Oldsmobile
Bravada
01-00-90-001A; replaces 01-00-90001; Recommended Rear Axle Lubricant;
2000-2001 Rear Wheel Drive Passenger
Cars, Light Duty Trucks and Four Wheel
Drive Vehicles
01-04-20-002; Exchange Program for
2001 Model Year (Transfer Case/Rear
Differential); 2001 Aztek with 3.4L Engine
(VIN E -- RPO LA1) and Versatrak AllWheel Drive System
HVAC:
01-01-38-002; HVAC Pollen Air Filter;
2000-2001 Chevrolet Tracker 4-Door
Models Only
01-01-38-003; Poor Heat Distribution
in Driver’s Area of Vehicle (Install New
Heat Diverter Ducts); 1996-2001
Chevrolet and GMC M/L Van Models
Built Before Breakpoints
01-01-38-004; Heater Outlet Hose
Contacts or Rubs Generator (Reroute and
Tie Strap Hose/Replace Hose if
Necessary); 1999-2000 Chevrolet and
GMC C6-7 H-Series Conventional
Medium Duty Models with Gasoline
Engine (VINs B, D -- RPOS L21, LP4)
SUSPENSION:
01-03-09-001; Metallic Ringing/Rattle
Noise From Rear of Vehicle (Install New
Shock Absorber); 2001 Pontiac Aztek
without RPO G67 (Automatic Level
Control) Built Prior to Breakpoint
01-03-10-001; Proper Location of
Wheel Lock Wrench During Pre-Delivery
Inspection; 2001 Chevrolet Camaro and
Pontiac Firebird
DRIVELINE AXLE:
99-04-21-005A; replaces bulletin 9904-21-005; Transfer Case Shudder (Flush
and Replace Transfer Case Fluid); 19992001 Chevrolet and GMC L-Van, 19992001 Oldsmobile Bravada with NV136
Transfer Case (RPO NP4)
01-04-17-001; Launch Shudder on
Acceleration (Install New One-Piece
Propeller Shaft); 1999-2001 Chevrolet and
GMC K2500/3500 Extended and Crew
Cab Long Box Pickup Models with
01-04-21-003A; replaces bulletin 9904-21-003; Front Wheel Slipping with
Vehicle in Four Wheel Drive (Replace
Transfer Case Clutch Plates and Front
Drive Axle Lubricant); 1999-2001
Chevrolet and GMC K and T Models
(Silverado, Sierra, Blazer, Envoy, Jimmy)
with NV236/246 Transfer Case (RPO
NP8)
BRAKES:
01-05-23-001; Brake Align ® System
for Brake Rotor Lateral Runout
Correction; 2001 and Prior Passenger
Cars
ENGINE/PROPULSION
SYSTEM:
00-06-01-015B; Engine Oil Level
Indicator and Tube Change; 2000-01
Chevrolet and GMC C/K Pickup Models
(Silverado, Sierra), 2001 Chevrolet and
GMC C/K Utility Models with 4.8L, 5.3L
or 6.0L V8 Engine (VINs V, T, U -- RPOs
LR4, LM7, LQ4)
01-06-01-003; Exchange Program for
Early 2002 Model Year 4.2L Engine; 2002
Chevrolet Trailblazer, GMC Envoy,
Oldsmobile Bravada with 4.2L Engine
(VIN S -- RPO LL8)
01-06-01-005; Cold Engine Tick Noise
(Replace Pistons); 2000-01 Buick Century,
Chevrolet Lumina, Malibu, Pontiac Grand
Prix with 3.1L Engine (VIN J -- RPO LG8)
01-06-01-006; Diagnosing Engine Oil
Leak into Spark Plug Wells; 1999-2000
Chevrolet Tracker with 2.0L Engine (VIN
C -- RPO L34)
01-06-01-007; Engine Coolant
Consumption or Coolant Leak (Inspect for
Material Degradation/Replace Intake
Manifolds); Various 1995-1998 Car
Models with 3.8L V6 Engine (VIN K -RPO L36)
01-06-01-008; Engine Oil Pan Leak
(Seal with RTV Sealant); Various 19952001 Car Models with 3.8L V6 Engine
(VINs K, 1 -- RPOs L36, L67) and
Stamped Steel Oil Pan
01-06-04-001; Poor Engine
Performance and/or Transmission Shift
Quality (Reflash Engine Calibration);
1999-2000 Chevrolet and GMC B, C and
F Medium Duty Models with Caterpillar®
3126 Engine (VIN C - RPO LG5) and
Allison® Transmission (Model AT545)
01-06-04-003; MIL Light On, DTC
P0141 Set (Replace Oxygen Sensor,
HO2S 2); 1996 Buick Skylark, Chevrolet
Cavalier, Oldsmobile Achieva, Pontiac
Grand Am and Sunfire, with 2.4L Engine
(VIN T - RPO LD9)
01-06-04-006; Lean Hesitation, Sag or
Stumble on Light/Moderate Acceleration
(Reprogram PCM); 1999 Chevrolet and
GMC C/K Pickup Models (Silverado,
Sierra) with 4.8L, 5.3L or 6.0L V8 Engine
(VINs V, T, U -- RPOs LR4, LM7, LQ4)
01-06-04-007; MIL Indicator
Illuminated, DTC Code P0442 Stored
(Replace Fuel Sender to Tank O-Ring);
2000-01 Chevrolet Cavalier, Oldsmobile
Alero, Pontiac Grand Am and Sunfire
01-06-04-008; Inaccurate or Erratic
Fuel Gauge Reading (Install New Fuel
Tank Sender Sensor); 2000-01 Chevrolet
Cavalier, Malibu, Oldsmobile Alero,
Pontiac Grand Am, Sunfire, Toyota
Cavalier
01-06-04-009; Service Engine Soon
(SES) Light On with DTC 0226 Set
(Replace Fuel Pressure Regulator
[Limiter]); 1998-2001 Chevrolet and GMC
F Model T-Series Medium Duty Tilt Cab
Models, 2000-2001 Chevrolet and GMC
WT5500 Series Medium Duty Tilt Cab
Models with 7.8L Diesel Engine (VIN 3 -RPO LG4)
TRANSMISSION/TRANSAXLE:
01-07-30-002; Malfunction Indicator
Lamp (MIL) On, Transmission Stuck in
Third Gear, Instrument Cluster
Inoperative (Replace Ignition Switch);
1999-2000 Cadillac Escalade, 1997-2001
Chevrolet and GMC C/K and S/T, 19972001 Oldsmobile Bravada with 4L60-E
Automatic Transmission (RPO M30)
01-07-30-003; 1995-2000 Summary of
3T40 Transaxle Technical Information (as
of 11/01/00); 1995-2000 Chevrolet
Cavalier and Pontiac Sunfire with 3T40
Automatic Transmission (RPO MD9)
continued on page 7
8
Return to page 1